Ebook Formatting the Easy Way
So I kind of take the whole DIY indie publishing to the extreme compared to a lot of authors. I do my own editing and proofreading, create my own covers, and format my own books. It helps that I have a background in each of those areas, through various jobs I've held over the years (I copyedited for a small publisher and I've done some freelance copyediting; I have a background in print design for a national magazine, including cover design; and I've done plenty of web design and coding, so hand-coding the HTML files for formatting is easy, if also tedious). Now I realize that not everyone is going to have the skills (or the desire) to do all of the above on their own. Personally, I enjoy doing it, and until someone complains about a lack of editing or bad formatting or a crappy cover, I'm going to keep doing all of those things myself.
But I've been looking for a better way to format my ebooks. While I know how to format and code by hand, it's still a long, tedious process. It's not exactly what I'd call "fun". And the constant tweaking it seemed to require to get the books absolutely perfect was getting time-consuming.
I'm about to publish my first full-length novel (The Steam and Steel Chronicles have all been novellas), and the prospect of having to format an ebook roughly three times longer than the ones I've done before wasn't appealing. I wanted to find a shortcut that would make it easier and faster to create perfectly formatted ebooks.
I think I've found the solution, and since it requires very little hand coding or other technical know-how, I decided to write up a tutorial (note: I wrote this tutorial at 1 AM, so if any of it doesn't make sense, let me know and I'll try to clarify). While you might not have the skills necessary to proofread your own books or design your own covers, I'm pretty confident that nearly anyone who can format a manuscript in a word processor can format their own ebooks using two simple, free tools.
First things first: you'll need a clean manuscript copy of your book. This means that basically all the formatting should be removed other than italics and scene breaks. If you have to (and if you don't mind redoing any italics you might have), save the whole thing as a plain text file. That will strip basically all but the most basic formatting from your file.
Now that you have a clean file, you'll need to go download two free pieces of software. The first is Sigil, which is an open source, WYSIWYG (What You See Is What You Get) ePub formatter. The second is Calibre, a free ebook library manager and converter. These two simple bits of software are all that are required to create both ePub and MOBI book files (ePub works for Barnes & Noble's PubIt! and Apple's iBooks, while MOBI is what you'll need for Kindle). Both programs are available for Mac, Windows, and Linux systems.
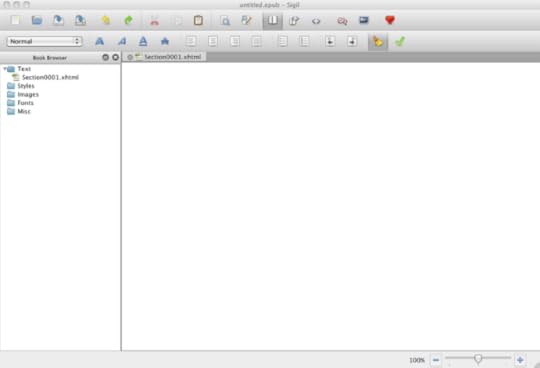
The first thing you'll want to do is start a new project in Sigil. You'll get an interface that looks like this:
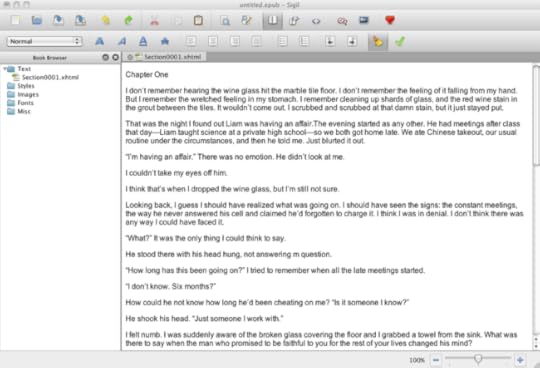
You need to create a separate file for each chapter in your book. Open up your cleaned-up manuscript file, and copy and paste your first chapter into the Sigil window. Make sure you're in WYSIWYG mode (you'll see in the top row that the open book is highlighted, not the book with brackets or just the brackets), and not in code mode.
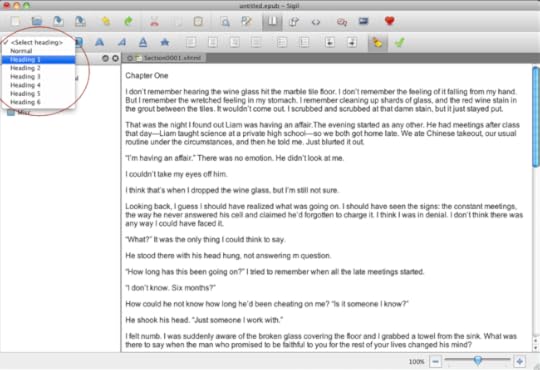
For your chapter title, you'll want to format it as a Heading 1 (which creates an "H1″ tag in the HTML). Place your cursor anywhere within the title, and then click on the drop-down menu in the upper left and select Heading 1. You'll see that your title is now larger and bold.
One thing you may notice about Sigil is that rather than indenting each paragraph, it adds extra space between them. Don't worry about this right now. We'll be using Calibre later to get rid of those extra spaces and add indents.
Create a new item for chapter two (right click under the Text folder and select "Add new item"), and repeat the process. Do this for each chapter, and don't forget to format your chapter titles as Heading 1. You might also opt to center your titles, which is done the same way you'd do it in a word processor (the second row of icons in the toolbar are almost all exactly like word processor controls, with the exception of the last two, the broom and the green check mark).
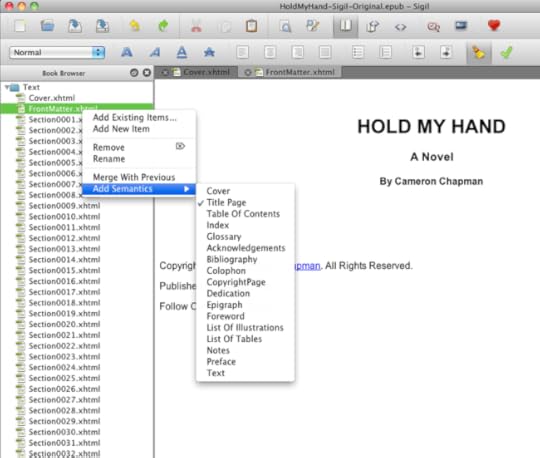
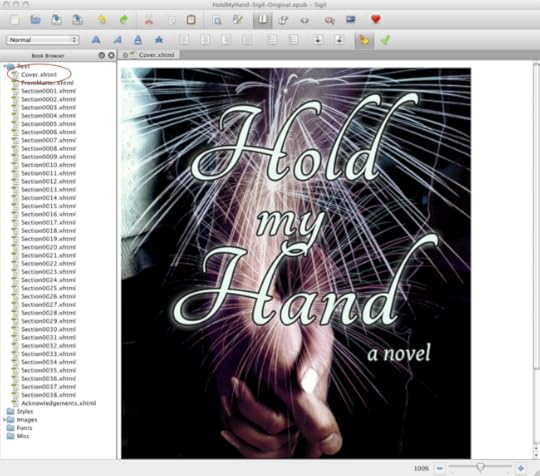
Now that you have all of your chapters in Sigil, it's time to add things like front matter, acknowledgements, and a cover. To do this, first add a new item like you did with the chapters. For simplicity sake, right click on the new item and rename it as "Cover". Drag and drop it to the top of the file list. Then right click on it again and go to "Add Semantics", and then click on "Cover". This tells the ePub reader that this is your cover. (Sorry, the image below shows adding semantics for the title page rather than the cover, but you can see where you'd select cover instead.)
Now, go to Insert, and then select "Image". Find your cover image and place that on the Cover page.
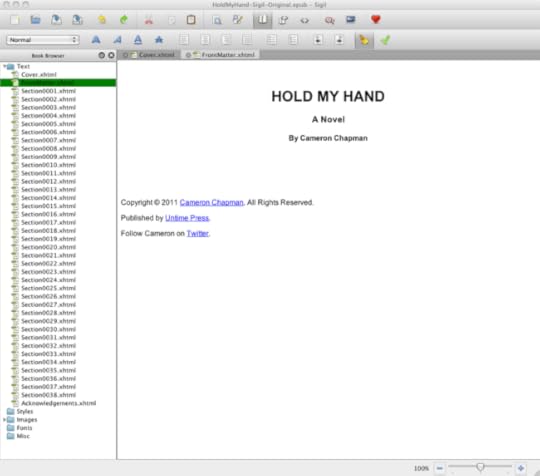
For your front matter, do the same as you did for the cover, creating a new file, renaming it and moving it to the top (just below the cover file). Under "Add Semantics", select the appropriate page type and then enter the appropriate information in the file. For my own books, I keep things simple, only adding a title page that includes the name of the book, my name, a copyright statement, and a "Published by" statement. I also include links to my Twitter account, website, and publisher website. You can format these things by using the Heading 1, Heading 2, Heading 3, etc. in the upper left drop down menu.
I also like to add an acknowledgements page to the end of the book. You do this in the same way, but just leave it at the bottom of the file list rather than moving it to the top.
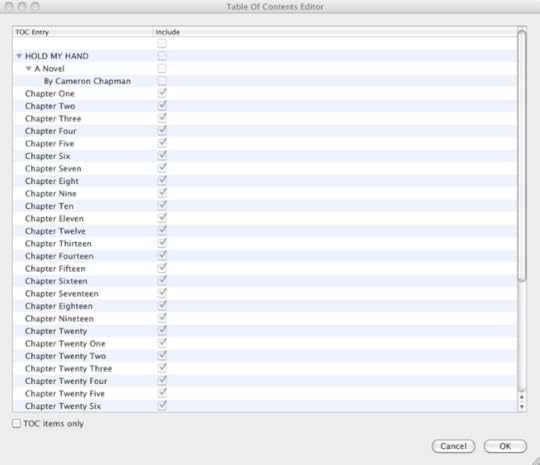
So, now you have all of your material in the correct format within Sigil. Time to create your table of contents. Go to "Tools" and select "TOC Editor". You'll see every heading in your book listed here, with a check box next to each one. Uncheck the boxes beside any of your front matter headings, but leave the chapter headings. This creates the interactive table of contents the ebook reader will use.
The final thing you need to do is edit the Meta information for your book. Click on "Tools" and then "Meta Editor". Enter the title, author, and language of your book in the dialogue box and click okay.
You may want to validate your ePub file at this point to make sure there are no errors. To do this, just click on the green check mark in the toolbar.
When you have all of this completed, make sure you save your file again (you should make a habit of saving regularly throughout the ebook formatting process, just in case your computer crashes, your power goes out, etc.).
Now, at this point the whole process to this point only took me about an hour.
Go ahead and look at your ePub file in an ereader (I use Adobe Digital Editions on my computer, but any ePub reader will work). Make sure that there's nothing strange going on with your formatting (remember, we'll be taking care of the extra space between paragraphs and line indents in Calibre, so don't worry about those). If everything above was done properly, you should have a perfectly readable ePub file.
Next, open Calibre and import your book (you can just drag and drop the ePub file you created into the main window in Calibre).
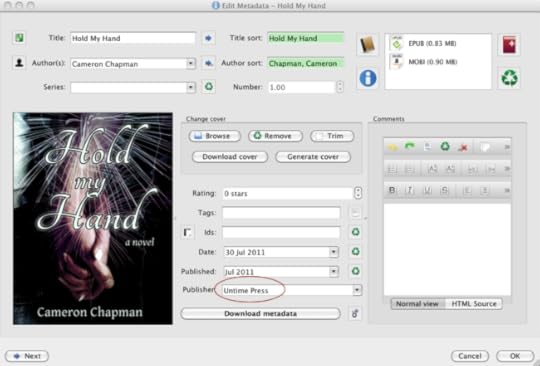
Right-click on the book and go to "Edit metadata" and then "Edit metadata individually". Here, you should see most of the fields already filled in and your cover displayed. The only field you want to add is the Publisher field (if you have a publishing company set up). Click OK.
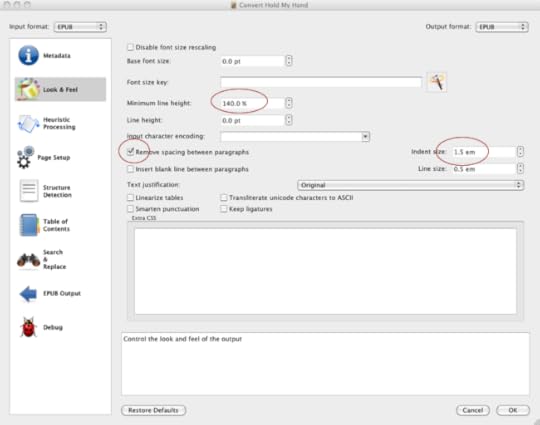
Right-click on the book again and go to "Convert books" and then "Convert individually". Make sure "EPUB" is selected in the "Output format" drop down. You can verify your metadata here, too. Then click on "Look & Feel". Here you'll want to check the box next to "Remove spacing between paragraphs" and enter an Indent size of 1.5 em. You might also want to adjust the "Minimum line height" (I prefer 140.0% over the standard 120.0%).
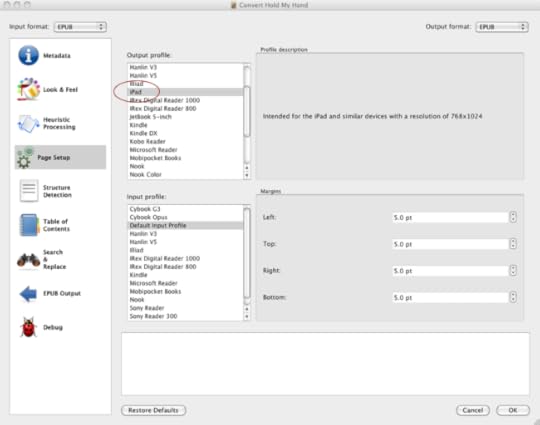
Next, click on "Page Setup". Here you can choose your input profile and output profile. I leave the Default Input Profile selected and then generally choose iPad for the Output profile, because it uses a larger cover image size.
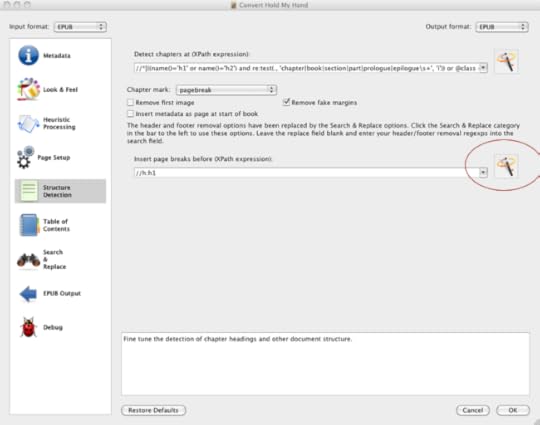
Click on "Structure Detection" next. Under "Insert page breaks before (XPath expression):", click on the magic wand. Then select h1 from the "Match HTML tags with tag name".
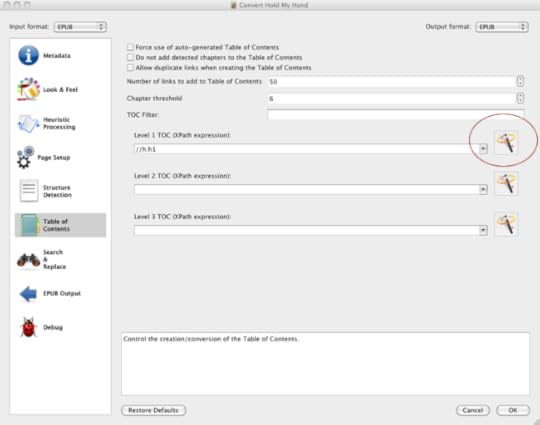
Click on "Table of Contents" and then under "Level 1 TOC (XPath expression):" click on the magic wand and again select h1 from the "Match HTML tags with tag name".
You shouldn't need to adjust the standard settings on any of the other option pages. When you're done with all of these, click on OK. The dialog box will disappear, but if you look at the lower right of the main Calibre window, you'll see that there's a Job processing with a spinning wheel.
You can then right-click on the book title again and choose "Save to disk" and then "Save ONLY ePub format to disk".
Open up your new ePub file and make sure all the formatting is correct. At this point, I sometimes tweak the formatting to get it just right (open it back up with Sigil to do this), but that requires HTML and CSS code editing. If you know how to edit code, now is the time to make adjustments. If you don't, then you'll probably just want to leave the ebook as-is. You might find that Calibre has re-inserted TOC elements that weren't in the original ePub file that you imported (like your title page elements). You can edit those back out using Sigil, with the TOC Editor. Honestly, I think you can leave the TOC stuff blank in Calibre, since it's already been defined with Sigil, but I'm not sure and I didn't feel like experimenting with it late last night when I was converting the ebook. If anyone can confirm this, let me know in the comments. I'll check next time I'm doing a conversion and update this if the above isn't necessary. But in either case, it doesn't really hurt anything.
When you're happy with the way your ePub file is displaying, then re-import it to Calibre (if you made changes) and output to MOBI using the same process you used for ePub, but with "MOBI" selected in the "Output format" dialog box.
Open up your exported MOBI file with the Kindle app and make sure all the formatting is as it should be.
That's all there is to it! Even without tweaking the code at all, you can create a very well-formatted, very readable ebook using only free tools.
A More Advanced Formatting Option
Now, if you want to add some slightly fancier formatting to your ebook, you're going to need to know some very basic HTML and CSS. If you've never used either, I'd recommend doing a few tutorials to get a feel for how they work before you start tweaking your ebooks. If you decide to dive right in, then let me first warn you that it's a good idea to always work from a copy, so that if you foul things up, you'll still have your original.
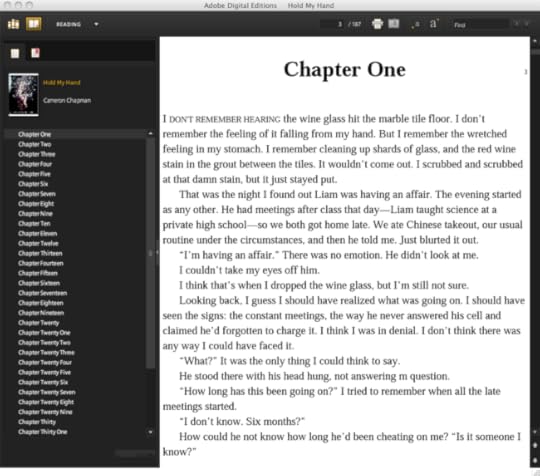
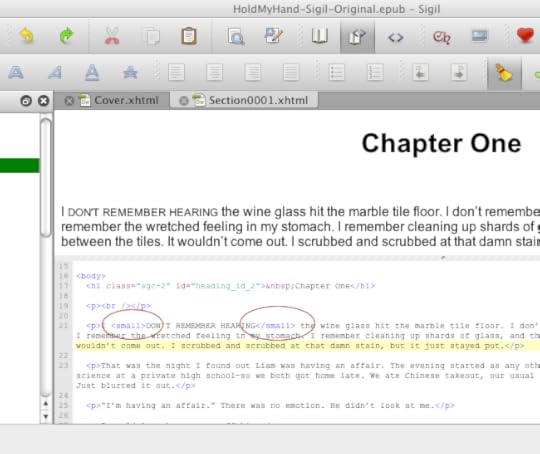
One thing you'll notice with my ebooks is that the first four words of each scene are done in small caps, and the lines aren't indented. This is a pretty easy one to do, though it's time-consuming. This should be done in your original ePub file, before you convert it with Calibre the first time.
All you do to achieve this effect is capitalize the first four words (manually, not with CSS), and then add tags around the letters that would be small caps (so leave out the first letter of the sentence, as well as the first letter of any proper nouns). Voila! That's all there is to creating small caps.
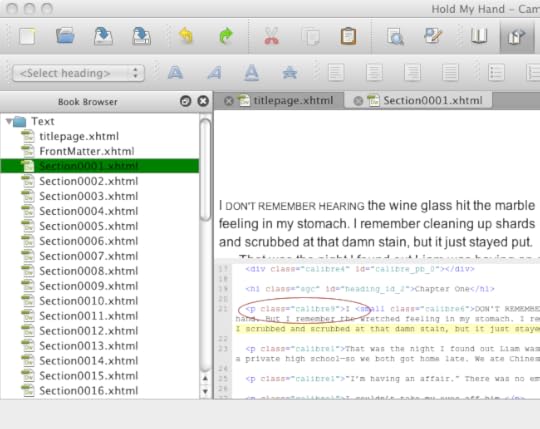
Now, to get the first paragraph to be flush left rather than indented, you'll need to create a new CSS class after Calibre has done it's conversion. All I do is create another "Calibre#" class, in numerical order from the highest class already created. In this case, that was "Calibre9". Copy and paste your "Calibre1" class (or whatever your main paragraph class is) and rename it "Calibre9". Then, delete the text-indent element. All you have to do from there is go through and change all the non-indented paragraphs from "Calibre1" to "Calibre9". Like I said, it's not a complicated thing to do, but it can be time-consuming.
There's nothing that says you have to make this change, though, so don't worry about it if you're not comfortable editing the CSS and HTML of your files.
If you have questions about the process or run into any problems, let me know in the comments and I'll try to help. Because Sigil and Calibre are both free, open source programs, they're not without their glitches. Take time to play around in each, using the WYSIWYG features to create more complex ebook layouts. Just make sure you thoroughly test your files when you're done to make sure you haven't created features that don't work (or don't look very good) in the final product. Make sure you also validate you ePub file, too! If it's not validated, you won't be able to sell it on some platforms, including the iBooks store.
If you found the above useful, the best thanks you can give me is to buy one of my books, or recommend them to a friend!

