#Windows 10 updates – #Metered Connection
This how-to is for all non-US users of Windows 10 who have capped broadband plans – i.e. only get XX gigabytes of data per month.
Pre-Step A
Go to:
Start
Settings
Update & Security
Windows Update
Advanced Options
Now make sure ‘Choose How Updates are Installed’ is set to ‘Automatic (recommended)’ as shown below:
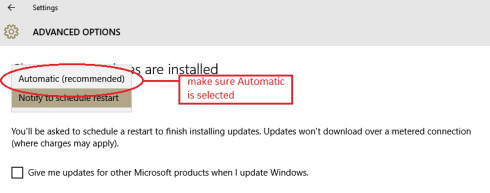
[Note: if this option is set to ‘Notify to reschedule restart’ at this point, Windows becomes…confused and could go into a perpetual loop. Mine did and I had to do a hard shutdown to get it to stop].
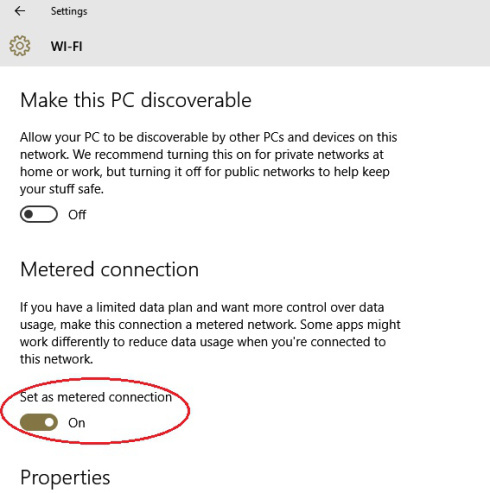
Step 1 – Finding the ‘Metered connection’ option
Click on the Start button and then select:
Settings
Network and Internet
Wifi
Advanced Options
Under ‘Metered connection’, click the slider button to show ‘on’:
Step 2 – changing how Windows 10 updates are scheduled
Now go back to:
Settings
Update & security
Windows update
Advanced options
and under ‘Choose how updates are installed’, change ‘Automatic’ to ‘Notify to schedule restart’.
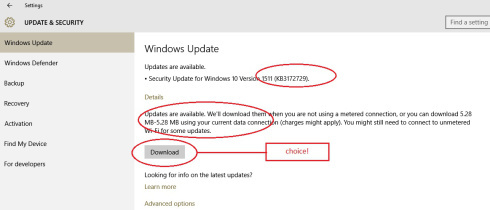
Now, Windows 10 will notify you of:
available updates, and
how much broadband they will use
but it will not download and install them automatically. This is what my laptop now shows:
My heartfelt thanks to The Opening Sentence for showing me where the ‘Metered connection’ option was hiding! I feel a lot better now.