How to Outline your Book
I received a question on Twitter recently where I was asked about outlining methods and how I outline my stories. I know I’ve talked about outlining in previous videos on my Youtube Channel, but I haven’t really gone into great detail. Today we’ll talk about outlining and some of the different methods out there and at the end, I’ll tell you exactly what I do to outline my novels.
If you'd rather watch this video, click play below. Otherwise, read on!
First, it’s important to understand the difference between plotters and pantsers. Plotters are those writers who prefer to have in-depth outlines in front of them before they sit down to write. Pansters, on the other hand, prefer not to have anything in front of them except for their laptop and ideas when they sit down to write. But what about those of us in the middle? I’ve deemed a new term for those of you who like to have some idea of what you’re writing, but still want that flexibility and creative room to write whatever comes to mind. I call them PLOTSERS. And I am one of them.
I’ll talk about the plotser method shortly, but let’s start on the right end of the spectrum with the plotters.
THE SNOWFLAKE METHOD This one starts small, with a single overarching idea and invites you to expand the idea from that central point. It definitely falls on the plotter end of the spectrum. Here are the 10 steps of the snowflake method.
Step 1: Write a one-sentence description of the novel. Try to make this sentence less than fifteen words and have it combine the overall larger story with the personal journey of the protagonist.
Step 2: Now expand that sentence to a paragraph of description. Try to do this in five sentences where the first sentence consists of the set-up, the next three describe the main conflicts or “disasters”, and the final sentence wraps up the story.
Step 3: Create a one-page summary sheet for each main character. This sheet should include the character’s major goals, conflict, motivation, and epiphany, and summarizes the story from that character’s POV.
Step 4: Here, we return to the plot and create a brief synopsis. Take the five sentences from Step 2 and expand each one into a paragraph of its own.
Step 5: This step returns to the characters, where you will write about the story from the POV of various characters. This is where each character gets to tell his or her own story. Aim for a page for main characters and half a page for supporting characters.
After completing these five steps, many writers find that it is sufficient preparation. But if you’d like to continue, read on:
Step 6: This step involves expanding your one-page synopsis to four pages.
Step 7: This step allows you to develop expanded character charts and histories.
Step 8: Map out each individual scene of the novel on a spreadsheet using one line per scene. List what point of view the scene will be told from and what happens in the scene. You can even estimate the length of the scene.
Step 9: Expand each scene from the spreadsheet into a paragraph to create a long narrative. This will reveal whether scenes introduce conflict.
Step 10: Write the first draft.
The advantage of having sketched out the novel so thoroughly is that you will unlikely succumb to the dreaded writer's block induced by not knowing where to take the story next.

THE SKELETON METHOD
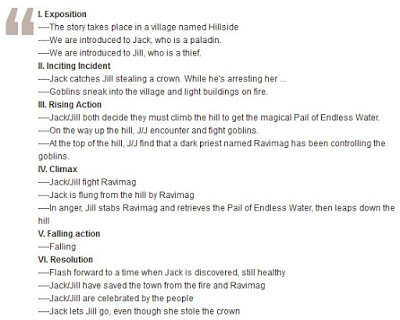
The skeleton method is one you’ve probably used to write research papers in school. It gives you the opportunity to lay out your core points in a way that will allow your story to flow smoothly. It also gives a good birds-eye view of your structure and can help you re-form your story for maximum impact. The skeleton method looks something like this:
I. Expositiona. Where does the story take place?b. What characters are we introduced to?II. Inciting Incidenta. What is the event or decision that begins the story’s problem?III. Rising Actiona. What actions do your characters take to address or overcome the inciting incident?IV. Climaxa. What is the highest point of tension or drama, the most exciting, intense, or important part of your story?V. Falling Actiona. What comes as a direct result of the climax? Expand on this. For example, if the climax involves the hero winning a car race, the falling action is the victory lap and the all the accolades.VI. Resolutiona. How does the story end?
EXAMPLE:


If you're a pantser, you're probably in panic-mode. These outlining methods may seem really intense. So let's move over to the pantser-friendly side of the spectrum with some less complicated methods...
THE FLASHLIGHT METHOD The flashlight method is all about letting yourself discover the story gradually while still doing enough planning that you can anticipate any walls you’re about to crash into. It uses brief chapter summaries to help you outline your story. Each chapter summary is usually only a paragraph or so in length, and gives you a simple guide to go off of. The flashlight method looks something like this:


THE VISUALIZER METHOD The visualizer method gives you the freedom to draw in connections and expand on concepts on the fly. Start with blocks for the core plot and character points and then branch off from those as you ask yourself more questions. For example, what was Jack’s motivation? Let's say he was the son of the president. Why did the city need water? Because there was a drought. Why did the city fall? Because there was a lion. Why was there a lion? Because of the drought, maybe? You get the idea. The visualizer method can be seen below, and usually has the main plot (or ending) in the middle with lines branching out to expand upon those ideas:


All of these methods have pros and cons, so it’s important to find out what works best for you. You can take pieces of each method and see what is most helpful for your writing process. My own personal writing process as a plotser goes something like this:
THE PLOTSER METHOD 1. I’ll get an idea and write it down. I’ll then write down a potential beginning, middle, and end, just to get my mind in “plotting” mode. I’ll also think about narration and whether I want to use first, third, or third-person omniscient. (This is similar to step 2 in the snowflake method.)2. I’ll then develop character arcs. I’ll choose names for my characters, write down their motives, physical characteristics, internal struggles, family history, likes and dislikes, etc. (This is similar to step 3 in the snowflake method.)3. Once I have my characters in place, I begin to outline using the visualizer method. I’ll get a large sheet of paper and write down core ideas that will branch off into potential sub-plots.4. I’ll then use my visual map to start the flashlight method. With an idea as to what’s going to happen in the beginning, middle, and end, I’ll divide my ideas up into chapters and decide what should happen in each. (By the end of the plotser method, I will have 4 sentences for each chapter to act as a guide.)5. Lastly, I write. I feel that utilizing multiple methods keeps my thoughts organized while also allowing the creative juices to flow and for the pantser in me to come out. It’s the best of both worlds.
So what are you? A plotter? A panster? Or my newly-created term, plotser? No matter what your writing process may be, it’s critical that you do whatever works for you – and don’t change it just because you watched this video or someone tells you that they've found the "tried-and-true" outlining method. We’re all unique and our minds work in different ways. Trust yourself and trust your creative process. After all, you’re the only one who really knows what works for you and what doesn’t.

Until next time,

Published on March 15, 2016 13:14
No comments have been added yet.


