
My First Climb up Kobe’s Mt. Rokko
Note: this article may not appear properly in news readers.
This article contains interactive aspects that are likely removed by most news readers. Please see this particular article directly on Jeffrey's blog for full functionality.
Panasonic LX100 at an effective 25mm — 1/640 sec, f/5.6, ISO 200 —
map & image data — nearby photos
Mt. Rokko Summit
Kobe Japan
六甲山山頂
この間、金光万石さんと一緒に六甲山を登りました、神戸空港から924mの山頂まで。
乗ったルートは距離は長かったので、坂はだいあいマイルドでした。楽しかった。
(ポートアイランドと神戸空港のサイクリングはつまらなかったけれども。)
一番キツイ道は16号線から山頂までの300mの丸形滑り止め道。15%の凸凹坂ですが、行って良かった。山頂からの景色は本当に良かったです。
On Thursday I made my biggest single bicycle climb so far, at least mathematically, by riding from sea level in Kobe Japan, to
924m (3,030') near the summit of Mt. Rokko some 25km (16mi) distant.
Despite its mathematical ranking, the route I
took was apparently the easiest route, and wasn't at all challenging. It was just fun.
Overall, the day saw 78km (48mi) with 1,800m (6,000') of
vertical climb. (Activity at Strava)
But the fun belies how totally stressed and apprehensive I was in the week leading up to it. Mt. Rokko is hundreds of meters higher than the 500m climb of my candlestick Hanase climb, which is a tough climb
for me, so I expected this Mt. Rokko climb to be all the worse.
I was also worried about forgetting something. I was going to be in Kobe to deliver something to
a friend, so took the opportunity to load the bike in the car as well and base my first Kobe ride from
there. For some reason I was ridiculously stressed about forgetting
something.
Panasonic LX100 at an effective 24mm — 1/60 sec, f/8, ISO 800 —
map & image data — nearby photos
Ready To Start
photo by Zak Braverman
It turns out that I didn't forget anything in Kyoto, but I realized later that I
did forget one of my water bottles in the car before heading off. Sigh. I had meticulously
researched the whole route via Google Street View (thank you Google) and had already been worried about a
lack of drink along the way. Now my carrying capacity was cut in half. Sigh.
In leaving Zak's place tucked up at the city/mountain edge overlooking Kobe, I had to descent slope
as steep as 20% to get down to the main part of the city...
Panasonic LX100 at an effective 72mm — 1/400 sec, f/5.6, ISO 200 —
map & image data — nearby photos
15%-Average Residential Street
Yikes, I'm going to have to return up this hill at the very end of my ride
Manseki and his bike had squished into the car with me on the ride from Kyoto, and he explored Kobe while I
visited with Zak. We met back up at Sannomiya Station in downtown Kobe to start our ride
together. Before heading up to the mountain, we first planned to head out to the far end of Kobe Airport, built out in the ocean
on an artificial island (which itself is beyond another artificial island, Port Island, just off the Kobe City mainland.
Panasonic LX100 at an effective 24mm — 1/125 sec, f/5.6, ISO 200 —
map & image data — nearby photos
Cycling/Pedestrian Bridgeway
over to Port Island
Panasonic LX100 at an effective 24mm — 1/500 sec, f/5.6, ISO 200 —
map & image data — nearby photos
Lots of Bridges of Various Kinds
Panasonic LX100 at an effective 28mm — 1/125 sec, f/5.6, ISO 200 —
map & image data — nearby photos
Crossing Kobe Bridge
神戸大橋
taken while moving at 29 kph (18 mph)
Panasonic LX100 at an effective 28mm — 1/125 sec, f/5.6, ISO 200 —
map & image data — nearby photos
Stopping for Photos
Panasonic LX100 at an effective 58mm — 1/125 sec, f/3.2, ISO 200 —
map & image data — nearby photos
Selfie
Panasonic LX100 at an effective 24mm — 1/250 sec, f/5.6, ISO 200 —
map & image data — nearby photos
Riding Through Port Island
Port Island is a big artificial island with big wide streets that we could ride on, but I wanted to
try the cycling/pedestrian paths. Somehow in my imagination I thought that they might be quaint, but
frankly it would have been nice only if I'd been on a city bicycle with the family.
Panasonic LX100 at an effective 38mm — 1/160 sec, f/5.6, ISO 200 —
map & image data — nearby photos
This Was Nice
protected from the sun, and those are peoplemovers in the distance!
(sadly, no, we didn't ride the bikes on them)
Panasonic LX100 at an effective 38mm — 1/250 sec, f/5.6, ISO 200 —
map & image data — nearby photos
Nice Wide Path
and a contender for “World's Ugliest Building”
Once you make the several-kilometer trip through Port Island, you reach the half-as-long Kobe Sky Bridge over to the airport.
Panasonic LX100 at an effective 28mm — 1/1000 sec, f/5.6, ISO 200 —
map & image data — nearby photos
Looking Back at Port Island
from the Kobe Sky Bridge (神戸スカイブリッジ)
Panasonic LX100 at an effective 28mm — 1/1000 sec, f/5.6, ISO 200 —
map & image data — nearby photos
Panasonic LX100 at an effective 24mm — 1/500 sec, f/5.6, ISO 200 —
map & image data — nearby photos
Kobe Airport
神戸空港
taken while moving at 32 kph (20 mph)
Actually reaching the airport was disappointing and anti-climactic, as there were no planes or crowds or really much of anything around.
Other than the sign saying “Kobe Airport”, we might not have realized we were at an airport.
We continued past to the farthest reaches of the island that the public was allowed.
Panasonic LX100 at an effective 24mm — 1/640 sec, f/5.6, ISO 200 —
map & image data — nearby photos
The End
absolutely nothing to see, except maybe the wind sock in the distance
I'd been thinking that the trek out across the man-made islands and to the airport would somehow be interesting, but it was
a waste of time other than satisfying my curiosity: now I know that it's a boring, tedious ride.
The one saving grace might have been the last section of road that parallels the runway. You can't see the runway and have no
sense that you're near an airport, but it's a perfectly straight 1,000-meter section with no traffic, so
it makes a nice opportunity for a
fast one-kilometer sprint.
Panasonic LX100 at an effective 24mm — 1/800 sec, f/5.6, ISO 200 —
map & image data — nearby photos
Start Your Engines
Unfortunately, we had a strong headwind, so we didn't even bother.
Panasonic LX100 at an effective 24mm — 1/320 sec, f/5.6, ISO 200 —
map & image data — nearby photos
Heading Back onto the Mainland
Panasonic LX100 at an effective 75mm — 1/400 sec, f/5.6, ISO 200 —
map & image data — nearby photos
Our Destination
is the little bump of a tower barely visible on the ridgeline at the far right
While making our way through the city, Manseki noticed a bicycle shop so I
bought another water bottle. Then we headed inland, toward the entrance to the mountains...
Panasonic LX100 at an effective 24mm — 1/400 sec, f/5.6, ISO 200 —
map & image data — nearby photos
Sloping Up
Of the three main routes out from Kobe City up to the top, we took what turned out to be the easiest, the Oku-Saido Driveway
(奥再度ドライブウェイ). I guess it's easiest because it's longest... the
ascent is spread out over a longer distance.
But it starts out quite sharply at about 14%...
Panasonic LX100 at an effective 24mm — 1/800 sec, f/4, ISO 200 —
map & image data — nearby photos
Here We Go
... and within a minute we're getting an impressive view...
Panasonic LX100 at an effective 28mm — 1/125 sec, f/4.5, ISO 200 —
map & image data — nearby photos
One Minute In
But there aren't many views from then on, as they're all obscured by mountains or trees. The slopes
are not so steep, so it's just a matter of keeping on, though there are occasional switchbacks that look
impressive, such as this one 12 minutes in...
Panasonic LX100 at an effective 24mm — 1/320 sec, f/5.6, ISO 200 —
map & image data — nearby photos
This One Looks Fun
taken while moving at 10 kph (6 mph)
Panasonic LX100 at an effective 24mm — 1/160 sec, f/5.6, ISO 200 —
map & image data — nearby photos
taken while moving at 8 kph (5 mph)
Soon after, I got my first view since the one near the start, so had to stop for a photo:
Panasonic LX100 at an effective 75mm — 1/800 sec, f/5.6, ISO 200 —
map & image data — nearby photos
First Real View
I wasn't paying attention to the map or the numbers, but looking at it now I see that the elevation
of that photo is 260m, so it's just a bit over a quarter of the way up.
Panasonic LX100 at an effective 56mm — 1/100 sec, f/2.8, ISO 1600 —
map & image data — nearby photos
“Curve #51”
every curve was conveniently numbered
Panasonic LX100 at an effective 24mm — 1/2000 sec, f/6.3, ISO 200 —
map & image data — nearby photos
“Warning: Grooved Pavement”
Though many roads don't seem to have it, by law roads over 7% steepness are apparently
required to have anti-slip technology,
such as groves cut into the pavement, or some kind of stipple pressed into the pavement (like the doughnuts seen
in “Here We Go” above).
The doughnuts like in “Here We Go” are horrible for cyclists
because the bumps actually decrease traction quite a bit. I hate them. The ridges used on this 21% slope make travel by bicycle
almost impossible. The grooved pavement being warned about above, at least, is not a
problem.
The bigger problem on this route are the occasional yellow stripes painted across particularly steep sections, such as seen in
“This One Looks Fun” above. Some of the stripes
are as thick as a plank of wood, so they're super bumpy to go over. I suspect
that's exactly the intention, to grab the attention of the daydreaming driver (though with 100 curves in just a
few miles, I don't see how such drivers would live long enough to get to this point).
The problem is that these are really dangerous and bone-jarringly uncomfortable for cyclists. As a
car driver I never would have given it a thought, but this is the
job of folks that work in highway planning. Shame on them.
Panasonic LX100 at an effective 56mm — 1/1000 sec, f/5.6, ISO 200 —
map & image data — nearby photos
Manseki Arrives at the Summit
六甲山山頂(925m)到着
One thing that makes the climb both easier and harder than it might first appear is that it undulates quite a bit. This means that it has some very nice fast downhill sections on which to have fun and rest, but it also
means that the total amount you have to climb is more than the simple difference from the lowest spot to the highest.
Strava reports that this route has an elevation difference of 922m, but
that's an utterly meaningless thing to report because it ignores the undulation. In this case, it
under-reports more than 200m of vertical climb one must do to reach the top.
Another problem with the undulation is that if you're not familiar with the route (or the mapping app on your phone), you don't
really know when you're near the summit... the start of a nice downhill section may mean you're at the
summit, or may just mean a minute's reprieve before you continue on up again. Manseki found this out all
too well when a few kilometers from the summit he asked someone whether he was at the summit, and was
told yes, he was. So Manseki spent 15 minutes looking for me. But we
eventually got in contact and he came charging up to the real summit.
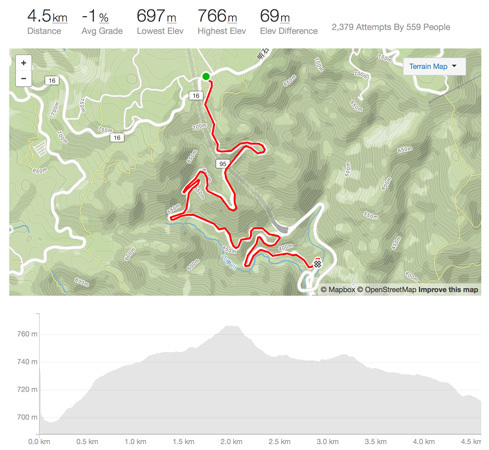
The main road is Rt 16, and it passes close to the summit, but to get to the top you have to take
a steep bumpy (doughnut-filled)
road for 300m up an average 15% grade (max 23% grade) until the pavement ends, and then you're just a
short stroll to the very top.

image data
Summit of Mt. Rokko
六甲山山頂
I think most cyclists don't know about the road, or don't bother with it. It seems from looking at
the various segments on Strava that most just consider the restaurant near the entrance (the building at right in the screenshot
above) to be “the top”. That's just lazy in my book. I went as far as there was pavement. The restaurant isn't even at the highest point
on Rt. 16... that's a few hundred meters south.
On the plus side, there are drink vending machines at the restaurant, which is nice.
As marked in the map, there's a viewing area just above the end of the paved road, but it's horrible because someone's marched
a bunch of utility wires smack dab in front, destroying and sense of view.
Panasonic LX100 at an effective 54mm — 1/1000 sec, f/5.6, ISO 200 —
map & image data — nearby photos
Typical Japan
facepalm-worthy aesthetics
Panasonic LX100 at an effective 24mm — 1/320 sec, f/5.6, ISO 200 —
map & image data — nearby photos
Angling To Avoid the Visual Garbage
Ignoring the vast expanse of Osaka, one can get part of Kobe without too many utility wires
Panasonic LX100 at an effective 75mm — 1/500 sec, f/5.6, ISO 200 —
map & image data — nearby photos
Reverse Angle View
blessedly free from wires, but on this day not from haze
Rather than waste time at the visually-neutered viewing spot, it's better to return a bit down,
to just past a little gazebo. The view from there is not free of utility crap, but it's much better,
and the full vastness of the Osaka Concrete Jungle leaves one in awe. (My photos do not even come close
to capturing the sense of huge that exists.)
Here's a side-to-side scrollable panorama of Osaka and what we can see of Kobe:

← panorama パノラマ →
Osaka and a bit of Kobe, from Mt. Rokko
大阪と神戸、六甲山山頂から
In this picture, the rightmost smudge of land visible in the ocean is the Kobe Airport were had been a
couple of hours earlier, 16km (10mi) as the crow flies. The smudge farther in the background and
slightly left is Kansai International Airport, 37km (23mi) away.
After futzing around for photos, we headed back and explored some of the side roads on the mountain.
One such road provided a nice, more intimate view of Kobe...
Panasonic LX100 at an effective 24mm — 1/500 sec, f/5.6, ISO 200 —
map & image data — nearby photos
Kobe, Japan
there, again, the background has Port Island and the airport
On the return into Kobe, we took one of the other routes,
the Omote Rokko Driveway (表六甲ドライブウェイ). This was very fun to descend.
Again, Strava mystifies in how they support and encourage wrong data. Their promoted segment for this downhill shows that half the route is a mild climb up followed by a mild descent, averaging out at a 1% descent...
Complete Strava Bullshit
The reality is that the road positively plummets nonstop, shedding 430m of elevation over 4.7km of road,
for an average descent grade of over 9%. That's steep!
Panasonic LX100 at an effective 24mm — 1/125 sec, f/2.2, ISO 200 —
map & image data — nearby photos
Super Twisty Descent
Omote Rokko Driveway (表六甲ドライブウェイ)
Just to give you an idea of this "1% decent", here's a video of the slow and easy descent from just after taking the photo above,
to the first stoplight: see video here.
The bigger deal, of course, is if one looks at Strava and thinks "climbing up the slight 1% grade should be easy, so I'll
take this route up!" only to faceplant into the reality that the climb is 9% and continues without respite.
The problem is not that someone made this segment with bad data, but that Strava gives no reasonable way of correcting the
situation other than making redundant (but accurate) segment and hoping folks notice it.
I did exactly that — here's my corrected
segment that shows a proper -9% grade — but it's mostly a wated effort because most cyclists
will never know it exists. Strava explicitly hides a new segment like this from most users. Most
Strava users interact only with the phone app, and this segment is invisible on the phone app. By
default it's invisible on the web site as well, but at least there, the small subset of users who know how to look for
“hidden” segments will at least have the opportunity to see it if they
bother looking, and if they do and somehow magically understand that it's better, they can promote it for their own
view.
It's very frustrating for a cyclist like me who cares about the difference between a 1% climb and a 9% climb. I happen to know that their particular segment in this case is wrong, but it makes me wonder about the
validity of every segment I see, such as while researching routes. Wrong data is worse than no data, and
Strava is full of wrong data.
As much as I love the idea of what Strava purports to offer, the gratuitous way they thumb their nose at any semblance of
accuracy saddens me.
Anyway, enough Strava angst for today. I'm just glad we didn't try to go up this route this time. I'll do it next time.
Manseki and I made our way back toward where we started, ending with that nasty 530 meters of 15.2% average.
Guttons for punishment, we decided to check out the cemetery behind (above) Zak's place,
which involved another punishing short climb.
Panasonic LX100 at an effective 70mm — 1/500 sec, f/5.6, ISO 200 —
map & image data — nearby photos
Manseki Approaching the Top
Nagamine Cemetery (長峰霊園)
Panasonic LX100 at an effective 24mm — 1/160 sec, f/5.6, ISO 200 —
map & image data — nearby photos
Now We're Done for the Day
We loaded the bikes into the car and made the hour-and-a-half drive home, satisfied with a good day's
adventure, knowing that cold beer awaited us at our respective homes.


Jeffrey E.F. Friedl's Blog
- Jeffrey E.F. Friedl's profile
- 14 followers

