
Scott Pilgrim 2010 Poster development
This is the poster that comes with the Scott Pilgrim Box Set, released late 2010.

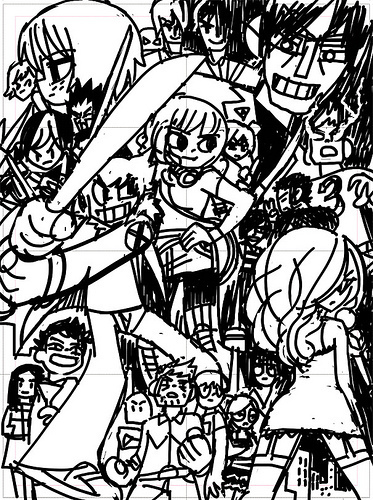
STEP 1: ROUGH SKETCH
Probably did some basic doodling in a sketchbook, then launched into this big scribble in Photoshop. I decided to do it this way because it would be easier to move stuff around and make changes and edits. So in this first sketch, a few of the characters are fully established and others are going to end up changing a lot.
STEP 2: SKETCH REVISION (1)
I changed Envy and Ramona, flipped Stephen's body, added a rough sketch of Joseph beside him, and redrew the Twins. At this point it became clear that I had a few too many characters and some major ones were getting lost in the shuffle.
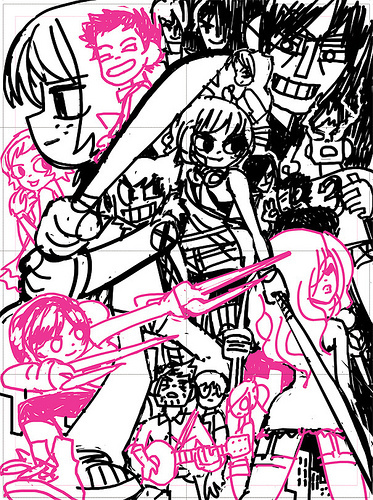
STEP 3: SKETCH REVISION (2)
I pushed Scott and Ramona toward the center, requiring me to redraw Roxy and Patel. Then I went ahead and redrew the entire left-hand side, making Kim / Wallace / Lisa more prominent and making Knives Chau dominate the bottom corner, removing Mr Chau, Stacey and Joseph in the process, as well as spontaneously giving Stephen Stills a guitar. Still not satisfied with Envy Adams.
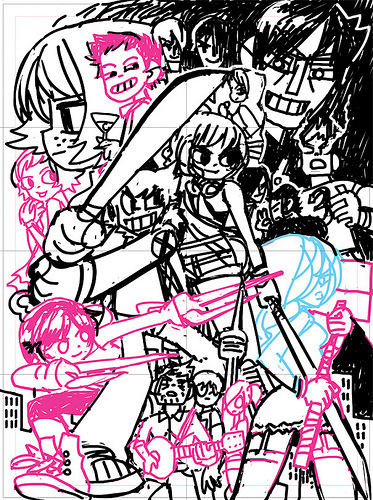
STEP 4: SKETCH REVISION (FINAL)
I brought everything in from the edges and extended the artwork a bit to make it feel less crowded. Envy still felt boring, so I gave her the hammer (from Vol 3) and redrew her yet again. I redrew Ramona's leg and brought the CN Tower into the foreground.
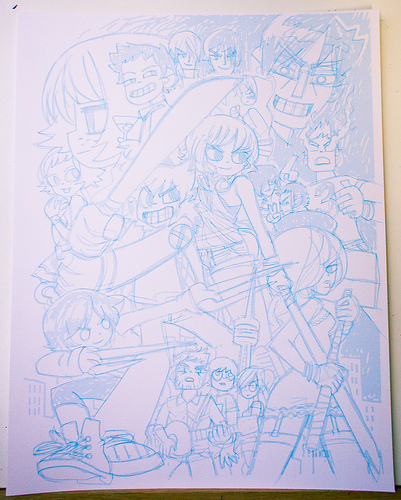
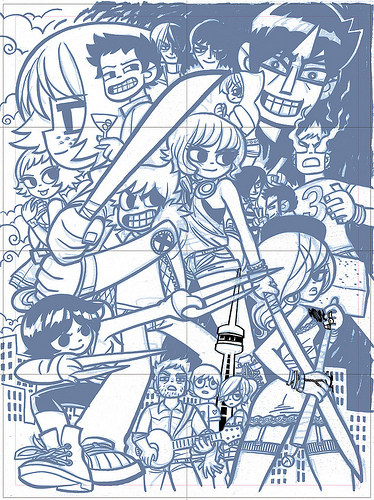
STEP 5: PENCIL CLEANUP
So at that point I printed the art out (in light blue) on a big piece of paper and tightened everything up in that form, then moved on to inks.
STEP 6: INKS (1)
This shows the inks having been scanned in (pencil roughs still visible) and a few additions in Photoshop. I mainly inked with a Rosemary & Co kolinsky sable brush, #3, plus a few miscellaneous pens and markers for small details. I meant to give Envy a bunch of jewelry and forgot to draw it, so I did that on the wacom. I also drew the CN Tower on wacom in order to get nice straight lines on it.
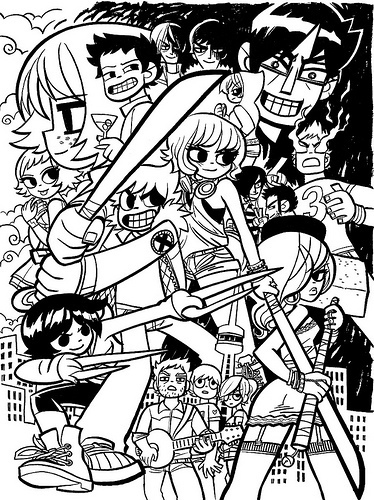
STEP 7: INKS (FINAL)
This is the final inks that I sent on to colorist Rico Renzi. Between the last step and this one, I erased the sword and hammer lines and redrew them (in Photoshop) to make them nice and straight. I also ended up simplifying the lace on the bottom of Envy's dress, and extending everyone's legs all the way to the bottom of the page.

STEP 8: FINAL FINAL
There were a few rounds of back-and-forth with colorist Rico Renzi, but it was a pretty painless procedure from my end and it turned out really cool!


Bryan Lee O'Malley's Blog
- Bryan Lee O'Malley's profile
- 4418 followers

