VBA UserForms – A Guide for Everyone (Part 1)
“The system should treat all user input as sacred.” – Jef Raskin
A Quick Guide to the VBA UserForm
The following table provides a quick guide to the most common features of the UserForm
FunctionExamples
Declare and create Dim form As New userformCars
Declare and create Dim form As userformCars
Set form = New userformCars
Show as modalform.Show
OR
form.Show vbModal
Show as non modalform.Show vbModeless
UnloadPrivate Sub buttonCancel_Click()
Unload Me
End Sub
HidePrivate Sub buttonCancel_Click()
Hide
End Sub
Get\set the titleform.Caption = "Car Details"
Introduction
UserForms are a useful tool in VBA. They provide a practical way for your application to get information from the user,
If you are new to UserForms you may be overwhelmed by the amount of information about them. As with most topics in VBA, 90% of the time you will only need 10% of the functionality.
In these two blog posts(part 2 is coming soon!) I will show you how to quickly and easily add a UserForm to your application.
This first post covers creating Userforms and using them as modal or modeless. I will also show you how to easily pass the users selection back to the calling procedure.
In the second post I will cover the main controls such as the listbox, the combobox(dropdown), the textbox and the checkbox. This post will contain a ton of examples showing how to use each of these controls.
Useful Resources
If you are looking for more online information about UserForms you can go to
MSDN – Microsoft Developer Network – UserForms
Another great resource is John Walkenback’s VBA book. It has an entire section(150 pages) dedicated to UserForms and is well worth reading
Excel 2013 Power Programming with VBA by John Walkenback
What are VBA Userforms?
A UserForm is a dialog which allows your application to get input from the user. UserForms are used throughout all Windows applications. Excel itself has a large number of UserForms such as the Format Cells UserForm shown in the screenshot below.
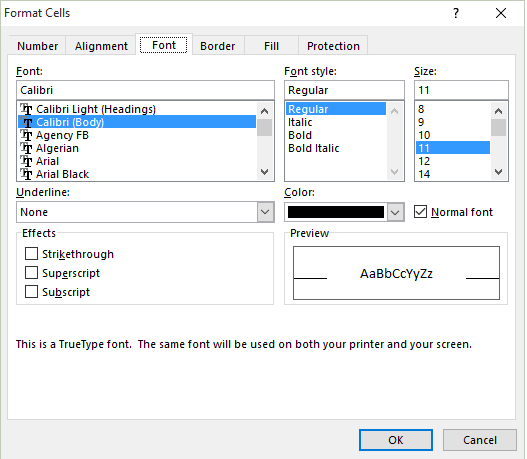
Excel’s Format Cells User Form
UserForms are made up of different types of controls such as buttons, listboxes, comboboxes(dropdown lists), checkboxes and textboxes.
In the Format Cells screenshot above you can see examples of these controls:
Font, Font style and Size contain a textbox with a listbox below it
Underline and Color use a Combobox
Effects uses three checkboxes
Ok and Cancel are command buttons
There are other controls but these are the ones you will use most of the time.
Built in VBA Userforms
It is important to note that VBA has some useful built-in UserForms. These can be very useful and may save you having to create a custom one. Let’s start by having a look at the MsgBox.
VBA MsgBox
The VBA message box allows you to display a dialog to the user. You can choose from a collection of buttons such as Yes, No, Ok and Cancel.
You can easily find out which of these buttons the user clicked on and use the results in your code.
The following code shows two simple examples of using a message box
Sub BasicMessage()
' Basic message
MsgBox "There is no data on this worksheet "
' Basic message with "Error" as title
MsgBox "There is no data on this worksheet ", , "Error"
End Sub
In the next example we ask the user to click Yes or No and print a message displaying which button was clicked
Sub MessagesYesNoWithResponse()
' Display Yes/No buttons and get response
If MsgBox("Do you wish to continue? ", vbYesNo) = vbYes Then
Debug.Print "The user clicked Yes"
Else
Debug.Print "The user clicked No"
End If
End Sub
In the final example we ask the user to click Yes, No or Cancel
Sub MessagesYesNoCancel()
' Display Yes/No buttons and get response
Dim vbResult As VbMsgBoxResult
vbResult = MsgBox("Do you wish to continue? ", vbYesNoCancel)
If vbResult = vbYes Then
Debug.Print "The user clicked Yes"
ElseIf vbResult = vbNo Then
Debug.Print "The user clicked No"
Else
Debug.Print "The user clicked Cancel"
End If
End Sub
InputBox
If you want to get a single piece of text or value from the user you can use the InputBox. The following code asks the user for a name and writes it to the Immediate Window(Ctrl + G to view)
Sub GetValue()
Dim sValue As String
sValue = InputBox("Please enter your name", "Name Entry")
Debug.Print sValue
End Sub
GetOpenFilename
We can use the Windows file dialog to allow the user to select a file or multiple files.
The first example allows the user to select a file
' Print the name of the selected file
sfile = Application.GetOpenFilename("Excel Files (*.xlsx),*.xlsx")
Debug.Print sfile
This following example allows the user to select multiple files
Sub GetMultipleFiles()
Dim arr As Variant
arr = Application.GetOpenFilename("Text Files(*.txt),*.txt" _
, MultiSelect:=True)
' Print all the selected filenames to the Immediate window
Dim filename As Variant
For Each filename In arr
Debug.Print filename
Next
End Sub
How to Create a VBA UserForm
If the built-in UserForms do not cover your needs then you will need to create your own custom Userform. To use a UserForm in our code we must first create one. We then add the necessary controls to this userform.
We create a UserForm with the following steps
Open the Visual Basic Editor(Alt + F11 from Excel)
Go to the Project Window which is normally on the left(select View->Project Explorer if it’s not visible)
Right-click on the workbook you wish to use
Select Insert and then UserForm(see screenshot below)
VBA Userform Create
A newly created UserForm will appear. Anytime you want to access this Userform you can double click on the UserForm name in the Project window.
The Toolbox dialog should also be visible. If it’s not visible select View->Toolbox from the menu. We use the toolbox too add controls to our UserForm.
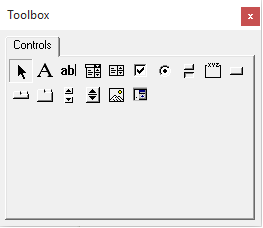
The UserForm Toolbox
Designing the UserForm
To view the design of the UserForm, double click on it in the Project window. There are three important windows we use when creating our UserForms.
The UserForm
The properties window – this is where we can change the setting of the Userform and its controls
The toolbox – we use this to add new controls to our UserForm
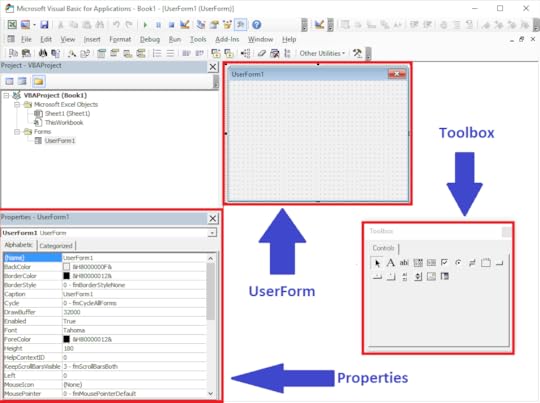
UserForm Windows
A Very Simple UserForm Example
Let’s have a look at a very simple user form example.
Create a new UserForm
Rename it to userformTest in the (Name) property in the properties window
Create a new module(Right click on properties window and select Insert->Module)
Copy the DislayUserForm sub below below to the module
Run the sub using Run->Run UserForm Sub from the menu
The UserForm will be displayed – you have created your first UserForm application!
Click on the X in the top right of the UserForm to close
Sub DisplayUserForm()
Dim form As New UserFormTest
form.Show
End Sub
Setting the Properties of the UserForm
We can change the attributes of the UserForm using the properties window. Select View->Properties Window if the window is not visible.
When we click on the UserForm or the control on a UserForm then the Properties window displays the attributes of that item.

VBA Properties Window
Generally speaking, you only use a few of these properties. The important ones for the UserForm are Name and Caption.
To change the name of the UserForm do the following
Click on the UserForm in the Project window or click on the UserForm itself
Click in the name field of the properties window
Type in the new name
The Controls
We add controls to the UserForms to allow the user to make selections, enter text or click a button. To add a control use the steps below
Go to the toolbox dialog – if not visible select View->Toolbox
Click on the control you want to add – the button for this control will appear flat
Put the cursor over the UserForm
Hold down the left mouse button and drag until the size you want
The following table shows a list of the common controls
ControlDescription
Label Displays text
TextboxAllows text entry
ComboBoxAllows selection from a list of items
ListBoxAllows selection from a list of items
CheckBoxTurn item on/off
CommandButtonClick to perform action
Adding the Code
To view the code of the UserForm
Right click on the UserForm in the properties windows(or the UserForm itself) and select “View Code”
You will see a sub called UserForm_Click. You can delete this when you create your first sub
Note: If you double click on a control it will bring you to the click event of that control. This can be a quicker way to get to the UserForm code.
Adding Events
When we use a UserForm we are dealing with events. What this means is that we want to perform actions when events occur. An event occurs when the users clicks a button, changes text, selects an item in a combobox etc. We add a Sub for a particular event and place our code in it. When the event occurs our code will run.
One common event is the Initialize event  which occurs when the UserForm is created at run time. We normally use this event to fill our controls with any necessary data. We will look at this event in the section below.
To add an event we use the comboboxes over the code window(see screenshot above). The left one is used to select the control and the right one is used to select the event. When we select the event it will automatically add this sub to our UserForm module.
Note: Clicking on any control on the UserForm will create the click event for that control.
The Initialize Event
The first thing we want to do with a UserForm is to fill the controls with values. For example, if we have a list of countries for the user to select from we could use this.
To do this we call the Initialize event. This is a sub that runs when the form is created in your application.
To create the Initialize event we do the following
Right click on the UserForm and select View Code from the menu
In the Dropdown list on the left above the main Window, select UserForm
This will create the UserForm_Click event. You can ignore this
In the Dropdown list on the right above the main Window, select Initialize
Optional: Delete the UserForm_Click sub created in step 2
Adding the Initialize Event
Once we have the Initialize event created we can use it to add the starting values to our controls. We will see more about this in the second part of this post.
Calling the UserForm
We can use the UserForm in two ways
Modal
Modeless
Modal Userform
Modal means the user cannot interact with the parent application while this is visible. The excel Format cells dialog we looked at earlier is a modal UserForm. So are the Excel Colors and Name Manager dialogs.
We use modal when we don’t want the user to interact with any other part of the application until they are finished with the UserForm.
Modeless Userform
Modeless means the user can interact with other parts of the application while they are visible. An example of modeless forms in Excel is the Find dialog(Ctrl + F).
You may notice that any Excel dialog that allows the user to select a range has a limited type of Modeless – the user can select a range of cells but cannot do much else.
Modal versus Modeless
The actual code to make a UserForm modal or modeless is very simple. We determine which type we are using when we show the UserForm as the code below demonstrates
Dim frm As New UserFormFruit
' Show as modal - code waits here until UserForm is closed
frm.Show vbModal
' Show as modeless - code does not wait
frm.Show vbModeless
' default is modal
frm.Show
As the comments in the above indicate the code behaves differently for Modal and Modeless. For the former it waits for the UserForm to close and for the latter it continues on.
Even though we can display any UserForm as modal or modeless we normally use it in one way only. This is because how we use them is different
Typical use of a Modal form
With a Modal UserForm we normally have an Ok and a Cancel button.
The Ok button normally closes the UserForm and performs the main action. This could be saving the user inputs or passing them back to the procedure.
The Cancel button normally closes the UserForm and cancels any action that may have taken place. Any changes the user made on the UserForm are ignored.
Typical use of a Modeless form
With a Modeless UserForm we normally have a close button and an action button e.g. the Find button on the Excel Find Dialog.
When the action button is clicked an action takes place but the dialog remains open.
The Close button is used to close the dialog. It normally doesn’t do anything else.
A Modal Example
We are going to create a modal UserForm example. It is very simple so you can see clearly how to use a UserForm.
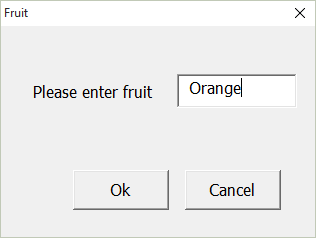
The following UserForm allows the user to type in the name of a fruit
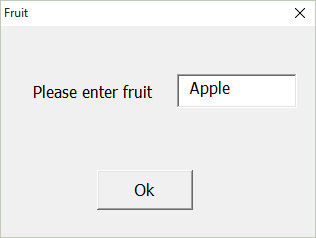
We use the following code to show this UserForm and retrieve the user input
' PROCEDURE CODE
Sub UseModal()
' Create and show form
Dim frm As New UserFormFruit
' Display Userform - The code in this procedure
' will wait here until the form is closed
frm.Show
' Display the returned value
MsgBox "The user has selected " & frm.Fruit
' Close the form
Unload frm
Set frm = Nothing
End Sub
' USERFORM CODE
' Returns the textbox value to the calling procedure
Public Property Get Fruit() As Variant
Fruit = textboxFruit.Value
End Property
' Hide the UserForm when the user click Ok
Private Sub buttonOk_Click()
Hide
End Sub
What you will notice is that we hide the UserForm when the user clicks Ok. We don’t set it to Nothing or unload it until after we are finished retrieve the user input. If we Unload the UserForm when the user clicks Ok then it no longers exists so we cannot access the values we want.
Cancelling the UserForm
We always want to give the user the option to cancel the UserForm. Once it is cancelled we want to ignore any changes they made to the userform.
Each form comes with an X in the top right-hand corner which allows the user to cancel it. This works automatically – no code is necessary.
When the user clicks X the UserForm is unloaded from memory. That is, it no longer exists so we will get an error if we try to access it. To avoid this error we need some way of telling if the UserForm is currently loaded. We can use the following function to do this
' Check if a given UserForm is currently loaded
Function IsUserFormLoaded(ByVal sUserFormName As String)
On Error Resume Next
Dim frm As Variant
' Go through all UserForms and check names
For Each frm In VBA.UserForms
If frm.Name = sUserFormName Then
' UserForm was found so return true
IsUserFormLoaded = True
Exit For
End If
Next
End Function
We can then update our procedure to check if the form is loaded
' PROCEDURE CODE
Sub UseModal()
' Create and show form
Dim frm As New UserFormFruit
frm.Show
' If not cancelled then retrieve the user entry
If IsUserFormLoaded("UserFormFruit") = True Then
MsgBox "The user has entered " & frm.Fruit
Unload frm
Else
MsgBox "Userform cancelled"
End If
Set frm = Nothing
End Sub
If we want to add a Cancel button it is simple to do. All we need to do is unload the UserForm in the click event for the Cancel button.
' PROCEDURE CODE
Private Sub buttonCancel_Click()
Unload Me
End Sub
Using the Escape key to cancel
If you want to allow the user to cancel using the Esc it is simple(but not obvious) to do. You set the Cancel property of your ‘Cancel’ button to True. When Esc is pressed the click event of your Cancel button will be used.
Putting All the Modal Code Together
The final code for a Modal form looks like this
' USERFORM CODE
' Returns the textbox value to the calling procedure
Public Property Get Fruit() As Variant
Fruit = textboxFruit.Value
End Property
' Hide the UserForm when the user click Ok
Private Sub buttonOk_Click()
Hide
End Sub
Private Sub buttonCancel_Click()
Unload Me
End Sub
' PROCEDURE CODE
Sub UseModal()
' Create and show form
Dim frm As New UserFormFruit
frm.Show
' If not cancelled then retrieve the user entry
If IsUserFormLoaded("UserFormFruit") = True Then
MsgBox "The user has entered " & frm.Fruit
Unload frm
Else
MsgBox "Userform cancelled"
End If
Set frm = Nothing
End Sub
' Check if a given UserForm is currently loaded
Function IsUserFormLoaded(ByVal sUserFormName As String)
On Error Resume Next
Dim frm As Variant
' Go through all UserForms and check names
For Each frm In VBA.UserForms
If frm.Name = sUserFormName Then
' UserForm was found so return true
IsUserFormLoaded = True
Exit For
End If
Next
End Function
You can use this code as a base for most of your Modal UserForms.
How to Use a Modeless form
We are now going to use a simple example to show how to use a Modeless form. In this example we will add a customer name to a worksheet each time the clicks on the the Add Customer button.
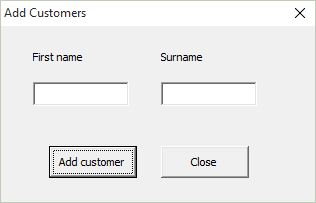
The following code displays the UserForm. The important thing to notice here is that after the frm.Show line, the code will continue on. This is different to Modal where the code waits at this line for the UserForm to be closed or hidden.
' PROCEDURE CODE
Sub UseModeless()
Dim frm As New UserFormCustomer
' Unlike the modal state the code will NOT
' wait here until the form is closed
frm.Show vbModeless
End Sub
When the Add button is clicked the action occurs immediately. We add the customer name to a new row in our worksheet. We can add as many names as we like. The UserForm will remain visible until we click close.
' USERFORM CODE
Private Sub buttonAdd_Click()
InsertRow
End Sub
Private Sub buttonClose_Click()
Unload Me
End Sub
Private Sub InsertRow()
With Sheet1
' Get the current row
Dim curRow As Long
If .Range("A1") = "" Then
curRow = 1
Else
curRow = .Range("A" & .Rows.Count).End(xlUp).Row + 1
End If
' Add item
.Cells(curRow, 1) = textboxFirstname.Value
.Cells(curRow, 2) = textboxSurname.Value
End With
End Sub
What’s Next?
This is the end of part one of a two-part post on UserForms. In the second part(coming soon!) we will look at using the UserForm Controls in detail. We will cover how to fill them with data, retrieve selection, setting default selections and much much more.
Get the Free eBook
Please feel free to subscribe to my newsletter and get exclusive VBA content that you cannot find here on the blog, as well as free access to my eBook, How to Ace the 21 Most Common Questions in VBA which is full of examples you can use in your own code.
The post VBA UserForms – A Guide for Everyone (Part 1) appeared first on Excel Macro Mastery.


