
Vision-Driven Exposures
This is my confession. I never use a light meter. I don’t spot meter. In fact most of the time I don’t even know what metering mode I’m on. My life as a digital photographer became infinitely easier when I abandoned those, put my camera back to manual and simply began exposing for what’s important.
Whether you use a meter or not – and you’re more likely to do so if you’re using a DLSR without in-viewfinder live histograms – isn’t the point. The point is understanding how to make the photograph you want, and knowing how to use a histogram is – at least for the digital photographer – key to this. I’ll explain that in a moment, along with the explanation of how I expose my images, but first I want to talk more directly to why I am writing this.
Something of a religion has been made of histograms lately, and with it, like all religions, a growing list of dos and do nots. Don’t burn out your highlights. Don’t lose shadow in the details. And, like most religions, especially the weird culty ones, there is almost never an explanation of why this dictate is to be followed at all. Here, in point form, are the short notes:
Burned out highlights mean no detail in those highlights.
Blocked up shadows mean no details in those shadows.
This, we are led to believe, is bad. And so, because badness – one assumes – is to be avoided, we give our reasoned minds over to the Histogram, in the hopes that slavish obedience to It will save us from ourselves. Hail the Histogram.
But there’s a problem. Digital sensors can’t capture the full spectrum of light from darkest blacks to brightest whites in every scene. Which means there are scenes in which one must make a choice. Do I expose for the lights and – God help me – plunge the shadow details into oblivion, or do I choose the shadows and let the highlights disappear? And that’s the exact spot the beginners who struggle with this, get stuck. Needlessly stuck.
It’s OK to blow your highlights. Obliterate them if they are unnecessary. See the photographs of the leopard? The dynamic range was far too great to expose for both detailed shadows (the leopard) and detailed highlights (the sky). So i have a choice and here are the two important questions: what’s possible, and what’s important? To me the leopard was key. I could have made a silhouette and exposed for the sky but it was featureless and uninteresting. Or I could have exposed for the leopard and let that featureless sky, the one without any real detail, just blow out. So I looked at my histogram and pushed it until the shadows had plenty of detail and then looked at the highlight warnings (the blinks) to be sure the highlights I was losing were only in the sky and not on the leopard (there are some highlights in which you really want to keep detail.) It’s not about whether I lose highlight details. It’s about which highlight details I lose.
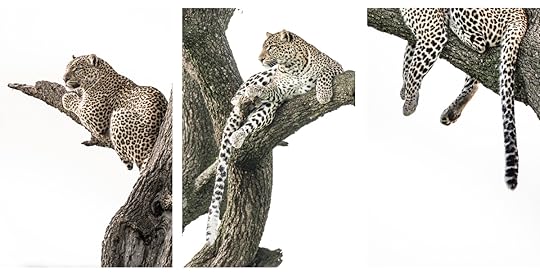
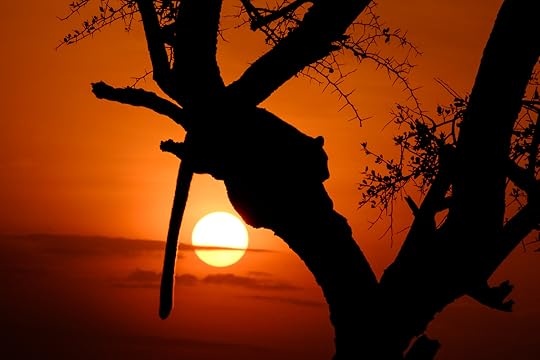
The leopard, silhouetted in front of the setting sun, has both blown highlights and plunged shadows.
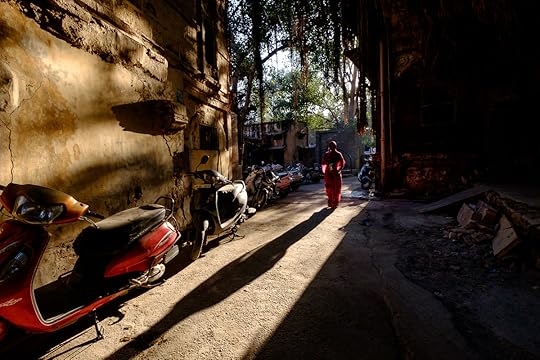
It’s also OK to plunge your shadows. Shadows are good. Say it with me: Shadows are good. Shadows add mood. They help isolate or frame key elements. They create new lines and shapes. Remember details have visual mass – they pull the eye. They provide information, and if that information is unnecessary, it can reduce impact by being a distraction. We used to do this all the time when photographing with slide film – underexpose the frame to make colours punchier, to keep the lighter, more important elements correctly exposed, and to add drama. There is no sin in trading details in the shadows so you can make a stronger photograph. See the images below where I’ve intentionally allowed the shadows to go much darker and imagine how much less impact the photographs would have if I’d exposed for them instead.
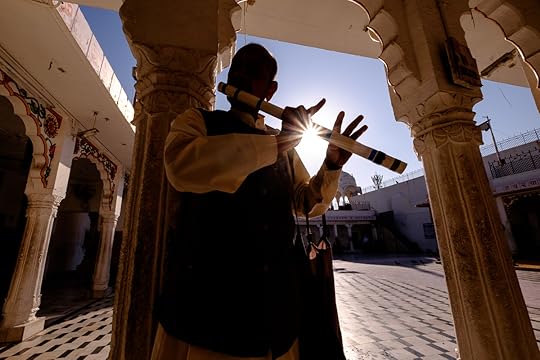
My camera wanted to make this scene a boring mess. Exposing manually I kept dialing the exposure down until I got all the highlights back (nothing running off the right side of the histogram). This gave me the best file. Then I underexposed it further in Lightroom. This gave me the best final photograph.
The sun is burned out. It will always be burned out. There is no detail in the sun. But I kept underexposing until the detail and colour in the sky came back.
That’s why metering modes aren’t helpful to me. Put the camera on manual, look at the histogram and expose according to where you want the information and where you want the impact. My Fuji cameras allow me to see what the image will look like if I dial that aperture closed, it’ll show me the impact of shadows. And it’ll show the inverse when I open it up – which highlights I’m blowing.
There is a give and take in exposing a photograph. Understand what you want from the image. Ask yourself where you want the information and where you want the impact. Will that overexposed area help you achieve your vision or will it pull the eye unnecessarily? Will those dark shadows create a stronger composition or will they obscure things that are key to your intent. Now, having done that, make the best possible exposure. Use your histogram, make it your b*tch, as they say. Don’t let it tell you what to do. It is there to tell you only what’s possible with the scene, not what you must or must not do.
A few last bits. It helps to shoot in RAW format – you’ll have much more flexibility and data. Using lower ISOs will still give you cleaner files and more flexibility. Where you can, it’s still prudent to push the histogram to the right to get as much data as you can. Don’t rely on the LCD screen to show you exactly what the image is going to look like – LCDs are for generalities, the histogram is more precise. Understand how to read the histogram, keep an eye on your blinkies so you know which details you’re losing, and most of all, expose for what matters to you, not to me, not to the pundits, but you. This is about making great photographs, not perfect histograms.
Like anything I write, my way is not the only way, but it’s the one that works for me. Questions?
Share the Love, Share this Post


