
Lara Neel's Blog, page 8
January 11, 2017
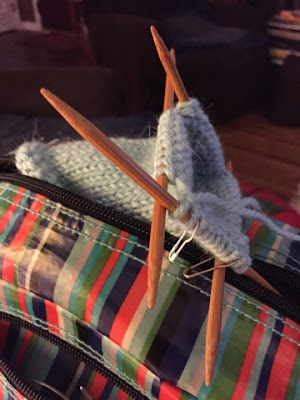
Mitten Knitting
There's nothing quite like knitting mittens. Quick, relaxing and fun!
This is a simple mitten pattern from One-Skein Wonders.
This is a simple mitten pattern from One-Skein Wonders.


January 9, 2017
Victorian Knitting Manuals on Archive.org
I included a link to Richard Rutt's collection of Victorian knitting manuals at the University of Southampton Library in my book. Sadly, pretty much right around the time that I published, they changed the way the collection was organized, which made it way less user-friendly!
They're now on Archive.org, and it's a pretty awesome resource! Go forth and marvel at how far we have come, but also remember that a lot of this wonderful knowledge has been "unfairly forgotten," as Barbara Walker said about at least one of the knitting stitches in her extensive collections. Or was it, "unjustly forgotten?" I really must read through those again, some day.
They're now on Archive.org, and it's a pretty awesome resource! Go forth and marvel at how far we have come, but also remember that a lot of this wonderful knowledge has been "unfairly forgotten," as Barbara Walker said about at least one of the knitting stitches in her extensive collections. Or was it, "unjustly forgotten?" I really must read through those again, some day.
January 4, 2017
New Serger Shopping List

I don't have a cute photo to go with this post, but I wanted to write it quickly because my darling sister received a serger this year as a gift!
So, this one is for all of you who either have a new serger or are new to using a serger.
1. This should have come with it, but if your serger doesn't have its manual, Google around and find your manual. It really helps to have the manual for YOUR serger. If your serger is secondhand, ask how long it's been since it was used. If it's been more than a few months, consider getting it tuned up by a professional repairperson. The oil could have congealed while in storage, and it might lock up on you, which would require repair, anyway.
2. Buy this book. I've read a lot of serger books in the last year, and this one has the best troubleshooting information, in my opinion. I'll never pass up the adorably cheerful 1980s serger books when I see them at Goodwill, but I don't really use them in the same way. They're just so adorable.
3. Buy this book, too. It's not quite as great at troubleshooting when you have a problem, but it has lots of great tips for getting the most from your machine.
4. Get a cover for it. You could make one, but I just bought this one. I'm a little paranoid about dust getting into my tension disks and messing up my machine. I consider this especially important if your machine is stored in a basement or other area that maybe isn't cleaned/used a lot. If you think your machine will go longer than 1 week without use, you really should cover it.
5. Buy a bunch of needles. If your machine takes regular machine needles, great! If not, buy the ones that your manual says you should have. If you're anything like me, when you're learning a machine, you're more likely to break needles.
6. Buy 1 cone of thread to match each of the tension disks on your machine. Ok, that's a weird sentence. What I mean is, if your machine takes up to 4 threads, each thread will have its own tension setting wheel. These are usually color-coded in some way. They might be yellow, pink, green and blue. My machine takes 5 threads, and I think they are blue, black, red, yellow and brown. When you're first threading up the machine, I think it's really helpful to thread each needle or looper with its own color, preferably matching the color on its tension wheel. It takes some practice to be able to see which thread is which, so if you already have it color coded, you'll be able to tell where the tension is off. I may never use up that yellow cone of thread, but it sure made my life easier when I was learning the machine. If your machine isn't color coded, just pick colors you like, but make sure they're easy for you tell apart.
7. Buy sets (3, 4, or however many your machine will take) of cones of thread in blendable colors. Unlike a regular sewing machine, all of the threads on a serger don't have to match. You can just use a matching thread in the left-most needle. I like to have black, grey, tan and peach in my arsenal. I've used Maxilock and Madeira Aerolock and I like them both. It's ok to look for deals, but cheapo thread is usually a false economy.
8. Buy these teeny vacuum attachments. If you're not perfect about cleaning a sewing machine, it's usually ok. If you're not at least good about cleaning your serger, it will break.
9. Get some oil. Now, you should have this, already, but see #8 for why I'm mentioning this. I have this one and I like it but if anyone has any tips for keeping it from leaking all over me when I use it, I'm all ears. As it is, I kind of swaddle it in a rag, but I still manage to drip on myself.
10. Buy some hemostats. It sounds weird, I know, but they're great for when you're threading the machine. Much better than tweezers. You can also use them to make grabbing short threads while seam ripping easier.
One more general tip: Try to set up your space so that you can have both your sewing machine and your serger ready to go at the same time. Switching back and forth when you actually have to move the machines will really wear you out.
Ok, still one more general tip: When you're getting to know your machine, just cut a bunch of fabric scraps into long strips, for practice. I try to cut myself strips to test stitches for every project. It really reduces my angst.
Craftsy class recommendations:
Serger Solutions: Troubleshooting TechniquesSew With Your Serger: Quick & Easy Projects - If you haven't taken a Craftsy class with Angela Wolf, you are MISSING OUT! She's an absolute delight.Coverstitch: Basics & Beyond - If your machine has coverstitch options, you don't want to miss this class. Gail has a lot of very useful tips.
December 28, 2016
Santa Hat

The person who this is meant for doesn't read this blog (I don't think). But, just to be safe, I waited to share it until after I gave it to her.
It's from Kwik Sew 3743, which might be out of print, but you can still get it. I saw the zebra-print fleece on sale and I couldn't resist - my mom LOVES animal prints of all kinds.
Everything went together quickly. I used the serger for everything except the pompom.
December 21, 2016
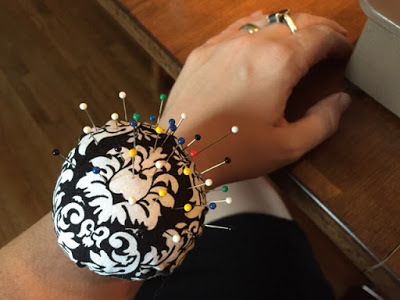
Pins and Needles
Are you looking for a last-minute gift for the sewist in your life? May I humbly suggest a wrist pincushion? For real, putting pins and needles in your mouth is dangerous. Don't. Just don't. I'm even a little leery of holding stitch markers in my mouth, since I read the above story.I don't have a pattern for these. The round one was a little hard to make. The rectangle was easier. I used scrap fabric, scrap elastic and cut-up cardstock. The cardstock is to put on the bottom of the cushion, so you can't accidentally stick yourself in the arm with a pin. Very heavy felt might also work, too, but I didn't have any of that. For the elastic, make a casing about an inch longer than the elastic by sewing a tube, then turning it inside out. The elastic will gather it a little bit, but it will still be able to stretch and fit over your hand when you pull it on. If you're weird like me, you might want at least two of these suckers. One is for "regular" pins. The other, in knit fabric, is for ballpoint-head (knit fabric only) pins. I hate trying to guess which is which!
\

December 14, 2016
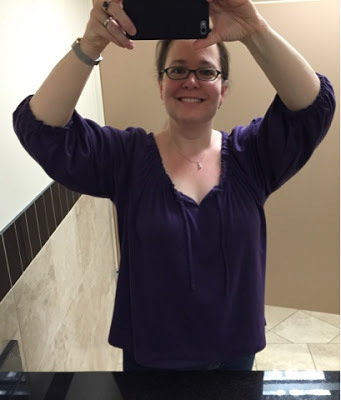
Purple Peasant Top
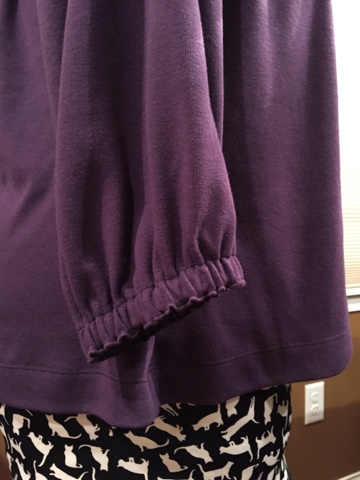
 I picked up some purple jersey at Jo-Anns and knew that I wanted to make a peasant-style top out of it. Paired with Stretch & Sew 1582 - perfection! I love these patterns not just because they are fun, but for the attention to detail. The sleeve isn't just a straight hem gathered into elastic. It's curved, so that it really fits the curve of your arm. I'm not saying that modern sewing patterns don't have this feature, but I really appreciate it, when I see it.
The neckline is kind of cool, too. The little self-fabric ties are there, but they're assisted by wider elastic. So, you get the look of little fabric ties with the gathering capability of a nice, wide elastic. Lovely.
I like the length and the hem, but if I make it again, I might change it to a shirt-hem style.


December 7, 2016
Poppy Panel Skirt


Yes, this selfie is at the gym because I don't have a full-length mirror with good light at home. I should probably change that, at some point.
I saw this panel print poplin on Marcy Tilton's website and I knew I just had. to. have. it.
I had Butterick's 5466 skirt pattern, so I decided to try view B with this fantastic print.
LOVE IT!
I'm now tempted to try to find some fabric the same color as the hot pink in the poppies to make a top. It would have to be a perfect match to work, so we'll see if I ever manage it. I think white would also look good.
November 30, 2016
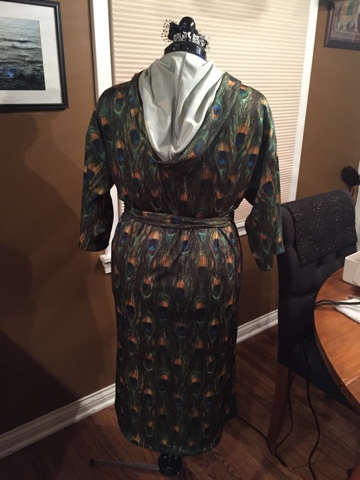
Peacock 1977
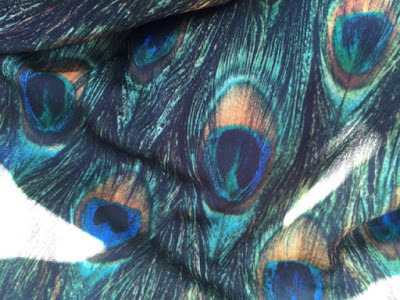 Polyester Peacock fabric, in the sunshine
I found this shiny, knit, polyester fabric at Goodwill for $2.99. I picked it up, giggled, and put it back. It was clearly from the 1970s - not a throwback, actual stashed fabric that's at least 35 years old. How do I know? It proudly proclaimed "100% polyester!" in the selvedge. Plus, peacocks.
I knew the texture couldn't work for me as a top, dress or pants, but I thought about it for a second - why not a bathrobe? Past Goodwill forays have yielded more than one bathrobe pattern. Why not?
At home, I dug up Simplicity 8275 from my stash. Stardate: 1977. A match made in polyester heaven.
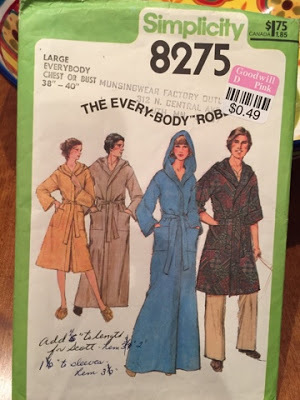


Awesome. Something to swan around the house in, for about $3.50. I serged all of the seams, then pressed them to one side and topstitched with a straight stitch. I'm going to go ahead and call that a super-fake fell seam.
I reinforced the sleeve seams with twill tape. I don't know if it would have stretched out, but I figured it was better to be safe than sorry.
I had EXACTLY enough fabric, with almost none to spare. I shortened the sleeves a bit so that I can cook in this robe in relative safety. No long robe sleeves for me - I saw The Sopranos.
November 23, 2016
Hugs
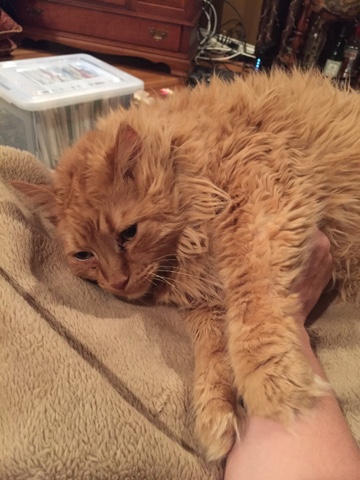 Sometimes Boomer kind of hugs me when I pet him. It's the cutest thing!
Happy early Thanksgiving, to those who celebrate it.
November 16, 2016
Latex-Free Underwear, Sewing, and Me
I'm a responsible adult, so instead of writing here about my Big Election Feelings, I'm going to write about my undergarments.
I've been thinking about this for a while, and apparently I have a lot to say about it, so here goes.
Most ready-to-wear underwear is kind of horrible. Especially if it's "affordable."
I grew up not thinking about it a lot. I bought undies by the handful out of the cheapo bin at the department store or at Victoria Secret. The elastic always wore out in about 6 months. I used to get very uncomfortable skin tags from the leg elastic rubbing and binding up on me. I never guessed there were better options and I had more important things to spend money on, like film and photo chemicals.
Then, around 17 or 18 years ago, my twin sister told me she had a latex allergy and I should be on the lookout for it, too. We both researched a lot in a quest for cute, affordable, latex-free underwear. I mean, lots of clothes can contain latex, but bras and underwear are the worst offenders. Even if the elastic used is latex-free, a lot of companies use latex in the thread. It just doesn't seem worth it to increase my exposure to latex on the wing and a prayer that the 3-pack of undies at the mall for $22.50 hasn't done that.
We hit on Decent Exposures pretty early on, and I can't recommend them, as a company, highly enough. Their customer service is impeccable. I lost a bit of weight and ordered some undies that were a size smaller than the pairs I had ordered 6 months before and they emailed me to make sure I hadn't made an error when I was ordering. Fantastic.
$15 per pair for latex-free panties isn't unusual, and the Decent Exposures undies that I wore for years cost between $16 and $28 (that's with shipping, the more expensive pairs are organic cotton). They are worth every penny. From their website:
"We try hard to be a socially responsible business. All our products are made in Seattle where our employees receive good wages and benefits and the flexibility they need for themselves and their families. We use recycled products whenever possible and pass on large scraps to those who can use them (give us a call if you're interested). We neither buy mailing lists nor sell ours, so you need not worry that your name will be given to others."
From another section:
"If you need customizing of your order (i.e. latex free elastic or other modifications you have had to previous orders), use the 'Special Instructions' box when checking out to make your requests."
They also last for years. I had pairs that I wore for over 4 years. They didn't even wear out, exactly. I lost some weight, so they just didn't work for me, anymore. I still wear an Un-Bra from them and I absolutely love it.
Around the beginning of this year, I decided to try my hand at making undies. I found this article online at the Very Purple Person and was like, ok. This looks pretty easy. I started out by buying t-shirts at Goodwill and using latex-free elastic from Bravo Bella. All of their elastics and trims are latex-free and they have rocking customer service. I'm their customer for life.
Sew Sassy Fabrics also has some latex-free elastics.
Things learned from my first experience:
- Seriously, mark the centers of things. Pattern pieces for panties are little, but that also means that if you're off by a bit, it matters a lot. I started out using snips to mark, but now I use Clover Wonder Clips.
- If you're printing a PDF pattern, make sure to check the width and height of the printing box. I didn't do this and my first pair of undies fit well in width but was about 20% shorter than it should have been. Not cute. I mean, I like a hipster style, but it really didn't fit well in the legs.
- I pulled too hard when attaching the leg elastic and ended up with undies that made it look like I'd been fighting off a school of tiny piranha all day. Also not cute.
Overall, ok, but not perfect.
A few weeks later, I bought the Scrundlewear pattern from Stitch Upon a Time. I'd read a lot of rave reviews about the pattern and I thought it would be cool to try an elastic-free kind of undie.
I made several pairs. They were good. I loved that I could either use elastic or replace it with a fabric band. I liked the "burrito" method I learned from the Very Purple Person, so I actually altered the pattern so that I could use that technique. The original is drafted so that you cut on the crotch as part of the front pattern piece, so I had to change that to get what I wanted and have a completely enclosed front and back crotch seam. I imagine her method is faster to sew, but I don't mind taking a little time on something that I'm planning on wearing about once a week for (hopefully) a few years.
There was something about the Scrundlewear pattern that I didn't like, even with my alterations. The fit was just...not right, in the back. I admit to having a rather bodacious booty, and in the comment boards and Facebook group of Scrundlefans, many suggestions came up for this, including "just use a size larger in the back." But, the width across the main part of the back was fine. It was just right at the bottom of my rear that was a problem. I considered shortening the crotch piece to pull the bottom of the undies forward, but that didn't make sense. When the fit on the leg bands wasn't just a little tight, the undies rode up like they were late for a gunfight at the OK Corral. That's not comfy, but neither are tight leg bands.
Then, I looked again at the Very Purple Person tutorial and had an "aha" moment. Her crotch pattern pieces weren't symmetrical. They're larger in the back. Because, well, so are we.
In May, I paid a little more than I usually do for patterns and scored a Stretch & Sew 2046 (Brief, Hipster and Bikini Panties) from The Sewin' Asylum. Again, awesome customer service. LOVE her. I made about 5 pairs of hipsters. They have a crotch piece that is asymmetrical and curved, which I think is a little harder to sew, but gives a really fantastic fit.
Ann Person's method for the leg elastic is to measure your body, then reduce the length of the elastic by a set amount (I think it's either 2 or 4 inches), and work the ease of that evenly around the entire leg. It works ok, but I still wasn't getting the results I wanted.
Then, two things happened.
- I took Beverly Johnson's Craftsy class on Sewing Panties: Construction & Fit. In the class, she has you measure yourself and draft your own pattern, from scratch. I'm sure it's awesome, but I haven't done it, yet. What I have done is use her method for measuring and attaching leg elastic. It's awesome. It's perfect, for me. You can even make a jig so that all of your panties will fit the same way in the leg elastic. GENIUS! She also does all of the construction "in the flat," which is easier and faster than in the round, in my opinion.
- I made a cami a little while back from this 1986 Stretch & Sew pattern (2072), and I didn't show it to you all because it was kind of a disaster, but when I picked up the pattern, again, to try another one, I noticed that it included a French Bikini. My favorite style. 1986, baby!
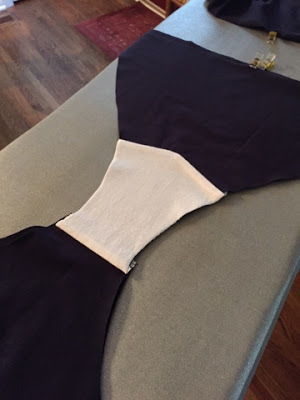
The crotch piece on these is curved in the back and straight across in the front. The fit is excellent.
So, very long story short, I'm using a 30-year-old sewing pattern and construction techniques from Beverly Johnson to make the cutest underwear I've worn in almost half my life. I'm very, very happy.
I topstitch all of the elastics using the coverstitch on my serger. This keeps the edges of the elastic from flipping over and rubbing on me.
It's cheaper, too. Even with shipping, the elastic and stretch lace I buy from Bravo Bella runs about $2.50 per pair. I could make it cheaper if I bought a ton at once, but I'm enjoying trying different styles and patterns. I bought my cotton fabric as a promotion through Purpleseamstress Fabric on Facebook. Back in January, she said she was drowning in little half-yard and one-yard cuts of cotton-blend jersey, so said if you bought a certain amount of other fabric from her, she would put in 10 of these cuts for free. The white lining is from a set of undershirts I bought at Costco, so I think of those as, essentially, free, too.
If I ever run out of these fabrics, I'll probably spring for organic cotton jersey. Let's say that's $8 per yard. I could definitely get at least 2 pairs out of a yard, and maybe more like 3. But, pretend it's just 2 pairs of undies per yard.
I could have organic, cute, latex-free undies for $6.50 a pair and less than 1 hour of work. Cheaper than the three-pack at the mall.
...and now I think this is the longest post I've written on this blog, and it's about underwear. Also, ads for underwear will now follow me around online for weeks. Perfect!
I contacted Dritz, which is the brand I encounter the most often in stores, and they sent me a list of which of their elastics are latex free. Not all of these work for underwear, but I figure that anyone who finds this page looking for latex-free sewing options might want this information, too.
Latex Free Elastic
Dritz 9325W –3/4” plush back stated on package
Also latex free
Dritz:
9344 – 5/8ʺ Glitter Elastics, black, gold and silver
9346C – lightweight elastic, clear
9347 – 5/8” buttonhole elastic, black and white
9348 – 3/8” stretch lace elastic, pink and white
9350w – 3/8” Non-Slip elastic, white
9577 -1 ½” soft waistband elastic, berry, green, orange, purple and tile blue
9387 – 1” Fold Over Elastic, black and white
9388 W– 5/8” double ruffle elastics, 20 SKU’s (maybe this means 20 different colors?)
9389 – 5/8” Fold Over Elastic, 17 SKU’s (17 colors?)
Walmart:
11346 – Lightweight Clear Elastic
11166 – 1” Fold Over Elastic
Babyville Boutique:
Fold Over Elastics:
35040
35041
35042
35043
35044
35045
35046
35047
35124
35214
35258
35259
35260
35261
35262
35304
35305
I've been thinking about this for a while, and apparently I have a lot to say about it, so here goes.
Most ready-to-wear underwear is kind of horrible. Especially if it's "affordable."
I grew up not thinking about it a lot. I bought undies by the handful out of the cheapo bin at the department store or at Victoria Secret. The elastic always wore out in about 6 months. I used to get very uncomfortable skin tags from the leg elastic rubbing and binding up on me. I never guessed there were better options and I had more important things to spend money on, like film and photo chemicals.
Then, around 17 or 18 years ago, my twin sister told me she had a latex allergy and I should be on the lookout for it, too. We both researched a lot in a quest for cute, affordable, latex-free underwear. I mean, lots of clothes can contain latex, but bras and underwear are the worst offenders. Even if the elastic used is latex-free, a lot of companies use latex in the thread. It just doesn't seem worth it to increase my exposure to latex on the wing and a prayer that the 3-pack of undies at the mall for $22.50 hasn't done that.
We hit on Decent Exposures pretty early on, and I can't recommend them, as a company, highly enough. Their customer service is impeccable. I lost a bit of weight and ordered some undies that were a size smaller than the pairs I had ordered 6 months before and they emailed me to make sure I hadn't made an error when I was ordering. Fantastic.
$15 per pair for latex-free panties isn't unusual, and the Decent Exposures undies that I wore for years cost between $16 and $28 (that's with shipping, the more expensive pairs are organic cotton). They are worth every penny. From their website:
"We try hard to be a socially responsible business. All our products are made in Seattle where our employees receive good wages and benefits and the flexibility they need for themselves and their families. We use recycled products whenever possible and pass on large scraps to those who can use them (give us a call if you're interested). We neither buy mailing lists nor sell ours, so you need not worry that your name will be given to others."
From another section:
"If you need customizing of your order (i.e. latex free elastic or other modifications you have had to previous orders), use the 'Special Instructions' box when checking out to make your requests."
They also last for years. I had pairs that I wore for over 4 years. They didn't even wear out, exactly. I lost some weight, so they just didn't work for me, anymore. I still wear an Un-Bra from them and I absolutely love it.
Around the beginning of this year, I decided to try my hand at making undies. I found this article online at the Very Purple Person and was like, ok. This looks pretty easy. I started out by buying t-shirts at Goodwill and using latex-free elastic from Bravo Bella. All of their elastics and trims are latex-free and they have rocking customer service. I'm their customer for life.
Sew Sassy Fabrics also has some latex-free elastics.
Things learned from my first experience:
- Seriously, mark the centers of things. Pattern pieces for panties are little, but that also means that if you're off by a bit, it matters a lot. I started out using snips to mark, but now I use Clover Wonder Clips.
- If you're printing a PDF pattern, make sure to check the width and height of the printing box. I didn't do this and my first pair of undies fit well in width but was about 20% shorter than it should have been. Not cute. I mean, I like a hipster style, but it really didn't fit well in the legs.
- I pulled too hard when attaching the leg elastic and ended up with undies that made it look like I'd been fighting off a school of tiny piranha all day. Also not cute.
Overall, ok, but not perfect.
A few weeks later, I bought the Scrundlewear pattern from Stitch Upon a Time. I'd read a lot of rave reviews about the pattern and I thought it would be cool to try an elastic-free kind of undie.
I made several pairs. They were good. I loved that I could either use elastic or replace it with a fabric band. I liked the "burrito" method I learned from the Very Purple Person, so I actually altered the pattern so that I could use that technique. The original is drafted so that you cut on the crotch as part of the front pattern piece, so I had to change that to get what I wanted and have a completely enclosed front and back crotch seam. I imagine her method is faster to sew, but I don't mind taking a little time on something that I'm planning on wearing about once a week for (hopefully) a few years.
There was something about the Scrundlewear pattern that I didn't like, even with my alterations. The fit was just...not right, in the back. I admit to having a rather bodacious booty, and in the comment boards and Facebook group of Scrundlefans, many suggestions came up for this, including "just use a size larger in the back." But, the width across the main part of the back was fine. It was just right at the bottom of my rear that was a problem. I considered shortening the crotch piece to pull the bottom of the undies forward, but that didn't make sense. When the fit on the leg bands wasn't just a little tight, the undies rode up like they were late for a gunfight at the OK Corral. That's not comfy, but neither are tight leg bands.
Then, I looked again at the Very Purple Person tutorial and had an "aha" moment. Her crotch pattern pieces weren't symmetrical. They're larger in the back. Because, well, so are we.
In May, I paid a little more than I usually do for patterns and scored a Stretch & Sew 2046 (Brief, Hipster and Bikini Panties) from The Sewin' Asylum. Again, awesome customer service. LOVE her. I made about 5 pairs of hipsters. They have a crotch piece that is asymmetrical and curved, which I think is a little harder to sew, but gives a really fantastic fit.
Ann Person's method for the leg elastic is to measure your body, then reduce the length of the elastic by a set amount (I think it's either 2 or 4 inches), and work the ease of that evenly around the entire leg. It works ok, but I still wasn't getting the results I wanted.
Then, two things happened.
- I took Beverly Johnson's Craftsy class on Sewing Panties: Construction & Fit. In the class, she has you measure yourself and draft your own pattern, from scratch. I'm sure it's awesome, but I haven't done it, yet. What I have done is use her method for measuring and attaching leg elastic. It's awesome. It's perfect, for me. You can even make a jig so that all of your panties will fit the same way in the leg elastic. GENIUS! She also does all of the construction "in the flat," which is easier and faster than in the round, in my opinion.
- I made a cami a little while back from this 1986 Stretch & Sew pattern (2072), and I didn't show it to you all because it was kind of a disaster, but when I picked up the pattern, again, to try another one, I noticed that it included a French Bikini. My favorite style.
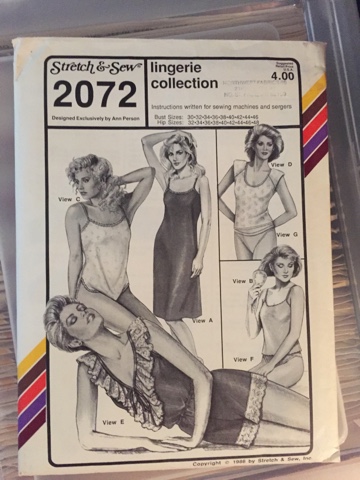 1986, baby!
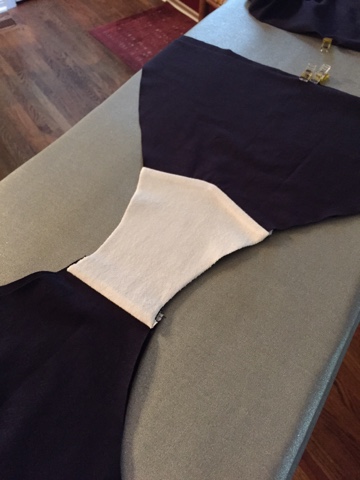
The crotch piece on these is curved in the back and straight across in the front. The fit is excellent.
So, very long story short, I'm using a 30-year-old sewing pattern and construction techniques from Beverly Johnson to make the cutest underwear I've worn in almost half my life. I'm very, very happy.
I topstitch all of the elastics using the coverstitch on my serger. This keeps the edges of the elastic from flipping over and rubbing on me.
It's cheaper, too. Even with shipping, the elastic and stretch lace I buy from Bravo Bella runs about $2.50 per pair. I could make it cheaper if I bought a ton at once, but I'm enjoying trying different styles and patterns. I bought my cotton fabric as a promotion through Purpleseamstress Fabric on Facebook. Back in January, she said she was drowning in little half-yard and one-yard cuts of cotton-blend jersey, so said if you bought a certain amount of other fabric from her, she would put in 10 of these cuts for free. The white lining is from a set of undershirts I bought at Costco, so I think of those as, essentially, free, too.
If I ever run out of these fabrics, I'll probably spring for organic cotton jersey. Let's say that's $8 per yard. I could definitely get at least 2 pairs out of a yard, and maybe more like 3. But, pretend it's just 2 pairs of undies per yard.
I could have organic, cute, latex-free undies for $6.50 a pair and less than 1 hour of work. Cheaper than the three-pack at the mall.
...and now I think this is the longest post I've written on this blog, and it's about underwear. Also, ads for underwear will now follow me around online for weeks. Perfect!
I contacted Dritz, which is the brand I encounter the most often in stores, and they sent me a list of which of their elastics are latex free. Not all of these work for underwear, but I figure that anyone who finds this page looking for latex-free sewing options might want this information, too.
Latex Free Elastic
Dritz 9325W –3/4” plush back stated on package
Also latex free
Dritz:
9344 – 5/8ʺ Glitter Elastics, black, gold and silver
9346C – lightweight elastic, clear
9347 – 5/8” buttonhole elastic, black and white
9348 – 3/8” stretch lace elastic, pink and white
9350w – 3/8” Non-Slip elastic, white
9577 -1 ½” soft waistband elastic, berry, green, orange, purple and tile blue
9387 – 1” Fold Over Elastic, black and white
9388 W– 5/8” double ruffle elastics, 20 SKU’s (maybe this means 20 different colors?)
9389 – 5/8” Fold Over Elastic, 17 SKU’s (17 colors?)
Walmart:
11346 – Lightweight Clear Elastic
11166 – 1” Fold Over Elastic
Babyville Boutique:
Fold Over Elastics:
35040
35041
35042
35043
35044
35045
35046
35047
35124
35214
35258
35259
35260
35261
35262
35304
35305


