
Lara Neel's Blog, page 5
June 27, 2017
No-Purl Pussyhat

Kids all go through phases where they don't want to wear hats. Our little model, Lila, is about 3 seconds away from ripping hers off in this photo. She's wearing it backwards, but she still looks super-cute (and only a knitter would know)!
This knitting pattern is super-easy, and involves nary a single purl stitch. I don't have anything against purls, I just don't invite them to the party when they're not needed.
The No-Purl Pussyhat can be made at any gauge, with any yarn, in any size. It's the only pussyhat pattern you need!


June 22, 2017
Tiny Hem Bandana

My niece, Maxine, modeled this bandana for me. It's the one with the tiniest writing and the fabric is called Tiny Nasty Woman, so I made it with a tiny hem. Check out the artist who made the fabric - she's giving all of the proceeds from this design to Planned Parenthood.
June 20, 2017
Street Casting

I wanted a photo of some women modeling my bandanas, and I happened to run into these ladies downtown at lunch. I think they're super-cute!
June 15, 2017
Nasty Dude Bandana

My coworker agreed to model the "Nasty Dude" bandana for me. The fabric pattern is by the same designer who made the Nasty Woman fabric. I think it looks pretty cool! The hemming method on this design can be sewn on a regular sewing machine with a regular foot. It just takes a little patience at the ironing board to look great.
June 13, 2017
Pussyhat Bandana

For this little number, I used Donna Druchunas's Resist Pussyhat Pussycat fabric. It's really fun, even though the cats look super unhappy.
I used a really easy way to hem in a sewing machine for this bandana. All you need is a satin-stitch foot and a little patience.
June 8, 2017
No-Sew Bandana

Did you know that they make pens that allow you to create your own iron-on transfers?
I did not know. Now everything in my house is in danger of being transferred onto. Even the cats.
Bandanas are important for when you are on the march. Of course, you can use them as napkins or handkerchiefs. Once you get used to having one or two on hand, they start to operate like a towel in The Hitchhiker’s Guide to the Galaxy. However, they can also help reduce the effects of tear gas and other non-lethal crowd control propellants. Wet your bandana down with water and use it to cover or wipe your face. Don’t wear contact lenses if there is any chance at all that you will be in this situation. It ruins the contacts, anyway, and is extremely painful for you, too.
June 6, 2017
Go Anywhere, Say Anything Messenger Bag


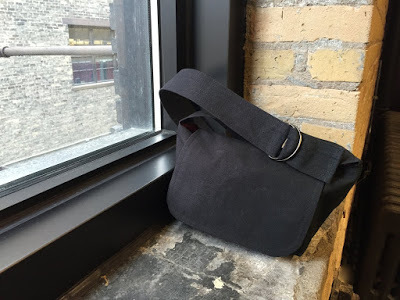
I really love this bag! I've used it every day since I made it. It's just big enough for my essentials - wallet, phone, etc., but it's still so light that I want to wear it even while playing arcade games with Dee. As a bonus, it fits inside the backpack I use when I bike to work. So, I don't have any excuse for leaving my keycard at home.
I designed it with a full zip across the lining, so if you toss it into another bag, or anywhere else, really, you don't have to worry about it spilling.
A tiny bit of hardware makes the strap adjustable, which is handy if you're making the bag for someone else or if you're just a tiny bit indecisive about bag strap length.
Full patterns and instructions for the Go Anywhere, Say Anything Messenger Bag will be included in Crafting the Resistance, which is due out in August!
June 1, 2017
Clarity Vinyl Tote

I had the idea to make this tote after we used clear totes at the Women's March on Washington.
I was a little afraid of stitching through heavy vinyl, but, in the end, it wasn't any harder than working with leather or any other tough material.
It was a lot of fun to sew and I also like the idea that you could use just about any color for the straps and zipper (assuming you could find matching colors!)
May 24, 2017
Peplum Top, Take 2

I made a version of this top back in November. I wanted to try again, with sleeves.
This print is a bit of a departure for me. I call it "chaos plaid," or "Prince went to Scotland and had a party plaid." I saw it at SR Harris and I just LOVED it.
I bought a little extra to make sure I would have enough fabric to make the peplum a double layer, as written in the pattern. It's interesting - basically the peplum has what I would consider a full-size facing/lining. This means that you don't have to hem the admittedly weird and very curved peplum shape, and it also gives it a little more weight. I made no attempt to match the pattern anywhere, since it's so chaotic.
The original sleeves were nuts, so I redrew the armhole to match a knit sleeve I already like, and simply slapped in that sleeve. One of these days, I'm going to actually trace off a sloper version of my favorite dartless knit pattern, without seam allowances. As it is, now I spend a fair amount of time monkeying around with different seam allowances and it feels like a bit of a waste.
I'm super happy with it! I finished the neckline with knit stay tape, turned and topstitched it, and the sleeve hems, with a coverstitch. This is a semi-slinky ITY-style fabric, so I wouldn't normally think of it working really well with darts, but the darts in the back look really good. Maybe that's because they're vertical?
May 17, 2017
On Making Bras

I've raved about Beverly Johnson before. (Yes, that's a long post, but it's in there.)
I'm not sure if I would have tried sewing bras without her class on Craftsy. I have a brand/style of bra that I've worn for a long time and it didn't really occur to me to try making my own.
That is, until a random, 1970 bra pattern showed up among a box of Stretch and Sew patterns that I bought on Ebay. The pattern isn't Stretch and Sew (I don't think Ann wrote bra patterns), and I didn't talk about it on the blog because the sizing was rid.i.cu.lous, so I threw the bra away, in frustration. But, it wasn't that hard to sew, really. It was just enough to make me curious.
I watched all three of Beverly's Craftsy classes, bought a kit at Bravo Bella Bras, a pattern from Sew Sassy and it was off to the races.
My first bra fit pretty well. It had a few errors that I figured were from my inexperience. So, I tried again. Bra number 2 (we're not counting 1970, thank you), was AMAZING. I felt (and feel!) so good in it!
I'm short and short-waisted and I'm starting to think that part of why I've always had a love/hate relationship with bras is that the underwire, inevitably, is just too darn long for me. That makes it dig into my side/underarm. Ouch!
For the last few years, I've worn bras that are foam cups and very stretchy. Really - now that I've worn another style, I'm realizing that I probably liked them just because the underwire didn't actually do much. The bottom band hangs so low on my body, even when I wear a somewhat smaller size, that the underwire doesn't even really touch me, if that makes sense? The shape of the bra forces the underwire to rest lower against my chest than my assets actually are. Everything just hangs, with the bra more or less sitting like a cover, not like a sling. It looks ok, but it's not as comfortable as actually having support. At certain times of the month, everything would get so sore that I would swear to never eat salt, again. But, it wasn't the salt. It was my bras.
I've read advice about how molded foam cups aren't great for a lot of women. As in, “(your breasts are) going to settle at the bottom of the contour cup and you’ll going to have space at the top of the strap.” I've noticed this in my foam cup bras, but I just was too afraid to try a different style and get murdered by escaping underwires, again.
As an aside, the expert above also says that you should replace a bra after 8 months. Let's do the math. She suggests not wearing the same bra 2 days in a row. Let's assume she has 2 "everyday" bras that she rotates through every single day and never wears another kind of bra. I was told, when I was growing up, that you should really have 3 bras you rotate. If her 2 bras last 8 months, that's about 120 wears each. If I use her same idea and do it with 3 bras, I would be replacing them all after about a year. Which, actually, is pretty much what I did when I was a teenager.
A wardrobe of 5 bras should, using these numbers, last for about 20 months, or almost 2 years! Not bad for $10 to $20 per bra, once you get into the swing of it. That comes to just over $50 per year spent on bras. I don't know about you, but there have been years where I've spent a lot more than $50 on bras. Heck, there are months where I've spent more than that. Plus, if my weight changes and I need a new bra after 3 or 6 months, I'll be way less annoyed about it, if I make it myself.


