
Shirley Jump's Blog: Eating My Words, page 6
December 17, 2012
Terri Rochenski's new book and an Easy Appetizer!

When I first saw Ms. Jump’s blog I was thrilled. She posts about two of my passions – books and cooking. And then she offered to let me guest post … well. Beyond thrilled to say the least!
Rather than blather on about writing or my process I decided to share one thought and a little about my newest release.
As a stay-at-home mom I often get bogged down in the details of life – kids, cleaning, laundry, cooking (even thought I love it!). I’ve found it’s easy for a woman’s identity to fade, oftentimes disappear altogether into the new one of mommy, wife, and housekeeper.
Writing has always been a passion of mine – my hobby – it’s the one thing I cling to that is all mine. M.I.N.E. It’s my escape, and I nab a few minutes wherever and whenever my children allow.
Because let’s face it … they do come first.
And one of the things I enjoy doing for them, the most besides hugs and kisses of course is cooking yummy food. Seeing as how the holiday season is upon us, I decided to share my favorite go-to party recipe.
#
Dried Beef Cheese Ball
3 4oz. packages of dried beef, broken up
3 8oz. softened cream cheese
1 small onion, chopped
2 Tbs. Worcestershire sauce
1 Tbs. Accent Season Salt
Mix all ingredence in a bowl. Shape into a ball, cover and refrigerate. (I like making it the night before to let all the flavors mingle together.)
Easy peasy! Slap some on a cracker and yums with a capital Y.
#
Now on to my newest release.
My short story, Beginning of Forever, is in Still MomentsPublishing’s Christmas Magic Anthology which released on December 4th. It’s a collection of my historical romance and three other contemporary stories. For now it is only available as an ebook.Here's an excerpt from Terri's new book!
 Beginning of Forever by Terri Rochenski
When Wayne Edwards moves to town, Lillian Davis experiences stirrings she thought were long dead. Guilt ridden over betraying her deceased husband and the feelings Wayne inspires, Lillian reluctantly lets him in. Secrets of the past – an old promise emerges, but will it threaten their forever?
Excerpt:
I rubbed my fussing son’s back and stumbled down the hall to grab the phone. “Hello?”
“Mrs. Douglas?”
A glance at the clock and my stomach clenched. Ronnie was an hour late for our Christmas Eve dinner. “Y-yes?”
“There’s been an accident.”
Through Steven’s heightened cries and the ringing in my ears I heard my husband’s name and Anna Jacques hospital.
This isn’t real. I need to wake up.
“Mrs. Douglas?”
I swayed and slumped to my knees on the linoleum floor, struggling to keep Steven in my grasp.
The floor is cold. I’m not dreaming.
A big thanks to Shirley for inviting me. I hope you’ll try the drool-inducing cheese ball AND my book!
Terri
Here's her blog and website, for more about Terri!
Thanks for visiting, Terri!
Shirley


December 7, 2012
Salted Caramel Shortbread
 I may never eat another vegetable again. I think I'm going to go the rest of my life, eating these every single meal. They are that good. Just awesomeness, in every bite.
Salted Caramel Shortbread Cookies
1 14-ounce can sweetened condensed milk
kosher salt
3 sticks butter (3/4 pound), unsalted, room temperature
1 cup sugar, plus extra
1 teaspoon vanilla
3 1/2 cups flour
1/4 teaspoon salt
First, make the caramel. Preheat the oven to 425 degrees. Pour the milk into a pie plate, stir in 1/4 teaspooon kosher salt, and cover it tightly with foil. Put the pie plate in a big roasting pan, and fill it halfway up the pie plate with hot water. Bake for 1 to 1 1/4 hours, adding more water if necessary. Let cool, then whisk until smooth.
Meanwhile, make the cookies.Set the oven at 350 degrees. The butter has to be room temp for this to work well, so what I did was set the butter out first thing in the morning, make the caramel, then about 15 minutes before that was done, I made the cookies.
Cream the butter and sugar in a mixer. Add the vanilla. Mix the salt with the flour, then add the dry ingredients a little at a time and mix until the dough comes together. I formed the dough into square logs (though you can make it into a plate shape and roll it out; I just hate doing cut-out cookies). Wrap in plastic wrap and refrigerate 30 minutes.
Slice or cut the dough into 1/4 to 1/2 inch thick cookies (mine were like 1/3 an inch). They don't spread much, so you can get quite a few on an ungreased cookie sheet. Sprinkle with reserved sugar. Bake for 20-24 minutes, switching the cookie sheets halfway through to get even cooking. Keep an eye on them because they go from perfect to burned fast.
Put wax paper under your cooling rack. Remove cookies from the oven, place on the cooling racks. Heat the caramel for 30 seconds in the microwave, then put it in a Ziploc bag and snip one end (to make a homemade pastry bag). Drizzle cookies with caramel, then sprinkle with kosher salt.
Eat. Repeat ;-)
Shirley

December 6, 2012
Christmas Treats :-)
I love baking at Christmas. It's a nice excuse to have a few thousand extra calories, all in the name of a holiday, of course ;-) I know I'll be running off these calories for the rest of winter, but hey, these desserts are worth it.
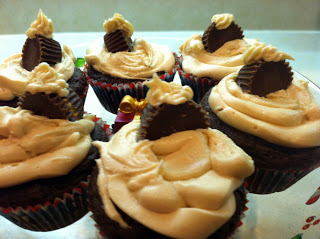 Peanut Butter Surprise Cupcakes
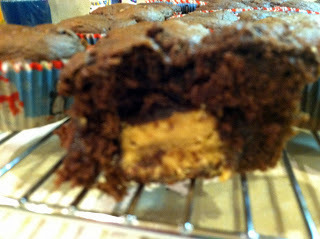 I've been spending WAY too much time on Pinterest lately, pinning cupcakes and cookies and all kinds of dessert ideas. I saw these Peanut Butter Surprise Cupcakes and HAD to have them. Reese's are, after all, my favorite candy eva, and these were like big Reese's. They're cupcakes with buckeyes in the center, and Reese's on top. I mean, really, what more does one need?
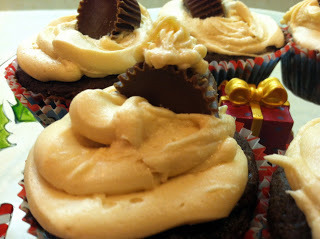 Not to mention, they were EASY. PEANUT BUTTER SURPRISE CUPCAKESCenter: 1 1/2 cups Peanut butter1 cup butter, softened1/2 teaspoon vanilla6 cups confectionary sugarMix all in a mixer (my trusty Kitchen Aid was busy tonight!) then form into balls a little smaller than 1-inch around. For the cupcakes, I mixed up Devil's Food cake mix. Line your cupcake pans with liners, add a little cake mix on the bottom, put in a peanut butter ball, then top with enough cake mix to cover. Bake as directed on the box. The frosting is a
Peanut Butter Buttercream
(I know, the calories in this...I can't even think about them!)3/4 cup butter, room temperature1/2 cup shortening1 teaspoon vanilla1/2 cup creamy peanut butter1/4 to 1/2 cup heavy cream (I used half-and-half)4-5 cups confectionary sugar Blend all in the mixer, whipping on high speed until fluffy. Add more or less cream and confectionary sugar to get the consistency you want. Frost, top with a mini Reese's, and eat!
Not to mention, they were EASY. PEANUT BUTTER SURPRISE CUPCAKESCenter: 1 1/2 cups Peanut butter1 cup butter, softened1/2 teaspoon vanilla6 cups confectionary sugarMix all in a mixer (my trusty Kitchen Aid was busy tonight!) then form into balls a little smaller than 1-inch around. For the cupcakes, I mixed up Devil's Food cake mix. Line your cupcake pans with liners, add a little cake mix on the bottom, put in a peanut butter ball, then top with enough cake mix to cover. Bake as directed on the box. The frosting is a
Peanut Butter Buttercream
(I know, the calories in this...I can't even think about them!)3/4 cup butter, room temperature1/2 cup shortening1 teaspoon vanilla1/2 cup creamy peanut butter1/4 to 1/2 cup heavy cream (I used half-and-half)4-5 cups confectionary sugar Blend all in the mixer, whipping on high speed until fluffy. Add more or less cream and confectionary sugar to get the consistency you want. Frost, top with a mini Reese's, and eat!
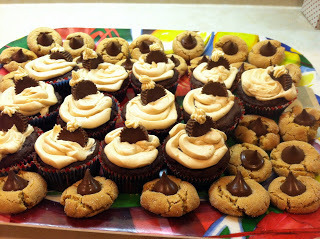 These are the ones I made for my husband's company (along with some Kiss cookies).
Then I made these fun Santa cupcakes. It's a basic yellow cake cupcake (from my trusty Betty Crocker), topped with white buttercream (what I did was double the above recipe for buttercream, but left out the peanut butter. Frosted the Santa ones first, then mixed in the PB and frosted the Peanut Butter Surprise Cupcakes).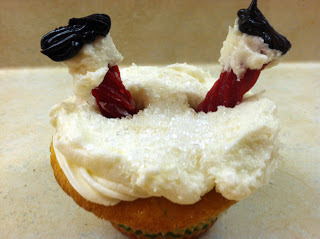 The legs are Twizzlers, cut in thirds. Dip in frosting, then top with black frosting boots. I sprinkled the cupcakes with white sparkles. Easy and cute!! Follow me on Pinterest, or let me know if you're a foodie like me and I'll follow you! Also, look for info soon about a new book! I'm off to have cupcakes and milk! :-) Shirley

 Peanut Butter Surprise Cupcakes
 I've been spending WAY too much time on Pinterest lately, pinning cupcakes and cookies and all kinds of dessert ideas. I saw these Peanut Butter Surprise Cupcakes and HAD to have them. Reese's are, after all, my favorite candy eva, and these were like big Reese's. They're cupcakes with buckeyes in the center, and Reese's on top. I mean, really, what more does one need?
 Not to mention, they were EASY. PEANUT BUTTER SURPRISE CUPCAKESCenter: 1 1/2 cups Peanut butter1 cup butter, softened1/2 teaspoon vanilla6 cups confectionary sugarMix all in a mixer (my trusty Kitchen Aid was busy tonight!) then form into balls a little smaller than 1-inch around. For the cupcakes, I mixed up Devil's Food cake mix. Line your cupcake pans with liners, add a little cake mix on the bottom, put in a peanut butter ball, then top with enough cake mix to cover. Bake as directed on the box. The frosting is a
Peanut Butter Buttercream
(I know, the calories in this...I can't even think about them!)3/4 cup butter, room temperature1/2 cup shortening1 teaspoon vanilla1/2 cup creamy peanut butter1/4 to 1/2 cup heavy cream (I used half-and-half)4-5 cups confectionary sugar Blend all in the mixer, whipping on high speed until fluffy. Add more or less cream and confectionary sugar to get the consistency you want. Frost, top with a mini Reese's, and eat!
Not to mention, they were EASY. PEANUT BUTTER SURPRISE CUPCAKESCenter: 1 1/2 cups Peanut butter1 cup butter, softened1/2 teaspoon vanilla6 cups confectionary sugarMix all in a mixer (my trusty Kitchen Aid was busy tonight!) then form into balls a little smaller than 1-inch around. For the cupcakes, I mixed up Devil's Food cake mix. Line your cupcake pans with liners, add a little cake mix on the bottom, put in a peanut butter ball, then top with enough cake mix to cover. Bake as directed on the box. The frosting is a
Peanut Butter Buttercream
(I know, the calories in this...I can't even think about them!)3/4 cup butter, room temperature1/2 cup shortening1 teaspoon vanilla1/2 cup creamy peanut butter1/4 to 1/2 cup heavy cream (I used half-and-half)4-5 cups confectionary sugar Blend all in the mixer, whipping on high speed until fluffy. Add more or less cream and confectionary sugar to get the consistency you want. Frost, top with a mini Reese's, and eat!
 These are the ones I made for my husband's company (along with some Kiss cookies).
Then I made these fun Santa cupcakes. It's a basic yellow cake cupcake (from my trusty Betty Crocker), topped with white buttercream (what I did was double the above recipe for buttercream, but left out the peanut butter. Frosted the Santa ones first, then mixed in the PB and frosted the Peanut Butter Surprise Cupcakes).
 The legs are Twizzlers, cut in thirds. Dip in frosting, then top with black frosting boots. I sprinkled the cupcakes with white sparkles. Easy and cute!! Follow me on Pinterest, or let me know if you're a foodie like me and I'll follow you! Also, look for info soon about a new book! I'm off to have cupcakes and milk! :-) Shirley
December 3, 2012
Welcome Vicki Bateman and Not Your Grandma's Fruit Cake recipe!
 Today, I'm thrilled to have Vicki Bateman on my blog, along with her recipe for Not Your Grandma's Fruit Cake (this one sounds so yummy, I'm going to have to try it for sure! I mean, how can you go wrong dipping ANYTHING in chocolate?) Welcome, Vicki!
She's also got a Christmas release, Twinkle Lights, out now!
Recipe: It Ain't Your Grandma's Fruit Cake
Fruit cake is maligned. And I'm here to make it delectable for everyone (and they won't even know it is fruitcake).
A good fruit cake (I use Collin Street Bakery)
Wilton Dark Cocoa Candy Melts
Wax paper
Drying rack
Cut the cake into bite-sized chunks. (Be sure to occasionally clean your knife).
In a microwavable bowl, pour in candy melts. Prepare according to directions.
Set cooling rack on top of sheet of waxed paper. Take a chunk of cake and dip into melted cocoa. Be sure all sides are coated.
Once cake is covered in cocoa, set on rack for cocoa to solidfy.
When cocoa is hardened, remove from rack and store in airtight container. Set in fridge. Will keep for a while.
Makes a lot of treats. Don't tell your guests what it is. They think they're eating an exotic dessert.
Look for her book at any major etailer, and also find out more about Vicki at: Website: http://vickibatman.blogspot.com
Facebook: http://www.facebook.com/pages/Vicki-Batman-sassy-writer-of-sexy-and-funny-fiction/133506590074451?ref=hl
Twitter: https://twitter.com/vickibatman
Pinterest: http://pinterest.com/vickibatman
Goodreads: http://www.goodreads.com/author/show/4814608.Vicki_Batman
Author Central: http://www.amazon.com/Vicki-Batman/e/B005AY5ZN8/ref=sr_tc_2_0?qid=1343929464&sr=1-2-ent
Thanks for visiting, Vicki!
Shirley

November 16, 2012
Alton Brown's Brining Recipe
If you google Alton Brown and brining, you get a few different results that aren't this one. I don't like the one he has on Good Eats as much as I do this one, from I'm Just Here for the Food. This one has yet to let me down :-) I've added a few adaptations to it, based on other brines I've used:
1 1/2 cups kosher salt
1/2 cup dark brown sugar
10-14 peppercorns (whole)
2-4 whole bay leaves
1 6-ounce container frozen OJ
1 gallon water
1 16-18 pound turkey
1 gallon ice cubes
canola oil
Dissolve the salt, sugar, and juice in 1 quart of hot water. Cool with the remaining 3 quarts of water. Remove the guts and stuff from inside the turkey and put it in the brining bag or container. Cover with the liquid. If it doesn't completely cover the bird, add more liquid (he uses chicken broth). Cover wtih ice and soak for at least 5-6 hours.
Alton dries off the bird, rubs it down with canola oil, then starts cooking the bird on high (500) then after a half hour, turns it down to 350 degrees. I've found that works pretty well. He covers the breast with a tent of foil, removes it at the end to get a little browning.
I highly recommend brining if you've never tried it before. Easy and quick, and the most tender bird ever!
Shirley
November 15, 2012
The Thanksgiving Plan
This has been my Thanksgiving plan for four years in a row, so I thought I'd rerun the tips. I have changed this slightly--in that I bought the brining bags at the store instead of using a pail (Farberware makes them and they were in the aisle with the roasters and kitchen twine, etc.). I have had success every time I use this recipe. Buying a fresh bird makes life ten times easier, but I have in a pinch defrosted a frozen bird and then brined it.
(and as an aside, for those of you who are friends with me on Facebook, on Monday I posted a link to my blog and a friend who is a professional chef shared his tips for brining, so check that out!)
Thanksgiving was a HUGE success in my house. Brining the bird was DA BOMB and I highly recommend it. I mean, HIGHLY recommend it. I have never had a juicier, more delicious turkey--it was beyond simple to cook, and twelve people devoured nearly an entire 21-pound bird. Lots of going back for seconds and thirds that day!
Take notes if you want for next year, because here's how I did it (and managed to have a LOT of relaxation time on the big day, too):
Wednesday Night: Brine the Bird (in the fridge by 8pm)
Equipment needed: 5-gallon pail from Lowe's or Home Depot
Alton Brown's recipe for Brining from I'm Just Here for the Food
(which involves essentially cooking some water, brown sugar, peppercorns, bay leaves and kosher salt, then cooling and adding to the bucket).
Plus: 3 gallons ice water and 1 1/2 cups kosher salt
Thursday Timeline:
7:00 a.m.: Remove bird from Brining Liquid
Preheat oven
Dry bird, stuff with an onion, celery sticks. Brush whole bird with melted butter, then tent with foil, stick a meat thermometer in it, then put the bird in the oven.
8:00 a.m.: Cook sausage for stuffing, chop vegetables for stuffing (celery, carrots and onions), then cook when sausage is done. Add dried cranberries, leave to cool and set aside
8:15 a.m.: Peel 8 pounds of potatoes and start boiling them for mashed potatoes
8:45 a.m.: Start simple syrup for kids' Floating Island Punch
Put Frozen raspberries, pink lemonade and sugar in bowl to thaw for Poinsettia Punch for grownups :-)
9:30 a.m.: Mash potatoes and put in crock-pot--done till 11:15 a.m. (take a nap, read the ads for Black Friday shopping...I do all my house cleaning on Wednesday, so I'm chilling for these two hours)
11:30 a.m.: remove foil tent from turkey, baste with more butter and turn oven temp up to 425 degrees
Start green beans (I made a healthy version, which I can post later)
Start Citrus-Glazed Carrots
12:15 p.m.: Assemble stuffing
12:30 p.m.: Remove turkey from oven and let set
Put rolls in oven
Put stuffing in oven
Make gravy
1:00 p.m.: Serve and eat ;-)
My MIL made the pies, and I had baked cookies on Wednesday night, so all the rest was done ahead of time. I usually make the pies a day or two ahead of time, but this time someone else did them, so I was saved that chore. This turkey was SO SO good, though. I just can't even tell you ;-)
How was your Thanksgiving? Was it a huge success? I do dishes as I go, and run the dishwasher about halfway through so that everyone can eat on real plates. Clean-up is still a lot of work, but it's not AS bad as it could be.
And if you want to read about my Black Friday adventures, I posted on RTB today about them!
Shirley
October 12, 2012
FREE! This weekend only!
 THE GROOM WANTED SECONDS
a Sweet and Savory Romance PrequelA limited time offer--you can get THE GROOM WANTED SECONDS for FREE! Pop on over to Amazon and grab this deal before it's gone! And FYI for those in the UK, it's free there too! Here's the UK link!
About the book:
Nothing like a little breakup to remind a man why he loves a woman and what an idiot he’s been. After a clunky marriage proposal, Rebecca Wilson breaks up with Jeremy Hamilton, an engineer lacking a romance chromosome. She goes away for the summer and thinks she has found true love. When she returns with a broken heart, Jeremy seizes the opportunity to convince her to give him a second chance.
But it isn’t until he brings out his wild and fun side that Jeremy sees a dim flicker of hope for a future with Rebecca. His determination drives Rebecca to break into her secret cookie stash, hoping Thin Mints can make her forget Mr. Wrong. She’s already been burned twice before—is she ready to take a second chance on love?
The Sweet and Savory Romances will make you laugh, cry, and rev up your appetite with their hunky heroes. As a special addition, satiate your hunger—for food that is— with tried-and-true recipes written by the characters inside. Look for the other books in the series, too: THE BRIDE WORE CHOCOLATE, THE DEVIL SERVED DESIRE and THE ANGEL TASTED TEMPTATION. Available for your favorite eReader!Show More Show Less

October 10, 2012
Easiest Crock-Pot Roast Beef Ever
 I love an easy recipe. Even better, one that requires almost no effort on my part, yet still gets rave reviews from my family. This roast beef fit the bill on all levels.
 Easiest Crock-Pot Roast Beef Ever
1 chuck roast, 3-4 pounds
1 package Italian dressing mix
1 package Brown gravy mix
1 package Ranch dressing mix
1/2 cup water
2 tablespoons corn starch
1/4 cup cold water
Put the roast in the crock-pot (browning beforehand is optional). Mix the three mixes and the 1/2 cup water, then pour over the roast. Cook on low for 6-8 hours or on high for 4 hours. When done, remove the roast and put on a cutting board, allowing it to rest before slicing. Meanwhile, mix the corn starch and cold water in a bowl, then add to the gravy in the crock-pot. Turn crock-pot to High and stir, until gravy thickens.
This was so tender, you could cut it with a fork. The gravy was AWESOME and definitely made the beef way more flavorful. Easy and quick, my favorite kind of cooking!
Shirley

October 9, 2012
A Behind the Scenes Peek at a Trilogy
 Last year, two of my author friends and I pitched and sold a trilogy to Harlequin. It was so much fun to work with Donna Alward and Fiona Harper, and to create three sisters who had a troubled past. We set the story in a fictional town in Massachusetts, and created three strong heroes for these amazing sisters. Read all about how this worked on this thread on eHarlequin, and pick up the first book, Snowbound in the Earl's Castle, in stores now! Look for Donna Alward's story, Sleigh Ride with the Rancher at the end of the month. My story (the third one) will be out at the end of November--Mistletoe Kisses with the Billionaire.
Read our thread here, and add your comments or questions for any one of us, or the group!
Shirley

October 8, 2012
Perfect for Fall's Chill: Oven Baked Beef Stew
 There's just something about fall that has me in the kitchen, cooking. I love the smells of things in the oven, love hunkering down with my loved ones and enjoying a dish I've made myself. This oven-baked Beef Stew is one of my all-time favorites and one of those things I crave as soon as the temperatures dip. I've made it a couple dozen times (which is a miracle in my house, because I'm always trying something new!).
Oven-Baked Beef Stew
1 pound round steak, cut into 1-inch cubes2-3 cups red wine (I use a Shiraz, or a Merlot, something we would normally drink; enough to marinate the beef)
1 tablespoon olive oil
1 teaspoon garlic, minced
3 large potatoes, peeled and cut into 1-inch cubes
1/2 pound carrots, chopped
2 small onions, chopped
1/4 cup butter
1/4 cup flour
2 cups red wine (same wine; but NOT the wine in the marinade; I basically dump the rest of the bottle in)
3 cups chicken stock
2 tablespoons tomato paste
1/2 cup cold water
3 tablespoons corn starch
Marinate the beef in a zip-lock bag for 1 to 3 hours, depending on when you remember to start this ;-). Remove from marinade, then heat olive oil and cook beef until browned. Remove from pan. Cook garlic and vegetables until browned, remove from pan. Melt butter, add flour and make a roux (the base for a sauce, if you don't know what this is, you can go here for the basics). Add the wine gradually, stirring with a whisk. Then the chicken stock and tomato paste. Put the beef, vegetables and liquid into an oven-safe Dutch Oven or other large pot/pan and bake at 375 for two hours (you can also put this in the Crock-pot).
Just before you're ready to serve, you can thicken the stew. I like a really thick stew, so I mix the water and the corn starch, then stir this into the hot stew. It makes it nice and thick, really yummy . I serve it with biscuits and that's enough for a mega meal. Okay, this is totally not Weight Watchers friendly but when it's 25 below outside, I really don't care ;-) Enjoy! Shirley

Eating My Words

Recipes, musings and writing advice from Shirley Jump
- Shirley Jump's profile
- 741 followers

