
Jessica Merchant's Blog, page 422
January 14, 2016
Palomas with Salty Chili Sugar.
I’ve got the citrus itch.

Only way to scratch it is with grapefruit and tequila. Maybe some lime and salt.
Kind of sounds like a margarita? It’s not! It almost is. But there are bubbles. Seltzery, soda-y bubbles. And homemade syrup of the citrusy variety. I’ve been trying not to drink it (… the syrup) all week.
Grapefruit, lime, bubbles and tequila are a thing and come together in a beautiful shade of pink to make these short days happier. Well, and probably shorter. But that’s okay.

It all starts with salty sugar. Is that a real life concoction? It is now because I’m making it one. I mixed… salt and sugar. To get salty sugar.
Life altering, I know.
But! I also added some chipotle chili powder. A touch of heat. It will blow your mind. And maybe chap your lips, so grab some Burt’s Bees and let’s do this.

I could take a spoon to an entire grapefruit (or three) and be thrilled as pie. Is that a taste buds thing? An acquired taste thing? A similar thing to my love for all things briney, vinegary and pickled? I’ve always loved it so maybe I was born with it.
And noooo I don’t want to count how many times I’ve used the word “thing” in this post. Just let me cover my eyes and run away.

SO.
This is ridiculously light and refreshing. It’s just FRESH, a la Kristen Wiig in Bridesmaids when she enters Helen’s compound for the bridal shower. If you even knew how many times a week I use the line “ah that’s fresh” you would disown me as an invisible internet friend. Even worse is the amount of times I want to use it but don’t.
The good news is that BECAUSE it’s so fresh and light, it should fit into your January resolution plan (does it look like this?) without much fright.
The bad news is that it’s still January. Good TV hasn’t even started yet! Are you dying? I’m dying.

Tell me: were you a diehard thirsty Thursday partier in college (and maybe beyond)? While I ALWAYS believed that the weekend started on Thursday (and still do, oops), I was more of a let’s-eat-some-oreos-while-cuddled-in-bed-and-watch-Grey’s thirsty Thursday-er.
Snoozefest. This is why I’m elderly.

Oh oh! Grapefruit is pretty good for us, right? Right. Let’s just consider this our morning juice… but around 5PM. I’ll justify it for you so don’t even worry.


Palomas with Salty Chili Sugar
Yield: makes one serving, is easily multiplied
Total Time: 15 minutes
Ingredients:
2 ounces grapefruit juice
2 ounces silver tequila
1 ounce lime juice
1 ounce grapefruit lime syrup
2 to 3 ounces club soda (or even a lime flavored seltzer)
grapefruit slices or lime wedges for ganish
crushed ice
grapefruit lime syrup
1/2 cup freshly squeezed grapefruit juice
1/4 cup freshly squeezed lime juice
1/4 cup water
1 cup sugar
salty chili sugar
3 tablespoons sugar
1/4 teaspoon salt
1/4 teaspoon chipotle chili powder
Directions:
Rim your glass with a lime or grapefruit wedge and dip in the salty sugar mixture to coat. Fill the glass halfway with crushed ice. Add the grapefruit juice, tequila, lime juice and syrup, stirring well with a mixer or long spoon. Pour the soda over top and garnish with a lime or grapefruit wedge. Serve!
grapefruit lime syrup
Heat the grapefruit juice, lime juice, water and sugar in a saucepan over medium heat. Whisk until the sugar dissolves and bring the mixture to a boil. Turn off the heat and let it cool to room temperature. It will become slightly syrupy. This stays great in the fridge for a few days.
salty chili sugar
Combine sugar, salt and chili powder on a plate and stir well to combine before dipping each glass.

(so fresh. I can’t help it!)


January 13, 2016
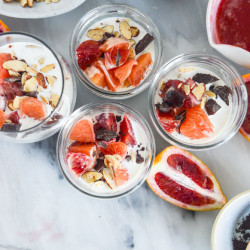
Creamy Winter Vanilla Bean Chia Pudding with Blood Orange Syrup and Dark Chocolate.
I’m a sucker for winter white, whether it is sweaters, suede skirts, hot chocolate or breakfast.

This is how we do it.
(But really no, I have a whole pinterest board dedicated to winter white. Whaaat.)
I assume that I’m drawn to winter white because of the gorgeous off-white, creamy shade that it lends and most likely, sticks out on the gloomiest and dark days of winter – but I thought it would be a passing trend for me, much like silk shirts in my 2nd grade school picture paired with paisley vests. And MC Hammer pants.
That is so not the case though, and my love for the gorgeous shade has hung on much like my 1989 Uncle Jesse crush.
Don’t think I’ll go as far as a winter white paisley vest though, so there’s hope.

You know it’s bad when I’m obnoxiously calling my food a shade of “winter white.” Yessss.

I’m a huuuuuge chia seed pudding person, especially in the winter months. And here’s why: I’m a wimp and don’t enjoy drinking freezing cold smoothies when it’s freezing cold outside. Chia pudding has a lot of the components that I put in my smoothies (coconut milk, yogurt, chia (duh!)), and then I can top it with whatever fruit I have. Or even a jam, or something like cinnamon apples or chocolate or sprinkles because inside I will always be a 13 year old girl.
Plus, if I have this for breakfast and then I seem to warm up throughout the day, say around 2 or 3PM when all I really want is a cupcake, a mocha, a mocha cupcake and a handful of salt and vinegar chips, I can use the smoothie then. It’s just not as bam-ice-cold-in-your-face after you’ve been awake for eight hours.

If you need a little more proof that I’m chia crazy:
vanilla bean chia pudding with mango, dark chocolate and mint!
coconut cream pie chia pudding, because we do what we want.
whipped (!!!) double chocolate chia seed pudding, in case crunchy pops freak you out.
It’s a problem.

ALSO. I’ve made a bunch of blood orange cocktails on the site (sangria, margaritas, bourbon smash) and I’m here to tell you that it is probably a wise idea to make a double –or, hey – a triple – batch of this syrup. You can have a drizzle for breakfast in the morning and a mojito prepped in minutes for cocktail hour. It lasts for a few days in the fridge, it tastes phenomenal, and it’s hot pink. So you know, life made.

This is my current favorite chia pudding combo – which, yes, of course is almost always changing. Because 1. we tend to eat seasonally here and 2. I get bored out of my mind constantly and always need something NEW.
Here goes:
Vanilla chia pudding made with – get this – vanilla powder. Oh yes. It’s my current favorite thing for a quick vanilla hit. Also works in coffee. Also ridiculous.
Blood orange syrup, which we covered the importance of above. See importance of: cocktails.
Toasted sliced almonds! Trader Joe’s ones are my fave.
High-quality dark chocolate. Or milk! Whatever you want. Chopped so there are big pieces and little ones too. It’s key.
Citrus. Blood oranges chunks but also, my love of the month, cara cara oranges. So lovely. And pink.
We can do this, right?

Creamy Winter Vanilla Bean Chia Pudding
Yield: makes 4 to 6 servings
Ingredients:
1 1/2 cups milk (I like to use coconut milk)
3/4 cups plain greek yogurt
1/3 cup chia seeds
1 tablespoon honey
2 teaspoons vanilla bean powder
1 pinch of salt
1 blood orange, segmented and chopped
1 cara cara orange, segmented and chopped
2 ounces dark chocolate, chopped
1/3 cup toasted almonds
blood orange syrup
1/2 cup blood orange juice
3/4 cup sugar
Directions:
In a large bowl, whisk together the milk, yogurt, chia seeds, honey, vanilla bean powder and salt until combined. Cover the bowl with plastic wrap and place it in the fridge to chill and thicken, for about 2 hours or even overnight.
When you're ready to eat the pudding, spoon it into 4 or 6 glasses or jars of your choice.
I like to top mine with a touch of coconut milk, then a drizzle of the blood orange syrup. Add on some orange segments, chopped dark chocolate and toasted almonds. Eat up!
To make the blood orange syrup, place the orange juice and sugar in a saucepan over medium heat. Whisk constantly and bring it to a bubble. Let cool for 1 to 2 minutes, then turn off the heat and let it sit until it cools. Store in the fridge for a few days in a sealed jar.

Now if only my mornings could include Uncle Jesse making coffee.
January 12, 2016


Tuesday Things.
1. I totally called it. The holidays ended and we are getting tons of snow. I 100% love it right now but in, like, two weeks, I’m hoping for tropical weather. I’m also 32 seconds away from buying Max a snowsuit. Also, P.S. this cupcake. You will freak. Finally, P.P.S. I call this Ugg weather, and they won’t leave my feet as long as I’m in the house.
2. Shutterbean meal prep might be my new favorite thing. She has the BEST ideas.
3. Eddie’s been stealing all of my recipe ingredients (by accident) since he drinks green smoothies now. Yes, he is STILL drinking green smoothies every morning! But then he ends up using all the bananas I need and today he took the spinach I needed to work with him. Do I need to start labeling my food with a sharpie?!
4. In the middle of the night I had a serious revelation that I am a grown up. It just FELT like I was an adult. Yeah, nevermind that I own a home, birthed a child and do laundry regularly – that didn’t make me feel grown up. Today for some reason, I do.
5. Please tell me you watched the Tatum lip sync battle. I adore them.
6. Golden Globes!! What did you think? Did you die over Leo? Did you think it was the best he ever looked? Did you cry when he hugged Kate? Did you wail I’LL NEVER LET GO!? Did you pause your screen and rewind 30 times when he flinched at Gaga? I thought Kate Winslet looked incredible, I love Taraji’s white dress (!!!), Brie Larson, J Law, J Lo – also faves. But I know nothing. Your thoughts?
7. The newest Gwen Stefani line for Urban Decay is robbing my wallet. It’s the worst (best).
8. UM. AND >>> newest Oh Joy for Target? Don’t even get me started.
9. Are you still resolutioning like a champ? I’m killing it in the bullet journal arena and I love doing the journaling prompts, though I’ve missed a few days. I also ate a donut which means nothing, except that most people probably do-nut eat donuts on Jan 5.
10. Whoa whoa. This green caesar mocktail!! I need it in my life. I’m thinking tomorrow. Nothing to do with the donuts.
January 11, 2016
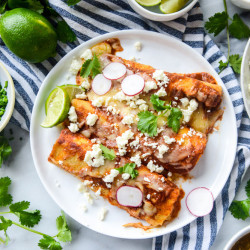
Cheese Enchiladas of my Dreams.
A surefire way to fail at your resolutions is to give up cheese.

Or visit my blog?
The jury is still out.

Wait wait – how fabulously delicious does that slather of homemade enchilada sauce look? If you haven’t made it at home yet, you are missing out bigtime. It takes ten minutes and you have to promise pinky swear cross your heart that you will try it this week. Magic happens.

But really, cheese is probably the one thing I can’t go without.
I can do no sugar. I sort of want to die the first three days, but I can do it. The cravings subside and fruit does the trick in a pinch. I can do no bread. I’ve never been a bread girl and I can easily do no pasta for the same reason. But.
I absolutely
cannot
say not to my beloved cheese.
Even if I only have the teeniest bit of goat cheese or feta on my scrambled eggs or in a salad or on a sweet potato – or a sprinkle of parmesan on, well, anything, it makes my whole dang day. I live for it.
This is not that. This would not be classified under “a little bit of cheese.” Not even close! We’re gonna make it work though.

Because even though I (allcaps) love cheese, cheese enchialdas are one thing that I rarely order a whole plate of because I just feel like it can be… too.much.cheese… ?
I know. Jaws just dropped. If I think something has too much cheese, the world must ending.
But they just don’t seem substantial enough for a whole MEAL, you know? I like to order a few different kinds of tacos and then maybe a side of one cheese enchilada. Just one. Because it’s so oooey and gooey, the cheese is ridiculously melty and it’s just enough when you have some carnitas or chicken or piles of nachos. I know you feel me.
It’s not even just the richness – it’s the flavor and texture that other options allow in the meal too. Give me 45 plates of small bites and let’s call it a day, to be honest.

So! Making cheese enchiladas at home? Total game changer. You can make an entire dish and serve them throughout the week. Have one with a salad (of course), one with your breakfast, one with some avocado toast, I mean – do whatever you want. And! You can pile them high with veggies and toppings. Sure, my “veggies and toppings” might consist of chives, cilantro and radish but I’m also the person who considers a margarita to have a serving of fruit.
Also, I love using the smaller tortillas for these so the portions are tinier since they are so super rich. It makes a whole bunch and you can have enchiladas out the wazoo for days.
Which frankly, isn’t a problem in my eyes.

Can we make a deal? You do enchiladas this week and maybe I’ll lighten up on the cheese. At least for one meal. Or one snack. Or cocktail hour. Or when I’m sleeping.

Cheese Enchiladas with Homemade Sauce
Yield: serves 4
Total Time: 1 hour
Ingredients:
12 ounces queso chihuahua cheese, freshly grated
8 ounces sharp white cheddar cheese, freshly grated
12 to 14 corn tortillas (4-inch size)
for serving: cilantro, salsa, salsa verde, sliced radish, queso fresco, lime wedges, sour cream
enchilada sauce
2 tablespoons olive oil
2 tablespoons flour
1 1/2 cups low-sodium chicken stock15 ounces tomato sauce
2 tablespoons tomato paste
2 tablespoons chili powder
1 teaspoon cumin
1 teaspoon onion powder
1/2 teaspoon garlic powder
1/4 teaspoon smoked paprika
1/8 teaspoon cayenne pepper
1/4 teaspoon salt
1/4 teaspoon pepper
Directions:
Preheat the oven to 375 degrees F. Start by making the enchilada sauce below. Spray a 9x13 inch baking dish with nonstick spray. Take about 1/2 cup of enchilada sauce and spread it on the bottom of the dish. Take a large plate and add 1/3 cup of enchilada sauce on it.
Take each tortilla and dip it into the enchilada sauce on the plate. Fill it with a handful of the cheeses (I mix mine together). Roll up the tortilla and place it in the dish - I like to do two rolls of 6 or 7. Repeat with remaining tortillas. Cover the tortillas with the sauce that is left and then sprinkle with the remaining cheese. Bake for 20 minutes, or until the cheese is bubbly and melty. Serve immediately with your desired toppings.
enchilada sauce
Heat a large saucepan over medium heat and add the olive oil. Whisk in the flour and cook until it is golden brown, about 2 minutes. Add the remaining ingredients and whisk together, bringing the mixture to a simmer. Reduce the heat to low and cook for 5 more minutes before using.

I’m ’bout to make a cheese enchilada pillow fort.
January 10, 2016
Weekend Snaps.


[shadyside strolling, mocha at coffee tree roasters, lunch at gaucho, blood orange margaritas, peace love little donuts]
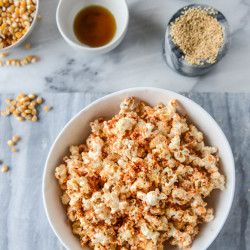
Brown Sugar Sriracha Sesame Popcorn.
New year, new snacks.

Over the last year, Eddie and I have become serial popcorn eaters. It’s weird, because neither of us cared for popcorn much in previous years – however I didn’t hate going to the movies and doing some damage on that disgustingly wonderful buttered bag of emotions.
Pumps of butter, what?!

It’s always been a staple because my dad would make it every week (on the stovetop with only salt) when I was growing up. But it wasn’t until last year around this time, probably when I accidentally on purpose ended up eating popcorn for dinner, that it became a snacky habit.
So. Our go-to nightly popcorn is popped on the stove in coconut oil and covered with this black truffle sesame salt that we are obsessive over. Ridiculously good.
But if we have some time, i.e. it’s the weekend – I love making homemade seasonings and toppings. I even bought Eddie a popcorn seasoning set for Christmas, with mostly selfish reasons that I could taste and learn how to recreate the flavors at home. Millennial moves?

Tonight, I’m planning on making no short of three popcorns while we watch the Golden Globes because 1. I’m a crazy person but also because 2. it is my favorite thing at the moment and isn’t even covered in chocolate. Which is a massive win.
I’m not even much of a heat lover and this has become my new DREAM popcorn. It has everything I want when it comes to snacktime: a hint of sweetness, a touch of heat and toasty, nutty flavor. You make your own homemade microwave (!yes!) popcorn and drizzle it with a flavorbomb mixture. Then cover it in sesame seeds. Then eat the whole bowl.
Sounds like the best plan to me.

Brown Sugar Sriracha Sesame Popcorn
Yield: serves 2 appropriately, 1 obnoxiously
Total Time: 5 minutes
Ingredients:
1/3 cup corn kernels
1 tablespoon coconut oil, melted
2 tablespoons brown sugar
2 tablespoons sriracha
1 tablespoon unsalted butter
2 tablespoons toasted sesame seeds
1 tablespoon toasted sesame oil
Directions:
Combine the kernels and coconut oil and place them in a brown paper bag. Fold the top down a few times so it's secure, then microwave for 2 minutes to 2.5 minutes, or until the kernels are popped. Open the bag and pour the kernels in a large bowl to cool slightly.
In a bowl, whisk together the sugar, sriracha and butter. Place in the microwave for 20 seconds, then remove and whisk well to combine. Drizzle the mixture over the popcorn in layers - I like to drizzle, then toss well, drizzle, then toss well, until all the sriracha is used and the popcorn is coated. Sprinkle the sesame seeds on and drizzle the toasted sesame oil with one more toss. Serve!

fave.
January 9, 2016
Currently Crushing On.

{via}
The first crushing on of 2016! I promise not to fill it with kale. I think.
And the first full week is O.VER. Thank goodness. It was a long one, no? How is your life and emotional headspace and everything in between?
What will your weekend be like? I’m filling mine with blood oranges, blood orange syrup and everything that comes along with that like margaritas. And some meal prep on sunday! Just an hour. No more than an hour. It’s a miserable time suck any other way. And then the Golden Globes! I’m so super excited. Make some champagne caramels, trust me.
Let’s talk about how much I am LOVING this post from designlovefest on blogging like it’s 2009. Nearly everything she says in that post I agree with and is why I wrote my resolutions out last week – wanting to get more personal and back to the reason I started doing this thang. You know? Yeah.
Also, tell me if you’ve watched Making a Murderer and if you are still reeling, because I still am.
and then more goods:
the best huevos rancheros i ever did see.
seven books that will change your life. i’ve read some, but adding the rest to my list!
my resolution: make these nutella stuffed brown butter blondies.
my second resolution: make these resolution cookies. they have EVERYTHING.
on wednesday night i made a version of this slow cooker pork and gnocchi and it was SO fab.
holy cow. white russian ice cream what what.
this matcha smoothie is what my dreams are made of. that green!
reallllly trying to do this imperfect 365 (err, 366) project. so far, so good.
almost raw crunchy caramel slice? i’ll do it.
pretty sure i just said this week i was over cookies but here’s a third: . i can’t.
January 8, 2016
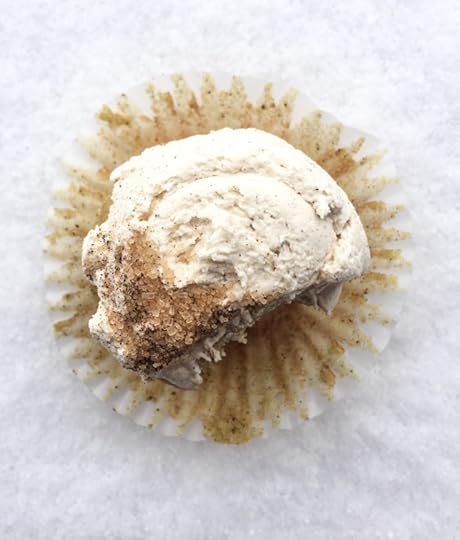
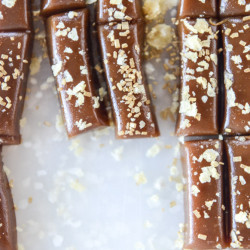
Potato Chip Salted Champagne Caramels.
Many exclamation points were harmed in the making of this post.

Champagne caramels! Caramels made with champagne!
These are essentially salted caramels, just salted with… crushed potato chips. !!!!!!
I mean.

I’m declaring these the best snack you can make for a Sunday viewing of the Golden Globes. It happens to be my favorite awards show of the season being the premium cable TV junkie that I am and I love a good fashion gossip session. (sesh? ew.)
AND I am absolutely loving this snack/dessert idea for the Globes because here’s the thing: we are only one week past the holiday season and I do not need nor do I want a cheesecake, cookies, cupcakes, ice cream or anything that I can eat more than one bite of easily. You know? I’ve had ENOUGH. Enough I said.
While the caramels are certainly rich (oh hi butter, sugar, cream), they are perfectly portioned for a sweet little bite. A decadent teeny taste. Plus, champagne.

So I was PETRIFIED of making caramels. I’ve wanted to make them for years, but really ever since I met Peabody in the fall of 2014 and she gave me a batch of apple cider caramels. I still dream about them. They were out of this world.
Being that I 1. don’t enjoy following instructions of any kind and 2. find it difficult to boil sugar for any length of time with a little snuggle nugget at my feet, I figured it would be impossible for me to make these.
However!
You guys.
They are easy. Pretty darn easy. Yes, you need a candy thermometer but last year at some point I picked one up at my grocery store in a huff, so they aren’t that difficult to find. Also, amazon prime, hello lover.

The only thing is that you have to keep your eyes on the caramel and only on the caramel. Do not pass go. Do not collect two hundred dollars. Do not watch Fuller House trailers. Do not dip a spoonful of chocolate chips into the peanut butter jar. Do not make a cheese quesadilla. Do not watch youtube beauty videos. Do not search an instagram hashtag.
Just watch the caramel.
Use your favorite champagne!
It doesn’t have to be fancy. Whatever you like to drink. Or whatever you have leftover from the holidays. (Wait, what’s that?)
And then, pop back in Sunday morning because I have an easy savory snack for your night of sitting on the couch!

Potato Chip Salted Champagne Caramels
Yield: makes about 40 (2-inch) caramels
Total Time: 1 hour (plus overnight setting)
Ingredients:
1 cup heavy cream
4 tablespoons unsalted butter
1/4 teaspoon salt
1/3 cup of your favorite champagne
1 1/2 cup white granulated sugar
1/4 cup corn syrup
1/2 teaspoon vanilla extract
1 cup kettle cooked potato chips, crushed into crumbs
metallic sprinkles
parchment paper for wrapping
Directions:
Line an 8x8 baking dish with parchment paper and spray it lightly with nonstick spray.
Place the butter and cream in a saucepan and heat until the butter melts and the mixture is warm. Remove it from the heat.
In a large saucepan, stir together the champagne, sugar and corn syrup over medium heat until it's combined - the mixture will be thick. Fit the pot with a candy thermometer. Do not stir - bring the mixture to a boil and let it cook until it reaches a golden and caramely color - about 275-300 degrees F. You can let it go as high as 320 degrees F, but no higher. Turn off the heat under the sugar and very slowly pour in the cream and butter mixture while whisking. The mixture will bubble up and triple in size. Return it to the heat, and heat until it's about 240-250 degrees F. Turn the heat off. Gently stir in the vanilla extract.
Pour the caramel into the lined baking dish and tap the pan on the counter a few times to remove any bubbles. Let it sit overnight (or even just 4 to 6 hours) - I loosely covered mine with a piece of foil. While the caramel sets, cut some parchment paper into squares - the amount you need will depend on the size and shape of your caramels.
When ready to cut, lift the caramel square out by the parchment paper on the sides. You can cover it with sprinkles and chip crumbs first, but I like to cut mine and then cover. Make them whatever size or shape you want! I like the longer caramels - so I sliced long pieces from the 8x8 square and then cut each piece into fours. You can very lightly spray your knife with nonstick spray since these caramels are chewy. Sprinkle with metallic sprinkles and potato chips, gently pressing to adhere if needed. Wrap each caramel in a piece of parchment paper and twist the ends. Serve with champagne!
[caramel recipe from the kitchn]

this chew is love.
January 7, 2016
Homemade Coconut Lattes.
I don’t know who I think I am right now.

A pretend barista or something?
Most of my caffeinated orders are things that would make a true barista cry, like extra caramel this and lots of mocha that and one pump of vanilla in absolutely everything I order always and forever.
No really, forever.
Plus, this all started at home with the nutella lattes. Not my fault. Those are my number one favorite, by the way. Doooo it.

These pretty little lattes are a surefire way to start a huge fight between Eddie and me. Yes, you might remember that there was a very long period of time of when I wrote this blog and hated coffee.
I mean, really hated it. But I wanted to like it! I wanted to be cool!
So now I like it. Am I cool? So not even close.
However, I have always loved coffee ice cream and coffee sugar bomb drinks and stuff. I’ve also always loved the scent of coffee brewing, I think because it’s a nostalgic scent from my childhood. Like when my parents would be brewing coffee in the morning before school or something.
Such a feel good scent.
WELL.
When I say that Eddie despises coffee, I mean he D.E.S.P.I.S.E.S. coffee. Like off the chart loathes. I really think he was banking on me leaving coffee in the dust after all those attempts at loving it.
But then I started to enjoy it. And then I had a baby who (still) nevereverevereverevereverever sleeps everever and actually found myself needing it. I hate that, but it’s true. I need the caffeine! I never wanted to be that person and now I’m totally that person.

So Eddie just begs me not to make a cup of coffee when he’s standing in the kitchen. That’s how much he dislikes the scent. This past summer when we went on vacation, I thought he was going to have an absolute meltdown in the car when my mom and I both grabbed coffees and trapped him in the car oven.
And I determined that he has such a horrible distaste for it (and the scent!) because he’s worked in a corporate office setting for twenty years now and that just screams bottom burnt coffee pots. Am I right?
I feel his pain. That exact terrible scent is theeee worst.
But anyhoo.
Coconut lattes. Not with coconut milk (though you totally can use coconut milk!) but with some homemade coconut syrup. Oooooh eeeeeh ahhhhh.
This coconut syrup is my new dreamboat lover.
Almost two years ago (how?!) I shared four of my favorite coffee syrups but coconut didn’t make the cut. Now that I have a solid flavor recipe that I enjoy, it’s at the top of my list. You just have to be careful because with one tablespoon you can go from coconut coffee to what tastes like you maybe poured half a cup of Malibu rum into your coffee.
Which isn’t always a terrible thing, but you know what I mean.
That tropical coconutty flavor? You want JUST enough so it’s light coconut with a hint of vanilla and coffee.
Plus steamed milk and foam and then toasted coconut and coconut sugar annnnnd maybe some of these chocolate covered coconut flakes I found.
I’m calling it my winter drink of choice and you should too!


Homemade Coconut Lattes
Yield: makes 1, is easily multiplied
Total Time: 15 minutes
Ingredients:
coconut syrup
1/2 cup coconut sugar
1/4 cup coconut milk
1/4 cup water
1/2 teaspoon coconut extract
to make one coconut latte
1 shot espresso
1 to 2 tablespoons coconut syrup
4 to 6 steamed milk with foam
coconut sugar for sprinkling
toasted coconut for topping
Directions:
To make the coconut syrup, combine the water, coconut milk and coconut sugar in a saucepan over medium heat. Whisk constantly until the sugar dissolves and bring the mixture to a bubble. Turn off the heat and allow to cool completely. Transfer to a jar and store in the fridge.
To make the latte, brew one (or two!) shots of espresso. Whisk in 1 to 2 tablespoons of the coconut syrup (totally depends on how sweet you'd like it, how much coconut flavor you want) and pour in the steamed milk. Cover with a sprinkling of coconut sugar and toasted coconut.

Seriously the biggest faceplant.
Jessica Merchant's Blog

- Jessica Merchant's profile
- 53 followers

