
Jessica Merchant's Blog, page 419
February 12, 2016
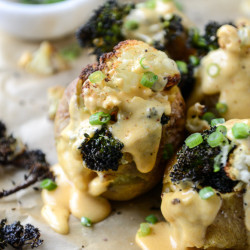
Roasted Cauliflower Broccoli Stuffed Potatoes with Cheesy Butternut Sauce.
Whyyyy do I do this.

Just when I’m really getting in the groove of eating vegetables by themselves, without covered in something fabulous, probably how they should be, I throw it back and cover them in CHEESE SAUCE.
But at least it’s adult cheese sauce. And by adult cheese sauce I don’t mean vodka cheese sauce, though that doesn’t sound terrible. (does it? whomp.)
I mean butternut cheese sauce! Technically, I put another vegetable inside of my cheese sauce so I’m eating vegetables on vegetables.
In other words, brilliance?

Potatoes were my absolute FAVORITE food when I was growing up. Favorite, I tell ya. If you asked me what my favorite food was, I’d say scalloped potatoes, baked potatoes, mashed potatoes – even my mom’s cheesy potato chip topped potato casserole. POTATOES gave me all the feels.

It was a rare occasion that we ate fast food when I was a kid, but my brothers and I were desperately obsessed with the idea of happy meals. Apparently I have always been a marketer’s dream?
We had fast food maaaaybe if my mom was going out with her card club friends (who never play cards) or if my grandpa took us after school one day, but it was only a handful of times a year. I obviously see the good in that NOW, but back then it was a special kind of torture.
There was a hot minute when I had the biggest fascination with the Wendy’s baked potatoes. Do they even still have them? After dance class I would beg my mom to get me a broccoli cheese potato, but I’d remove all of the broccoli because it was broccoli. And I’d just eat the cheesy potato.
I was the worst.

But I figured out the solution. They should have been ROASTING(!!) their broccoli. Because then I probably would have eaten it.
Obviously.

Let’s talk about the sauce. Cheesy and melty, made with butternut squash and actual cheese. I’ve done this before in butternut mac and cheese recipes. But I know that most butternut cheese sauces you can find on the good old internets are vegan versions made with nutritional yeast. I will be the first to say how much I LOVE nutritional yeast – it really is super cheesy and is the only thing I put on my kale chips. However.
I was sold on making cheese sauce with freshly grated cheese. And my favorite squash. It’s been a minute since I’ve made anything with squash (typical after a full blow obsession, as usual. obsessed > forget about for four months > repeat.) and it’s still so abundant in my grocery store that I should be taking advantage.
So I am!

Over the years I have detailed my love for meatless meals when Eddie is away. Three years ago those meatless meals were very much centered on wine and cheese but today, it’s not just me that I have to feed.
With that, I’m absolutely wacky over this meal. I had one of these potatoes with my favorite house salad for dinner a few nights last week and it was so satisfying – not to mention incredible comfort food. And it was so much better than the drive thru potato my highlights-reading, tap-dancing twelve year old self wanted back in the day. Super glad I discovered that now.

Roasted Cauliflower Broccoli Stuffed Potatoes with Cheesy Butternut Sauce
Yield: makes 6 potatoes, is easily multiplied
Ingredients:
6 yukon gold or butter potatoes
4 tablespoons olive oil
1 teaspoon salt
1 teaspoon pepper
1/2 teaspoon garlic powder
2 cups cauliflower florets
2 cups broccoli florets
4 green onions, thinly sliced
cheesy butternut sauce
2 cups cubed butternut squash
½ teaspoon salt
½ teaspoon pepper
2 garlic cloves, minced
¾ cup whole milk
12 ounces sharp cheddar cheese, freshly grated
1 ½ tablespoons cornstarch
Directions:
Preheat the oven to 425 degrees F. Poke holes in all of the potatoes with a fork. Brush the potatoes with 2 tablespoons of olive oil and sprinkle with 1/2 teaspoon each of salt and pepper. Place them on a baking sheet.
On another baking sheet, place the cauliflower and broccoli. Toss it with the remaining olive oil, salt and pepper. Sprinkle with the garlic powder.
Roast both the potatoes and the veggies for about 20 to 25 minutes. Check the veggies - they might be done (totally depends on how roasted you like yours. I like mine VERY roasted.) Roast the potatoes for 15 to 20 minutes more, until fork tender.
Remove the potatoes and cut them down the center. To serve, spoon some of the cheese sauce into the potato, then top with the cauliflower and broccoli. Pour more of the cheese sauce on top and sprinkle with scallions. Top with some freshly cracked black pepper or crushed red pepper. Serve immediately.
cheesy butternut sauce
Heat a large skillet over medium heat and add the squash cubes. Add 1/4 cup of water, cover the skillet and cook, stirring occasionally, until the squash is fork tender and soft enough to be pureed. Sprinkle it with salt and pepper. Transfer it to a blender or a food processor, add the garlic and blend until totally smooth.
Heat a saucepan over medium heat and add the milk. Cook until the milk is warm and bubbles appear around the edges, then whisk in the pureed squash. Heat again until warm, just a few minutes. Toss the grated cheese with the cornstarch until the cheese shreds are coated. Reduce the heat until the milk to low add in small handfuls of cheese, stirring until completely melted. Repeat with remaining cheese. Have patience! Stir in very small amounts of cheese slowly so it melts evenly and doesn't get gritty and separate. If it does become too thick, whisk in a few teaspoons of milk.

Bacon next time. For sure.


February 11, 2016
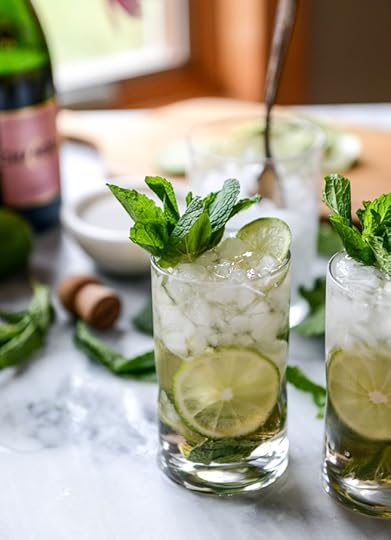
Rosé Champagne Mojitos. (with champagne syrup!)
My Thursday is unreasonably thirsty.

So let’s do something about it. Something pink, naturally.
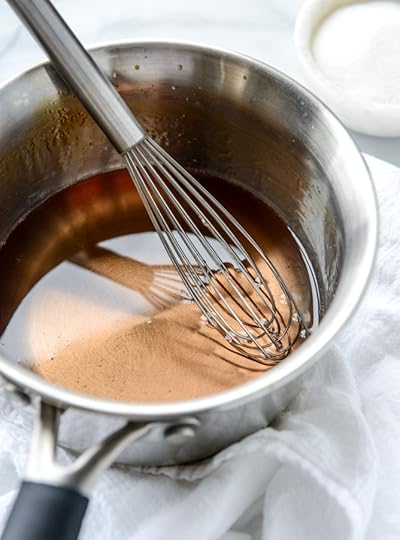
Can we talk about this syrup?!
I am in severe lust. Why I haven’t made a champagne syrup before, I have no idea. I’ve clearly missed out on tons of possible cocktails.
Must make up that time. Must make it up.

And that’s the thing! While I chose to make mojitos, yes because I love them but mostly because I’ve more recently made a margarita and sangria, you can use this syrup for everything. Any kind of cocktail or drink – and I sort of also want to pour it over sponge cake.
If it’s wrong, I don’t want to be right.

It’s kind of difficult to tell in these photos, but the drinks have the slightest hint of blush color – they are so pretty! Definitely can brighten up these winter months, but will be even more fun come Spring and wedding season and Easter and well, Wednesday night in three weeks or so.
Basically whenever.

You can use whatever champagne you’d like, but I would recommend one that isn’t super sweet. It’s replacing the bubbly selzter/soda in the mojito – something that isn’t so sweet, you know?
But use what you love. If you use a sweeter one, just play with the rum and lime juice and syrup. And maybe make a double?

Luckily, I had no problem finding fresh mint at my grocery store at the moment, even in the dead of winter. Thanks 2016 universe. If you can’t find it, perhaps go the margarita route. I will say that these are making me so super excited for warmer weather and sunshine. Tons of it.
Speaking of sunshine, remember when I mentioned that I lost my favorite sunglasses earlier this week?
WELL. It’s a whole long mess but I accidentally (definitely not on purpose this time) ordered FOUR pairs because my brain is a trainwreck so come this weekend, I will have four pairs of the exact same sunglasses showing up at my door. I swear I did not drink five champagne mojitos before online shopping. Thank goodness for return policies.
And champagne mojitos after returns!
Oh and the best part is that this morning? I found my lost sunglasses. So there’s that. Winning?
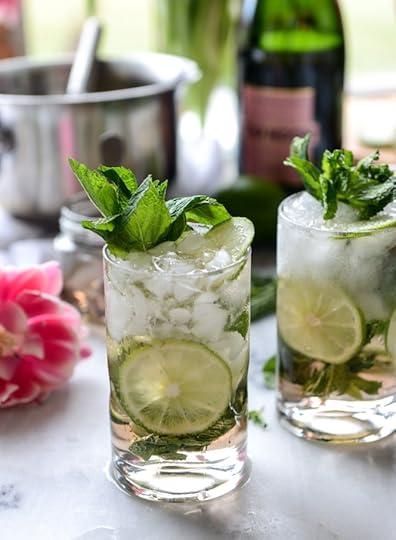

Rosé Champagne Mojitos
Yield: makes one serving, but is easily multiplied!
Total Time: 30 minutes
Ingredients:
6 to 8 fresh mint leaves
2 1/2 ounces of champagne syrup
1 ounces freshly squeezed lime juice
1 ounce white rum
2 ounces rosé champange
1 lime, cut into wedges
champagne syrup
1 cup rosé champagne
1 1/4 cups sugar
Directions:
In the bottom of a glass, add 1 ounce of the syrup and the mint leaves. Muddle with a muddler or use the clean bottom of something blunt, like a screwdriver! Add ice to the glass, some lime wedges or slices, and pour rum, remaining syrup, lime juice and champagne over top. Mix with a long spoon or knife and serve with an additional big sprig of mint.
champagne syrup
Combine the champagne and sugar in a saucepan over medium heat. Bring to a boil while whisking constantly until the sugar dissolves. Turn off the heat and let the mixture cool to room temperature, it will thicken slightly. You can store this in the fridge for a few weeks!

P.S. let’s make some popcorn.
February 10, 2016
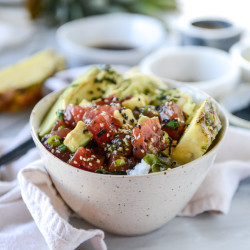
Ahi Poke Bowls with Pineapple and Avocado.
Hello dreamboat.

My current favorite thing, right here. It’s right up there! I want to faceplant into that bowl and resurface in four months when it’s sunny and hot outside. And preferably, I’ll be swimsuit ready.

This recipe is doing double duty today.
First, Valentine’s Day! This is the simplest and lightest meal that you can make for your loved one. Or WITH your loved one, if the idea doesn’t make you roll your eyes ten thousand times in the kitchen. (not I… not I.)
Second, when Lent rolls around I tend to share a few of the seafood recipes we are loving, mostly salmon. Even though there are quite a few tilapia recipes on my site, we haven’t eaten tilapia in probably over a year – but use those recipes I have for some other flakier, white fish. I was almost ready to share a new salmon recipe this week then I’m like NO. No no no no no no.
Get out of the box! I have a million salmon recipes here. We eat it often, but I wanted to share something else that we’ve been loving and eating at home. And it’s different. And shockingly, EASY!
Because you don’t have to cook it.
Okay, don’t freak out.

Funny story. The first time I ate actual sashimi was with Eddie. I don’t know if it was one of our first dates or in this limbo period where we were just talking but not necessarily dating – since a majority of this readership consists of millennials, tell me something. When you met your significant other for the first time, did you do one of the text-all-day things? When Eddie and I first exchanged numbers, we texted nonstop for days. In fact, for a few of those days I was on the west coast and three hours behind him – and I still remember texting him at 1AM pacific standard time, so 4AM eastern standard time. These days I can barely get him to stay awake until 10PM to watch a movie with me, whomp whomp.
Anyhoo – we did that texting thing a bunch before actually dating. I know, I said it was a millennial thing.
So on one of our real first dates, we ate sushi! I had eaten rolls before, but I don’t think I’d had pieces of raw fish, straight up, until that moment.
(I realize that there has never been a time when “funny story” is just a figure of speech as much as RIGHT NOW.)

And then.
Something terrible happened.
Eddie got the flu. But he got the flu a day after we ate sushi. I know you know where this is going.
It wasn’t the sushi that did it, he was truly sick. But since then, the thought of anything sushi related turns his stomach. It’s the WORST. For me, of course. That’s what this is all about, right?
But I get it. Earlier this year, on the day that I made this recipe, I got mastitis. I’ve never been so sick in my life and while that pasta was incredibly delicious, I can’t even look at the photos.
Universe, why did it have to happen with sushi though?

Luckily (for me, again), a year or two ago we ordered seared ahi tuna while out and Eddie actually ate it and loved it. LOVED it! I think it was the whole “seared” thing that sold him.
So with the promise of rice and a few other ingredients (and let’s face it: tortilla chips), I convinced him to taste this delicious tuna and fall back in love. At least for the time being. And he did just that, so much so that we ate it again for the Super Bowl Sunday night. Lots of tortilla chips involved in that sitch.

Let’s talk bowls!
The base is rice – whatever rice you want. I made sticky rice from short grain white rice I found at a local Asian grocery store but it was a bit of a process. You can use whatever you have on hand and most importantly, whatever you love! Making the rice is probably the most time consuming part of this entire recipe.
You want lots of flavor for the tuna, and I wildly adore toasted sesame oil. Mix some delicious ingredients together and toss the tuna in the mess for tons of flavor. Add some thinly sliced scallions and sesame seeds and you’re good to go! If you want to skip the rice, you can scoop it all up with tortilla chips.
YES.
BRB, need a chip.

Totally optional but incredible: adding chopped avocado and pineapple. Add those right before serving or eating. I like to do cucumber half moons and some seaweed salad if I have it. The easiest thing for me is to buy a seaweed salad packet and follow the directions, which usually just include rehydrating the seaweed and tossing it with some things you have on hand like the toasted sesame oil, soy sauce and rice vinegar. SO GOOD.
If you’ve never had a poke bowl or get freaked out at the idea of preparing this yourself, seriously – go buy the tortilla chips. Or even better: make them yourself. And scoop up every last bit of love!

Ahi Poke Bowls with Pineapple and Avocado
Yield: serves 4
Total Time: 20 minutes
Ingredients:
1 pound sushi-grade ahi tuna, cut into cubes
1/4 cup low-sodium soy sauce
3 tablespoons toasted sesame oil
1 tablespoon rice vinegar
1 teaspoon toasted sesame seeds
1 teaspoon black sesame seeds
1/2 teaspoon freshly grated ginger
1 garlic clove, freshly grated
4 green scallions, thinly sliced
2 avocados, 1 cubed and 1 sliced
2/3 cup cubed pineapple
1 seedless cucumber, cut into half moons
your favorite rice for serving, about 1 cup per bowl
seaweed salad, if desired for the bowl
tortilla chips for serving
Directions:
Place the tuna in a large bowl. In a smaller bowl, whisk together the soy sauce, oil, vinegar, sesame seeds, ginger and garlic. Pour over the tuna and toss to coat. Stir in the green onion. Cover the bowl with plastic wrap and place it in the fridge to chill for 10 minutes.
Right before serving, stir in the cubed avocado and the pineapple.
To make the bowls, place 1 cup of rice in the bowl. Cover with a handful of cucumbers (I like to toss mine in toasted sesame oil), seaweed salad (see post above for my tips, I buy a packaged one and follow the directions) extra sliced avocado and a big scoop of the tuna and marinade. Top with extra sesame seeds. This is wonderful eaten with tortilla chips!

i love you THISMUCH.
February 9, 2016
Tuesday Things.

1. My mom made this old school chocolate whipped cream frosted cake over the weekend and it was ridiculously good. Like so ridiculously good that I think it was demolished in 24 hours.
2. Question of the day: how badly can I crave this peanut butter and jelly cookie tart?
3. My ultimate mom fail so far: came home on Saturday night and realized I’d been wearing two different earrings the entire night. Both studs, but one was easily triple the size of the other. HOW?!
4. Do you have a favorite pair of headphones?? Or I should say earbuds. I’m not looking for over-the-ear headphones (I have a pair of Beats) but ones that don’t kill the insides of my ears if I wear them for 30 minutes. Maybe I just have abnormally small ears.
5. Speaking of things that go on your face, I lost my most favorite pair of sunglasses ever ever. I’ve never lost sunglasses before and I know they have to be around here somewhere (unless I left them at lunch one day? WAH.) but it’s making me insane. I’m so boring that I might end up ordering the exact same pair, I love them so much. (< the wildfox catfarer deluxe. love!)
6. My super inspiring friend Nicole started a podcast and you can find my (what I’m sure is horrifically embarrassing) interview here! Listening to your own voice is a special kind of torture.
7. We just watched Billions last night and it’s easily becoming one of my favorite shows. Like The Affair and Homeland worthy. What did you think of this week’s episode? And Super Bowl halftime thoughts? I love Bruno Mars (like, love so much that I still often youtube his first halftime show which in my opinion, was the best EVER) and obviously love Beyonce, and really like Coldplay too… but was fairly underwhelmed? And we all know that I’m one of those people that always loves everything. Worst critic ever. I did love all the neon though. Of course.
8. Always so inspired by Tracy’s weekly meal prep. It’s so REAL and legit.
9. Are you eating anything exceptional for Fat Tuesday? I totally forgot that it was Fat Tuesday until, well, right now! What should I make?!
February 8, 2016
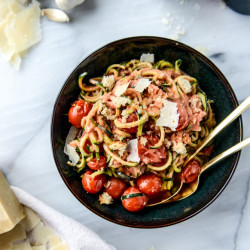
Zucchini Noodles with Cherry Tomato Garlic Cream Sauce and Breadcrumbs.
I’m making you dinner in 30 minutes!

It’s that simple. So easy. And it will be on the table pronto, so open up that bottle of wine.

Late as usual, but I’m really getting into zoodles. FINALLY. I’m psyched too, because it’s been an easy way for me to incorporate more vegetables. One of the keys to making sure that I actually EAT them is trying to add in something at each meal. Ugh. I don’t love it. And I find myself doing a mushroom egg scramble in the morning and maybe having tomatoes with avocado toast at lunch, and before I know it, I’m making charred corn for dinner and have totally flaked on anything GREEN.
I wish my greenery could be more intentional but… it isn’t. So I’m doing this! I’ve been making some zucchini noodles once or twice a week and incorporating them into our meals. Even if we still use regular noodles, I’ve tossed some zucchini ones in there too. For good measure. We are L.O.V.I.N.G. it.
At least I say we are loving it. I’m loving it. I don’t even know if Eddie has noticed. Typical.

Also, um I need to tell you about this sauce that I used. A few weeks ago I walked into DeLallo to buy a humiliating quantity of cheese and I found these cans of cherry tomato sauce. There are whole cherry tomatoes in the sauce and I just think it is completely adorable. Obviously, this exact type or brand of sauce isn’t necessary for this recipe, but it’s where those plump little red rounds come from. You can mimic the look with whole cherry tomatoes from the grocery store, tossed in your sauce, if you’re into cute things.
But really, all you need is your favorite tomato sauce, cream and garlic cloves out the wahzoo.

There is LOTS of garlic in here so if you’re not into that, you might want to adjust to your kissing preferences.
You can also find: copious amounts of parmesan cheese. Along with garlic butter breadcrumbs, which I am finding have become a signature topping of mine for pretty much everything over the last five years. This bowl is crunchy, creamy and cheesy. The three C’s of deliciousness and the needs of texture freaks everywhere.

I didn’t even realize until I was finishing this dish that it could end up… PINK. I haven’t made a tomato cream sauce in ages and I forgot what a lovely shade the end result turns to. Also, I guess this could be a super perfect holiday meal since it’s green and red and pink but…
I’m liking it a little better for Valentine’s day. A healthy Valentine’s day, of course! All cheese and cream is canceled out by the vegetable. Just how it works.

Zucchini Noodles with Cherry Tomato Garlic Cream Sauce
Yield: serves 2 to 4
Total Time: 30 minutes
Ingredients:
4 medium zucchini squash, spiralized into spaghetti-like noodles
1 tablespoon olive oil
1 tablespoon butter
1 shallot, thinly sliced
5 garlic cloves, minced
1/2 teaspoon dried basil
1/4 teaspoon crushed red pepper flakes
28 ounces tomato sauce with whole tomatoes (mine were cherry!)
1/3 cup half and half or heavy cream
2 tablespoons finely grated parmesan cheese
freshly shaved parmesan cheese
garlic butter breadcrumbs
2 tablespoons unsalted butter
1 tablespoon olive oil
1 cup torn crusty bread pieces
1/4 teaspoon garlic powder
1/8 teaspoon salt
Directions:
Heat a large skillet over medium-low heat and add the olive oil and butter. Add the shallots and a pinch of salt. Cook until softened, stirring occasionally, about 5 minutes. Stir in the garlic, basil and red pepper. Cook for 1 minute. Add in the tomato sauce and stir. Cover and simmer for 10 minutes.
Stir in the cream or half +half, along with the grated parmesan cheese. Add the zucchini noodles to the skillet and take your time thoroughly tossing them in the sauce. Cover and let simmer for 10 more minutes. Top with the breadcrumbs, freshly shaved parmesan and serve.
garlic butter breadcrumbs
Add the butter and olive oil to the saucepan. Once melted, add bread pieces and stir well to coat and combine. Sprinkle with garlic powder and salt. Stir constantly over medium-low heat until the crumbs are golden and toasty.

all those veggies = extra cake for dessert too.
February 7, 2016
Vanilla Bean Chocolate Cake.
Here’s the big question.

Are you a chocolate or vanilla person?

I just can’t decide. Annoyingly, as usual.
Which shouldn’t come as a shock to those of you that know me, an indecisive food lover, occasionally flashing my flakey dessert options.
The thing is, like most of desserts or indulgences, it totally depends on my mood. I love chocolate AND vanilla ice cream, but has my day been wonderful or terrible? If we’re being completely honest then most of you know that I will go for the seriously trashed up version (how many desserts can I shove inside a dessert?) but chocolate or vanilla as the base? That is the question.

I’ve always been the same way with cake, but I’d say that nine times out of ten, a fudgy chocolate version wins. For instance, if my mom was making me a birthday cake? I’d probably ask for fudgy chocolate. I might also ask for “yellow” cake with chocolate fudge frosting but let’s not split hairs here.

It’s no secret that baking cakes – actual layer cakes – is not my cup of tea due to extreme lack of patience in the cake cooling, crumb coating and frosting departments. But I was determined to make a cake for Eddie this past week after he had been traveling, because he loves COLD refrigerated cake and frosting. Absolutely loves it.
Even if he is desperately craving a piece of cake, he has to stick it in the fridge (or maybe the freezer, if the craving is so severe) before he eats it. Cold cake is the only way to go. With his side of diet Coke, of course. Why is that a thing?!

Plus, even if I don’t like BAKING cakes, I like EATING cakes. It’s a win-win either way – but there might be a tantrum or two in the middle.

Last summer I experienced the wonderful Rodelle vanilla products in this no churn ice cream (and subsequent peanut butter chocolate chip cookie dough blizzard, thank you very much) and it has been the only vanilla bean paste I’ve been using ever since. I LOVE me some vanilla bean paste. Also, this reserve vanilla is pretty much the best thing that’s stashed in my kitchen right now, and I have fight Eddie every time he tries to put it in his oatmeal. I’m like – you don’t need this liquid gold in your OATMEAL.
So, this year, I’m partnering with Rodelle to bring you some out-of-this-world chocolate and vanilla recipes over the course of 2016. I’m already hungry.

Sidenote, this is how messy the frosted cake looks before you smooth it out. It’s actually quite simple. Stick that frosting on and then smooth it out with an offset spatula. If you have perfectionist cake frosting tendencies, yours will even end up looking thirty times better.

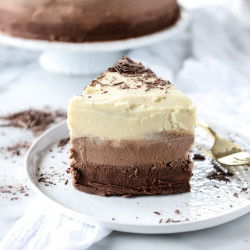
Bake to my favorite vanilla beans though – can you see the little flecks in the frosting?! Eeep. That makes me ridiculously happy.
Not only is the cake inside super chocolately and laced with vanilla bean – it’s covered in three buttercream frostings. It’s slightly high maintenance, but not as bad as you may think. If I can do it, you can totally do it. TRUST ME.
We have vanilla bean frosting – a chocolate cocoa frosting – and then a richer, fudgy dark chocolate frosting. Your valentine deserves it!
Even if your valentine is yourself.

Two frostings in the center, quick mini chocolate curls on top, lots of delicious feelings baked inside: it’s one little rich slice of love.

Vanilla Bean Chocolate Cake
Yield: makes one 9-inch layer cake
Total Time: 2 hours
Ingredients:
1 3/4 cups all-purpose flour
3/4 cup Rodelle dutch process cocoa
1 1/2 teaspoons baking powder
1 1/2 teaspoons baking soda
1/4 teaspoon salt
2 large eggs, lightly beaten
1 1/2 cups sugar
1/2 cup vegetable oil
1 tablespoon Rodelle vanilla paste
1 teaspoon Rodelle vanilla extract
1 cup hot brewed coffee
vanilla bean and cocoa frosting
1 cup unsalted butter, at room temperature
4 to 4 1/2 cups powdered sugar
1 tablespoon Rodelle vanilla paste
1 teaspoon Rodelle vanilla extract
1 tablespoon whole milk, if needed
3 tablespoons Rodelle dutch process cocoa
1 chocolate bar for curls, if desired
chocolate fudge frosting
5 ounces high quality chocolate, chopped
4 tablespoons unsalted butter
3 cups powdered sugar
3 tablespoons Rodelle dutch process cocoa
1 teaspoon Rodelle vanilla extract
1/3 cup milk
Directions:
Preheat the oven to 350 degrees F. Butter and flour two 9-inch cake pans. In a small bowl, whisk together the flour, cocoa, baking powder, soda and salt.
In the bowl of your electric mixer, beat the eggs, sugar and oil together until combined, mixing on medium speed for about 2 to 3 minutes. Stir in the vanilla extract and paste. With the mixer on low speed, stir in the dry ingredients, and once they are all added, increase the speed to medium-high. Beat the cake batter for another 2 to 3 minutes. Pour the hot coffee into the batter and stir by hand to incorporate it - it will seem a bit thin and water, but stir and fold the batter until it is combined. Pour the cake batter evenly into both pans. Place in the oven and bake for 30 to 35 minutes, or until the center is set. Let the cake cool almost completely (I wait about 25 minutes) before gently turning it out on parchment paper. This cake is super moist and soft, so be careful!
I like to wrap the cakes in plastic wrap once cool and refrigerate or freeze so they are easier to frost. I freeze them overnight. Then I make the frosting the next morning and go from there. To frost, remove the cakes and place a layer of the chocolate fudge frosting on one of the cakes. Top it with a big spoonful of the cocoa frosting and even it out with a spatula or spoon. Place the other cake layer on top.
For the multiple frostings on the outside, I start at the bottom and using a knife, place big scoops of the frosting onto the bottom of the cake, all around. I then do the same with the cocoa frosting. Finally, I do the same with the vanilla, place it on top and down the top edge. It looks messy! (See photo above.) Using an offset spatula or knife, start dragging it around the cake so all of the frosting smoothes out at once. I do this multiple times, using multiple spatulas (or just washing the one I have) until it looks smooth enough to my liking. It's supposed to look messy and like the colors are run together.
If desired, finish it off by topping with some chocolate curls. To do this, I simply stick a chocolate bar in the freezer for an hour or so, then use a vegetable peeler to "peel" some curls.
vanilla bean and cocoa frosting
Add the butter to the bowl of an electric mixer and beat on high speed until creamy. With the mixer on low speed, slowly add in the sugar. Beat until the sugar is incorporated and add vanilla paste and extract. Scrape down the sides of the bowl if needed. Beat the frosting on high speed for 3 to 4 minutes until fluffy and creamy. If the frosting seems too thick, beat in the tablespoon of milk for 1 to 2 minutes until combined. Once you have your vanilla frosting, remove half of it and place in a bowl.
Add the cocoa to the remaining frosting and beat until combined, scraping down the sides.
chocolate fudge frosting
Melt the butter and chopped chocolate together in the microwave - I do 30 seconds on medium power (once or twice), stirring each time, until melted. Place the chocolate in the bowl of your electric mixer. Add 2 cups of powdered sugar and the cocoa and mix on low speed. Stream in the milk and add the remaining powdered sugar, making sure to scrape down the sides of the bowl. Beat the frosting on medium speed until it comes together - it might take a few minutes until it is creamy and frosting-like. Beat in the vanilla, continuing to scrap down the sides and bottom of the mixer. If the frosting appears too thin, add in a bit more powdered sugar 1/4 cup at a time. If it's too thick, add in a bit of milk, 1 tablespoon at a time.
[cake slightly adapted from allrecipes]

My heart is in that bite.
[this post is brought to you by Rodelle, who I’m partnering with in 2016 to make all sorts of delicious dessert! as always, I only work with products that I 100% love and use in my own kitchen. thank you for your support!]
February 6, 2016
Currently Crushing On.

{via}
What up weekend! I have never been oh-so glad to see you. It was a looooong week. How was yours? I must know the answer to this question: are you making something for the super bowl, and what the heck is it?
If you need a tip: here’s a video of how I make my 30 minute buffalo chicken french breads. It’s like buffalo chicken dip… on toast! And if you still need another tip, you can find my bacon goat cheese guac and homemade queso cheese dip with chorizo over on the pioneer woman this week!
Going to see how much weekend I can get into right now, but first, faves:
guys, these best ever paleo chocolate chip cookies? oh my gosh. they are SO good. I’ve made them twice this week. we aren’t paleo, but these are so easy and delish. no mixer needed! one bowl!
this is exactly the way to my heart… pizza cookies.
not sure i’ve ever craved anything like i am craving this market street clam chowder. those pictures!
love this post gina did on meal planning for breakfasts and lunches and snacks – $60 for the whole week.
holy cow, these roasted grapefruit margaritas with smoked sea salt are insane.
so fun: famous besties + couples memory game. love.
taco pull apart bread: YES GIMME.
how cute are these hazelnut macarons? adorable.
is it possible to make anything more wonderful than charred feta with homemade pita?
forbidden rice breakfast porridge is on the menu next week!
dying over buffalo fried chicken sandwiches.
continuing to fuel my obsession with meyer lemon polenta cake.
the best chicken fajitas, right here.
gluten free copycat tagalong cookies? i want all the chocolate and peanut butter things.
February 5, 2016
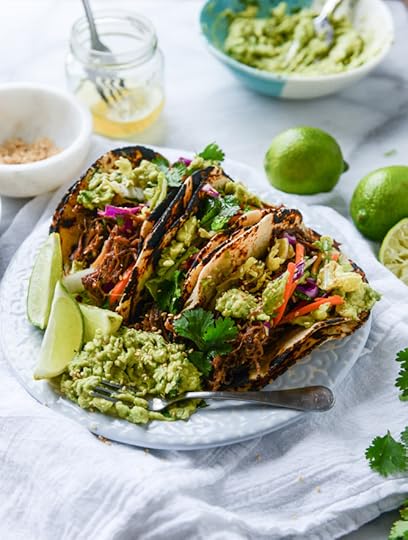
Sweet and Spicy Short Rib Tacos with Sesame Guacamole.
Imagine if you lived in a house built of tacos.

How long would it take you to eat your way to the outside? I’m guessing for myself… four days.
Guess what? It’s been far too long since we’ve talked about tacos. Only two months plus two days… but still. Too long.

Ugh, what a sight. Dinner in a slow cooker, right there, ready to go! Short ribs are a little high maintenance because I always sear every side of each, but it’s worth it. Super worth it.
I had stopped using my slow cooker for awhile because everything tasted like “slow cooker.” It all tasted like how your house smells when something has sat in the slow cooker for eight hours. I’ve mentioned this a million times and a bunch of you agree that it’s a thing, but since having a kid I’ve been breaking it out once every two weeks or so. I seriously forgot how wonderful it was to throw dinner together in the morning and just have it DONE.
Makes me feel like I’m winning at life and stuff.
(Spoiler alert: I’m not.)

ALSO!
Toasted sesame guacamole. Wowza. It’s so delicious and yes, the idea freaked me out a little bit. But we know I’m not one to stray from trashing up guac. The flavors here in this mashed avocado compliment the tacos beautifully. It just seems… right. It WORKS.

So, you know, I love bacon. Obviously. It’s no secret. But it’s not like I eat slices of bacon everyday of my life, and in the grand scheme of things if bacon didn’t exist, sometimes I think I wouldn’t miss eating meat if I quit it.
And then, I think about pulled pork. And chicken cheesesteaks. And that stupid new Shake Shack chicken sandwich that is blowing up my instagram and that I’m dying to try, but we don’t have a Shake Shack. And – short ribs, which are probably my favorite cut of beef. My favorites have to be the worst for you, of course. So rich and comforting and taste best when you’re eating all the feels. I absolutely looooooove short ribs.

These ones were inspired from the sweet and spicy pork shoulder I made in anticipation for New Year’s Day. The flavor profile leads to SUCH a versatile meal plan. Yes, we’re going to eat tacos here (together! yes please!) with a vinegary slaw and guac, but if you make a pot of the short ribs, you can easily use them for sandwiches, put them on pizza, serve them over polenta or mashed potatoes, the works.
That’s my kind of meal.

I propose… your Super Bowl menu, right here! Pop these short ribs in the slow cooker early on Sunday morning. Let them go all day. Get your taco stuff ready and let’s do two drink options, because #millennials get bored quickly. I like the idea of a few blood orange bourbon smash(es?) and a tub of pineapple sangria. Okay, okay, a pitcher.
Also, butternut squash goat cheese dip! You seriously cannot go wrong. Maybe a cheese board instead, or to go along with.
A big salad, but keep it neutral enough so it doesn’t interfere with your tacos and slaw.
To throw it way, way (like, WAY) back, a peanut butter fudge brownie trifle, because it’s a delicious trashed up way to feed a crowd.
And lots of tortilla chips, so you can make a big plate of short rib nachos for a midnight snack. Let’s do it.

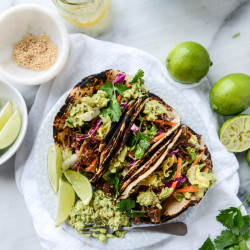
Slow Cooker Sweet and Spicy Short Rib Tacos with Sesame Guacamole
Yield: serves 4 to 6
Total Time: 10 hours
Ingredients:
10 to 12 beef short ribs
1 teaspoon salt
1 teaspoon pepper
3 tablespoons flour
2 tablespoons canola or vegetable oil
1/2 cup brown sugar
1/3 cup soy sauce
1/3 cup rice vinegar
1/4 cup chili garlic paste
4 garlic cloves, minced
corn tortillas for serving
napa cabbage slaw
1/2 napa cabbage, thinly sliced
1/4 red cabbage, thinly sliced
1/3 cup shredded carrots
1/2 cup cilantro, chopped
1/4 teaspoon salt
1/4 teaspoon pepper
2 limes, juiced
1 garlic clove, minced
1/2 tablespoons toasted sesame oil
1 tablespoon olive oil
1 tablespoon honey
2 tablespoons toasted sesame seeds
toasted sesame guacamole
3 avocados, chopped
1 lime, juiced
1 1/2 tablespoons toasted sesame oil
1/4 cup fresh cilantro, chopped
1 1/2 tablespoons toasted sesame seeds
1/4 teaspoon salt
1/4 teaspoon pepper
Directions:
Sprinkle the short ribs with the salt, pepper and flour. Heat a large skillet over medium-high heat and add the oil. Add the short ribs in batches and sear until golden brown on all sides. Place the short ribs in the slow cooker and repeat with remaining ribs.
In a bowl, whisk together the brown sugar, soy sauce, rice vinegar, chili garlic paste and garlic cloves. Pour mixture over the ribs. Set the slow cooker to low and cook for 8 to 12 hours.
Remove the ribs from the slow cooker (keep the juices!) and place them on a plate to cool so you can handle them comfortably. Once slightly cooler, pull the beef off the bone and remove and bits of fat if desired. Place all the shredded beef back into the slow cooker and into the juices. Set the crockpot back on low or warm and toss well. The ribs are ready to eat at this point, but I like to let them soak up the juice for about 30 minutes.
napa cabbage slaw
In a bowl, mix together the cabbage, carrots and cilantro. Season with salt and pepper. Whisk together the lime juice, garlic, sesame oil, olive oil and honey. Pour the dressing overtop and toss well, completely coating every bit. Let sit for 20 minutes before serving. Sprinkle with sesame seeds.
toasted sesame guacamole
Mash all ingredients together in a bowl before serving.
Now this is eating green.
February 4, 2016
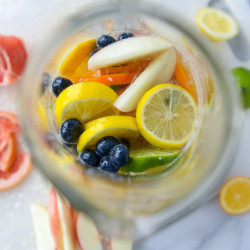
Meyer Lemon Shandy Sangria.
I’m passing you the pitcher!

Back in the day, like waaaay long ago – years – we would meet family friends at Pizza Hut one night during the week (proudly wearing our Book It pins, obviously) after I had a gymnastics session . Three things I remember from those dinners: personal pan pizzas (mine was always PLAIN because I had the palette of a seven year old since I was one), jars of crushed red pepper flakes (this was really my first encounter with them, and once I dumped them ALL over a slice of pizza and took a few bites – that went over well, I didn’t hate life at all) and pitchers of beer.

The pitchers of beer weren’t for our table (though with seven kids combined I have no idea why not) but as we’d walk to our seats, the pitchers were everywhere! A beer pitcher at every table, practically. I thought they were lemonade.
Hard day’s work + reward? Probably.
My next encounter with pitchers of beer wouldn’t be until college, and that went over exactly as you’d expect. Exactly.
Therefore I haven’t wanted a pitcher of beer in approximately ten years.

Until now!
Until I added fruit and lemon soda and juice and brandy and trashed it up until my heart was content.
Shandy sangria. Let’s make it a thing.

Since we’re already using lemonade soda, it’s probably not a must to use citrusy beer but I think it makes the drink so much better. I still had a few bottles of this grapefruit shady in my fridge (don’t ask me HOW) and while we’re all about the meyer lemons here at the moment, the grapefruit added the most fabulous extra kick. Super bright and fresh.

Plus, if you haven’t tried the grapefruit shandy, you haven’t lived. It’s is so fabulous. And, I mean, it’s grapefruit. So it’s healthy.
Also, you don’t NEED to use meyer lemons. We just so happen to be a few days away from the Super Bowl and meyer lemons are in season, but if you come across this sangria in, say, June and want to make a batch to take to the beach, use up some regular old lemons. I’d just taste and adjust the sweetness if needed since the meyers are slightly sweeter.

So, cheers? (Now please slide the pitcher back to me. k thanks.)

Meyer Lemon Shandy Sangria
Yield: serves 4
Total Time: 20 minutes
Ingredients:
3 (12-ounce) cold bottles citrus-y wheat beer (I adore leinenkugel sunset wheat or grapefruit shady)
1 1/2 cups cold lemon soda, like sanpellegrino limonata
1 cup cold ginger beer (or ale, it will be less spicy)
1/2 cup Grand Marnier
1/4 cup meyer lemon juice
2 meyer lemons, sliced
2 limes, sliced
1 orange, sliced
1 grapefruit, segmented
1 apple, sliced
1/2 cup blueberries
Directions:
All all of the fruit in the bottom of a large pitcher. Combine the ingredients together and stir gently. Pour the drink over extra fruit and ice. Unlike regular sangria, I don't let this sit overnight since we're using the beer and it's carbonated and fizzy. Also, as note, taste your sangria before serving. The sweetness level will depend on the beer you use along with the sweetness of your lemons!

this pour picture makes me happier than it should.
February 3, 2016
Meyer Lemon Scones with Raspberry Crumbs.
Any excuse to cover my food in pink crumbs?

Count me in.
I have a plan for you this Valentine’s Day: make yourself an adorable breakfast.

Scones are for the real pastry lover. The legit pastry lover.
You definitely play a game of scone roulette if you walk into a bakery and choose one as your treat because as we’ve discussed a handful of times before, you might be thisclose to getting a mouthful of dry, dusty crumbs.
Dry scones are the WORST.
These are not that! If you’ve been reading then you know that this recipe is my favorite, a serious go-to, and the recipe that turned me into a scone lover. They are almost biscuit-like, covered in crunchy sugar and stunning raspberry pieces. I love it when my food is cute.

Meyer lemons, oh how I love you so.
There is just something so… classy… about lemon recipes. To me, at least. And this says a lot considering for the last three days I’ve been obsessing over something cookies and cream recipe related. I just can’t figure out what unique thing that cookies and cream thing should be. Plus, cookies and cream is soooo 2010, so it has to be good. I’m right?
Give me your cookies and cream suggestions on this recipe that has nothing to do with cookies and cream please.

My adoration for lemon recipes has increased with age, but even when I didn’t want lemon treats, I always wanted MEYER lemon treats! So sweet instead of sour and perfect enough to actually eat an entire slice, I’ve put them on pizza and candied them for salads. The season is way too short and my heaven will consist of an always blooming meyer lemon tree.
If the entire slice freaks you out, leave it off! Throw it in a mimosa on the side instead.

I definitely feel an ingredient obsession coming on. And it’s not just ONE ingredient. It’s all this freeze dried fruit!
I 100% stole this idea from my friend Ashley. She made these cupcakes with freeze dried strawberries last year around this time (only I thought it was, like, two months ago, that’s how behind on brain time I am) and the idea has been in my head ever since. How fun! How delicious! HOW PRETTY AND PINK.
You know that’s the thing that really sold me. Pink forever and ever.
Also, in depressing news, freeze dried blueberries crumble into a beige mess. Not cool. Not blue. Definitely not pink.

As cloyingly charming as they look, there is good news: they taste just as wonderful. And not super sweet. The classic lemon raspberry combo is lovely and just begging for spring to show its sunny face. Yes you can make them for a friend or your love or your mom, but you totally should make them for yourself. You deserve it. And you’re cute!


Meyer Lemon Scones with Raspberry Crumbs
Yield: makes 8 to 10 scones
Total Time: 1 hour
Ingredients:
3 1/4 cups flour
1/3 cup granulated sugar + 2 tablespoons
2 1/2 teaspoons baking powder
1/2 teaspoon baking soda
1/2 teaspoon salt
3/4 cups cold butter, cut into pieces
1 cup buttermilk
2 teaspoons vanilla extract
4 meyer lemons, zested
2 meyer lemons, sliced as thin as you can
melted butter for brushing
coarse sugar for sprinkling
1/2 cup freeze dried raspberries
Directions:
Preheat the oven to 425 degrees F. In a small bowl, combine 1/3 cup sugar with about 1/2 of the grated orange zest. Rub together with your fingers until combined and fragrant.
In large bowl combine the flour, lemon sugar, salt, baking soda and powder. Using your fingers, a fork or a pastry blender, cut in butter until it forms coarse crumbs. Stir in the buttermilk and vanilla, and add the remaining lemon zest. Add the juice from 2 of the zested meyer lemons. Stir with a spoon until a dough forms, using your hands to bring it together. Turn onto a lightly floured surface and knead gently.
Divide the dough in half and pat each into 7-inch round circles. Combine the remaining sugar and orange zest. Brush each scone with melted butter and top with a lemon slice. Gently press on the slice so it sticks, then poke a few holes in the slice down into the dough. The slice needs to be reeeeeally thin so the dough under it bakes. Sprinkle with coarse sugar. Cut each round into 4 or 6 slices, or use a biscuit cutter to make rounds. Bake the scones for 14 to 16 minutes, until the tops are slightly golden. Be sure to check right under the lemon slice to see if the scone is fully baked.
While the scones are baking, crush the freeze dried raspberries into powdery crumbs.
Sprinkle the raspberry crumbs over the scones before serving.
[adapted from my blood orange scones]

Now if only I could cover broccoli in these pink crumbs.
Jessica Merchant's Blog

- Jessica Merchant's profile
- 53 followers

