
Jessica Merchant's Blog, page 380
January 26, 2017
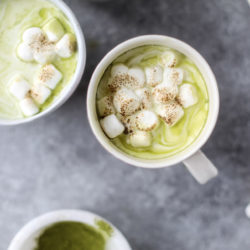
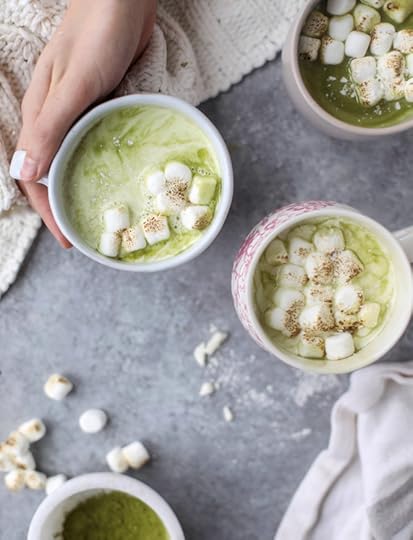
Matcha Honey Hot Chocolate with Toasted Marshmallows.
This might get me on the right track to consuming more green.

I feel like it’s inappropriate for me to even share a recipe containing matcha since I barely know how to pronounce it. I mean, I KNOW how to pronounce it. But I always want to pronounce it as “maaaaahtcha,” like “I need to light a match” instead of “m-awe-tcha,” like “oh this is so AWEsome.”
Sort of also like how I say keee-no-waah when I offer Eddie quinoa for dinner. It’s become such an annoying staple that I often forget the correct pronunciation.
Or! Or. I can’t help but say that I’m having an “ah-kai” bowl instead of “awe-sigh-eeee” bowl. When I’m making an acai bowl.
So really, should I even be allowed to share a matcha re?!

Here’s the thing. It took me awhile to get on the matcha bandwagon because I think that tea tastes like dirty water. Coffee also sort of tastes like dirty water, but if you add sugar and cream to coffee, it tastes like ice cream. If you add sugar and cream to tea, it tastes like sugary dirty water.
Fact.

The first time I had matcha, it was very much a combination of dirty water and green grass. I’m not sure if this green grass added something wonderful or terrible, but when I added sugar… I LIKED IT.
I actually liked it.

I’ve tried my hand at a few matcha desserts and while I never love it alone, I really enjoy it when it’s combined with chocolate, especially dark chocolate. I figured that whole thing might work with white chocolate too and this is where it took me.
And guess what?
The white chocolate is the BEST combination.

White chocolate isn’t even my favorite chocolate but it’s my favorite when combined with matcha. So creamy and sweet and herby in a good way.

And! This hot chocolate is made with coconut milk too. You could use all coconut milk if you’d like, but I used a mix of coconut and cow’s milk. It has that light hint of coconut and is just so flavorful that I can hardly stand it.

Want to know a secret? I am craving a big snow. I want a huge blizzard if only so we can cuddle on the couch and watch movies after playing in the snow and sled riding. I can’t believe that it’s the end of January and we haven’t really had one good snow yet, so I’m willing it to happen with multiple mugs of hot chocolate.
Even if most of the time my brain is thinking BEACH.
Matcha Honey Hot Chocolate
Yield: serves 4 to 6
Total Time: 15 minutes
Ingredients:
1 (14-ounce) can coconut milk
1 cup milk
2 tablespoons honey
16 ounces white chocolate, chopped
2 teaspoons ground matcha tea
1 teaspoon vanilla extract
1/4 teaspoon salt
mini marshmallows for serving, toasted if desired
Directions:
Combine the milks, honey, chocolate, matcha and salt together in a large saucepan and stir constantly until the chocolate is melted and the mixture is heated through. Turn off the heat and stir in the vanilla extract.
Serve immediately with toasted marshmallows.
Be sure to follow howsweeteats on instagram and tag your recipes with #howsweeteats! You can also post a photo of your recipe to the howsweeteats facebook page. I appreciate you so much!
Would an extra chocolate drizzle be too much?
The post Matcha Honey Hot Chocolate with Toasted Marshmallows. appeared first on How Sweet It Is.


January 25, 2017
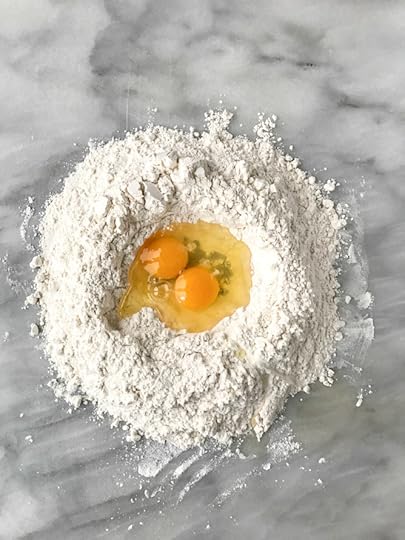
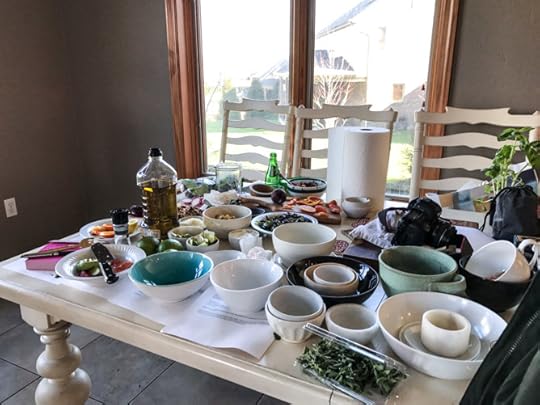
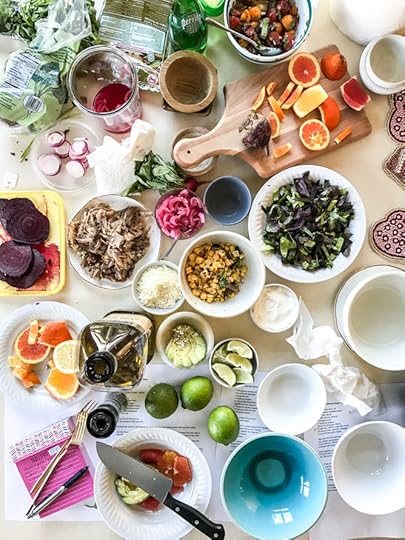
Behind the Book: Testing and Single Recipe Shots.
Annnd I’m here with my behind the scenes book post that I promised… with huge blocks of text. GUYS. I am so wildly wordy in this post. I’m giving you all the details!
I just wanted to document so much more of this process than I did last time, so here it is.
Not only am I loving the process more this time, it’s actually going smoother and I feel a lot more confident about that. I believe it’s due to three reasons:
I’ve done it before, so it’s not quite as intimidating
I have less time than I did before
I have lots of help
So.
Let me explain. The first one is obvious. I’ve been here before.
The second one? So my dad has always said “the more you have to do, the more you get done.” Even though I was working more than full time when I was writing the first book, I didn’t have a kid! I would seriously work all hours of the day, nonstop. I’d work 12 days at a time writing and shooting and testing, barely leaving my house like a recluse freak and sleeping a few hours a night just to recharge. I had no one else to take care of and Eddie was traveling a bunch at the time, so I had allllll the time in the world.
These days, I have Max so I find that I’m much more efficient with my time and work hours. I have so much more to do right now, so I have to be really prepared, really consistent with my work hours, confident in my recipes and sure of what I love.
Here’s an idea of how my process worked the first time:
I tested my recipes for a few months with no photos. Just testing, retesting, trying to decide what I loved enough to put in the book and what I wasn’t a fan of. I solidified a list of 150 recipes after testing around 250 or so. Oooomp. I wrote nothing at this time, other than recipes. My recipes were written on paper (you know I’m a big pen and paper girl) and not typed.
I planned hugely packed photoshoot days that took weeks. It was April and May, so it was light out until 7 or 8 PM, sometimes longer. I would plan to make about 13 to 15 recipes per day, starting at around 6AM, photographing them as I went, finishing around 8PM and starting the clean up process. These days were ROUGH. But I had my photos done! I still wrote none of the manuscript at this time. I drank a shit ton of coffee.
During the photography period, I ended up cycling through a bunch more recipes. Ones I no longer deemed “good enough” for the book. Testing and retesting here.
Once I had all the photos done, I started writing the manuscript. Since all of my recipes were handwritten with multiple testing and retesting notes, there were a handful of them that I couldn’t read or remember which notes were correct. This really sucked. I retested a few and tried to figure out what I had done to make the recipe so good since I couldn’t read my food-splattered chicken scratch. Most recipes came out in the end. A few I had to scrap because I couldn’t figure it out.
THEN, I finally sat down to write the manuscript. This was a challenge. If you heard me talk along one of my book tour stops or have heard me speak about this process, you’ll know that I really struggled writing the manuscript because for some reason, I felt that it had to sound weirdly, inauthentically professional since it would be a book. That was on a SHELF. IN A BOOK STORE. Possibly FOREVER. (if I could only be so lucky.)
After week of struggling, I approached my manuscript as I do my blog posts. I acted like I was writing to my friends about 150 recipes in my blog posts! This helped immensely.
That process worked the first time, but again, I had all the time in the world. I could do it whenever I wanted, I could work for 12 days straight for 20 hours a day and then sleep for 2 days straight and not be able to move. It didn’t matter! No one counted on me to survive! While I felt really close to the book, it was in a different way.
So now, here’s how I have approached this process, which is going SO well this time.
In the summer and fall of 2016, I tested my recipes whenever it was convenient for me. I made them for dinner, for parties, for breakfast, etc. When I had extra ingredients left over from testing freelance or blog recipes, I’d test what would fit into those ingredients. I spent a good six months testing and retesting and almost immediately felt REALLY comfortable and confident with my recipe list. (OMG YOU GUYS THEY ARE SO GOOD!) I think it’s also important to mention that I have another almost-five years of serious recipe development and cooking under my belt since this last book process, so I’m really confident about what I’m making. I took tons of notes too, obviously. Most recipes were tested three times. Some a lot more.
My recipes are TYPED! They are typed up fully in a huge document that is separated a few different ways. I have a full recipe list. Another recipe list by meal type (breakfast, dessert, etc). A recipe list with full, written out recipes. This may seem like a big DUH! moment and very trivial, but it is huge for me.
Right now I am photographing single recipes. I have the recipes printed on those days, and my team and I make about 12 to 15 recipes a few days a week. Since I’m having them make the recipes on their own too, it gives it another good test. Essentially as we’re making it, we’re testing things for the fourth time. We take lots of notes and write them down. I’m writing almost every single day, and writing portions of the manuscript here too! I write about the recipes that week so I’m insanely close to the recipe process. I’m not going eight weeks without writing like I did the first time.
Later in the spring, we will do some larger scale photoshoots that include multiple recipes together, parties, etc.
Once ALL the photos are done, I’ll be working more on the manuscript in one large chunk. This might seem backwards to some people, but I’m such a visual person that I love seeing the photos WITH the recipes. It helps me feel like the book is a full package. I will do lots of editing to the manuscript, and I may even take the approach as if I’m writing the entire thing from scratch. But I’ll have tons of notes and writing along the way. Something to edit!

(he found the chocolate shavings…)
There have been a few recipes that I’ve scrapped already in this process, but it’s nothing like last time. For example, I realized that I had a TON of butternut squash recipes (like an embarrassing amount – shocker, right?) and I took one out that I will probably share on the blog at some point once I retest it to make sure it’s perfect. Took out another that wasn’t doing it for me anymore. I am also still coming across recipes I love so much that I want to include in the book, so I add them in. For instance, I’ve been making this to-die-for Bolognese that we are loving so much. I’m trying to decide if it should go in the book or on the blog. IT’S SOOO GOOD.
Now for the best part: my team is saving me!
Colleen and Katy help me regularly, so we work well together. We have a flow that works in the kitchen, so it’s not like we are learning to work around each other now that it’s book time.
I also have Erin from The Almond Eater helping me style the recipes. THIS IS AMAZING!! First, I love Erin’s styling so much. She has an incredible eye. A few weeks ago, my friend Ashley told me that I had to relinquish some control, that styling and photography were so creatively intense (especially for 150+ recipes at once) and to have help in certain areas I wasn’t used to. It wasn’t like I needed permission, but it made me feel better, hearing from someone who has shot and styled multiple books recently.
Just having Erin here with me to help set up the shot and help me style things creatively is AMAZING. I am not a food stylist. I can style my own recipes for the blog, but it’s not my favorite thing to do. It’s really hard for me. It takes a long time. I can never match someone else’s style. The difference with Erin is that while HER own style is different from mine, she is capable of working in my own style and seeing things in my style. It’s life changing. I love her. If you are working on a book and need help with styling, I cannot recommend her more. Having someone there to even do a minor thing like help choose a color palette for one recipe or rearrange a fork has changed the game for me. I can’t tell you how many photos I reshot with the first book because I was unhappy with them. We’ve shot a lot already, and I love EVERY photo I’ve taken!
After Erin and I set up the shot(s), I take all the photos, back everything up multiple times and do a few quick edits so I can get my pictures looking sharp. I want to make sure that I love the photo and can see the book together as a whole.
Like I mentioned before, having help this time around is forcing me to stay very organized and prepared. I don’t have recipes strewn about or random notes of paper that I will never find! I want to make sure that all our time is used wisely and efficiently.
(As a side note, I also have a babysitter who comes and watches Max on these days where we do the large shoots. She is amazing and keeps him out of our hair. This is the hardest part for me because I want him with me at all times, so I love that he is still there. I steal a kiss like once every 30 minutes.)
Oh and lastly? Having this help assures that we really aren’t wasting any food. It always has somewhere to go! Unless it’s a super gross fail like these below.

Some things I can’t live without:
Desk calendars and planners! I have two desk calendars going right now. I always have one, where I map out my blog editorial calendar. So I have that. My second one is for our shoots and my manuscript planned out as a whole. I love these big calendars so I can see everything as a whole. I’m also using my day designer for really detailed book and work notes. I’m using the nourished planner as my life/overlook/appointment planner, if that makes sense.
Google photos. I had never used google photos before, but I have all my book photos in an album and LOVE the layout. I print them as well, and hang them on the wall, but seeing them in google photos gives me such a great idea of the layout, the colors I’m shooting, the feel and style that I’m shooting, etc. I’m obsessed. It’s also shared with my editor so she has an idea of what the photos are already looking like.
A super strict clean up and prop organization process. My team is probably laughing hysterically because if you saw my props, you’d die. They are a huge jumbling mess. Piled on top of each other. Falling over. But! We know where everything is. It’s easy to find. I am fully cleaning up the house and kitchen after every shoot (meaning, I’m putting props back exactly where they go, instead of piling them on my dining room table like I did last time). I try really hard to have the fridge completely organized every shoot day so everything can easily be found. I have one of those side-by-side fridges and they are the WORST. I cannot explain my hatred for them. They fit nothing. Things get lost and die in the back. So keeping it organized is key.
My canon 5d mark iv. I know I’ve mentioned this a million times since I bought it, but the touch screen is amazing. I don’t always shoot tethered because I find it restrictive and with the touch screen, I can easily zoom in by touching and make sure everything is in focus. I live and die for this camera. Best purchase ever.
My iPhone 7plus. I LOVE having the plus! It’s huge and I snap a photo of every book recipe on my phone for quick and easy access. All of these photos above were taken with my 7plus.
So that’s that! Super long and if you’ve made it this far, ummmm thank you, I love you beyond belief. I’ll be sharing these posts often and if you have any questions, leave ’em below! xo
The post Behind the Book: Testing and Single Recipe Shots. appeared first on How Sweet It Is.
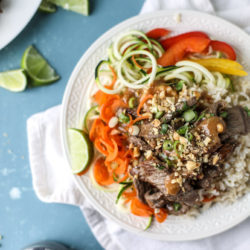
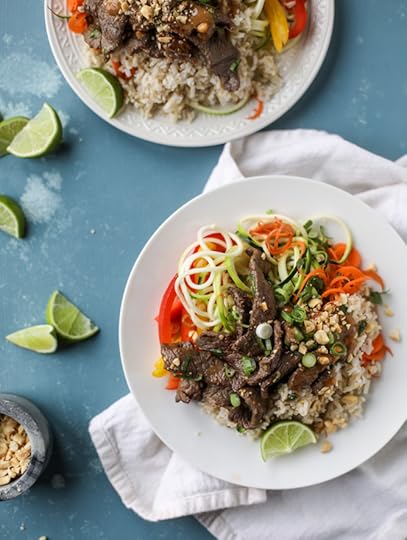
Thai Beef Bowls.
Welcome to the dish I’d like to eat every day for the next month.

I’ve really loved all the dishes I’ve shared in this first month of 2017, but this one takes the cake. Or it takes the beef. It’s my new favorite dinner until my next favorite dinner comes along!
I bet you’re surprised?

I absolutely adore any sort of Thai or Thai-inspired cuisine. It’s probably second on the list (right after Mexican of course) and one of those foods that I’m always in the mood for, no matter what the day has been like. Plus, I have tons of cool memories associated with Thai cuisine. Eddie and I spent our first New Year’s Eve together, starting with some Thai food. We also once had one of our biggest fights ever driving to get Thai food.
I really wish I remember what the fight was about – considering it seemed like a huge one and I’d love to (over)share the details ten years later – especially since apparently it was of zero importance. Because I can’t even remember. You know. Oh marriage!

The rundown on this big huggable bowl of love:
tender, flavorful beef tossed with delicious peanut sauce and scallions.
lots of spiralized zucchini and even a spiralized carrot!
a big spoonful of brown rice.
sliced bell peppers and…
lots of crunchy peanuts!

This peanut sauce is one of my go-to recipes and has been for years. If you’ve ever made some of my Thai inspired recipes from the site, you’ll totally recognize it. It’s packed with flavor and you cook it down so it’s a wonderfully thick drizzle all over the bowl. It essentially doubles as the flavor for your steak and the dressing on top of all the things.
Double duty, what whaaaaat.

It’s fresh and delicious and fairly healthy and you could make a million substitutions based on what you’re craving. Rice noodles? Let’s do it! Lettuce wraps? Even better.
Something really cool that I don’t even know about? Sure.

Thai Beef Bowls
Yield: serves 2
Ingredients:
1/2 cup sweet chili sauce
1/4 cup rice vinegar
1/4 cup lite canned coconut milk
3 tablespoons brown sugar
3 garlic cloves, pressed or finely minced
1 tablespoon creamy peanut butter
1 teaspoon-sized knob of ginger, grated
1 lime, juiced
1/2 tablespoon soy sauce
6 ounces beef, thinly sliced
1/4 teaspoon salt
1/4 teaspoon pepper
2 teaspoons vegetable oil
1 cup cooked brown rice
1 red pepper, thinly sliced
1 zucchini, spiralized
1 carrot, spiralized
fresh basil and cilantro for topping
lime wedges for garnish
chopped peanuts for topping
Directions:
In a saucepan, combine the chili sauce, vinegar, coconut milk, sugar, garlic, ginger, peanut butter, soy sauce and lime juice, whisking to combine. Cook over medium-low heat until the mixture thickens a bit, about 5 to 6 minutes.
Heat a skillet over medium-high heat. Season the beef with the salt and pepper. Add the oil to the skillet and once it's hot, add the beef and sear until it's just cooked through (or done to your desired liking). Once the beef is finished, drizzle some of the peanut sauce over top.
To assemble the bowls, add the spiralized zucchini and carrot into a bowl with the red pepper and brown rice. Top with the beef and the sauce, tossing everything together. Top with the fresh herbs, a spritz of lime and the chopped peanuts.
Be sure to follow howsweeteats on instagram and tag your recipes with #howsweeteats! You can also post a photo of your recipe to the howsweeteats facebook page. I appreciate you so much!
Color quota fulfilled!
The post Thai Beef Bowls. appeared first on How Sweet It Is.
January 24, 2017
Tuesday Things.

1. Aren’t these radishes the prettiest things ever?! They are called easter egg radishes! Now only if they come covered in sparkles and glitter, my life would be complete.
2. I’m seriously craving these butterbean and squash toasts. Looks like a flavor explosion.
3. Please tell me you’re in this club: I set an alarm on the weekends even though I don’t need to, because I can’t think of anything worse than sleeping late and wasting the day away.
4. Over the weekend, I bought an actual CD. An actual CD! My car is almost ten years old and while it has an audio jack, it doesn’t have bluetooth connection or anything, and I got the iphone 7 for Christmas and it there is zero way to plug my phone into my car for music purposes… so I bought a CD to make it through a 30 minute ride.
5. Having a kid has made me crazy in the holiday decor area. Our house looks like cupid exploded everywhere and I 100% love it. It makes Max so excited!
6. TV things! What the heck was up the with The Affair? I kind of expected that to be the situation with Noah, but I need more Cole/Allison in the story next week. And I did like this episode of Homeland a little more than the first one. Nashville? Still liking it more than I thought. And This is Us… best show ever.
7. Speaking of TV, I’m into season five of Gilmore Girls (yes I have not slept at all and basically do every ounce of work with netflix on, oh well), and while I am HEAVILY team Jess, there is one major problem. There is not enough Jess! Like he is in the show for five minutes. I need more. So much more.
8. Ooooh and last week I finished Lauren Graham’s new book (I liked it, it was cute) and I randomly started the Little Book of Hygge on a whim because I keep hearing about it. What are you reading right now?
9. Things that should never be on your to-do list. Well this just ruined my day.
10. One day last week, I somehow got sucked into the ice fishing hashtag on instagram which then got me sucked into looking up facts on Antarctica and if people live there or travel there and holy cow can you say procrastination?
The post Tuesday Things. appeared first on How Sweet It Is.
January 23, 2017
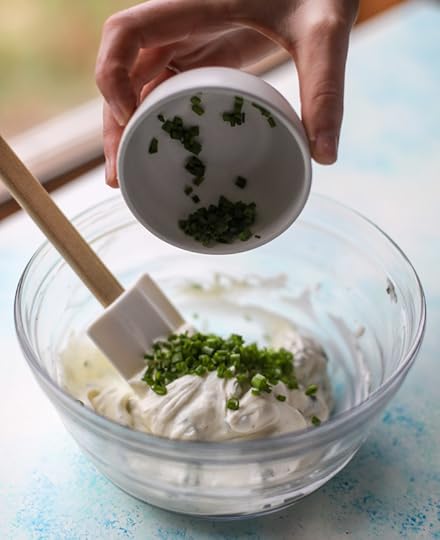
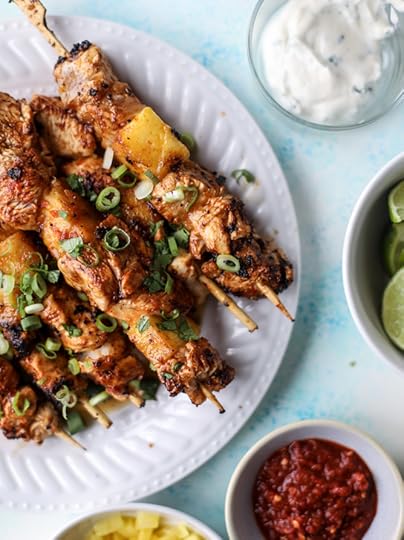
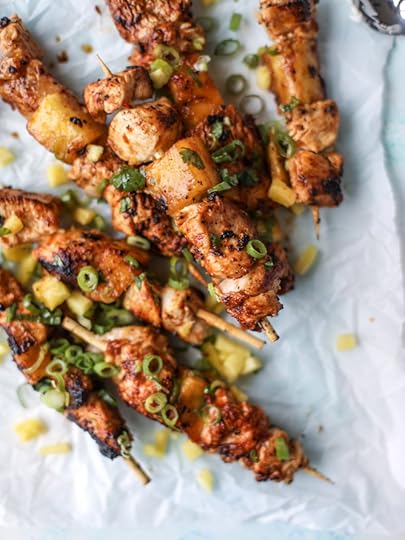
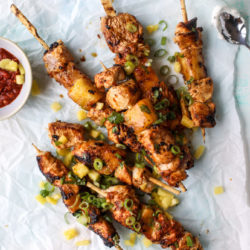
Pineapple Chili Chicken Skewers with Garlic Chive Dip.
Oh look! It’s my annual chicken on a skewer recipe.

Why does chicken on a stick taste so much better than chicken baked in a dish in the oven?! The world may never know.
But no matter what, I will try to figure it out every.single.year. at this time. See also:
Chili garlic chicken skewers with yogurt dip
Grilled chicken, burst tomatoes and artichoke skewers
Chipotle lime skewers with avocado ranch!
Yes I might have a problem. I just can’t handle the boring old chicken dinners. If you’ve been reading for a while, you’ll know that boring chicken dinners are motivation enough for me to continue my own personal recipe development. It’s purely for selfish reasons, you know.
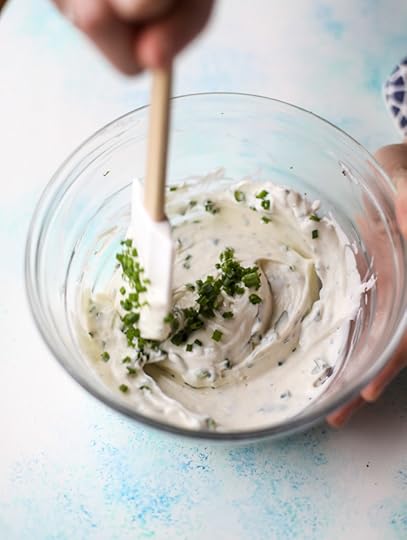
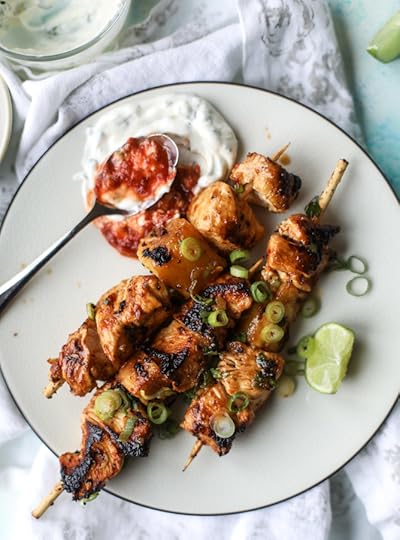
So. The greek yogurt dip is by far my favorite dipping sauce for the chicken. It’s so light and refreshing and just adds this delicious coolness to the charred grilled skewers. The flavor combination is right up my alley so I knew I didn’t want to lose it.
In fact. The first time I made this, I had zero intention of sharing the recipe because I thought it was a little too similar to my chili garlic skewers. I basically took the pineapple marinade idea from my pulled pork enchiladas and marinated the chicken in it for a few hours.
GUYS. You only need three ingredients for the chicken. THREE! You need chicken, obviously. You need chili garlic paste, which should be available in your local grocery store near soy sauce and curry paste. And you need fresh pineapple. That’s it!
AHH! It is such a simple (like, clearly an embarrassingly simple) marinade idea for chicken, especially if you are using the grill and planning on that smoky flavor.
But we loved it so much. I made it one more time the SAME WEEK for dinner (which basically never happens) and then once a week later. It’s something about the sweetness and the spice and all that refreshing yogurt and blah blah blah blah blah. I could go on and on. And I probably would, except I’m really close to the ending of season four of Gilmore Girls and hello, you know what that means.
Unfortunately, I know what it means too because I have no patience and always read ahead. Gotta be prepared.
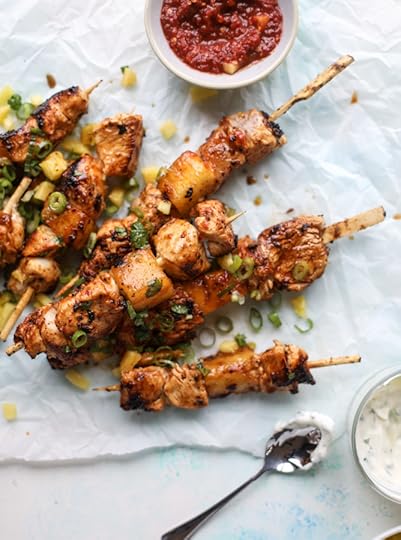
While the chicken is flavorful on its own, I find that a little sprinkle of scallions and a spoonful of finely chopped cilantro adds a ton of extra taste. If you have some pineapple left too, you can chop it up finely and throw it on top. And then, of course, the yogurt drizzle! Or spoonful. Or dip. Or pour!
My entire life is about going overboard.
Pineapple Chili Chicken Skewers
Yield: serves 2 to 4
Prep Time: 2 hours marinade
Cook Time: 30 minutes
Ingredients:
1 pound boneless, skinless chicken breasts, cut into pieces
1 cup cubed fresh pineapple, plus extra for skewering
1 tablespoon chili garlic paste
limes for spritzing
chopped pineapple for garnish
chopped cilantro for garnish
herb yogurt sauce
1 cup plain greek yogurt
2 tablespoons olive oil
2 garlic cloves, minced
4 tablespoons snipped chives
1 tablespoon honey
1 lime, juiced
1/4 teaspoon salt
1/4 teaspoon pepper
Directions:
Add the pineapple and chili garlic paste to a food processor and blend until pureed. Place the chicken in a bowl or resealable plastic bag and cover it with the pureed pineapple mixture. Refrigerate and marinate for anywhere from 2 hours to overnight.
Soak a few bamboo skewers in water. Skewer 4 to 5 chicken pieces on each skewer along with 1 or 2 pieces of pineapple. Heat a large skillet (or your grill!) over medium-high heat and add the olive oil (not if using the grill). Add the chicken skewers and cook on each side for 4 to 5 minutes, until cooked through. Serve immediately with the yogurt sauce and extra lime wedges. Garnish with cilantro and chopped pineapple.
herb yogurt sauce
Whisk all ingredients together in a bowl until creamy and combined.
Be sure to follow howsweeteats on instagram and tag your recipes with #howsweeteats! You can also post a photo of your recipe to the howsweeteats facebook page. I appreciate you so much!
Oh yeah! Pineapple on the skewer too. I can’t be stopped!
The post Pineapple Chili Chicken Skewers with Garlic Chive Dip. appeared first on How Sweet It Is.
January 22, 2017
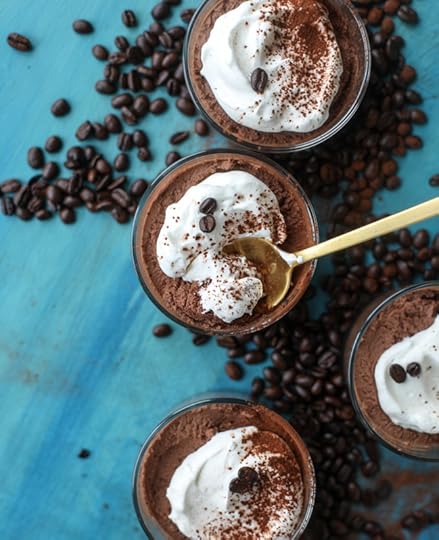
Whipped Tiramisu Coffee Chocolate Mousse.
[this post is in partnership with Harry and David. I’m creating some wonderful recipes with their tiramisu whole bean coffee this season and I can’t wait for you guys to see what I’ve come up with! xoxo]
It’s like I died and went to chocolate coffee heaven!

Even before I liked coffee, I used to be obsessed with going into coffee shops and smelling the whole beans. I did this as a young child and was so fascinated by the wild and crazy dessert flavors that the beans could take on. In fact, you’re probably not surprised that it might have been the sole reason that I wanted to like coffee.
My parents always bought whole beans and ground them every week and every single time, I begged them to get the Irish cream or the mudslide or even just the vanilla flavors. I was convinced that they would taste 100% like dessert because they smelled so fabulous.

Much to my dismay, they never bought the flavored coffee. Never ever. But! My grandma would sometimes buy the flavored espresso packets (these came in small foil bags and I never see them anymore, but I swear they were a thing in the 90s) and after special dinners, we’d always have it. I would ask for a cup, drown it in cream and sugar, take two sips and be so disappointed because it didn’t taste like cake.
I’d never learn.

I was super excited when I got to choose a flavor of the full bean coffee from Harry and David. Tiramisu was an obvious choice (having just made the MOST delicious tiramisu-inspired recipe for my cookbook, I couldn’t resist, even though I was super tempted by the chocolate cherry and cherry vanilla (!!!!)) and I think I inhaled the scent of the beans for a full five minutes before grinding them up.
Wow wow wow. My crazy love for this coffee is intense.
I might love it even more because I made it in my French press since I don’t have a traditional coffee maker. For some reason I find French press coffee to be so good – maybe only because I feel cool and hipster-ish using my press. Shocking.
Since I partnered with Harry and David to make a recipe, I didn’t want it to be JUST coffee. Or even a drink! The only logical use for my coffee was a decadent mousse. One that would make every single resolution fly out the window, but was also rich enough to have just a few bites. I’m sure a few bites have negative calories, it’s a Jessica law.

I whipped this mousse a little more than my milk chocolate mousse recipe and oh my gosh – it’s like a chocolate CLOUD. It’s almost lighter and fluffier than traditional mousse. It’s super rich, but since it’s whipped, it just feels so light.
Like it is a light dessert! We can consider this a light dessert, right? Please? Just me?
I knew you’d come through.


Tiramisu Coffee Chocolate Mousse
Yield: serves 6
Ingredients:
8 ounces high-quality milk chocolate, chopped
2 tablespoons unsalted butter
2 tablespoons freshly brewed Harry and David Tiramisu Coffee
1 cup cold heavy cream
2 large egg yolks
1 tablespoons sugar
2 tablespoons freshly brewed Harry and David Tiramisu Coffee
extra whipped cream for topping
unsweetened cocoa for sprinkling
coffee beans for garnish
Directions:
Combine chocolate, coffee and butter in a microwave safe bowl. Microwave on medium heat for 30 seconds, stir, then microwave for 30 seconds again. Stir constantly until all chocolate is melted and the mixture is smooth. Set aside to cool for 10 minutes.
Place cream in the bowl of your electric mixer. Beat until peaks form and you have whipped cream. I like to have firm peaks here and whip the cream to a thicker consistency as I find it makes the chocolate even lighter when folded in.
Add egg yolks, sugar and coffee to a saucepan over medium heat. Whisk constantly until sugar is dissolved, mixture is opaque and light yellow and has thickened and can coat the back of a spoon. Remove from heat and stir in melted chocolate mixture. Place saucepan in a bowl of ice water and whisk constantly until chocolate is cooled.
Remove whipped cream from the fridge and fold it into the chocolate mixture. Once whipped cream is completely folded in, evenly pour mousse into either two, four or six glasses depending on the size. This can serve six if served in 1/3 to 1/2 cup servings. Refrigerate for 4 hours. Top with fresh whipped cream, a sprinkle of cocoa powder and a coffee bean!
Be sure to follow howsweeteats on instagram and tag your recipes with #howsweeteats! You can also post a photo of your recipe to the howsweeteats facebook page. I appreciate you so much!
It’s definitely worth breaking the rules for.
The post Whipped Tiramisu Coffee Chocolate Mousse. appeared first on How Sweet It Is.
January 21, 2017
Currently Crushing On.

{via}
Helllllo weekend!
We are getting to the point in winter where I’m a teeny bit stir crazy, but it’s still so gloomy and cold that we don’t do much else aside from cuddling up on the couch and watch movies. This past week, I busted through 40 cookbook recipes for the new book and next week, I’m going to share my first post on this cookbook process with you! It’s definitely different from my first book.
Sooooo. Today I’m going to take some time today and relax, rejuvenate and maybe get lost in a book.
What are you guys up to?
Oh oh! And last night I finally shared our two year old toddler favorites.
P.S. if you need some football food recipes this weekend, I have 190 for you!
Links I love this week:
these coffee chocolate chunk blondies look so fantastic.
how i could always eat veggies: vegetable tempura.
totally making these chocolate sugar cookies this weekend.
ridiculously excited about the studio DIY balloon shop! speaks to my heart.
how adorable is this love letter tuxedo cake?
is this real life?! taco frachos.
loving the sound of this asian chicken zoodle soup.
brussels sprouts and zucchini fritters! what an awesome combo.
craving a bowl of spicy beef noodle soup.
nourishing gentle lentils sound like the best comfort food.
these peanut butter chocolate dates with sea salt are calling my name..
ohhhh wow. cheesy chicken enchilada sweet potato fries!
the cutest ever olive oil mini loaf cakes.
these sweet potato burgers with chipotle mayo! whoa.
The post Currently Crushing On. appeared first on How Sweet It Is.
January 20, 2017
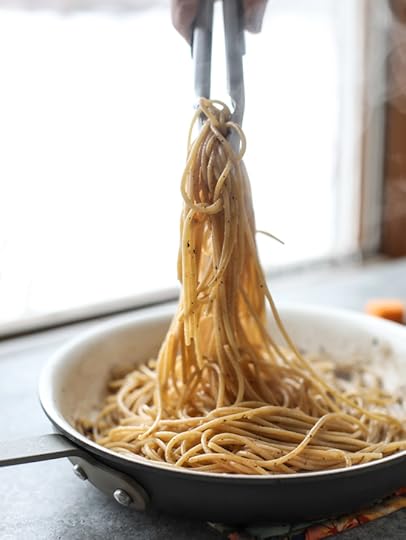
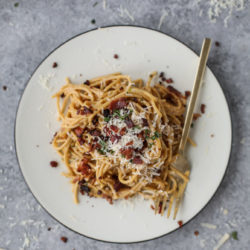
Butternut Squash Spaghetti Carbonara.
NEW FAVORITE DINNER ALERT!

Sorry to shout. It’s just SO good. Winter food at it’s finest!

For a long time, carbonara was my home alone meal. My single girl meal, which just meant that I made it when Eddie was traveling or out for dinner without me. I figured he would NEVER go for carbonara because there isn’t chicken or steak or another kind of meat aside from crumbled bacon.
THEN.
One day (or night), I had no idea what to make for dinner and was asking him for suggestions. This is usually a huge fail because if Eddie has just eaten, he can’t see to his next meal. His go-to answer is, “I just ate, I’m not hungry, so I don’t know what I want.” (Even if 31 minutes later he is STARVING OMG THE WORLD IS ENDING.)
That’s also one of the reasons that menu planning can be tough in our house because he prefers not to commit to five different kinds of meals in one day, but I can handle that. Since I have a general idea of his favorites, I can often menu plan with success.
But anyhoo.

That one day, the one day I asked him what we should have for dinner, he came back with… “what about carbonara?”
Um, what? My jaw dropped. What did he even MEAN carbonara? Was this a trick question? Was he going to request carbonara with grilled chicken? When I asked if he was serious, if he wanted it as an actual full meal and not as a side dish, he was like… “yeah. I mean it’s all bacon and eggs, so that’s protein.”
Boom. Problem solved.

I mean, of course I knew that, but many other dishes I try to serve him with just bacon or eggs? Usually require a big old steak or something. Not to mention, did he even realize how much cheese was actually in carbonara? I had no idea.
But I certainly wasn’t telling him.

So it’s become a serious comfort food staple in our house. Not a week staple or anything, but a comfort food staple – and something that I even make in lieu of breakfast for dinner because it’s just SO easy.
So so simple.

And now, I’ve found an even more delicious version if that’s possible. I found a way to remove half of the cheese from the recipe – which, let’s be real, there is still a BOATLOAD of cheese in this recipe – but HALF the cheese? I swapped it for butternut squash.
Oh god. I SWAPPED CHEESE FOR A VEGETABLE.
Halp me. Next thing you know I’m going to be dipping pepper slices in hummus and throwing my pita chips away.

If you’re a crazy fan of squash like we are, you will absolutely love this. The squash adds a wonderful richness to the pasta in a “wintery” way. I mean, carbonara is rich enough as it is, but this adds richness in a vegetably way. A little spice, a little more heartiness, a little more warming that just regular carbonara.

The only downside here is that this recipe does require more time than traditional carbonara since you’re roasting and pureeing squash. You can always do that part ahead of time though. It can be a part of your menu planning on Sundays or if you’re really crunched for time, you could use pureed butternut squash.
I have all the solutions for you, trust me.

Pretty sure you have dinner tonight!

Butternut Squash Carbonara Pasta
Yield: serves about 4
Ingredients:
2 cups cubed butternut squash
2 tablespoons olive oil
1/4 teaspoon salt
1/4 teaspoon pepper
1/4 teaspoon freshly grated nutmeg
8 slices bacon, chopped
1/2 teaspoon freshly cracked black pepper
4 garlic cloves, minced
1/2 pound whole wheat spaghetti
2 large eggs
3/4 cups freshly finely grated parmesan cheese, plus extra for topping
extra salt + pepper for taste, if needed
fresh herbs for sprinkling
Directions:
Preheat the oven to 425 degrees F. Line a baking sheet with parchment paper or aluminum foil.
Toss the squash cubes with the olive oil, salt, pepper and nutmeg. Spread them out on the baking sheet and bake for 15 minutes, then toss and bake for 15 more, or until tender when pierced with a fork.
Add the squash (and any olive oil drippings) to a food processor and blend until completely pureed and smooth. Once smooth, add the squash to a large bowl with the eggs and parmesan cheese. Whisk until combined and most of the lumps have been smoothed out.
While the squash is roasting, you can heat a large skillet over medium heat and add the bacon. Cook until totally crispy and the fat is rendered. At this time, you can also boil the water for the spaghetti and cook it.
Remove the bacon from the skillet with a slotted spoon and place it on a paper towel to drain the grease. Add the spaghetti to the skillet and toss it well in the bacon fat with kitchen tongs - you want it to be throughly coated. Remove the skillet from the heat.
Pour in the squash/egg/parmesan mixture and stir quickly and constantly to create a creamy sauce, tossing for about 3 to 4 minutes or so. Stir in the bacon into the pasta and sprinkle with fresh herbs. Top with extra cheese. Taste and season additionally if you'd like. Serve immediately!
Be sure to follow howsweeteats on instagram and tag your recipes with #howsweeteats! You can also post a photo of your recipe to the howsweeteats facebook page. I appreciate you so much!
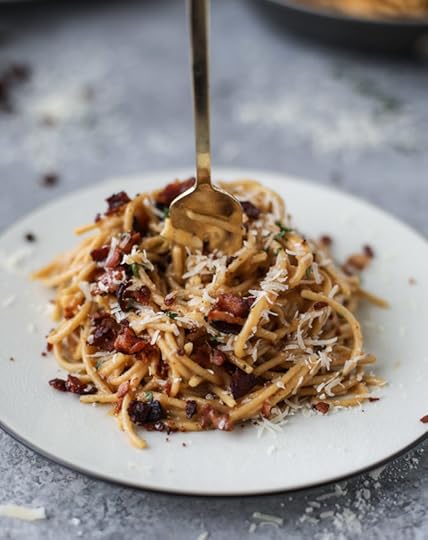
Twirl away!
The post Butternut Squash Spaghetti Carbonara. appeared first on How Sweet It Is.
January 19, 2017
Blood Orange Tequila Fizz.
I’ve very busy trying to figure out the billion ways I can consume blood oranges.

Very, very busy.
FYI: The depression that will set in when blood orange season is over will be ROUGH. I don’t care much about regular oranges at all. You know? They are just so… regular.

Out of all the things, all the cakes and breads and salads and salmon, cocktails are probably my favorite thing to make with blood oranges. I realize that this probably comes as no surprise give my Lisa-Frank-loving-neon-pink-heart-glitter-flecked life but I figured that I should remind you.
THE COLOR!

Also, the deliciousness. That’s a horrible word, isn’t it? In this day and age of adding “ness” to everything, it makes most people, even myself, cringe. Yet I still write. I still even SAY it, in real life. Like the words actually come out of my mouth. I don’t know why I torture my keyboard and ears this way.

So, how is your January? Are you on the no booze train right now since it’s still the beginning of the year? When do resolutions fall off? I vote for the second weekend of January. The first weekend you still have all that momentum to make it through. You’re excited about the new lifestyle changes you’re making. It’s like, bacon cheeseburgers? HA! Who needs those?
And then by the second weekend, it’s all me, ME! I need those bacon cheeseburgers! Insert your cheese/chocolate/coffee/pizza/cookies/wine here. Feeling you.

We rarely have a drink throughout the week because I need full clarity for this busy time, but come Thursday, I’m ready. I usually don’t cave until Friday afternoon – it is the happiest hour after all! However you might remember that I’ve wanted to reinstate (or, um, start) margarita Mondays for quite some time. It should be a law.
AND. It’s also rare that I make a drink using tequila that isn’t a margarita. I love a good Paloma but it’s not something I make often, especially since Eddie doesn’t love grapefruit. He doesn’t even really love tequila, but sometimes I can sneak it into a delicious cocktail like this one and pull some trickery on him.
Not only can I rave about the color here, but the FLAVOR! It’s not margarita-like, even though we have some lime simple syrup. It’s topped off with ginger ale (or beer – your call) for the fizzy bubbles and can be as sweet as you like. Annnnd it might make you forget about the pizza you want this weekend. #truth


Blood Orange Tequila Fizz
Yield: makes one drink, is easily multiplied
Ingredients:
3 ounces freshly squeezed blood orange juice
2 ounces gold tequila
1 ounce lime simple syrup
2 ounces ginger ale (or ginger beer!)
lime simple syrup
1/3 cup freshly squeezed lime juice
1/3 cup sugar
Directions:
Fill a chilled glass with crushed ice. Add a blood orange slice.
In a shaker, combine the blood orange juice, tequila, lime juice and lime syrup. Shake well for about 30 seconds then pour over the ice. Top with the ginger ale/beer and add a lime wedge. Serve!
lime simple syrup
Heat the lime juice in a saucepan over medium heat. Whisk in the sugar and cook until it dissolves and the mixture begins to simmer. Remove from the heat and let it cool to room temperature.
Be sure to follow howsweeteats on instagram and tag your recipes with #howsweeteats! You can also post a photo of your recipe to the howsweeteats facebook page. I appreciate you so much!

You need it! Because I said so.
The post Blood Orange Tequila Fizz. appeared first on How Sweet It Is.
January 18, 2017
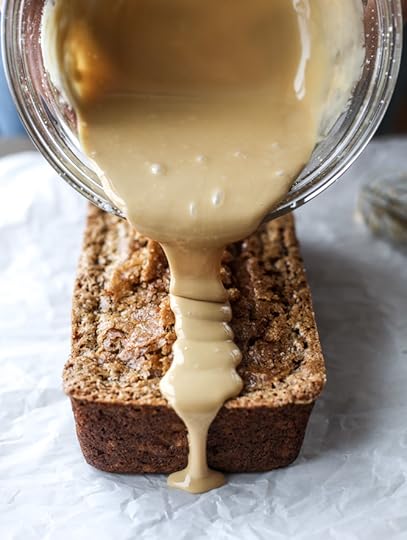
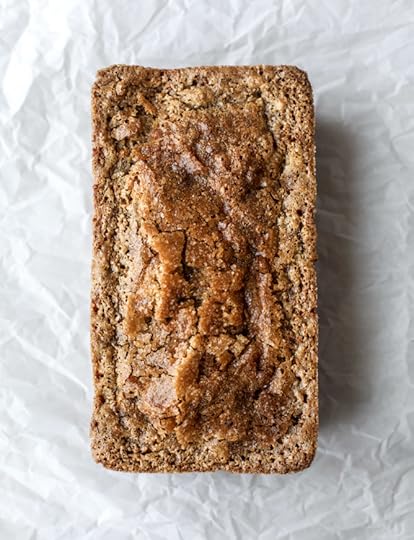
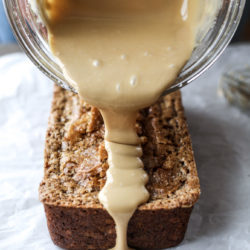
Banana Bread with Espresso Glaze.
I’ve discovered a new way to caffeinate.
And it involves cake. I mean bread. I mean cake, disguised as bread. We all know that’s what this really is, right? This whole banana bread thing is really just a big old cake masquerading as bread so we don’t feel as terrible about ourselves when we house three slices right out of the oven, burning every last taste bud off our tongue due to this syndrome called extreme impatience.
Yes, it’s all the cake bread’s fault.

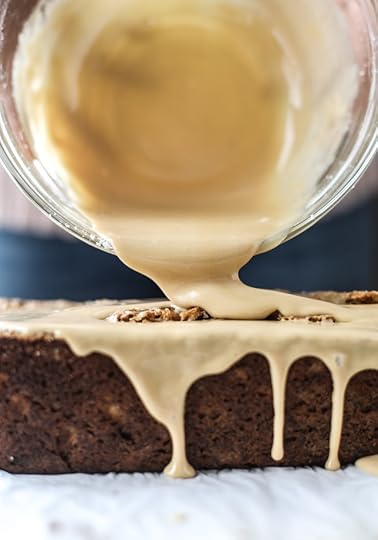
Not surprisingly whatsoever, the glaze is my favorite part. It’s embarrassing really, assuming that anything on earth could make banana bread taste better, but I have found it. For me, I’ll tell you what doesn’t work: nuts. No nuts in my bread. Or my cake. Or my dessert, forever ever.
But espresso glaze? I have unlocked the secret to being able to consume more banana bread than we thought was humanely possible.
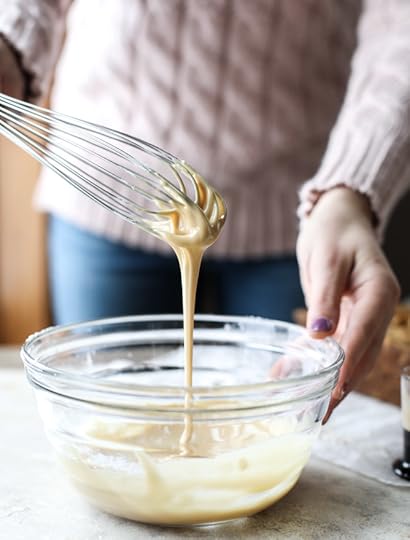
The glaze is just so… warm. WarmING. I mean, not physically warm or anything, but it’s warming to the soul. I’m getting deep, I know. It’s void of all spices but for some reason, the espresso and the sugar just whip into this deliciously warm tasting blanket of love.
That is going to cover your bread cake. I mean cake bread.

Also! Look at this crunchy top. I added turbinado sugar before baking, so it was crunchy UNDER the glaze. Um, best idea ever. Hello.
FUNNY you should mention that I’m still on a mini-hiatus from coffee at the moment. (read: just this week, before I go wacky.). It’s pretty apparent that I might be losing my mind to the caffeine addiction when I find it necessary to cover my baked goods in it.
But here’s the thing! The banana bread also has a teeeeeny hint of espresso powder, so it lends a richness to the flavor without tasting like a big old cup of coffee.
It works together and tastes just a leeeettle different than plain old banana bread.
I’ve shared quite a few banana bread recipes over the years, soooo can you tell I’m crazy obsessed with the glaze here? IT’S ALL ABOUT THE GLAZE!
Nooooo. Not crazy at all.
Banana Bread with Espresso Glaze
Yield: makes one 9x5-inch loaf
Ingredients:
1 2/3 cups whole wheat pastry flour
1 teaspoon baking soda
1/2 teaspoon salt
1/4 teaspoon cinnamon
2 large eggs
1 cup loosely packed brown sugar
1/3 cup milk
1/2 cup coconut oil, melted and slightly cooled
4 bananas, mashed
1 teaspoon vanilla extract
coarse sugar, for sprinkling
espresso glaze
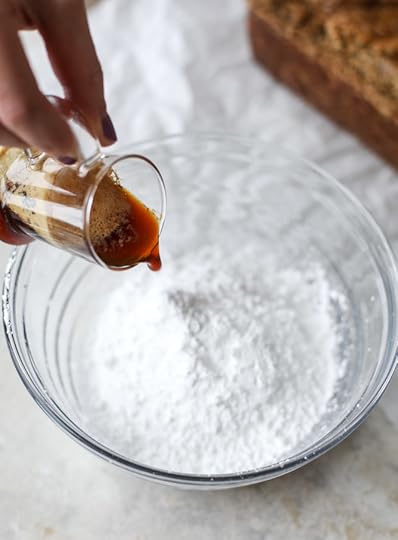
1 1/2 cups powdered sugar
2 ounces freshly brewed espresso
1 teaspoon milk
1/2 teaspoon vanilla extract
Directions:
Preheat oven to 325 degrees F. Spray a 9x5 inch loaf pan thoroughly with nonstick spray. In a small bowl, combine the flour, baking soda, cinnamon and salt, whisking thoroughly. Set aside.
In a large bowl, whisk together the eggs and brown sugar until smooth. Add in the milk and coconut oil, whisking until combined. Stir in the mashed bananas and vanilla extract until mixed. Slowly stir in the dry ingredients and mix until just combined. Pour batter in the greased loaf pan. Top with coarse sugar.
Place the loaf pan on a baking sheet and set in the oven. Bake for 75 to 85 minutes, or until the center is set. If the streusel begins to brown, tent the bread with aluminum foil. Remove the bread and let it cool in the pan for 20 minutes. Gently turn the bread out on a plate or cutting board and let it cool completely before glazing.
espresso glaze
Whisk together the ingredients until a smooth, drippy glaze forms. If the mixture is too thin, you can thicken it by adding a little more powdered sugar. If it seems too thick, add 1 teaspoon of milk at a time, whisking to combine. Pour it over the banana bread and let it set for 30 minutes before slicing.
Be sure to follow howsweeteats on instagram and tag your recipes with #howsweeteats! You can also post a photo of your recipe to the howsweeteats facebook page. I appreciate you so much!

I might just drink a shot of that instead.
The post Banana Bread with Espresso Glaze. appeared first on How Sweet It Is.
Jessica Merchant's Blog

- Jessica Merchant's profile
- 53 followers

