
Jessica Merchant's Blog, page 379
February 4, 2017
Currently Crushing On.

{via}
HELLO WEEKEND! What are you guys up to? Whatcha got planned?
I want to say that I have a TON of fun stuffed planned, but I totally don’t and most likely, the majority of my Saturday and Sunday are going to be spent working on my book. I’m really far ahead at the moment and in a good groove, so I want to keep it going. Especially since I’ll probably add in a bunch of things last minute before turning it in, in true Jessica fashion.
Have a great one!
P.S. beauty favorites!
P.P.S. ten million recipes to make for the super bowl! In case it’s all about the food. Like it is here.
favorite internet things of this week:
love these hygge rituals.
dying for a plate of pulled pork taquitos.
also: nacho loaded potato skins. i die.
i could get behind this spicy salmon sushirito. doesn’t look as intimidating as i thought.
right up my alley: a DIY inspiration pegboard.
fruity quinoa salad for a taste of summer.
absolutely making these double decker tacos!
and these sweet potato nachos look perfect.
so much yes to caramelized banana, nutella and pecan pancakes.
this creamy potato soup with beer and bacon sounds so comforting.
as does this slow cooker tortellini minestrone.
blood orange vodka sour! i can’t quit the citrus.
i want a no bake skinny blueberry cheesecake parfaits. yes yes.
The post Currently Crushing On. appeared first on How Sweet It Is.


February 3, 2017
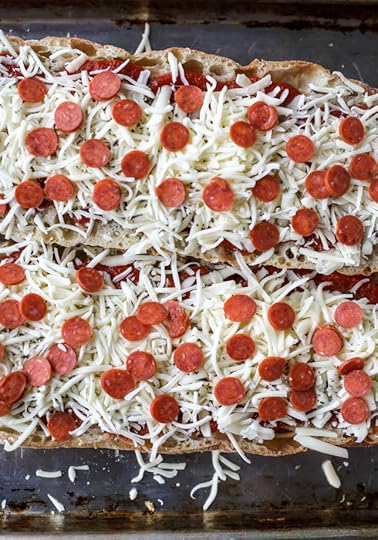
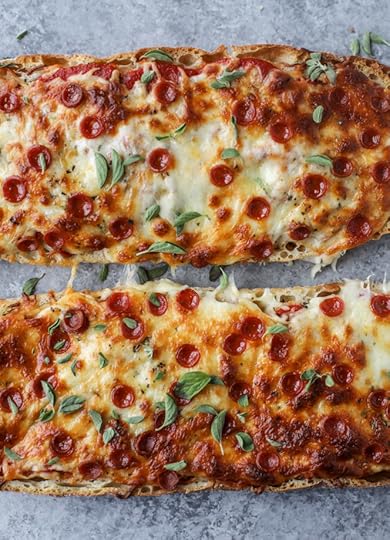
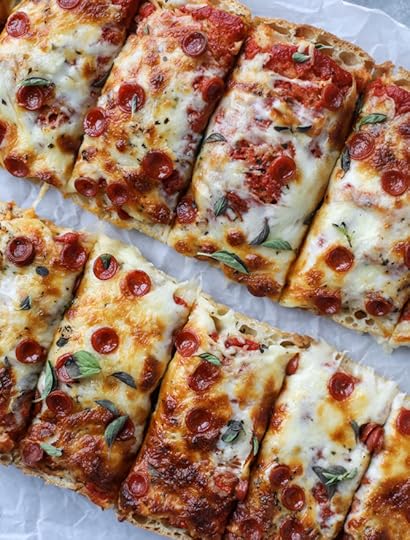
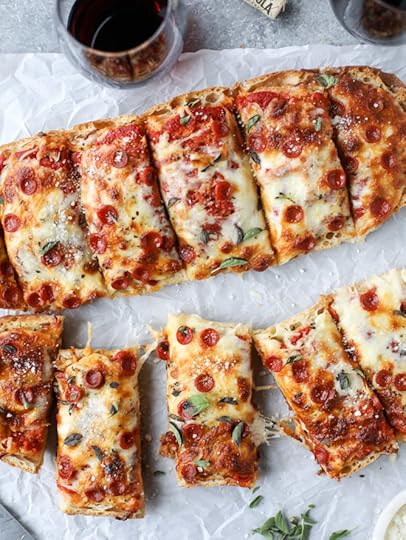
Ciabatta Pizza Bread.
I swear that after today, no more bread!

This week has been a bit bread heavy. Cheesy pesto garlic bread AND pizza on a loaf of bread. For someone who doesn’t live and die by a loaf of bread (I can easily pass up the bread basket but dessert? Never.), it means that these two quick little “recipes” (or let’s say… methods? Throw together meals? Trashed up snacks?) MUST be good.
This is it! I promise. I saved the best for last.
I mean… it’s a PIZZA LOAF. It will take you 30 minutes, tops. Cover your bread with cheese and call it a day.
Tell me why why why I never thought to make a quick little pizza on ciabatta bread? I’ve done French bread, pita bread, bagels, tortillas and even naan – but never a ciabatta bread. Also, I haven’t even made one of these breads recently. I almost always make my own dough and it becomes a production – albeit a delicious one – and the cleanup is insane because I essentially throw flour everywhere.
Cleaning as I go will NEVER happen. Ever.
French bread pizzas were one of the first recipes I shared on the site. They are so easy and versatile and I’m not too proud to admit that we used to throw back a Stouffer’s French bread pizza every now and then when I was a kid. And the mac and cheese too. The burnt and bubbly cheese parts. I caaaaan’t.
But anyway.

There are a few things I love about the ciabatta pizza loaf though. First, the loaf of bread is wider than the French bread so it can serve more people. It makes dinner seem more substantial in this millennial world where it’s all about how we FEEL. You know?
Second, the bread is so wonderfully chewy and when the outside toasts in the oven, it’s a texture lover’s dream. Even though bread would never be my drug of choice, if I had to pick one bread to eat on it’s own, it would certainly be a ciabatta if for the chewiness alone.
GAH. It’s so good.
Every time I share a pizza photo on Instagram, I get lots of questions about what sauce I use, what cheese is my favorite and where the mini pepperonis come from! The toppings on this bread are exactly what I’m doing now for homemade pizza dough too.
When it comes to sauce, well… you guys know I don’t love tomato sauce. On pizza it’s fine because hello, it’s PIZZA. But I have zero desire to make my own. Back in the day, I used Mids. Then I started using this DeLallo’s sauce and just last month, moved to the cherry tomato sauce from DeLallo’s because it’s sort of sweet and perfect for margherita pizzas, which usually have my favorite sauce.
Cheese? Oh hi, you’re talking to the queeeen. I like a mixture of three cheeses, plus finely grated parmesan for topping. I tend to go with provolone, mozzarella and fontina, all freshly grated (this makes a ha-yuge different in melt quality!) and if I only have two on hand, that’s fine too. But definitely a mix.
I love to brush my dough or bread with olive oil and sprinkle it with garlic powder. Yes, I know fresh garlic reigns supreme, but unless I’m mincing ten cloves, I won’t get the even flavor. So garlic powder it is.
Also! A sprinkle of dried basil and oregano IN the toppings makes for so much flavor. Sometimes I’ll sprinkle it over the sauce and sometimes over the cheese – whenever I remember.

I used to be a super plain pizza gal – cheese only and lots of it – but when I was pregnant with Max I stopped loathing pepperoni. So weird. I don’t like huge slabs of meat though (save your jokes please), so the tiny pepperoni are key! This way, I can put a ton of it on Eddie’s side of the pizza and be a bit more sporadic on my side. I find the mini pepperoni by Hormel at my grocery store.

I finish the whole thing off with a sprinkle of fresh basil and oregano and a touch more cheese. Of course. I mean, who do you think I am? But for REAL, this is my perfect pepperoni pizza method and it gets rave reviews. It’s so easy but the little things like the spices and three cheeses make a difference in the total package.
And when you put it on ciabatta bread, you can serve it to all your friends this week! With lots of beergaritas. Wins all around.


Ciabatta Pizza Loaf
Yield: serves 4
Total Time: 30 minutes
Ingredients:
1 loaf ciabatta bread, sliced in half lengthwise
2 tablespoons olive oil
1 teaspoon garlic powder
2 cups marinara sauce
½ teaspoon dried basil
1/2 teaspoon dried oregano
1 cup freshly grated provolone cheese
1 cup freshly grated mozzarella cheese
1/2 cup freshly grated fontina cheese
½ cup finely grated parmesan cheese, plus extra for topping
mini pepperoni for sprinkling
fresh basil and oregano for topping
Directions:
Preheat the oven to 425 degrees F. Drizzle the olive oil over the sliced ciabatta bread. Sprinkle with the garlic powder. Spread the marinara over top and cover with the dried basil and oregano.
Mix the cheeses together. Evenly sprinkle them over the sauce. Top with the pepperoni. Bake for 15 to 20 minutes, until the cheese is golden and bubbly.
Remove from the oven and top with extra parmesan and the fresh herbs. Slice and serve.
Be sure to follow howsweeteats on instagram and tag your recipes with #howsweeteats! You can also post a photo of your recipe to the howsweeteats facebook page. I appreciate you so much!

Just look at the meltiness!
The post Ciabatta Pizza Bread. appeared first on How Sweet It Is.
February 2, 2017
Key Lime Beergaritas.
I made these for your tacos!
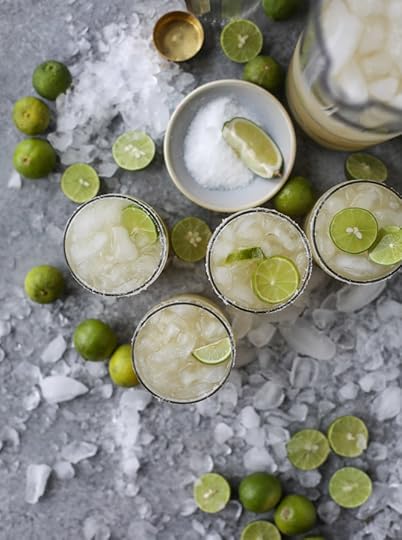
And for your big, huge fun super bowl party this weekend. It’s the best of both worlds because it’s a margarita and it’s beer. Tequila plus beer might equal some small issues in party behavior but I’m willing to take the chance.
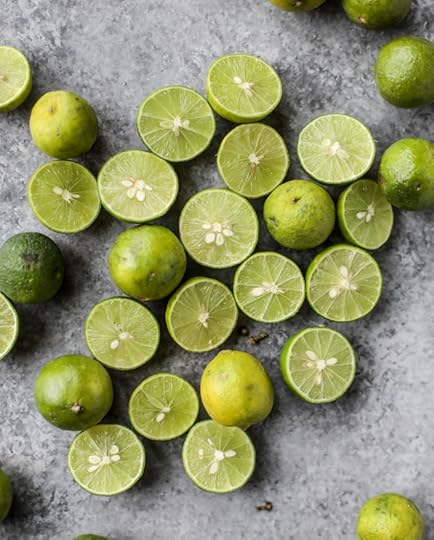
And key limes! The most delicious key lime juice also makes its way into the pitcher and I couldn’t be more excited.
This picture does the key limes no justice, but they are the cutest little citrus rounds I’ve ever got my hands on. And they are so sweet! But so tart! But so bright! But so tart.
I know. Because I ate one. It was a rough day.

Also. I tried to do it.
I tried not to add the crushed ice to the margarita photo.
But I just.can’t.stop.
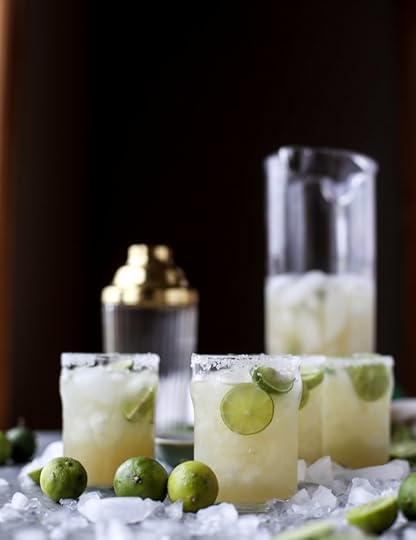
The drink looks so much more appealing when surround by a huge pile of frosty ice!
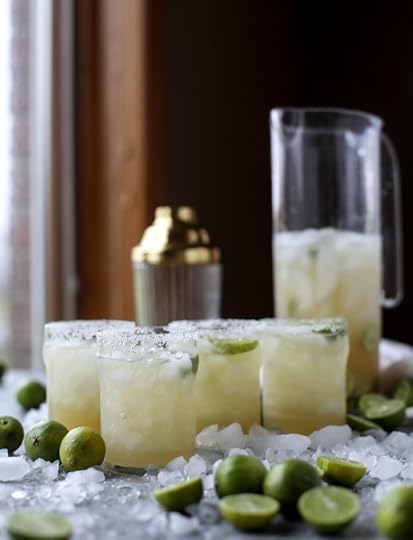
I’ve made beergaritas once before, but it was using ginger beer. Not BEER beer. I’ve always been hesitant about making them from scratch because it seems like every recipe calls for tequila, beer and… frozen limeade. I’m sooo not a fan of margaritas or drinks with any sort of sours mix (tastes like college, amirite?) and was hesitant about the tequila + beer, even though I really like tequila.
But I did it! For us. All in the name of cocktail sacrifice.

As for what kind of beer to use, I used Corona and I think Tecate (and the like) would be great too. As long as you like the taste of the beer AND you like margaritas, you will like these babies. I included a recipe for a pitcher below (hello game day fun!) but I think it’s important to note that you might need to adjust some of the flavors to your tastes.
To make a pitcher, I rarely multiply the tequila by ten (or however many people I’m serving) because the drink can be super strong and taste only of tequila. Start with the recipe for the pitcher below, and add more booziness or syrup to your liking.

That means lots of tastes for you! It’s okay. It’s weekend eve! You deserve it.

Key Lime Beergaritas
Yield: make a single or a pitcher!
Total Time: 15 minutes
Ingredients:
for a single:
2 ounces key lime juice
2 ounces beer (such as Corona)
1 ½ ounces silver tequila
1/2 ounce grand marnier liqueur (you can sub triple sec, I much prefer GM)
1 ounce simple syrup
fresh key limes for garnish
coarse salt for the rim
for a pitcher: (serves about 4)
1 cup key lime juice
1 cup beer
1/3 to ½ cup silver tequila
1/4 cup grand marnier liqueur (you can sub triple sec, I much prefer GM)
¼ cup simple syrup
fresh key limes for garnish
coarse salt for the rim
Directions:
The key to make these super delicious is to use frosty glasses! So a few hours (or the night) before, stick your glasses in the freezer. I suggest making a single serving first and taste it so you can add more/less tequila or syrup to your liking. Everyone is different and prefers their drinks a different way, so feel free to add more or less tequila, more simple syrup, more lime juice, etc. This is my absolute favorite combo listed above.
Before serving, rim the edge of the glass with a lime slice and then dip it in coarse salt to coat. Fill the glass with just a few ice cubes or even with crushed ice – my ice preference of late.
In a shaker, combine the lime juice, beer, tequila, grand marnier and simple syrup. Shake well for 30 seconds, then pour it over the crushed ice. Garnish with the extra limes.
Be sure to follow howsweeteats on instagram and tag your recipes with #howsweeteats! You can also post a photo of your recipe to the howsweeteats facebook page. I appreciate you so much!

Eeeep! Those adorable little green gems.
The post Key Lime Beergaritas. appeared first on How Sweet It Is.
February 1, 2017
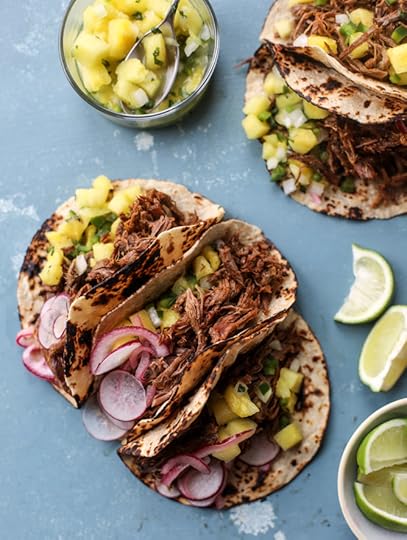
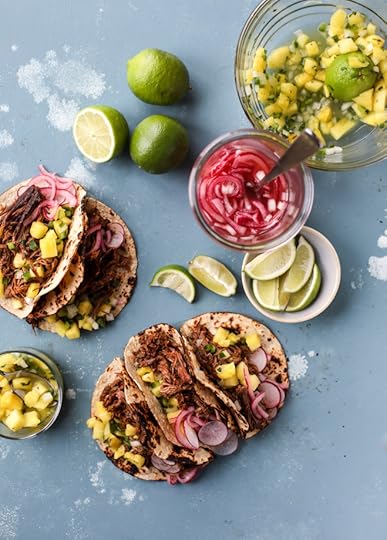
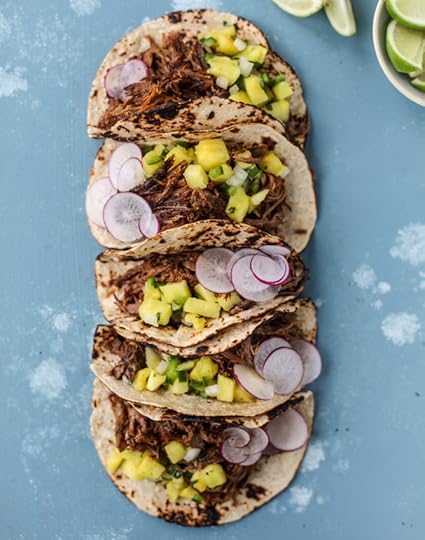
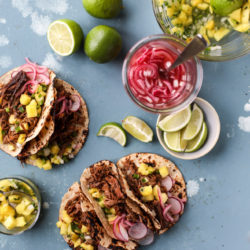
Slow Cooker Barbacoa Beef Tacos with Pickled Onions and Pineapple Pico.
I’m almost embarrassed to tell you the overtime my slow cooker has been working lately.
Since I’m knee deep in book photos, we have a ridiculous amount of food in our house at the moment. I’ve been trying every shoot day to make sure that I’m making SOMETHING that we can eat for dinner that night, because after prepping ten+ recipes everyday, cooking something new is just not in the cards. I also figured that, hey! While my slow cooker is out, I might as well make any and alllll slow cooker recipes that are headed for the new book.
And I keep finding insane ones I love in the process.
So.
My slow cooker?
Five straight days. Five! Different meals of course. It’s not like it ran nonstop for five days. More like I cooked a recipe overnight for about 10 hours and photographed it in the morning, started a new one in the early afternoon, threw it in the fridge and started another one that night. P.S. This slow cooker has still saved my life in the process.
And this was one of my favorite recipes!
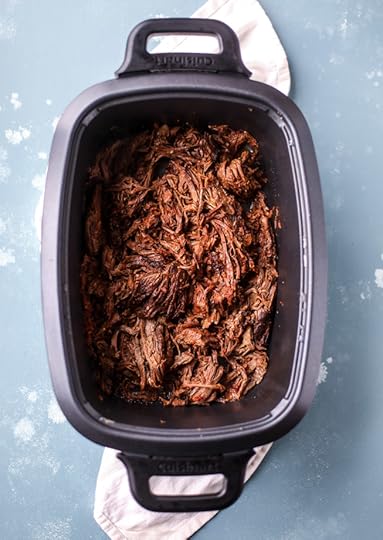
I love a delicious, tender, fall-apart barbacoa beef. I love it on salads, in rice bowls, in burritos, in enchiladas and especially in tacos.
Especially when those tacos are covered in pickled onions.
And pineapple pico!
And thinly sliced radish.
And cheeeeese.
Stuffed inside charred tortillas. That I char on my super fancy gas stovetop, like a freak. And occasionally almost burn the house down.
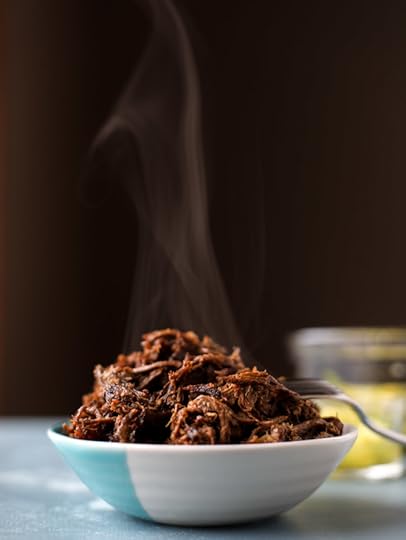
But guess what? This beef has so much flavor and I was so hungry as I was prepping it for dinner that I actually just ate the beef in a tortilla. Plain. Totally cheeseless. Salsaless. Cilantroless!
Apparently I was starvvvving.
Apparently I’ve lost my mind.
It is still super good, even without all the toppings. However… what is life without toppings?
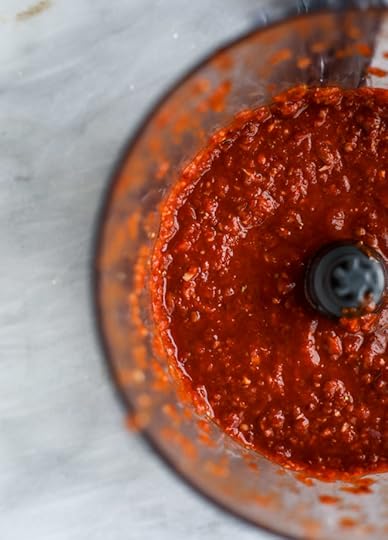
The barbacoa beef is ridiculously flavorful in itself, like I mentioned. I went off this base recipe from serious eats because I trust them the most and having zero experience in making barbacoa (but lots of experience eating it), I wanted it to be perfect. Simple and loaded with flavor.
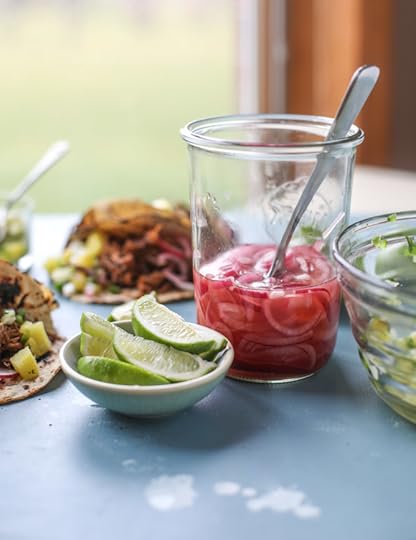
But it only gets better with a quick pineapple pico. It’s nothing new here and I love the flavor of it with beef. And the pickled onions?
Gosh. I never expected to like them so much. Even if I only like them because they are pink. But Eddie is obsessed with them and eats them right out of the jar. The whole combination is to die for!
We can eat tacos every day. Because I said so.
Slow Cooker Barbacoa Beef Tacos with Pickled Onions and Pineapple Pico
Yield: serves 4 to 6+
Total Time: 8 hours
Ingredients:
2 tablespoons grapeseed, canola or vegetable oil
1 (4 pound) beef chuck roast
1 teaspoon salt
1 teaspoon pepper
4 garlic cloves
2 chipotle peppers in adorable sauce
½ red onion, diced
3 tablespoons adobo sauce
3 tablespoons apple cider vinegar
2 tablespoons lime juice
1 teaspoon ground cumin
½ teaspoon dried oregano
¼ teaspoon ground cloves
corn or flour tortillas
pickled onions
1 red onion, thinly sliced
3/4 cup apple cider vinegar
1 1/2 tablespoons sugar
1 teaspoon coarse salt
pineapple pico
1 cup fresh pineapple cubes, diced
1 pint cherry tomatoes, quartered or diced
1 jalapeño pepper, seeded and diced
1/2 sweet onion, diced
3 tablespoons chopped fresh cilantro
1 lime, juiced
salt and pepper to taste
Directions:
Place the garlic, peppers, onions, adobo sauce, vinegar, lime juice, cumin, oregano and cloves in the bowl of your food processor and blend until combined.
Season the beef with the salt and pepper. If you have a slow cooker that you can sear in, heat it to the highest setting. If not, heat a large pot or skillet over medium-high heat. Add the oil (to either, whatever you’re using) and once it’s hot, add the beef and sear until deeply golden on every side, about 2 minutes per side.
Place the sauce mixture in the bottom of the slow cooker (and if the beef was seared in there, just lift up the beef and pour it underneath) with the beef over top. Cook on low for 8 to 10 hours, or until the beef falls apart.
pickled onions
Place the onions in a jar or cup. In a bowl, whisk together the vinegar, sugar and salt until the sugar and salt dissolve. Pour over the sliced onions. Let sit at room temperature for an hour. You can obviously make this ahead of time and once made, store it in the fridge in a sealed container or jar.
pineapple pico
Combine all the ingredients together in a large bowl and stir. Let sit for 30 minutes or so for the flavor to develop.
Be sure to follow howsweeteats on instagram and tag your recipes with #howsweeteats! You can also post a photo of your recipe to the howsweeteats facebook page. I appreciate you so much!

But why do I always JUST miss taco Tuesday?!
The post Slow Cooker Barbacoa Beef Tacos with Pickled Onions and Pineapple Pico. appeared first on How Sweet It Is.
January 31, 2017
Tuesday Things.
1. Say hello to the most perfect game day sheet pan nachos.
2. My end of January fantasy every year is that we go skiing even though we don’t ski and by skiing, I mean we go to ski lodge and sit by a fire and drink glasses of alcohol while watching skiers outside.
3. Absolutely obsessed with: how to prioritize when everything is important.
4. Considering a chocolate lovers week before Valentine’s Day. In a purely selfish move of course, because I have 27 chocolate recipe ideas and can’t narrow them down.
5. I’ve only been in Target ONCE the entire year! It’s a miracle.
6. What on earth what The Affair finale, aside from being a horrible waste? It was like 45 minutes of nothing. Bah! I also really still can’t get into Homeland. I have a feeling this definitely has something to do with my major Gilmore Girls obsession. It’s the only thing I put on if I turn on any TV so I feel like I’m basically living inside the show.
7. Related: the Gilmore Guys podcast? Worth it? I’m kind of tempted to start listening to it but holy cow, it’s a commitment. Those episodes are loooong.
8. Best dressed SAG awards? I’m going with the Stranger Things cast. And Yara Shahidi. Her dress was so fun! And I weirdly loved Nicole Kidman’s dress but I think it was just the color that sucked me in.
9. What are you making for the super bowl?! All I want is a huge vat of guac.
The post Tuesday Things. appeared first on How Sweet It Is.
January 30, 2017
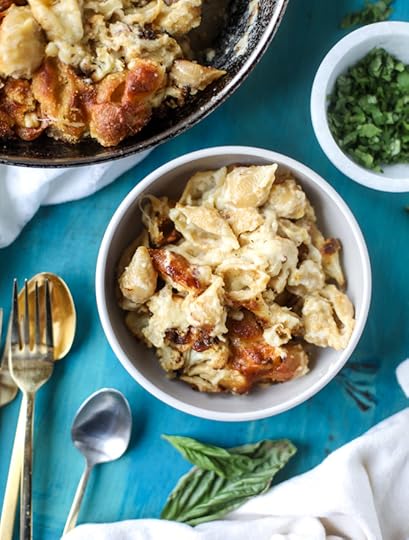
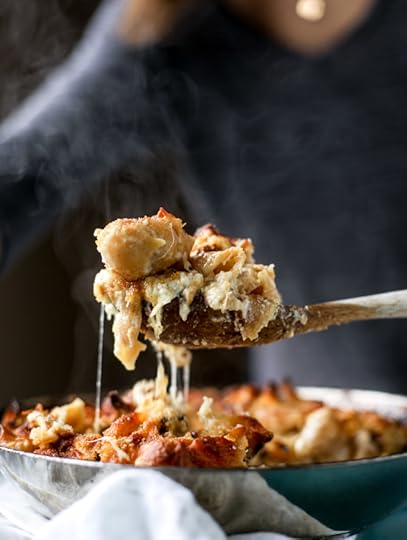
Roasted Cauliflower Shells and Cheese.
Since it’s Monday, I felt like vegetables were required.
This counts. Right?
RIGHT. I knew I could count on you.
Counting on my veg AND invisible internet friends this morning. So healthy all around!
Even though cauliflower was one of the first vegetables that I found remotely tolerable, I still don’t use it enough in different and unique ways. Years ago I discovered that when it was roasted – like really, really roasted – it almost took on a popcorn-esque flavor. Since then, I want to roast it for every single dish we make with it (hellllo charred cauliflower carbonara) and apparently I’m not stopping here.
At least this is better than other options that I felt were necessary when eating vegetable florets. I might have even considered chocolate sauce in my younger days. Proud of it.

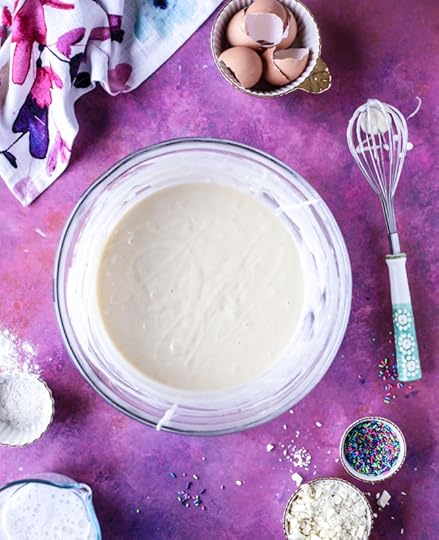
My heart skips a beat at the sight of this cheese sauce. And I just wrote “beet” so I must have vegetables on the brain. And then I wrote “site” instead of “sight” so I’m trying super hard to not hate myself at the moment. THE INTERNET HAS DESTROYED ME.
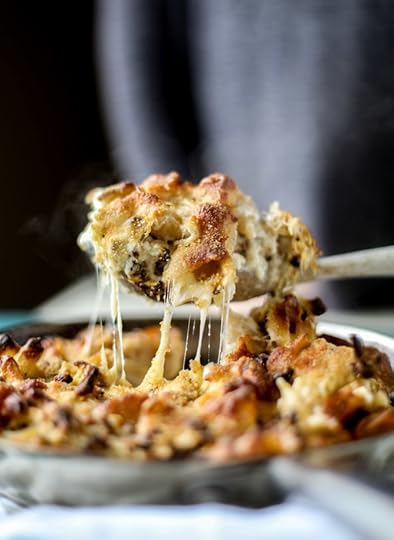
But look at that stringy, delicious cheese! Heart hurts.
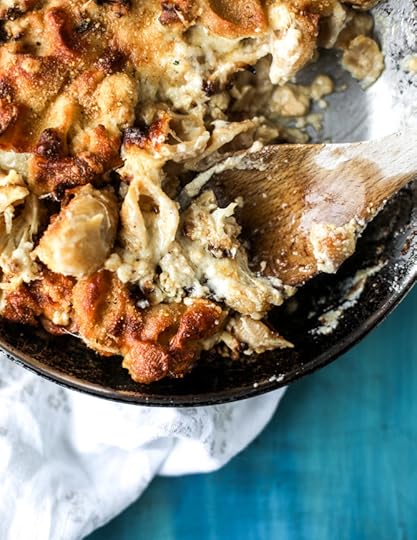
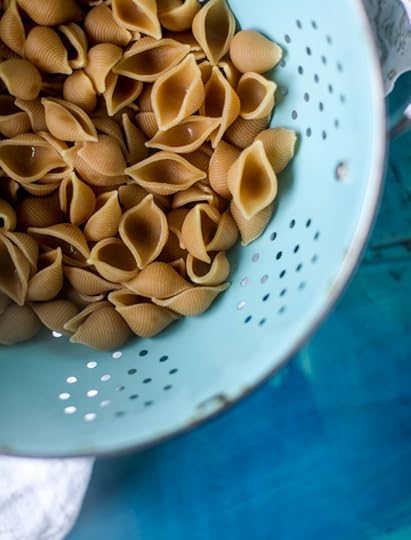
I used my favorite whole wheat shells, a super melty fontina and havarti cheese sauce and lots of roasted cauliflower. Contrary to other recipes I’ve seen, I did NOT make the cheese sauce out of cauliflower. I simply roasted the heck out of some cauli and threw it into the shells and sauce.
It was SO good. So, so, so, so good.
Even if it does look like we are on the beige diet here.
Roasted Cauliflower Shells and Cheese
Yield: serves 4
Total Time: 1 hour 20 minutes
Ingredients:
1 head cauliflower
2 tablespoons olive oil
1/4 teaspoon salt
1/4 teaspoon pepper
¼ teaspoon garlic powder
3 cups whole wheat shell pasta
3 tablespoons unsalted butter
3 tablespoons flour
2 cups milk
4 ounces fontina cheese, freshly grated
4 ounces havarti cheese, freshly grated
2 teaspoons dijon mustard
¼ teaspoon freshly grated nutmeg
pinch of salt and pepper
Directions:
Preheat the oven to 425 degrees F. Place the chopped cauliflower on a baking sheet. Toss it with the olive oil, salt and pepper. Sprinkle with the garlic powder. Roast for 20 to 25 minutes, until golden and slightly charred.
Reduce the oven heat to 375 degrees F. Bring a salted pot of water to a boil.
Heat a pot over medium-low heat and add butter. Once sizzling, whisk in the flour and cook until fragrant and golden in color. Slowly whisk in the milk. Cook until the mixture thickens, about 5 to 6 minutes. Reduce the heat to low and stir in the cheeses, one small handful at a time, until melted. Stir in the mustard, nutmeg and a pinch of salt and pepper.
Cook the pasta according to its directions. Once the pasta is cooked, stir it and the cauliflower into the cheese sauce.
Pour the pasta in a dish and top with the breadcrumbs. Bake for 30 to 35 minutes, until golden and bubbly. Top with fresh herbs before serving.
Be sure to follow howsweeteats on instagram and tag your recipes with #howsweeteats! You can also post a photo of your recipe to the howsweeteats facebook page. I appreciate you so much!
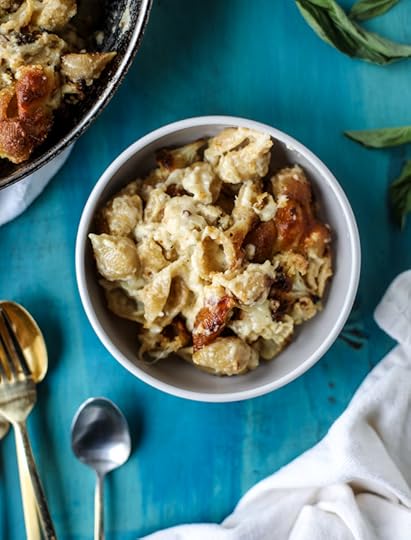
Sometimes this is my version of feel good food.
The post Roasted Cauliflower Shells and Cheese. appeared first on How Sweet It Is.
January 29, 2017
January Favorites: Beauty.
We made it!

To the end of January and I went a little skincare crazy because my face was about to flake off in the cold, dry weather.
Most of my days this month were filled with cookbook photography, so I wasn’t necessarily wearing the fullest face of makeup. I did my basics: tinted moisturizer, mascara, concealer and brows – and if I remembered, something balm-like on my lips! Around this time I always get into really bright shades (corals, oranges and pinks) because they brighten my mood so much. I’m looking for some to try and may go after this Burberry one! I’ve never tried any of the Burberry makeup (and haven’t even had a desire too) but then I saw the bright crimson shade and I was DEAD.
So now, while I only have six things that I really have been wowed by this month… here they are!

Hourglass Lip Stylo in Creator. This is my perfect “my lips but better” shade! I’m always looking for one, but it’s so hard to go on recommendations since everyone has different lip colors. Not only do I love how this feels (it’s not SUPER matte, but it’s not shiny either and it is comfortable on the lips and way too easy to apply), the shade is just so pretty. It’s like one shade pinker than my lips. I want these in all the colors! (of course.)
Sol de Janiero Moisturizing Shower Cream Gel. While I haven’t brought the bum bum cream back out quite yet (it’s a little too tropical smelling for my January days), I bought the shower gel and LOVE IT. It smells exactly the same (which is like heaven, hello), but it doesn’t linger like the cream (where the scent lasts forever!). This way I can get my fix. And it is very moisturizing.
It Cosmetics CC Illumination Cream SPF 50. You might remember that I used the original version of this when I started talking about my beauty favorites regularly. I ran out and probably around the same time grabbed the Complexion Rescue (which I still LOVE!) and started using that. While I do still love that, it is a very light coverage. I always want something in between a full foundation and light coverage and since I’m all about the glow, was super excited to try the illuminating version of the CC cream. OMG. I love it so, so much. It is thicker than I’m used to working with, especially on my dry skin, but as long as I’ve moisturized well, it goes right on. I love the illuminating effect!

Drunk Elephant C Firma Day Serum. I’ve wanted to add in some vitamin C to my skincare and this was the best rated product I found. I loooove Drunk Elephant products and this feels amazing on my skin. I swear my skin looks better somehow already – maybe more… vibrant? Either way, for right now I’m using it every other morning under moisturizer.
Dr Jart Water Sleeping Mask. This has been a favorite for a long time but it’s really saving my skin right now. Here’s the thing. I can’t go ONE day without my nighttime skin routine in the winter because I’m so dry. My face is a mess if I don’t moisturize or do every step at night. I almost always do, but I’ve had a few late nights on days where I didn’t even wear makeup, and I just used a quick makeup wipe before I went to bed. NOT GOOD. This saved my skin big time after those days. I’m using this about 4 days a week right now.
It Cosmetics Bye Bye Makeup Melting Cleansing Balm. Okay this is a love/hate relationship. I LOVE cleansing oils and use them every time I wear any makeup on my eyes. My go-to has always been the MAC cleanse off oil because it has a pump! Yes, I’ve used coconut oil and I love it, but having the pump is just so easy and convenient and I swear the makeup melts in seconds. Now, I am really loving this product because it’s so gentle, has zero fragrance (zero!) and takes everything off. But since I’m still opening up a jar and scooping it, it would be just as easy to use coconut oil. Hmmm. On the fence.

What spring things are you loving right now?! I heard that there are some new Cover FX enhancing drops coming out (rose gold?!) and I’m super excited about those. Eeeep.
{as usual, none of this is sponsored and all of these products were purchased by me. i am not affiliated with any of the companies above, nor do i accept free products. just love to talk about what i like, makeup junkie to makeup junkie. there are a few amazon general links above. thank you for being here!}
The post January Favorites: Beauty. appeared first on How Sweet It Is.
Cheesy Stuffed Pesto Garlic Bread. {Video!}
[this post is in partnership with my favorites, DeLallo Foods! I’m created some delicious recipes and videos that you’ll see over the next few months. xo]
Let me profess my love to you with cheesy pesto garlic bread.

There is definitely enough to go around!

Okay, so you want to know what I love about embarrassingly easy recipes like this? It can be a fancy snack… or a SIDE!
Eddie is the king of side dishes. I wrote this about him years ago, but he loves multiple side dishes with dinner. And things that I don’t even want or need a side with (i.e. pizza, spaghetti and meatballs, etc), he always wants a side.
Shockingly enough, many times garlic bread works as a side dish for him which makes dinner time ridiculously easy. While I would never be able to make an entire loaf of bread like this for our dinner (well, I guess I totally could, but then we’d be forced to eat it all and hate ourselves in the morning, whomp whomp), I LOVE this idea as a garlic bread side dish for a dinner with friends or family. It can easily be made in one loaf and everyone just pulls their slice off!
Easy peasy.

On the slip side, it’s completely appropriate to serve a big loaf of cheesy bread at any party. I mean, it’s usually the first snack I gravitate to at a party, and throw in some pesto? And some roasted garlic? Which is caramely and sweet?
I.cannot.get.enough.
EEEEEEEEEEP.

While I’m still kind of wishing for one big snow in these parts, the one thing that is killing me is the major lack of fresh herbs. We couldn’t even find basil in a package last week at the grocery store and ended up buying an entire basil plant that has already died. WHYYYY.
But! Enter one of my favorite things from my loves at DeLallo’s: the basil pesto. This pesto is so freaking good and one of the sole reasons I started to love basil pesto a few years ago. Before that, I’d only do arugula pesto with tons of cheeeese.
And while I do like freezing a batch of pesto in the fall each year as my herbs go bye bye, it’s gone within a few months. So we have LOTS of this on hand and use it for pizzas and pastas and everrrrrything in between.
Even better?! Here’s a peek at some of my favorite pantry items we grab at DeLallo’s each week! They are also giving 10% off all products on the site if you use the code SWEET10. Wahoo!


Cheesy Stuffed Pesto Garlic Bread.
Yield: serves 4 to 6
Prep Time: 45 minutes
Cook Time: 25 minutes
Ingredients:
1 head of garlic
1 tablespoon olive oil
1 loaf of Italian bread
½ cup unsalted butter, softened
1 jar of DeLallo basil pesto
1 cup freshly grated fontina cheese
1/4 cup finely grated parmesan cheese
Directions:
To roast the garlic, preheat the oven to 350 degrees F. Slice off the top portion of the garlic head to reveal the cloves. Lightly rub back and forth to remove the paper and peel any excess paper off. Pour a bit of the oil over each bulb. Wrap the bulbs tightly in foil and place in the oven. Roast for 45 to 60 minutes, until the cloves are caramel and golden in color. You can do this process ahead of time!
Heat the oven to 400 degrees F. Line a baking sheet with foil and place the bread on the sheet.
Take the bread and make 1-inch slices ¾ of the way down into the bread, leave the whole loaf intact.
Place the butter in a bowl. Squeeze in the roasted garlic cloves. Add about 2 tablespoons of the pesto and stir and mash the mixture together. Take the butter and spread it inside every slice and crevice of the bread, reserving just a bit. You can use a little more of the pesto and spoon and spread it in the slices and crevices. Take the fontina cheese and stuff it inside the slices and crevices.
Brush the top of the bread with the remaining garlic pesto butter. Bake for 20 to 25 minutes, until golden and bubbly. Remove and sprinkle it with the parmesan. Serve while it's hot!
Be sure to follow howsweeteats on instagram and tag your recipes with #howsweeteats! You can also post a photo of your recipe to the howsweeteats facebook page. I appreciate you so much!

I think it can be lunch and dinner too. And breakfast.
The post Cheesy Stuffed Pesto Garlic Bread. {Video!} appeared first on How Sweet It Is.
January 28, 2017
Currently Crushing On.

{via}
Happy Saturday! After another busy week, I’m so glad it’s the weekend. And we woke up to some snow today! No huge plans are on the schedule for us, so I’m hoping for a few low key days. What are you guys up to?!
Be on the lookout for my beauty and lifestyle favorites coming in the next few days.
And P.S. you should make some olive oil and dark chocolate banana muffins!
Favorites of the week:
triple chocolate avocado bread. omg.
really want to try these overnight turmeric chia oats.
tomato coconut curry soup! i need it.
too adorable: circus animal cookie marshmallows.
when you want to quit your healthy resolutions. so good.
the sound of this almond crusted chicken piccata… yes.
how to make temporary tattoos. my 90s heart explodes.
kale and white bean pizza sounds fantastic.
this chocolate fudge pecan pie is ridiculous.
amazing greek turkey burgers with tzatziki sauce.
oooh this cheesy vegetable pasta bake looks awesome.
blank tahini morning buns. how lovely!
The post Currently Crushing On. appeared first on How Sweet It Is.
January 27, 2017
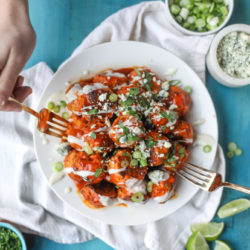
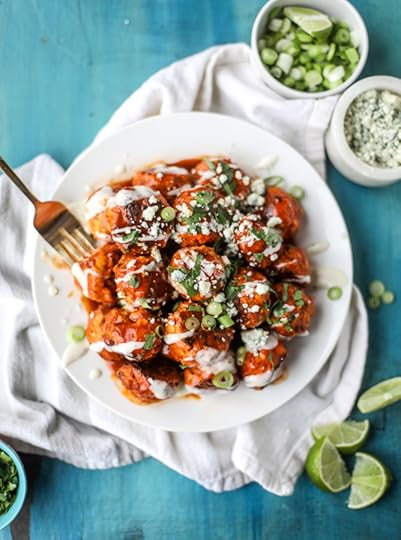
Slow Cooker Buffalo Chicken Meatballs.
It’s time for a reeeeally good game day snack.

One that you barely have to work with. One that you can make and throw in the slow cooker and forget about while you watch all the commercials and drink all the sangria.
This sounds like fun! Please invite me.

If you’re on the hunt for superbowl eats, I have a bunch of them (like, 190!) right here. I’m thinking about making some nachos, a dip and a big house salad, along with something in the slow cooker. If not these meatballs, probably something sandwich-like. Have you tried that whole Mississippi roast thing? It’s pretty darn good.
The problem is that I’m so fly-by-the-seat-of-my-pants when it comes to party planning. I know what I want TODAY and what sounds good TODAY but what will I want a week from now? Don’t make me choose.

I love this recipe so much more than I expected to. But! There are some important things that you really need to do.
First, ground chicken. Not ground chicken breast. I made them once with ground chicken breast and they were so, so dry. So unappetizingly dry.
Next, butter in your buffalo wing sauce. It’s my go-to ingredient in all of my buffalo chicken recipes, but this time you’re going to cube it and add it to the slow cooker. Weird and perfectly delicious. It makes a huge difference, I swear!

Third, all the toppings! I sound like a broken record if you’ve made my other buffalo-inspired recipes, but these are the required goods for LOADS of flavor:
Crumbled blue cheese!
Ranch dressing drizzle, and I don’t even like ranch so trust me.
Snipped chives…
Thinly sliced green onions…
And a sprinkle of cilantro.
YES YES YES.

I’m not really a meatball-on-a-stick girl. There is something about meatballs that scream “I belong in a bun with cheese!” to me, so if that’s your game plan, we are right on the same page.
But don’t get me wrong. You can absolutely serve these as is, with a little toothpick poked in the center for easy grabbing. I just don’t always go for a big bite of meat and want to give the carbs some loving. Grab a few brioche buns for those like me and keep some extra blue cheese on the side. Maybe even cheddar!
Maybe even all the cheese.

Slow Cooker Buffalo Chicken Meatballs
Yield: makes about 30 meatballs
Ingredients:
2 pounds ground chicken
3 tablespoons buffalo wing sauce
1/4 cup panko bread crumbs
1/2 teaspoon pepper
1/2 teaspoon salt
1 teaspoon dried parsley
1 teaspoon dried basil
¼ cup crumbled gorgonzola cheese
1/3 cup romano cheese
1 tablespoon ranch dressing
1 tablespoon olive oil
1 egg
2 green onions, thinly sliced
2 garlic cloves, minced
1 tablespoon vegetable or canola oil
2/3 cup buffalo wing sauce
6 tablespoons butter, cut into pieces
to serve: chopped cilantro, chopped chives, sliced scallions, ranch dressing for drizzling, crumbled blue cheese
Directions:
In a large bowl, add chicken, egg, oil, ranch dressing, green onions, cheeses, breadcrumbs, garlic, salt, pepper, basil and parsley. Mix to combine, gently tossing a few times with your hands. Don’t overmix – it will result in tough meatballs!
Roll the chicken into 1-inch meatballs (about 2 tablespoons of chicken). If your slow cooker can sear and saute food, you will want to heat the slow cooker to the highest setting to sear the meatballs. If it doesn't, you can heat a skillet over medium heat and add the canola oil, the brown the meatballs until just golden on the outsides. I find that this helps the meatballs hold together as opposed to adding them raw to the slow cooker.
Place the browned meatballs into the slow cooker and cover with the buffalo wing sauce. Add the butter pieces on top. Cover and cook on low for 4 to 6 hours. If you're home at the time, you can toss the meatballs and stir them a few times.
To serve, cover with the ranch dressing drizzle, chopped chives, green onions, cilantro and blue cheese.
Be sure to follow howsweeteats on instagram and tag your recipes with #howsweeteats! You can also post a photo of your recipe to the howsweeteats facebook page. I appreciate you so much!
These might work on pizza too. Just sayin’.
The post Slow Cooker Buffalo Chicken Meatballs. appeared first on How Sweet It Is.
Jessica Merchant's Blog

- Jessica Merchant's profile
- 53 followers

