
Jessica Merchant's Blog, page 366
June 10, 2017
Currently Crushing On.

Hey hey hey! Happy weekend! Tell me! How are you? Lots of exclamation points in your responses, I hope.
We’re doing great over here after a super busy week. This weekend, we’re heading to my sister-in-law’s baby shower and let’s be real: counting down the days until next Friday when the newest Cars 3 movie comes out. Max has been waiting forEVER.
Speaking of, in a few days I’ll be sharing Max’s 2.5 year update as well as our current favorites over on the baby page! Crazy.
P.S. since you really liked when I shared a few older recipes last week, I’m throwing in some of my favorite oldie but goodies below! xoxo
Favorite links of the week:
GUYS. freaking s’mores sliders. you have to see these!
crispy barbecue beans! these sound so good.
this beautiful, incredible, amazing garden inspo.
and yes yes yes please to chocolate peanut butter banana bread. LOOK at that.
the most gorgeous beet hummus ever.
elote pasta salad. OMG.
all of these no-churn ice creams? amazing.
lemon herb pasta salad. so much love.
obsessed with this mediterranean tomato and feta dip.
i will never stop loving a good old fashioned dirt dessert.
and then all the deets for a detox smoothie.
sweet tea pork chops with grilled peaches. want to make this!
delish lemon pudding with blueberry compote. that combo!
And now, five recipes you should try this weekend!
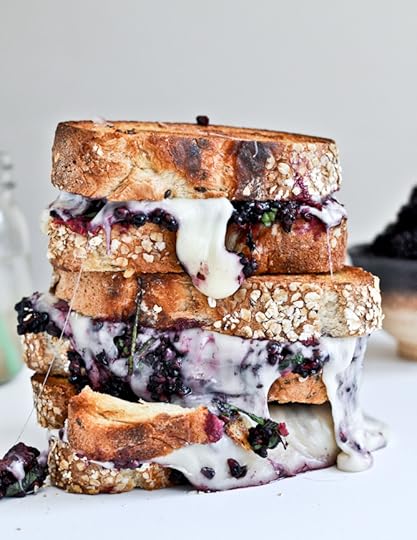
Fontina + Blackberry Basil Smash Grilled Cheese. This is insane!
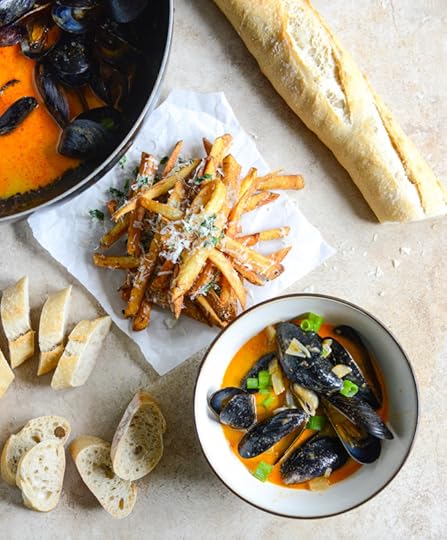
Coconut Curry Steamed Mussels. Grab some fries and bread and this is amazzzzing.
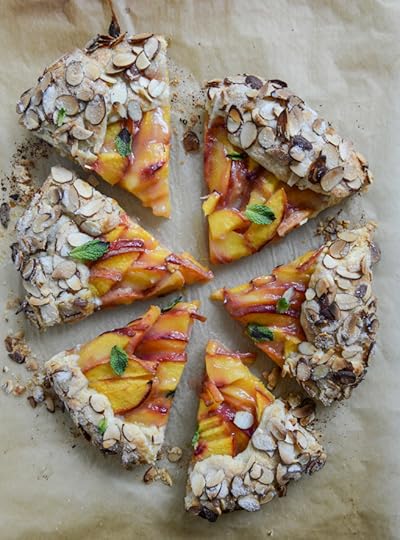
Ginger Peach Galette. For those of you who also hate making pie!
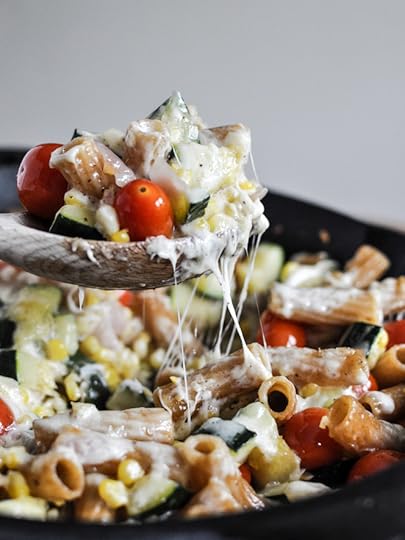
Brown Butter Garden Vegetable Pasta. This is one of the most popular recipes here on the site! So good.

Fudgy Avocado Brownies. Oh yes. They are a thing.
Have a great one! xoxoxo
The post Currently Crushing On. appeared first on How Sweet It Is.


June 9, 2017
Let’s Set Up a Taco Bar for Father’s Day!
[This post is sponsored by McCormick! In 2017, I’m teaming up with them to share some delicious recipes that I can’t wait to tell you about!]
Let’s taco ‘bout this taco party!
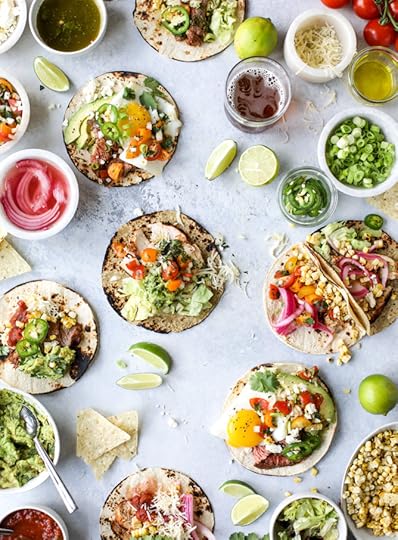
I might not be able to participate in most real bar activities these days given the bun in my oven, but I CAN fully participate in a taco bar! Sounds like a good weekend brunch plan to me, even if I have to subtract the margaritas and mojitos.
And, what better way to celebrate Father’s Day next weekend than setting up a big old taco bar where everyone can make their own tacos? Hello. Yes please.
The weekend before my first cookbook released, Eddie put together a little party and we had a taco stand actually come to our house. It was super fun and while they offered a few different flavor options, they made they tacos fully before serving. Ever since, I’ve wanted to set up a huge taco bar with my own toppings so I could have a ton of different tacos at once, of course. I mean, these are the things I can get away with being a millennial and all.
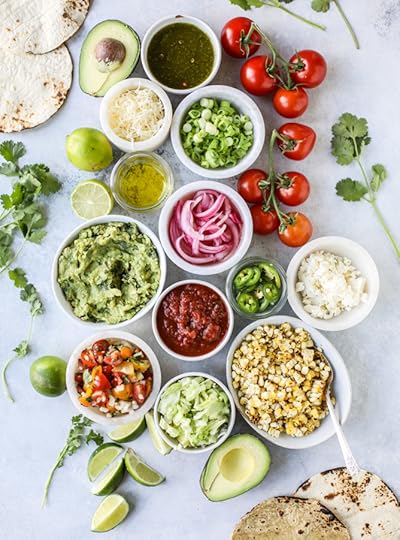
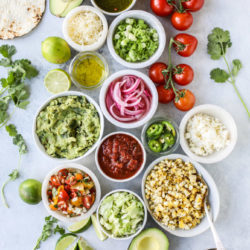
Can you even take those beautiful toppings?! AH!
Here’s how I did this thing.
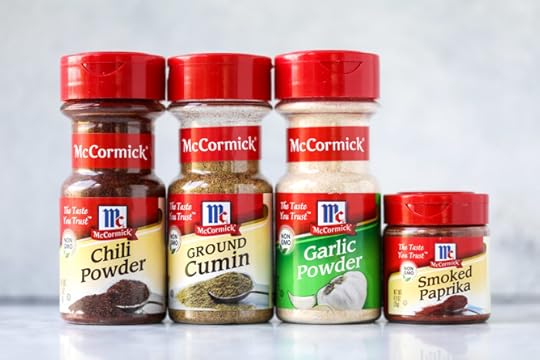
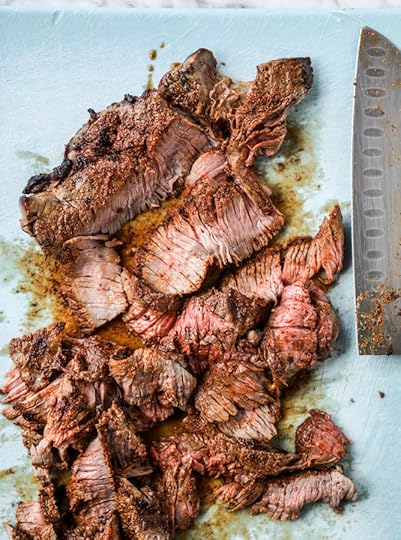
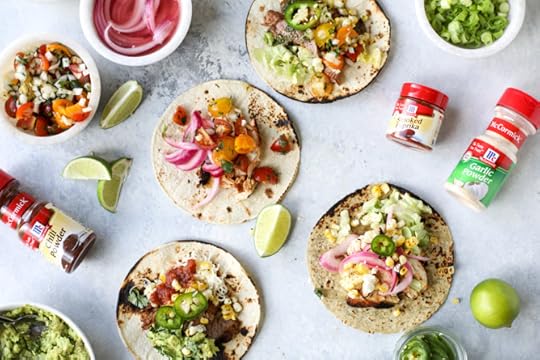
First up, a super quick and basic homemade spice mix. An easy one that would work on both chicken and flank steak, so I could give both a quick rub and throw them on the grill. I used the McCormick Garlic Powder, McCormick Smoked Paprika, McCormick Ground Cumin and McCormick Chili Powder – mixed it all together and off to the smoky grill we went!
When it comes to the toppings? Uh, hello – life is alllll about the toppings! I like to serve some traditional taco toppings, because my family doesn’t love when I make “weird food,” so we have salsas (let’s have a variety!) and then some shredded lettuce, cheese and guacamole.
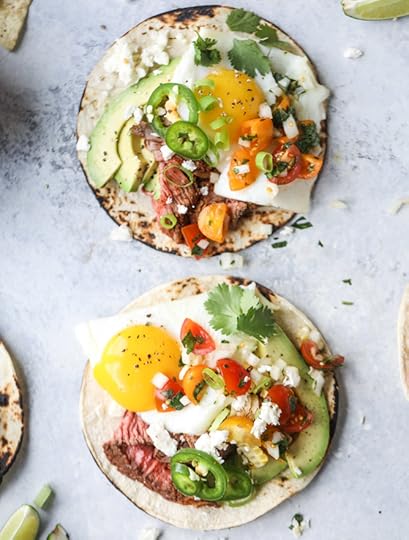
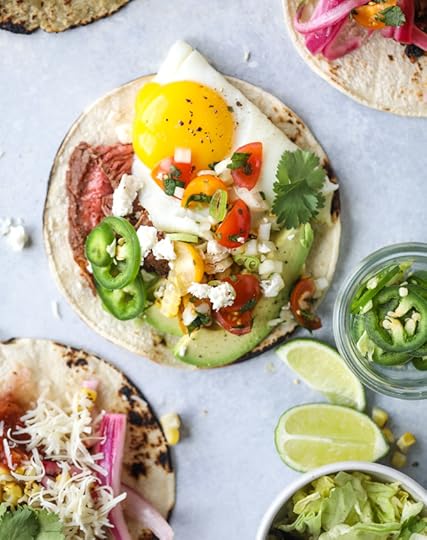
But! On my tacos I also love pickled onions, grilled corn and some queso fresco cheese – it’s all there and we have the best of both worlds!
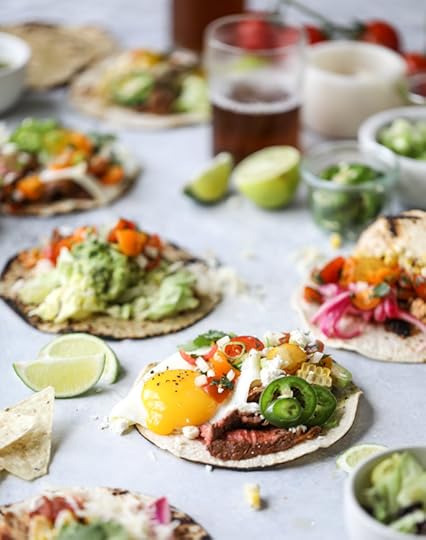
And perhaps my favorite part is the fried egg! Or should I say, Eddie’s favorite part. His ideal taco was filled with steak and topped with an egg. What isn’t good with an egg on top, after all?
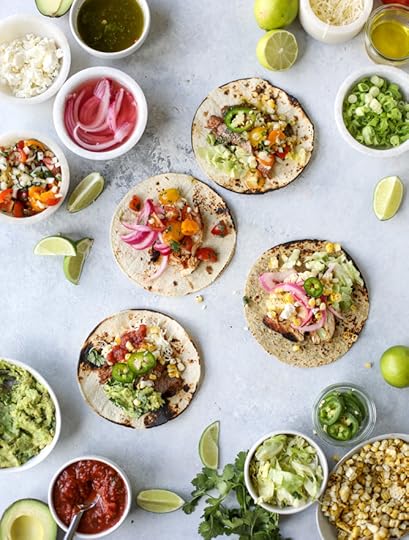
I realize that it looks a bit complicated, but all of these toppings can be prepped ahead of time. Even the guac!
I often make guacamole an hour or two before serving it, cover it tightly with plastic wrap and store it in the fridge. This is just so I’m not making a gigantic mess in the kitchen while everyone is over. You know? You can also rub the steak and chicken and let it sit in the fridge for a few hours or even overnight. All it takes is setting a few things out and grilling your meat to put the whole shebang together and give your dad or husband a super fun day (or at least a taco?) to remember.
And then, the fun for Father’s Day begins!
If I was any good at math, I’d be able to tell you the exact number of combinations you can put together with all of these delish toppings. But since my only math skill is beginner’s addition, let’s just say that two tacos plus two tacos equals HEAVEN.
Let's Set Up a Taco Bar for Father's Day.
Yield: Serves 6 to 8 with leftovers!
Total Time: 1.5 hours
Ingredients:
1 (2-pound) flank steak
1 pound boneless, skinless chicken thighs
1 teaspoon salt
½ teaspoon black pepper
1 tablespoon McCormick Chili Powder
1 tablespoon McCormick Ground Cumin
2 teaspoons McCormick Garlic Powder
2 teaspoons McCormick Smoked Paprika
12 to 16 corn or flour tortillas for serving
quick pickled onions
1 red onion, thinly sliced
3/4 cup apple cider vinegar
1/3 cup water
1 1/2 tablespoons sugar
1 teaspoon coarse salt
my favorite quick guacamole
3 avocados, chopped
1 jalapeño pepper, seeded and diced
1/4 cup diced sweet onion
1/4 cup fresh cilantro, chopped
1 lime, juiced
1/4 teaspoon salt
1/4 teaspoon pepper
quick pico de gallo
1 pint cherry tomatoes, quartered
¼ sweet onion, diced
3 tablespoons chopped fresh cilantro
1 lime, juiced
other topping options
grilled corn, cut from the cob
fresh cilantro
salsa (red or green!)
sliced scallions
freshly grated cheddar cheese
crumbled queso fresco cheese
shredded lettuce
sliced fresh jalapeño pepper
sliced avocado
fresh lime
Directions:
Place the steak and chicken in two baking dishes.
In a bowl, stir together the salt, pepper, chili powder, cumin, garlic powder and smoked paprika. Sprinkle it over the flank steak and the chicken thighs. If desired, you can let these sit in the fridge to marinate!
Heat your grill to the highest setting. Place the flank steak directly on the grill. If it's about 1-inch thick, grill for 5 to 6 minutes per side to still have some pink in the steak. When you remove the steak from the grill, let it rest for 10 minutes.
After 10 minutes, slice the steak against the grain in to super thin strips.
Place the chicken on the grill. Grill it about 5 to 6 minutes per side, then remove and let it sit for 10 minutes. Slice the chicken or pull it apart with two forks.
While the steak and chicken are resting, set out your toppings! Many of them can be prepped and made ahead of time and if you’re serving a crowd, I suggest getting the prep work out of the way. You can also wrap your tortillas in foil and warm them in a 200 degrees F oven.
Grab your friends and have a taco party!
quick pickled onions
Place the onions in a jar or cup. In a bowl, whisk together the vinegar, water, sugar and salt until the sugar and salt dissolve. Pour over the sliced onions. Let sit at room temperature for an hour. You can obviously make this ahead of time and once made, store it in the fridge in a sealed container or jar.
my favorite quick guacamole
In a bowl, mash the avocado with a fork. Stir in the, peppers, onion, cilantro, lime juice, salt and pepper. Mix until combined and you have the desired consistency of smashed versus mashed (< your call!). Taste and season additionally with salt and pepper or more lime juice if needed.
quick pico de gallo
In a bowl, mix together the tomatoes, onion, cilantro and lime juiced, stirring well. Season with a pinch of salt and pepper.
Be sure to follow howsweeteats on instagram and tag your recipes with #howsweeteats! You can also post a photo of your recipe to the howsweeteats facebook page. I appreciate you so much!
P.S. if tacos aren’t your speed, last year we did a flank steak toppings bar for Father’s Day! Ooooh yes.
The post Let’s Set Up a Taco Bar for Father’s Day! appeared first on How Sweet It Is.
June 8, 2017
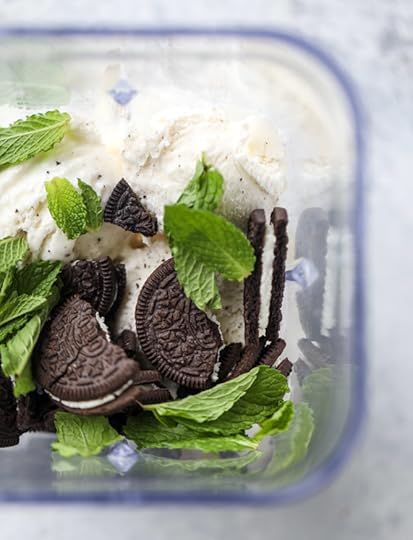
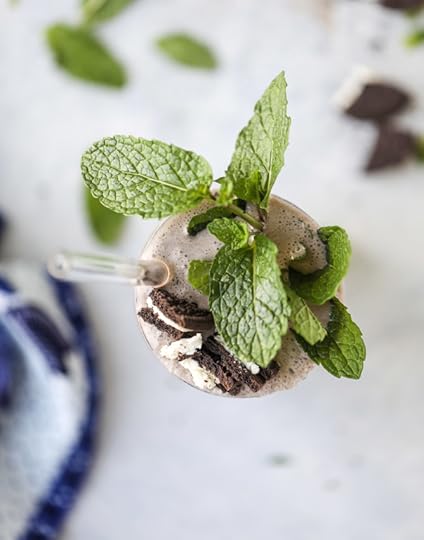
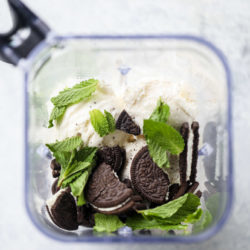
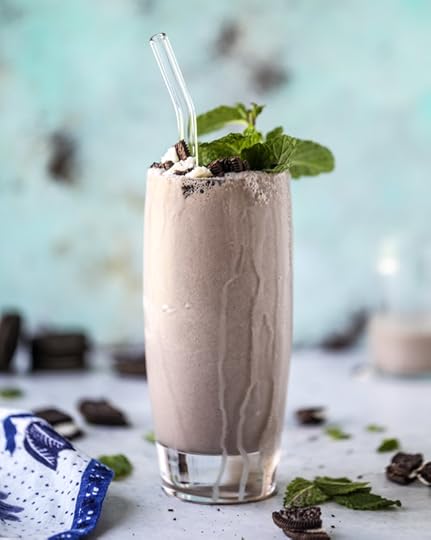
Fresh Mint Cookies and Cream Shake!
Hello hello! Today we talking about an embarrassingly easy SHAKE that needs to be in your summer rotation.
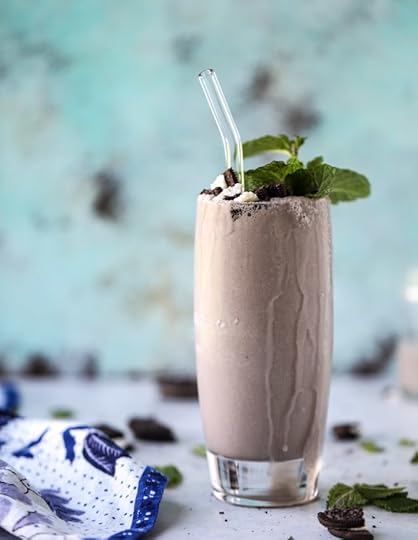
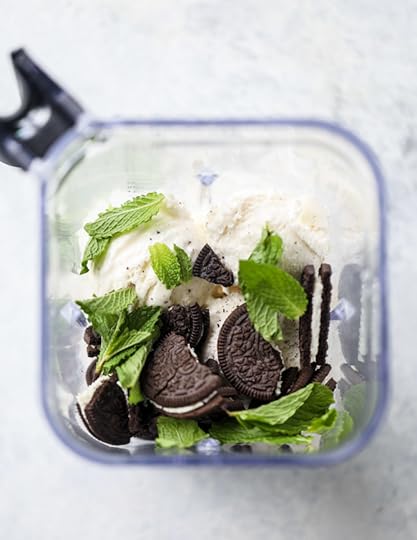
When blended it might not look like a beauty, but it’s filled with fresh mint! And cookies! And cream! In the form of ice cream, of course. I think my inner ten-year-old just flipped from milkshake excitement.
And yes, I’m trying to be a legitimate friend and tell you how to blend things in a blender. I mean.
Eddie’s favorite ice cream flavor is cookies and cream. His favorite dessert, period, is anything cookies and cream. Even when we get froyo, he actually LAYERS the crushed cookies into his yogurt. He gets a little yogurt, scoops in the cookies, gets more yogurt, scoops more cookies and repeats it, like, seven more times until he has a huge bowl.
So! I made these cookies and cream milkshakes with the thought of Father’s Day in mind. But since I’m a terrible, selfish, horrible, no-good person, I put fresh mint in two of them!
Eddie doesn’t like mint and chocolate together. He thinks it tastes like chocolate toothpaste, which in a word, is horrific.
I couldn’t resist though. My herb garden is killing it this year, I’m guessing since we’ve got so much rain. I can’t make mojitos and I planted my mint in a separate pot this year (yes yes, going to share everything I planted over on Crumbs very soon!) – and I already have a ton of it! It just makes everything taste so… fresh.
Plus, you might remember from way way waaaay back in the day when I shared some milk chocolate and fresh mint cupcakes. I mean, sure, I might have also dubbed them toothpaste cupcakes, but they were super good! A bunch of you still make them to this day which totally blows my mind.
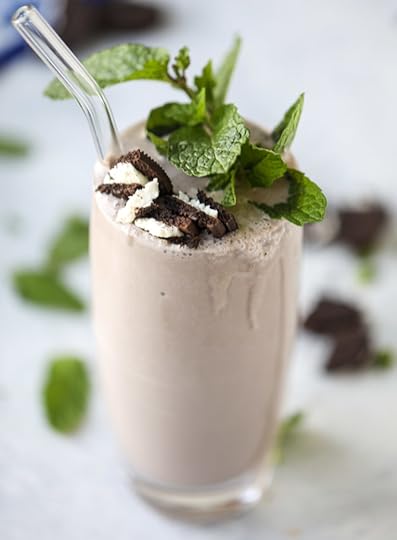
Isn’t this basically health food since there is a green leaf that resembles a small piece of lettuce in my shake? I think so. for sure.
Fresh Mint Cookies and Cream Shake
Yield: serves 2 to 4
Ingredients:
1 1/2 cups vanilla ice cream
1/2 cup milk (almond, coconut, cow's, your choice!)
8 chocolate sandwich cookies (like oreo's, obvs)
1 handful of fresh mint leaves, plus extra for garnish!
1 teaspoon vanilla extract
Directions:
Add everything to a blender and... blend it! Serve with a big old sprig of fresh mint AND some whipped cream if it's not too rich. Maybe some cookies on top. Go get it.
Be sure to follow howsweeteats on instagram and tag your recipes with #howsweeteats! You can also post a photo of your recipe to the howsweeteats facebook page. I appreciate you so much!
P.S. a little drop of Kahlua wouldn’t be so bad in here…
The post Fresh Mint Cookies and Cream Shake! appeared first on How Sweet It Is.
June 7, 2017
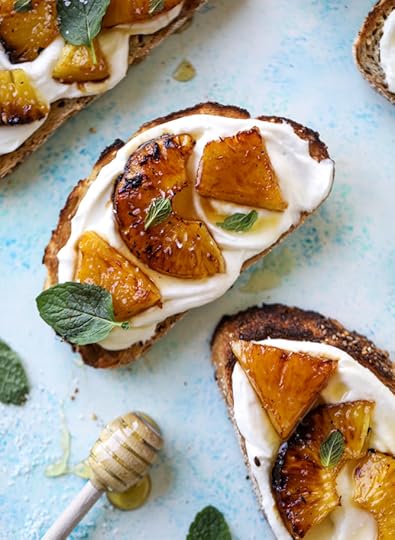
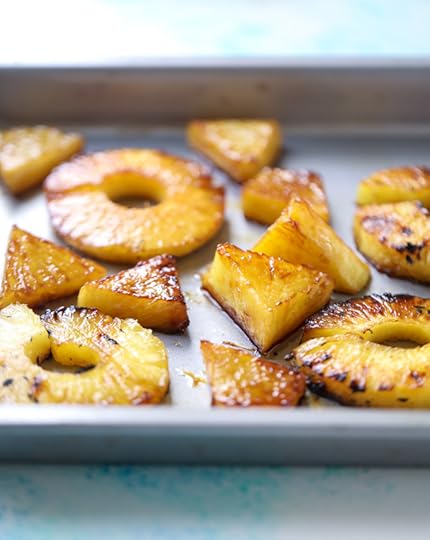
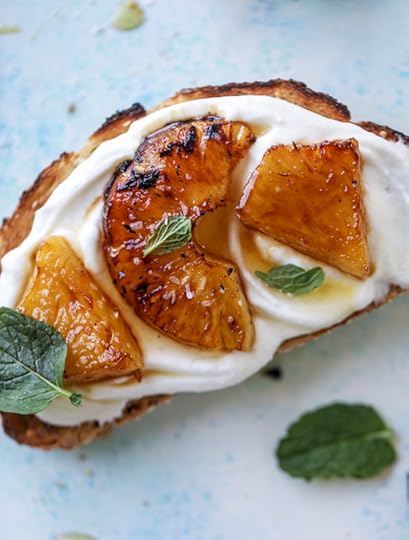
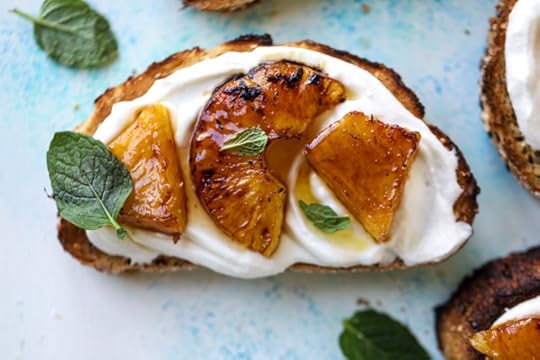
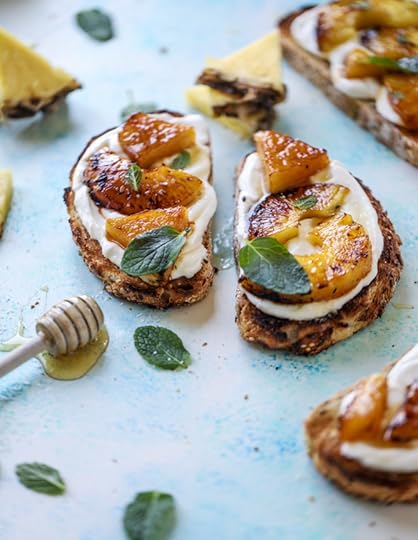
Roasted Pineapple Whipped Ricotta Toast with Sea Salt.
I’m having a toast problem.
I will seriously put ANYthing on a piece of toast. It is getting ridiculous.
But! I have good reasoning.
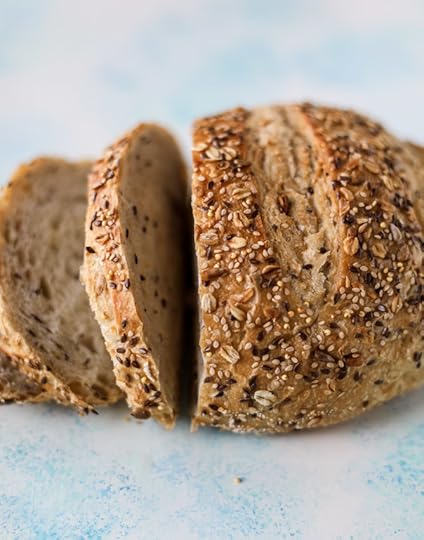
Just look at this grainy, seedy bread! Would you want to throw everything on top of it too?
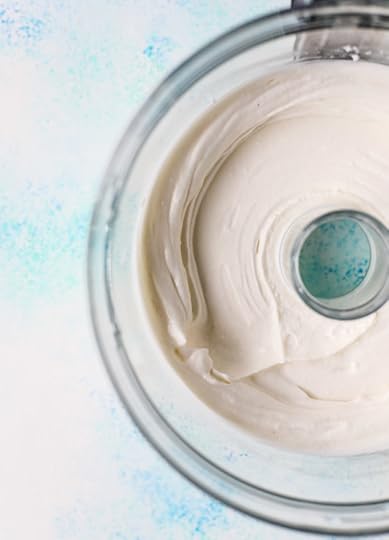
Whipped ricotta is not a new thing for me on toast – you know this! – but with roasted, caramely pineapple? Ooooooh. It’s (embarrassingly) the bomb.
Given my insane fruit obsession, pineapple ranks up there. There aren’t many fruits that I won’t eat by the bowl full. I love most fruits when they are roasted or grilled too, and pineapple is no exception. Especially with the freshness of the mint! And the creaminess of the ricotta. And the crunchiness of the toast.
My texture brain goes into overload.
There aren’t many people who would consider this a meal (um, hi, my husband?), and maybe I wouldn’t either. It probably wouldn’t be lunch, but it’s a perfect breakfast. Or a perfect snack for the time when you need a little something extra but don’t want to feel weighed down. Better than just a cookie, you know?
It’s this balance of savory and sweet that just gets me every.single.time.
Also, let’s revisit the toast issue. How do you like your toast? Toasted to oblivion? Warm bread that masquerades as toast but is really not? I’m still on the super dark and golden, very extra crunchy toast train. Eddie is still very much on the warm bread train.
Sometimes he makes me breakfast and “toasts” the bread to have with eggs and it’s soft with not a golden hue in sight.
I need there to be CRUNCH, people!
Not only could this be breakfast or a snack, I’m fairly obsessed with the idea of serving it on tiny crostini as an appetizer at a party. How freaking cute would that be?
And let’s just get this out of the way: Eddie would nevvvvvver eat this. It’s totally not his thing. Not his taste buds. Not his palette. He’d maaaaybe eat it if the pineapple was in jam form, if that could be a thing. Wait! Is that a thing? Can caramelized pineapple jam happen? It should.
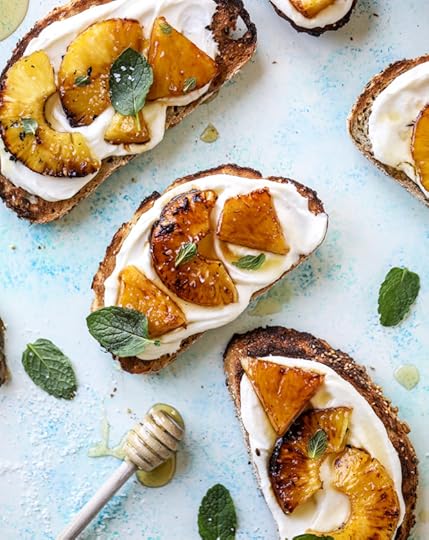
A drizzle of honey and a few sprinkles of sea salt take this over the top. It’s rather filling too – I mean, more filling than you would expect. It’s better than eating a brownie though, right? RIGHT?!
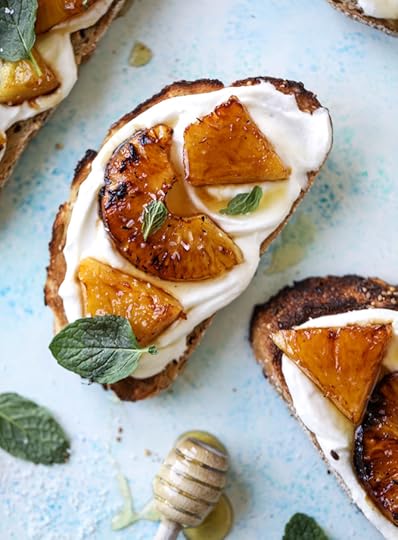
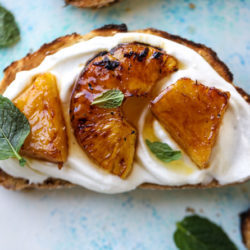
Roasted Pineapple Whipped Ricotta Toast with Sea Salt
Yield: makes 4 toasts
Total Time: 35 minutes
Ingredients:
6 pineapple rings or 1 cup chopped pineapple
2 to 3 tablespoons honey, plus extra for drizzling
1/2 cup ricotta cheese
4 slices of your favorite bread, toasted
a handful of fresh mint leaves
sea salt for sprinkling
Directions:
Preheat the oven to 450 degrees F. Line a baking sheet with parchment paper and place the pineapple on the sheet. Drizzle it with the honey. Roast for 15 to 20 minutes, until super golden and caramely. If desired, you can turn the broiler on for a minute to really caramelize the tops!
Add the ricotta to a food processor and blend until it's smooth and creamy. Spread it all over your toast! Place the pineapple on the toast and sprinkle it with the sea salt and fresh mint. Drizzle with extra honey if desired. Eat up!
Be sure to follow howsweeteats on instagram and tag your recipes with #howsweeteats! You can also post a photo of your recipe to the howsweeteats facebook page. I appreciate you so much!
Oh p.s. I love you.
The post Roasted Pineapple Whipped Ricotta Toast with Sea Salt. appeared first on How Sweet It Is.
June 6, 2017
Tuesday Things.

1. Want to hear something pathetic? I’m looking forward to going on vacation to do a PUZZLE. Like a legit puzzle. We’ve always done them on vacation as a family and it’s relaxing. But on vacation? Why don’t I just do one now.
2. WHOA. I really want this frozen cherry cola slushie. 2017 version, hello!
3. Which is HUGE because I’m in the pregnancy phase where I still don’t want to eat anything sweet. Like one bite of something is too much. It’s so, so weird.
4. I’m very intrigued by the Apple HomePod and sort of interested in the getting an Alexa. TELL ME. What can I do with this thing in my home? Alexa also freaks me out.
5. Freaking Bloodline. I haven’t finished it yet – I’m trying to wait for Eddie. Why can’t he binge watch like I can? So don’t tell me! But it’s so good. I blew through House of Cards in a few days. I found it sort of boring at first but really got into the end. And can we discuss how fantastic Neve Campbell still looks?
6. Puhlease tell me that you saw my summer reading list! I have been so excited ever since I put it together because my summer is going to be SET.
7. May be going to Target once a week just to check out their pool float collection. Feel like a child.
8. Perhaps I need to read up on how to stop saying “um” and “like”? Ummmmm.
The post Tuesday Things. appeared first on How Sweet It Is.
June 5, 2017
Easy Painted Bud Vases

Looking for the colorful glass vases that perfectly match your color scheme or tablescape? Create your own in the span of an afternoon. It’s pretty easy, it just takes a little bit of patience and the right paint colors. The best part about this craft? Because the paint goes inside the bottles the outside looks smooth and doesn’t have that crafty-vibe, ya know? Love these!
What you’ll need:
-glass jars
-acrylic craft paint
-a plastic syringe
-plastic container
-water
-wire rack
How-to:
1. Start out by picking your paint colors. I love the Martha Stewart craft paints. They come in a variety of colors and always work so well. I think I have a bottle of every color! Using colors in the same family looks great with this project.
2. Mix together 3/4 of the bottle of the craft paint with just a little water in a plastic container. You want to thin out the paint so it’s easier to get it into the bottle.

3. Suck up the paint mixture into your syringe and then gently squeeze it into the inside of the bottle. Be sure to carefully coat the neck and the entire inside of the bottle.
4. Once there is enough paint inside each bottle, gently rotate the bottle in your hands until the inside is completely covered.
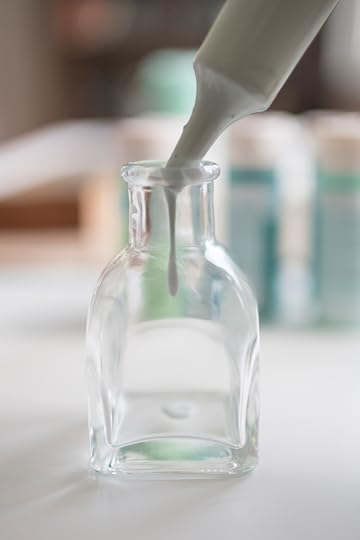
5. Place the bottle upside down on your wire rack and let the excess paint drain out. Once the excess is drained, wipe the mouth of the bottle or any drips that might have formed.
6. Repeat for each individual color, rinsing your syringe and bowl between each new color. Let the inside dry completely before using.
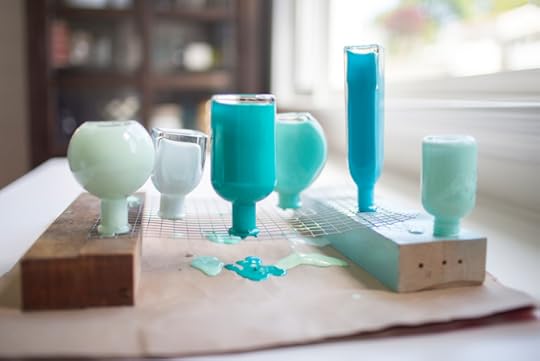
7. Enjoy! Place single blossoms or a sprig of flowers in each. It makes for a high impact arrangement without having to arrange too much.
[image error]
The post Easy Painted Bud Vases appeared first on How Sweet It Is.
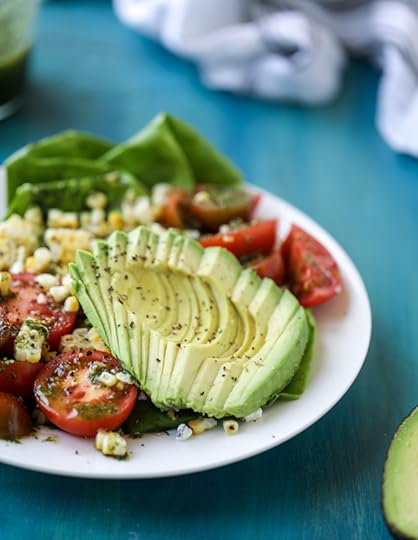
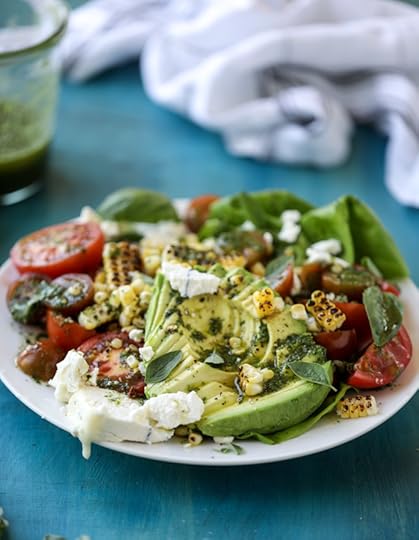
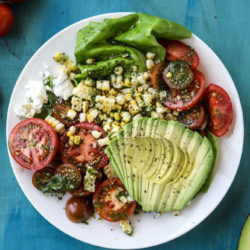
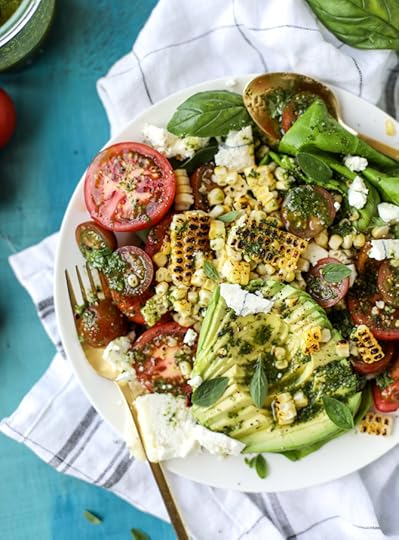
Grilled Corn, Tomato and Avocado Salad with Chimichurri.
BEHOLD. It’s the start of summer salads!
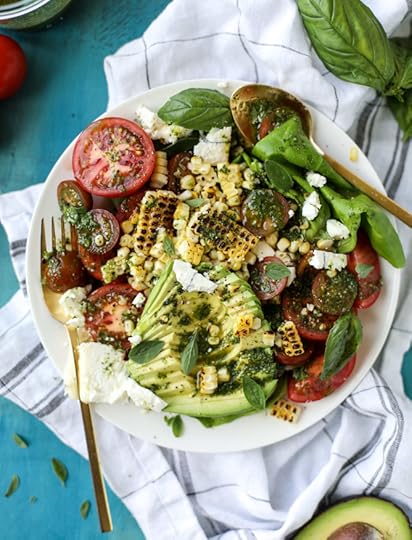
Also known as, one of my most favorite things ever. Give me all the grilled corn, tomato and avocado and drench it in a good shower of chimichurri. I am ONE happy camper. Lots of herbs too. Some cheese for good measure.
This is seriously how I can eat vegetables like a normal human. I mean, maybe a normal human doesn’t have to smother them in chimichurri and goat cheese, but if not, then I prefer to be abnormal.
GUYS.
I am such a huge chimichurri fan. I make it for this amazing flank steak all the time, but the first time I used it on a salad was last year and ohhhh my heavens. It is GOOD. It’s like a more potent vinaigrette and if you’re into super briney and tart things like I am? You’ll love it to pieces.
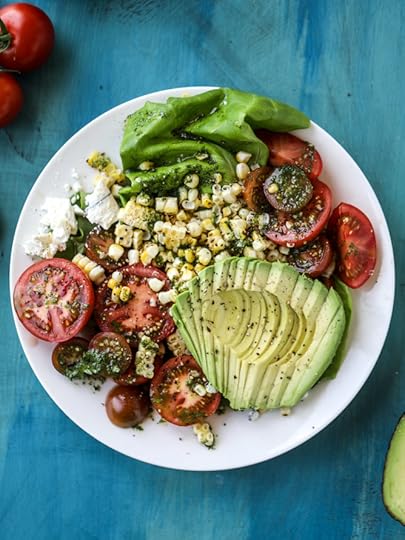
Plus, we have creepily-thin sliced avocado. Seriously, what else does your Monday need?
You don’t have to slice your avocado like a creep though – not unless you have a food blog and feed off of other avocado lovers’ comments. You know. Normal life things.
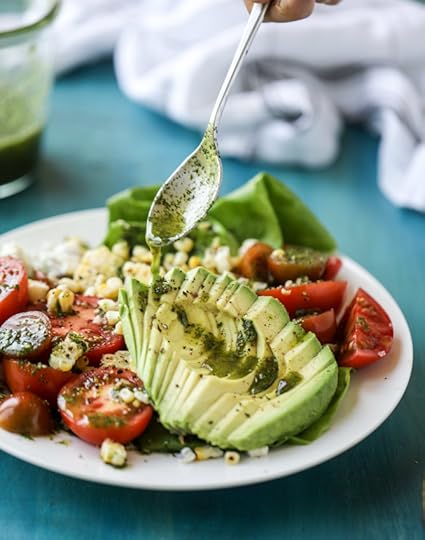
This salad is so freaking simple. It’s one of those embarrassingly simple recipes that tastes fantastic once the chimichurri is thrown on top. You can make the chimichurri ahead of time (the night before! the day before!) and assemble the salad right before serving. Grill some ears of corn for that sweet and caramely flavor.
Grab some super sweet cherry tomatoes that almost taste like candy. Don’t you hate when people say that about vegetables? Me too.

Throw some super soft butter lettuce on your plate and top it all off with some creamy goat cheese. I crumbled humboldt fog on top because it’s the best cheese in the universe. It’s an excellent lunch salad but also a really good weekend salad. AND. You can totally add some chicken if you want! Or steak!
And then you serve it to all of your friends and DEVOUR. BFF’s for life.
Grilled Corn, Tomato and Avocado Salad with Chimichurri
Yield: serves 2, is easily multiplied
Total Time: 30 minutes
Ingredients:
4 slices butter lettuce
4 campari tomatos, halved
1/2 pint cherry tomatoes, halved
2 ears of sweet corn, grilled
1 avocado, thinly sliced
salt and pepper for sprinkling
2 to 4 ounces goat cheese (chevre), like humboldt fog
fresh basil and oregano for sprinkling
chimichurri
1 cup fresh cilantro
2/3 cup fresh parsley
1/4 cup fresh oregano
2 garlic cloves, minced
1/4 cup red wine vinegar
2/3 cup olive oil
1/2 teaspoon salt
1/2 teaspoon pepper
1/4 teaspoon crushed red pepper flakes
Directions:
To grill the corn, rub the ears with the olive oil. Lately, I've been grilling my corn without the husks on, tied at the bottom, and without foil, so it takes only a few minutes. Place the ears on the grill and cook until the corn is golden or charred - whichever you prefer - turning the ears as you go. Remove them from the grill and let cool slightly, then slice the kernels off the cob.
Arrange the salad by placing the butter lettuce on the plate with some tomatoes, sliced avocado and corn - however you'd like! Be sure to season everything with a small sprinkle of salt and pepper as you go. Drizzle on some spoonfuls of chimichurri. Sprinkle on the goat cheese and add the fresh herbs, then add another drizzle of chimichurri. Serve immediately.
chimichurri
Combine the parsley, cilantro, oregano and garlic in a food processor and pulse until small leaves and pieces remain. Add in the vinegar and pulse once more. With the processor going, stream in the olive oil and mix until just combined. Stir in the salt, pepper and red pepper flakes. Taste and season additionally if needed. Store sealed in the fridge for up to a week or so!
Be sure to follow howsweeteats on instagram and tag your recipes with #howsweeteats! You can also post a photo of your recipe to the howsweeteats facebook page. I appreciate you so much!
And like usual, more room for cookies!
The post Grilled Corn, Tomato and Avocado Salad with Chimichurri. appeared first on How Sweet It Is.
June 4, 2017
Strawberry Picking!
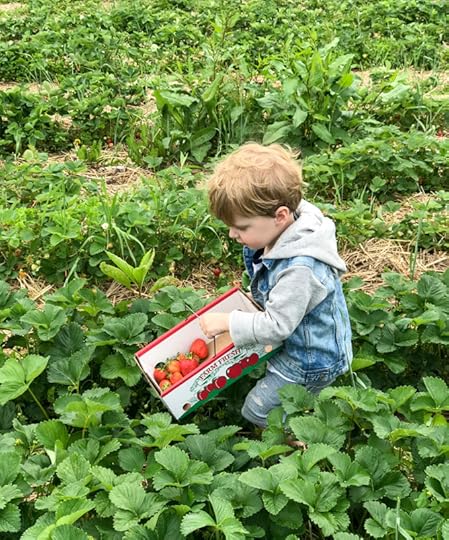
Here’s a peek at our morning of strawberry picking at Triple B Farms!


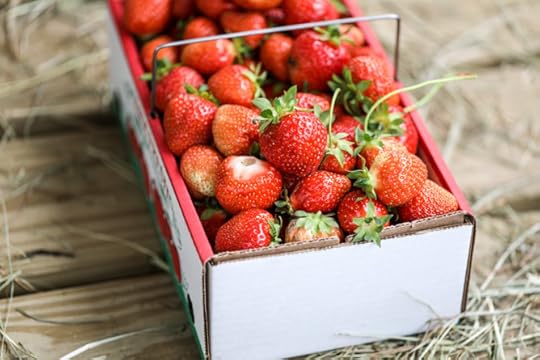
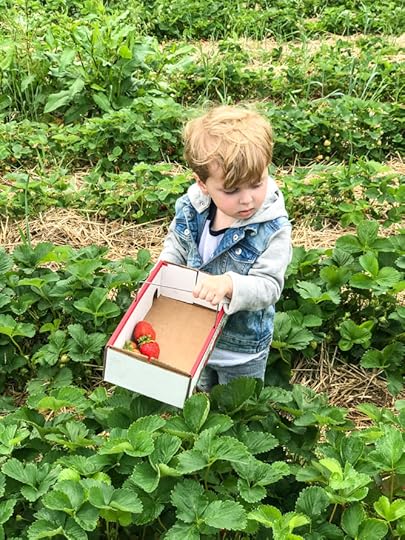


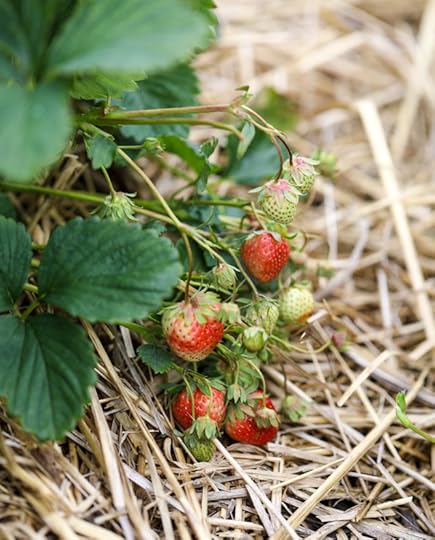
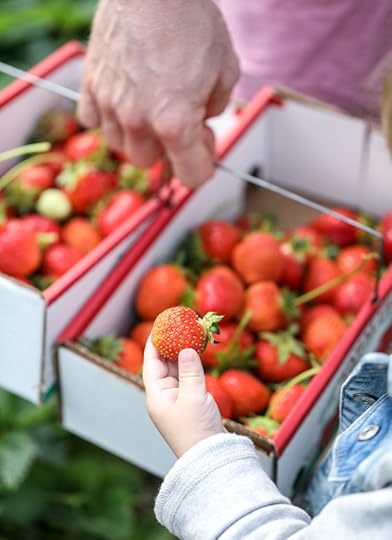

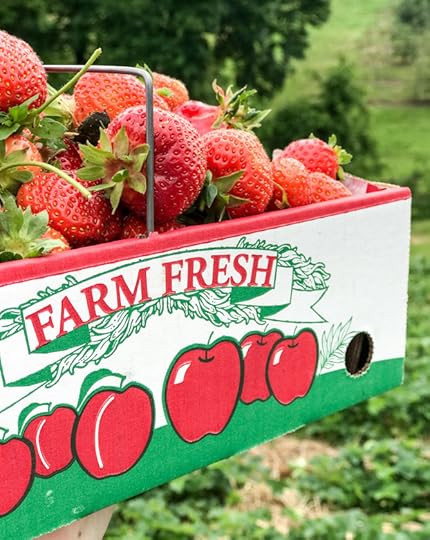


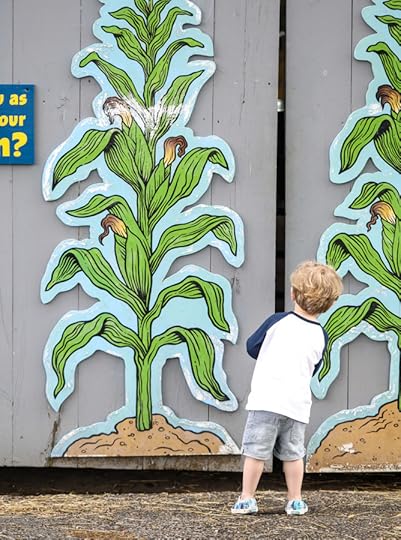

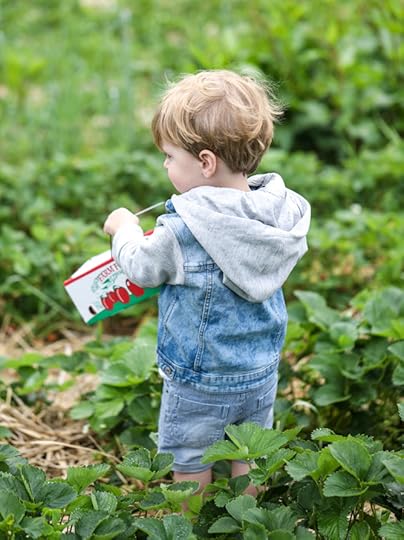
This day was so, so, so much fun! If you live in the Pittsburgh area, you should seriously go pick ’em before the time is up!
The post Strawberry Picking! appeared first on How Sweet It Is.
June 3, 2017
Currently Crushing On. (and 5 recipes to try this weekend!)
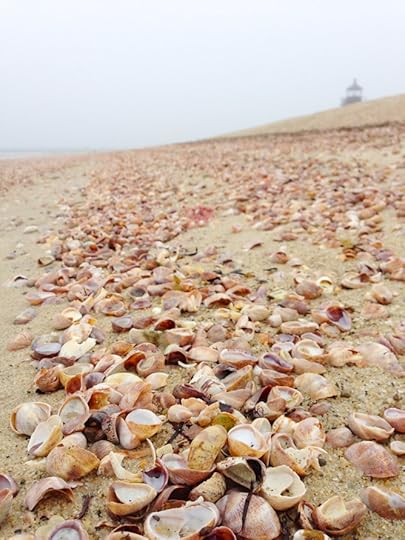
Happy weekend! I am feeling nostalgic (as usual) with this pic above that I took a few years ago in Nantucket. Ah I want to go back! What are you guys up to this weekend?
I shared SO many posts over on crumbs this week! Be sure to check out my beauty favorites, lifestyle favorites, our memorial day weekend recap and my summer reading list!
And P.S. scroll down for five old recipes to try this week!
Favorites of the week:
s’mores doughnuts! i die.
in love with these white chocolate granola slices.
this green minestrone soup looks lovely.
i need a huge slice of this spring cream pizza.
samoa popcorn? i am so there.
haha! free printable chick flick trivia. how fun!
want this southwest BBQ chicken salad!
this rainbow watermelon pizza makes me so happy.
a small space vertical herb garden. too cool.
also! roasted vegetable rainbow hummus. the prettiest.
craving one of these cherry apricot margaritas.
vegan PB cookie dough milkshake. ohhhh my.
realllly want to try .
jasmine ice cream! oh my gosh.
5 recipes to try this weekend:
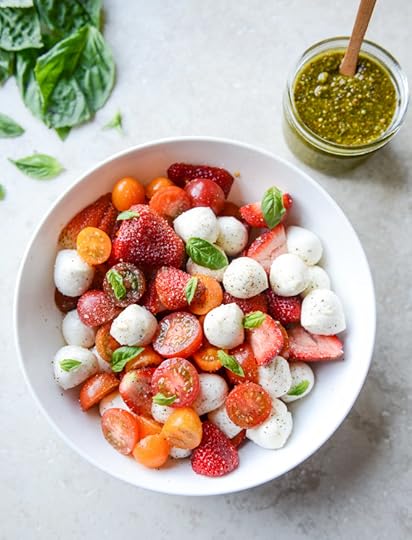
Strawberry Caprese with Pistachio Pesto
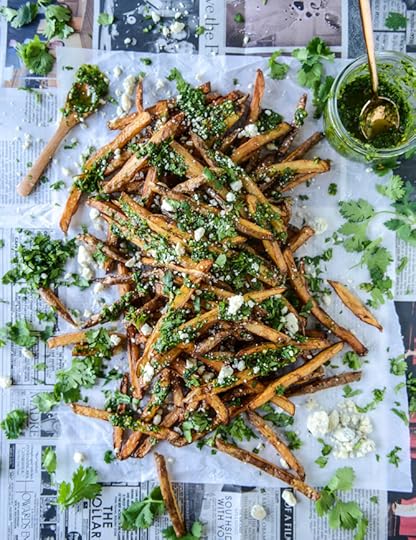
Chimichurri Fries with Gorgonzola
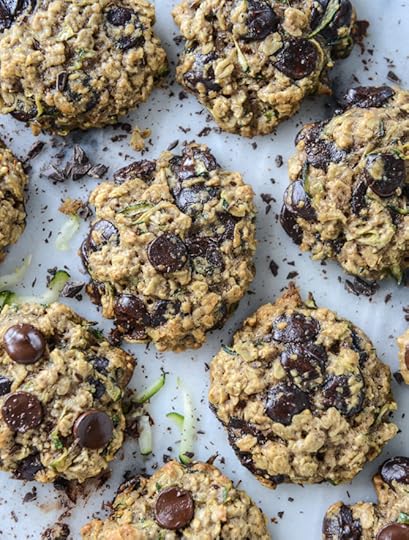
Chewy Oatmeal Zucchini Cookies
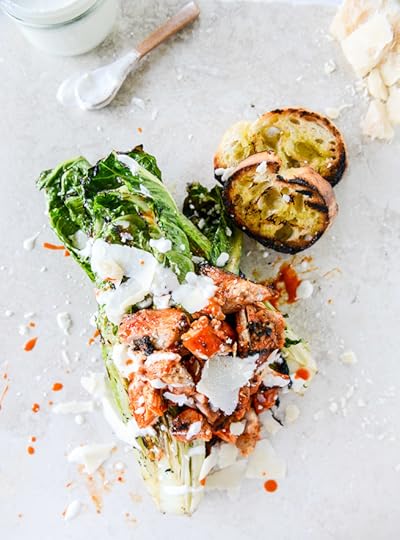
Grilled Buffalo Chicken Caesar Salad
Have a great one!
The post Currently Crushing On. (and 5 recipes to try this weekend!) appeared first on How Sweet It Is.
June 2, 2017
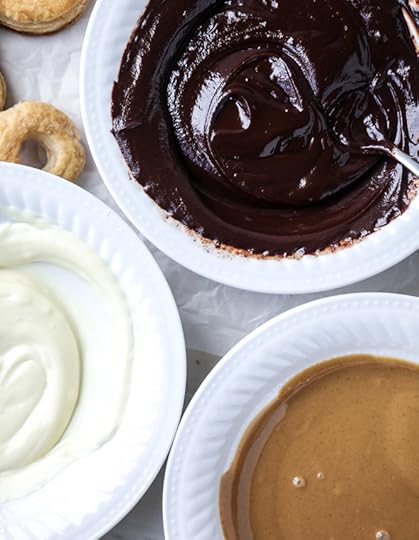
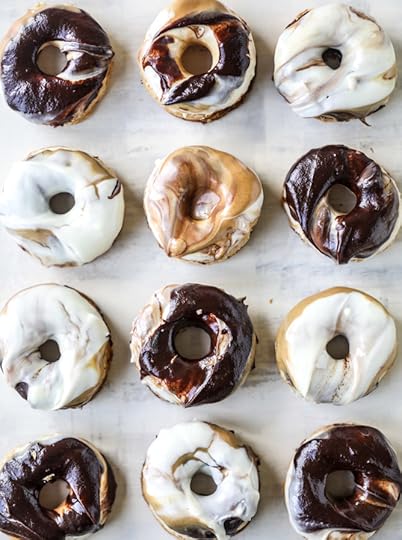
Triple Dipped Chocolate Peanut Butter Doughnuts.
Happy National Doughnut Day!

I often laugh in the face of food holidays, but this is one that I get behind. ALWAYS. Join me please!
SO.
Last year I made these puff pastry doughnuts. YEP, I cheated and used my favorite puff pastry, I KNOW. But guys – it’s unbeatable. It’s sort of like a cheater’s cronut and so, so easy. You can bake or fry them. I’ve made traditional yeasted doughnuts before as well as regular old baked doughnuts and those are great too. But for those of us that love raised doughnuts and are pressed for time? Puff pastry is where it’s AT.
Hence why I did it again.
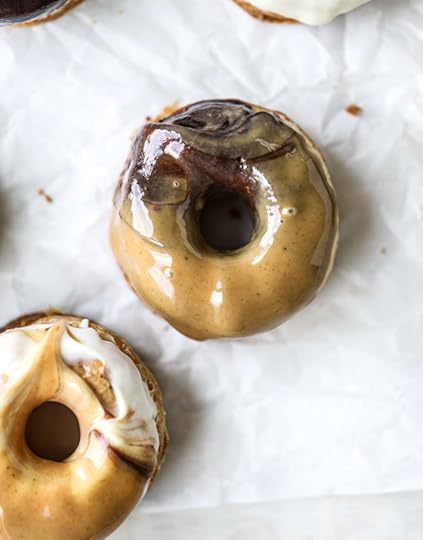
Also. The dips. TRIPLE DIPPED.
God, I know I’m extremely obnoxious with the exclamation points today. More obnoxious than usual. But triple dipped?! Hello!
I alternated the dippage between dark chocolate, white chocolate and peanut butter. Three of my favorite things that I looooove to put together. Super rich and decadent.
Oh hi, remember the time a few years ago when I didn’t even like doughnuts?
I didn’t. That was odd.
You’ve probably heard me ramble on about how I really love yeasted doughnuts so much more than cake. Which is why I love these ones. Cheater raised doughnuts!

So if you reeeeallly want to go all out for national doughnut day, you don’t HAVE to use my puff pastry method. You can totally bake or fry your doughnuts a la one of my recipes below and THEN.
And then, triple dip them for the heck of it.

Oh yeah! And if you need more doughnut ideas? Ummm… I’ve got you. Trust me.
Peanut butter cream filled doughnuts!
Strawberry sprinkle buttermilk doughnuts!
Chocolate frosted cake doughnuts!
Glazed chocolate doughnut holes!
Greek yogurt doughnuts with strawberry stovetop granola!
Chocolate frosted yeasted doughnuts with KETTLE CHIPS!
Baked chocolate fudge doughnuts!
I just used up all of my life’s worth of exclamation points. BUT. All these exclamation points… grammatically necessary. I’m sure an English teacher would agree. Shhh.


Triple Dipped Chocolate Peanut Butter Doughnuts
Yield: makes 12 doughnuts
Total Time: 1 hour
Ingredients:
coconut, vegetable or canola oil for frying
4 sheets puff pastry, thawed
1 egg, lightly beaten
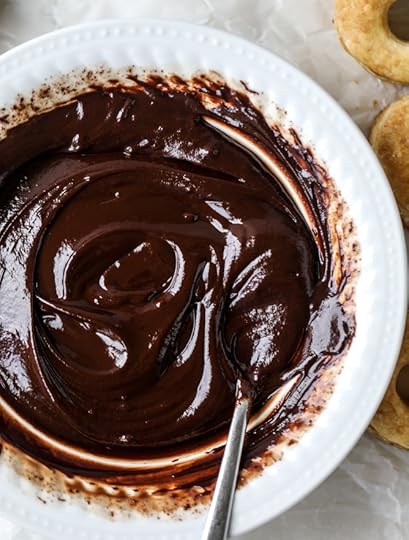
dark chocolate ganache
6 ounces high-quality dark chocolate, chopped
1/3 cup heavy cream
1/2 tablespoon unsalted butter
white chocolate ganache
6 ounces high-quality white chocolate, chopped
1/3 cup heavy cream
1/2 tablespoon unsalted butter
peanut butter layer
1/2 cup peanut butter
1/2 tablespoons coconut oil
Directions:
Heat about 3 to 4 inches of oil over medium-low heat in a large potted fitted with a candy thermometer. You want the oil to be about 350 degrees, not higher.
Take the sheets of puff pastry (they will most likely be folded into thirds) and slice them on the seems. Each sheet will be cut into thirds. Once they are separate, brush one side of the cut piece with the beaten egg. Place a second piece on top of that, and brush it with beaten egg. Place the third piece on top. Gently press so they stick together. Repeat with remaining sheets - you should have 4 long rectangles now that have 3 sheets stacked in each.
Using a biscuit or doughnut cutter, cut holes in the stack. You will probably get 3 doughnuts from each (feel free to fry the scraps as they are also delish!). Cut a hole in the center - I actually use an apple corer for this part, but anything that can cut a hole right in the center will do.
Fry your doughnuts 2 to 3 at a time (no more as it will lower the oil temp) until they are golden and puffed, about 2 to 3 minutes each. Place on a paper towel to drain excess grease and repeat with remaining pastry.
For dipping, dip each doughnut in an alternating layer of dark chocolate, white chocolate and peanut butter. You can let the toppings set a bit before dipping each, but I like mixing them and getting that marble swirl look!
Serve immediately. These are best eaten right after frying!
ganache and peanut butter
Add the chopped dark chocolate to a bowl. Heat the cream in a saucepan over low heat just until bubbles appear around the edges and it's warm. Pour the cream over the chocolate and let it sit for 30 seconds, then stir continuously until it's smooth. Stir in the butter and set aside until ready to use.
Add the chopped white chocolate to a bowl. Heat the cream in a saucepan over low heat just until bubbles appear around the edges and it's warm. Pour the cream over the chocolate and let it sit for 30 seconds, then stir continuously until it's smooth. Stir in the butter and set aside until ready to use.
Melt the peanut butter in a bowl in the microwave. I start with 30 second increments and go from there, stirring constantly. Stir in the coconut oil until melted - it just helps it firm up! You don't need any sugar here because of the white and dark chocolate.
Be sure to follow howsweeteats on instagram and tag your recipes with #howsweeteats! You can also post a photo of your recipe to the howsweeteats facebook page. I appreciate you so much!

How are you celebrating?! You HAVE to be celebrating.
The post Triple Dipped Chocolate Peanut Butter Doughnuts. appeared first on How Sweet It Is.
Jessica Merchant's Blog

- Jessica Merchant's profile
- 53 followers

