
Jessica Merchant's Blog, page 364
July 1, 2017
Currently Crushing On. (+ 5 Summer Recipes to Try!)
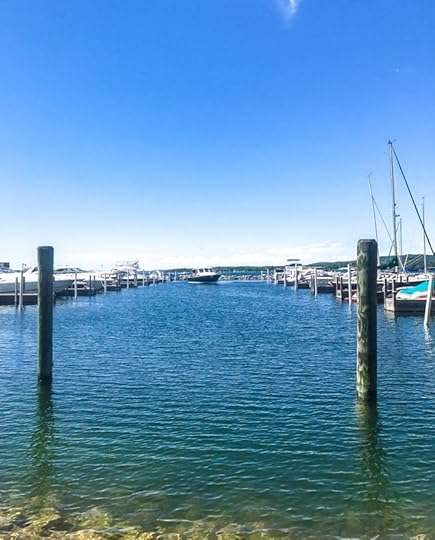
I’m super struggling coming back to reality this weekend when we leave our vacation. Have you ever had a vacation that didn’t leave you feeling relaxed? YES. That is this. So good but also so weird and Eddie feels the same and we can’t figure out whyyyy.
Seriously excited that it’s a holiday weekend/week though! I love the 4th of July, even though inside my anxious brain it makes me feel like the summer is almost over (yeah I’m the worst). What are your plans for the 4th?
Later this weekend I’ll have up my beauty and lifestyle favorites, so keep your eyes peeled! Annnd I included five of my favorite (of course) summer recipes below!
Faves of the week:
alllll the popsicles for popsicle week, with some of my faves mentioned below.
super into these chipotle deviled eggs!
freaking lemon bar popsicles. AH.
whoa. these grilled meatball chimichurri sandwiches are incredible.
chocolate banana tahini pops sound amazing.
holy insane: bacon double cheeseburgers. WOW.
totally trying this creamy corn small batch soup.
coconut cake with coconut meringue frosting… yes!
these tuna avocado boats sound like the best lunch.
also want a few vegan salted caramel chocolate pops. omg.
love the sound of this gnocchi puttanesca.
amazing poppy seed cake… and more pops.
Summer recipes for your weekend!
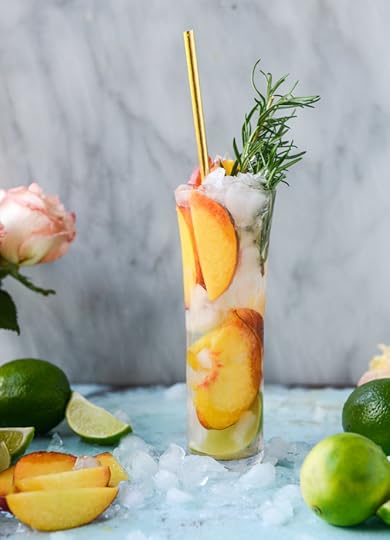
fresh peach gin and tonic. this is one word: REFRESHING.
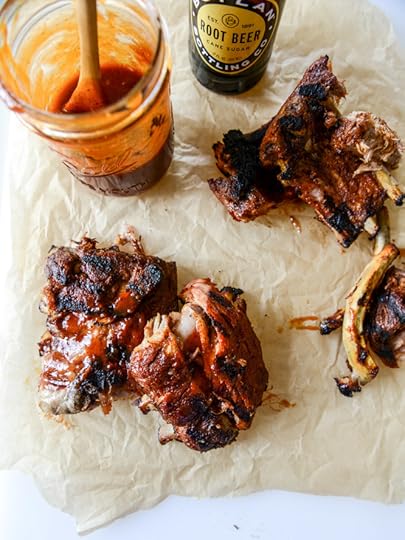
grilled baby back ribs with root beer BBQ sauce. da best.

sweet corn, zucchini and fresh mozzarella pizza. making it this weekend!
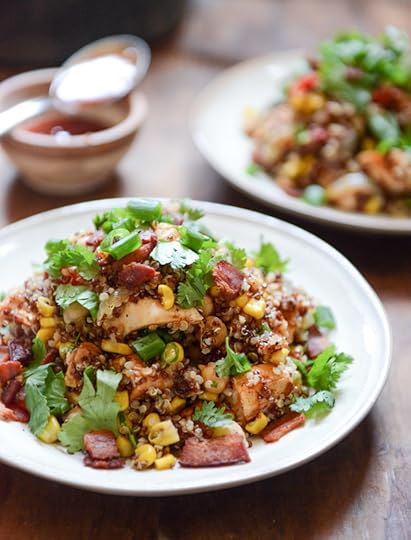
summer BBQ chicken quinoa salad. makes lunch and dinner fun.
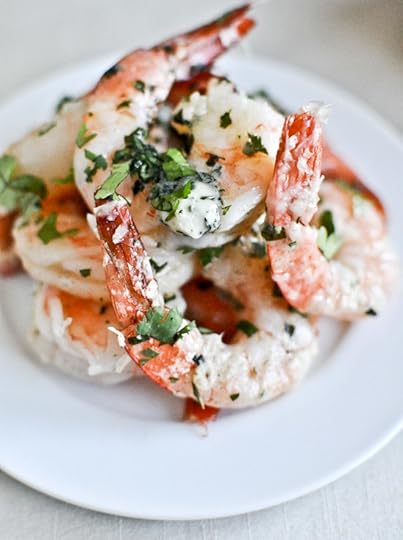
roasted basil butter parmesan shrimp. serious oldie but goodie.
The post Currently Crushing On. (+ 5 Summer Recipes to Try!) appeared first on How Sweet It Is.


June 30, 2017
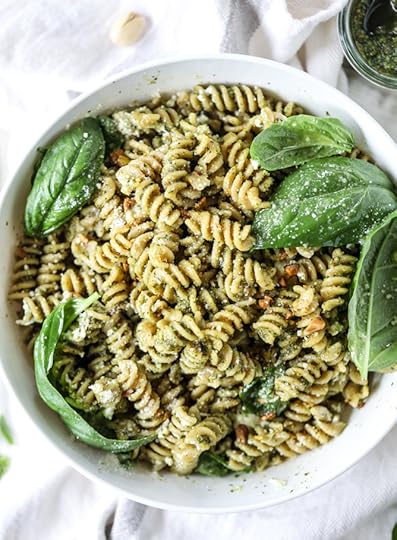
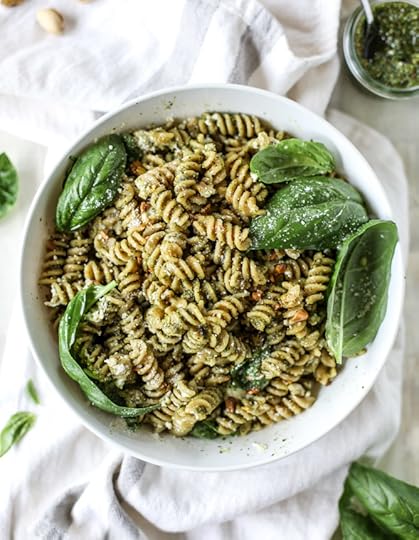
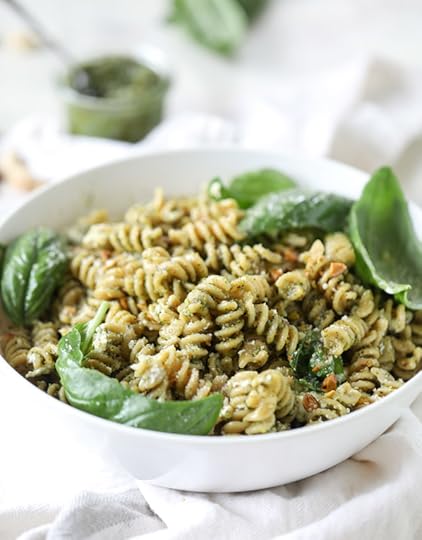
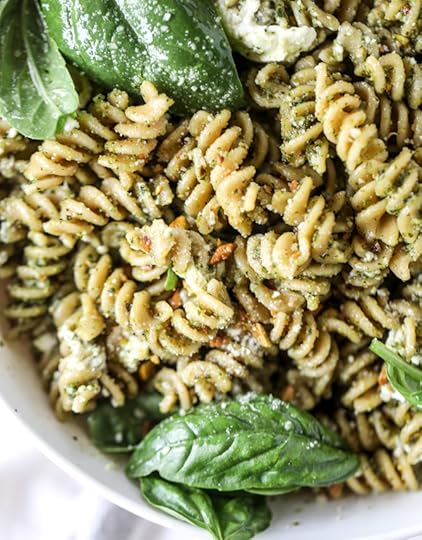
Pistachio Pesto Pasta Salad with Burrata.
I have the dish you’re going to eat morning, noon and night this weekend!
And just to play it safe? Let’s say the entire rest of the summer. K? Great.
Pistachio pesto pasta salad could only be made better by one thing: burrata cheese. Of course! It’s tangy, creamy, a little crunchy and so, so flavorful. This has so much flavor, I want to cry. Bawl! Sob!
It’s ridiculous.

If you’re thinking… um, didn’t you make something similar to this last year, you’re totally right. I DID. But it was a warm regular old noodle pasta with burrata twirled in. Not a cold, chilled pistachio pesto pasta salad with burrata mixed in.
Uhhhh.
Same thing?
I know I know. It’s similar! But the REAL thing is that Eddie and I have been eating this pesto pasta salad for dinner (and, um, lunch) like crazy people. Like we can’t stop. Like we have made it our side dish every single night, even for weird things that don’t require a side dish. Even for me who in general does not require a side dish. Eddie ALWAYS requires a side dish.
It’s like he looks forward to JUST the side dish on his drive home from work.
You totally could serve this warm, but I wanted you to have the recipe written as cold so you can make it for all of your 4th of July festivities this weekend.
If you’ve follow the blog for a while, you know I’ve been obsessed with pistachio pesto (and, well, generally all things pistachio) for years and years and years. The flavor is so buttery and rich. So toasty. So delicious!
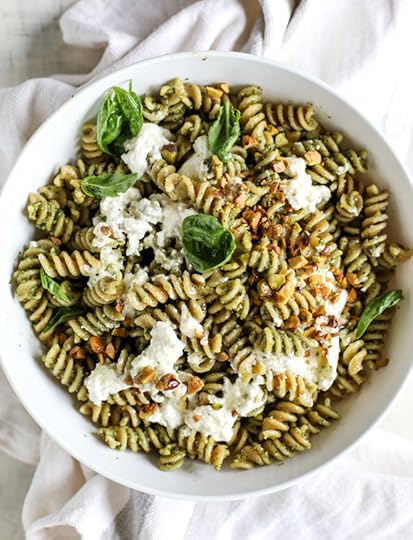
I also like to add in a bit of fresh arugula for bite. Waaaay way way back, many moons ago on this blog, I used to whine about how I didn’t really care for pesto. I initially fell in love with arugula pesto for the sharp taste is gave to all the summer things. I haven’t turned back since and I love basil pesto equally now too.
Plus, some fresh oregano for good measure. Dried oregano has always been a little strong for my liking but fresh is my favorite herb from my garden. I love it SO much.
So tell me! What are your plans for the weekend? And are you celebrating the 4th of July this weekend or on Tuesday? I totally wish that all holidays like that should just be attached to the weekend. Right?
We will do a pool partay and lots of good food. Tons of fireworks and sparklers even if I want to crash in bed at 9 like the old grandma that I am.
Just promise me that this little bowl here will grace your table at some point in the next five days. Breakfast, lunch and dinner, I’m telling you!
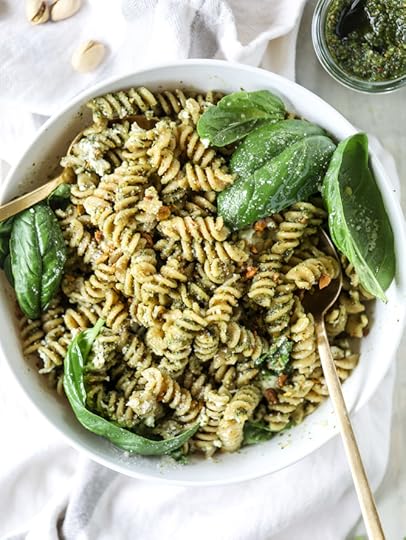
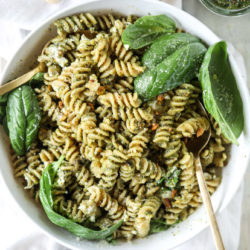
Pistachio Basil Pesto Pasta Salad with Burrata
Yield: serves 4 to 6
Total Time: 30 minutes
Ingredients:
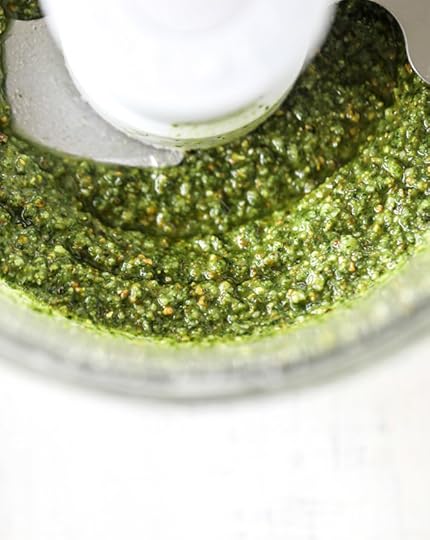
pistachio basil pesto
1 cup shelled pistachios
1 1/2 cups loosely packed fresh basil leaves, torn
1/2 cup fresh arugula
2 tablespoons fresh oregano
3 garlic cloves
1/3 cup finely grated pecorino romano cheese
1/3 to 1/2 cup extra virgin olive oil
1/4 teaspoon salt
pasta
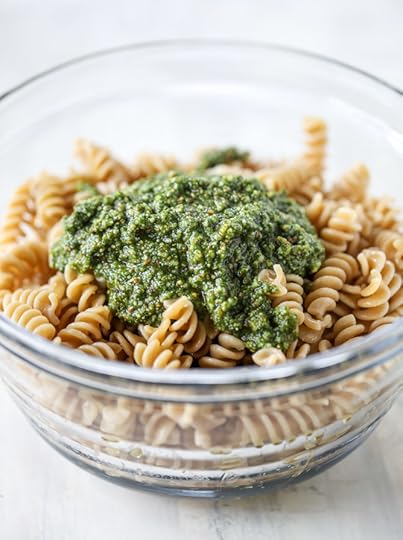
1 pound fusilli pasta
1 ball burrata cheese
1/4 cup parmesan cheese
2 tablespoons chopped pistachios
1 handful fresh basil for tossing
Directions:
pistachio basil pesto
Place the pistachios, basil, arugula, oregano, garlic and cheese in a food processor. Pulse and blend until the nuts are coarsely chopped, then with the processor on, stream in 1/3 cup of olive oil. Add a little more if necessary, depending on how "spreadable" you want your pesto to be. Taste the pesto and add in the salt, blending once more. This will make a little extra pesto than needed, so store it sealed tightly in the fridge for up to a week.
pasta
Cook the pasta according to the directions on the package. Once you drain the pasta, immediately toss it with the olive oil and a few scoops of the pesto - as much as you'd like! You can use all of it or just a few tablespoons. Pull apart the burrata cheese and toss it into the pasta over and over. Toss in the parmesan cheese. At this point, you can serve it warm, but I love to stick the whole bowl in the fridge and let it cool down for a few hours. The flavor is unreal!
Before serving, top with the extra pistachios and fresh basil leaves.
Be sure to follow howsweeteats on instagram and tag your recipes with #howsweeteats! You can also post a photo of your recipe to the howsweeteats facebook page. I appreciate you so much!
Oh and p.s. if you have extra pesto? HELLO PIZZA.
The post Pistachio Pesto Pasta Salad with Burrata. appeared first on How Sweet It Is.
June 29, 2017
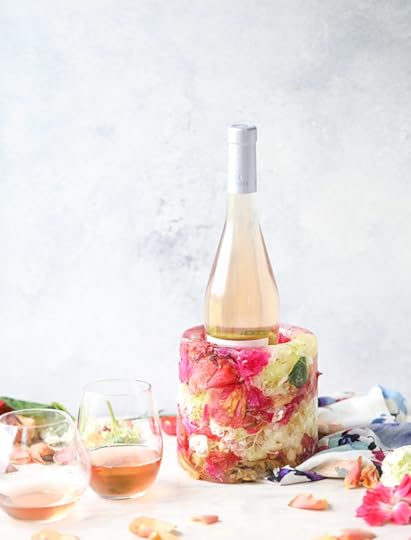
How to Make a Floral Ice Bucket. {Video!}
OH HI!
So we’re doing something a leeeeettle different for thirsty Thursday today, but I promise that it does include a drink. Err, something to put your drink IN. Which is almost as good.
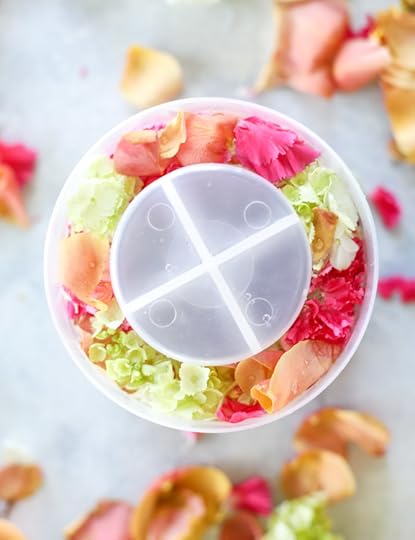
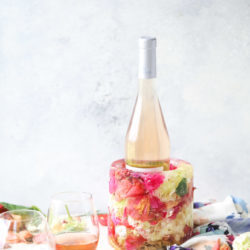
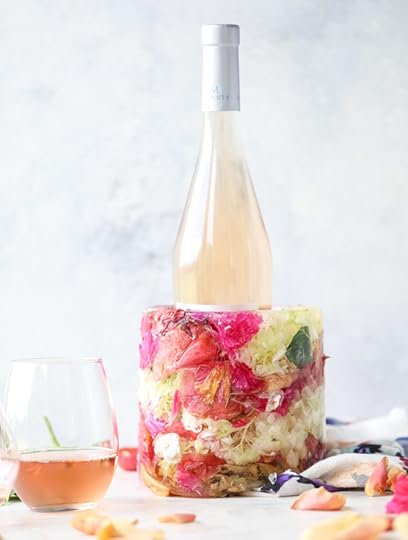
Yes yes! This floral ice bucket was such a hit last summer and I’ve had tons of requests to share, so here’s how we are doing it. It’s super fun and pretty and people think that you are wildly talented because you can mix flowers and water. To create ice! To hold your wine!
I know that technically one of these ice molds isn’t required, but it makes the process about a million times easier. SO much easier, trust me. I tried making one of these before getting a mold and it was near impossible to get out and also super difficult to fit in my freezer to freeze.
So! Ice mold it is. This one is from crate and barrel (full disclosure, they sent me one of these last summer because I do a lot of freelance work for them, but I purchased a second on my own because I wanted to make two molds for a party!) and it works like a charm.
When it comes to the flowers, I can’t bear to buy gorgeous fresh flowers JUST for this purpose. So I usually buy them a few days (or even a week) in advance and then use up the flowers once they are on their last leg. This makes me feel better about life in general and like I didn’t buy $20 worth of flowers to cover in water and make an ice cube. You know.
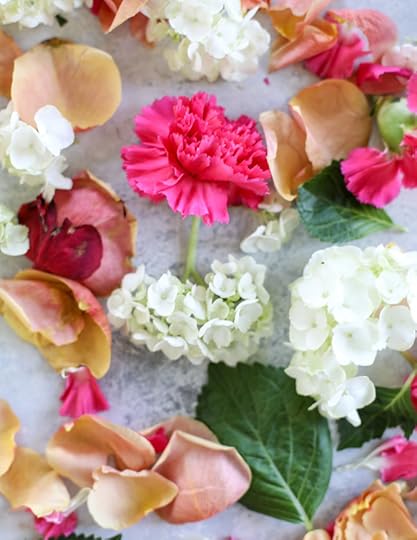
The flowers to use? Whatever you want! Pick whatever flowers you love and whatever colors you love. I pull off some of the petals when necessary and pull the flower from the stems. Sometimes I incorporate the bigger, heartier green leaves too because I like the color. Fill up the mold and fill it with water. The WORST part is waiting the full 24 hours for this big thing to freeze, so yes I do suggest planning this out ahead of time.
In fact, if you go right this season and buy flowers you can have this done for the weekend! So you can really shout yes way rosé from the rooftops. FUN.
How to Make a Floral Ice Bucket
Total Time: 24 hours
Ingredients:
a cooler ice cube mold (like this one)
a bunch of fresh flowers
Directions:
Most molds will have their specific directions, so you can easily follow them. But I like to cut the flowers from the stems and place them into the molds in alternating colors. You can also use citrus or other fruits! I then pour in hot water (so it will hopefully freeze as clear as possible) and freeze overnight. Right before using, run under warm water, remove from the mold and stick your wine inside!
So pretty.
Note: the mold I use comes with a container to hold it in - on top of using that, you can also set this on a platter of ice. It melts much slower than you'd think, but I would still only use it indoors!
Be sure to follow howsweeteats on instagram and tag your recipes with #howsweeteats! You can also post a photo of your recipe to the howsweeteats facebook page. I appreciate you so much!
Of course if you in my situation, you can fill it with some sparkling blood orange soda. Almost as good.
The post How to Make a Floral Ice Bucket. {Video!} appeared first on How Sweet It Is.
How to Make a Floral Ice Bucket.
OH HI!
So we’re doing something a leeeeettle different for thirsty Thursday today, but I promise that it does include a drink. Err, something to put your drink IN. Which is almost as good.
Yes yes! This floral ice bucket was such a hit last summer and I’ve had tons of requests to share, so here’s how we are doing it. It’s super fun and pretty and people think that you are wildly talented because you can mix flowers and water. To create ice! To hold your wine!
I know that technically one of these ice molds isn’t required, but it makes the process about a million times easier. SO much easier, trust me. I tried making one of these before getting a mold and it was near impossible to get out and also super difficult to fit in my freezer to freeze.
So! Ice mold it is. This one is from crate and barrel (full disclosure, they sent me one of these last summer because I do a lot of freelance work for them, but I purchased a second on my own because I wanted to make two molds for a party!) and it works like a charm.
When it comes to the flowers, I can’t bear to buy gorgeous fresh flowers JUST for this purpose. So I usually buy them a few days (or even a week) in advance and then use up the flowers once they are on their last leg. This makes me feel better about life in general and like I didn’t buy $20 worth of flowers to cover in water and make an ice cube. You know.
The flowers to use? Whatever you want! Pick whatever flowers you love and whatever colors you love. I pull off some of the petals when necessary and pull the flower from the stems. Sometimes I incorporate the bigger, heartier green leaves too because I like the color. Fill up the mold and fill it with water. The WORST part is waiting the full 24 hours for this big thing to freeze, so yes I do suggest planning this out ahead of time.
In fact, if you go right this season and buy flowers you can have this done for the weekend! So you can really shout yes way rosé from the rooftops. FUN.
How to Make a Floral Ice Bucket
Total Time: 24 hours
Ingredients:
a cooler ice cube mold (like this one)
a bunch of fresh flowers
Directions:
Most molds will have their specific directions, so you can easily follow them. But I like to cut the flowers from the stems and place them into the molds in alternating colors. You can also use citrus or other fruits! I then pour in hot water (so it will hopefully freeze as clear as possible) and freeze overnight. Right before using, run under warm water, remove from the mold and stick your wine inside!
So pretty.
Be sure to follow howsweeteats on instagram and tag your recipes with #howsweeteats! You can also post a photo of your recipe to the howsweeteats facebook page. I appreciate you so much!
Of course if you in my situation, you can fill it with some sparkling blood orange soda. Almost as good.
The post How to Make a Floral Ice Bucket. appeared first on How Sweet It Is.
June 28, 2017
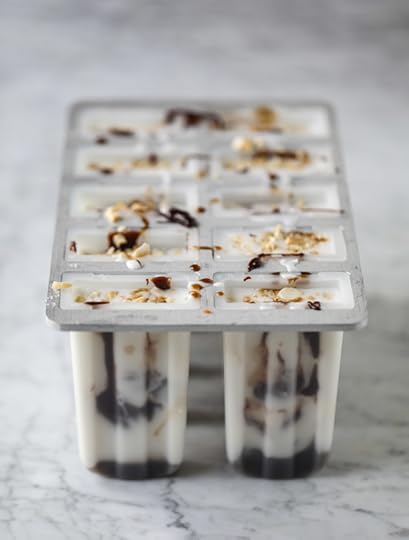
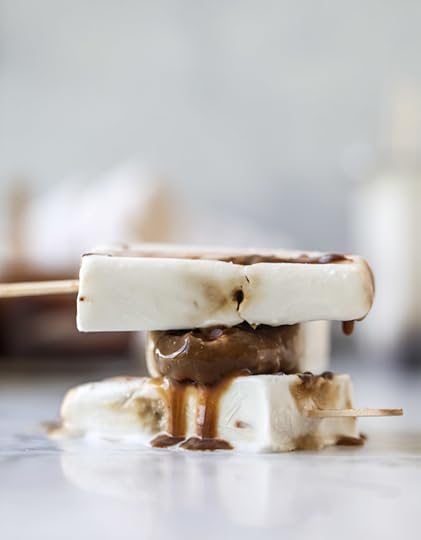
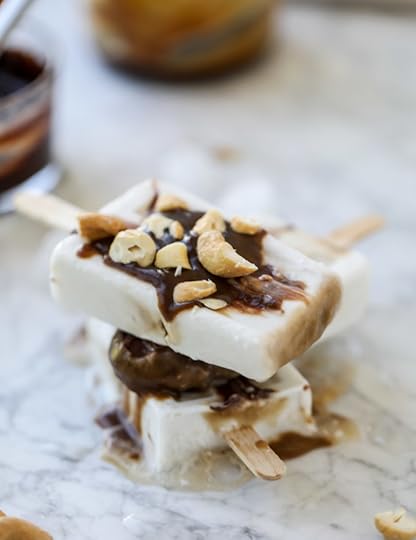
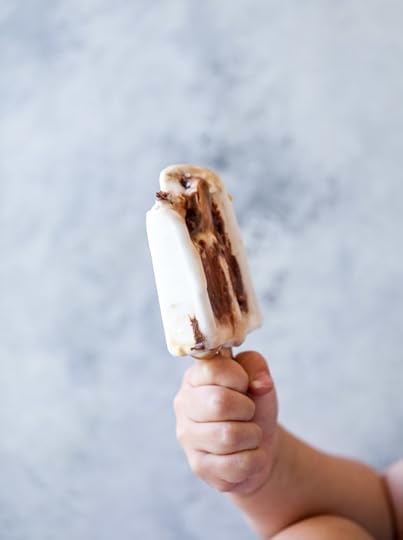
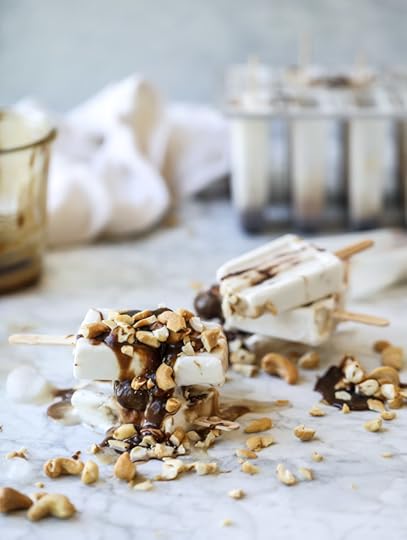
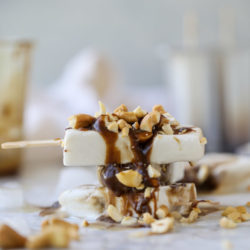
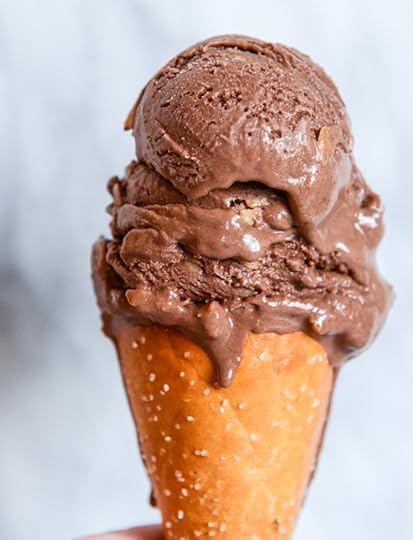
Coconut Chocolate Caramel Cashew Popsicles.
How’s that for (almost) alliteration?!

It’s the most wonderful week of the YEAR!
Popsicle week is HERE and I could not beeeee more excited. Coconut Chocolate Caramel Cashew excited, to be exact. That’s a serious kind of excited. In case you were wondering.
Every summer, Billy from Wit and Vinegar puts together popsicle week and there are hundreds of amazing popsicle ideas from around the internets. Seriously! Tons of them!
I’m usually into fruity pops but I was really feeling something different and creamy and coconutty this year. Something with a hint of chocolate. And a bite!
Enter one of my current favorite flavor combinations.
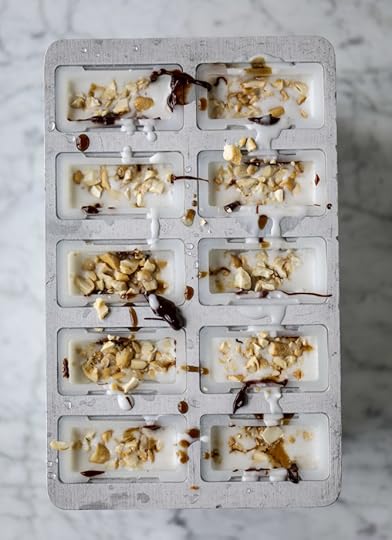
It’s creamy, rich, fudgy and crunchy. So much texture, a little bit chewy from the caramel and soooo ridiculously delicious. The base is coconut milk (especially the cream part!) mixed with a little sweetened condensed milk. A coconut sugar caramel (!!!) comes next, then a chocolate fudge ganache and roasted cashews for crunch before serving.
Yes yes yes. You read that right. A caramel sauce made with coconut sugar! I can’t even handle it.
Even Max went a little crazy with these because they taste so ice cream-like.
AND, that is huge because I’ve actually had a bunch of freezer pops at our house because I crave them like made when I am pregnant. Even though I technically SHOULD make my own all the time. I can’t help it. I just want to eat all the red ones.
Are you also like WHAT are freezer pops? I just can’t call them otter pops. I cannot. Will not.
So even though this is technically a popsicle, I like to serve it with a little plate so you can drizzle on some extra caramel long with a rain shower of salty cashews. NO, of course they don’t have to look as messy and wild as below for real life.
Unless you like your life blanketed with caramel. You know. Normal people things.

Annnnnd P.S. for more delish popsicles, you can see:
Salted watermelon margaritas popsicles!
Ooooh and these late night snacksicles. Oh yes I am serious.
Get it get it!
Coconut Chocolate Caramel Cashew Popsicles
Yield: makes 10 to 16 pops, depending on your molds
Total Time: 8 hours
Ingredients:
coconut base
2 cans full-fat coconut milk
1/2 cup cashew milk
1/3 cup sweetened condensed milk
1/2 teaspoon vanilla extract
1/2 cup roasted cashews, coarsely chopped
caramel
3/4 cup coconut sugar
1/2 cup heavy cream
2 tablespoons unsalted butter
1/4 teaspoon salt
1 teaspoon vanilla extract
chocolate ganache
6 ounces dark chocolate, chopped
2/3 cup heavy cream
Directions:
IN a large bowl or measuring cup, whisk together 1 full can of coconut milk, the cream from another can of coconut milk (discard/use the liquid), the cashew milk, condensed milk and extract until smooth. Fill your popsicle molds with just about 2 tablespoons of the coconut mixture and place them in the freezer for 30 minutes so the tops can set. While they are setting, make your caramel and your ganache.
Once the tops have set, remove the molds and add a little more coconut mixture, then alternate between adding spoonfuls of caramel and ganache, along with the coconut base. Do this until the mixture is to the top, the sprinkle some cashews into the mold to finish it off.
Freeze for at least 4 to 6 hours, then remove according to your mold's directions. You can reheat any saved caramel and ganache for drizzling purpose and top it with extra cashews!
caramel
Place the sugar, cream, butter and salt in a saucepan over medium heat. Whisk until the sugar dissolves then let the mixture bubble for 5 minutes, whisking occasionally. Turn off the heat. Stir in the vanilla extract and then pour the caramel in a jar or bowl. It will thicken as it cools. You want the caramel to still be somewhat runny so you can add it to the popsicles, but you don't want it to be warm.
chocolate ganache
Place the chopped chocolate in a bowl. Heat the heavy cream in a saucepan or the microwave just until warm and the edges bubble (do not scald or boil!). Pour it over the chocolate and let it sit for 1 minute. Stir until a smooth chocolate forms - this will take a few minutes and lots of stirring! Let cool slightly before using.
Be sure to follow howsweeteats on instagram and tag your recipes with #howsweeteats! You can also post a photo of your recipe to the howsweeteats facebook page. I appreciate you so much!
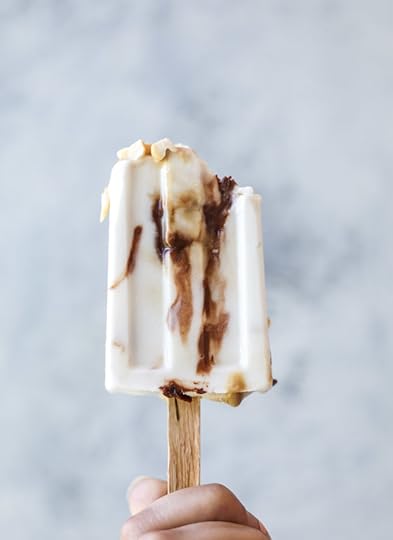
It’s a heavenly bite.
The post Coconut Chocolate Caramel Cashew Popsicles. appeared first on How Sweet It Is.
June 27, 2017
Tuesday Things.
1. Stupidly, I got my first sunburn in YEARS on the first day of vacation. I’ve been a legit psycho about sunscreen and skincare for the last few years and haven’t got one shade of pink in ages and now I feel like I RUINED everything in a few minutes outside in my typical dramatic fashion.
2. If you watch my insta stories, you know that a few nights ago I got roped into watching Forrest Gump and could not stop BAWLING MY EYES OUT at the end. I mean I probably haven’t seen that movie in 15 years, and I know I’m in an emotional state at the moment but I definitely never cried at movies before. Now I can’t watch anything even remotely moving without melting into a puddle.
3. Absolutely dyyyying over why these tops are the worst. I mean, as a huge Kelly Kapowski forever fan I always WANT to love the look, but it is so embarrassingly impractical for my life at the moment that I just cannot. p.s. I found this over on Tracy’s blog because she always has the best lists!
4. OKAY! So I finished OITNB and ended up getting really into the last few episodes. I don’t know why I haven’t been able to get into the show the last few seasons at the beginning. I still wish that they had moved the episodes forward more because having them set in the same scene for basically 13 episodes was insane, but I really ended up liking it and now can’t wait for next year!
5. When I was a teenager I heard about people getting pregnant and their feet growing so much that they could no longer wear any of their shoes. In those very vain years, I was seriously worried about that. BUT! Now that I’m over halfway through my second, that hasn’t happened at all so maybe it’s not a thing? Is it a thing? The Sperry’s I told you about last week actually ended up being too big?!
6. I barely even remember before the internet now. HA.
7. Soooo how many times is it appropriate to eat ice cream on vacation? Also, how many times is it appropriate to give your toddler ice cream on vacation? Asking for a friend. Who isn’t even really an ice cream person.
8. Remember a few weeks ago when I was also weirdly emotional over the Stanley Cup finals? UGH. This article is KILLING me. Whyyy am I such a sap.
9. I finally am finishing up The Identicals (um, the Barnes and Noble version has an extra chapter at the end!! Even though I preordered the book on my phone before it came out, I bought a copy at the signing two weeks ago!) and moving on to something next on my summer reading list. What have you made it through so far?
The post Tuesday Things. appeared first on How Sweet It Is.
June 26, 2017
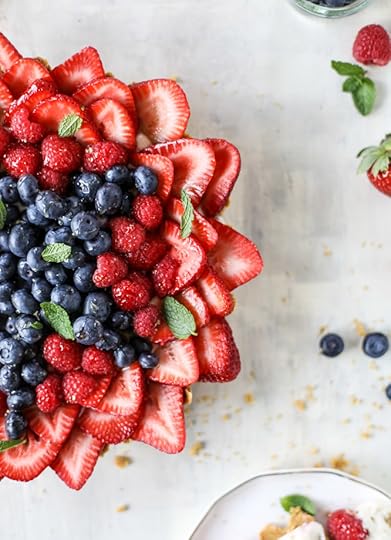
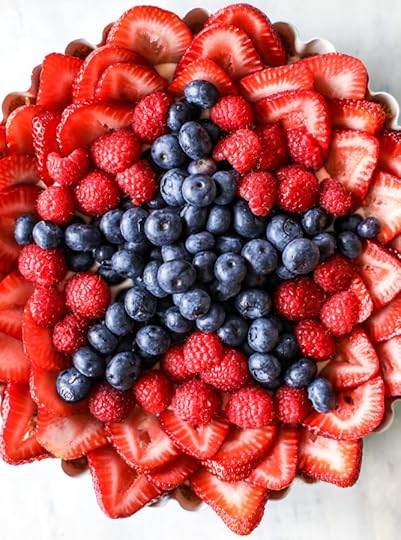
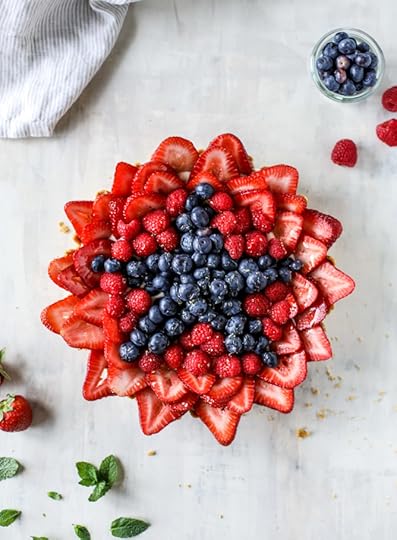
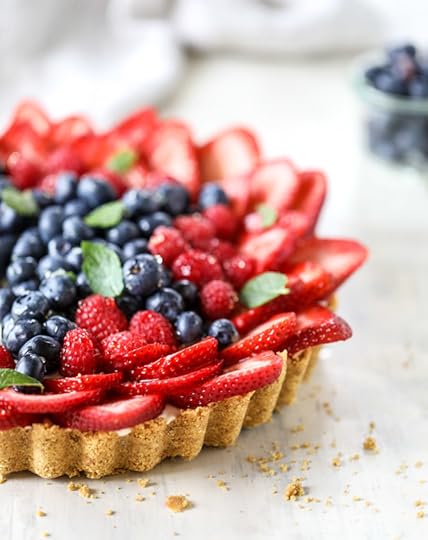
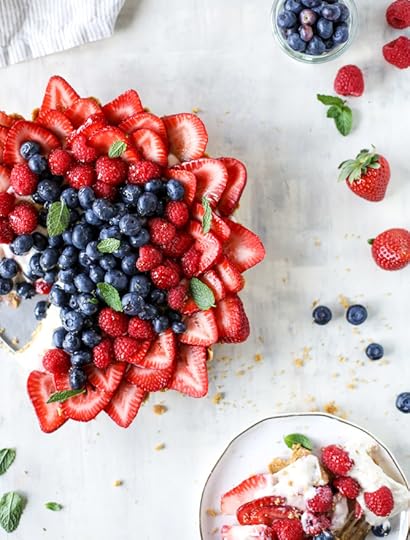
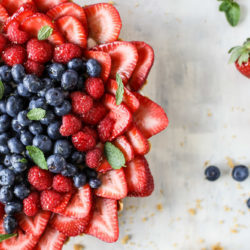
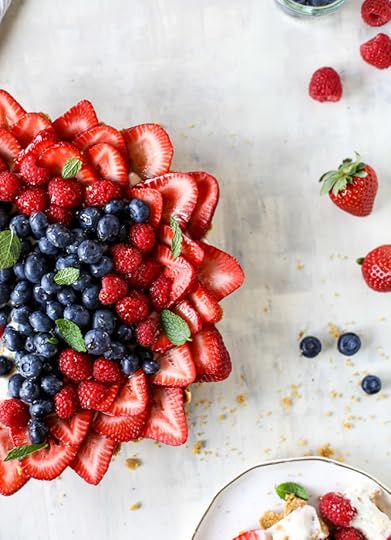
No-Bake Cheesecake Triple Berry Star Tart. {Video!}
Hiiiiiiiii. TELL ME SOMETHING.
How are we over halfway through June? Like almost at July? I don’t even understand this in my stereotypical cliché world and I need time to slow down just a little bit.
ENTER this no-bake cheesecake triple berry star tart (!!!!) with fireworks vibes. Because we need to be festive and all since the 4th of July is a mere week away. Fireworks, BBQs, pool parties and MARGARITAS.
Those have nothing to do with this so I regress.
Aside from my sad attempt at a berry star, this tart is SO delicious if you love cheesecake. It’s simple, only has a few ingredients and is a huge hit at parties.
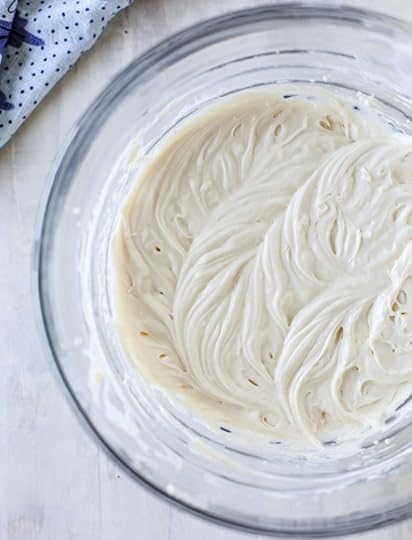
The crust and base for this tart comes from all of my no-bake cheesecake recipes. And it’s SO freaking easy! The cheesecake layer is simply cream cheese, sweetened condensed milk and vanilla extract. Three super basic ingredients whipped up to make the silkiest filling EVER.
And you all know how I live for graham cracker crust. I will gladly eat the crust without the filling if I’m forced to. Or, err…. Not even asked to. It’s SO good. Just love a graham crust! With the crust ingredients, that brings us to an easy five ingredients for the base of the cheesecake.
I DIE.
It is embarrassingly simple. Horrifyingly. Humiliatingly.
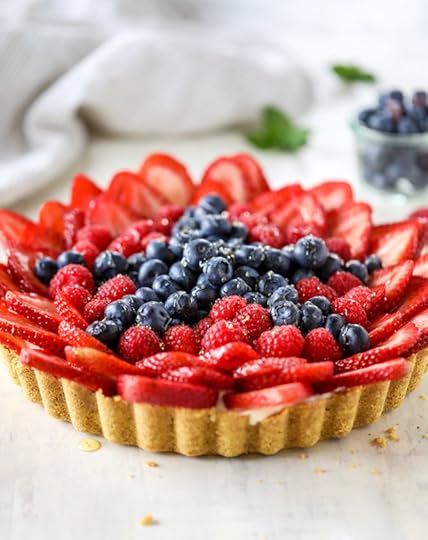
Then, the berries! I used this tart from Martha as inspiration for my blueberry star and let’s just say it isn’t quite as easy as it looks. It definitely isn’t as Martha-perfect as it should be. But the three berry variations with the plain vanilla cheesecake are such a classic.
And they taste like SUMMER. The peak of hot summer days.
ALSO. Even better news. You can totally make this ahead of time because it has to set up anyway, especially since it’s no-bake. It will be a little creamier than your regular old baked cheesecake, but it should still hold up great. Just place the berries on right before serving and you’re good to GO.
So tell me allll the plans you have for the 4th and allll the things you intend on making! Or eating! Or drinking! And drink one for me.
No Bake Cheesecake Triple Berry Star Tart
Yield: serves 6 to 8
Total Time: 6 hours
Ingredients:
graham crust
8 tablespoons unsalted butter, melted
2 cups graham cracker crumbs
no bake cheesecake filling
12 ounces cream cheese, softened
1/2 cup sweetened condensed milk
2 teaspoons vanilla extract
berry star
2 pints strawberries, hulled and sliced lengthwise
1 pint blueberries
1/2 pint strawberries
honey for drizzling
fresh mint for garnish
Directions:
graham crust
Stir together the graham crumbs and melted butter in a large bowl until the crumbs are moistened. Press them into a tart pan, bringing the crust up the sides of the pan. Refrigerate for 30 minutes while you make the filling.
no bake cheesecake filling
In the bowl of your electric mixer, beat the cream cheese until creamy and smooth. Beat in the condensed milk and vanilla extract until combined. The mixture should be creamy with no lumps. Pour the mixture on top of the graham crust. Refrigerate for 4 to 6 hours (or overnight!) before adding the berries on top.
berry star
To make the berry star, form the blueberries into a star in the center of the tart. It doesn't have to be neat, just get the shape and you can fix it later! Layer the strawberries along the outsides of the tart, making two or three rows. Fill in the center spaces with raspberries. Go back in and "perfect" the star as much as you can. Right before serving, drizzle with honey and top with fresh mint.
[berry star idea from martha]
Be sure to follow howsweeteats on instagram and tag your recipes with #howsweeteats! You can also post a photo of your recipe to the howsweeteats facebook page. I appreciate you so much!
This just makes me giddy!
The post No-Bake Cheesecake Triple Berry Star Tart. {Video!} appeared first on How Sweet It Is.
June 24, 2017
Currently Crushing On. (and 10 Recipes for the 4th of July!)

HI!!
I’m writing to you from my most favorite place ever. We are up in northern Michigan, so if you want to be bombarded by ice cream, sunset and beach photos, please follow along on instagram stories.
Since the 4th of July falls on a Tuesday this year, you may be celebrating with a big party next week like us! Below I linked a few of my OMGfavesMUSTmake recipes for the holiday.
And last but not least, I shared our current toddler favorites over on the baby page this week. Woohoo. Would love to hear what you are up to this weekend, so please share below!
What I’m dying over from the internets:
whoa! sunflower seed gouda pesto. so much flavor.
this miso glazed tofu looks amazing.
5 cold brew coffee recipes. HELLO.
perfect pancakes with balsamic strawberry compote.
craving these roasted radishes with burrata and pesto.
seriously, desperately want to do a DIY ombre wall.
jalapeño cornbread with raspberry jam? i’m so curious.
super simple chipotle yogurt dip! love this.
creme fraiche cake is all i need to know.
this mediterranean chickpea salad is right up my alley.
and so is this mediterranean pasta salad.
never going to pass up this guacamole with smoky black beans.
sangria blanca! beautiful.
10 recipes to try for the 4th of July!
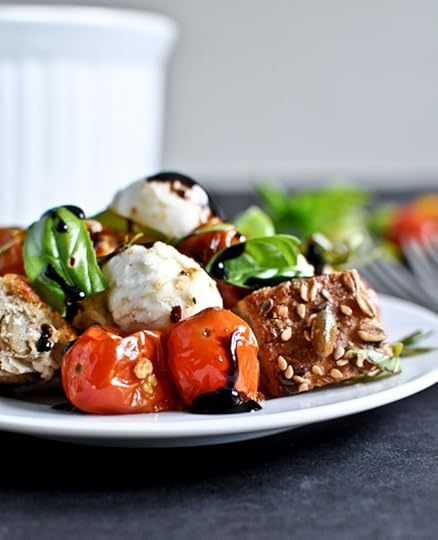
roasted tomato caprese panzanella
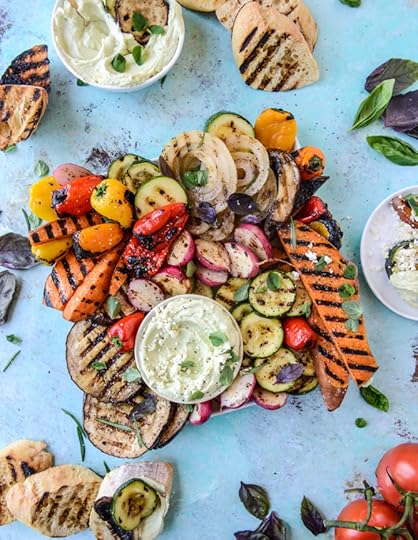
grilled veggies with avocado whipped feta
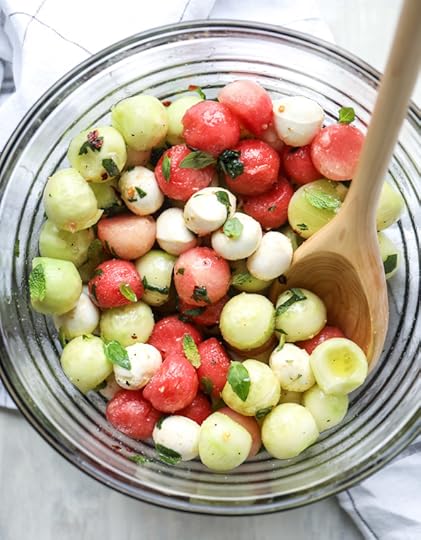
marinated mozzarella melon salad
kalua pork sliders with mango blueberry salsa

chocolate peanut butter pretzel ice cream
Have an amazing weekend! xo
The post Currently Crushing On. (and 10 Recipes for the 4th of July!) appeared first on How Sweet It Is.
June 23, 2017
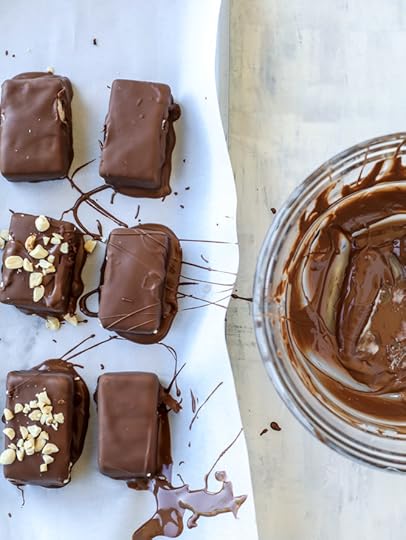
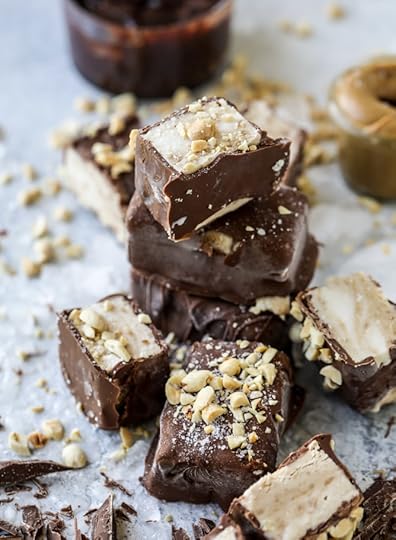
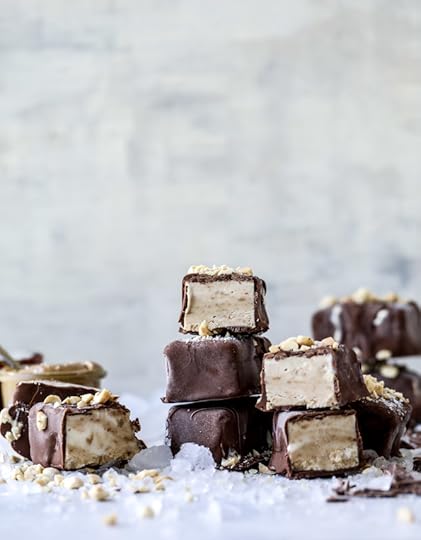
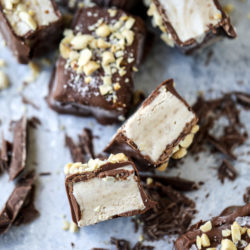
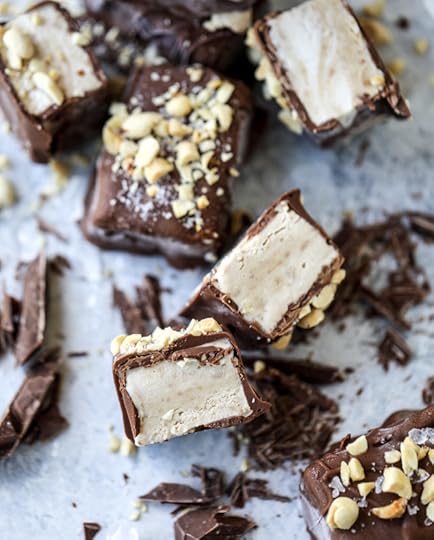
Salted Peanut Butter Ice Cream Bars.
Oh.My.Gosh.
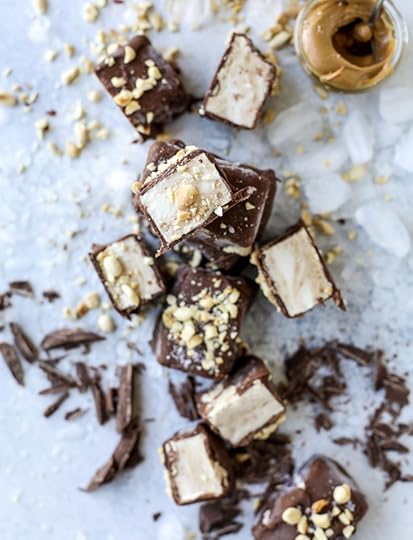
!!!!!!!!!!!!!!!!!!!!!!
Salted peanut butter ice cream bars. HOMEMADE. You heard that right. These are currently the best thing to come out of my kitchen. I can not lie.
Now how to make them appear in my freezer every single week for the next few months…
The flavor? Well, if you’ve ever had Jeni’s salted peanut butter ice cream with chocolate flecks, then you know it’s seriously insane. It is so amazing – like I could eat a pint at a time and I’m not even a major ice cream person. It’s the salt… and the peanut butter…. And the chocolate flecks.
Like the perfect storm.
So since I first had a pint in my freezer, I’ve been dying to make something similar with that flavor.
Also! I’ve had my eye on these homemade ice cream bars since last summer from bon appetit. I never got around to making them and then it was, well… winter. Hence saving them for this summer. I married the two ideas and HERE WE GO.
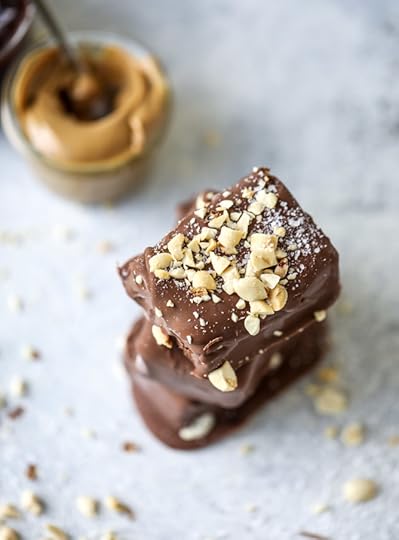
Most importantly! Don’t waste amazing ice cream like Jeni’s by putting it in these bars. Buy a plain old vanilla ice cream that you really like, but one that’s just that – PLAIN. We’re going to make a sugary, salted peanut butter ripple to fold into the softed ice cream.
The freeze it in a giant pan. Cut it into bars.
Dip it in chocolate melted with coconut oil.
Cover that whole thing with sea salt and peanuts.
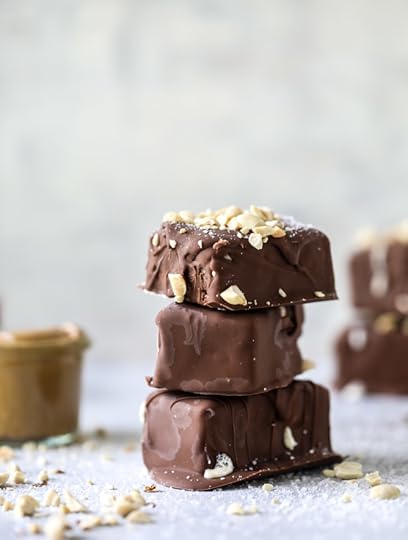
Eat them and nearly diiiiieee because they are so insanely good.
I have seriously had to stop myself from grabbing one for breakfast. Horrifying.
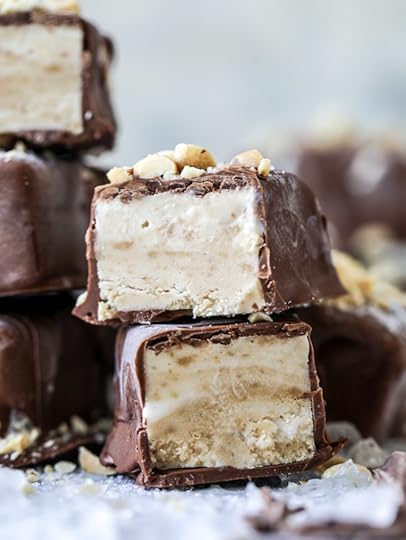
ALSO. More important news to note. When I was a kid, my mom would occasionally (like, once a summer) buy the snickers ice cream bars as a treat for us. They were my absolute favorite. And while these are missing the caramel, one bite totally took me back to that flavor and feel. Soooo close!
Here is how good these are: when I am pregnant, I rarely have a sweet tooth. Sweets don’t appeal to me much and I don’t really crave anything sweet. BUT THESE.
They have been the first thing in five-ish months that I’ve had to manage my own self control on. They are divine. And while they do take a little bit of work and an overnight to freeze, they really are quite simple and they last as long as you can handle in your freezer!
Meaning… as long as you don’t eat them. Good luck.
Salted Peanut Butter Ice Cream Bars
Yield: makes 12 to 15 bars
Total Time: 12 hours
Ingredients:
1/4 cup heavy cream
1 cup creamy peanut butter
1/2 cup brown sugar
3/4 teaspoon sea salt
1 gallon vanilla ice cream, softened
chocolate coating
3 cups milk chocolate chips
1/4 cup coconut milk
1/2 cup roasted, salted peanuts, chopped
Directions:
Line a 8x8 baking dish with plastic wrap, letting some hang over the sides.
Place the cream, peanut butter, sugar and salt in a blender. Blend until smooth and almost pourable. If it's still really thick, blend in a tablespoon or two of water until it can be poured.
Place the ice cream in a large bowl. Break it apart and stir until it's super thick and creamy, sort of like cake batter. Pour in the peanut butter mixture and swirl it - don't fully mix it! Just swirl. Transfer the mixture to the baking dish and spread it in an even layer. Cover with plastic wrap. Freeze overnight.
The next day, lift the ice cream square out of the dish and place it on a cutting board. Quickly cut the square into bars or squares and place them on a parchment lined baking sheet. Freezer for 2 hours, until solid.
Make the chocolate topping and chop the peanuts. Remove the bars from the freezer and quickly dip them in the chocolate and cover with the peanuts. Place each back on the baking sheet. Freeze for another hour before serving.
chocolate coating
Melt the chocolate chips in a double boiler or microwave (I do 30 seconds on medium power until melted, stirring often). Once melted, stir in the coconut oil until it melts.
[adapted from bon appetit]
Be sure to follow howsweeteats on instagram and tag your recipes with #howsweeteats! You can also post a photo of your recipe to the howsweeteats facebook page. I appreciate you so much!
Please make these. Do it for me.
The post Salted Peanut Butter Ice Cream Bars. appeared first on How Sweet It Is.
June 22, 2017
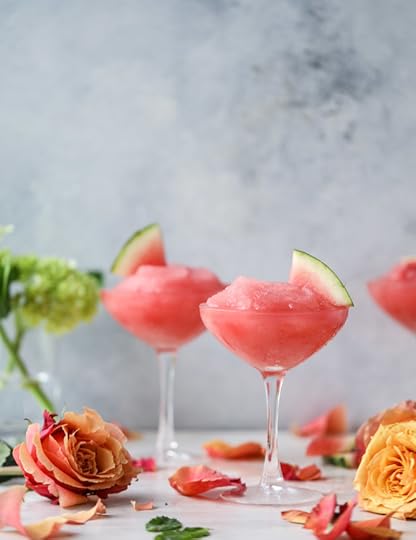
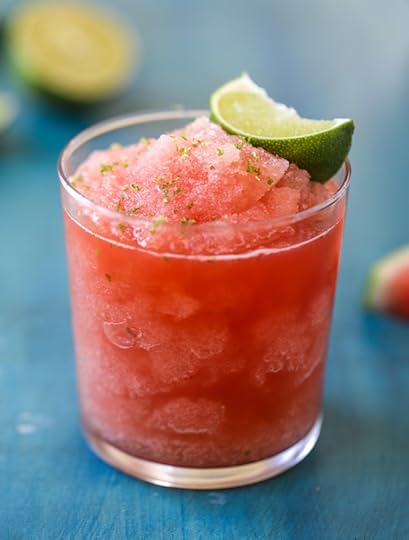
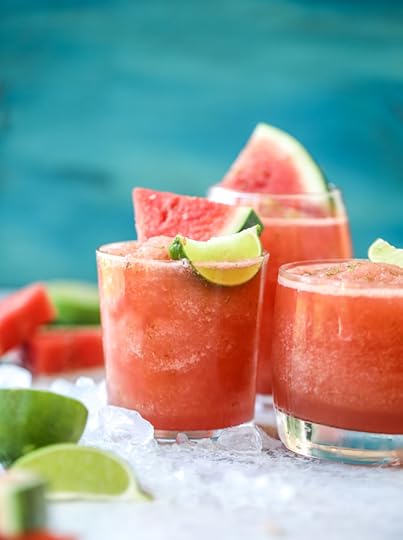
Frozen Watermelon Lime Agua Fresca.
I can think of nothing better than celebrating the second day of summer with THIS.
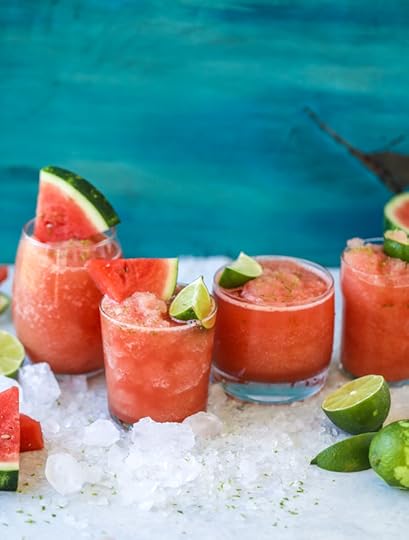
Frozen agua fresca! Specifically, frozen watermelon lime agua fresca. Yes yes yes. Now if only I could spend every single minute by the pool this summer with one of these in hand. At all times. Heaven!
I’m counting down the seconds because we are sooo close to leaving on vacation. When I was a kid, I think I started packing and preparing things weeks in advance and well, I hate to say that I’ve still sort of been doing the same thing. I am the procrastinator of all procrastinators, except when it comes to packing for vacation. I will actually be PACING in the kitchen while Eddie is racing to pack his things last minute right before we leave. Because I am a psycho.
Still though, I have been severely needing a non-boozy taste of summer. Just like this!
So! Ever since I made the watermelon frosé, I’ve got tons of questions (uh, rightfully so, I’m asking too!) on if there is a way to make it non-alcoholic. My answer is always no, because it’s basically frozen wine, and what can replace frozen wine?!
BUT.
I’ve made us something else that is just as close, just as delicious, just as perfect for a super sunny, hot day and extremely refreshing.
Also cute. The cuteness factor is important, I get it. Instagram rules lives, people. HELLO WHAT CAN I EAT TODAY THAT WILL LOOK CUTE ON INSTAGRAM?
I mean, no, of course I never think that way. Ever.
Thanks 2017.
I made watermelon agua fresca a few years ago – funnily enough, it was right when I was finishing up the photography for my first book! I love it so much. Watermelon is probably my favorite flavor of agua fresca, followed closely by strawberry as long as it’s not super sweet. We have an amazing taco stand here in Pittsburgh and they make some fabulous strawberry agua fresca, but you have to be willing to deal with some sweet teeth. It’s super refreshing but also super sweet.
Here, I did the frozen watermelon thing with lots of lime juice (as you can see I’m really missing margaritas too) and just a little bit of sugar to sweeten it. You can sweeten it as much or as little as you want! Totally up to you.
Also of note, I almost always use simple syrup in all of my drink recipes, but since this is being blended with tons of ice, plain old sugar is fine. And it’s much quicker too! If you have extra simple syrup on hand or feel like making some (it takes minutes, literally), go for it.
Then make yourself a big old pitcher and sit in the sun.
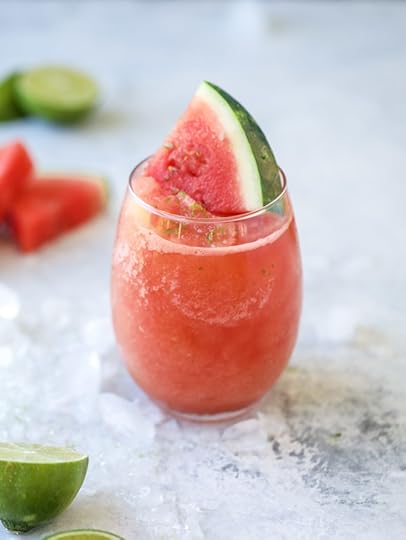
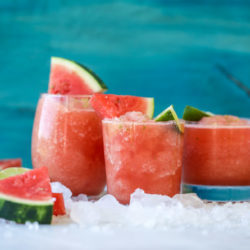
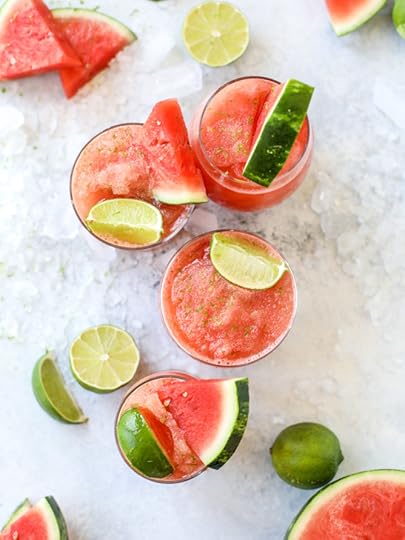
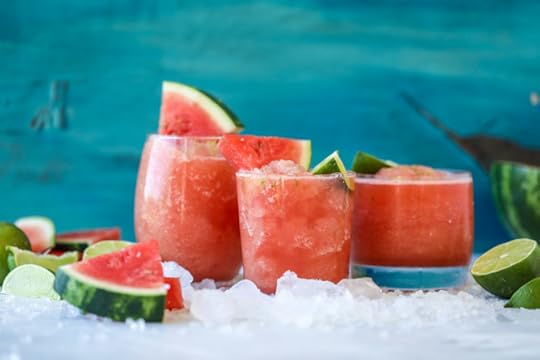
Frozen Watermelon Lime Agua Fresca
Yield: serves 4
Total Time: 20 minutes
Ingredients:
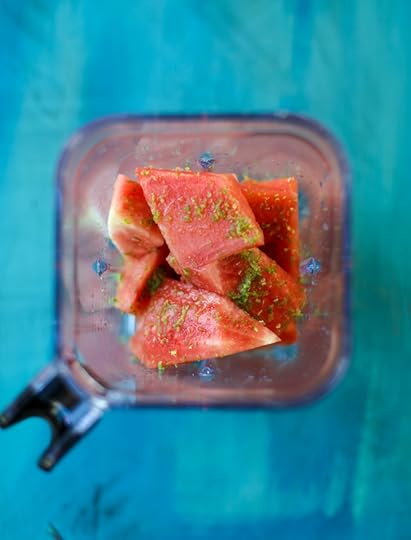
1/2 large watermelon, seeded and cubed (about 4 cups)
1/2 cup freshly squeezed lime juice
1 teaspoon freshly grated lime zest, plus extra for topping
3 tablespoons sugar
pinch of salt
4 cups ice
for serving:
lime wedges
watermelon wedges
Directions:
Place the watermelon, lime juice and zest, sugar, salt and ice in a blender. Blend until you have a slushy consistency and the mixture is cold and frozen. You can taste and add more sugar if desired.
Pour it into glasses and top with a sprinkle of freshly grated lime zest. Add in a lime wedge and watermelon slice. Serve immediately.
Be sure to follow howsweeteats on instagram and tag your recipes with #howsweeteats! You can also post a photo of your recipe to the howsweeteats facebook page. I appreciate you so much!
Annnnd you can maybe add rum.
The post Frozen Watermelon Lime Agua Fresca. appeared first on How Sweet It Is.
Jessica Merchant's Blog

- Jessica Merchant's profile
- 53 followers

