
C.S. Wilson's Blog, page 2
August 20, 2025
Butterfly Baths
The original craft that Nebalee wanted to do for our sister craft day was to make Butterfly Baths. She found a cute example on Facebook, and had her heart set on it. Unfortunately, the cost of terracotta pots has skyrocketed and it quickly became cost prohibitive to make these, so we settled on the garden poles.

Jay has taken up a side hustle as a reseller on eBay and spends time every week hitting the garage sale circuit. When I am off on Fridays, I join him. A couple of weeks ago, at one of the garage sales, I found an assortment of terracotta pots for $12, so I scooped them up. They were smaller than the large pots shown in the example, but I was certain we could make them work.
I was so excited to get to do the craft Nebalee originally wanted to do, that I was super impatient and strong-armed her into coming over after Mom and I did our glass class.
The first thing I did was stack the pots different ways, to see how we could make them work. I only had enough of the right sizes to make one stack like the picture, so I declared that stack Nebalee's. Mom and I played around with what was left and decided we could make a double-decker butterfly bath each. While waiting for Nebalee to arrive at my place, we went ahead an painted the backgrounds. That way, when Nebalee joined us, we could jump right in to painting the fun stuff.
 Oh, by did we make a mess!
We each ended up with a different shade of blue. Mom had brought down some paints from one of her earlier projects, and I picked up some cheap acrylic from Wally World. The base coats dried just enough that once Nebalee got there, we could get to painting.


We loosely followed the example, but it turns out, we all have different interpretations of what mushrooms and butterflies look like. We spent a couple of hours happily painting away
I didn't have any little terracotta pots for the top of the baths, but for my 50th birthday, Nebalee and our friend wrote out words to describe me on fifty different rocks. I've been holding on to those rocks for the past four years, not knowing what to do with them. I dug them out of the potting shed, and we each chose a few to add to our baths for the butterflies/bees/bugs to stand on and not drown.
Once we were done painting, I broke out my favorite glue of all time, E6000, and we went about gluing all the pieces together. Nebalee had to run, so we quickly took pictures and sent her on her way. Mom and Neballe left their baths with me to finish drying/curing, and for me to seal the next day.
 The horses are busy bodies and had to inspect them all.
 Chonky Skeeter was just sad it wasn't edible
 Nebalee's, Mom's, mine
The next morning, I got up and ran outside to spray the first coat of sealant on them. I picked up by rattle can of sealant, shook it really well, then blasted the top of Nebalee's bath.
Wait ...
The sealant is clear, right?
Why is it spraying white?
Oh, shit!
Yep, I'd sprayed right across the top of Nebalee's beautiful butterfly bath with white primer, not clear sealant.
I was horrified! All of the work that Nebalee put into hers, and with one careless mistake, I'd erased part of it.
Luckily, I still had all of the colors, so when Mom showed up to watch court with me, I fessed up that I'd have to repaint some of Nebalee's bath. After we watched the judge give yet another continuance to the defense attorney, we went outside and started painting. I painted Nebalee's butterfly bath, and Mom painted the trim pieces for Maggie.

I couldn't get the primer off the rocks, so we chose some bright colors that matched the colors on the rest of her bath and I started re-painting. I had to go back to my pictures to see which rocks she had chosen in order to re-write them. I'm so thankful that I was able to biggerfy one of the pictures to read her rocks. Finally, all of the baths got sealed, with sealant this time, and got distributed to their respective homes.
 Mine went in with my "garden in
a box" native flowers.
 Nebalee's went into her "garden in a box"
butterfly garden.
We don't know where Mom's will end up yet, but if I'm guessing, it'll be in her rock garden, near her garden pole. But that's just a guess.
Update 8/20/25 from Mom:
 Text from Mom this morning.
 Nestled in the geraniums for now.


August 19, 2025
Delayed Birthday Weekend
My birthday was last month, and I had a great time doing sister crafts with Nebalee. The following weekend, Jay and I went to a fancy dinner date in Denver, at a restaurant I'd been eyeballing for a year. Overall, I had a great 54th birthday, and didn't give it a second thought.
This past Saturday, though, I realized that I was getting a second birthday weekend. My present from Jay was to finish my circus tattoo, and my present from the Bionic Cowgirl was a one-day stained glass class. Yipee! I get birthday, round two!
All of my tattoos, of which there are many, are of things that I love. While I was hesitant to get my first pop culture tattoo, once I jumped in, I went all in. Over the past couple of years, I've added many things that I love and want to remember. Pop culture-wise: Supernatural, John Wick, The Walking Dead. Mom-kid tattoos: Belle reading from Beauty and the Beast, and Toad from Frog and Toad. Birthiversary tattoos: Conch shell (Key West), sea turtle (Costa Rica), Aztec firebird (Cancun), dolphin (Marco Island). Everything else I love in life: Estes and Skeeter on out on the trails; peace, love, and pew; book dragon, with books depicting each of the kids' (and the Gremlin's) birth years; my Aztec warrior.
I was lacking a circus tattoo, but struggled with finding one that really spoke to me. Jay and our tattoo artist, the Infamous Katie, collaborated to come up with the perfect one. I had the outline done a few months ago, so for my birthday, Jay offered to pay for me to finish it. I jumped at the opportunity.

 They incorporated me into it,
not some random pic from the 'net.
 My love of lyra and sling is incorporated,
and she brought in colors from my other tattoos
so I'm kind of matchy-matchy.
Jay also had some tattoo work done on Saturday. "Katie Dates" have become one of our favorite dates. We go hang out for a few hours with the Infamous Katie, who has become like a little sister to us, then we go grab something to eat. This time, since Jay had plans with his sibs after our Katie Date, we just hit Dairy Queen for an ice cream. I don't know about anyone else, but I am ravenous after a tattoo session, even if I eat before.
On Sunday, Mom and I headed to the class she'd signed us up for. I love learning new things, and have taken a few one-day "taster" classes. They are great, because they give you a good introduction to a skill or a craft that I might be interested in, but without all of the expense involved in buying all of the equipment upfront. A couple of years ago, Jay and I took a welding class, which was a blast! This year, Nebalee and I took a glass fusion class; Mom and I took a soap making class (I still have several bars of "monkey fart" scented soap left); and Jay and I took a writing class. These one day classes can quickly become addictive. :)
The class I'd chosen for my birthday was a honeycomb stained glass class. I'd been eyeballing it since the beginning of the year, so when Mom asked what I wanted to take, this was it. The class was small, which I love, only six students, and we didn't have to do any glass cutting. The instructor had done that bit of prep work for us, for which I'm thankful.
We talked a little bit about the process, then jumped right into choosing our glass and laying out our projects.
 Mom's
Mom's Mine
MineIt was amazing to me to look around the classroom and see all of the different ways each of us chose to lay out our six pieces of glass. I'm not super creative, so I went with the layout that most closely mirrored the example on the wall. I did choose to add the round pieces as a bit of embellishment, but the reason for that is silly. When adding foil to the glass, it's fairly straightforward on pieces with straight edges, but when adding foil to the round pieces you get to shake each of them up in a little round container. It looked like a lot of fun, so I decided I wanted to do that, too. <grin>
 Adding the foil.
After we wrapped everything in foil, and I got a giggle out of shaking up the container with the round bits, we started in on the soldering. Now, believe me when I tell you that just because I used to solder really well in high school, when I learned to do it on electronic components, doesn't mean I can solder well forty years later. Holy cow, I suck at soldering stained glass. Instead of a nice, tiny dot just to make a connection between a component and the motherboard, it takes a lot of solder with a big, unwieldy soldering iron to put the stained glass together. Both the Bionic Cowgirl and I struggled with this.
 We are used to fine-tip irons,
these heavy flat-tipped ones were
hard for both of us to use.
 Such ugly joints. I welded better than
this, and that's saying something!
Eventually, I quit dicking around with trying to make my solder nice and smooth and decided "it's good enough for who it's for". The finished products look pretty good, as long as you look at them from a distance.


My honeycomb found a place in one of Whimsy's big windows, and I'm not sure where Mom's is going to end up, but this was such a fun class. I'm not super creative, but I think I could really enjoy following some stained glass patterns in future.
August 11, 2025
Meet Beemer the Gargoyle
If you've ever been to the Lodge, you probably noticed that Bill had a collection of gargoyles throughout the space. Most people absolutely loved them, but there was one notable religious group that took offense to Bill's protectors and insisted on turning all of them to face the wall or the corner. Bill, being Bill, just laughed and went with it.
After Bill's death, both Nebalee and I wanted one of his gargoyles for our respective gardens. It took a couple of summers, but we did each get one. Mom had a few for us to choose from, and Nebalee wasn't up there, so I chose two winged ones for us.
I didn't exactly know where my gargoyle was going to land in the garden, but knew it had to be near Maggie, the Magical Potting Shed. Maggie already had a dragon on her side, so she needed the gargoyle to live there, too.
I kind of plopped it down on a shelf next to a couple of plants, and he's lived there since he came home.
 He fit here pretty well.
My intent was always to paint Maggie barn red to match the rest of the outbuildings, and I finally got around to it on Friday. I have an old wooden coat rack over Maggie's door, where I hang windchimes and other goodies. While painting, I took the rack down to touch it up with white paint, and so I could paint Maggie's walls behind it.
As I was putting the rack back up, the gargoyle caught my eye, and I thought, "hm, would he fit up here?"
 Turns out, he does fit up there!
Though he looks stone, he's really just plastic, and weighs next to nothing, so I knew I had to secure him somehow, otherwise our winds would find him a new home, posthaste. E6000 glue has become my go-to outdoor adhesive, so he got a healthy dose of it.

Now that he has a permanent home, he needed a name. The obvious name to call him would be Bill, since he was one of Bill's gargoyles. But the Lodge's big gargoyle is named Barton, after my Grandpa Ed. So, if I named the gargoyle Martin, we'd have a Barton and a Martin. I kind of like the rhyminess (yes, it's a word, I just typed it) of Barton/Martin.
But Martin didn't fit any better than Bill fit, honestly.
I had been running the names past Mom and finally told her that he'd give me his name eventually. Overnight, I played with variations, but nothing seem to fit
I remembered that before we lost both Bucky and Bill, they'd joked around about having a ranch and naming it the Lazy BM, with both of their initials. They'd even drawn up a brand. Though, both of them would have cracked the heck up if I'd named the gargoyle BM, I just couldn't do it. But ... BM ... Bee Em ...could easily become Beem, the spelling of which is a play on Ranger's name for Beel.
The next thing I knew, Beem became Beemer, and the gargoyle suddenly had a name.
August 5, 2025
Rest Well, My Gizmo
On July 25th, we said goodbye to our Grand Dame, Gizmo. At 18, I knew that this would likely be her last summer, but the time came too quickly.
 Enjoying the nice weather and a good brushing,
Gizmo was technically Digger's cat, but she came to live with us shortly after we moved in to our little place. She was a spitfire from the get-go. In fact, it was Gizmo that got me arrested.
 As she got older, she stayed closer to home.
She'd also smacked the crap out of my dad (not Bill, she loved Bill) at one point. When Gizmo and Ashee were living in my grandma's house with my dad, he wanted to take a nap on the couch, but Giz was already on the couch. He made her move, then stretched out on the couch. Just as he was falling asleep, she made her displeasure known by reaching down from the back of the couch, where she was lying and bam-bam-bam smacked him across the forehead before (wisely) quickly exiting.
She had her share of kittens, and didn't much care for them. Which meant she didn't love it when we introduced new cats to the household, but she always warmed up to them. Children, though, were just skin kittens in here eyes and she never liked them. Until the Gremlin came along and some milk leaked out of his bottle while he was sleeping, then she decided that skin kittens were okay as long as they spilled milk for her to clean up. I have a picture, somewhere, of them sleeping together, his hand curled in her fur. In fact, her name was one of the first he uttered, "Mo-Mo". We've called her Gimmo-gimmo for ages, and he renamed her Mo-Mo.
None of our animals developed much of a taste for human food, because we tried never to give them any. Ashee's dog Gracie was so uninterested in people food that we could leave plates unattended on the floor and she wouldn't bother them. Well, we could, until Gizmo taught Gracie that human food was yummy. Gizmo didn't love human food, and would mostly leave it alone, but her weakness was pepperoni pizza. She once jumped right into the middle of Digger's pizza to get at it.
She mellowed out with age - thank goodness! - and was just a steady presence in and around the house. She'd often just hang out with us outside, quietly keeping us company.


She put up with my stupid hooman tricks of dressing her up for Christmas card pictures and wearing a crocheted witch's hat last year.
 She didn't love wearing the hat, but she allowed it.
A few weeks ago, she'd been bitten by another cat (who will remain nameless) and had developed a huge abscess on her back. I only noticed the abscess when it broke open and was streaming bloody pus. I feel a bit bad that I didn't realize she'd been injured sooner, but she'd taken to just hiding out in the bathroom or under the bed for the last couple of months. I figured, she's old, she gets to hang out where she wants to. However, on nice days, I did force her to go outside and sit in the sun. Vitamin D therapy and a dirt bath always did wonders for her mood.
I cleaned her abscess as well as I could, and sequestered her in the bathroom to heal. She did not complain about the pampering or the cans of wet food she got twice a day during her convalescence. She didn't, though, love when it was time to clean and dress the abscess. It became obvious, about a week in, that healing was taking a lot out of her, and when the vet came for the horses' well child checks, I asked him about euthanizing her. He didn't have time that day to do it, so we set an appointment.
On the day we chose, I made sure Gizmo had the best day possible. She loved being groomed, but in the day or so before her appointment, she'd had a hard time cleaning up after going to the bathroom. I couldn't let her be seen like that, so she got a butt bath. I had intended on giving her a whole bath, but she was so humiliated by a human scrubbing her butt that I decided not to do the entire bath. Other than the bathing ordeal, she had a great day. She ate what she wanted (wet food, dry food/milk "cereal") and hung out in the sun with me while getting brushed. Other than being humiliated by the bath, I'd say she had a 9/10 day.
Many moons ago, I had a vet tell me that he'd rather be way too early to put an animal down, than one second too late. I've tried to live by that and honor the life the animal has given us. We were right on the edge of almost too late, I think, but she had a good day the day we helped her across the bridge and that brings me a lot of peace.
July 23, 2025
One Last Birthday Craft with The Best Sister Ever
However, a couple of days later, Jay and I were at an antique mall and I happened to see a coil of rusty barbed wire that instantly made me think of a wreath. Then ... my brain made the connection between the coil of barbed wire in the antique mall and the length of barbed wire I'd just thrown in the dumpster a couple of days earlier and I knew I had to make a barbed wire wreath for the outhouse.
I went dumpster diving when we got home, pulled the barbed wire out, and cut away all of the hay net that had gotten tangled in the barbs. Jay was kind enough to coil it while I looked up pictures for inspiration on Pinterest. One of the pictures showed a horseshoe in the middle of the wreath, and I remembered I had an old rusty horseshoe that we'd found in the yard this spring. Since we don't shoe our horses, I knew that it was old and had to have come from a horse other than ours. I held onto it to put on Maggie's door, but knew it had to go into the wreath instead.
 Barbed wire from our hay bale,
horseshoe from our yard.
When we were finished with our garden poles, Nebalee helped me wire some silk flowers to the wreath, which was surprisingly more difficult than I expected it to be.
 It's rather minimalist, but I love it.
Putting it up on the outhouse was one of the many "little" chores I had lined up for the next day, and I wanted to see it on the outhouse so badly that it jumped to the top of my to-do list and I knocked it out first thing Sunday morning.
 Just ignore my finger.
I love it, but I might add some more greenery to it at some point. Or maybe not, it depends on how badly I want to risk tetanus. Either way, I love it on the outhouse door. Once it cools down, Mom and I are going to use stencils to paint flowers around the base of the outhouse to liven it up a little bit.
July 22, 2025
Birthday Crafts with The Best Sister Ever
Birthday #54 was last week, and I was traveling for work, so it was pretty low-key. Nebalee and I had planned a craft day for the Saturday after my birthday, and I was so excited about it. She and I don't spend nearly enough time together any more. A couple of years ago, we were doing monthly 5 and 10k, but life keeps getting in the way. The fact that we both love and enjoy spending time with our significant others is a hindrance, too.
We had planned to make butterfly baths out of terracotta pots, but that became cost prohibitive very quickly, so Nebalee came up with an alternative craft - making garden totem poles. I looked at Pinterest for a few ideas and was pretty overwhelmed. I love me some crafts, but I'm not super creative or artsy. I do best when I can look at a few ideas and steal them to make my own, so that's what I did.
 Our "practice" beam on the left.
 I tried, and failed, to paint flowers
so I made Nebalee paint them for me.
 Nebalee's flowers.
 I wish I'd thought to do my flowers like this!
 I'm always hashtagging my pictures
#WeLiveInAPostcard so it had to
go on the post.
 After I saw Nebalee's dragonflies,
I made her add one to the flowers I'd
previously made her paint.
 Side-by-side. Mine is taller because I had to
sink it securely in the ground. I don't need the
wind treating this like the outhouse.

 #BestSisterEver and I with our completed posts.
 We planted hers in her butterfly garden.
This was such a fun craft! While I was initially overwhelmed with possibilities, once I settled down and decided to simplify the post, things went much better. Right at the very beginning, I had a thought of painting vines to wrap around each side, but I didn't like the way they turned out. You know what the beauty of painting is? If you hate it, you can just paint over it. So I did, and ended up with lady bugs, bumblebees, flowers, and our hashtag. Every bit of my garden pole makes me smile.
I was determined to get my garden post planted right away, so the next morning I pulled out the auger and got to work. It's scary how fast I'm getting with the auger - it no longer intimidates me, so it's no big deal to just pull it out and dig a hole. Jay did come out to help me with the last couple of inches - I'm not quite tall enough to get the leverage over the top to dig down as far as I need sometimes. This was one of those cases, and when I saw all of the shale dust come out of the hole I understood why I came to a standstill with my hole digging.
I decided to plant my garden pole at the end of my newest arch. The arch was supposed to support the watermelon I planted. Unfortunately, my watermelon plants didn't make it. I may have been a little over-confident in my growing abilities this year.

After Jay helped me dig the hole deep enough, he broke up the flagstone for under my little arch, and helped me move my antique school bench from Whimsy to the archway. This was another one of those "it'll just take a minute" projects that sits and sits. With his help, it did take just a minute, and I'm thrilled with how it turned out. This fall, I'll sprinkle some creeping thyme seeds in between the flagstone to germinate over the winter.
 Just picture this next year with some sort of climbing edible plant.
 The Bionic Cowgirl and I took a moment to enjoy
the new seating area.
July 15, 2025
The Outhouse Conclusion (I hope!)
I mentioned in my last outhouse post that it had to be ready to go for an event we were hosting on Saturday. So, of course, that meant that I'd put off doing any actual real work on it until Friday and Saturday. Such is the life of a procrastinator.
I only had to work a half day on Friday, and I had grand plans of checking the anchors, resetting them if need be, and getting everything set up and ready to go. What I did instead was take the prints I'd picked up from ARC last fall, and went into town to find some "cheap" frames and mats. I paid $1.99/each for the prints, and spent over $50 on supplies to frame them myself. Typical.
Then I came home and took a nap. Peak procrastination right there! After nap time, I did get the prints matted, framed, and put up in the outhouse. I think they're perfect for it, and breaks up the brown OSB walls a bit.
 I love the lantern with the print.
 The print on the other side.
I felt pretty good about my "progress" on the outhouse and spent time hanging out in the Whimsical Treehouse with Diana and Pina before calling it a day. Whimsy did have a surprise for me - there are two toads living in there. I know one is living in Diana's straw mulch, and I think the other one came up from under the weed barrier, but I'm not 100% sure. I'll post a Diana the Pomegranate update soon - she's doing great!
By Saturday morning, I knew I had to do what I was dreading. I had to go pull on the anchors to see if the concrete had set correctly, and if not, I'd have to pull the anchors and do it all over again. In my gut, I just knew that I'd have to re-set the anchors, and I was right. It took next to no pressure to pull two of the four right out of the ground. Grrr. I was lucky that we hadn't had any significant wind since Mom and I sank the anchors on Monday.
Jay helped me auger out the holes, which we made a bit deeper so the anchors would sit flush, and I filled each hole with concrete instead of just mixing it with dirt. He also suggested crossing the rachet straps - running one from the front of the outhouse to the back anchor, and vice versa - to give it more stability. In order to do so, I had to change out my straps, but I feel like it's much more stable with them crossed as he suggested.
 You can see how I've crossed the ratchet straps from front to back.
Should I have just sunk actual posts at each corner of the outhouse and secured it that way? Yes. Why didn't I? I wanted to be able to move it, if necessary. I never factored in the wind knocking it over b.s. that's been going on.
It gets dark out where we live, though not as dark as it used to thanks to all of the urban sprawl. However, out at the edge of the property, it's dark and I didn't want anyone tripping over the anchors, so I had the brilliant idea of wrapping the front ratchet straps with solar powered fairy lights.
Here's the thing about fairy lights. I love 'em, once they're strung up. But, good gods do I despise stringing them. It's like detangling fishing line with permanent knots where the little LED lights are. It took me two hours to string the lights. Two hours! When I was done, I told Jay that I felt like the outhouse was going to look like Beetlejuice's place with the big flashing sign over it.
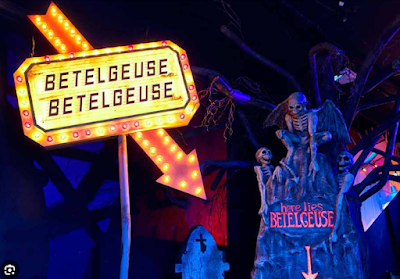
I'm not going to lie, if I leave the fairy lights on "flashing" mode, it does kind of look like Beetlejuice's sign, but overall, I'm pleased with the way it turned out.
Back in Part 1, I mentioned that I'd found a chamber pot-style set up for the outhouse. It was really low to the ground, so low, it was almost a squat pot. I built a platform for it to bring it up to normal toilet height. It's not a pretty platform, but it'll do. At some point, I will probably stain them both to match and look less discrete. The original outhouse had a chemical toilet, but after researching how to clean it, and realizing I'd have to take it into the house and flush it down the toilet, I opted out. Instead, I found some camping toilet liners and an additive to turn the contents into a compostable gel. I'm not composting human waste in my yard, but I don't feel bad about putting the compostable liner and gunk into the dumpster to compost at the landfill.
If you look closely on the right side of the picture, you'll see Bill's toilet paper holder. He was super proud of himself for using an old curb bit and curb strap as the toilet paper holder. He went the practical route and used a nylon curb strap, but I might change it to a leather one in the future, just to keep with the old west vibe.

Being knocked over the last time had screwed up the door latch again, so I changed it out to a hook and eye lock on the inside. I figure if - God forbid - the wind blows it over again, the hook and eye lock is more forgiving if the door shifts again.
Finally, after hours spent doing everything I'd procrastinated, the outhouse was ready for its debut. The next step is getting everyone trained to use it instead of traipsing through the house. I heard no complaints from the people who did use it, and clean up the next morning was a breeze.
 There's still a bit of a "Beetlejuice" vibe, but I'm happy with
the way it turned out.
July 8, 2025
The Outhouse, Part 3
Let's see, where'd we leave off? Oh, yes, Mom and I ripped the old roof off an replaced it with a lighter weight piece of tin. My intention was to get some wood glue and glue up the crack before we stood the outhouse back up, but I blinked and it's two weeks later. The outhouse has to be up and functional by this coming Saturday. We're hosting Dinner and an Outdoor Movie, and unless I want to scrub my house from top to bottom, this outhouse has to be functional. Let's be honest, in the time it has taken me to futz around with the outhouse, I could have had my house deep-cleaned, but being outside is way more fun.
Yesterday, during Mom Monday, the Bionic Cowgirl and I got to work. I had failed to get wood glue, so patching the wall didn't happen. What did happen is that we stood the outhouse back up, and rotated it 90 degrees, so that the door opens to the south now. It was cute with the door opening to the west, as it overlooked the property, but with it opening to the south, the angle of the roof should cut down on some of the wind damage.
 The crack in the wall is barely
noticeable.
No, the tin roof isn't square, but that's because the outhouse isn't square. It matches Maggie, with her roof on at a jaunty angle. Once we got it situated and mostly level, we brought out the auger and dug holes for the anchors. I had purchased some cool screw-in anchors previously, but our ground is too rocky for them to screw in. Last night's plan was to use the auger to dig the holes for each anchor, back fill it with dirt and concrete, then attach ratchet straps from the anchors to points on the outhouse.
The ground is so rocky that even the auger had trouble getting through, so we have a couple of anchor points that are not flush with the ground. We finally got the anchors in, added water to the mix of dirt and concrete, then went in the house for dinner while it cured.
When we came back out to attach the ratchet straps, Mom realized that I hadn't taken into consideration the length of the ratchet straps, and two of them were too short to reach from the ground anchor to the anchors I'd screwed into the outhouse, near the roof line. Oops. I moved the outhouse anchors down about a foot and a half on the backside, which made the distance just enough for the ratchet straps to reach.
 Oy, the anchor straps are ugly.
I really hate the anchor system, and will likely end up just sinking actual posts in the future, but this will do for now. I've ordered some solar fairy lights to wrap around the front two anchor straps so no one trips and kills themselves this weekend. I've been told that hollyhocks are the official flowers of outhouses and I should plant some near. That would be cool, except that there's not a good water source nearby (unless the ditch is running, and it isn't yet). I'd love to do something to "pretty" it up, but I think that's a next summer problem. You know, if these anchors hold and the damn thing doesn't fall over again!
The one thing I did for the outhouse that I love, is that I turned an old lantern into a light. Originally, I just had a bare light bulb hanging in there. Mom and I were talking about how to dress it up, and she said an old lantern would be cool. The next time she came down, she brought one with her.
I took out the kerosene tank and wick, and replaced it with the solar light bulb. I had to do some crazy crafting with E6000 glue to pull it all together, but I'm pleased with the way it turned out.

I have a couple of pictures to frame for the inside of the outhouse, and I'm sure there's a bit more decorating I could do to make it cute, but for right now it's upright and functional and that's all I can ask for.
The Saga of the Outhouse, Part 3
Let's see, where'd we leave off? Oh, yes, Mom and I ripped the old roof off an replaced it with a lighter weight piece of tin. My intention was to get some wood glue and glue up the crack before we stood the outhouse back up, but I blinked and it's two weeks later. The outhouse has to be up and functional by this coming Saturday. We're hosting Dinner and an Outdoor Movie, and unless I want to scrub my house from top to bottom, this outhouse has to be functional. Let's be honest, in the time it has taken me to futz around with the outhouse, I could have had my house deep-cleaned, but being outside is way more fun.
Yesterday, during Mom Monday, the Bionic Cowgirl and I got to work. I had failed to get wood glue, so patching the wall didn't happen. What did happen is that we stood the outhouse back up, and rotated it 90 degrees, so that the door opens to the south now. It was cute with the door opening to the west, as it overlooked the property, but with it opening to the south, the angle of the roof should cut down on some of the wind damage.
The crack in the wall is barelynoticeable.
No, the tin roof isn't square, but that's because the outhouse isn't square. It matches Maggie, with her roof on at a jaunty angle. Once we got it situated and mostly level, we brought out the auger and dug holes for the anchors. I had purchased some cool screw-in anchors previously, but our ground is too rocky for them to screw in. Last night's plan was to use the auger to dig the holes for each anchor, back fill it with dirt and concrete, then attach ratchet straps from the anchors to points on the outhouse.
The ground is so rocky that even the auger had trouble getting through, so we have a couple of anchor points that are not flush with the ground. We finally got the anchors in, added water to the mix of dirt and concrete, then went in the house for dinner while it cured.
When we came back out to attach the ratchet straps, Mom realized that I hadn't taken into consideration the length of the ratchet straps, and two of them were too short to reach from the ground anchor to the anchors I'd screwed into the outhouse, near the roof line. Oops. I moved the outhouse anchors down about a foot and a half on the backside, which made the distance just enough for the ratchet straps to reach.
Oy, the anchor straps are ugly.I really hate the anchor system, and will likely end up just sinking actual posts in the future, but this will do for now. I've ordered some solar fairy lights to wrap around the front two anchor straps so no one trips and kills themselves this weekend. I've been told that hollyhocks are the official flowers of outhouses and I should plant some near. That would be cool, except that there's not a good water source nearby (unless the ditch is running, and it isn't yet). I'd love to do something to "pretty" it up, but I think that's a next summer problem. You know, if these anchors hold and the damn thing doesn't fall over again!
The one thing I did for the outhouse that I love, is that I turned an old lantern into a light. Originally, I just had a bare light bulb hanging in there. Mom and I were talking about how to dress it up, and she said an old lantern would be cool. The next time she came down, she brought one with her.
I took out the kerosene tank and wick, and replaced it with the solar light bulb. I had to do some crazy crafting with E6000 glue to pull it all together, but I'm pleased with the way it turned out.
I have a couple of pictures to frame for the inside of the outhouse, and I'm sure there's a bit more decorating I could do to make it cute, but for right now it's upright and functional and that's all I can ask for.
June 30, 2025
The Accident and On-Going Legal BS
(Cross posted from Mom and Bill's blog)
If you'd like to get caught up on what was posted previously, the posts are here and here. As you'll read in the second post, I had intended to continue posting about the accident, but grief is dumb and I ran out of spoons to keep posting.

The accident was November 21, 2022 and we're just now getting around to seeing some action on the case. It took almost two years of hounding the Utah Highway Patrol and reaching out to the County Attorney to get some traction. Finally, on November 15th, 2024 (I wasn't kidding about it taking almost two years!), the County Attorney notified us that charges were being filed against the driver who hit Mom and Bill.
The initial charges were: automobile homicide, 2nd degree felony for Bill's death, and negligently operating a vehicle resulting in injury, 3rd degree felony for Mom's injuries. At some point, I'm unsure when, the charges were amended to:
Negligently operating a vehicle resulting in death, 2nd degree felony (Bill)Negligently operating a vehicle resulting in serious bodily injury, 3rd degree felony (Mom)Driving under the influence - 1st offense in 10 yearsThe warrant was issued, which was a weight off our shoulders. It had been 725 days since the accident, and I'd basically given up. I figured the other driver got away with killing Bill and almost killing Mom and there was nothing to be done about it. I knew that the accident report was complete, which took until July 2, 2024 to finalize. But, knowing that the accident report was complete, I didn't see any reason why charges hadn't been filed. The evidence is pretty clear, in my eyes, that the other driver is at fault.Honestly, it was rage at the injustice that forced me to "get mean" when I reached out the the County Attorneys in October, 2024. I wasn't sure which county would be handling the case, so I reached out to two adjoining counties and hounded them until I heard back. My relieve was short-lived at hearing that the other driver had been charged, and a warrant issued, because the other driver lives in Washington State. I knew they weren't going to go extradite him, that we'd have to wait until he was stopped for another traffic infringement. Then, his warrant would show in the system and he'd be arrested and sent back to Utah.
I (we, but I don't want to put words in anyone else's mouth) settled in for another long wait. I really thought it would be a traffic violation that would bring him in. Imagine my surprise when I got an email from the County Attorney on a Sunday night (March 2, 2025) that the other driver was in custody. But not for a traffic violation, because he'd been caught breaking and entering. For some reason, it never crossed my mind that he was a career criminal. It didn't matter how he was brought into custody, just that he was.
Since his first court appearance in March of this year, it has been nothing but hurry up and wait. We've had several virtual court dates. Most have resulted in an extension while he was searching for an attorney to represent him - he makes too much money for a public defender. He finally found an attorney, and we played hurry up and wait again while his attorney got caught up on the case. We were supposed to finally have an arraignment a week or so ago, but he got yet another extension while his attorney gathered the "factual evidence" of the case. I don't know, I think the objective toxicology report, the information pulled from each of the cars computers, and the reconstruction of the accident are pretty factual, but I know it's his attorney's job to question everything.
The one thing the other driver's attorney and I agree on is that this should not have taken over two years to get to this point. This case should be over and done by now.
We had a meeting with the County Attorney, and we were told that while he'll take our feelings into consideration, we really have no say in whether or not he offers a plea deal (drop to 3rd degree felony for Bill's death, 0-5 years prison) or goes to trial. He wants to offer the plea, we want to go to trial (2nd degree felony for Bill's death is 15 years to life). He agreed to consult with a toxicologist regarding the levels of meth in the other driver's system and how fast it metabolizes, then make the determination if he can prove the other driver was impaired. If he can solidly prove the other driver was impaired, then he's more willing to pursue a trial.
He'll let us know his decision before the next arraignment date in August. I'm not hopeful for a trial, I suspect we're going to have to make peace with a plea. But ... I might be able to swallow the injustice of the plea as long as the other two charges aren't altered.
Logically, I get it. He has a huge case load, and needs to close them. But my sense of right and wrong is outraged.
A friend of mine is fond of saying, "We don't have a justice system, we have a legal system." He's absolutely correct. There will be no justice, no matter how this turns out. So, we'll play within the legal system and pray that he faces some consequences.


