
Nathan Lively's Blog, page 33
February 9, 2014
10 Critical Tax Questions Answered For Sound Engineers

Being self-employed can be both a dream and a nightmare.
In this episode of the Sound Design Live podcast I speak with Stephen Fishman, attorney and author of Working For Yourself: Law & Taxes for Independent Contractors, Freelancers & Consultants. We answer the following questions:
What are the pros and cons of being a freelance sound engineer (independent contractor)?
How do I choose a business structure (sole proprietorship, LLC)?
How do I handle equipment expenses and rentals that are reimbursed by the client?
What common tax deduction might I be missing?
How do I deal with clients who won’t pay?
What are alternative pricing models (hourly/day rate/project rate) for sound engineers?
Do I really need a business license?
How do I keep track of business expenses?
Can I save money with a Healthcare Saving Account (HSA)? Can I use it for preventative care (massage, yoga)?
Will Obamacare save me money?
Details from the podcast:
 All music in this interview by Rui Faustino
Flow is a book by Mihaly Csikszentmihaly. Everyone should read it.
Tax forms:
Schedule C: Reports income or loss from a business you operated or a profession you practiced as a sole proprietor.
W-9: Used to request name, address, and taxpayer identification number.
1040: Individual income tax return.
Tools: TurboTax, iExpensit.
If a client includes your expenses in their 1099, then you should list them as deductions in Schedule C.
Covered California
Nolo
Fishman’s thoughts about the new public health insurance exchanges:
Many self-employed people will qualify for tax credits. You can get tax credits to help pay for your health insurance if you are single and make up to $45,000/year.
A lot of people are in their jobs now because they can’t get healthcare anywhere else. Many people will probably leave their jobs, some will retire early, and some may become self-employed because they will be able to get health care coverage.
This article 10 Critical Tax Questions Answered For Sound Engineers appeared first on Sound Design Live. If you found it helpful, please donate to show your support.
Read Related Articles:
How Much Do Live Sound Engineers Make?
Easy Invoicing For Sound Engineers
Best Tips For Building A Career In Pro Audio


February 2, 2014
Honestly, Live Audio Is Not Based On Science
 Did you hear my interview with Dave Swallow? You should. In our conversation it was obvious that he has a ton of valuable information to share, but that information is kind of hidden in his book. Let’s dig around in the dirt and pull out the gems.
Your job as an engineer is to get the best out of what you are given, even when you are given the worst.
Bored.
Swallow spends a lot of time covering information that you can find in the user manuals for mixing consoles and outboard gear. It overshadows his personal experiences with mixing, which were the parts that I found interesting AND that I couldn’t find somewhere else. If I were to edit this book, I would cut everything but the personal experience.
I found the summary of audio basics to be too brief, and disconnected from the practical goals of the book. It would probably be better served with footnotes and a glossary.
WTF Bro?
Some parts of Live Audio are just plain misleading.
For example, the section on hearing loss prevention is misleading because he says, “You can’t wear earplugs while you are mixing because then you won’t be able to hear what you are doing,” then later mentions that molded earplugs are “worth the money.” The truth is that many artists and engineers work with molded ear plugs and IEMs and enjoy slower hearing loss and a longer career because of it.
I do really appreciate this point, though: “Don’t put anything down your ear.” It reminds me of a story I heard from a friend about new military recruits that had access to medical facilities for the first time and would excessively clean their ear canals, leaving them dry and irritated. Ear wax is normal.
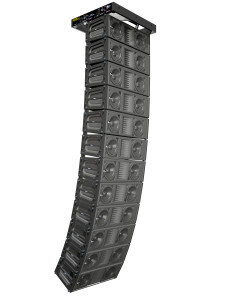 Some of Dave’s comparisons of point source and line arrays are also misleading.
Hardly anyone uses a pure line array with all speakers parallel anymore. So the arrays he refers to are really two different versions of a coupled point source array, with different speaker types.
You can aim any speaker array poorly. Swallow writes, “Line arrays tend to create strong sound reflections off the rear wall, which muddies the sound in shallow rooms.” That doesn’t make sense. You can point a point source array at the back wall and make problems just as easily as you can with a line array.
When Swallow writes, “Line arrays require a very high ceiling because they must be tall to work properly,” I think, wow, that’s way too general. Firstly, most line arrays have hardware available so that they can be ground stacked. Secondly, he is really discussing the physics of array length versus frequency response, so his offhand reference to “tall” is useless. Lastly, Swallow suggests avoiding line arrays for outdoor events because, “As much as they have the ability to not lose many decibels over a long distance, the actual power of the wavefront that is formed seems to be fairly weak, rendering the sound pretty useless in anything over a slight breeze.” Is it just me, or is that confusing? If it’s not losing decibels then why would the wavefront be weak?
In another example Swallow writes, “…with the point source system, you get more volume down at the front”; why? I want more explanation!
I understand that Swallow is introducing these concepts in a way that won’t be overwhelming, but you can’t just skip to the end and lead the reader to think there is nothing more to know, that things are always one way. My advice is to take his rules of thumb with a grain of salt.
 Another confusing subject is the environmental effects of humidity and temperature. Swallow’s comments on directional transmission are helpful, but he makes a big deal about temperature increasing the speed of sound and having some effect on high frequencies. I read it several times and didn’t understand what he was trying to say. Here are three important things to remember about temperature and humidity from Sound Systems: Design And Optimization:
The speed of sound in air is only slightly temperature dependent. A 1% change in the speed of sound occurs with either a 5°C or 10°F change in temperature.
As humidity rises, high frequency transmission improves.
The high frequency loss rate is highest around room temperature and increases as temperature either rises or falls around this standard.
And one more thing that is just plain wrong: “To measure a room’s frequency response, you use a real-time analyzer (RTA).” Why is this wrong? Please read this.
Meeting Ear To Ear
And then, a saving grace! Remember in my article on controlling feedback onstage when I condemned “ringing out” stage monitors? Swallow totally agrees! See? I’m not crazy. The world is crazy!
This procedure…is extremely annoying for anyone else trying to work in the room and is considered by most industry professionals to be extremely amateurish. Instead, you should understand what the frequencies do in terms of how boosting and cutting each frequency on the graphic affects the overall sound…Do not sacrifice the sound of the system just for a little more volume.
Also, Swallow’s explanation of why graphic EQs are pretty much useless is right on the money. I’ve already beaten that subject to death on Sound Design Live.
Hey, remember in my interview with Philip Graham when he challenged my assumption that dynamic mics are more forgiving than condenser microphones on vocals? Well, read it and weep Philip:
A dynamic mic can be much more sympathetic, more forgiving to a bad mic technique…
There are some sections that a good editor should have just cut. For example, in the section on using an SPL meter Swallow describes the fast and slow response settings: “If you have a fast reading, you’ll see the numbers changing very quickly on the display, whereas with a slow reading, the numbers change much more slowly.” Really? You just wasted seven seconds of my life. I can’t get those back now.
Awesome!
So where are the good parts in this book?
 The value of Live Audio is Swallow’s personal experience. For an example in this section on how he uses Pitch Shift:
With La Roux, I use +4 on the left side and a delay of 14ms; on the right side I use -14 and a delay of 4ms. When combined with the vocal, it gives a very unique sound and sinks the vocal into the music while still keeping it loud enough to be heard.
This is gold! I had never thought about using pitch shifting in live sound before! Why can’t the entire book be like this?
When we get into the chapter on mixing is when Live Audio starts reading like great advice and less like a bad user manual. His suggestions for equalization, dynamics, and effects processing are very helpful. Also, the section on microphone technique is useful and gave me a lot of god ideas to try. Especially his five-mic array for piano.
I really appreciate Swallow’s suggestions for critical listening. I generally try to work really fast and have been guilty of trying to fix everything with EQ. Swallow reminds us throughout the book to walk around the venue and stage when there is a problem we cannot identify.
His best tip on soundchecks is to finish the soundcheck on the first song of the set so that everything will be set to go right out of the gate. Brilliant.
I’m glad Swallow talks about panning and stereo because I’ve long wondered why anyone would ever setup a stereo sound system when only a small portion of those people in the center will hear in stereo (see What’s wrong with stereo?). Swallow answers this question by explaining that while yes, stereo panning will produce a different result in each seat of the audience, it also produces a sense of spaciousness that everyone enjoys. And now I remember that Bob McCarthy said pretty much the same thing in our interview. Basically, stereo is here to stay because people like it and there are ways to accomplish it without sabotaging your system optimization.
Conclusions
I can see how this book might be good for a stage manager or technical director who doesn’t have experience in pro audio and may want an overview of how it all works. But if you are a sound engineer, skip to the sections with personal experience and definitely read the mixing chapter. Because honestly, Live Audio is not based on science. Swallow has toured the world making music, so when he says that something works or doesn’t, it’s because he’s been there and done that.
This article Honestly, Live Audio Is Not Based On Science appeared first on Sound Design Live. If you found it helpful, please donate to show your support.
Read Related Articles:
Mixing The Biggest Festivals In Europe with Dave Swallow
6 Smart, Proven Methods To Control Feedback Onstage (Without EQ)
Condenser Microphones For Live Sound
January 19, 2014
6 Smart, Proven Methods To Control Feedback Onstage (Without EQ)

 There is nothing worse than spending an entire event struggling with feedback demons. You may have been taught to fight feedback with a graphic EQ, but there is a better way. Actually, that’s not true: there are six better ways. Use my guide to controlling feedback onstage and mix in fear no more.
“The feedback frequency is determined by resonance frequencies in the microphone, amplifier, and loudspeaker, the acoustics of the room, the directional pick-up and emission patterns of the microphone and loudspeaker, and the distance between them.” -Wikipedia
Method #1 – Microphone Placement
Close Miking
For loud stages and busy rooms, close miking is generally the way to go. It might not always be the best for sound, but for the maximum gain before feedback, you have to kiss the mic. Remember, with each doubling of distance, sound level is cut in half. Plus, if you’re working mostly with Shure SM58 and SM57 microphones, that’s how they are designed to be used anyway.
For corporate audio this usually means teaching your presenter how to handle the mic. For theatre this means adjusting headworn capsule placement. I have seen sound designers successfully mic a play without headworn microphones, but it’s tricky (see How To Mic An 800 Seat Theatre With Floor Mics).
Polar Pattern

From SoundOnSound
For concert sound you almost never use an omnidirectional mic. Microphones with a cardioid pickup pattern have the most rejection at the rear of the mic capsule, which should be pointed at the stage monitor.
Don’t cup the mic! This will defeat the directional pattern, turning it into an omnidirectional mic.
Corporate and theatre events require specific and stable placement of the microphone capsule. Some sound engineers argue in favor of using omnidirectional capsules on the grounds that they are easier to place and produce more reliable results with the movement of the actor. My experience is that none of that matters when the audience can’t hear the actor because you can’t get enough gain.
I’ve done a lot of musicals and concerts with omnidirectional head-worn microphones in the past, though, and it’s always a struggle. The performers can’t hear themselves, and if the audience starts clapping or singing along, chaos ensues. Why did I do this? Because it was what I had available. These days I try to let directors and event producers know way ahead of time about the limits of working with certain equipment. If possible, I’ll schedule a test so they can hear the difference in the performance space.
Method #2 – Speaker Placement
Stage Monitors
Floor wedges should be placed on-axis and as close to the performer’s head as possible. I’ve heard people suggest moving the monitor away from the performer for better gain before feedback, but don’t do that. That just creates lower sound levels at their ear level, so you’ll have to turn it up louder. Most live stages are loud enough as it is, so anything you can do to lower the stage monitor level will be helpful.
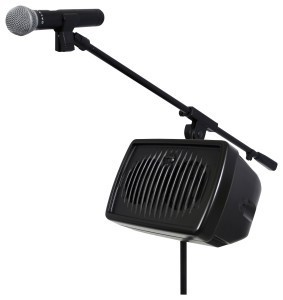 Have you ever seen those little Hotspot monitors? I haven’t seen them in a few years, but I love the idea. Put a small monitor on a stand and you significantly reduce its distance to the performer.
Sometimes, because of sightline issues or stage layout, you can’t get a monitor right in front of a performer where a cardioid microphone’s off-axis point is. This happens often with drummers and keyboard players whose instruments take up so much space and lead vocalists who want clear sightlines. This is when you need a hyper-cardioid or super-cardioid microphone and this is why many live music venues have a collection of Shure SM58 (cardioid) and Beta SM58A (supercardioid) microphones, or similar.
If you find yourself stuck with a drummer or piano player whose stage monitor is at a 90° angle to a cardioid microphone, try cheating the microphone out closer to 45° to get more rejection. If an artist requests a monitor position that is less than ideal for your microphone selection, go ahead and do it, but warn them that you may run into feedback problems and need to reconfigure the speaker and mic.
I’ve seen some pretty creative microphone and monitor placement that allow for very high gain before feedback. If you are working with acoustic instruments, ask the performers if they have any tips for placement. I used to work with a cello player in Portugal who placed the stage monitor a little behind himself so that it wasn’t pointed at his microphone but it was still aimed at his head. It worked great.
Stage monitor placement for theatre deserves its own article, but my number one tip is to start the conversation early. Explain your limitations to the production team and discuss ways to best accommodate the actors. You don’t want to realize in tech rehearsals that the actors can’t hear the musicians and that the director won’t allow downstage speakers. I often lobby for small downstage monitors straight out of the gate. I also try to make friends with the set director and builder as quickly as possible, alerting them to the fact that I’ll probably need help hiding speakers around the stage.
FOH
Make sure your FOH speakers are covering the house and not the stage. This means checking the speakers’ off-axis angles to make sure they are not spilling onto the stage or creating strong wall reflections. (See also: How To Tune A Sound System In 15 Minutes.) I’ve heard people say that all microphones must be at least six feet behind FOH, but I’ve seen it done many different ways. Some situations call for more separation and control, others less.
Method #3 – Instrument/Source Placement
 If you are working with a loud rock band and you place the lead vocalist right in front of the drummer, guess what happens? Your vocal mic will be full of drums and your vocalist won’t be able to hear. This happens all the time, and explains why you see the bands on Saturday Night Live using a drum shield on that very small stage.
Your goal is to balance every source input for the performers and audience. Now let’s talk about the most frequent offenders.
Drums
Drums are loud. Some drummers are interested in harmony and balance, and will change their technique, use brushes, and dampen their instruments. Those drummers are in the minority. Why? Well, have you ever played drums? It’s fun as hell to play loud, and boring as shit to play soft, or so goes my personal experience.
If you’re on tour, you’ll need a rug and a drum shield. If you’re full-time at a venue, put absorption everywhere. Two of the noisiest venues I’ve worked at have pulled the same trick and covered their ceiling and walls with black semi-rigid insulation or vinyl that screws right into the wall. Big help.
Electric Guitars
I’m a guitarist, and as such I’m fully aware of how hard it is to hear myself without the amplifier blaring. The only way I was able to handle this in my band was to learn to play without hearing. In the real world, getting a guitarist’s amp as close to their head as possible will help. Put it on a chair or milk crate. Most are open-back, so put a bunch of absorption back there.
In my interview with Larry Crane he mentions a guitarist who built a Plexiglass shield for his amp that redirected the sound upward at an angle so that he could play with feedback and do fancy things with his amp without blasting the stage. Pretty smart.
 I worked on a show last year where the guitarist made a shield for his amp from case lids and jackets. This helped it not bleed into other microphones as much.
Buford Jones is famous for doing whole tours mixing from inside a truck outside of the venue. (He’s even more famous for mixing some band called Pink Floyd.) These were large venues where they had little acoustic sound coming from the stage. The guitar amps where all in dog houses off-stage and all of the performers were on IEMs (in ear monitors). Most of us won’t experience that, but it gives you an idea of how far people will go to control sound levels on stage. If you are worried about approaching a guitarist to discuss changing their setup, just remember that asking them to turn down their amp and put it on a stand is nothing compared to removing it from the stage entirely.
Method #4 – Mix
Stage Monitor
Most performers these days are wise to the challenges of microphone feedback on stage and will make specific requests for their monitor mix. I’ve made it a practice to not add anything to a stage monitor mix until expressly asked to, except for vocalists who almost always need reinforcement. When musicians walk in the door saying, “Just give me a mix of everything,” they likely don’t know what they need. Smile and nod.
I’ve made it through entire shows without adding anything to some performers’ stage monitors because the stage layout allowed them to hear everyone. I’ve also worked on shows where the band has skipped sound check then walked on stage expecting a complete mix. I try not to work off of assumptions and I give people only what they need, because the lower your stage volume, the better your FOH mix will be, and everyone will be happier.
FOH
In small to medium venues, you aren’t “mixing” in the classical sense, you are doing sound reinforcement. You are balancing the acoustic energy in the room for a more pleasant musical experience. From my interview with Howie Gordon:
The other thing I hear a lot about [is] guys setting the whole mix base from the drums, and in my opinion that’s the last thing you should do because the thing that immediately suffers is vocals. It’s the one instrument that can’t control its own stage volume. -Howie Gordon
And from my interview with Larry Crane:
How many times have you been blown out of the water by the mains because you’re trying to keep up with the stage? It’s like, “No, no, no! That’s not necessary.” You’re not building the mix up from the kick drum at that point. You’re building the mix down from what’s happening on the stage, and you’re filling in what’s missing, just a little bit. -Larry Crane
If you need definition on the bass guitar, roll off the low end and mix it in. If you are missing the melody from the keyboard, bring up the right hand. If the guitarist is too loud then invert the polarity and lower his volume in the house with deconstructive interference. That’s how noise cancelling headphones work.
(Just kidding! You know I’m kidding, right? If you actually try that and it works, keep it to yourself.)
Compression
Normally, I love compressors, but they raise the noise floor and reduce dynamic range, and therefore reduce gain before feedback. I would really like to use compression on lapel mics during corporate presentations, for example, but I’m often on the verge of feedback and can’t spare the gain.
Method #5 – The Holy Grail
IEMs, e-drums, synths. Done! 
Method #6 – Don’t Give A Fuck
“These setups that we’re working on, there’s EQs everywhere. If there’s still feedback, it’s too loud. So lower it or let it ring all night. I don’t give a fuck.” —Dimitris Sotiropoulos
I laugh every time I read this quote, but there is plenty of truth to it. Half of what I write on Sound Design Live is about psychology. People don’t trust sound because they can’t see it. That also means they don’t trust you because they can’t see what you’re doing. Letting the monitor feedback for a second before you bring it down communicates to the artist that it has reached it’s maximum level and that you are turning it down.
Q: But you do use EQ, right?
A: Um, yeah, most of time. At least to attenuate some low end.
#ObligatoryBonus – EQ
This is your last tool in the war on feedback. Use high-pass filters to remove the rumble from guitars and the proximity effect from vocals. Use narrow-band filters on a parametric EQ to surgically remove problem frequencies. Although it’s your last step, it’s also necessary. Temperature, humidity, and performance changes throughout the night will require compensation.
I recently worked with a sound engineer who would cut the low end from all of his vocals up to 200Hz in the stage mix. That’s a lot! But it worked. A few years ago I worked on an outdoor event where everything would be balanced during the afternoon sound check, then explode into feedback at night because of environmental changes.
So I think we can agree that some amount of EQ is necessary, but watch out for assuming too much. There is a process that we sound engineers call “ringing out the monitors” that often takes place before any artists have arrived. We use this process to lessen the amount of time we will need to chase feedback during sound check. I gotta tell you that over years of working on live events I do this less and less. Why? Because if you do it before sound check then you are making a lot of assumptions about the sound that can all be ruined by changing a mic or its placement. You’re also making changes to the speakers’ performance and sound quality without due cause. A better technique is to test for feedback, make note of those frequencies, but hold out on makes changes until you need more gain.
I sort of hate the fact that “ringing out” is supposed to be a normal part of our job. Under normal circumstances, with high-quality equipment and a properly optimized system, you shouldn’t have to do this. The fact that it is a normal part of our job makes me realize that there are a lot of sound systems out there that need your TLC.
Pulling half the bands down on a graphic EQ is like removing a tumor with a wiffle ball bat.

Q: So what’s your problem with graphic EQ?
A: Have your read none of my other posts?
Q: Don’t be a dick.
A: That’s not even a question. It’s nothing personal. They’re just tools, but they’re often used for the wrong job.
Q: What is the right job?
A: Nothing. Just kidding. Basically, the only things that graphic EQs are good for are ear training and maybe use in the battlefield that is Monitorland. For more, see my interview with Dave Swallow, my interview with Bob McCarthy, and my review of McCarthy’s book.
Other Tricks To Try
Feedback Eliminator
If you look up reviews for feedback eliminators they are almost equally bad and good. You never see them on professional productions. Part of the issue is that sound engineers don’t like things to be out of their control, but the main problem is that these units just don’t work that well. Everyone who has used them has horror stories.
That being said, sometimes pro audio feels like a war zone, and I will never judge you for using one. Especially for corporate events where you have several lapel mics walking around a stage and you only need to stop one frequency from feeding back on one microphone for three seconds at a time. Or small setups where you are very limited in the way of EQ.
I’d love to make a feedback eliminator plugin for Software Audio Console. Then you could put it on only those channels going to the stage monitor mix. Wanna make it? Contact me.
Frequency Training
Imagine the show-stopping seconds you could save if you could identify feedback frequencies immediately without using an analyzer. There are some nice apps out there that will train you to identify frequencies. This is not the same skill as having perfect pitch. It’s pitch memory and anyone can learn it. Most of them train you using the 32 bands of a standard graphic EQ, which isn’t ideal, but is a great place to start, helping you avoid a frequency-wide sweep. I’ve used TrainYourEars and I’ve heard good things about Quiztones. I’ll do a review in the future. If you have experience with these, let me know in the comments below.
Microphone Splitter
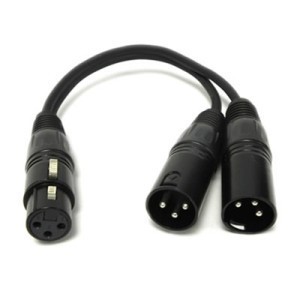 Don’t have a digital mixer or a separate mix console for the stage? Try splitting a few channels for more control. Let’s use the lead vocal microphone as an example. Right before it comes into the mixing board, connect a splitter or use a Y cable for the most basic passive version. This will give you two copies of the lead vocal coming into the mixing board. Mix one for the house, mix one for the stage. This will allow you to roll off way more low end then you normally would and make other adjustments to the stage mix without significantly affecting the house.
Phase and Delay
It has been suggested to me that you can invert phase or add small amounts of channel delay to get more gain before feedback. I’ve never had success with this. It just moves the feedback to a different frequency, makes it attack slower, or makes no change at all.
Conclusion
Don’t be a dick. Oh wait, that advice was just for me. Your best tool for controlling feedback in live sound is stage layout. That means microphone placement, speaker placement, and instrument/source placement. Then you can work on the mix and if you still can’t get enough gain before feedback, use EQ. If you’re lucky you work with a synth-pop band (call me Active Child!). If you’re unlucky, challenges abound, everyone’s a dick, and you just let it ring all night, cause fuck it (please reread How To Become A Sound Engineer or your life will suck).
What are your best tips for fighting feedback on stage? Comment below!
This article 6 Smart, Proven Methods To Control Feedback Onstage (Without EQ) appeared first on Sound Design Live. If you found it helpful, please donate to show your support.
Read Related Articles:
Single Miking Groups On Stage With Condenser Microphones
Condenser Microphones For Live Sound
Sound System Design And Optimization with Bob McCarthy
January 12, 2014
How To Become A Sound Engineer
 The truth is, anyone can become a sound engineer.
Getting your foot in the door is easy, but it can be difficult to move up and that gives an impressive quality to the people who stick with it. Being a sound engineer is hard; lots of people want to mix the biggest festivals, but only a small number make it to that high level. You could say that those people are naturally better engineers than the rest of us, and maybe they are, but I think a bigger truth is that they have superior emotional intelligence and work ethic.
So how do you harness your own emotional intelligence and work ethic to set professional goals and find success? Let’s take look at Dave Swallow’s article How To Become A Sound Engineer, which asks these two questions: 1) Why do you want this job?; and 2) What do you crave?
Why do you want to become a sound engineer?
You need to work out why you want to do this job. If you are after fame and fortune, you are in the wrong job. If you want to hang around and be friends with famous people, you are in the wrong job. If you want and crave credit for the work you are doing, you are in the wrong job. If it sounds great, the band gets the credit. If it sounds terrible, you get the credit. However, if you love music and understand how it works to its core, then maybe you’ll just make it. This is a hard industry full of people who will try and stab you in the back just to get your gig because they don’t have one. And unfortunately this is the reality. -Dave Swallow
More specifically, if you love live music and crave the emotional thrill of experiencing it with a group of people, then you might make it. But those moments of musical euphoria can be few and far between. You’ll work with bands you dislike. You’ll work on corporate events with no music. In our interview, Swallow says that he doesn’t even go out to shows anymore. I’m the same way. Even when you start out with the craving, it weakens over time and your interests change. How do you maintain that drive?
Through an interest in technical proficiency and the pride of a job well done. Part of the reason I currently take lots of corporate work that I would have declined in the past is that my craving shifted; where I used to want emotionally satisfying music, I now crave the personal satisfaction of a job well done. Even if from the outside it appears that the event is falling apart, I pride myself in remaining calm and not losing my shit. This is both a necessity for maintaining sanity and also creative problem solving.
I’ll argue with Swallow on his second point though. I’ve never had anything but respect and support from my colleagues. We look out for each other and help each other out. That being said, I’ve never worked on a top-tier tour, so I believe him if he says that the competition is bloodthirsty.

What do you crave?
The key to my own success is already written in the prelude and introduction in the book. And what you will find in there is only that I had a dream, and I believed I could do it. I wasn’t always able to get a job as a sound engineer at either end of the multicore. I had many different jobs in the industry including tour and production managing, driver, and merchandiser, and most of the time these jobs were doubled up even tripled up. I’d do anything, just as long as I met people. -Dave Swallow
A lot of people get depressed on tour. I know, I’ve been there. Being deprived of your normal network of relationships and habits is a great emotional challenge and that no one thinks about. While I was battering Dave Swallow with questions about how he deals with the shitty parts of being a sound engineer, the most important (and understated) thing he said to me was: “You can get stuck up your own ass, but as a sound engineer your job is to make it sound as good as you can. What are you going to do? Moan about it or get on with the job. I don’t see any point in getting stressed about it. It is what it is. These things happen and it’s part and parcel of being on the road. Things will go wrong. If you stress about them, you’re not really doing yourself any favors or anyone around you any favors, so just chill.”
That didn’t really sink in until the second time I listened to his interview, but it’s so important. I often get upset about the conditions of the job and the state of the industry, but getting upset doesn’t help anyone, and it’s a killer if you want to keep doing this. Anyone can get a job as sound engineer, I promise you. Getting your foot in the door is the easy part. Sticking around is the hard part.
I really like this thought: “I’d do anything, just as long as I met people.” Swallow’s first tour was six months of unpaid work. Are you crazy?! Yes and no. Networking is the most important thing in our industry. Swallow repeats several times in our interview how important it was that he “got on” with his colleagues, both crew and artists. Swallow got that first tour after working at a music venue for six years because a local band liked him. I got my first touring gig with the band O’QueStrada because they liked me (and the fact that I would let them do crazy things with microphones like distance group miking in a tiny venue).
 The “I’ll do anything” mentality does not just mean painting floors and making coffee, it’s also staying open to opportunities in live audio. In concert sound there are a lot more sound engineers at work than just the FOH engineer. The stage monitor engineer, the microphone tech, the stage hands, the system tech, the audio production manager, and the live recording engineer are all equal contributors to high production quality, and each position has its own set of challenges and benefits. For example, the stage monitor engineer has a far more personal relationship with the artists during the show than the FOH mixer. Once I had the opportunity to mix monitors for John McLaughlin and his band. Imagine how cool it was that everyone on stage, including McLaughlin, had to learn my name!
Every time I go to see my favorite band, Sigur Rós, I go up to the FOH engineer after the show and ask him how he got his job. He always says the same thing: “Oh, they just knew about me from other work I had done.” In college I used to read every TapeOp Magazine from cover to cover, desperate to deconstruct the sound engineer’s career path. It was always a let down, because there is no step-by-step method. Why? My guess is that the industry just isn’t that developed yet. Think about professions with well-defined career paths and guidelines. They are older and more organized, like the medical and legal industries.
This industry is still very young and, as such, is constantly changing. Just remember that if you want to make a career out of it, you must be professional, responsible, and courteous at all times. -Dave Swallow
Swallow’s career story isn’t complicated. He met someone with connections, asked for help, did well, and one thing led to another. The impressive part is that he stuck with it through all of the shitty parts of the job. Sure, he works with celebrities and great artists, but that shine wears off after about 500 miles of touring. Hear Swallow’s career path starting at 35m40s in the interview below.
Hey you, yeah, you there reading this. What drives you to continue to be a sound engineer? Comment below.
For more on career paths, read the Education chapter of Sound Design Live: Build Your Career As A Sound Engineer.
Nathan Lively's post How To Become A Sound Engineer appeared first on Sound Design Live. If you found Nathan’s post helpful, please donate to show your support.
January 8, 2014
Kickstart This!

How I spend most of my days…
One of my new year’s resolutions is to grow the Sound Design Live Media Empire (TM). Enter, the sponsorship.
Do you know someone in audio/event technology, audio education, or connected services who would like their message to be heard by over 2,500 event industry professionals world wide per month? Contact me. Ideally I would like a 6-12 month relationship with someone whose work I would be inclined to feature on the show even if they weren’t a sponsor. I love new technology, books on audio and brain science, and great apps and services that might improve that lives of sound engineers. Do you make any of those things? If so, contact me.
You may have noticed that I’ve started asking for donations in my podcasts and articles. I’m gearing up for some big projects in 2014-2015 (more on that later); to make them happen I need to generate funding and test the commercial viability of my ideas. Seeing which posts get donations and which businesses choose to sponsor Sound Design Live will help point me in the right direction.
Intrigued? You know what to do: contact me.
[contact-form]
Nathan Lively's post Kickstart This! appeared first on Sound Design Live. If you found Nathan’s post helpful, please donate to show your support.
January 5, 2014
Mixing The Biggest Festivals In Europe with Dave Swallow

In this episode of Sound Design Live I interview Dave Swallow, the author of Live Audio: The Art Of Mixing A Show, about how he went from being the in-house sound engineer at a local music venue to mixing at the biggest festivals in Europe. We also discuss why graphic EQs are rubbish, time-aligning stage monitors for better vocal intelligibility, why lead singers use more than one stage monitor, how performers communicate with sound technicians, avoiding hearing damage, and why you should never defeat the ground on a power amp.
Never defeat the ground on a power cord, try using DI boxes or XLR adapters to lift the ground on one end of the connection.
 Details from the podcast:
Music by DJ Fresh, James, La Roux, Goldie Lookin’ Chain
Clearcom
Transient smear: Audio distortion caused by differences in the time domain. Imagine two speakers playing the same program material which arrive at your ears slightly out of synch so that there is no echo but there is destructive interference.
Ear Defenders, Beyerdynamic DT 770 PRO, Ultimate Ears 5 Pro Custom In-Ear Monitors
“Horses for courses”: the practice of selecting the best person for a particular job.
XLR lift adapter, DI Box with earth lift
Shunting: allowing electrical current to pass around another point in the circuit by creating a low resistance path.
Midas XL8
Quotes
We don’t align time; that’s something Dr. Who does.
If the audience isn’t having a nice time then there’s no point in you being there.
Nathan Lively's post Mixing The Biggest Festivals In Europe with Dave Swallow appeared first on Sound Design Live. If you found Nathan’s post helpful, please donate to show your support.
December 29, 2013
The Five Most Popular Posts of 2013

 2013 was a big year around these parts. Besides publishing the Sound Design Live eBook, I created a Google+ page, a YouTube channel, and even made the podcast available as a BitTorrent! I also expanded the site to include reviews of pro audio books and hardware, as well as sound engineering tutorials and articles. Wonder what topics people were most interested in this year? Ladies and gentlemen, I give you Sound Design Live’s most popular podcast interviews and pro audio tutorials and articles of 2013:
Sound System Design & Optimization with Bob McCarthy: Bob McCarthy told us why graphic EQs are useless, common misconceptions about stereo, and why we must optimize our sound system design before we mix.
��How Much Do Live Sound Engineers Make?: Salary information for four sound engineers in the U.S., Czech Republic, Slovak Republic, Greece, and Sweden.
Condenser vs. Dynamic Microphones For Live Sound: Philip Graham of Ear Trumpet Labs compares condenser microphone and dynamic microphones for live sound, and discusses close miking and stage monitor feedback.
From Highschool Dropout To Head Of Audio: An interview with the late Steve Brown about his journey from high-school drop out to head of audio at the Royal Exchange Theatre in Manchester.
Condenser Microphones For Live Sound: Why are condenser microphones less common in live sound? What are the advantages and drawbacks? Listen & learn.
I hope your year was as great as mine, and that you have many fun projects lined up for 2014. I’m looking forward to another great year on Sound Design Live, so if you’d like to hear an interview with a specific individual or read about a particular subject, let me know in the comments below and I’ll make your dreams come true.
High-fives,
Nathan Lively
Nathan Lively's post The Five Most Popular Posts of 2013 appeared first on Sound Design Live. If you found Nathan’s post helpful, please donate to show your support.
December 18, 2013
How To Find Speaker Coverage In One Step
In sound system design, step one is to define speaker coverage. Lucky for you, Daniel Lundberg and I have created a great new speaker coverage calculator that makes this initial step quick and easy. The calculator will give you a consistent coverage result for any scenario, but unfortunately it’s not very smart. It doesn’t know about walls and other speakers, so it works best for single-speaker applications like balconies, side fills, and smaller venues.
Consistent coverage means that SPL will not vary more than 6dB. So if the highest measured level in the audience is 100dB SPL, then no part of the audience may be lower than 94dB SPL. This calculator is designed to give you the least amount of level variation across the listening area, but there are many more variables at play here. With that in mind, let’s proceed.
Step 1 And Done
Put your measurements into the Speaker Coverage Calculator above. That’s it! Listen to my conversation with Lundberg for a more details on how it works.
Example 1 – Balcony
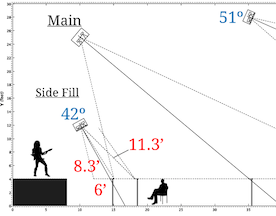
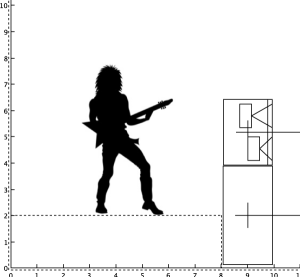
Let’s take the room from How To Tune A Sound System In 15 Minutes, add a balcony, and raise the ceiling. I used visual aids to show a four-foot seated audience height covered by four speakers: Main, Balcony, Sidefill, and Under Balcony. Download my MAPP Online Pro project to follow along.

Put your measurements into the speaker coverage calculator above. It recommends a nominal vertical coverage of 51° and a UPQ-1P aimed 25.3° above the front. You can manually work out the angle in MAPP, or use the speaker coverage calculator. Input the angle of your architectural guide (the one showing distance to front) and the calculator will tell you exactly what to put into the Rotation About CDRM box in MAPP. I put in a 139° front angle and got -15.7° for the speaker aiming angle.

Here’s a prediction at 8kHz. Did we meet our criteria for consistent coverage? Just looking at the graph I would say there’s no more than a 3dB difference from on-axis to off-axis, and consulting the virtual SIM I see there is no difference in average SPL and only about a 4dB difference in the high end. Great success!

Example 2 – Side Fill
 The speaker coverage calculator recommends a UPA-1P aimed 21.2° above the front. Virtual SIM tells me that there is about a 8dB difference from on-axis to off-axis. This doesn’t meet our requirements, but I found that if I aim it lower I can can get more even coverage and meet the crossover point with the main speaker.

Example 3 – Under Balcony
 With limited height, it’s going to be hard to cover this listening area with one speaker. The speaker coverage calculator recommends subdivision, but it also keeps recommending a giant JM-1P (see prediction below). Now I know how Dr. Frankenstein feels: I asked for consistent coverage and I got it, but I also got a mob of angry townspeople. I tried a UPM-2P here aimed at the last row and that worked a lot better.

Example 4 – Small Venue
Let’s take a look at Ashkenaz, one of the first music venues I worked at when I moved to Berkeley. When I first put the triangle lengths into my speaker coverage calculator (9.5′, 28.5′, 25′), it gives me some crazy results and recommends that I subdivide the array. Let’s assume that I use a down fill to cover the first ten feet of the audience. With new results, I try a UPQ-1P and see that it provides even coverage. I also observe that aiming it further down will get me less consistent coverage, but will let me send more of those expensive decibels into the audience, providing more bang for the buck.

To Subdivide or Not To Subdivide
How do we determine when we need to subdivide our coverage into more than one segment? Here’s a nice rule of thumb that I learned from Bob McCarthy’s seminar: measuring from the speaker, take the ratio of the distance from the first row to the last and subtract one. So in our example the first row is 9.4ft from the speaker array and the last row is 28.5ft from the same array. That’s a ratio of 1:3. 3 – 1 = 2. So a two-segment array would probably work better for this coverage area. How many speakers in each segment? That’s up to you and your budget. For a much better explanation of this topic, read McCarthy’s article, Array Or Not To Array.
Finding Speaker Coverage When Front And Back Are Equal
The horizontal coverage plane of a sound system often looks like an isosceles triangle (two equal sides and angles) and the loudspeaker nominal coverage can be found with basic trigonometry. Remember soh cah toa from trigonometry? No?! Me neither. Lets watch this video! To find speaker coverage angles in the field, find the lengths of the triangle for the area you are trying to cover and solve for the inside angles. There are also plenty of free triangle solvers online and iPhone apps.
Please test this out the speaker coverage calculator and send me your results! If you have suggestions for a better calculator, let me know in the comments below. After I get some more comments and suggestions I’ll publish a second version and Daniel and I will do another podcast with a better explanation and more case studies.
The post How To Find Speaker Coverage In One Step appeared first on Sound Design Live.
December 8, 2013
BOOK REVIEW: Sound Systems: Design And Optimization by Bob McCarthy
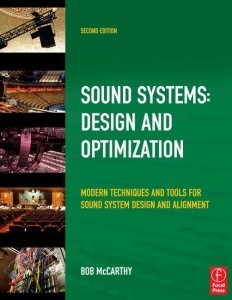 I freely admit that I love this book. I’ve read Sound Systems: Design & Optimization cover to cover and use it as a reference on an ongoing basis. The first time I read the book, I was excited to learn that there are areas of audio that can be predicted and measured. It felt like all of a sudden invisible audio could be visualized and altered. Since then, I’ve felt a strong affinity for system tuning and have tried to bring it into my work whenever possible.
The upside of reading this book is that you learn a lot about topics you never knew existed but have been affecting your audio work this entire time. The downside is that you will want to change everything, and be frustrated when you can’t. All of a sudden you will want to move speakers around and fly mono point-source clusters. You’ll want to measure everything and play a lot of pink noise. You’ll want to throw out your graphic EQ and RTA, but you will encounter resistance from producers, managers, owners, colleagues, and the clock. It is really hard to be so excited about this stuff and not be able to get your hands on it. Keep your eyes open and trust me, opportunities will start to present themselves.
Sound reinforcement is far from perfect. Speakers are “mechanical devices attempting to produce wavelengths that vary in size by a factor of over 600:1.” Luckily measurement systems are affordable and we can set goals to get the most out of our imperfect systems. McCarthy is a realist, and his book is all about triage. Your patients will never be 100% injury-free, but you can apply pressure and stop bleeding from the major arteries.

If the system is always operated safely within its linear range, there is no need for limiting. This could happen in our lifetime, as could world peace. But unfortunately, we have to assume the worst-case scenario: that the sytem will be subjected to the maximum level of abuse fathomable, plus 6 dB.
Bob McCarthy
Introductory chapters walk you through terminology with a minimal amount of math and a constant connection to their necessity for the job at hand. This is not a simple read. There were many ideas and terms I had never heard before, as well as lots of tables and diagrams to interpret. This complexity is also what made the book so captivating. I couldn’t beleive that there was so much about audio that I didn’t know! McCarthy makes sure to keep you motivated by providing real-world applications like a carrot at the end of a stick.
The premise of this text is minimal theoretical math and maximum field applicability.
Bob McCarthy
Pro Tip number one: This book is best read from start to finish. Later on you can use it as a reference manual, but if you try to start in the middle of a chapter without understanding the context you may be disappointed and confused. This isn’t because you’re dumb or the material is obtuse! Rather, our brains like to preserve energy, and when you present too many new ideas (including vocabulary) at once, they fight back and try to dissuade us from attempting to understand the material. That’s why you don’t always understand everything the first time you read it, but when you go back read it again the concepts become more clear. Pro Tip number two: also check out McCarthy’s website for more real-life examples.
One thing that I love about McCarthy’s style is that he crushes audio myths left and right, but does so gently and with good humor. It is kind of annoying to find out that I’ve been doing it wrong for the past ten years, but I don’t feel attacked, just well-informed. For example, graphic EQs are really no good for system optimization because of their fixed bands, but I’ve used them for years because they were…available (see interview below at 24m24s). Also, designing a stereo system is usually a futile effort because only a small triangle of the audience will hear in stereo, but I did that for years because that’s how recording studio systems are set up (see interview below at 28m54s).
.
The real-time analyzer (RTA) has a number of applications in which it is the best tool for system optimization: zero.
Bob McCarthy
Speaking of doing it wrong…back when I was starting out in theatre at the National Theatre of Portugal, they had a rack-mounted 32-band RTA. No one really knew how to use it, but look at those pretty LEDs bounce up and down! Later I bought my own handheld RTA. Man, it was cool. No one had ever seen one. I felt like a god over sound. I could take measurements in different locations of the room, average them together, and set my graphic EQ by the numbers. Solved. Why did I think this was the best tool for system optimization? From the manual and marketing materials for the RTA of course! Another win for marketing over science.
Back to the book! The section summaries and best-practice recommendations in the newest edition are super helpful. McCarthy makes a point to be unbiased and very specific in his writing, which is a breath of fresh air after audio literature that is full of useless generalizations that pander to quick answers. With the first edition of Sound Systems I would sometimes finish an entire chapter having learned many details on a subject and still not know where to start. Imagine a whole book about making pancakes that focuses on the food chemistry of eggs and flour. In contrast, the second edition of McCarthy’s book includes some recipes at the end to get you started.
Pro Tip three: Take notes! This book contains a wealth of knowledge. As you read it, you will find specific pieces of information that pertain to your work. Write those down. I refer back to mine often, except I lost it in a move a few years ago. I’m going digital this time!
One of the reasons that this book is so long is that McCarthy is genuinely trying to prepare us for any situation we might possibly encounter. I mean, it’s 106 pages before “We are now ready to apply our study of summation and the acoustic crossover to the practical construction of speaker arrays.” It does not provide solutions for specific scenarios; instead you’ll have “a road map with milestones of what we should expect to find, and where.” This is one of the rare occasions in life when stereotypes are good. Without them, the possibilities for design and optimization would be endless and nauseating. Armed with a set of geometrical tools, we can look at a design or a space and begin to narrow down our possible outcomes. No matter how complex the speaker array, it is still built on the basic foundations of physics.
I never thought that I was a geometry lover, but my favorite parts of this book are the sections on speaker coverage. No one speaker is a perfect fit for a room, so there is always opportunity for system design. Looking for help finding speaker coverage in a room? Check out my article Finding Speaker Coverage In One Step.
This is a challenging read, but completely worth the effort. McCarthy eases you into difficult physics concepts with great care and humor. Before you know it, you’re swimming in the deepest waters of professional sound system design.
Really, though, you don’t have to read this book to get great sound. You could just hire me to do it for you.
The post BOOK REVIEW: Sound Systems: Design And Optimization by Bob McCarthy appeared first on Sound Design Live.
December 1, 2013
How To Tune A Sound System In 15 Minutes
 Even professionals often skip sound system setup and go straight to mixing, because there just isn’t enough time. Here’s a secret: you can measure and optimize a sound system in 15 minutes. How? It’s simple.
Simple Sound System Goals
The goal for tuning a sound system is very simple: provide the same sound in every seat. Setting the master EQ at the mix position does not meet this goal. Instead, we need an order of operations to help us make changes that will benefit the entire listening area, or at least mitigate this damage. That includes:
Driver functionality and polarity
Speaker aim and splay
Speaker level and crossover
Phase/delay
Filter/EQ
It might seem like you don’t have 15 minutes to spare to check all of this, but remember this universal rule: if we verify every element of the sound system, nothing will go wrong, but if we skip any one part, it will fail and hysteria will spread.
Measurement Equipment: dual channel analyzer (SIM, SMAART, SATLive, EASERA); laser; protractor.
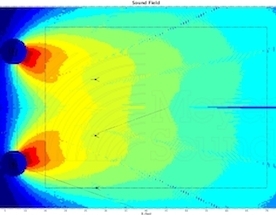
Sound System: (2) CQ-1, (2) 650-P in an uncoupled symmetrical point destination array (see diagram below). This is the most common professional sound system setup that I run into; it is not ideal by any means. One CQ-1 flown above downstage center would match the room. Both subs together on one side or in the corner would help our low-end coverage. These things almost never happen, and I could complain about it and waste your time, but those speakers will still be sitting there, bored as hell.
One thing I often like to do in this situation is to mute one of the subs and apply high-pass filters to the tops. This technique usually gets more even coverage below 100Hz. One of the subs ends up being a fancy speaker stand, but no one notices. Download the MAPP online project if you would like to follow along with each step.
Disclaimer: This is a highly simplified recipe to give you an idea of the structure for verifying and calibrating a professional sound system. There are many factors at play and details that I do not cover, like how to operate an analyzer. For a more in-depth analysis of this subject, listen to my interview with Bob McCarthy and buy his book.

Professional Sound System Setup
0-4min: Driver Functionality & Polarity
Do you think a lighting technician starts running a show without making sure that all of their instruments work? No! Better make sure all of your speakers are playing what they are supposed to play.
Set all outputs to unity.
Play pink noise and isolate one speaker at a time. In this setup we are unable to solo individual drivers, but do it if you can.
Is output X playing from speaker/driver X? If not, track it down. Many times it’s just a case of faulty patching. If you’ve got lines wrong inside of a closed box, you’re going to need more than 15 minutes. You may need to get your head close and listen to each one. This is best done with an assistant to guard and operate the mixing board. Repeat for each speaker/driver.
Measure phase response on your dual channel analyzer at the on-axis point of each speaker/driver. If the phase trace is around 0°, that’s normal phase. If it’s at 180°, that’s inverted. Is output X phase response what you expected? Polarity inversion is often cause by an improperly wired cable or by the use of a gender turn-around.
I spend the most time on this step because it’s the most important. It will be a sad dance party if your subs aren’t working — don’t make the frat boys cry.
4-8min: Speaker Aim & Splay
As Steve Bush from Meyer Sound likes to say, “Put sound where there are people.”
Using a protractor and a laser on top of speaker A, show horizontal coverage towards the (house) left wall. If you can avoid the wall completely, great, but in situations like this where the room is too long and speakers too wide, shoot for about halfway down the audience area.
Point the laser on-axis and find the spot where it crosses the middle of the audience. Halfway from there to your speaker is OnAx A.
Measure and record OnAx A.
Find the edge of the audience (house left), equidistant from the speaker. This is easy since the delay from the speaker shown on your analyzer should be exactly the same. This should be OffAx A.
Measure OffAx A. Pay special attention to the HF region. It should be close to -6dB from OnAx A. If it is not, adjust speaker position and aim.
Copy final aim to speaker B
8-10min: Speaker Level & Crossover
Return to OnAx A. Record level at spectral crossover frequency (100Hz in my case).
Without moving the microphone, measure OnAx C. Adjust output C to match A at spectral crossover frequency (-1dB in my case).
We’ll get to speaker B in a minute.
10-12min: Phase & Delay
Observe the phase response difference of OnAx A and OnAx C around the spectral crossover frequency without changing the compensation delay of the analyzer. Are they matched?
If not, measure OnAx C while adjusting it’s output delay to match OnAx A at the spectral crossover frequency.
Once they match, combine A and C and check for uniform response.
Note: In cases like this where the subs are very close to the tops, you will often have matching phase response. The manufacturer has designed them that way.
12-15min: Filter & EQ
Set EQ of OnAx A.
Add speaker C and EQ.
Compare with OffAx A. Make tough decisions (-4dB between 250 and 500Hz to compensate for pink shift in my case).
Now for speaker B.
Measure OnAx B and match level, delay, and EQ to OnAx A.
Combine A, B, & C and check OnAx B and A again.
This was a very basic example. If you would like this kind of step-by-step instruction for different system setups, let me know and I can produce more of them.
These are some of the methods I’ve come up with to deal with this all-too-popular professional sound system setup. What are some of your tuning tricks for this scenario?
The post How To Tune A Sound System In 15 Minutes appeared first on Sound Design Live.


