
Mathea Ford's Blog, page 5
February 28, 2025
The Importance Of Diet For Stage 3 Chronic Kidney Disease-Podcast

Chronic Kidney Disease (CKD) is a progressive condition that affects kidney function over time. When CKD reaches Stage 3, kidney function is moderately reduced, and diet plays a crucial role in slowing disease progression. By making informed food choices, individuals with Stage 3 CKD can manage symptoms, maintain overall health, and potentially delay the need for dialysis.
For More Recipes and Ideas --->> Get Your Free Meals and Recipes That Are Perfect for Pre-Dialysis Diets, Pre-Dialysis with Diabetes, or Dialysis Diets.
In this post, weâll explore why diet is so important for Stage 3 CKD, key dietary guidelines, and practical tips for meal planning.
Understanding Stage 3 CKDStage 3 CKD is categorized by a moderate decline in kidney function, with an estimated glomerular filtration rate (eGFR) between 30 and 59 mL/min. At this stage, the kidneys are still working but are not as efficient at filtering waste and excess fluids. Common symptoms include fatigue, swelling, and changes in urination patterns. While Stage 3 CKD does not usually require dialysis, managing it through lifestyle and dietary changes is essential to prevent further decline.
Key Dietary Considerations for Stage 3 CKD1. Protein IntakeProtein is an essential nutrient, but excessive protein can put additional strain on the kidneys. Individuals with Stage 3 CKD should aim for a balanced protein intake, focusing on high-quality protein sources like lean meats, eggs, and plant-based proteins. Working with a dietitian can help determine the right amount of protein for your needs.
2. Sodium ReductionReducing sodium intake is crucial for controlling blood pressure and minimizing fluid retention, both of which are common concerns for CKD patients. To lower sodium intake:
Choose fresh, whole foods over processed and packaged foods.Cook with herbs and spices instead of salt.Read nutrition labels and opt for âlow-sodiumâ or âno salt addedâ products.3. Potassium and Phosphorus ManagementAs kidney function declines, the body may struggle to balance potassium and phosphorus levels, which can lead to complications like heart issues and bone problems.
Limit high-potassium foods such as bananas, oranges, potatoes, and tomatoes.Opt for lower-potassium alternatives like apples, berries, cauliflower, and rice.Reduce phosphorus intake by avoiding processed meats, sodas, and dairy-based foods, and choosing fresh, unprocessed options.4. Fluid IntakeWhile staying hydrated is important, individuals with CKD may need to monitor their fluid intake, especially if experiencing swelling or fluid retention. Your healthcare provider can guide you on the appropriate amount of fluids based on your specific condition.
Foods to Include in a Kidney-Friendly DietA well-balanced CKD diet should include:
Lean proteins like chicken, fish, eggs, and plant-based sources.Low-potassium fruits and vegetables such as apples, berries, green beans, and zucchini.Whole grains like white rice, couscous, and oats (in moderation).Healthy fats including olive oil, avocado (in small amounts), and unsalted nuts.Foods to Avoid with Stage 3 CKDTo protect kidney function, limit or avoid:
High-sodium foods: Canned soups, processed snacks, and fast food.High-potassium foods: Bananas, oranges, tomatoes, and potatoes.High-phosphorus foods: Dairy products, dark sodas, and processed meats.Excessive protein: Large portions of red meat and high-protein diets.Tips for Meal Planning and CookingPlan meals ahead of time to ensure a balanced and kidney-friendly diet.Use fresh ingredients to control sodium and phosphorus levels.Try simple swaps, such as using herbs instead of salt or choosing white bread over whole wheat if potassium intake needs to be limited.Cook at home more often to have better control over ingredients and portions.Diet plays a significant role in managing Stage 3 CKD and preventing further kidney damage. By focusing on balanced nutrition, limiting sodium, potassium, and phosphorus, and consulting with a healthcare provider, individuals with CKD can improve their quality of life.
If you or a loved one has Stage 3 CKD, start making small, manageable dietary changes today. For more kidney-friendly nutrition tips, check out our additional resources and recipes!
Need more guidance?Explore our meal plans and expert advice to take control of your kidney health.
Learn more about Whatâs the difference between Peritoneal dialysis and Hemodialysis?-Podcast
Learn more about Can I still eat bananas if I have CKD?-Podcast
The post The Importance Of Diet For Stage 3 Chronic Kidney Disease-Podcast appeared first on Renal Diet HQ.


February 26, 2025
Whatâs the difference between Peritoneal dialysis and Hemodialysis?-Podcast

Choosing the right type of dialysis is a crucial decision for managing kidney disease. There are two main options: Peritoneal Dialysis (PD) and Hemodialysis (HD). Each method has its own benefits and considerations, and the best choice depends on your medical needs, lifestyle, and personal preferences. In this article, weâll break down the differences between PD and HD to help you make an informed decision.
For More Recipes and Ideas --->> Get Your Free Meals and Recipes That Are Perfect for Pre-Dialysis Diets, Pre-Dialysis with Diabetes, or Dialysis Diets.
What is Peritoneal Dialysis (PD)?Peritoneal Dialysis (PD) is a type of dialysis that uses the peritoneum, the lining of your abdominal cavity, to filter waste and excess fluids from your blood. A soft tube is placed in your abdomen, allowing a special dialysis solution, called dialysate, to flow in and out. This process can be done multiple times a day or overnight while you sleep.
Advantages of PD:Can be done at home â Offers more independence and flexibility.Gentler on the body â Because itâs a continuous process, it mimics natural kidney function more closely.Convenient for active lifestyles â Ideal for people who want to maintain work schedules or travel easily.Considerations for PD:The dialysate contains glucose, which may lead to increased blood sugar levels, especially in people with diabetes.Requires a sterile environment to prevent infections, such as peritonitis.Daily commitment â While flexible, it requires regular exchanges that must be managed diligently.What is Hemodialysis (HD)?Hemodialysis (HD) is a process where your blood is filtered outside your body through a machine. Blood is drawn out through a vascular access point (such as a fistula or graft), passes through an artificial kidney filter (dialyzer), and then is returned to your body.
Types of HD:In-Center Hemodialysis â Performed at a dialysis clinic, typically three times a week under professional supervision.Home Hemodialysis â Requires specialized training and equipment but offers more flexibility and frequent treatment options.Advantages of HD:Professional monitoring â In-center HD is managed by medical professionals who can respond to complications.Less daily responsibility â With in-center HD, treatments are done only a few times per week.More efficient waste removal per session â The machine can clear toxins and excess fluids effectively.Considerations for HD:Time commitment â Each session lasts about 3-4 hours, plus travel time.Strict dietary restrictions â Fluid and food intake may need to be carefully controlled, especially with in-center HD.Requires a vascular access site â Some people experience complications like infections or clotting.How to Decide Which Dialysis Type is Right for YouYour choice of dialysis will depend on several factors, including:Medical condition â Some patients may not be suitable candidates for PD due to prior surgeries or infections.Lifestyle and work schedule â Those who want flexibility may prefer PD or home HD, while others may prefer the routine of in-center HD.Support system â Home-based dialysis requires commitment from either yourself or a caregiver.Comfort level with self-care â PD and home HD require training and confidence in managing treatments at home.Professional oversight â If you prefer medical supervision, in-center HD may be a better choice.Dietary Considerations Based on Dialysis TypeYour diet may change depending on the type of dialysis you choose:Home Hemodialysis (daily treatments) â Allows for a more flexible diet since dialysis occurs more frequently.In-Center Hemodialysis (3 times per week) â Requires stricter fluid and food restrictions to prevent toxin buildup between sessions.Regardless of the dialysis method, itâs important to follow a renal-friendly diet tailored to your specific needs. Work with your nephrologist and dietitian to determine whatâs best for you.
Final Thoughts: Thereâs No One-Size-Fits-All ApproachDialysis is a unique journey for each individual. Take time to weigh the pros and cons of PD and HD, ask questions, and consult with your nephrologist and healthcare team. The best dialysis option is the one that supports your health, comfort, and quality of life.
If you have any questions about dialysis options, feel free to reach out to your healthcare provider. Remember, you are not alone on this journeyâthere are resources and support available to help you navigate your treatment choices.
Learn more about Best Plant-Based Milks for a Pre-Dialysis CKD Diet | Kidney-Friendly Alternatives-Podcast
The post Whatâs the difference between Peritoneal dialysis and Hemodialysis?-Podcast appeared first on Renal Diet HQ.
February 25, 2025
Tangerine Cake
Discover a delightful solution to satisfy your sweet tooth without compromising your dietary restrictions with our kidney-friendly tangerine cake. This recipe offers a burst of citrus flavor while adhering to the dietary needs of those managing kidney disease. Eating delicious desserts can often feel like a challenge when you're balancing dietary considerations, but this easy-to-follow recipe ensures that even novice bakers can create a treat that aligns with their health goals. By using simple ingredients and offering a fresh, tangy taste, our tangerine cake allows individuals with kidney disease to enjoy a flavorful dessert without the worry of negatively impacting their diet.
I remember the challenges my parents faced when they were both diagnosed with chronic kidney disease, which fueled my dedication to crafting kidney-friendly recipes. With over 25 years of experience as a Registered Dietitian, I have focused on creating delicious, evidence-based diet solutions that align with the needs of those managing CKD. This tangerine cake recipe not only satisfies your craving for dessert but also adheres to the latest guidelines for kidney health, showcasing how thoughtful ingredient choices can lead to enjoyable and compliant meals.

This tangerine cake recipe is especially suitable for those following a Chronic Kidney Disease (CKD) diet because it focuses on fresh, natural ingredients while maintaining a balance of flavors. By incorporating citrus fruit like tangerines, this dessert provides a burst of vitamin C without relying on high-sodium or high-potassium ingredients, which are often avoided in CKD diets. Additionally, the use of unsalted butter and sour cream helps maintain the necessary kidney-friendly nutrient levels, ensuring that this delightful treat can be enjoyed with peace of mind.
This recipe is one of the many desserts that are kidney friendly we have on the blog. You might also enjoy a healthy strawberry cobbler or cinnamon baked pears. This dessert pairs well with our low sodium chili recipe or our renal diet side dishes like green beans and corn or herbed pilaf.
[feast_advanced_jump_to]Ingredients For Tangerine CakeThis copycat Paula Deen tangerine cake is a delightful treat that combines the tangy zest of fresh tangerines with the comforting sweetness of homemade cake, resulting in a refreshing dessert experience that's both easy to make and satisfying to taste.
 Butter: Softened unsalted butter helps to create a tender and moist cake texture by adding fat and flavor.Eggs: Large eggs provide structure and richness to the cake, helping it rise and hold together.Flour: All-purpose flour acts as the base of the cake, providing necessary structure.Sugar: Granulated sugar sweetens the cake and helps to create a tender crumb by incorporating air when creamed with butter.Baking Powder: This leavening agent helps the cake rise, ensuring a light and fluffy texture.Tangerine Zest: Tangerine zest adds a burst of citrus flavor and a pleasant aroma to the cake.Tangerine Juice: Freshly juiced tangerine juice infuses the cake with natural citrus flavor and adds moisture.Sour Cream: Sour cream brings a creamy texture and subtle tang, which enhances the cake's flavor profile and moisture.Cornstarch: In the glaze, cornstarch acts as a thickening agent to create a smooth, glossy finish.Sugar for Glaze: Granulated sugar sweetens the glaze, providing a delicious contrast to the tangy citrus notes.
See recipe card for quantities.
How To Make Tangerine CakeMaking this easy tangerine cake is as simple as mixing the ingredients, baking, and topping it with a fresh citrus glaze. Follow these step-by-step instructions to create a moist, flavorful cake with a delightful crisp glaze on top.
 Preheat oven to 350'F and prepare a loaf pan by spraying it with pan spray
2. In a large mixing bowl, beat together the butter, eggs, flour, sugar, baking powder, zest, tangerine juice and sour cream until smooth.

3. Pour into loaf pan evenly. Bake in preheated oven for about 50-60 minutes or until golden brown and a toothpick inserted into the center of the cake comes out clean.

4. Leave to cool in pan for 5 minutes while you make the glaze.

5. While the cake is cooling in the pan, mix together the tangerine juice and the cornstarch and stir until no clumps are seen. Add the ½ cup of sugar to make the drizzle.

6. While the cake is still warm, transfer to a wire rack (with a pan underneath) and prick the warm cake all over with a skewer or fork. Then pour over the drizzle - the glaze will sink into the cake and form a crisp crust on top.
Hint: Room Temperature Ingredients: For a smoother batter and better texture, make sure your butter, eggs, and sour cream are at room temperature before mixing. This will help them combine more evenly.
 Variations for Tangerine Cake Recipes
This whole tangerine cake recipe can be easily adjusted to fit different preferences while keeping it kidney-friendly. Here are some tasty variations:
Lemon-Tangerine Cake â Swap out half the tangerine juice and zest for lemon to create a citrus blend.Nut-Free Version â If you want a nutty flavor without actual nuts, try adding a teaspoon of almond extract.Spiced Tangerine Cake â Add a pinch of cinnamon or nutmeg for a warm, cozy twist on this citrusy cake. Storage Tips for Tangerine Cake
This easy tangerine cake offers a delightful blend of citrusy flavors that are sure to please any dessert lover. Perfectly moist with a vibrant glaze, it's a treat that will brighten any occasion. Here's how you can enjoy it later by storing it properly:
Refrigerator Storage: Allow the cake to cool completely before wrapping it tightly in plastic wrap or storing it in an airtight container. Place it in the refrigerator where it can safely last for about 3 to 4 days. This will help maintain its freshness and prevent it from drying out.Freezer Storage: To enjoy your tangerine cake for an extended period, first wrap individual slices in plastic wrap, then place them in a freezer-safe bag or container. This prevents freezer burn and allows you to easily reheat single portions. The cake can be stored in the freezer for up to 3 months.Thawing and Reheating: When you're ready to enjoy your cake, transfer it from the freezer to the refrigerator to thaw overnight. For a quicker option, you can also let it sit at room temperature for a couple of hours. If you prefer it warm, gently heat it in the microwave for a few seconds.By following these storage tips, you can savor the sweet, citrusy goodness of this tangerine cake anytime you wish.
Top TipDonât Overmix â Overmixing the batter can lead to a dense cake, so stir just until the ingredients are combined.FAQs for Easy Tangerine CakeCan I substitute the tangerine zest and juice in the cake recipe?Yes, you can substitute the tangerine zest and juice with other citrus fruits like oranges or lemons for a different flavor. However, this will alter the taste of the cake, so keep that in mind if you're aiming for a specific citrus profile.
How can I ensure my tangerine cake bakes evenly?To ensure even baking, ensure your oven is preheated to 350°F before putting the cake in. Additionally, make sure the batter is evenly distributed in the loaf pan. The toothpick test is a great way to check for donenessâif it comes out clean from the center, your cake is ready.
What can I use if I don't have sour cream on hand?If you don't have sour cream, you can use plain yogurt as an alternative. It should provide similar moisture and tang to the cake. Greek yogurt, in particular, can be a great substitute for maintaining the texture.
Related Desserts for Chronic Kidney DiseaseLooking for other recipes like this? Try these:
 Tangerine Cake
 Healthy Oatmeal Date Bars
 Cinnamon Baked Pears
 Healthy Strawberry CobblerPairing with Delicious Kidney Friendly Meals
These are my favorite dishes to serve with Tangerine Cake:
 Healthy Valentines Meal
 Healthy New Year For Chronic Kidney Disease Patients
 Holiday Meal for CKD
 Kidney Friendly Thanksgiving Dinner
If you tried this Recipe or any other recipe on my website, please please leave a star rating and let me know how it goes in the comments below. I love hearing from you!
Recipe PrintTangerine Cake Recipe#wprm-recipe-user-rating-0 .wprm-rating-star.wprm-rating-star-full svg * { fill: #343434; }#wprm-recipe-user-rating-0 .wprm-rating-star.wprm-rating-star-33 svg * { fill: url(#wprm-recipe-user-rating-0-33); }#wprm-recipe-user-rating-0 .wprm-rating-star.wprm-rating-star-50 svg * { fill: url(#wprm-recipe-user-rating-0-50); }#wprm-recipe-user-rating-0 .wprm-rating-star.wprm-rating-star-66 svg * { fill: url(#wprm-recipe-user-rating-0-66); }linearGradient#wprm-recipe-user-rating-0-33 stop { stop-color: #343434; }linearGradient#wprm-recipe-user-rating-0-50 stop { stop-color: #343434; }linearGradient#wprm-recipe-user-rating-0-66 stop { stop-color: #343434; }#wprm-recipe-user-rating-0.wprm-user-rating-allowed.wprm-user-rating-not-voted:not(.wprm-user-rating-voting) svg * { fill-opacity: 0.3; }This delightful tangerine cake features a moist texture thanks to its blend of butter, tangerine juice, and sour cream. Finished with a sweet tangerine glaze that infuses into the cake, it offers a perfect balance of sweet and citrusy flavors with a satisfying crunch on top.Course Dessert, SnackCuisine AmericanDiet Low Fat, Low Salt, VegetarianPrep Time 30 minutes minutesCook Time 1 hour hourServings 10Calories 309kcalAuthor Mathea Ford, RDN, LD, MBAEquipment1 Loaf Pan1 Juicer1 ZesterIngredientsFor the Cake½ cup softened unsalted butter2 large eggs1 ½ cups all purpose flour1 cup granulated sugar1 teaspoon baking powder2 tablespoon tangerine zestâ
cup tangerine juice freshly juiced½ cup sour creamFor the Glaze¼ cup tangerine juice freshly juiced1 teaspoon cornstarch½ cup granulated sugarGet ingredients with
PrintTangerine Cake Recipe#wprm-recipe-user-rating-0 .wprm-rating-star.wprm-rating-star-full svg * { fill: #343434; }#wprm-recipe-user-rating-0 .wprm-rating-star.wprm-rating-star-33 svg * { fill: url(#wprm-recipe-user-rating-0-33); }#wprm-recipe-user-rating-0 .wprm-rating-star.wprm-rating-star-50 svg * { fill: url(#wprm-recipe-user-rating-0-50); }#wprm-recipe-user-rating-0 .wprm-rating-star.wprm-rating-star-66 svg * { fill: url(#wprm-recipe-user-rating-0-66); }linearGradient#wprm-recipe-user-rating-0-33 stop { stop-color: #343434; }linearGradient#wprm-recipe-user-rating-0-50 stop { stop-color: #343434; }linearGradient#wprm-recipe-user-rating-0-66 stop { stop-color: #343434; }#wprm-recipe-user-rating-0.wprm-user-rating-allowed.wprm-user-rating-not-voted:not(.wprm-user-rating-voting) svg * { fill-opacity: 0.3; }This delightful tangerine cake features a moist texture thanks to its blend of butter, tangerine juice, and sour cream. Finished with a sweet tangerine glaze that infuses into the cake, it offers a perfect balance of sweet and citrusy flavors with a satisfying crunch on top.Course Dessert, SnackCuisine AmericanDiet Low Fat, Low Salt, VegetarianPrep Time 30 minutes minutesCook Time 1 hour hourServings 10Calories 309kcalAuthor Mathea Ford, RDN, LD, MBAEquipment1 Loaf Pan1 Juicer1 ZesterIngredientsFor the Cake½ cup softened unsalted butter2 large eggs1 ½ cups all purpose flour1 cup granulated sugar1 teaspoon baking powder2 tablespoon tangerine zestâ
cup tangerine juice freshly juiced½ cup sour creamFor the Glaze¼ cup tangerine juice freshly juiced1 teaspoon cornstarch½ cup granulated sugarGet ingredients with  InstructionsPreheat oven to 350'F and prepare a loaf pan by spraying it with pan sprayIn a large mixing bowl, beat together the butter, eggs, flour, sugar, baking powder, zest, tangerine juice and sour cream until smooth.Pour into loaf pan evenly. Bake in preheated oven for about 50-60 minutes or until golden brown and a toothpick inserted into the center of the cake comes out clean.Leave to cool in pan for 5 minutes while you make the glaze.While the cake is cooling in the pan, mix together the tangerine juice and the cornstarch and stir until no clumps are seen. Add the ½ cup of sugar to make the drizzle.While the cake is still warm, transfer to a wire rack (with a pan underneath) and prick the warm cake all over with a skewer or fork. Then pour over the drizzle - the glaze will sink into the cake and form a crisp crust on top.NutritionCalories: 309kcal | Carbohydrates: 47g | Protein: 4g | Fat: 13g | Saturated Fat: 7g | Polyunsaturated Fat: 1g | Monounsaturated Fat: 3g | Trans Fat: 0.4g | Cholesterol: 64mg | Sodium: 60mg | Potassium: 76mg | Fiber: 1g | Sugar: 32g | Vitamin A: 459IU | Vitamin C: 5mg | Vitamin D: 0.2µg | Calcium: 50mg | Iron: 1mg | Phosphorus: 60mgCheck Out Our Meal Plans For People With Chronic Kidney Disease (CKD)
The post Tangerine Cake appeared first on Renal Diet HQ.
February 24, 2025
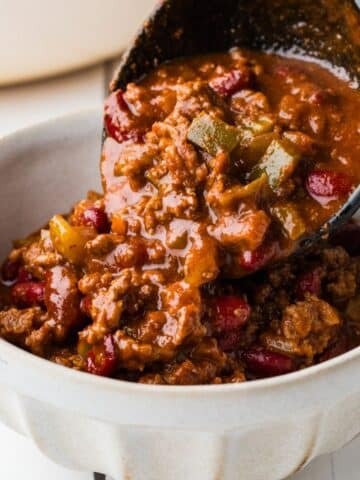
Simple Low Sodium Chili
Enjoy a comforting and easy-to-make chili tailored for kidney health thatâs flavorful and friendly for low-salt diets. Perfect for those new to cooking, this recipe supports your well-being without compromising on taste.
As someone whose parents were diagnosed with Chronic Kidney Disease (CKD), I deeply understand the challenges of maintaining a kidney-friendly diet. With over 25 years of experience as a Registered Dietitian, I've dedicated myself to crafting recipes that cater to these dietary needs. This renal diet chili recipe combines evidence-based practices and personal expertise, ensuring that you not only enjoy a flavorful meal but also adhere to current guidelines for managing CKD. Through carefully selected ingredients, such as no salt added tomato sauce and kidney beans, it aligns with trusted standards, offering a practical and delicious solution for your dietary requirements.

This low salt chili with beans recipe aligns well with a Chronic Kidney Disease diet due to its mindful selection of ingredients that are low in sodium and potassium. By using no salt added tomato sauce and kidney beans, and replacing regular broth with a low sodium version, this dish helps manage fluid retention and blood pressure, critical concerns for those with kidney issues. The spices enhance flavor without adding unnecessary salt, making it both a delicious and health-conscious choice.
I love this time of year when we are making soups and stews that are kidney friendly again! I have some options for side dishes for this recipe, like our low sodium cornbread or the peas and carrots we have. You might also enjoy another soup recipe like our low sodium beef barley soup.
[feast_advanced_jump_to]Ingredients in Chili Recipe for Kidney PatientsThis heart-healthy chili recipe combines fresh vegetables, lean ground beef, and a fragrant blend of spices to create a flavorful and satisfying dish without the extra salt.
 Onions: Chopped onions add a savory depth of flavor and a hint of sweetness that enhances the overall taste of the dish.Green Pepper: Chopped green peppers bring a fresh and slightly tangy flavor, adding texture and color to the recipe.Celery: Diced celery provides a crisp texture and a subtle, earthy taste that complements the other vegetables.Olive Oil: Used to sauté the vegetables, olive oil adds a smooth, rich flavor and helps in blending the ingredients together.Ground Beef: Lean ground beef serves as the hearty, protein-packed base, contributing richness and substance to the dish.Tomato Sauce: No salt added tomato sauce brings a robust, tangy flavor while allowing you to control the salt content in the recipe.Kidney Beans: These beans add a creamy texture and are a great source of fiber, giving the dish additional nutritional value especially after being drained and rinsed.Chili Powder: This spice provides a warm, smoky heat and is essential for giving the dish its signature chili flavor.Cumin: Cumin introduces a hint of earthiness and a slightly nutty, peppery aroma, enhancing the overall spice profile.Smoked Paprika: With its sweet, smoky flavor, smoked paprika adds depth and a vibrant color to the dish.Beef Broth: Low sodium beef broth acts as a savory liquid base, enhancing the meat's flavor while keeping the dish lower in salt.
See recipe card for quantities.
How to Make Low Sodium ChiliGet ready to make a deliciously hearty and low-sodium chili thatâs sure to satisfy! Follow these simple steps and enjoy a warm, comforting bowl in just a few easy moves.
 Heat large stockpot or dutch oven on medium heat. Add oil, onion, celery and pepper. Cook until tender but not browned, about 3-5 minutes.
 Add ground beef, breaking into small pieces and cook until brown. Drain fat from meat mixture before continuing.
 Add tomato sauce, beans, chili powder, cumin, smoked paprika and beef broth. Mix thoroughly and bring to a simmer, then turn heat to low.
 Simmer covered for 60-75 minutes.Each serving is 1 cup, makes 5 cups of chili.
Hint: Flavor Boost: To enhance the flavor, consider adding a splash of vinegar or lime juice before serving. This will add a touch of acidity that brightens the dish.
 Variations for Easy Low Sodium Chili Recipe
Creating a delicious and heart-healthy no salt chili doesn't have to be a challenge. This classic dish can be adapted to suit various dietary needs, including those following a kidney-friendly diet. Below are some creative and CKD-friendly variations of a low sodium chili recipe that you can enjoy while keeping an eye on your health.
Low Sodium Chili with Turkey: Substitute the lean ground beef with ground turkey to reduce saturated fat content. Turkey provides a leaner protein option, making it ideal for those watching their heart health.Vegetarian Low Sodium Chili: Skip the meat altogether and add more vegetables like zucchini, carrots, and butternut squash. This not only lowers the potassium content but also makes the dish lighter and packed with vitamins.With these variations, you can enjoy a comforting bowl of chili without compromising your health requirements. Adjust the spices to your taste, and feel free to get creative with additional veggies or lean meats to make this recipe truly yours.
Storage Tips for Low Sodium Chili with BeansWhen you're in search of a hearty and heart-healthy chili, this low sodium recipe is an excellent choice. It's flavorful and easy to prepare, ensuring you can enjoy a comforting dish without worrying about excess salt.
Refrigeration: Once the chili has cooled to room temperature, transfer it to an airtight container. It can be stored in the refrigerator for up to 3-4 days. Reheat individual portions on the stove or in the microwave.Freezing: For longer storage, the chili can be frozen. Divide the cooled chili into single serving sizes and place them in airtight freezer-safe containers or heavy-duty freezer bags. Label them with the date for easy tracking. The chili can be stored in the freezer for up to 3 months. When ready to eat, thaw it in the refrigerator overnight before reheating.These storage tips ensure that your low sodium chili stays fresh and ready for whenever you crave a nutritious and satisfying meal.
Top TipConsider Alternative Proteins: Combine beans for a vegetarian option or to just switch up your choice of legumes.
FAQs for Low Sodium Homemade ChiliCan I use other types of beans in place of kidney beans?Yes, you can substitute No Salt Added Kidney Beans with other low sodium bean options that you prefer, such as black beans or pinto beans. Just make sure to drain and rinse the beans before adding them to the chili.
This recipe focuses on heart health by using lean ground beef, a generous amount of vegetables, and no added salt to reduce sodium content. It incorporates No Salt Added Tomato Sauce and Kidney Beans, making it suitable for those monitoring their sodium intake. Additionally, using olive oil instead of butter or other fats can promote cardiovascular health.
Soups For Chronic Kidney DiseaseLooking for other recipes like this no salt added chili? Try these:
 Simple Low Sodium Chili
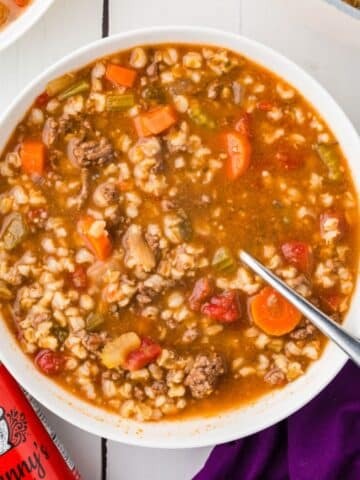 Low Sodium Beef Barley Soup
 Broccoli Cauliflower Soup
 Cabbage Sausage and Potato SoupPairing with Low Potassium Chili
These are my favorite dishes to serve with Low Sodium Chili:
 Green Beans and Corn
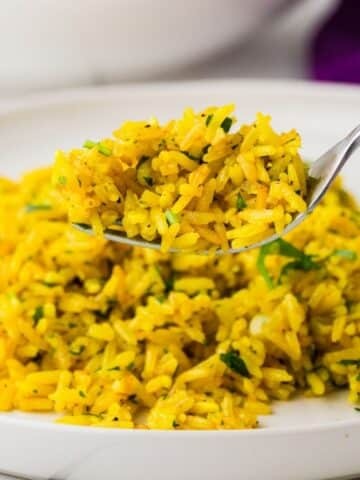 Garlic Turmeric Rice
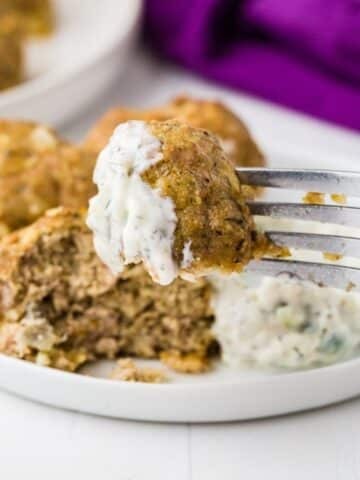 Greek Turkey Meatballs
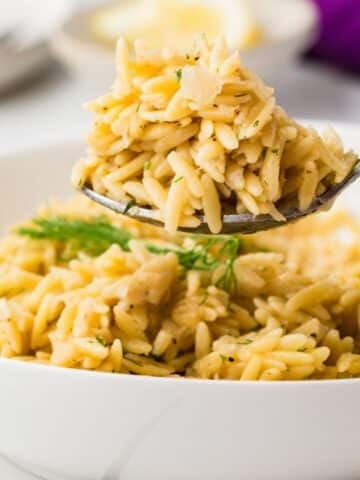 Orzo Pilaf
If you tried this Recipe or any other recipe on my website, please please leave a star rating and let me know how it goes in the comments below. I love hearing from you!
Recipe PrintLow Sodium Chili Recipe#wprm-recipe-user-rating-1 .wprm-rating-star.wprm-rating-star-full svg * { fill: #343434; }#wprm-recipe-user-rating-1 .wprm-rating-star.wprm-rating-star-33 svg * { fill: url(#wprm-recipe-user-rating-1-33); }#wprm-recipe-user-rating-1 .wprm-rating-star.wprm-rating-star-50 svg * { fill: url(#wprm-recipe-user-rating-1-50); }#wprm-recipe-user-rating-1 .wprm-rating-star.wprm-rating-star-66 svg * { fill: url(#wprm-recipe-user-rating-1-66); }linearGradient#wprm-recipe-user-rating-1-33 stop { stop-color: #343434; }linearGradient#wprm-recipe-user-rating-1-50 stop { stop-color: #343434; }linearGradient#wprm-recipe-user-rating-1-66 stop { stop-color: #343434; }#wprm-recipe-user-rating-1.wprm-user-rating-allowed.wprm-user-rating-not-voted:not(.wprm-user-rating-voting) svg * { fill-opacity: 0.3; }Course Dinner, Entree, Main Course, SoupCuisine AmericanDiet Diabetic, Low Calorie, Low SaltPrep Time 20 minutes minutesCook Time 1 hour hourTotal Time 1 hour hour 20 minutes minutesServings 5Calories 301kcalAuthor Mathea Ford, RDN, LD, MBAEquipment1 Stockpot1 Vegetable ChopperIngredients½ cup chopped onions½ cup chopped green pepper½ cup diced celery1 tablespoon olive oil16 ounces lean 95% ground beef15 ounce can No Salt Added Tomato Sauce15.5 ounce can No Salt Added Kidney Beans drained and rinsed2 tablespoon chili powder1 tablespoon cumin2 teaspoon smoked paprika2 cups low sodium beef brothGet ingredients with InstructionsHeat large stockpot or Dutch oven on medium heat. Add oil, onion, celery and pepper. Cook until tender but not browned, about 3-5 minutes.Add ground beef, breaking into small pieces and cook until brown. Drain fat from meat mixture before continuing.Add tomato sauce, beans, chili powder, cumin, smoked paprika and beef broth. Mix thoroughly and bring to a simmer, then turn heat to low.Simmer covered for 60-75 minutes.Each serving is 1 cup, makes 5 cups of chili.NutritionCalories: 301kcal | Carbohydrates: 32g | Protein: 27g | Fat: 8g | Saturated Fat: 3g | Polyunsaturated Fat: 1g | Monounsaturated Fat: 4g | Trans Fat: 0.3g | Cholesterol: 56mg | Sodium: 177mg | Potassium: 1037mg | Fiber: 7g | Sugar: 5g | Vitamin A: 1827IU | Vitamin C: 21mg | Vitamin D: 0.1µg | Calcium: 77mg | Iron: 7mg | Phosphorus: 356mgCheck Out Our Meal Plans For People With Chronic Kidney Disease (CKD)
The post Simple Low Sodium Chili appeared first on Renal Diet HQ.
February 21, 2025
Best Plant-Based Milks for a Pre-Dialysis CKD Diet | Kidney-Friendly Alternatives-Podcast

Living with chronic kidney disease (CKD) means making mindful dietary choices, especially when it comes to milk alternatives. Many people with CKD need to limit their intake of phosphorus, potassium, and sodium, which can be challenging when selecting the right plant-based milk. In this guide, weâll explore the best options tailored to pre-dialysis CKD patients.
For More Recipes and Ideas --->> Get Your Free Meals and Recipes That Are Perfect for Pre-Dialysis Diets, Pre-Dialysis with Diabetes, or Dialysis Diets.
Why Choose Plant-Based Milk for CKD?Traditional dairy milk is high in phosphorus and potassium, which can be problematic for CKD patients. Many plant-based milk alternatives offer lower levels of these minerals while still providing a good source of nutrition. However, not all plant-based milks are created equal, and some contain additives that may not be kidney-friendly.
What to Look for in a Kidney-Friendly Plant-Based MilkWhen selecting a plant-based milk for CKD, consider the following factors:
Low Phosphorus â Aim for less than 100 mg per serving.Low Potassium â Opt for varieties with less than 200 mg per serving.Low Sodium â Keep sodium content below 140 mg per serving.No Phosphorus Additives â Check labels for ingredients like phosphates, which can increase phosphorus absorption.Unsweetened Options â Avoid excess sugar, which can contribute to inflammation and other health issues.Best Plant-Based Milk Options for CKD Patients1. Almond MilkWhy Itâs a Good Choice: Almond milk is naturally low in phosphorus and potassium, making it one of the best options for CKD patients.
Phosphorus: ~20 mg per cupPotassium: ~50 mg per cupBest Option: Unsweetened and unfortified versions to avoid additives.2. Rice MilkWhy Itâs a Good Choice: Rice milk is another low-potassium and low-phosphorus option. However, it tends to be higher in carbohydrates, so it may not be ideal for those managing blood sugar.
Phosphorus: ~30 mg per cupPotassium: ~50 mg per cupBest Option: Choose unsweetened versions with no phosphate additives.3. Coconut Milk (Diluted)Why Itâs a Good Choice: Coconut milk, when diluted, can be a good low-phosphorus and low-potassium alternative. However, it is often high in saturated fat.
Phosphorus: ~30-40 mg per cupPotassium: ~50 mg per cupBest Option: Look for unsweetened, refrigerated versions instead of canned coconut milk.4. Hemp MilkWhy Itâs a Good Choice: Hemp milk contains omega-3 fatty acids, which may support heart health. However, phosphorus content can be slightly higher than other options.
Phosphorus: ~100 mg per cupPotassium: ~100 mg per cupBest Option: Choose unfortified versions with no phosphate additives.5. Oat Milk (With Caution)Why Itâs a Good Choice: Oat milk is creamy and naturally sweet but tends to have more phosphorus and potassium than other alternatives.
Phosphorus: ~150 mg per cupPotassium: ~130 mg per cupBest Option: If choosing oat milk, opt for brands without phosphate additives and limit intake.Plant-Based Milks to AvoidCertain plant-based milks contain higher amounts of phosphorus and potassium, making them less ideal for CKD patients:
Soy Milk â High in potassium (~300 mg per cup) and phosphorus (~200 mg per cup).Cashew Milk â Often contains more phosphorus than almond or rice milk.Flax Milk â Some brands contain added phosphorus and potassium.Choosing the right plant-based milk for CKD requires careful label reading and attention to phosphorus, potassium, and sodium levels. Almond milk and rice milk tend to be the best options, while oat milk and hemp milk can be consumed in moderation. Avoid plant-based milks with phosphate additives and high potassium levels to keep your kidneys healthy.
By making informed choices, you can enjoy a nutritious and kidney-friendly diet without compromising on taste or variety.
Learn more about How to Manage Chronic Itching (Pruritus) in CKD-Podcast
The post Best Plant-Based Milks for a Pre-Dialysis CKD Diet | Kidney-Friendly Alternatives-Podcast appeared first on Renal Diet HQ.
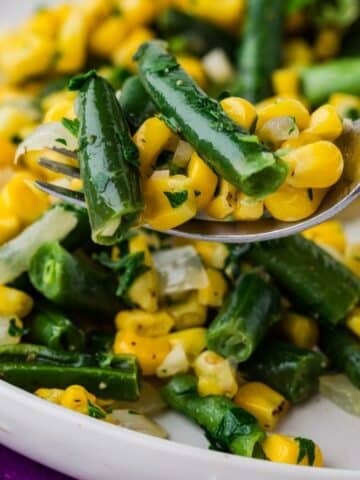
Green Beans and Corn
Satisfy your taste buds and dietary needs with this easy, kidney-conscious side dish that's perfect for beginners in the kitchen.
Facing dietary restrictions due to kidney disease can make meal planning a daunting task, especially when you're trying to find recipes that are both nutritious and flavorful. Our Simple and Delicious: Kidney-Friendly Green Beans and Corn recipe offers a solution by delivering a tasty side dish that meets your dietary needs without sacrificing taste. This recipe is specifically designed for beginners in the kitchen, using easy-to-find ingredients like frozen corn, green beans, and fresh parsley. It's a great option for those looking to maintain a kidney-conscious diet, without feeling deprived of flavorful meals. With minimal preparation time and straightforward steps, this dish is not only easy to make but also supports your health goals, making it a must-try for anyone managing kidney disease.
Growing up with both of my parents facing chronic kidney disease (CKD), I witnessed firsthand the challenges of maintaining a satisfying and nutritious diet. With over 25 years of experience as a Registered Dietitian, I've turned my passion for creating delicious, kidney-friendly recipes into a practical approach to CKD management. This Green Beans and Corn recipe uses easy-to-find ingredients and adheres to evidence-based dietary guidelines, making it both heartening and health-conscious. By prioritizing nutrient-rich, low-sodium ingredients, this side dish fits seamlessly into a balanced diet, supporting kidney health while ensuring meals are as enjoyable as they are nourishing.

This green beans and corn recipe is a wonderful addition to a Chronic Kidney Disease diet because it carefully balances flavor with nutritional requirements. The ingredients are naturally low in sodium and potassium, making them suitable for those monitoring their kidney health. Additionally, the use of fresh parsley and black pepper adds a flavorful boost without relying on high-sodium seasonings, ensuring that the dish is both delicious and mindful of dietary restrictions.
You can serve this with our Greek Meatballs recipe, part of our turkey entrees for kidney failure section. You might like to eat some healthy Marry Me Chicken with it instead! Try it with our garlic turmeric rice or as part of another of our healthy meals for chronic kidney disease.
[feast_advanced_jump_to]Ingredients in Corn and Green BeansDiscover the delightful combination of corn and green beans in this simple and tasty side dish. This recipe requires just a handful of ingredients to create a flavorful medley.
 Butter, unsalted: This rich and creamy ingredient adds flavor and moisture to the dish, acting as the primary cooking fat.Frozen corn: Sweet and juicy, corn adds color and a pleasant texture that complements the other vegetables.Minced garlic: Infusing the dish with a pungent and aromatic flavor, garlic enhances the overall taste profile.Frozen chopped green beans: These nutritious greens introduce a satisfying crunch and balance the sweetness of the corn.Chopped onion: Offering a subtle sweetness and a hint of sharpness, onions form the base for building flavors in the recipe.Fresh parsley: This herb adds a burst of freshness and a pop of color, elevating the dish with its fragrant notes.Black pepper: Spicy and sharp, black pepper adds a touch of heat and depth to round out the flavors.
See recipe card for quantities.
How to Make Green Beans CornDive into this easy and delicious vegetable side dish featuring frozen corn and green beans, perfect to accompany any meal. With a few simple steps, youâll have a flavorful dish ready in no time, using ingredients straight from your kitchen.
 Melt the butter over medium heat in a large skillet. Add the onions and cook for 3-4 minutes to soften.
 Add the frozen corn and green beans to the skillet, and stir into the butter. Cook until they are heated through, about 5 minutes
 Add the garlic and stir to combine, and cook 1-2 more minutes.
 Once the mixture is hot, add the parsley and black pepper, stir to combine and cook for 1-2 more minutes.Remove from heat and separate into servings of about 1 cup each.
Hint: Use Fresh Vegetables: While the recipe calls for frozen corn and green beans, feel free to substitute with fresh alternatives for a different texture and taste. Just adjust the cooking time as needed to ensure they're heat properly.
Variations for Green Beans and CornIf you're looking for a simple and delicious side dish, this Green Beans and Corn recipe is a perfect choice. It's versatile enough to complement a variety of main courses, and its fresh ingredients make for a delightful addition to any meal.
Here are a few CKD-friendly variations to consider:
Herb Infusion: Enhance the flavor profile by adding fresh herbs like dill or basil instead of parsley. These herbs can offer a refreshing twist without affecting the kidney-friendly nature of the dish.Zesty Lemon: For a citrusy kick, squeeze fresh lemon juice over the finished dish just before serving. The acidity from the lemon can brighten the flavors while keeping the sodium content low.Nutty Crunch: Sprinkle toasted almonds or sunflower seeds on top for added texture and a nutty flavor. These nuts and seeds are typically lower in phosphorus and can be a great addition for those following a renal diet.Feel free to experiment with these variations to discover your perfect side dish!
 Storage Tips for Green Beans and Corn
Creating a delightful side dish for your meal doesn't have to be complicated. This corn and green beans recipe is simple yet flavorful, bringing together staple ingredients for a wholesome addition to your table.
Refrigerator: Allow the dish to cool completely before transferring it to airtight containers. Store it in the refrigerator for up to 3-4 days. Reheat in a skillet over medium heat or in the microwave until warmed through.Freezer: Place the cooled dish in freezer-safe containers or heavy-duty zip-top bags. Be sure to remove as much air as possible before sealing to prevent freezer burn. Label the container with the date and store in the freezer for up to 1-2 months. To reheat, thaw in the refrigerator overnight and then warm in a skillet or microwave as needed.By storing this dish properly, you can enjoy the convenience of a ready-made side that's just as tasty as the day you prepared it.
FAQ's for Green Beans and CornCan I use fresh vegetables instead of frozen ones in the recipe?Yes, you can use fresh vegetables if you prefer. If using fresh green beans and corn, make sure to adjust the cooking time since fresh vegetables may take a little longer to cook through compared to frozen ones.
How can I customize the green beans and corn side dish?Feel free to experiment by adding your favorite seasonings or ingredients. For example, a dash of red pepper flakes can add some heat, or you can sprinkle some grated Parmesan cheese for extra flavor. You can also add other vegetables like bell peppers or mushrooms if you like.
Is this green beans and corn recipe suitable for meal prep?Absolutely! This recipe can be easily doubled or tripled for meal prep. Once cooked, divide the mixture into individual servings and store them in airtight containers in the refrigerator. They can be reheated as needed, making them a convenient option for busy days.
Try Our Other Kidney Friendly Side DishesLooking for other renal diet side dish recipes like this? Try these:
Garlic Turmeric RiceGreek Turkey MeatballsOrzo Pilaf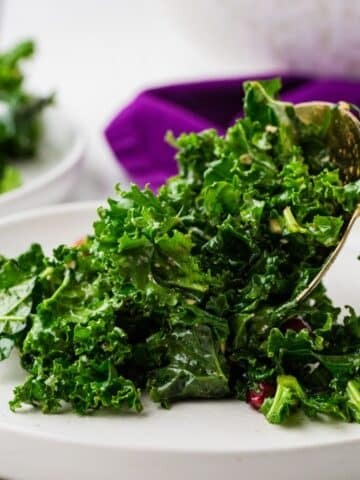 Kale and Pomegranate SaladPairing with Chicken Entrees
These are my favorite dishes to serve with Green Beans and Corn:
 Healthy Marry Me Chicken
 Chicken and Broccoli with Cashews
 Hawaiian Chicken Salad
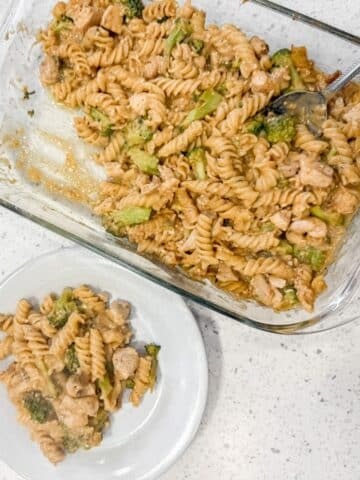 Chicken and Broccoli Pasta Bake
If you tried this Recipe or any other recipe on my website, please please leave a star rating and let me know how it goes in the comments below. I love hearing from you!
Recipe PrintGreen Beans and Corn Recipe#wprm-recipe-user-rating-0 .wprm-rating-star.wprm-rating-star-full svg * { fill: #343434; }#wprm-recipe-user-rating-0 .wprm-rating-star.wprm-rating-star-33 svg * { fill: url(#wprm-recipe-user-rating-0-33); }#wprm-recipe-user-rating-0 .wprm-rating-star.wprm-rating-star-50 svg * { fill: url(#wprm-recipe-user-rating-0-50); }#wprm-recipe-user-rating-0 .wprm-rating-star.wprm-rating-star-66 svg * { fill: url(#wprm-recipe-user-rating-0-66); }linearGradient#wprm-recipe-user-rating-0-33 stop { stop-color: #343434; }linearGradient#wprm-recipe-user-rating-0-50 stop { stop-color: #343434; }linearGradient#wprm-recipe-user-rating-0-66 stop { stop-color: #343434; }#wprm-recipe-user-rating-0.wprm-user-rating-allowed.wprm-user-rating-not-voted:not(.wprm-user-rating-voting) svg * { fill-opacity: 0.3; }Course Side DishCuisine AmericanDiet Diabetic, Gluten Free, Low Calorie, Low Fat, Low Lactose, Low Salt, VegetarianPrep Time 5 minutes minutesCook Time 10 minutes minutesServings 2Calories 165kcalAuthor Mathea Ford, RDN, LD, MBAEquipment1 Skillet1 Vegetable ChopperIngredients1 tablespoon butter unsalted1 cup frozen corn1 tablespoon minced garlic1 cup frozen chopped green beans¼ cup chopped onion2 tablespoon fresh parsley½ teaspoon black pepperGet ingredients with InstructionsMelt the butter over medium heat in a large skillet. Add the onions and cook for 3-4 minutes to soften.Add the frozen corn and green beans to the skillet, and stir into the butter. Cook until they are heated through, about 5 minutesAdd the garlic and stir to combine, and cook 1-2 more minutes.Once the mixture is hot, add the parsley and black pepper, stir to combine and cook for 1-2 more minutes.Remove from heat and separate into servings of about 1 cup each.NutritionCalories: 165kcal | Carbohydrates: 27g | Protein: 4g | Fat: 7g | Saturated Fat: 4g | Polyunsaturated Fat: 1g | Monounsaturated Fat: 2g | Trans Fat: 0.2g | Cholesterol: 15mg | Sodium: 56mg | Potassium: 434mg | Fiber: 4g | Sugar: 3g | Vitamin A: 898IU | Vitamin C: 21mg | Calcium: 45mg | Iron: 2mg | Phosphorus: 109mgCheck Out Our Meal Plans For People With Chronic Kidney Disease (CKD)
The post Green Beans and Corn appeared first on Renal Diet HQ.
February 20, 2025
Garlic Turmeric Rice
Flavorful garlic turmeric rice stands out as an ideal kidney-friendly dish, perfect for those managing chronic kidney disease (CKD) or caregivers striving to balance dietary needs with taste. This simple recipe addresses the challenge of creating meals that are both nutritious and satisfying, particularly for individuals navigating dietary restrictions. With easy-to-find ingredients like turmeric and garlic, this dish not only adds a vibrant color and aroma to your table but also ensures compliance with kidney care guidelines. By focusing on health without sacrificing flavor, this recipe offers a taste of comfort and assurance that adheres to CKD dietary requirements, making meal preparation less stressful and more delightful.
Having spent over 25 years as a Registered Dietitian, my commitment to kidney health is both professional and deeply personal, influenced by my own parentsâ journey with chronic kidney disease. These experiences have fueled my dedication to crafting kidney-friendly recipes like garlic turmeric rice, which satisfies taste without compromising health. By incorporating evidence-based practices into my meal plans and adhering to current kidney care guidelines, I aim to make managing CKD both practical and enjoyable, offering trusted strategies that bring both peace of mind and flavor to your dining table.

This garlic turmeric rice recipe is particularly suitable for a Chronic Kidney Disease (CKD) diet as it incorporates low sodium chicken stock and limits the use of salt, which is crucial for maintaining healthy kidney function. The use of turmeric not only adds vibrant color and flavor but also boasts anti-inflammatory properties that can be beneficial for kidney health. By selecting fresh parsley and avoiding high-potassium ingredients, this dish stays mindful of dietary restrictions while offering a delicious meal option.
Rice is an excellent side dish that is kidney friendly for your diet. Fish entrees that are kidney friendly are perfect to eat with this yellow jasmine rice. Try it with our Lemon Garlic Shrimp (quick recipe) or as part of our meals for CKD recipes. I also love it with our Greek Turkey Meatballs and Tzatziki sauce.
[feast_advanced_jump_to]Ingredients in Garlic RiceWelcome to the flavorful world of turmeric garlic rice, where aromatic jasmine rice meets the vibrant hues of turmeric and the savory depth of garlic.
 Unsalted Butter: Used for sautéing, this rich ingredient adds a subtle, creamy flavor base to the dish.Onion: Finely diced onion brings essential sweetness and depth to enhance the overall flavor profile.Minced Garlic: This aromatic ingredient infuses the dish with a robust, savory fragrance that's irresistible.Turmeric Powder: Adds a warm, earthy flavor and vibrant color, transforming the dish into an inviting visual delight.Jasmine Rice: The fragrant, aromatic quality of jasmine rice makes it the perfect choice for a flavorful and fluffy side.Low Sodium Chicken Stock: Employs a gentle, savory broth to cook the rice and amplify its taste without overwhelming it with salt.Black Pepper: Offers a touch of heat and additional dimension, enhancing and balancing the flavors.Fresh Parsley: This fresh herb provides a burst of color and a hint of brightness, tying all the flavors together perfectly.
See recipe card for quantities.
How to Make Garlic Jasmine RiceGet ready for a flavorful side dish that's both simple and delicious!
 Melt butter in a pot over medium heat. Add onion and garlic and saute for 2 minutes or until fragrant.
 Add turmeric and rice and stir to combine. Mix together until everything is coated.
 Add stock and pepper to the pot. Mix to combine and bring to a boil.
 Cover, reduce heat to low and simmer for 15 minutes covered. Remove from heat and set aside for about 5 minutes before fluffing with a fork.
5. Serve with a meal. Makes 2 servings.
Hint: For added flavor, try toasting the rice briefly after adding the butter, onion, and garlic but before adding the stock. This step can enhance the nutty flavors of the rice.
Variations For Turmeric Garlic RiceGarlic turmeric rice is a flavorful side dish that can complement a variety of meals. It's both aromatic and vibrant, making it a great option for those looking to add a kick to their usual rice dishes. Here are some CKD-friendly variations that incorporate the delicious flavors of garlic and turmeric while being mindful of dietary restrictions.
Brown Rice: Replace jasmine rice with brown rice for a higher fiber option, which can be beneficial for overall health. Keep in mind that brown rice contains more phosphorus, so portion size may need to be adjusted based on individual needs.Herb-Enhanced Version: Boost the freshness and flavor profile by adding a wider variety of herbs. Along with the parsley, mix in cilantro or dill just before serving. These herbs can add a delightful aroma and enhance the overall taste without adding extra salt.Vegetarian Delight: For a vegetarian-friendly option, replace the chicken stock with vegetable broth. Enhance the dish further by incorporating finely chopped vegetables such as bell peppers or zucchini. This version provides more nutrients and adds texture to the rice. Storage Tips for Garlic Turmeric Rice
To enjoy your garlic turmeric rice at a later time, follow these steps for optimal storage.
For refrigeration, let the rice cool to room temperature before transferring it to an airtight container. It can be stored in the refrigerator for up to three days. When freezing, spread the cooled rice on a baking sheet to prevent clumping, then transfer to a freezer-safe bag or container once frozen. Label with the date and consume within one month for the best flavor. Reheat the rice gently on the stove with a splash of water or in the microwave, stirring occasionally to ensure even heating.These storage tips ensure that your low sodium chili stays fresh and ready for whenever you crave a nutritious and satisfying meal.
FAQs for Garlic Turmeric RiceWhat type of rice should I use for this recipe?For this garlic turmeric rice recipe, jasmine rice is recommended for its fragrant aroma and slightly sticky texture. It complements the flavors of garlic and turmeric well. However, you can experiment with other types of long-grain rice if preferred.
Absolutely! To make this dish vegetarian or vegan, substitute the unsalted butter with a plant-based alternative like olive oil or vegan butter. Also, replace the chicken stock with vegetable stock to keep it plant-friendly.
This recipe doesnât include any overtly spicy ingredients, but the garlic does give it a robust flavor profile. If you enjoy spicier food, you could add a pinch of chili powder or cayenne pepper to increase the heat without overpowering the garlic and turmeric flavors.
Other Side Dishes For CKDLooking for other side dish recipes like this? Try these:
Garlic Turmeric RiceGreek Turkey MeatballsOrzo PilafKale and Pomegranate SaladPairing with Pork EntreesThese are my favorite dishes to serve with Garlic Turmeric Rice:
 Baked Ranch Pork Chops
 Roast Pork Ribeye
 Cauliflower Stuffing with Ground Turkey
 Pork Tenderloin Medallions Recipe
If you tried this Recipe or any other recipe on my website, please please leave a star rating and let me know how it goes in the comments below. I love hearing from you!
Recipe PrintYellow Garlic Rice#wprm-recipe-user-rating-0 .wprm-rating-star.wprm-rating-star-full svg * { fill: #343434; }#wprm-recipe-user-rating-0 .wprm-rating-star.wprm-rating-star-33 svg * { fill: url(#wprm-recipe-user-rating-0-33); }#wprm-recipe-user-rating-0 .wprm-rating-star.wprm-rating-star-50 svg * { fill: url(#wprm-recipe-user-rating-0-50); }#wprm-recipe-user-rating-0 .wprm-rating-star.wprm-rating-star-66 svg * { fill: url(#wprm-recipe-user-rating-0-66); }linearGradient#wprm-recipe-user-rating-0-33 stop { stop-color: #343434; }linearGradient#wprm-recipe-user-rating-0-50 stop { stop-color: #343434; }linearGradient#wprm-recipe-user-rating-0-66 stop { stop-color: #343434; }#wprm-recipe-user-rating-0.wprm-user-rating-allowed.wprm-user-rating-not-voted:not(.wprm-user-rating-voting) svg * { fill-opacity: 0.3; }Course Side DishCuisine American, MediterraneanDiet Gluten Free, Low Salt, VegetarianPrep Time 5 minutes minutesCook Time 20 minutes minutesServings 2Calories 257kcalAuthor Mathea Ford, RDN, LD, MBAEquipment1 Stockpot1 Vegetable ChopperIngredients1 tablespoon unsalted butter¼ cup onion finely diced2 tablespoon minced garlic½ teaspoon turmeric powder½ cup jasmine rice uncooked¾ cup low sodium chicken stock¼ teaspoon black pepper2 tablespoon fresh parsleyGet ingredients with InstructionsMelt butter in a pot over medium heat. Add onion and garlic and saute for 2 minutes or until fragrant.Add turmeric and rice and stir to combine. Mix together until everything is coated.Add stock and pepper to the pot. Mix to combine and bring to a boil.Cover, reduce heat to low and simmer for 15 minutes covered. Remove from heat and set aside for about 5 minutes before fluffing with a fork.NutritionCalories: 257kcal | Carbohydrates: 43g | Protein: 6g | Fat: 7g | Saturated Fat: 4g | Polyunsaturated Fat: 0.4g | Monounsaturated Fat: 2g | Trans Fat: 0.2g | Cholesterol: 15mg | Sodium: 34mg | Potassium: 230mg | Fiber: 1g | Sugar: 1g | Vitamin A: 514IU | Vitamin C: 9mg | Vitamin D: 0.1µg | Calcium: 45mg | Iron: 1mg | Phosphorus: 104mgCheck Out Our Meal Plans For People With Chronic Kidney Disease (CKD)
The post Garlic Turmeric Rice appeared first on Renal Diet HQ.
February 19, 2025
Greek Turkey Meatballs
Discover how to create delicious, kidney-safe Greek turkey meatballs with minimal effort. Perfect for those seeking simple, nutritious meals that cater to special dietary needs.
Whether you're new to cooking or seeking a reliable recipe to fit your lifestyle, these meatballs take the guesswork out of planning kidney-safe meals, making them a perfect choice for anyone prioritizing both nutrition and simplicity.
Reflecting on my journey as a Registered Dietitian with over 25 years of experience, I've seen firsthand the challenges those with chronic kidney disease (CKD) face, especially through my parentsâ own diagnoses. This Greek turkey meatballs recipe stands out as a product of my dedication to creating meals that are not only delicious but also adhere to kidney-friendly guidelines. Packed with lean protein and flavorful herbs, these meatballs align with current CKD dietary standards, offering a practical and enjoyable way to manage your health without sacrificing taste.

This Greek Turkey Meatballs recipe is ideal for those following a Chronic Kidney Disease (CKD) diet due to its low sodium and phosphorus content. By using lean ground turkey, which is lower in saturated fat compared to beef or pork, the recipe supports heart healthâa critical consideration for individuals with CKD. Additionally, the use of fresh herbs and a creamy, calcium-rich tzatziki sauce adds flavor without relying heavily on salt, making it a delicious and kidney-friendly choice.
If you are a fan of Mediterranean cooking, we have a quinoa salad with vegetables that is delicious, as well as other renal diet salads to go with this delicious kidney friendly turkey entree.
[feast_advanced_jump_to]Ingredients in Greek Turkey MeatballsLooking for a delicious twist on classic meatballs? This Greek turkey meatball recipe combines ground turkey with a medley of Mediterranean flavors, including feta cheese, oregano, and cumin, creating a savory and nutritious dish perfect for any occasion.
 Ground Turkey: The 93% lean ground turkey serves as the main protein and base for the dish, offering a lean but flavorful option for your patties.Panko Breadcrumbs: These light, airy breadcrumbs help bind the meat mixture while adding a delicate crunch to the texture.Red Onion: Pureed or finely chopped, red onion adds a touch of sweetness and a hint of sharpness that complements the turkey.Feta Cheese: Feta is incorporated in small pieces to provide a tangy and salty burst of flavor throughout the patties.Olive Oil: This rich, healthy oil enhances the moisture and adds a Mediterranean flair to the overall dish.Minced Garlic: Garlic is a classic seasoning that brings depth and aromatic intensity to the patties.Egg: The egg acts as a binder, holding the ingredients together and ensuring the patties maintain their shape while cooking.Oregano: A touch of oregano introduces an earthy and slightly minty note, giving the patties a traditional Mediterranean taste.Dried Dill: Dill adds a fresh herby flavor and is an integral part of any Greek-inspired dish.Cumin: This warm spice provides an earthy background that complements the flavors of the turkey and other seasonings.Black Pepper: A pinch of black pepper adds a subtle spicy kick, enhancing all the other flavors in the dish.
For the tzatziki sauce:Plain Greek Yogurt: This thick, creamy base makes the sauce rich and tangy, as well as a perfect complement to the patties.Cucumber: Deseeded and finely chopped, cucumber adds refreshing crunch and coolness to the tzatziki sauce.Dried Dill: Extra dill in the sauce brings a consistent herby taste and adds to the authenticity of the Greek flavor.Minced Garlic: Garlic also features in the sauce, marrying the flavors with the patties and adding depth.Lemon Juice: A splash of lemon juice brightens the sauce, balancing richness with a hint of citrusy tang.Olive Oil: A touch of olive oil helps integrate all the ingredients while enriching the sauce's flavor profile.Black Pepper: Just a bit of black pepper underscores the sauce with a gentle spice while enhancing the fresh flavors.
See recipe card for quantities.
How to Make Greek Turkey MeatballsGet ready to enjoy some delicious Greek flavors with this easy-to-follow recipe for Greek Turkey Meatballs with Tzatziki Sauce!
 Make the tzatziki sauce first. Wrap your diced cucumber in a few paper towels and wring out as much liquid as possible.
 Add your diced cucumber to a large mixing bowl along with the rest of the ingredients for tzatziki sauce and stir until combined.Cover bowl and keep in the refrigerator while you prepare the meatballs.
 Preheat oven to 400'F and line a baking sheet with parchment paper. Make sure the feta cheese is in very very small pieces and the onion is diced very small.Add all ingredients for meatballs into a large bowl and mix them together with your hands. Mix well.
6. Form the mixture into 8 meatballs, about 1.5 in around and place on prepared baking sheet. Place the meatballs into the oven and bake for 15-20 minutes.

7. Serve immediately with tzatziki sauce.
Hint: Feta Choices: Opt for authentic Greek feta cheese made from sheep's milk if possible. Its tangy and creamy profile brings out the best flavors in the meatballs. Be sure the feta is chopped finely to ensure even distribution in each bite.
Substitutions in Greek Turkey MeatballsGreek turkey feta meatballs are a delicious and healthy way to enjoy bold Mediterranean flavors. This dish pairs perfectly with a refreshing homemade tzatziki sauce. With simple ingredients and an easy preparation, these meatballs are a great option for a quick meal or party appetizer.
Reduce Sodium by Limiting Feta: Use a low-sodium or reduced-fat feta cheese alternative to decrease the sodium content in the meatballs.Swap Panko Breadcrumbs with Whole Wheat Flour: Replace the panko breadcrumbs with a small amount of whole wheat flour to maintain meatball texture while lowering phosphorus intake. Variations for Greek Turkey Meatballs
These Greek turkey meatballs are a great option for a satisfying meal while accommodating a variety of dietary needs. Below are some Chronic Kidney Disease (CKD)-friendly variations to further adapt this recipe to individual nutritional requirements.
Lower Sodium Option: Omit the feta cheese or use a reduced-sodium version to significantly decrease the sodium content. Increase the herbs, like adding more oregano or fresh dill, to enhance flavor without the need for added salt.Gluten-Free Adaptation: Replace panko breadcrumbs with a gluten-free alternative or ground oats to ensure this dish fits a gluten-free diet. Ensure all other ingredients are certified gluten-free to avoid traces of gluten.These variations allow you to customize the Greek turkey meatballs while keeping the dish flavorful and suited to specific dietary preferences or restrictions. Enjoy this healthy and delicious meal with your own personal twist!
Storage Tips for Greek Turkey MeatballsTo ensure your Greek turkey meatballs are just as tasty the next day, follow these simple storage tips.
Refrigerator Storage: Once the meatballs have cooled completely, place them in an airtight container and store in the refrigerator. Tzatziki sauce should be stored separately in another airtight container. Both will stay fresh for 3-4 days.Freezer Storage: For longer storage, you can freeze the meatballs. Arrange them on a baking sheet and freeze until solid. Then, transfer them to a freezer-safe bag or container. They can be stored in the freezer for up to 2 months. When you're ready to enjoy, reheat them in the oven at 350°F until warmed through. The tzatziki sauce, however, is best made fresh and doesnât freeze well due to the yogurt base.With these storage tips, even future meals can share in the deliciousness of your homemade Greek turkey meatballs.
Top TipChill for Better Shape: If time permits, chill the meatball mixture in the refrigerator for about 30 minutes before forming the balls. This will make shaping them easier and help them hold together better during baking.
FAQs for Greek Turkey MeatballsHow do you ensure the feta cheese is evenly distributed in the meatballs?To achieve even distribution of feta cheese in the meatballs, make sure the feta is cut into very small pieces, no larger than â
inch. Mix the ingredients well in step 5, ensuring that the small feta pieces are evenly spread throughout the turkey mixture.
After deseeding and finely chopping the cucumber, wrap it in a few paper towels and wring out as much liquid as possible. This step keeps the tzatziki sauce from becoming too watery, ensuring it stays thick and creamy.
Poultry Recipes for Chronic Kidney DiseaseLooking for delicious turkey or chicken recipes like this? Try these:
Healthy Marry Me ChickenChicken and Broccoli with CashewsHawaiian Chicken SaladChicken and Broccoli Pasta BakePairing with Salad RecipesThese are my favorite dishes to serve with Greek turkey meatballs with tzatziki sauce:
Kale and Pomegranate Salad Corn Pasta Salad
 Cornbread Salad
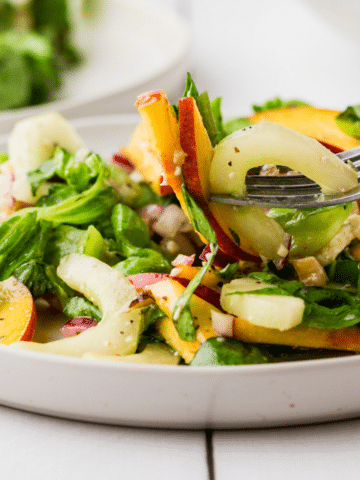 Nectarine Salad
If you tried this Recipe or any other recipe on my website, please please leave a star rating and let me know how it goes in the comments below. I love hearing from you!
Recipe PrintGreek Turkey Meatballs Recipe with Tzatziki Sauce#wprm-recipe-user-rating-0 .wprm-rating-star.wprm-rating-star-full svg * { fill: #343434; }#wprm-recipe-user-rating-0 .wprm-rating-star.wprm-rating-star-33 svg * { fill: url(#wprm-recipe-user-rating-0-33); }#wprm-recipe-user-rating-0 .wprm-rating-star.wprm-rating-star-50 svg * { fill: url(#wprm-recipe-user-rating-0-50); }#wprm-recipe-user-rating-0 .wprm-rating-star.wprm-rating-star-66 svg * { fill: url(#wprm-recipe-user-rating-0-66); }linearGradient#wprm-recipe-user-rating-0-33 stop { stop-color: #343434; }linearGradient#wprm-recipe-user-rating-0-50 stop { stop-color: #343434; }linearGradient#wprm-recipe-user-rating-0-66 stop { stop-color: #343434; }#wprm-recipe-user-rating-0.wprm-user-rating-allowed.wprm-user-rating-not-voted:not(.wprm-user-rating-voting) svg * { fill-opacity: 0.3; }Course Appetizer, Entree, Main CourseCuisine American, MediterraneanDiet Diabetic, Low Calorie, Low SaltPrep Time 15 minutes minutesCook Time 20 minutes minutesServings 2Calories 460kcalAuthor Mathea Ford, RDN, LD, MBAEquipment1 Sheet Pan1 Vegetable Chopper1 Large BowlIngredientsFor the meatballs½ pound ground turkey I used 93% lean3 tablespoon panko breadcrumbs2 tablespoon red onion pureed or chopped very fine2 tablespoon feta cheese into very small pieces with none larger than â
th inch2 tablespoon olive oil1 tablespoon minced garlic1 egg1 teaspoon oregano½ teaspoon dried dill½ teaspoon cumin¼ teaspoon black pepperFor the tzatziki sauce½ cup plain greek yogurt½ cup cucumber deseeded and chopped fine½ teaspoon dried dill1 teaspoon minced garlic1 tablespoon lemon juice1 teaspoon olive oil½ teaspoon black pepperGet ingredients with InstructionsTo Make Tzatziki SauceMake the tzatziki sauce first. Wrap your diced cucumber in a few paper towels and wring out as much liquid as possible.Add your diced cucumber to a large mixing bowl along with the rest of the ingredients for tzatziki sauce and stir until combined.Cover bowl and keep in the refrigerator while you prepare the meatballs.To Make The MeatballsPreheat oven to 400'F and line a baking sheet with parchment paper. Make sure the feta cheese is in very very small pieces and the onion is diced very small.Add all ingredients for meatballs into a large bowl and mix them together with your hands. Mix well.Form the mixture into 8 meatballs, about 1.5 in around and place on prepared baking sheet. Place the meatballs into the oven and bake for 15-20 minutes.Serve immediately with tzatziki sauce.NutritionCalories: 460kcal | Carbohydrates: 19g | Protein: 40g | Fat: 25g | Saturated Fat: 6g | Polyunsaturated Fat: 3g | Monounsaturated Fat: 14g | Trans Fat: 0.03g | Cholesterol: 162mg | Sodium: 415mg | Potassium: 613mg | Fiber: 2g | Sugar: 4g | Vitamin A: 303IU | Vitamin C: 7mg | Vitamin D: 1µg | Calcium: 233mg | Iron: 3mg | Phosphorus: 478mgCheck Out Our Meal Plans For People With Chronic Kidney Disease (CKD)
PrintGreek Turkey Meatballs Recipe with Tzatziki Sauce#wprm-recipe-user-rating-0 .wprm-rating-star.wprm-rating-star-full svg * { fill: #343434; }#wprm-recipe-user-rating-0 .wprm-rating-star.wprm-rating-star-33 svg * { fill: url(#wprm-recipe-user-rating-0-33); }#wprm-recipe-user-rating-0 .wprm-rating-star.wprm-rating-star-50 svg * { fill: url(#wprm-recipe-user-rating-0-50); }#wprm-recipe-user-rating-0 .wprm-rating-star.wprm-rating-star-66 svg * { fill: url(#wprm-recipe-user-rating-0-66); }linearGradient#wprm-recipe-user-rating-0-33 stop { stop-color: #343434; }linearGradient#wprm-recipe-user-rating-0-50 stop { stop-color: #343434; }linearGradient#wprm-recipe-user-rating-0-66 stop { stop-color: #343434; }#wprm-recipe-user-rating-0.wprm-user-rating-allowed.wprm-user-rating-not-voted:not(.wprm-user-rating-voting) svg * { fill-opacity: 0.3; }Course Appetizer, Entree, Main CourseCuisine American, MediterraneanDiet Diabetic, Low Calorie, Low SaltPrep Time 15 minutes minutesCook Time 20 minutes minutesServings 2Calories 460kcalAuthor Mathea Ford, RDN, LD, MBAEquipment1 Sheet Pan1 Vegetable Chopper1 Large BowlIngredientsFor the meatballs½ pound ground turkey I used 93% lean3 tablespoon panko breadcrumbs2 tablespoon red onion pureed or chopped very fine2 tablespoon feta cheese into very small pieces with none larger than â
th inch2 tablespoon olive oil1 tablespoon minced garlic1 egg1 teaspoon oregano½ teaspoon dried dill½ teaspoon cumin¼ teaspoon black pepperFor the tzatziki sauce½ cup plain greek yogurt½ cup cucumber deseeded and chopped fine½ teaspoon dried dill1 teaspoon minced garlic1 tablespoon lemon juice1 teaspoon olive oil½ teaspoon black pepperGet ingredients with InstructionsTo Make Tzatziki SauceMake the tzatziki sauce first. Wrap your diced cucumber in a few paper towels and wring out as much liquid as possible.Add your diced cucumber to a large mixing bowl along with the rest of the ingredients for tzatziki sauce and stir until combined.Cover bowl and keep in the refrigerator while you prepare the meatballs.To Make The MeatballsPreheat oven to 400'F and line a baking sheet with parchment paper. Make sure the feta cheese is in very very small pieces and the onion is diced very small.Add all ingredients for meatballs into a large bowl and mix them together with your hands. Mix well.Form the mixture into 8 meatballs, about 1.5 in around and place on prepared baking sheet. Place the meatballs into the oven and bake for 15-20 minutes.Serve immediately with tzatziki sauce.NutritionCalories: 460kcal | Carbohydrates: 19g | Protein: 40g | Fat: 25g | Saturated Fat: 6g | Polyunsaturated Fat: 3g | Monounsaturated Fat: 14g | Trans Fat: 0.03g | Cholesterol: 162mg | Sodium: 415mg | Potassium: 613mg | Fiber: 2g | Sugar: 4g | Vitamin A: 303IU | Vitamin C: 7mg | Vitamin D: 1µg | Calcium: 233mg | Iron: 3mg | Phosphorus: 478mgCheck Out Our Meal Plans For People With Chronic Kidney Disease (CKD)The post Greek Turkey Meatballs appeared first on Renal Diet HQ.
How to Manage Chronic Itching (Pruritus) in CKD-Podcast

If you or a loved one has Chronic Kidney Disease (CKD), you may have experienced one of its most frustrating symptomsâchronic itching, also known as pruritus. This persistent itch can significantly affect your comfort and quality of life. But why does it happen, and what can you do to manage it?
In this post, weâll explore the common causes of itching in CKD and share practical tips to help soothe your skin, from hydration and skincare to dietary adjustments and medical treatments.
For More Recipes and Ideas --->> Get Your Free Meals and Recipes That Are Perfect for Pre-Dialysis Diets, Pre-Dialysis with Diabetes, or Dialysis Diets.
Why Does Itching Happen in CKD?Chronic itching in CKD can occur for several reasons:Buildup of Waste Products â When the kidneys arenât functioning properly, toxins that would normally be filtered out remain in the blood. This buildup can irritate the skin and cause itching.Imbalances in Minerals and Hormones â High phosphorus levels and certain hormonal changes associated with CKD can contribute to itching.Dry Skin â People with CKD often experience excessive dryness, which can make itching even worse. Keeping the skin well-moisturized is essential for relief.Skincare Tips to Reduce Itching1. Keep Your Skin HydratedDry skin is one of the leading causes of itching in CKD, so keeping it moisturized is crucial. Hereâs how:Use a gentle, fragrance-free moisturizer at least once or twice a day.Apply moisturizer immediately after showering while your skin is still damp to help lock in moisture.2. Choose Gentle Bathing MethodsHarsh soaps and hot water can strip the skin of its natural oils, making dryness and itching worse. Instead:Take lukewarm showers instead of hot baths.Use mild, fragrance-free soaps or body washes to avoid irritation.After bathing, gently pat your skin dry with a soft towel rather than rubbing it.Managing Phosphorus LevelsHigh phosphorus levels can contribute to itching, so managing your diet is key. Hereâs what you can do:Take phosphate binders as prescribed by your doctor.Limit high-phosphorus foods like dairy products, dark sodas, and processed foods.Stick to your recommended dietary guidelines to help control phosphorus levels and reduce itching.Medications for CKD-Related ItchingIf your itching is severe, certain medications may help. Speak to your healthcare provider about:Antihistamines â These can sometimes provide relief from itching.Prescription treatments for CKD-related pruritus â Your doctor may recommend specific therapies designed to target CKD-related itching.Staying Cool and ComfortableEnvironmental factors can also influence itching. To stay comfortable:Wear loose, breathable fabrics like cotton to minimize skin irritation.Keep your home at a cool temperatureâoverheating can make itching feel worse.When to Talk to Your DoctorChronic itching is more than just an annoyanceâit can have a real impact on your daily life. If youâre struggling with persistent itching, talk to your doctor. They can help determine whether itâs caused by mineral imbalances, dry skin, or another underlying factor.
Managing CKD-related itching involves a combination of skincare, dietary management, lifestyle adjustments, and medical guidance. By keeping your skin hydrated, monitoring your phosphorus intake, and seeking medical advice when necessary, you can reduce discomfort and improve your quality of life.
If you found this information helpful, share it with others who may be dealing with CKD and check back for more kidney health tips!
Learn more about Can Yoga Help CKD? Heres What You Need to Know-Podcast
The post How to Manage Chronic Itching (Pruritus) in CKD-Podcast appeared first on Renal Diet HQ.
February 14, 2025
Can Yoga Help CKD? Heres What You Need to Know-Podcast

Exercise is crucial for everyone, but it becomes even more important for individuals with Chronic Kidney Disease (CKD). Regular physical activity helps maintain overall health and can even improve kidney function by promoting circulation and reducing strain on the body. Yoga has gained popularity among CKD patients as a gentle yet effective form of exercise that enhances both physical and mental well-being.
For More Recipes and Ideas --->> Get Your Free Meals and Recipes That Are Perfect for Pre-Dialysis Diets, Pre-Dialysis with Diabetes, or Dialysis Diets.
Yoga combines physical postures, breathing exercises, and meditation, offering a holistic approach to health. According to the National Institutes of Health, yoga originated from ancient Indian philosophy and is widely used today to improve health, manage chronic conditions, and relieve stress. In this guide, we will explore the benefits of yoga for CKD patients, different styles of yoga, essential safety tips, and modifications to ensure a safe and effective practice.
The Benefits of Yoga for CKD PatientsPhysical BenefitsEnhances balance, strength, flexibility, and coordination.Improves posture and blood circulation, which supports kidney function.Reduces fatigue and boosts energy levels, making it easier to stay active.Restorative yoga poses can be especially helpful for CKD patients, as they provide gentle movement without excessive strain, improving both physical function and overall vitality.
Mental Health BenefitsAlleviates symptoms of depression and anxiety, which are common among CKD patients.Helps individuals stay calm and relaxed during medical treatments and appointments.Incorporates mindfulness and meditation, reducing stress and promoting emotional well-being.Yoga fosters a mind-body connection that supports overall health, making it an excellent practice for managing CKD symptoms holistically.
Different Types of Yoga for CKD PatientsThere are several styles of yoga, each offering unique benefits. CKD patients should choose a practice that aligns with their physical abilities and wellness goals.
Hatha Yoga: Focuses on postures and breathing techniques to improve physical and mental well-being.Vinyasa Flow: A dynamic style that links breath with movement, increasing circulation and energy.Restorative Yoga: Uses supported poses to promote deep relaxation and stress relief, ideal for CKD patients.Yin Yoga: Involves gentle stretching and long-held poses, improving flexibility and reducing tension without intense exertion.Safety Tips for Practicing Yoga with CKDTo ensure a safe and beneficial yoga experience, CKD patients should follow these essential precautions:
Consult with Your Doctor: Before beginning any exercise routine, check with your healthcare provider to confirm that yoga is safe for your condition.Choose an Instructor Who Can Modify Poses: An experienced instructor can help adapt movements to fit your physical limitations.Use Props for Support: Blocks, straps, and chairs can make poses more accessible and comfortable.Listen to Your Body: Stop immediately if you experience discomfort, dizziness, shortness of breath, or pain.Be Mindful of Swelling: If you notice swelling, particularly in the ankles, adjust your stretches to avoid discomfort or injury.Yoga Modifications for Different CKD StagesStages 1â2 (Mild CKD)Focus on gentle stretches, low-impact movements, and calming breathing exercises.Consider light activities like walking or swimming for additional cardiovascular benefits.Stages 3â4 (Moderate to Severe CKD)Practice strengthening poses slowly with attention to how your body feels.Use props like blocks or straps for balance and stability.Take frequent rest breaks to avoid overexertion.Stage 5 & Dialysis PatientsPrioritize restorative yoga, breath awareness, and stress management techniques.Seated meditation can help reduce anxiety and improve overall well-being.Focus on gentle stretches and deep breathing to alleviate anxiety associated with treatments.Yoga Poses to Avoid with CKDWhile yoga offers many benefits, certain poses should be avoided to prevent complications:
Inversions (Headstands, Handstands, Shoulder Stands): These can increase blood pressure and cause instability.Poses That Cause Shortness of Breath: Rapid breathing can reduce oxygen levels and create discomfort.Standing Poses (Warrior II, Triangle Pose): These may cause balance issues due to muscle weakness from CKD. Modifications, such as using a chair or blocks, can help make these poses safer.Restorative poses are often the best option, as they provide relaxation and flexibility without unnecessary strain.
Additional Benefits of Yoga for CKD ManagementReduces Blood Pressure: Studies show yoga helps lower both diastolic and systolic blood pressure.Enhances Kidney Function: Yoga may help lower blood urea and serum creatinine levels, reducing kidney strain.Alleviates Stress and Depression: Mindfulness techniques in yoga promote relaxation and a positive outlook.Improves Circulation and Reduces Fluid Retention: Gentle movement helps flush out toxins and improve blood flow.Supports Digestion and Blood Sugar Control: Beneficial for diabetic CKD patients, yoga increases glucose use in muscles.The Role of Meditation and VisualizationMeditation and visualization techniques can enhance the benefits of yoga for CKD patients. These practices:
Promote relaxation and mental clarity, reducing stress levels.Improve symptoms like fatigue, insomnia, and overall discomfort.Encourage a positive mindset and motivation for managing CKD.Enhance physical relaxation, helping to ease pain and breathlessness.Regular practice of meditation and visualization fosters a deeper connection with the bodyâs healing process, supporting long-term well-being.
Yoga is a safe, adaptable, and highly beneficial exercise for individuals with CKD. Its physical and mental health benefits make it a valuable addition to CKD management. However, safety should always come first. Consult with your doctor, listen to your body, and choose yoga styles that fit your health needs.
Incorporating yoga into your daily routine can improve flexibility, reduce stress, and enhance overall well-being. Whether your goal is to boost energy, relieve anxiety, or simply create a moment of peace in your day, yoga can be a transformative tool in your CKD journey.
Embrace yoga as part of a holistic lifestyle approach alongside a kidney-friendly diet, and enjoy the benefits it brings to your health and quality of life.
Learn more about When should someone with CKD consider a Kidney Transplant-Podcast
The post Can Yoga Help CKD? Heres What You Need to Know-Podcast appeared first on Renal Diet HQ.


