
Marina Delio's Blog, page 40
September 26, 2013
One Ingredient Grape Sorbet Recipe
Grape sorbet is a healthy, naturally sweet, and almost instant dessert made by blending frozen grapes.
[image error]

Ever since I was a little girl, frozen grapes have been one of my favorite desserts. My girls love them now too. I was telling a friend the other day that grapes become incredibly sweet and the texture inside is like a little bite of sorbet. Then I started thinking... what if I blended these little sorbet bites into an ice cream-like treat! I wasn't sure this was actually going to work.
[image error] I tossed some of our frozen grapes in the food processor and blended away until there were not any more grape skin chunks. Delicious! But would the kids go for it?
Keep reading for the recipe!
CONTINUE READING THIS POST »


Ever since I was a little girl, frozen grapes have been one of my favorite desserts. My girls love them now too. I was telling a friend the other day that grapes become incredibly sweet and the texture inside is like a little bite of sorbet. Then I started thinking... what if I blended these little sorbet bites into an ice cream-like treat! I wasn't sure this was actually going to work.
[image error]
I tossed some of our frozen grapes in the food processor and blended away until there were not any more grape skin chunks. Delicious! But would the kids go for it?Keep reading for the recipe!
CONTINUE READING THIS POST »


September 16, 2013
Homemade Protein Bars
[image error]
Two recipes for protein bars. Homemade protein bars with hemp and chia seeds are a tasty, healthy, and frugal alternative to store bought protein bars.

[image error]
Yummy Hubby is training for a century cycling race. Yes, that's one HUNDRED miles.
He had asked me to pick up some protein bars he could take on his long rides or to have right after. I always try to have a green protein smoothie within 30 minutes of my own workouts to build muscle, but that's not always convenient. I usually avoid protein bars because they often have added junky ingredients, excessive sugar, and are very processed. Not to mention the cost! At $1 to $3 per bar, I noticed my grocery bill increasing with Mr. Yummy Mummy's protein bar consumption. So it was time to make them myself. I've made these homemade protein bars several times this week because they went so quickly. I grabbed a couple of protein balls for myself as I ran out the door with the girls for school, not having time for breakfast. They are great for active kids who need energy for sports too.
 The great thing about making your own food is that YOU are the quality control manager. YOU can choose the sweetener you like - brown rice syrup, coconut nectar, stevia, honey. YOU can choose to use organic peanut butter (peanuts are heavily sprayed with pesticides FYI) or gluten-free oats.
Continue reading for the recipes!
CONTINUE READING THIS POST »


Two recipes for protein bars. Homemade protein bars with hemp and chia seeds are a tasty, healthy, and frugal alternative to store bought protein bars.
[image error]
Yummy Hubby is training for a century cycling race. Yes, that's one HUNDRED miles.
He had asked me to pick up some protein bars he could take on his long rides or to have right after. I always try to have a green protein smoothie within 30 minutes of my own workouts to build muscle, but that's not always convenient. I usually avoid protein bars because they often have added junky ingredients, excessive sugar, and are very processed. Not to mention the cost! At $1 to $3 per bar, I noticed my grocery bill increasing with Mr. Yummy Mummy's protein bar consumption. So it was time to make them myself. I've made these homemade protein bars several times this week because they went so quickly. I grabbed a couple of protein balls for myself as I ran out the door with the girls for school, not having time for breakfast. They are great for active kids who need energy for sports too.
The great thing about making your own food is that YOU are the quality control manager. YOU can choose the sweetener you like - brown rice syrup, coconut nectar, stevia, honey. YOU can choose to use organic peanut butter (peanuts are heavily sprayed with pesticides FYI) or gluten-free oats. Continue reading for the recipes!
CONTINUE READING THIS POST »
September 5, 2013
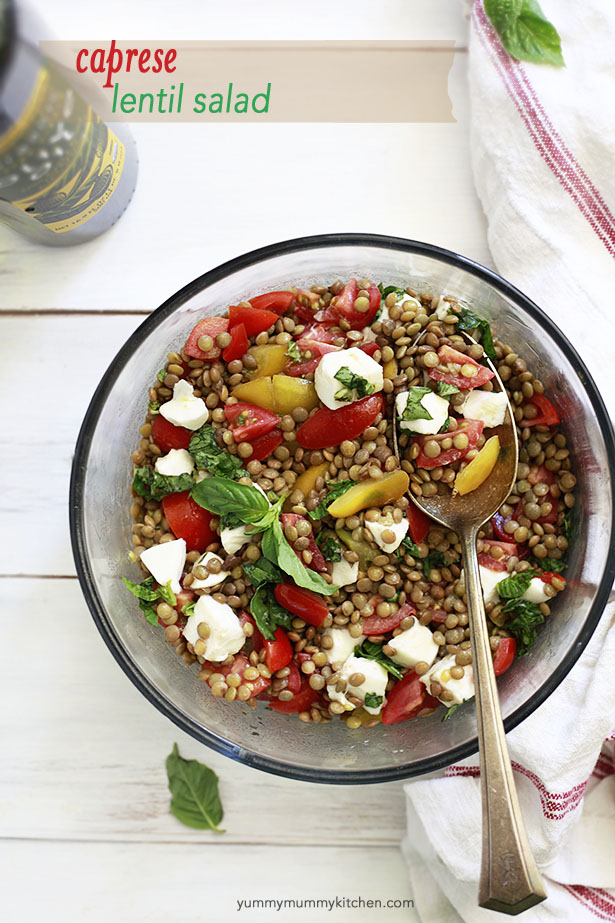
Caprese Lentil Salad Recipe
[image error]
A healthy and satisfying lentil salad with the classic flavors of Caprese.
 Holy heat wave! As I type this, at 9 PM, it is 87 degrees F inside our house. No, we don't have AC. Which makes me very sad. And very tired since the kids aren't sleeping well. And very sweaty. Sorry.
But this hearty salad makes me very happy. I've been craving cool, refreshing, healthy meals that I can just pull out of the fridge whenever I get a chance to eat. One of my favorite ways to ensure healthy eating is to have healthy prepared recipes like this one in the fridge. I don't usually love lentil salads, but I do love how nutritious they are. Lentils are a great source of vegetarian protein, iron, folate, fiber, and vitamins and minerals. So I decided to pair lentils with a no-fail combination - Caprese. Tomatoes, mozzarella, and basil. Always yummy.

This salad holds up very well and would be great packed in lunches.
More after the break!
CONTINUE READING THIS POST »
September 3, 2013
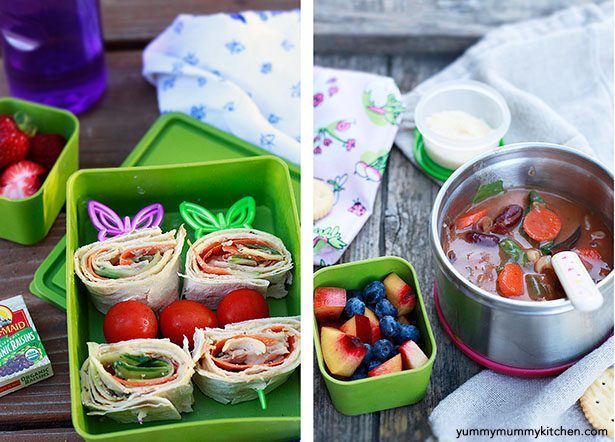
September Lunchbox Ideas
[image error]

We made it through the first week of school! As you know, I was nervous about 5 days a week of school starting early in the morning, now that we have a big kindergartner. But it was actually really easy and fun! Although the kids are back in school, the first day of Autumn isn't until September 22nd. The weather here is hotter than it's been all summer, and the produce is still in summer mode. Keep enjoying fresh berries, stone fruit, tomatoes, watermelon, cucumber and summer squash this month, as it won't be around long.
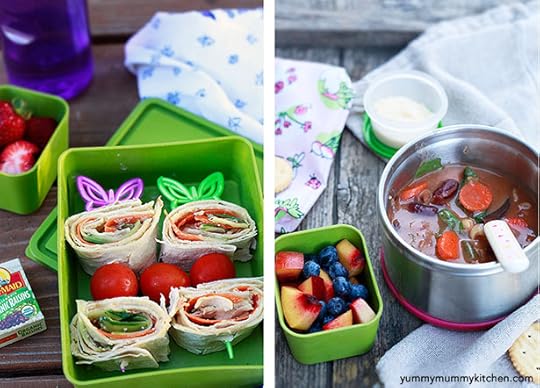
Here's what I packed in my kids' lunchboxes last week using seasonal organic produce. Everything is quick and easy to make, plant based, and easy to make gluten free. I hope it will give you some ideas. Because personally, I can always use more lunch ideas.
Be sure to pack an ice pack with these lunches to keep them fresh.
1. Egg Salad Lettuce Wraps, Watermelon, and Rice Crackers
*If the lettuce wrap is too "green" for your kids, you could try egg salad with crackers or half a croissant (for a much more decadent and non-gluten-free option).
Instructions: Boil eggs the night before. Make egg salad, wrap in one or two green lettuce leaves and close with a pick.
2. Chopped Romaine Salad, Grilled Corn & Cherry Tomato Kabobs, Half Avocado, "Ants on a Log," and Grapes
Instructions: Peel corn and char in a frying pan or grill pan coated with cooking spray over medium-high heat. Cool and cut into pieces, crosswise. Skewer with tomatoes or just lay over a bed of greens. Add a small container of favorite salad dressing on the side. Cut an avocado in half lengthwise. Sprinkle with a little salt and squeeze a drop or two of lime juice over the top to prevent browning. Some drained and rinsed black or kidney beans would be great in here too.
3. PB&J or Sunbutter Roll-ups, Carrots and Celery, Watermelon, and Yogurt.
Instructions: Makes two wraps. Please take nut allergies seriously and only use peanut butter if there are no nut-allergies in your child's class. Spread PB or Sunbutter and jam over lavash or a gluten-free tortilla. Place banana over, and roll up. Pack whole, or cut into pieces. Younger kids usually have an easier time holding and eating these in one long piece. Pack the fruit and veggies in separate compartments. I pack a frozen yogurt, such as Chobani Champions (check the ingredients don't include carrageenan).
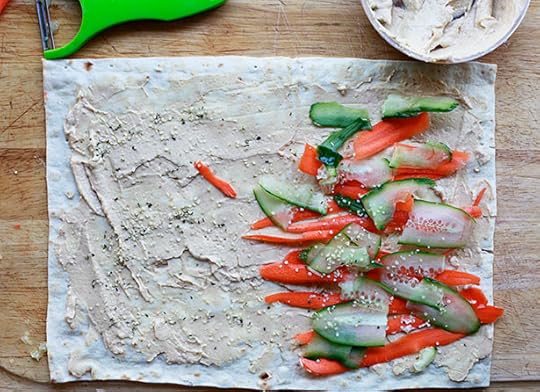
4. Wraps with Hummus, Cucumber and Carrot Ribbons, and Hemp Seeds, Cherry Tomatoes, Strawberries, and Raisins.
Instructions: Makes wraps for 2 kids. Spread hummus over lavash or gluten-free tortilla. Use a vegetable peeler to make ribbons of cucumber and carrot. Lay cucumber and carrot ribbons over one side of the hummus and sprinkle with hemp seeds for extra protein, if using. Roll tightly starting on the short side over the veggies. Want more in there? Fresh mozzarella, avocado, lettuce, and tomato are all delicious additions.
5. Minestrone Soup with Parmesan Cheese, Nectarines and Blueberries, and Crackers.
Instructions: My girls love soup and it's a great way to get kids to eat their veggies. Usually when I make soup I will make a big batch and freeze extra for lunches. Since it's summer and I didn't have any frozen so I used a box (gasp!) of organic minestrone soup from Whole Foods. My kids especially love the pre-made Minestrone from Trader Joe's. When using store-bought, I like to "freshen it up" by throwing in some fresh chopped veggies, herbs, or spinach before heating. Heat the soup and then pour it into a hot food container and close tightly. Pack a small container of Parmesan, crackers, and fruit.
Some of the lunch packing supplies I use can be found here: Amazon Lunchbox Store
If you would like a printable grocery list of the ingredients used in these lunches, I've made one for you here.
[image error]


We made it through the first week of school! As you know, I was nervous about 5 days a week of school starting early in the morning, now that we have a big kindergartner. But it was actually really easy and fun! Although the kids are back in school, the first day of Autumn isn't until September 22nd. The weather here is hotter than it's been all summer, and the produce is still in summer mode. Keep enjoying fresh berries, stone fruit, tomatoes, watermelon, cucumber and summer squash this month, as it won't be around long.
Here's what I packed in my kids' lunchboxes last week using seasonal organic produce. Everything is quick and easy to make, plant based, and easy to make gluten free. I hope it will give you some ideas. Because personally, I can always use more lunch ideas.
Be sure to pack an ice pack with these lunches to keep them fresh.
1. Egg Salad Lettuce Wraps, Watermelon, and Rice Crackers
*If the lettuce wrap is too "green" for your kids, you could try egg salad with crackers or half a croissant (for a much more decadent and non-gluten-free option).
Instructions: Boil eggs the night before. Make egg salad, wrap in one or two green lettuce leaves and close with a pick.
2. Chopped Romaine Salad, Grilled Corn & Cherry Tomato Kabobs, Half Avocado, "Ants on a Log," and Grapes
Instructions: Peel corn and char in a frying pan or grill pan coated with cooking spray over medium-high heat. Cool and cut into pieces, crosswise. Skewer with tomatoes or just lay over a bed of greens. Add a small container of favorite salad dressing on the side. Cut an avocado in half lengthwise. Sprinkle with a little salt and squeeze a drop or two of lime juice over the top to prevent browning. Some drained and rinsed black or kidney beans would be great in here too.
3. PB&J or Sunbutter Roll-ups, Carrots and Celery, Watermelon, and Yogurt.
Instructions: Makes two wraps. Please take nut allergies seriously and only use peanut butter if there are no nut-allergies in your child's class. Spread PB or Sunbutter and jam over lavash or a gluten-free tortilla. Place banana over, and roll up. Pack whole, or cut into pieces. Younger kids usually have an easier time holding and eating these in one long piece. Pack the fruit and veggies in separate compartments. I pack a frozen yogurt, such as Chobani Champions (check the ingredients don't include carrageenan).
4. Wraps with Hummus, Cucumber and Carrot Ribbons, and Hemp Seeds, Cherry Tomatoes, Strawberries, and Raisins.
Instructions: Makes wraps for 2 kids. Spread hummus over lavash or gluten-free tortilla. Use a vegetable peeler to make ribbons of cucumber and carrot. Lay cucumber and carrot ribbons over one side of the hummus and sprinkle with hemp seeds for extra protein, if using. Roll tightly starting on the short side over the veggies. Want more in there? Fresh mozzarella, avocado, lettuce, and tomato are all delicious additions.

5. Minestrone Soup with Parmesan Cheese, Nectarines and Blueberries, and Crackers.
Instructions: My girls love soup and it's a great way to get kids to eat their veggies. Usually when I make soup I will make a big batch and freeze extra for lunches. Since it's summer and I didn't have any frozen so I used a box (gasp!) of organic minestrone soup from Whole Foods. My kids especially love the pre-made Minestrone from Trader Joe's. When using store-bought, I like to "freshen it up" by throwing in some fresh chopped veggies, herbs, or spinach before heating. Heat the soup and then pour it into a hot food container and close tightly. Pack a small container of Parmesan, crackers, and fruit.
Some of the lunch packing supplies I use can be found here: Amazon Lunchbox Store
If you would like a printable grocery list of the ingredients used in these lunches, I've made one for you here.
[image error]
August 30, 2013
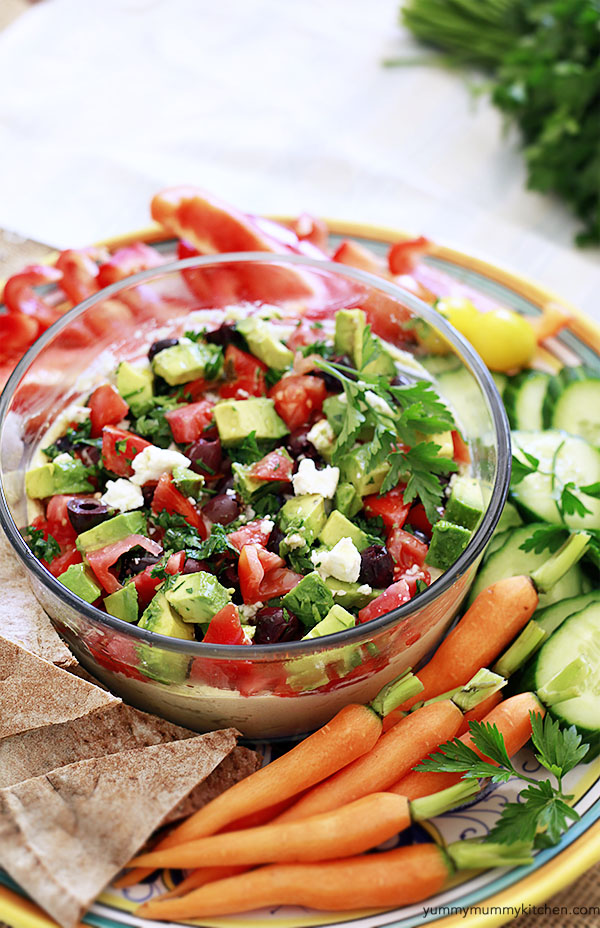
Loaded Hummus Recipe
[image error]

Last weekend we went to a glorious end-of-summer BBQ filled with friends, great food, clothed kids jumping in the pool, s'mores and wine at our friend, Holley's house. I was asked to bring an appetizer to share. After a summer of gloomy fog-filled mornings, the weather has finally been H.O.T. here in Santa Barbara the past week. So I needed something cool, and since all my friends are health nuts (I say this lovingly and include myself here) I needed something fresh and healthy. I think I was still in Grecian la la land after swooning over Slim Paley's beautiful adventures in Greece.

Keep reading for the rest of the post and recipe!
CONTINUE READING THIS POST »


Last weekend we went to a glorious end-of-summer BBQ filled with friends, great food, clothed kids jumping in the pool, s'mores and wine at our friend, Holley's house. I was asked to bring an appetizer to share. After a summer of gloomy fog-filled mornings, the weather has finally been H.O.T. here in Santa Barbara the past week. So I needed something cool, and since all my friends are health nuts (I say this lovingly and include myself here) I needed something fresh and healthy. I think I was still in Grecian la la land after swooning over Slim Paley's beautiful adventures in Greece.
Keep reading for the rest of the post and recipe!
CONTINUE READING THIS POST »
August 27, 2013
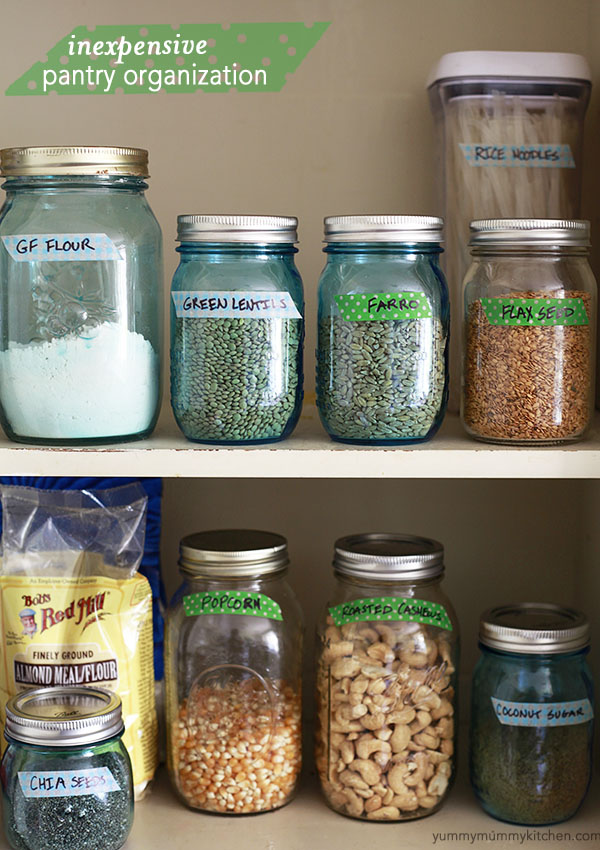
Vintage Jars, Pantry Organization, and a Pfister Giveaway Announcement
[image error]

Whew! I just finished a mini pantry makeover and my pantry ingredients look so much nicer in canning jars labeled with washi tape than they did in plastic bags. Ingredients like these usually come home with me in bulk-bin plastic bags or pre-packaging.Which means there is a high likelihood the ingredients will spill out, they are touching plastic - no BPA thank you very much, and they could quickly go rancid once the package is opened.

I've always loved vintage blue mason jars, but they've been hard to find. Until now. Recently I've spotted new "vintage" canning jars for sale! Wondering where to buy blue mason jars? Cost Plus World Market has a few sizes, and Ball has just come out with a Heritage Collection. I couldn't resist grabbing some both times I found them. My favorite thing to do with these jars is use them as casual flower vases. Remember last year's summer dinner party? I also like to use them for drinks and office supplies.
Keep reading for the rest of the post!
CONTINUE READING THIS POST »


Whew! I just finished a mini pantry makeover and my pantry ingredients look so much nicer in canning jars labeled with washi tape than they did in plastic bags. Ingredients like these usually come home with me in bulk-bin plastic bags or pre-packaging.Which means there is a high likelihood the ingredients will spill out, they are touching plastic - no BPA thank you very much, and they could quickly go rancid once the package is opened.
I've always loved vintage blue mason jars, but they've been hard to find. Until now. Recently I've spotted new "vintage" canning jars for sale! Wondering where to buy blue mason jars? Cost Plus World Market has a few sizes, and Ball has just come out with a Heritage Collection. I couldn't resist grabbing some both times I found them. My favorite thing to do with these jars is use them as casual flower vases. Remember last year's summer dinner party? I also like to use them for drinks and office supplies.
Keep reading for the rest of the post!
CONTINUE READING THIS POST »
August 22, 2013
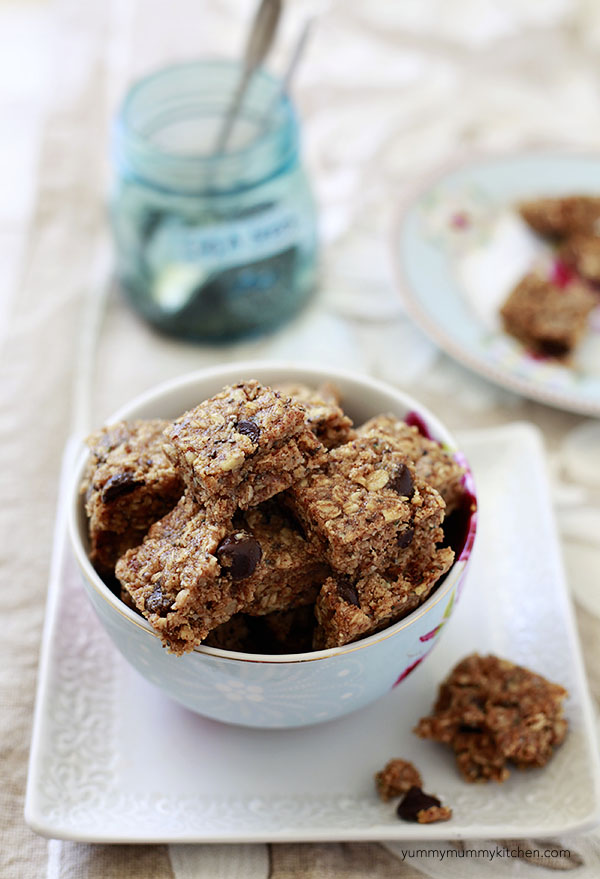
Homemade Cereal Bars Recipe
Homemade cereal grain bars are even tastier than the boxed version, but so much healthier. These are made with oats, flaxseed meal, and honey, and easily made vegan or gluten-free.

My kids love nutrigrain and other fruit cereal bars. At first glance, they look like a healthy easy lunchbox option. Many are even organic. But after looking at the ingredients on the back of the box I decided I could not continue to buy these very often. The long ingredient list is the first red flag. Then comes sugar listed as the first ingredient, gums, maltodextrin (possibly GMO), and carrageenan (a thickening additive thought to cause GI tract problems). So I set out one night to make my own version without any white sugar - just a tablespoon of honey and no white flour - just good, real food ingredients.
Guess what. These homemade grain bars are even tastier than the boxed version! At first I was lazy and used organic store bought jam. They were good. But the second time? AMAZING! I simmered down some fresh blueberries (feel free to use frozen) while I was making the dough. I have been storing these in the fridge and hubby has been taking one to work every day. They will be great for lunchboxes. I'm planning to make another batch soon to freeze for the girls' school snacks and lunches.

Then things got crazy. I thought, hey, why not try some peanut butter and chocolate as the filling for some? Helloooo nutrigrain folks... why have you not done this? These were so yummy warm from the oven, and no sugar other than the choco chips! I was a happy mama having one of these for breakfast the next day.
Keep reading for step-by-step pictures and recipe!
CONTINUE READING THIS POST »
August 21, 2013
How to Make Framed Chalkboard Hooks

Is it normal to go into complete nesting mode right before school starts? Like when you're having a baby and everything has to be perfect and in order? There are some big changes happening over here. For the first time ever, we're entering elementary school. That means school FIVE days a week for our big girl. In the past the girls have been in preschool just a few morning a week. I know she is ready to be a big kindergartner, but am I ready? Ready for waking the kids up early, sticking to a strict schedule, homework, packing lunches every day...
My kindergarten nesting this week manifested itself in creating a space for hanging backpacks (she has a backpack! Not just a little lunchbox - a full blown backpack!) We picked up a few supplies at the craft store and the next day had cute and inexpensive chalkboard wall hooks. And my kindergarten nesting was satisfied. For now. Here's how to make the DIY chalkboards.
 We got 3 wooden frames at Michael's on sale for $1 each, chalkboard paint and white craft paint, and a few hooks from the hardware store. I removed the glass and backs of the frames. My helper and I painted the frames white, and the backs of the frames with the chalkboard paint.

DIY Framed Chalkboard Hooks
Materials:
wood frames (found at craft stores)
2 craft paintbrushes
chalkboard paint
craft paint for the frame (any color you like)
wall hooks (can be found at hardware stores)
chalk
screwdriver
frame mounting hardware
Instructions:
Lay newspaper over your work surface - it's going to get messy.
Remove the glass and board backing of your frames. Discard the glass or store it for later use.
Paint the front of the frames with the craft paint.
Paint the board backing with three coats of chalkboard paint, allowing 30 minutes of drying time between coats.
When all paint is completely dry, place chalkboard painted board into the frame.
After the chalkboard paint has "cured" for 24 hours, rub a piece of chalk over it and wipe off. This will season the board so when you write/draw for the first time it doesn't become permanent.
Use a screwdriver to attach hooks to the frames. Our screws were longer than the frames, so we screwed them right into the wall.
Hang your frames at kid-height if you're using these for little ones like we did.


August 16, 2013
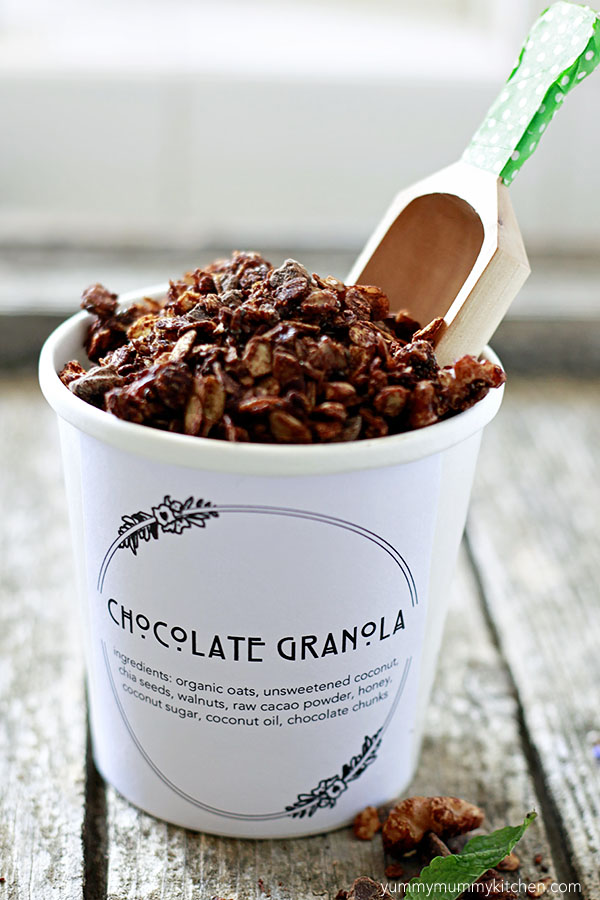
Healthy Chocolate Granola Recipe
Healthy superfood ingredients like raw organic cacao powder, coconut, and chia seeds come together to create a decadent tasting breakfast or snack. Who says you can't have chocolate for breakfast?!

I've made this delicious granola twice in the past week. The first time I made it, planning to send it off to friends as a housewarming gift, it disappeared. Yummy Hubby really loved it. Like, a little too much. So I made the chocolate granola a second time, but was smarter this time a put a "hands off!" sticky note on the container until I had it out of the house.

Chocolate granola is best with cold milk. The milk quickly turns into chocolate milk and reminds me so much of the chocolate rice krispies cereal I only got to have on vacation as a kid for that chocolate milky reason. And that reason only - this one is loaded with nutrients without all the sugar.

Have I mentioned I have horrendous handwriting? Slapping on labels is more my thing. Thank goodness the kindergarten teacher included glue sticks on the supply list! And don't tell my big girl I sneaked her new glue stick from her backpack in the middle of the night. I created this one in Photoshop and you're welcome to print it out and use it. Click here to download the jpg file.
Continue reading for the recipe!
Chocolate Granola
printer friendly recipe
Yield: About 7 cups
Ingredients:
4 Cups rolled oats
1 cup unsweetened shredded coconut (I use Bob’s Red Mill)
1 cup raw walnut halves or pieces (or any nuts you have!)
½ cup chia or flax seeds
½ teaspoon salt (optional)
½ cup, plus 1 tablespoon cacao powder (I use SunfoodOrganic)
1/3 cup melted coconut oil
½ teaspoon vanilla extract
1/3 cup mild tasting honey (agave or maple syrup if vegan)
1/4 cup coconut sugar (or light brown sugar or more honey)
1/4 cup chopped chocolate (optional for extra decadence)
Instructions:
Preheat oven to 325 degrees Fahrenheit.
In a large bowl, stir together the oats, coconut, walnuts,
seeds, and salt. In a medium bowl, whisk together the cacao, coconut oil,
vanilla, honey, and coconut sugar until smooth. Pour cacao mixture over the oat mixture and stir
until oats are coated. I find using two rubber spatulas at the same time to mix
the ingredients works best. If you like your granola very clumpy, add more honey.
Coat one large or two small rimmed baking sheet(s) with
cooking spray or rub with a little more coconut oil. Press granola into the
bottom of the prepared baking sheet and bake for 15 minutes. Stir and bake
another 10-15 minutes. Cool completely in the pan without stirring. Granola
will crisp up, clump, and harden as it cools. Gently stir in chocolate chunks, if desired. Store in an airtight container.
Serve over milk and topped with raspberries or bananas. Yum!
Vegan option:
Use agave syrup or maple syrup instead of the honey. Use only vegan chocolate chips.
Gluten Free option:
Make sure your oats are gluten-free. Oats are naturally gluten-free, but are often contaminated during processing. Also check that the chocolate you use is gf.


I've made this delicious granola twice in the past week. The first time I made it, planning to send it off to friends as a housewarming gift, it disappeared. Yummy Hubby really loved it. Like, a little too much. So I made the chocolate granola a second time, but was smarter this time a put a "hands off!" sticky note on the container until I had it out of the house.
Chocolate granola is best with cold milk. The milk quickly turns into chocolate milk and reminds me so much of the chocolate rice krispies cereal I only got to have on vacation as a kid for that chocolate milky reason. And that reason only - this one is loaded with nutrients without all the sugar.
Have I mentioned I have horrendous handwriting? Slapping on labels is more my thing. Thank goodness the kindergarten teacher included glue sticks on the supply list! And don't tell my big girl I sneaked her new glue stick from her backpack in the middle of the night. I created this one in Photoshop and you're welcome to print it out and use it. Click here to download the jpg file.
Continue reading for the recipe!
Chocolate Granola
printer friendly recipe
Yield: About 7 cups
Ingredients:
4 Cups rolled oats
1 cup unsweetened shredded coconut (I use Bob’s Red Mill)
1 cup raw walnut halves or pieces (or any nuts you have!)
½ cup chia or flax seeds
½ teaspoon salt (optional)
½ cup, plus 1 tablespoon cacao powder (I use SunfoodOrganic)
1/3 cup melted coconut oil
½ teaspoon vanilla extract
1/3 cup mild tasting honey (agave or maple syrup if vegan)
1/4 cup coconut sugar (or light brown sugar or more honey)
1/4 cup chopped chocolate (optional for extra decadence)
Instructions:
Preheat oven to 325 degrees Fahrenheit.
In a large bowl, stir together the oats, coconut, walnuts,
seeds, and salt. In a medium bowl, whisk together the cacao, coconut oil,
vanilla, honey, and coconut sugar until smooth. Pour cacao mixture over the oat mixture and stir
until oats are coated. I find using two rubber spatulas at the same time to mix
the ingredients works best. If you like your granola very clumpy, add more honey.
Coat one large or two small rimmed baking sheet(s) with
cooking spray or rub with a little more coconut oil. Press granola into the
bottom of the prepared baking sheet and bake for 15 minutes. Stir and bake
another 10-15 minutes. Cool completely in the pan without stirring. Granola
will crisp up, clump, and harden as it cools. Gently stir in chocolate chunks, if desired. Store in an airtight container.
Serve over milk and topped with raspberries or bananas. Yum!
Vegan option:
Use agave syrup or maple syrup instead of the honey. Use only vegan chocolate chips.
Gluten Free option:
Make sure your oats are gluten-free. Oats are naturally gluten-free, but are often contaminated during processing. Also check that the chocolate you use is gf.
August 8, 2013
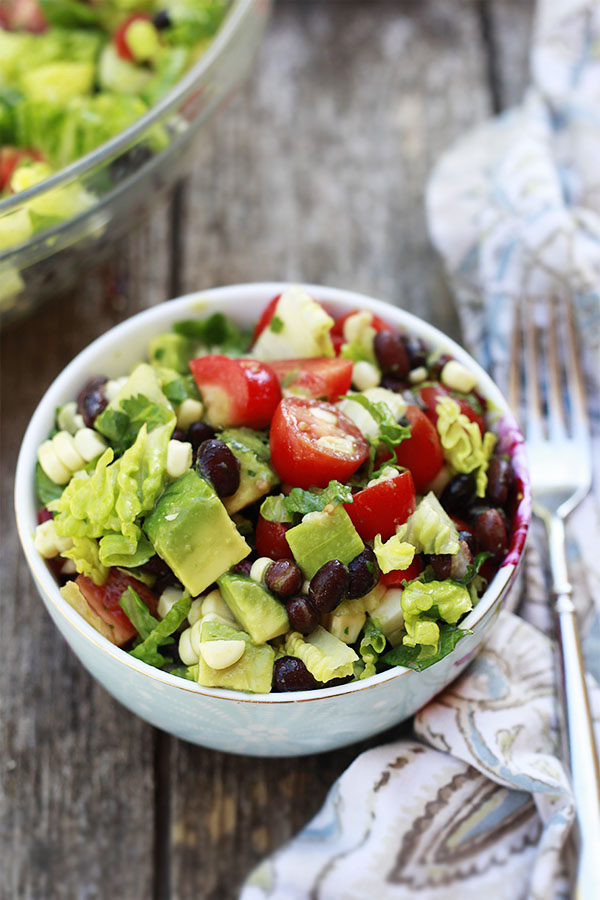
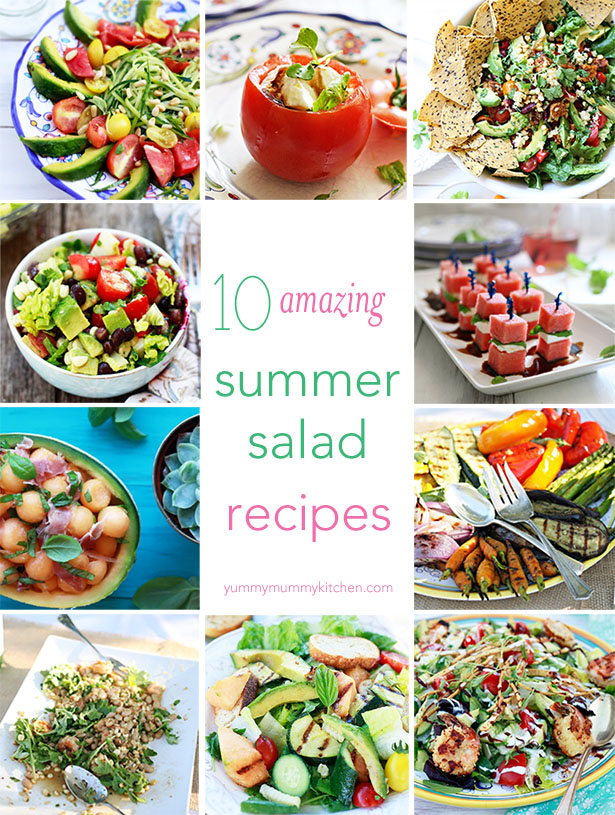
Mexican Salad and 10 Best Summer Salad Recipes
This healthy Mexican salad is packed with flavor and crunch. With beans, corn, tomatoes, avocado, and more, it's like a burrito - salad hybrid. And it's delicious.

I know. I know. A lot of salad recipes lately, right? I promise to share something sweet next. But...
This is it. The salad I cannot stop eating. I have made it three times in the past few weeks. There are salads that you eat delicately, piece by piece. And then there are salads you just shovel in - this one is the latter and I love that about it. It's hearty and fresh and sweet and crunchy all at the same time. The kids also love this one because everything is already bite-sized and the beans and avocado make it guacamole-ish. And who doesn't love something guacamoleish?! I brought this Mexican Salad to two separate Fiesta parties last week and they were a huge hit with all our friends.
This salad makes and excellent side dish, or a main dinner salad. Especially when served over quinoa or with a sprinkle of cheese over the top. We loved this with feta cheese crumbled over the top!

Continue reading for the Mexican Salad recipe and 10 more amazing summer salad recipes!
CONTINUE READING THIS POST »


I know. I know. A lot of salad recipes lately, right? I promise to share something sweet next. But...
This is it. The salad I cannot stop eating. I have made it three times in the past few weeks. There are salads that you eat delicately, piece by piece. And then there are salads you just shovel in - this one is the latter and I love that about it. It's hearty and fresh and sweet and crunchy all at the same time. The kids also love this one because everything is already bite-sized and the beans and avocado make it guacamole-ish. And who doesn't love something guacamoleish?! I brought this Mexican Salad to two separate Fiesta parties last week and they were a huge hit with all our friends.
This salad makes and excellent side dish, or a main dinner salad. Especially when served over quinoa or with a sprinkle of cheese over the top. We loved this with feta cheese crumbled over the top!
Continue reading for the Mexican Salad recipe and 10 more amazing summer salad recipes!
CONTINUE READING THIS POST »


![[image error]](http://www.pinterest.com/pin/create/button/?url=http%3A%2F%2Fwww.yummymummykitchen.com%2F2013%2F09%2Fone-ingredient-grape-sorbet-recipe.html&media=http%3A%2F%2Ffarm8.staticflickr.com%2F7384%2F9957787544_f4da486307_o.jpg&description=One%20Ingredient%20Grape%20Sorbet%20on%20Yummy%20Mummy%20Kitchen)
![[image error]](http://pinterest.com/pin/create/button/?url=http%3A%2F%2Fwww.yummymummykitchen.com%2F2013%2F09%2Fcaprese-lentil-salad-recipe.html&media=http%3A%2F%2F1.bp.blogspot.com%2F-YpVaqtQz85k%2FUilbfy_2-zI%2FAAAAAAAA1CQ%2F84ElPbG5bpY%2Fs1600%2Flentils.jpg&description=Lentil%20Caprese%20Salad%20Recipe%20on%20Yummy%20Mummy%20Kitchen)
![[image error]](http://pinterest.com/pin/create/button/?url=http%3A%2F%2Fwww.yummymummykitchen.com%2F2013%2F09%2Fseptember-lunchbox-ideas.html&media=http%3A%2F%2F2.bp.blogspot.com%2F-eZFpUdmoyAM%2FUiJevSKLaoI%2FAAAAAAAA1Bc%2F_ESS-rbQEuA%2Fs1600%2Flate%2Bsummer%2Blunches.jpg&description=Healthy%20Kids%20Lunchbox%20Ideas%20on%20Yummy%20Mummy%20Kitchen%20)