Lynn Demarest's Blog
August 2, 2024
My New Substack is Finally Here
Check out my new substack at https://lynndemarest.substack.com
So far, I’m planning on serializing The Soul Gene there. Right now, it has a few of the chapters that read OK as short stories.
I’ll probably post short stories I’ve written here, too. They’ll be released in a book eventually, but they’ll always be free on the substack.
If you find any errors, please submit comments to let me know and I’ll make the change before the collection of short stories is published.
Thank you!


December 8, 2023
Activating a Cable Modem/Router with the Xfinity App
To save a couple coins, I decided to buy my own cable modem/router instead of paying rent to Comcast every month.
The modem worked well — it was one of those approved by Comcast (an Arris G36) — but I soon discovered that I could not get some channels on my streaming devices — IPhone, Kindle Fire, IPad, PCs.
All the TVs worked fine, and internet browsing worked for the most part, but when I tried to view CBS, PBS and a variety of other channels on the Xfinity Stream app, the WATCH button was disabled and, above it, there was a message telling me I needed to connect to my in-home wifi because of contract restrictions blah blah blah.
Of course I was connected to my home router. Problem was, Xfinity didn’t know that because I’d neglected to tell Xfinity that my new router was my “in-home” router. Because of the oversight, Xfinity assumed my new router was a random wifi hotspot, as if I were down at the Starbucks. And CBS and others for some reason decided it didn’t want to grant access unless I was at home.
The problem was fixed by simply telling Xfinity about my new modem. This was accomplished by downloading the Xfinity App to my IPhone and activating the new modem, as described here:
https://www.xfinity.com/support/articles/xfinity-app-activation
The one tricky bit is that the instructions above mention a CM MAC “number” that is supposed to be found on the modem’s info sticker. Problem is, my modem didn’t have such a number. After trial and error, I found that the HFC MAC code — which includes letters and numbers — worked.
In retrospect, the solution was simple and made me feel stupid once I’d found it. This is so often the case with computer stuff.
Final Note: I am dismayed that Comcast technical support failed to recognize the issue immediately. I’m certainly not the only customer who has failed to activate a new modem! And why didn’t the tech who visited check whether the modem was activated? It appears that Comcast’s customer service reputation is perhaps well deserved.
August 17, 2023
“The Soul Gene” joins Alison Nissen and the Florida Writer Podcast
I’m pleased to announce the latest podcast featuring The Soul Gene.
Alison Nissen is passionate about stories and believes everyone has a story worth sharing. As an award-winning author, blogger, podcaster, and co-founder of Revel Coach, she finds inspiration in helping others identify their purpose. Alison is an accomplished public speaker, hosts the Florida Writer Podcast and co-hosts Revel Coach’s Revel Coach+ Podcast, where each week, she and her partner (and sister) interview individuals who are changing the world. In her journey from college professor and author to entrepreneur and coach, Alison has built an audience through storytelling. Now, she shares her lessons with others.
Hear it here: https://tinyurl.com/soulgeneradio2
Thank you Alison!
May 9, 2023
“The Soul Gene” to be On the Air in Sarasota, Florida
Exciting News!
Tune in to WSLR 96.5 this Friday at 9 AM ET to hear me chat with neurologist Dr. Steve Norris, of Surreal News, about The Soul Gene, my novel, which explores how reincarnation might be proved scientifically.
If you’d rather not wait until Friday, you can hear the interview now by clicking this image.

Click the image below to visit The Soul Gene at Amazon.com:

July 15, 2021
Using Chocolatey Package Manager
Chocolatey is a package manager for Windows, much like apt-get on linux. Like all package managers, it allows you to easily install and upgrade applications. Note that not all applications are available, but many are.
Here’s how to use it.
Install the chocolatey package managerOpen powershell as administrator and execute:Set-ExecutionPolicy Bypass -Scope Process -Force; [System.Net.ServicePointManager]::SecurityProtocol = [System.Net.ServicePointManager]::SecurityProtocol -bor 3072; iex ((New-Object System.Net.WebClient).DownloadString('https://chocolatey.org/install.ps1'))Create a config file.
Create a folder and create in it a new file called choco.config containing the packages you want to install.
To find available apps, go to https://community.chocolatey.org/pack... or try executing
choco find [name]Here's a sample config file:
Process the config file choco install choco.config -y
The “y” lets the script run without pausing for prompts.
Here’s the output:
See the log for details (C:\ProgramData\chocolatey\logs\chocolatey.log).Installed:
nodejs v16.5.0
git.install v2.32.0.2
vscode.install v1.58.2
kb3033929 v1.0.5
postman v8.7.0
chocolatey-vscode.extension v1.1.0
selenium v3.141.59
visualstudio2019community v16.10.2.0
dotnet4.5.2 v4.5.2.20140902
notepadplusplus v8.1.1
beyondcompare v4.3.7.25118
firefox v89.0.2
dotnetfx v4.8.0.20190930
nodejs.install v16.5.0
kb2999226 v1.0.20181019
7zip v19.0
googlechrome v91.0.4472.124
sysinternals v2021.6.24
notepadplusplus.install v8.1.1
vscode v1.58.2
kb2919442 v1.0.20160915
7zip.install v19.0
vscode-prettier v8.0.1
kb3035131 v1.0.3
kb2919355 v1.0.20160915
git v2.32.0.2
chocolatey-windowsupdate.extension v1.0.4
chocolatey-core.extension v1.3.5.1
chocolatey-visualstudio.extension v1.9.0
chocolatey-dotnetfx.extension v1.0.1
visualstudio-installer v2.0.1
PS C:\coding\chocolatey>
That’s it. All of the applications now are installed.
4. To upgrade (not update!) all installed packages,
— END —
March 21, 2021
.Net Core 3.1 CORS
Cross Origin Resource Sharing centers on the fact that modern browsers won’t accept data from foreign servers unless the server expressly allows it. The browser considers foreign servers to be any server except the one from which the page originally came. The difference can be in any part of the “origin,” or the first part of the URL, concluding with the port.
https vs. httpdomain or subdomain — sub.mydomain.com is different from www.mydomain.comport — mydomain.com:1000 is different from mydomain.com:1001For example, when an Angular application served from https://mydomain.com wants to log into an authentication server at https://auth.mydomain.com, it has got to ask first. From the point of view of the Angular app, this is all done behind the scenes. Of course the server has to be ready to respond to the request for access.
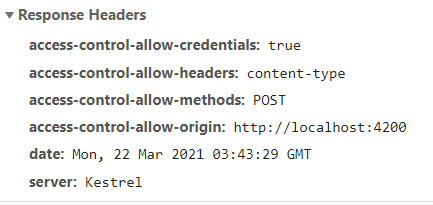
The request for access starts with an http OPTIONS request (as opposed to GET, POST, etc.) that the browser sends automatically when it sees that the requested URL is for a different origin than the one from which the page was served. Below, you can see such a request. The requested URL is https://localhost:5001, but the origin of the request is http://localhost:4200.

You can see that the browser is announcing it is
from origin: http://localhost:4200requesting localhost:5001 on schema httpsrequesting permission to do a POSTThe server responds with a message that either approves or rejects the request. Here, the request is approved:
If the request is not approved, an http error is thrown. Otherwise, the client code is free to make the POST request. (See below for the Angular code used to make the request.)
The .Net Core Server CORS SetupYou don’t have to do anything to get CORS working in the browser. Just make the request as you normally would. On the server, .Net Core has tried to make it easy to set up CORS — you just give the origins allowed to access the server. You do this in startup.cs, of course.
You can see in the Configure Services code below that the our CORS policy is given the name “authenticate” and is set up to allow requests from http://localhost:4200.
services.AddCors(options =>{ options.AddPolicy(name: "authenticate", builder => { builder.WithOrigins("http://localhost:4200") .AllowAnyHeader().AllowAnyMethod().AllowCredentials(); }); });There are other ways to set up CORS, such as using an attribute, but the above works for most circumstances.Then, in the Configure method of startup.cs, invoke CORS after routing:
app.UseRouting();// CORS must go here! // app.UseCors("authenticate");The POST RequestIn this example, we are authenticating the user from an Angular SPA by hitting an auth server. Note that the POST request must include a Content-Type header (application/json) which stops the server from throwing an Unsupported Media Type (415) error. In Angular, set up the headers like this
let httpHeaders = new HttpHeaders({ 'Content-Type': 'application/json' });Then the login request is made like this:
// post returns an Observable.// The observable's "subscribe" method has 3 callbacks: next?, error?, and complete?// jsonToken is what we get back//// Note: httpHeaders.Content-Type tells the server the format of the data being sent,// which in this case is 'application/json' or a JSON object (model, below) converted// into a string with "stringify."// Without this header, the server returns a 415 errorthis.http.post(url, JSON.stringify(model), { headers: httpHeaders}).subscribe( (x: jwsToken) => { // next if (x.token != undefined && model.username != undefined) { var token: string = x.token; this.signalrService.setJWTtoken(token, model.username); this.router.navigateByUrl('/play'); }}, (error) => { // error console.log(error); }, () => { // complete console.log('Completed'); } );March 17, 2021
How to Unlock a Locked Port in Windows 10
Now and then when developing an Angular SPA with Visual Studio Code, I lock up the default port, 4200. When this happens, you are told you can just reconfigure the app to use a different port, but that’s no solution. It’s better to kill the process holding onto the port, which of course is just a VS Code debugging process that hung for some reason.
By the way, Googling the VS Code issue, I found it’s a known bug and may be a symptom of using VS Code’s integrated terminal to run ng serve. A possible fix is to turn off something called Conpty in the VS Code settings.

But say you have some other reason to free up a locked port? To do it, you first have to find the PID of the process using the port, then you need to kill the process using the PID. To see the process id (PID) of the process using a particular port (4200 in the example here) run this in a command window with admin privileges.
netstat -a -n -o | find “:4200” | find /I “listening”
You can read more about netstat here. In a nutshell,
-aDisplays all active TCP connections and the TCP and UDP ports on which the computer is listening.-n
Displays active TCP connections, however, addresses and port numbers are expressed numerically and no attempt is made to determine names.-o
Displays active TCP connections and includes the process ID (PID) for each connection. You can find the application based on the PID on the Processes tab in Windows Task Manager. This parameter can be combined with -a, -n, and -p.
find /I just finds lines with the given text and outputs only them. See more about find here.

7400 on the right side of the listing is our PID (process id).
To kill the process
taskkill -f /pid 7400
February 14, 2021
Razor Component Callbacks
To communicate from a child razor component to the component that references it (the parent), pass the name of the callback function to the child component in much the same way you pass parameters. Think of the callback function as a delegate you pass to the child as a parameter.
(In this case, the child component lists chess players and allows you to select one to challenge. The callback in the parent component receives the player being challenged.)
// PARENT COMPONENT <<< the callback function// The callback function referred to in the component HTMLpublic static async Task ChallengeAsync(Models.Player PlayerToChallenge) { if (ThisPlayer.PlayerID != PlayerToChallenge.PlayerID) { System.Threading.CancellationToken cancellationToken = default; // will create game record await PlayChess._hub.InvokeAsync("startgame", ThisPlayer.Name, PlayerToChallenge.Name, cancellationToken); } }// CHILD COMPONENT// Create an event handler in the child razor component // This button is in a for-next loop. Each time through, @p is a "Models.Player"// ChallengeAsyncCallback.InvokeAsync(@p))">Challenge// The type of the event callback parameter is Models.Player.// ChallengeAsync is the name of the HTML attribute that holds the name of the // function to call on the parent componennt.// indicates that the callback function in the parent component // takes a Models.Player as an argument. [Parameter]public EventCallback ChallengeAsyncCallback { get; set; }The name of the parent component’s function name (the callback) is given in the HTML component as an attribute. Above, ChallengeAsyncCallback(1)=”ChallengeAsync”(2) means the ChallengeAsyncCallback(1) property in the child component (the EventCallback declaration, which uses the same name as the attribute) will point to the ChallengeAsync(2) function in the parent.
If the callback function takes an argument, the declaration of the callback in the child component can be given a type of the argument, thus:
[Parameter]
public EventCallback ChallengeAsyncCallback { get; set; }
means that the parent component’s callback function accepts an argument of type Models.Player. It appears as though only one callback argument is allowed.
For more on component communication, see https://chrissainty.com/3-ways-to-communicate-between-components-in-blazor/
February 3, 2021
Run MS SQL Server in a Docker Container
If you haven’t discovered Docker yet, you’re missing out. Docker is so popular you probably know it allows applications to run in lightweight containers similar to virtual machines but more nimble because the containers don’t have their own copy of the operating system kernel.
(If you like video, check out this YouTube video, which is very nice. Brice Ayers is even bold enough to leave his typos in, so you can see that even mortals can handle Docker stuff. The code here is essentially stolen from the code in the video.)
Docker containers allow applications to be published in configured image files that include all of the needed dependencies. This eliminates the chances that the application won’t run on a server because the environment there is different from the development environment. It also allows applications to be spun up (and down) quickly in order to save system resources. (If you only need Redis for a particular project, you don’t have to have the Redis service running if you’re not working on the project that needs it.)
While applications running in a docker container use their own file systems, you can map folders outside the container (on localhost, if you will) to folders inside the container, so that the docker container will read/write to the outside folder when it thinks it’s writing to the local folder inside the container.
In this example, we use the mapping so that even after the running docker container (or even the image itself!) is deleted, the data remains.
Here, we show how to use docker-compose to download, configure, and run SQL Server in Docker…
How to do itOnce Docker is installed, create a folder and in it a text file called docker-compose.yml with this content:
version: "3.7"services: sql-server-db: container_name: sql-server-db image: mcr.microsoft.com/mssql/server:2019-l... ports: - "1433:1433" volumes: - c:\sqldata:/var/opt/mssql/data/ environment: SA_PASSWORD: "[PASSWORD]" ACCEPT_EULA: "Y"Note that .yml files use indentation, so make sure your indents are correct.
Open a command prompt and navigate to your new folder. Check your versions of docker and docker-compose:
docker -v
docker-compose -v
See https://docs.docker.com/compose/compose-file/ to see which docker-compose version is compatible with your docker version. For example, 3.7 is compatible with Docker 18.06.0 and above.
To see the images running:
docker-compose ps
To start the docker container defined in docker-compose.yml as a demon (-d) so it continues to run in the background:
docker-compose up -d
To bring it down:
docker-compose down
Note that as long as the running docker container is not deleted, the data will be preserved if you use docker-compose. The running container can be stopped and restarted without destroying the data. However, if you delete the running image, the data will go with it. To prevent this, we’ve used the volumes setting in the docker-compose file, which tells the container to write data to an “outside” folder (c:\sqldata) so it will be there when the image is run the next time.
Opening sqlcmd CLI in the containerOnce SQL Server is running in the container, you should be able to connect to it using SSMS or any other client. (The video shows how to hit the database using javascript running in Node.js)
To run sqlcmd from within the docker container, go to a terminal and enter:
docker exec -it [CONTAINERID] /opt/mssql-tools/bin/sqlcmd -S localhost -U SA -P [PASSWORD]
Of course, [PASSWORD] needs to be your sql password and [CONTAINERID] is the name of the container, sql-server-db, in our case.
You can also run the CLI from within docker desktop, then just run the command:
/opt/mssql-tools/bin/sqlcmd -S localhost -U SA -P [PASSWORD]
You can then create a database and tables, etc., using standard sql commands. Don’t forget to use “go” as the next command to execute the commands previously entered. (If you have Microsoft Sql Server Management Studio, you can create databases and tables using it as you would any Sql Server database.)
docker-compose -logs will show you the logs if something goes wrong.
December 26, 2020
Using toastr.js
toastr.js/toastr.css lets you easily display self-hiding notifications easily in an HTML page. Get the files here, along with usage tips.
https://github.com/CodeSeven/toastr
Note that the javscript requires jQuery.
In $(document).ready, you can initialize the toastr object:
toastr.options = {
"timeOut": 30000, // toast will disappear by itself after 30 seconds
"extendedTimeOut": 1000, // after mouseover, toast will disappear in 3 seconds
"closeButton": true,
"showDuration": 1000,
"hideDuration": 1000,
"progressBar": true,
"tapToDismiss": true,
"hideEasing": "linear",
"showEasing": "swing"
};
Then you can display a self-closing alerts like this:
toastr.error("This is an error", "ERROR");
toastr.error("This is info", "Info");
toastr.error("This is a warning", "WARNING");
toastr.error("This is success", "SUCCESS");