Josh Kilmer-Purcell's Blog, page 62
November 24, 2013
Have Your Cake and Eat it Too! Day 11
Monday, November 25th
Thanksgiving week is finally here! Thanksgiving has always been one of my favorite holidays. I love spending quality time with my friends and family and I love just about every dish that typically adorns the table this time of year. I haven’t found a pumpkin pie that I haven’t liked!
This year, in addition to pumpkin pie, I’m also going to try one of the desserts in the Beekman 1802 Heirloom Desert Cookbook. I’m debating between the Pumpkin Jelly Roll and the Gingerbread Cookie Ice Cream Sandwiches. I’m leaning toward the pumpkin roll but I think my 4-year-old and my 6-year-old may vote for the ice cream sandwiches. Either way, I’m sure both will be incredible!
Enough talk about desserts – let’s talk about burning some extra calories so we can enjoy any and all the desserts we come across this Thursday.
Today’s workout is designed to last 30 minutes and is developed so each individual can exercise at his or her own pace. Each exercise should be performed to failure—when you feel as though you can’t complete even one more rep—or to the max number of reps listed. For example if the exercise is squat jumps and lists a max of 50 reps, you should do as many reps as possible up to 50. If you complete 10 reps and find that you can’t do another rep while maintaining good form, then simply move on to the next exercise. If you can complete all 50 with good form, do so and then move to the next exercise.
If you get through all 5 exercises in less than 30 minutes (which should be the case), repeat the cycle until the 30 minutes is up.
Please note: Before adopting any new exercise routine, you should consult your physician.
Today’s full-body, calorie-burning workout:
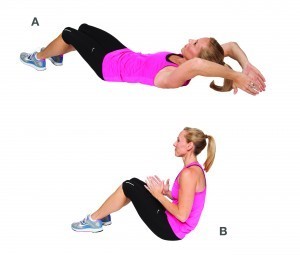
Exercise 1: Arms Above Head Sit Ups (Perform to Failure or max 50 reps)
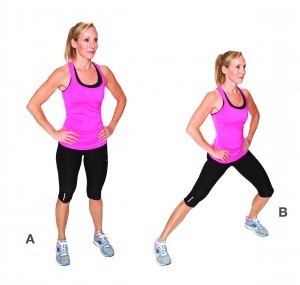
Exercise 2: Side Lunges (Perform to failure or max 20 reps each side)
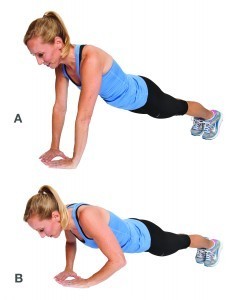
Exercise 3: Diamond Push Ups (Perform to failure or max 30 reps)
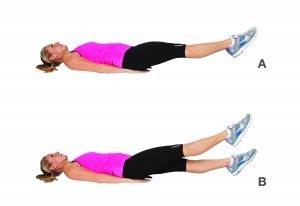
Exercise 4: Flutter Kicks (Perform to failure or max 100 reps)
Exercise 5: Tuck Jumps (Perform to failure or max 40 reps)
A detailed description and accompanying photo is provided for each exercise below.
Exercise 1: Arms Above Head Sit Ups (Perform to Failure or max 50 reps)
How to do it: Lie on your back. Place your arms straight above your head. Bend your knees and plant your feet on the floor. Tighten your core. Slowly raise your head, shoulders and arms off the floor until you are in a seated position. Slowly bring your head, shoulders and arms back to the floor.
Exercise 2: Side Lunges (Perform to failure or max 20 reps each side)
How to do it: Stand with your feet hip width apart. Place your hands on your hips for balance. Slowly step to the right. Shift your weight to your right leg and bend your right knee. Keep you left leg straight. Push off with your right foot and come back to the starting position. Repeat with your right leg for entire series of reps. When complete, switch to your left leg and repeat exercise.
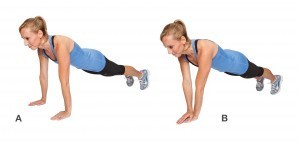
Exercise 3: Diamond Push Ups (Perform to failure or max 30 reps)
How to do it: Lie on your stomach. Get in push up position. Place your palms flat on the floor in a diamond shape directly under your chest. Your thumbs and first fingers should touch to form the diamond shape. Push up off the ground so your arms are fully extended and you’re on your toes. Keep your back flat and engage your core. While maintaining a flat back, lower yourself down until your chest hovers over the diamond. Push yourself back up by fully extending your arms. Note: you can make the exercise slightly easier by coming to your knees and performing the diamond push up.
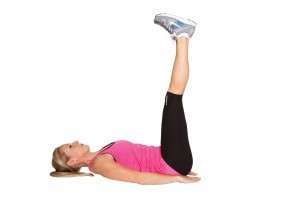
Exercise 4: Flutter Kicks (Perform to failure or max 100 reps)
How to do it: Lie flat on your back with your arms tucked slightly under your hips with palms facing down. Lift your feet 6 to 8 inches off the floor. Quickly kick (flutter) your legs up and down, raising and lowering your feet only a few inches. Note: to make the exercise easier, raise your legs up higher than the 6 to 8 inches. To make the exercise more difficult, keep your feet closer to the ground.
Exercise 5: Tuck Jumps (Perform to failure or max 40 reps)
How to do it: Stand with your feet hip width apart and knees slightly bent. Bend your knees as you come to a squat position. From the squatting position explode up and tuck your knees to your chest. While in mid air, grab your knees with your hands. Release your knees and extend your legs as you come back down. Allow the knees to bend upon landing. Repeat Note: Do not lock your knees on landing.
I hope you enjoy today’s workout. Please share your feedback with me by commenting below.
About the Author:
 Dawna Stone is a health, fitness, and wellness expert. Her new book, Healthy You!: 14 Days to Quick and Permanent Weight Loss and a Healthier, Happier You is available on Amazon.com. To find out more about Dawna or to view her Healthy Living videos, tips and recipes, go to dawnastone.com
An American Council on Exercise (ACE) certified Health Coach, Stone has contributed health and wellness articles to numerous newspapers and magazines. She earned her bachelor’s degree from UC Berkeley, and her master’s degree from UCLA. An avid runner and Ironman triathlete, she lives in St. Petersburg, Florida with her husband, 6-year-old daughter and 4-year-old son.
Disclaimer: This information is intended to provide helpful and informative material and is not intended to treat, diagnose, prevent or cure any health condition, nor is it intended to replace the advice of a physician. Always consult your physician before adopting a new eating or exercise regimen. The author and publisher specifically disclaim all responsibility for any liability, loss or risk, personal or otherwise, which is incurred as a consequence of reading this information or participating in the exercises suggested in this material.
Copyright © 2013 by Dawna Stone
Cranberry and Quinoa Salad

Quinoa is gaining in popularity and for good reason! Quinoa is a healthy wheat alternative and can be made in a variety of ways. Personally, I love pairing quinoa with a slightly sweet fruit.
Try this delicious Cranberry and Quinoa Salad. You’re sure to be surprised as it’s not often you can find a recipe that is both festive and refreshing. Most holiday recipes are heavy and calorie-dense often leaving you feeling stuffed and lethargic.
A signature recipe in new bestseller, Healthy You!, this Cranberry and Quinoa Salad is sure to please the entire family and it’s perfect for any time of year. It’s hearty enough to complement the holiday turkey yet light enough to remind you of a warm spring day. Bring it to the office for a light and healthy lunch or serve it at a family gathering, as it’s sure to be one of the most popular and talked about side dishes.
Prep time: 5 minutes
Cook time: 20 minutes
Total time: 25 minutes
Yield: 4
INGREDIENTS:
1 cup uncooked quinoa, rinsed
1/2 cup dried cranberries
2 scallions, finely chopped
1/4 cup toasted almonds, sliced
1/4 cup fresh cilantro, chopped
1 tablespoon fresh parsley, chopped
2 tablespoons fresh squeezed lemon or lime juice
2 tablespoons extra virgin olive oil
1/4 teaspoon ground coriander
1/4 teaspoon ground cumin
Salt, to taste
Pepper, to taste
INSTRUCTIONS
Cook quinoa according to package directions, transfer to bowl and refrigerate.
Once cool, combine quinoa, cranberries, scallions, almonds, cilantro and parsley in large bowl.
In separate bowl, whisk together lemon (or lime) juice, olive oil, coriander, cumin, salt and pepper.
Pour dressing over quinoa, stirring gently to coat.
ABOUT THE AUTHOR:
 Dawna Stone is a health, fitness, and wellness expert. Her new book, Healthy You!: 14 Days to Quick and Permanent Weight Loss and a Healthier, Happier You is available on Amazon.com. To find out more about Dawna or to view her Healthy Living videos, tips and recipes, visit dawnastone.com.
An American Council on Exercise (ACE) certified Health Coach, Stone has contributed health and wellness articles to numerous newspapers and magazines. She earned her bachelor’s degree from UC Berkeley, and her master’s degree from UCLA. An avid runner and Ironman triathlete, she lives in St. Petersburg, Florida with her husband, 6-year-old daughter and 4-year-old son.
November 23, 2013
Plaster Cast Leaf Tutorial
Thanksgiving is almost here and along with the holidays comes a ton of entertaining. Place cards are always a good idea as they keep the peace in case of any inter-family drama but don’t hesitate to use them even if everyone gets along. Designating a special seat for each individual guest makes the event that much more special. So this year, knock place cards and favors off your list at the same time with rustic plaster cast leaf ornaments. Don’t let the long list of materials deter you! Most of the stuff you can find around the house and the rest can be picked up quickly at any craft supply store. So let’s dive right in and cast some leaves!
Materials
(available in most craft stores)
Variety of leaves
Paper towels
Self adhesive foam sheets (available in most craft stores)
Brayer (rolling pin will also work for this step)
Hole punch
Parchment paper (available at the grocery store)
Rolling pin
2 pencils
Small craft scissors
Plaster of Paris (available in craft or hardware stores)
Water
Plastic cup
Spoon
Fine grit sandpaper
Acrylic paints
Spray or brush on clear coat
Paper tags
Twine or ribbon
1. Collect a variety of leaves and break off the stems. When selecting leaves, make sure they have good texture, aren’t too dry or brittle, and the shape of the leaf is not too skinny in any one area or your casts will be too fragile. If the leaves are collected wet, place them between sheets of paper towel and set them under a heavy book until they’re dry.
2. Cut a piece of foam to fit one leaf and peel off the paper backing. Place the leaf face down (the vein texture is more apparent on the back of the leaf) onto the sticky side of the foam and press flat using a clean brayer or rolling pin. Repeat with the rest of the leaves.
3. Carefully cut around the leaf to maintain its natural shape with small craft scissors. When finished, adhere the foam backing to a second piece of foam and cut out. The double layer of foam will give the leaf added thickness when creating the mold. Finally, punch a hole through all three layers at the base of the leaf.
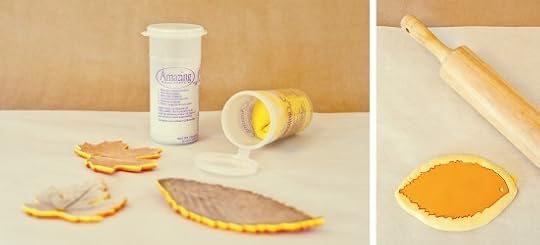
4. Cut a piece of parchment paper large enough to protect your work surface. Read through all of the manufacturer’s instructions on the mold putty before you begin as it will vary company to company. For most brands, mix equal parts of the putty together until a uniform color is achieved and there is enough to lay down a 1/2″ thick layer slightly larger than the object to be molded.
5. Flatten the putty out on the parchment paper in the shape of the leaf and press the leaf face down into the putty. Lay a pencil on either side of the mold and flatten with the rolling pin. The pencils keep the rolling pin at a uniform level so neither side of the mold is thinner than the other. Repeat for the rest of the leaves.
6. Place another piece of parchment paper on top of the molds and place a heavy book on top. Let the molds sit for 1/2 an hour. When the molds are dry the parchment paper will be stuck to the putty so carefully and slowly peel it off.
7. Gently pull the leaves from the dry putty. If any part of the leaf becomes detached from the foam and sticks inside the mold carefully scrape it out with a finger nail or wet the mold and try rubbing it off.
8. In a plastic cup, mix 2 parts plaster to 1 part cold water. For example, to fill 3 molds I used 1/2 cup plaster and 1/4 cup water. Mix until smooth and then carefully spoon into molds. Tamp down to even the plaster out and get rid of air bubbles. Let stand 2 to 3 hours and then gently remove from the molds and repeat as needed. When the plaster is removed from the cast it will feel slightly damp and cold. Lay the casts flat to fully dry overnight.
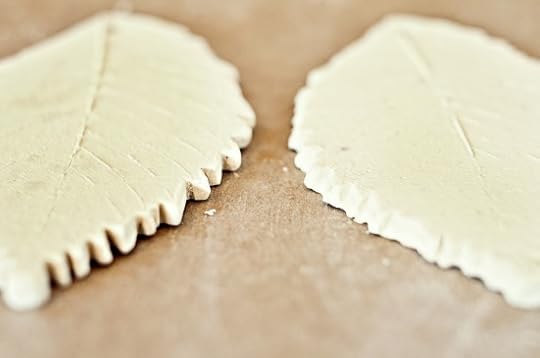
9. Use fine grit sandpaper to remove any excess plaster and to clean up the shape of the leaf. In the photo below the leaf on the left has been sanded and the leaf on the right has not.
10. Make sure all the sanding dust is off of the leaves before beginning to paint. First, begin by painting the base white with one coat of acrylic paint. Let the paint dry completely.
11. To antique the leaves, rub a second darker layer onto the leaf with a clean cloth or paper towel. For example, I used a mixture of brown and silver paints. Quickly rub the paint on and then with a second damp cloth, rub the paint off. Keep experimenting until the desired effect is reached. Let dry.
12. Once the antiquing has dried, spray or brush on a matte finish clear coat to protect the surface and make the leaves more durable. Allow to dry.
13. Write the name of your guests onto paper tags and thread them each onto a strip of twine or ribbon 14″ long. Knot the twine at the top.
14. Adjust the tag so it’s at the top of the twine near the knot. Thread the bottom through the hole in the leaf, back to front, make a loop, and slip the knot and the tag through the loop. Pull tight, adjusting as you go so the knotted end is evenly centered at the top.
15. Now place the ornaments on your Thanksgiving table and ENJOY!
You can also check out our hand-made ceramic Fallen Leaves in the Beekman 1802 Mercantile. Click here
Lucy Blaire has written for countless craft magazines including Sew News, Stitch, Simply Handmade, and ReadyMade; she has appeared
on PBS’s Sew It All TV; writes for her blog, East Camp Home; and runs her
Etsy shop, Lucy Blaire Handmade.
With what little time is left Lucy can be found living quietly in Catskill, NY with her husband Ben and baby Marian in their little house with the red tin roof.
November 21, 2013
Have Your Cake and Eat it Too! Day 10
Friday, November 22nd
No matter if you’ve done every workout or you’re just joining the program, today’s workout is going to be a blast—not to mention burn a lot of calories!
As always, today’s workout is designed to last 30 minutes and is developed so each individual can exercise at his or her own pace. Each exercise should be performed to failure—when you feel as though you can’t complete even one more rep—or to the max number of reps listed. For example if the exercise is squat jumps and lists a max of 50 reps, you should do as many reps as possible up to 50. If you complete 10 reps and find that you can’t do another rep while maintaining good form, then simply move on to the next exercise. If you can complete all 50 with good form, do so and then move to the next exercise.
If you get through all 5 exercises in less than 30 minutes (which should be the case), repeat the cycle until the 30 minutes is up.
Please note: Before adopting any new exercise routine, you should consult your physician.
Today’s full-body, calorie-burning workout:
Exercise 1: Squat Jumps (Perform to Failure or max 50 reps)
Exercise 2: Mason Twists (Perform to failure or max 25 reps each side)
Exercise 3: Alternating Lunges (Perform to failure or max 30 reps each leg)
Exercise 4: Tuck Jumps (Perform to failure or max 40 reps)
Exercise 5: Wide Push Ups (Perform to failure or max 30 reps)
A detailed description and accompanying photo is provided for each exercise below.
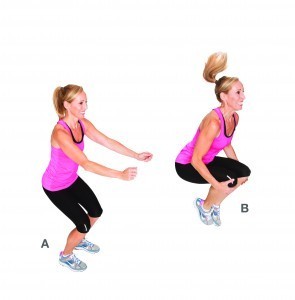
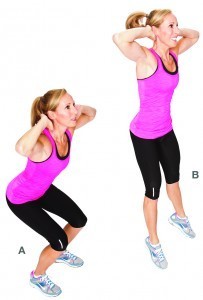
Exercise 1: Squat Jumps (Perform to Failure or max 50 reps)
How to do it: Stand with your feet shoulder width apart and arms behind your head. Squat down with knees parallel to the floor. Don’t bend below parallel. Jump up as high as you can while keeping your core tight. Lower back down to your squat position as you land.
Exercise 2: Mason Twists (Perform to failure or max 25 reps each side)
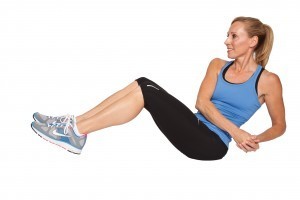
How to do it: Sit on the floor. Bend your knees so that your feet are planted on the floor in front of you. Bend your elbows and clasp your hands together in front of you. Lean back slightly so you’re your core engages. Lift your feet slightly off the floor. Rotate first to the right and try to touch your clasped hands to the floor near your hip. Rotate to the left and try and touch your clasped hands to the floor near your hip. Repeat. As you rotate from side to side, try and keep your core engaged and your feet stable.
Exercise 3: Alternating Lunges (Perform to failure or max 30 reps each leg)
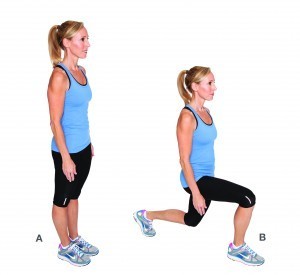
How to do it: Stand with your feet hip width apart, back straight and arms at your side or on your hips. Step forward with your right foot making sure your toes are facing forward and that your knee is at a 90 degree angel – which will ensure that your thigh is parallel with the ground. Push up with your right foot as you return to your starting position. Repeat with your left leg. Note: make sure you don’t extend your front knee over your toes, as this will place more pressure on your knee.
Exercise 4: Tuck Jumps (Perform to failure or max 40 reps)
How to do it: Stand with your feet hip width apart and knees slightly bent. Bend your knees as you come to a squat position. From the squatting position explode up and tuck your knees to your chest. While in mid air, grab your knees with your hands. Release your knees and extend your legs as you come back down. Allow the knees to bend upon landing. Repeat. Note: Do not lock your knees on landing.
Exercise 5: Wide Push Ups (Perform to failure or max 30 reps)
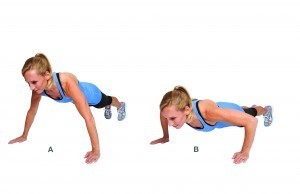
How to do it: Lie on your stomach. Place your palms flat on the floor wider than shoulder width apart. Push up off the ground so your arms are fully extended and you’re on your toes. Keep your back flat and engage your core. While maintaining a flat back, lower yourself down until your chest almost touches the floor. Push yourself back up by fully extending your arms.
I hope you enjoy today’s workout. Please share your feedback with me by commenting below.
About the Author:
 Dawna Stone is a health, fitness, and wellness expert. Her new book, Healthy You!: 14 Days to Quick and Permanent Weight Loss and a Healthier, Happier You is available on Amazon.com. To find out more about Dawna or to view her Healthy Living videos, tips and recipes, go to dawnastone.com
An American Council on Exercise (ACE) certified Health Coach, Stone has contributed health and wellness articles to numerous newspapers and magazines. She earned her bachelor’s degree from UC Berkeley, and her master’s degree from UCLA. An avid runner and Ironman triathlete, she lives in St. Petersburg, Florida with her husband, 6-year-old daughter and 4-year-old son.
Disclaimer: This information is intended to provide helpful and informative material and is not intended to treat, diagnose, prevent or cure any health condition, nor is it intended to replace the advice of a physician. Always consult your physician before adopting a new eating or exercise regimen. The author and publisher specifically disclaim all responsibility for any liability, loss or risk, personal or otherwise, which is incurred as a consequence of reading this information or participating in the exercises suggested in this material.
Copyright © 2013 by Dawna Stone
November 20, 2013
5 Beautiful Things
Time’s Meddling Fingers
Last May, my friend Jessica and I traveled to Sharon Springs together for a magazine assignment. It was my third visit and Jessica’s first. She immediately loved the atmosphere of the town with its mix of vibrant new businesses and the crooked and gnarled architectural relics of its former hayday as a spa-resort town. One morning, Jessie went out to explore the streets without me, taking only her camera with her. An adventurous soul, it wasn’t long before she found herself inside some of the abandoned bath houses in the town, snapping shots of the decaying bellies of these once proud and bustling places. I love these photos and find them to be very beautiful, despite the ruinous nature of the subject matter. I love the colours, the textures and especially the patterns of time, which are so harshly apparent. If you have not yet seen Sharon Springs for yourself, please do consider making the trip. To see more of Jessie’s photography, click here.
November 19, 2013
Holiday Survival Guide
The holidays are often a time of stepping away from our normal routine. From office parties to family gatherings, the holidays can wreak havoc on your weight loss goals. Add in the stress of holiday shopping, relatives in town and school being out, and you have a recipe for overindulging. Don’t get too discouraged. This Holiday Survival Guide can help you avoid holiday weight gain and still enjoy the festivities.
The holidays should be a festive time to enjoy family and friends, not a time to feel guilty or be consumed with thoughts of gaining weight. Following all 10, or even just a few, of our holiday survival tips can make your holidays guilt-free. Don’t let holiday weight gain sneak up on you this year – let this new found knowledge help you enjoy the holidays leaner and happier!
Click here to download the Holiday Survival Guide
ABOUT THE AUTHOR:
Dawna Stone is a health, fitness, and wellness expert. Her new book, Healthy You!: 14 Days to Quick and Permanent Weight Loss and a Healthier, Happier You is available on Amazon.com. To find out more about Dawna or to view her Healthy Living videos, tips and recipes, visit dawnastone.com or connect with her on Facebook.
An American Council on Exercise (ACE) certified Health Coach, Stone has contributed health and wellness articles to numerous newspapers and magazines. She earned her bachelor’s degree from UC Berkeley, and her master’s degree from UCLA. An avid runner and Ironman triathlete, she lives in St. Petersburg, Florida with her husband, 6-year-old daughter and 4-year-old son.
November 18, 2013
Have Your Cake and Eat it Too! Day 9
Wednesday, November 20th
Thanksgiving is right around the corner at just over a week away! I know that my schedule gets crazy this time of year. Many of us will be hosting relatives or traveling to see family and friends.
Need some extra motivation to stick to your exercise program during these hectic times? Feel free to reach out to me with questions or comments. You can comment below or connect with me at dawnastone.com. Tell me how you’re enjoying the workouts, what’s your favorite and or least favorite exercise. I’d love to hear about your progress and provide you with some inspiration and motivation to keep you on track.
Today’s workout is designed to last 30 minutes and is developed so each individual can exercise at his or her own pace. Each exercise should be performed to failure—when you feel as though you can’t complete even one more rep—or to the max number of reps listed. For example if the exercise is squat jumps and lists a max of 50 reps, you should do as many reps as possible up to 50. If you complete 10 reps and find that you can’t do another rep while maintaining good form, then simply move on to the next exercise. If you can complete all 50 with good form, do so and then move to the next exercise.
If you get through all 5 exercises in less than 30 minutes (which should be the case), repeat the cycle until the 30 minutes is up.
Please note: Before adopting any new exercise routine, you should consult your physician.
Today’s full-body, calorie-burning workout:
Exercise 1: Standard Push Ups (Perform to failure or max 30 reps)
Exercise 2: Burpees (Perform to Failure or max 15 reps)
Exercise 3: Pulse Ups (Perform to failure or max 100 reps)
Exercise 4: Hand Touch Plank (Perform to failure or max 30 reps)
Exercise 5: Squats (Perform to failure or max 50 reps)
A detailed description and accompanying photo is provided for each exercise below.
Exercise 1: Standard Push Ups (Perform to failure or max 30 reps)
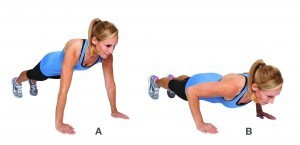
How to do it: Lie on your stomach. Place your palms flat on the floor shoulder width apart. Push up off the ground so your arms are fully extended and you’re on your toes. Keep your back flat and engage your core. While maintaining a flat back, lower yourself down until your chest almost touches the floor. Push yourself back up by fully extending your arms.
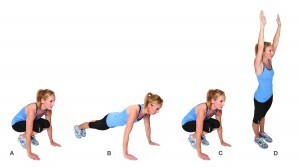
Exercise 2: Burpees (Perform to Failure or max 15 reps)
How to do it: Squat with your hands on the ground in front of you. Jump your feet back to plank (or push up) position. Jump your feet back under you to the squat position. Immediately jump up as high as you can with your hands straight over your head. Repeat. Note: if you want to make the move even more difficult, you can perform a push up when you are in the plank position.
Exercise 3: Pulse Ups (Perform to failure or max 100 reps)
How to do it: Lie flat on your back with your arms tucked slightly under your hips with palms facing down. Bring your legs up to form a 90-degree angle as if you’re trying to put the soles of your feet on the ceiling. Pulse you hips directly upward without rocking your legs. (Your legs should remain at a 90-degree angle.) Bring your hips back down and immediately repeat.
Exercise 4: Hand Touch Plank (Perform to failure or max 30 reps)
How to do it: Start in pushup position. Place your hands directly under your shoulders and feet hip-width apart. Keep your core/abdominals tights. Lift your right hand slightly off the ground and place it on top of your left hand. Quickly return the hand to its starting position. Repeat with the left hand. Lift your left hand slightly off the ground and place it on top of your right hand. Quickly return the hand to its starting position. Repeat.
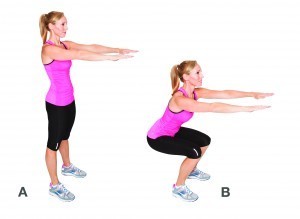
Exercise 5: Squats (Perform to failure or max 50 reps)
How to do it: Stand with your feet shoulder width apart and arms straight out in front of you. Squat down until knees are parallel to the floor. Don’t bend below parallel. Return to the starting position and repeat.
I hope you enjoy today’s workout. Please share your feedback with me by commenting below.
About the Author:
 Dawna Stone is a health, fitness, and wellness expert. Her new book, Healthy You!: 14 Days to Quick and Permanent Weight Loss and a Healthier, Happier You is available on Amazon.com. To find out more about Dawna or to view her Healthy Living videos, tips and recipes, go to dawnastone.com
An American Council on Exercise (ACE) certified Health Coach, Stone has contributed health and wellness articles to numerous newspapers and magazines. She earned her bachelor’s degree from UC Berkeley, and her master’s degree from UCLA. An avid runner and Ironman triathlete, she lives in St. Petersburg, Florida with her husband, 6-year-old daughter and 4-year-old son.
Disclaimer: This information is intended to provide helpful and informative material and is not intended to treat, diagnose, prevent or cure any health condition, nor is it intended to replace the advice of a physician. Always consult your physician before adopting a new eating or exercise regimen. The author and publisher specifically disclaim all responsibility for any liability, loss or risk, personal or otherwise, which is incurred as a consequence of reading this information or participating in the exercises suggested in this material.
Copyright © 2013 by Dawna Stone
Christmas in Sharon Springs!
Little has changed in Sharon Springs in over 200 years, and when revelers flock to Main Street the first Saturday of every December dressed in their holiday best, it actually looks like a snapshot of a village frozen in time.
It’s now our third annual Victorian Christmas Celebration, and what separates the celebration apart from other holiday activities is that we encourage EVERYONE who comes into town to dress the part! It could be as simple as a top hat and long coat, or a bit of lace at the neck and a long skirt, or you could join those who spend all year dreaming up their Victorian finery. You get to be a part of the picture!
This is the most intimate festival we have in Sharon Springs during the year, and you have the chance to chat with everyone in the village–and we’re all on our best behavior (during the day)!
For complete details of the day along with information about lodging and restaurants in the area, check out Enjoy Sharon Springs
Schedule of Events (partial)
7:00am-12:00pm- have a delicious start to the day with the pancake breakfast served at the firehouse!
9:30am- Designers Roger and Chris Stout-Hazzard from Love Decades give a talk on Victorian Home Design. Learn about the history of Victorian home design and the creative way that they are re-interpreting these features in their own home and work (the talk and Q & A will be held at 204 Bistro, right beside the Love Decades studio) FREE
11:00am-3:00pm- your carriage awaits! Sleigh rides through the village ($1/person)
12:30-3:00pm-musical performances and Victorian dance lessons at Studio North on South Main Street
3:30pm-this is the moment everyone waits for all day! It’s time to strut your stuff in our annual Victorian Costume Contest! Meet on the deck-cum-catwalk of 204 Bistro
Josh + Brent will be in the Mercantile all day trying to determine whose top hat is taller
PLUS, special deals and activities at the shops in Sharon Springs all day (check ENJOY SHARON SPRINGS for details)
November 17, 2013
Have Your Cake and Eat it Too! Day 8
Monday, November 18th
As you embark on today’s workout, give some thought as to why you’re participating in the program. Maybe you want to drop a few pounds before the holidays or just want to be able to have your favorite holiday treats without the guilt. The two most common reasons for participating in an exercise program is weight loss or weight maintenance, but there are so many other benefits to exercise.
Did you know that according to the Mayo Clinic, exercise (or regular physical activity) can help prevent or manage health problems such as stroke, type 2 diabetes, depression, arthritis and certain types of cancer. Exercise also improves your mood, boosts energy and promotes better sleep, not to mention helps to prevent excess weight gain and helps with weight loss. So keep up the good work and reap the benefits of your hard work.
Today’s workout is designed to last 30 minutes and is developed so each individual can exercise at his or her own pace. Each exercise should be performed to failure—when you feel as though you can’t complete even one more rep—or to the max number of reps listed. For example if the exercise is squat jumps and lists a max of 50 reps, you should do as many reps as possible up to 50. If you complete 10 reps and find that you can’t do another rep while maintaining good form, then simply move on to the next exercise. If you can complete all 50 with good form, do so and then move to the next exercise.
If you get through all 5 exercises in less than 30 minutes (which should be the case), repeat the cycle until the 30 minutes is up.
Please note: Before adopting any new exercise routine, you should consult your physician.
Today’s full-body, calorie-burning workout:
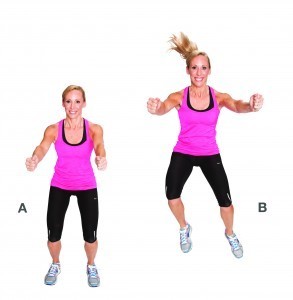
Exercise 1: Side-to-Side Jumps (Perform to failure or max 30 reps)
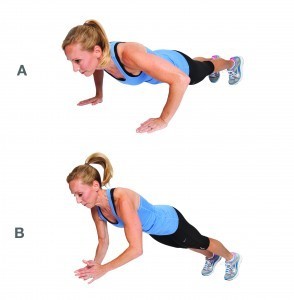
Exercise 2: Clapping Push Ups (Perform to Failure or max 15 reps)
Exercise 3: Squat Jumps (Perform to failure or max 50 reps)
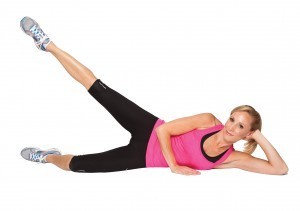
Exercise 4: Side Leg Lifts (Perform to failure or max 30 reps each side)
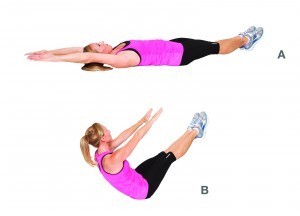
Exercise 5: V-Ups (Perform to failure or max 20 reps)
A detailed description and accompanying photo is provided for each exercise below.
Exercise 1: Side-to-Side Jumps (Perform to failure or max 30 reps)
How to do it: Stand with your feet hip width apart. Bend your knees and jump to the side landing with soft knees and on both feet at the same time. Alternate sides as quickly as possible while still maintaining good form. Note: Pretending you are jumping over an object will make the exercise easier and often makes you jump higher.
Exercise 2: Clapping Push Ups (Perform to Failure or max 15 reps)
How to do it: Lie on your stomach. Place your palms flat on the floor shoulder width apart. Push up off the ground so your arms are fully extended and you’re on your toes. Keep your back flat and engage your core. While maintaining a flat back, lower yourself down until your chest almost touches the floor. Explode back up by fully extending your arms and allowing your hands to come up off the floor. As you hands leave the floor clap them together before you land. Note: If you cannot clap your hands in between pushups, just complete the push up without a clap. The clapping will come in time. You can also but your knees on the ground to make the pushup easier to complete.
Exercise 3: Squat Jumps (Perform to failure or max 50 reps)
How to do it: Stand with your feet shoulder width apart and arms behind your head. Squat down with knees parallel to the floor. Don’t bend below parallel. Jump up as high as you can while keeping your core tight. Lower back down to your squat position as you land.
Exercise 4: Side Leg Lifts (Perform to failure or max 30 reps each side)
How to do it: Lie on your right side with your right arm at a 90-degree angle supporting your head. Place your left palm on the floor in front of you. Bend your bottom leg slightly. Lift your top leg to 45-degrees and then lower just before you touch your bottom leg. Lift and lower your top leg for the entire series of reps. Repeat on your left side.
Exercise 5: V-Ups (Perform to failure or max 20 reps)
How to do it: Lie on your back with your legs straight and your hands above your head with palms facing up. Simultaneously raise your upper body and legs and reach for your toes Keeps your arms and legs straight and your core tight as you move into the “V” position. Slowly lower yourself back down and repeat.
I hope you enjoy today’s workout. Please share your feedback with me by commenting below.
About the Author:
 Dawna Stone is a health, fitness, and wellness expert. Her new book, Healthy You!: 14 Days to Quick and Permanent Weight Loss and a Healthier, Happier You is available on Amazon.com. To find out more about Dawna or to view her Healthy Living videos, tips and recipes, go to dawnastone.com
An American Council on Exercise (ACE) certified Health Coach, Stone has contributed health and wellness articles to numerous newspapers and magazines. She earned her bachelor’s degree from UC Berkeley, and her master’s degree from UCLA. An avid runner and Ironman triathlete, she lives in St. Petersburg, Florida with her husband, 6-year-old daughter and 4-year-old son.
Disclaimer: This information is intended to provide helpful and informative material and is not intended to treat, diagnose, prevent or cure any health condition, nor is it intended to replace the advice of a physician. Always consult your physician before adopting a new eating or exercise regimen. The author and publisher specifically disclaim all responsibility for any liability, loss or risk, personal or otherwise, which is incurred as a consequence of reading this information or participating in the exercises suggested in this material.
Copyright © 2013 by Dawna Stone
November 16, 2013
Gartending: Cranberry Soused
Klaus is a sporting lad. What I mean by this is that Klaus likes tromping through the cranberry bogs searching for these tart berries to pop into his mouth. He’s gotten rather adept at skimming along the surface of the cranberry bog, his little flask filled with rye whiskey. Rye Whiskey you say? Why rye? Klaus will explain that of all the whiskies produced in our country, rye dates back to George Washington. George Washington distilled rye whiskey for his consumption with 60% rye, 35% corn, and 5% malted barley. This must have been a heady concoction given the predilection for strong intoxicants in the early days of our nation. Rye is historic, like Thanksgiving!
Rye whiskey reminds Klaus of the Old Country, where he rose out of the soil and joined the legions of drinking gnomes around the world. His father watered the soil where Klaus popped up with rye whiskey!
Thanksgiving is coming all too soon. Then the rush to the Christmas holidays begins. Wouldn’t it be nice to have what Klaus has in his little ceramic flask? Would you like to know what he concocted using ingredients you have in your kitchen right now????
Do you have cranberry sauce? What’s that little can doing lurking in your pantry? Open it up and add 2 tablespoons of it to a cocktail shaker. How about that bottle of honey over there? Yes that’s the one. It’s all crystallized? Perfect. Just boil some water and add it to the honey, let it cool and pour it into the shaker. Did I see some apple cider in the fridge? Sure I did. It’s gone a bit fizzy. That’s exactly what this drink needs. Don’t have any fizzy cider? Try a hard cider from the supermarket beer isle. There are dozens of them available all over the globe. Pour a bit of that into the shaker too.
Of course the most important part, the part that Klaus values over all the other parts is the giggly part. The part that is intoxicating. And that is the rye whiskey! Isn’t it funny that Klaus, a little guy made of terra cotta would know the difference between “just a drink” and a well-balanced cocktail? I think you will immediately know the very moment this comes together. As I said, anyone can make it with ingredients that you have right now. Ok, you may have to buy a bottle of rye whiskey and you certainly have some apple cider in your fridge at this time of the year. These ingredients alone make a fine drink. But add some honey syrup and some cranberry sauce and you have a lovely refreshing slurp.
Yes, I’ll Come to Cambridge Cocktail serves two handily. Right Klaus? Klaus?
Ingredients: (Klaus proven!)
3 oz. Rye Whiskey *sure, you can use bourbon, or even Scotch!
2 oz. Cranberry Sauce (that little can will do)
2 oz. Apple Cider or Hard Apple Cider in a bottle with fizz
1 oz. Honey Simple Syrup- 2:1 ratio honey to boiling hot water, then cool.
Good Ice, meaning double boiled water in a tray, hand cut.. easy to do!
Lime pinwheels
Preparation:
Klaus has said over a dozen times, put the ingredients in the shaker, BEFORE adding the ice. I haven’t paid attention.. Now I should..
Pre-chill with bar ice and water- two Collins Glasses for this drink, then pour out
Add all the ingredients to a Boston Shaker (except the lime garnish)
Add ice to ¾ in the shaker and then cover
Shake hard for 15 seconds
Add a couple cubes of hand cut ice to your pre-chilled Collins glass
Strain the Cambridge Cocktail over the ice
Garnish with the lime pinwheel and a long straw


<
>
Hey Klaus, save some turkey for us!

