
Mark Sisson's Blog, page 30
March 1, 2022
The 12-3-30 Workout: All Hype or Worth Trying?
 In today’s Dear Mark, I’m tackling a reader’s question regarding a new workout that’s apparently all the rage on social media. I’m not much for hopping on viral fitness trends myself, but I’m always interested in keeping my finger on the pulse of what people are doing in the name of health, strength, and weight loss. You never know when the next truly great thing is going to come along, right?
Let’s get into it:
Dear Mark,
I’m seeing a new fitness trend all over my TikTok: “12-3-30.” Other users are claiming it changed their bodies in just a month, and I’m tempted to try it, but as far as I can tell it’s just… walking uphill? Is this trend too good to be true or worth trying? Do you think something like this could be considered “primal”?
Thanks for asking—and for thinking that I might be hip enough to already know about a TikTok trend! As a general rule, if a “get fit quick” scheme seems too good to be true, it probably is. However, let’s not discredit the actual value this trend might hold without examining it more closely.
What is the 12-3-30?A quick dive into Google explains the “12-3-30,” aka the 12.3.30 treadmill routine, is walking at a 12 percent incline at 3mph on a treadmill for 30 minutes. Credited to influencer Lauren Giraldo, this workout’s short time frame and relative ease have piqued people’s interest. I’m sure the testimonials from people claiming to have made big physique gains in a short time don’t hurt either.
To answer your question: yes, from what I can tell, the 12-3-30 workout is basically just walking uphill. From a Primal perspective, I’d give it a qualified thumbs-up. Here are a few reasons why:
Pros of the TikTok 12-3-30 workout:The biggest pro is simply that it gets people moving. As you probably know, I’m a particularly big fan of walking. It’s the ultimate Primal exercise and one of the best ways to combat the myriad health problems that result from a modern, mostly sedentary lifestyle. If I was being cynical, I might say something about how disconnected we are from Primal human movement patterns if it takes a viral TikTok trend to get people walking for 30 minutes, but far be it for me to rain on people’s parade. If this is what motivates people to get moving, who am I to argue?
Uphill walking can also be easier on the joints because it involves less impact, and it works the muscles somewhat differently than walking on a flat surface.
Potential cons of the 12-3-30 workout:My biggest concern is that this could become just another form of chronic cardio depending on how challenging this workout is for you. Generally speaking, I define chronic cardio as sustained, repetitive exercise that keeps your heart rate pegged in the “black hole.” That’s the middling ground where workouts are too hard to be considered truly aerobic and not hard enough to achieve the benefits of high-intensity workouts like sprinting.
The best way to know if you’re in the black hole is to use a heart rate monitor. To keep your effort level in the aerobic zone—which is what I’d recommend here—you’d want your heart rate to stay below the MAF threshold of 180 minus age. For example, a 50-year-old wouldn’t exceed a heart rate of 130 beats per minute at any point during the workout.
From what I read online, people often find the 12-3-30 routine pretty challenging, especially at first. If you’re panting away on the treadmill, that’s a pretty good sign your heart rate is in the black hole. The Primal recommendation would be to adjust the treadmill speed so you can keep your heart rate under 180 minus age. That will deliver more overall fitness benefits than grinding away at a moderately hard—and thus overly stressful—workout intensity. In lieu of wearing a heart rate monitor, try breathing only through your nose. Nasal breathing serves as a decent proxy of aerobic threshold.
A couple other caveats:Being in a gym all the time isn’t the most Primal. As I said, I don’t want to discourage people from walking in any form. Still, I’d encourage you to go outside and find a real hill sometimes, too, if possible. Part of what I love about walking is that it gets you out of the house or office, ideally into green space and fresh air.
Finally, do I think the 12-3-30 workout is enough to “melt the pounds away” and deliver all the health, fitness, and physique benefits you could possibly want? No. Even if you commit to this workout regularly, you’re still going to want to supplement with lifting heavy things, high-intensity sprints (or something equivalent), and maybe the occasional microworkout.
So what do you think, are you going to try the TikTok 12-3-30 workout? Are there other workouts you’re seeing on social media that you’d like me to weigh in on? Let me know in the comments!
Related Posts from MDAA Case Against Cardio (from a Former Mileage King)The Evidence Continues to Mount Against Chronic Cardio17 Reasons to Walk More This Year (function($) { $("#dfeE4wP").load("https://www.marksdailyapple.com/wp-ad..." ); })( jQuery );
The post The 12-3-30 Workout: All Hype or Worth Trying? appeared first on Mark's Daily Apple.


February 28, 2022
Collagen Coffee Chocolate Bomb Recipe
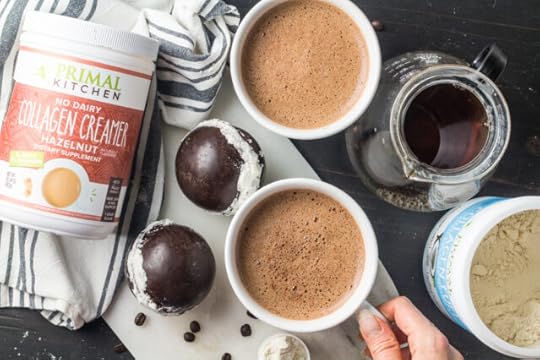 Coffee, collagen, and chocolate? That’s three of our favorite things in one recipe!
While this chocolate bomb recipe might sound too good to be true, you can make this decadent coffee upgrade at home using your collagen coffee creamer from Primal Kitchen. Delight brunch guests or add a little elegance to a weekday brew with Collagen Coffee Chocolate Bombs. All you need is a few ingredients and a hot chocolate bomb mold.
Made with tempered chocolate, these “bombs” melt into hot coffee and infuse your cup with velvety, rich flavor… plus, all the collagen protein benefits from a scoop of Collagen Fuel®. Add a little elegance to your caffeine fix with this crave-worthy coffee bomb recipe!
What Is a Chocolate Bomb?A chocolate bomb is a hollow orb made of tempered chocolate and filled with a tasty surprise—in this case, Collagen Fuel! When you drop it in hot coffee, the chocolate melts, releasing the delicious contents. From there, you can stir or use a frother or immersion blender to mix it all together. Voila, your ordinary coffee is now a deluxe coffee beverage worth bragging about!
Collagen Chocolate Bomb RecipeMakes: 4 collagen coffee bombs

Start by chopping your chocolate. To temper using a double boiler:
Fill a pot with a few inches of water and place it on your stovetop over medium heat.Place a heat-safe bowl on top of the pot. It should be a little bigger than the pot, and the bottom of the bowl should sit nicely inside the top of the pot. Pour about 2/3 of your chopped chocolate into the pot.Use a spatula to stir the chocolate as it melts in the bowl. When the chocolate is nearly melted, use a food thermometer to test the temperature of the chocolate. When the melted chocolate reaches 115 degrees Fahrenheit (46 degrees Celsius), quickly remove the bowl from the heat.Add the remaining chocolate to the bowl a little at a time, stirring continuously to promote the rest of the chocolate melting. This will also help cool down the melted chocolate slightly.Once all of the chocolate has been added and the temperature of the melted chocolate reaches 80 to 82 degrees Fahrenheit (26 to 28 Celsius), place the bowl back on the pot.Stir until the melted chocolate reaches 88 to 89 degrees Fahrenheit (31 to 32 Celsius), then quickly remove it from the heat again. Now your chocolate is tempered and ready to use!

Step 2: Make Your Coffee Bombs in a Hot Chocolate Bomb Mold
I recommend using a 2-inch or 2.5-inch silicone mold for the coffee bombs.
Use a silicone brush to brush the chocolate all over the insides of each of the round molds. This recipe will make 4 or 5 coffee bombs depending on the size of the mold you use and how much chocolate you use in each mold, so you will need to “paint” the insides of 8 to 10 molds total. I’d recommend starting with 8. You can always make an additional one if you have extra chocolate.
Once you have made your first chocolate layer, place the mold(s) in the fridge for 5 to 10 minutes to harden.
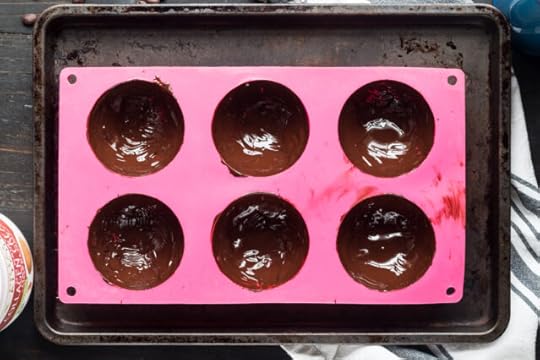
Remove the molds from the fridge and repeat the process of brushing the chocolate inside the molds, really focusing on building up the chocolate near the rims. Place the molds back in the fridge.
At this point, you can attempt to remove the chocolate from the molds, or paint the chocolate in the molds a third time. I’d recommend 3 times total to make sure your chocolate is thick enough and stays intact. Refrigerate one last time for about 15 minutes.
Once chilled and set, carefully remove each of the round halves from the molds.
Step 3: Fill the Coffee BombsIn a small bowl, combine the coconut milk powder and collagen powder. Scoop the mixture into 4 (or 5, if you made 10) of the chocolate halves.
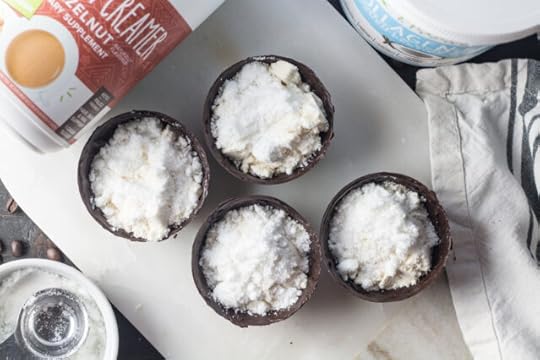
Brush a little melted chocolate on the outside rim of one empty chocolate half, then carefully press it on top of one of the filled halves to create a sphere. If you’d like, you can brush some chocolate around the outside of where the rims joined and roll it in a little collagen powder or coconut milk powder, as shown in the picture below.
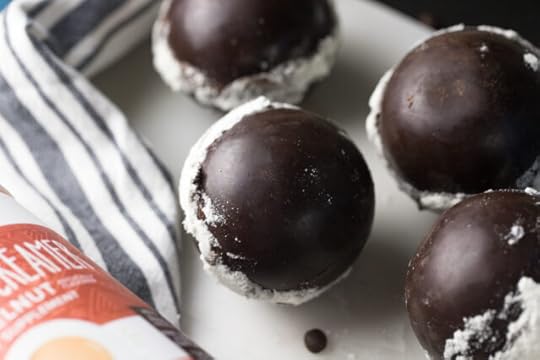
Repeat with the remaining chocolate. Store the collagen bombs in the fridge.
Step 4: Enjoy a Collagen Coffee Chocolate Bomb!Brew your favorite coffee. Pour a little in a mug and then add the collagen coffee bomb. Top with more coffee until the chocolate sphere melts and the contents come out. Use a little immersion blender or frother to blend everything up.
Optionally, add your favorite milk to the coffee and/or top with whipped cream or coconut cream. Enjoy immediately.

 Collagen Coffee Chocolate Bomb Recipe Author: Mark's Daily Apple
  Yield: 4 chocolate bombs [image error] Print Recipe [image error] Pin Recipe Description
 These chocolate “bombs” melt into hot coffee and infuse your cup with velvety, rich flavor… plus, all the collagen protein benefits from a scoop of Primal Kitchen Collagen Fuel®.
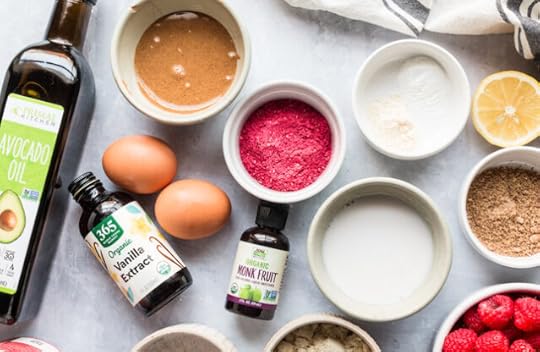
Ingredients200g 85% chocolate bar (see notes for types of chocolate)
1/4 cup coconut milk powder
4 scoops Primal Kitchen Vanilla, Hazelnut or Chocolate Collagen Fuel
24–32 oz. of your favorite coffee
Instructions Step 1: How to Temper ChocolateStart by chopping your chocolate. To temper using a double boiler:
Fill a pot with a few inches of water and place it on your stovetop over medium heat.Place a heat-safe bowl on top of the pot. It should be a little bigger than the pot, and the bottom of the bowl should sit nicely inside the top of the pot. Pour about 2/3 of your chopped chocolate into the pot.Use a spatula to stir the chocolate as it melts in the bowl. When the chocolate is nearly melted, use a food thermometer to test the temperature of the chocolate. When the melted chocolate reaches 115 degrees Fahrenheit (46 degrees Celsius), quickly remove the bowl from the heat.Add the remaining chocolate to the bowl a little at a time, stirring continuously to promote the rest of the chocolate melting. This will also help cool down the melted chocolate slightly.Once all of the chocolate has been added and the temperature of the melted chocolate reaches 80 to 82 degrees Fahrenheit (26 to 28 Celsius), place the bowl back on the pot.Stir until the melted chocolate reaches 88 to 89 degrees Fahrenheit (31 to 32 Celsius), then quickly remove it from the heat again. Now your chocolate is tempered and ready to use!Step 2: Make Your Coffee Bombs in a Hot Chocolate Bomb Mold
We recommend using a 2-inch or 2.5-inch silicone mold for the coffee bombs.
Use a silicone brush to brush the chocolate all over the insides of each of the round molds. This recipe will make 4 or 5 coffee bombs depending on the size of the mold you use and how much chocolate you use in each mold, so you will need to “paint” the insides of 8 to 10 molds total. I’d recommend starting with 8. You can always make an additional one if you have extra chocolate.
Once you have made your first chocolate layer, place the mold(s) in the fridge for 5 to 10 minutes to harden.
Remove the molds from the fridge and repeat the process of brushing the chocolate inside the molds, really focusing on building up the chocolate near the rims. Place the molds back in the fridge.
At this point, you can attempt to remove the chocolate from the molds, or paint the chocolate in the molds a third time. I’d recommend 3 times total to make sure your chocolate is thick enough and stays intact. Refrigerate one last time for about 15 minutes.
Once chilled and set, carefully remove each of the round halves from the molds.
Step 3: Fill the Coffee BombsIn a small bowl, combine the coconut milk powder and collagen powder. Scoop the mixture into 4 (or 5, if you made 10) of the chocolate halves.
Brush a little melted chocolate on the outside rim of one empty chocolate half, then carefully press it on top of one of the filled halves to create a sphere. If you’d like, you can brush some chocolate around the outside of where the rims joined and roll it in a little collagen powder or coconut milk powder.
Repeat with the remaining chocolate. Store the collagen bombs in the fridge.
Step 4: Enjoy a Collagen Coffee Chocolate Bomb!Brew your favorite coffee. Pour a little in a mug and then add the collagen coffee bomb. Top with more coffee until the chocolate sphere melts and the contents come out. Use a little immersion blender or frother to blend everything up.
Optionally, add your favorite milk to the coffee and/or top with whipped cream or coconut cream. Enjoy immediately.
NotesWe recommend using a chocolate bar rather than chocolate chips for this recipe. The chopped bar will melt better and have more success being tempered. We used a very dark chocolate bar. Using a low-carb chocolate bar (e.g., Lily’s) would probably work as well.
If you can tolerate dairy, feel free to use regular milk powder instead of coconut milk powder.
Nutrition Serving Size: 1 chocolate bomb Calories: 213 Sugar: 5.5g Sodium: 247g Fat: 11g Saturated Fat: 6g Carbohydrates: 29g Fiber: 8g Protein: 3g Cholesterol: 5mg Net Carbs: 21gKeywords: Coffee, Collagen
 Did you make this recipe?
 Share a photo and tag Mark's Daily Apple — we can't wait to see what you've made!
(function($) { $("#dfiyABT").load("https://www.marksdailyapple.com/wp-ad..." ); })( jQuery ); 
The post Collagen Coffee Chocolate Bomb Recipe appeared first on Mark's Daily Apple.

February 25, 2022
New and Noteworthy: What I Read This Week—Edition 166

Research of the Week
More meat, longer life.
Colon cancer patients who survive and eat lots of meat do just fine.
Resistance training is the most effective exercise modality for seniors who want to improve cognitive function.
More serum albumin, longer life.
Higher vitamin D levels, more muscle (in Korean adults).
In infertile men, taking vitamin D improves HDL levels and fasting insulin.
New Primal Kitchen PodcastsPrimal Kitchen Podcast, Episode 19: The Secrets on Sexual Optimization and Aging with Dr. Amy Killen
Media, SchmediaArchaeologists uncover a pristine 7000 year-old shrine where ancient Jordanian hunters corralled and slaughtered gazelles.
Lab leak theory now considered the most likely to be true in many circles.
Interesting Blog PostsSocial NotesQuite the map.
Everything ElseOn natural wines.
Nice guide to shellfish.
Things I’m Up to and Interested InClassic: “The Skinny on Fats”
Good letter to the editor: Wonder why it was rejected.
Wonder why: Fake meat companies aren’t doing so well.
Incredible: Teen born without legs wins state wrestling championship.
Not surprising: Meat intake a strong predictor of longevity.
Question I’m AskingHow much time do you spend on the floor?
Recipe CornerSimple chile paste, sambal oelek.Squash, pork, apples: the perfect triumvirate.Time CapsuleOne year ago (Feb 19 – Feb 25)
How I’d Change Higher Education — What I’d do.Orthorexia: Where to Draw the Line Between Healthy Eating and Obsession?— Where’s the line?Comment of the Week
“Mark i really enjoyed your post today. You made me realize the different types of hunger and whether it was even “real” hunger. Great food for thought today”
-I see what you did there.
(function($) { $("#dfOAaV1").load("https://www.marksdailyapple.com/wp-ad..." ); })( jQuery ); 
The post New and Noteworthy: What I Read This Week—Edition 166 appeared first on Mark's Daily Apple.

February 24, 2022
Dear Mark: How to Freeze Produce

Dear Mark,
Your website inspired me to join a CSA this past year, and I’m looking forward to frequenting my local farmers’ market again this summer. I absolutely love all the produce selections, but this has opened my eyes to how limited I am in the late fall/winter by what’s usually available (and affordable) in the grocery store. (I live in the Northern Plains.) I’d like to begin thinking about freezing some items to enjoy them post-season. What tips do you have for doing this? Thank you!
Thanks for the question! You’re correct—as incredible as it is to enjoy fresh veggies and fruits when they are in season, it’s smart to look ahead to the “scarcer” months. One of the best ways to carry over the season’s best, of course, is freezing. (Grok would’ve traded a lot of hides for a deep freeze chest….) This year, as you load up on seasonal produce in the spring, summer, and early fall, here are a few suggestions and resources for the best freezer prep and storage techniques.
The week of Feb 21, 2022, Primal Kitchen is featuring ways to cut down on food waste. Find food waste facts, waste reduction tips, exclusive recipes, and resources from the Farmlink Project by signing up here.
Set UpSelect your freezer spaceFirst off, I’d highly recommend investing in a deep freezer. You can certainly make use of the freezer compartment of your refrigerator, but it’s typically a limited space and doesn’t stay as consistently cold as a deep freezer chest. (For best results, freezers should be kept at 0° Fahrenheit or less. A simple freezer gauge can give you an accurate reading.) Although items should still last a number of months, you aren’t going to get the same longevity using your refrigerator freezer (8-12 months for most produce when properly prepped and packaged).
If you’re worried about initial cost, keep in mind that there are plenty of good used deep freezers for sale. Check scratch and dent sales, classifieds, and Craigslist for starters. And also keep in mind that you have the potential to recoup much of that money within the first year alone, depending on how much you choose to freeze (produce, meats, etc.). It’s less expensive to buy good quality produce in season and make it last through much of the winter than it is to buy your full produce needs in the off-season. When you add the savings of cowpooling or other bulk meat/poultry/game storage, it won’t be long before your freezer will pay for itself.
Storage solutions for produceAs for wraps, bags, and such, don’t skimp. You’ll need high-quality storage to keep out moisture. Lined freezer paper and freezer tape can work for “dry” packing produce. Another option, particularly for purees or fruits that will be stored with juice, is freezer-appropriate canning jars. Many people find it more convenient to use plastic freezer bags (either the Ziploc kind or the self-cut kind that requires a heat sealer).
In any case, the freezer wrap or bags should be freezer-designated and vapor proof as well as pliant. The idea here is to mold the packaging as close to the outline of the food as possible to remove trapped air and to prevent the exchange of moisture. If the item is allowed to give off its own moisture, freezer burn will set in—those brownish, tough, odd-tasting areas on thawed veggies. Spare your produce the calamity and yourself the frustration (and lost money) by investing a little extra change in good storage solutions.
Prep the ProduceSelecting fresh produceFor the sake of taste and nutrients, you’ll want the freshest produce you can get your hands on. If you’re not a gardener yourself, the next best thing can be found in CSA packages or farmers’ markets, as you’ve discovered. Items are generally picked within a day or even a few hours of sale/distribution.
Washing and preparing the product to freezeWash, cut, peel and prep as needed. (The smaller the pieces, the more tightly you can pack your produce.)
Nearly all vegetables will need to be blanched before freezing. (A few like sweet potatoes and pumpkin should be thoroughly cooked before freezing.) The quick shot in boiling water or steam will halt the enzyme action responsible for natural decomposition. Too little, and you run the risk of not shutting down the enzyme activity (maybe even accelerating it). Too much, and you might be sacrificing nutrients as well as texture and taste. A brief “shock” in ice water immediately after blanching will keep the items from cooking further.
The timing on blanching, however, is a delicate dance. Check out this resource for specific blanching times for different vegetables. If you choose to “steam blanch,” the times are generally 1.5 times the length of traditional blanching.
Tips for freezing produceA few other notes to keep in mind:
You won’t need a lot of complicated equipment, just some large pots, bowls, tongs, towels, and maybe wire baskets.Although microwave blanching may work for small batches that will be eaten in a short period of time, many experts recommend against it for long-term freezing. There’s doubt that it halts all enzyme activity.Certain fruits like apples, peaches, avocado, and pears should be stored with ascorbic acid to prevent discoloration. You might also consider it for vegetables like artichokes and sweet potato to maintain peak color.Package Well and Freeze FastHow to freeze fruits and vegetablesOnce the vegetables and fruits are appropriately prepped, cooked/blanched, and cooled, allow them to thoroughly drain and dry. Kitchen towels or paper towels can speed up the process, especially for certain intact items like green beans or whole berries.
Some fruits like apples and nectarines tend to freeze better with juice, but most vegetables and many fruits can be packed without any juice. After draining, you can tightly pack them in freezer bags or wrap and frozen in their bulk packaging. (Sugar or syrup packing is often recommended for fruit, but a small amount of juice and ascorbic acid can work just as well.)
If you have space, it’s a good idea to freeze fruits and vegetables in a single layer on a tray first, then immediately pack them in bags or wrap. This keeps them from clumping together and makes it easier to remove portions.
Cooked purees can be stored in large containers, but it’s even better to use silicone ice cube trays or containers designed especially for freezing single servings. This works especially well for baby food, where you only want to thaw a small amount at one time.
Organizing frozen produce in the freezerOnce you have your packages loaded and ready for storage, stack up already frozen items and move them to one side of your freezer. Spread the new packages across the open areas to encourage speedier freezing, which will discourage freezer burn and help preserve taste.
Have your own tips for freezing spring and summer’s harvest? Prefer canning or fermenting to freezing? Favorite uses for your frozen stores? As always, thanks for your questions and comments, and keep ‘em coming!
Other Food Waste Posts from MDA:How to Best Preserve ProduceSeasonal Eating: Getting the Most Out of Winter VegetablesHow to Start Composting (function($) { $("#dfyvCSz").load("https://www.marksdailyapple.com/wp-ad..." ); })( jQuery );
The post Dear Mark: How to Freeze Produce appeared first on Mark's Daily Apple.

February 23, 2022
How to Start Composting
 Composting is one of those things that everyone agrees is good. There are literally no downsides, only benefits.
Composting creates nutrient-dense, well-fertilized soil.
Composting means “food waste” is no longer wasteful.
Composting is better for the environment.
Composting organic materials is more productive than simply throwing them away into a landfill.
Composting is passive income. You’re not actively breaking down the organic materials. You’re not doing anything except throwing it in the pile or in the container. The microbes handle the rest and you get the benefit.
From all perspectives, composting is a smart move. If you just want a healthier garden, composting does that. If you want to improve soil health and fight soil nutrient deficiencies, composting does that. If you want to fight environmental degradation, composting does that. If you just want less stuff in your trash can and in the landfill, composting does that.
There’s no reason not to compost. Even if you live in a small space without a yard, you can participate. But how do you get started?
The week of Feb 21, 2022, Primal Kitchen is featuring ways to cut down on food waste. Find food waste facts, waste reduction tips, exclusive recipes, and resources from the Farmlink Project by signing up here. All week, MDA will be featuring posts that can help you get the most bang for your grocery budget and minimize food waste to boot!
How to Get Started CompostingThe basic way to get started is to just get started.
First, figure out what can and can’t be composted:
What to CompostVegetable and fruit scrapsCoffee grounds and paper filtersTeabags, old tea leavesUnglossy/matte paper products and cardboard products (including PrimalKitchen.com kraft paper used in shipping!)Yard clippingsLeaves, grassHay and strawUntreated wood chips, sawdust, wood scraps, toothpicksWine corksTissuesEggshells (crushed best)Fur, hair, feathersManureOld bread, cooked pastaCotton, wool, linenWhat Not to CompostPlasticGlossy paper products—magazines, “shiny” paperMetalStoneGlassLarge branches, wood roundsPet and human wasteTreated wood chips, sawdust, wood scrapsSynthetic fabricsOilSo, do you just throw everything from the “What to Compost” list in a big pile or bin out in the yard?Not exactly.
You should think of compostable materials in terms of “greens” and “browns.” Greens are wetter materials, higher in nitrogen. Browns are drier, higher in carbon.
Greens include:
Most kitchen scrapsManureCoffee groundsFresh (green) grass, leaves, and yard clippingsBrowns include:
Wood scraps, dust, chipsPaper, cardboardHayDried (brown) grass, leaves, and yard clippingsEgg shellsRatio: You want more browns than greens in your compost pile or bin. It doesn’t have to be an exact ratio, but somewhere between 4:1 and 2:1 brown:green is good. “More browns than greens” is good enough. It’s not an exact science, more an art. Your compost should be moist, not soaking wet. It shouldn’t be dry, it shouldn’t be slimy, it should be juuuust right.
Layers: You should create rough “layers” of browns and greens. Browns on the bottom, then greens, then browns, then greens, and so on. Make sure the bottom and top are both browns. This will allow air to flow and prevent moisture from pooling. The layers are bound to get upset as the compost develops and you turn it, and that’s okay. It’s a guideline, not a hard-and-fast rule.
What Kind of Compost Set-Up is Best?You can do your compost on the ground in a pile. No structure, no walls, nothing but the compost and the earth beneath it. That will work.
You can do your compost in a large bin. Four walls and a roof. If your compost is totally cut off from the ground, make sure you “seed” it with some garden soil to introduce microbes. That will work.
You can do your compost in a big tumbler with a handle that lets you tumble the contents and aerate it. That will work.
The best compost set up is the one that you can set up and maintain where you live. If that’s a small bin on your patio, that’s fine. If it’s a big pile in your garden, that’s fine. Whatever you have the room for will be a-ok.
Just stick with the basic concept of “more browns than greens,” frequently aerate or turn your compost with a spade or pitchfork (or tumbler handle), and avoid excessive moisture or too little moisture. Don’t lose sleep over composting set ups. Just do it.
There are some other options, though.
Make a Worm Composting BinWorm bins are great for smaller places without yards because they’re self-contained. Making a worm bin is pretty easy. Here’s how:
Get two plastic tubs. One shorter, one taller, with the taller one able to fit inside the shorter bottom one.Bottom tub: 15 inches long, 25 inches wide, 5 inches tall
Top tub: 15 inches long, 20 inches wide, 15+ inches tall
The top tub has a lid. Bottom tub doesn’t need one.Drill a 1-inch hole 2 inches from the top of the top tub. Drill another one inch hole on the opposite side.Near each bottom corner of the top tub, drill 1/8 inch holes.Cover all six holes with vinyl screen. Glue or staple the screen in place. This will keep worms from escaping.The top tub goes inside the bottom tub. Fill the top tub three inches deep with shredded paper and a pound of garden soil to introduce microbes. Add enough water that it’s all moist (but not wet).Add the worms. Red wrigglers are best.Let them acclimate to the bin for a few days, then add food. Food can be almost anything from the kitchen, but avoid meat, dairy, and bones in your worm bin. To add food, create a hole in the middle of the bin’s contents, add the food, and cover with the soil/paper mixture. You may have to add more soil/paper mix until the worms start creating enough soil of their own.Feed your worms about once a week. If they’re ignoring a certain food you put in there, fish it out and don’t add it again. Worms have preferences. Yours simply might not care for that particular food.The liquid that pools in the bottom tub is highly nutritious—for your plants. Add it to your garden.When the compost reaches the two holes you drilled in the top bin, it’s time to harvest some of your compost and add it to your garden. Try to avoid scooping out worms.
If you don’t want to make your own, you can also buy pre-made setups.
Try Bokashi CompostingBokashi is a Japanese method of composting that uses anaerobic fermentation to produce compost in a fraction of the time it takes a regular compost pile. And it’s easy to make your own setup.
Get two 5-gallon buckets and one snug-fitting lid.Drill 20 small holes in the bottom of one bucket. Place the bucket with holes in the bottom inside the bucket with no holes. These are drain holes for the composting liquid.Add kitchen scraps to the top bucket. Kitchen scraps can include anything, including meat, bones, and fat. Avoid excessive liquid and oil, though, and try to keep the pieces relatively small to speed up fermentation.Sprinkle with bokashi bran—this is bran that has been inoculated with the bokashi microbes. Cover the surface of the scrap layer with bran and stir to mix. 1-2 tablespoons per every 2 inches of food scraps.Put the lid back on. Make sure it’s airtight, as the bokashi needs an air tight environment to flourish. It’s even a good idea to cover the compost itself with a tight fitting plate or plastic weighed down with rocks to limit air exposure.Every time you add more kitchen scraps, sprinkle on more bokashi bran and stir, then press down with a potato masher to compact the compost and minimize air.Add kitchen scraps every other day at most; you want to minimize air exposure as much as possible.Drain the liquid in the bottom bucket every few days. You can use this diluted on the garden.Once the top bucket is almost full, cover and leave for two weeks for the process to finish. Keep draining liquid. After two weeks, the contents should be ready to move out to the garden to be buried or composted further. Don’t apply it right away to your plants, as it’s still very acidic. Another two weeks of “curing” outside or buried will render it suitable for garden application.
Some people even have success adding bokashi bran to their existing compost piles. It’s worth a try.
Choose Your MotivationOne important part of composting is your motivation. Why are you composting? Are you composting to save the world and fight climate change? Or are you composting to get better soil, to create your own fertilizer, to have a more sustainable way of life in your own household? I would argue that the latter motivations are more helpful and more sustainable for someone who wants to start composting and keep composting.
Because here’s the thing: when you are composting to save the world or some other grand design with global implications you’re not going to see any impact from your actions. It may help in some small way, but throwing your banana peels in the compost pile is not going to move the needle on the climate or world hunger or soil devastation. However, it will move the needle on the quality of your own garden and your own life.
If you’re expecting your little compost pile to save the world, and then it doesn’t, you’re less likely to stick with it. What’s the point?
If you’re expecting your little compost pile to save your garden, and then it does, you’re more likely to stick with it. Because that’s the entire point.
That’s it: a quick and dirty guide to composting.
How do you compost? What did I miss? What would you add to this article? Let me know down below!
More Ways to Reduce Food Waste from MDA:How to Preserve Fresh VegetablesSeasonal Eating: Getting the Most Out of Winter Vegetables (function($) { $("#df9ees1").load("https://www.marksdailyapple.com/wp-ad..." ); })( jQuery );
The post How to Start Composting appeared first on Mark's Daily Apple.

February 22, 2022
Seasonal Eating: Getting the Most Out of Winter Vegetables
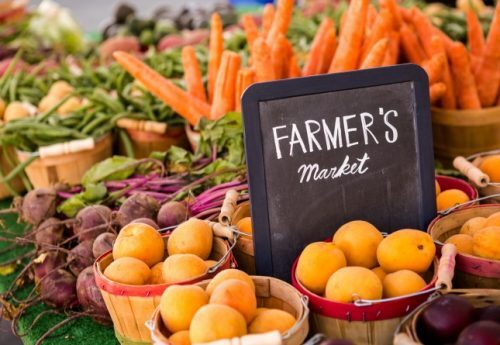 Keeping on our theme this week of minimizing food waste, today we’re going to talk about seasonal eating and getting the most out of the winter vegetables you’ll find at your farmer’s market and grocery store this time of year.
The statistics on food waste are sobering, as discussed yesterday. Reducing food waste takes a multi-pronged approach. Some of the things you can do to waste less food and be more sustainable in the kitchen include:
Prioritize the produce that is seasonal in your region.Don’t buy more than you need.Learn how to store food correctly.Learn how to preserve food if you won’t eat it in time.Use the whole plant when possible. (Hint: All of the vegetables we’ll be mentioning today have edible leaves!)Use food scraps in broth, soups, smoothies.Compost what you don’t eat. (More on composting tomorrow!)The week of Feb 21, 2022, Primal Kitchen is featuring ways to cut down on food waste. Find food waste facts, waste reduction tips, exclusive recipes, and resources from the Farmlink Project by signing up here. All week, MDA will be featuring posts that can help you get the most bang for your grocery budget and minimize food waste to boot!
What Is Seasonal Eating?Seasonal eating means making an effort to buy vegetables and fruits that are naturally grown and harvested in a given climate.
Technically, this can include food grown on the other side of the planet and flown or shipped thousands of miles to your local grocer—for example, apples grown in Chile or New Zealand and sent to New England in winter. They are in season in the region they were grown, hence “seasonal.”
Generally speaking, though, when we talk about seasonal eating, we have more locally grown produce in mind. In-season, local fruits and vegetables are likely to be fresher and tastier by the time they make it to your plate, so you’re more apt to eat them. The less they have to travel, the less likely they are to spoil in transit, too, and they’ll carry a smaller ecological footprint.https://pubmed.ncbi.nlm.nih.gov/25027...
Another benefit of seasonal eating is that it encourages you to diversify your diet throughout the year. For those of us who value variety, eating according to the season means you effortlessly incorporate a diverse array of produce as you move from hearty winter greens, cruciferous vegetables, and citrus fruits to summer berries, tomatoes, cucumber, and zucchini to autumn’s apples and squashes.
Of course, your ability to buy in-season and local produce depends very much on where you live. If you’re currently buried under feet of snow, you won’t have the same access to locally grown vegetables as someone who lives in a warmer climate. Gardening websites and resources like the USDA can tell you what grows well in your area and beyond throughout the year.
As always, this is a “don’t let perfect be the enemy of good” situation. Eating seasonally is a great goal to strive for, but it shouldn’t be stressful. It’s awesome if you can take steps that allow you to decrease your ecological footprint and food waste. You also shouldn’t feel bad about using frozen fruits and vegetables and fresh produce from farther afield to round out your diet when accessibility is an issue.
What Vegetables are in Season, and How Do I Use Winter Vegetables?Late winter is the time to celebrate sulfur-rich cruciferous vegetables (aka Brassicas), robust leafy greens, and alliums (onion, garlic, leeks)! Although we’re focusing on vegetables today, let’s not overlook the citrus fruits and persimmons that abound at this time of year, too.
(The specifics obviously depend on where you’re located. I’m writing about winter vegetables now because it is winter in the northern hemisphere. Our friends below the equator are enjoying summer’s bounties. Likewise, these vegetables are ones we commonly grow in America. Your local harvest might look different.)
A few notes on preserving vegetables:There are more tips for freezing vegetables coming tomorrow. For vegetables that can be frozen, the general method is:
Bring a large pot of water to boil. Cut the vegetable into chunks or separate florets (broccoli and cauliflower).Place the vegetables in boiling water for two to five minutes, then transfer immediately to an ice bath for a minute or two. (Check recommended times for the vegetable you wish to freeze.)Drain and dry the vegetables as well as possible.Place on a baking sheet in a single layer in the freezer.Once frozen, transfer to an airtight container, removing as much air as possible.Root vegetables—beetroots, carrots, radishes, rutabaga, turnips, and the like—can also be packed in sand, sawdust, peat moss in a wooden crate or plastic box. They will keep that way for up to six months if the crate is kept in a cool place like a garage or cellar. I’m not going to go into detail about that method here, but that’s an option you can explore.
For more information about how to safely can vegetables and fruits, start with the National Center for Home Food Preservation.
Dehydrating is another option for many fruits and vegetables, but today we’ll focus on methods that don’t need special equipment.
Now, without further ado, here are 18 of our favorite late-winter vegetables:
Arugula (aka Rocket)Peppery leafy green in the Brassica family (a cousin of cabbage, Brussels sprouts, and broccoli). Usually eaten raw but can be cooked as well.
How to store: Roll loosely in a thin kitchen towel and place in an open food storage bag or bin so moisture can escape. Keep in the crisper drawer and try to use within three to five days.
How to preserve: Arugula can be frozen like spinach, but the best way to preserve arugula is to make a pesto or compound butter and freeze in individual portions (an ice cube tray works well for freezing pesto).
Try these recipes:
Pear Arugula Salad {Primal Kitchen}Arugula Pesto {Epicurious}AsparagusComes in green, purple, and white varieties. Rich in Vitamin K, folate, and the prebiotic inulin, asparagus can be eaten raw or roasted, grilled, broiled, stir-fried, and more.
How to store: Trim off the woody ends and store upright in a jar of water in the refrigerator. Eat within five to seven days.
How to preserve: Asparagus can be frozen, pickled, or canned.
Try these recipes:
Asparagus Dip {Primal Kitchen}Spicy Pork and Asparagus Stir-fry {Nom Nom Paleo}Parmesan Roasted Asparagus {Food Network}BeetsBeets are in in the same family as spinach and chard. Beetroots come in a variety of sizes and colors and are delicious raw or cooked. Try spiral cutting them into veggie noodles, or use your dehydrator to make beet chips. And don’t toss the greens! Sauté the greens with garlic or add them to your next stir-fry.
How to store: Separate the roots from the leaves. Roll the leaves loosely in a thin kitchen towel and place in an open food storage bag in the crisper drawer. Use within a few days. Beetroots can hang out in the crisper drawer loose or in a storage bag for weeks.
How to preserve: Beetroots can be pickled or canned. Roasted beets can also be frozen. Store in sand.
Try these recipes:
Sautéed Beet Greens {Food Network}Belly Dance Beet Salad {Mel Joulwan}Beet Noodles with Mushrooms and No-Dairy Vodka Sauce (Vegan) {Primal Kitchen}Bok ChoyAnother member of the Brassica family, bok choy is most commonly associated with Chinese cuisine. Usually, the leaves and stalks are separated and added to soups or stir-fries.
How to store: Roll loosely in a thin kitchen towel and place in an open food storage bag. Keep in the crisper drawer and try to use within a few days.
How to preserve: Bok choy doesn’t preserve well. Try to eat it while it’s still fresh.
Try these recipes:
Bok Choy Dim Sum {I Heart Umami}Korean Beef with Bok Choy {The Castaway Kitchen}BroccoliYou know you can eat the florets and stalks, but if you’re lucky enough to find broccoli with the leaves still attached, grab it. Chop the leaves and add them to your next salad, stir-fry, or smoothie.
How to store: Make sure it is dry, then store it in an unsealed storage bag in the crisper drawer. Eat within three to five days.
How to preserve: Freezing works best.
Try these recipes:
Summer Broccoli Salad {MDA}Roasted Broccoli with Dairy-free Cheese Sauce {Primal Kitchen}Creamy Broccoli and Spinach Soup {MDA}Brussels SproutsBrussels sprouts must have gotten a new publicist in the past decade, because they went from being one of the most hated and maligned vegetables to appearing on the appetizer menu of every hip restaurant and gastropub. This glow-up is well deserved. Perfectly roasted Brussels sprouts are pure heaven.
How to store: If you can find Brussels sprouts still on the stalk, this is ideal. They will stay fresh on the stalk for a couple weeks in the fridge. Otherwise, keep Brussels sprouts in an unsealed or perforated storage bag in the crisper.
How to preserve: Freeze, pickle, lacto-ferment.
Try these recipes:
Shaved Brussels Sprouts Salad {MDA}Balsamic Roasted Brussels Sprouts {MDA}CabbageCabbages come in a variety of shapes, sizes, and colors. They were first domesticated thousands of years ago and are the original Brassicas from which all the other Brassicas on this list (arugula, bok choy, broccoli, Brussels sprouts, cauliflower, collard greens, kale, kohlrabi, radishes, rutabaga, turnips) derive.
How to store: Do not wash or cut cabbage until you are ready to use it. Make sure cabbage is dry, then wrap in plastic. It will stay fresh in the crisper drawer for several months.
How to preserve: Ferment. Turn your cabbage into lacto-fermented sauerkraut or kimchi, and it can live in your refrigerator for months. If you can it, the heat kills the beneficial bacteria that drive the fermentation process, but you can store canned sauerkraut safely for several years in a cold cellar.
Try these recipes:
Keto Cole Slaw {MDA}Unstuffed Cabbage Bowl {MDA}Roasted Veggie Bowl with Kale & Cabbage Slaw {Primal Kitchen}Homemade Sauerkraut {Cultures for Health}CarrotsCarrots probably won’t help you see better, sadly, but they do contain high levels of vitamin A. When shopping for carrots, look for ones with the leaves still attached and turn the leaves into pesto. Make sure you wash the leaves thoroughly, as they trap a ton of dirt.
How to store: Cut off the leaves just above the carrot. Roll the leaves loosely in a thin kitchen towel and place in an open food storage bag. Store unwashed carrots in mesh or paper bags so they can breathe. The leaves will keep for a couple days in the crisper, while carrots will stay fresh for several weeks, perhaps even longer.
How to preserve: Freeze, pickle, ferment. Store in sand.
Try these recipes:
Balsamic Roasted Carrots {Primal Kitchen}Carrot Top Pesto {Simply Recipes}Creamy Paleo Carrot Soup with Bacon {What Great Grandma Ate}CauliflowerAh, the ubiquitous cauliflower. Thanks largely to the keto movement, cauliflower is having its heyday standing in for bread, pizza crust, rice, and potatoes. Is there anything cauliflower can’t become? (Yes, plenty, but it’s still pretty darn versatile!)
How to store: Wrapped in plastic in the crisper, it will stay good for several weeks.
How to preserve: Freeze, pickle, lacto-ferment.
Try these recipes:
Cauliflower Steaks With Chimichurri {MDA}Buffalo Sauce Cauliflower Wings {Primal Kitchen}Lacto-fermented Cauliflower, Carrots, and Garlic {Cultures for Health}Chard (aka Swiss Chard)Packs tons of vitamins K and A, plus a decent amount of fiber. Both the stems and leaves can be eaten raw or cooked, as with any of the hearty greens.
How to store: Roll loosely in a thin kitchen towel and place in an open food storage bag. Keep in the crisper drawer and try to use within a few days.
How to preserve: Freeze the leaves. The stems can also be frozen, but the texture becomes unappealing.
Try these recipes:
Warm Mushroom and Chard Salad with Bacon and Mustard Dressing {MDA}Swiss Chard with Raisins, Pine Nuts, and Porkitos {Nom Nom Paleo}Collard GreensMost associated with Southern cooking, especially collards cooked low-and-slow with bacon or ham hocks. The leaves are sturdier than lettuce or chard, so they make a good substitute for tortillas, though some people find raw collard greens to be bitter.
How to store: Roll loosely in a thin kitchen towel and place in an open food storage bag. Keep in the crisper drawer and try to use within a few days.
How to preserve: Trim off the tough stems, then freeze the leaves.
Try these recipes:
Collard Green Tuna Wraps {MDA}Chicken Bacon Ranch Wrap {Primal Kitchen}Bacon Braised Collard Greens {PaleOMG}FennelFennel is kind of like if celery and licorice had a baby. That sounds atrocious, but fennel bulb is absolutely delicious raw in salads paired with citrus fruits and avocado (both of which are in season in the winter) or roasted with a whole chicken. The stems and feathery fronds are edible, too!
How to store: Optionally separate the bulbs from the stems and fronds. Roll them loosely in a thin kitchen towel and place in an open food storage bag. Keep in the crisper drawer and try to use within a week.
How to preserve: Fennel bulbs can be frozen (quarter or slice first) or fermented. The fronds can be frozen as-is or made into pesto. Try pickling the stems.
Try these recipes:
Braised Turkey Legs with Fennel and Artichoke Hearts {MDA}Sausage, Fennel and Kale Ragù {Primal Gourmet}Citrus Salad with Fennel & Avocado {Love & Lemons}Fragrant Fennel Fronds Pesto {Whole Food Bellies}KaleKale has exploded on the food scene in recent years and divided us into two camps: kale lovers or kale haters. I find that different types of kale work better for different applications—curly kale massaged for salad or dehydrated into kale chips, lacinato sautéed with shallots and garlic, red the jack-of-all-trades.
How to store: Roll loosely in a thin kitchen towel and place in an open food storage bag. Try to use within a week.
How to preserve: As with other leafy greens, freezing is best.
Try these recipes:
Balsamic Glazed Salmon with Kale & Avocado Salad {Primal Kitchen}Turmeric & Kale Soup with Ground Lamb {MDA}Roasted Veggie Bowl with Kale & Cabbage Slaw {Primal Kitchen}KohlrabiKohlrabi is one of those vegetables that you might have seen in the store and thought, “What the heck is that?” It looks sort of like a cross between a turnip and a cabbage with leafy greens growing out the sides. Tastewise, it’s kind of like a mild turnip and is great raw (thinly sliced or shredded) in salads. Alternatively, you can roast it, sauté it, or use it recipes as a substitute for turnips, radishes, or rutabaga.
How to store: Separate the leaves from the bulb. Roll the leaves loosely in a thin kitchen towel and place in an open food storage bag in the crisper drawer. Use within a few days. Toss the bulbs into the crisper loose or in an open or perforated storage bag. They’ll stay good for a few weeks.
How to preserve: Kohlrabi bulbs can be frozen (cut into small cubes first) or fermented into pickles or kraut.
Try these recipes:
Simple Kohlrabi with Pistachios and Sage {Healthy Seasonal Recipes}Paleo Kohlrabi Apple Slaw {Ugly Food Makeover}Lacto-fermented Kohlrabi Pickles {Cultures for Health}RadishesMany people have only eaten radishes raw, but cooked, they can sub in for potatoes or other root vegetables like turnips or kohlrabi in many recipes. The leaves are also edible, but make sure you wash them very thoroughly, lest you end up with a mouthful of soil.
How to store: Cut off the leaves just above the bulb. Roll the leaves loosely in a thin kitchen towel and place them in open food storage bags in the crisper drawer. Use the leaves within two or three days. Radishes can be stored the same way, or keep them in a jar of cold water in the fridge, changing the water every few days. They will keep for a couple weeks or more.
How to preserve: Lacto-fermenting, either on their own or in something like kimchi. Store in sand.
Try these recipes:
Vegetable Latkes {MDA}Summer Broccoli Salad {MDA}Garlic Roasted Radishes {The Real Food Dietitians}RutabagaIf you like turnips, you’ll love rutabaga, which is like turnip’s mellower, slightly sweeter cousin.
How to store: Place in a storage bag in the crisper. They will stay good for several weeks.
How to preserve: Freeze. Store in sand.
Try these recipes:
Low-Carb and Keto Alternatives to Mashed Potatoes {MDA}Instant Pot Roast {The Castaway Kitchen}Rutabagas O’Brien {Primal Wellness}TurnipsAnother Brassica with edible leaves and a flavorful, often under-appreciated bulb (which is actually part of the stem, not a root per se). Although they can be eaten raw, cooking them will help release some of the natural sweetness.
How to store: Separate the roots from the leaves. Roll the leaves loosely in a thin kitchen towel and place in an open food storage bag in the crisper drawer. Place the turnips in the crisper drawer loose or in a storage bag. They will stay good for at least a couple weeks.
How to preserve: Freeze. Store in sand.
Try these recipes:
Keto Egg Bake {MDA}One Pot Braised Pork with Root Vegetables {MDA}Roasted Turnips {Healthy Seasonal Recipes}Related Posts from Mark’s Daily Apple6 Primal-Minded Reasons to Hit the Farmers Market This WeekendIs Eating Local Best? Perhaps Not(function($) { $("#dfiLBpF").load("https://www.marksdailyapple.com/wp-ad..." ); })( jQuery );
 References https://pubmed.ncbi.nlm.nih.gov/25027288/
The post Seasonal Eating: Getting the Most Out of Winter Vegetables appeared first on Mark's Daily Apple.

February 21, 2022
Vegetable Victory: How to Best Preserve Produce
 The week of Feb 21, 2022, Primal Kitchen is featuring ways to cut down on food waste. Find food waste facts, waste reduction tips, exclusive recipes, and resources from the Farmlink Project by signing up here. All week, MDA will be featuring posts that can help you get the most bang for your grocery budget and minimize food waste to boot!
You love eating vegetables. When you hit the supermarket or farmer’s market, you enthusiastically fill your basket with all the colors of the rainbow, grabbing up vegetables, fruit, and fresh herbs with abandon. But what you can’t figure out is how to prevent your fridge full of fresh, healthy produce from turning into a vegetable drawer full of mush!
Globally, people waste an estimated 1.3 billion tons of food each year between food that doesn’t get harvested in time and food that spoils during processing, in transit to stores, on store shelves, and in our refrigerators.https://www.fao.org/3/my358en/my358en... A 2020 survey of almost 40,000 Americans found that they spend more than $1,300 each year on food that’s ultimately wasted—more than the average American spends on gas, clothing, property taxes, or household repairs and upkeep.https://nutritionj.biomedcentral.com/... This comes at not only a great economic cost but also an environmental one, as resources are poured into growing and transporting food that never gets eaten.
You can help reduce food waste by making sure that the food you buy doesn’t go bad before you get a chance to eat it. Here’s everything you need to know to preserve produce.
How to Select ProduceFresh, healthy produce will last longest.When selecting produce, make every attempt to select items that are near ripening, that have no bruises or brown spots, and that do not appear wilted. Selecting “ugly” produce—the lumpy, scarred, asymmetrical pieces—can actually help prevent food waste, as they are the most likely to end up in the trash bin. Just make sure they aren’t actually damaged or rotting if you can help it. If you bring any damaged items home, be sure to either eat them immediately or, if you intend to store them, remove the damaged parts to prevent the spread of microbes that can speed deterioration.
Separate Different Types of ProduceFor ideal freshness, store fruits and vegetables separately.Although fruits and vegetables are often lumped under the same “produce” umbrella, the reality is they don’t really get along that well, especially when it comes to ethylene. Fruits are generally ethylene producers, while vegetables are ethylene sensitive. That means vegetables tend to spoil even more quickly in the company of fruits.
There are a few exceptions to the rule:
Asparagus and tomatoes, for example, are two vegetables (well, sort of) that actually produce ethylene,.Watermelon is something of a cross-over artist and is one fruit that is actually very ethylene sensitive.As a rule of thumb, though, it’s best to keep your fruits and vegetables separated at all times for longevity.
Ideal Temperature and Humidity for ProduceAim for the optimum temperature to preserve fruits and vegetables.Every fruit and vegetable has an optimum temperature that can promote ripening while also staving off deterioration. Broccoli, lettuce and mushrooms, for example, need to be stored in a refrigerator, preferably at a temperature of between 34 degrees and 40 degrees Fahrenheit. Meanwhile, avocados, eggplants, onions, and squash are best left at room temperature.
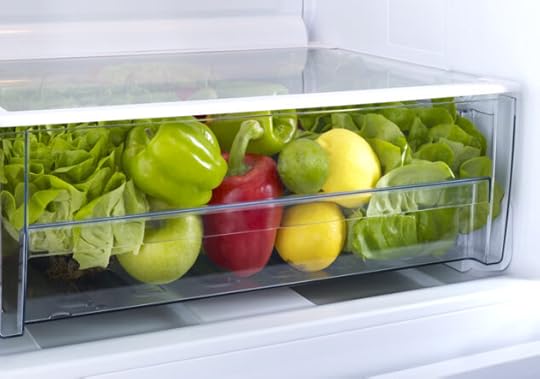
Which refrigerator drawer is best for storing different produce?Fruits need a dry drawer, but vegetables need a cold, crisp drawer.Since fruits should be kept in a dry environment, and they should not be washed prior to refrigeration (or, if you’re going to wash them, make sure to dry them thoroughly).
Vegetables, on the other hand, like some moisture. “Moist” is not the same as “wet,” though. Delicate leafy greens are especially susceptible to rotting if they are too wet. Most vegetables will keep best when stored in the crisper drawers at the bottom of the fridge, wrapped loosely in kitchen towels and/or storage bags. Not only are crispers the coldest spot in the fridge—what with that whole law of physics, cold air sinks thing—but the drawers can also be set to preserve humidity. Need motivation to stock up on more produce? The crisper drawers actually work best when they are two-thirds full.
When storing leafy green vegetables such as spinach and lettuce, it is best to wash and dry the leaves, wrap them in paper towels and then store them in an airtight container. To prevent browning due to too much moisture, replace the paper towels every other day or so.
Freezing Produce for PreservationDo you have too much produce that will go bad before you get the chance to eat it? Freezing is a great option for preserving the nutrient content of fresh produce.
However, in order to freeze vegetables successfully, you must first blanch them, a process whereby you partially cook them for a few minutes – either in boiling water or in a microwave – and then prepare them for freezing. For best results, blanched produce should be frozen within two hours.
If you’d like to learn more about freezing produce, we’ll have a post coming up later this week!
Do you have any special tricks to handle an abundance of rapidly decomposing produce? Let us know in the comments.
Further Reading:
Fresh Vs. Frozen Food: Which is Better?10 Freezer-friendly MealsReferences https://www.fao.org/3/my358en/my358en.pdfhttps://nutritionj.biomedcentral.com/articles/10.1186/s12937-020-00552-w (function($) { $("#dfLybKs").load("https://www.marksdailyapple.com/wp-ad..." ); })( jQuery ); 
The post Vegetable Victory: How to Best Preserve Produce appeared first on Mark's Daily Apple.

February 18, 2022
New and Noteworthy: What I Read This Week—Edition 165
The week of Feb 21, 2022, Primal Kitchen is featuring ways to cut down on food waste. Find food waste facts, waste reduction tips, exclusive recipes and resources from the Farmlink Project by signing up here.
Research of the Week
Fake plant milks: three times as expensive as dairy with fewer nutrients.
Pharmaceutical residues in rivers.
More dietary creatine, less depression.
Acute CBD improves verbal memory recall.
Exercise right after vaccination increases antibody response without increasing side effects.
Primal Kitchen Podcast, Episode 18: Falling in Love With Your Body With Danika Brysha
Media, SchmediaNote how the idea that “plant-based meats” are the future is still implicit in this article critical of them.
A trillion dollars spent on statins, and what do we have to show for it?
Interesting Blog PostsCool post about head and visual stabilization.
Social NotesEverything ElseChildhood obesity skyrocketed the past year.
Trees need weeds. I’m reminded of “junk DNA.”
Utah lowers legal blood alcohol limit for drivers, and fatal crashes drop.
Things I’m Up to and Interested InBig news: Vitamin D reduces autoimmunity.
Disgusting name: Milck
Troubling: The cognitive impact the pandemic response has had on children.
Where I have I heard about these foods before?: “We find that the top sources of priority micronutrients are organs, small fish, dark green leafy vegetables, bivalves, crustaceans, goat, beef, eggs, milk, canned fish with bones, mutton, and lamb.”
Interesting tool: Wood splitting sword.
Question I’m AskingWhat happens when the neural implant or bionic eye you install goes obsolete and the company who made it goes out of business?
Recipe CornerWonton soup.Carrot soup. I would use chicken stock instead of vegetable stock, and perhaps omit the carrot juice.Time CapsuleOne year ago (Feb 12 – Feb 18)
Dear Mark: Keto and Selenium Deficiencies—Something to Fear? — Should you?DIY Parallettes: Plus a Dip Bar Workout — This is how to do it.Comment of the Week
“I’ve made my husband (and best friend) of 44 years a handmade card and tomorrow night we will dress up and go to a Valentine’s Day Dinner & Dance featuring big band style music. He will write me a “Daily Sweet” email as he’s been doing (daily) for almost ten years.”
-Beautiful, Debbie.
(function($) { $("#dfq3wZG").load("https://www.marksdailyapple.com/wp-ad..." ); })( jQuery ); 
The post New and Noteworthy: What I Read This Week—Edition 165 appeared first on Mark's Daily Apple.

February 16, 2022
Summer Survival Tips
 Last week, I discussed winter survival tips and gear. That’s what most people mean when they talk about survival situations: staying alive in harsh snowy conditions. But there’s also summer survival. What do you do against the heat? If winter survival is all about maintaining body heat, keeping metabolic rate high, increasing both true temperature and the “feeling” of being warm, what is warm weather survival about?
There are a few primary things you need to take into account when dealing with warm weather survival:
Staying hydrated.Avoiding excess sun exposure.Staying cool during the day (and warm at night).Staying fed.Tending to wounds and injuries.In other words, you need to focus on the bottom two levels of Maslow’s Hierarchy of Needs: food, shelter, water, warmth, security, and safety.
These tips and this gear don’t just apply to full-on warm weather survival situations. They also apply to “simulated” warm weather survival situations—camping, hiking, backpacking. Any time you’ll be out in the heat for more than a few hours, paying attention to all these basic requirements will help you have an enjoyable and safe journey.
Survival Tips for Warmer WeatherYou need access to safe drinking water.Most water you encounter in a survival situation isn’t fit for drinking without treatment. And even if it is, you can’t know for sure, and making a mistake like that can set you back—or worse. There’s nothing quite so debilitating as a water-borne illness.
Chlorine tabsIodineBoiling water for a minute (or three minutes at elevation)Lifestraw (or similar filters)Another thing to keep in mind is that springs are often clean. Map out any nearby springs using Find A Spring before you’re in a survival situation.
You need to regulate your electrolytes.Hydration isn’t just about the H20. You also need to consume electrolytes. You need sodium, magnesium, and potassium. You even need a little bit of glucose or sucrose to aid in the absorption of water.
Normally, I recommend drinking a big glass of Gerolsteiner mineral water with salt, lime or lemon juice, and magnesium powder for proper hydration. That’s in the context of someone following a keto diet and trying to satisfy their increased electrolyte requirements—from the safety of their own home. But you can’t exactly lug heavy glass bottles of expensive German mineral water or go around mixing up coconut water with molasses in a survival situation. You need something hyper-portable, lightweight, and shelf-stable.
LMNT is a great powdered electrolyte supplement to keep on hand. Just add to water, shake, and drink to stay hydrated. Snake Juice is another option.
If you can figure out how to store it, blackstrap molasses is also a great source of electrolytes, especially calcium, potassium, and magnesium. Eating just a couple tablespoons of blackstrap molasses gives you more than twice the potassium of a banana, more calcium than a cup of raw spinach, and almost 100 mg of magnesium. Throw in some salt, add to water, and you’re good to go.
You need food that won’t go bad.Grain-free granolaJerky, biltong, pemmicanOlives or dried olivesNuts and nut butter (available in single-serve packets)Trail mix, spiced roasted nutsHard salami, summer sausageHard cheese, freeze-dried cheeseTuna packets or other tinned fishLow-carb protein barsLow-carb tortillasDried fruit: mangos, dates, figs, apples, pineappleDried milk, coconut milk powderInstant coffeeScope out the Keto Backpackers group on Facebook for a lot of great tips for keeping keto out in the wilderness.
There is a great Paleo MRE available made of jerky, nuts, and dried mango offering 800+ calories balanced between fat, carbs, and protein. This also looks good.
You need to know where you’re going.Your phone won’t work forever. Keep paper maps and a compass.
You need a way to disinfect and dress wounds.First aid is a must. Adventure Medical Kits makes some great first aid kids to fit almost any situation (ultralight, car, even canine first aid). Browse their offerings and get one that can handle the size of your party.
Practice first aid skills before you need them.
Have portable shade.Maybe it’s a tarp you put up when you stop to rest. Maybe it’s light long-sleeve clothing that reflects heat. Maybe it’s a wide-brimmed hat (see below). Maybe it’s good sunblock (zinc oxide only) or a hiking umbrella. Maybe it’s planning your route through trees. Just make sure you have access to shade.
Get a good hat.A good wide-brim hat will protect your face, neck, and shoulders from excessive sun exposure. Stetson is always a winner, or you could go for a “performance fabric” hat.
Bring a bandana.Anytime you come across water, dip the bandana in it and wear it to keep cool.
Wear linen.Spending more time in Miami has made me realize how much I love linen. It’s the perfect clothing material for hot, muggy weather because it wicks moisture and dries quickly. It also sits lightly on your body, allowing air to pass through and keep you relatively cool. I’ve since started wearing it on hikes and more grueling physical outings, and it holds up and works really well. Most people don’t consider linen activewear, but they should.
Alex Crane makes good linen with some “flex” to them.
Wear merino wool.Merino wool is another breathable natural fiber with natural antibacterial properties that breathes well and keeps you cool. Wool is also fairly good at blocking UV.
Icebreaker offers a good merino wool line.
Stay ahead of exhaustion.Take breaks in the shade whenever possible. Drink water even when you’re not yet “thirsty.” Eat food before you get hunger pangs. Just stay ahead of it.
Stay warm at night.Days are warm, but nights can be cold. Make sure you have ample protection for all weather that may befall you. Get a nice warm wool jacket or sweater, some of the blankets from the last post, and some way to protect yourself from the elements—sleeping bag, tent, tarp.
Travel only at night (if serious survival, post-apocalyptic situation).If there are bad people who will do bad things to you if they see you, traveling at night makes you harder to spot. It’s also much cooler.
Have the ability to start a fire.Fire is soothing. Even if it’s summer, sitting around a fire at night is a lovely, nurturing way to spend the time. It’s also how you heat up food and water.
Just don’t start any fires in unsafe conditions!
I recommend at least two sources of fire starter: a gas lighter, matches, and/or flint. You also need fire starter substrate. Extra dryer lint is perfect. So are cotton balls soaked in Vaseline. Store in ziplock bags to keep dry. Or, you can use a Blackbeard fire starter.
Stoves are good, too. Something like this that runs off fuel, or something that runs on wood. Both, preferably.
Other helpful tools.Paracord.A good knife.Something to dig with.Leatherman multitool.Silk sheet for sleeping.Anti-insect spray, gel, or clothing.Protection: firearm, bear spray. Really depends on the situation, of course, and the local fauna (hominid or otherwise).I could probably go on for a long time and never really cover this subject entirely, and that’s where you come in. What do you have to add? What are your essential tips, tricks, and gear for warm weather survival and outdoor experiences?
Thanks for reading, everyone. Take care.
(function($) { $("#df2vZql").load("https://www.marksdailyapple.com/wp-ad..." ); })( jQuery );
The post Summer Survival Tips appeared first on Mark's Daily Apple.

February 14, 2022
Valentine’s Day Pink Primal Pancakes
 Love is in the air today at Mark’s Daily Apple, and nothing says “I love you” like cooking a meal for the people who mean the most to you.
How about starting the day with a healthy breakfast featuring these heart-shaped Primal pancakes? And because we go the extra mile for the people we love (including ourselves!), we made these pancakes pink by adding freeze-dried raspberry powder—the perfect touch for our Valentine’s Day theme.
Pink Primal Pancakes for Valentine’s Day (or Any Day)Makes: 4 servings
Time in the kitchen: 15 minutes
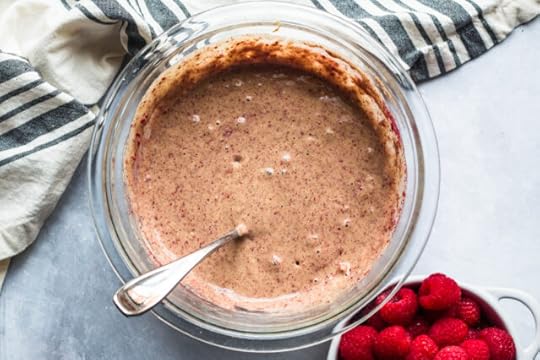
In a bowl, combine the almond flour, tapioca starch, flaxseed, baking powder, and coconut flour.
In another bowl, whisk together the milk, almond butter, 1 tablespoon of avocado oil, vanilla, lemon, liquid sweetener, and eggs.
Pour the dry ingredients into the wet ingredients and mix until combined. Use a blender or spice grinder to grind the freeze-dried raspberries and then mix them into the batter.
Heat ½ tablespoon of avocado oil in a pan over medium heat. Once the oil is hot, pour a small amount of batter into the pan. To make a heart shape, pour the batter in a shape of a V. You can make 1 or 2 pancakes, depending on the size of your pan.
Allow the batter to cook on the stovetop until the batter in the pan has a few bubbles and indents in it. Carefully flip the pancake over and continue cooking for an additional 30-45 seconds, or until the pancakes are cooked through. Use a spatula to remove the pancake from the pan and set it aside.

Spray the pan with avocado oil spray and repeat. Continue until you’ve used up all of your batter.
Serve your pancakes with a pat of butter, fresh berries, and your favorite syrup, if desired.
Tips:
If you plan to use a cast-iron skillet, place the seasoned skillet over the stovetop on medium heat and allow it to heat up for 3-5 minutes prior to adding batter.You can use any type of freeze-dried fruit you’d like. If you’d prefer, you can use fresh berries and stud the pancakes with them once you pour batter into the pan.For a sweeter pancake, you can use more liquid stevia or monk fruit, if desired.

Nutritional Info (¼ of recipe):
Calories: 292
Fat: 23g
Total Carbs: 13g
Net Carbs: 8g
Protein: 11g
(function($) { $("#dfd30cK").load("https://www.marksdailyapple.com/wp-ad..." ); })( jQuery ); 
 Valentine’s Day Pink Primal Pancakes Author: Mark's Daily Apple
  Total Time: 15 minutes Yield: 4 servings [image error] Print Recipe [image error] Pin Recipe Description
 Show some love with these pink heart-shaped pancakes made with almond flour and freeze-dried raspberries for an extra-special touch.
Ingredients 1/2 cup almond flour1/4 cup tapioca starch4 tsp. ground flaxseed1 tsp. baking powder1 tsp. coconut flour5 tbsp. milk of choice (we used almond)1/4 cup almond butter2 tbsp. Primal Kitchen Avocado Oil, divided1 tsp. vanilla extract1/2 tsp. lemon juice3 drops liquid monk fruit or stevia2 eggs2 tbsp. ground freeze-dried raspberriesPrimal Kitchen Avocado Oil Spray InstructionsIn a bowl, combine the almond flour, tapioca starch, flaxseed, baking powder, and coconut flour.
In another bowl, whisk together the milk, almond butter, 1 tablespoon of avocado oil, vanilla, lemon, liquid sweetener, and eggs.
Pour the dry ingredients into the wet ingredients and mix until combined. Use a blender or spice grinder to grind the freeze-dried raspberries and then mix them into the batter.
Heat ½ tablespoon of avocado oil in a pan over medium heat. Once the oil is hot, pour a small amount of batter in the pan. To make a heart shape, pour the batter in a shape of a V. You can make 1 or 2 pancakes, depending on the size of your pan.
Allow the batter to cook on the stovetop until the batter in the pan has a few bubbles and indents in it. Carefully flip the pancake over and continue cooking for an additional 30-45 seconds, or until the pancakes are cooked through. Use a spatula to remove the pancake from the pan and set it aside.
Spray the pan with avocado oil spray and repeat. Continue until you’ve used up all of your batter.
Serve your pancakes with a pat of butter, fresh berries, and your favorite syrup, if desired.
Tips:
If you plan to use a cast-iron skillet, place a seasoned skillet over the stovetop on medium heat and allow it to heat up for 3-5 minutes prior to adding batter. You can use any type of freeze-dried fruit you’d like. If you’d prefer you can use fresh berries and stud the pancakes with them once you pour batter into the pan.For a sweeter pancake, you can use more liquid stevia or monk fruit, if desired.Prep Time: 5Cook Time: 10 Category: Breakfast Nutrition Serving Size: 1/4 of recipe Calories: 292 Fat: 23g Carbohydrates: 13g Protein: 11g Net Carbs: 8g
 Keywords: Pancakes, Breakfast
Did you make this recipe? Share a photo and tag Mark's Daily Apple — we can't wait to see what you've made!
The post Valentine’s Day Pink Primal Pancakes appeared first on Mark's Daily Apple.

Mark Sisson's Blog

- Mark Sisson's profile
- 199 followers

