
Luisa Weiss's Blog, page 17
September 16, 2013
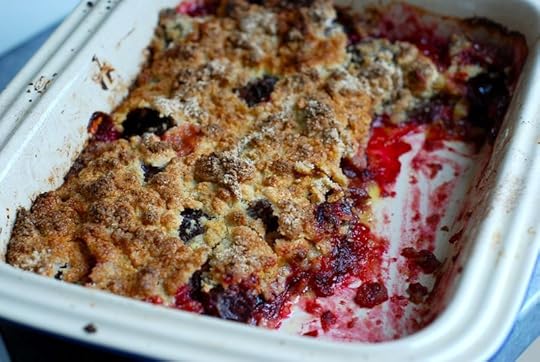
A Glut of Plums
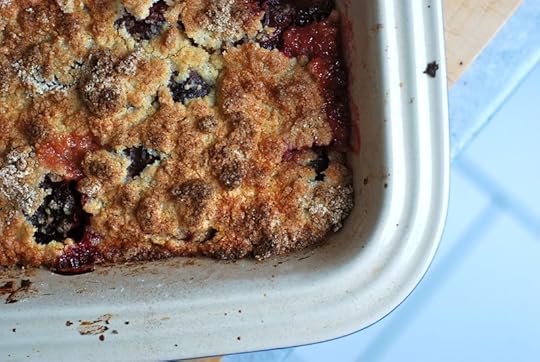
The markets are flooding with the last prune plums of the season. I can never walk past the piles of them, dark and smooth, like big purple bullets. I've made Pflaumenmus (see my book for the recipe) and plum cake and poached plums, too, but this past week, a bowl of plums I'd bought the week earlier from a vendor who warned me that they were very sour, almost too sour, languished on my countertop. Hugo didn't want any and I didn't blame him: they were too tart for eating raw.
So last night, then, after Max left and Hugo was asleep, I decided to go back to one of my all-time favorite recipes on this blog, Marian Burros' plum crumble. But this time I more than doubled the fruit. I wanted a mostly fruity dessert, with the crumble topping as a jaunty, crunchy cap. I kept the amount of candied ginger the same and only added a touch more
sugar, hoping that the plums would turn into a tangy jam beneath the
rubble. I was aiming for a crumble that I could eat for breakfast with yogurt with nary a second's thought and one that would use up the last of my plums, of course, too.
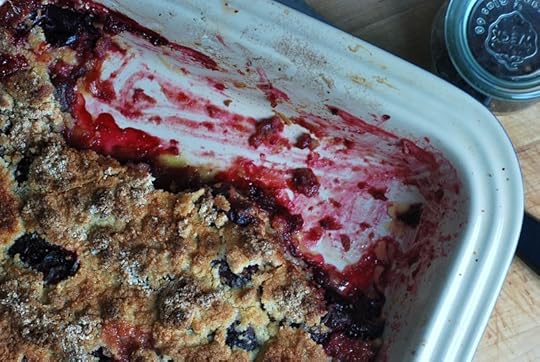
I'd forgotten that the crumble topping is unusual in its assembly - you massage a beaten egg into spiced flour and sugar and baking powder, drop this streusel of sorts onto the fruit and only then drizzle (inundate?) the whole thing with melted butter.
In the oven, magic happens. The plums soften and melt, the topping rises and browns and turns almost cookie-like, but with soft pockets of yielding dough here and there. I hadn't been mistaken, this truly is one of the best recipes I know, and this new version, heavy with fruit, is perfection. It's best eaten with a puddle of creamy plain yogurt. At least, that's how I like it best - the sourness of the yogurt a wonderful companion to the tart plums and sugary top.
Plum Crumble
Serves 6 to 8
34 purple Italian or prune plums, cut in half and pitted
3 tablespoons brown sugar
2 tablespoons plus 1 cup unbleached all-purpose flour
1 teaspoon cinnamon, divided
1/2 teaspoon ground ginger
2 heaping tablespoons finely chopped candied ginger
3/4 cup granulated sugar
1 teaspoon baking powder
1/8 teaspoon salt
1 egg, well beaten
1/2 cup unsalted butter, melted
1. Place plums in medium bowl. Heat oven to 375 degrees, with rack in center.
2.
In a small bowl, thoroughly mix brown sugar, 2 tablespoons flour,
1/2 teaspoon cinnamon, ground ginger and the candied ginger. Add to
plums and mix well. Arrange plums skin side up in ungreased, deep
9-inch pie plate or baking dish.
3. In a small bowl, combine granulated sugar,
baking powder, remaining flour and cinnamon and the salt. Mix well.
Stir in egg. Using hands, mix thoroughly to produce little particles.
Sprinkle over plums.
4. Drizzle butter evenly over crumb mixture
and bake 30 to 35 minutes. Crumble is done when top is browned. Remove from oven and
cool.
5. Serve crumble warm or refrigerate for up to two days or
freeze, well covered. If reheating, bring to room temperature, then
warm at 300 degrees.


September 13, 2013
Friday Link Love

It's 6:08 pm, Hugo's asleep and I'm nursing a bottle of beer and Googling "how do you know if you have a spirited child". It's been that kind of week.
Deep breath.
But it's Friday and in a few hours my husband will be here and tomorrow we're giving Max the tour of Hugo's future daycare (less than two months before he starts!) and tomorrow night we are getting dressed up and going out for a fancy dinner just because and so all is well. Besides, now I can ask Hugo to make the sounds of an owl, a monkey, a lion, a cat, a dog, a cow and a horse and he complies with gusto and his adorable, crooked smile. (The owl is my very favorite - if I ever manage to catch it on film, I shall post it here and force you poor people to watch to it over and over again.)
Elsewhere,
A lovely excerpt on a fantastic used cookbook store in Pasadena from this book.
Made me laugh: the secret to food blogging.
Made me cry: On dinner diaries and the passage of time.
Grandmothers and their signature dish, photographed by Gabriele Galimberti.
Do you need a life-affirming cooking video? Watch (and read) this.
And finally, Ruth Reichl loathes honey and other secrets of the NYTimes restaurant critics.
Have a good weekend, folks!
September 11, 2013
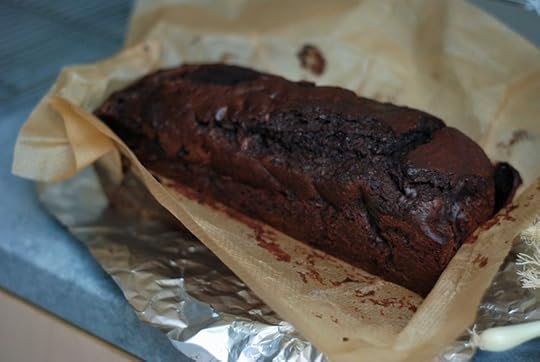
Dorie Greenspan's Cocoa Banana Bread
Friends, I ask you: do you also have partners who always insist that you keep the kitchen stocked with something that they swear up and down to desperately need, but then never actually eat, leaving you up to your eyeballs in the duly supplied item? For me, or Max, rather, we're talking bananas. Bananas, bananas, bananas. I don't like them and every time Hugo is offered one he takes a big bite before spitting it out theatrically (every time!), and frankly, between you and me, I think Max mostly eats them out of a sense of duty because he thinks they're healthy. But he always asks me to buy some before the weekend when he's due home and then I see them descend into spotted blackness like clockwork when he leaves again.
However, I am not complaining. Because as we all know (don't we?), even those of us who don't like bananas can learn to love banana bread.
I mean, was ever a more perfect baked good invented? You can freeze old bananas and just defrost them when you're in the mood to bake (or when you need to clear out your freezer). You don't need anything special to make banana bread - if you've got even a pretty minimally stocked pantry, you probably have everything you need for banana bread. And it is gussied up in so many delightful ways. Ginger, coconut, chocolate - all of these things make banana bread sing.
Best of all, you're never really done discovering that banana bread contains multitudes. I mean, just the other day, I stumbled across Dorie Greenspan's version, which features a whole cup of cocoa powder along with chopped chocolate and buttermilk and other delicious things and in one fell swoop, I went from trying to figure out how to use up a glut of plums to making a beeline for the freezer to unearth some blackened bananas so I could get to work.

Cocoa banana bread is the kind of thing that makes you scratch your head and wonder where it's been your whole life. (I kind of feel that way about most things from Dorie's kitchen.) It's very dark and gorgeous, it's rich and damp, it's wonderful. The cocoa and buttermilk make for a light, devil's food-like crumb, but the banana weighs it down just enough to transform it into something satisfyingly plump. The loaf is enormous (taking over an hour to bake through) and it slices into these wonderfully hefty pieces that are actually very easy to eat. Of course, it's nicest when the loaf is still warm, so you have little pockets of melting chocolate to poke with your tongue. But no one will turn down a piece of this the next day, when the banana flavor settles and flattens amiably and the little chunks of chocolate go faintly chalky again and the crumb turns velvety soft.
So like clockwork tomorrow, I'll be buying more bananas for my husband's return. And I'm actually pretty grateful he keeps leaving them behind.
Dorie Greenspan's Cocoa Banana Bread
Adapted from Baking: From My Home to Yours
Makes one 9-inch loaf
2 cups all-purpose flour
1 cup unsweetened cocoa powder
1 1/2 teaspoons baking powder
1/2 teaspoon salt
1/4 teaspoon baking soda
1 stick (8 tablespoons) unsalted butter, at room temperature
3/4 cup sugar
1/2 cup (packed) light brown sugar
2 large eggs
2 ripe bananas, mashed
3/4 cup buttermilk
3 ounces bittersweet chocolate, coarsely chopped, or 1/2 cup store-bought chocolate chips
1. Center a rack in the oven and preheat the oven to 350 degrees F.
2. Line a 9×5-inch loaf pan with parchment paper, then place on two baking sheets stacked on
top of each other. (This will keep the bottom of the
bread from over-baking.)
3. Sift together the flour, cocoa, baking powder, salt and baking soda.
4. With a stand mixer fitted
with a paddle attachment, or with a hand mixer in a large bowl, beat the
butter at medium speed for about a minute, until softened. Add the sugars and beat for 2 minutes more. Add the eggs one at a time, beating for a minute after each addition. Reduce the mixer speed to low and mix in the mashed bananas.
5. Add the dry ingredients in 3 additions, mixing
only until they disappear into the batter. Still on low speed, add the
buttermilk, mixing until it is incorporated. Stir in the chopped
chocolate. Scrape the batter into the pan.
6. Bake for 30 minutes. Cover the bread loosely
with a piece of foil to keep the top from getting too dark, and continue to
bake for another 40-45 minutes (total baking time is between 70-75
minutes), or until a thin knife inserted into the center comes out
clean.
7. Transfer the pan to a rack and cool for at least
20 minutes before running a knife around the edges of the bread and
unmolding it. Invert and cool to room temperature right side up.
September 9, 2013
André Heimann's Hungarian Cabbage Strudel
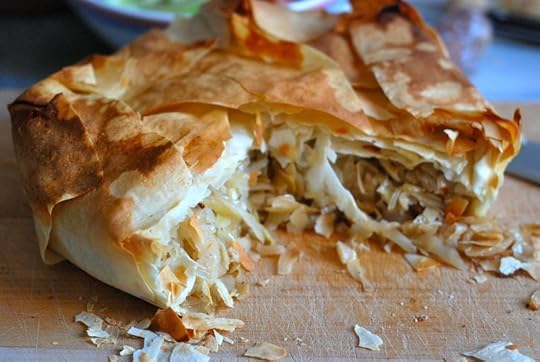
This post's alternate title should be A Cautionary Tale About Avoiding Butter.
What happened was I read about cabbage strudel (did ever those two words have better partners?) almost four years ago and dutifully clipped the recipe (actually, by then I think I bookmarked it) and then schlepped that bookmark around with me from New York to Berlin, from one computer to another, until finally - finally! - last week, I found myself with a small head of cabbage and a package of phyllo dough and time - PRECIOUS, PRECIOUS TIME - to make it.
But when I got into the kitchen and reread the recipe for the last time before getting started, I got a little skeered about the amount of butter called for. I mean, did the strudel really need two whole sticks of butter? As much as I like to follow recipes faithfully, I just couldn't bring myself to use that much butter. It surely wouldn't make that much of a difference if I reduced a bit here and there, I told myself. Back me up, dear readers - wouldn't you have done the same thing? Gulp.
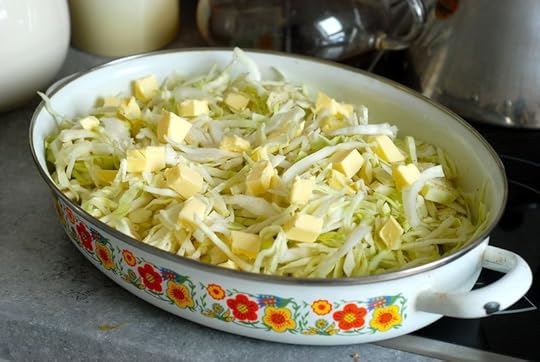
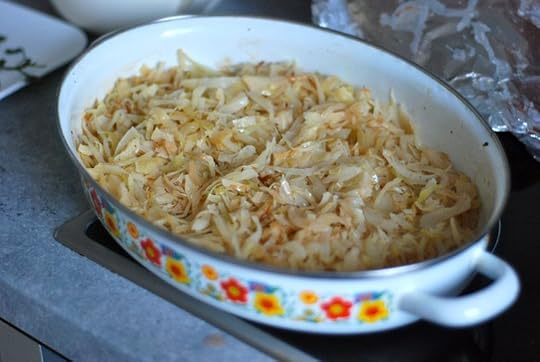
The recipe comes from a little shop in Forest Hills, Queens that sells only strudel. (I am chagrined to admit that in all the years I lived in Forest Hills, I never made it to André's.) Their cabbage strudel recipe is a study in simplicity - baked, shredded cabbage flavored with salt and pepper, then wrapped in buttered strudel leaves and baked. That's it. No extraneous herbs or spices, no special sauces. As the owner says, in this recipe "butter rules."
Ahem. Right. So let me admit right here and now that, yes, in this recipe, butter indeed does rule. I halved the amount that went into the cabbage and probably quartered the amount that went onto the phyllo leaves and while my strudel looked lovely and crisp and burnished and also smelled very good indeed, it needed a serious puddle of Sriracha to liven things up.
But every now and then, especially when I bit into the delectably crisp bottom layer of phyllo, where all the butter had pooled before baking, I got a fleeting taste of what this strudel would have tasted like had I been a dutiful cook and followed the recipe. It would have tasted pretty darn great.
So. Be ye not so frugal! You only live once! Don't let the amount of butter make you blanch. (But if it does, Sriracha helps. A lot.)
Update! The incomparable Nora Ephron on this very cabbage strudel. Perfection. The end.
André Heimann's Hungarian Cabbage Strudel
Serves 4
8 ounces (2 sticks) unsalted butter, more for greasing pan
1 very small head cabbage or half a medium cabbage (about 1 pound), cored and shredded
1/2 teaspoon salt
1/2 teaspoon freshly ground black pepper
10 sheets phyllo dough, defrosted
1. Heat oven to 350 degrees. Lightly
butter a large baking pan and spread cabbage evenly in pan. Sprinkle
with salt and pepper. Cut up 4 ounces (1 stick) butter into small
pieces, and sprinkle over cabbage. Cover with foil, sealing edges. Bake
until tender and golden, 45 minutes to 60 minutes, occasionally lifting
foil and mixing cabbage, then resealing.
2. Remove from heat, uncover and allow to
cool to room temperature. (May be stored, covered and refrigerated, for
up to 24 hours; use chilled.)
3. Set oven temperature to 400 degrees. In
a small saucepan, melt remaining 4 ounces butter. Place a sheet of
parchment paper on a work surface with the narrow end closest to you,
and top with a sheet of phyllo dough. Brush lengthwise (up and down)
with a little butter. Top with another sheet of phyllo, and brush again
with butter. Repeat until all 10 sheets are buttered and stacked.
4. Arrange cabbage on top sheet, at end
closest to you, in a thick layer 2 inches deep. Spread evenly to side
edges. With the help of the parchment paper (and rolling as if for sushi
in a bamboo roller), roll phyllo starting at the end with the cabbage.
As you work, adjust parchment paper so that phyllo is rolled, enclosing
cabbage, without the paper. Brush top of roll with butter, place on
baking sheet and bake until golden, about 40 minutes. Serve hot or warm.
September 3, 2013
Summer Digest
Aaaaaaand we're back! Thanks, folks, for being so kind while I took some time off. We had a lovely week in Austria, near Salzburg, Sound of Music country, where it really does look like Maria is going to come bounding around the corner in her Tracht any minute now, and Hugo and I spent a hot, gorgeous weekend in the Mosel with our friends from Brooklyn, but mostly we passed the days knee-deep in sand at the playground and visiting the family of goats that live around the corner from us (no, really) and going on long walks in the park across the street and even making it down to Wannsee, where we had to forcibly restrain Hugo repeatedly from throwing himself dramatically into the waves. Max is, unfortunately, still commuting home on weekends (epic floods, submerged railway tracks, yadda yadda yadda, gnash, urgh, argh, etc), so that part of our summer didn't quite work out, but otherwise, it really was wonderful. Hot and sunny for weeks on end (pretty rare for this town) and full of incredible little moments with our temperamental bundle of toddler joy.
(Who, as of last Tuesday, now walks! Alone! Glory be.)
What I didn't do while on vacation was cook. Or hardly at all, let's say. It was mostly survival food over here, you know, the things you can do with your eyes closed when your child finally goes to bed and you are too bushed to care about what comes next. Related: Last night, I sat in front of the computer, trying to figure out how to get back into the swing of things here, but came up totally empty. See, the nice thing about taking time off is the time off. The bad thing is realizing afterwards how totally rusty and out-of-practice you are, feeling like, whoever said I was any good at this blogging or cooking thing?
But! Today is a new day. And when I went through my photos of the past months this morning, I realized I did have a few things to tell you about. So we're going to do a little round-up this morning to get us all back in the swing of things.
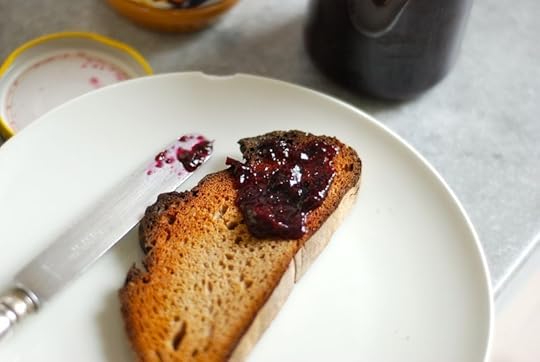
1. I made Kevin West's Blueberry Lime Jam after picking several kilos worth a few weeks back. My jam took longer to set up than he said it would and I find it a little on the sweet side for my personal taste, but I love the touch of cinnamon and the fact that the end product really does taste of (very sweet) blueberries, something I haven't always had luck with when making blueberry jam before. It's brilliant on French toast and pancakes in lieu of syrup and Hugo and I both highly recommend putting it on top of ricotta-spread peasant bread for breakfast.
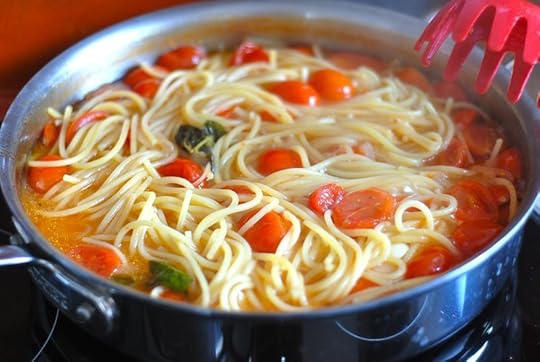
2. I made the much-hyped one-pan pasta from Martha Stewart Living when my dad was in town, but we were a little underwhelmed. It tasted just fine, but we agreed that it would never get either of us to stop making tomato sauce in one pan and spaghetti in another. Funnily enough, this felt like more work than just doing it the regular way. Go figure.
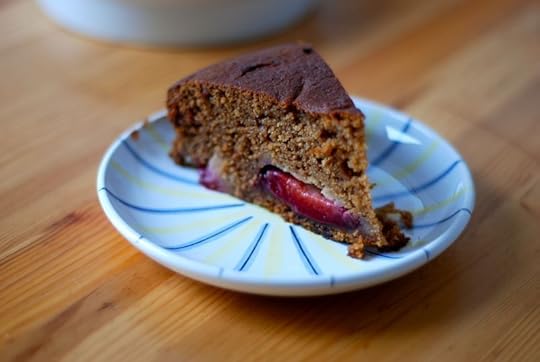
3. Currently drowning in plums, I made Nigel Slater's plum cake with cinnamon and honey the other day. Since I was out of golden syrup, I used honey instead, strong chestnut honey from my mother, which gave the cake a grown-up, ever-so-slightly bitter profile. The recipe seems a little odd when you get started and the batter looks too thin and you really are meant to leave it to cool for 20 minutes (but no longer!) in the oven with the heat turned off, but the result is very fine indeed. Tender and moist, with a lovely, haunting flavor. It feels cozy and autumnal and would be good for Rosh Hashanah, I think. Hugo gobbled an entire slice all by himself.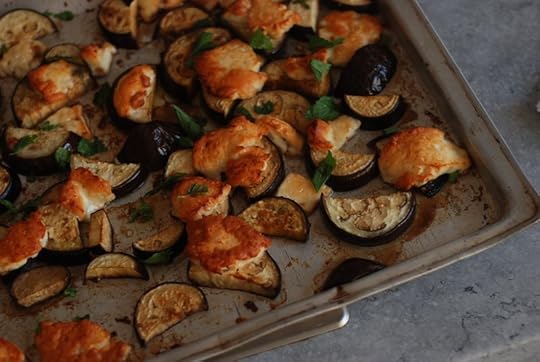
4. This! The hit of the summer, hands down. It's Rose Elliot's Grilled Eggplant and Halloumi except instead of grilling it, I bake it. My friend Suzy told me about this recipe and, as usual with things recommended by her, it was a total winner. (Suzy has also left Berlin and moved to Barcelona, leaving me absolutely bereft.) We made it no less than four? five? times in two weeks. It's so good. The silly link above only gives you the ingredients and first steps, though, so make a note of this: You make the marinade (I halved the maple syrup quantity) and you cut up the eggplant and halloumi. Then you toss everything together, arrange it on a baking sheet and bake at 400 F (I think?) for 20 minutes. It should look like the photo above. Remove from the oven and strew with chopped mint and eat immediately. DELICIOUS.

5. Finally, just to keep things real over here, I made this gorgeous pan of cauliflower cloaked in béchamel sauce flavored with nutmeg and a mix of grated cheddar and comté, figuring that it would make Hugo's day. (He loves cruciferous vegetables! He loves cheese! He loves milk!) Of course, he was totally outraged that I would even try to put a tiny forkful in his mouth, proceeded to throw an honest-to-goodness seated tantrum and then made me eat it all by myself. Oh, what hardship. (In case you'd like to try: Parboil a head of cauliflower, then break into florets, arrange in
baking dish and cover with a nutmeg-and-cheese flavored béchamel. Bake at 375 (ish?) until
browned and bubbling.) Goes well with a big glass of wine to drown out the sounds of your screaming child.
(Kidding!)
Oooh, it's good to be back!
August 22, 2013
Eight Years
Eight years ago today, I wrote my very first blog post here. I was living in a ground-floor apartment with friends in Chelsea then, commuting by foot to my office just a few blocks away. I had a window that looked out onto noisy mail trucks rumbling down 18th Street, there were massive black cockroaches who periodically liked to terrify me in the kitchen (water bugs, to get specific) and I had to tiptoe into one of my roommate's bedroom each morning to take a shower while she slept. But it was glorious! (Well, except for the water bugs.)
One year was the time limit I gave myself to write the blog. Just a year and then you'll be done.
Ha.
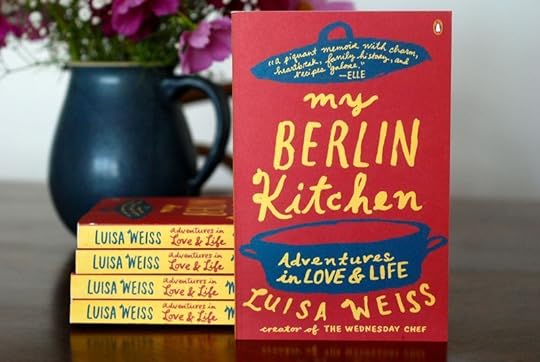
Eight years later, I live in an apartment at the very top of an old building in a quiet neighborhood in western Berlin. I have a toddler who is (blessedly) asleep in his room, a lovely husband who (still) works in another city, I'm the author of a book, a book that will be published in paperback in a few short days, and I'm still blogging.
Ha!
To celebrate, I wanted to give you a cake. The tender, gorgeous, simple cake my friend Gabriella made for Hugo's first birthday, the one that made him faceplant into a slice of it (though, admittedly, it might have just been CAKE in general and not that cake, but I'm sticking with the first version). However, my life these days is not conducive to cake-baking. It is not conducive to any kind of baking or cooking or time in the kitchen at all beyond making Hugo's meals and cleaning up after them. I realize this sounds sort of complain-y (I do sometimes fantasize about live-in help), but really, more than anything, I'm just trying to be honest. Life with a toddler - newsflash! - is like living with a crazy person? Who can't speak? Or walk? But has OPINIONS? And NEEDS? And FEELINGS, LOTS OF THEM? I'm still trying to figure it out. (Don't worry, I'll get you the cake eventually - give me another week or three.)
But I still want to celebrate. I mean, eight years! My book in paperback! Me, still here! You, still here! So instead of cake, let's do books. I want to thank you for being here, for reading me, for being my lovely audience and for being patient when I take a little time off. So, if you'd like to win a copy of the paperback edition of My Berlin Kitchen, leave me a comment and by the end of the weekend, I'll pick eight people to send a copy to. Sound good?
Eight years!
xo
July 25, 2013
Summer Break
One little housekeeping note: for reasons too boring to get into (involving my truly pitiful computer skills), I deleted my old Wednesday Chef Facebook account a few weeks ago. There were several thousands of you who were following my updates there, though - I'm so sorry for the inconvenience! Anyway, I now have a brand-new Facebook account for the site and if you'd like to come over and "like" it or "follow" it or whatever you want do with it, I'd be thrilled. My apologies, again.
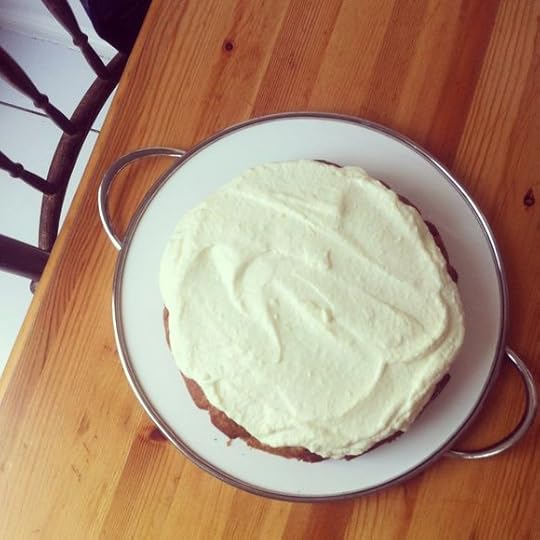
Now to the matter at hand: It occurred to me at some point today, as I baked my husband a
belated birthday cake in our scorching kitchen (this recipe, in a cake
pan instead of a cupcake tin) and the whipped cream topping started sliding off the top of the cake in this heat, that it might be time for a little summer
break. You know, turn off the computer, commune with people, take in
the mountain air, swim in some lakes?
Luckily, the three of us are heading to Austria tomorrow for some
time off in the countryside with our friends and their baby girl, a
small stack of books (one can dream), and a to-do list that looks like
this:
1. Sleep.
2. Recharge.
3. Sleep some more.
4. Watch Hugo and Emilie fall all over each other in their attempts at walking (babies!).
5. Sleep.
I can't wait. I'll see you back here in a few weeks. Stay cool!
July 22, 2013
Cooking for Hugo: Guidelines for Feeding After the First Year

A while back, I mentioned that at Hugo's one-year check-up, his doctor had given me a little pamphlet on feeding children after the first year was over. So many of you (so many!) expressed an interest in what that pamphlet said that I thought I'd do a little post on it.
(Full disclosure: the pamphlet comes from Aptamil, the formula company. But this is not a sponsored post. Nor is it a post about the glory of formula. It's just a post about feeding your baby. Okay? Okay!)
So the pamphlet is written by a Professor Doktor Heino Skopnik, who is the head of this pediatric teaching hospital), and an Aptamil "expert" named Gabriele Voss - from what I can tell, she's the one who interjects the fun stuff in between Prof. Dr. Skopnik's rules. There are a lot of photographs of adorable blond children (seriously! not a single brown-haired one in the bunch) and graphics of pyramids.
It starts with the importance of getting enough to drink. One-year olds need about 600-700 milliliters of liquid per day (that's 20-23 ounces). The best thing to give them is tap water or flat mineral water with low sodium. If your child likes sparkling water, though, that's okay, too. Unsweetened herbal teas are also good (fruit and rooibos teas are included here). The pamphlet also says that you can give your kid fruit juice as long as it's mixed with water (at least 1 to 2 ratio). Avoid all soda, green, white and black teas, energy drinks and coffee.
(The expert chimes in! You must model good drinking behavior to your child and drink a lot of water yourself. Only give your kid beverages in cups (not bottles) and fill them only halfway. Get your child to drink more by using fun straws and colorful cups.)
It continues with fruits and vegetables: serve your child 5 small portions (about the size of your child's hand) of fruits and vegetables per day. Try to vary the produce and use fresh whenever possible (frozen is also okay) and divvy it up as follows: 3 vegetable portions and 2 fruit portions. At least half of the daily vegetables should be cooked (steaming is best), but raw food is good, too.
Legumes are not easily digested by small children, says the pamphlet, so go easy when introducing them. If your child digests them well, then at least one meal a week should feature legumes as the main course in the form of a thick soup, for example.
(Here the expert says to avoid fruit that can be inhaled, like blueberries, redcurrants, grapes and raisins - but I say take this with a grain of salt. Hugo, for one, is obsessed with blueberries and redcurrants and gums them just fine. She also says to carve fruits and vegetables into the shape of a car or a ship - I say (lovingly!) that she must be insane and clearly has never been the working mother of a small child with no time to spare before dinnertime. I think? She adds that if you do use frozen vegetables, make sure they are free of cream, flour or spices.)
On to grains and carbohydrates: Give your child a varied assortment of wholegrain breads. Give them oats, like plain instant oats mixed with fruit and milk or yogurt to produce a pretty quick breakfast. Potatoes are the ideal accompaniment to vegetables, says the pamphlet. Boiled, baked or mashed are good. Avoid French fries and potato chips. Noodles and rice, especially brown rice, are all good meal filler-outers. Try millet, bulgur, couscous, and spelt as well.
(The expert! says that at least half of the child's daily carbs should be wholegrain.)
Okay, onto the big, important stuff: dairy. Your one-year old should be getting between 300 and 330 milliliters of milk and milk products per day (that's 10 to 11 ounces). Scientists have shown that dividing this among 3 meals per day is best for calcium absorption. Do not give them more or less than this amount: consuming too much protein at this age can lead to being at risk for obesity later. The pamphlet says that you can give your child whole or reduced-fat milk depending on what other dairy you feed your child. If they drink whole milk, then give them reduced fat yogurt or cheese. If you give your child reduced-fat milk, then give them full-fat yogurt and cheese. We're not talking skim: In Germany, milk only exists in two forms: full fat and 1.5%, so I
would assume that in the US, you shouldn't go lower than 2% milk. 15 grams of hard cheese (1/2 ounce) or 30 grams of soft cheese (1 ounce) are enough for a daily portion. Don't give your child raw-milk cheese.
(Now it's time for me to interject: Hugo often goes over that amount of dairy per day. He drinks about 330 ml of milk per day and often will have a bowl of yogurt, too - not every day, but often enough. His doctor says his weight is ideal, so I'm not too fussed for now. Also, this pamphlet was the
first I'd heard of the dairy fat concerns - I give Hugo full-fat milk and yogurt and
cheese.)
Fats and oils: 1.5 to 2 tablespoons per day of oil and butter are enough for your child.
It's time to talk meat, fish and eggs: All hugely important parts of your child's diet, providing iron, zinc, B vitamins and valuable protein. Red meat, like beef and lamb, is especially important for small children because of its high iron content. Pork is high in vitamin B, poultry has lots of zinc. Fish is high in iodine and vitamin D. So give your kid 2 to 3 meals a week that feature meat (a portion is about the size of your child's hand). Choose lean cuts of meat and poultry. Make sure it's tender and chewable. Give your child 1 to 2 meals featuring fish per week. 1 to 2 eggs per week round out your child's protein needs. If your kid is a vegetarian, you can up the egg consumption.
Then the pamphlet moves on to covering your behavior during your child's meals. Be a good role model by eating a varied diet with pleasure. Avoid stress at the dinner table and institute rituals. Stay relaxed and patient - understand that it might take your kid some time to adjust to each new food on his or her plate. Praise your child when he or she does a good job at the table. Don't pressure your kid and let him or her eat at their own pace. That's how they learn to understand if they're still hungry or ready to stop.
Let's recap:
Meat: maximum 3 x per week
Fish: 1-2 x per week
Eggs: 1-2 per week
Dairy: 300-300 ml milk and diary per day, divided into 3 portions
Water: 600 to 700 ml per day
Fruit: 2 x daily
Veg: 3 x daily
Legumes: 1 x per week
I hope this was helpful! I have to say that I'm really liking this phase of feeding Hugo. It's so much fun to see him try new things and really dig into stuff he likes. Also: We spent this past weekend with my friends from New York and their almost-three-year old, who is going through a very age-appropriate food-refusal stage. While Hugo dug into pasta with sardines, tuna and broccoli, I told myself to enjoy every minute. Who knows when the time will come that he'll refuse it all and demand ice cream for dinner. Let's cross that bridge when we get there!
July 8, 2013
The Best Roasted Vegetables Ever
Sometimes I say to myself, I say, Luisa, does the world really need another recipe for and then I fill in the blank with whatever thing I'm about to tell you about, cookies or soup or roasted vegetables, say. And then I hem and I haw with myself for a good while, feeling alternatingly dejected and enthusiastic and, er, also slightly mad, before I make a decision.
For example: A batch of oatmeal cookies with chocolate (milk chocolate!) and raisins I made a few months ago? I decided against them. (Even though they were pretty good!) Because I kind of feel like I'd just be adding to the internet bedlam. These cookies are the best! No, make these cookies over here! No, no, my cookies are the be-all and end-all! Gah. Sometimes a girl just gets a little tired of all the noise. You know?
And so it was with these roasted vegetables. I mean, I love them and I think they are lamination-worthy (anyone reading here who still remembers that? ha!), but chances are you already roast your vegetables your very own way and is my little blog post really going to get anyone into the kitchen when it's hot and sticky out and everyone would rather be eating popsicles and swilling cold cocktails after hours and so on and so forth?
(It was a self-doubt kind of day, friends.)
But ultimately, the deliciousness factor made me change my mind. I mean, even if just
one person starts to make their roasted vegetables this way, I guess I
will have won (what contest I couldn't even say) and so that was enough
deliberating for me. Besides, my aunt Laura made us these vegetables the
first day of our vacation and then was obliged to make them four
more times over the course of the two weeks because none of us, not me,
not my mother, not Hugo, not Max, could stop eating them. That's how
good they are.
(SO GOOD.)
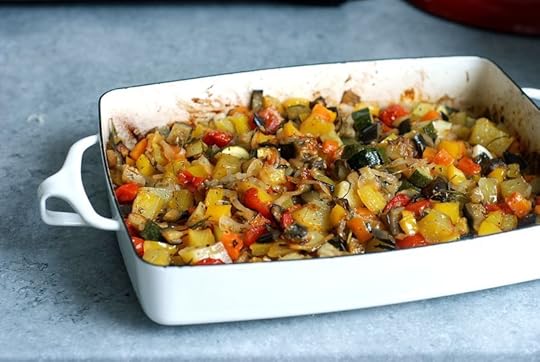
Okay, so I don't know about you, but when I roast vegetables, I always just take the vegetable I'm going to roast (asparagus, say, or parsnips or Brussels sprouts or whatever), cut them into pieces (or not!), put them on a sheet pan with a little bit of oil and salt and stick them in a hot oven. I try not to crowd the vegetables so that they have space to brown and blister and get crisp, and I turn the heat up way high. And that's it.
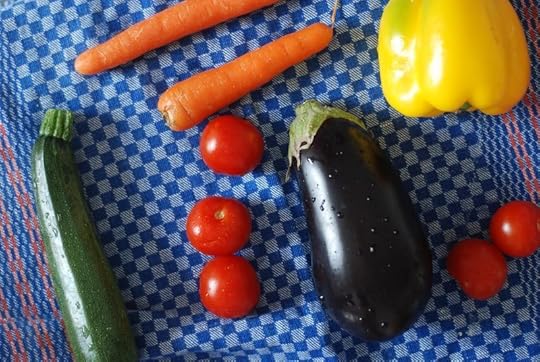
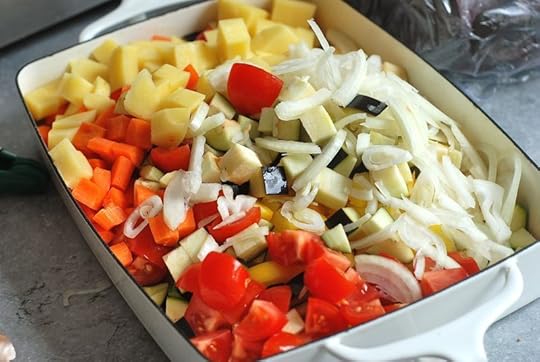
But Laura did everything differently. First, she mixed a whole bunch of vegetables together. An eggplant, a zucchini, an onion, two carrots, a bell pepper, a few small potatoes and a couple of tomatoes. Tomatoes! She cut everything into little pieces, much smaller than I usually do (so small that about 3 pieces could fit into Hugo's (admittedly) widely-opened mouth once cooked). Then she piled all the vegetables into a baking dish. The vegetables were layered a few inches thick, squished willy-nilly on top of and next to each other. Laura also used way more olive oil than I usually do (which left a gorgeously hued puddle of delicious cooking juices at the bottom of the pan that we battled over, armed with pieces of bread, at the end of the meal). And finally, she turned the heat a little lower than I usually do and let the vegetables cook for much longer. Close to an hour, I'd say.

For seasonings, she used this herb mixture (garlic already included) and a bit more salt and some pepper. Since then, I've done some experimenting, using herbs like thyme or rosemary or wild fennel, and I have to say that all of them work deliciously. Just make sure you mince your rosemary or else you will have poky little pieces strewn throughout your soft, fantastic vegetables and they will make you feel a little stabby. (Or is it just me?) What's important is that you include garlic in some form (either minced or left whole or in the herb rub), use plennnnnty of olive oil, crowd the vegetables as best you can into a dish (the more crowding, the better!) and let them cook for as long as you can stand.
What you will get, at the end, are vegetables that have sort of contracted and shrunk and sweetened. They get wholly infused with the flavors of the herbs, garlic and oil. The potatoes turn into potato candy - all chewy and sweet and incredible. The tomatoes lose all their moisture to the pan, but miraculously retain their shape, so you get little bombs of tomato flavor now and then. The onions snake their way throughout, perfuming every bite. The eggplants soften into silk. And all together, ooh, it's just so good that it's worth every bit of interest noise I might herewith create.
Ready? Here we go:
THE BEST ROASTED VEGETABLES EVER!!!!!!!
Roasted Vegetables
Serves 6 as a side dish
1 medium onion
1 medium or 2 small carrots
1 zucchini
1 eggplant
2 small potatoes
5 small tomatoes
1 red or yellow pepper
2 cloves of garlic
Salt and pepper to taste
Dried herbs (sage, thyme, rosemary, wild fennel are all good choices - either individually or combined in some form)
4 to 5 tablespoons of olive oil, plus more to taste
1. Preheat the oven to 375 F (180 C). Quarter and slice the onion thinly. Dice all the vegetables into pieces that are approximately the same size (no larger than 1/2 inch). Pile the vegetables into a baking dish so that the vegetables lie a few inches thick. Season with salt, pepper and herbs to taste and then pour the olive oil over the vegetables. Mix thoroughly but gently - you don't want to destroy the tomatoes before the dish goes into the oven. Now check the vegetables to make sure they are well-coated and glistening with oil. If need be, add more oil.
2. Put the dish in the oven and cook for 45 minutes to an hour. Halfway through the cooking process, remove the dish from the oven and very gently stir the vegetables so that the ones at the bottom come to the top. Towards the end of the cooking process, stir a second time. Remove from the oven and let cool slightly. Check for seasoning and serve.
July 1, 2013
Cooking for Hugo: Pastina for Dinner
Let me tell you a little bit about pastina, my secret weapon, my loyal friend. It is quick, it is nourishing, it is guaranteed to delight even the pickiest eater and, most importantly, really, it is delicious.
Well, of course it is. It's just pasta, in adorable little shapes (alphabet letters! grains of rice! melon seeds! little squares!), cooked in a little bit of barely-salted water, then served in a puddle of cooking water, with a drizzle of olive oil and a scattering of grated Parmesan cheese on top.
I started feeding Hugo this base recipe for pastina when he was 6 or 7
months old and oh, how he'd open his mouth wide, tilting his head back,
blinking desperately at me for more and more! It was something else.
Now
that he's a little older, I add a few quartered cherry tomatoes to the
water along with the pasta and then pull the skins off with my fingers
before serving the dish to Hugo for dinner and he gobbles up those
cooked, sweet tomatoes with gusto.
When we were in Italy, our friend Maria (or was it Franca?) gave us a few freshly laid eggs from her chickens. Back home, at dinnertime, my aunt Laura told me to stir one of the eggs into Hugo's pot of pastina, just after the pasta finished cooking and the flame was already turned off.
What resulted was a stewier, creamier version of egg drop soup. Not only
did Hugo practically inhale it, but I even found myself sneaking a bite
or three when he wasn't looking.
The heat of the boiling water cooks the egg almost instantly as you stir it into the pot. Since the eggs were so fresh and impeccable, I didn't have any concerns with salmonella, but if you are in any way worried, you can just stir the egg into the pot before taking it off the flame. But either way, work quickly - you don't need to cook the egg for very long.
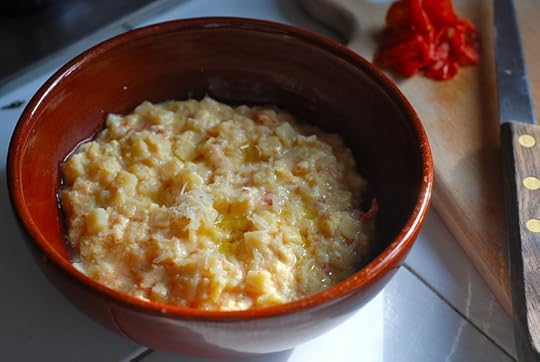
Egg or no egg, I love giving Hugo a bowl of pastina for dinner. It's wonderful to know that I can have his dinner hot on the table in the blink of an eye and that it's the same dinner that I ate as a kid and that my mother ate before me. I don't need anything special in the house to make it and Hugo will clean his plate every time.
Best of all: I like to think I'm giving Hugo a dinnertime tradition of his own. A bowl of pastina will hopefully always be a bowl of simple comfort for him.
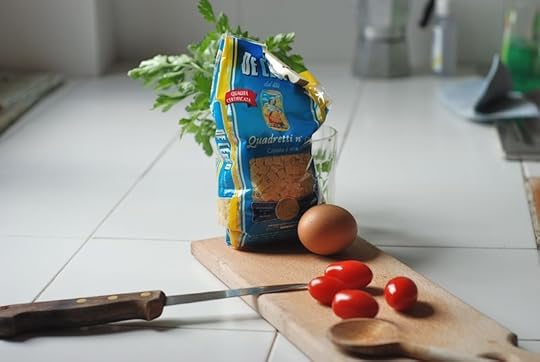
Pastina
Serves 1 baby
2-3 tablespoons small soup pasta (my favorite brand is DeCecco)
4 grape or cherry tomatoes, quartered
Olive oil
Grated Parmesan cheese
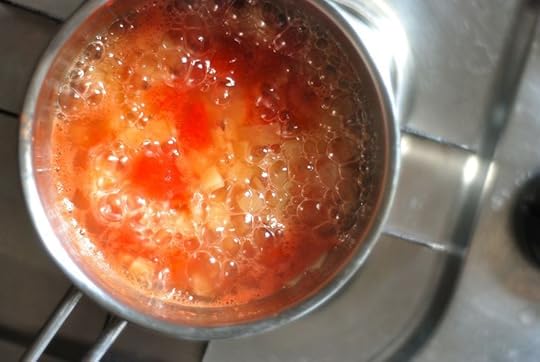
1. In a small saucepan, bring an inch of water to the boil with a small pinch of salt. When the water is boiling, add the soup pasta and the quartered tomatoes and cook until the pasta is done.
2. Spoon the pasta, tomatoes and a little bit of the cooking liquid into a serving bowl. Drizzle with a little olive oil and top with a little grated cheese. Serve.
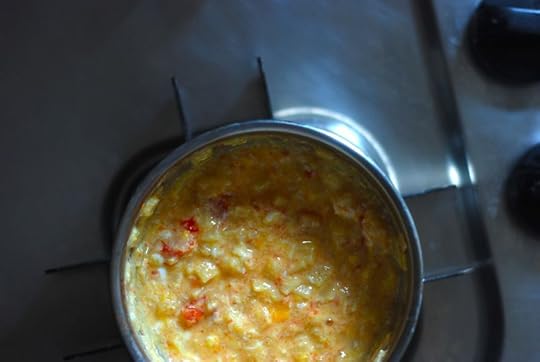
Variation with 1 very fresh egg:
When the pasta is finished cooking, turn off the heat under the pot and crack the egg
into the pasta. Stir the egg until it is cooked and transformed into
custardy shreds. Pour the contents of the pot into a serving bowl, top with olive oil and cheese and serve.
Nota bene: Make sure to really only use the amount of water that you want to serve, if using the egg. Once the egg is stirred into the pot, you can't reduce the amount of liquid in the pot.


