
Ruth Reichl's Blog, page 42
July 3, 2013
Chocolate Covered Cherries
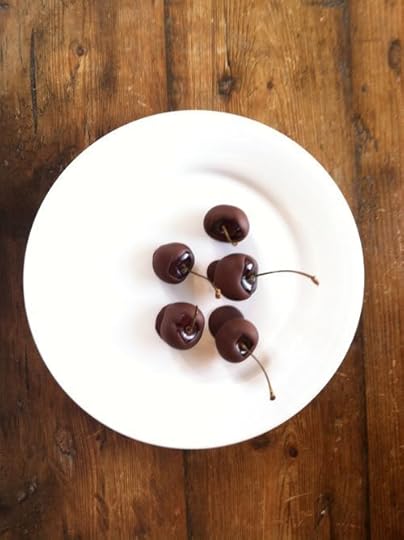
I loved chocolate-covered cherries so much as a teenager that I had a secret pact with a friend; we sent them to each other every month. Today the candies strike me as cloyingly sweet, but the combination of chocolate and cherries continues to haunt me. This morning in the market I was loading my basket with armfuls of Bing cherries, and suddenly saw them in a whole new light. I had a quick taste memory of chocolate cherries - and then I wondered why I'd never tried making my own.
Everyone dips fresh strawberries into chocolate, but cherries are better in every way. The texture is so much more appealing, the flavors are more compatible, and they even come equipped with a convenient dipping handle. I suppose it's fear of pits that's kept chocolate-covered fresh cherries from becoming a summer standard.
Once you’ve tasted these, that might change. They’re wonderful. And easy. I can't think of a better way to celebrate the Fourth.
Chocolate Covered Cherries
¼ lb 70% dark chocolate (I used Scharffen Berger’s bittersweet bar)
a handful of Bing cherries, (I am sure you can use Rainiers, but I love the deep flavor of Bings)
Wash the cherries and carefully dry them, storing them in the freezer until you’re ready to dip.
Slowly melt the chocolate (in a metal or ovensafe dish), over simmering water, stirring lazily and infrequently so you don't streak it. Once the chocolate has completely melted, give it a little time to relax and cool down.
When the chocolate is just comfortably warm, remove your cherries from the cold and dip them in, one by one. Place them on a baking sheet lined with parchment and transfer to the refrigerator until you're ready to indulge.
Eat happily, being careful of the pits.


July 2, 2013
An All American Dessert
The Great Hot Fudge Sundae
Quick. What’s the best food pairing you can think of? If you didn’t immediately answer hot fudge and vanilla ice cream, we may have to revoke your passport. There are hundreds of perfect pairings - bacon and eggs, peanut butter and jelly, rice and beans - but none is as wonderful as the pure black and white simplicity of hot fudge and vanilla ice cream.
Hot and cold. Black and white. Sticky and smooth. But best of all is the way hot fudge makes vanilla ice cream taste more like vanilla, and vanilla ice cream makes the densest hot fudge reveal new aspects of its personality.
If you’ve been buying banal bottled hot fudge and bland vanilla ice cream, this may be news to you. But hot fudge is easy: nothing you can do in the kitchen offers bigger rewards for so little effort. As for ice cream, there are many excellent brands out there, but ice cream is always at its best when it is freshly made and eaten right out of the churn.
A few hints:
1.Use the best, deepest, densest, chocolatiest chocolate you can find. In this case, better really is better.
2. Corn syrup has a bad reputation, but you really do need it to give your hot fudge body and shine. Why? Because corn syrup is an invert sugar, which means that it prevents sugar crystals from forming without adding too much sweetness.
3. You need cocoa powder for the fudgey flavor, and chocolate for the fudgey texture.
4. And you need a little bit of instant espresso. Coffee has the magical ability to make chocolate taste more like chocolate. A little pinch of instant espresso powder makes the chocolate flavor leap right to the forefront (and you will never taste the coffee)..
Hot Fudge
2/3 cup heavy cream
1/2 cup light corn syrup
1/3 cup dark brown sugar
1/4 cup Dutch-processed cocoa powder
pinch of salt
6 ounces bittersweet chocolate, chopped
2 tablespoons unsalted butter
1 teaspoon instant coffee powder
1 teaspoon vanilla
Mix the cream, corn syrup, brown sugar, salt and cocoa powder together in a small (1-2 quart) heavy-bottomed saucepan. Add half the chocolate and stir, over medium heat, until the chocolate is melted.
Cook, stirring, for about 5 minutes, until it’s smooth.
Add the butter, remaining chocolate, vanilla and coffee and keep stirring, off the heat, until it is smooth and shiny.
Pour it over vanilla ice cream and revel in the flavor.
The sauce will keep, in covered jar in the refrigerator, for a couple of weeks.
Vanilla Ice Cream (adapted from David Leibovitz)
1 cup whole milk
3/4 cup sugar
1/4 teaspoon salt
1 large vanilla bean, split lengthwise
2 cups whipping cream
5 large egg yolks
Stir the sugar and salt into the milk in a small saucepan over low heat. With a small knife, slit the vanilla bean open and scrape the seeds into the milk mixture. Throw in the bean pod as well. When it is warm, cover the pan, take it off the heat, and let it sit for an hour so that the milk soaks up all the vanilla flavor.
Put a small (2-quart bowl) inside a large one that is filled, about half way, with an ice and water mixture. Put the cream into the small bowl to keep it cold.
Separate the eggs, and save the whites for another use. Gently stir the yolks in a small bowl. Reheat the milk, very gently, pour a bit of the warm into the yolks, whisking constantly, and then pour the now warm yolks into the milk in the pan. Cook, over very low heat, stirring constantly, until the custard is thick enough to coat a spatula.
Put a strainer over the bowl of chilled cream and slowly strain the yolk/milk custard into the cream. Stir over the ice until it is cold, and put in the refrigerator for at least 4 hours, until it is completely cold. Longer is better.
Take the vanilla bean out of the mixture and freeze the ice cream in an ice cream maker.
Makes about 1 quart
July 1, 2013
The Most Refreshing Summer Drink

How to Make a Great Mojito
Wash and dry a handful of fresh mint leaves, plucking the leaves from the stalk and placing in a pile. Set aside a few leaves for garnish.
Make a simple syrup by combining a cup of water with a cup of sugar in small saucepan and heating slowly, watching the sugar dissolve. Set it aside to cool.
Lightly muddle the mint leaves with a few tablespoons of sugar. The best tool for this is a mortar and pestle, but if you don’t have one you can put them into a heavy bowl and pound the mixture with a spoon until it begins to disintegrate.
Divide the mint into two glasses, add a few tablespoons of the simple syrup, a couple shots of light rum, and the juice of half a lime to each glass. Add ice cubes, and fill the glasses to the brim with soda water. Garnish with a few leaves of mint.
June 29, 2013
How To Pit a Sour Cherry

The best tool is an ordinary paperclip, opened out. Works like a charm; simply insert and flip the pit out.
For a pie you'll need about 5 1/2 cups of cherries, with pits, which is about 2 pints. (Or 4 cups of pitted cherries.)
June 28, 2013
Ginger Ale Floats for a Hot Summer Day
It's a sweltering summer day. Friends are coming for dinner. And you're stumped about dessert. Baking? It's just too hot to turn on the oven. Home-made ice cream seems like far too much trouble.
You could, of course, settle for an icy slice of watermelon. A handful of cherries. You might buy a pie. Or a pint of exotic ice cream. On the other hand, there are these fantastically refreshing floats. Surprising. Fresh. And you get bragging rights for having created your very own ginger ale.
Homemade Ginger Ale Floats
Makes 4 floats
1 fresh ginger root, peeled and sliced
1 cup organic sugar
1 cup water
1/2 teaspoon vanilla extract
3 cups seltzer (or very bubbly soad water)
1 pint high quality vanilla bean ice cream (I like Three Twins' Madagascar Vanilla, but Hagen Daas will do the trick as well -- coffee is also surprisingly pleasant if you have that instead.)
Using a spoon gently scrape back the papery skin from your ginger root and slice it thing. Place the ginger, sugar, and water in a saucepan over low heat and allow to cook until the sugar dissolves and your simple syrup begins to simmer. Add the vanilla and set aside to cool completely. Strain.
For the float, add a few tablespoons of ginger syrup to the botto of your glass (the taller the better, but you'll need the spoons to match) and pour in your soda, leaving room at the top for the float to, well, float. In goes a scoop of ice cream and watch as the whole thing gently erupts. Drink slowly - or dive in with a spoon.
June 27, 2013
Lemonade for Lemon Lovers
One of the great joys of summer in Paris is to sit in a cafe on one of the grandes avenues, watching beautiful people parading past with their even more beautiful dogs. In the evening you might want a Kir Royale or a glass of vin rose, but in the early afternoon what you want is a citron presse. Served with great ceremony, it arrives on a silver tray: a carafe of water, a small pitcher of fresh lemon juice, another of simple syrup and a bucket of ice. It makes the sweet lemonade you are too often served in America seem extremely dull.
Now that we’ve become a cocktail culture, I keep waiting for the return of great lemonade. With its lovely pale color and fresh, tangy aroma, it's the most refreshing drink on earth. It is also extremely good for you: in addition to containing lots of infection-fighting vitamin C, lemon juice is an antioxident and very effective in times of gastric distress. I can’t think of a better drink on this hot summer day.
The first important thing to know about lemons is that the best flavor is in the peel, which contains all that wonderful lemon oil. If you're going to take advantage of this, buy organic lemons or scrub your lemons well before using them.
But here’s the problem: just below the bright yellow zest is the evil pith, the spongey white part of the lemon which is bitter. That’s the part you want to avoid; if you crush it into your lemonade within a few hours you will end up with an unpleasant drink.
Simple syrup is one of the secrets to great lemonade. It's nothing more than sugar dissolved in water, but it means that the sugar will sweeten the lemon juice rather than fluttering down to the bottom of the glass. If you infuse the lemon zest into the syrup, you get all the complexity of the zest with none of the bitterness of the white.
You’ll need a lot of lemon juice, so you want to get as much juice out of each lemon as you can. If you’re lucky, you’ll get about a quarter of a cup of juice out of each lemon; if you’re stuck with unfortunate lemons you might need as many as six for a cup of juice. Increase your chances by rolling the lemon around on the counter beneath your palm to break down the cells inside the fruit; it will give you more juice.
If the lemons seem hard and unforgiving, microwave them for 20 seconds. This will shock them into relaxing, just a little.
Garnish lemonade with a sprig of mint. It looks lovely - and it adds a very pleasant flavor note.
Great Lemonade.
1/2 cup sugar
1/2 cup water
4-6 lemons juice, enough to make a cup of lemon juice
2 cups water
With a sharp knife or a vegetable peeler, remove the zest from the lemons, being careful not to get any of the white pith.
Mix the sugar and water in a saucepan and bring to a boil. Simmer, stirring, until the sugar is dissolved. Remove from heat, throw in the lemon zest and allow to cool.
Juice the lemons until you have a cup of fresh juice.
Strain the sugar syrup; it should be a lovely yellow. Add half to the lemon juice, along with the water, and keep more until it is sweetened to your taste. (I prefer mine quite tart. The strained syrup will keep almost indefinitely in the refrigerator.)
Pour over ice cubes and serve, garnished with a sprig of mint or a slice of lemon.
June 25, 2013
Things I Love
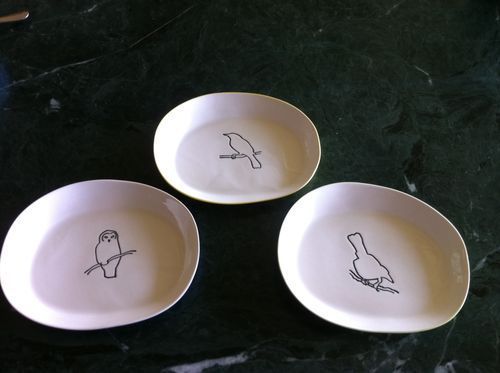
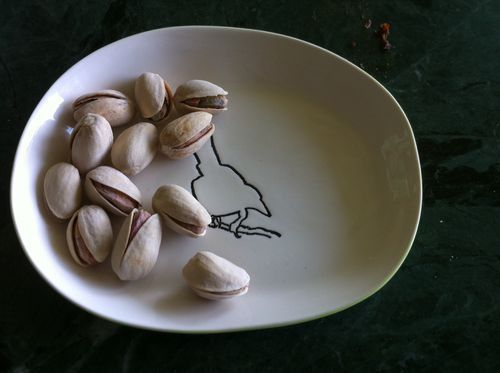
Had leftover cochinita pibil for lunch today, rolled into a tortilla. And as I was making a quick little salsa to serve with it - just chiles, tomatoes, onions and lime - it occurred to me that I couldn’t live without these tiny oval dishes They’re just the right size for so many things: a dish of olives, a few nuts, a bit of jam for your bread or a dab of sour cream for your potato. And when it comes time to put them away, they take up so much less space than bowls. At $14 apiece, they also make perfect presents.
My Latest Obsession
Lemon Verbena!

Who knew it was so simple? Simply put the leaves in a pot, pour boiling water over the top and steep for a few minutes. The result is remarkably refreshing: sweet and citric with a cool green complexity. Even better over ice.
June 24, 2013
Dangerously Delicious Jam
Found the first local apricots at the farmers' market this weekend They're so lovely, and the scent they send into the air as they sit on the kitchen counter is endlessly seductive. But I bought too many, don't want to refrigerate them, so the ones we haven't eaten go into this quick, delicious jam.
Fresh Apricot Jam
¼ cup water
1 ¼ cups sugar
2 pounds apricots, including skin, pulled apart, divided
vanilla bean, optional
juice of half a lemon
Stir the sugar and water together in a small heavy bottomed saucepan and bring to a boil. Reduce the heat and simmer, stirring until clear, 1-2 minutes.
Pull apart the apricots, and add half of them to the syrup. Simmer until they disintegrate, stirring, for about 10 minutes.
Add the remaining apricots and vanilla bean, and stir for another 5-7 minutes, until the apricots soften.
Remove the vanilla bean. Slice it the long way, and run a knife along the inside edge to remove the seeds. Stir the seeds into the jam.
Add the lemon juice and cook for another 3 minutes.
This will keep well in the refrigerator for a couple of weeks - but it's unlikely to last that long.
June 23, 2013
Sour Cherry Lemonade
The joy of this drink is that you don’t have to engage in the tedious task of removing the pits from the cherries. You do, however, have to remove the stems from a quart (about 2 pounds) of sour cherries and toss them into a blender until they’ve turned into a rough mush. Some of the pits will be chopped too; that’s fine because you’re going to put them in a strainer and press hard, extracting as much puree as you can. Discard the solids.
Put the cherry puree into a pitcher and stir in the juice of four lemons, and about a half cup of sugar. (If you like things really sour, you might want less; if you’ve got a sweet tooth, you’ll want more.)
This will keep for a day or two in the refrigerator, but after that it becomes rather murky. When you’re ready to drink the lemonade, pour into glasses and add water (or sparkling water) to taste.
Ruth Reichl's Blog

- Ruth Reichl's profile
- 2980 followers

