
Blanche Vaughan's Blog
June 15, 2017
House and Garden Festival
Favourite Summer Recipes
As Food Editor at House & Garden, I’ll be discussing my favourite summer recipes and demonstrates how to make a delicious summer lunch dish. I’ll also be talking about my fascination with eggs and their vital role in cooking which led me to writing a cookbook, EGG, celebrating this simple but complex ingredient in a huge variety of recipes. I will be showing you how to prepare one of my favourites, Mozzarella in Carozza, while discussing eggs, chickens and being a food writer.
For more information about the festival and tickets, please click here


November 26, 2016
Yuzu and yoghurt cheesecake with bergamot
Yuzu, a fruit which you may well have tasted but rarely seen, is a popular Asian citrus variety with a beguiling and exotic flavour – somewhere between a sweet mandarin and a fragrant grapefruit. Until recently I had only ever tasted it in Japanese restaurants, usually combined with savoury flavours – it is excellent with fish – or in salad dressings. I am now delighted to discover you can buy hand squeezed fresh yuzu from thewasabicompany.com, along with other more mainstream suppliers, like Waitrose. At this time of year, thewasabicompany.com also sells the whole fruit, a small and deeply wrinkled orb shaped citrus indigenous to Japan and Korea, which is in season now. The zest is prized for its strong flavour and is often used instead of the juice. The benefit of the juice over the whole fruit is that a whole bottle can serve several recipes, is less expensive and keeps for longer.

Yuzu fruit
So for this recipe, I’ve substituted the yuzu zest with bergamot. Another exotic fruit, but one which is grown in Europe and therefore much more available and also in season this time of year. It has a slightly sweeter, more fragrant flavour than lemons, the zest is highly perfumed (traditionally used as the scenting oil in Earl Grey tea). Bergamot zest adds a delightful flavour to the cheesecake mixture and the sweeter yuzu juice adds a good balance with both flavours contributing exotic and unusual elements.
If you end up buying more than one bergamot and need other ideas of ways to use it, Patricia Michelson of La Fromagerie, one of a few retail stockists of bergamot, recommends making bergamot syrup to add to prosecco or sparkling water. She also likes to slip slices of bergamot into a cup of Earl Grey and single- estate Ceylon tea. Or recently I ate a beautiful pudding of poached quinces with whipped bergamot-infused cream at Sally Clarke’s restaurant, Clarkes.
With Thanksgiving this week, I looked to America for pudding inspiration. A cheesecake is not a dessert I grew up with and one which took me some time to come to like, probably because I’d never had a really good one. Challenged by this, I thought I’d introduce these new flavours to something classic and try to give it a lift. I’m a fan or Mascarpone but it can create too heavy a filling, so I’ve used half yoghurt to balance it out. The yoghurt also gives a subtle sourness to temper the richness of the cream cheese. More importantly, it’s light, delicious and really simple to make – with an impressive outcome, if nothing else, that’s worth giving Thanks for.

You will need:
20cm springform tin
A roasting tray large enough to fit inside surrounded by water
tin foil
Serves 6
160g plain digestive biscuits
75g unsalted butter, melted
300g thick Greek style yoghurt
300g mascarpone
130g caster sugar
3 whole eggs
3 egg yolks
4tbsps yuzu juice
½ bergamot, zested

Preheat the oven to 180°C/Gas mark 4.
Using a pestle and mortar or a food processor, crush the biscuits until they are the texture of coarse crumbs, then mix with the melted butter.
Line the base of the springform tin with baking paper and wrap the bottom of the tin with a single sheet of tin foil which covers and seals the base and sides. Repeat with another sheet for double protection. Press the biscuit and butter mixture into tin, using your hands or a spatula to form an even surface. Place the tin in the oven for 8-10 minutes to toast the biscuits and form a crisp crust. Remove from the oven and cool.
Put the yoghurt, mascarpone and sugar in a large bowl or the bowl of an electric mixer and beat to combine. Add the eggs, yuzu juice and bergamot zest and continue beating until you have a smooth, creamy mixture.
Place the tin in the roasting tray and pour the cheesecake mixture over the biscuit base in the tin. Boil the kettle and fill the roasting tray with water so that it comes at least halfway up the sides of the cake tin, but be careful it doesn’t seep over the top of the tin foil.
Carefully place the roasting tray in the oven and bake the cheesecake for 40 minutes then reduce the temperature to 150°C and continue cooking for another 10 minutes. Remove the cake when the top still feels slightly wobbly.
Carefully lift the cake tin onto a wire rack and allow to cool before removing the foil. When the cheesecake is cooled to room temperature, chill in the fridge for an hour or so before removing the springform tin.
The cake can be kept in the fridge for up to 2 days.


October 6, 2016
Puffball mushrooms
Grilled Puffball with rosemary and garlic

Last weekend I discovered a puffball. It was the first one I’ve seen this season and a very welcome sight it was, too. Fairly big, it needed two hands to cup it and it looked in prime health. Puffballs remind me of giant marshmallows and indeed the texture is not dissimilar.
They are excellent to cook and behave much better than many other mushrooms, mainly because they don’t release masses of liquid when you put them in a hot pan. They are perfect to grill and because their flavour is mild, they are all the better with a good marinade.

I crushed garlic and mixed it with olive oil to brush generous amounts over both sides and studded the soft flesh with rosemary. Lots of salt and pepper is necessary and a fairly long time grilling on both sides, then finished with some good olive oil. Simple but delicious.
There are many other ways you could try too. Other herbs such as thyme or savoury would taste good and another good tip I’ve been given is to fry them in salty smoked bacon fat for breakfast. Definitely worth a try.

1 puffball mushroom, sliced lengthways into pieces about 1cm thick
Garlic, crushed to a paste with a little salt
Rosemary sprigs
Olive oil
Salt and pepper
Mix the crushed garlic with some olive oil and brush it over both sides of the mushroom. Push the sprigs of rosemary into the flesh and season well with salt and pepper.
Heat a griddle pan or frying pan and cook the slices on both sides for 3-4 minutes or until well coloured and soft.
Pour over some good olive oil to serve.


June 28, 2016
Lemons for Summer
When I think of lemons, I think of Italy: my favourite country to travel to, with a cuisine that celebrates these beautiful citrus fruit in every way. There is a wonderful book, written by Helena Attlee – The Land Where Lemons Grow – an exploration of both Italy and its extraordinary production of citrus fruit, which I read a few years ago. I’ve since re-read it several times, to squeeze out every last word of this evocative, informative odyssey into my two great passions: Italy and lemons.

I first encountered real Italian lemons as a child when I visited family friends in Northern Italy one summer. All along the terrace, which stretched the length of the front of the house, were huge terracotta pots holding lemon trees, covered in deep green leaves and hanging with bright yellow fruit. I had seen a million lemons in fruit bowls before but I had never seen a lemon growing from a tree. When I picked one, I saw the skin was thick and covered in deep pores, unlike the smooth wax-dipped British imports. Just holding the fruit in my hands made the citrus oils seep out onto my skin, perfuming them with a fragrance of zest, sunshine and freshness.
Italians have known these pleasures for thousands of years and although we often associate citrus growing with southern areas like the Amalfi coast, I later learnt in Attlee’s book that historically a thriving business also had operated close to where I was, around Lake Garda. Here the cooler climates produced lemons with an acidity which appealed to the Northern European market. The reason the lemons I saw were growing in pots, was not just a way to decorate the terrace, it was so the trees could be moved, when the temperatures drop dramatically in the winter, into purpose built limonaia or insulated lemon houses.
My next experience of Italian lemons came many years later when I was living in Florence, in an apartment that overlooked the Boboli gardens, which had once belonged to the Medici family, who started one of the great citrus collections during the 16thC, the evidence of which still exists there today. As well as building lemon houses and displaying their collections, during the Italian Renaissance, there had been a fascination for lemon chimeras – those with bizarre forms; finger shaped varieties or with strange protuberances like limbs; gargantuan specimens and those with ribbed skin. Fortunately scientific life sized wax models were commissioned at the time, some of which are still displayed at The Natural History museum on Via La Pira in Florence.

We have grown so used to perfect uniformity and ubiquitous net bags containing lemons in supermarkets, but I now specifically seek out sources of Italian lemons which are displayed in just their packing boxes with stalks and leaves still attached. These are knobbly and irregular shaped and often much larger than the tiny supermarket varieties. If you gently press your fingernail into the skin, a burst of citrus oil will be released – a good test to check if they have been wax dipped or not. Waxing is a commercial method of preservation which covers the scent of the zest and kills the natural fragrance of the lemon’s skin.
Cedro, or Citron, Attlee tells us, are one of the first species of citrus fruit. They epitomise these organic characteristics, with a bizarrely ginormous size, uneven round shape and “saturated in essential oil..its surface is sculpted into ridges like a downland landscape, or raised in terrible carbuncles..It smells stronger, wilder and more exotic that a lemon”. These are technically not ‘lemons’ but another species of citrus fruit and are used predominantly for their zest and pith. The only place I have yet encountered these in London is at the wonderful cheese shop and delicatessen in Marylebone, La Fromagerie. Read my recipe for Cedro risotto here.

The pith and zest produced by half a Cedro lemon
I now seek out any special Italian lemons I can find (usually those imported from the Amalfi coast and sold at good quality greengrocers) and always have them on hand for cooking with, starting with a slice of lemon in hot water to drink when I get up. Because they aren’t wax coated, I tend to keep them in the fridge, especially in warmer temperatures, as it prevents the skin from becoming mouldy in the fruit bowl. When life gives me lemons, these are two of the recipes I turn to to celebrate with: spaghetti al limone, the simplest of dishes which is only possible with proper, Amalfi lemons whose zest and juice are fragrant and pure; and lemon tart, a circle of sunshine inside a pastry shell. And when I want to really embellish it, I top it with fluffy Italian meringue.


Spaghetti al Limone
Serves 2
200g spaghetti
2 Amalfi lemons
4tbsp extra virgin olive oil
20g flat leaf parsley, finely chopped
Grated parmesan (about 50g)
Sea salt and freshly ground black pepper
Bring a large pan of salted water to the boil. Add the spaghetti and cook for 10-12 minutes (or according to packet instructions) until al dente.
When the pasta is cooked, drain it, keeping back a few tablespoons of the cooking water in the pan (this will help create a luscious sauce).
Pour the olive oil over the pasta and mix well. Grate the zest of both the lemons, then squeeze the juice over the spaghetti. Add the parsley and grated Parmesan and mix well. Season with salt and pepper and serve.
Lemon meringue tart
This recipe uses the Italian method for cooking the egg whites, which produces the fluffiest meringue. Overall, it’s a more failsafe version of making meringue – which can often be tricky. The whites are cooked by pouring hot sugar syrup into the bowl while whisking, and all it needs is a short time in the oven to produce golden-brown peaks and to firm it up enough so it can be sliced with a knife. If you’ve never made it before, I would recommend using a thermometer, just to see what the syrup looks like at the correct temperature.
And the beauty of making tarts is that you can make the pastry and line the shell the day before, which almost halves the preparation time.
Makes one 23cm tart
For the pastry:
plain flour 140g
unsalted butter 75g, very cold and cut into small pieces
icing sugar 40g
egg yolk 1 (save the white for the meringues)
cold water 1-2 tbsp
flour for rolling
For the filling:
fresh lemon juice 200ml
caster sugar 160g
cornflour 25g
egg yolks 3 (save the whites for the meringue)
unsalted butter 25g, cut into small pieces
For the meringue:
caster sugar 200g
golden syrup 1 tbsp
egg whites 4, at room temperature
cream of tartar 1 tsp
To make the pastry, sift the flour into a bowl with a pinch of salt. Add the butter and mix together, using a food processor or your fingertips, until the mixture resembles rough breadcrumbs. Sift in the sugar and mix briefly. Stir in the egg yolk and just enough water to bring the mixture together to form a firm dough. If I’m using a food processor, I often do this final part by hand, to make sure I don’t add too much water and make a sticky dough. The firmer the dough, the shorter the pastry will be. Wrap it in clingfilm and pat it into a disc shape. Let it rest in the fridge for at least 30 minutes.
(If you’re making this the day before, you can then roll out the pastry and line the tart shell. Keep covered in the fridge until ready to use.)
Heat the oven to 170C/gas mark 3. On a lightly floured surface, roll out the pastry and line the tart shell. Press it into the bottom corners and trim off any excess around the sides. (Save this for later in case you need to patch up any cracks.)
Line the pastry case with baking parchment and fill with baking beans (they’re not essential, so don’t worry if you don’t have any, but this can help prevent shrinkage). Bake for 20 minutes then remove the paper and beans, if using, and return to the oven for another 5-10 minutes or until the base is golden and feels firm and sandy. Remove and cool on a wire rack.
To make the filling, put lemon juice, sugar and cornflour into a small pan and whisk to combine. Bring to the boil, stirring, while the mixture thickens. Remove from the heat and whisk in the egg yolks, then add the butter, stirring until it melts and the mixture becomes smooth. Pour into the tart shell and allow it to cool and set while you make the meringue.
To make the meringue, preheat the oven to 150C/gas mark 2. Put the sugar and golden syrup in a small sau cepan and just cover with water. Heat, undisturbed, until all the sugar has dissolved. Turn up the heat and boil, without stirring, until the syrup registers 120C on a thermometer (firm- ball stage). This will take a couple of minutes, so in the meantime you can get the egg whites whisking.
Whisk the egg whites with a mixer on low speed until starting to get foamy, then add the salt and cream of tartar. Increase the speed to medium, and whisk just until soft peaks are starting to form. Turn off the mixer at this stage while the syrup reaches the right heat.
When the syrup is ready, start whisking the whites again on a low speed while pouring hot syrup down the side of the bowl in a slow, steady stream. When all the syrup is added, increase the speed to high and continue whisking for about 10 minutes, or until the bowl feels cool to the touch. During this time, the whites are cooking in the heat of the syrup and they will become voluminous, thick and smooth looking.
Spread the meringue all over the top of the tart right up to the sides, and make some little peaks on the surface with a knife for decoration.
Cook for 15 minutes, or until the top has slightly browned and the meringue feels a little firm. Remove and allow the tart to cool slightly before eating.


April 21, 2016
Wild garlic frittata with herbs and ricotta
If you go down to the woods today or any day in the next week or so, you should find swathes of wild garlic. Right now is the time to pick it, while the leaves are young and at their most tender for cooking.

Although it looks more beautiful later on, when the small white flowers pierce out from amongst the lush greenery, it becomes a little more fibrous to eat.
Even if you aren’t able to go foraging for it yourself in the woods, this delicate wild plant has now become available in farmers’ markets and specialist shops, so it’s worth seeking it out to enjoy it during the short season. Although called ‘garlic’, its flavour is more like a gentle spring onion and when cooked, it is only softly pungent and enhances other flavours, rather than overpowering them.
Supplemented with a few spinach leaves from my garden (still going strong despite being overwintered), all I needed were fresh eggs, a spoonful of ricotta and fresh herbs to make the perfect early spring dish.
Wild garlic and spinach frittata with herbs and ricotta
Serves 2
A handful of wild garlic leaves, washed
A handful of spinach leaves, washed
1 tbsp mixed, chopped parsley and marjoram
100g fresh ricotta, crumbled into chunks
6 eggs
15g unsalted butter
Salt and pepper
You will need a small frying pan that is ovenproof.
Turn on the grill to a medium setting.
Heat a little oil in a separate saucepan and add the garlic and spinach leaves and a little salt. Cover and cook for a minute or so until wilted and soft. Drain to remove any excess liquid.
Roughly chop the wilted leaves and put in a bowl with the herbs and ricotta.
Crack in the eggs and mix a little. Season well.
Get your small frying pan hot and melt the butter in it. Pour in the mixture and cook for about 5 minutes, until the bottom has set, then put the pan under the grill for the top to cook. This should take up to 12 minutes, but keep testing it by pressing the middle gently. It should feel just firm.


April 5, 2016
Nettle ravioli
Even though my vegetable patch is looking pretty sparse at the moment, outside of the garden the first opportunities of foraging are beginning, starting with nettles. Stinging or common nettles (ortica dioica) are a great wild gift of early spring and right now is the time to gather them, when the first tender leaves are starting to sprout.
Few things can be as menacing yet desirable as the stinging nettle. Their flavour is delicious, a bit like an intense, rich spinach and they’re full of health giving vitamins and iron. You need to pick just the tops off each plant, where the leaves are at their most tender and once cooked for 2-3 minutes in boiling water, they’re free from the sting. If you don’t cook them long enough, you can still get a harmless little tickle on the tongue.
It might seem strange to love a weed that stings but people have been using them forever. Nettles are full of medicinal properties; animals are fed a dried nettle supplement to help make their coats glossy and in Cornwall the leaves are wrapped around Yarg cheese to encourage its ripening. We eat nettle soup in Europe and in Northern India they cook nettles with spices, where they are known as Shishnu. In the vegetable garden they can indicate high soil fertility and when cut, they can be used as a compost activator.
The ones I picked this weekend I made into ravioli parcels, but for my next picking I thought a risotto or a souflee would be good to try. If you can’t face the nettle bed you can buy them online from www.natoora.co.uk
Pick from areas that you are certain haven’t been sprayed with pesticides or where dogs may have peed. Wear protective gloves to avoid the sting and pick the top 4 bracts of the plant (approx.. the top 20cm). This will ensure you don’t get any tough stalks.

For the pasta:
Makes about 500g
350g 00” pasta flour (Italian fine milled)
A good pinch of salt
1 egg and 2-3 egg yolks (depending on the size)
Fine semolina flour for kneading
Sieve the flour into a big bowl, add the salt then make a well in the middle. Add the whole egg and yolks and mix together until it forms a dough. You can also do this in a Kitchen Aid using the hook attachment, or a Magimix. The dough needs to be soft, but not sticky and wet. If it’s too wet, add a little more flour and if it’s dry, add another egg yolk or water.
Sprinkle some semolina flour on a work surface and knead the dough until it’s smooth and stretchy.
Divide into two balls and wrap in cling film. Refrigerate for at least 20 minutes.
For the ravioli filling:
A carrier bag full of nettles (keep some aside to serve)
200g ricotta cheese
50g parmesan, grated
Nutmeg, to grate
Salt and pepper
To serve:
100g butter
Nettle leaves
Parmesan
Wash the nettles and remove any woody stalks.
In a pan of boiling, salted water, cook the nettles for a couple of minutes until they soften and wilt. Drain and squeeze out as much of the water as you can. Take out a small handful and set aside. These are to put on top when serving. Roughly chop the others
In a bowl, mix the ricotta with a fork then add the chopped nettles, parmesan and a grate or two of nutmeg and season well with salt and pepper.
To make the ravioli:
Flour the work surface with the semolina and using a pasta machine, start rolling one ball of the dough through the machine. Start on the highest setting and work down gradually so you end up with smooth, thin dough which reaches each side of the machine.
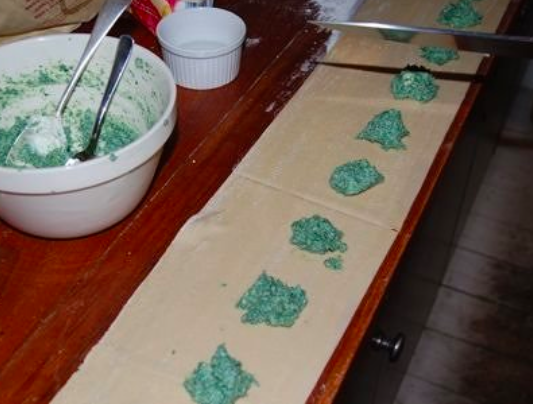
Spoon little balls of the filling onto the dough, then, with a little water, wet the dough where it will join. Fold it over to cover and carefully squeeze out any air trapped in the parcels before sealing. Cut each parcel into a little rectangle to make your individual raviolis.
Repeat this until you have used all your filling. If you have any dough left over, you can keep it in the fridge for a few days to use for something else.
In a saucepan, melt the butter and add the nettle leaves you kept aside. Allow the butter to start foaming before you take it off the heat.
Cook the ravioli in a pan with plenty of boiling, salted water for about 3 minutes. Drain and put on a plate with the melted butter and nettle leaves poured over with a grate of parmesan.


March 23, 2016
Beetroot and herb salad with soft boiled eggs
Most of the eggs that we will eat at Easter will be made of chocolate, so here’s a healthy, seasonal recipe as an antidote to all that wonderful indulgence.
Roasted beetroot has a really intense, sweet flavour but the long cooking time means it’s not ideal when you want a quick salad. To get around this problem, I usually roast double or triple what I need, all at once when I have time, like on a Saturday morning, and then use the beetroot for different dishes throughout the week, like salads and quick soups.
With some roasted beetroot in your fridge, you can make this salad as an easy lunch dish, and the eggs provide all the protein you need for one meal. I sometimes serve this with smoked eel and horseradish for an extra treat.

Beetroot salad with herbs and soft boiled eggs
Serves 2-4
4 beetroot, washed
Small bunch of thyme
4tbsp olive oil
2 soft-boiled (mollet) eggs
3 spring onions, chopped
1tbsp capers, rinsed, drained and chopped
Small bunch of flat leaf parsley, chopped
Small bunch of fresh dill, chopped
2tbsp sour cream or creme fraiche
1tbsp red wine vinegar
Sea salt and freshly ground black pepper
Preheat the oven to 200°C/400°F/gas mark 6.
Put the unpeeled, raw beetroot into a roasting tray with the thyme sprigs, 2 tablespoons of olive oil, a few pinches of salt and a few tablespoons of water. Cover with foil and roast for 1 1/2 – 2 hours, or until a knife inserted through the middle meets no resistance.
Remove and allow to cool slightly before slipping off their skins.
Meanwhile cook the eggs. For fridge temperature eggs, cook in lightly boiling water for 8 minutes, remove and run under cold water then peel.
Cut the beetroot into wedges and put them in a bowl with the spring onions, capers and herbs.
Mix the sour cream with the vinegar and remaining oil, season well and then stir into the beetroot.
Arrange the beetroot salad on a serving dish, halve the eggs lengthways and arrange on top.


March 11, 2016
Blood orange and pomegranate margarita
Every time I cut open a blood orange, I marvel at its strange, dark beauty. The best blood oranges are grown on the volcanic plain surrounding Mount Etna in Sicily, where the soil and the fluctuation of temperature between day and night cause pigments called anthocyanins (which are high in antioxidants), to develop. So it isn’t just the evocative names of the varieties: Moro, Tarocco and Sanguinello to tempt me, the fruit is a superfood too.

The ruby red seeds of pomegranates, also cultivated in Sicily and probably introduced by the Arabs, have a high anthocyanin content due to the same blood-red pigmentation. Fortunately both of these wonderful fruit varieties overlap seasonally, so around this time of year, my fruit basket is filled with these two exotic and health giving ingredients.

It’s healthy to have fun too, so mixing up a cocktail every so often is just the way to celebrate these beautiful fruits. I’d recently bought a wonderful 100% agave tequila reposed from Tapatio, which is rested for four months in ex-bourbon casks to round out the flavour and tame the edges. A flash of inspiration led me to mix up this beautiful pink drink.

For one or two:
1/3 cup tequila
1/4 cup fresh pomegranate juice
1/4 cup fresh blood orange juice
a dash of Cointreau
a dash of agave syrup
Ice and salt
Chill the glasses in the freezer for half an hour.
Stir the liquid ingredients with lots of ice to chill completely.
Rub the rim of the glass with salt and strain the drink into the glass.
I like to serve it very chilled but without ice in the glass so there’s no dilution.


March 9, 2016
Eggs, a love letter: my piece in the Guardian

They’re the beating heart of a kitchen, the ideal bed partner for many ingredients, and breed endless possibilities for the curious cook. Yet eggs are strangely undervalued. With the launch of my book, EGG, in the U.S. it feels like the right time to give eggs the praise they deserve.
Eggs are magical things. These beautiful ovoid forms are one of the greatest gifts nature ever gave to the cook. No other ingredient can perform in such a complex way. They are simple and yet protean, indispensable but taken for granted, sometimes treated harshly and misunderstood, and yet continue to be the cornerstone of cookery.
Underneath the shell – that perfect vessel both to store and protect it – the egg gives us not one, but two ingredients: yolk and white. These parts can be separated and used either individually or together, both of which offer unique elements that perform in completely different ways. Yolks can emulsify to make thick, creamy sauces, while egg whites can be whipped into a foam and grow into great clouds. Whole eggs can be poached, fried, boiled, baked; or beaten together to give body and lightness to cakes.
“A good egg has a strong white, a hard shell, and a pert yolk that sits up proud and doesn’t burst easily”
Boiled eggs, sitting snugly in china egg cups, is one of my first memories of the table. Later, I learned to watch my mother as she cooked, breaking eggs and separating the yolk from the white, carefully dropping it between the two cracked shells. Their presence in my life remained constant and unquestioned until, not long ago, my doctor told me to eat more eggs. No longer vilified for contributing to high cholesterol, they are now back in favour with health experts. Suddenly, I started to take eggs more seriously – how could I make the most of eating them? This was the inspiration to write my book, Egg.
Consuming more eggs made me consider their provenance more carefully. While the sensation of plucking a warm egg, fresh from the nest, and cupping it in your hand is one of life’s great grounding pleasures, realistically, most of us are taking a box from the supermarket shelf. Unless you’re buying direct from a farm, often it’s the supermarkets that can supply the freshest eggs, because their turnover is so high. I always go for free-range and organic, if possible. It makes sense, as free-range hens that are fed on natural feeds and move about in spacious areas lay healthier, stronger eggs. Currently, Clarence Court Burford Browns are my first choice for their lurid, bright orange yolks.
It’s a simple rule with cooking: if you begin with good ingredients, you will get better results. A good egg has a strong, gelatinous white, a hard shell and a pert yolk that sits up proud and doesn’t burst easily. They poach perfectly; make superior cakes; shine through in rich custards; and, most importantly, taste exceptional.
As I explored the subject further, I thought about the role eggs could play in any meal of the day: prepared in a matter of minutes for a rushed breakfast (my favourite is soft boiled with anchovy butter soldiers). A fail-safe lunchtime dish is sformata, a simplified take on soufflé, made of whole eggs beaten with ricotta, spinach, marjoram and parmesan. It emerges from the oven slightly puffed up, golden brown on top and fills the kitchen with beautiful baked smells. My apricot, orange blossom and pistachio cake – made with four eggs – has become a staple at teatime.
At dinner, eggs perform crucially in the guise of sauces: flavoured mayonnaise, chopped boiled eggs enriched with herbs and capers to eat with simply grilled fish, or warm hollandaise for scooping the new season’s asparagus spears into. After dinner, I might shake up a cocktail, using egg whites to create that inimitable creamy topping on a whiskey sour.
What started as a prescription has ended in a book, a love and a lifestyle. Where would we be without eggs?

Soft boiled eggs with anchovy toast from my new book, EGG
Soft boiled eggs with anchovy toast
This is my favourite way to eat a simple boiled egg: crisp toast soldiers dipped into rich, runny egg yolk. There is something magical about the combination of salty anchovy, buttery toast and warm yolk.
I like to use salted anchovies, rather than those preserved in oil, as they blend more easily into the butter. They come packed in salt and need to be cleaned and filleted, which is easier than it sounds: just rinse them gently in water and remove the backbone with your fingers. Anchovies in oil will also work if you haven’t got salted ones; just make sure you drain them well. It’s worth making a larger batch of anchovy butter as it keeps for up to a week in the fridge and means that breakfast will be quicker to prepare next time.
Serves 1
eggs 1-2 , depending on how hungry you are
white bread or sourdough a slice, toasted
anchovy 1 whole, salted, cleaned and filleted
lemon juice a squeeze
unsalted butter 10g
freshly ground black pepper
Boil the egg(s) to your preferred consistency – I recommend soft-boiled. While the eggs are cooking, toast your bread and prepare the anchovy butter. Chop the anchovy finely and pound it with the lemon juice in a pestle and mortar, which will cause it to dissolve slightly. Add the butter and pepper, pounding until smooth and spreadable. (If you are using an anchovy in oil, you may need to add some salt at this stage.)
If you don’t have a pestle and mortar, you can do this on a chopping board. Chop the anchovy finely and then use the flat side of the knife blade to squash and spread it repeatedly. Transfer to a bowl and use a fork to blend with the lemon juice and then the butter.
Spread the butter on the toast and cut into soldiers. As soon as the eggs are cooked, crack open the top and get dipping.


February 26, 2016
Madeleines for Mother’s day

Hand made gifts often mean more than anything bought. It’s not just the thought they require, it’s the time taken too. Last Christmas my sister gave me a basket full of jams and preserves she had made with fruit grown in her garden, and special ingredients foraged from the Cornish hedgerows where she lives. Every time I open a jar to scoop out some green tomato chutney or some rowanberry jelly, I think of her and the flavours transport me to rural Cornwall.
The experience of food can be a hugely evocative thing; taste and memory are so closely intertwined and many memories are of dishes cooked for us, or eaten with, our mothers: the restorative vegetable soup she made when I was ill; her English muffins baked fresh for breakfast with homemade marmalade; roast lamb for Sunday lunch. These are not just memories of the taste and texture of the food, they bring back the experience of the table where we ate; the room; the light and the emotions.
Proust’s involuntary memory which flooded into his consciousness when he nibbled on a madeleine, is the most famous example of how taste experience can trigger human perceptions. Although it’s his mother who triggers the recollection when she gives him a madeleine as an adult, what he actually remembers is the morning tea and madeleine he ate with his aunt during his childhood.
“one day in winter, as I came home, my mother, seeing that I was cold, offered me some tea, a thing I did not ordinarily take. I declined at first, and then, for no particular reason, changed my mind. She sent out for one of those short, plump little cakes called ‘petites madeleines,’ which look as though they had been moulded in the fluted scallop of a pilgrim’s shell. And soon, mechanically, weary after a dull day with the prospect of a depressing morrow, I raised to my lips a spoonful of the tea in which I had soaked a morsel of the cake. No sooner had the warm liquid, and the crumbs with it, touched my palate, a shudder ran through my whole body, and I stopped, intent upon the extraordinary changes that were taking place. An exquisite pleasure had invaded my senses”
Then after much contemplation on the cause of this reaction, he realises:
“And suddenly the memory returns. The taste was that of the little crumb of madeleine which on Sunday mornings at Combray (because on those mornings I did not go out before church-time), when I went to say good day to her in her bedroom, my aunt Léonie used to give me, dipping it first in her own cup of real or of lime-flower tea.”
And so it goes on, and on, and on…but what we do know is that the madeleine had originated long before Proust, and food memories and their associations are basic human instinct.
The origins of ‘Mothering Sunday’ date back to the 16thC when domestic servants were given the day off to visit their ‘mother’ church and usually with their mothers. Children would pick flowers on the way to the church to give in offering.
When I thought about what Mother’s day means to us now, the common theme still bound up in our traditions, is of memory and thanks giving. This year, I’ll bake my mother a batch of honey madeleines and deliver them in a parcel, tied with a ribbon. Maybe I’ll find some lime blossom tea for her to dip them in too. That’ll give her something to remember.

makes 24
125g unsalted butter, plus extra for the tin
2tbsp best-quality runny honey
3 organic, free-range eggs
120g caster sugar
125g self-raising flour, plus extra for the tin
Pinch of sea salt
It’s worth finding a madeleine tray with its little scallop shaped moulds to create the unique madeleine shape.

Melt the butter and honey together in a small pan.
In an electric stand mixer or using a handheld blender, whisk the eggs and sugar until they have doubled in volume and become thick enough that a dribble of mixture will leave a trail across the surface.
Pour the melted butter and honey not the eggs and whisk to combine.
Sift in the flour and salt and fold thoroughly with a metal spoon or spatula to combine and then chill for 1 hour.
Preheat the oven to 170°C/325°F/Gas mark 3.
Melt about a tablespoon of butter and prepare a 12-hole madeleine tray by brushing the insides with the melted butter and dusting with a little flour.
Spoon half of the mixture into the moulds, but don’t overfull as the cakes will rise. Keep the remaining mixture in the fridge to make the second batch.
Bake in the preheated oven for 12 minutes or until risen and golden brown. Remove from the tin and repeat the process to cook the second batch.
Leave until just cool enough to handle – these are best eaten warm!
Also try:
Add lemon or orange zest to the batter
Add a few drops of almond extract instead of the honey
Recipe from EGG, published in March 2016 in the US by Harper Collins


Blanche Vaughan's Blog

- Blanche Vaughan's profile
- 4 followers

