
Matador Network's Blog, page 478
May 12, 2022
The 7 Best Beaches for Clamming in Washington State
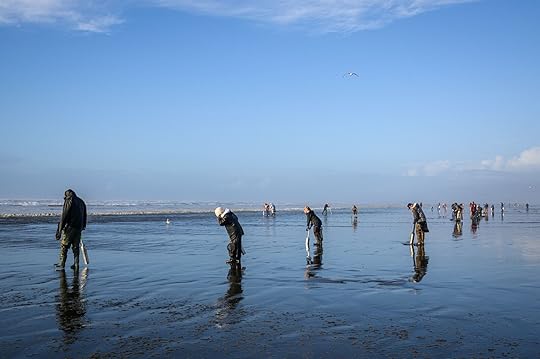
Spring, fall, or winter, icy rain, wind, or even the occasional and much longed for sunshine — whatever nature brings there are families armed with shovels who flock to Washington’s hard-packed, wet-sand beaches in bucket hats and galoshes to go clamming. And these mollusk enthusiasts know that the best beaches for clamming (and the many other types of seafood that Washingtonians love) are scattered all over the state, often nestled within expansive state parks.
Clamming is a surprisingly easy endeavor, unlike salmon fishing in Washington state, which takes more practice. That’s a big part of what makes it such an ideal activity for the whole family – little ones included (though they are likely to have more fun running down the beach and playing in the waves).
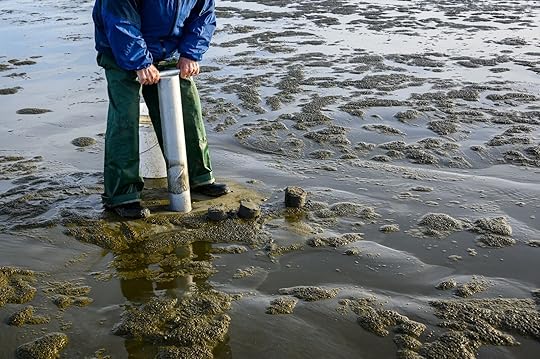
Photo: knelson20/Shutterstock
You need to arrive at low tide, armed with just three tools: a shovel or a clam gun, a bucket or other container in which to store your clams, and your clamming license, which you can learn more about purchasing here.
Clamming season passes quickly, so it’s important to check the Washington Department of Fish and Wildlife frequently for updates. The website posts the allotted days when clamming is allowed, as well as the clam limit per person. For instance, spring razor clamming season (which ran from April 29 to May 7) was just nine days long, and participants could take home 20 clams (and you have to keep the first 20 clams you find). Don’t fret though: There’s always another season not too far away.
In the fall and winter, people tend to head to beaches for clamming at night when the tide is low, but you’ll need a heavy raincoat, a flashlight, and cold weather gear. The beaches are open for clamming from 12:00 AM to 11:59 AM the following day, so you’ll also see some early birds heading onto the sand at 4:00 AM.
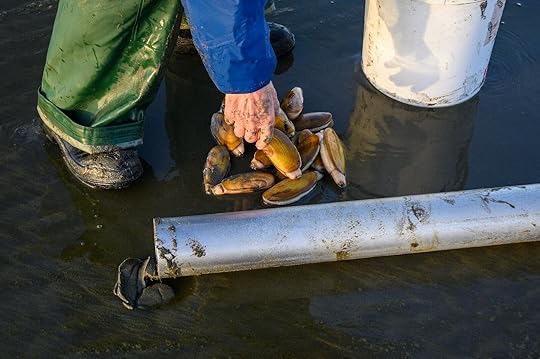
Photo: knelson20/Shutterstock
While you can start digging haphazardly on the beach, there are some very subtle signs you can look for: Experts recommend arriving two hours before peak low tide. You’ll want to look for those telltale, dime-sized dimples in the sand that indicate a clam’s siphon is just below the surface. They can also surface when the clammer smacks the surface of the sand with the handle of their shovel (the WDFW provides instructions on how to dig for clams once you identify where they are burrowed).
Clams can be found on what the Washington Department of Fish and Wildlife calls “intertidal coastal beaches” – beaches that are almost completely exposed at low tide. Pacific razor clams are the most popular and widespread type of clam in Washington, but you can also find Manila, littleneck, butter, and horse clams, among others, as well as the iconic geoduck – a saltwater clam that is so massive its shell isn’t big enough to enclose its entire body.
The WDFW created a map outlining the seven beaches open seasonally for razor clam digging, but there are windswept and salty beaches throughout the Pacific Northwest where all sorts of clam beds lay waiting for your shovel.
The best beaches for clamming in WashingtonPotlatch State Park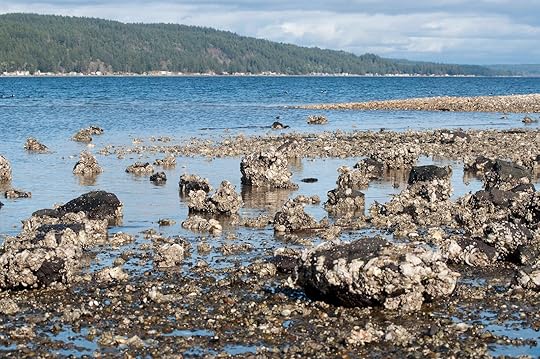
Photo: SNC Art and More/Shutterstock
Butter clams are the most prevalent variety of clam at Potlatch State Park, but experts say you can also dig for Manila and littleneck clams here. The rocky beach requires sturdy footwear and a strong arm – you’ll likely be digging for clams through both sand and gravel. Oyster beds are located near the highway, according to the WDFW.
DuckabushOpen from May 1 through October 31 for clam and oyster harvesting, Duckabush is especially abundant with Manila clams, sometimes also called steamers by experienced clammers (littleneck clams can also be found here, but are not as common). Duckabush is an expansive beach, so be forewarned that searching for clams here takes time and patience. Located on the Olympic Peninsula, about a four hour drive from Seattle, the rocky, muddy beaches of Duckabush will get your hands dirty but fill up your clam bucket.
Dosewallips State Park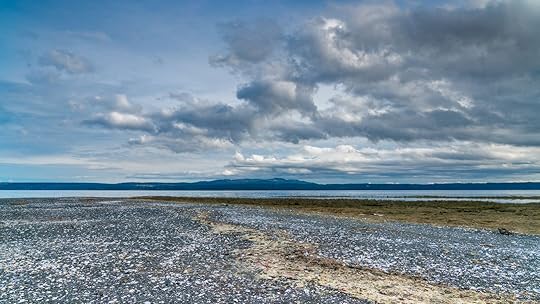
Photo: John T Callery/Shutterstock
Less than 13 miles away from Duckabush is Dosewallips State Park, another one of the most popular beaches for clamming. Here you’ll find more Manila clams, and it’s also a popular spot for digging up geoducks, which the WDFW specifies can be found at “low intertidal zones.” While you’re at it, you might also harvest oysters at Dosewallips, which are plentiful here.
Birch Bay State Park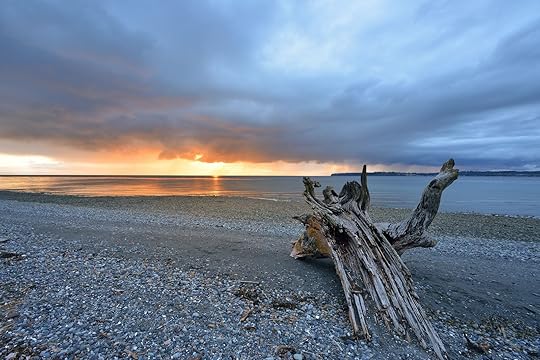
Photo: Lijuan Guo/Shutterstock
People like to go clamming at Birch Bay because parking is so close to the beach you can step out of your car and be digging for clams within minutes. The shallow waters make it easy to find Manila, butter, and horse clams. Oysters can be found here, too – though they aren’t quite as abundant as on other beaches on this list.
Oak Bay ParkButter clams and Manila clams are the most abundant at Oak Bay, but you can find littleneck clams here as well. There’s a lagoon in the park that regulars to the area say kids like to play in, so families are likely to flock here. There’s also a campground nearby.
Wolfe Property State ParkThere are few signs that will direct you to this beach, making it somewhat of a hidden gem, though locals know it well as one the best beaches for clamming in Washington. Like most other Pacific Northwest beaches, this one is rocky and cold but majestic. You might find this one a little less crowded than the more popular clamming beaches in the state. Littleneck and Manila clams are common here — there’s a planted clam area specified on this WDFW map where clammers are advised to dig.
Twanoh State Park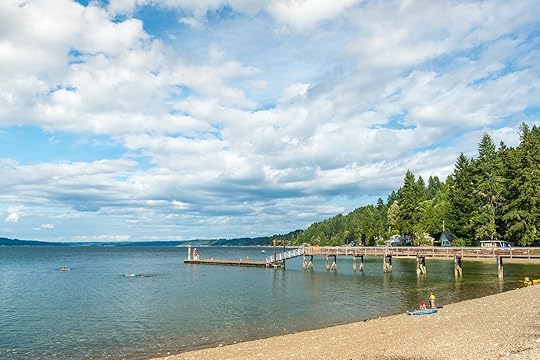
Photo: Checubus/Shutterstock
Located at the tip of Hood Canal just an hour and a half drive from Seattle, Twanoh State Park is one of the most family-friendly and versatile parks in the country. In the summer, a swimming area opens, and there are restrooms, a boat ramp, and camping on-site. As for clamming, you’ll find a wide variety here, including Manila, littleneck clams, butter clams, and cockles, just below the oyster beds. If you’re planning to hunt for oysters here, be aware that you are required to shuck the oysters on the beach, as the discarded shells form beds for new young oysters. 


CLEAR Is Offering a Steep Discount for Couples and Friends Just in Time for Summer Travel

Airport security lines can stretch for hours. But for those who have a service like CLEAR that lets them bypass the crowd, lines are just an afterthought. And now, your favorite travel partner can reap the benefits, too, if they’re not already members.
CLEAR is offered at more than 50 airports, stadiums, and arenas across the United States. It uses biometric identifiers like your eyes, face, and fingerprints to confirm your identity instead of waiting for a TSA agent to do it at the kiosk, allowing you to jump to the front of the line. However, unlike TSA PreCheck, you still have to follow traditional security measures once you cut the line, like removing jackets, laptops, and shoes.
CLEAR typically costs $179 per year ($15 per month). However, with this new package that you can purchase on CLEAR’s website, you and a partner or friend can get CLEAR for two for just $239 per person. That adds up to $120 in savings. Children are already allowed to tag along with your CLEAR membership for free, which means the entire family can get through security in a snap.
So now there’s no need to worry about whether you’re getting to the airport early enough, and no excuse to not bring someone else along with you if you’re the type of person who ditches your travel partner while they wait in the line you skipped.
Plan Your Summer Escape To These Rustically Gorgeous Rocky Mountain Cabins
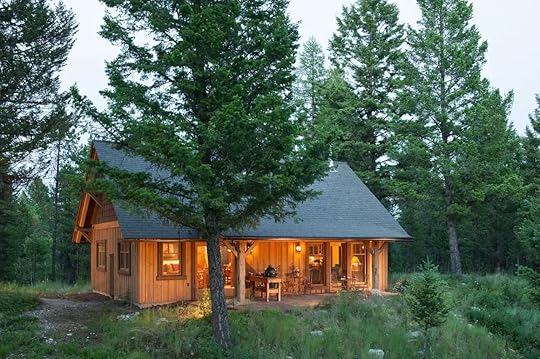
The Rocky Mountains are indeed a sight to see. Stretching 3,000 miles across the states of Montana, Wyoming, Idaho, Colorado, New Mexico, Utah, and Arizona, the mountains are beautiful towering peaks that everyone wants to catch a glimpse of. If you’re looking to see the beautiful Rockies then here are some Rocky Mountain Cabin rentals in prime locations in Colorado, Utah, Idaho, Wyoming, and Montana.
Rocky Mountain cabins in ColoradoRocky Mountain cabins in UtahRocky Mountain cabins in IdahoRocky Mountain cabins in WyomingRocky Mountain cabins in MontanaRocky Mountain cabins in ColoradoCharming rustic cabin near Rocky Mountain National Park
Photo: Airbnb
Photo: Airbnb
Photo: Airbnb
Photo: Airbnb
Visit Rocky Mountain National Park with the many Rocky Mountain cabin rentals that Colorado has to offer. This simplistic charming log cabin has knotty hardwood paneling and exposed beams and is the perfect spot for your getaway. The cabin has two bedrooms, a kitchen and dining area, and a cozy living room with an indoor fireplace.
Six guests, two bedrooms
Price: $275 per night
Photo: Airbnb
Photo: Airbnb

Photo: Airbnb
Photo: Airbnb
Have a pleasant and comfortable stay at this modern western cabin. This spacious cabin is pet friendly and has a spacious living room and kitchen. There is a lovely covered porch with an outdoor dining area lighting and a gas grill with stunning mountain and lake views.
Seven guests, three bedrooms
Price: $288 per night
Photo: Airbnb
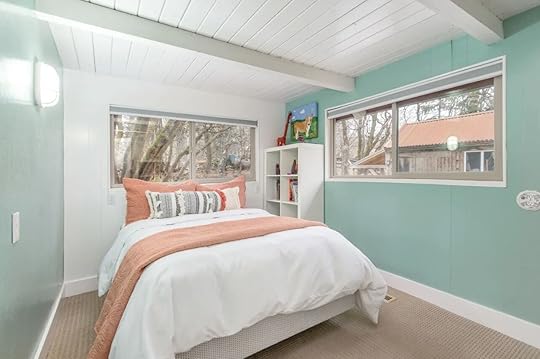
Photo: Airbnb
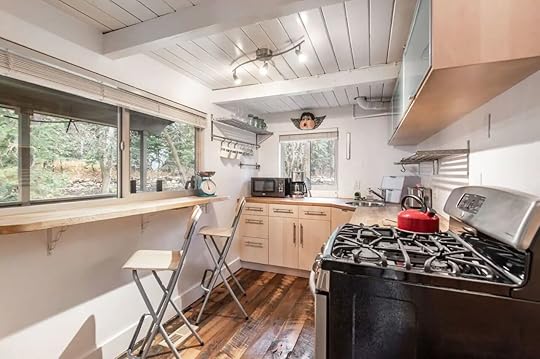
Photo: Airbnb

Photo: Airbnb
Looking for charming and cozy Rocky mountain cabin rentals in Utah? Well, then check out this quaint cottage. This cabin embodies coziness and has a spacious living room with a fireplace, a kitchen, and a small dining area. If you’re feeling up for something unique, there is also a furnished tipi on the property that you can stay at.
Four guests, two bedrooms
Price: $434 per night
Traveling to Colorado? Check out Matador’s Colorado accommodation guides to the best places to stay across the state: 10 Airbnb Estes Park rentals near Rocky Mountain National ParkThese Denver airport hotels put you close to the terminal with luxe amenitiesThe best Airbnbs in Denver for beer, 420, and mountain cultureVail Airbnbs that make you feel like you’re in the heart of BavariaAspen Airbnbs to chill like a celebrityStay near Garden of the Gods and Pikes Peak at these Colorado Springs AirbnbsSecluded cabin in the foothills of the LaSal Mountains
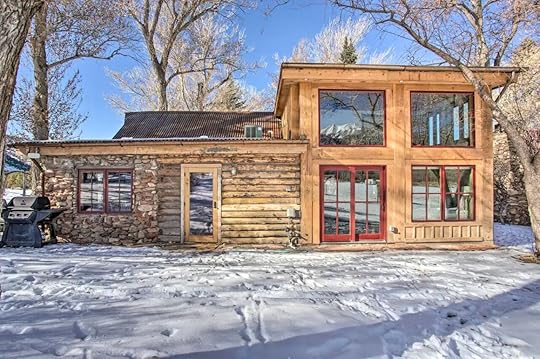
Photo: Airbnb

Photo: Airbnb
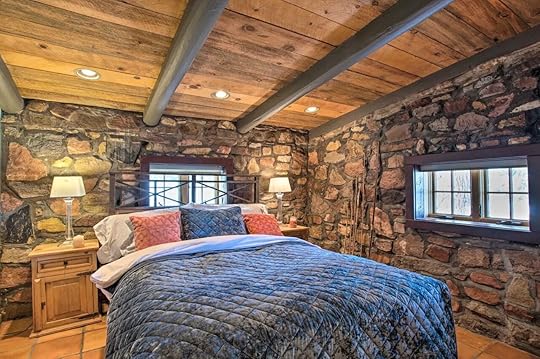
Photo: Airbnb
Photo: Airbnb
Located in a nice secluded spot in this spacious cabin. This dream destination cabin has a seasonal pool, hot tub, and sauna year-round. Relax in the spacious living room by the fireplace or cook up a delicious meal in the fully equipped kitchen. There is a furnished patio with an outdoor dining area and gas grill.
Six guests, two bedrooms
Price: $364 per night
Photo: Airbnb

Photo: Airbnb
Photo: Airbnb

Photo: Airbnb
This Teton Springs cabin is one of the perfect Rocky Mountain cabin rentals for your mountain getaway. This cabin has three bedrooms and a spacious floor plan that gives plenty of space to relax and enjoy. There is a large living room area and kitchen area, and there is a deck with a large private hot tub with stunning views.
Six guests, three bedrooms
Price: $702 per night
Photo: Airbnb
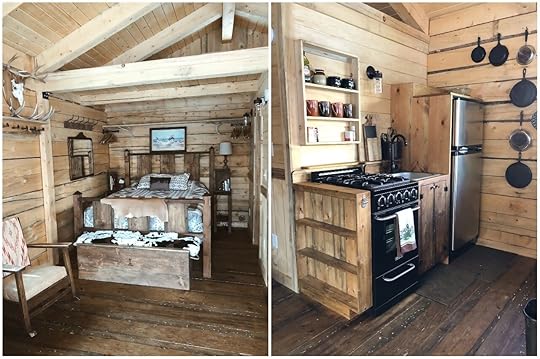
Photo: Airbnb
Come and stay at this cozy off-grid cabin. This quaint cabin has a bedroom area and kitchenette area. Enjoy gorgeous views and wildlife in their natural habitat and the soothing sound of the creek nearby. There are many outdoor activities to enjoy like snowshoeing, stargazing, backpacking, fishing, and more.
Two guests, one bedroom
Price: $150 per night

Photo: Airbnb
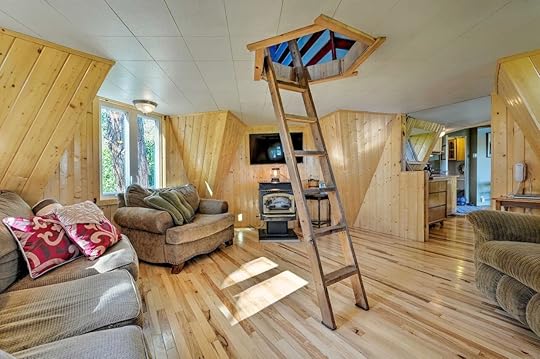
Photo: Airbnb
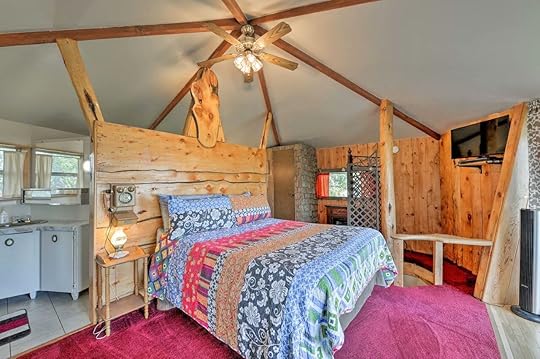
Photo: Airbnb
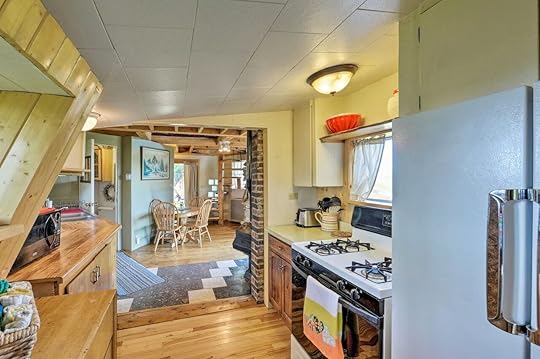
Photo: Airbnb
Experience some cozy Mountain cabins with this Wild West Snowflake Cabin. This unique cabin has waterfront access with a wrap-around deck and outdoor furniture. Inside there is a spacious living room area and a fully equipped kitchen with a gas range stove. This space has 16 acres and a horse pasture, and kayaks if you want to get out on the water.
Two guests, one bedroom
Price: $163 per night
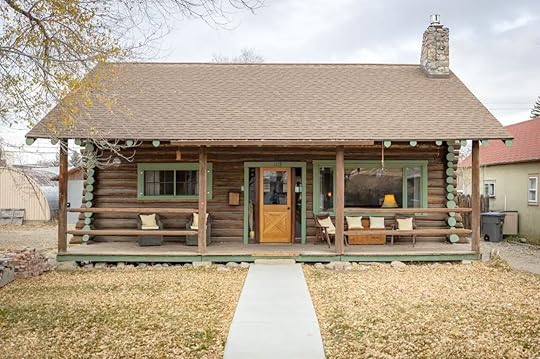
Photo: Airbnb
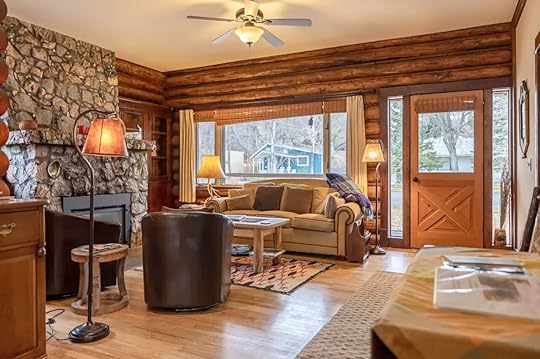
Photo: Airbnb
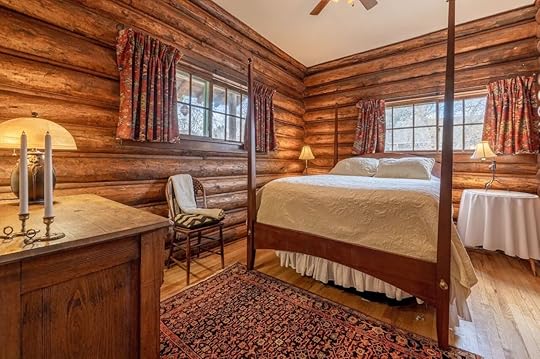
Photo: Airbnb
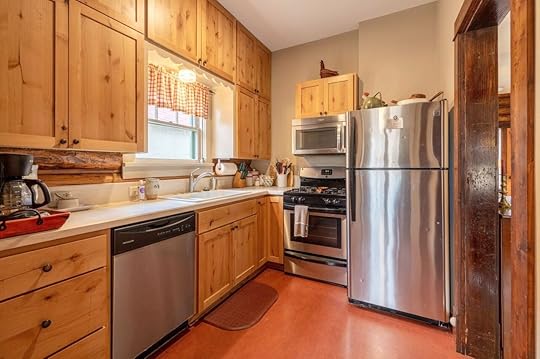
Photo: Airbnb
Cozy up and relax with yourself, your spouse, or your family at some special Rocky Mountain cabins like this one. This relaxing and beautiful cabin is a ½ block away from the heart of downtown Cody. The private cabin features a comfortable living room with a fireplace, and there is a new, fully equipped kitchen with a gas stove. Hang out and have a coffee, enjoy the front porch, and relax.
Eight guests, four bedrooms
Price: $250 per night
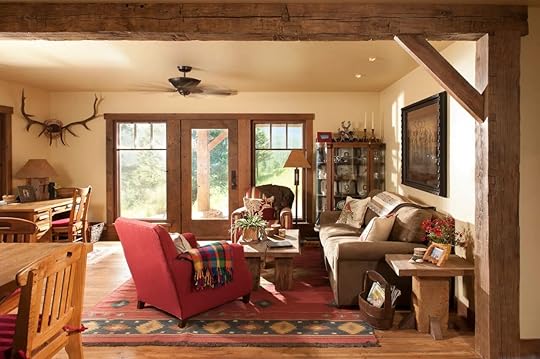
Photo: Airbnb
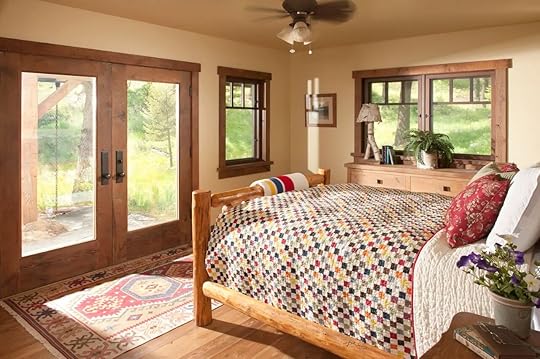
Photo: Airbnb
Photo: Airbnb
Photo: Airbnb
Check out this spacious cabin with many excellent amenities tucked away in its 1000 square footage. This rustic cabin has an open floor plan with a living room and a fully equipped kitchen. There is a private covered porch, and there are many outdoor activities like hiking, fishing, and kayaking.
Four guests, one bedroom
Price: $289 per night
Photo: Airbnb
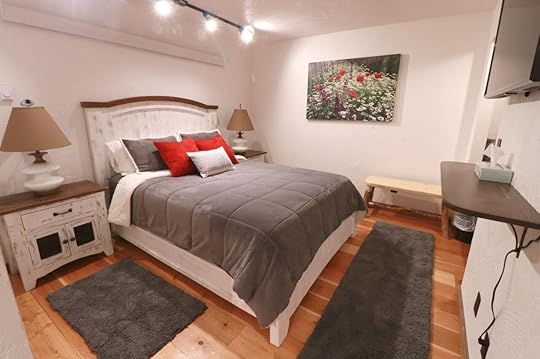
Photo: Airbnb
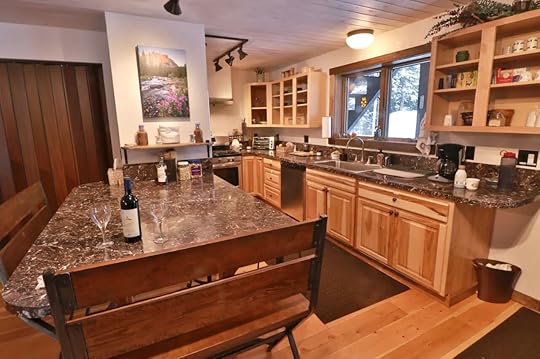
Photo: Airbnb
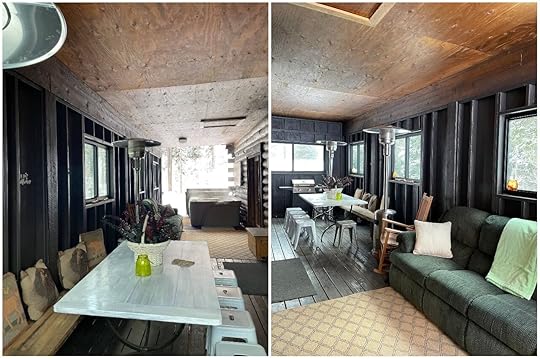
Photo: Airbnb
Escape to some cabins near Rocky Mountain National Park. This spacious and serene cabin is the perfect home base for a family or friend’s getaway. The cabin features a living room with a propane fireplace and a fully stocked kitchen. The cabin is located just east of Daisy and Lulu pass.
Eight guests, two bedrooms
Price: $364 per night
Scuba Divers Just Pulled 25,000 Pounds of Trash From Lake Tahoe. Here’s the Wild Stuff They Found.

After an impressive 81 days of scuba diving in Lake Tahoe (average temperature 43 – 63 degrees Fahrenheit), Clean Up the Lake finished its massive Lake Tahoe cleanup effort. The total amount of trash they pulled from the 22-mile-long lake totaled an unbelievable 25,281 pounds. Divers used more than 626 air tanks to explore the lake, which is the largest alpine lake in North America and approximately 1,644 deep. Divers dove to approximately 75 feet, which is around the maximum depth for most divers in high-elevation areas.
Photo: Clean Up The Lake
The year-long cleanup effort was developed and executed by Clean Up the Lake, a non-profit formed to clean up plastics and pollution. The expensive effort was funded by a variety of private and public partners, including Tahoe Blue Vodka, the Tahoe Fund, and the Nevada Division of State Lands, among others. Lake Tahoe has 72 miles of shoreline, and partners were invited to sponsor on a per-mile basis at a cost of $1,000 – $2,499. Other partners donated everything from dive gear to use of kayaks for the surface support volunteers.
Of the 24,797 individual pieces of litter pulled from the lake, most were small — cans, bottles, metal scraps, and wires. But the Clean Up the Lake divers also found a handful of other bizarre items, including:
Several diamond engagement ringsMunicipal lamp posts468 tennis and golf balls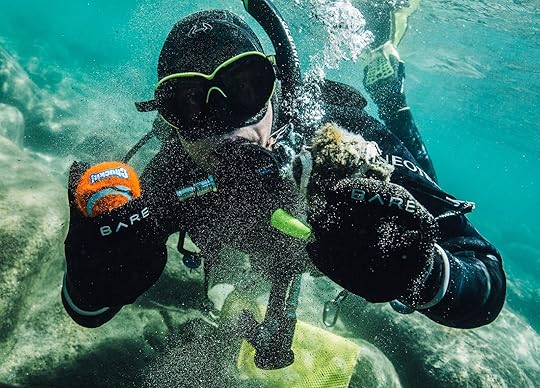
Photo: Clean Up The Lake
Multiple Nikon film cameras, circa 1980127 anchorsA “no littering” signCordless telephones from the 1990sA vintage Walkman with a “Tower of Power” tape inside295 pairs of sunglasses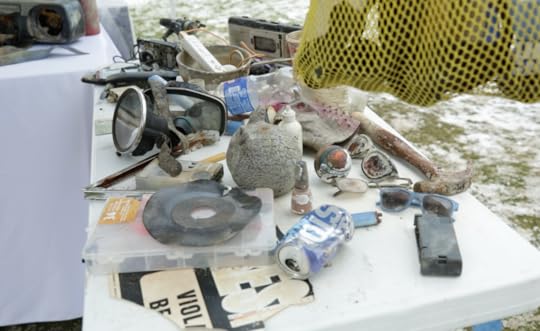
Photo: Clean Up The Lake
Pieces of a claw-foot bathtubVintage recordsA sunken flag from the Tahoe Yacht Club and massive pieces of boatsSeveral walletsVideo game controllersShoes and underwear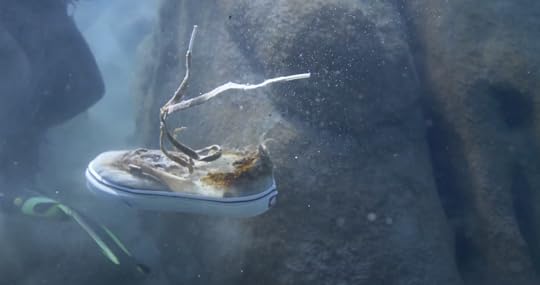
Photo: Clean Up The Lake
While it’s quite funny to think of all the people who sacrificed their sunglasses and dogs who let their tennis balls fall into the lake, every piece of litter under the surface harms the lake’s overall health. Tahoe’s clarity used to be estimated at around 100 feet, but now, it averages around 80 feet.
In addition to pulling up trash, Clean Up the Lake’s volunteers were also monitoring specific areas of the lake to note how quickly litter accumulated. The goal is to work with tourism and waste management partners to better address the issue of trash in the lake. While most items pulled from the lake will be disposed of as properly as possible, a few items will get a second life as part of a new art installation in South Lake Tahoe. “Surfaced” will feature sculptures made from the trash by local artists and has the goal of educating visitors about the importance of keeping the lake clean.
The next projects for Clean Up The Lake include continued monitoring of Lake Tahoe and nearby Donner Lake, a cleanup of South Lake Tahoe’s Fallen Leaf Lake, and a cleanup of June Lake in the Eastern Sierra.
More like thisNewsTahoe Ski Patroller Reveals All the Things Dropped Off Ski Lifts Last Season
How To Make the Most of a Weekend Trip To the Catskills on a Budget
When it comes to reinvention, the Catskills are king. From the 19th to mid-20th centuries, the rolling plateaus northwest of New York City went from fantastical wilderness to beloved Jewish Borscht Belt. In the summer of ’69, bohemian Boomers turned it into a hippie haunt, and most recently, Brooklyn hicksters molded the mountains into an affordable anti-Hamptons for uber-cool urbanites. But the anti-Hamptons are dying. A pandemic-fueled real estate explosion has turned towns from Narrowsburg to New Paltz into top-dollar destinations. With non-stop openings of luxury hotels and high-end boutiques, the region is in a new era: Hamptonsification. This means taking a Catskills weekend getaway can quickly get expensive.
Photo: John Garry
Bethel — the town where more than 400,000 free-loving hippies once gathered for Woodstock — recently became the site of the Chatwal Lodge — a lavish resort where one night costs upwards of $1200. Wildflower Farms — an equally expensive vacation site near the Shawangunks — plans to open this fall. They join a laundry list of high-end hotels and wellness retreats catering to travelers with money to burn. There’s The DeBruce, a rural resort with Dirty Dancing energy, where one night costs around $500. If you’re feeling fancy at Kenoza Hall — a renovated boarding house-turned-hotel and restaurant, expect to pay at least $80 for a steak.
This kind of sticker shock is the ultimate buzzkill for budget travelers. It seems like only yesterday, the Catskills were the last bastion for cheap escapes near NYC — the ultimate antidote to haughty Hamptons weekends.
Despite these developments, it’s still possible to live the Rip Van Winkle fantasy without breaking the bank. Here are the secrets to doing the Catskills weekend getaway on a dime.
We hope you love the Airbnbs we recommend! Just so you know, Matador may collect a small commission from the links on this page if you decide to book a stay. Listed prices are accurate as of the time of publication.
Choose cheap transportationGetting around the Catskills requires a car. Unlike the neighboring Hudson Valley, where NYC trains stop along main streets in walkable towns, public transportation leaves much to be desired. Taxis and rideshares aren’t always reliable, and most train and bus stops are far from the cutest locales.
If you don’t have a car, renting can be expensive — particularly when traveling from NYC. Manhattan-based rental companies charge a premium for location, knowing most travelers will pay for the convenience. To avoid city prices, take a train to a nearby suburb. The daily rate for cars at the Enterprise in Mahwah, New Jersey (a stop on New Jersey Transit as it heads into the Catskills) can be as much as $100 cheaper than the Enterprise in Midtown Manhattan.
Choosing the right destination will also impact transportation costs. The Catskills cover roughly 7,000 acres and over 33 mountain peaks. If you’re staying in Callicoon but want to see Kaaterskill Falls, the drive will take around two hours. Booking lodging close to sites you want to explore so you don’t blow your budget on gas.
Find affordable lodgingBudget hotels might not have the same amenities as regal retreats like the Chatwal, but they can offer something even more important — location. There’s little reason to stay holed up in a room if you’re close to the region’s top spots.
Photo: Hotel Darby
Photo: Hotel Darby

Photo: Hotel Darby
The Hotel Darby, with rooms from $159 to $289 per night, is located on the Pennsylvania side of the Delaware River and a five-minute walk from Narrowsburg. Explore the property’s 17 acres of forested trails and possibly spot bald eagles soaring overhead. Trod across the bridge into New York’s western Catskills and Narrowsburg’s Main Street delights with an indie bookstore, tasty eateries, and designer boutiques. Tubing and hiking excursions can also be reached within minutes by car.
As for the actual hotel, it’s not a far cry from the Catskills’ fanciest resorts. The Foster Supply Company — which also owns the DeBruce, Arnold House, and Kenoza Hall — added the Hotel Darby to their collection in 2021. Darby’s retro interior comes equipped with a pool table, darts, board games, and a wood-burning fireplace where guests can roast s’mores, provided gratis.
Photo: Graham & Co./Peter Crosby
Photo: Graham & Co./Peter Crosby
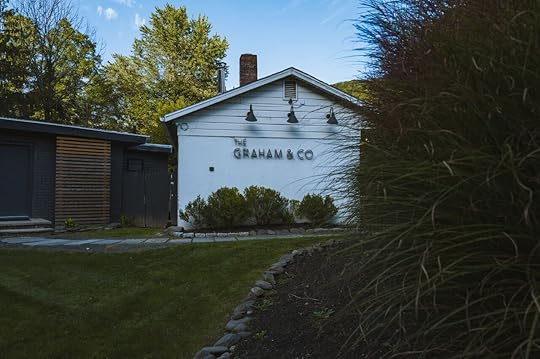
Photo: Graham & Co./Peter Crosby
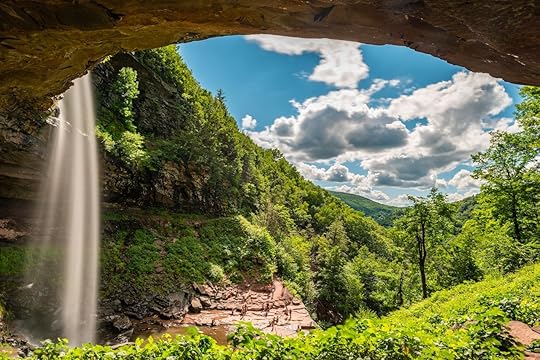
For a budget hotel in the eastern Catskills, check out The Graham & Co. — where rooms range from $99 to $205 per night. The hotel is in Phoenicia, a stone’s throw from the greasy-gourmet Phoenicia Diner, a five-minute drive from the world’s largest kaleidoscope, and a thirty-minute drive from Kaaterskill Falls, New York’s tallest cascade. An on-site pool means there’s somewhere to cool off after hiking neighboring Mount Tremper.
Rent an Airbnb and cook your mealsSave on food by trading the hotel for a home share with a fully-equipped kitchen.

Microbrew Cabin. Photo: Airbnb
Microbrew Cabin. Photo: Airbnb
Microbrew Cabin. Photo: Airbnb
The Microbrew Cabin ($168 per night) — is a romantic one-bedroom home tucked behind the Catskill Brewery. Another Airbnb in the same location is the three-bedroom, Brewmasters Cottage ($209 per night) which is ideal for a group of friends or a small family. These rentals are located in Livingston Manor. The town has an upscale market and fish hatcheries so you can shop locally and cook back at home.

Top floor apartment on Main Street. Photo: Airbnb
Top floor apartment on Main Street. Photo: Airbnb
Top floor apartment on Main Street. Photo: Airbnb
For an eastern Catskills escape, try this mid-century top floor apartment near the Hudson River on Catskill’s historic Main Street. The $155 price tag beats most digs you’ll find close to the Hudson Valley.
This bohemian stone cottage near the Ashokan Reservoir exudes Woodstock’s arty sensibility. Grill on the side porch and hang in an outdoor hammock for only $139 per night.
Hunter Greenhouse. Photo: Airbnb
Hunter Greenhouse. Photo: Airbnb
Hunter Greenhouse. Photo: Airbnb
If you’re planning a weekend away with friends, take a peek at the Hunter Greenhouse outside Tannersville. Six guests split among three bedrooms turns the $479 price tag into roughly $80 per person — a steal for sleeping in a refurbished A-frame built in 1971.
Should connecting with nature be more your speed, book one of the rustic cabins on Majestic Farm ($155 per night) — an organic farm and apple orchard snuggled between Mountain Dale and Rock Hill. Four rentals share a kitchen and outhouse — a style best suited for adventurous travelers intrigued by old-school Catskills living.
Consider campingIf hotel prices still seem steep, the cheapest room in the Catskills is under the stars. Between June and September, people pitch tents and park trailers around the region’s 1,000-plus campgrounds for less than $25. While price doesn’t account for proper camping equipment, even nature newbies can find pre-set tent sites for as little as $100 via Tentrr.
Photo: mervas/Shutterstock
Devil’s Tombstone Campground, one of the Catskill Forest Preserve’s oldest campsites, is ideal for serious hikers interested in scaling the region’s tallest peaks. Campers can wake up to waterfront views of Notch Lake, spend the day hiking to the highest fire tower in New York on Hunter Mountain, then return to cook dinner over one of the on-site grills. Sites start at $16 per night.
Look for deals at restaurants and farmers’ marketsEating well in the Catskills doesn’t have to mean fine dining. In the western Catskills, reserve Sunday mornings to peruse the Callicoon Farmers’ Market for produce and pastries. A breakfast wrap from the quaint Bethel Market Cafe only costs $6.50, and hand-rolled biscuits from the Walk In in Livingston Manor start at $6. Sandwiches from the Tusten Cup in Narrowsburg begin at $5, and if you drop by the Cochecton Fire Station for dinner, you can order a cedar plank trout or a gooey s’more for one dollar more.

Photo: The Junction

Photo: The Junction
Even the fancier options in the west won’t burn a hole in your pocket. Chef Evan Chesney, a Kenoza Hall alum, churns out $15 entrees like veggie-friendly grain bowls and fried chicken sandwiches at The Junction in Roscoe.
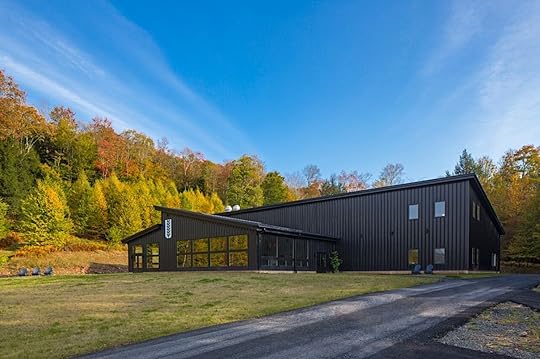
Photo: Upward Brewing/Art Gray Photography @artgrayphoto

Photo: Upward Brewing/Art Gray Photography @artgrayphoto
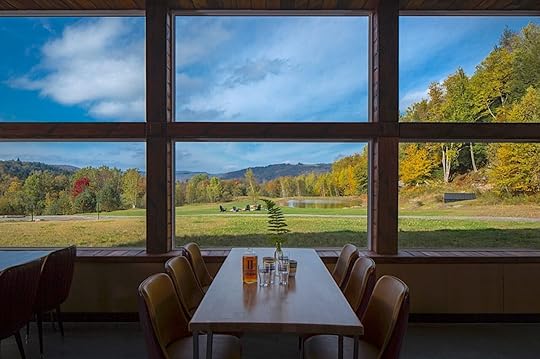
Photo: Upward Brewing/Art Gray Photography @artgrayphoto
Drive ten minutes away to Upward Brewing’s chalet-style beer garden, and it’s possible to pair a locally brewed pilsner with a $3 hotdog.
Photo: Harana Market/Nigel Barker

Photo: Harana Market/Irene Wong and Eva Tringali
Prices tend to be higher in the eastern Catskills, but there are still plenty of ways to keep meals cheap. Start at Kelder’s Farm — where visitors in Kerhonkson can hand-pick in-season fruits and vegetables. For cooking supplies, stop by Woodstock’s Harana Market — an Asian grocery store with homestyle Filipino takeout. Locally sourced beef patties at Mama’s Boy Burgers in Tannersville cost around $11 a pop, and a breakfast sandwich costs $12 from Woodstock’s go-to cafe, The Mud Club.
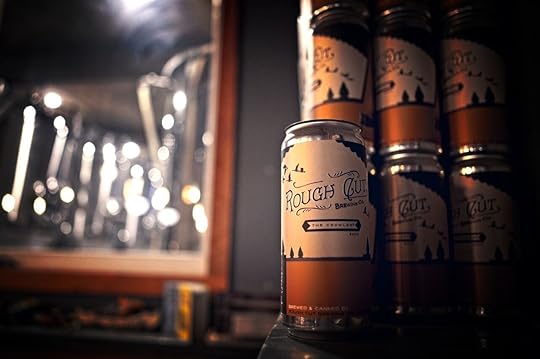
Photo: Rough Cut Brewing

Photo: Rough Cut Brewing
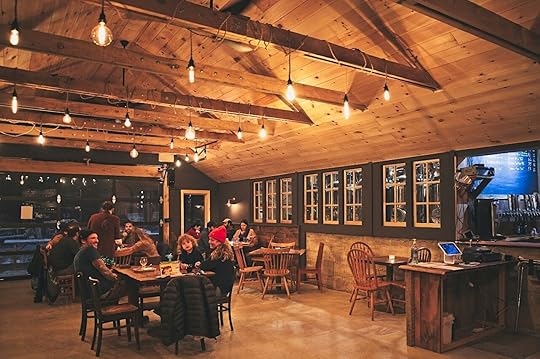
Photo: Rough Cut Brewing
Rough Cut Brewing, Kerhonkson’s local brewery, serves snacks like wings for $5 and charred Brussels sprouts for $7. Pair it with a $7 oatmeal milk stout, and you’ve got yourself a full meal.
Go on free outdoor adventuresEach corner of the Catskills dazzles with outdoor activities like hiking to waterfalls, riding river rapids, or swimming in cobalt lakes. But entrance fees can turn state-sanctioned parks into costly endeavors, and the money adds up quickly if you visit more than one.
The hiking pass for Mohonk Mountain House, a lodge near New Paltz with craggy trails through the Shawangunks, costs a whopping $35 per day. Mohonk Preserve, another Shawangunk park beloved by hikers, climbers, and bikers, costs $15. Swimming at the Peekamoose Blue Hole, famous for its electric-aqua waters, requires a $10 permit, and floating tours down the Delaware can cost around $35.
Photo: John Garry
Save money by visiting trailheads and swimming holes that remain free to the public. These adventures are just as worthwhile — if not better — than their pricey counterparts. You’ll only have to pay in sweat to hike up Overlook Mountain — a 4.6-mile trek with early 20th-century ruins and a fire tower above Woodstock.
Photo: Brandt Bolding/Shutterstock
The same goes for the Tusten Mountain Trail, a 3-mile route near Narrowsburg with Delaware River views. There’s no price tag for jumping off the 24-foot crag into the river below at Fawn’s Leap, and Lou’s Tubes rents tubes for $6 so visitors can float along the Delaware at their own pace.
Explore local culture at little to no costSave the big-ticket museums for NYC — when it comes to art and history, you can see the best of the Catskills for free.
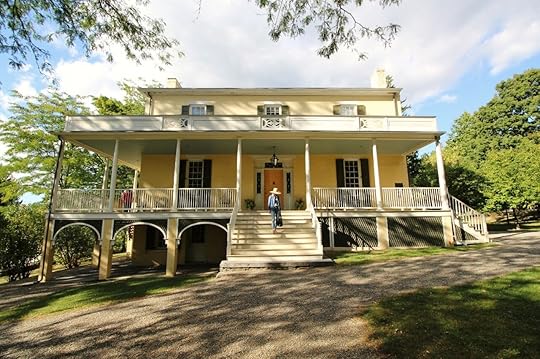
Photo: Thomas Cole National Historic Site

Photo: Thomas Cole National Historic Site
Photo: Thomas Cole National Historic Site
Amble around the Thomas Cole National Historic Site, once home to the famed Hudson River School artist, to experience the region like a 19th-century romantic. Seeing the artwork inside the museum will cost you, but exploring the gardens comes without charge. To glimpse where Thomas Cole likely worked plein air, follow the Hudson River School Art Trail to destinations preserved on canvas by the artist and his contemporaries.
In Bethel, the hills are alive with the sound of Woodstock (the 1969 concert, not the town). Park at the site where a crowd of more than 400,000 gathered for the likes of Jimi Hendrix and soak up the ghost sounds of concerts long gone. Play Joni Mitchell’s Woodstock, a folksy song she wrote having missed the infamous happening, to commiserate with a rock legend in real-time.
If you’re interested in fine art, drive to the Catskill Art Society, a tiny contemporary art operation in Livingston Manor. The gallery is open for free from Friday through Sunday. The Woodstock Artists Association and Museum — founded in 1919 — suggests a $10 donation to see its locally created collection.
For a collage of Catskills history, there’s no better place to explore than the area’s many antique stores. Wander aisles in places like New Paltz’s Antiques Barn or Callicoon’s Antique Center to search for cheap mementos like Borscht Belt hotel signs, Woodstock posters, and postcards depicting the 19th-century Catskills. They’re all reminders that treasures from today’s Hamptonsification will one day become antiques, too.
How To Make the Most of Casual Weekend Trip To the Catskills
When it comes to reinvention, the Catskills are king. From the 19th to mid-20th centuries, the rolling plateaus northwest of New York City went from fantastical wilderness to beloved Jewish Borscht Belt. In the summer of ’69, bohemian Boomers turned it into a hippie haunt, and most recently, Brooklyn hicksters molded the mountains into an affordable anti-Hamptons for uber-cool urbanites. But the anti-Hamptons are dying. A pandemic-fueled real estate explosion has turned towns from Narrowsburg to New Paltz into top-dollar destinations. With non-stop openings of luxury hotels and high-end boutiques, the region is in a new era: Hamptonsification. This means taking a Catskills weekend getaway can quickly get expensive.
Photo: John Garry
Bethel — the town where more than 400,000 free-loving hippies once gathered for Woodstock — recently became the site of the Chatwal Lodge — a lavish resort where one night costs upwards of $1200. Wildflower Farms — an equally expensive vacation site near the Shawangunks — plans to open this fall. They join a laundry list of high-end hotels and wellness retreats catering to travelers with money to burn. There’s The DeBruce, a rural resort with Dirty Dancing energy, where one night costs around $500. If you’re feeling fancy at Kenoza Hall — a renovated boarding house-turned-hotel and restaurant, expect to pay at least $80 for a steak.
This kind of sticker shock is the ultimate buzzkill for budget travelers. It seems like only yesterday, the Catskills were the last bastion for cheap escapes near NYC — the ultimate antidote to haughty Hamptons weekends.
Despite these developments, it’s still possible to live the Rip Van Winkle fantasy without breaking the bank. Here are the secrets to doing the Catskills weekend getaway on a dime.
We hope you love the Airbnbs we recommend! Just so you know, Matador may collect a small commission from the links on this page if you decide to book a stay. Listed prices are accurate as of the time of publication.
Choose cheap transportationGetting around the Catskills requires a car. Unlike the neighboring Hudson Valley, where NYC trains stop along main streets in walkable towns, public transportation leaves much to be desired. Taxis and rideshares aren’t always reliable, and most train and bus stops are far from the cutest locales.
If you don’t have a car, renting can be expensive — particularly when traveling from NYC. Manhattan-based rental companies charge a premium for location, knowing most travelers will pay for the convenience. To avoid city prices, take a train to a nearby suburb. The daily rate for cars at the Enterprise in Mahwah, New Jersey (a stop on New Jersey Transit as it heads into the Catskills) can be as much as $100 cheaper than the Enterprise in Midtown Manhattan.
Choosing the right destination will also impact transportation costs. The Catskills cover roughly 7,000 acres and over 33 mountain peaks. If you’re staying in Callicoon but want to see Kaaterskill Falls, the drive will take around two hours. Booking lodging close to sites you want to explore so you don’t blow your budget on gas.
Find affordable lodgingBudget hotels might not have the same amenities as regal retreats like the Chatwal, but they can offer something even more important — location. There’s little reason to stay holed up in a room if you’re close to the region’s top spots.
Photo: Hotel Darby
Photo: Hotel Darby
Photo: Hotel Darby
The Hotel Darby, with rooms from $159 to $289 per night, is located on the Pennsylvania side of the Delaware River and a five-minute walk from Narrowsburg. Explore the property’s 17 acres of forested trails and possibly spot bald eagles soaring overhead. Trod across the bridge into New York’s western Catskills and Narrowsburg’s Main Street delights with an indie bookstore, tasty eateries, and designer boutiques. Tubing and hiking excursions can also be reached within minutes by car.
As for the actual hotel, it’s not a far cry from the Catskills’ fanciest resorts. The Foster Supply Company — which also owns the DeBruce, Arnold House, and Kenoza Hall — added the Hotel Darby to their collection in 2021. Darby’s retro interior comes equipped with a pool table, darts, board games, and a wood-burning fireplace where guests can roast s’mores, provided gratis.
Photo: Graham & Co./Peter Crosby
Photo: Graham & Co./Peter Crosby
Photo: Graham & Co./Peter Crosby
For a budget hotel in the eastern Catskills, check out The Graham & Co. — where rooms range from $99 to $205 per night. The hotel is in Phoenicia, a stone’s throw from the greasy-gourmet Phoenicia Diner, a five-minute drive from the world’s largest kaleidoscope, and a thirty-minute drive from Kaaterskill Falls, New York’s tallest cascade. An on-site pool means there’s somewhere to cool off after hiking neighboring Mount Tremper.
Rent an Airbnb and cook your mealsSave on food by trading the hotel for a home share with a fully-equipped kitchen.
Microbrew Cabin. Photo: Airbnb
Microbrew Cabin. Photo: Airbnb
Microbrew Cabin. Photo: Airbnb
The Microbrew Cabin ($168 per night) — is a romantic one-bedroom home tucked behind the Catskill Brewery. Another Airbnb in the same location is the three-bedroom, Brewmasters Cottage ($209 per night) which is ideal for a group of friends or a small family. These rentals are located in Livingston Manor. The town has an upscale market and fish hatcheries so you can shop locally and cook back at home.
Top floor apartment on Main Street. Photo: Airbnb
Top floor apartment on Main Street. Photo: Airbnb
Top floor apartment on Main Street. Photo: Airbnb
For an eastern Catskills escape, try this mid-century top floor apartment near the Hudson River on Catskill’s historic Main Street. The $155 price tag beats most digs you’ll find close to the Hudson Valley.
This bohemian stone cottage near the Ashokan Reservoir exudes Woodstock’s arty sensibility. Grill on the side porch and hang in an outdoor hammock for only $139 per night.
Hunter Greenhouse. Photo: Airbnb
Hunter Greenhouse. Photo: Airbnb
Hunter Greenhouse. Photo: Airbnb
If you’re planning a weekend away with friends, take a peek at the Hunter Greenhouse outside Tannersville. Six guests split among three bedrooms turns the $479 price tag into roughly $80 per person — a steal for sleeping in a refurbished A-frame built in 1971.
Should connecting with nature be more your speed, book one of the rustic cabins on Majestic Farm ($155 per night) — an organic farm and apple orchard snuggled between Mountain Dale and Rock Hill. Four rentals share a kitchen and outhouse — a style best suited for adventurous travelers intrigued by old-school Catskills living.
Consider campingIf hotel prices still seem steep, the cheapest room in the Catskills is under the stars. Between June and September, people pitch tents and park trailers around the region’s 1,000-plus campgrounds for less than $25. While price doesn’t account for proper camping equipment, even nature newbies can find pre-set tent sites for as little as $100 via Tentrr.
Photo: mervas/Shutterstock
Devil’s Tombstone Campground, one of the Catskill Forest Preserve’s oldest campsites, is ideal for serious hikers interested in scaling the region’s tallest peaks. Campers can wake up to waterfront views of Notch Lake, spend the day hiking to the highest fire tower in New York on Hunter Mountain, then return to cook dinner over one of the on-site grills. Sites start at $16 per night.
Look for deals at restaurants and farmers’ marketsEating well in the Catskills doesn’t have to mean fine dining. In the western Catskills, reserve Sunday mornings to peruse the Callicoon Farmers’ Market for produce and pastries. A breakfast wrap from the quaint Bethel Market Cafe only costs $6.50, and hand-rolled biscuits from the Walk In in Livingston Manor start at $6. Sandwiches from the Tusten Cup in Narrowsburg begin at $5, and if you drop by the Cochecton Fire Station for dinner, you can order a cedar plank trout or a gooey s’more for one dollar more.
Photo: The Junction
Photo: The Junction
Even the fancier options in the west won’t burn a hole in your pocket. Chef Evan Chesney, a Kenoza Hall alum, churns out $15 entrees like veggie-friendly grain bowls and fried chicken sandwiches at The Junction in Roscoe.
Photo: Upward Brewing/Art Gray Photography @artgrayphoto
Photo: Upward Brewing/Art Gray Photography @artgrayphoto
Photo: Upward Brewing/Art Gray Photography @artgrayphoto
Drive ten minutes away to Upward Brewing’s chalet-style beer garden, and it’s possible to pair a locally brewed pilsner with a $3 hotdog.
Photo: Harana Market/Nigel Barker
Photo: Harana Market/Irene Wong and Eva Tringali
Prices tend to be higher in the eastern Catskills, but there are still plenty of ways to keep meals cheap. Start at Kelder’s Farm — where visitors in Kerhonkson can hand-pick in-season fruits and vegetables. For cooking supplies, stop by Woodstock’s Harana Market — an Asian grocery store with homestyle Filipino takeout. Locally sourced beef patties at Mama’s Boy Burgers in Tannersville cost around $11 a pop, and a breakfast sandwich costs $12 from Woodstock’s go-to cafe, The Mud Club.
Photo: Rough Cut Brewing
Photo: Rough Cut Brewing
Photo: Rough Cut Brewing
Rough Cut Brewing, Kerhonkson’s local brewery, serves snacks like wings for $5 and charred Brussels sprouts for $7. Pair it with a $7 oatmeal milk stout, and you’ve got yourself a full meal.
Go on free outdoor adventuresEach corner of the Catskills dazzles with outdoor activities like hiking to waterfalls, riding river rapids, or swimming in cobalt lakes. But entrance fees can turn state-sanctioned parks into costly endeavors, and the money adds up quickly if you visit more than one.
The hiking pass for Mohonk Mountain House, a lodge near New Paltz with craggy trails through the Shawangunks, costs a whopping $35 per day. Mohonk Preserve, another Shawangunk park beloved by hikers, climbers, and bikers, costs $15. Swimming at the Peekamoose Blue Hole, famous for its electric-aqua waters, requires a $10 permit, and floating tours down the Delaware can cost around $35.
Photo: John Garry
Save money by visiting trailheads and swimming holes that remain free to the public. These adventures are just as worthwhile — if not better — than their pricey counterparts. You’ll only have to pay in sweat to hike up Overlook Mountain — a 4.6-mile trek with early 20th-century ruins and a fire tower above Woodstock.
Photo: Brandt Bolding/Shutterstock
The same goes for the Tusten Mountain Trail, a 3-mile route near Narrowsburg with Delaware River views. There’s no price tag for jumping off the 24-foot crag into the river below at Fawn’s Leap, and Lou’s Tubes rents tubes for $6 so visitors can float along the Delaware at their own pace.
Explore local culture at little to no costSave the big-ticket museums for NYC — when it comes to art and history, you can see the best of the Catskills for free.
Photo: Thomas Cole National Historic Site
Photo: Thomas Cole National Historic Site
Photo: Thomas Cole National Historic Site
Amble around the Thomas Cole National Historic Site, once home to the famed Hudson River School artist, to experience the region like a 19th-century romantic. Seeing the artwork inside the museum will cost you, but exploring the gardens comes without charge. To glimpse where Thomas Cole likely worked plein air, follow the Hudson River School Art Trail to destinations preserved on canvas by the artist and his contemporaries.
In Bethel, the hills are alive with the sound of Woodstock (the 1969 concert, not the town). Park at the site where a crowd of more than 400,000 gathered for the likes of Jimi Hendrix and soak up the ghost sounds of concerts long gone. Play Joni Mitchell’s Woodstock, a folksy song she wrote having missed the infamous happening, to commiserate with a rock legend in real-time.
If you’re interested in fine art, drive to the Catskill Art Society, a tiny contemporary art operation in Livingston Manor. The gallery is open for free from Friday through Sunday. The Woodstock Artists Association and Museum — founded in 1919 — suggests a $10 donation to see its locally created collection.
For a collage of Catskills history, there’s no better place to explore than the area’s many antique stores. Wander aisles in places like New Paltz’s Antiques Barn or Callicoon’s Antique Center to search for cheap mementos like Borscht Belt hotel signs, Woodstock posters, and postcards depicting the 19th-century Catskills. They’re all reminders that treasures from today’s Hamptonsification will one day become antiques, too.
Kentucky Has Over 130 Caves. These Are the 7 You Don’t Want To Miss.
Kentucky is synonymous with a few classic all-American staples: the Kentucky Derby, fried chicken, and baseball bats. So threatening your Derby betting bookie with a Louisville Slugger while simultaneously chowing down on KFC might sound like the ultimate Kentucky experience. You would, however, be missing out on one of the most beautiful and underrated pastimes in the state: exploring the many caves in Kentucky.
Thanks to a unique topography and significant underground erosion, there are more than 130 caves in Kentucky. These caves have served a variety of purposes, from criminal shelters to burial sites and places for medicinal research. Today, many are open for visitors.
Mammoth Cave National Park is the state’s largest and most well-known cave system, with over 412 miles of mapped caverns, but there are plenty of other subterranean grottos just waiting to be explored. From the Outlaw Cave where Jesse James once hid to the surreal, glittering rock formations in Diamond Caverns, these are the must-do adventures in caves in Kentucky.
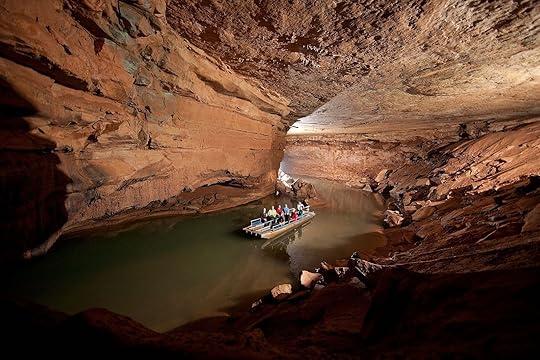
Lost River Cave: boat tours on an underground riverPhoto: Visit KentuckyGraphix Berdeaux
If cruising through a subterranean cavern on a boat is your idea of the ideal cave experience, head to Bowling Green’s Lost River Cave. The seven-mile-long cave system is home to Kentucky’s only natural cave boat tour, ending in a dramatic cathedral-like cavern. You can also take a walking tour instead along the edge of the underground river. Whether you choose to explore by land or by water, you’ll learn all about the cave’s historical use by Native Americans, European settlers, and Civil War soldiers.
There’s plenty to do above ground, too. Visitors will find a 72-acre park with a large network of hiking trails, a zipline operator, a seasonal butterfly habitat, and an education center where you can learn more about the cave.
Hidden River Cave: cross a hanging suspension bridge
Photo: Visit Kentucky
Adjacent to Mammoth Cave, Hidden River Cave is one of the largest caves in the state at around 10 miles long. It’s under the town of Hose Cave and was once a source of drinking water for the town, until its commercialization (and subsequent pollution) resulted in its decades-long closure. The cave reopened in the 1980s thanks to the American Cave Conservation Association, which implemented conservation and environmental protections and opened a museum for visitors.
Now, it’s one of the top caves in Kentucky is home to 21 types of flora and fauna, making it a global hotspot for underground biodiversity and one of the most biologically diverse cave ecosystems in the world. The cave also has the world’s longest suspension bridge inside a cave system and is the largest single cave room in the Mammoth Cave region.
Carter Caves State Resort Park: crawl through caves with a headlamp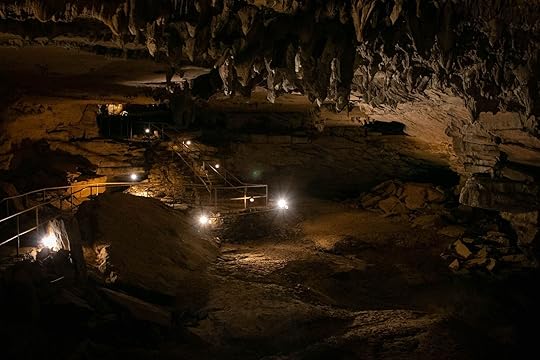
Photo: Kentucky Tourism
Carter County has the highest concentration of caves in Kentucky, making it a perfect basecamp if your goal is to visit as many caves in Kentucky as possible. You’ll. find more than 20 caves in Carter Caves State Resort Park alone, including Cascade Cave (with its 30-foot waterfall), Saltpetre Cave, and X-Cave. For a true spelunking experience, sign up for a cave crawl, where you’ll explore the caves by squeezing through narrow, unlit passages. More claustrophobic visitors might want to choose a more leisurely, self-guided walking tour instead. Or stay entirely above ground, where you can take advantage of more than 26 miles of hiking and biking trails.
Diamond Caverns: a multi-level cave adventure
Photo: Khairil Azhar Junos/Shutterstock
While you shouldn’t enter Diamond Caverns expecting to see shimmering diamond-encrusted walls, it’s pretty much the next best thing. When the cave was discovered in 1859, early explorers thought the calcite formations looked like glittering diamonds, making for a truly resplendent sight. The cave is known for its cathedral-like chambers of impressive rock formations, including columns, curtain deposits, and colorful calcite. It also has a sophisticated lighting system, illuminating a half-mile of tunnels.
The cave is two levels and requires visitors to climb around 350 steps, so take that into account before adding it to your Kentucky caves list.
Outlaw Cave: see where Jesse James hid from the lawThe aptly-named Outlaw Cave is infamous for its use as a shelter by notorious outlaws, the most notable of whom was Jesse James. But apart from its criminal past, the cave is known for the mist perpetually hanging in the air and colorful rock formations, including massive floor-to-ceiling columns. To keep the cave as natural as possible, no boardwalks or stairs have been added, though it’s still wheelchair accessible. ONE OTHER THING HERE
Gap Cave: take a guided wildlife and nature tour
Photo: National Park Service
Inside Cumberland Gap National Historical Park, Gap Cave is between three and five million years old, formed by natural water erosion that continues to impact the cave’s evolution. And in that time, this Kentucky cave has developed quite the history. It was a meeting place in prehistoric Native American life and to visited by Civil War soldiers in the 1800s, more than 300 of whom etched their names in the rock. Both the Union and the Confederacy occupied the site at various times, and there’s even a smaller “Soldier’s Cave” that once served as a battlefield hospital.
Inside the cave, you’ll find stalagmites, stalactites, flowstone (a thin rock sheet created by flowing water), and soda straws (spaghetti-like hanging rock formations), as well as wildlife like cave flies, crickets, salamanders, crayfish, bats, and more. The best way to explore the 1.5-mile cave is on a guided tour, which lasts about two hours.
Crystal Onyx Cave: climb into the cave through a sinkhole
Photo: Visit Kentucky
With prehistoric origins, Crystal Onyx Cave is known for its curtains of stalactites, domes, sinkholes, and speleothems (accumulations of mineral deposits). Your journey through the cave will begin with a short walk to one of the many sinkholes, where you will descend a set of stairs into the cave. The trails throughout the cave have been recently renovated with crushed limestone and handrails, and you can explore approximately a half-mile of the cave’s tunnels. To add another layer of adventure to the experience, camp nearby at Yogi Bear’s Jellystone Park, which offers a variety of campsites with access to hiking trails and kayaking.
More like thisWinter SportsIceland’s Ice Caves Could Last for Decades — or Be Gone Next Month. Here’s How To See Them.
May 11, 2022
Your Outdoor Gear Should Use Ethically Sourced Down. Here’s Why It Matters.
The “swoosh” sound of your arms swinging while you walk in a puffy jacket is the sound of winter in many places around the globe. Puffy jackets, as they’re commonly called, are a go-to piece of outerwear for pretty much anyone that spends time outdoors in the cold. That’s because they usually come in awesome colors, keep you toasty warm, and are easy to find — almost every outdoor brand makes at least half a dozen. But while you can’t see the feathers inside your puffy, the fill — down — is sourced from geese and ducks. Historically, those geese and ducks haven’t been raised in good conditions, and the process for extracting the feathers has been harmful to the animals.
That makes it very much not ethically sourced down.
There are, however, lots of ways to ensure you are buying ethically sourced down. Here’s the low-down on why ethically sourced down matters, how to find it, and some great gear from brands leaning into the sustainable movement.
What is down, and where does it come from?
Photo: = Claudiu Maxim /Shutterstock
“Most down is a byproduct of the food industry,” says Scott Kaier, President of Formidable Media, which represents ALLIED Feather & Down. It provides ethically sourced down to clothing manufacturers around the globe. Most of the down used in jackets, vests, pillows, and other common items, is a mix of different types of feathers from geese and ducks, Kaier notes, explaining that historically, most down comes from countries where eating those animals is common practice.
Therein lies the problem with most down, he says. Because it’s a byproduct of the food system, which usually raises geese and ducks in factory farm settings where they’re often exposed to neglect and abuse, the down they produce is unethical. Buying products that use that down is supporting an industry that doesn’t care much about animal welfare.
Of course, those wholly opposed to using animal products can argue that all down –- even down sourced from animals treated humanely – is unethical by default. But Kaier argues that ethically sourced down can be a renewable resource that helps the products it fills be more sustainable. The most commonly used alternate option is plastic filling or other materials that are harmful to the environment (or finite in quantity).
“Down is a fully circular product,” Kaiser says. “It is natural, useable, and recyclable, with no microplastics. So when a brand uses down, and then surrounds it with responsible coating, what they’re producing is a product that is as sustainable as possible.”
Whether it can be called ethically source down comes down to how it’s sourced. Feathered birds living in natural and outdoor environments that experience life with space to roam and exhibit natural behaviors produce higher-quality feathers, in part because they aren’t plucked when not molting. This practice also reduces cruelty, as the animals are not “farmed” in the modern sense of the food industry. Instead, their feathers are taken towards the end of a natural life cycle. ALLIED Feather & Down doesn’t ever use feathers that were live-plucked (a process both painful and harmful for the birds), nor does it work with farms that force-feed birds to create foie gras (a dish so closely tied to animal cruelty that it was banned in California in 2004).
In the case of Allied Feather and Down, each batch of down receives a “Lot number” displayed on the final product. “This allows consumers to see what is in their jacket and its history,” Kaiser says. “Pretty cool way to know exactly what you’re buying.”
In order to tell whether your down product is ethically sourced, check the label. Brands are not shy about boasting of sustainability and the ethical causes they support.
Why is down insulation better that other materials?
Photo: Daxiao Productions/Shutterstock
Fashion designer Eddie Bauer created the down jacket as we know it today in 1936. Down gained popularity because of its ability to trap heat, thus keeping its wearer warm and insulated — a product of particular use in cold climates with long winters. Because down jackets are water-resistant, they gained traction among outdoor enthusiasts (hence the original appeal to Eddie Bauer), who used them for everything from skiing to camping to hiking. These days, down jackets are a fashion symbol as much as they are a functional piece of outerwear, especially if you live in a place where outdoor activities hold cultural supremacy (looking at you, Boulder).
As a fashion trend, down has stuck around, even as trends introduced afterward have come and gone. That’s because down is extremely functional, and no company has yet come up with a natural material that works better. Travel the world and you’ll see down worn by extreme mountain climbers and urban hipsters alike, largely for the same purpose: staying warm.
How does down work?Down works by clustering heat. The “puffy” pockets in your puffy jacket create space for the down feathers to expand and loft up. Those fluffy feathers trap heat generated by your body. Whether it’s in a jacket, pants, shoes, blankets, or sleeping bag, there’s no better natural material for keeping people warm. And the icing on that toasty cake is that down is also incredibly breathable, so you can walk, ski, hike, or even jog in your down layer, and perspiration won’t get trapped in your layers. Down is also water-resistant, so it won’t soak up your sweat. And if you get caught in some light rain (or heavy rain; it depends on the outer fabric), it won’t penetrate your down.
How to care for and wash down clothingPhoto: yurakrasil/Shutterstock
It may surprise you to learn that down actually can be machine washed. Wash your down jackets, pants, or other wearables on a gentle cycle in warm water and use a down-specific soap. Don’t throw it in the dryer with the rest of your clothes, though — it’s better to hang it or lay it flat on a clothing rack and let it sit for several hours. You can tumble dry on a slow cycle if you’re in a hurry. Note that high heat can ruin the jacket, so be conscious of the settings on your tumble dryer. This is all just a general rule, though, so check the label on your specific product before tossing it in the washer to be safe.
Because down jackets, in particular, are made with thin coatings and are generally designed to be packable, they are prone to punctures from sharp objects (we’re looking at you, bushwhackers). Fortunately, this problem is relatively easy to fix. All you need is Gear Aid’s Tenacious Repair Tape. Stick a small cut of the tape over any punctures or small holes, and your down jacket will continue to function as normal. You can usually buy waterproof iron-on patches in various colors and shapes, too.
How to find ethically-sourced down clothingWe hope you love the ethically-sourced down products we recommend! Just so you know, Matador may collect a small commission from the links on this page if you decide to make a purchase. Listed prices are accurate as of the time of publication.
Many popular outdoors brands including The North Face and Patagonia, as well as smaller companies with eco-conscious founders like Jones, makes ethically-sourced down products. Bonus for REI Coop members as many are available for purchase directly from REI (see the complete list here). You can find nearly every down product in an ethically sourced version., s actually possible to build your entire down collection in an ethical fashion. Let’s run through an example for an avid camper. You could fill up on down, but any one of these products makes an excellent gift or addition to your own camp setup.
NEMO Disco 15 sleeping bag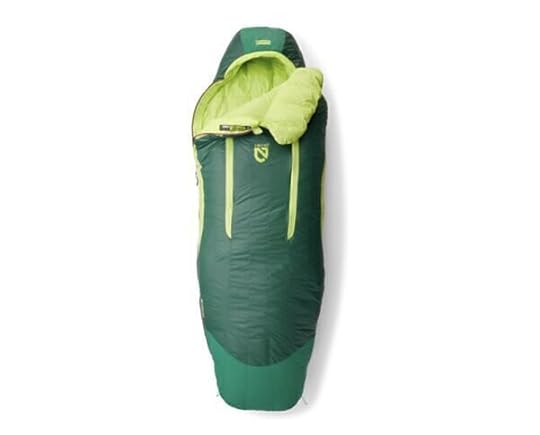
Photo: REI
NEMO produces ethically-sourced down sleeping bags in its Disco line, available in both women’s and men’s options. With 650-fill down, full-length two-way zippers, and a breathable shell, the Disco is an excellent option for spring, summer, and fall camping below treeline, or anywhere where the overnight temperature won’t drop below 15 degrees. Our outdoor editor has the women’s version of this bag and loves it, both for the spoon shape that accommodates bent-knee sleepers, and the front zippered “gills” to dump heat if you wake up sweating in your bag at 3 AM.
Price: $299.95
REI Coop 650 Down Jacket
Photo: REI
All of the REI Coop branded items are made with ethically sourced down, making for an easy win if you aren’t sure what to buy. The brand’s basic 650 Down Jacket, available in women’s and men’s options, will keep you toasty on cold evenings by the campfire and is great for everyday use during winter. The jacket is also made in a Fair Trade Certified factory.
Price: $99.85
Sea-to-Summit Down Pillow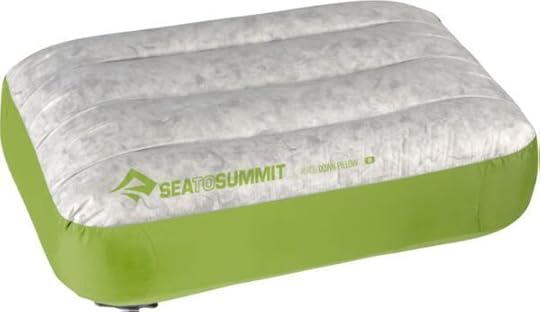
Photo: REI
If you prefer to sleep atop a comfortable pillow rather than using your down jacket or pulling the classic “tent bag stuffed with clothes” move, Sea-to-Summit makes an excellent ethically-sourced down pillow. It’s pillow-topped, inflatable, and easy to pack in a backpack or keep in the back of your car.
Price: $59.95
REI Coop Down Blanket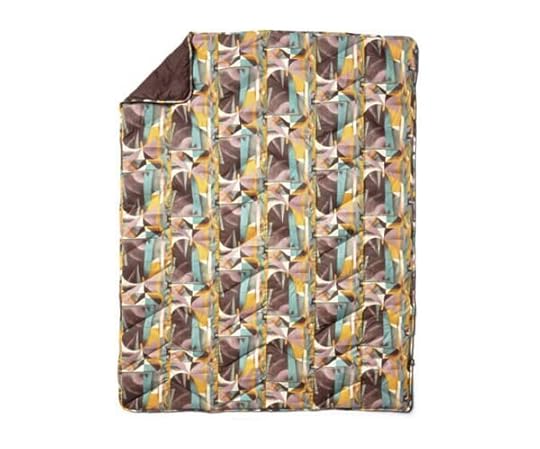
Photo: REI
Sitting ‘round the campfire until the wee hours is much more enjoyable when your entire body is warm. This is where the REI Coop Down Blanket comes in. You’ll feel good on frigid nights when you’re protected from the cold and feel good about buying an ethically sourced product. In fact, even the polyester used in the blanket is recycled. The quilt itself is stuffed with 600-fill down.
Price: $169
More like thisBackpackingThe Ultimate Summer Backpacking Gear GuideNevada Is One of the Best States for Stargazing. Here’s Where To Go

The great thing about stargazing is you don’t have to be an expert to do it, and the pastime can be enjoyed year-round. All you have to do is find a dark sky destination, and look up.
Nevada is one of the best locations in the US for truly dark skies, and excellent stargazing. Home to several dark sky parks and sanctuaries, and vast swaths of desert with low light pollution, Nevada has all the ingredients for clear and awe-inspiring stargazing, so its no surprise that it has an abundance of dark sky-certified parks and sanctuaries, as well as special stargazing-themed experiences. The sunset, stars, and Champagne Train is perhaps the most unique stargazing offering in the state. Departing from the East Ely Depot, the train gives passengers an unrivaled night sky experience through the Steptoe Valley. From Ely, you’ll set out from the city in an open-air car, and as you leave the light pollution behind, you’ll see thousands of stars, constellations, planets, and galaxies–all visible to the naked eye. And the best part? They include a glass of champagne in the ticket fare.
Stargazing in a national park means doing something a good deal of might consider unconventional–visiting after dark. No, you might not see the mountains, lakes, rivers, or forests as clearly, but the vault of stars above more than makes up for it. While not all parks are open to visitors at night, there are 20 International Dark Sky certified national parks in the US, which really come alive after dark.
Before your nighttime park adventure, however, it’s important to be prepared. In the absence of natural light, have flashlights and headlamps on hand for safety’s sake. Also, remember to wear appropriate layers. You might be outside longer than expected, especially if you’re watching or waiting for a meteor shower, or looking for planets through a telescope. Since even familiar trails may look very different at night, you might take a ranger-guided tour – if one is offered – or at least bring navigational tools like a GPS.
If you’re looking to get out there and experience Nevada stargazing for yourself, here’s where you should start:
Great Basin National Park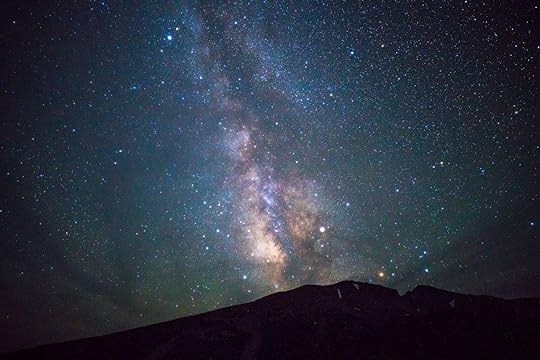
Photo: Asif Islam/Shutterstock
Great Basin National Park is ideal for avoiding light pollution while stargazing and is one of the country’s most underrated national parks. Its campgrounds sit between 8,000 and 10,000 feet above sea level, and on clear nights you’ll be able to see the Milky Way, Andromeda Galaxy, meteors, stars, and man-made satellites. The skies in this official International Dark Sky Park are believed to be among the darkest in the Lower 48. It’s also one of the country’s least-visited national parks, making it even more ideal for avoiding crowds–as well as the light pollution–that can often disturb your stargazing peace.
Stargazing events or tours:Solar Telescope Viewing at Astro FestGreat Basin Astronomy FestivalAstronomy AmphitheaterCamping spots in the area:Upper and Lower LehmanWheeler Peak CampgroundMassacre RimBest dates to go:May 15-16 for the Total Lunar EclipseJune 14 for the Strawberry MoonSeptember 22-24 for the Great Basin Astronomy FestivalClosest towns:BakerElyMassacre Rim Dark Sky Sanctuary
Photo: Allexxandar/Shutterstock
One of seven Dark Sky Sanctuaries in the world, Massacre Rim Dark Sky Sanctuary is located in the northwestern corner of Nevada and is one of the best stargazing spots in the country. It’s no surprise that scientists visiting Massacre Rim have discovered never-before-seen parts of the Milky Way in its night skies, and it’s common to see stars shining so brightly (on moonless nights) that they actually cast shadows. The Sanctuary is composed of two volcanic plateaus and wide valleys, a topography that makes for a dramatic stargazing backdrop. Note that the sanctuary’s remoteness makes it an ideal low-light pollution dark sky destination, but that same remoteness also means there’s no cell service or nearby gas stations, so plan accordingly.
Camping spots in the area:Sheldon National Wildlife RefugeModoc National ForestApplegate Field OfficeBlack Rock Field OfficeBest dates to go:June 18-June 27 to view Mercury, Venus, Mars, Jupiter, and Saturn in a perfect line.July, to view the Sagittarius and Scorpio constellations when they’re highest in the sky.Closest towns:Vya (ghost town)CedarvilleMore like thisWhere to Stay10 of the Most Luxurious Stargazing Resorts Around the World
Guide to Australian slang
Australia, being so far away from the rest of the English-speaking world, has, over the years, transformed the language into its own fun, crude, and unique version that only Aussies can decipher. Australian slang is unlike anything else you’ll hear around the world, and even the most crass of British, Irish, and Scottish slang words cannot beat the vulgarity and hilarity of the idioms, sayings, and insults you hear Down Under.
This guide to Australian slang, sayings, and one-of-a-kind vocabulary will assist you in understanding what the locals are saying — and maybe even help you blend in without having to drink Foster’s and pretend to like Vegemite.
Australian slang words and phrases and how to use themFunny Australian sayings and their meaningAustralian-up your vocabularyAustralian slang words and phrases and how to use themI’ve been flat chatTranslation: I’ve been very busy
Alternatives: “I’ve been flat out like a lizard drinking” or “I’ve been busy as a one-legged man in an arse-kicking contest.”
Translation: Speedos
Explanation: Skimpy male beachwear. The bulge in the lycra briefs’ forward-facing extremity resembles that of a parakeet, or “budgie” to Aussies.
Explanation: This quintessential Aussie slang word is useful if you want to disagree with someone in a very polite way.
Alternative: Yeahyeahyeahyeahnahhh / Yeahyeahnah
Explanation: Australian slang word describing something that is impressive or impactful.
Alternative: Blinder
Example of usage: “Mate, that was a screama of a match last night.”
Translation: Fantastic / Really, really good / Intensely excellent
Spit the dummyTranslation: Throw a fit
Explanation: Expressing extreme dislike for a particular situation in the form of an immature tantrum like that of an infant spitting out their pacifier and bursting into a crying fit.
Example of usage: “I appreciate that you’re upset that your brother recently made love to your girlfriend; however, there is no need to spit the dummy.”
Explanation: An affirmation or response to good news. Fair dinkum can be used in a variety of contexts, such as to say that someone is genuine or to ask if one is telling the truth. It is one of the most commonly used Australian slang phrases.
Example of usage: “You can trust Jill, she’s fair dinkum” / “I just got a job in South Africa!” “Fair dinkum?”
Translation: Toilet
Alternatives: Loo / Crappa / Outhouse / Thunderbox / Long drop
Translation: Getting drunk
Alternatives: Getting paro / Pissed / Maggoted / Being Loose
Explanation: Australian rough and ready individual with an affinity for the mullet hairstyle, touring car races, Victoria Bitter beer, and generally uncouth behavior.
Example of usage: “Stay away from Rundle Street during the Clipsal 500 car race; you may well end up in a fistfight with a pissed bogan.”
Translation: Moaning, whining, or complaining
Example of usage: “Jim is having a whinge about his girlfriend, boss, or something or other. I stopped listening after he opened his mouth.”
Translation: Great guy
Explanation: Bloke is simply a male
Example of usage: “Jonno is such a top bloke; he gave me free tickets to the footy, bought a case of beer, and set me up with his smoking-hot cousin.”
Explanation: Reprimand for behaving in an idiotic fashion
Example of usage: “Stop being a dickhead and pull your head in.”
Translation: Chatting
Chuck a sickieExplanation: Strategically fabricating an illness in order to avoid work for personal matters or self-indulgence.
Example of usage: “With such beautiful weather on Friday, I decided to chuck a sickie and enjoy a three-day weekend.”
Translation: My round!
Explanation: When one person pays for everyone’s drink at the bar. In a group, each person generally takes turn to pay for a round / a shout.
Translation: You bet / Of course / That’s true
Example of usage: “Bloody oat I’m coming to your party!”
Translation: He’s disappeared / He’s left without saying where he was going
Example of usage: “My keys have gone walkabout!”
Translation: I don’t want to waste my time
I’m dry as a dead dingos dongerTranslation: I’m thirsty (for a beer, most likely)
I could eat the arse out of a low-flying duckTranslation: I’m very hungry
Alternative: I’m hungry enough to eat a horse then chase the jockey!
Translation: She’s hot
He’s all sizzle and no steakTranslation: He’s all talk
Explanation: He does not live up to expectations
Translation: He is a strong, muscular man
She is cross as a frog in a sockTranslation: She’s angry
Alternative: She’s mad a cut snake
Translation: Useless
Alternatives: Handy as a back pocket on a singlet / Handy as tits on a bull
Translation: He’s disorganized
Alternative: He can’t organize a bucket of sand at the beach
Translation: None of your business!
He’s a bullock short of a deckTranslation: He’s not very bright
Australian-up your vocabularyHow ‘r’ ya going?Translation: How are you? / How is it going?
Explanation: A casually inquisitive greeting on the state of one’s affairs. More of a pleasantry than a genuine question regarding how you’re actually feeling.
Translation: Hello / Hi
Explanation: The classic Aussie greeting where “good” and “day” compress to form the hybrid word of “G’day”.
Translation: That’s okay
Alternative: No worries / No dramas
Explanation: It’s like saying “take a chill pill,” “you’re welcome,” and “it’s going to be alright” all at the same time. “No wukkas” is a shortening of “No wuckin furries,” which needs no explanation.
Translation: That’s really good
ThongsTranslation: Flip-flops
TogsTranslation: Bathing suit / Swimming costume / Swimwear
Alternatives: Cossies / Swimmers
Translation: Cooler
AmbosTranslation: Ambulance workers / Paramedics
Explanation: Australians are very fond of shortening words, including profession titles. There is “tradie” for tradesperson, “brickie” for bricklayer, “firie” for fireman, “polly” for politician, “journo” for journalist, “greenie” for environmentalist, “gyno” for gynecologist, etc.
Translation: Kissing
Explanation: You may even get a “pash rash” afterwards
Translation: Cigarettes
Alternative: Darts
Translation: Beers
Alternative: Frothies / Grog / Longnecks / Cold ones
Translation: Gas station / Service station
She’ll be rightTranslation: She’ll be okay
MaccasTranslation: McDonald’s
TinniesTranslation: Cans of beer
BrekkyTranslation: Breakfast
To chuck a U-eyTranslation: To do a U-turn
Alternative: To do a U-bolt
Translation: sausages
MissoTranslation: Girlfriend / Partner / Wife
Alternative: Missues
This article is the combined work of five writers: Will Bowie, Jess Buchan, Lauren White, Stephanie Be, Elke Wakefield, and Kate Beveridge.
More like thisLanguagesThis Guide To British Sayings and Slang Will Have You Chitchatting With the Queen in a SnapMatador Network's Blog

- Matador Network's profile
- 6 followers

