Mandi Ehman's Blog, page 38
November 14, 2014
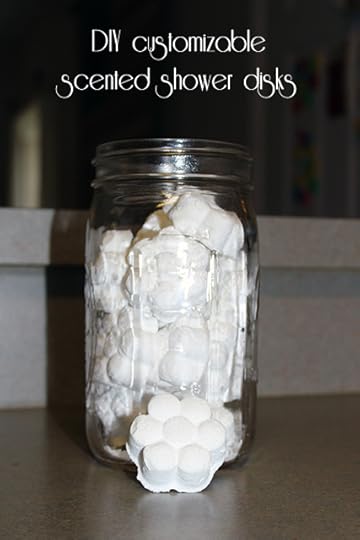
DIY scented shower disks {101 Days of Christmas}
I love this idea, and my girls will definitely be getting some of these in their stockings this year!
It’s been so fun to partner with Plant Therapy for this year’s 101 Days of Christmas series, and Christina, one of their staff aromatherapists and resident bloggers, has put together a few of her favorite projects to share with Life Your Way readers as well. These are one of her creations.
The really cool part about these disks is you make them ahead of time without any scent and then add the essential oil of your choice right before your shower. That means after a hard day you can enjoy a relaxing shower as the scent of lavender mingles with your steam. On a busy morning, a little orange or lemon can help wake you up. For the kids, Plant Therapy’s A+ Attention would be great before a big test at school. Or Germ Destroyer when a virus is going around at school. Really, the possibilities are endless!

Ingredients:
1-1/3 cups baking soda 1/2 cups waterDirections:
Preheat oven to 200 degrees F.
In a small bowl, combine the baking soda and water to form a thick paste.
Spoon into a silicone mold of your choice.
Bake for 30 minutes. Turn oven off and allow mold to cool on the rack.
When it’s completely cool, move the mold to the counter to sit overnight.
After 24 hours, remove the disks from the molds and store in an airtight container.
To use: Add 5-8 drops of essential oil and set the shower disk on the floor of your tub or shower. You don’t want it directly in the spray, but some water should hit it.
Projects from the archives:

Join us as we celebrate 101 Days of Christmas with new DIY projects, gift ideas, traditions and more every day from now through Christmas!
 Mandi Ehman is the blogger behind Life Your Way. She and her husband have four beautiful girls plus one baby boy, and together they live, work and homeschool on a little slice of heaven in wild, wonderful West Virginia. Mandi loves coffee, chocolate, easy meals, beautiful things and minimalist spaces.
 Meet the 101 Days of Christmas sponsors:
King Arthur Flour's Baker's Hotline: free professional help with any holiday baking challenge
World Vision Gift Catalog: share a full life with children in need by giving unique, life-changing gifts
Plant Therapy Essential Oils: 100% pure, undiluted oils you can trust at a price you can afford
Life Your Way Christmas Shop: get your 2014 Christmas planner today
DIY scented shower disks {101 Days of Christmas}
© 2010-2014 Purple Martin Press, LLC | All rights reserved


 Commentsi was just looking at a similar recipe on another blog and ... by JoAnn C.


November 13, 2014
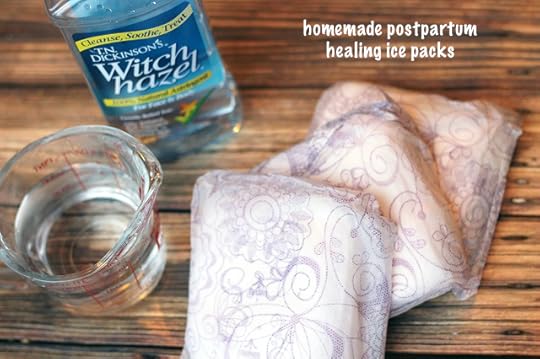
Homemade postpartum ice packs for momma
The following post is from Katie of Kitchen Stewardship:
I’m four for four on tearing during childbirth, much to my dismay.
Numbers two and three were mighty fast and their births were full of adrenaline — not so good for relaxing and taking it slowly — and the first three babies were all delivered more or less on my back, which can be hard on the perineum. (Read about my crazy E.R. delivery here.)
For number four, my goals were three-fold: to have a more peaceful birth, to lock the image of seeing my baby for the first time in my memory (I think because of all that adrenaline, I can’t picture that moment for numbers two and three!!), and to avoid tearing so recovery would be a piece of cake.
I got about one-and-a-half out of three. Eh.
I remember “the moment” – a little blue alien thing rising up out of the water, but hey, he was mine! 
I guess it was “more” peaceful. But I’m not sure if “peaceful” remains a word I’d use on purpose to describe childbirth. Perhaps it was an ill-fitted goal.
And as for tearing…see the top of the post. Darn!
Avoiding Perineal TearingThere are known strategies for trying to avoid tearing during childbirth, including:
perineum massage during pregnancy waterbirth birthing positions like squatting and hands-and-knees can reduce pressure on the perineum warm compresses on the bottom during pushing (if not a waterbirth)We went for a hands-and-knees delivery in the water, but to no avail.
Since that was the case, I was glad I had these little babies in the freezer…
Homemade Postpartum Healing Ice PacksI had so many “to do list” items for “before baby comes,” it felt insane. I wanted to clean the house, switch out kids’ seasonal clothing, get things ready for baby, of course, and go through the prep list the midwife gave us, plus plenty of online “work” items.
Thankfully, it turned out that this one was quick and painless. A five minute job!
When in the hospital, the nurses often give new moms a diaper stuffed with ice cubes to sit on right after birth and the next day. The ice reduces swelling and provides some pain relief and the diaper soaks up the melted water.
I found these pads to be nearly as cold, more comfortable to sit on and with the added benefit of healing witch hazel for the stitches.
Supplies:
witch hazel water 3-6 “bladder control” incontinence pads or hospital grade pads gallon zippered bagDirections:
Open the pads and lay them flat on the counter. Pour some water into the absorbent side of the pad. How much? Who knows…enough that the pad will hold it without being totally saturated. I won’t give measurements because really, what busy momma has time to look up the recipe? Just make these from memory on the fly… Squirt some witch hazel on top, a few layers. I probably used half the bottle for 6 ice pack pads. Place into the zippered bag (flat) and freeze solid, at least overnight. After birth, if you have any tearing, stitches, swelling or discomfort “down there” simply pull one out and put it over your normal pad. Sit on it until it’s thawed completely. Note: Even without another pad or incontinence underwear, both of which are great for postpartum mess control, these pads never “leaked” or let any of the water out as they thawed. The witch hazel does not sting the torn skin.If you happen to know a bit more about herbs than I do, I’m sure there are some other herbs or oils one could add to this pad or infuse into the witch hazel for healing the stitches. Just make sure you know what you’re doing because it will directly touch open wounds.
Here are a few other natural postpartum pain management strategies.
What do you do to keep the postpartum time natural or DIY?
 Katie Kimball has been “green” since 5th grade when she read 50 Things Kids Can Do to Save the Earth. She remains slightly disappointed that she didn’t actually save the whole thing back then, but now that she has 3 kiddos counting on her, she keeps plugging away hopefully. Katie blogs at Kitchen Stewardship about real food and natural living and is the author of Healthy Snacks to Go and other eBooks, available for Kindle.
 Meet the 101 Days of Christmas sponsors:
King Arthur Flour's Baker's Hotline: free professional help with any holiday baking challenge
World Vision Gift Catalog: share a full life with children in need by giving unique, life-changing gifts
Plant Therapy Essential Oils: 100% pure, undiluted oils you can trust at a price you can afford
Life Your Way Christmas Shop: get your 2014 Christmas planner today
Homemade postpartum ice packs for momma
© 2010-2014 Purple Martin Press, LLC | All rights reserved

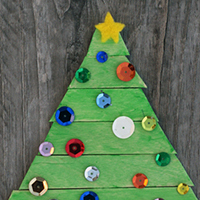
Borax crystal ornaments {101 Days of Christmas}

This is such a fun craft / handmade gift / science project all rolled into one!
With a little borax and water, you can cover pipe cleaner shape in sparkling crystals to make snowflakes for the windows or ornaments for the tree.
The best part is that kids (and adults!) can spend their time getting creative with the pipe cleaners without worrying about making a big mess and then you simply put the ornaments in a borax-and-water solution overnight for the crystals to grow. It doesn’t get much easier than that!

Supplies:
pipe cleaners string 6 cups water 1 cup borax wooden dowelDirections:
Use your pipe cleaners to make ornaments. Snowflakes or icicles made out of white or blue pipe cleaners are fun, but my favorite is the red and white striped candy cane. I cut both a red and white pipe cleaner in half and twisted the two halves together to form a thicker pipe cleaner before twisting the two colors around each other, and I love how that one turned out!
Select a bowl that is both wide and deep enough for your pipe cleaner creations. If your ornaments touch the sides or bottom, they may get stuck as the crystals grow. (I found that Pyrex bowls work best because the sides are straight rather than slanted.)
Once your ornament is ready, loosely lie a string around it to hold it in the water.
Tie the other end to a wooden dowel that is long enough to set across the opening of your bowl or container. This lets them hang straight down in the water without touching the sides. Adjust the strings once the dowel is in place to make sure the ornaments hang at the right height.
In a medium saucepan, bring the water to a rolling boil. Add borax and stir until the borax dissolves and the water is once again clear.
Pour the water into a bowl and let sit undisturbed overnight.
In the morning, carefully remove the crystals from the water. Remove the original string and add a fresh string to hang them.
To clean the bowl, simply run it under hot water and use a dish scraper to loosen the crystals that have grown on the sides.
Crafts from the archives:
Join us as we celebrate 101 Days of Christmas with new DIY projects, gift ideas, traditions and more every day from now through Christmas!
Mandi Ehman is the blogger behind Life Your Way. She and her husband have four beautiful girls plus one baby boy, and together they live, work and homeschool on a little slice of heaven in wild, wonderful West Virginia. Mandi loves coffee, chocolate, easy meals, beautiful things and minimalist spaces. Meet the 101 Days of Christmas sponsors:
King Arthur Flour's Baker's Hotline: free professional help with any holiday baking challenge
World Vision Gift Catalog: share a full life with children in need by giving unique, life-changing gifts
Plant Therapy Essential Oils: 100% pure, undiluted oils you can trust at a price you can afford
Life Your Way Christmas Shop: get your 2014 Christmas planner today
© 2010-2014 Purple Martin Press, LLC | All rights reserved

November 12, 2014
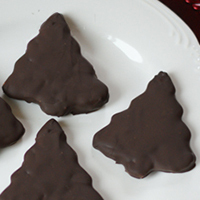
Chocolate-covered mini candy canes {101 Days of Christmas}

I tried to make chocolate-dipped candy canes a couple of years ago, but my chocolate was too hot and the candy canes kept breaking. I got frustrated and gave up, but this year — after realizing what had caused it! — I wanted to try again. I went with mini candy canes this time because everything is cuter in miniature, and I love the way these look piled in a bowl, treat bag or take out box!
Ingredients:
4 oz. milk, white or dark chocolate 24 mini candy canesDirections:
Line the counter with parchment paper.
Heat chocolate in a double boiler until melted, stirring frequently. It’s important to use a dry bowl and spoon and avoid getting any water in your chocolate. Even a single drop will mess up your chocolate!
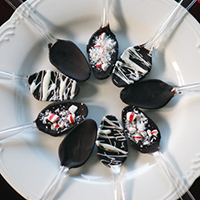
Carefully dip each candy cane into the chocolate, allowing the extra to drip off before moving it to the wax paper. Set your dipped treats on the furthest corner of the wax paper, moving toward you as you go, so that you don’t drip chocolate on those that are already done.
For the striped candy canes, lay candy canes in a row on the waxed paper and drizzle chocolate across them.
Let the chocolate harden completely and then transfer to a tightly sealed container.
Sweets from the archives:
Join us as we celebrate 101 Days of Christmas with new DIY projects, gift ideas, traditions and more every day from now through Christmas!
Mandi Ehman is the blogger behind Life Your Way. She and her husband have four beautiful girls plus one baby boy, and together they live, work and homeschool on a little slice of heaven in wild, wonderful West Virginia. Mandi loves coffee, chocolate, easy meals, beautiful things and minimalist spaces. Meet the 101 Days of Christmas sponsors:
King Arthur Flour's Baker's Hotline: free professional help with any holiday baking challenge
World Vision Gift Catalog: share a full life with children in need by giving unique, life-changing gifts
Plant Therapy Essential Oils: 100% pure, undiluted oils you can trust at a price you can afford
Life Your Way Christmas Shop: get your 2014 Christmas planner today
Chocolate-covered mini candy canes {101 Days of Christmas}
© 2010-2014 Purple Martin Press, LLC | All rights reserved

November 11, 2014
The 101 {More} Days of Christmas ebook is here!

The new 101 {More} Days of Christmas ebook is here…with 101 new recipes, projects, tutorials and printables!
Drawing from the first three years of the 101 Days of Christmas series here on the blog, this ebook is formatted for easy navigation and easy printing.
It features some of my favorite recipes, like Poor Man’s Toffee, Eggnog Hot Chocolate and Peanut Butter Balls, plus craft projects for your children, your home and your gift giving!
Get yours today!P.S. Use coupon code 101DaysBoth to get both 101 Days of Christmas ebooks for $5.98! Just add both books to your cart and enter the coupon at checkout. Expires 11/17.
Join us as we celebrate 101 Days of Christmas with new DIY projects, gift ideas, traditions and more every day from now through Christmas!
Mandi Ehman is the blogger behind Life Your Way. She and her husband have four beautiful girls plus one baby boy, and together they live, work and homeschool on a little slice of heaven in wild, wonderful West Virginia. Mandi loves coffee, chocolate, easy meals, beautiful things and minimalist spaces. Meet the 101 Days of Christmas sponsors:
King Arthur Flour's Baker's Hotline: free professional help with any holiday baking challenge
World Vision Gift Catalog: share a full life with children in need by giving unique, life-changing gifts
Plant Therapy Essential Oils: 100% pure, undiluted oils you can trust at a price you can afford
Life Your Way Christmas Shop: get your 2014 Christmas planner today
The 101 {More} Days of Christmas ebook is here!
© 2010-2014 Purple Martin Press, LLC | All rights reserved

November 10, 2014
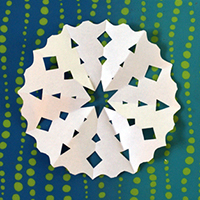
3-D paper snowflakes {101 Days of Christmas}

I love these 3-D snowflakes, and while they’re a bit labor intensive, this is the perfect craft to keep older kids busy for a few hours. And they’re so pretty! In fact, my husband liked the first one I made so much that he asked if I could show the girls how to make them so we could have a bunch to hang in the windows.
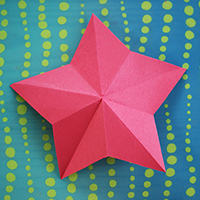
The fun part about these is that you can easily make them in a bunch of different sizes, depending on the size of the square you start with.
Make giant ones by using a full piece of paper for each of the six points, or use a tiny square to make little snowflakes!
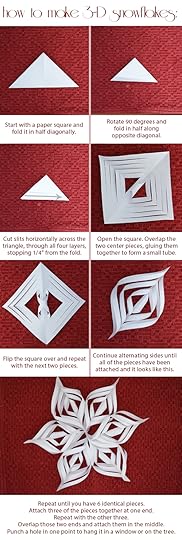
The pictures may be more helpful than the written directions alone, but here’s a little more detail on how these are done:
Supplies:
paper cut into squares (you’ll need 6 squares of the same size for each snowflake) scissors glue sticksDirections:
Start with a paper square, folding it in half diagonally.
Rotate 90 degrees and fold in half along the opposite diagonal.
Cut slits horizontally across the triangle, through all four layers, stopping 1/4″ from the fold.
Open the square. Overlap the two center pieces, gluing them together to form a small tube.
Flip the square over and repeat the process with the next two pieces.
Continue alternating sides until all of the pieces have been attached.
Repeat until you have three identical shapes.
Attach three of these shapes together at one end (make sure they’re all facing the same direction).
Repeat with the other three.
Overlap the ends of these two pieces and attach them in the middle.
Punch a hole in one tip for a ribbon to hang the snowflake in a window or on the tree.
Projects from the archives:
Join us as we celebrate 101 Days of Christmas with new DIY projects, gift ideas, traditions and more every day from now through Christmas!
Mandi Ehman is the blogger behind Life Your Way. She and her husband have four beautiful girls plus one baby boy, and together they live, work and homeschool on a little slice of heaven in wild, wonderful West Virginia. Mandi loves coffee, chocolate, easy meals, beautiful things and minimalist spaces. Meet the 101 Days of Christmas sponsors:
King Arthur Flour's Baker's Hotline: free professional help with any holiday baking challenge
World Vision Gift Catalog: share a full life with children in need by giving unique, life-changing gifts
Plant Therapy Essential Oils: 100% pure, undiluted oils you can trust at a price you can afford
Life Your Way Christmas Shop: get your 2014 Christmas planner today
3-D paper snowflakes {101 Days of Christmas}
© 2010-2014 Purple Martin Press, LLC | All rights reserved

November 8, 2014
Beeswax candles + a Plant Therapy giveaway {101 Days of Christmas}
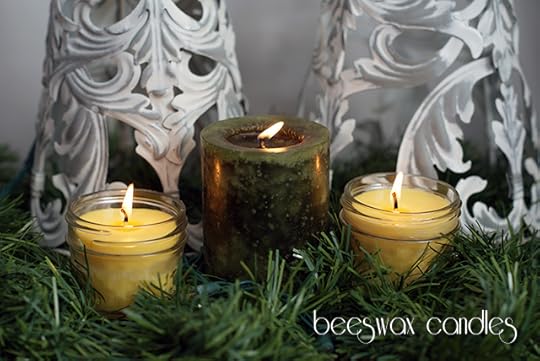
While I’m not opposed to regular wax candles, I have quite a bit of beeswax in my cabinet and decided to look into making beeswax candles this year. Thankfully, I came across a tutorial at DIY Naturals with Betsy’s tips for beeswax candles, and I love how they turned out!
The creamy yellow color of these candles feels warm and natural, and I’m excited to make more of them as gifts this year!
I used the palm shortening I had on hand (which actually uses a mixture of palm oil and coconut oil) as well as the wicks I had in my stash (which were no longer in a package or marked with a size) without any problem, but be sure to read Betsy’s tips for selecting a wick size. She also weighs her ingredients, while I measured mine out by volume. And, of course, I added essential oils because I wanted candles that smell like the holidays.
Supplies:
**per 4-ounce candle
an old, clean jar 1/2 cup beeswax pastilles 1/2 cup palm oil shortening wicks wooden skewers 4-ounce jelly jars 30-45 drops essential oils (this holiday synergy is just delicious!)Directions:
In an old jar that you don’t plan to reuse, add beeswax and palm oil shortening. Set the jar inside a pot of water and heat the water over medium heat, stirring the wax and oil with a wooden skewer until it’s melted.
Cut your wick to twice the height of your jar. Carefully dip the bottom half of the wick in the melted beeswax mixture and lay flat on a piece of wax paper, stretching it out to lay straight and flat.
Turn down the heat on the stove and add essential oil to the wax, stirring to mix.
Pour 1/2″ of melted wax in the bottom of the jar. Add the wick, making sure it touches the bottom and holding it straight until the wax hardens.
Once the wax is completely hardened in the bottom, rest a wooden skewer on top of the jar and wrap the wick around it securely. This will help hold it in place as you add additional wax.
Pour more wax in the jar, leaving room at the top. Set aside to harden.
Once the wax has hardened, cut off the extra wick and you’re done!
And now for a giveaway!
I’ve shared before that the thing I love most about Plant Therapy is that they promote safe, responsible use of essential oils.
Essential oils are extremely potent, and while they are all natural, they still come from plants, which means they can still have negative side effects if used improperly. Plant Therapy works closely with Robert Tisserand, a noted aromatherapy expert and author of one of the most comprehensive guides to essential oils, and they recommend extreme caution when using essential oils around babies or children. Despite offering only the highest quality, pure essential oils (as shown through third-party testing), they do not recommend internal use without the supervision of a trained aromatherapist, and they warn against using essential oils undiluted (or neat) because of potential issues with phototoxicity or sensitization.
And they host one of the best essential oil Facebook groups around, with almost 25,000 members asking questions, sharing recipes and more.
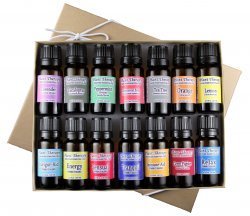
Because they’re awesome, Plant Therapy is giving away two of their 14 Essential Oil Sets this week on Life Your Way!
These sets are worth $54.95 each and contain Plant Therapy’s top singles and synergies. Whether you are struggling with holiday stress, need some sleep or simply trying to stay healthy, this set is for you!
Each set contains 14 (10 ml) bottles of pure essential oils including 7 singles and 7 synergies:
Lavender (Lavandula Officinalis) Peppermint (Mentha piperita) Eucalyptus (Eucalyptus Globulus) Tea Tree (Melaleuca Alternifolia) Orange (Citrus Sinensis) Lemon (Citrus Limonum) Cinnamon Bark (Cinnamomun cassia blume) Sensual Synergy (Aphrodisiac) Energy Synergy (Physical Energy) Germ Fighter Synergy (Like Thieves) Relax Synergy (Physical Relaxation) Immune-Aid Synergy (Immune System Booster) Tranquil Synergy (Emotional Stress Relief) Invigor-Aid Synergy (Mental Invigoration)To enter to win, please fill out the form below:
Loading…
The giveaway ends at 11:59 p.m. ET on Saturday, 11/15. The winner will be selected randomly and notified by email, and this post will be updated with their name as well. Unfortunately, due to the international laws governing sweepstakes and lotteries, we’re only able to offer these giveaways to U.S. residents 18 years and older.
Join us as we celebrate 101 Days of Christmas with new DIY projects, gift ideas, traditions and more every day from now through Christmas!
Mandi Ehman is the blogger behind Life Your Way. She and her husband have four beautiful girls plus one baby boy, and together they live, work and homeschool on a little slice of heaven in wild, wonderful West Virginia. Mandi loves coffee, chocolate, easy meals, beautiful things and minimalist spaces. Meet the 101 Days of Christmas sponsors:
King Arthur Flour's Baker's Hotline: free professional help with any holiday baking challenge
World Vision Gift Catalog: share a full life with children in need by giving unique, life-changing gifts
Plant Therapy Essential Oils: 100% pure, undiluted oils you can trust at a price you can afford
Life Your Way Christmas Shop: get your 2014 Christmas planner today
Beeswax candles + a Plant Therapy giveaway {101 Days of Christmas}
© 2010-2014 Purple Martin Press, LLC | All rights reserved

Weekend reading: November 8, 2014
From Facebook: ♥♥♥ {no other words necessary!}
Can you believe there are less than 3 weeks until Thanksgiving and just 7 weeks until Christmas? I really haven’t thought much about the “stress-inducing” parts of Christmas (despite the fact that I released the free 2014 Christmas planner almost 2 months ago!), but I feel like a little kid anticipating all the fun parts!
This year we were trying desperately to come up with non-toy gift ideas, and we’re struggling to find the perfect gifts. We don’t want our families to feel like they’re wasting their money or the girls to feel like what they want doesn’t matter. They’re completely on board with the idea of a special “big” gift for all of them, and we’ve tossed around ideas like karate lessons and a family vacation, but so far nothing has everybody feeling really excited. Thankfully we still have a little time.
What I’m reading: I put my reading list aside to read Lizzy & Jane by Katherine Reay this week, and I cried my way through the entire second half. As I said on Instagram, it’s not a perfect book, but it has a ton of heart! Next week, it’s back to my original reading list: Free to Learn by Peter Gray, The Thief by Megan Whalen Turner and Let’s All Be Brave by Annie F. Downs
What I’m cooking: chicken quesadillas, spaghetti casserole, roasted chicken sausage, potatoes & red peppers, shrimp alfredo
What I’m pinning: frozen hashbrown patties, make-ahead apple cinnamon steal cut oats, cheesy mashed potato casserole
What I’m thinking about:
{Follow my personal Facebook feed for the things I’m thinking about and talking about all week!}
Simplifying the Holidays 40 Plus Advent Ideas: simple ways to count the days | Simple Kids Our Craigslist Christmas. | Modern Mrs. Darcy Joyful Motherhood What Happy Parents Know & Do When It Gets Hard | A Holy Experience The gift of resentment | Simple Homeschool How I stopped yelling at my kids… & how it’s changed our home | Money Saving Mom Around the World Do American Christians Care At All About Christians Being Persecuted In The Middle East? | The American Jesus Map: The Africa Without Ebola | The Washington PostHave a great weekend!
Mandi Ehman is the blogger behind Life Your Way. She and her husband have four beautiful girls plus one baby boy, and together they live, work and homeschool on a little slice of heaven in wild, wonderful West Virginia. Mandi loves coffee, chocolate, easy meals, beautiful things and minimalist spaces. Meet the 101 Days of Christmas sponsors:
King Arthur Flour's Baker's Hotline: free professional help with any holiday baking challenge
World Vision Gift Catalog: share a full life with children in need by giving unique, life-changing gifts
Plant Therapy Essential Oils: 100% pure, undiluted oils you can trust at a price you can afford
Life Your Way Christmas Shop: get your 2014 Christmas planner today
Weekend reading: November 8, 2014
© 2010-2014 Purple Martin Press, LLC | All rights reserved

November 7, 2014
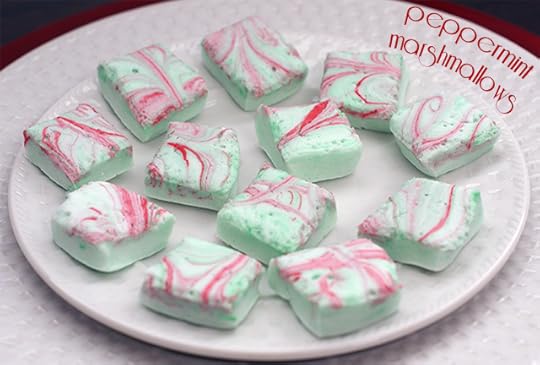
Peppermint swirl marshmallows {101 Days of Christmas}
I feel kind of guilty about these marshmallows.
Not because I ate too many (although that’s a possibility as well!), but because I shared our oldest daughter’s struggles with food dyes a few months ago, and I fully intended to avoid any artificial dyes for this year’s series.
Then we pulled our old dyes out of the cabinet for a science experiment, and as I was making these marshmallows a couple nights ago, I just couldn’t resist adding dye to match their peppermint flavor.
I originally added green, intending to swirl it throughout, but my mixer jumps speeds really fast (anyone else have this problem?), and before I could react, a good portion of the marshmallow cream was dyed green. After I transferred it to a pan, I added just a couple drops of red dye and swirled it on top to make these pretty red and green marshmallows (leaving a few St. Patrick’s Day green for our oldest!).
But, really, whether you add dye or not, marshmallows are fun to make, and they taste amazing, making them the perfect Christmas treat to share with friends and family!
Ingredients:
2/3 cup cold water, divided 2 envelopes unflavored gelatin 1 1/2 cups sugar 2/3 cup light corn syrup 1/8 teaspoon salt 3/4 teaspoon peppermint extract confectioner’s sugarDirections:
Grease a 9″x13″ pan and spatula and set aside.
Add 1/3 cup cold water to your electric mixer bowl and sprinkle with gelatin. Let sit for 5-10 minutes.
In the meantime, bring 1/3 cup water, sugar, corn syrup and salt to a boil until it reaches 238 degrees on a candy thermometer (about 5 minutes).
Whisk gelatin mixture on low speed, slowly adding the syrup by pouring it down the side of the bowl. Gradually increase to high speed and beat for about 12 minutes until thick and white. Add peppermint extract and beat for 30 seconds.
Pour the marshmallow mixture onto your prepared baking sheet and smooth with the spatula.
To create swirls, add a couple drops of dye well spaced across the surface of the marshmallows and use a toothpick (or the tip of a knife) to swirl it throughout.
Cover and let sit overnight.
Grease a cookie cutter or knife and divide into individual marshmallows.
Roll the edges in powdered sugar or crushed candy canes or let them sit out for a bit to harden so that they don’t all stick together. (You can also toss them in powdered sugar, which works great for plain white marshmallows but covers up the swirls in these!)
Candy recipes from the archives:


Join us as we celebrate 101 Days of Christmas with new DIY projects, gift ideas, traditions and more every day from now through Christmas!
Mandi Ehman is the blogger behind Life Your Way. She and her husband have four beautiful girls plus one baby boy, and together they live, work and homeschool on a little slice of heaven in wild, wonderful West Virginia. Mandi loves coffee, chocolate, easy meals, beautiful things and minimalist spaces. Meet the 101 Days of Christmas sponsors:
King Arthur Flour's Baker's Hotline: free professional help with any holiday baking challenge
World Vision Gift Catalog: share a full life with children in need by giving unique, life-changing gifts
Plant Therapy Essential Oils: 100% pure, undiluted oils you can trust at a price you can afford
Life Your Way Christmas Shop: get your 2014 Christmas planner today
Peppermint swirl marshmallows {101 Days of Christmas}
© 2010-2014 Purple Martin Press, LLC | All rights reserved
 CommentsYum! You have so many great ideas! Can't wait to try these. Do ... by Meg
November 6, 2014
Join me in creating a life you love in 2015!

At the beginning of this year, as I was considering my “one word” options, I kept coming back to the word “live” again and again. Not [līv], as in U2 Live in Concert!, but [liv], as in “to be fully alive.”
I started the year wondering if 2014 could be my chance to really learn to live both intentionally and creatively, where I made time for my passions, let go of my workaholic tendencies, prioritized the things I said mattered, and connected more with the people around me.

Early 2014 put this resoloution to the test in so many ways. As I consolidated the magazine-style Life Your Way into a simpler, more personal site and looked for other ways to simplify and focus my business, Sean broke his knee in a power-kiting accident, and I spent weeks as the primary caregiver to our 5 children plus my bedridden husband while trying to keep my business afloat.
During that experience, my focus was on not just living but choosing joy despite the hard, exhausting circumstances, and in April, for my 32nd birthday, I got wrist tattoos with the phrases that have become my life motto: “Love to live. Live to love.”

Because this simple, four-letter word continues to impact my life, I’m excited to be launching a 12-month course to share what I’ve learned as well as encouragement and practical resources from other bloggers you know and love!
Through this course, we’ll intentionally walk through a different area of what really living means each month:
January :: Simplify February :: Love March :: Connect April :: Focus May :: Rest June :: Explore July :: Know {Yourself} August :: Disconnect September :: Learn October :: Serve November :: Create December :: Celebrate

To be clear, I’ve learned a lot and made some pretty drastic changes in 2014, but I’m not preaching from the pulpit as someone who thinks she’s arrived. In fact, as we began planning this course, we were going through a stressful couple of weeks, and I looked at my husband and asked, “Am I being a hypocrite by launching this course?” He reminded me that living a life you love doesn’t mean everything will always be perfect or that you won’t ever fall off the wagon and have to intentionally climb back on; it means embracing what life throws your way and making choices intentionally along the way.
While my life today looks different than it did a year or two ago — and I hope to inspire and equip you to create a life you love as well — I am not going to be leading this course alone. Instead, I will be joined by 12 experts who exemplify the monthly theme in their own lives. They will share their stories and encouragement with you as well, and we’ll all participate in this journey together. You’ll hear from women like Tsh Oxenreider, Crystal Paine, Andrea Dekker, Stephanie Langford, Anne Bogel, Lisa Grace Byrne, Jamie Martin, Meagan Francis and Sarah Mae.

Why a course and not just regular blog posts? Quite honestly, because I want to be able to give you more than just a few random blog posts mixed in with the rest of our content. With your membership, you’ll get:
a step-by-step approach that helps you focus on one area of your life at a time to create real, lasting changes experts sharing fresh, exclusive content on each topic a variety of multimedia formats: written blog posts, podcasts, vlogs and printables ad-free online and offline content (PDF, .mobi and .epub) access to a private Facebook group for encouragement and discussion a rolling format that allows you to join us in any month and cover the course material over the following 12 months lifetime membership so you can revisit the monthly themes year after year

Could this next year be the year that you create a life you love?
Register below to receive our special early bird offer of $156 (the price will increase to $199 on December 15th!):

If you’d prefer to pay monthly, we will be offering monthly payment options beginning on December 15th. Click here and enter your email address to receive an email reminder before the course launches.
You are worth investing in, and I hope you’ll join us!
Mandi Ehman is the blogger behind Life Your Way. She and her husband have four beautiful girls plus one baby boy, and together they live, work and homeschool on a little slice of heaven in wild, wonderful West Virginia. Mandi loves coffee, chocolate, easy meals, beautiful things and minimalist spaces. Meet the 101 Days of Christmas sponsors:
King Arthur Flour's Baker's Hotline: free professional help with any holiday baking challenge
World Vision Gift Catalog: share a full life with children in need by giving unique, life-changing gifts
Plant Therapy Essential Oils: 100% pure, undiluted oils you can trust at a price you can afford
Life Your Way Christmas Shop: get your 2014 Christmas planner today
Join me in creating a life you love in 2015!
© 2010-2014 Purple Martin Press, LLC | All rights reserved