Mandi Ehman's Blog, page 130
March 19, 2013
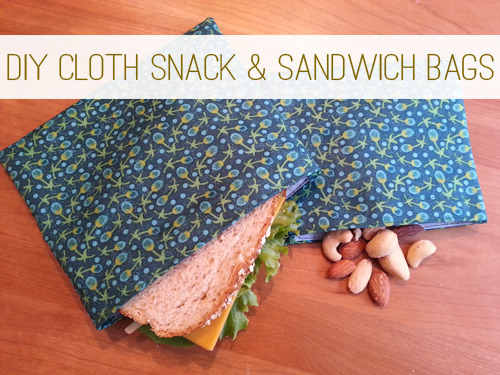
Tutorial: How to Make Reusable Snack & Sandwich Bags

The following post is from Micaela of Mindful Momma:
source: Micaela Preston
Reusable food bags are indispensable in my life. Whether I am packing a lunch for my kids or grabbing a snack for an afternoon on the run, I am always reaching for my stash of handy snack and sandwich bags. You can find snack bags in so many cute fabrics these days, and the best part is that they can be used over and over again, so you can ditch the wasteful plastic baggies for good!
I think you’ll be surprised at how easy it is to make your own snack and sandwich bags. For me, the hardest part is dragging my sewing machine out from the basement. After that, it’s just a few simple steps! Be prepared to whip up a bunch of bags at a time. You will appreciate having a good quantity on-hand (you never know when one might get lost), and they make great gifts too!
Note: After testing out a variety of snack sacks, I have found that the ones I like best are lined with a water-resistant fabric. The lining helps keep stains out of the fabric and makes cleanup much easier. As far as I can tell, basic ripstop nylon is a pretty safe material to use. It is not coated with chemicals to make it waterproof and is free of yucky chemicals like BPA, PVC and phthalates. Of course, if you prefer to use all natural materials for your snack bags, you can use cotton fabric for the lining.
Supplies
cotton fabric
ripstop nylon lining
5/8″ wide sew-on Velcro
coordinating thread
Directions:
Snack Bag (5″ x 6″ finished size): Start with 12″ x 7″ pieces of both cotton fabric and ripstop nylon as well as a 5″ strip of Velcro.
Sandwich Bag (6″ x 7 1/2″ finished size): Start with 14″ x 8 1/2″ pieces of both cotton fabric and ripstop nylon as well as a 6 1/2″ strip of Velcro.
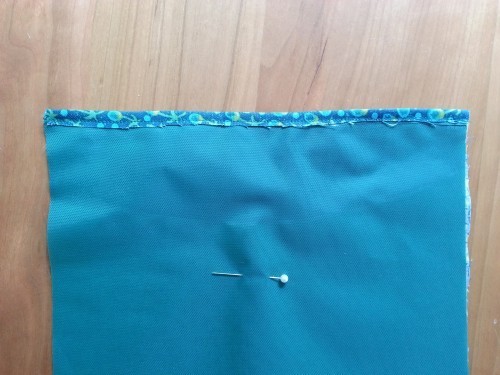
Place cotton fabric and ripstop nylon together with right side of cotton facing out (there is no right or wrong side to ripstop nylon).
Fold top edge under 1/4″ and lightly press with an iron on low setting (not too hot or nylon may melt). Use sewing machine to stitch in place. Repeat with bottom edge.
source: Micaela Preston
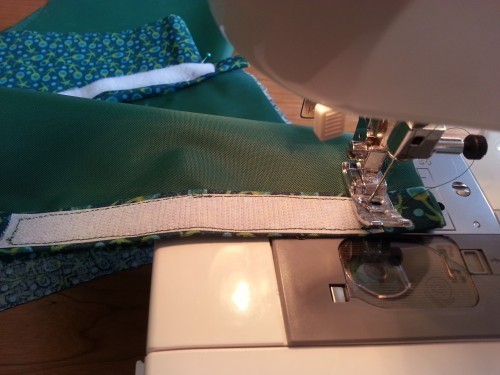
Fold the same edges over another 3/4 inch. Press and pin in a couple places. Place Velcro strip on each edge (the fuzzy side on one edge and the hook side on the other edge) and stitch in place.
source: Micaela Preston
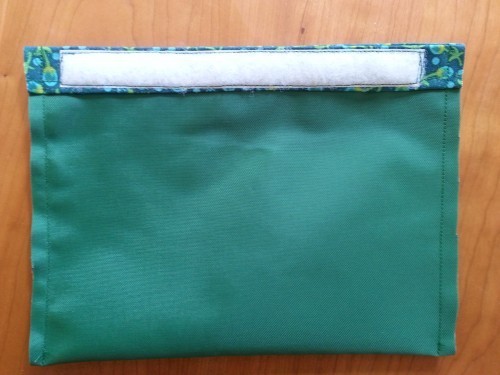
Fold material in half with right sides together. Stitch side seams at 1/2 inch. When finished, trim seams to 1/4 inch.
source: Micaela Preston
Turn bag inside out and push corners out with the end of a pencil if you need to. The Velcro seams should match together at the top.

source: Micaela Preston
Finished bags can be washed by hand or machine-washed.
What foods do you carry in snack bags?

Micaela Preston is a green lifestyle writer and marketing consultant with a passion for sustainable products and brands. Her award winning blog, Mindful Momma, focuses on living a green and healthy lifestyle while balancing the realities of life with young children. Micaela lives in Minneapolis with her husband and two boys. When she is not writing, she is busy whipping up a healthy meal or the eco-craft du jour.
Tutorial: How to Make Reusable Snack & Sandwich Bags is a post from Life Your Way
© 2010-2013 Purple Martin Press, LLC | All rights reserved - This feed is provided for the convenience of Green Your Way subscribers. Any reproduction of the content within this feed is strictly prohibited. If you are reading this content elsewhere, please send an email to contact@yourway.net to let us know. Thanks.


5 Quick-Fixes to Fix Overwhelm When Working from Home

The following post is from Prerna of The Mom Writes :

source: stockimages/freedigitalphotos
Overwhelmed.
Exhausted.
Burnt out.
Just plain tired.
Yes, we’ve all been there. Whether you’d been working from home for 6 months or 6 years, chances are there have been days in your life, when everything just seemed to snowball and your carefully arranged life just seems to fall apart.
What do you do?
Here are my 5 strategies for coping with work-at-home overwhelm and coming out feeling awesome instead of lonesome:
1. Take a nap.
That’s right. When overwhelm creeps up, take a power nap. Draw the shades, play some soft music, close the door and just rest. A short 10-minute nap, too, can yield wonders and give your tired mind a much-needed rest. If needed, let the kids watch a 15-minute cartoon clip while you get some shuteye. Trust me, they’ll be happier if you are happier.
2. Review your routine.
Write down everything you need to do as part of your work-at-home routine. Are there things on there that you can let go off? Like checking email twice in the same hour. Or are there tasks that aren’t giving you any returns? Like being on a social network where your target audience doesn’t interact much. Review all your action items and activities and see what can be shuffled around, dropped, delegated.
3. Seek some support.
This work-at-home gig can’t be done alone. That’s right. You need a support system to keep you motivated. Inspire you. Encourage you. Pick you up when you fumble.
Whether it is your spouse, a mentor, an online mastermind group, a coach, find your cheerleading squad and help them help you by asking, sharing and being honest about your struggles and challenges.
4. Eat clean. Stay hydrated. Exercise.
Put in junk. Feel like junk. Simple. Eat healthy and you’ll feel much better. Whenever I wake up in the morning feeling horrid, I know it is because of what I ate the day before. In my experience, food plays a HUGE role in how we feel, our energy levels, our moods, our overall behavior. So, skip that packet of preservative-laden, chemically flavored packet of chips and munch on some fruits and nuts instead.
Also, remember to drink enough water. Dehydration can cause stress and make you feel exhausted and irritable. I keep a pitcher of water on my desk while working and set myself the goal of drinking it up before my work day ends.
Working from home often means we skip getting out of the house. Ask me how I know. However, when it feels as if things are getting way too much for you to handle, close the laptop and head out for a run or a walk. Just being out, breathing in fresh clean air, can help unclog your head and help you think clearly and come back ready to tackle that to-do list.
5. Clear your desk.
Finally, overwhelm loves clutter. If you’re desk is piled high with papers, files, post-it notes floating around and office supplies sticking out in random places, it is time to get decluttering and clear out your desk. This season, I have been busy spring cleaning my home and business and it feels wonderful!
How do you deal with work-at-home overwhelm?

Prerna Malik is a mom, a wife, a writer and woman who believes in being postively productive, parenting with love and creating a home that invites you to put your feet up and relax. Find her sharing her journey and experiences with productivity and parenting at The Mom Writes.
5 Quick-Fixes to Fix Overwhelm When Working from Home is a post from Life Your Way
© 2010-2013 Purple Martin Press, LLC | All rights reserved - This feed is provided for the convenience of Work Your Way subscribers. Any reproduction of the content within this feed is strictly prohibited. If you are reading this content elsewhere, please send an email to contact@yourway.net to let us know. Thanks.
Printable Easter Treat Bag Topper

The following post is from Kacey of Well-Rounded Home:

source: Kacey
Easter is just weeks away, and Pinterest is buzzing with all manner of amazing Easter crafts, decor and, of course, baskets. I’d like to say I’ll be that mom whipping up some crazy beautiful Easter baskets filled with delectable treats, creative toys and timeless gifts, but that would be a lie. While I can spend hours browsing the pictures, I don’t see myself investing the time (and money) to get anything done. So, for now, I’m making peace with simple and easy.
Simple and easy like these Easter treat bags. You can knock them out while watching an episode of your favorite t.v. show. Make them for your kids, hand them out as favors after an Easter egg hunt or send your child to school with a batch.
Supplies:
printable treat bag topper (each page makes two toppers measuring 6.5 x 2 inches when folded)
8.5 x 11-inch card stock paper (white or light colored, bright paper wok best)
sandwich bags
candy
scissors
stapler
Directions:
Print the topper on card stock paper and cut along the border. Fold each topper in half lengthwise.
Fill bag with candy, then wrap topper around the top of the bag. You can roll or fold bag down as needed depending on how full the bags get.
Staple topper to bag.
What are you making for Easter? Have you seen any Easter-themed pins that had you saying, “Wow?”

With three little busy bodies to care for, Kacey is on a mission to take motherhood to the next level. Her blog, Well-Rounded Home, is filled encouraging words and inspiration for moms in the trenches with taking care of home and wrangling kids. She’s a die-hard Texas girl who loves her sweet tea and the word y’all. By day, she’s the marketing and client services guru for a small real estate investment firm.
Printable Easter Treat Bag Topper is a post from Life Your Way
© 2010-2013 Purple Martin Press, LLC | All rights reserved - This feed is provided for the convenience of Family Your Way subscribers. Any reproduction of the content within this feed is strictly prohibited. If you are reading this content elsewhere, please send an email to contact@yourway.net to let us know. Thanks.
A Little More on Quiet

The following post is from Amanda of ohAmanda.com :

source: kaneda99
The last two months I’ve written posts on Family Your Way about quiet and margin. This whole idea of slowing down, silencing some of the busy in your life and cutting back on the to-do has been following me around lately. I’ve seen the same idea in books I’m reading, podcasts I’m listening to, blogs I’m following and even in music I’m listening to. Maybe someone is trying to tell me something?
Today I’m going to share a few more practical tips about getting your schedule quiet and staying quiet in your heart and mind.
I hope some of these ideas will help you not just relax, but stay away from stress and the overly busy.
1. Focus on now.
This seems trite, but it’s true. Don’t get caught up in your still-hasn’t-been-done-to-do-list. Focus on what you’re doing now–making pancakes, playing a game with the kids or cleaning out the closet. Lisa T Bergren in her book, Upside-Down Prayers for Parents says this is how we are to live life, “Not always anticipating what might be around the bend, over the next horizon, but focusing on here, now. To constantly be on the lookout for what’s next is to miss the blessings at hand.”
2. Turn off the radio.
There’s an old song by Switchfoot that says, “If we’re adding to the noise, turn off this song. If we’re adding to the noise, turn off your stereo, radio, video”. Sometimes we fill our hearts and minds with noise to keep us away from things we don’t want to think about. So, if something in your life is adding to the noise–turn it off!
3. Do what only you can do.
As moms, we try to do all the things. Michael Hyatt says, do the things that only you can do–cook that special meal, plan the birthday party or kiss that boo-boo. Learn to put some things aside and delegate (yes, I said delegate some of your mom duties!) to other people. Maybe that means you need to hire a mother’s helper to fold laundry, ask your husband to clean out your car or just stop volunteering at school. Whatever it is that you do best, is what should be priority on your to-do list.
4. Put your big rocks in first.
When you prioritize your to-do list, your wanna-get-dones and do the really important things first, you’ll have more time to do all the things you need to do. Your capacity (and room for quiet) will expand when you put your big rocks in first.
Although it is a day to day journey, learning to be quiet and build quiet-ness into my life has brought me more peace. I feel less stressed and I realize the things that seemed so important and pressing, really weren’t as big of a deal as I thought. When I focus on calming my schedule and mind down, I find myself more able to focus on what’s before me–my kids, my husband the life we’re living now.
What’s a practical way you keep quiet and margin in your life?

Amanda is a stay-at-home mom of two who blogs at ohAmanda.com. In her former life, Amanda was a Children’s Pastor — overseeing, organizing and developing ministry for kids in nursery through middle school, but now that she is a mom, her “skills” are used up on her kids!
A Little More on Quiet is a post from Life Your Way
© 2010-2013 Purple Martin Press, LLC | All rights reserved - This feed is provided for the convenience of Family Your Way subscribers. Any reproduction of the content within this feed is strictly prohibited. If you are reading this content elsewhere, please send an email to contact@yourway.net to let us know. Thanks.
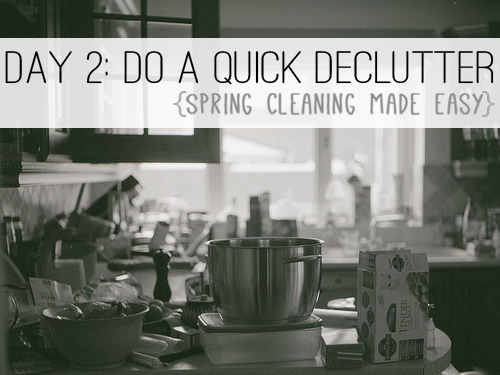
Day 2: Do a Quick Declutter {Spring Cleaning Made Easy}

 For the next month, we’ll be spring cleaning the easy way with our Spring Cleaning Made Easy series! The goal is to get the whole house clean — one mini task at a time — without having to set aside a whole week, or even a whole day, to clean.
Today we’re going to take some time to clear out some clutter so that we can spend more time cleaning and less time dealing with stuff as we go through the various rooms in our home.
source: Stuart Heath
This is important: Today’s task is to do a quick declutter. You’re not emptying closets or drawers or decluttering every nook and cranny in your home, just breezing through with a couple boxes or bags and clearing the surfaces that you can deal with quickly.
To start, grab at least two boxes or bags — one for trash, one to give away (or sell).
Start in the main area of your home and put any trash you find in your trashbag. Then, evaluate the things that are covering shelves, tables and counters. Put away the things you want to keep and add the rest to your giveaway box. These could be books, toys, knick knacks — whatever you’re willing to part with!
Continue this same process in each room until all of the surfaces are cleared.
If you have trouble making decisions about what to give away, ask yourself these 10 questions to help you declutter. You could also set a goal to fill one box (or three!) with stuff to keep you motivated as you go.
I was serious when I said this is a quick declutter. If you try to declutter it all, you’re going to run out of steam before we even start cleaning. For today, don’t open any drawers or closets. Just clean off the surfaces and spaces you can see when you walk into a room. But clearing the surfaces now means you’ll have less to deal with each day as we start deep cleaning, so don’t skip this step either!
Track your progress this month with the Spring Cleaning Made Easy checklist, which comes in two versions — one with dates to coincide with the live series and one with generic labels so you can do it on your own at another time. Click here to download or print your copy!
Want to get a jump start on tomorrow’s task? We’ll be cleaning out the refrigerator and freezer.
Do you like decluttering, or is this a painful task for you?

Mandi Ehman is the founder and publisher behind Life Your Way and the co-author of All in Good Time, as well as a wife and the homeschooling mom to four beautiful girls. She lives with her family on a little slice of heaven in wild, wonderful West Virginia and loves coffee, chocolate, easy meals, beautiful things and minimalist spaces.
Day 2: Do a Quick Declutter {Spring Cleaning Made Easy} is a post from Life Your Way
© 2010-2013 Purple Martin Press, LLC | All rights reserved - This feed is provided for the convenience of Home Your Way subscribers. Any reproduction of the content within this feed is strictly prohibited. If you are reading this content elsewhere, please send an email to contact@yourway.net to let us know. Thanks.
Nature’s Way Organic Extra Virgin Coconut Oil as Low as $6.21


 (1,139 reviews)
HOT DEAL!
If you’re a regular Life Your Way reader, then you know I’m a fan of coconut oil, both in my kitchen and in my bathroom, and right now you can pick up Nature’s Way Organic Extra Virgin Coconut Oil for as low as $6.21 when you purchase through Subscribe & Save.
This is a great chance to try coconut oil at a low price — whether it’s in place of the vegetable oil in your next batch of brownies or as a facial moisturizer!
Here’s how:
Nature’s Way Organic Extra Virgin Coconut Oil, 16 Ounce
is on sale for $7.31.Save 5-15% with Subscribe & Save.
Pay just $6.21-$6.94 with FREE shipping.
Be sure to visit Jungle Deals & Steals for new Amazon.com deals every day! Or subscribe by email or in a feed reader so you don’t miss any deals.
Nature’s Way Organic Extra Virgin Coconut Oil as Low as $6.21 is a post from Life Your Way
© 2010-2013 Purple Martin Press, LLC | All rights reserved - This feed is provided for the convenience of Money Your Way subscribers. Any reproduction of the content within this feed is strictly prohibited. If you are reading this content elsewhere, please send an email to contact@yourway.net to let us know. Thanks.
March 18, 2013
6 Strategies for Stress-Free Holiday Portraits

The following post is from Krystal of Krystal Griffin Photography:

source: Mandi Ehman
Easter is right around the corner, and many of us will be pulling out our cameras for the annual Easter picture with our children and families, just as we did for Christmas and are likely to do again for other major holidays. I understand well, the frustration of wanting to get the annual photo while dealing with less than cooperative children.
I want to share six strategies with you that will cut the stress from these annual portraits.
1. Learn a few Jokes.
Unless you were the “class clown” you may not have any kid friendly jokes in you arsenal. Take some cues from your kids to figure out what humors them. My kids are really into knock-knock jokes, and since I have boys a little “potty humor” always seems to do the trick. If you don’t have a joke book in your house, a quick internet search will yield plenty of options. Even the lamest jokes will elicit a small genuine grin, though they may be laughing at your attempts.
2. Learn a few games.
My husband has this thing he does when we take pictures of the kids. With my permission, he makes fun of me behind my back. This is one of many ways that you can get goofy behind the camera. Others might be “peek-a-boo” or blowing “raspberries” for little ones. With my older ones, I’ll joke that their feet are stinky like (fill in the blank). This sort of goofing off should loosen them up, and when you get good at it you will snag some full out belly laughs from them.
3. Bribe them.
I’m not above bribes now and then. There are two kinds of bribes I want to talk about, and which one you choose will depend on the age of your children. The first kind includes a small reward every couple frames or clicks of the camera. They get a raisin, a Smarty or a chocolate chip each time they cooperate for the picture. They give you a picture. You give them a bribe. The other kind of bribe would be saved for the end of your little session and would be for older children. You might promise a fun activity, the whole pack of Smarties or a sheet of stickers. The trick is to find something that motivates them and follow through with the reward.

source: Krystal Griffin
4. Give them a silly one.
You might call this a game or a bribe, but either way it’s a strategy I can always count on. When the gang is wiggly and a bit fitful, I always promise that I will give them a silly one at the end. By this I mean that they are free to make goofy faces and do whatever they want for a few frames. If they are especially wound up, I might give them a silly frame first, ask them for my photos and give them those last few frames to get goofy.
5. Feed them – the right food.
This is very simple. Hungry children aren’t happy. Because I don’t want to leave this tip at two sentences, I will add that you should be sure to feed them the right things. Feeding your children food that is loaded with sugar (unless, of course, it’s a bribe) may not help in your effort to keep them still for a few minutes. A small piece of fruit and cheese might be a better choice.

source: Krystal Griffin
6. Develop a predictable routine.
I can’t emphasize this last strategy enough! It is so important that your family knows what to expect from your portrait times. Developing a predictable routine will help you get the photos you want as quickly as possible. Once they know what to expect and that you won’t hold them hostage forever, they will be more will to cooperate in future sessions. And while we are talking about holding them hostage, let me make one final point. Mom, I know you want that perfect picture of your children, but holding them hostage until you get it might do more damage than good. It’s life- crying children, rolling eyes, snotty noses and all. So remember, any picture is better than no picture.
Which holidays or events do you annually gather up your family for a photo?

Krystal is a stay-at-home mom of four children, ages 4-9, whom she homeschools. She is acutely aware of how fast her children are changing and is passionate about keeping family memories alive through photographs. Now and then she gets to help other families’ bottle up their own memories at Krystal Griffin Photography.
6 Strategies for Stress-Free Holiday Portraits is a post from Life Your Way
© 2010-2013 Purple Martin Press, LLC | All rights reserved - This feed is provided for the convenience of Tech Your Way subscribers. Any reproduction of the content within this feed is strictly prohibited. If you are reading this content elsewhere, please send an email to contact@yourway.net to let us know. Thanks.
March 16, 2013
Weekend Reading: March 16, 2013


source: mandiehman on Instagram
Last weekend my sister and I flew down to Florida to help my parents unpack their new home, and we were able to sneak in a day at the beach as well. Although it was hard being away from my girls and my hubby (and harder still dealing with morning sickness while traveling), it was fun to have some time with my family without the little ones stealing the show.
Of course, I’m still playing catch up on work, laundry and sleep, but it was worth it!
Have you subscribed to our new weekly newsletter? Be sure to subscribe to stay up-to-date on the latest happenings and posts plus special tips and recipes you won’t find anywhere else!
Here are some of my favorite posts from this week. As always, check out what I’m reading to see the other posts that make me stop and think. You’ll find new posts all week long!
Family {Giving Up On Perfect}
15 Things You Can Do Each Morning to Make Your Day More Successful | Money Saving Mom
The Myth of the Perfect Day | Finding Joy
Debunking the Myth of Consistency | Steady Mom
Food {Homemade is Better}
Homemade English Muffins | The Finer Things in Life
Homemade Peanut Butter Cups (No Refined Sugars!) | Red and Honey
Honey Wheat Sandwich Bread: Tackling the Lunchbox | Simple Bites
Green {Natural & Beautiful}
How I Keep My (Natural) Beauty Routine Sane | Simple Mom
DIY All-Natural Egg Dyes | Live Renewed
Have a great weekend!
Mandi Ehman is the founder and publisher behind Life Your Way and the co-author of All in Good Time, as well as a wife and the homeschooling mom to four beautiful girls. She lives with her family on a little slice of heaven in wild, wonderful West Virginia and loves coffee, chocolate, easy meals, beautiful things and minimalist spaces.
Weekend Reading: March 16, 2013 is a post from Life Your Way
© 2010-2013 Purple Martin Press, LLC | All rights reserved - This feed is provided for the convenience of Life Your Way subscribers. Any reproduction of the content within this feed is strictly prohibited. If you are reading this content elsewhere, please send an email to contact@yourway.net to let us know. Thanks.


March 15, 2013
Parent Controls for Young Kids on iPad and iPhone

The following post is from Lauren Rothlisberger of Get Me Geeky :

source: Lauren
If you are one of those parents that lets your kids use your iPhone or iPad (I am), I am sure you have run into one of these problems:
1. Photomania
One of your kids goes into the Camera app and proceeds to take about 800 pictures of their thumb, the floor, or their sibling’s eyeball. Not only is this maddening because it takes up space, it takes forever to delete them all. They are also known for taking the most flattering (not) pictures of their parents.
2. Dis-APP-earing
Have you ever grabbed your iPhone to check something on an app. Then it happens, you start looking, then looking, your flipping through the pages trying to find that one app.
The app that can solve all your problems right now. And you realize your sweet child managed to delete that app with their grubby little fingers. Now not all is lost, you can re-download that app free of charge, but what a pain!
3. Mortgage Payment Spent on In-App Purchases
If you haven’t had this unfortunate experience yet, it is probably just a matter of time. App developers are always trying to find clever little ways to make a little extra money. Kids have no idea that buying more jewels, or buying the next level in their game is going to cost you.
I have great news. Hidden in the mysterious Apple settings are the solutions to all your problems!
Note: This requires an iPad2 or higher.
1. Control Photomania with Child Lock (aka) Guided Access
To turn on Guided Access follow these steps:
Go to “Settings”
Go to “General”
Scroll down, choose “Accessibility”
Scroll down, Under “Learning” chose “Guided Access”
Turn it on and set your Passcode
Visual learners, watch this video:
How does this help you?
Next time your child has your iPhone/iPad get them in the App you want them in, then triple-click the “home” button. Press the “start” in the upper right-hand corner to start Guided Access. Once you start it your child can not leave without the passcode you set up. Triple-click to end the Access.
2. Restrict Deleting Apps
Guided Access helps a lot with the deleting App issue. But in case you are not really into the Guided Access idea, Apple also gave you an option to prevent your Apps from being deleted:
Go to “Settings”
Go to “General”
Go to “Restrictions”
Choose “Enable Restrictions”
You will set a Passcode
You will see a list of items you can restrict. If the restriction is “OFF” that item will disappear from your phone. So, if Safari is restricted you will no longer see the icon.
To restrict deleting your apps, scroll to “Deleting Apps” and turn it “OFF”
Be sure to adjust your other restrictions.
Visual learners, watch this video:
How does this help you?
When your child manages to get your iPhone or iPad in edit mode, those little Xs with circles that delete the app will no longer be available.
3. Prevent In-App Purchase
It is the simple switch of a button to prevent In-App purchases:
Go to “Settings”
Go to “General”
Go to “Restrictions”
Choose “Enable Restrictions” (if you haven’t already)
You will set a Passcode
Scroll down to “In-App Purchases” turn it “OFF”
Visual learners, watch this video:
How does this help you?
Bottomline, you are saving money. There are horror stories out there about kids racking up hundreds to thousands of dollars of in-app purchases. Probably best to just turn off the option.
That’s it! I hope these three tips help save you money and frustration.
What parental controls do you have on your tech devices?

Lauren Rothlisberger blogs and consults over at Get Me Geeky. As a military wife and mom of three girls five years old and under, she loves focusing on technology and productivity and finding new ways to simplify her life. She recently started putting together MacMinis, which are easy to follow videos for Mac users, and also wrote an ebook, Evernote for Moms.
Parent Controls for Young Kids on iPad and iPhone is a post from Life Your Way
© 2010-2013 Purple Martin Press, LLC | All rights reserved - This feed is provided for the convenience of Tech Your Way subscribers. Any reproduction of the content within this feed is strictly prohibited. If you are reading this content elsewhere, please send an email to contact@yourway.net to let us know. Thanks.
On Pregnancy After Miscarriage, Hope In Spite of Fear


source: mandiehman on Instagram
After I miscarried in October, I found myself locked in a tug-of-war with myself: We have four beautiful daughters. Our youngest is (finally!) out of diapers and sleeping through the night. Life is good. Do we really want to try for another baby?
But each month I would feel that familiar longing, and try we would. And each month I would feel a little heartbroken over the negative test that followed.
It got a little harder to see other people’s pregnancy and birth announcements (as much as I didn’t want it too!), and even though four months isn’t long at all in the grand scheme of things, it was long for us, and it was nervewracking.
February was no different. I had a feeling I wasn’t pregnant anyway, but I took an early pregnancy test two days before my period was due just so I could stop wondering, and this time I wasn’t surprised that it was negative. But that didn’t stop the hurt. In the midst of the Whole30 and PMS, I found myself angry and frustrated and just plain sad.
Friday came and went and my period hadn’t started. Saturday too.
By Sunday, I had the slight urge to buy another test, but my cycles aren’t extremely regular, and I was fed up with wasting money on negative tests, so I didn’t.
That afternoon I got the slightest twinge of pain in my chest. And that evening I realized that I hadn’t broken out during PMS. I always break out.
By Monday I was really starting to wonder, but my husband — just as tired of the negative tests as I was — said we should wait until Wednesday to get one. So we waited.
On Tuesday I was cataloging my symptoms — those I had and those I didn’t.
Wednesday morning saw us rushing around the house, frantically packing lunches, preparing breakfasts, brushing hair and teeth and shouting orders as we attempted to get out of the house for an early field trip…with enough time to stop for a test on the way.
We pulled into the Walmart parking lot later than we should have, and despite the fact that we were going to be late for the field trip, I couldn’t bring myself not to stop. I needed answers at that point.
I picked out a test, grabbed a Cherry Pepsi for my husband and headed straight for the bathroom stalls. Thankfully, our Walmart’s bathrooms are pretty clean, especially in the early morning on a weekday.
As I unwrapped the test from its wrapper, my hands began to shake. And not just a slight tremble, but violently shake. I hadn’t realized I had so much hope riding on the test until that moment.
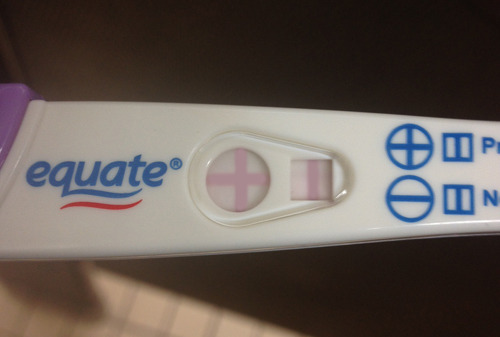
source: Mandi Ehman
I peed on the stick and sat and watched as the plus sign appeared. Immediately I broke out in a smile — just me, myself and I in the bathroom stall, staring at that positive test.
I snapped a picture (yes, I am that person), gathered my stuff and steeled my face into a stoic expression so that I could walk back through the store and to the parking lot without the goofy grin on my face.
As I walked toward the car, I could see my husband’s eyes searching my face, and I couldn’t hold it in any longer. I burst into a smile, and when I got in the car, we began whispering to each other in the front seat. We don’t keep our pregnancies a secret from our girls, but telling them 15 minutes before we arrived at a field trip with dozens of our friends didn’t seem like a great idea, unless I wanted everyone to know the moment we arrived.
On the remainder of our drive, I texted the picture to my mom and sister and a couple close friends and soaked up their excitement for us. Later that afternoon, after the fun of the field trip and enough time for the news to sink in, we split a cheesecake brownie from Starbucks between the girls and told them the news.
Our three-year-old’s reaction? “I don’t WIKE babies!”
But the other girls chattered excitedly, wanting to know when the baby would arrive (after everybody’s next birthday!), when we would know whether this baby would stay with us or go to heaven, when we’d know if it was a boy or a girl.
We made the decision not to keep this pregnancy a secret (as tempting as that is, especially following a miscarriage), and after we told our family, we shared the news with our friends on Facebook. A few days later I was ready to share it more publicly — on Instagram and on the blog.
And then begins that horrible wait — the four weeks of hoping and praying and wondering and worrying as we countdown the days to the eight-week mark. While anything can happen at any point in a pregnancy, my losses have all been during that six to eight week window, and so our focus is just getting through the waiting to that point where we can breathe slightly easier.
The wait hasn’t been easy, and I’ve found myself keeping track of my symptoms with a hyper-vigilance that is probably not healthy — pressing my arms against my chest to be sure it still aches, worrying during the moments when I don’t feel nauseous, surprised at the appearance of a few pimples that I didn’t expect to show themselves until after the baby is born.
I want to let go and trust, to believe that this baby will live and daydream about holding him or her in just 8 months. I want to have faith that God will protect its life. But I also want to protect my heart, to be realistic and be prepared if — God forbid — we miscarry once again.
Today I’m 7 weeks pregnant. I can’t say for sure what the next week will bring, although my hope is that it’s more nausea and exhaustion. If you think of us during this time, I covet your prayers, not just that our baby will continue to develop properly but that my heart will be prepared for whatever comes.
Thank you.
Mandi Ehman is the founder and publisher behind Life Your Way and the co-author of All in Good Time, as well as a wife and the homeschooling mom to four beautiful girls. She lives with her family on a little slice of heaven in wild, wonderful West Virginia and loves coffee, chocolate, easy meals, beautiful things and minimalist spaces.
On Pregnancy After Miscarriage, Hope In Spite of Fear is a post from Life Your Way
© 2010-2013 Purple Martin Press, LLC | All rights reserved - This feed is provided for the convenience of Family Your Way subscribers. Any reproduction of the content within this feed is strictly prohibited. If you are reading this content elsewhere, please send an email to contact@yourway.net to let us know. Thanks.