
Heidi Boyd's Blog, page 3
November 1, 2010
Hometown Halloween
Our town shines especially bright at Halloween. Creativity abounds as families and friends make costumes to parade down Maine Street. Our daughter Celia loved finding her school friends and teachers in the crowd. Next year Jon and I have vowed to create costumes of our own.

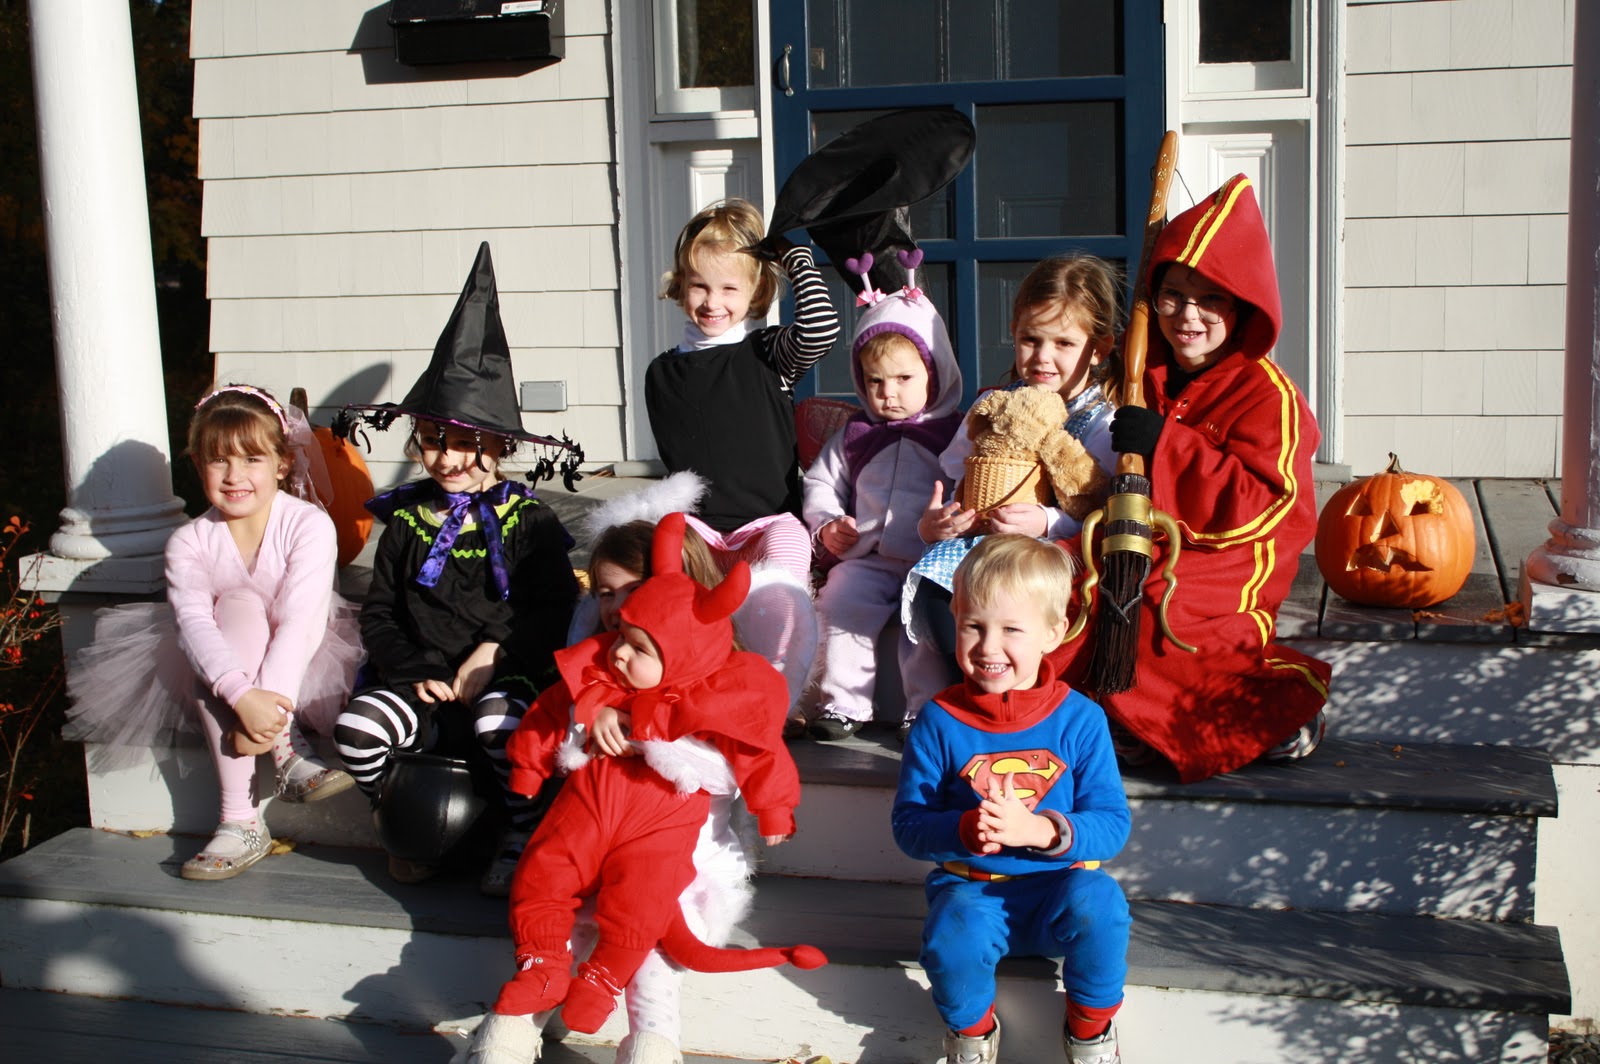
Here's a shot of our pre parade party group, our little ballerina is on the left wearing her Sheabella tutu. When the junior high band walks by, we know it's time to make our way into town.
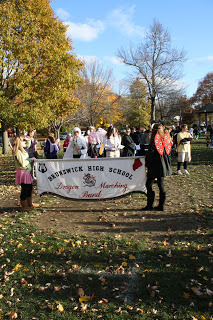
The 'mall' is our green space in the center of town. In the summertime it holds food vendors and farmers market and evening concerts in the bandstand. The junior high band leads the parade and the high school band pulls up the rear. The play a great rendition of the Adam's family theme song for this event.

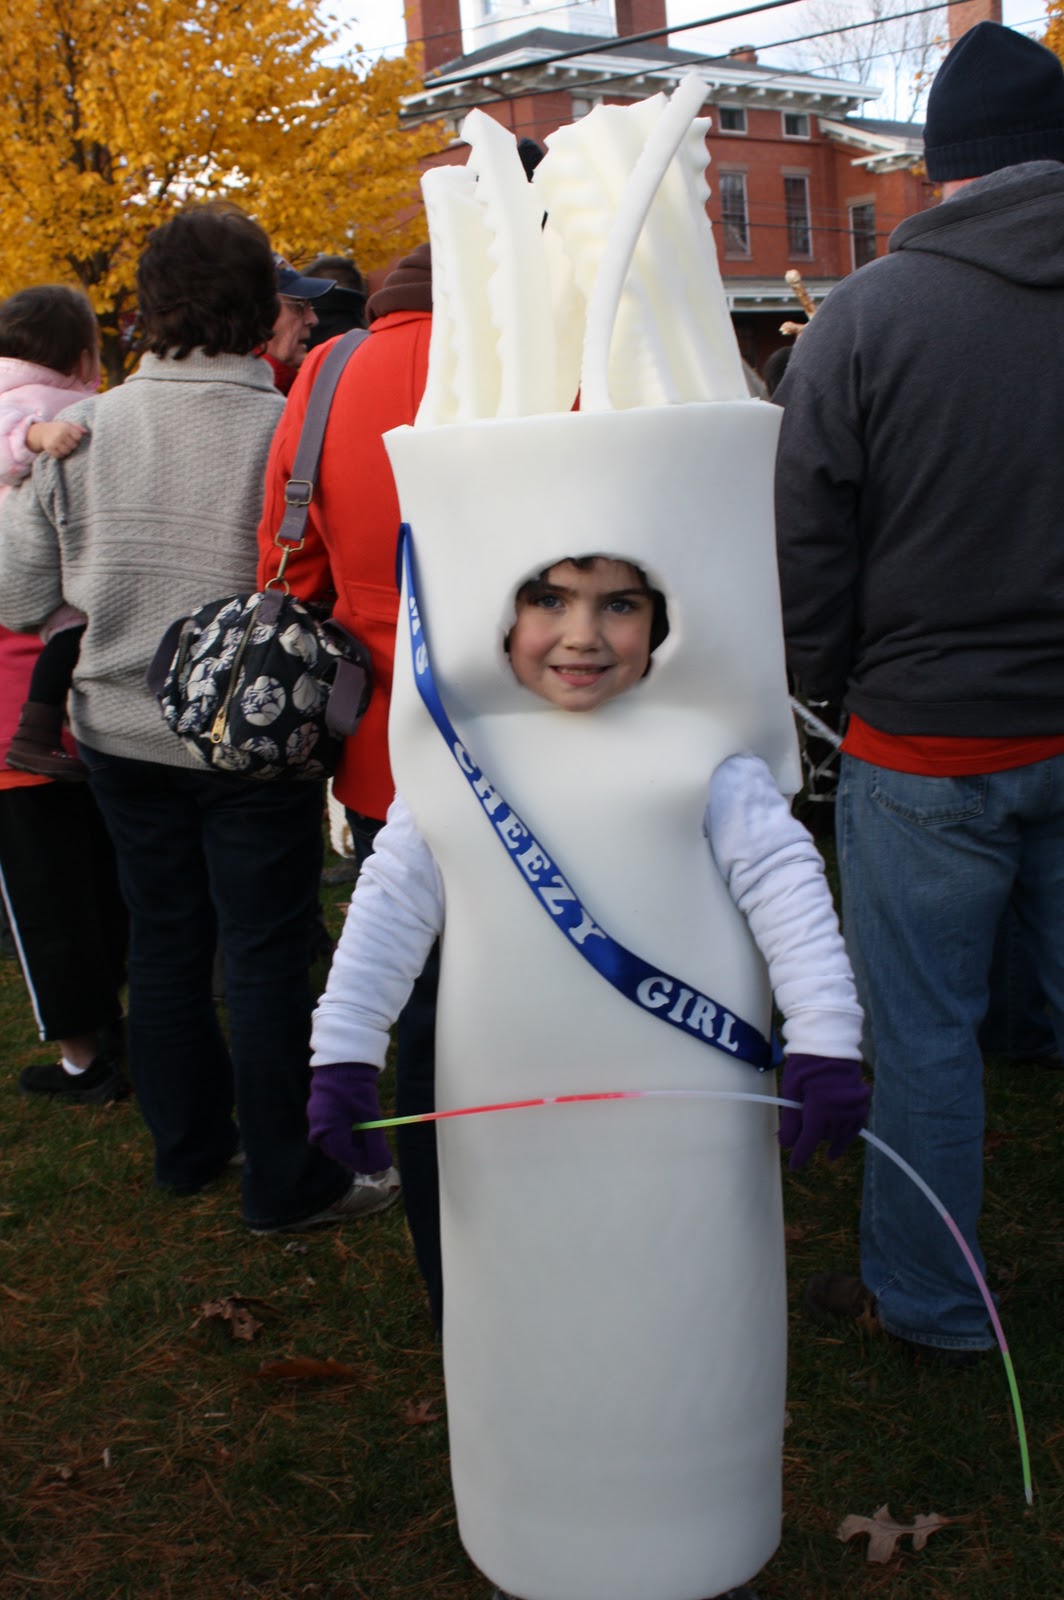
Surrounded by chocolate and candy this healthy string cheese stands out from the crowd. High school students from the key club distributed glow in the dark necklaces.
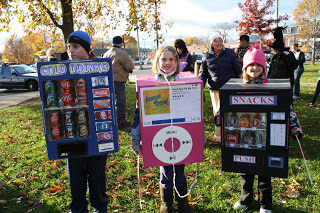
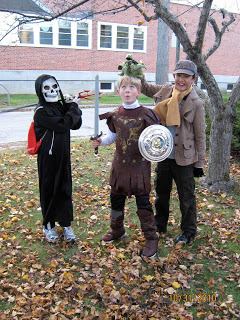
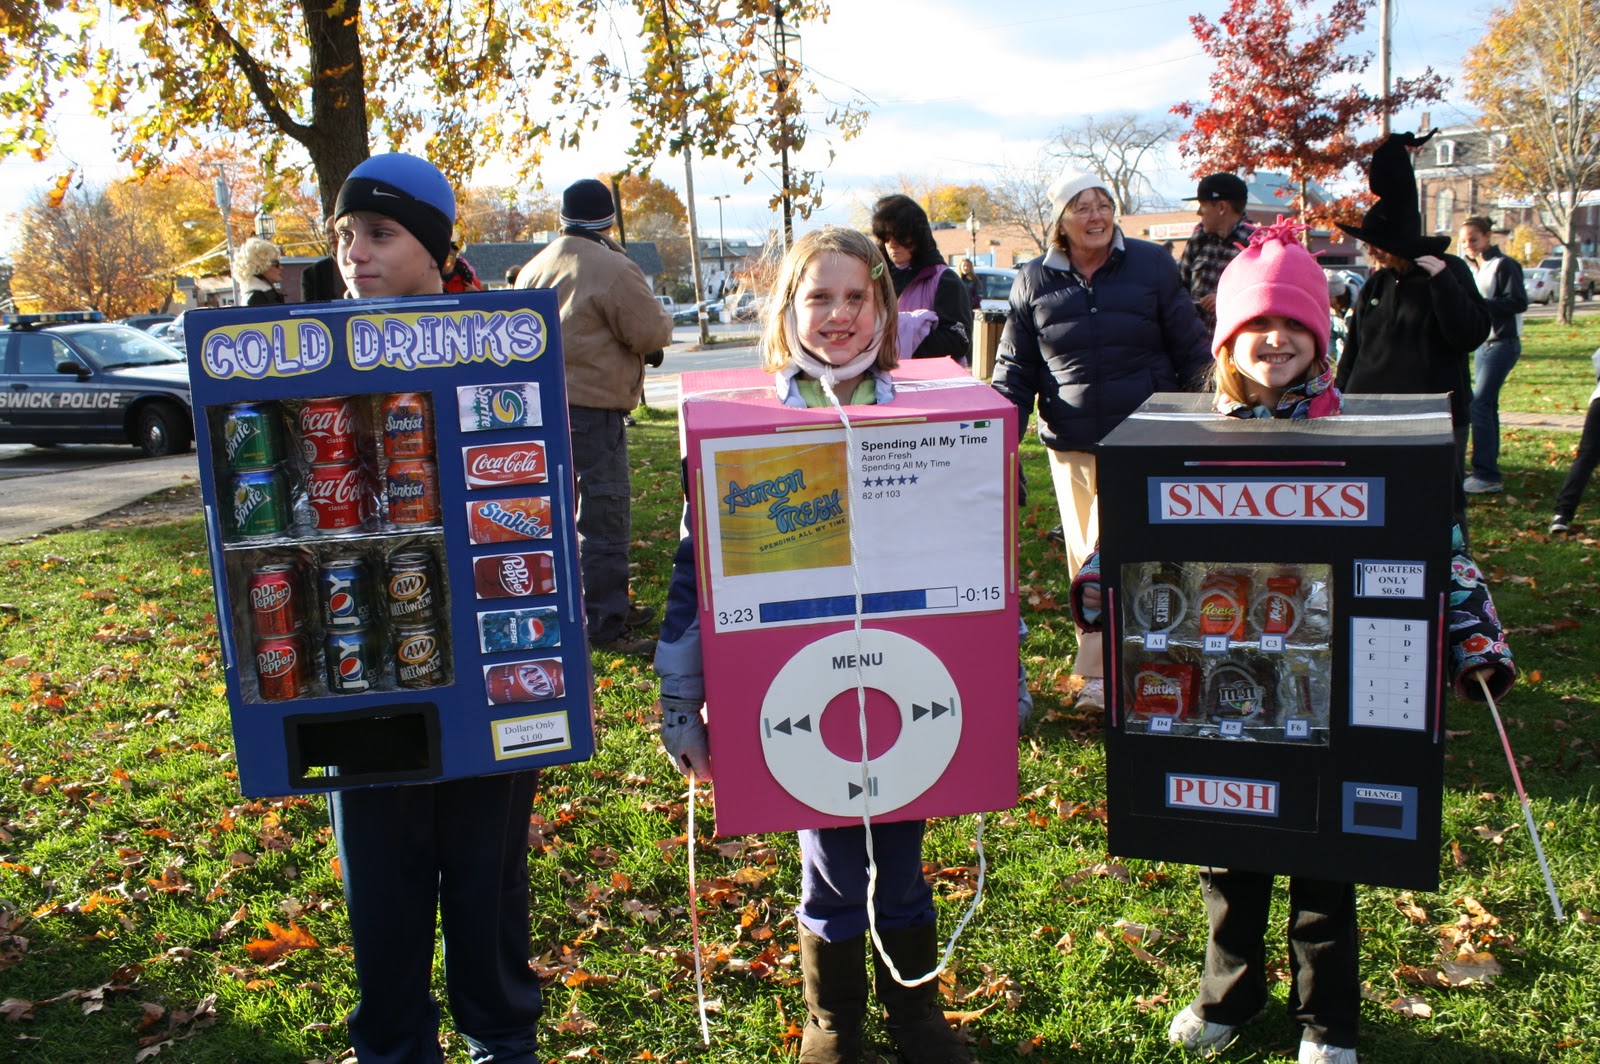
This trio displayed seriously impressive techno crafting skills!
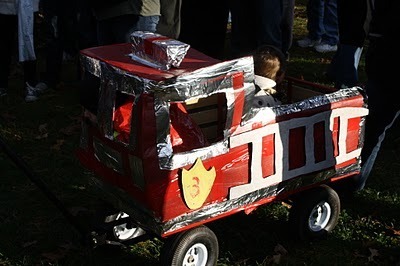
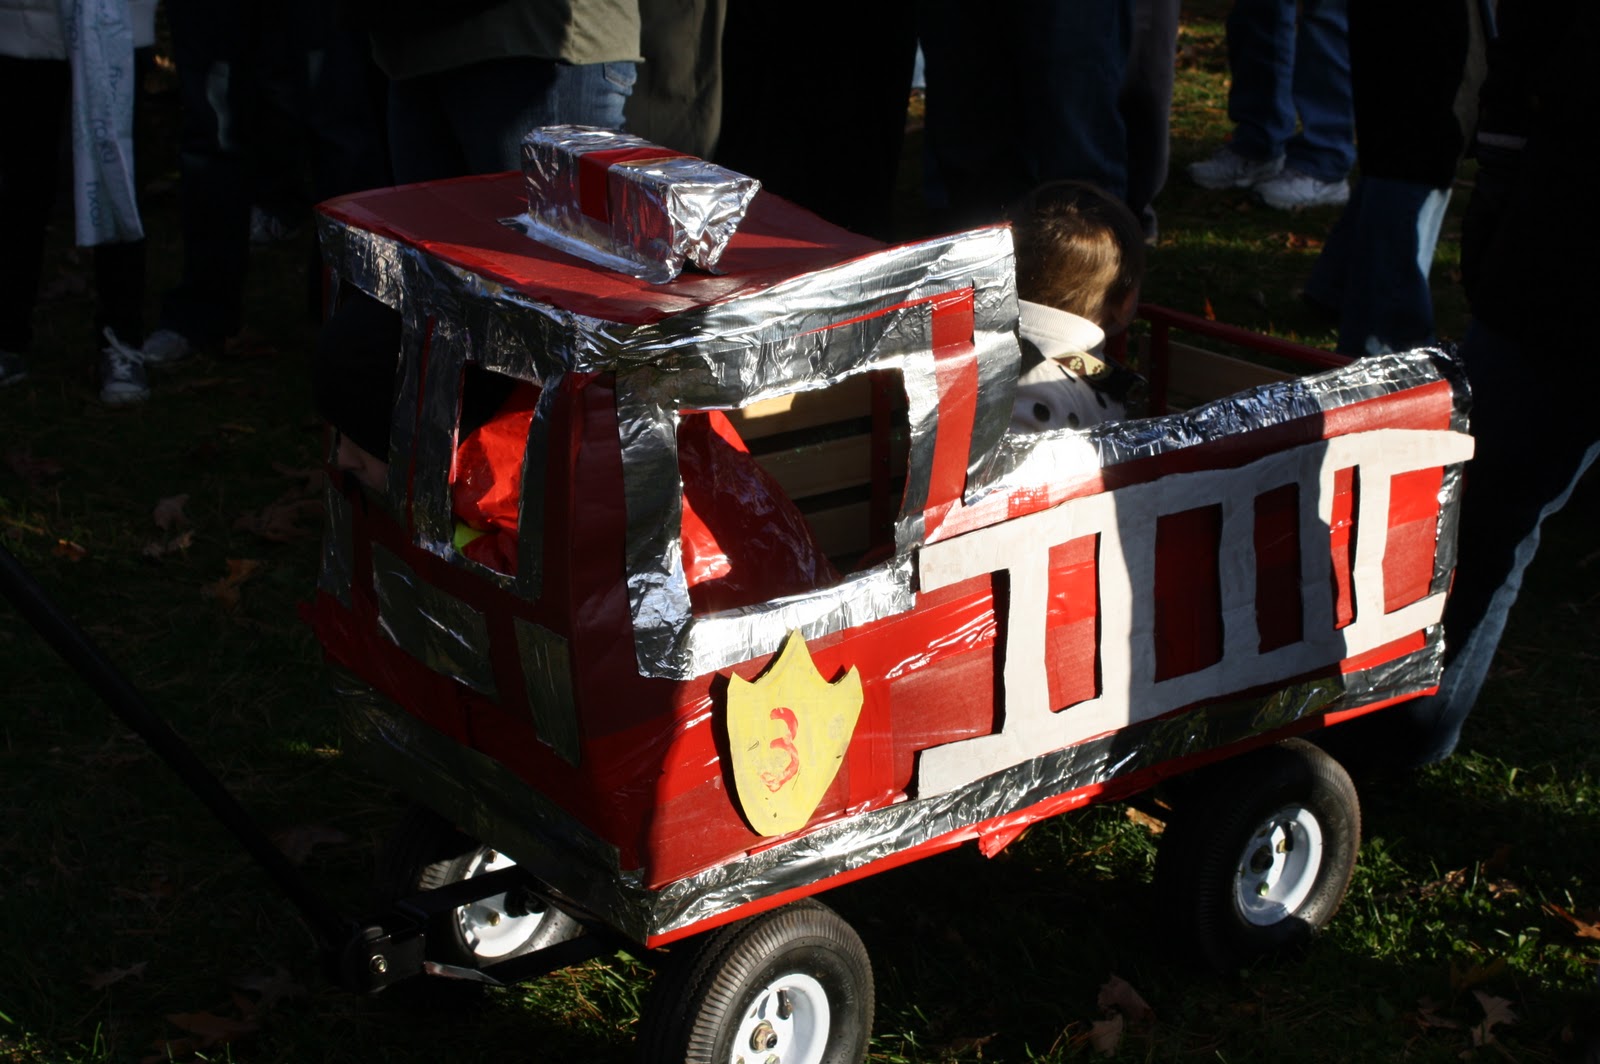
Some of my favorite creations are the stroller and wagon makeovers. Tucked inside this truck was a fireman and a dalmatian puppy.

This lovely jellyfish caught the afternoon light in it's beautiful iridescent fabric.
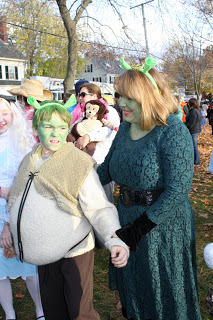
Who doesn't love Shrek? The teal dress is perfect.
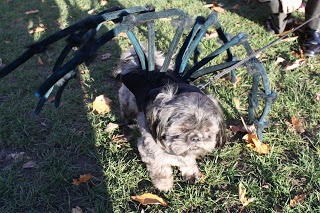
You had to see this pup in motion the spider legs were the perfect length for his body and jiggled with every movement.
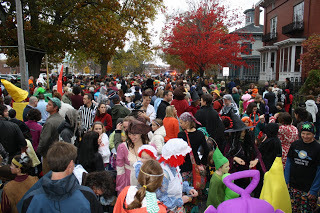
Jon calls this the money shot, the throng of parade goers getting into formation. It gives a glimpse of the tail end of our fall colors and the historic New England architecture. The police are busy blocking off traffic, once they give the all clear the junior high band starts the procession. This year many onlookers brought candy into town to fill the kids treat bags.
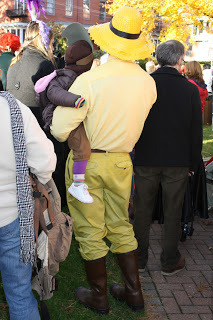
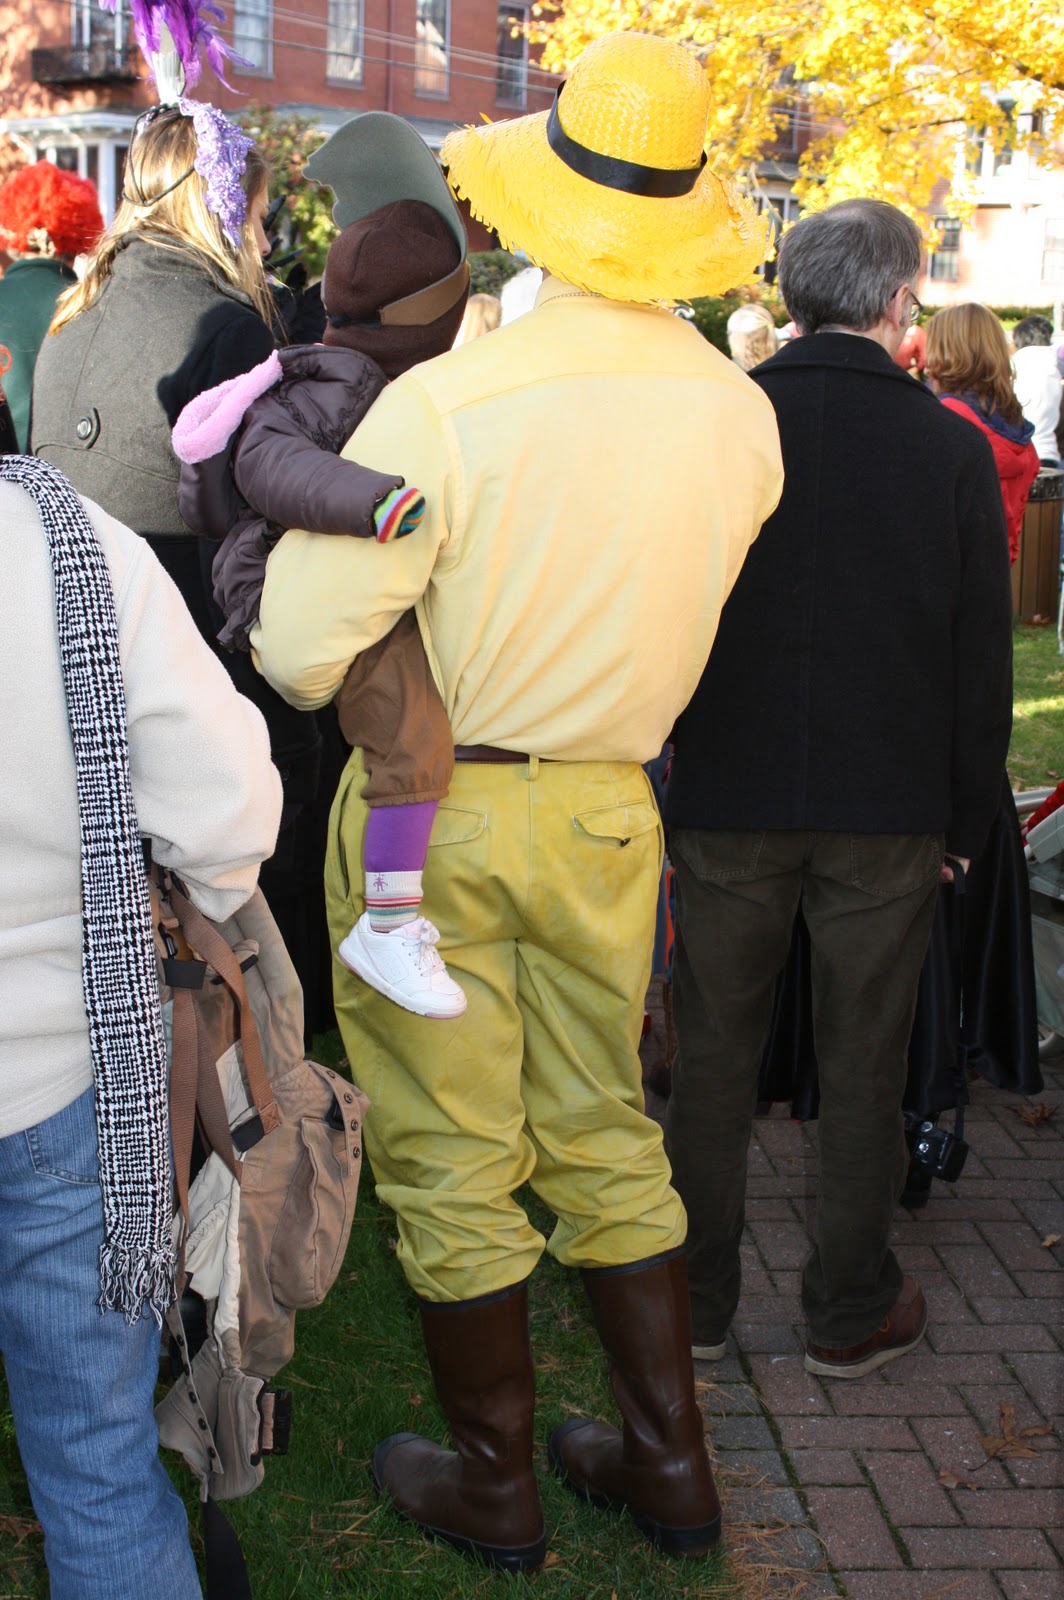
We spotted several men with Yellow hats carrying monkey's in the crowd.
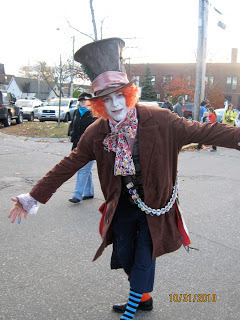
This may just be a professionally made costume, love the Mad Hatter!

Love the brilliance of Anna's simple costume!
The parade ends at our rec department, a final chance to see friends you might have missed along the parade route. They host a fabulous costume party and give out treat bags. We always dash home to grab a quick bite to eat and then go door to door trick or treating around town.
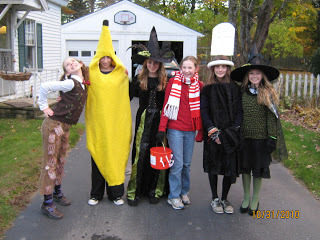
After marching in the parade this great bunch of girls are heading out on a candy quest. Check out little miss smarty pants on the left!
Here's a shot of our pre parade party group, our little ballerina is on the left wearing her Sheabella tutu. When the junior high band walks by, we know it's time to make our way into town.

The 'mall' is our green space in the center of town. In the summertime it holds food vendors and farmers market and evening concerts in the bandstand. The junior high band leads the parade and the high school band pulls up the rear. The play a great rendition of the Adam's family theme song for this event.
Surrounded by chocolate and candy this healthy string cheese stands out from the crowd. High school students from the key club distributed glow in the dark necklaces.
This trio displayed seriously impressive techno crafting skills!
Some of my favorite creations are the stroller and wagon makeovers. Tucked inside this truck was a fireman and a dalmatian puppy.

This lovely jellyfish caught the afternoon light in it's beautiful iridescent fabric.

Who doesn't love Shrek? The teal dress is perfect.

You had to see this pup in motion the spider legs were the perfect length for his body and jiggled with every movement.

Jon calls this the money shot, the throng of parade goers getting into formation. It gives a glimpse of the tail end of our fall colors and the historic New England architecture. The police are busy blocking off traffic, once they give the all clear the junior high band starts the procession. This year many onlookers brought candy into town to fill the kids treat bags.
We spotted several men with Yellow hats carrying monkey's in the crowd.

This may just be a professionally made costume, love the Mad Hatter!
Love the brilliance of Anna's simple costume!

The parade ends at our rec department, a final chance to see friends you might have missed along the parade route. They host a fabulous costume party and give out treat bags. We always dash home to grab a quick bite to eat and then go door to door trick or treating around town.

After marching in the parade this great bunch of girls are heading out on a candy quest. Check out little miss smarty pants on the left!


October 24, 2010
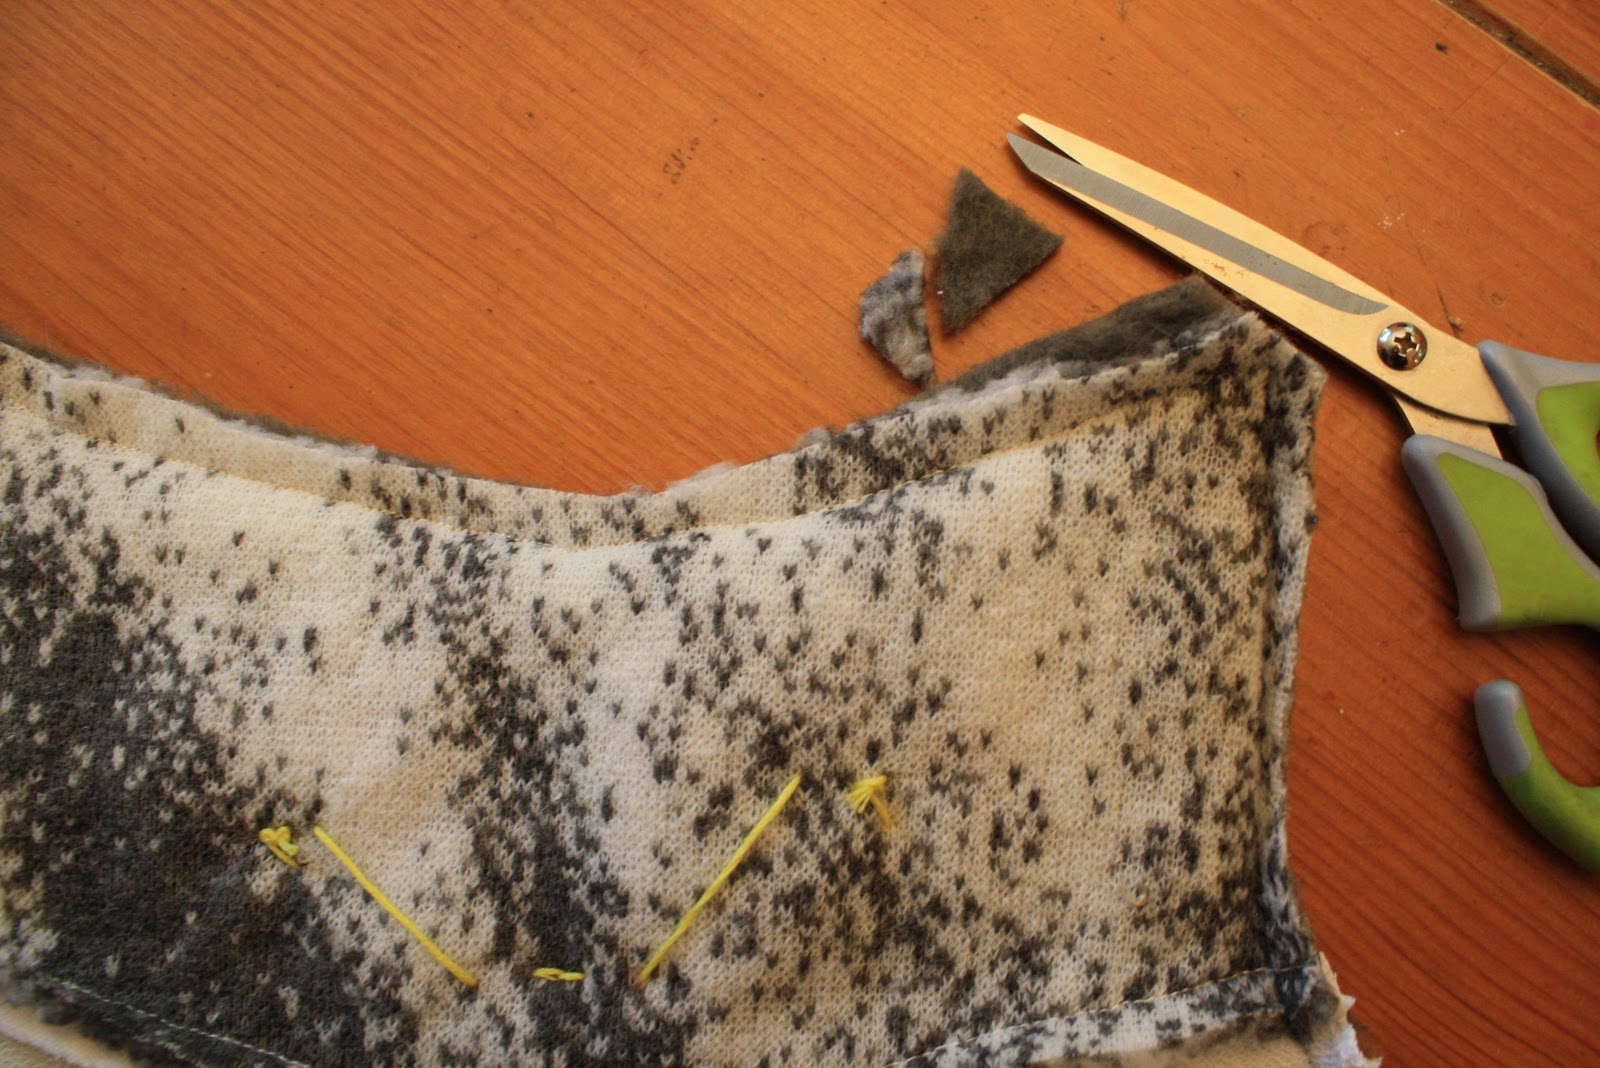
How to make your own Zombie Plushie
For the last month I've been all about creating felt and fabric for my new sewing book. I spend more time pushing the pedal of my sewing machine than I do driving my car. I'm completely immersed in the stitching zone. When it came time to plan a library event I knew I wanted to share my enthusiasm for plushies with teens and zombies were the perfect way to grab their interest.

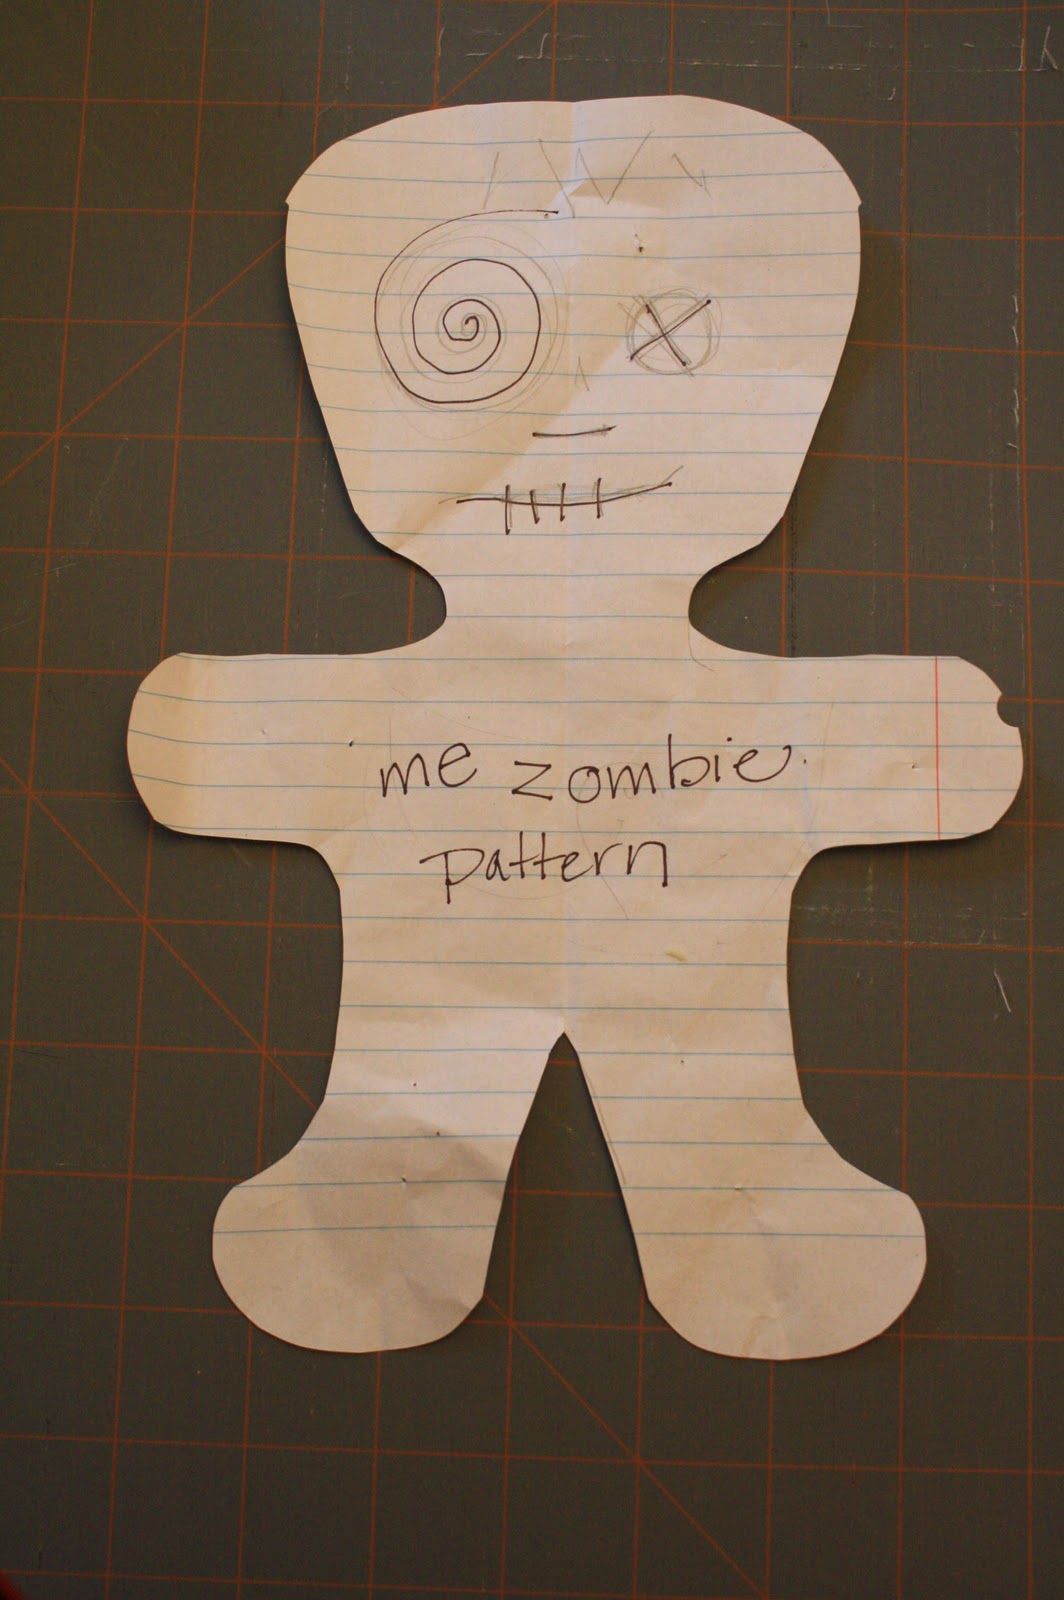
Coming up with this Zombie pattern was a snap, I folded a piece of loose leaf paper in half and then outlined a large head, short neck, arm and foot. Cut through both layers of paper and unfold, you'll have a perfectly symmetrical pattern. I use this trick whenever I design patterns.
Stack two layers of fleece over each other and then pin the pattern ontop of the layered fabric. Cut a quarter inch away from the edge of the pattern, this will be your seam allowance. You've just cut out the front and back of your zombie.

Set the pattern aside, re-pin the two fabric layers together to stabilize them while you seam around the outside edge. Leave a two inch opening on the outside of the leg.
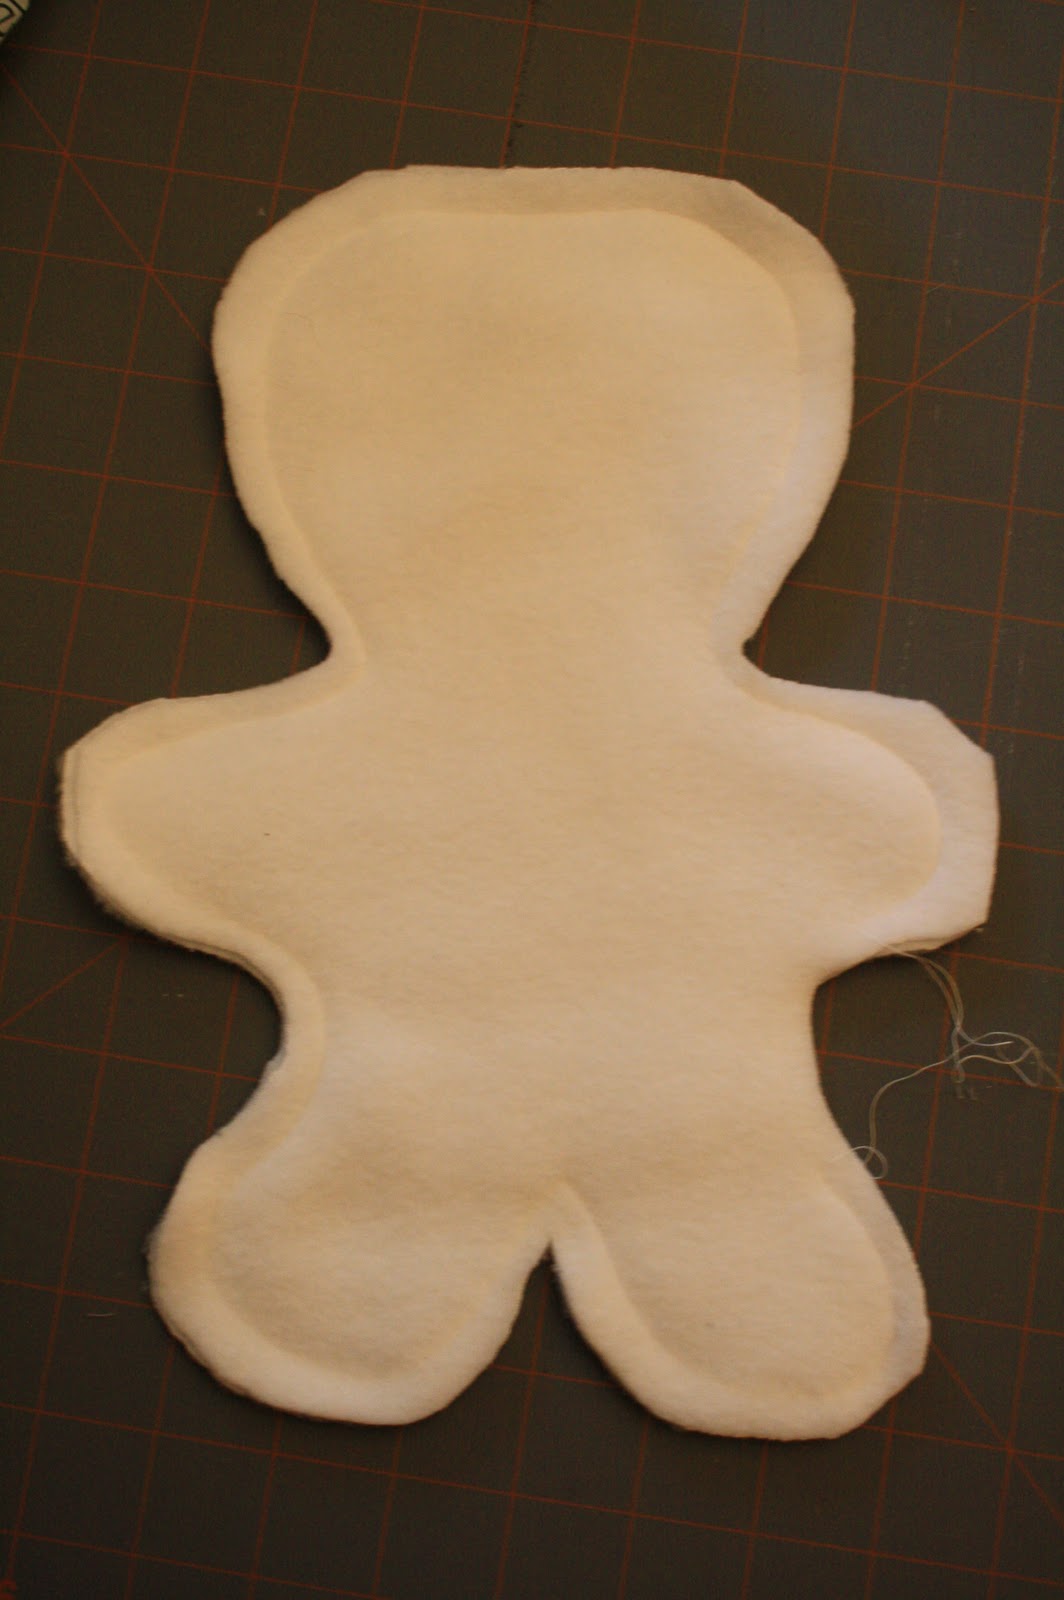
This is where all the teens started the craft, we had pre cut and pre sewn zombie bodies to this step. Trim away any excess fabric and turn your zombie right side out through the opening. Start feeding Fiberfil stuffing through the opening. It's important to tightly pack the head arms and legs and then cram more into the stomach. The fleece will expand to accommodate the stuffing and tighter fabric is easier to embroider.

I passed out sewing needles and a thread for them to hand stitch the openings closed, I was amazed not single person had trouble with this step!
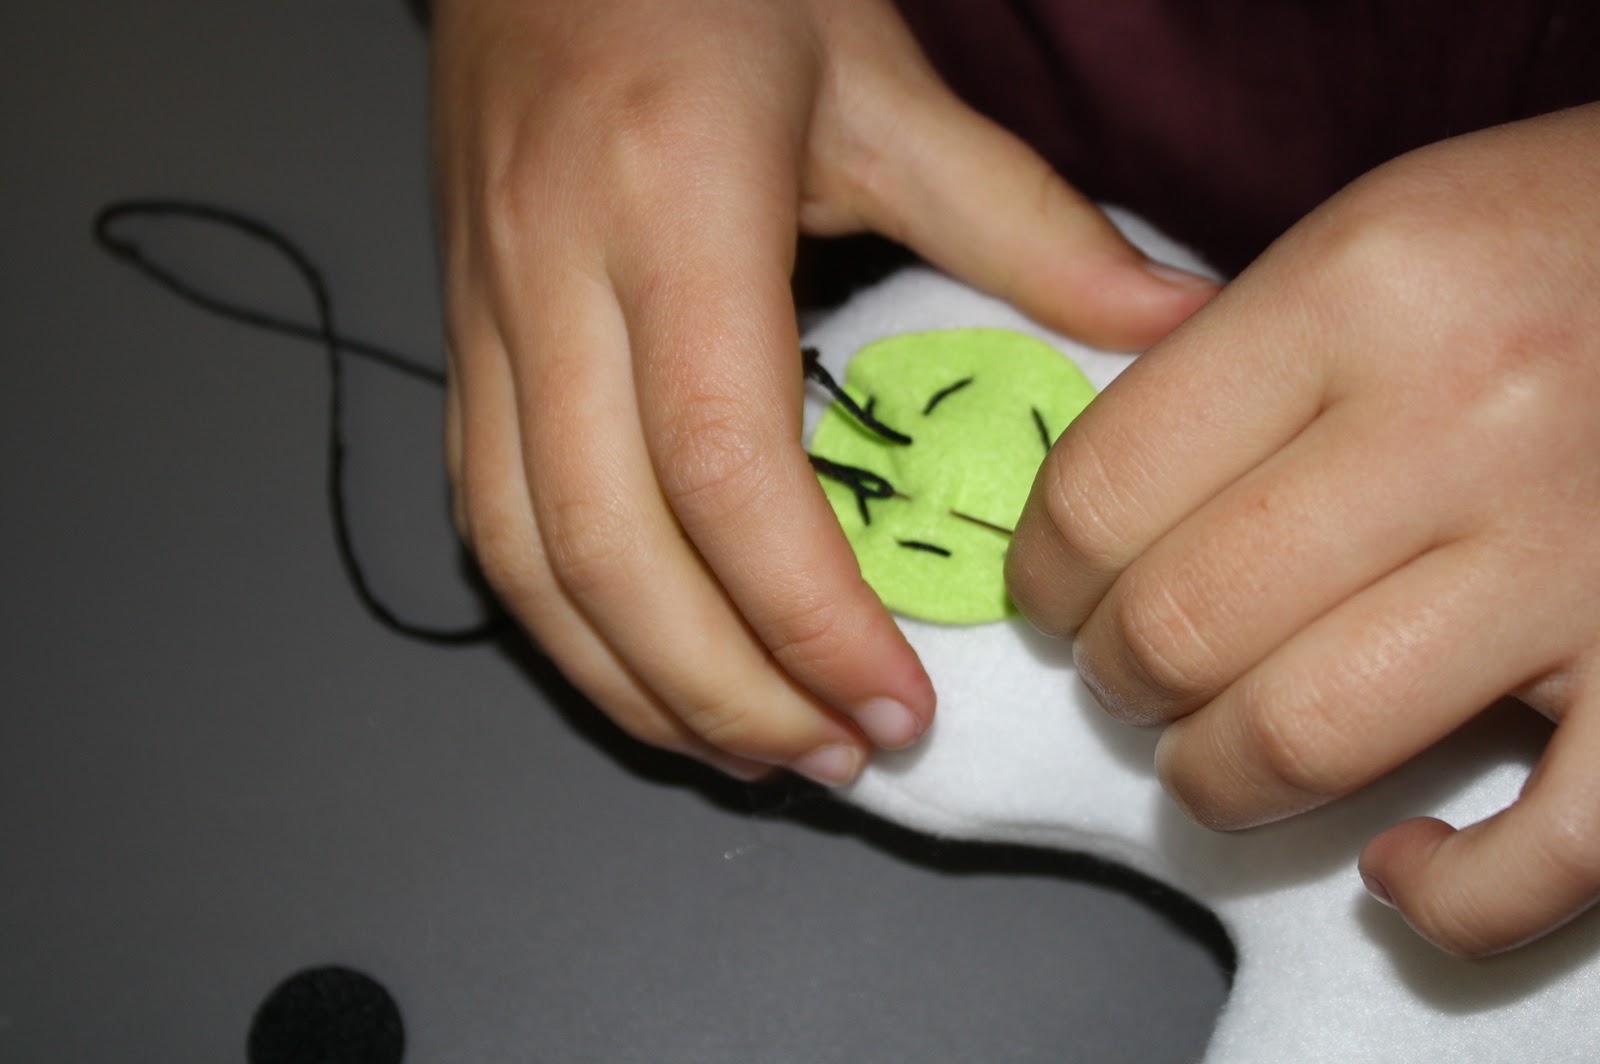
I laid out pre-cut circle eyes (thanks to my Sixxiz Big Kick and circle template) and passed out a crewel needle with a full strand of DMC embroidery floss so that they could stitch a face on their zombie.
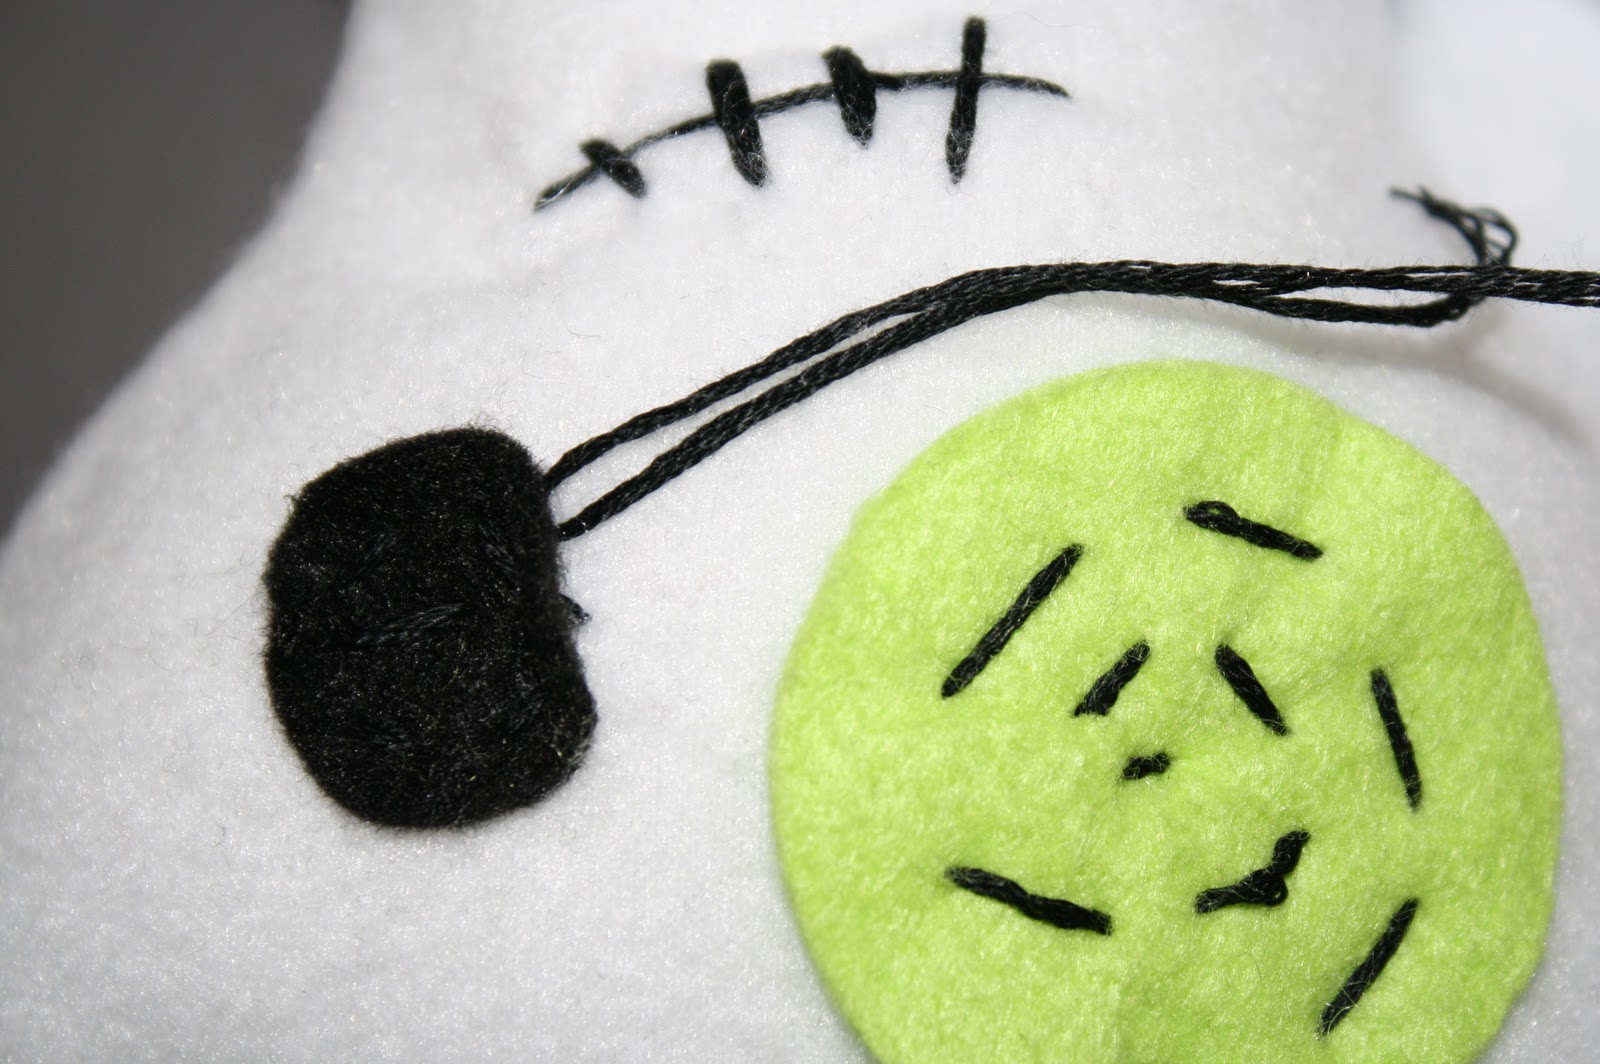
It's a good idea to pass the needle inside the head between the eyes and mouth so that you can use one continuous strand of floss. The most popular mouth design was a single horizontal stitch that gets intersected by a row of three or four vertical stitches. I taught them to tie the ends in a knot under the edges of the felt eyes.

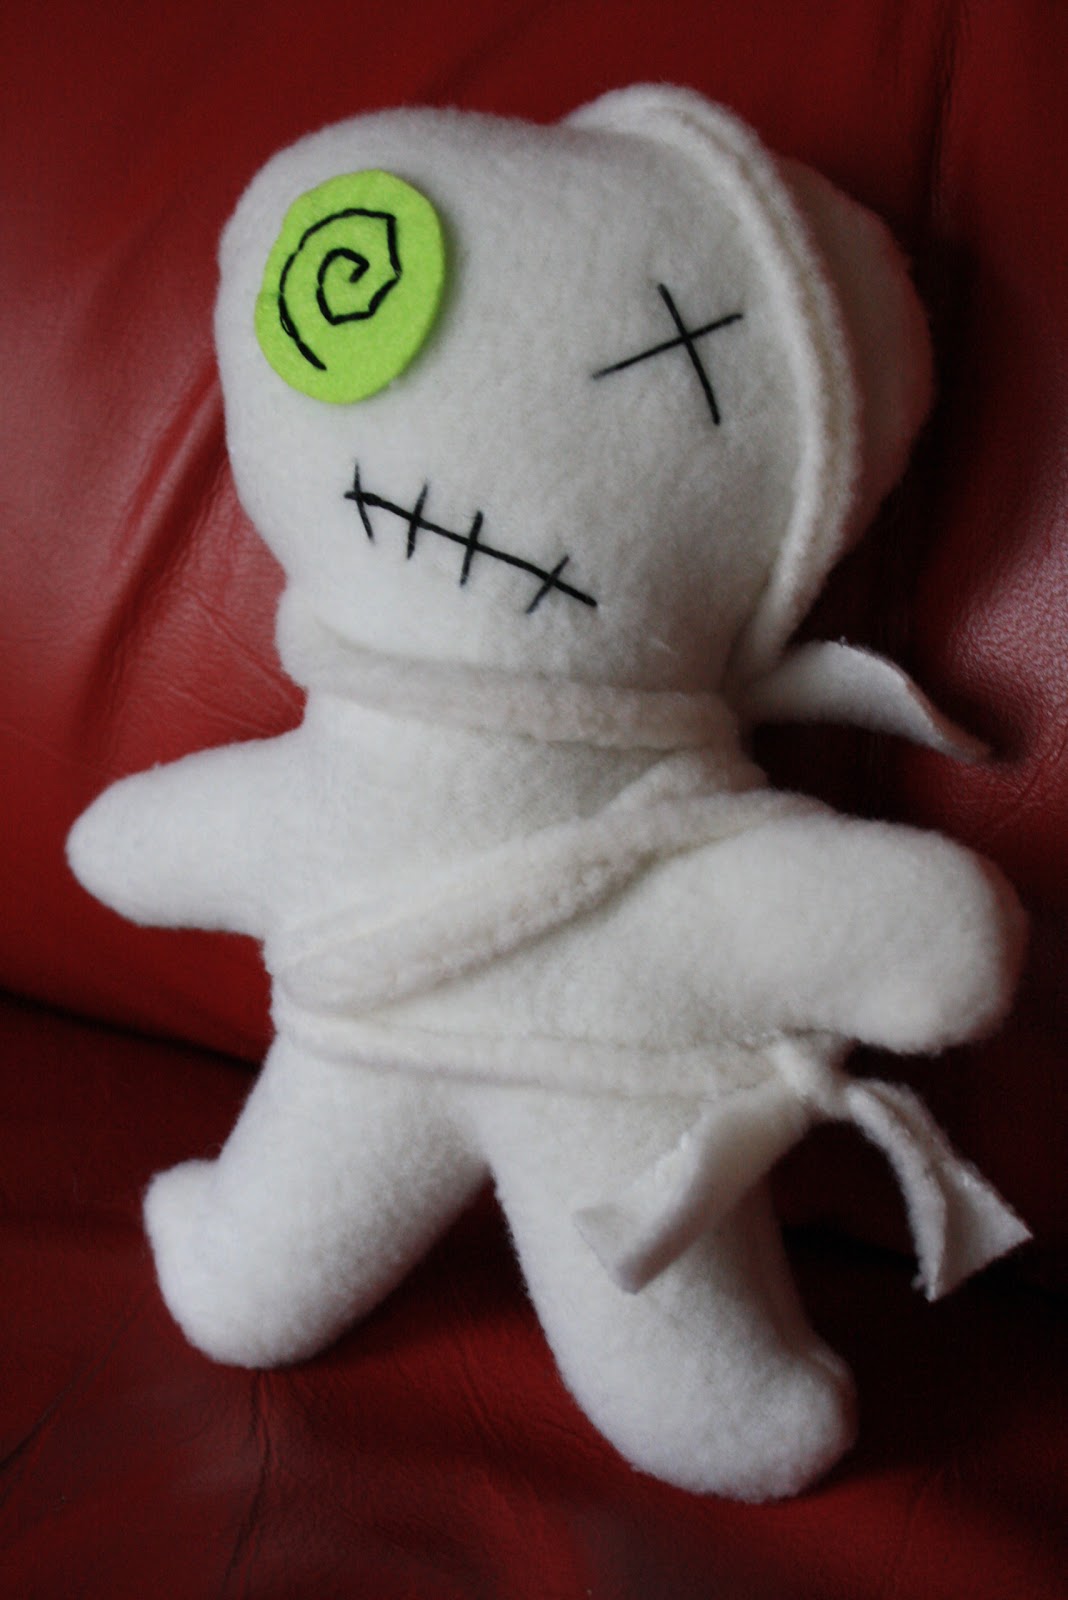
I love the creative stitching on the right eye of this zombie! I had a pile of straight fleece strips that we free for the taking, they made great bandages to wrap around the zombie. I wished I'd brought some red paint to make these creations a little more gruesome.


October 19, 2010
Hootenanny!
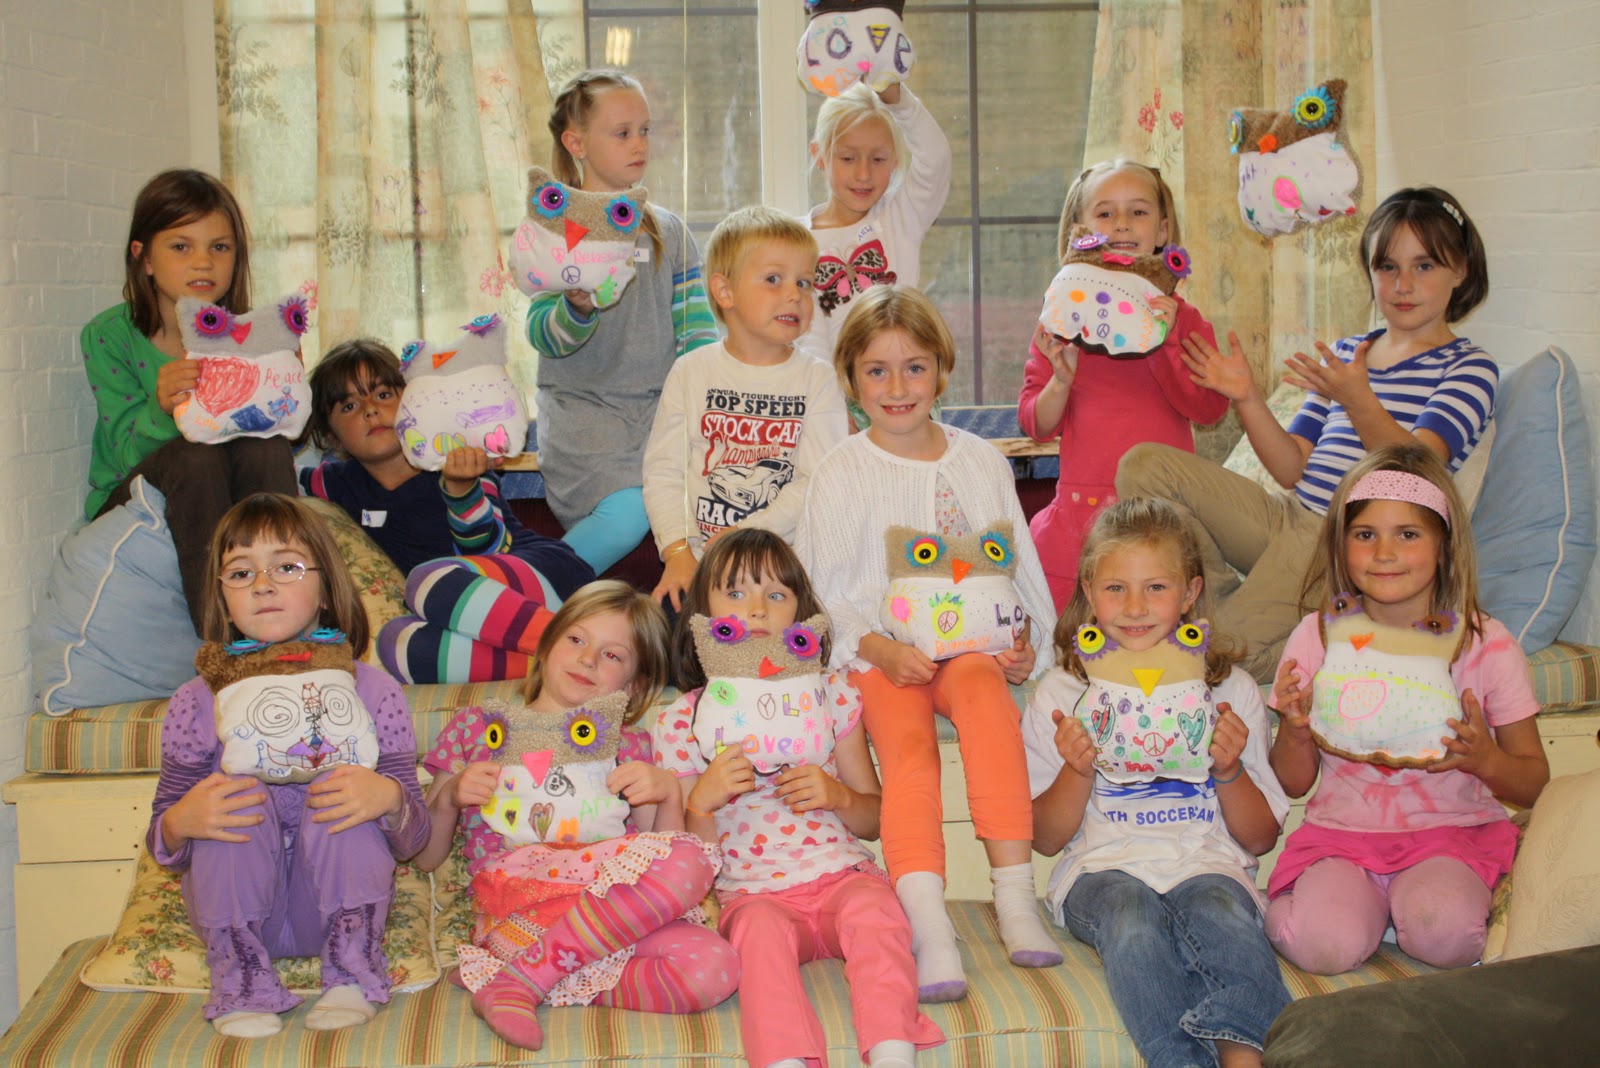
A couple weeks ago I had the privilege of putting on a birthday party for a special seven year old girl. I came up with an owl project that encouraged the party goers to color, stitch and stuff. At the end of the party each child went home with an owl softie of their very own.
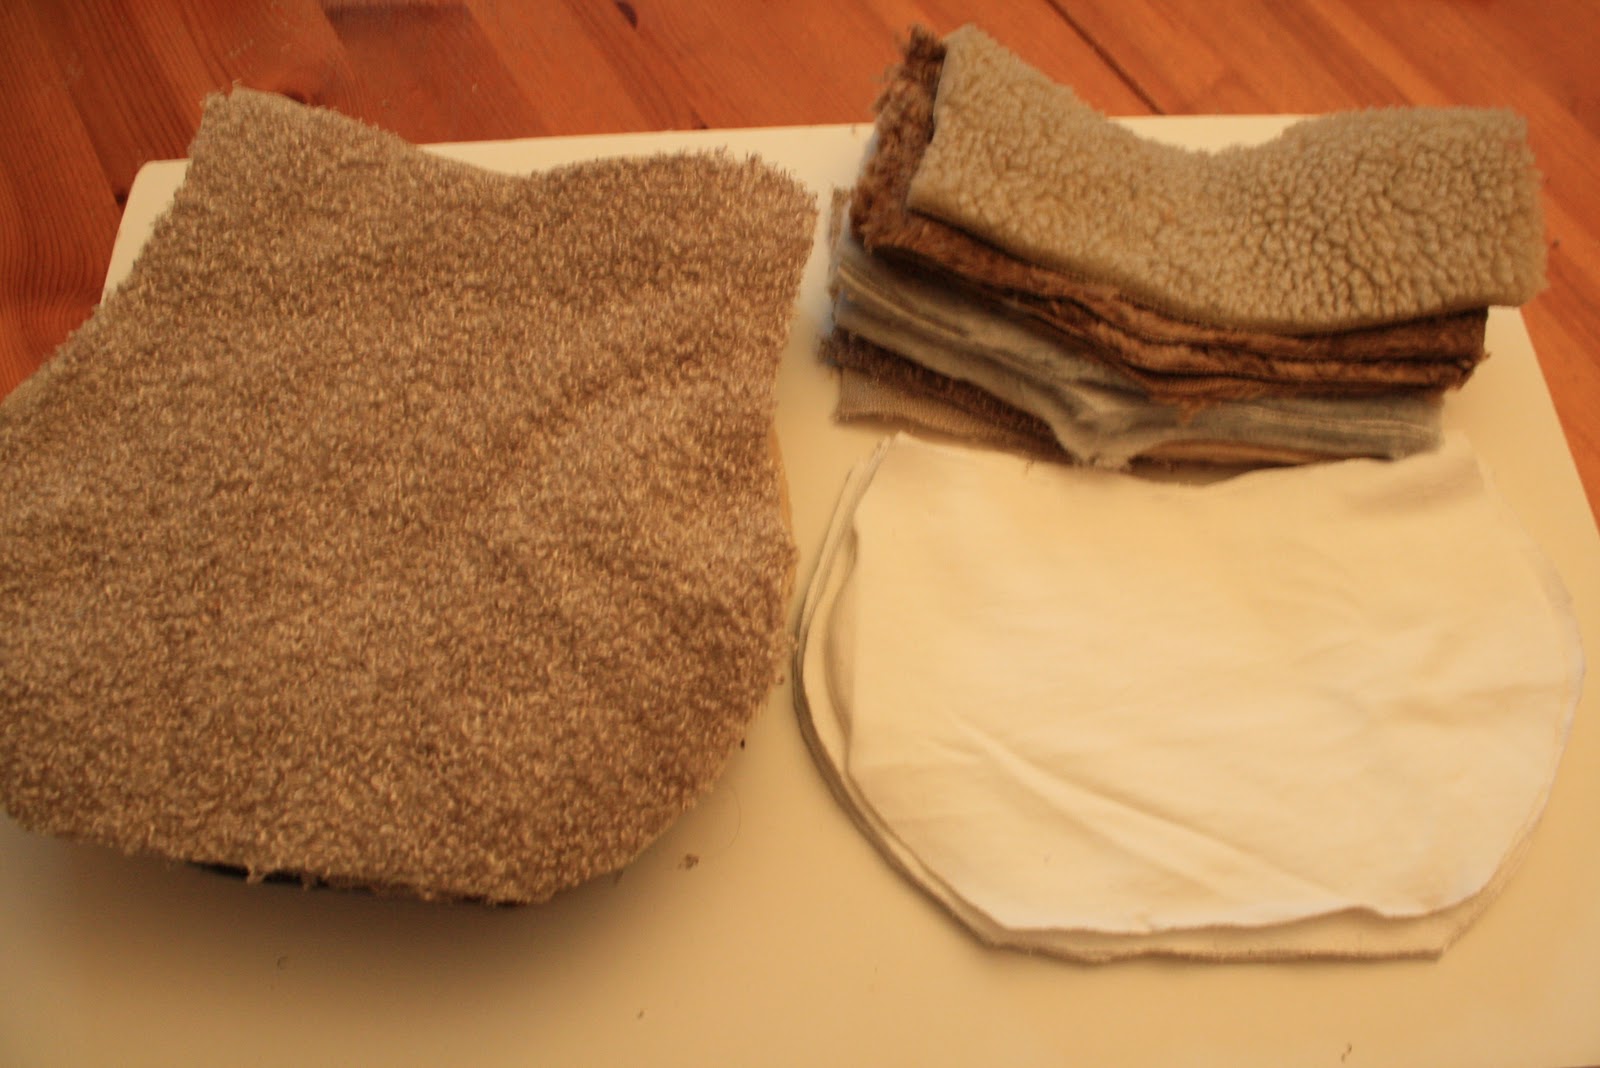
Before the party I created a simple pattern with folded newspaper. I made a top and bottom piece for the owl front and a single piece for the back. I pulled out assorted fake furs, and white cotton knit from my fabric stash. This is a great time of year to purchase fun fur, it's on clearance with Halloween novelty fabrics.

I pre-stitched the owl heads to the bodies to cut down on machine stitching at the party.

The first step was to have the children decorate the white owl bellies with fabric markers. Be sure to place a piece of scrap paper under the fabric to protect the table.
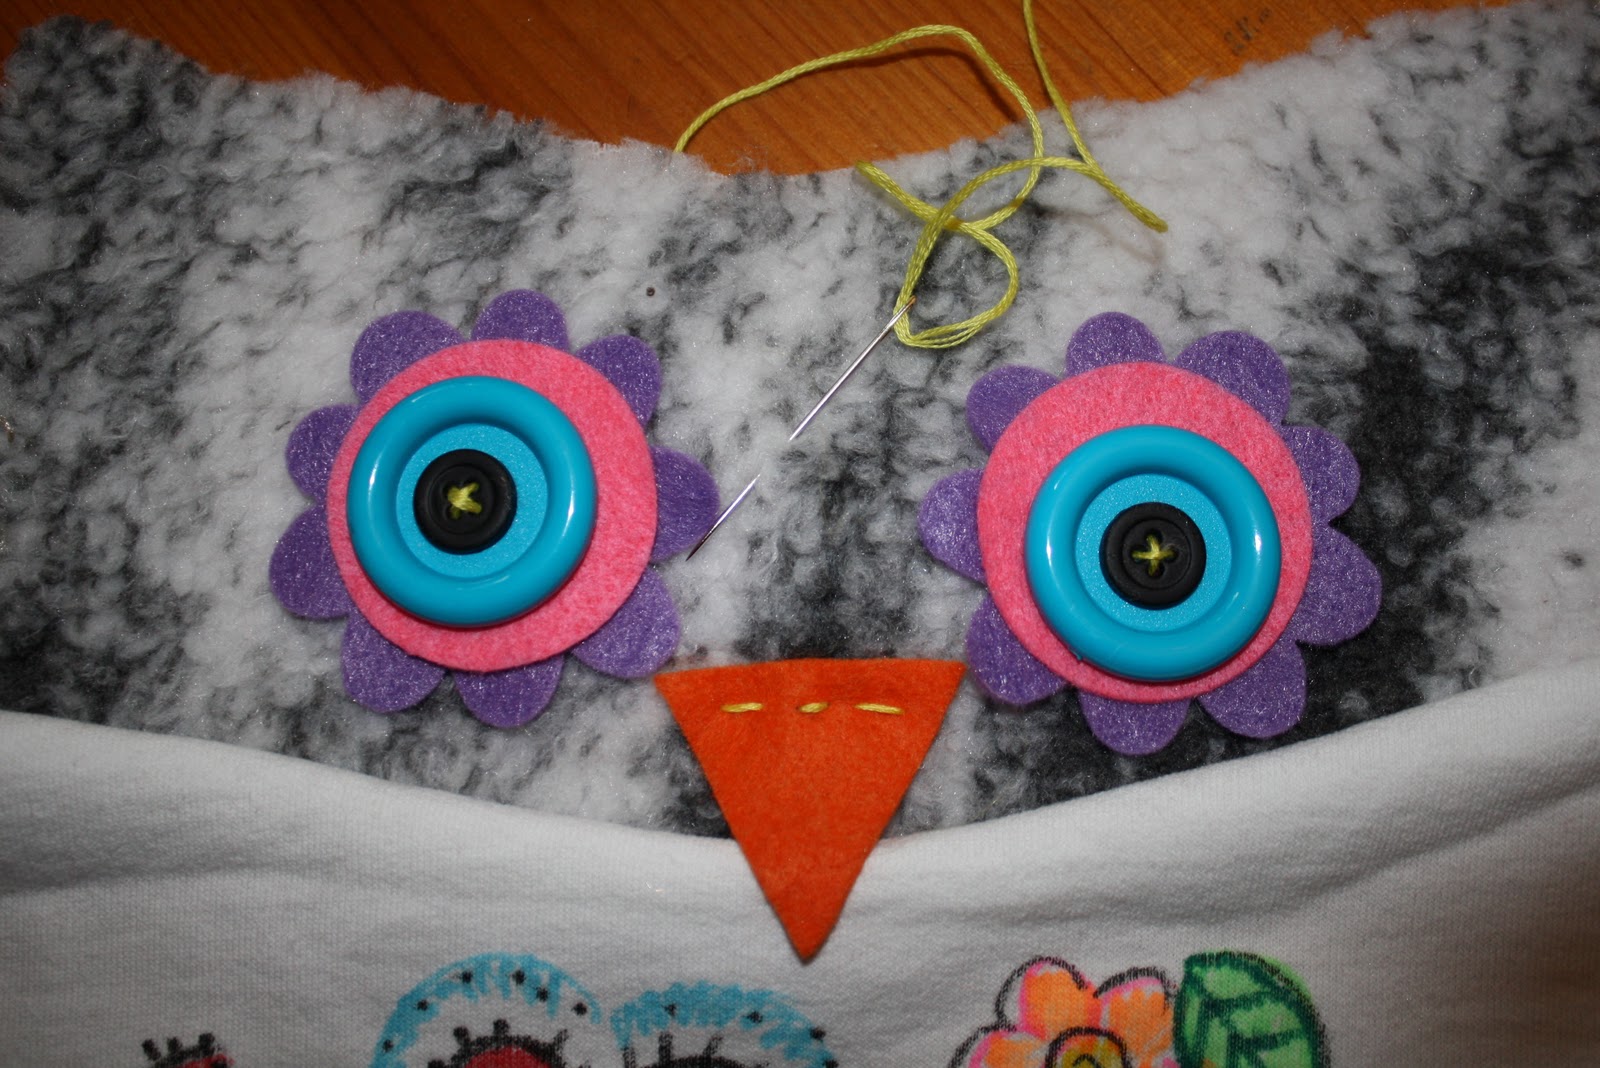
Next we outfitted each girl with a crewel needle strung with a full strand of embrodiery floss. They stitched felt flowers, circles, large button eyes, and a triangle beak to the owl's head. I encouraged them to keep the embellishments away from the sides where they might get trapped in the seams.

After a quick demo the kids pinned the fronts and backs right sides together. This is when the line began to form at the machine, fortuantely not everyone was ready at the same time. It took me a couple minutes to make a continuous seam around the outside of each owl. Many girls left their owls with me while they enjoyed snacks and cake.
I left a three inch opening at the base and snipped the excess fabric off the top of the ears. I showed them how to turn the owls right side out and sent them to stuff their owl. This is a favorite step, I've yet to meet a child who doesn't like to stuff! For time sake I needed to stitch the opening closed on the sewing machine. We found that lightly stuffed owls were much easier to get through the machine. Be sure to tuck under 1/4" of the cut fabric edges in before seaming up the opening closed.
This party took place at one of my favortite creative places Art Mind and Soul Studios in Fort Andross.
Wishing the party girl many happy returns of the day!

Birthday Party Hoots!
A couple weeks ago I had the privilege of putting on a party for a special seven year old girl. I came up with an owl project that encouraged the party goers to color, stitch and stuff. At the end of the party each child went home with an owl softie of their very own.
Before the party I created a simple pattern with folded newspaper. I made a top and bottom piece for the owl front and a single piece for the back. I pulled out assorted fake furs, and white cotton knit from my fabric stash. This is a great time of year to purchase fun fur, it's on clearance with Halloween novelty fabrics.
I pre-stitched the owl heads to the bodies to cut down on machine stitching at the party.
The first step was to have the children decorate the white owl bellies with fabric markers. Be sure to place a piece of scrap paper under the fabric to protect the table.
Next we outfitted each girl with a crewel needle strung with a full strand of embrodiery floss. They stitched felt flowers, circles, large button eyes, and a triangle beak to the owl's head. I encouraged them to keep the embellishments away from the sides where they might get trapped in the seams.
After a quick demo the kids pinned the fronts and backs right sides together. This is when the line began to form at the machine, fortuantely not everyone was ready at the same time. It took me a couple minutes to make a continuous seam around the outside of each owl. Many girls left their owls with me while they enjoyed snacks and cake.
I left a three inch opening at the base and snipped the excess fabric off the top of the ears. I showed them how to turn the owls right side out and sent them to stuff their owl. This is a favorite step, I've yet to meet a child who doesn't like to stuff! For time sake I needed to stitch the opening closed on the sewing machine. We found that lightly stuffed owls were much easier to get through the machine. Be sure to tuck under 1/4" of the cut fabric edges in before seaming up the opening closed.
This party took place at one of my favortite creative places Art Mind and Soul Studios in Fort Andross.
Wishing the party girl many happy returns of the day!
October 9, 2010
Autumnfest Craft fair
Fall is one of the loveliest times to visit New England, and this weekends weather was perfect for Autumnfest in Bath, Maine. We were overwhelmed by the fantastic response to our booth, so grateful for all the kind words and many purchases. Half of our customers were local and the other half were on vacation enjoying the peak color.
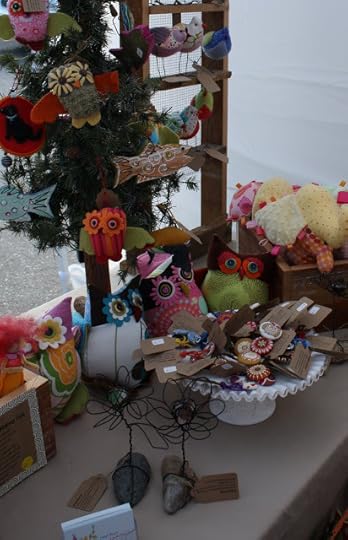
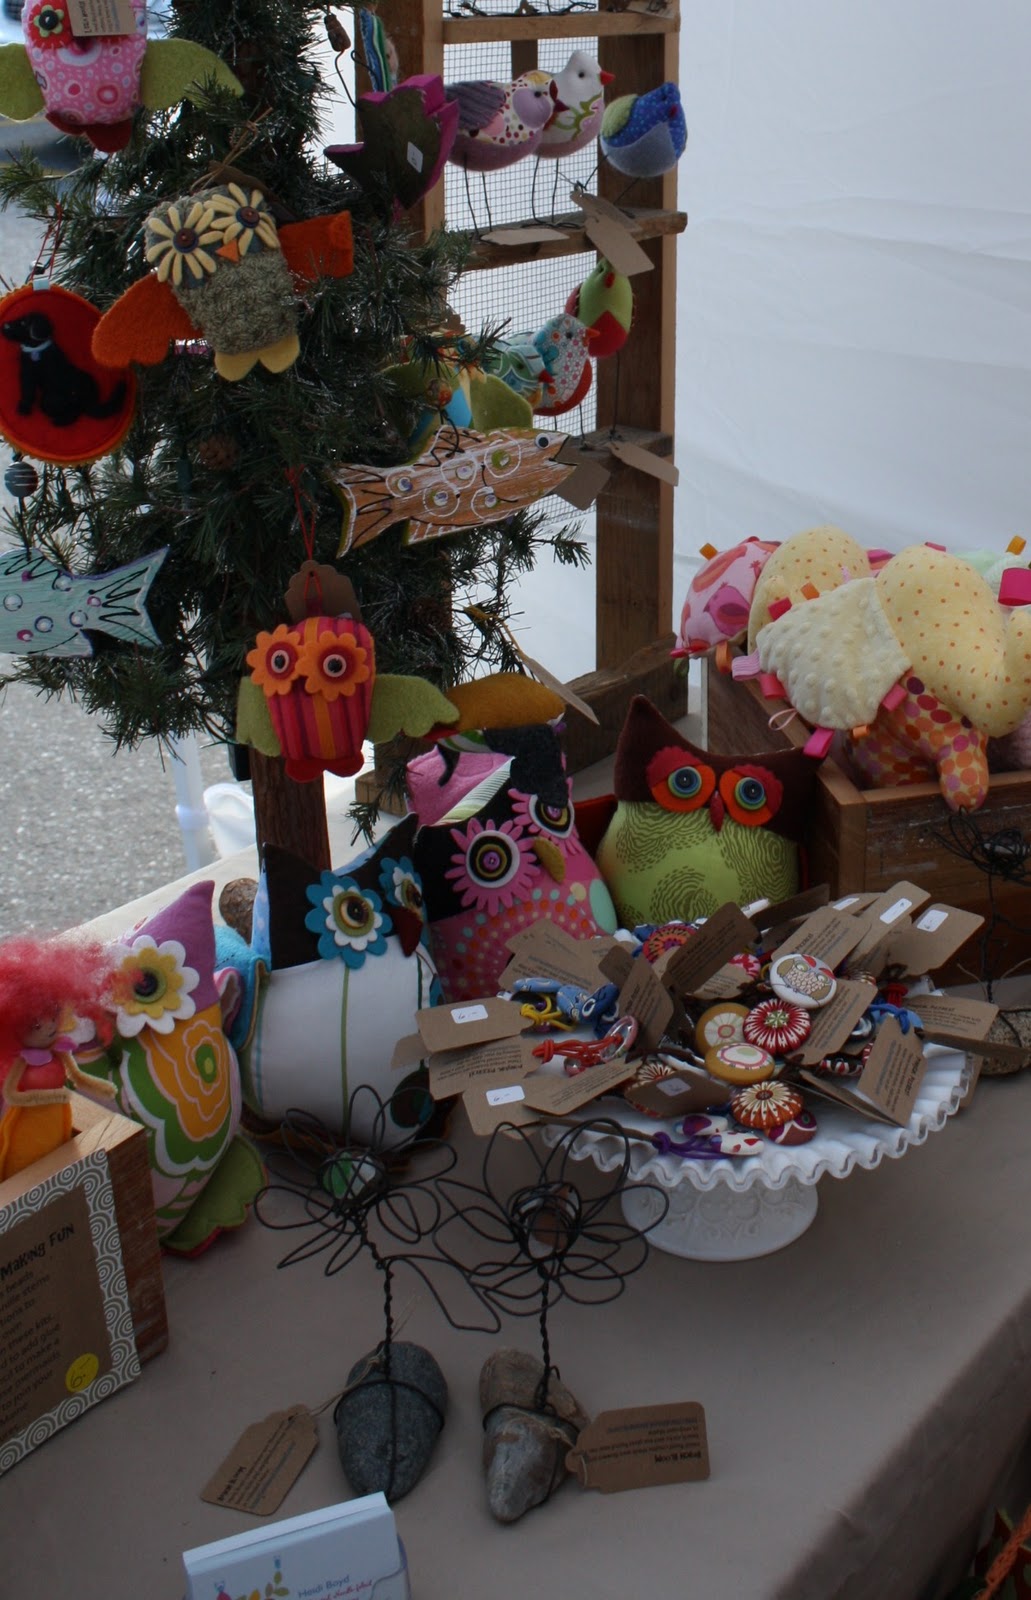
As expected the owls where the hit of the day both the Hilarious Hoots and Little Hoot ornaments literally flew off my tables (not just because of the wind!). I'll be spending many nights stitching up new flocks before the holiday season is over.

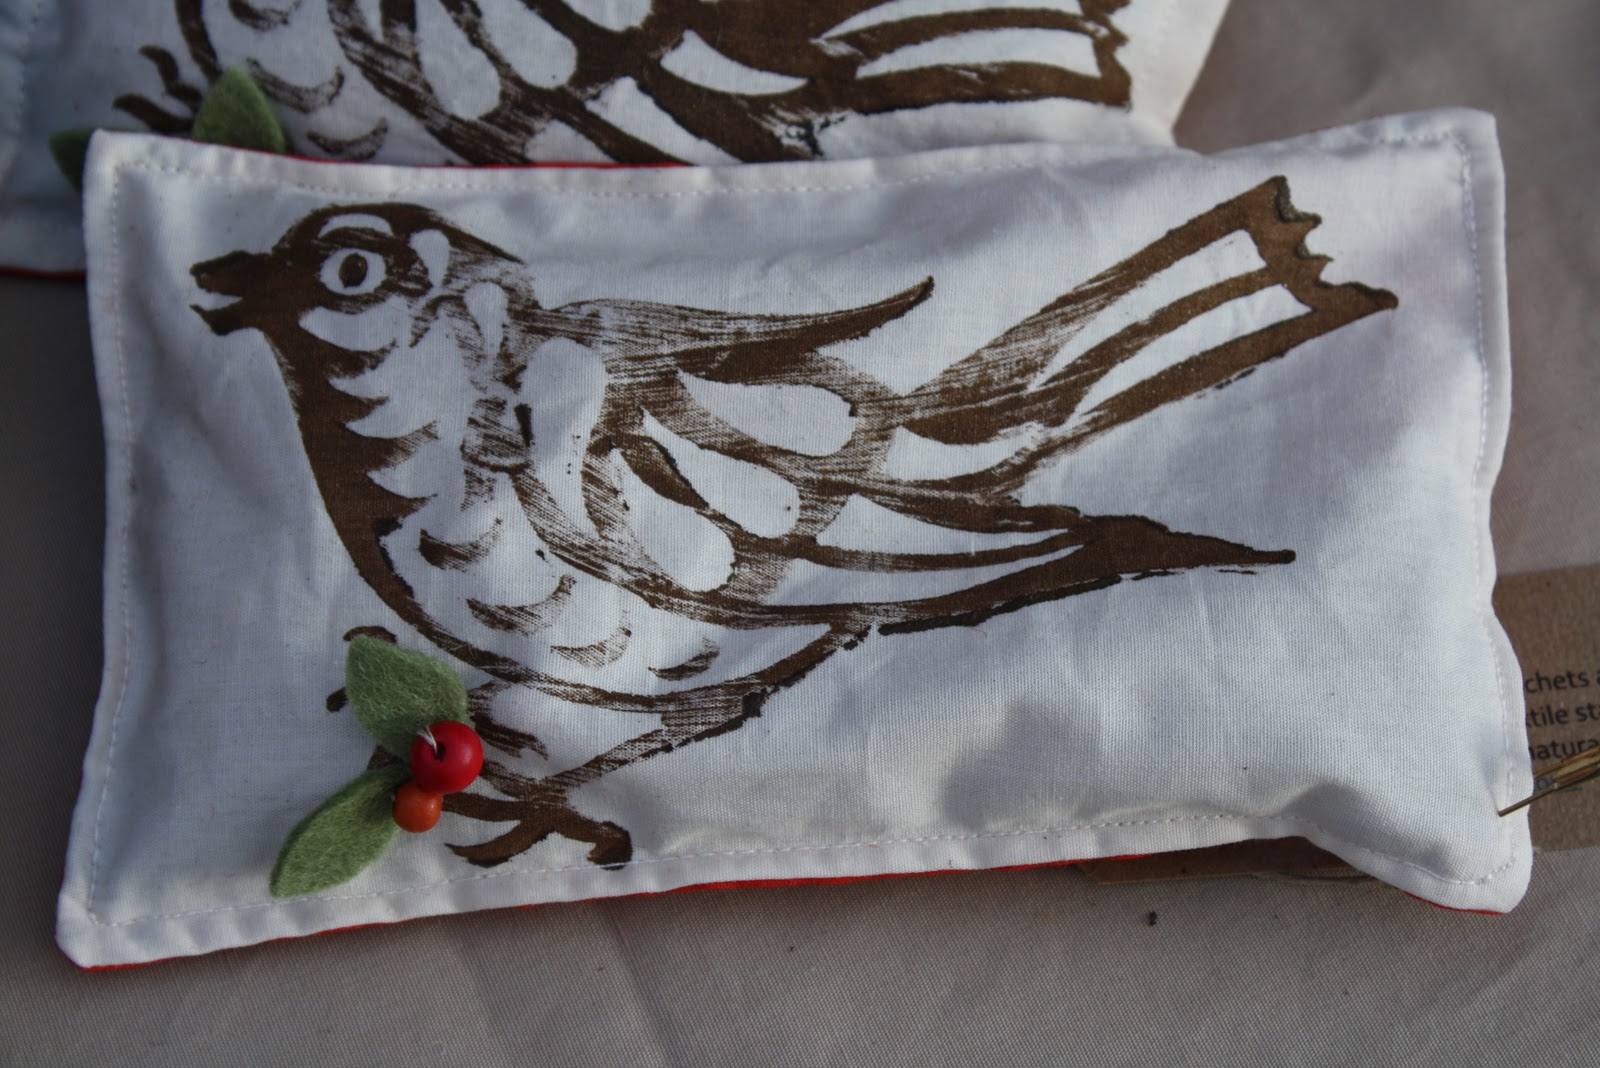
Scentsational sachets were a new product I unveiled today. They're filled with a combination of Balsam and Lavendar. I hand stamped the images with Fair trade textile stamps from India. They're backed in bright cottons and embellished with wooden beads and felt leaves.

The owl version has a felt bead in an acorn cap, thanks to my husband Jon for drilling the acorn caps!
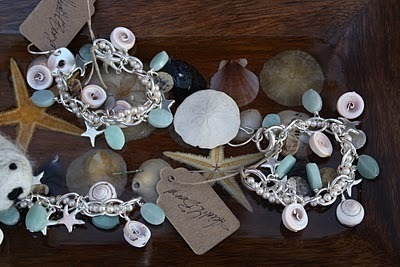
I had such great reactions to the seashore bracelet I made for Crafts n Things on-line newsletter that I whipped up a bunch for this sale, they quickly sold out!

After the successful library workshop these Mermaid and King Triton Kits have become a new staple in my fair inventory.
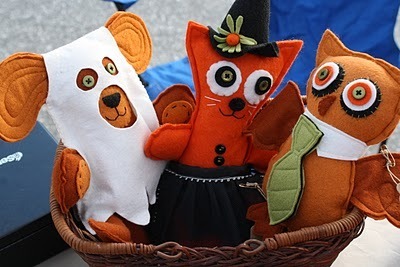
This much admired felt trio were a hit in the booth. Originally featured in this falls issue of Crafts n Things magazine, they're still in need of a good home!

The ponytail holders were a hit, I'll be replenishing this supply before the holiday fairs kick in!

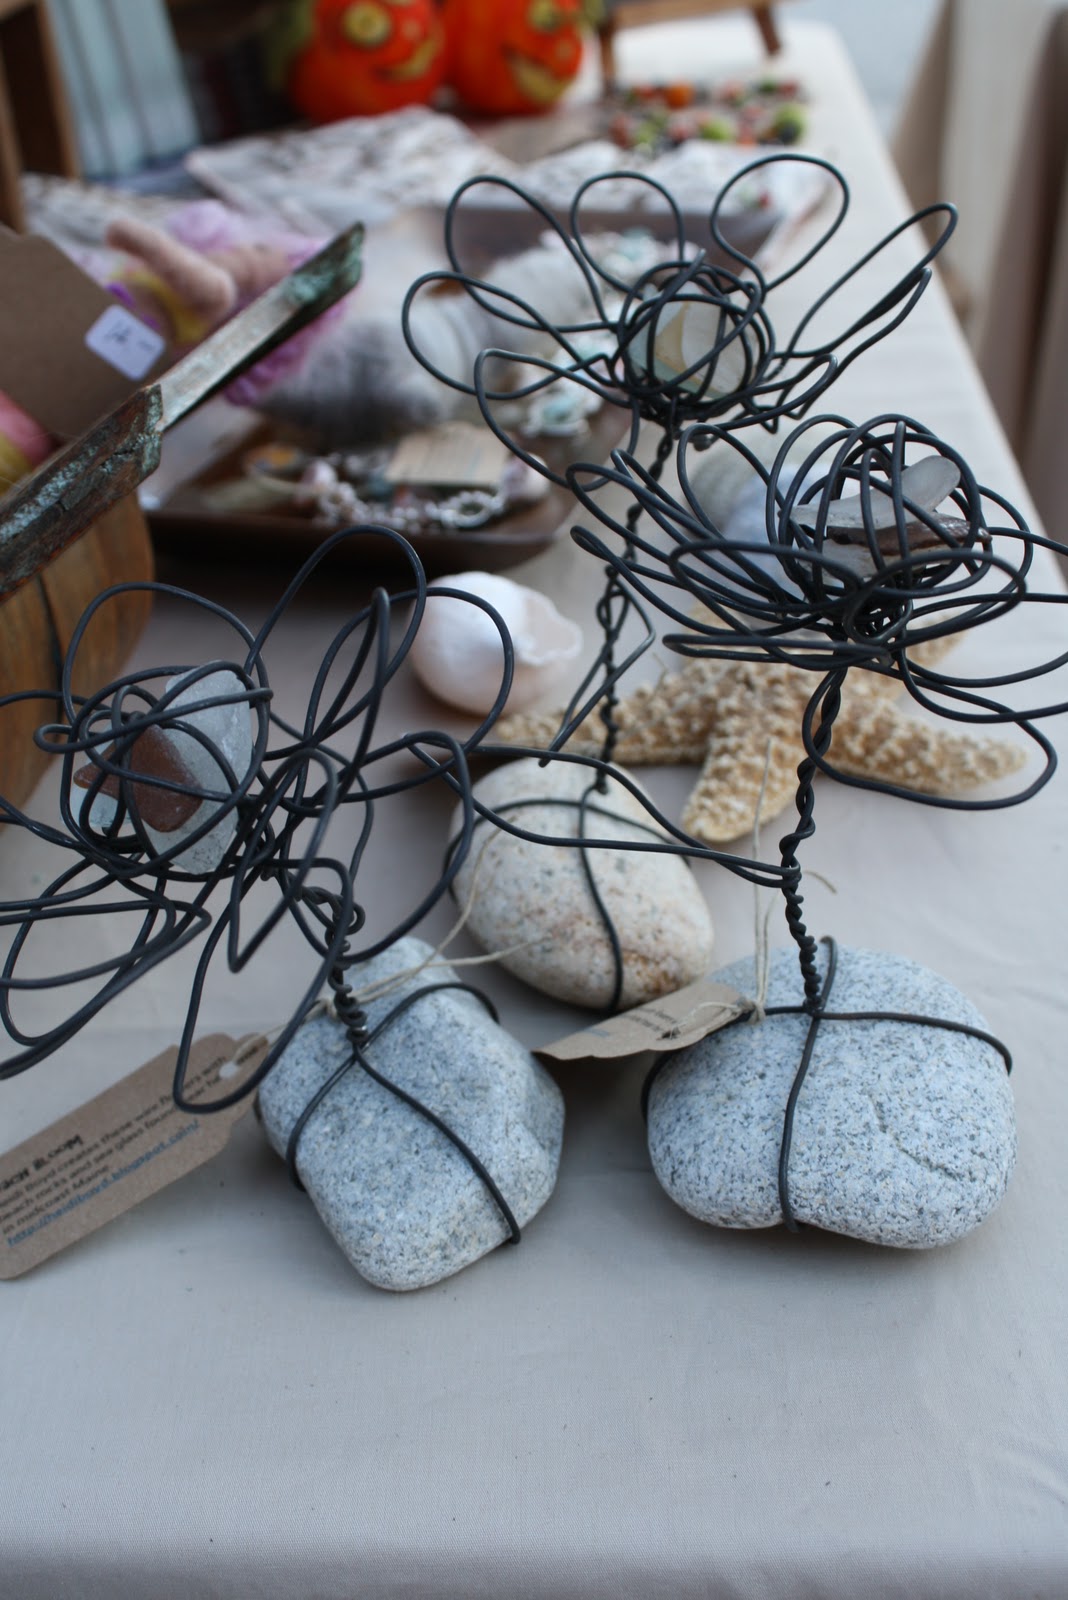
Wire Beach Blooms with sea glass centers made great mementos for tourists to bring back home.

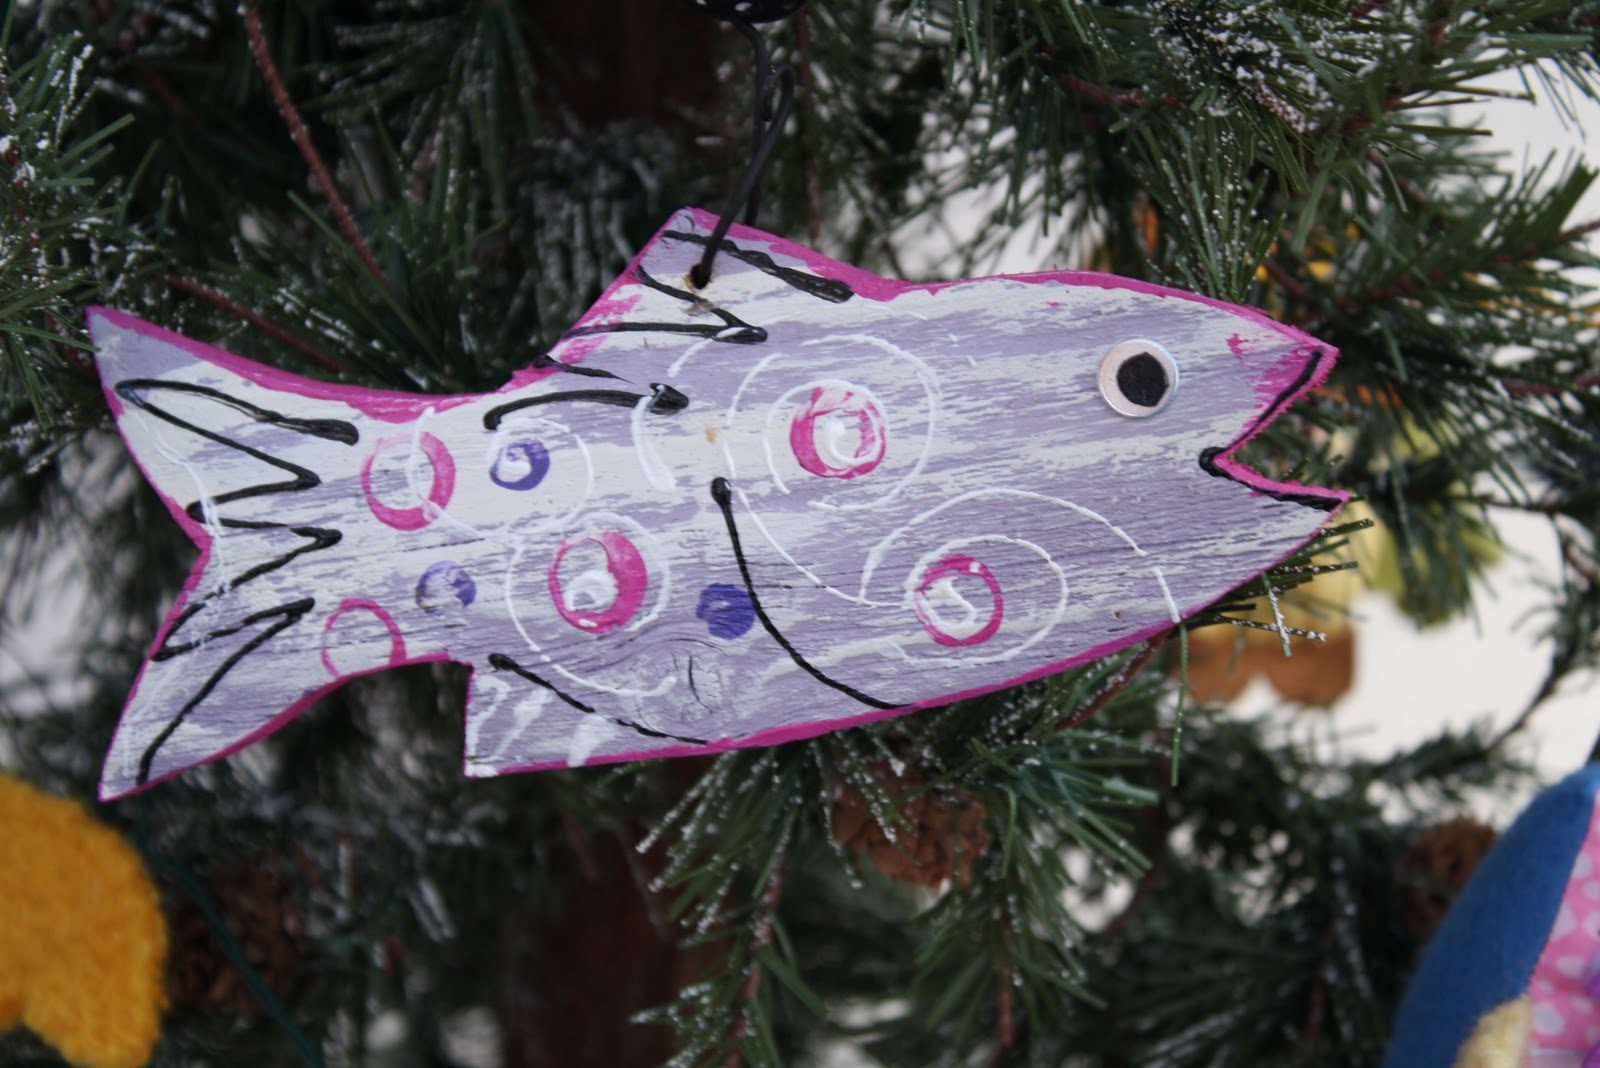
These new little wood fish feature spiraled wire hangers with glass beads. It's a little early for tree ornaments but we'll be working on several more editions with different brushstrokes. Lisa Marie would like a set for her store in Bath were hoping to add inventory to Penobscot Porch Swings in Brunswick as well.
I love single day local fairs, it's wonderful when friends stop by our booth. I make new connections and meet interesting vendors each time we set up. Tonight I'm completely relaxed, tomorrow I'll try to put the house back together before the work week begins. I've got a big book deadline this Friday!

As expected the owls where the hit of the day both the Hilarious Hoots and Little Hoot ornaments literally flew off my tables (not just because of the wind!). I'll be spending many nights stitching up new flocks before the holiday season is over.
Scentsational sachets were a new product I unveiled today. They're filled with a combination of Balsam and Lavendar. I hand stamped the images with Fair trade textile stamps from India. They're backed in bright cottons and embellished with wooden beads and felt leaves.

The owl version has a felt bead in an acorn cap, thanks to my husband Jon for drilling the acorn caps!

I had such great reactions to the seashore bracelet I made for Crafts n Things on-line newsletter that I whipped up a bunch for this sale, they quickly sold out!

After the successful library workshop these Mermaid and King Triton Kits have become a new staple in my fair inventory.

This much admired felt trio were a hit in the booth. Originally featured in this falls issue of Crafts n Things magazine, they're still in need of a good home!

The ponytail holders were a hit, I'll be replenishing this supply before the holiday fairs kick in!
Wire Beach Blooms with sea glass centers made great mementos for tourists to bring back home.

These new little wood fish feature spiraled wire hangers with glass beads. It's a little early for tree ornaments but we'll be working on several more editions with different brushstrokes. Lisa Marie would like a set for her store in Bath were hoping to add inventory to Penobscot Porch Swings in Brunswick as well.
I love single day local fairs, it's wonderful when friends stop by our booth. I make new connections and meet interesting vendors each time we set up. Tonight I'm completely relaxed, tomorrow I'll try to put the house back together before the work week begins. I've got a big book deadline this Friday!
September 28, 2010
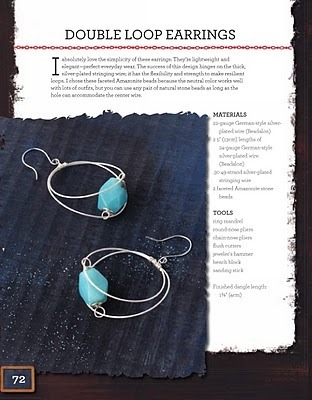
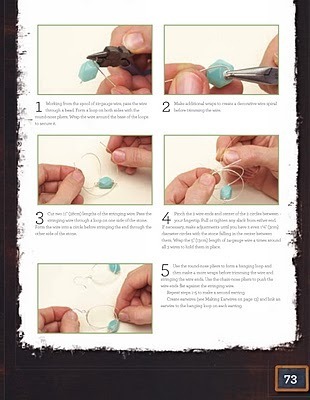
Free Double Loop Earring project from Wired Beautiful!
Wired Beautiful is filled with unique projects that I'd love to share with my blog followers. After much deliberation I decided to post instructions for the earrings that I was happiest to get back from the photo shoot. They're straightforward and simple with an original twist, making them a perfect introduction to beading with wire, Enjoy!
Shaun was the lucky winner of the book drawing hope she sends her shipping address to my e-mail heidiboyd@suscom-maine.net so I can mail a copy off to her!


Shaun was the lucky winner of the book drawing hope she sends her shipping address to my e-mail heidiboyd@suscom-maine.net so I can mail a copy off to her!
September 20, 2010
Shameless self promotion and Wired Beautiful book giveaway!

Wired Beautiful has arrived ... and it's absolutely gorgeous! I'm head over heels in love with the design and photography.
This book is intend for people who love to string beads and are looking to branch into wire work. This approachable book takes you through the basic process of making your own clasps, jump rings, earring wires. Never again will you need to search stores to find coordinating findings, when you can easily make them yourself! The projects also include non traditional wire te...
September 6, 2010
Bead Blessing
A couple weeks ago I was honored to take part in a special going away party for two local artist friends Beth and Esther. Patricia who leads the local art collaborative had the wonderful idea to send them on their new adventures with a custom made piece of jewelry. We came to the evening with beads and a special message in mind.
After a lovely dinner followed by cake, we took turns placing our beads in water while imparting our words of wisdom. Some people had taken the time to look up the mea...

After a lovely dinner followed by cake, we took turns placing our beads in water while imparting our words of wisdom. Some people had taken the time to look up the mea...
August 22, 2010
Covered Button Ponytail Holder: How To
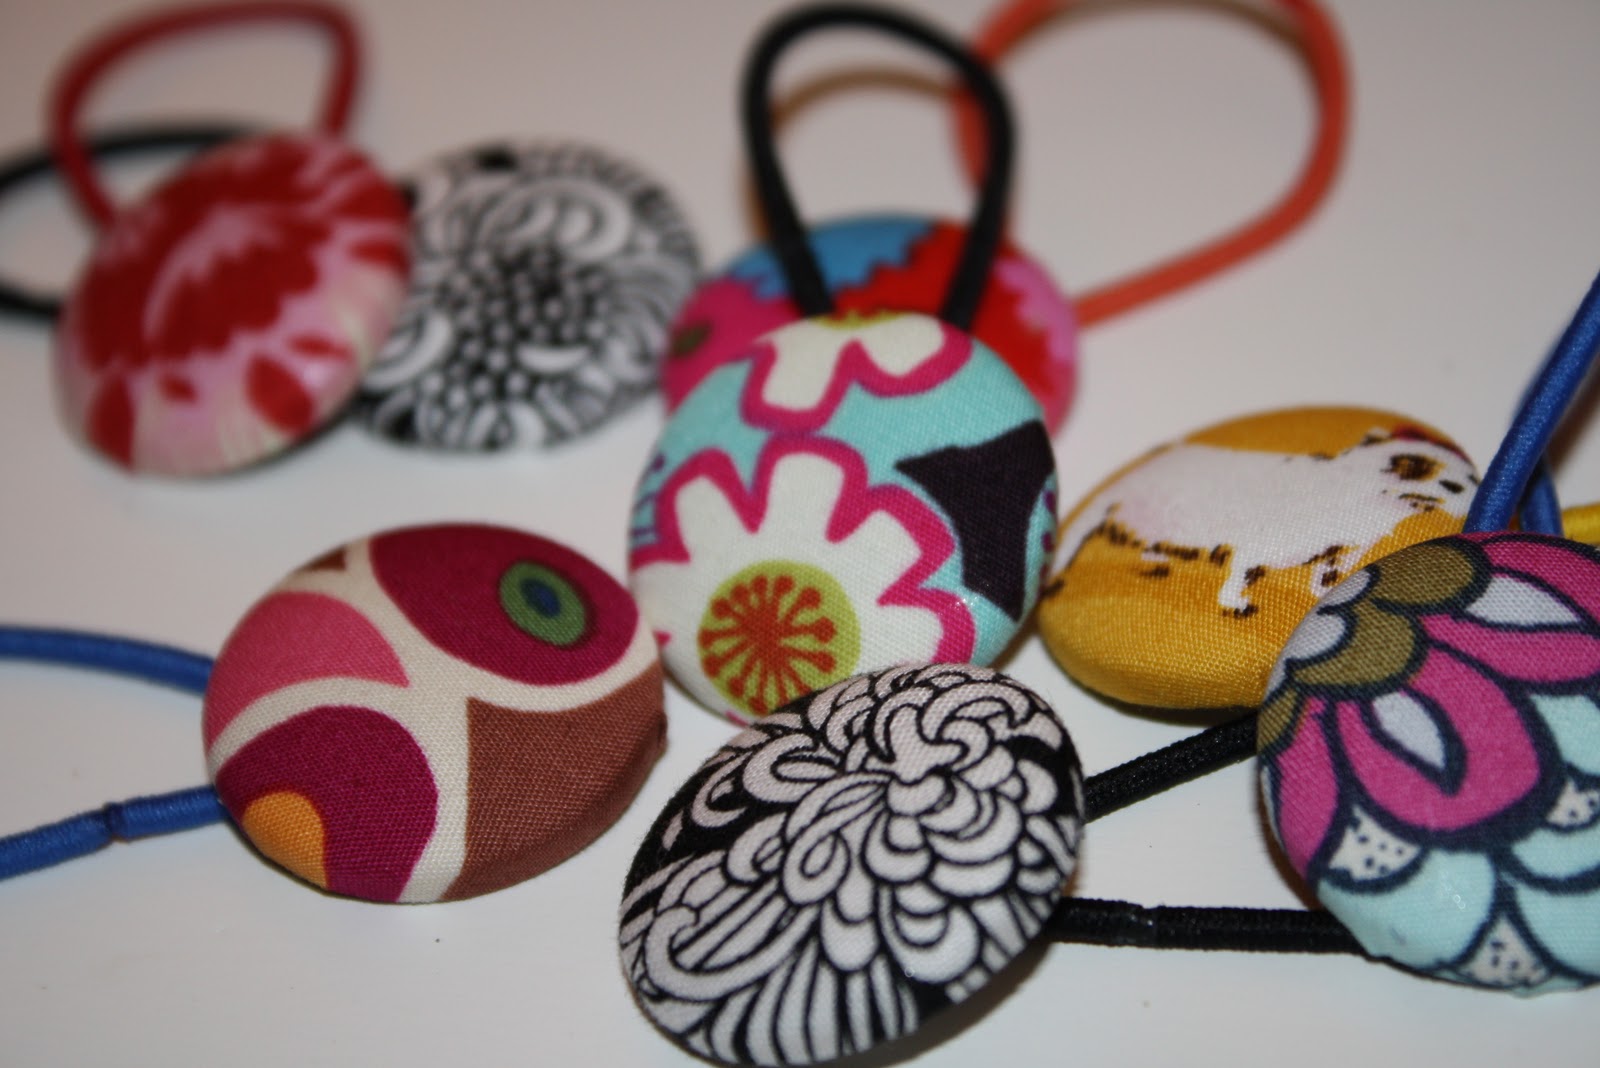
It's back to school time! Once you've picked out your wardrobe, it's time to get crafty and make coordinating hair accessories. If you stash fabric or are holding onto small scraps this project is just for you. Making fabric covered buttons is a cinch, if you haven't tried it before follow these easy steps. It's a great crafty trick to have up sleeve.
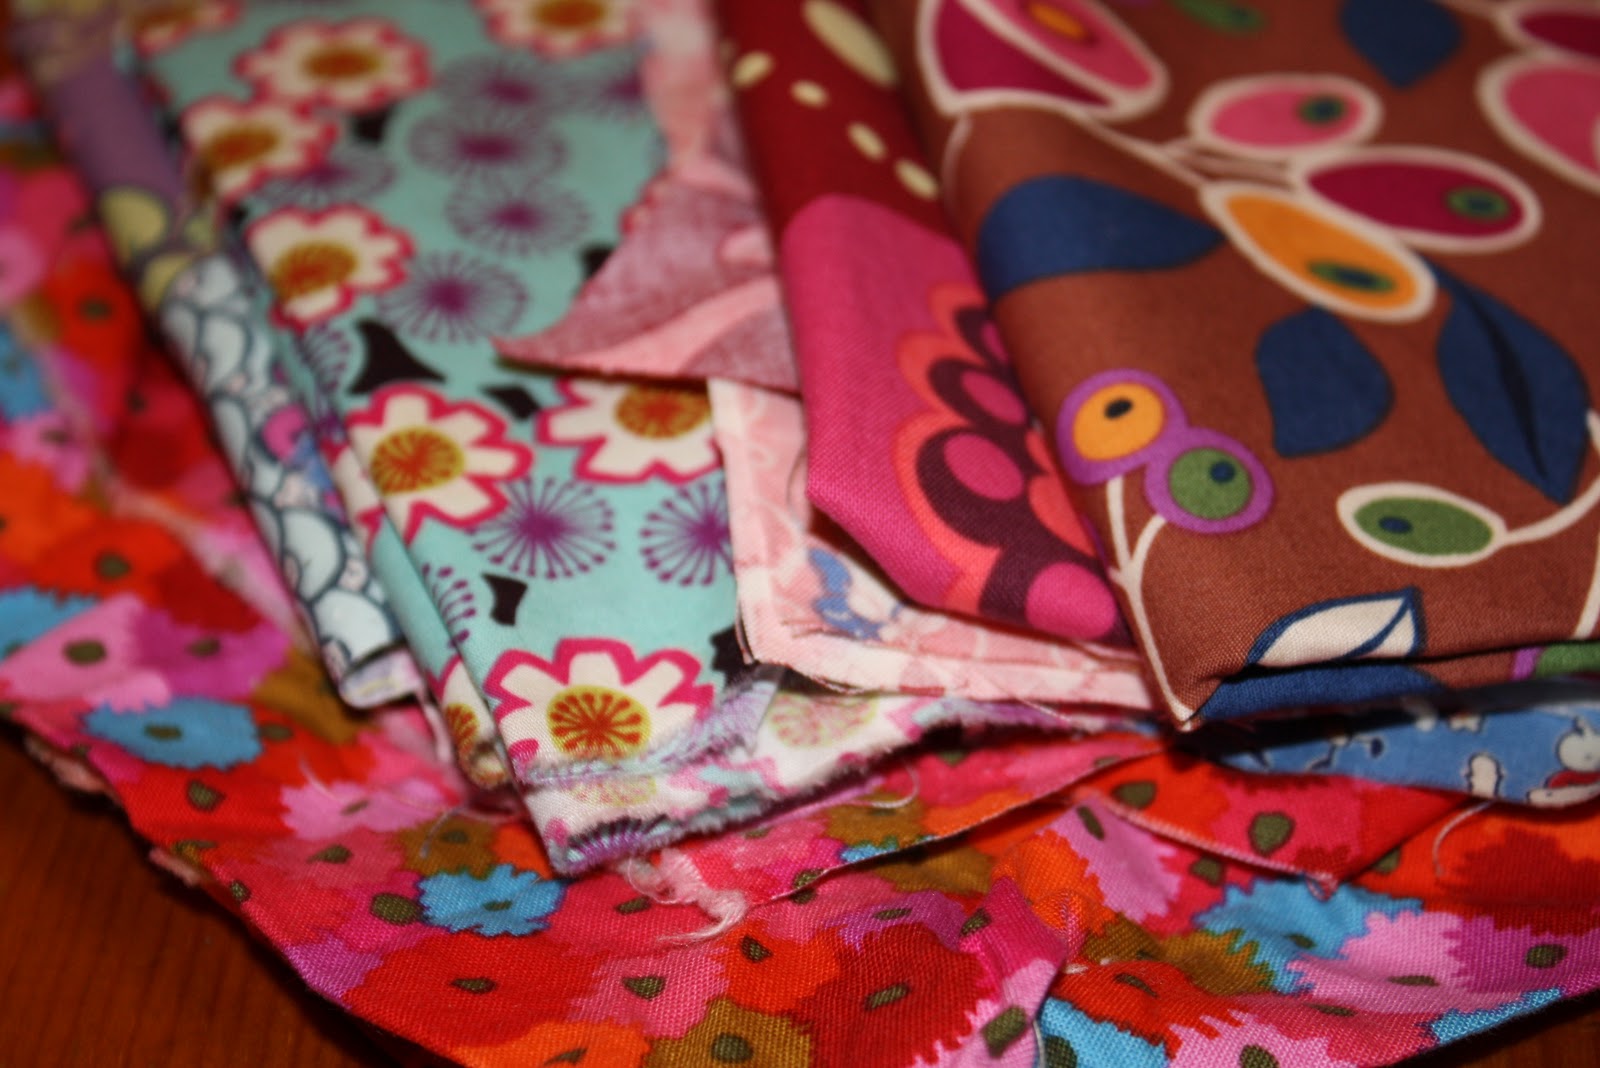
Purchase the desired sized button covers and tool kit at your local sewing store. I used 11/8" covers which are too large for toddlers and pres...
August 18, 2010
DIY Throw pillows for teens

I wrapped up my summer teen program with this sensational teen DIY throw pillow craft . Creativity was on the loose and Polyfill stuffing was flying through the air.

Last spring I was gifted a beautiful selection of fabrics I pulled out a stack of 1/2 yards for the teens to use. Our wonderful teen librarian Melissa had the kids select their favorite patterns. She borrowed my rotary cutter, cutting mat, and straight edge to pre-cut the fabric into pairs (fronts and backs) of 16" squares.
I cut M...


