Heidi Boyd's Blog, page 2
May 9, 2011
Quilt Market Butterflies
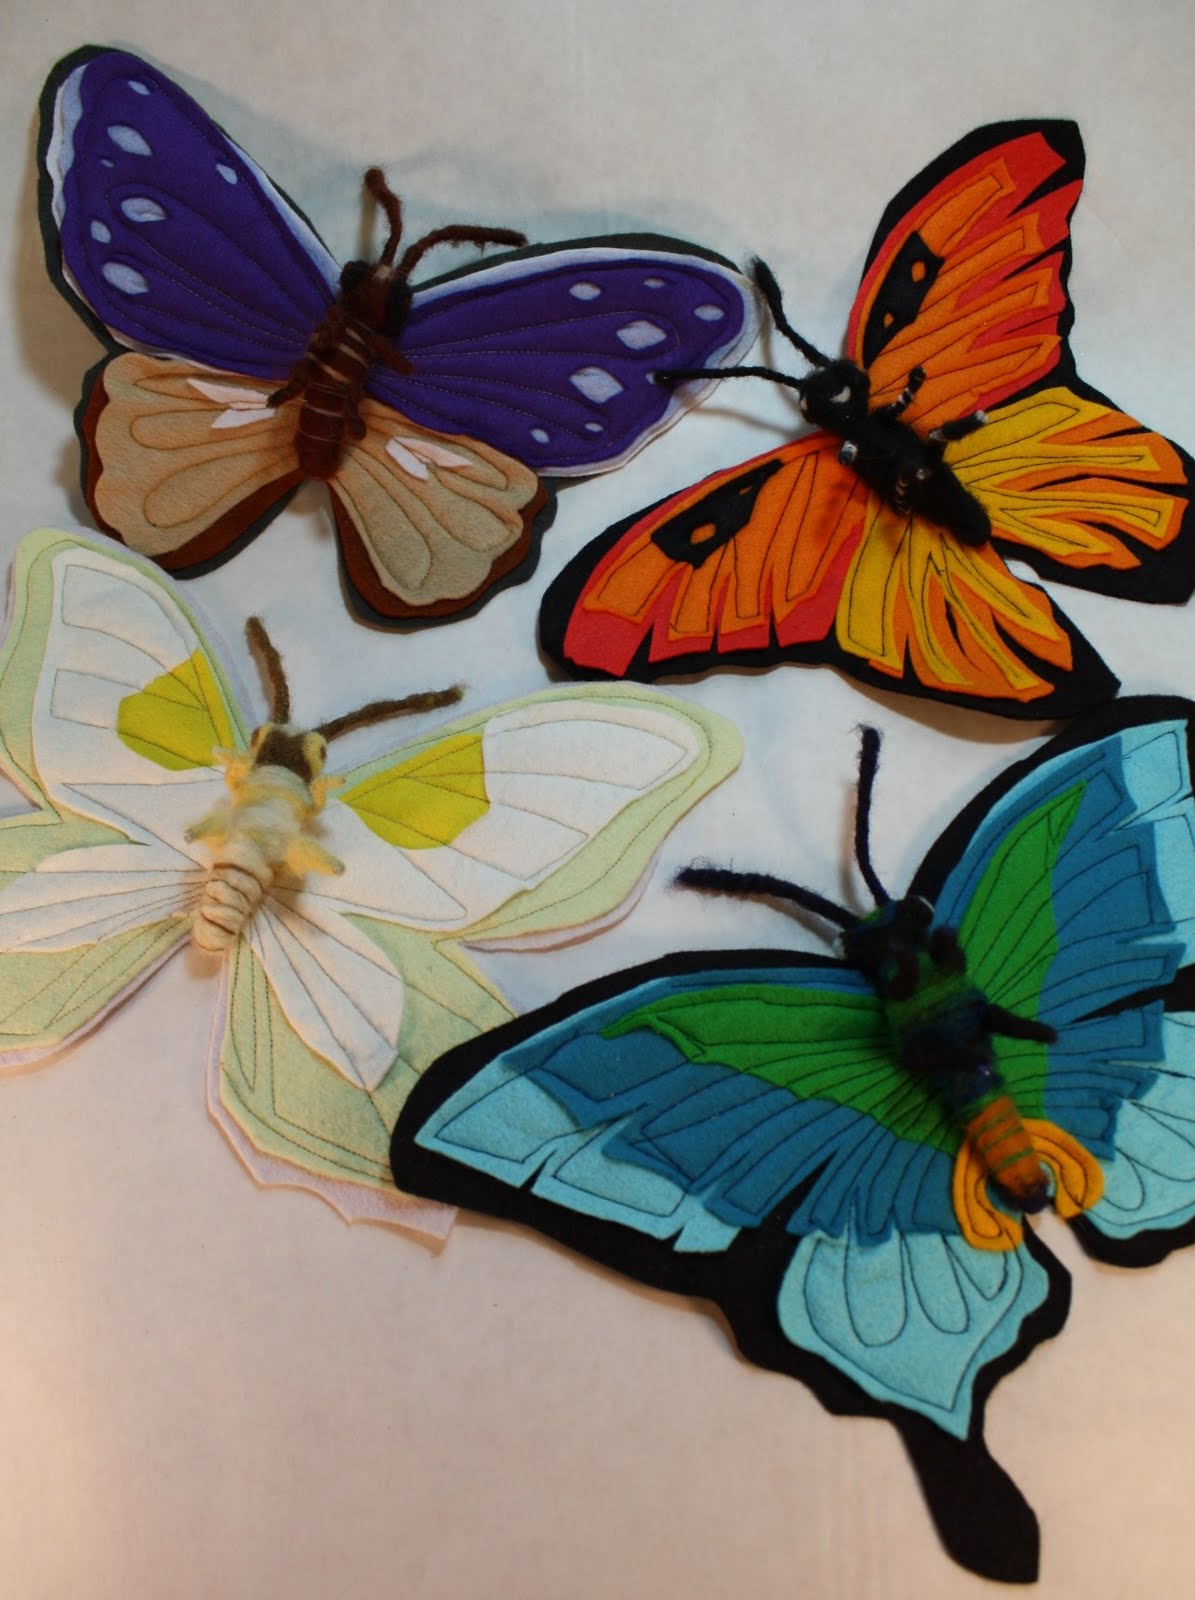
It's a treat to be able to share a current design project on my blog. Most of what I work on needs to be kept under wraps before it appears in books and magazines. I was delighted to make these butterflies for National Nonwovens Quilt Market booth. They manufacture gorgeous wool felts and roving products. The company supplies me with a selection of their product for my publishing work. I was especially grateful to have an array of their felt on hand while I worked through the designs for my newest book Stitched Whimsy, a playful pairing of felt and fabric (October 2011 North Light books).
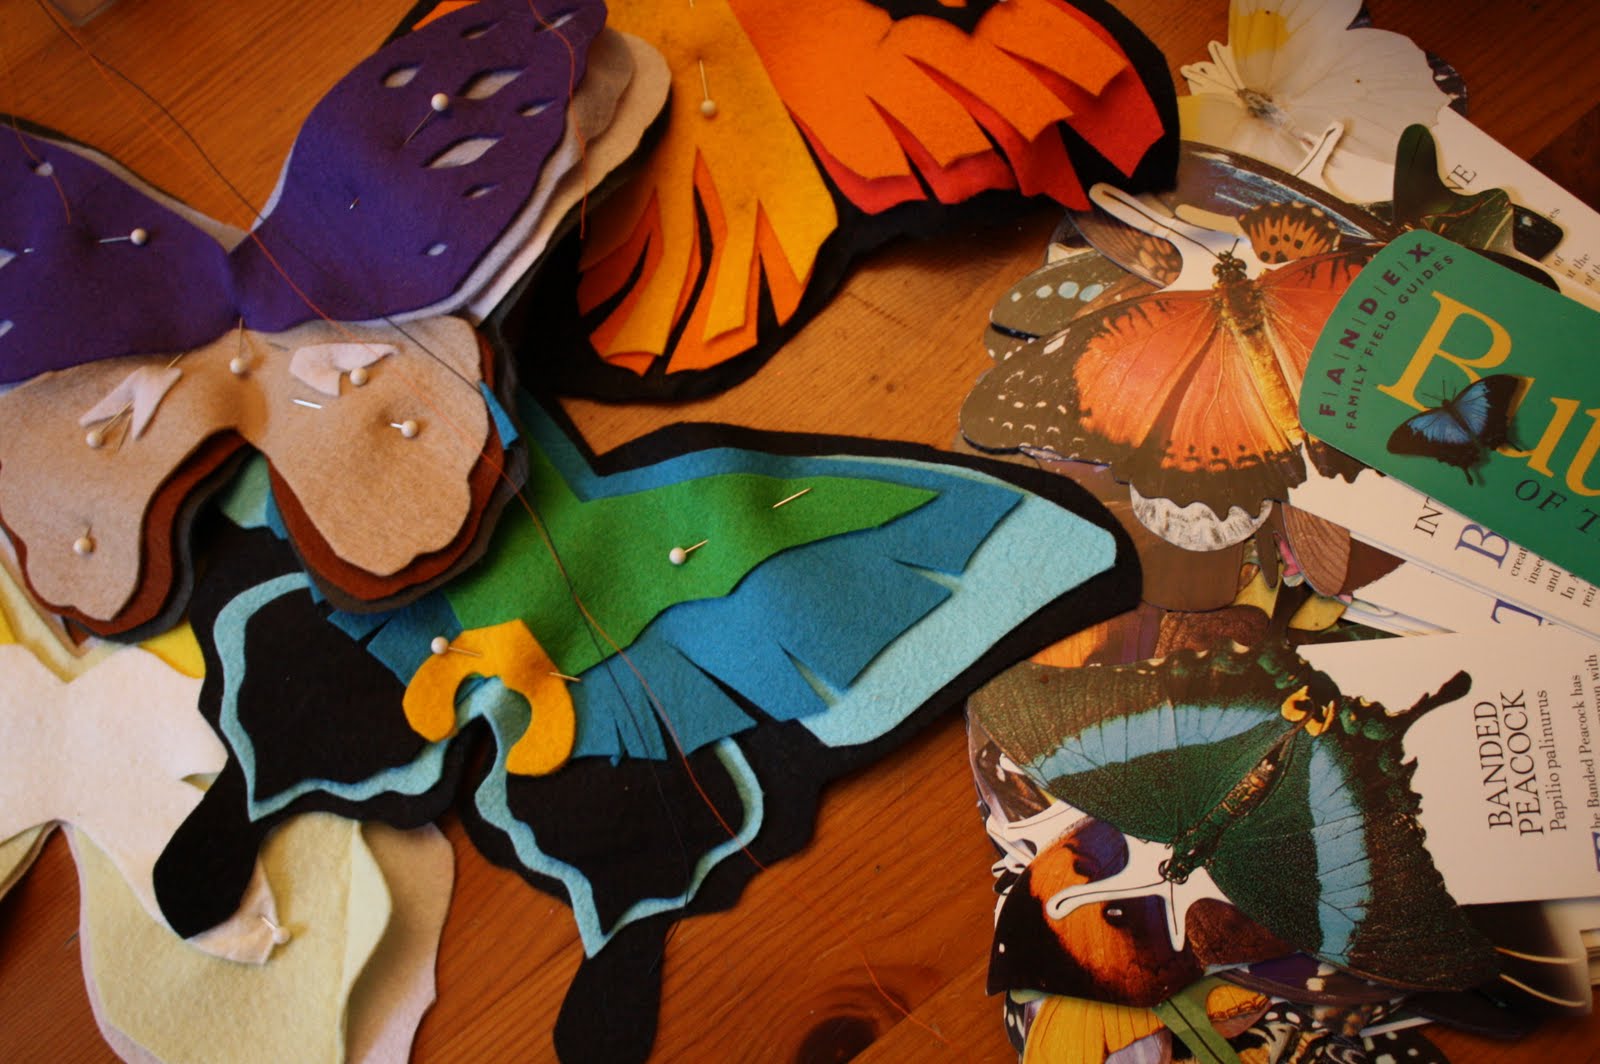
They choose a butterfly theme for their trade booth and asked me to make a pair. Once I pulled out my butterfly guide and stack of felt, I couldn't stop at two. I expanded the project to four distinctly different butterflies in order to better showcase their product.

To make the pattern I simply folded a sheet of paper in half and then used the guide to draw half a butterfly wing. I cut the wing shape out of both layers of paper. Once unfolded I had a symmetrical paper pattern for the first layer of felt. I continued using the folded paper technique to make two to four additional smaller patterns for the overlays.
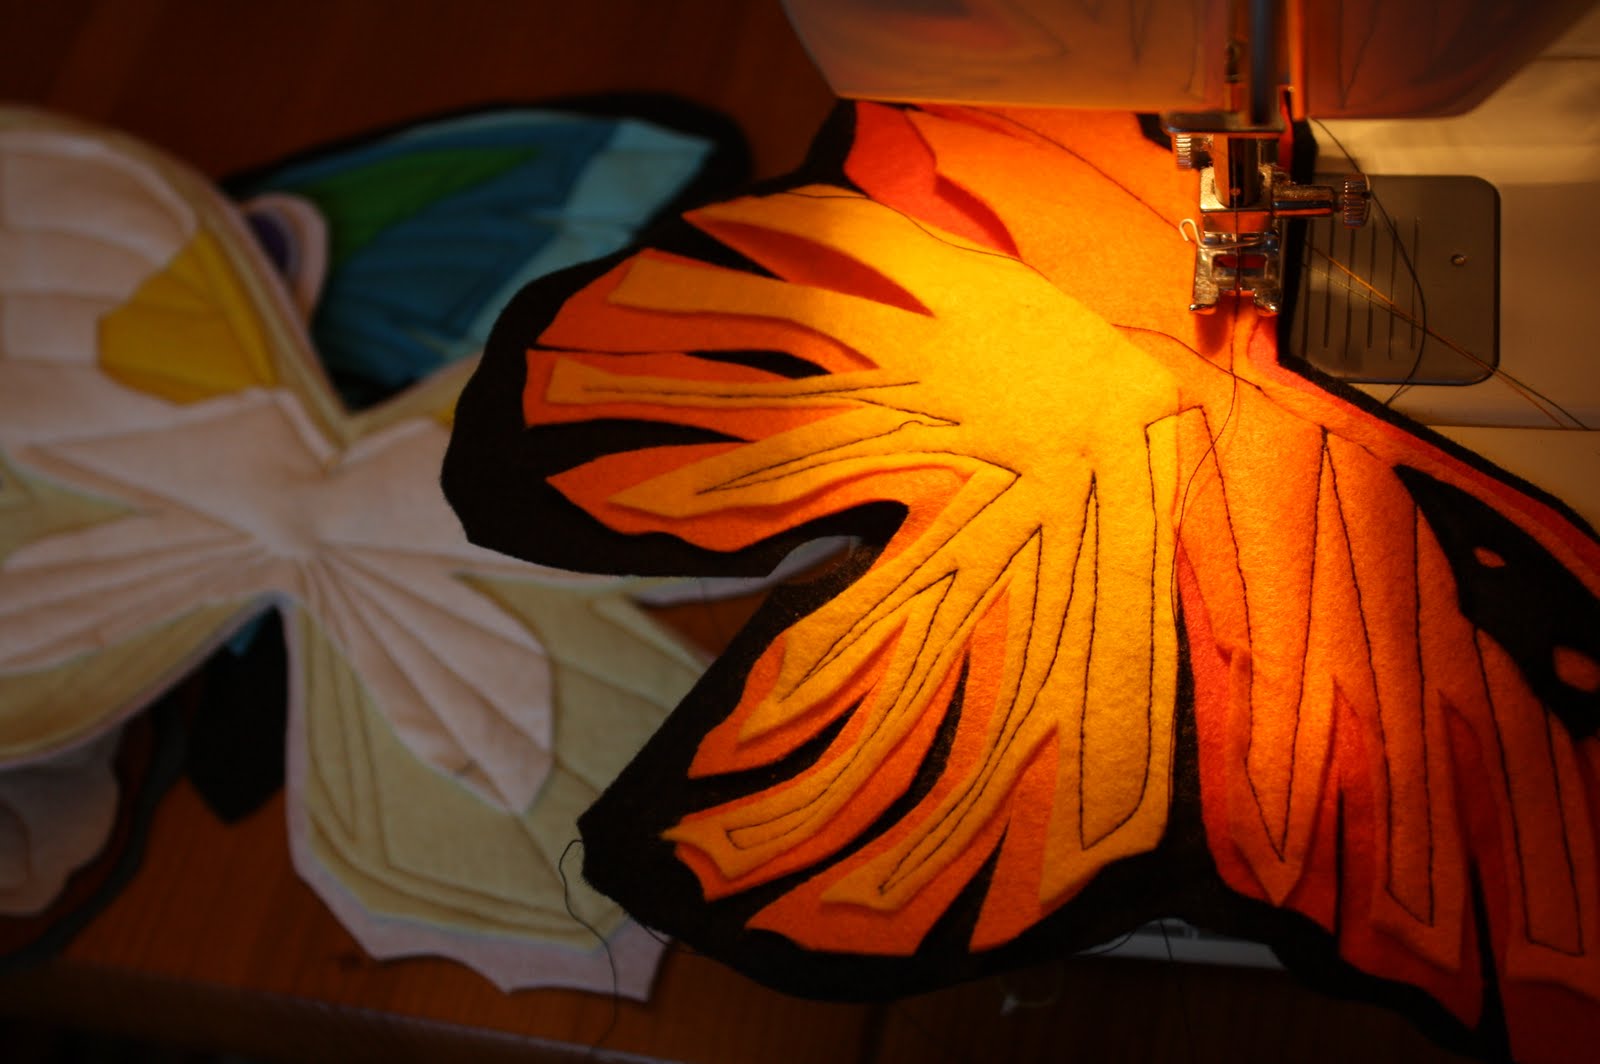
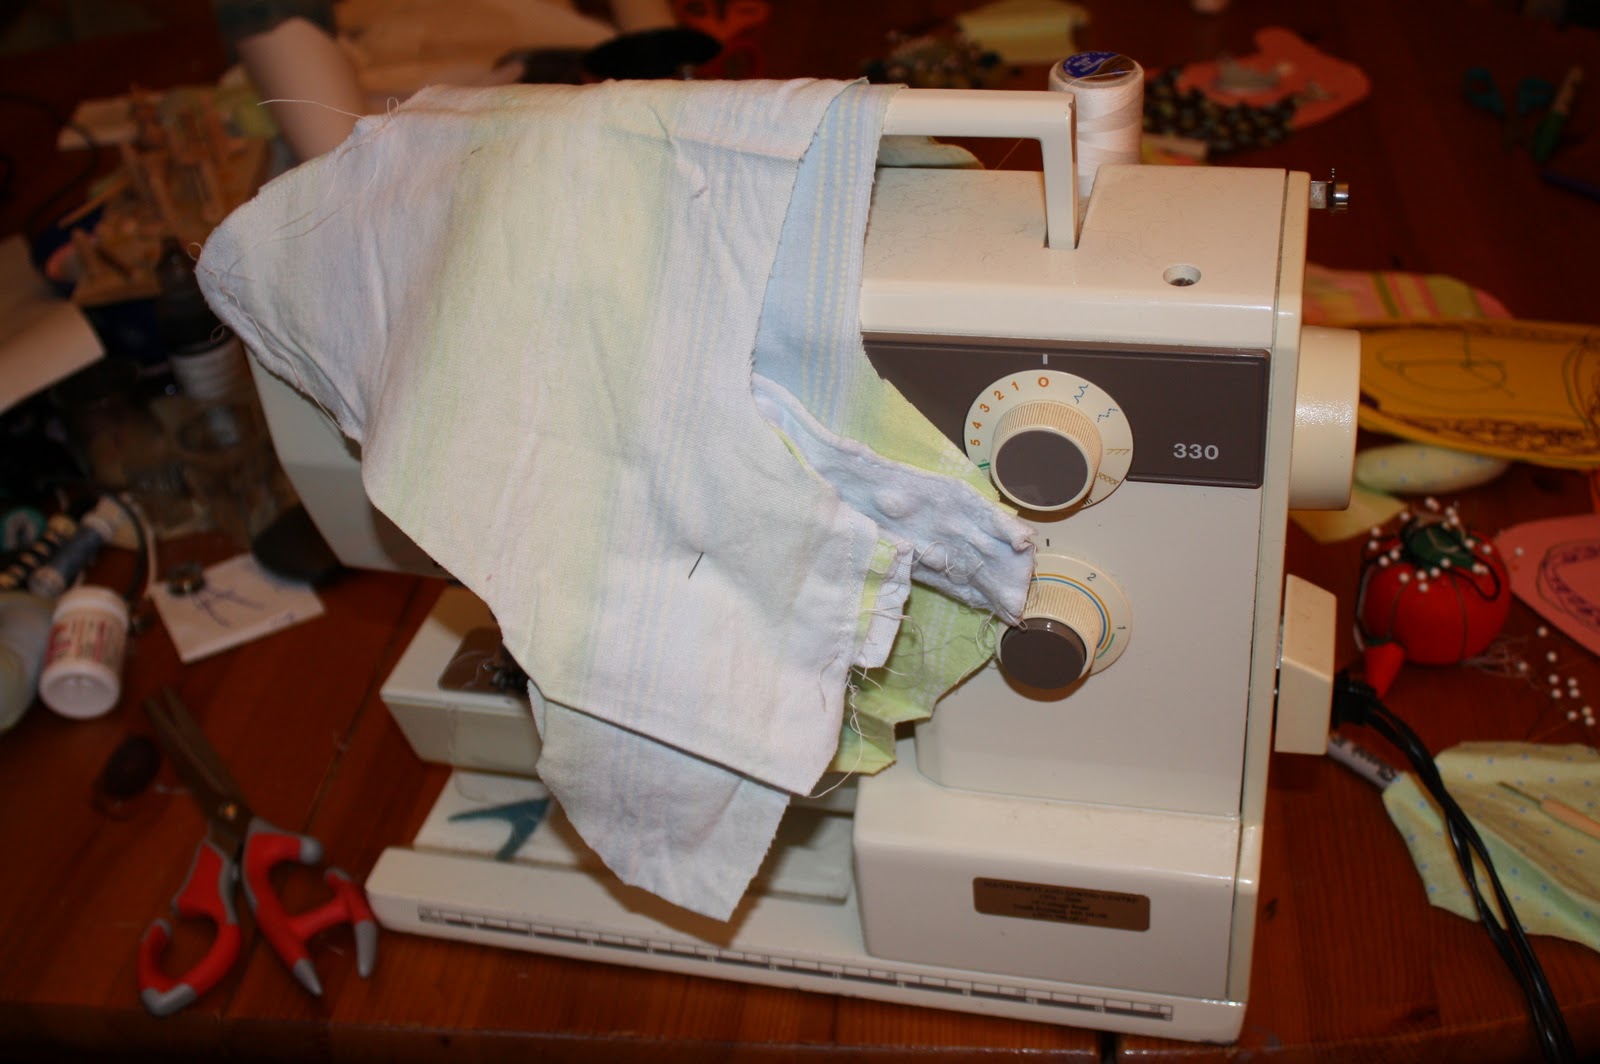
I stacked and pinned the wing layers together. In some cases I snipped holes or cut triangular darts into the overlays to reveal the color underneath. I machine stitched the layers together, creating a decorative network of freestyle seams.

The butterfly bodies began with a twisted chenille stem armature that I wrapped in wool roving. I needle felted all sides of the body to insure the roving was tightly anchored in place. The final step was to hand stitch the back of the body to the finished wings. If you're in Salt Lake City for the show be sure to stop by the booth and check out my warm woolen butterflies from Maine.


May 3, 2011
Flower Crowns for May Day!

Happiness is watching children joyously dancing around the May pole. A symbolic ritual that chases away cold winter winds and welcomes springs blooming flowers and trees. As the mom of a kindergartner this was our first time celebrating May day at our local elementary school.
 The children were divided into two groups; the youngest simply skipped around the pole, the older children looped and wove the ribbons.
We had a few after school rehearsals to practiced lining up skipping and dancing around the pole. During one of the practices I realized they needed someone to make thirty seven crowns. I quickly volunteered and set off to raid the spring garland display at JoAnn's Fabric store.
 Stacks of twisted crowns filling my family room couch. These are the easy crowns made from the lightweight garland.
I was unable to find enough of one kind of garland so my method for making the crowns adjusted with the available materials. Lightweight berry garlands could simply be cut in half and wound into two separate crowns.
 Heavy weight wire cutters and pliers were necessary to cut the wire vines apart. You can see the flower sprays that were pulled out of the garland at the top of the frame.
The other garland consisted of a heavy brown vine and lighter green stems. I had to pull this garland completely apart. I used wire cutters to clip the heavy vines and twisted them circles that were slightly too small for my head. I wrapped the loose sprays to the vine with lightweight plastic coated Fun Wire (Toner). the green wires of two floral sprays could also be twisted together to make a single crown. It took more work but I was able to get five crowns out of each these garlands.
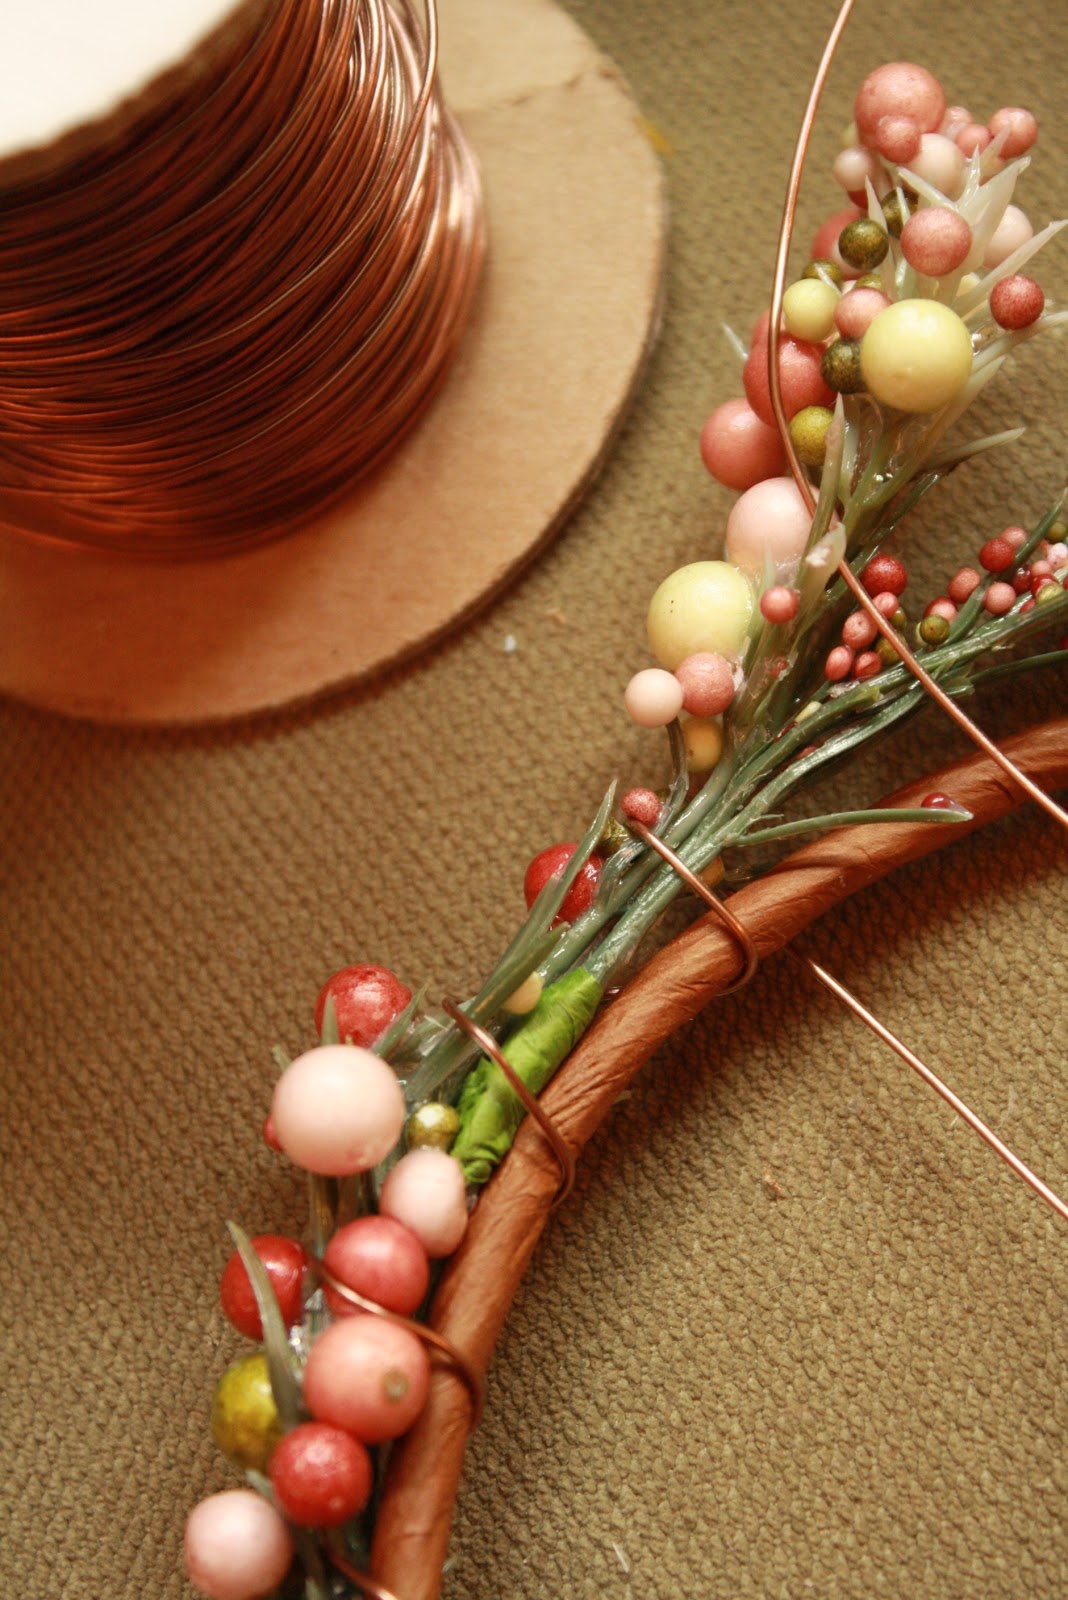 Simply hold the berries to the vine in one hand while the other hand wraps the wire.
I brought the garlands into one of the last practices and shamelessly asked for help from other moms to cut and loop three folded ribbon lengths around each crown.
 Finished crowns on the school bleachers.
The evening was a great community building event. Money was raised by May basket raffle tickets, and light refreshments sales. Koi fish were also sold to in honor of children's day and to raise money for Japanese Tsunami relief.
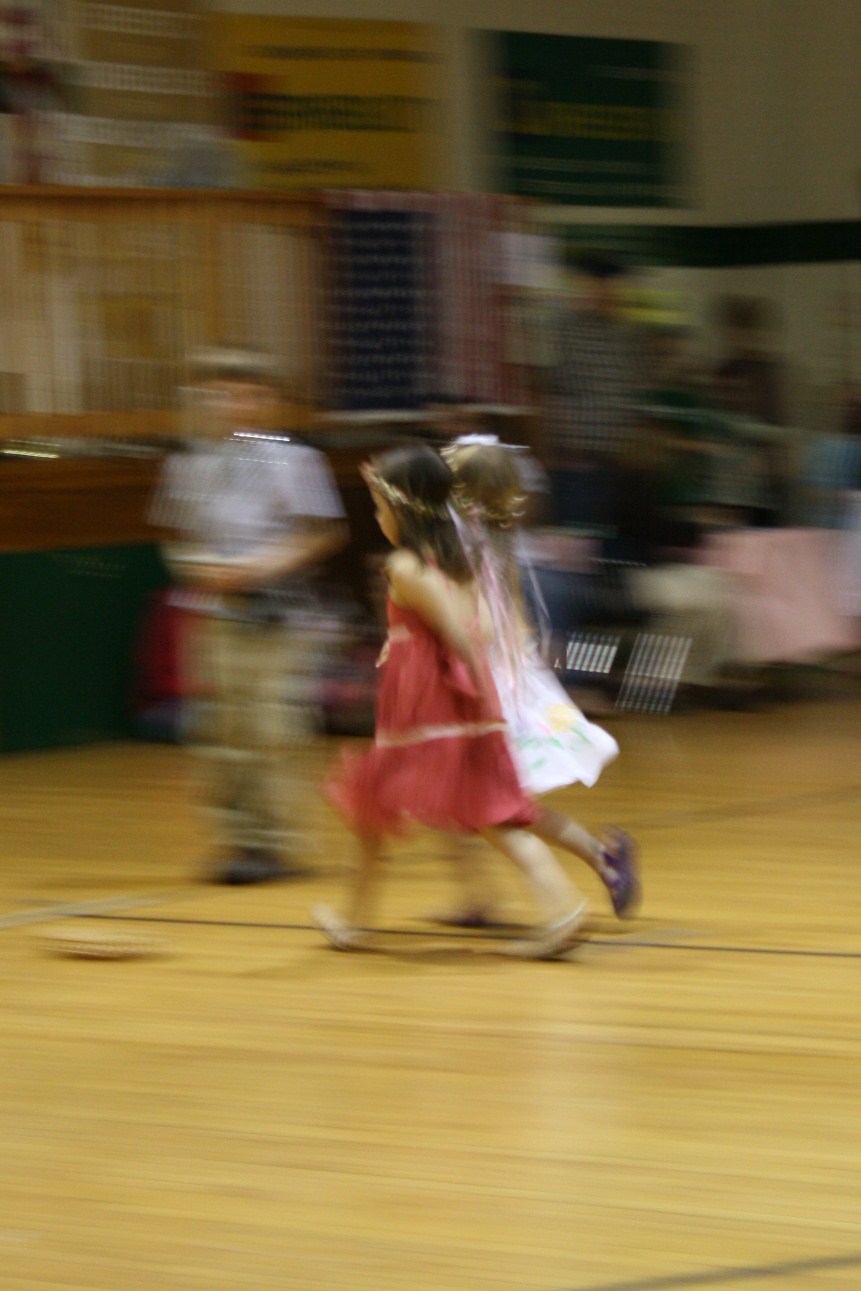 Celia and her dance partner leaving the May pole.
It's wonderful to be able to help with something that comes easily to me. It also makes me smile to know that each of the dancers took home their flower crowns as a keepsake from the dance.

March 14, 2011
Hedgehogs: Needle Felting Tutorial
Last Friday I had the pleasure of crafting with some great teens. Needle felting is a simple accessible craft, if you can poke a needle you can needle felt. Only two of the participants were experienced needle-felters but everyone was very successful.

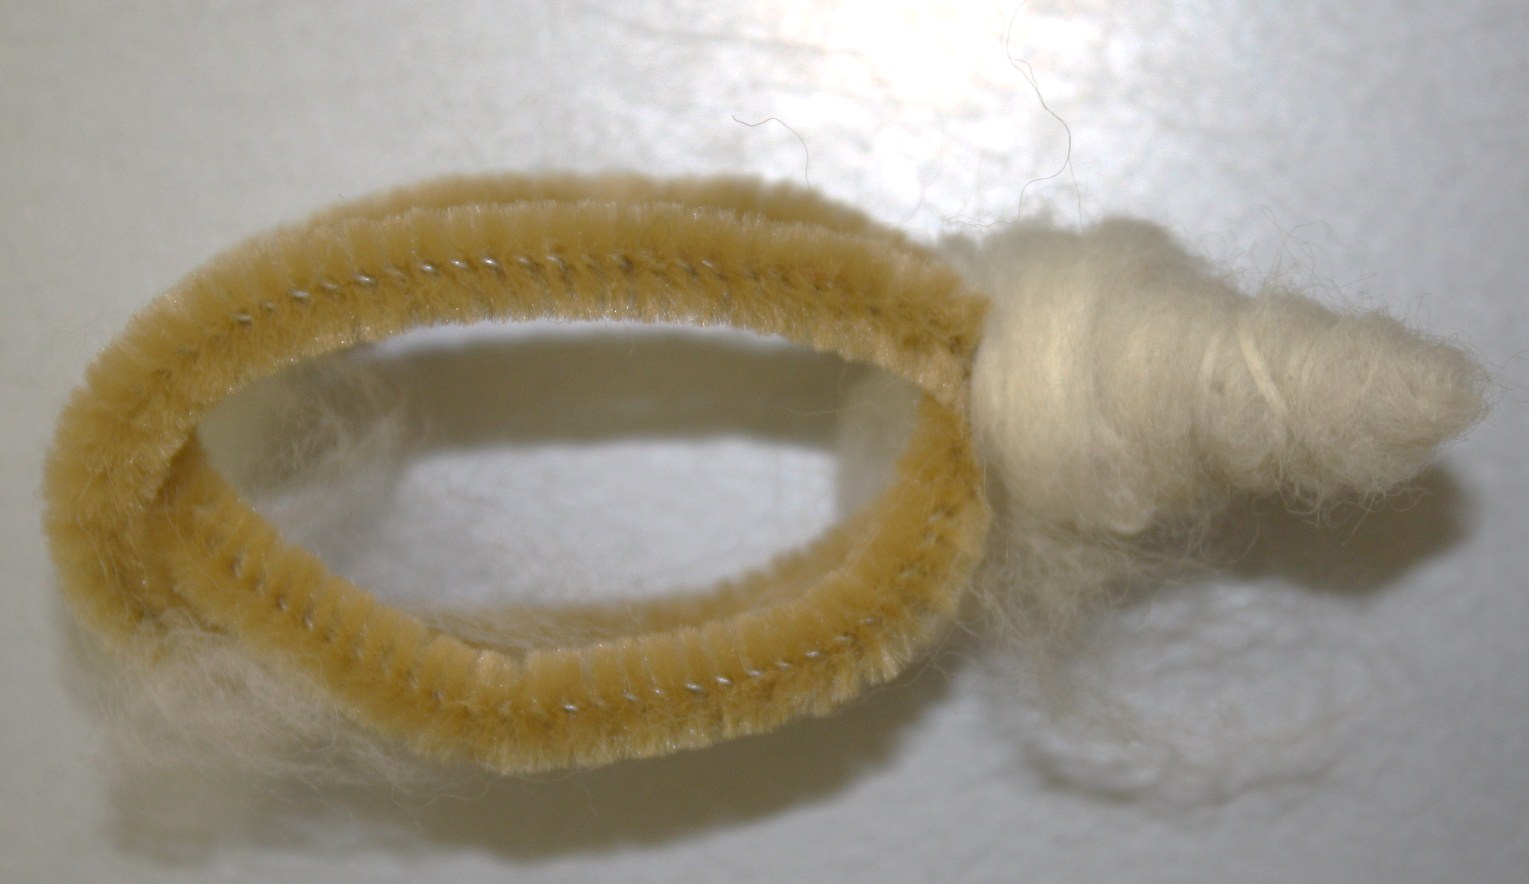
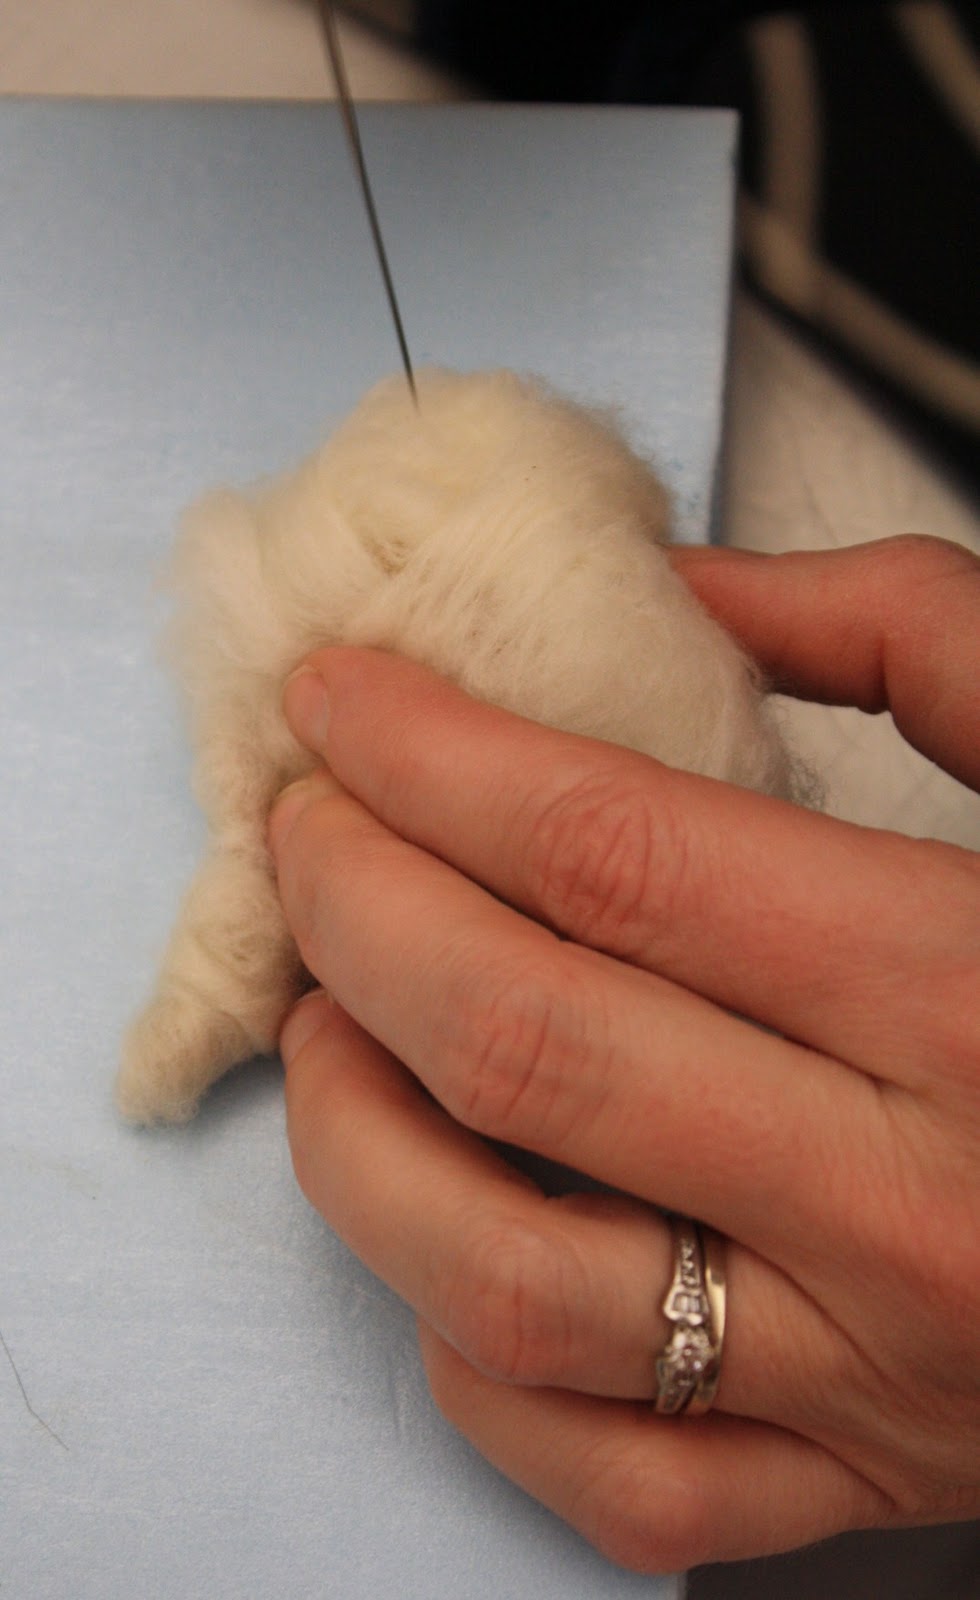
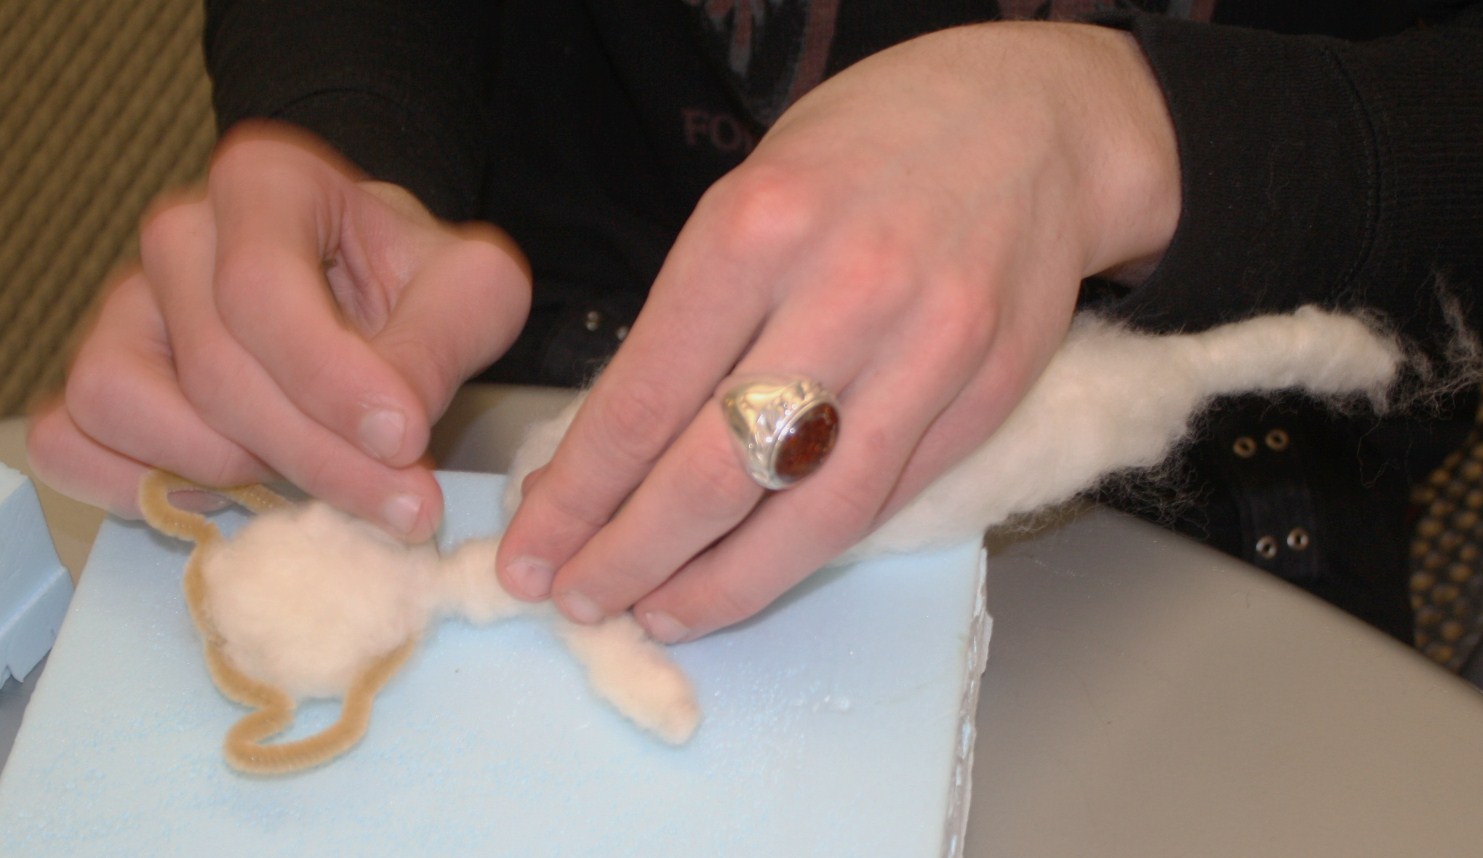
Hedgehogs are surprisingly popular in our northern porcupine country. Their shape makes them the perfect beginner project. I've been needle-felting lots of critters for my new book project Stitched Whimsy. In the process I've realized the importance of chenille skeletons that form a sturdy flexibility core under the wool roving. In this case the wire allows you to raise and lower the hedgie's nose. The first step is to fold the chenille stem in half and trap a thin pinch of roving in the fold. I use inexpensive wool mill scraps for the foundation of all my felted creations.

Form the chenille stem ends into two loops, twist the wire ends around the base of the loops. Interlock the two loops together to create a framework for the body.
Tightly wrap the roving around the folded chenille stem to create the nose and head. Working over a foam matt or section of rigid foam insulation poke the roving on all sides with a felting needle. A felting needle has tiny barbs that catch the individual wool fibers and knit them together, the more you poke the more the fibers are compressed.
Fill the chenille frame with roving and then over wrap the body with additional base roving. Needle-felt the roving on all sides to compress the fibers and solidify the body.
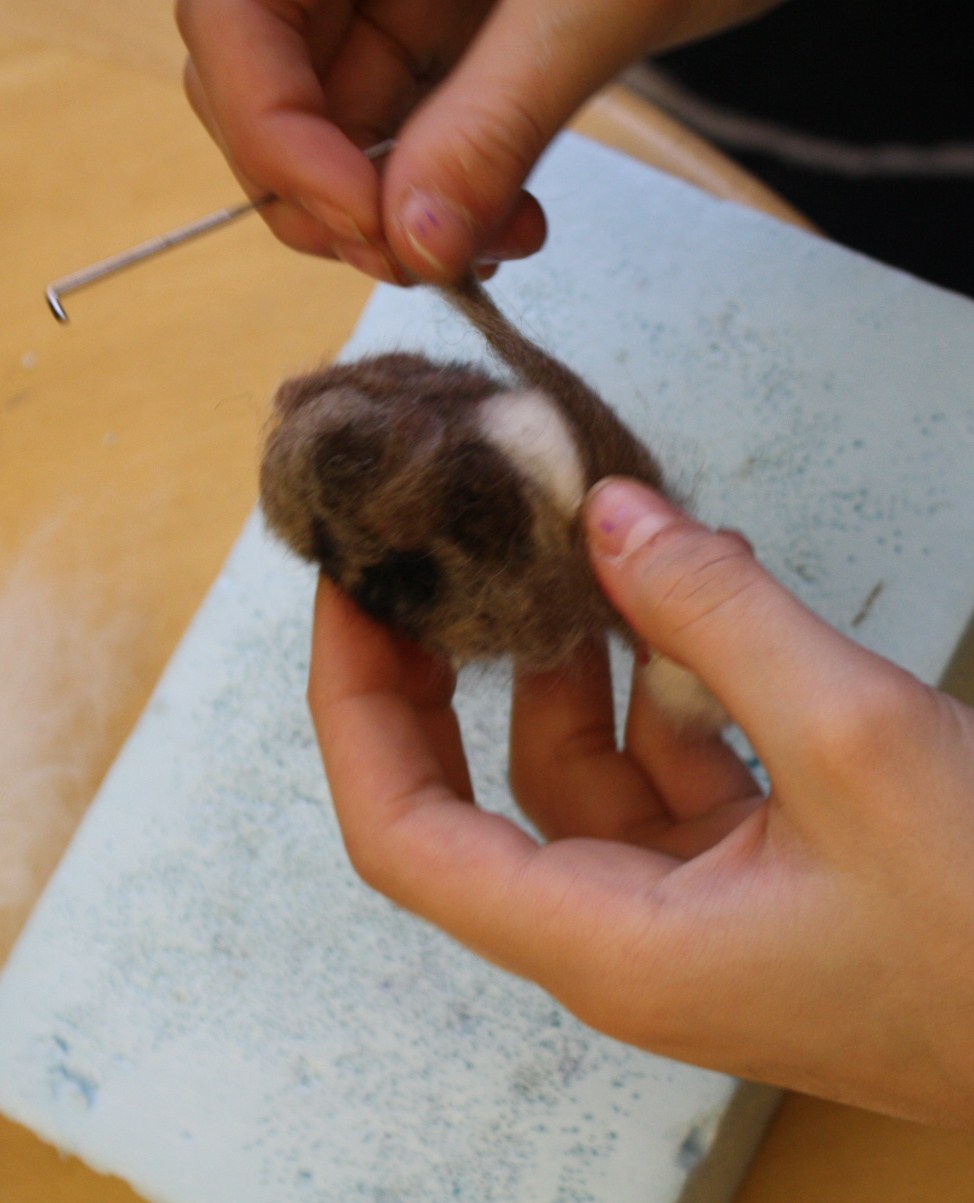
Cover the base color with brown roving, switch directions as if you were winding a skein of yarn. The combination of overwrapping and needle felting will tighten the body. Wrap the head and nose in beige roving and needle-felt in place.
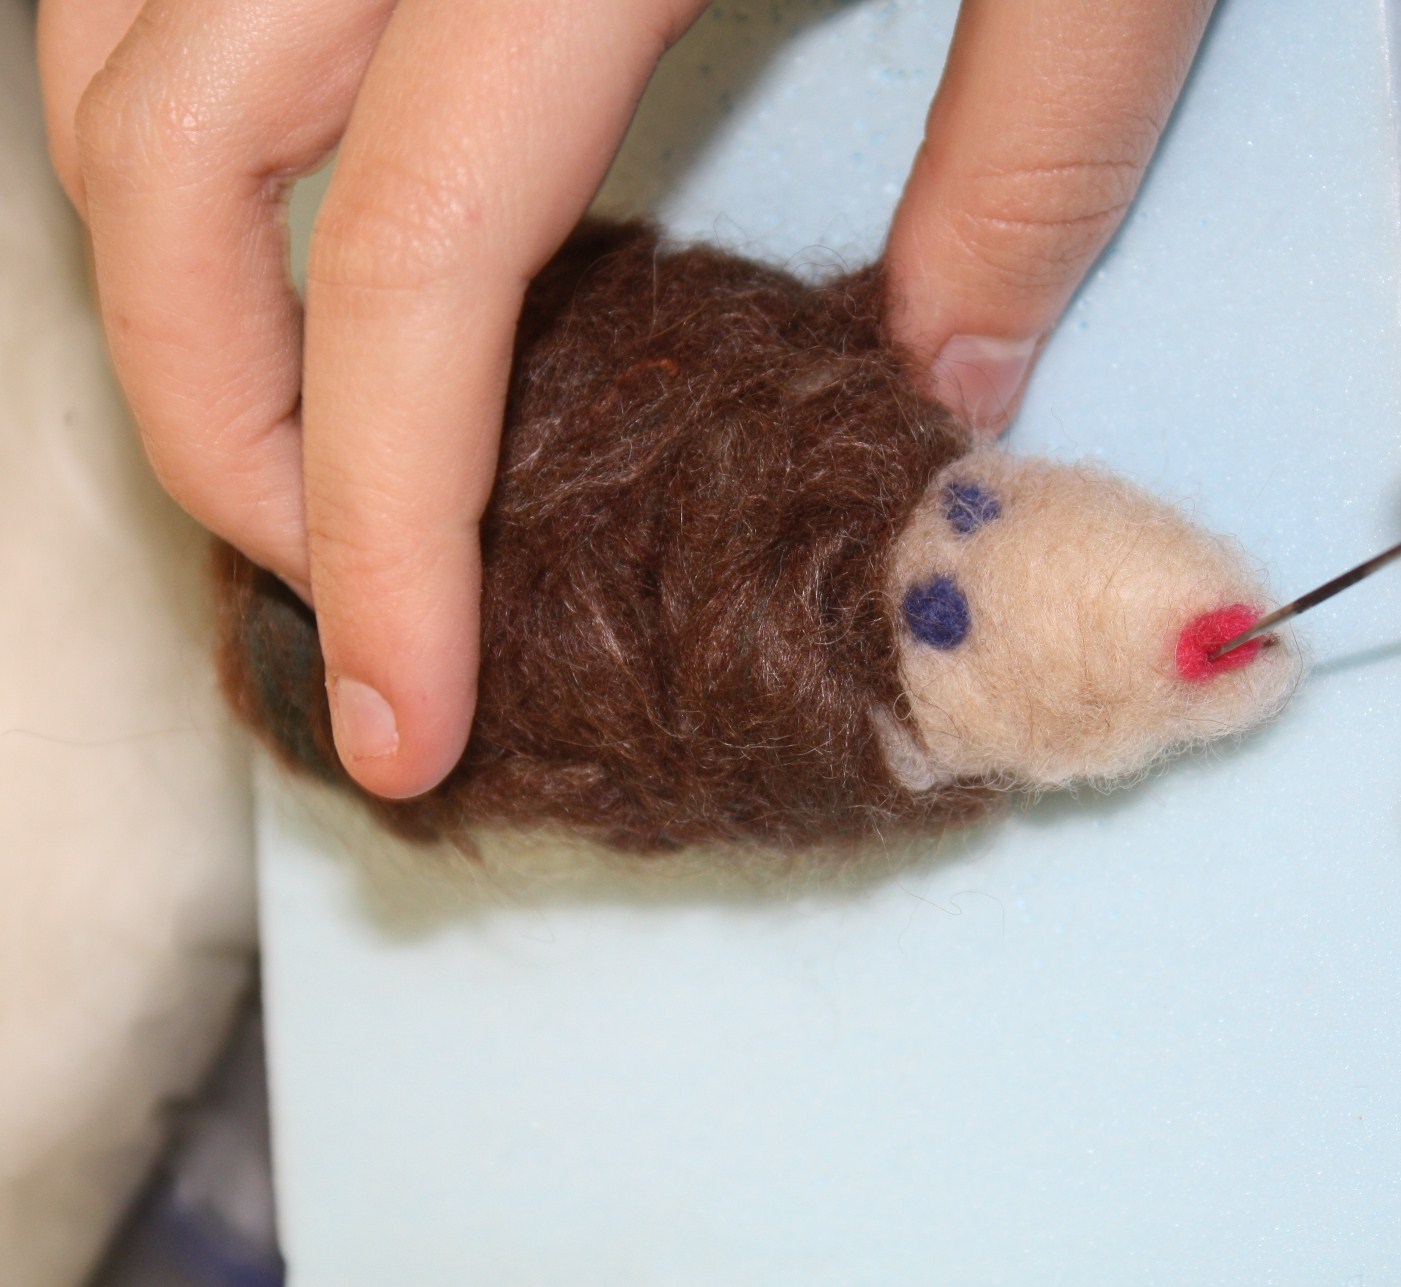
Roll tiny pinches of colored roving to make the eyes and nose. Needle felt these small pieces directly into the beige head. Spiral slightly larger pinches of beige roving and needle-felt them on the matt/board before felting the bottom edges to either side of the head.
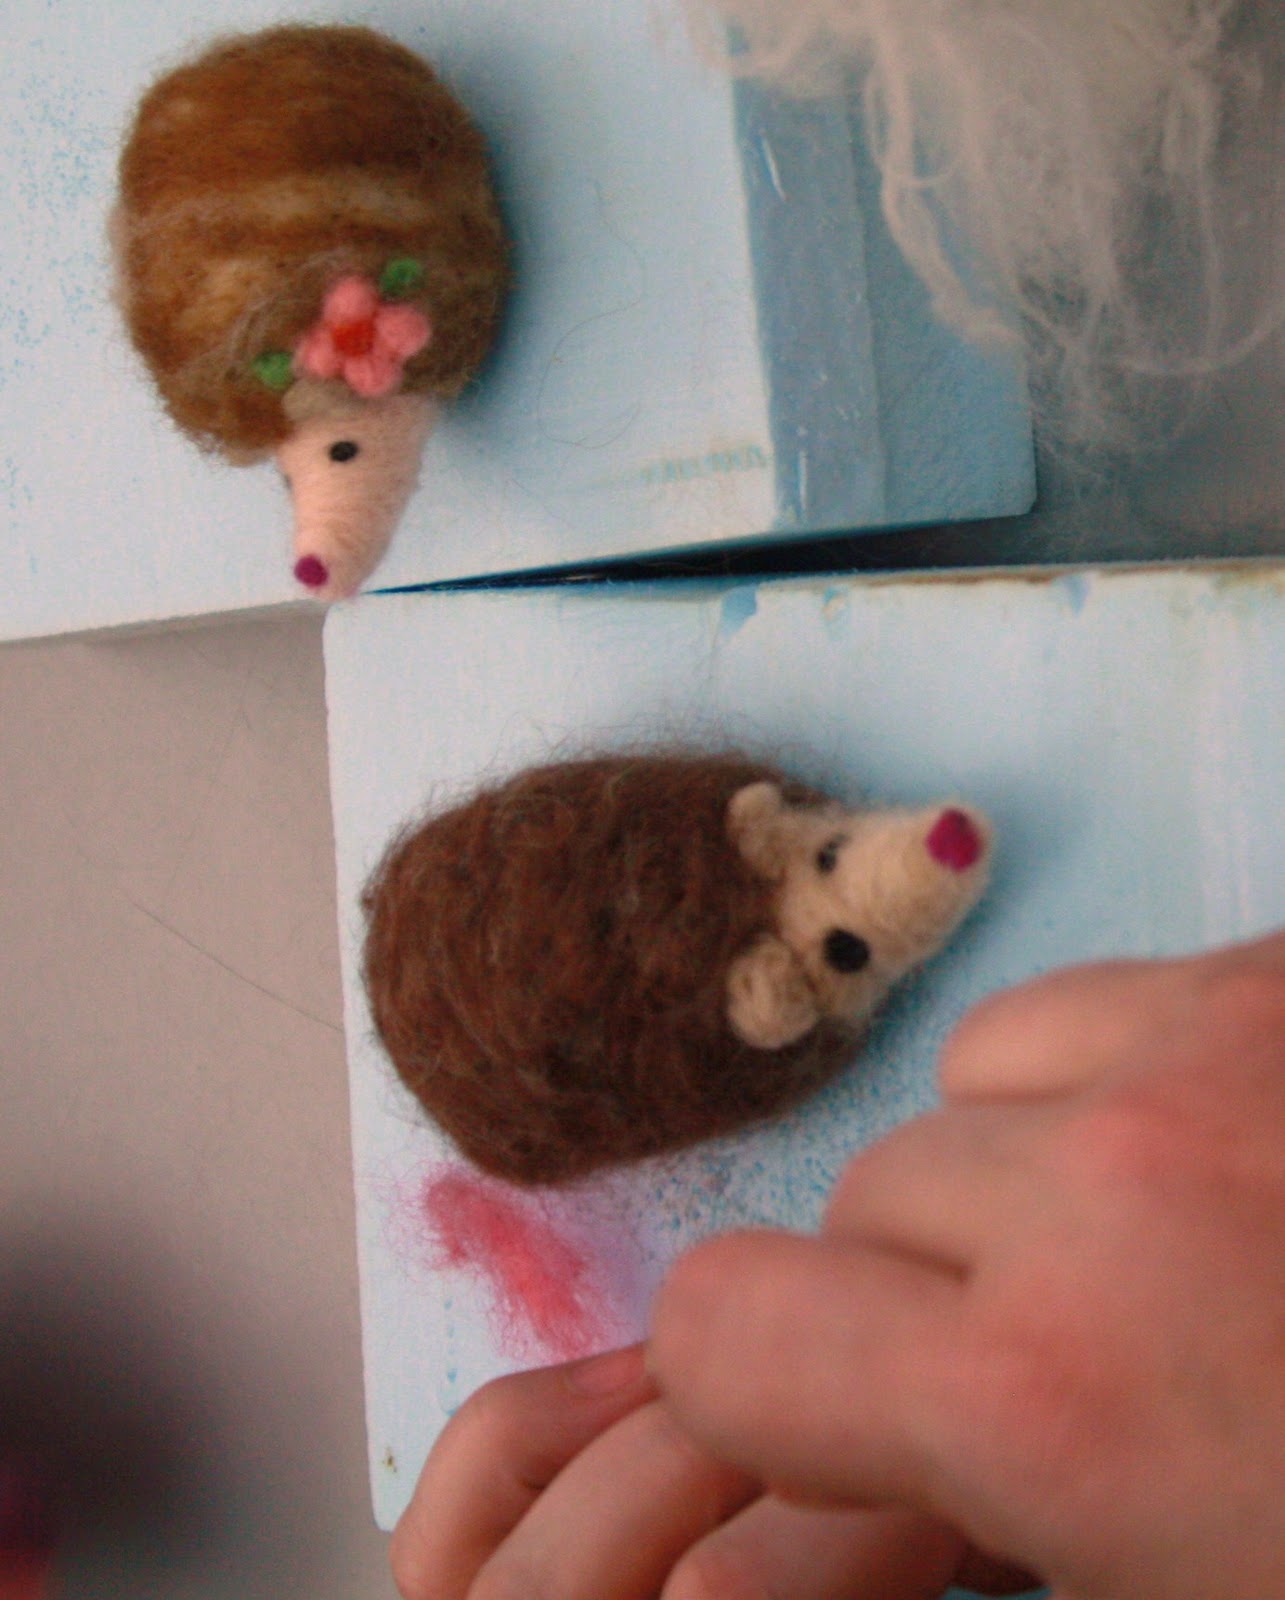
The flower embellishment is made by spiraling a piece of roving into a circle and felting it just behind an ear. Pull strands into the center to form petals. I added a touch of green roving for a small leaf accent.
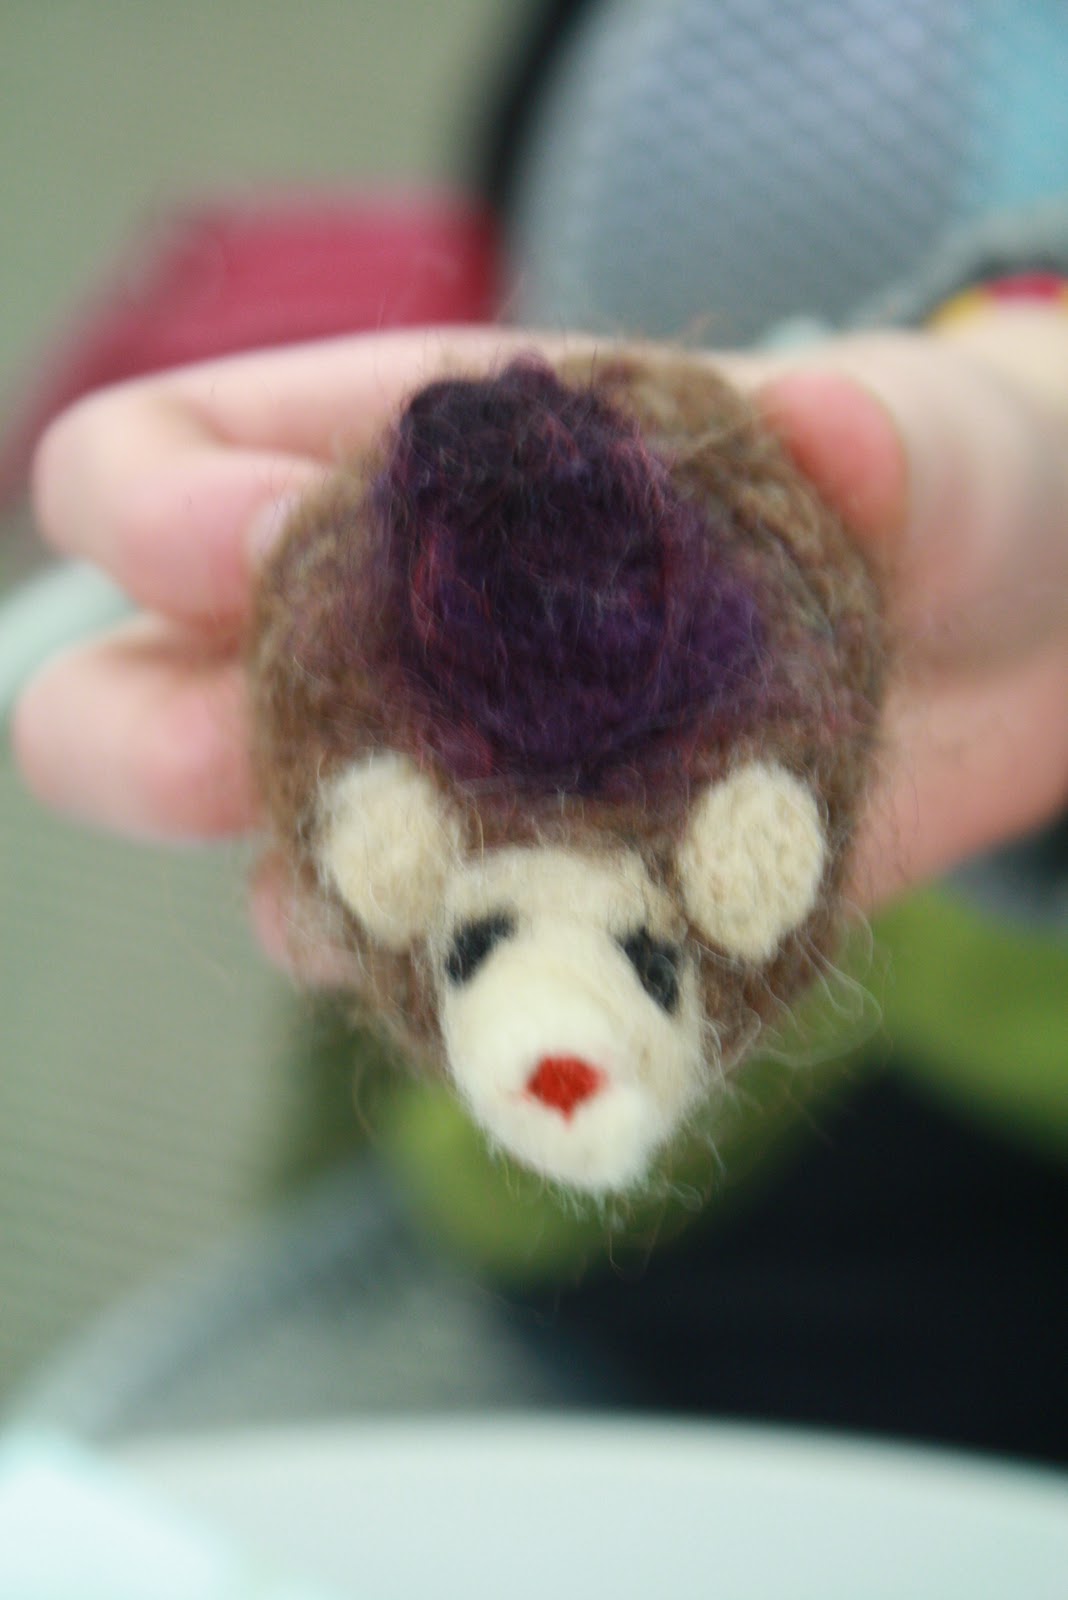
This lucky critter was given a stylish purple top hat.
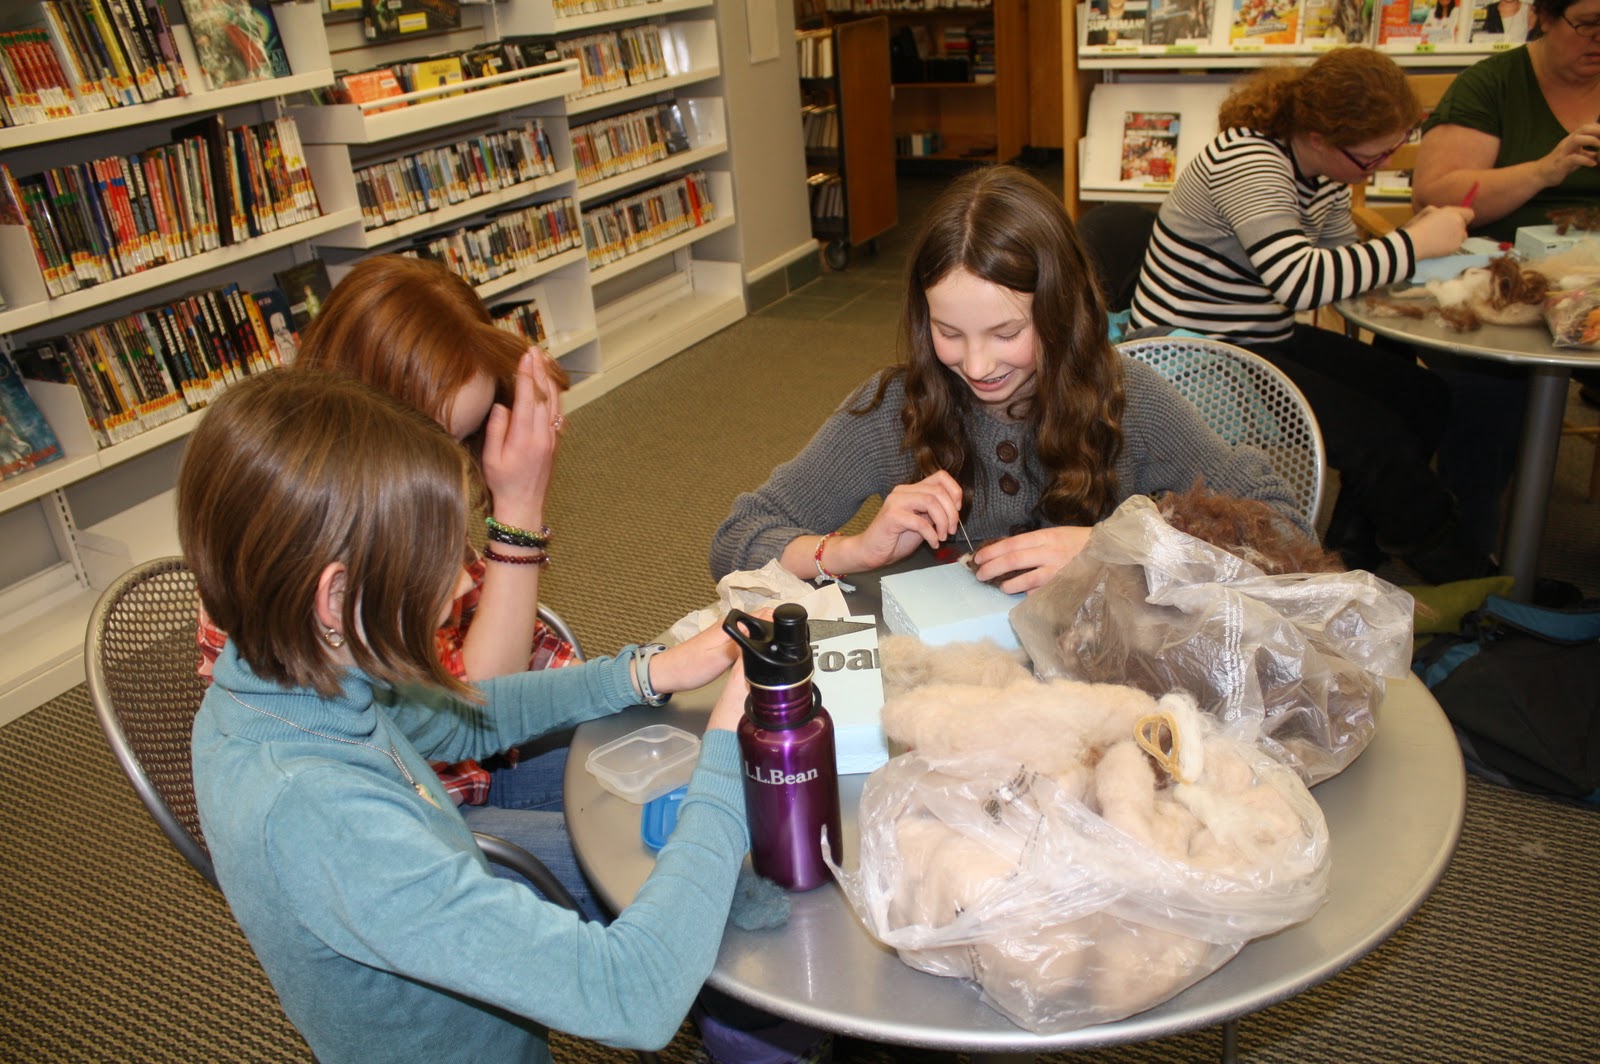
Three top tables and coffee tables made for cozy crafting. The bags of roving are from my favorite needle felting supplier Portland Fiber Company, on Congress Street in Portland.
As always my projects are open to adaptation, it was fascinating to observe the creation of this weasel.

One of the participents came late and skipped on the chenille stem step she made an adorable mashed potato pair.
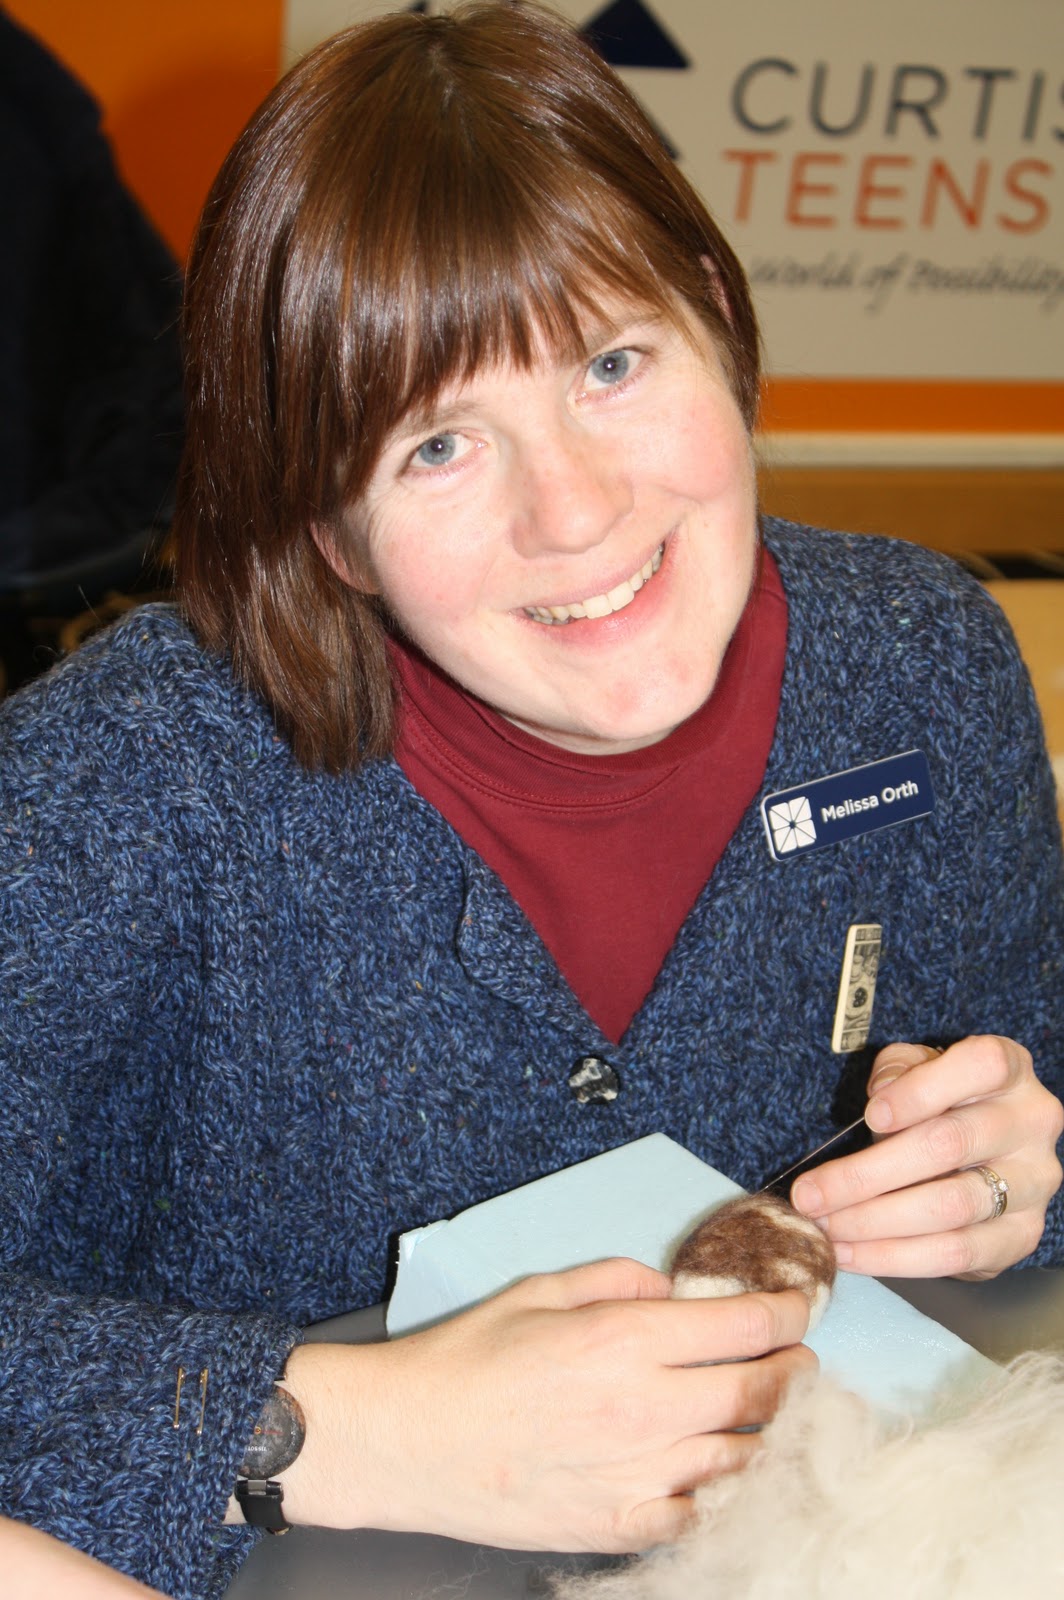
So happy our amazing teen librarian was able to leave the desk and join the fun. I was also surprised to have crafty friends join me all the way from Standish.

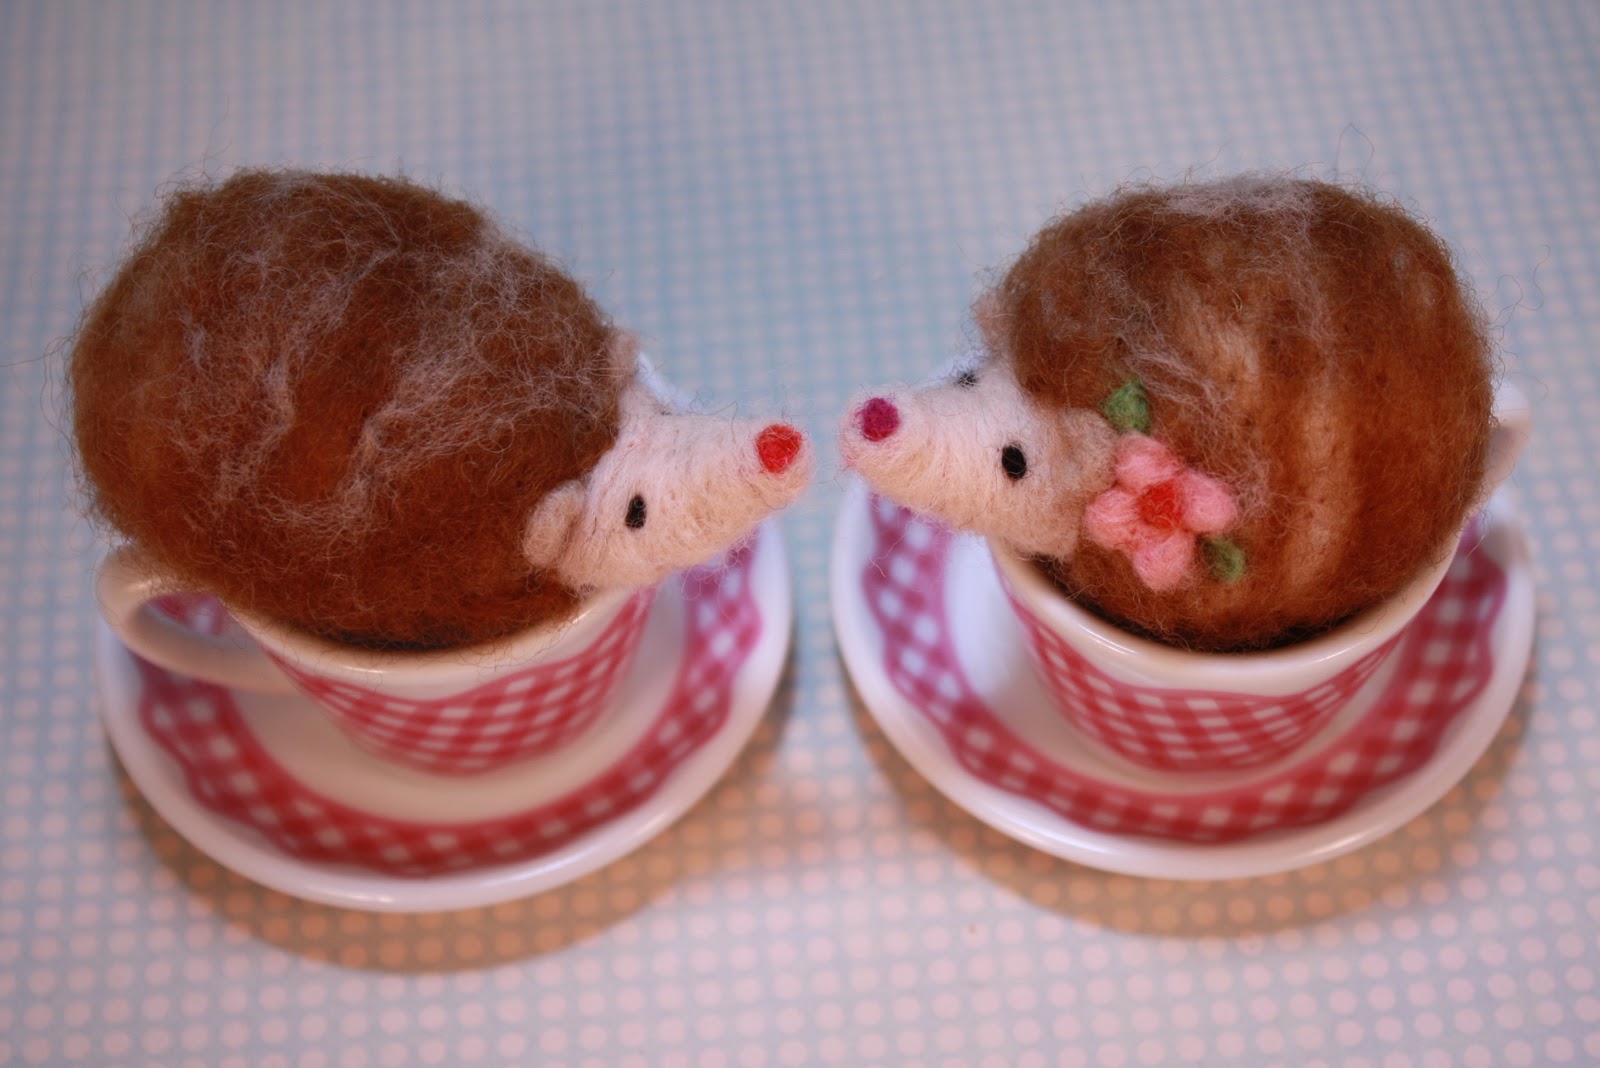
We had a rare albino hedgehog sighting and a camera shy multi-colored tie dye hedgie.

Don't stop at just one, they're happier in pairs!

March 6, 2011
Winter Break Snow Globes: a tutorial
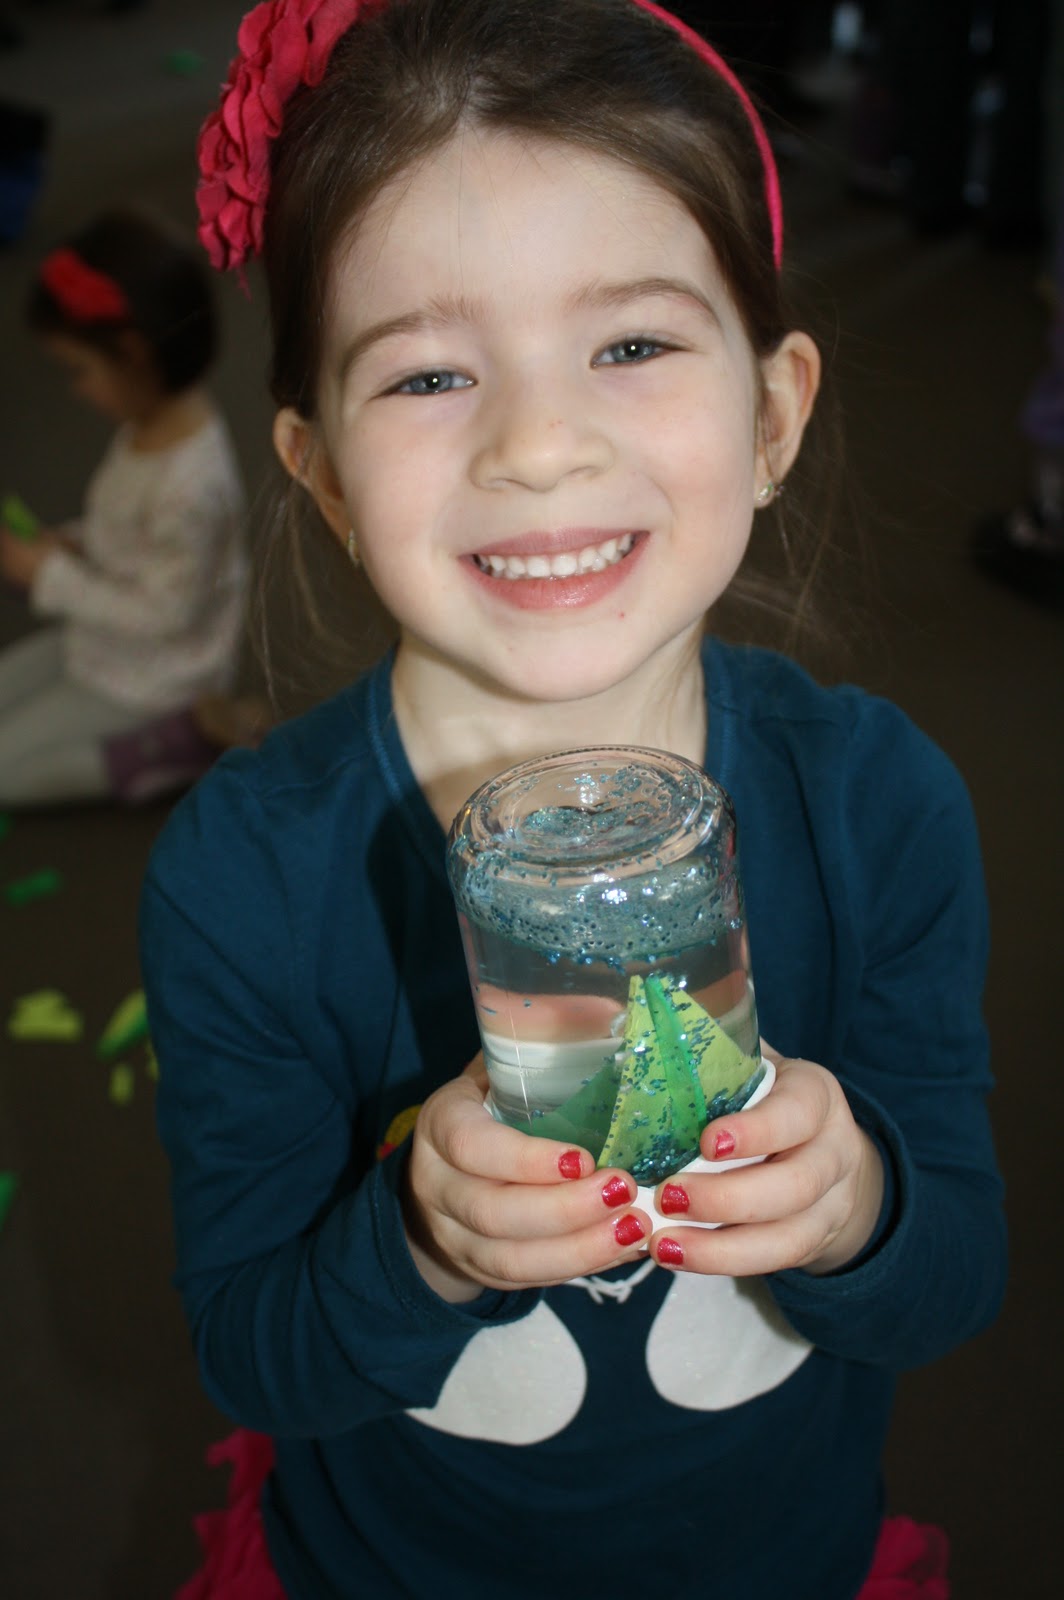 This crafter doesn't need glitter to shine.
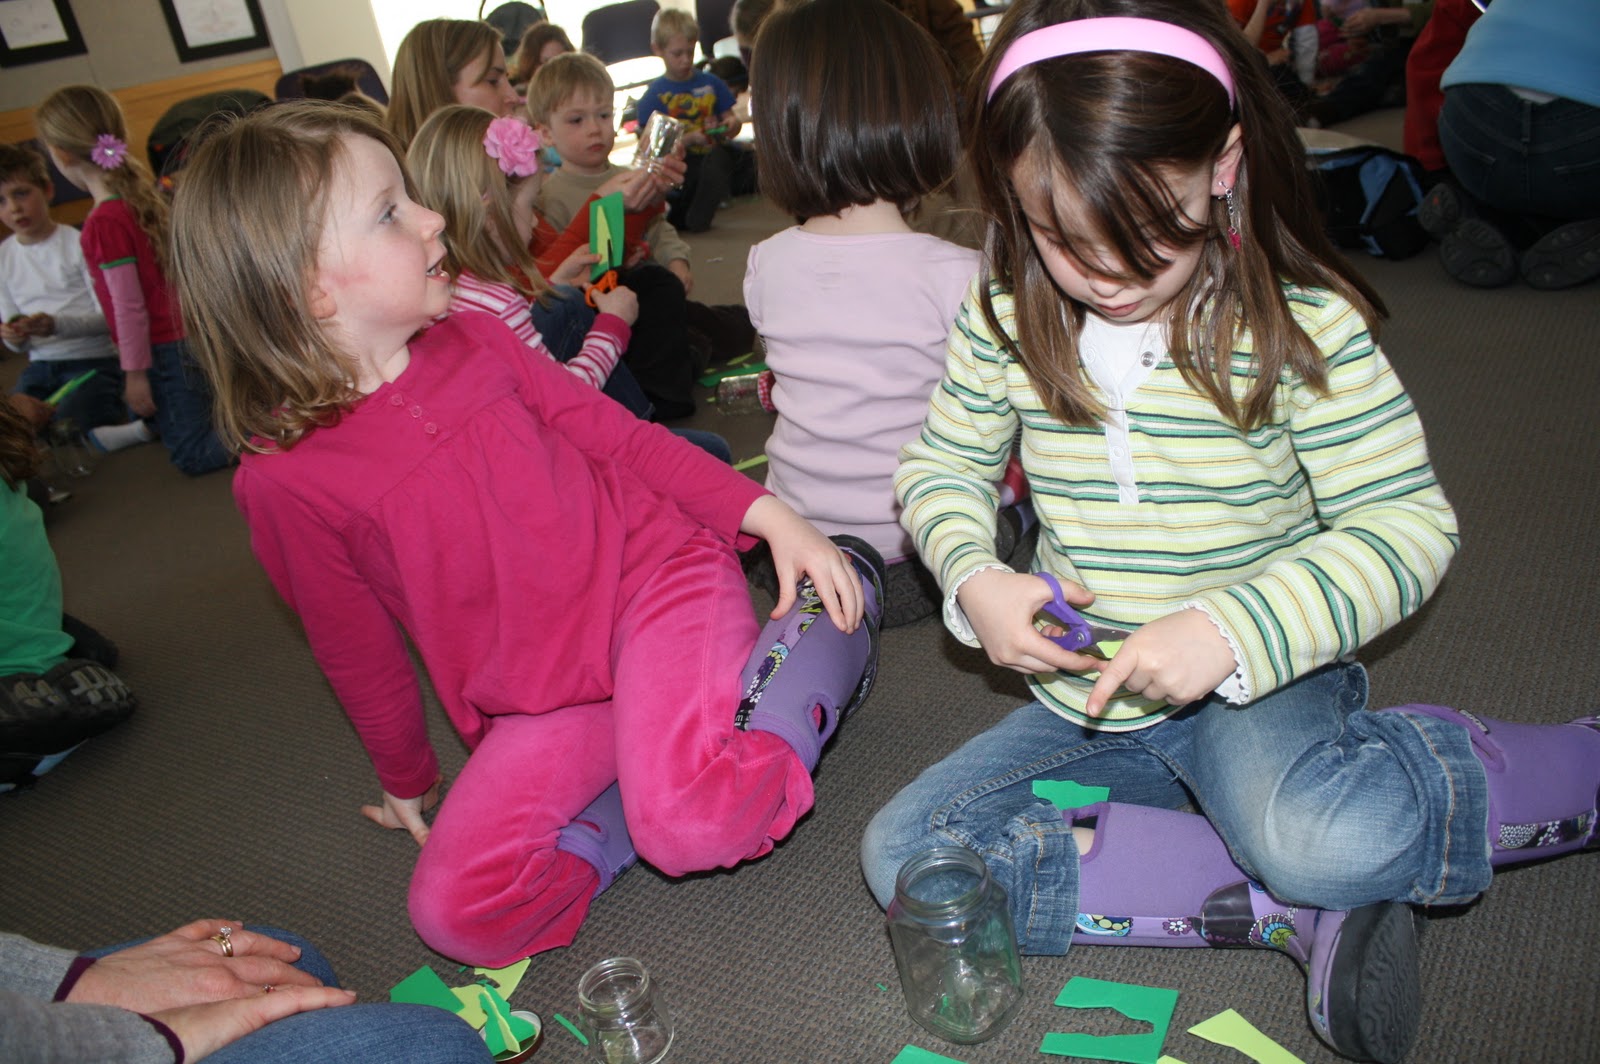
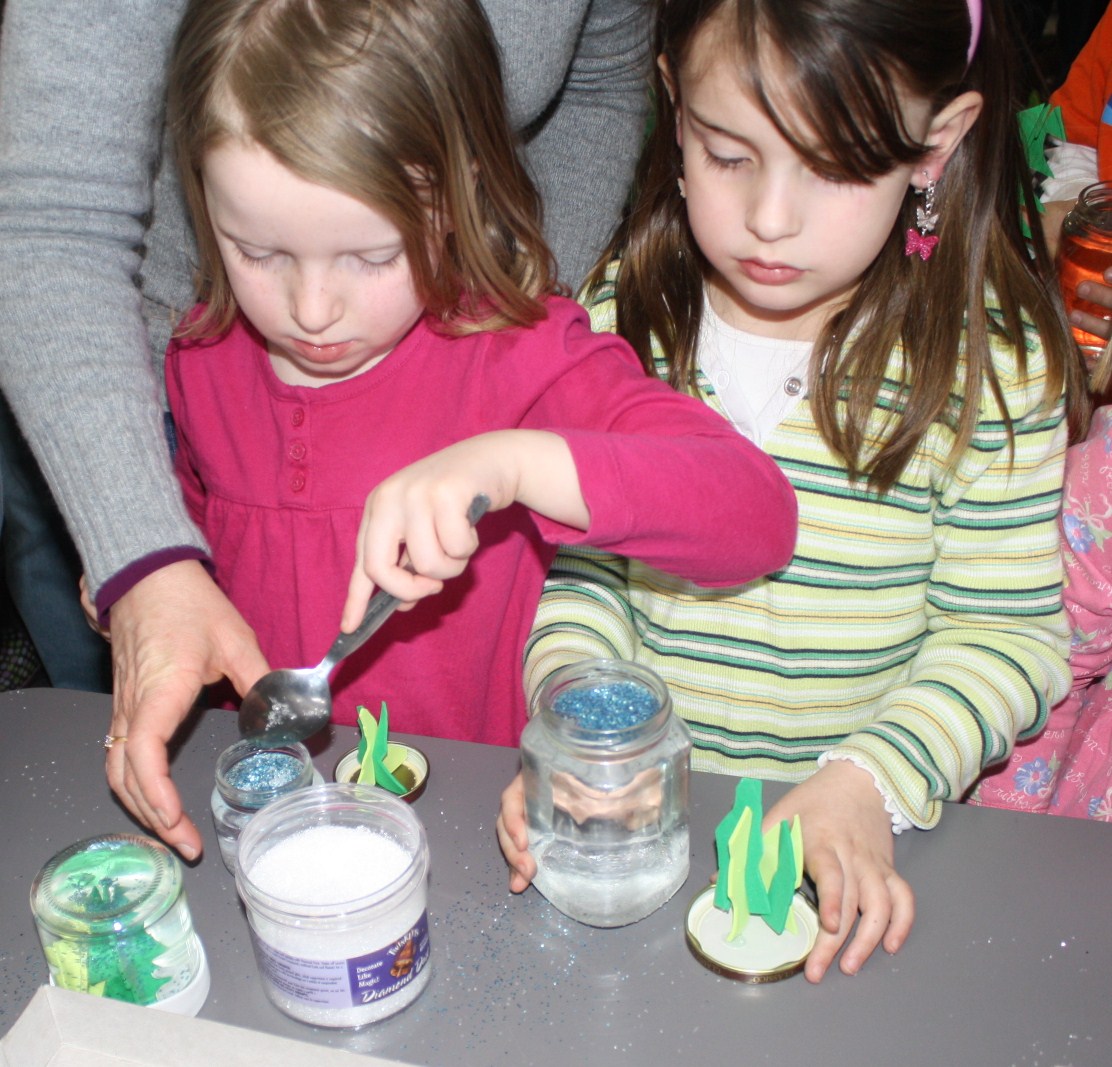
While the rest of the country might be seeing signs of Spring, Maine is still under a heavy blanket of snow. Last week the kids were home for winter break. A school holiday invented to slow the spread of colds and flu, give students and teachers a break, while providing everyone a chance to enjoy winter sports. The library requested a craft and we quickly agreed that snow globes would be perfect. We were astounded by the turn out, approximately eighty children arrived with glass jars in hand!
 Hope it passed the test!
I started the event with the perfect book The Snow Globe Family, by Jane O'Connor. It was my first time being miked for a library event, it worked well until I moved around for the room for the demo and unwillingly broadcasted ear piercing screeches.
 Jane O'connors book about life inside a snow globe is a classic.
Most snow globe projects require a strong adhesive to attach a plastic object to the inside of the lid. This presents two problems, the library budget can't afford 80 plastic objects and children don't want to wait a day for the glue to dry before filling their globes with glitter and water.
 Crafting with a crowd is exciting inspiring and also distracting!
I decided craft foam would be the perfect alternative, it's waterproof and easy for kids to cut. My best discovery was permanent Glue Dots, they were easy to distribute, mess free, and best of all instantly held craft foam in place!
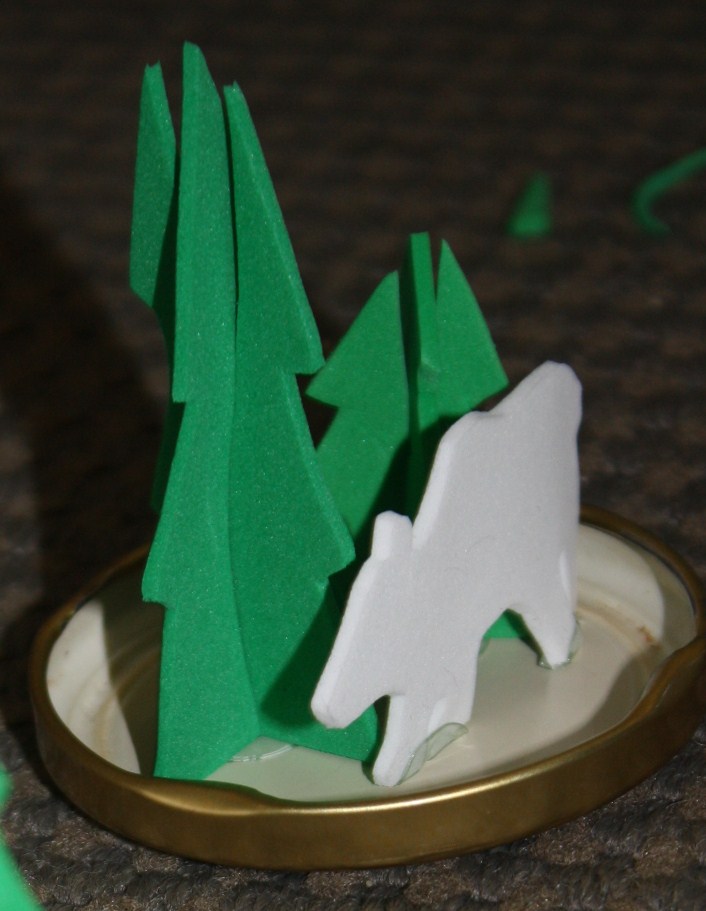 A creative participant added a wonderful polar bear to the scene
We supplied the children with two shades of green foam and scissors. I demonstrated how to cut out two tree shapes (that would fit inside your jar). Then I cut a slit halfway down the middle of one tree and halfway up the middle of the other tree. Slide the two pieces together and you instantly have a three dimensional tree.
 Test fit your tree before filling the jar, it's easy to give your tree a haircut if it's too tall or wide.
I had them place a glue dots inside the lid and press the base of the tree into the glue. Only a couple of trees sprang loose, to prevent this I'd suggest anchoring the sides of the trees with 1-2 additional dots.
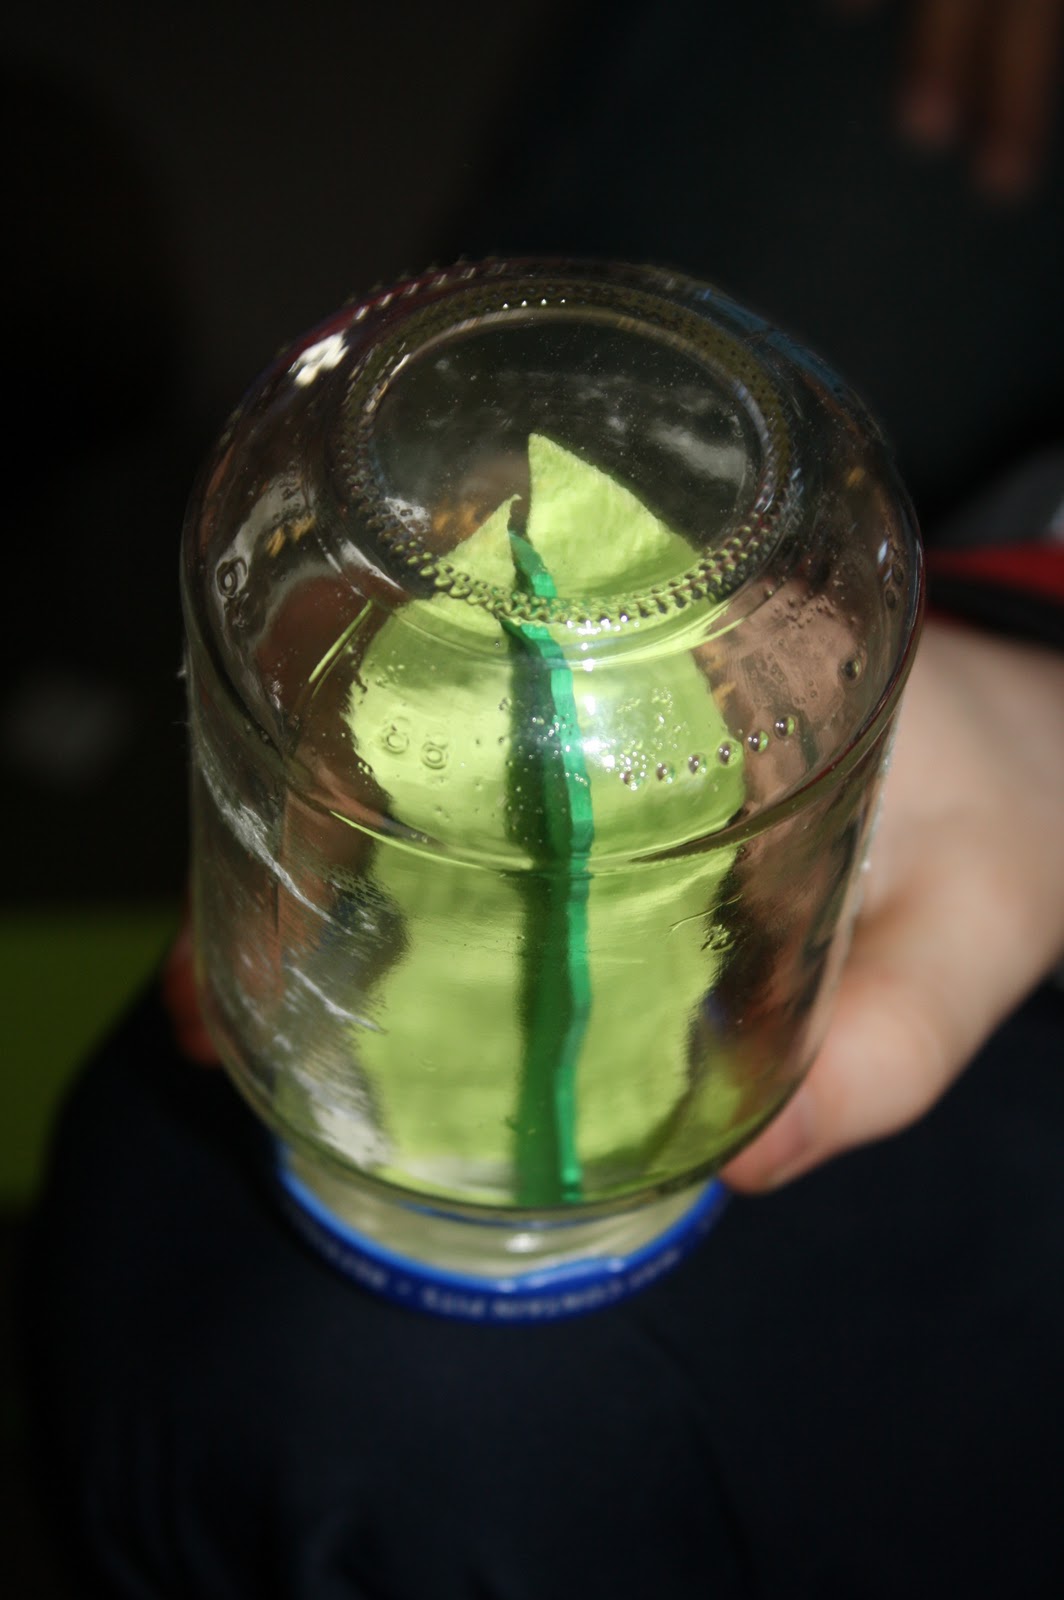
Fill the glass jar to the first screw line with distilled water. Then squeeze in 5-7 drops of glycerin, which slows down the glitters movement in the water. Glycerin is sold with cake making supplies in craft stores but is less expensive in drugstores.
 Initially the glitter floats on the top, once you screw on the lid and give it a shake the glitter is set into motion.
The favorite step was adding a spoonfuls of iridescent and light blue glitter. For a true snowy appearance I would recommend opaque white glitter. Glitter is the one ingredient that I should have double stocked, it's impossible to have too much!
Parents (and my two high school helpers) applied a bead of Silicon Aquarium Sealant (sold at pet stores) to the inside edge of the metal lid before screwing it in place. If you're making the project at home with the kids you could easily substitute a glass and metal glue.

We also provided white craft foam strips to wrap around the base of the jar. This covered the lids and gave the illusion of a snow bank. Glue dots were used to attach the overlapped ends.
 No doubt about it, kinetic crafting is a hit!
I'll always wonder if our combined enthusiasm for snow ushered the ten inch storm that fell the next day. I'm already looking forward to planning a warmer craft for April break, maybe we can get flowers to bloom!
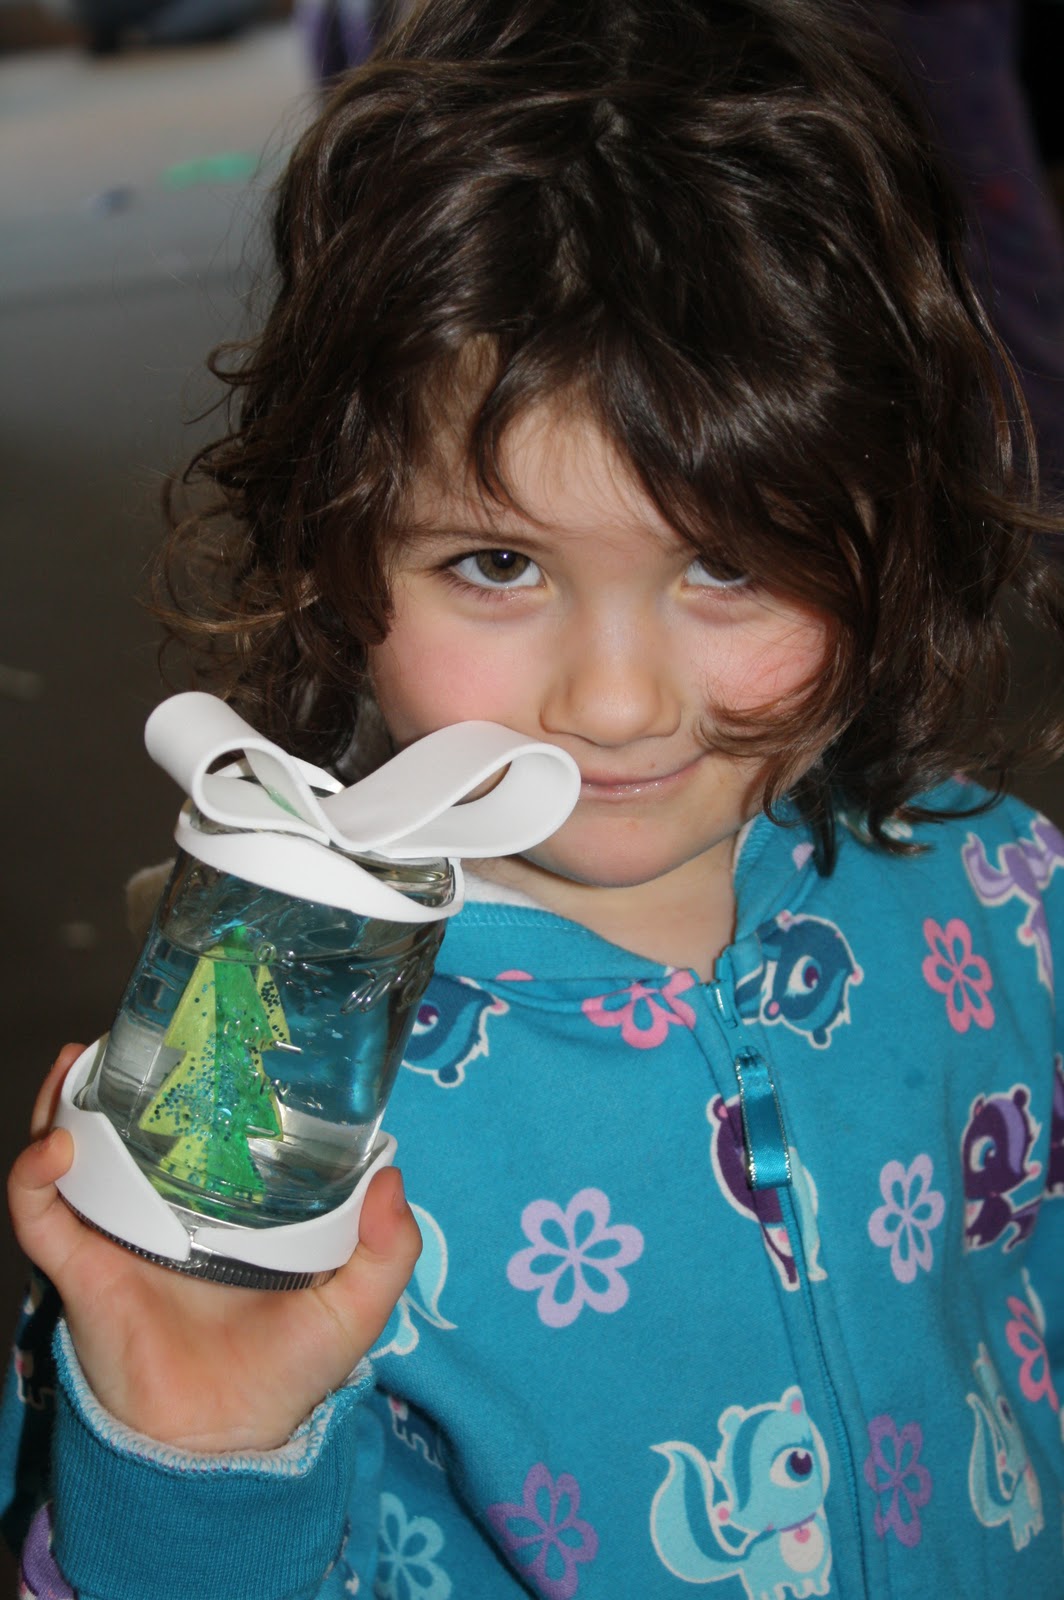 Isn't everything better with a bow on top?
February 28, 2011
Dog Gone Fun - Toy tutorial and Beefy biscuit recipe
I'll admit I'm dog crazy, can't imagine my days without four paws by my side.

Just before the holidays we bid a teary goodbye to our ten year old wheaten terrier, Maizy. She was my faithful companion and an expert nanny dog. She was the inspiration behind my second book, Pet Crafts. She left us far too young but will be treasured in family memories.

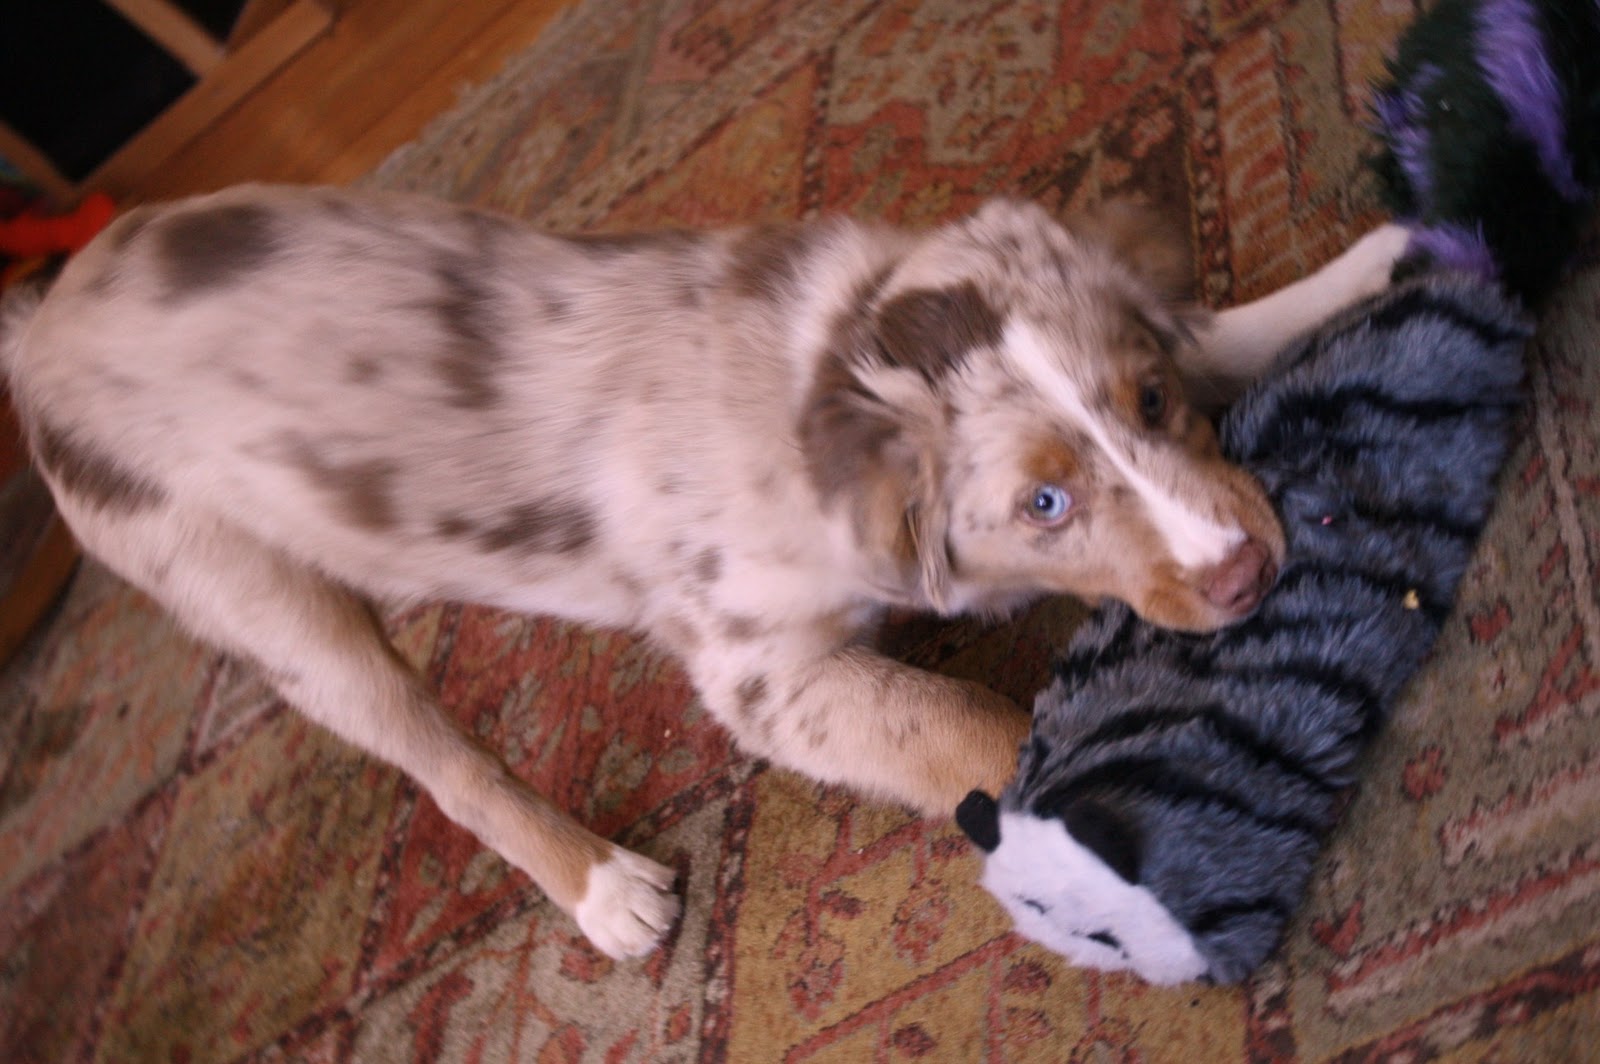
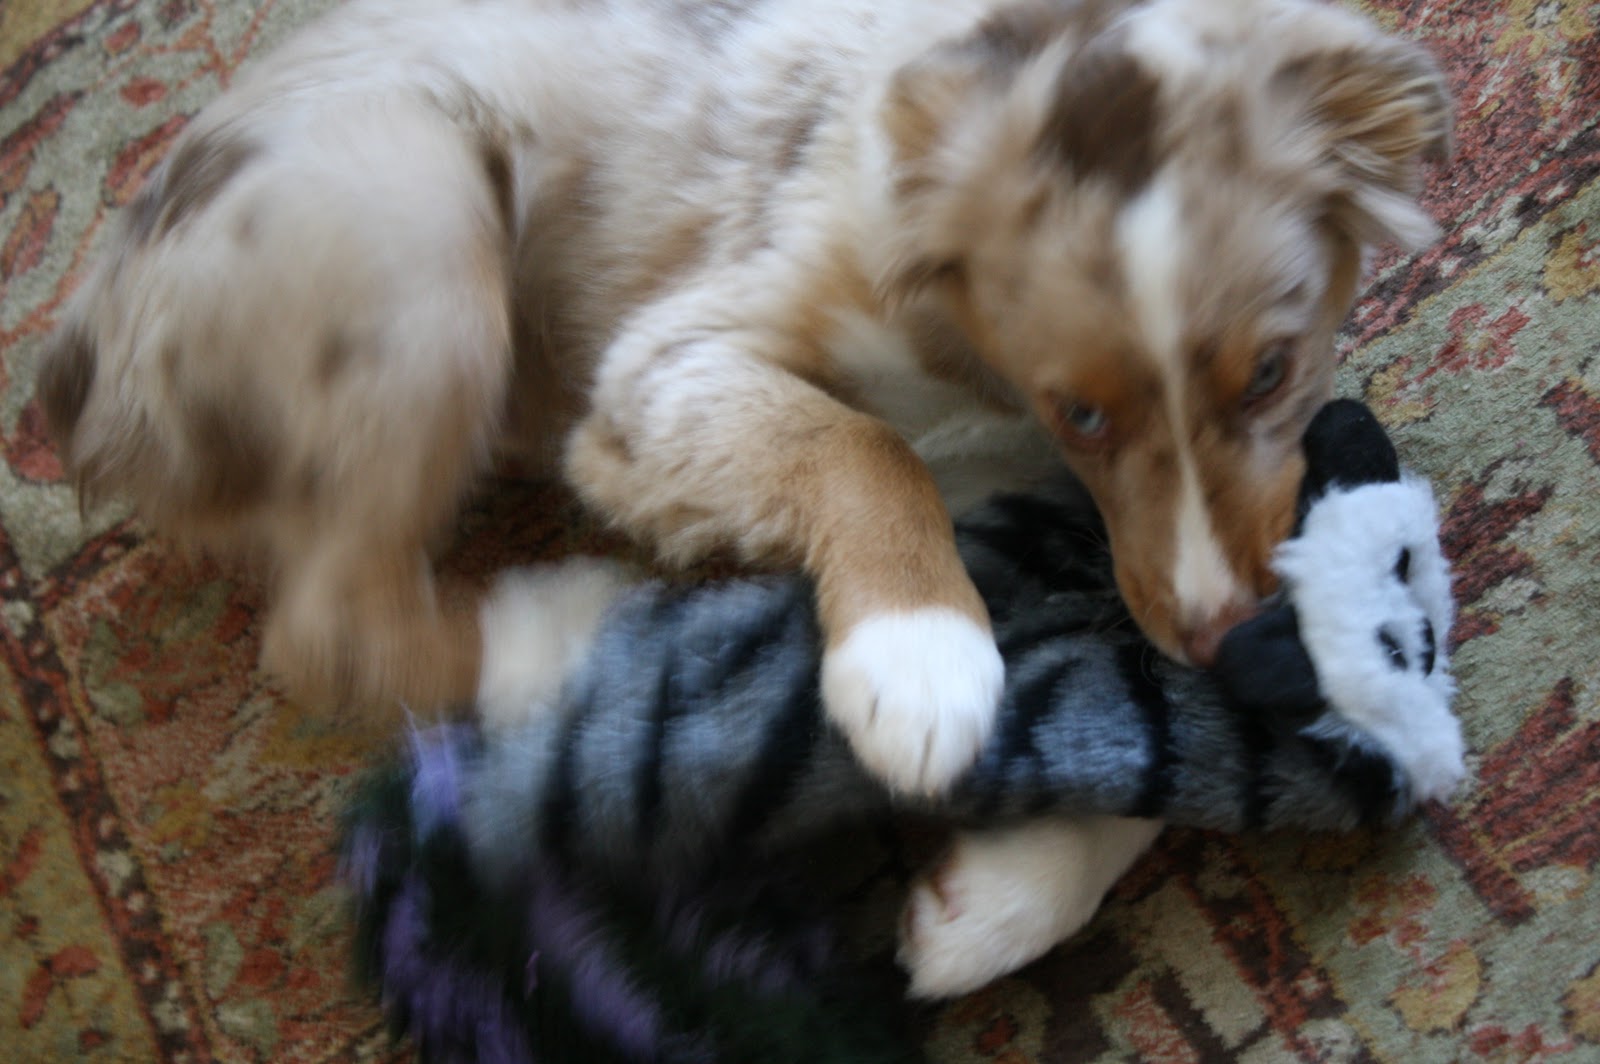
We picked up Otto at the begining of the new year. He's a spring loaded mini aussie whose filling our days with love and laughter. Our five year old daughter is having a great time helping with all things puppy from training to bathing.

Puppy toys and upscale treats can be pricey, you'll be amazed how easy and inexpensive it is to make and bake your own. Over winter break Celia devoted an hour making Otto a crazy furry critter.

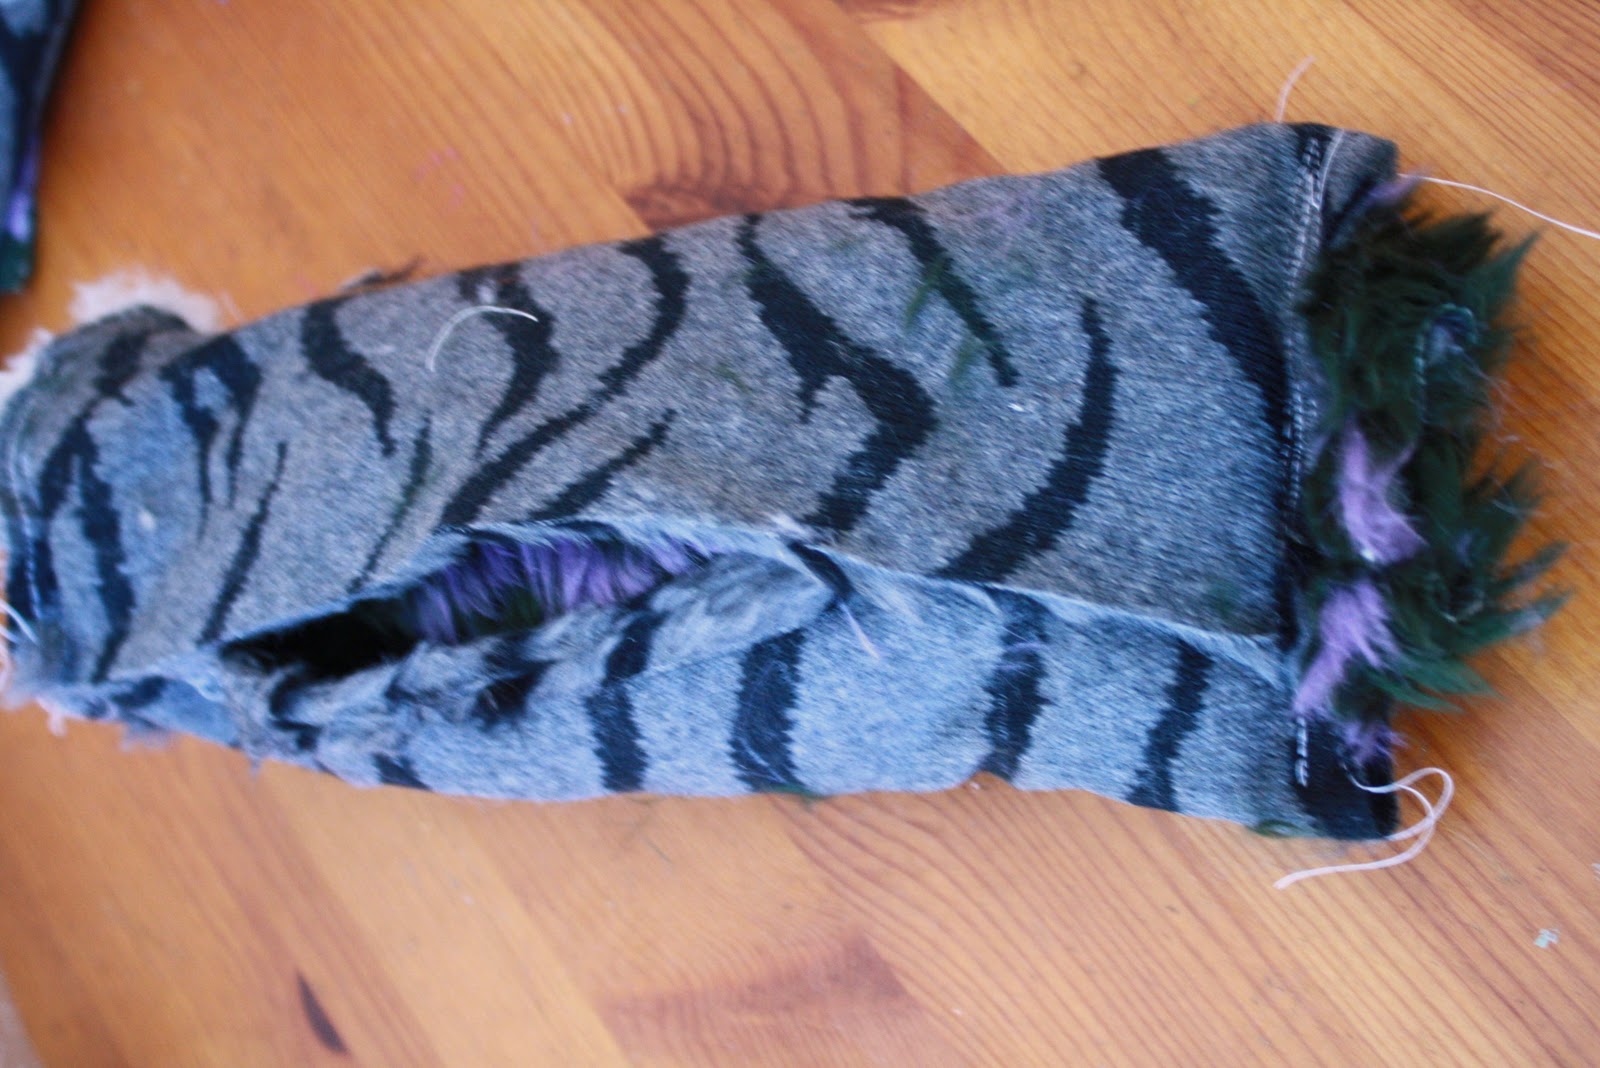
He immediately pounced on the crackling body and attacked the squeaky tail. This unique toy features a long Velcro body opening so that you can replace the crinkly water bottle stuffing.

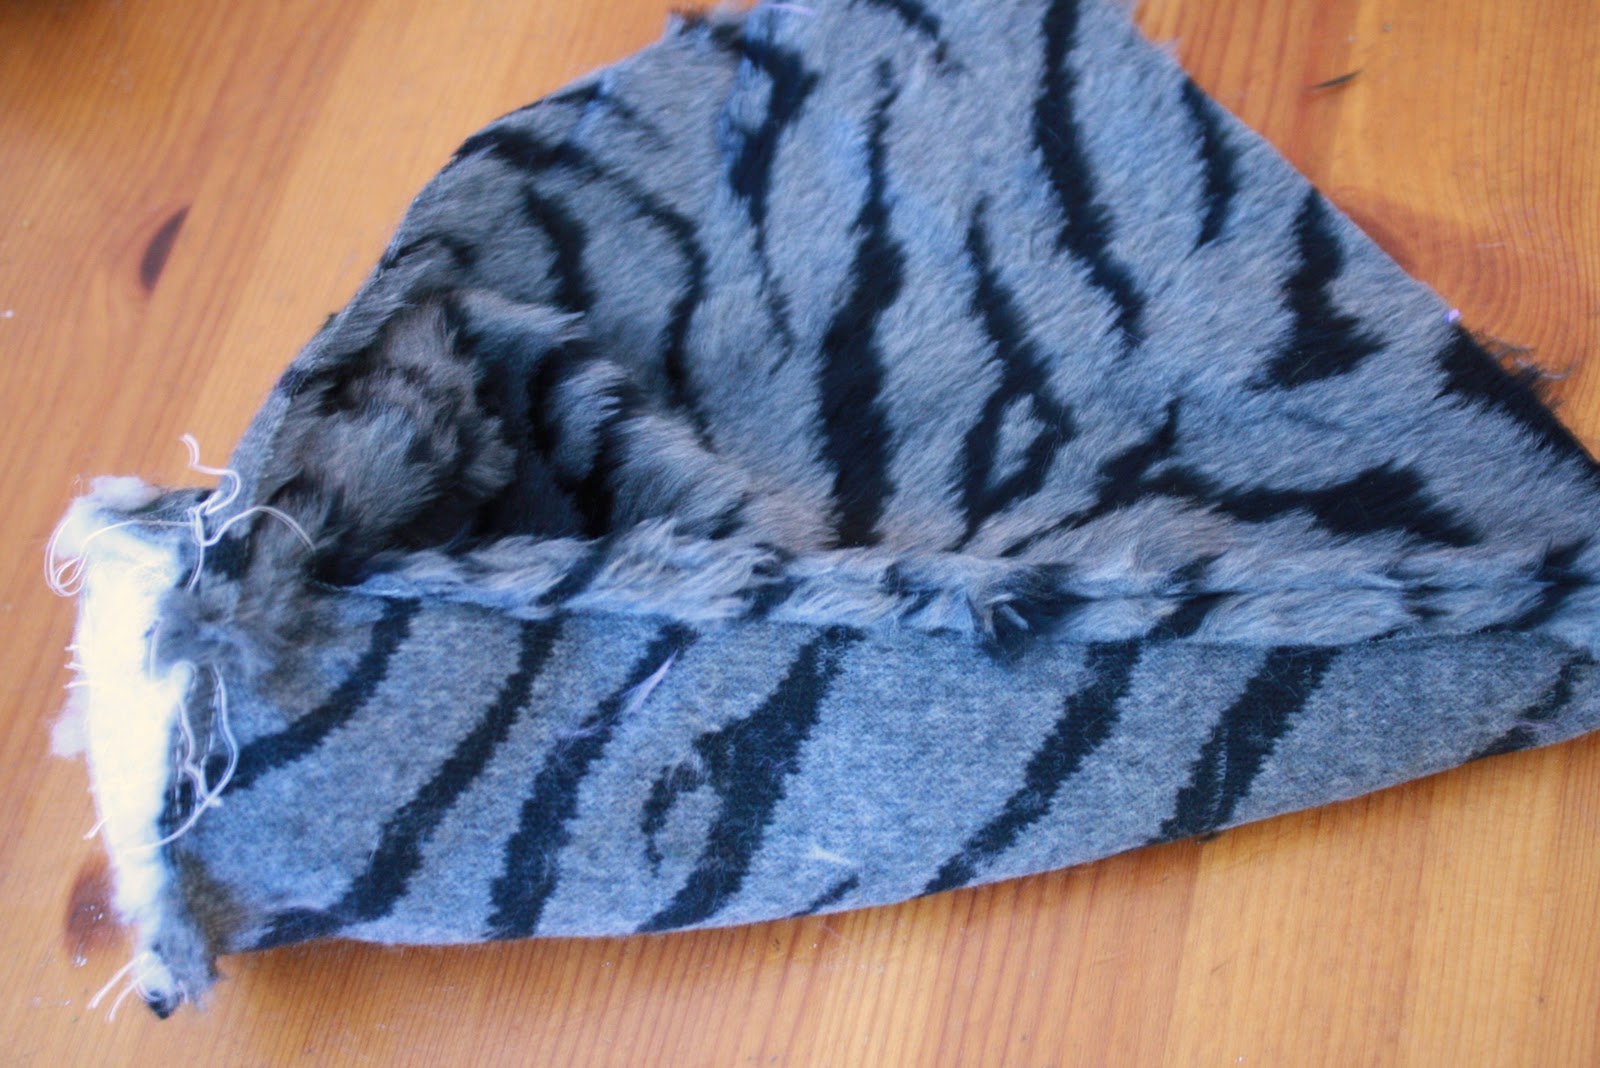
You'll need the following supplies: fun fur and felt scraps,fiber fill stuffing,sew-on hook and loop fastener a squeaker , you can recycle one from an old toy or order them online.
Fold the tail fur in half and cut through both layers to make a pointed tail shape that is 12" long, 5" at it's widest halfway down the tail, and 3.5" wide at the base. Cut the body fur into a 11" wide x 12" long rectangle; which should be wide enough to wrap around a large sized water bottle. Then cut a circle that is 4" in diameter for the head. Finally cut two pairs of 1.5" high and 1.5" wide felt ears, a 1.5" wide nose, and two .75" circle eyes.

Place the right sides of the tail together and machine stitch around the outside edge, be sure to leave the base unsewn. Make a second reinforcing seam. Snip off the very tip of the tail and turn the fabric right side out.

Lightly fill the tail with stuffing, then insert the squeaker.

Stack the ears together and stitch around the outside edge leaving the base unsewn, then turn them right side out. Position the eyes and nose in the center of head and spiral stitch them in place. Place the ears point sides down over the face and stitch them to the edge of the head.

Placing right sides together stitch the bottom edge of the body rectangle to the head. The body piece should overlap by an inch and half to enable the loop and closure to work.

Reach inside and turn over a half an inch of the cut fabric edge down the length of the body. Machine stitch a single seam to finish the folded edge.

Insert the tail into the base of the critter. Make sure that the unfinished body edge overlaps the finished one. Stitch through all the layers to close the base and attach the tail.

Turn the critter right side out. Pin and sew 10.5" length of hook and loop closure to the top of the unfinished edge and the underside of the finished edge. Insert the the bottle and let the games begin! A word of caution please be aware of your animals chewing habits and do not leave them unsupervised while they play.

When your pup slows down for a snack here's a biscuit recipe that will make them sit and beg.

Beefy Dog Biscuits
Preheat the oven to 300 degrees
In a large bowl/or stand mixer combine: 1/4 cup instant milk powder 1 T garlic Powder1/2 cup cornmeal1/2 cup wheat germ1 cup oatmeal2 1/2 cups flour
In a pryex measuring cup: Dissolve two beef bouillon cubes in 1 1/2 cups of boiling waterAdd 1 T of Peanut butter and drizzled in some honey.
Pour the wet ingredients into the dry ingredients and mix well. Roll the dough to a 1/4" - 1/2" thickness on a floured work surface. We use a snowflake or flower shaped cookie cutter so that we can break off small pieces for training or stuffing into Kongs. Bake for 45 mins. then turn off the heat and leave the cookies to cool and harden in the oven for 10 hrs. Store in an airtight container. This recipe makes a generous cookie supply that lasts us almost a month.

Just before the holidays we bid a teary goodbye to our ten year old wheaten terrier, Maizy. She was my faithful companion and an expert nanny dog. She was the inspiration behind my second book, Pet Crafts. She left us far too young but will be treasured in family memories.

We picked up Otto at the begining of the new year. He's a spring loaded mini aussie whose filling our days with love and laughter. Our five year old daughter is having a great time helping with all things puppy from training to bathing.

Puppy toys and upscale treats can be pricey, you'll be amazed how easy and inexpensive it is to make and bake your own. Over winter break Celia devoted an hour making Otto a crazy furry critter.
He immediately pounced on the crackling body and attacked the squeaky tail. This unique toy features a long Velcro body opening so that you can replace the crinkly water bottle stuffing.

You'll need the following supplies: fun fur and felt scraps,fiber fill stuffing,sew-on hook and loop fastener a squeaker , you can recycle one from an old toy or order them online.
Fold the tail fur in half and cut through both layers to make a pointed tail shape that is 12" long, 5" at it's widest halfway down the tail, and 3.5" wide at the base. Cut the body fur into a 11" wide x 12" long rectangle; which should be wide enough to wrap around a large sized water bottle. Then cut a circle that is 4" in diameter for the head. Finally cut two pairs of 1.5" high and 1.5" wide felt ears, a 1.5" wide nose, and two .75" circle eyes.

Place the right sides of the tail together and machine stitch around the outside edge, be sure to leave the base unsewn. Make a second reinforcing seam. Snip off the very tip of the tail and turn the fabric right side out.

Lightly fill the tail with stuffing, then insert the squeaker.

Stack the ears together and stitch around the outside edge leaving the base unsewn, then turn them right side out. Position the eyes and nose in the center of head and spiral stitch them in place. Place the ears point sides down over the face and stitch them to the edge of the head.

Placing right sides together stitch the bottom edge of the body rectangle to the head. The body piece should overlap by an inch and half to enable the loop and closure to work.
Reach inside and turn over a half an inch of the cut fabric edge down the length of the body. Machine stitch a single seam to finish the folded edge.
Insert the tail into the base of the critter. Make sure that the unfinished body edge overlaps the finished one. Stitch through all the layers to close the base and attach the tail.

Turn the critter right side out. Pin and sew 10.5" length of hook and loop closure to the top of the unfinished edge and the underside of the finished edge. Insert the the bottle and let the games begin! A word of caution please be aware of your animals chewing habits and do not leave them unsupervised while they play.
When your pup slows down for a snack here's a biscuit recipe that will make them sit and beg.

Beefy Dog Biscuits
Preheat the oven to 300 degrees
In a large bowl/or stand mixer combine: 1/4 cup instant milk powder 1 T garlic Powder1/2 cup cornmeal1/2 cup wheat germ1 cup oatmeal2 1/2 cups flour
In a pryex measuring cup: Dissolve two beef bouillon cubes in 1 1/2 cups of boiling waterAdd 1 T of Peanut butter and drizzled in some honey.
Pour the wet ingredients into the dry ingredients and mix well. Roll the dough to a 1/4" - 1/2" thickness on a floured work surface. We use a snowflake or flower shaped cookie cutter so that we can break off small pieces for training or stuffing into Kongs. Bake for 45 mins. then turn off the heat and leave the cookies to cool and harden in the oven for 10 hrs. Store in an airtight container. This recipe makes a generous cookie supply that lasts us almost a month.
February 9, 2011
Tweet Sachet tutorial
The woods surrounding our Maine home are covered in a dense quilt of snow. The early mornings are especially quiet, if it wasn't for the sounds of the woodpeckers and chickadees I'd be convinced that the whole world was sleeping. The last few morning robins have covered our crab apple tree filling their bellies with fruit. I'm hoping these red breasted birds are a harbinger of warmer temperatures and birdsong to come.
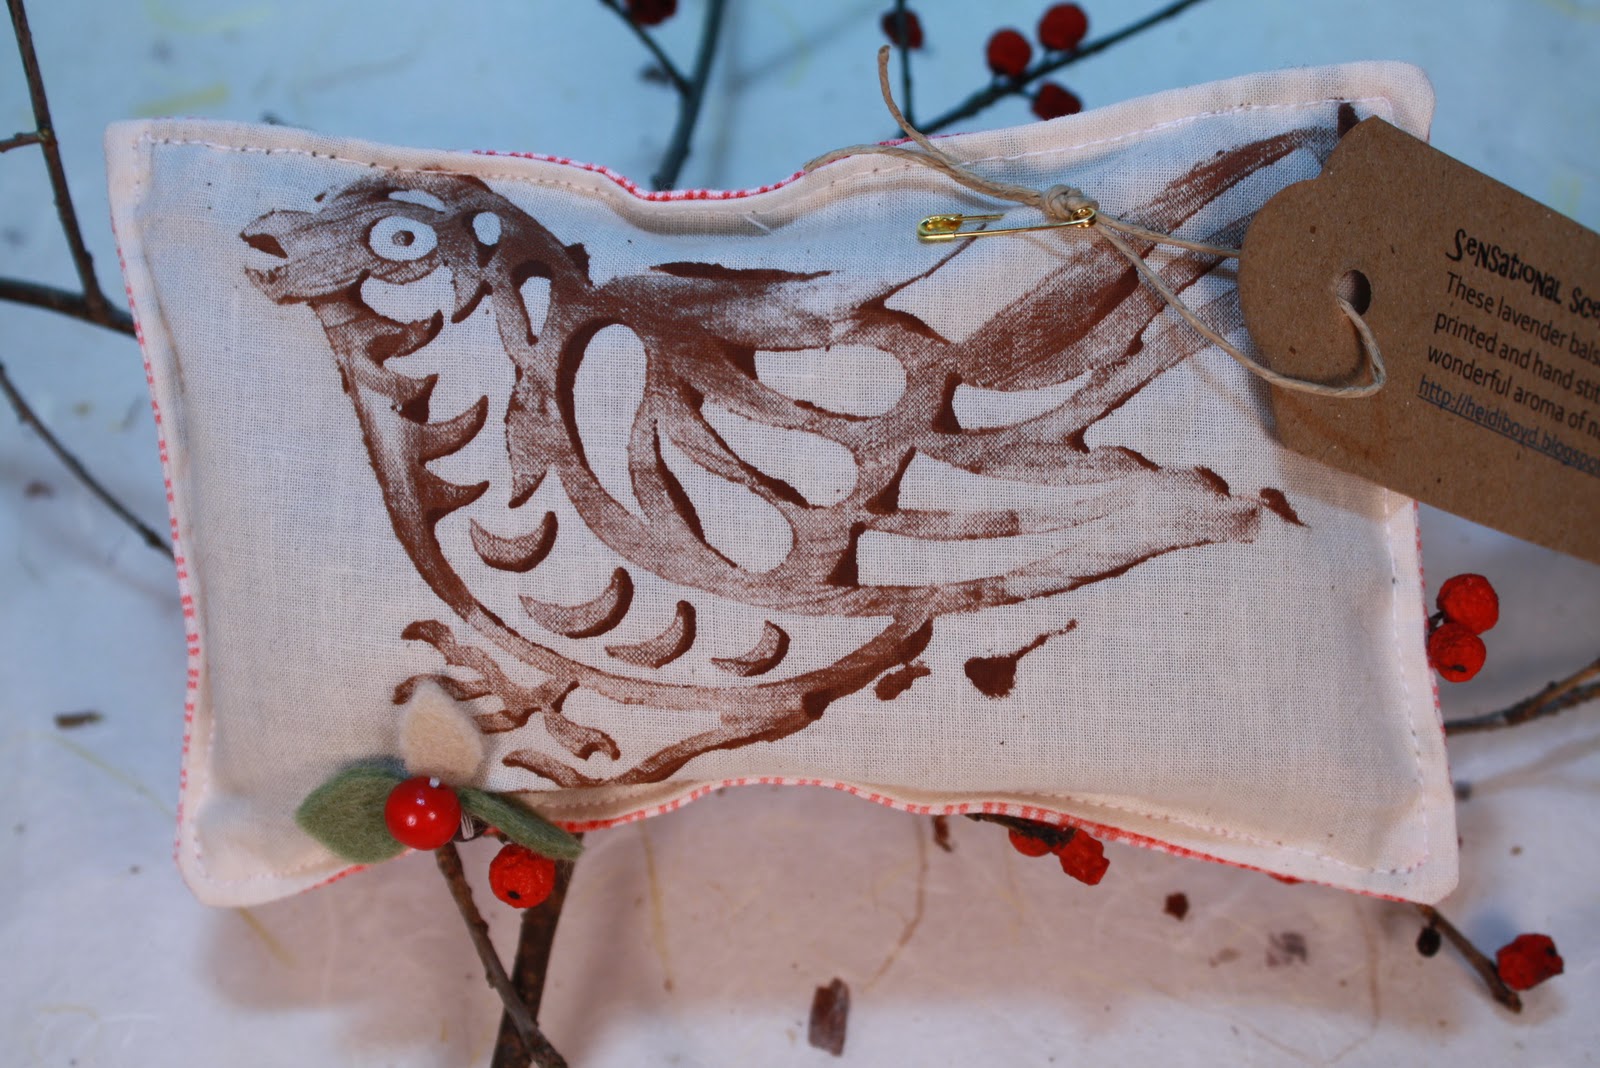
Just after the holidays a local patron had asked me to make a couple of the bird sachets that I had stocked over the holiday fair season. She was willing to wait until I'd wrapped up the copy and illustrations for my latest book 'Stitched Whimsy'. I finally delivered the finished sachets this morning, just in time for her to mail them as Valentine gifts. I took photographs while I made them so I could share the instructions with you.
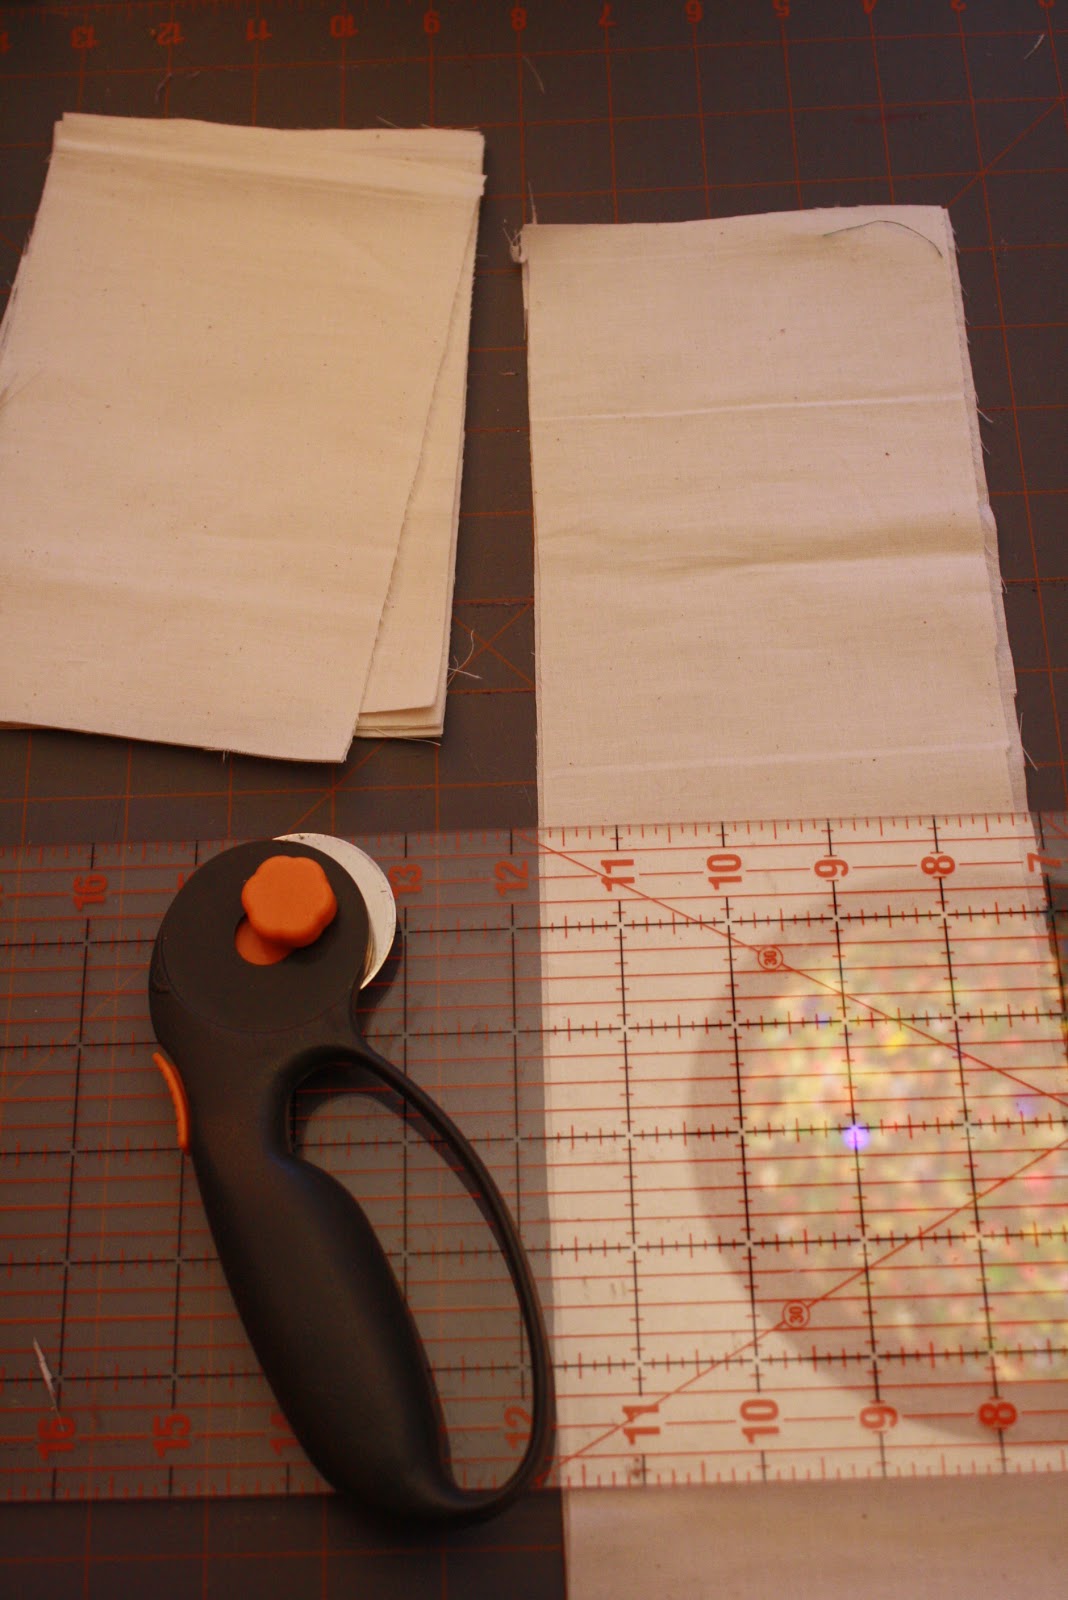
You'll need scraps of muslin and cotton. Use a cutting mat, clear rule and rotary cutter to cut a 7 1/4" x 4 3/4" rectangle of muslin for the front and the same sized printed cotton for the back. While you're set up go ahead and cut multiples. When you're in stamping mode you'll be happy to have a stack of muslin ready for printing.
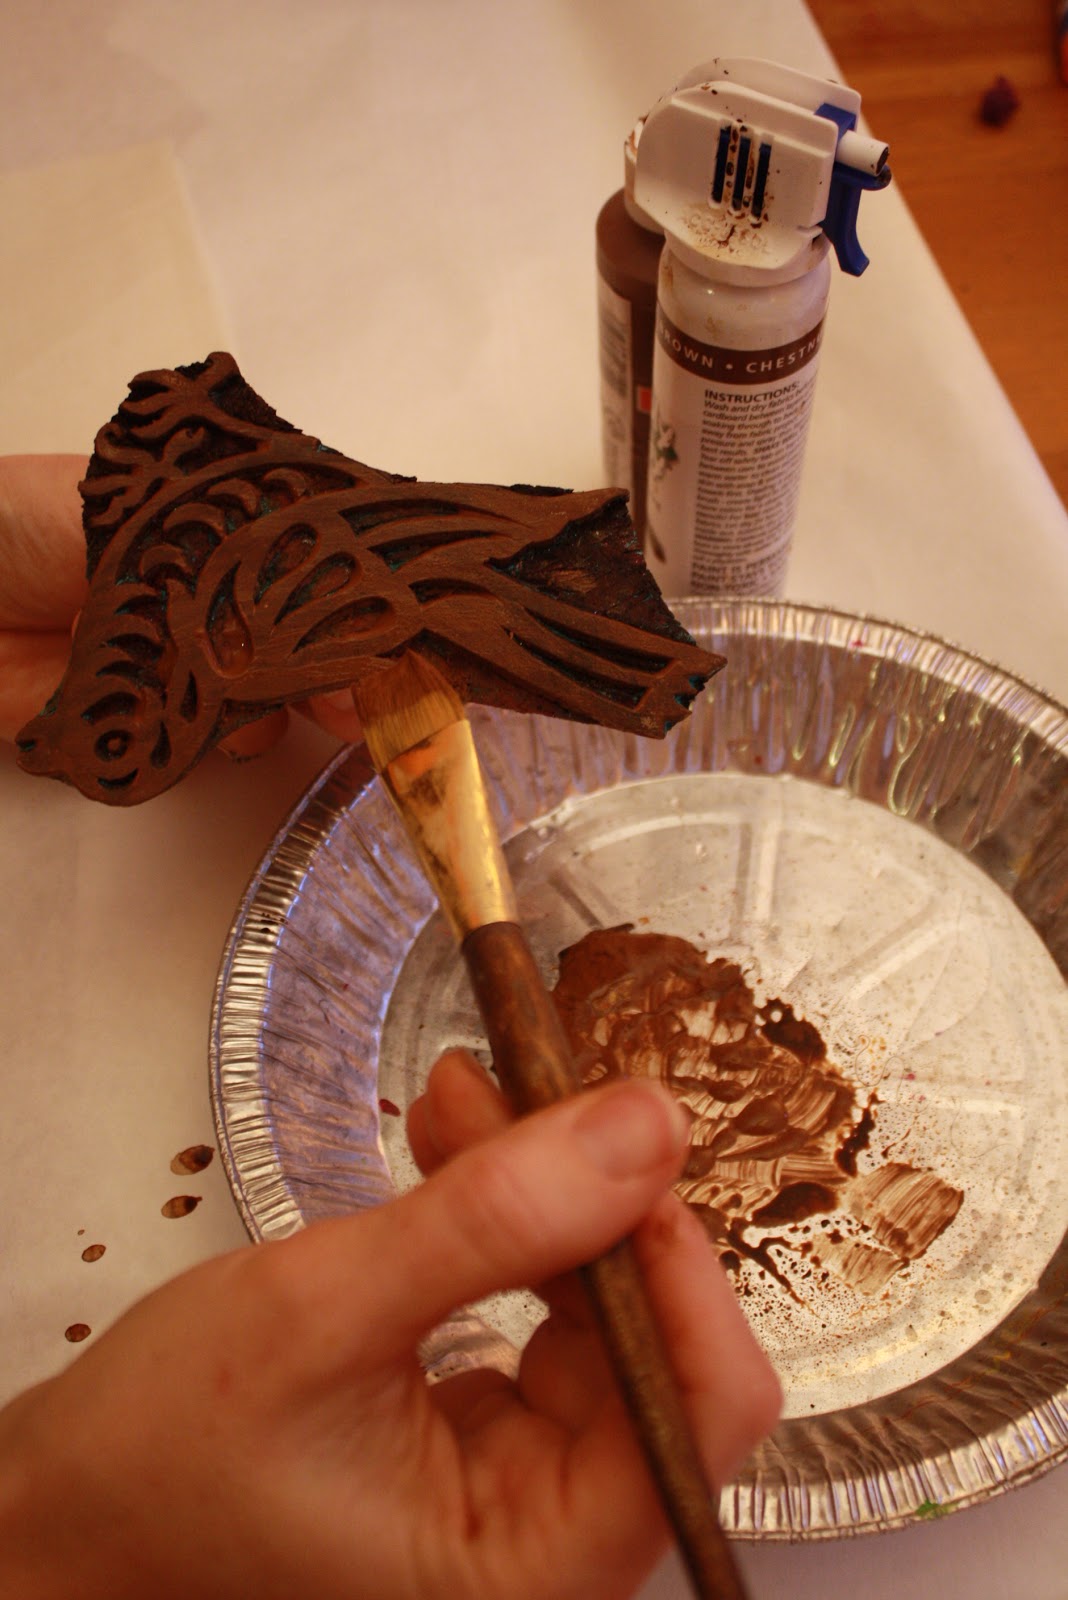
Cover your work surface and mix up Simple Spray (Duncan) fabric paint with brown acrylic paint. I find the loose liquid of the simple spray dilutes acrylic and helps the fabric absorb the paint. Brush the mixed paint onto the fabric stamp. I purchased this gorgeous hand carved wood stamp from Nest, its a fair trade product that is also available online at Connected. Match your brushstrokes to the form of the stamp. I started at the head and worked my way down the body increasing the length of the stroke on the wings and tail.
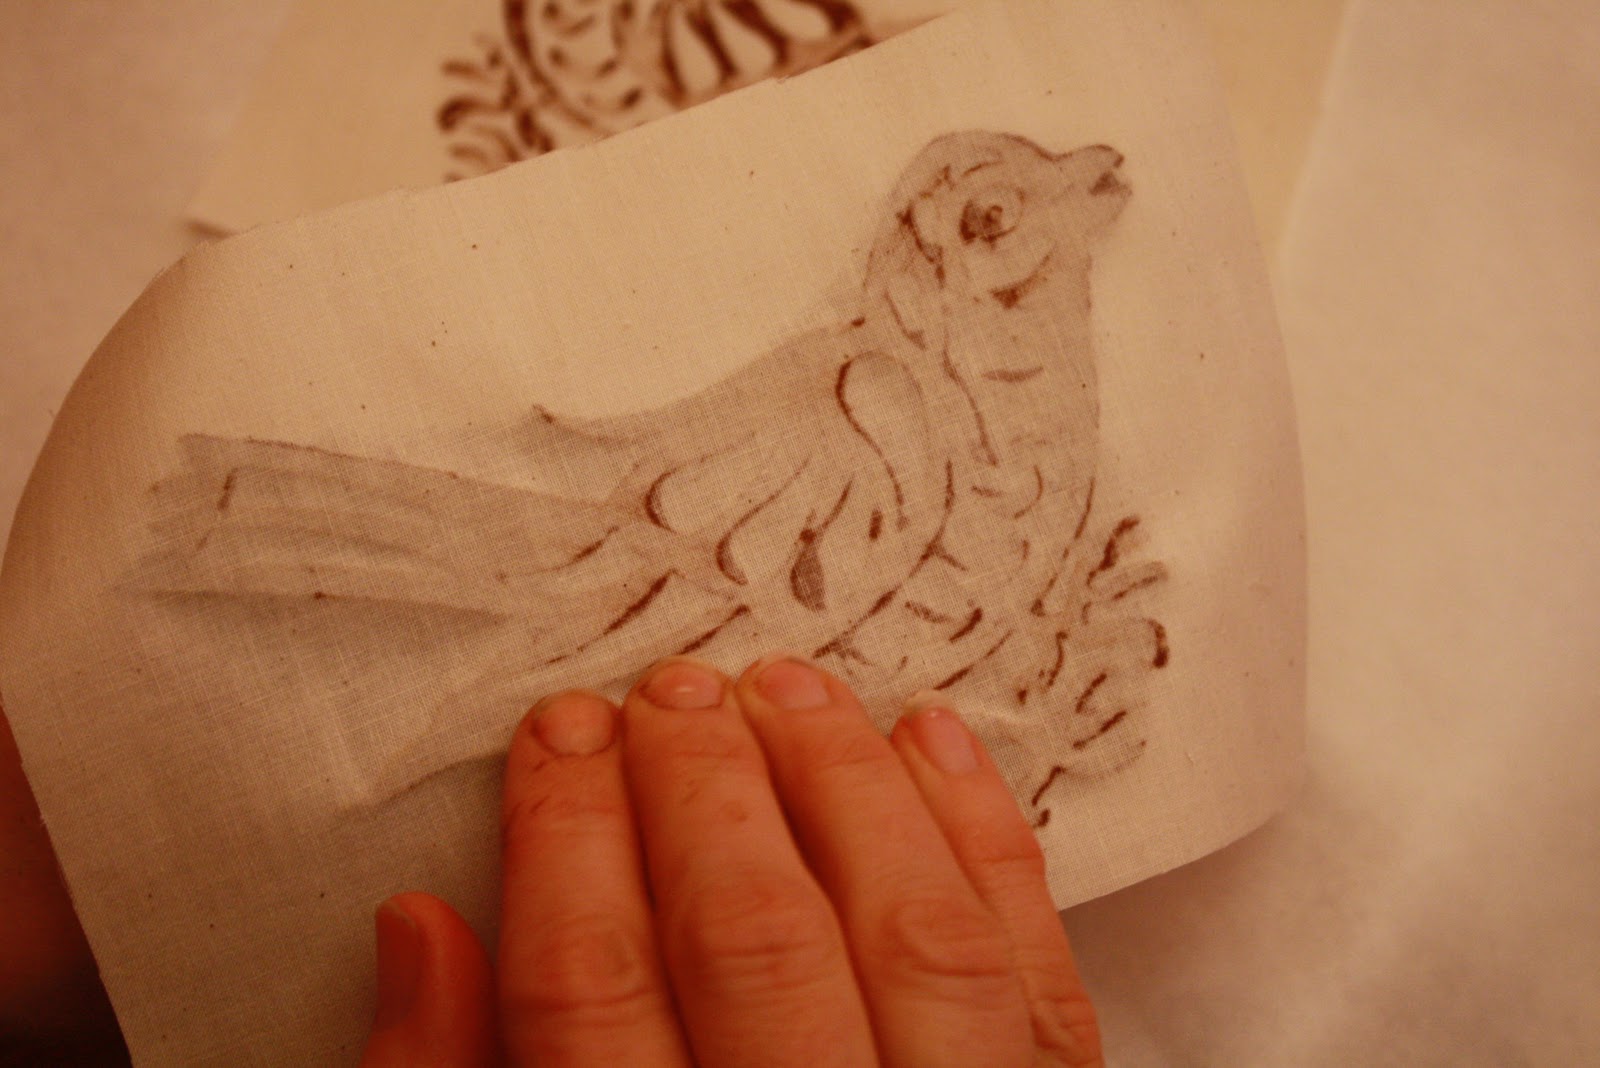
I found that laying the fabric over the painted stamp works better than conventional stamping. Rub your fingers over the entire surface of the fabric covered stamp. If you prefer to press the stamp down onto the fabric, layer a folded old towel under the muslin. The padding will allow you to press down on the stamp and push more paint into the muslin.
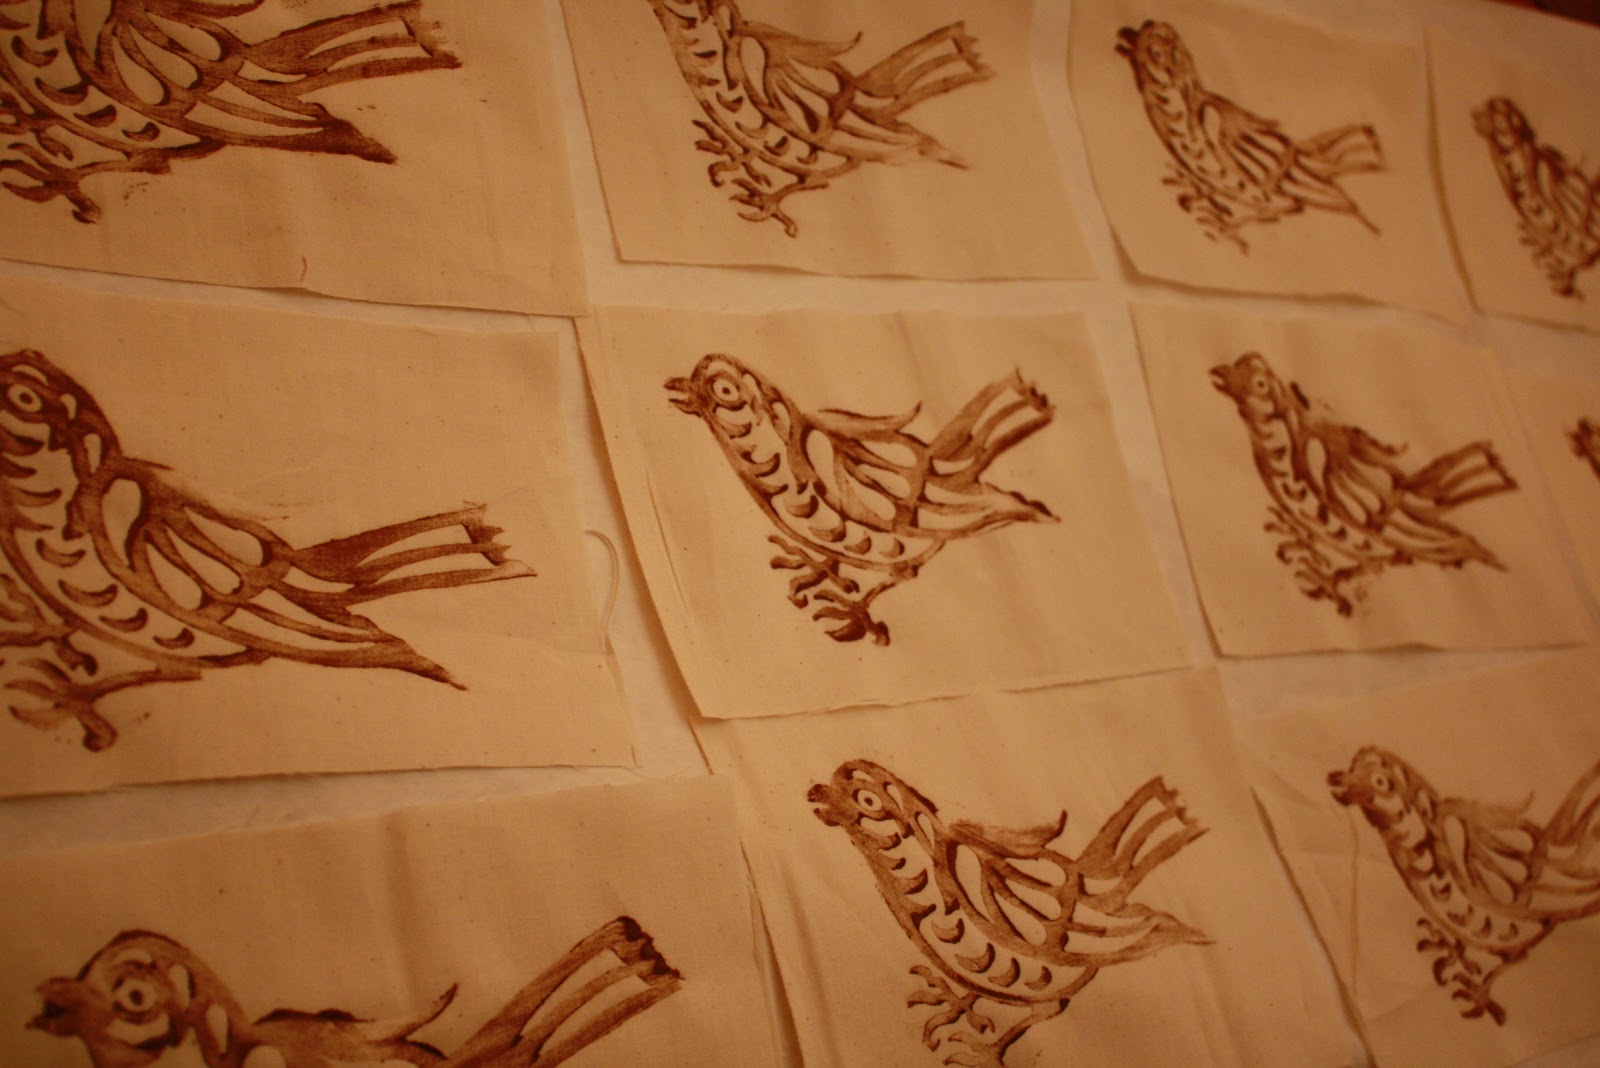
Allow the printed fabric to dry before continuing.

Placing right sides together pin the printed muslin to the printed fabric backing.
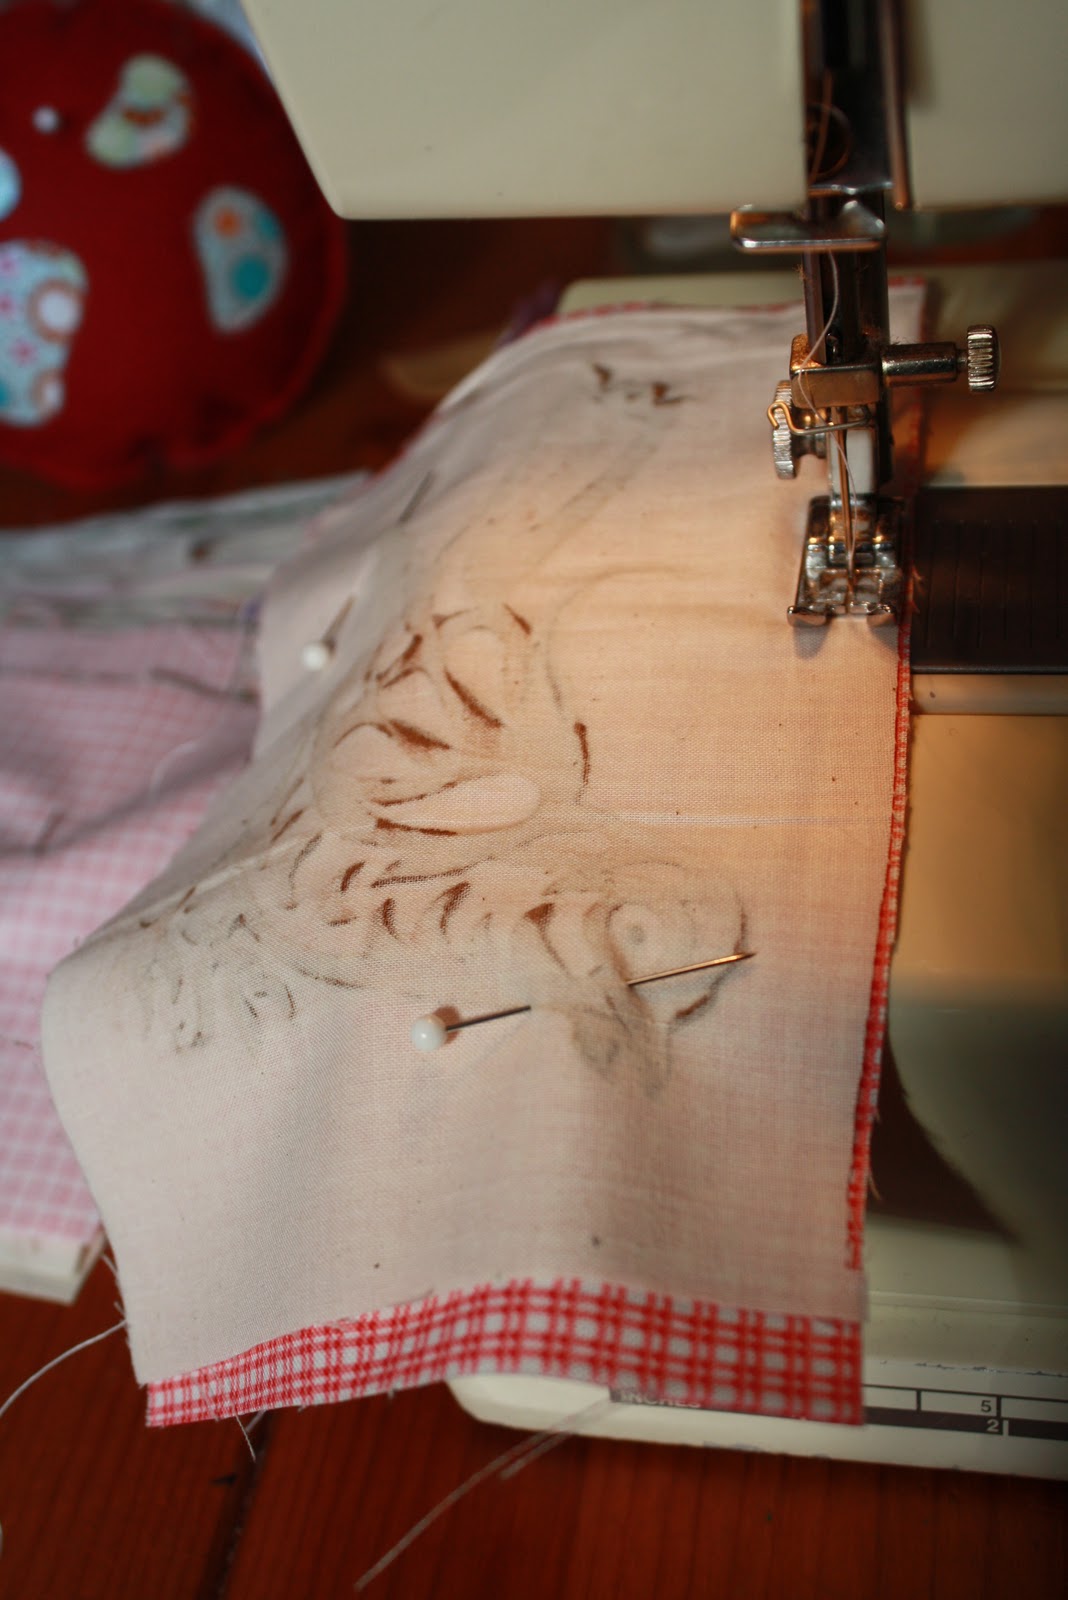
Align the outside edge with your presser foot and machine stitch around the outside of the sachet. Leave a one inch opening to turn the sachet right side out.
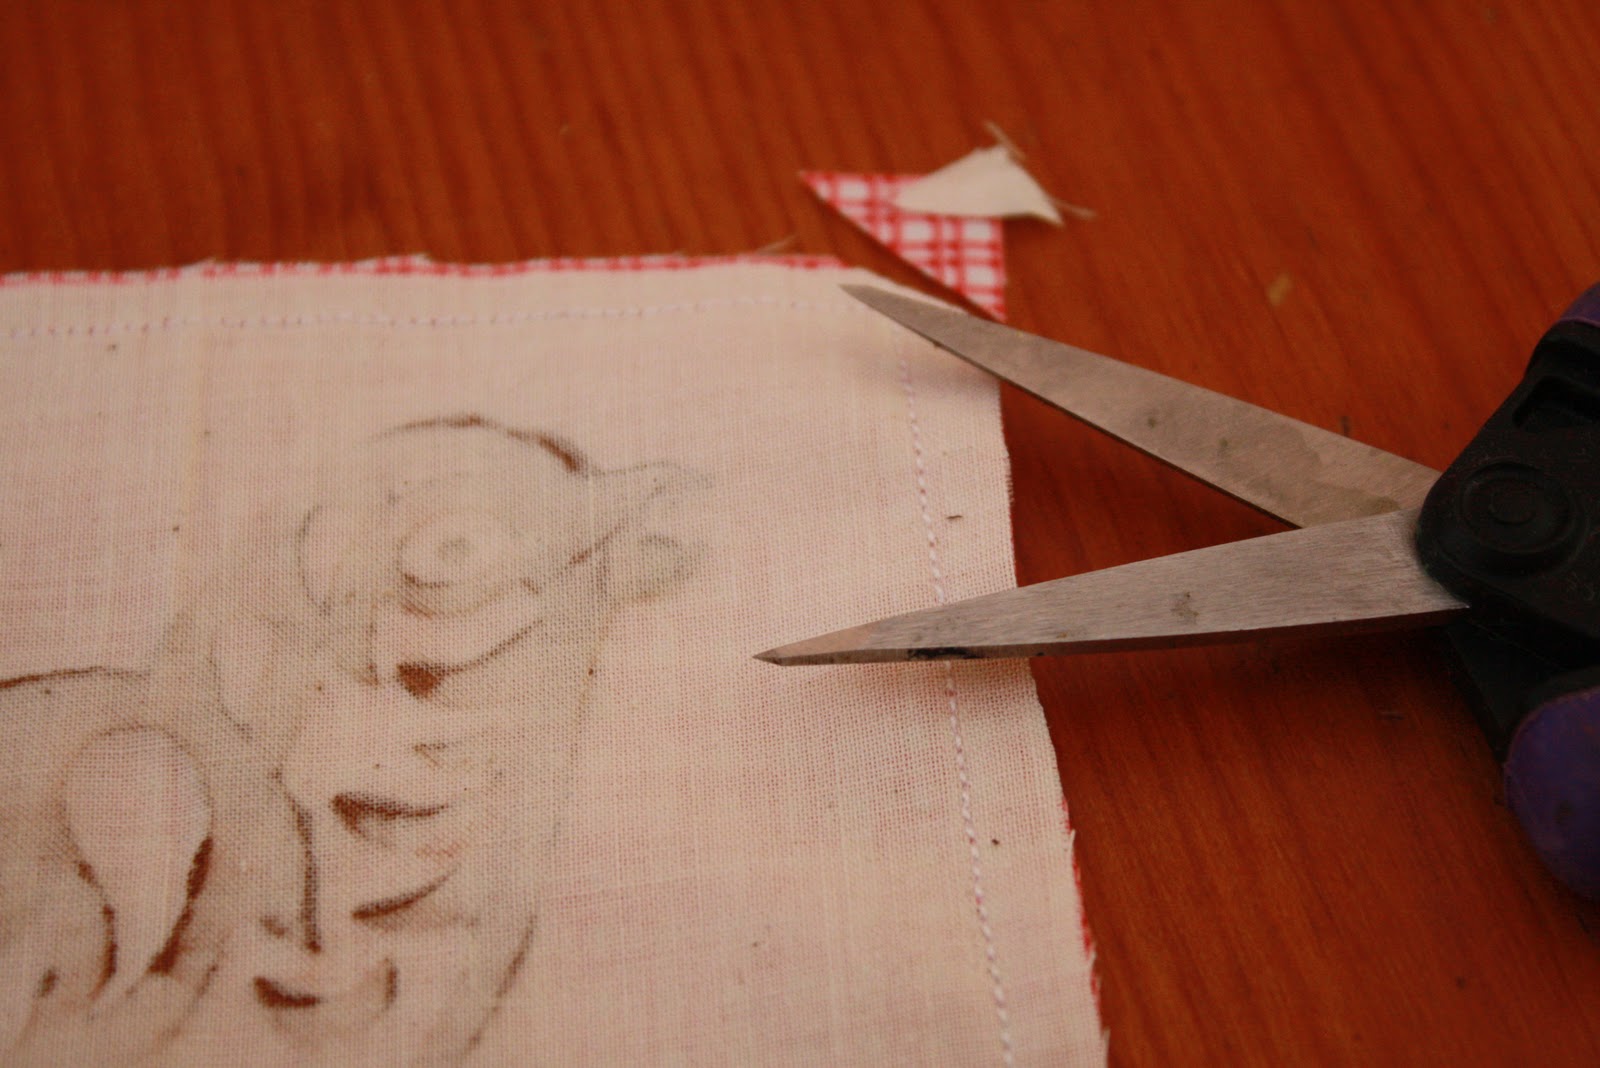
Trim away any excess fabric and clip the corners.

Turn the sachet right side out, using a stuffing stick or knitting needle to push out the corners.

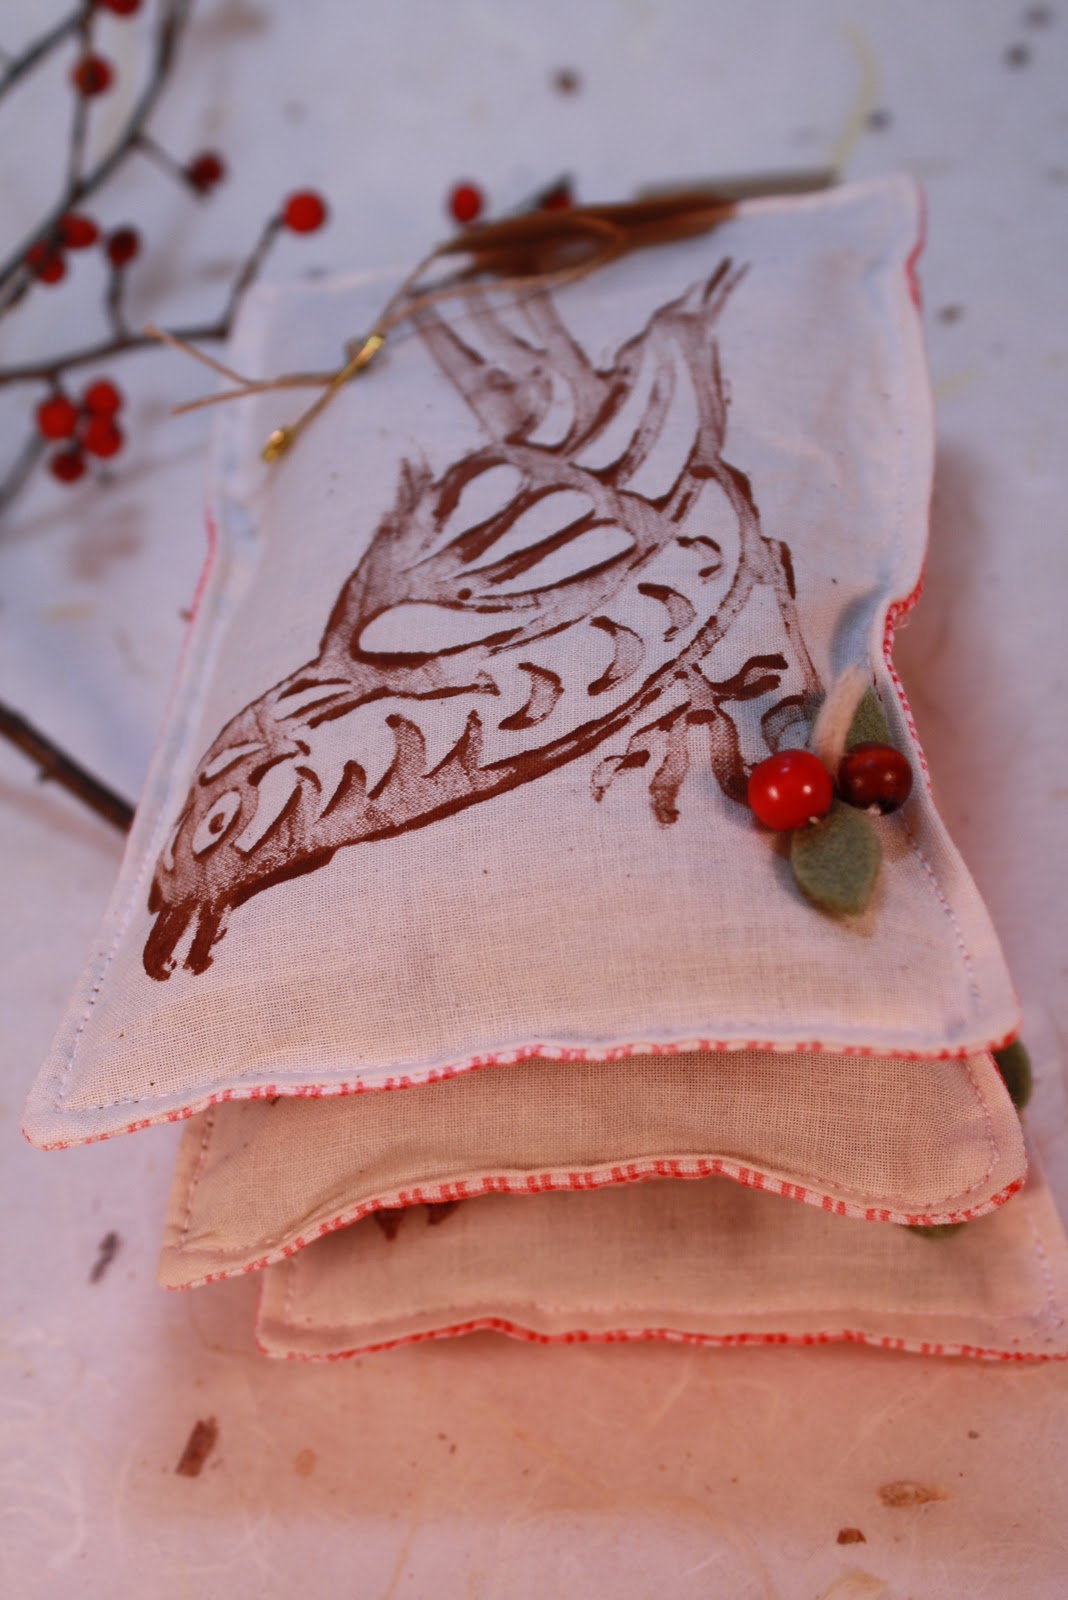
Pour a cup of dried herbs into the opening. I used a 1/2 cup each of Balsam and Lavender over the holidays. I filled this new batch sachets with a cup of lavender. It's time for me to place a new order at San Fransisco Herb Co. and experiment with spring and summer scents. Tuck the raw edges of the opening into the sachet so it matches the seamed edges on either side. Instead of hand stitching the opening closed I machine stitch a second top stitched seam around the edge of the stuffed sachet. The opening will be stitched closed in this seam.

Hand stitch cut felt leaves and wooden beads by the foot of the bird. You'll be happy that you cut and stamped extra birds, this sweet sachet makes a great gift. It's too pretty to hide in a drawer enjoy it out in the open until spring arrives. If you're not in the mood to whip a sewing project I'll be stocking these sachets in my brand new Etsy Store.

December 14, 2010
Holiday Craftiness - Simple Gifts
This weekend I had the pleasure of crafting with some wonderful teens at our local library. I planned three quick and easy projects that used materials I had on hand to keep costs down. We made wreath ornaments, lavender sachets and beaded choker pendants. The girls were thrilled with their creations and had friends and family in mind for each gift.

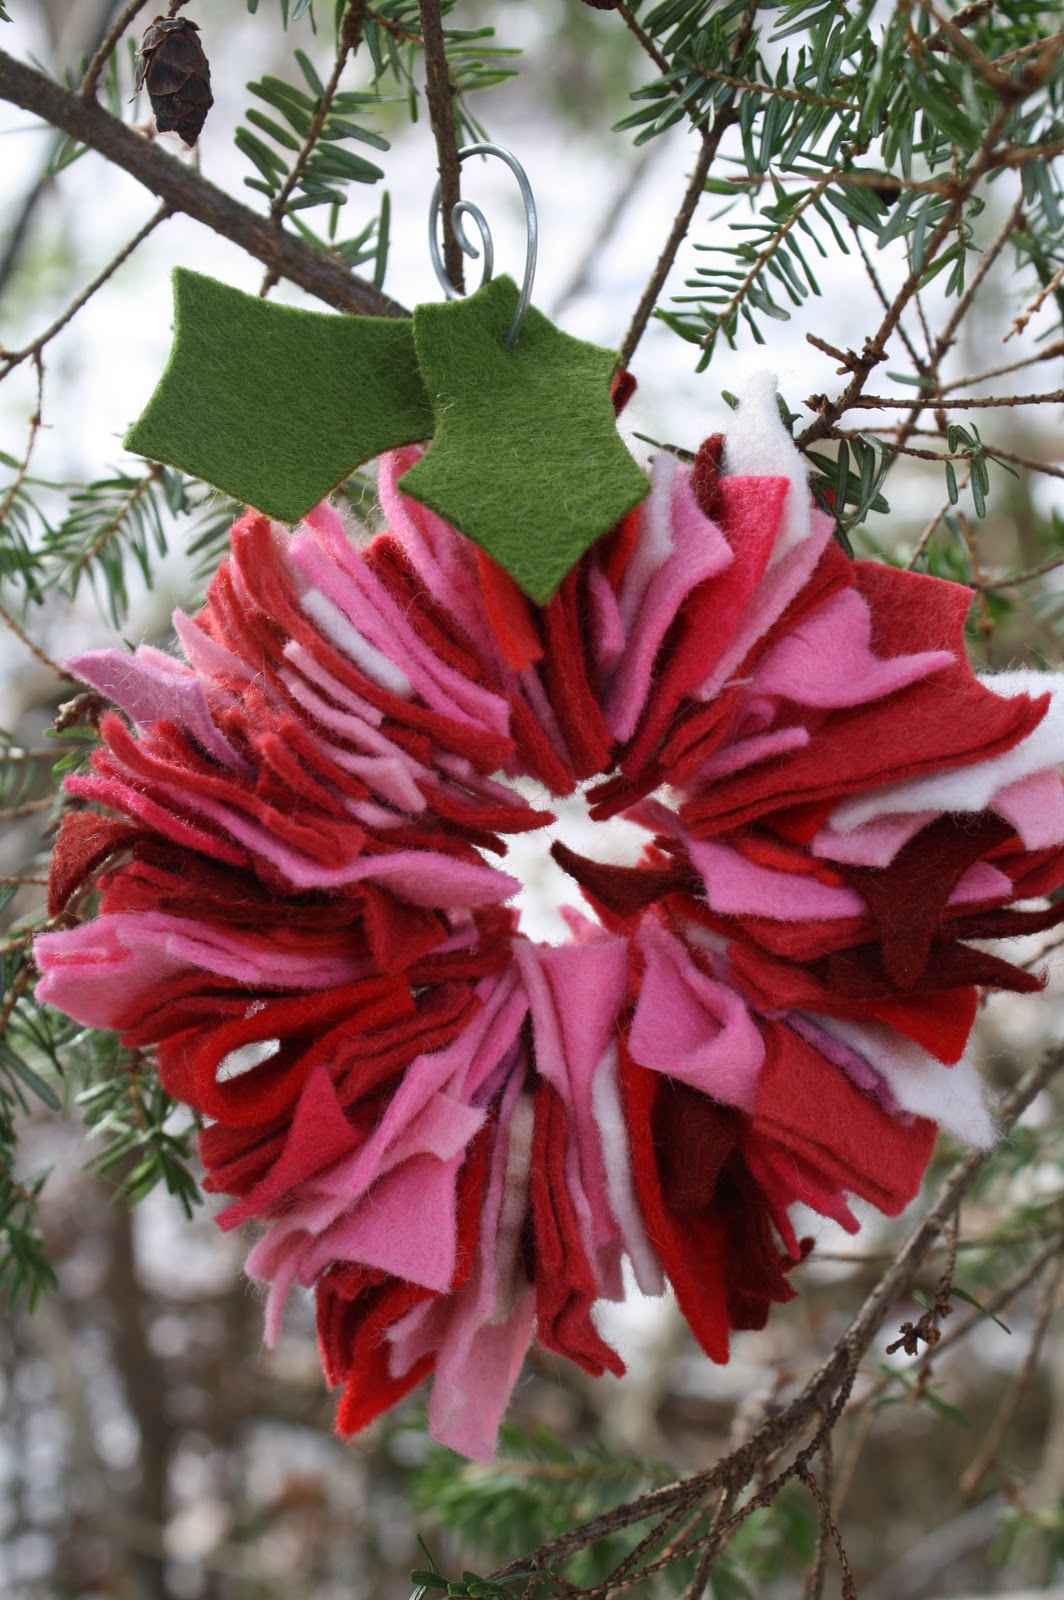
Crafting wreath ornaments was a great way to work through my giant bag of scraps. You'll also need to gather: 18 gauge galvanized steel wire (hardware store), jingle bells, scissors, pliers and wire cutters. Start by cutting the scraps into 'uniform' one inch square pieces. Fold each piece in half and clip a small slit along the fold line.
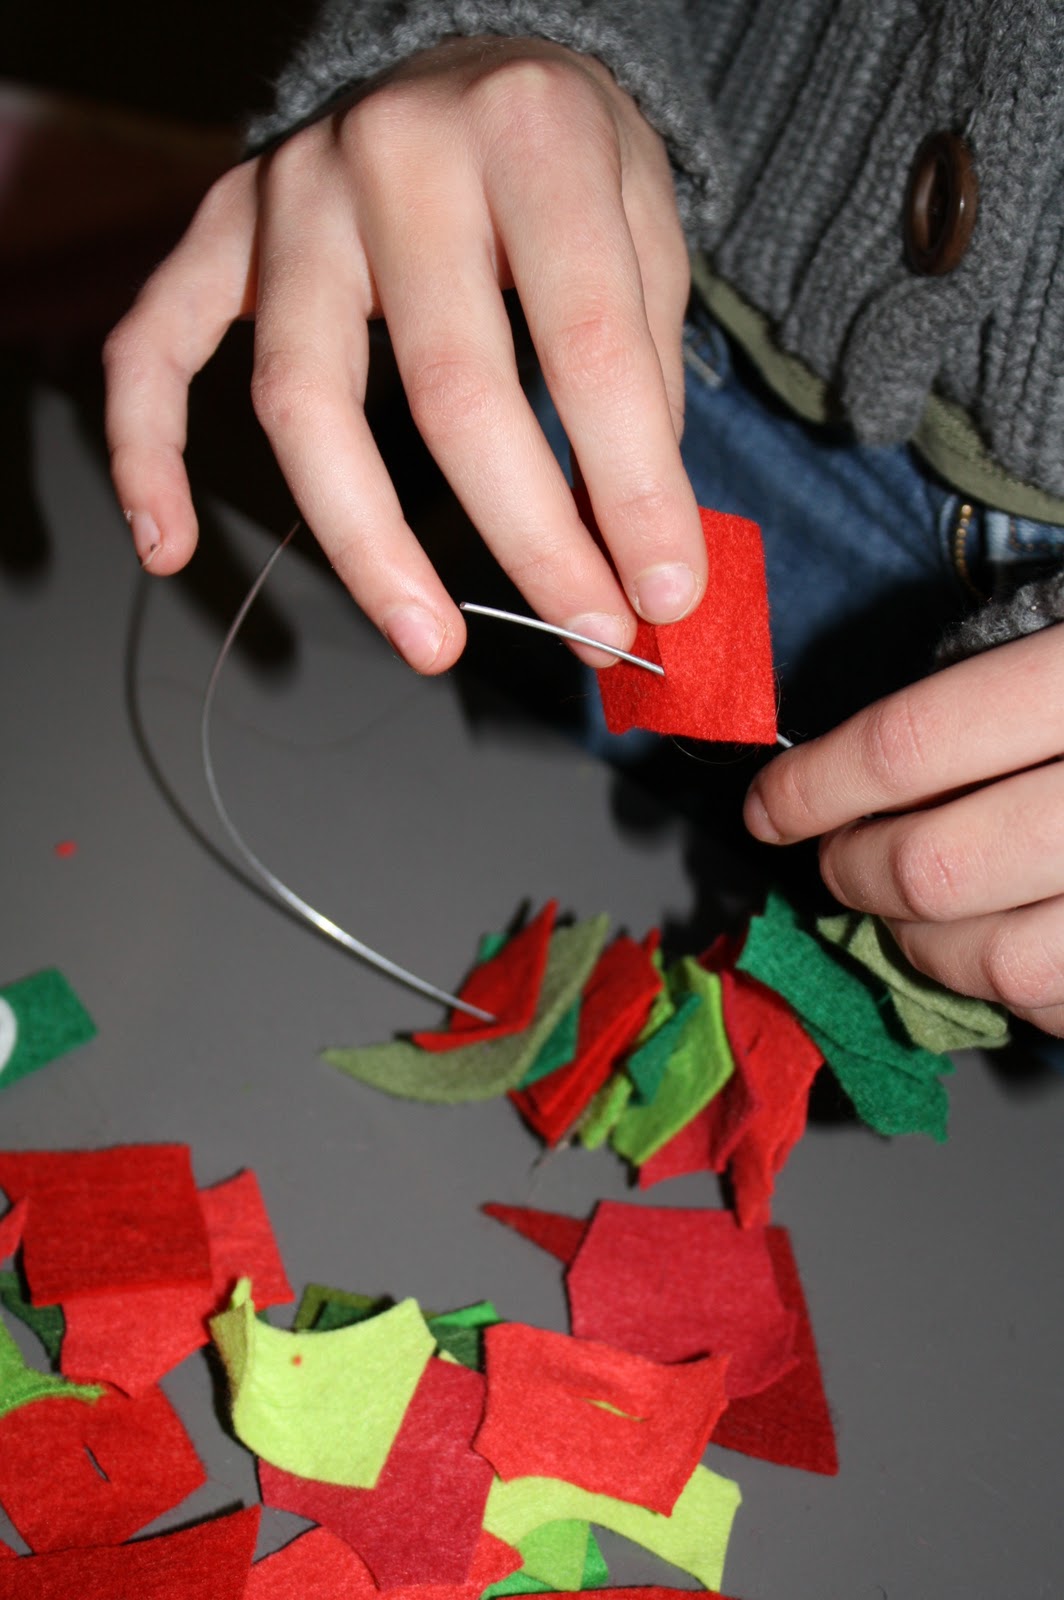
Once you've prepared enough pieces String them onto a 14" length of wire. Continue stringing until you have enough felt to encircle a wreath. String a jingle bell and/or two felt holly leaves onto one of the wires.
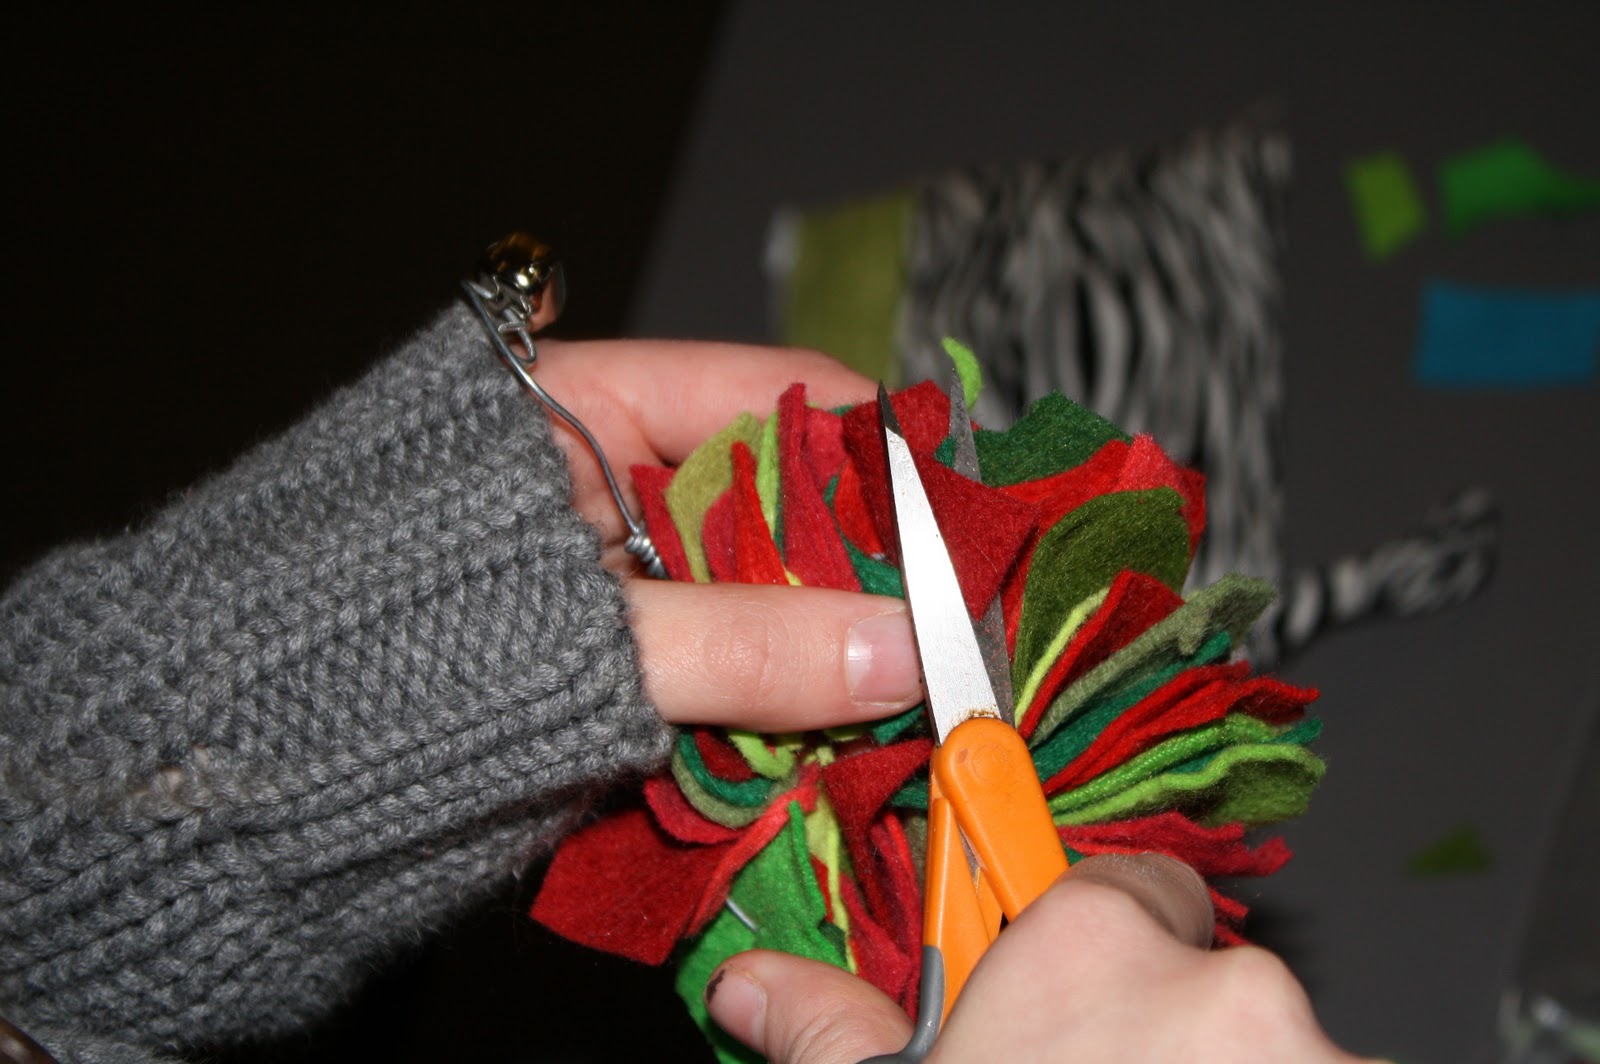
Bend the wires at a ninety degree angle where they meet at the top of the wreath. Coil one wire end around the other, use wire cutters to trim the coiled wire end. Use pliers to form the other end into a large open spiral hanger. Give your wreath a hair cut, use scissors to trim away stray felt ends.

This simple beaded choker pendant was a very successful group beading project. Making a beaded pendant is just like making one half of an earring set. It also allows you to showcase one of a kind beads. Rubber Silkies necklace cords are my favorite new beading supply. They're manufactured by Pepperrell and are sold at our local JoAnn's fabric store. The smooth rubber clasp is built into the cord and is very comfortable to wear.

I purchased a bulk bag of glass beads and divided them in bowls for easy selection. You'll also need small bead caps, head pins, round nose pliers, and wire cutters.
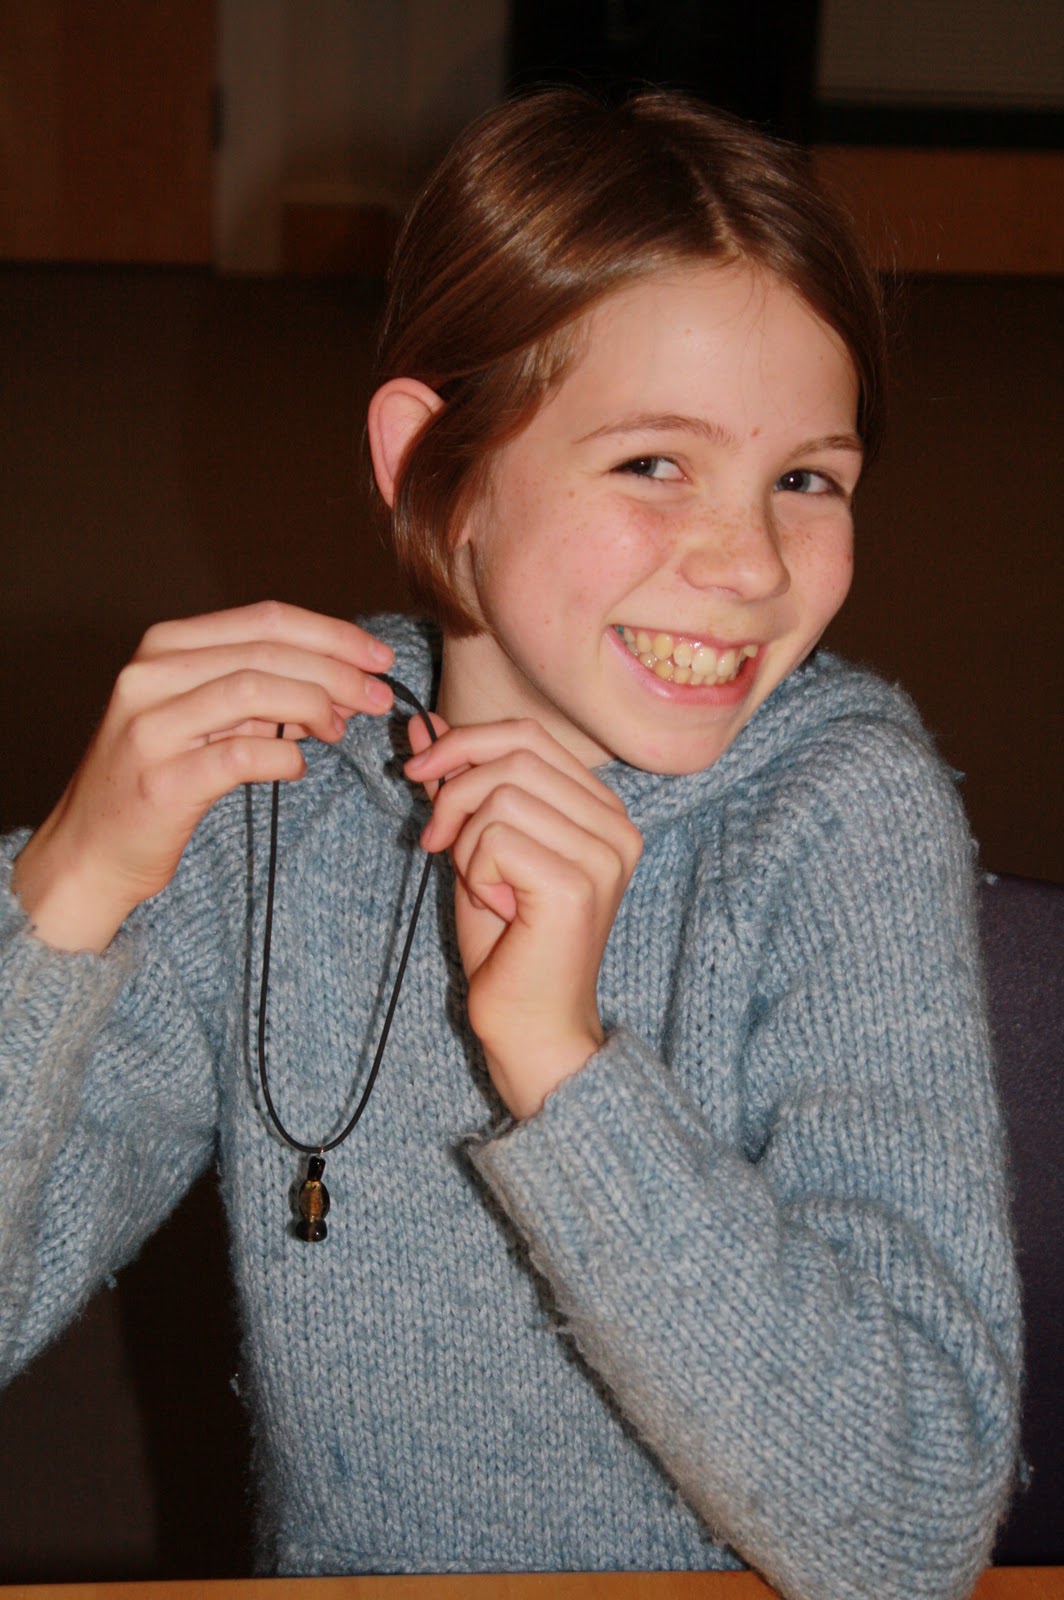
Simply string three beads onto the head pin, add a bead cap into the mix if you want to highlight a bead or narrow the opening of a large bead. Use round nose pliers to turn the end of the head pin into a loop. Open the loop laterally and then slide it onto the center of the cord. Be careful you don't pinch the rubber in your pliers as it breaks apart when squeezed with metal. Use the pliers to carefully close the loop back to it's original shape.
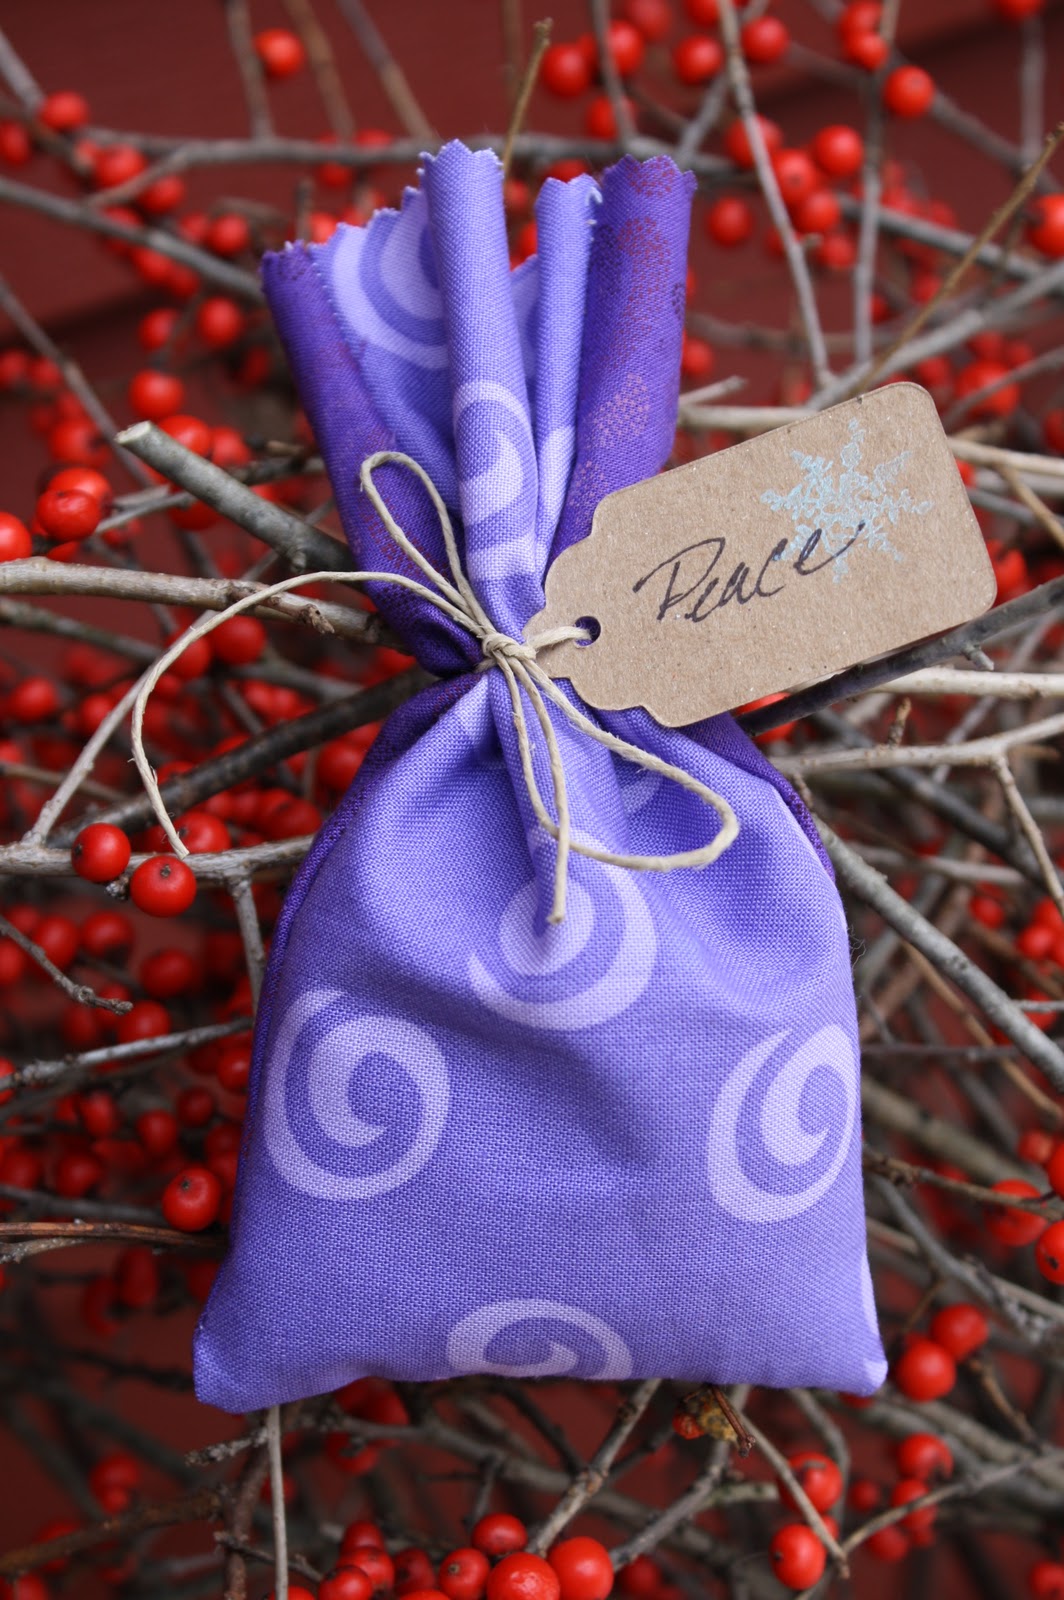
These sweet little lavender sachets scented the room as we crafted. You could easily substitute great smelling Balsam or make use the fabric pouch as a small gift bag. You'll need two different colors of purple fabric, straight pins, lavender buds (San Fransisco herb Company), thread, hemp cord, card stock labels (I cut my with my Sizzix Big Kick), stamps, chalk ink pad, black pen.

Cut the fabric into 4" x 7" rectangles, placing right sides together stack one color over. Pin the two layers of fabric together. Because I had a nice small group I was able to help each girl machine stitch three sides of the fabric together. For many of the girls it was the first time they'd used a sewing machine. Trim the top off the bag with pinking sheers then clip the extra fabric off the corners with regular scissors.

Turn the fabric right side out and used a pencil point to push out the corners. Pour a half cup of lavender buds into the sachet.
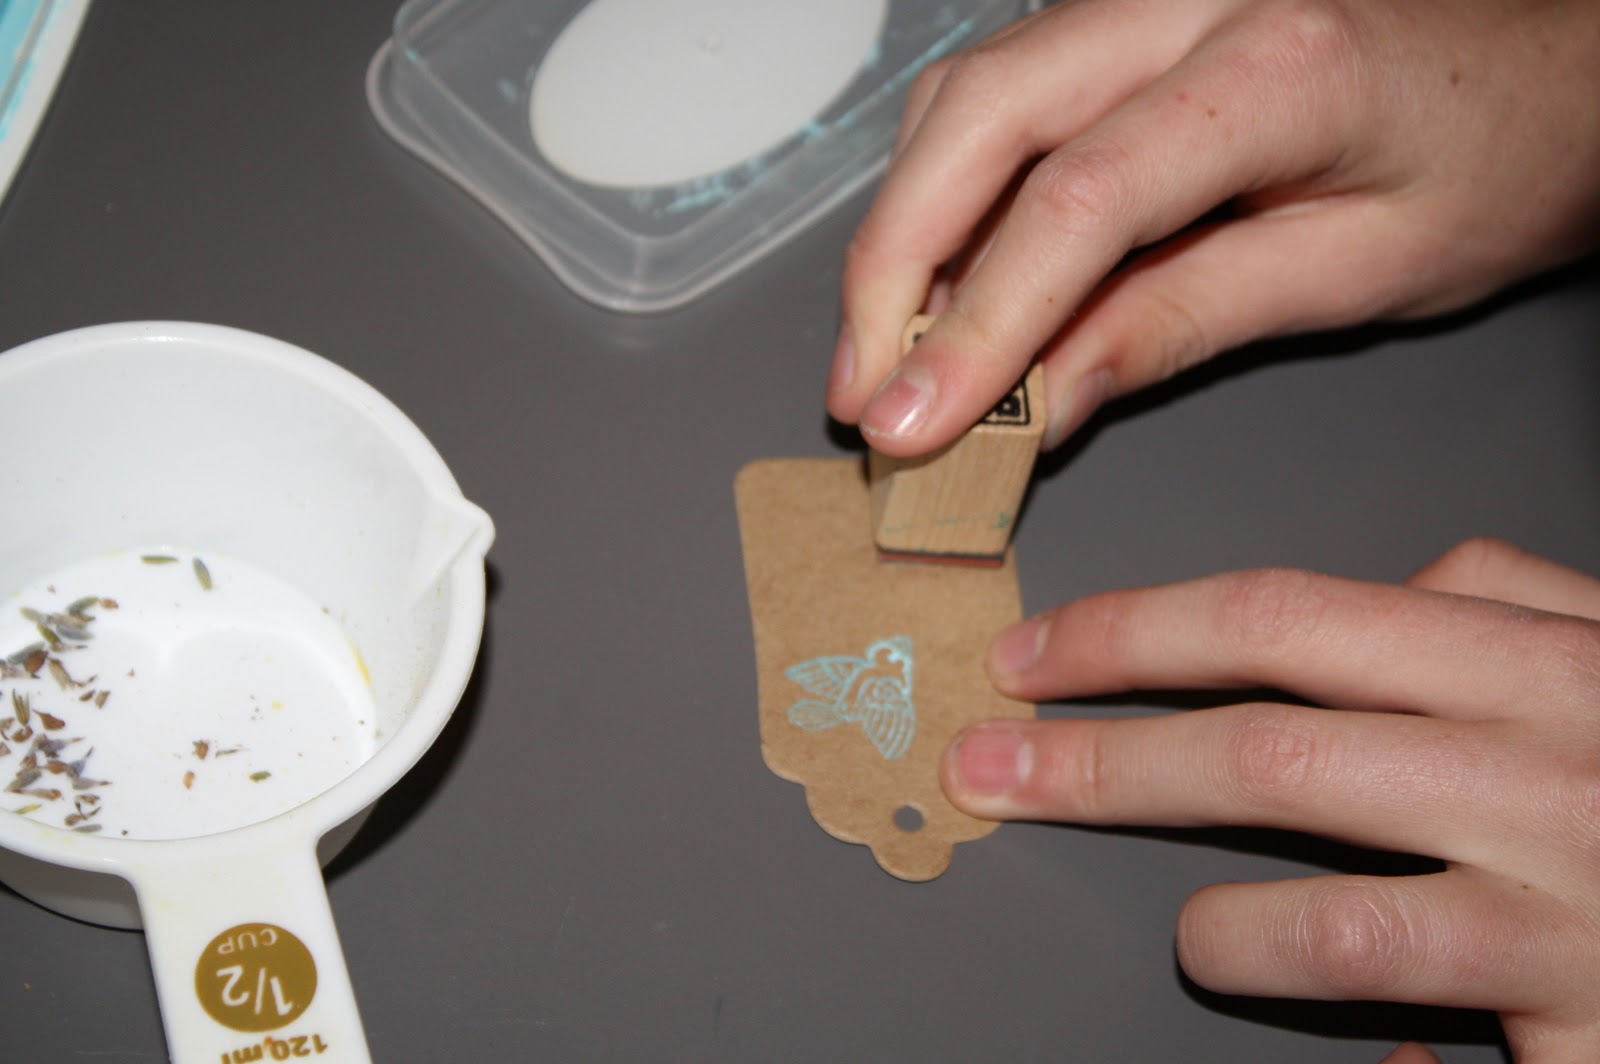
Stamp and write messages onto the tags before tying them around the top of the sachet with a section of hemp cord.
 Fa la la la la ...Crafty girls with their creations!
November 24, 2010
Felt the Halls with Wooly Garlands!

The holidays are officially here and it's time to get your crafty self into action! Forget about stringing popcorn and cranberries this up-cycled wool garland project will add warmth and color to your home all winter long.

Over the last year I've been saving my wool and felt scraps from plushie making. I regularly use my stash for bird beaks, wings, leaves and flowers. However the bags get larger each day and I needed to find a craft that uses entire color selection in their existing shapes. I found inspiration at my neighbors home, she has gorgeous handmade wool garlands hanging around the door ways and windows of her home.
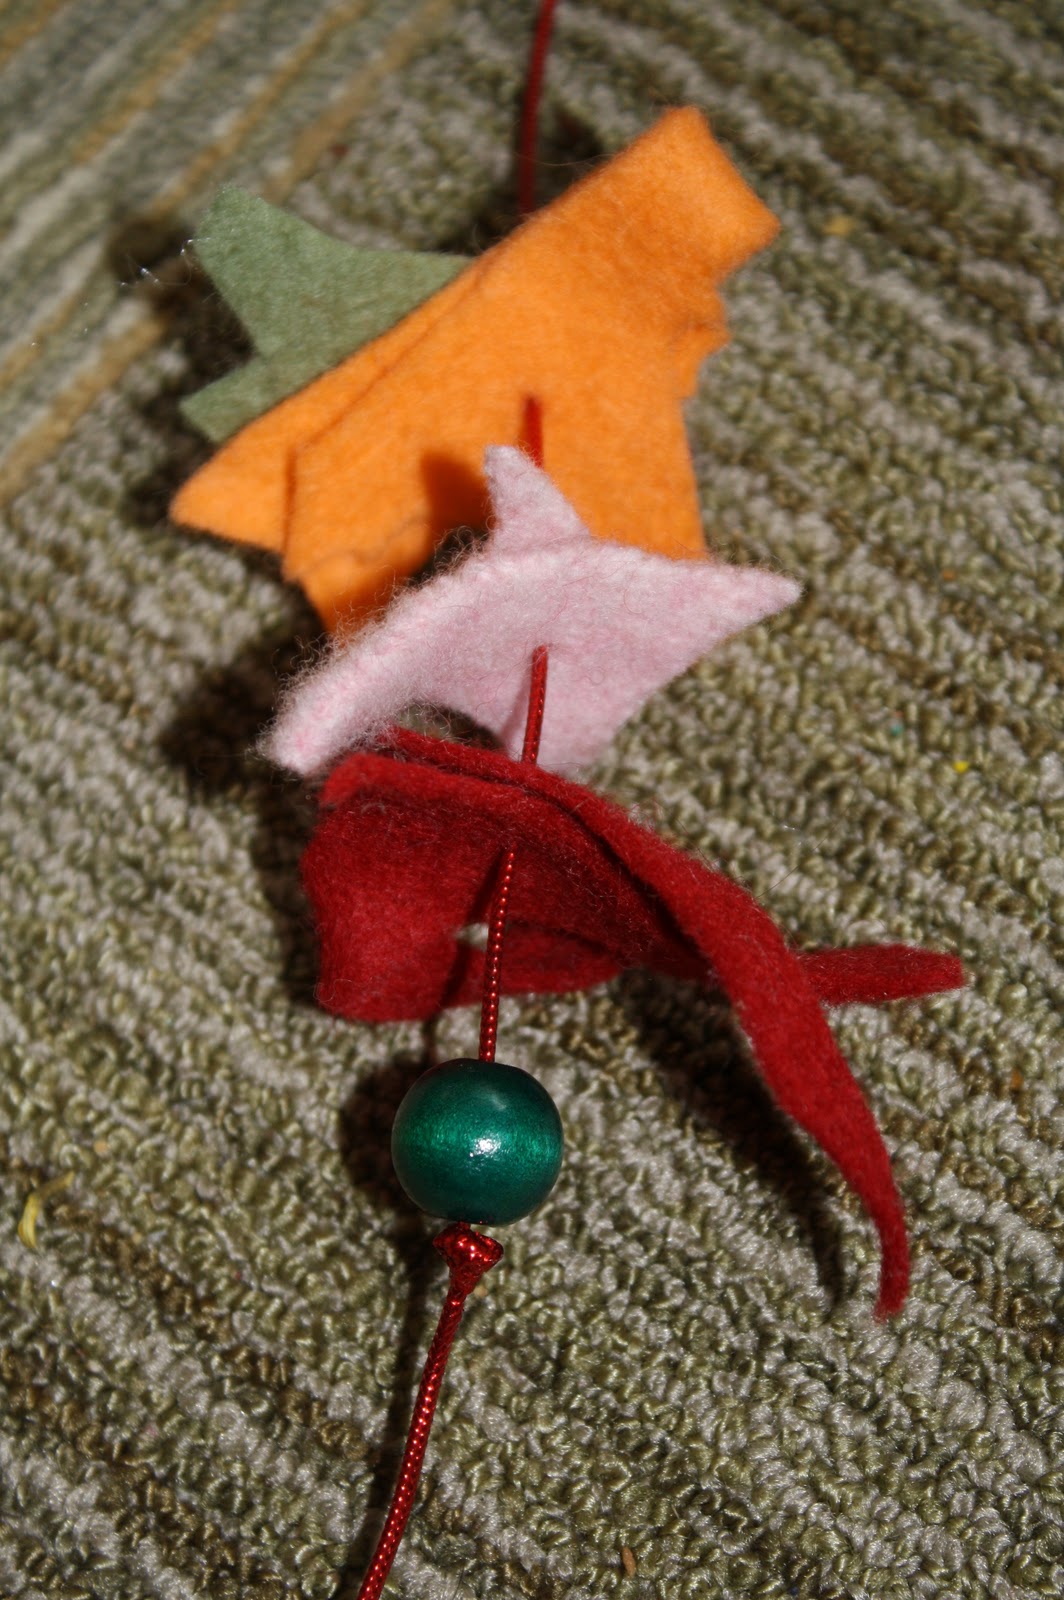
I turned up an over sized darning needle, some cording, and a collection of large wooden beads in my studio. Then moved the bags of scraps to the floor of our television room. The first step is to tie an overhand knot at the end of your of cording. The length of the cording is dependent on where you want to hang the garland and how much time you have. The next step is to slide a wood bead on to the cord so it rests against the knot, it'll prevent the felt pieces from falling off.
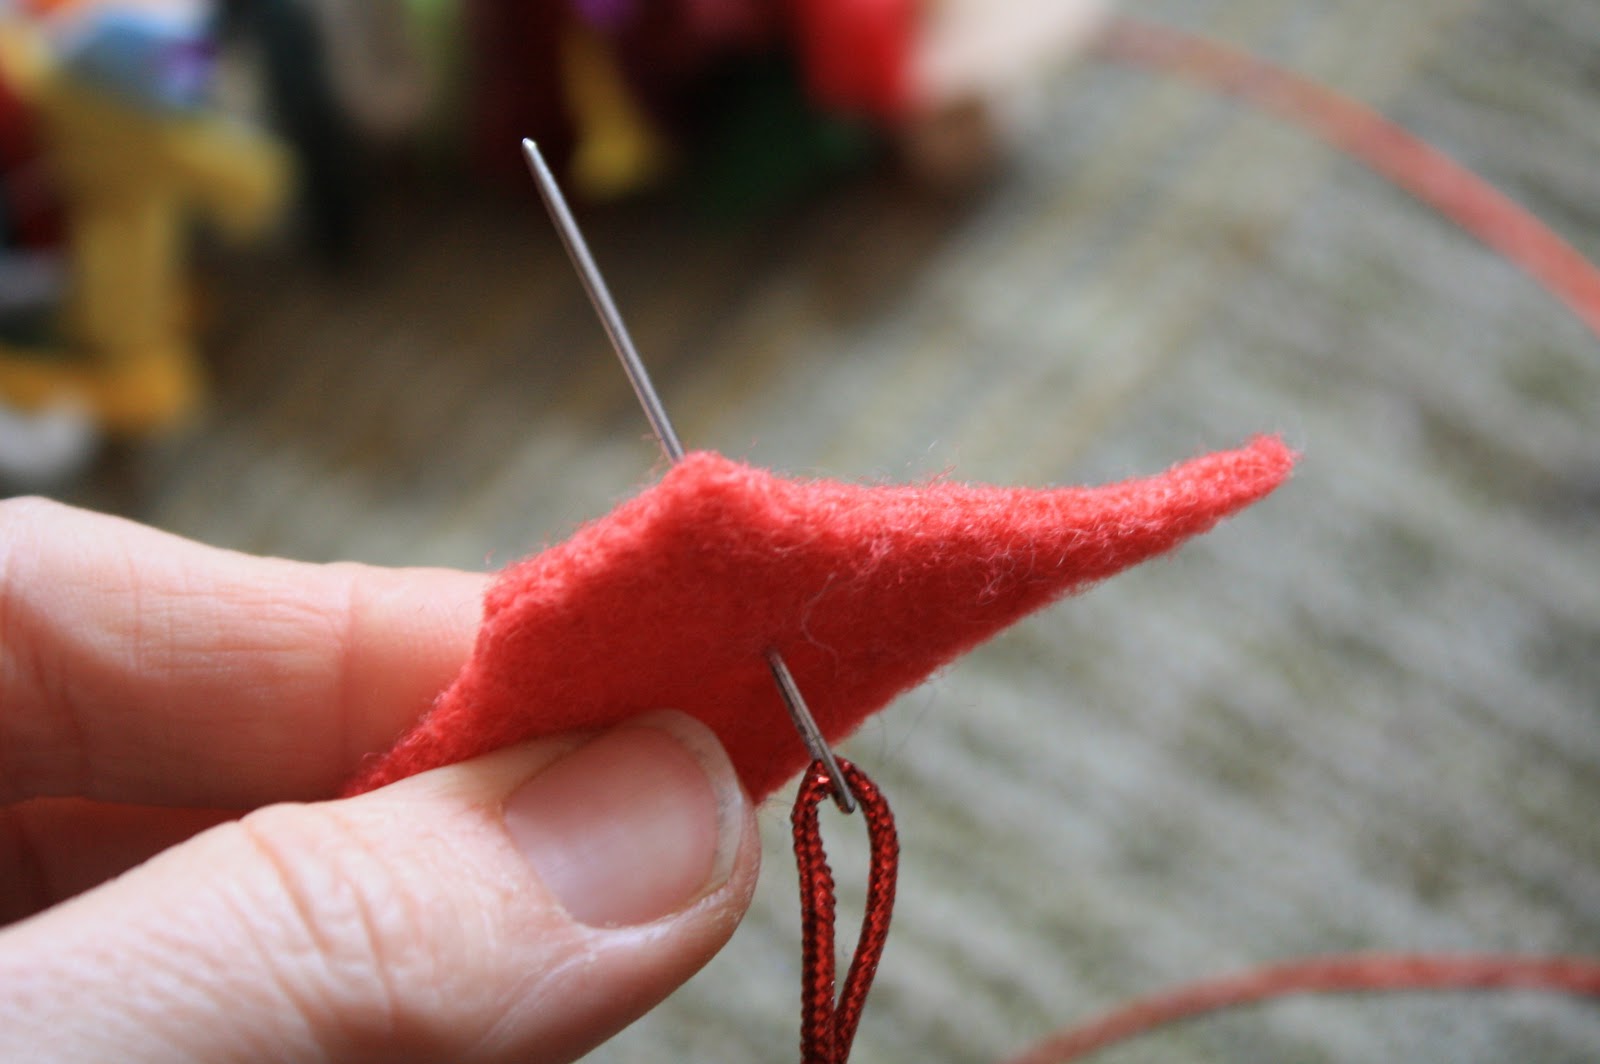
Now you're ready to begin stringing the length of your garland. Simply slide the 2" by 1" scraps onto the needle. I folded my long strips in half and drew the needle up through both layers.

I quickly discovered that felted sweater scraps effortlessly slid over the needle whereas the tight weave of the brightly colored commercial felt from Commonwealth Felt was a struggle. My solution was to fold the felt and snip a single cut into the center of the piece, then unfold and string the needle through the cuts.
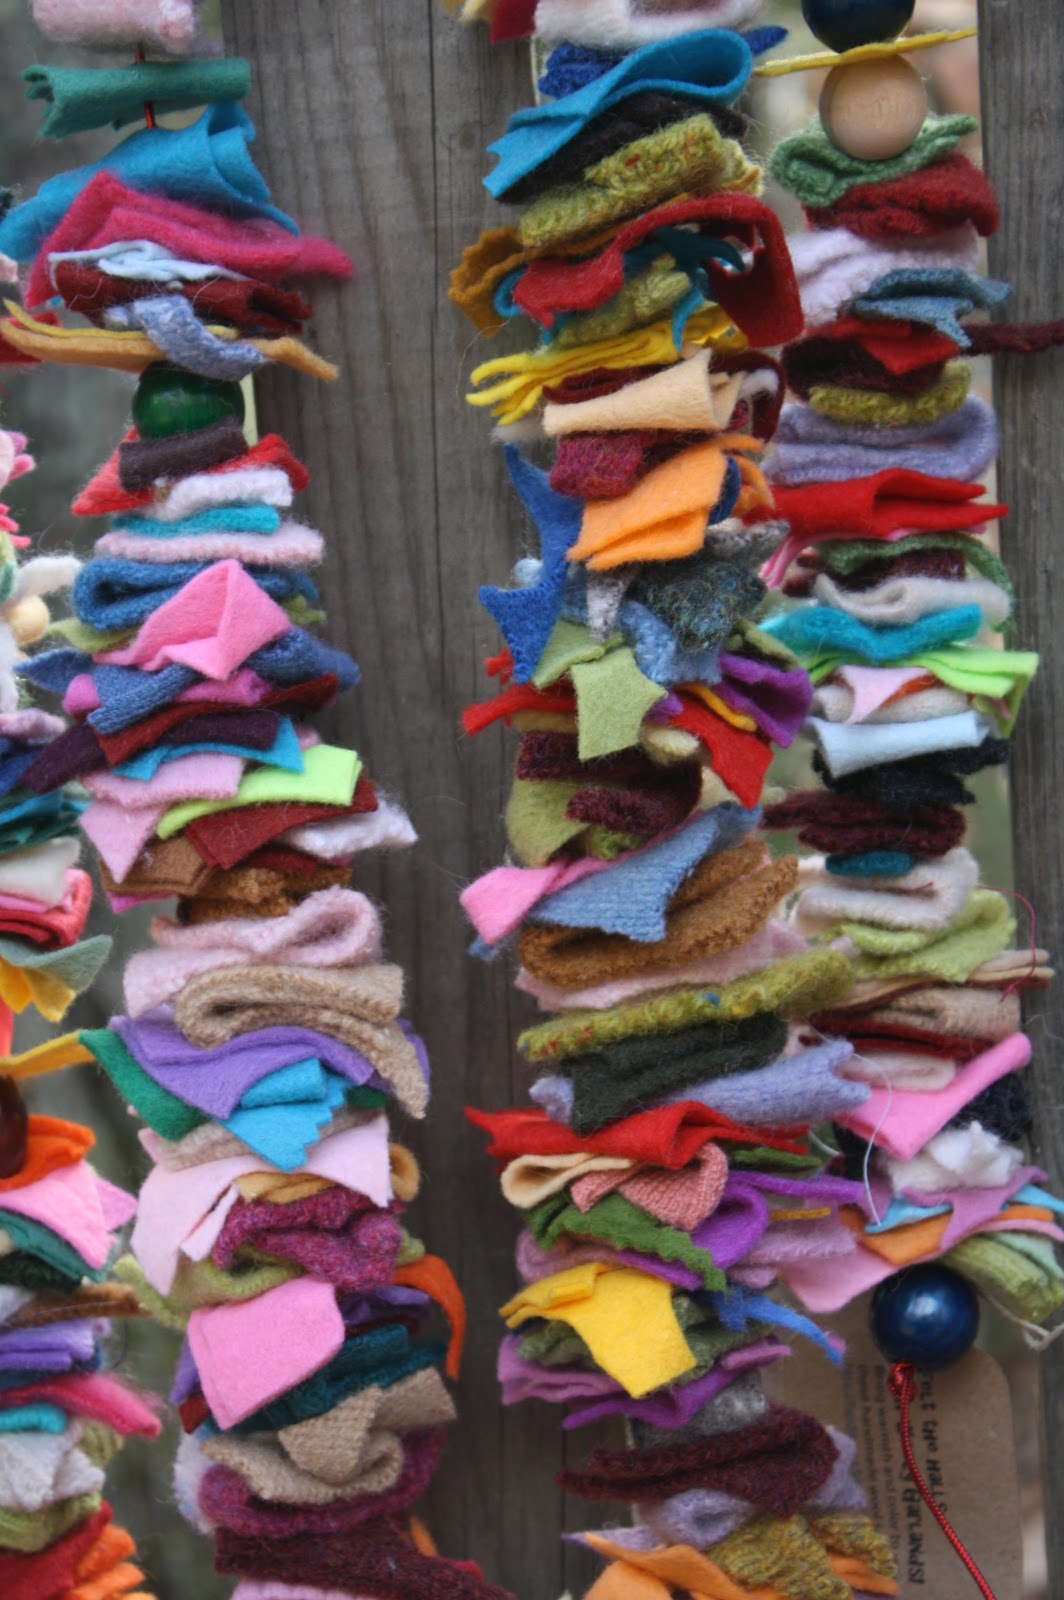
I'm drawn to random color stringing when I bead, it was automatic for me to distribute colors and textures along the length of the garland. Custom stringing garlands to match your decor is as simple as sticking to a limited color pattern or grouping like colors together. To break up the monotony of the stringing I periodically added beads a felt flowers to the strand.

I had grand plans of making loads of long garlands for craft sales. The results are beautiful but they took twice the time than I estimated. I stopped at five 55" long garlands and still have piles of scraps left to use. If you don't want to commit to making a whole garland consider adapting this project to make a fun scarf. For comfort I'd suggest omitting the beads and using strong yarn as your stringing material.
My book Craftcycle features projects that use felted sweaters and other recycled fabrics. For more crafty inspiration take advantage of the FREE SHIPPING on all books at Mycraftivity.com on Thanksgiving day!

November 17, 2010
Home Studio Chaos
This time of year can throw any professional crafter into a tailspin, but add a December book deadline and craziness abounds. Here's a behind the scenes peek at what creativity looks like in my house.

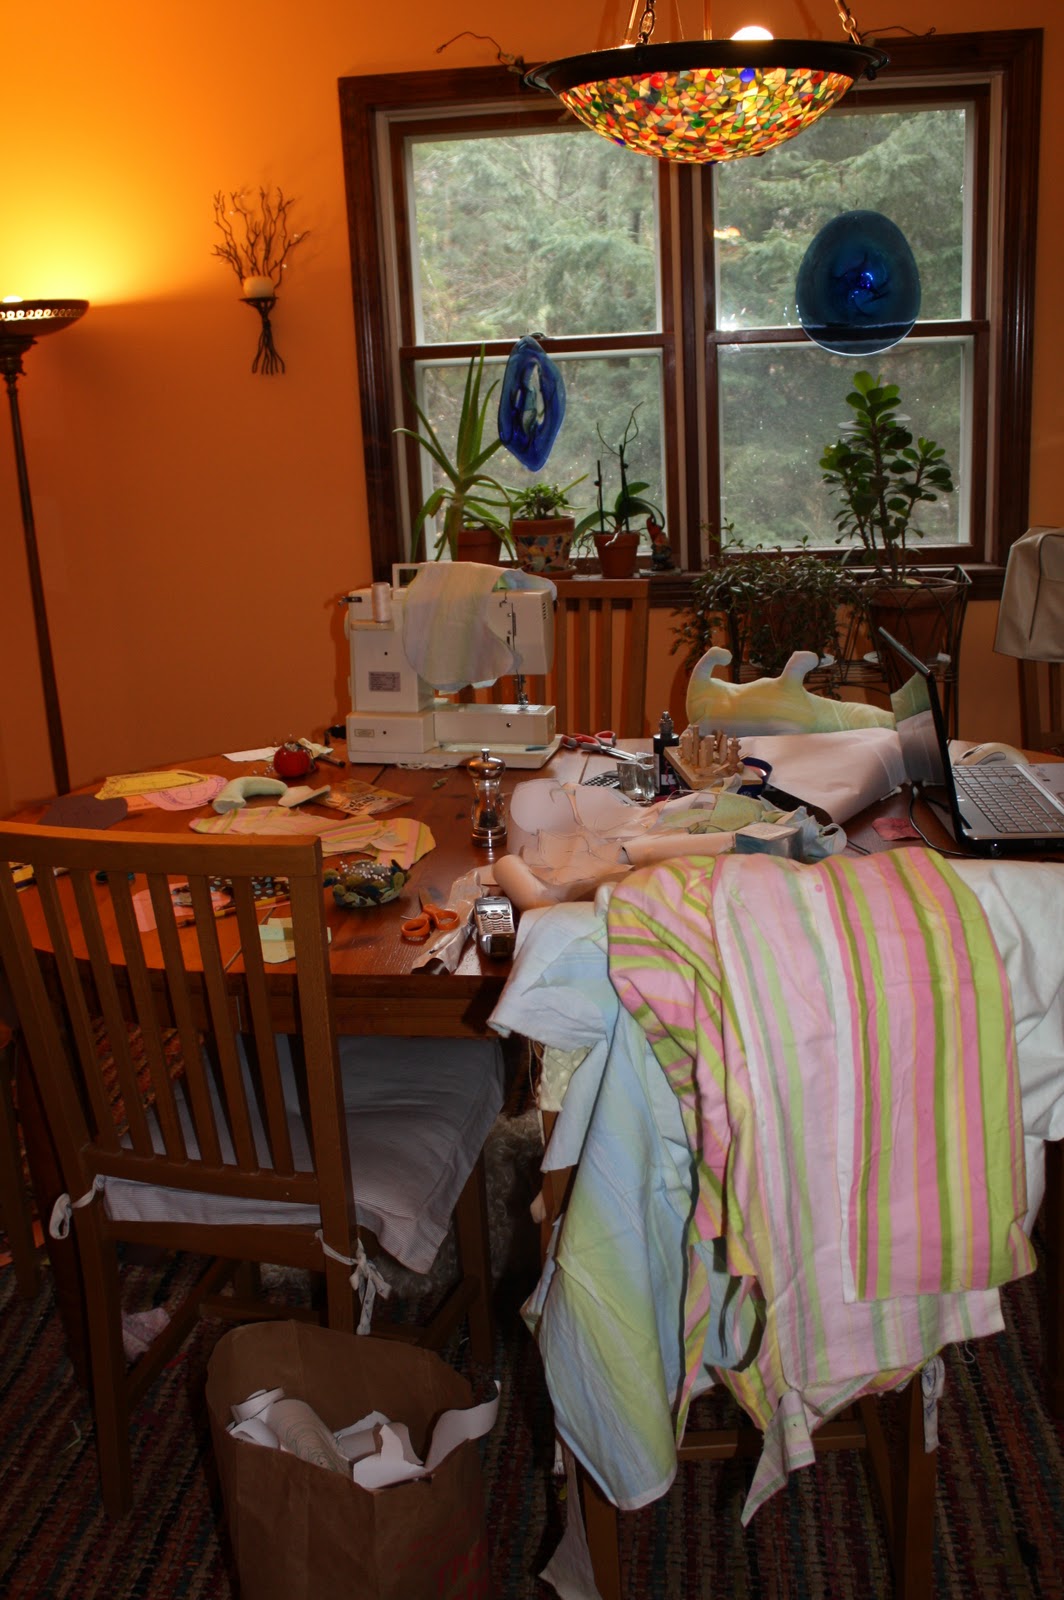
My dining room sewing set up, the chairs become portable shelving. Note the paper bag full of scraps they're test patterns that didn't make the cut. It all needs to be cleaned up and put away before dinner, a necessity that helps keep me organized.

This morning I've been working on vintage dachshund, cat and deer patterns for my upcoming book 'Stitched Whimsy'. I'm stitching the prototypes with flannel and Minky. I have some wonderful vintage prints, fuzzy eco felt and corduroy ready to use on the final versions. My sewing machine is a little Bernina, a twenty year old wedding gift from my parents. No bells and whistles but it's a workhorse that's seen me through years of Better Homes and Gardens costume making.

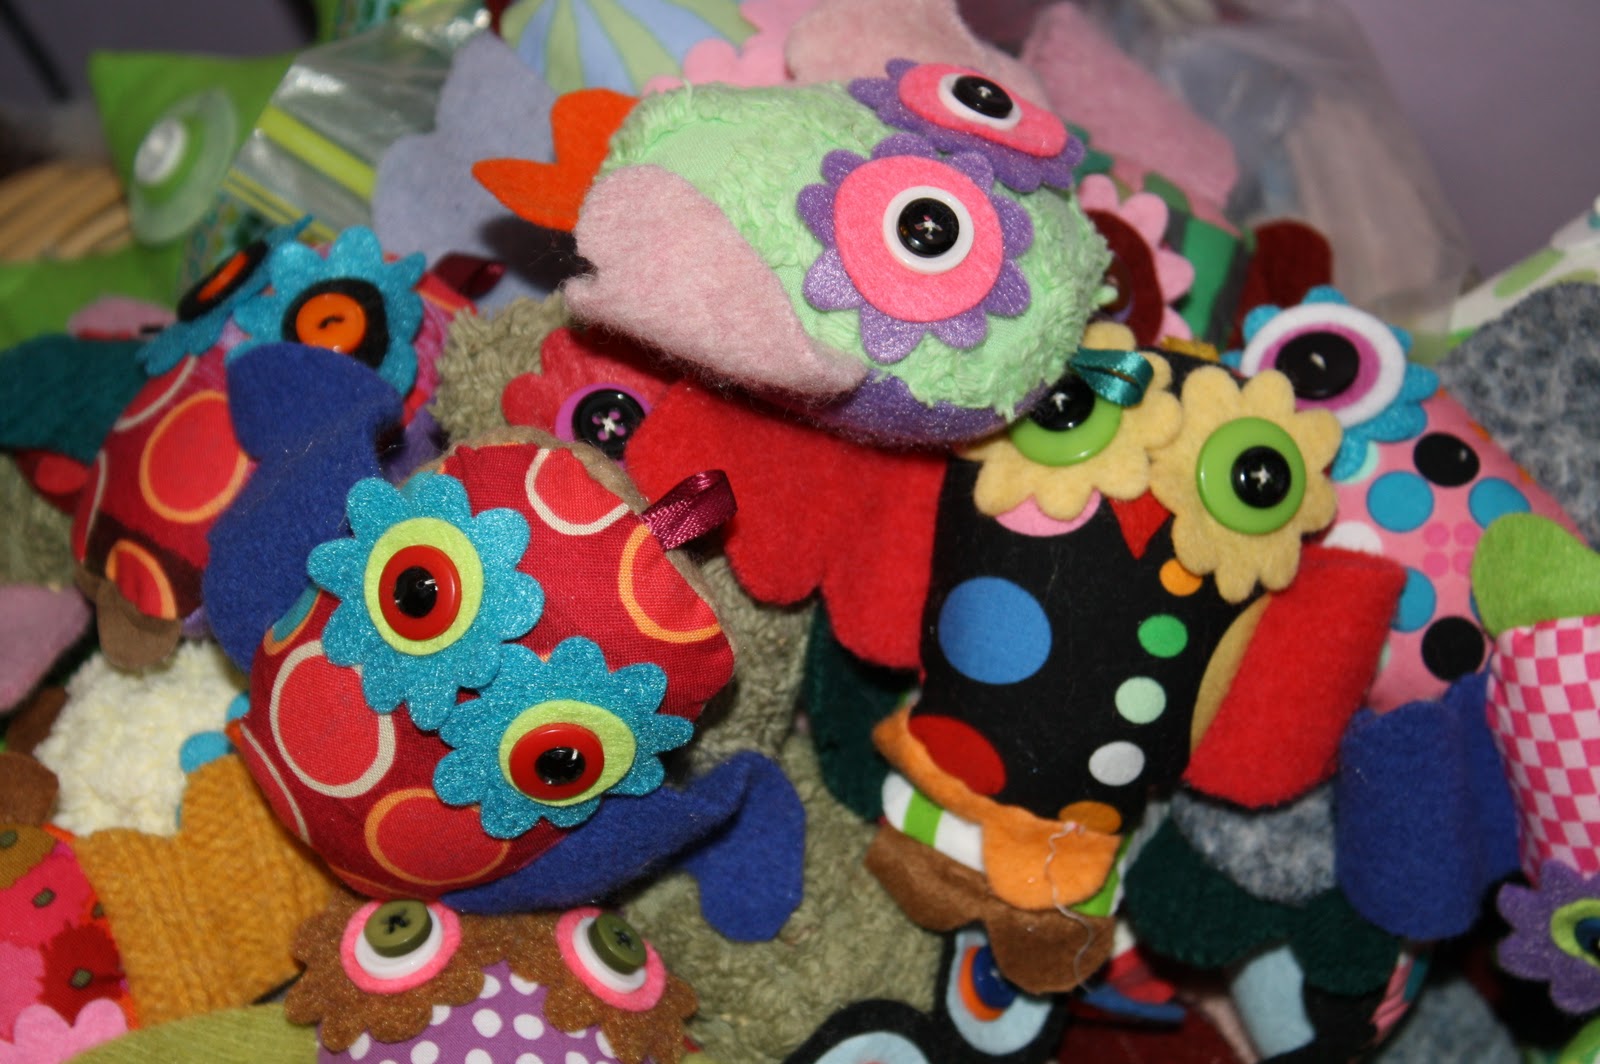
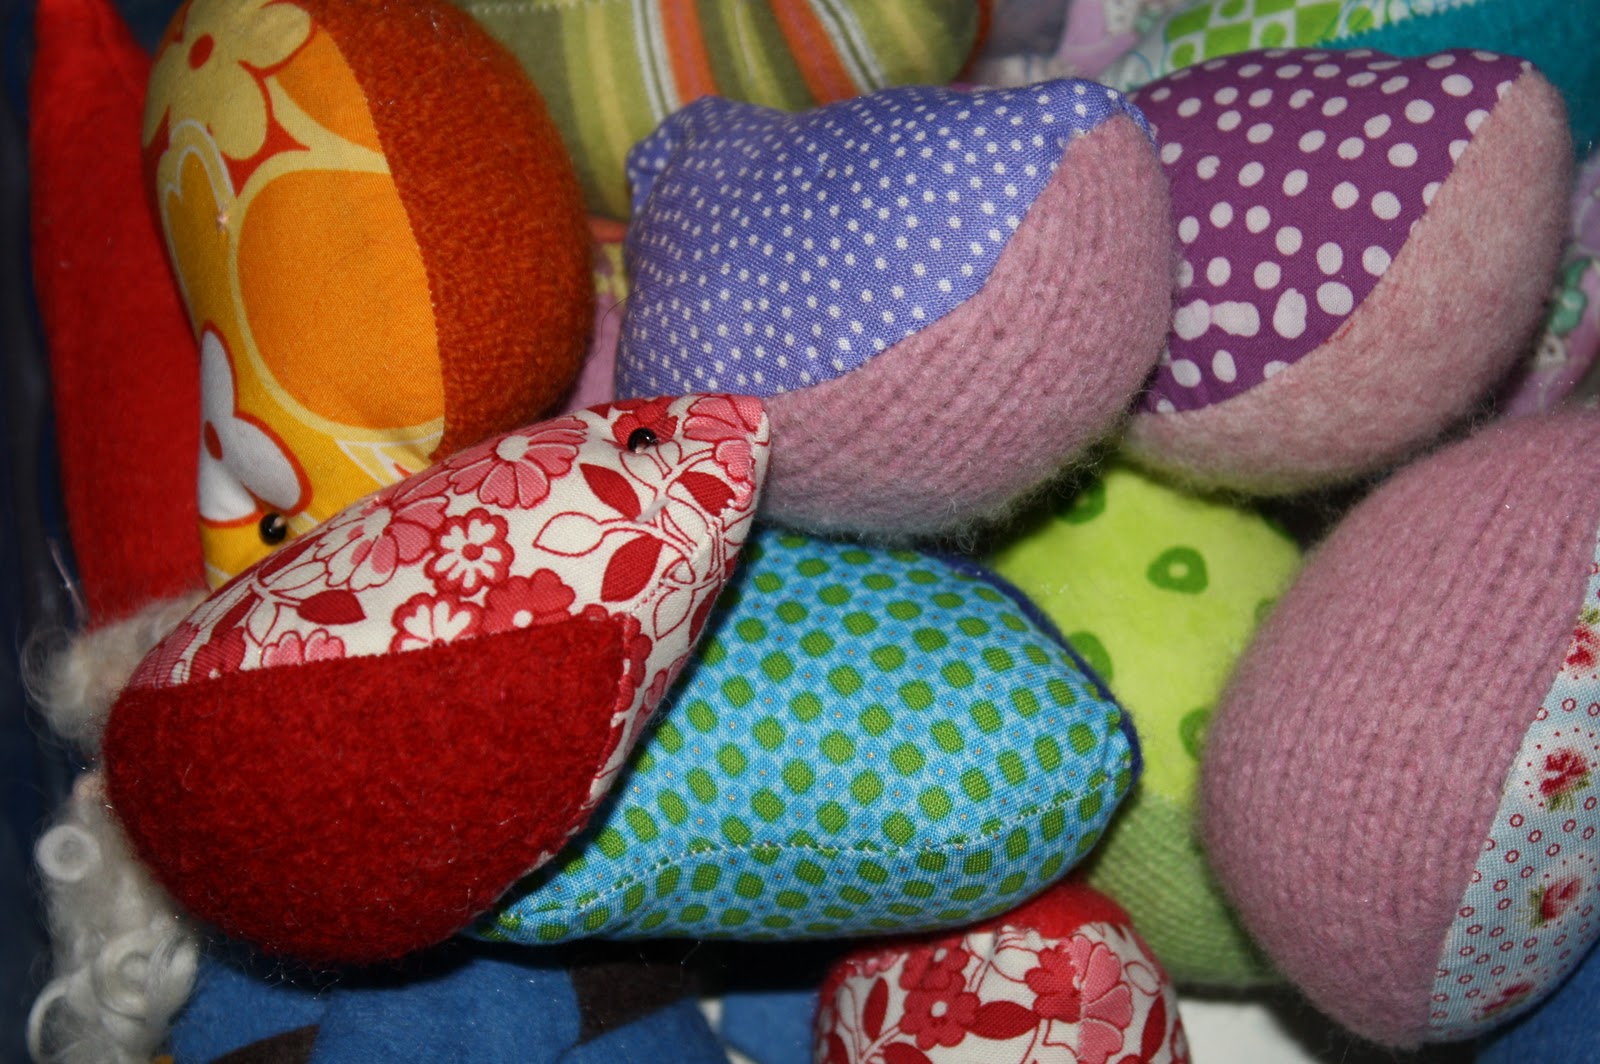
The Hedgehog Softie I created for Stitched Whimsy worked out so well I've been making a few extra for the weekend fairs. Jon cut out eight sets of pattern pieces and I've been assembling them production style. These finished arms are ready to meet their bodies.

I do have actual studio space upstairs over the garage but I find it's easier to work down where the kids are. When life is busy, part of the studio becomes a dumping area. It's hard to tell but underneath this chaos is a treadmill that has been seeing very little action.

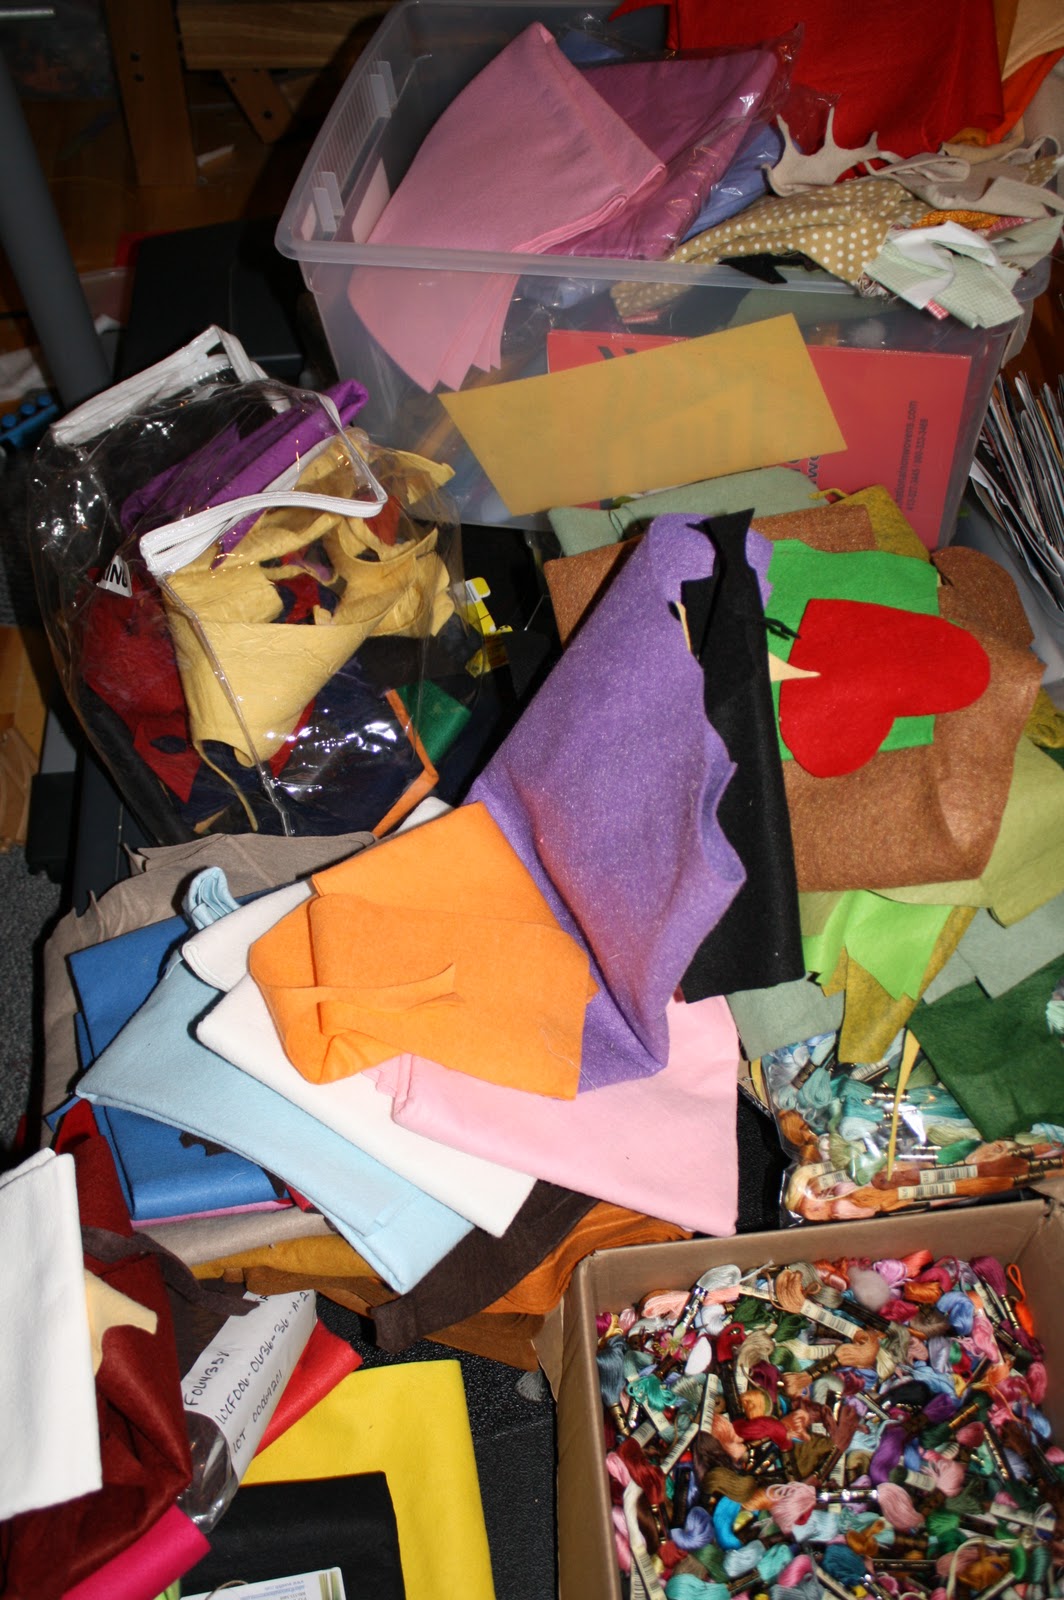
I have an awesome felt selection from Commonweath felt. I've been using their 100% wool 35% wool and bamboo felt in many of the designs for my upcomming book.

I separated my fabric collection into warm and cool colors. I owe a huge debt of gratittude to my sister for filling out the selection with wonderful prints she collected in NYC.

I'm not going to lie it's a thrill to paw through prints and felt to find the right combination for a design.

Decorative top stitching finds it way into many of my designs. I can't tell you how happy I was when this designer kit arrived from my friends at DMC.

After my little one goes to sleep I'm too brain dead to work on book designs, that's when I nestle into the couch with piles of busy work. These 'Little Hoots' are awaiting hand embroidery. They sell so well it's hard to keep them in stock. I'm contemplating add the pattern them to my book...

More late night busy work these birds of a sweater first seen in Craftcycle are in need of wings and legs they're stationed by the television remote. Despite my creative stash I still make weekly runs to JoAnn's for missing items. At the top of this weeks list - more stuffing! Here's wishing you a happy holiday season filled with creativity.
My dining room sewing set up, the chairs become portable shelving. Note the paper bag full of scraps they're test patterns that didn't make the cut. It all needs to be cleaned up and put away before dinner, a necessity that helps keep me organized.
This morning I've been working on vintage dachshund, cat and deer patterns for my upcoming book 'Stitched Whimsy'. I'm stitching the prototypes with flannel and Minky. I have some wonderful vintage prints, fuzzy eco felt and corduroy ready to use on the final versions. My sewing machine is a little Bernina, a twenty year old wedding gift from my parents. No bells and whistles but it's a workhorse that's seen me through years of Better Homes and Gardens costume making.
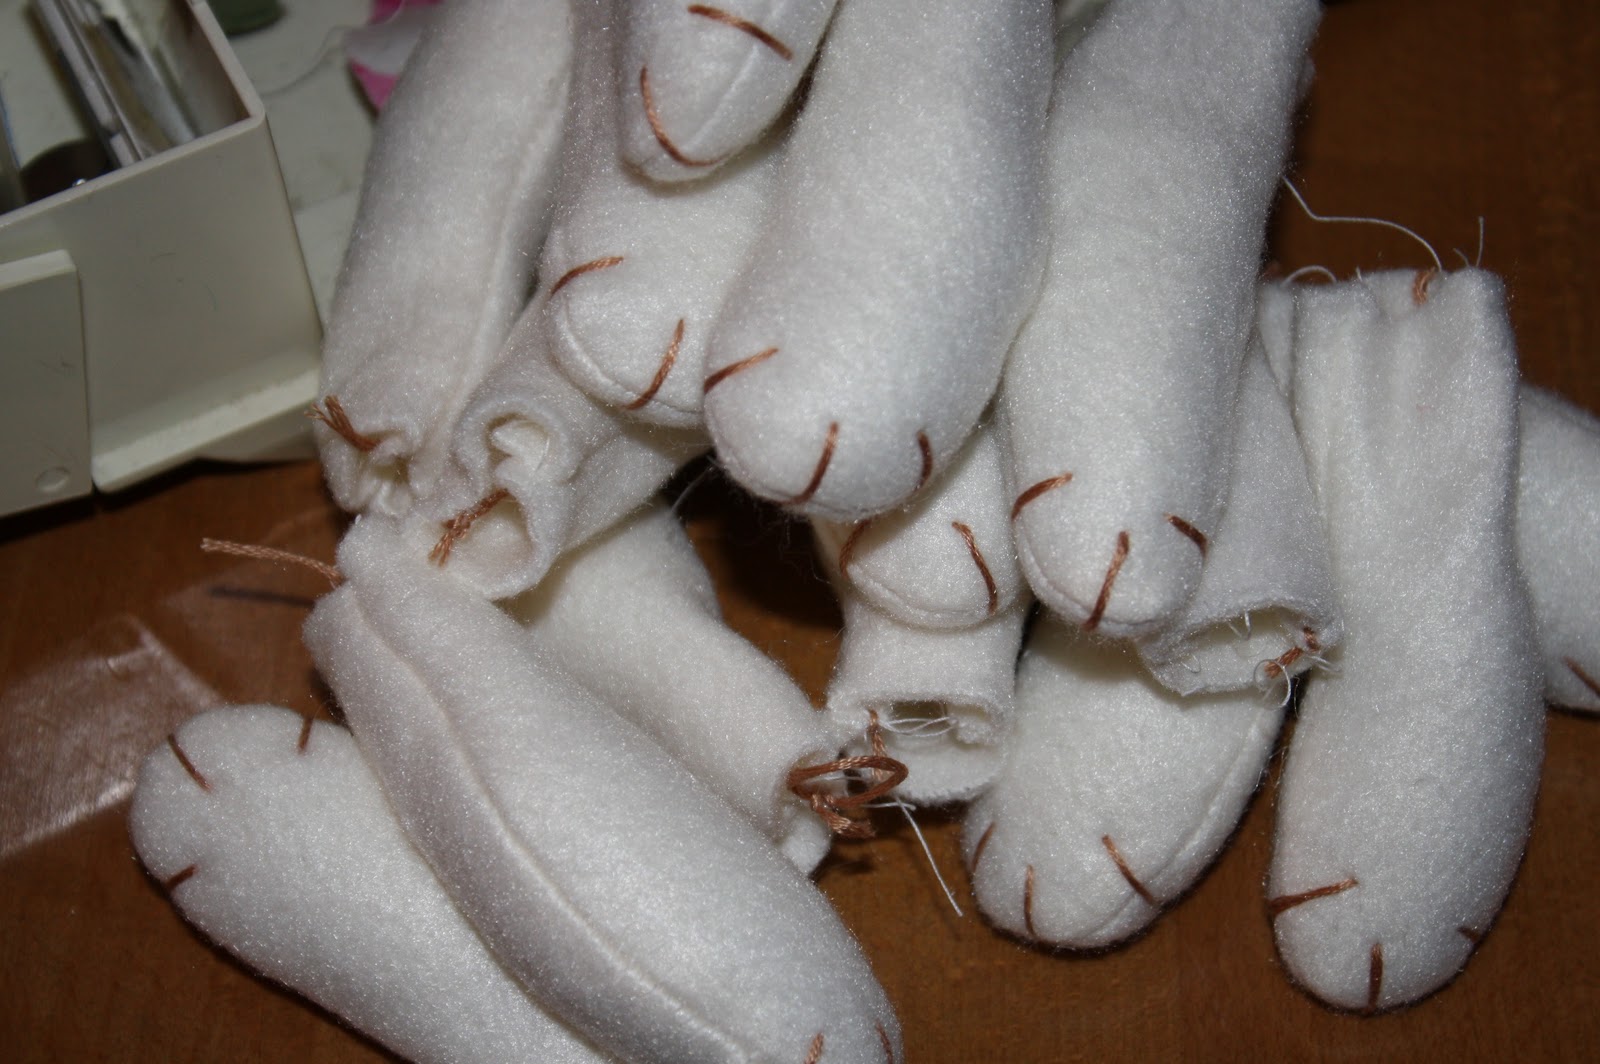
The Hedgehog Softie I created for Stitched Whimsy worked out so well I've been making a few extra for the weekend fairs. Jon cut out eight sets of pattern pieces and I've been assembling them production style. These finished arms are ready to meet their bodies.
I do have actual studio space upstairs over the garage but I find it's easier to work down where the kids are. When life is busy, part of the studio becomes a dumping area. It's hard to tell but underneath this chaos is a treadmill that has been seeing very little action.

I have an awesome felt selection from Commonweath felt. I've been using their 100% wool 35% wool and bamboo felt in many of the designs for my upcomming book.
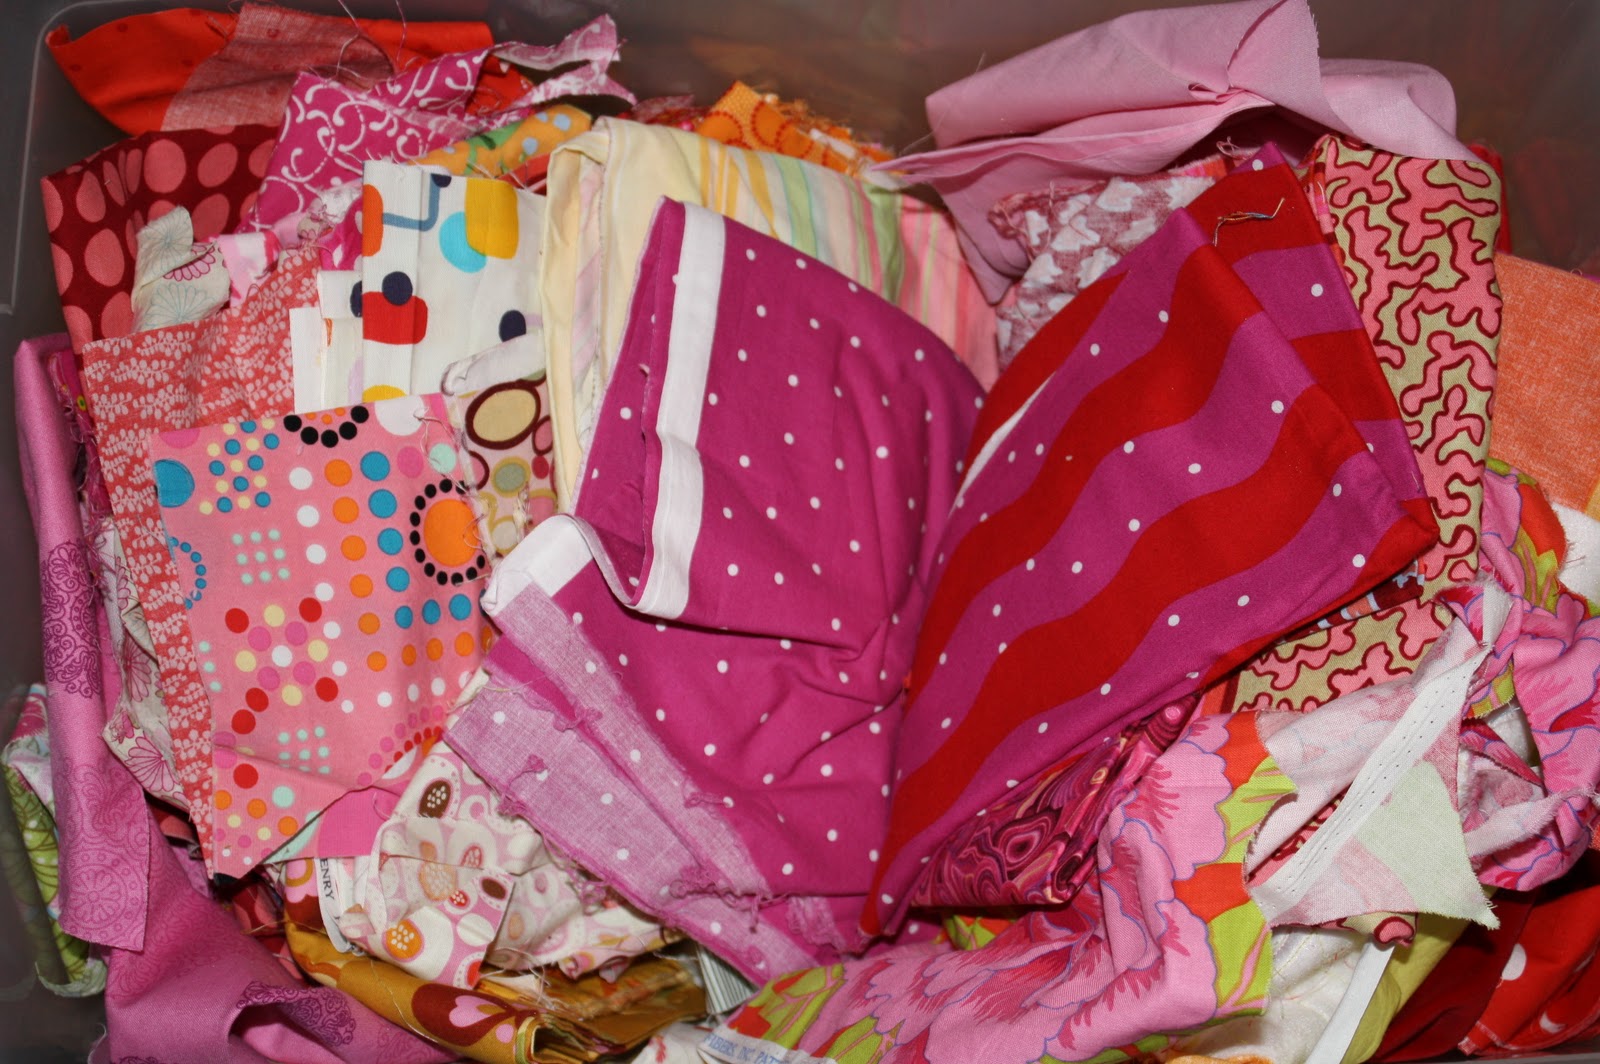
I separated my fabric collection into warm and cool colors. I owe a huge debt of gratittude to my sister for filling out the selection with wonderful prints she collected in NYC.

I'm not going to lie it's a thrill to paw through prints and felt to find the right combination for a design.

Decorative top stitching finds it way into many of my designs. I can't tell you how happy I was when this designer kit arrived from my friends at DMC.
After my little one goes to sleep I'm too brain dead to work on book designs, that's when I nestle into the couch with piles of busy work. These 'Little Hoots' are awaiting hand embroidery. They sell so well it's hard to keep them in stock. I'm contemplating add the pattern them to my book...
More late night busy work these birds of a sweater first seen in Craftcycle are in need of wings and legs they're stationed by the television remote. Despite my creative stash I still make weekly runs to JoAnn's for missing items. At the top of this weeks list - more stuffing! Here's wishing you a happy holiday season filled with creativity.
November 5, 2010
Brunswick's first Indie Holiday Marketplace
 Mark your calendars spread the word and grab a friend. Thursday night is the first ever Artsy Affair at the Frontier, Fort Andross in Brunswick Maine. It's starts a five, don't bother cooking dinner plan to enjoy Frontier's delicious food and wine.
 The gorgeous Frontier Cinema and Cafe.Artsy is the brainchild of Brunswicks own Carrie Sullivan of Sheabella Tutus. She had participated at similar evening events in Boston and knew the concept would work in Brunswick. Carrie and I sat down to coffee and made the commitment to bring her idea to reality.
  One of Carrie Sullivan's beautiful tutu creationsEnlisting the help of Amanda Smilien of Maine Street Events has been the key to creating a successful evening. She has made launching this event a pure delight! From the very inception our goal has been to create a unique handmade marketplace, filled with some of the best design talents in the area. It's amazing how quickly the planning has fallen into place. We've been overwhelmed by the response of the Frontier, artists and the community.
 Here's a sampling of the twenty two vendors that are sure to make this evening a success:
 Whimsy skirts feature gorgeous fabric, playful trims and a comfortable adjustable waist band!One of my favorite vendors is Kendra Haskell's line of 'Whismy' skirts bags and accessories. I couldn't resist choosing one of her skirts at Higgins beach fair this summer.
 Original wire work jewelry by Susan Bryant CaronSusan Bryant Caron will be showcasing her amazing wire work jewelry - this is a lady I could learn some wire work tricks from!
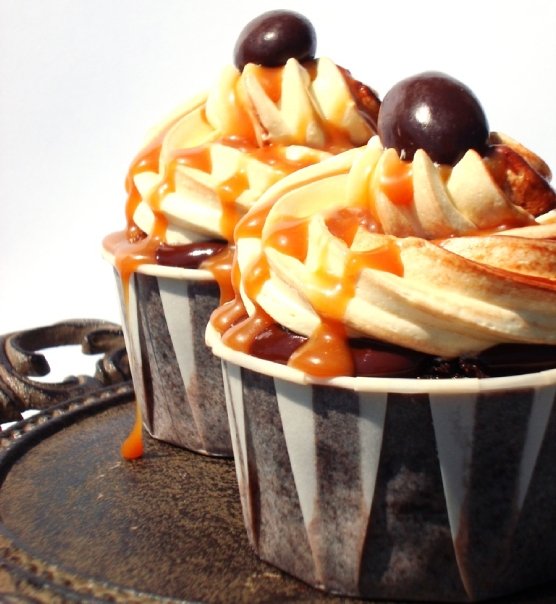 Amazing cupcakes from Fields of Cake I'm looking forward to meeting Carrie Fields of Fields of Cake in person. She's offering six packs of the following amazing cupcakes: Chocolate Cake filled with homemade salted caramel and toasted pecans, lemon cake filled with lemon curd, Triple Vanilla Brown Butter cake filled with wild Maine Blueberries and topped with Maine Maple Buttercream, Gingerbread stout cake filled with cheesecake and topped with Caramel Brown Sugar Buttercream ....Oh my goodness I'm salivating!
 Wendy Jung of Soggy Dog Design's photography will be on hand to photograph the evening and showcase her playful portraiture.
To take away the chill Annie Roberts is bringing her colorful fleece hats and sweaters from Little Planet Creations and Regina Kusche will displaying her elegant Akosua knitwear designs.
 Lovely bird magnets from LittleputlandCasie Metcalf Hitchcock is our Maine Etsy team leader she's be bringing her Littleputland scrabble tile jewelry and magnets. She introduced me to Anna Low of Purple Bean Bindery in Portland, I can't wait to get a closer look at her incredible handmade books.
 An amazing handmade book from the Purple Bean bindery.Charlotte Agell will be signing her books and offering a chance to win a child's portrait to be painted at your home. Her very talented daughter Anna Simmons has her own creative business entitled ANNAES and will be selling her graphic narrative pieces.
Sitting alongside Charlotte will be talented illustrator Lisa Bossi, who'll be selling her gorgeous prints and books.
Our very own Barbara Berry Palm (art teacher at our junior high) will be showing the detailed polymer clay pieces she creates for her Moose Winks line. Chake Higginson and Catherine Worthington are two more fabulous local artists. Chake and Peyton will have their very popular shirts on hand and Catherine will have her gorgeous fabric art pieces from her Earth Tone and Fish Bone line.
If you're looking for homemade preserves and jams Berts Awesome Stuff will have a great selection on hand.
We invited Spindleworks to be our guests, I'm looking forward to seeing what their talented artists have cooked up.
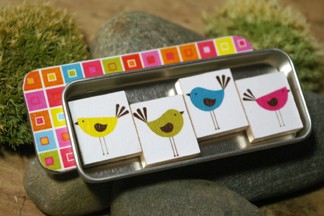
They're are so many more talented people coming to this event but if I don't stop posting links and photos I won't have time to get my own work ready. If you live in the area please come join in the 'Artsy' fun. I'd love to meet you - my booth will be the one filed with birds owls and lobsters!