
Ali Edwards's Blog, page 136
December 21, 2018
December Daily® 2018 | Day Twenty

Welcome to December Daily® Day 20 for 2018.
This month is trucking right along. Can you guys believe it's just a few more days until Christmas?
I've been holding on to this story for a week or so, waiting for a good day to share it and today's the day. Just a heads up that today's story does include holiday spoilers for kids.
Here's a look at Day 20:

Today I'm working on the back of a 4-pocket 6x8 page protector. I decided I wanted to keep the same tag shape as Day 19 so I used one of the tags as a template to cut my pieces into that same shape.
Inside the three tag pockets I included a "magic is something we make" word art (see download below), a chipboard santa on top of vellum and santa pattern paper, and my story that I printed using red text on a pink background on photo paper.
"Do you enjoy the magic of the season?" I responded as she asked me those tough childhood questions surrounding beleiving in things we can't see. "Yes," she said as she lowered her eyes and was enveloped in that bittersweet blanket of truth. "My sweet girl," I whispered, "now you'll become a magic maker and you'll be able to help create that for others." I went on, "Magic is something we make. Do you want to help make some magic with me this year?" She looked away feeling the disappointment and then looked back up at me with a brave face, "Yes, okay. But don't tell Dad because I want to feel the magic over there."
Before I shared this I asked her to read it and tell me if she felt like it was an accurate representation of our conversation and she said she thought it was and then told me I should be a writer. She has also already talked to Chris as well.
You can also read my past Holiday Helper post here that talks about this topic and Simon.
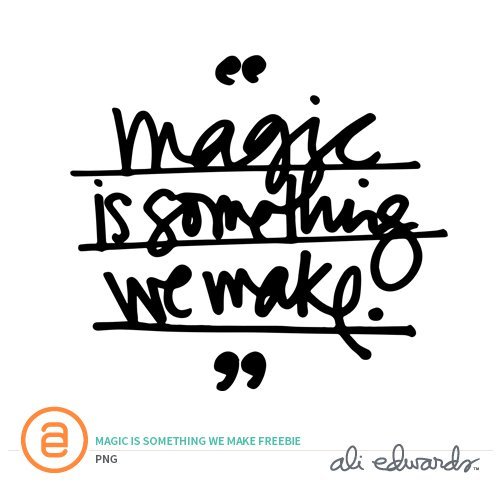
You can download the "magic is something we make" word art here.

On the top left I created another fun hanging cluster using red embroidery thread attached to the back of the epoxy paper clip from yesterday. The cluster includes a gold glitter star, a plastic circle that was a Joy Story Kit™ Add On, and a paper die-cut Santa.
You can also see that I added the gold star brads to the center top of each of the tags. Those seem to be the product I can't get enough of this time around.
VIDEO OVERVIEW
SUPPLIES
December Daily® 2018 Main KitCrate Paper Merry Days ChipboardCrate Paper Merry Days TagsGold Glitter StarsEpson PictureMate PM400Gold Star BradsVellumEcho Park Merry + Bright Santa ClausStory Kit™ Joy Add On Transparent Circle


December 20, 2018
December Daily® 2018 | Day Eighteen + Nineteen

Hello Friends!
Today I'm sharing Days 18 and 19 in my December Daily® in one post. Day 18 is a super simple story about the weather and Day 19 is a look at some things I think are "so great" around here using a tag page I created for Product Play 2.
Let's start with Day 18:

Today's story is all about the weather. Remember that your stories don't have to be long and complicated.
And no surprise - it's raining. Yep.

I took a photo looking up though the sunroof of my car and printed it as a 6x8 on my Canon Pixma MG7720 printer (newer version). On top of that I added the weather forecast from my local paper along with a "yep" I cut on my Silhouette (Bebas font). For the number I cut out a star from the December Daily® Main Kit box and used the gold number stickers from the Main Kit on top.
Let's move on to Day 19:

Day 19 was originally created for the Tag lesson in the Product Play 2 workshop. For my foundation pages I did the stamping (using this stamp set) + embossing on the tags and created the title tag using the epoxy star paper clip from Crate Paper.

For my story today I went around the house and looked for things I think are "so great." That included a firewood delivery, our kid-centered ornament tree, and candy houses that the girls have been working on for a few days.
I printed 3x2 photos along with 3x2 journaling blocks. I adhered the journaling blocks to the tags that are slipped into the pockets. Then, on top of the page protector, I added the photos. Along the top of each photo I added washi tape and then used a scoring tool to create a crease in order to make the photo able to flip-up.
December Daily® Main Kit
December Daily® Making Spirits Bright Stamp Set
Silhouette
Canon Pixma MG7720 Printer (newer version)
Ribbon
Crate Paper Merry Days Tags With Glitter Accents
Crate Paper Merry Days Epoxy Paper Clips
Crate Paper Merry Days Washi Bundle

December 19, 2018
December Daily® 2018 | Day Seventeen

For my December Daily® Day 17 story I'm going with all photos. In projects like this it's nice to remember that you don't have to include words every day - especially on a day like this where you might want the photos to tell more of the story.
I went with an Around The House theme and have included a circle word art download for you below. The second page is from my Product Play 2 Workshop which includes a download for the background pattern.
Here's a look at my Day 17:

For the backside of the 2x2 pockets I took photos from around the house and my Top 9 from Instagram in 2018 and a photo from a lunch with friends. I also created 1.5 inch circles to go on the back of the chipboard circles from Day 16 and have those available in both a filled in and an outline version for you to download:
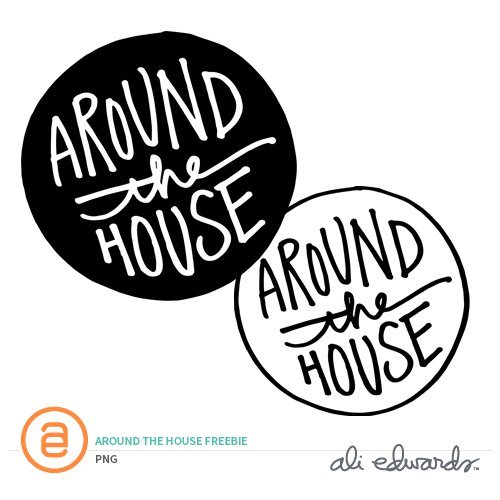
Download the Around The House circles here.

In the video you'll see me using a punch I was introduced to at the December Daily® Prep Party that punches true 2x2 squares. It's technically a punch to punch photos for Passports but it works great for photos.
I also used the punch to punch out one of the transparent Joy circles that was an add-on for the Story Kit™ this month.

It's fun + easy to walk around your house to take photos of things happening. I added another gold glitter star on top of the cut out wreath circle on the second page for a nice visual triangle with the pocket page.
Again, more details about that page can be found in the Product Play 2 workshop.
VIDEO OVERVIEWSUPPLIES2x2 Passport Punch Gold Glitter Stars 6x8 Page Protector With 2x2 Pockets 1.5 Inch Circle Punch December Daily® 6x8 Patten Paper Stack Transparent Circle Add Ons for Joy Story Kit™

December 18, 2018
December Daily® 2018 | Day Sixteen

Hello and welcome to Day 16 of my December Daily® album for 2018.
Today I'm sharing a story about how much I love that Anna (and Simon) have followed in Chris' footsteps to be really good card givers. They take time and attention when selecting cards and that definitely comes from him rather than me. It's something I always liked about him and something that I love seeing Anna and Simon do as well.
This is a great example of slowing down enough to see stories happening in front of you. While she was selecting cards I stood there and watched her and smiled to myself. Rather than being in a hurry to get on to the next thing or going to another area to cross other things off my list I let her take her time. While she was doing that I grabbed my phone and snapped a photo in order to tell this story today.
Here's a look at how it came together:

In the Product Play 2 workshop I created the 2x2 page to hold a story using "who, what, where, when, and why" as the jumping off point for the story (this is under the titles/text lesson). Again, this is part of the reason I love foundation pages - they give me a starting place/story beginning for many of my days. In today's story the whole thing moved along quicker because I had already stamped the cards and had them all ready to add my story.

I printed a full page photo (same size as the outside of the page protectors) that shows Anna looking at cards at Target for her teacher. On top of the photo I added a circle chipboard piece and a gold glitter star from this package. On top of the gold star I added a small letter "A" for Anna.

The second page is a 2x2 pocket page protector. Inside those pockets you'll find white cardstock with green stamped titles using this stamp set and my handwritten responses. I also added a couple of custom squares that include "love your mighty heart" and "finding words that matter" and "go Anna go." You'll also find circle chipboard pieces and gold glitter stars.
Here's a look at the spread outside the album:

December Daily® December Moments Chipboard Bundle Merry Days Glitter Stars Small Alpha Stickers 6x8 Page Protector with 2x2 Pockets December Daily® Main Kit Willamette Crafters Ink 6 Hole Punch See + Stamp Alpha Stamps

December 17, 2018
December Daily® 2018 | Days Five Through Nine Using A Travelers Notebook

I'm super excited to finally share my December Daily® Days 5-9 from our trip earlier this month to New York City.
We ventured to NYC because it was Simon's choice for a 16 year old trip. He gave me a list of the things he wanted to do and see and we stuck pretty close to that with a few other things added in that the rest of the group was excited about as well. It was a family trip that included my Mom, my sister Jessica, my niece Gabrielle, Simon, Elliott, Katie and me. We had an awesome time seeing all that we could see over a couple days. Simon's favorite was seeing the Statue Of Liberty. Mine was seeing Hamilton.
I shared my initial idea and a walkthrough of this TN (travelers notebook) in my Foundation Pages post for 2018. This idea was an excellent solution for me to document this time we were traveling.
Here's my basic documenting method for this project:
Before Travel: Set up travelers notebook. During Travel: Use the notebook to write down stories for each day day (basically a recap of what we did each day) while we were traveling, take photos, collect some ephemera that could be used in the project. After Travel: Print full page vertical photos, add some ephemera, write up an "I want to remember" page, and add a few embellishments.
If you are interested in learning more about my approach generally to travel memory keeping I invite you to check out my Travel Product Play workshop.
I love how this turned out. The overview video below includes an in-depth look at the process I went through after we got home from the trip. I used the Canon Pixma MG7720 for printing all the photos used in this project.
Here's a look at how I brought it all together:

My MInd's Eye Starry Night Pattern Paper was used as the cover of my TN (travelers notebook). A red label sticker from the December Daily® Sticker Bundle was added on the outside.

For the "NYC" I used my Mixed Alpha Stamp Set + green (Willamette) ink + a rolling date stamp below (this was all done before we left as part of my Foundation Pages for my 2018 album).

Before we left, but after I posted my Foundation Pages, I printed up this itinerary and added it to the album. I used the Large Travel Words 4x6 Stamp Set to add the word "adventure."
Make sure to check out the video at the bottom of this post to see the actual process I went through. Essentially I do all the words and photos first and then at the very end I add in a few embellishments. The chipboard heart here is from the Be Merry + Celebrate Chipboard Bundle.

Words + photos for the win. Setting up a place for words + photos in advance of the trip? Also winning.
My embellishment strategy was super simple: add word/phrase stickers to most of the photos. I love keeping it super simple like that and limiting the supplies I have access to when I'm finishing it all up.

Joy chipboard circle is from the Be Merry + Celebrate Chipboard Bundle.
This trip was so awesome. All his favorite movies coming to life.

I loved incorporating things I picked up along the way like this sheet from Shake Shack. It's the liner they use on their trays and it worked great as another page in my album. I cut it to size and folded it in half and it became a page. Large plastic circle is in the December Daily® Main Kit.

In the video you'll see my use a long-reach stapler to staple these two plastic circles in place.

This paper was from The Color Factory which is an awesome temporary exhibit. If you are in or around NYC just go.

I added in a sheet of vellum to create another page. I seriously loved adding this vellum page and will definitely do that again in future TN projects. It was great as a home for a few additional photos that I punched using a 3 Inch Circle Punch. The "our story" circle sticker was from a past One Little Word® product collection.

On the back I was able to repeat that same circle shape. I also added one of the clear plastic circles that were a recent Add On option for Story Kit™ subscribers.

Photos for the win.

For this page - which is the opposite side of the vellum - I cut out the bag I received when purchasing a book at the Statue Of Liberty. Super fun to cut that out and add it right onto the vellum.

On the backside I used my 3 inch punch again for another photo of some of our group.
Seeing the Statue Of Liberty for the very first time in person was really moving. I would totally visit again.

We made the climb up to the crown which is TINY. I had no idea how tiny it was. I held Gabrielle's hand the whole time - or maybe she was holding mine.
And the blue sky. Man. Hard to beat that.


Definitely had to include a few photos at the airport. Our trip home was a super, super long day of hurrying up and then waiting.

I really loved taking just the little bit of time it took to jot down those initial handwritten fact-based pieces of our adventure.

And I also loved coming back home and writing out a list of things "I want to remember" that are more from the heart reflections vs. facts about the trip. Having both these two styles of journaling within this one project makes the whole thing feel complete for me.

Love these guys.

Katie and I basically decided this should be an annual adventure and it should be our office Christmas party. Ha. I don't know if we will actually be able to make that happen but I love the idea. There is so much to see and do in NYC. This trip was really focused on the things that Simon wanted to see and do (his 16 year old trip) - which was just fine with all the rest of us. Also, we got our super puffy coats at Target (Champion brand) before we left and we LOVED them for the super color temperatures.
On this second to the last page I cut up little pieces of the ephemera I brought home to create this organized collage. Bits and pieces for the win.

I finished up the album with another building/sky shot and a circle punched photo of our group taken by my Mom.
A couple things to note:
I initially thought I would be stapling the pages all together to create the binding. It ended up way too thick for that. At this time I'm just leaving it how it is as it seems to function fairly well when I flip through the pages (you can see that in the end of the video below as well). Big thanks to my friend Jess for suggesting this as the way to tackle this piece of the month. I loved doing something different within the album and I loved being able to just experience the trip and have a plan in place for the storytelling when I got home. I want to say a big thank you to the community for giving me the freedom to do something a little different within this project. VIDEO OVERVIEWSUPPLIES
December Daily® Main Kit 3 Inch Circle Punch Ink Jet Vellum Word Phrase Stickers from past Story Kits™ + other projects December Daily® Variety Sticker Bundle Canon Pixma MG7720 Story Kit™ Envelope (to hold the TN in my album) Gold Number Stickers My Mind's Eye Joyful Collection Starry Night Pattern Paper (used for the TN cover) Avery Index Tabs Rolling Date Stamp Mixed Alpha Stamp Set Green Ink (Willamette) Green Washi Tape Large Number Stamps 6x8 Paislee Press Wishlist Stamp Set Be Merry + Celebrate Chipboard Bundle Long Reach Stapler

December 16, 2018
December Daily® 2018 | Day Fifteen

Welcome to December Daily® 2018 Day 15.
Today features one of the pages I put together for the December Daily® Product Play 2 workshop (you can still join if you are looking for additional how-to inspiration). On the underside of the flap I added a black + white photo of a group of us hanging out on the couch watching a movie. My journaling is simple - I identified four things to celebrate right now (including Audrey's 10th birthday).
How is your storytelling going? I hope you are finding + embracing your own rhythm.
Here's how I told my story today:

In the Product Play 2 Workshop I created the front flap with my large number stamps, gold embossing powder, and red + green ink.
On the inside I used the Making Spirits Bright Stamp Set to stamp "celebrate" four times.

After printing the photo I added it to the inside of the flap and cut up the 3x8 star transparency to add to the top. A digital version of that sold out transparency is available here (you could print on a transparency like I did yesterday and run it through a Minc machine).
On top of that I added one of the black chipboard stars from the main kit to the transparency piece.

I looked for bigger and smaller things to celebrate: Audrey's birthday + getting laundry done. All the good stuff.
When I added my journaling for today I also added gold foil numbers from the Main Kit.
VIDEO OVERVIEW
SUPPLIES
Inks: Pendleton (red) + Willamette (green)Numbers 6x8 Stamp SetMaking Spirits Bright Stamp SetDecember Daily® 2018 Main Kit (chipboard star + gold foil numbers)VersamarkGold Embossing PowderHeat GunSnappy Tray

December 15, 2018
December Daily® 2018 | Day Fourteen

Happy December Daily® Day 14!
Today I gave myself permission to play with something I've never used before - a Minc foiling machine. I used it to get white foil on a laser transparency using some word art you can download below.
It's one of the things that I always love about this project: the opportunity to play on the days when I have a little more time.
Here's a look at how it all ended up (lots of trial and error can be seen in my video overview below):

Today's story includes a 6x8 photo, a laser transparency ran through my Minc machine, journaling cut out on top and a few gold star brads keeping it all together with the page protector.
I created my journaling in Photoshop and printed it out on photo paper before cutting out each individual section and adhering it on top of the transparency.
Here's the word art download for you:
Download the digital package here.

I ended up attaching the transparency to the outside of the page protector using gold star brads.

I love how this one turned out and I love the process of how it all evolved from what I thought I would do in the beginning and how it all came together in the end.

On the bottom (on top of the page protector) I added some of the gold numbers from the Main Kit.
Minc Machine White Minc Foil Laser Printer Transparency (in order for the foil to adhere within the Minc machine you need to have a laser printed design) Gold Star Brads December Daily® Main Kit Star Glitter Chipboard Bundle (Story Kit™ Add On)

December 14, 2018
My Plans For Project Life® 2019

It's time for me to switch things up with Project Life®.
For 2019 I'll be using a 9x12 album (now available in the shop). Rather than focusing on weekly documentation I'm going to do it once a month. After eight years of doing 12x12 I've been feeling the need to change something up with this project and am feeling super excited to mix things up.
This year I want to reflect on each month as a whole at the end of the month and pull out the stories that feel the most meaningful to me. Sometimes that might be a "big" story and other months it might be a collection of smaller stories. My initial idea is to mix page protectors but have something that is the same each month - this might be a 6x12 or a full page 9x12 or something along those lines.
Do I know how this will all turn out? Nope, but I'm ready for a change.
My plan is share how I tackle my 2019 project here on my blog each month.
For those of you who are Story Kit™ subscribers I will still be sharing 12x12 Project Life® spreads in the classroom each month as I continue to work through 2018 and any earlier weeks I haven't completed.
Here's a short video message from me regarding this change:
Thank you so much for being a part of this storytelling community! I'm excited for this change and looking forward to sharing my process with you over the course of the next year.
The kit shown in the main image above is the January Stories By The Month™ for 2019. Subscriptions are now available.

December Daily® 2018 | Day Thirteen

Today I'm telling a simple story of what's happening around here right now by creating a flip-open card on the back of the 5x7 photo of Elliott from yesterday. I paired a photo of my favorite nook in our house right now with some fun, graphic journaling on the inside.
This story is designed to go along with the embellishment tree I created in the December Daily® Product Play 2 workshop.
Here's a look at how it all turned out:

The outside of my flip-out card includes a photo, a merry + bright embellishment + some fun washi tape from Crate Paper.
On the edge of the photo I added a tab sticker from the December Daily® Sticker Bundle. Watch my video below to see the full process of creating this flip-out.
And on the inside:

I loved the designs included in Crate Paper's Merry Days collection and included their Fa La La paper on the inside of my flip-open card.

The font I used above is Blackout.
VIDEO OVERVIEWHave an awesome weekend!
SUPPLIESDecember Daily® Be Merry + Celebrate Chipboard Bundle December Daily® Dimensional Bundle December Daily® Variety Sticker Bundle Blackout Font Crate Paper Merry Days FaLaLa Pattern Paper Crate Paper Merry Days Washi Bundle Week In The Life™ Pennant Flag Days Of The Week Stamp Set 6 Hole Punch Avery Index Tabs Tiny Attacher

December 13, 2018
December Daily® 2018 | Day Twelve

Welcome to
December Daily® 2018 Day 12.
On the 12th day of the 12th month Elliott turned 12. A "golden birthday" for a kid who is truly a kind, fun, special kid - I am so thankful I get to be a part of his life and it was so great to get to take him to New York earlier this month (more on that adventure soon). For my story today I wrote a little note to him in the reverse shape of the heart I used yesterday (I printed that note twice and added it to the bulletin board in his bedroom).
Here's a look at how I celebrated him in my album:

I used my
Epson PictureMate PM400 to print the 5x7 photo - you'll hear me say in the video that the reason I chose that size is because I'm out of my other sizes of photo paper. Ha. Make do with what you have is how I'm working today.
I moved my original 12 chipboard from the embellishment tree I created in
December Daily® Product Play 2 to this day and will use that tree for my story tomorrow.

My journaling is a little note to Elliott that was added to the back of yesterday's
vellum printed photo. In yesterday's post I included a digital package with the book club heart and the reverse of the heart to be able to adhere the same shape on the back of the vellum.
To create this I hand-wrote the message, scanned it in using Illustrator, traced the design and then reversed the colors to get the white type on the black heart. I did something similar in my album last year
here.
Along the outside edge of the photo I added an Avery Index Tab and used a stamp from my Brave Stamp Set (available in my shop).
VIDEO OVERVIEWSUPPLIES
Strathmore Ink Jet Translucent Vellum Epson PictureMate PM400 (can print both 4x6 and 5x7) Silhouette Gold Star Brads 6 Hole Punch Brave/Encouragement Stamp Set Avery Index Tab Gold Dot Chipboard Numbers


