
Lorraine Pascale's Blog, page 3
February 11, 2015
Lorraine's Valentine's Dinner Menu

If music be the food of love, eat on! As we all know, the way to a lover's heart is through a lovingly made meal - so to help inspire your Valentine's soirée I've created this simple yet sophisticated menu - complete with some lighter options of your classic date-night dishes.
These recipes have been collected from How To Be A Better Cook, Fast, Fresh and Easy Food and A Lighter Way To Bake.
A great way to start the day...
Homemade Valentine's gift: White chocolate lollipops with dried cranberries
(From Fast, Fresh and Easy Food)
Valentine's breakfast recipe: Mixed Berry & Cinnamon Muffins
(From A Lighter Way To Bake)
Cocktail
Recipe: Strawberry and Mint Mojitos
(From Fast, Fresh, Easy Food)
Starter
Recipe: Asparagus and egg puff tarts with parmesan and basil
(From How to be a Better Cook)
Mains
Recipe: Lovely, lighter lasagna with courgette 'pasta'
(From A Lighter Way To Bake)
Or
Recipe: Prawn linguini with chorizo & cabarnet tomato sauce
(From Fast, Fresh, Easy Food)
Dessert
Recipe: Plum & almond frangipane tarts in a sticky amaretto glaze
(From A Lighter Way to Bake)


Lovely, lighter lasagne with courgette 'pasta'
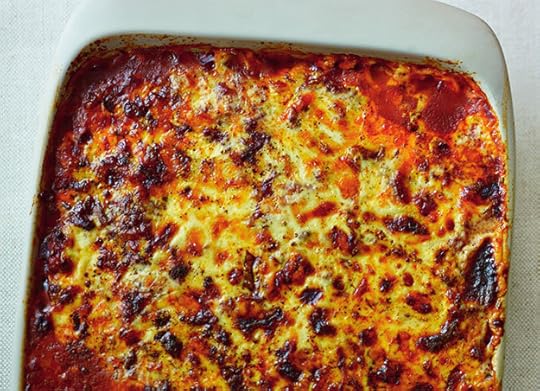
If you are not a fan of courgettes, carrots can be used in their place. This makes the recipe nice and low-carb.
However, if you fancy getting your teeth stuck into some carbs, then wholemeal pasta has a great nutty flavour. I really tried hard to make a roux which was super tasty using reduced flour and butter, but I just could not come up with a satisfactory product. The best way I found was to make a faux white sauce with flavourings, olive oil, milk, cheese and flour – still bags of flavour, but a lot better for you. I experimented with low-fat cheeses, but I found that the reduced and half-fat cheese was full of stuff we may not like to be eating, and was very, very stringy and stretchy and did not really melt. So I opted for a reduced quantity of regular cheese.
Serves 6
EQUIPMENT & INGREDIENTS
21⁄2 litre baking dish measuring
25.5cm square and 6cm deep
White sauce
475ml semi-skimmed milk
1 sprig of rosemary, bashed a bit
to release the flavours
1 bay leaf
5 black peppercorns
1⁄4 tsp freshly grated nutmeg
25g plain flour
25ml olive oil
50g mature Cheddar cheese,
roughly grated
Ragù
2 tbsp olive oil
2 onions, finely chopped
3 carrots, finely diced
2 tsp finely chopped rosemary
2 tsp thyme leaves
2 tsp dried oregano
2 garlic cloves, finely chopped
600g lean beef mince
2 tbsp cornflour
1 tbsp smoked paprika (optional)
2 x 400g tins chopped tomatoes
400ml Marsala or a good red wine or a good liquid beef stock
3 tbsp Worcestershire sauce
3 tbsp tomato purée
1–11⁄2 tsp caster sugar (optional)
Salt and freshly ground black pepper
Courgette ‘pasta’
4 courgettes, trimmed and cut lengthways into 0.5cm-thick slices (use wholemeal or regular pasta if courgettes are not your thing)
Topping
A little freshly grated nutmeg
25g mature Cheddar cheese,
roughly grated
8 basil leaves
To serve
Crisp green salad
METHOD
Preheat the oven to 180°C, (Fan 160°C), 350°F, Gas Mark 4. Sit a 2½ litre baking dish measuring 25.5cm square and 6cm deep on a baking sheet, and set aside.
First, flavour up the milk for the white sauce. Pour the milk into a medium pan over a medium heat and add the rosemary, bay leaf, peppercorns and nutmeg. Once the milk is just beginning to steam, take it off the heat and
leave to one side for the flavours to infuse.
Next, make the ragù. Heat 1 tablespoon of the oil in a large, wide pan over a low heat. Add the onions and cook for about 6 minutes, stirring from time to time so they don’t catch. Once softened, add the carrots, rosemary, thyme and oregano and cook these gently for 5 minutes, adding the garlic for the final minute. Tip this mixture out into a bowl and set aside for a moment.
Heat the remaining tablespoon of oil in the pan on a high heat and add half of the mince. It may need to be broken up a bit with a wooden spoon. Cook for 4–5 minutes, stirring regularly until this turns from pink to brown. Using a slotted spoon, scoop the meat out (leaving the oil behind) and add to the onion mixture. Repeat with the remaining meat, leaving it in the pan once browned. Then, return the onion and beef mix to the pan and stir in the cornflour, paprika (if using) and seasoning and cook for a further minute. Then stir in the tomatoes, Marsala, Worcestershire sauce and tomato purée.
Taste and add some sugar if you feel it is necessary (there may be some bitterness from the tomatoes). Turn up the heat and bring to the boil before reducing to simmer for a good 45 minutes for the sauce to thicken and the flavours to intensify.
About 5 minutes before the ragù is cooked, continue to make the white sauce. Strain the infused milk through a sieve into a large jug and discard the flavourings. Return the empty pan to a low heat and put in the flour and oil. Stir together to combine and cook for about 30 seconds before removing from the heat. Gradually add the infused milk, stirring all the time so no lumps form.
Then, once all the milk is added, return the pan to a medium heat and bring to a simmer. Allow it to bubble away for a couple of minutes until it thickens, stirring from time to time so it does not stick on the bottom.
Then, add the Cheddar cheese (for the sauce, not topping), stirring until melted. Season to taste, remove from the heat and set aside.
Now, time to assemble everything in the baking dish. Arrange a third of the courgette slices in a just-overlapping single layer in the bottom of the dish. Spoon in half of the ragù and spread it out evenly, followed by a layer using half of the white sauce. Then, add another layer of courgette slices, again using a third of them, followed by the remaining ragù, the remaining courgette slices, and then finish with the remaining white sauce. Finally grate over a little nutmeg and scatter the cheese on top.
Bake in the oven for 40–45 minutes until piping hot, golden on top and the courgettes feel just tender when pierced with a knife. Remove from the oven, scatter over ripped basil leaves and serve with a crisp green salad.
Strawberry & mint mojitos

Ahh, mojitos. My Achilles heel, for sure. Whether they be alcoholic or virgin, I love these sugary South American drinks. Strawberries can be substituted with other fruit, such as blackberries or raspberries, and the rum replaced with extra soda water or lemonade for a non-alcoholic version.
Time from start to finish: 15 minutes
Makes: 4
EQUIPMENT & INGREDIENTS
Four 350ml glasses, rolling pin, straws or cocktail
stirrers
3 limes
8 tbsp demerara sugar
12 strawberries
400g crushed ice
Small handful of fresh mint
250ml white rum
250ml soda water or lemonade (or even Pimm’s)
METHOD
1. Cut the limes into quarters lengthways and put three pieces in the bottom of each of four 350ml serving glasses. Make sure the glasses are wide enough to fit the end of a rolling pin in. (You’ll see why.)
2. Add 2 tablespoons of the sugar to each one. Then, using the end of a rolling pin, squash everything together to squeeze the lime juice out and mix with the sugar.
3. Hull the strawberries (cut out the green bit with the point of a sharp knife) and add three to each glass. Then very gently crush them a bit too.
4. Fill the glasses almost to the top with the crushed ice. Pick and reserve four nice mint sprigs from the bunch and then rip the remaining leaves off the stalks and scatter them onto the ice. Divide the rum evenly between the glasses and then top with the soda water or lemonade.
5. Mix everything together with a spoon, then add a sprig of mint to each glass and serve at once with a straw or cocktail stirrer popped in.
Plum & almond frangipane tarts in a sticky amaretto glaze
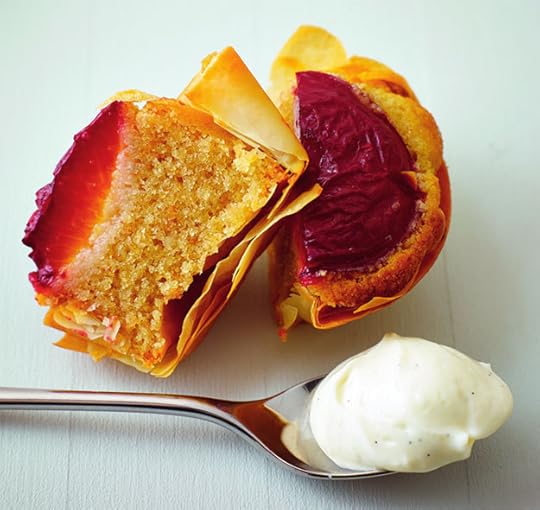
From How To Be A Better Cook.
A curiously appetizing concoction of a sponge in a tart, based loosely on the Bakewell which we know, and some of us love.
Any leſtover bits of filo can be kept and used for something like the Moroccan pie topping (see page 58). These are, I admit, not spectacularly healthy – despite many, many attempts at cutting back the sugar and fat, I couldn’t make them taste as good as I wanted them to be. So here’s the (nearly) full monty, just fractionally lighter than a full-fat, full-sugar fruity frangipane tart.
Makes 12
EQUIPMENT & INGREDIENTS
12-hole muffin tin (try heart-shaped for Valentine's!)
Pastry case
Spray oil
6 sheets of filo pastry, defrosted
Frangipane
100g unsalted butter, soſtened
100g soſt light brown sugar
2 eggs
100g ground almonds
25g plain flour
25g wholemeal flour
1⁄2 tsp baking powder
Finely grated zest of 1 unwaxed lemon
Seeds of 1 vanilla pod or 1 tsp
vanilla extract
Pinch of salt
1 tbsp Amaretto (optional)
Plums
6 ripe plums, halved and stoned
Vanilla cream
175g crème fraîche
2 tbsp icing sugar, siſted
Seeds of 1⁄2 vanilla pod or 1⁄2 tsp vanilla extract
Glaze
1 tbsp honey
1 tbsp Amaretto
METHOD
Preheat the oven to 200°C, (Fan 180°C), 400°F, Gas Mark 6. Place a baking sheet into the oven to heat up. This will give extra bottom heat to the tarts so that the bases cook through and are not soggy. Grease a 12-hole muffin tin with a little spray oil and set aside.
Lay four of the filo sheets out on top of each other in a stack. Lay the remaining two on top of each other too, but cut them in half across the width and stack them on top of each other to make another stack four sheets deep. Then, using a 10cm round, straight-sided cutter, stamp out eight circles from the larger sheets and four from the half-sized ones to give 12 round stacks in total. Then line each hole of the muffin tin with a stack of discs, pushing the pastry down well into the ‘corners’ of each hole. Keep any filo not being worked on under a lightly dampened tea towel so that it doesn’t dry out. Spritz each one with a little spray oil and bake in the oven for 10 minutes until crisp and lightly golden.
While the pastry cases are cooking, prepare the frangipane. Beat the butter and sugar together until they are nicely combined and then add the eggs and beat well. Tip in the ground almonds and the flours, baking powder, lemon zest, vanilla seeds or extract, salt and Amaretto (if using), and stir until uniform.
Once the pastry cases are ready, use two spoons to divide the frangipane mixture evenly between them. Place a plum half, cut side down, on top of each mixture. There is no need to push them down, as the plums will sink during cooking. Bake in the oven for about 20 minutes or until the frangipane turns golden and feels springy to the touch.
As the tarts bake, gently stir the crème fraîche, icing sugar and vanilla seeds or extract together with as few stirs as possible until blended. You want to avoid the mixture becoming too loose. Cover with cling film and set aside in the fridge until ready to serve.
Mix the honey and Amaretto in a small bowl and then set aside also.
Once the tarts are ready, remove them from the oven, brush the tops with the honey glaze, and then serve with a spoonful of the vanilla cream.
Prawn linguine with chorizo & cabernet tomato sauce
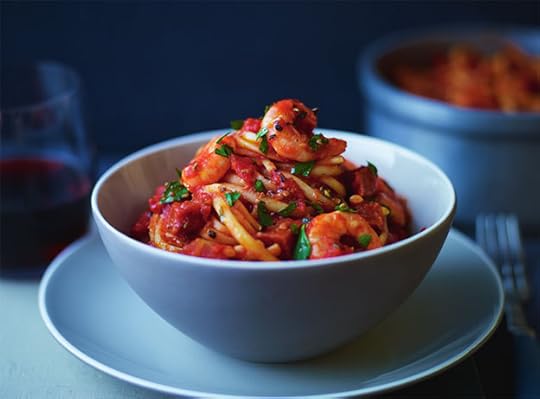
I am a chorizo lover. I cannot get enough of it. I think not a day goes by without me eating some of it. Really! If you can’t get your hands on a chorizo ‘ring’ then any flavourful sausage will do. Try some venison sausage or those made with pork and caramelised red onion, which are a great substitute
Time from start to finish: 25 minutes
Serves 4
INGREDIENTS
2 tsp fennel seeds, slightly crushed
150g (5oz) spicy chorizo ring
2 sprigs of fresh rosemary
2 garlic cloves
1 red chilli
olive oil
2 x 400g tins of chopped tomatoes
1 glass of cabernet sauvignon, about 150ml (5 fl oz) or other red wine or a good fish or chicken stock
1 tbsp harissa paste (or tomato purée if you don’t like it too hot)
2 tsp dried oregano
300g (11oz) linguine pasta
225g (8oz) sustainably caught peeled prawns (preferably raw but cooked will work too)
2 tsp caster sugar (optional)
small handful of fresh flat leaf parsley, to serve
salt and freshly ground black pepper
METHOD
1. Put a large sauté pan on a medium heat (with no oil in for the moment). Bash up the fennel seeds using a pestle and mortar (or in a mug with the end of a rolling pin) until lightly crushed and tip them into the pan. Cook for a minute or two, tossing them from time to time, until they start to release their lovely smell.
2. Meanwhile, slit the chorizo down the side, peel and discard the casing and cut the sausage into chunks. Pull your fingers down the length of the rosemary to release the leaves and then finely chop them. Peel and finely chop the garlic and deseed and finely chop the chilli. Add everything to the now sweet-smelling fennel with a little drizzle of oil and cook for 1–2 minutes, stirring.
3. Next add the tomatoes, wine (or stock), harissa paste (or tomato purée) and oregano. Then whack up the heat and leave it to bubble away for about 15 minutes so the sauce can become nice and thick and full of flavour. Give it a stir every so often to prevent it sticking.
4. As this cooks, put the kettle on to boil and then cook the linguine in a large pan according to the packet instructions.
5. Add the prawns to the sauce for the last 4–5 minutes of cooking time. If using already cooked prawns, they will take a little less time as you are simply warming them through.
6. Meanwhile, drain the cooked pasta well and return it to the pan, adding a good drizzle of oil and some salt and pepper, then pop the lid on to keep warm.
7. The prawns should now be cooked in the sauce. They should be pink and white on the outside and white inside. Taste the sauce, adding some salt and pepper if you think it needs it and a little sugar if it tastes too sharp. If you add sugar, stir it in well and then leave to cook for another minute.
8. Finally, tip the sauce into the pasta, stir well, then divide among four plates, scatter with the ripped-up parsley and serve.
Asparagus and poached egg puff tarts with parmesan and basil
A simple method for perfect poached egg is to have just a little water barely bubbling in a sauté pan then simply slide in the eggs and leave them to cook for a short while. The stiller water and the gentleness of adding them to the pan means that the eggs stay intact giving you an egg with a perfect poach.
INGREDIENTS
For the tarts:
plain flour, for dusting
500g/1lb 2oz puff pastry
200g/7oz low-fat cream cheese
¼ lemon, finely grated zest only
flaked sea salt and freshly ground black pepper
30 medium asparagus spears
1 free-range egg, beaten, to glaze (alternatively use a little milk)
For the topping:
6 medium free-range eggs
25g/1oz parmesan, made into shavings with a potato peeler
good handful small basil leaves
drizzle extra virgin olive oil (optional)

METHOD
1. Line a large baking tray with baking parchment and set aside.
2. Dust a little flour on a clean work surface and roll out the puff pastry to a 28x30cm/11x12in rectangle about the thickness of a £1 coin. Trim the edges so that the sides are nice and straight and neat. Cut the pastry in half down the length and then into thirds across the width to give six 10x14cm/4x5½in rectangles.
3. Put the pastry rectangles on the baking tray, cover with cling film and refrigerate for 20 minutes (or freeze for 10 minutes) for the pastry to firm up. It is important to do this so that when the puff pastry goes into the oven the flour cooks before the butter melts ensuring a much lighter pastry.
4. Preheat the oven to 220C/425F/Gas 7 (200C fan). Mix the cream cheese and lemon zest together in a small bowl and season to taste with salt and pepper. Trim the asparagus so that each stem is 10cm/4in long (you can use the trimmings to make a quick soup or add to a pasta sauce).
5. Once firm, remove the pastry from the fridge (or freezer) and use a sharp knife to mark a 1cm/½in wide border around each rectangle. Then, using a crosshatch pattern, mark the border so each pastry shape resembles a picture frame. Take a fork and prick the centre of each shape about 10 times, right through to the baking tray.
6. Brush the border with the beaten egg (or milk), making sure that it does not go down the sides of the pastry (if this happens, wipe it away with your finger otherwise the egg will stick the layers of the pastry together and stop the pastry from rising).
7. Divide the lemony cream cheese between the six tarts, spreading it out with the back of the spoon and making sure that it stays inside the ‘frame’. Lay five asparagus spears in a single layer, touching each other and pointing in the same direction on each tart, and push them down slightly.
8. Bake the tarts in the oven for 18-20 minutes, or until the pastry has puffed up nicely and is firm and golden-brown where it has risen.
9. About 10 minutes before the tart is ready, pour about 4cm/1½in of water into a sauté pan or a deep frying pan and bring to the boil over a high heat. Turn the heat down to bring the water to a gentle simmer. Crack an egg into a very small bowl or tea cup and then slide the egg into the water. Repeat with all of the eggs, spacing them apart. Cook them for about 3-4 minutes, or until the white is cooked but the yolk still soft. Remove with a slotted spoon onto a warm plate.
10. Remove the tarts from the oven and divide between six serving plates. Sit a poached egg on top of each tart and scatter over the parmesan and basil leaves. Sprinkle with a little salt and pepper and drizzle with a little olive oil, if liked, and serve.
February 9, 2015
Valentine's Breakfast: Mixed Berry & Cinnamon Muffins

From A Lighter Way To Bake.
These love-muffins are packed full of high-fibre wholemeal flour, so are perfect for powering you through Valentine's Day!
Makes 12 muffins
EQUIPMENT & INGREDIENTS
12-hole muffin tin, muffin cases
300g wholemeal flour
1 tsp baking powder
1⁄2 tsp bicarbonate of soda
1 tsp ground cinnamon
1 egg
2 egg whites
200ml semi-skimmed milk
100g low-fat natural yogurt
50ml sunflower oil
4 tbsp maple syrup
200g frozen summer berry or fruits of the forest berry mix
METHOD
Preheat the oven to 200°C, (Fan 180°C), 400°F, Gas Mark 6, with the middle shelf of the oven at the ready. Line a muffin tin with 12 paper muffin cases.
Place the flour, baking powder, bicarbonate of soda and cinnamon in a large bowl and quickly toss together. Beat the egg and egg whites in a large jug briefly and then beat in the milk, yogurt, oil and maple syrup until smooth and well combined. Mix this wet mixture into the dry ingredients to give a wet, sloppy consistency. Finally, gently fold in two-thirds of the frozen berry mix.
Pouring the mixture into a jug or using two spoons (or I like to use a mechanical ice-cream scoop), divide it among the 12 cases. Scatter the remaining frozen berries evenly over the tops and press them in lightly. Pop into the oven to bake for 20 minutes or until a skewer inserted into one of the muffins comes out clean.
Remove from the oven and leave to cool for a few minutes in the tin. Then tuck in!
February 5, 2015
Valentine's gift: White chocolate lollipops with dried cranberries

From Fast, Fresh and Easy Food.
The best chocolate for these lollipops is cheap white children’s chocolate. You can use sprinkles, nuts or other dried fruits for these; just about anything that does not have too much of a water content will work.
Prep time: 10 minutes for disc lollipops or 20 minutes for trellis-type
Chilling time: 15 minutes
Makes: about 10 lollipops
Equipment:
Large tray or baking sheet
10 cocktail or lollipop sticks
Medium bowl and medium pan or microwave, scissors and sticky tape or stapler (optional)
100g white chocolate
1 tbsp dried cranberries
Method:
1. Line a large tray or baking sheet with baking parchment so the paper is really flat (making sure that the tray will fit in the fridge a bit later on). Lay the cocktail or lollipop sticks out on the sheet, spaced well apart.
2. Snap the chocolate up a bit into a medium bowl and either melt in the microwave in 30-second blasts, stirring between each addition, or set over a pan of simmering water, making sure that the bottom of the bowl does not touch the water.
3. White chocolate is more difficult to melt than dark or milk. There is a fine line between it being just melted and it burning and drying out (where it becomes thick and ‘doughy’). Keep a close eye on it and as soon as it starts melting, stir for a few seconds and then remove from the heat.
4. If making disc lollipops, simply place a spoonful of melted chocolate on top of one end of each of the sticks to give a 4cm disc. If making trellis-type lollipops, cut out a 12.5cm square of baking parchment, then roll it into a cone shape and gently pull the flap on the inside to tighten the whole thing and create a nozzle tip. Secure down the side with some sticky tape or a stapler, then snip the tip with a scissors to give a 5mm nozzle opening. Spoon the melted chocolate in and fold down the top of the piping bag so the chocolate does not squidge out the wrong end.
5. Gently squeeze the chocolate from the piping bag to draw whatever shape you like over one end of each of the sticks. Flick it over and back in a crisscross pattern or go around and around in circles, for example.
6. Once your chosen lollipop shapes have been made, finely chop the cranberries and scatter them over the chocolate to stick.
7. Place them in the fridge for at least 15 minutes or until set. Very carefully peel the lollipops off the paper and serve. They will keep for up to a month in the fridge (if they have survived being eaten!).
January 26, 2015
Aussie olive damper bread
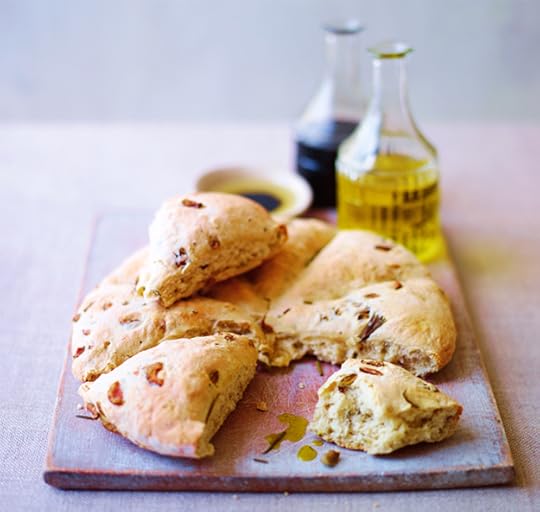
I first went to Sydney in my teens and when I saw the Opera House, I fell head over heels in love with the place.
This is an Australian bread traditionally (I am led to believe), made by people in the bush on the camp fire. I love green olives, but the black variety, although normally a little more bitter, work well too.
INGREDIENTS
450g/1lb self-raising flour, plus extra for dusting
3 sprigs rosemary, leaves only, roughly chopped
½ tsp salt
1 tbsp extra virgin olive oil
75g/3oz pitted green or black olives, roughly chopped
To serve
fruity olive oil and balsamic vinegar
METHOD
1. Preheat the oven to 200C/400F/Gas 6 and put a baking tray in to warm up.
2. Put the flour in a large bowl, with the rosemary, salt, oil and 225ml/8fl oz water. Mix everything well until the dough starts to come together in a ball. Then get your hands in and squidge all the dry bits in, using the bread like a cloth to gather the bits all up.
3. Dust a clean board or work surface with a little flour and place the dough down. Squish it into a flattish round, put the olives in the centre and squash them down a bit, bringing the edges of the dough towards the centre, so that the olives are covered. Then flip the dough over and knead the olives in.
4. At this point, the dough may be quite wet with olives flying all over the shop, but just keep pushing the rogue olives back into the dough. If everything is too wet, just add a small handful of flour to dough. Shape it into a 20cm/8in round and place on the warmed baking tray.
5. Rub a little flour onto the handle of a wooden spoon. Then, holding the handle horizontal to the bread, press down onto the loaf making an indent almost to the bottom of the tray.
6. Turn handle so that it is at a 90 degree angle to the first line and push down again to make a cross. Do this two more times so your bread looks like a kind of clock face of eight triangular portions.
7. Bake in the oven for 35 minutes or until the bread sounds hollow when tapped on the bottom. This is wonderful served warm with some fruity olive oil and balsamic.
January 25, 2015
Oven roast semi-dried tomatoes
I have been munching on tomatoes for years now. I will buy a box of them and happily eat them through the day as a snack, the way one would usually do with a punnet of grapes. Not only because I love the way they taste but also because they have a lot less sugar in them than grapes and therefore I felt it gave me the right to eat so many more of them.
However, working with the nutritionist wonder duo Aidan Goggins and Glen Matten, (I will talk a lot of about them in my blog), I have since learnt that raw tomatoes are not giving me as much as when they are cooked, nutrition wise. So once a week I buy a bulk load of tomatoes on the vine and then roast them slowly in the oven for about five hours on a low heat.
Lycopene gives tomatoes and other fruit and vegetables - such as apricots and watermelon - their red colour. Many people get the majority of lycopene (which is a strong anti-oxidant which some say may help prevent us from getting some cancers and heart diseases) from tomatoes. Processing tomatoes, by mechanically breaking them down or through heat makes the lycopene much easier for the body to use.
A Tupperware full of slow roasted tomatoes to use throughout the week therefore not only helps us nutritionally but can also be a lovely addition to things like salads and pasta sauces, or just eaten as a ketchup replacement with your morning eggs.
INGREDIENTS
1 kilo (or however many you want to roast)
salt
½ tsp of chill flakes (optional)
Drizzle of avocado oil (or your favourite oil)
3 sprigs of thyme
4 sprigs of rosemary
METHOD
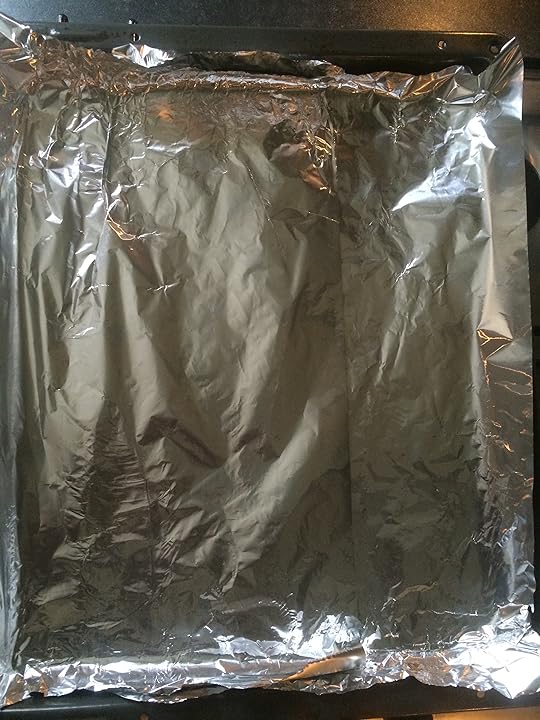
Preheat the oven to 140°C. Line a large roasting tin with tin foil. And I mean really line it. The mess the tomatoes leave is incredibly sticky and tough to clean so make sure there is lots of tin foil covering up all the nooks and crack. This way all you have to do once the tomatoes are cooked is scrunch up the tin foil, leaving you with a relatively clean pan!
Place the tomatoes onto the roasting tin. I leave the vines on as they just come off so easily once the tomatoes are cooked.
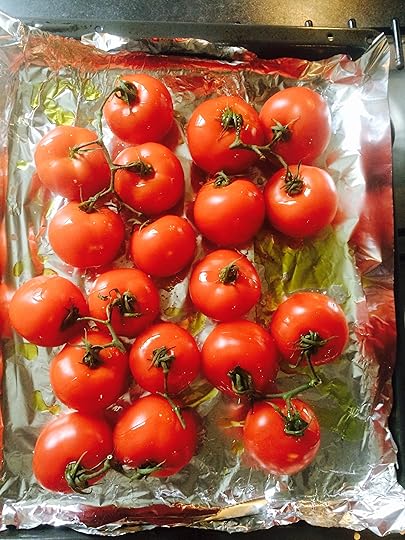
Drizzle over with your favourite oil. I am loving avocado oil at the moment. It has an incredibly high smoke point which means it can be heated to a high temperature before it breaks down. It is unique compared to some other oils in that it is made from the pulp and not the seed of the avocado. I do not use it every day however as it is somewhat pricey.

Get some rosemary, thyme and some garlic.
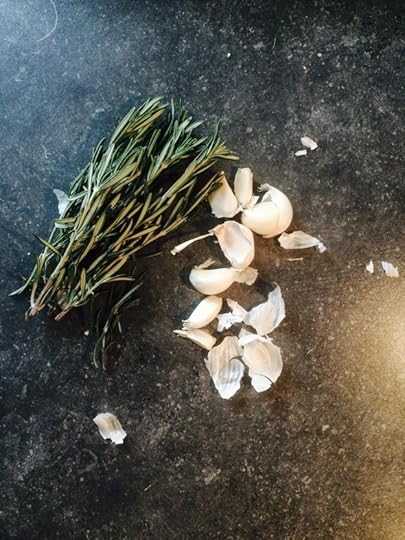
And scatter them all over the tomatoes...
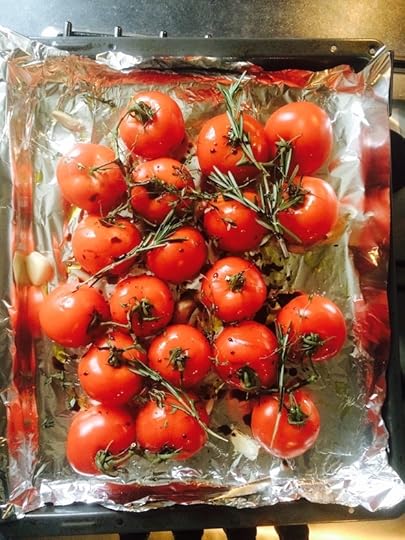
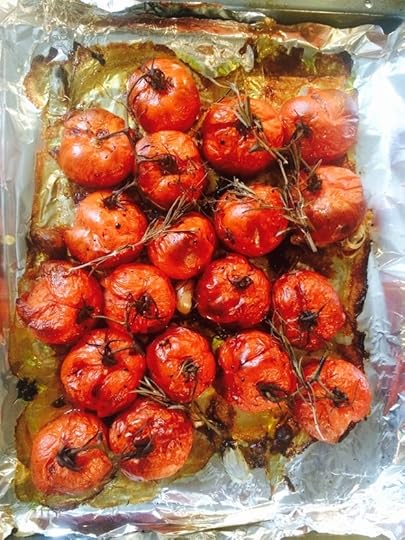
Then roast for about 5-6 hours until the tomatoes are dried on the outside but still a little moist in the inside. If you want them completely dried, roast them for about 12 hours at a slightly lower temperature - but keep checking them every 2 hours or so.
Once cooked to your liking remove them from the oven and leave to cool completely in the tin. Once cool, remove the vines and store the tomatoes in a container in the fridge.
Enjoy. LPx
Lorraine Pascale's Blog

- Lorraine Pascale's profile
- 33 followers

