
Rinku Bhattacharya's Blog, page 84
April 9, 2014
Sweet Potato and Tapioca Cakes – Sabudana Vada
 I have dealt with so many little things over the past couple of days, I cannot believe that it is Tuesday. The fact that my Monday started with a hangover, did not help my case. LOL! There is a lot of excitement and work building up to the release Spices and Seasons, and I do hope everyone is keeping it in mind for a gift or their next cookbook. Well, the highlight of my weekend was actually making a couple of recipes (two from the book) and a random sweet potato variation of these classic crisp and savory tapioca spiked cakes.
All of these were taken with care for a tea (yes, I know but there was a lot of good wine with the tea, and I got a rather early start). Well, all things considered, this tea thing happened because some of us were unable to cobble together any other time and what was a lot of fun was the fact, the offbeat time allowed us to enjoy a whole bunch of food items that may or may not work some other time of the day.
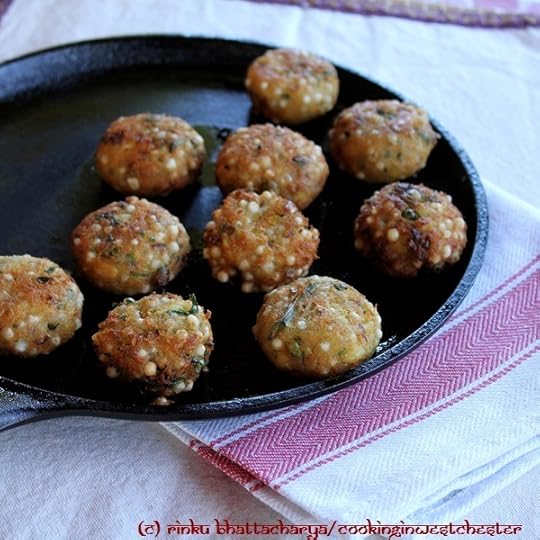
Amidst all of this, I just heard some news about someone breaking up! It filled me with a sense of melancholy. Somewhere, it russtled back memories of the first time I had made these vadas. I had picked them up from an old cookbook, somewhere and made them from my father. Crisp, crunch filled with the citrusy flavors of curry leaves, nicely spiked with green chilies and fresh cilantro leaves. These were seved with ketchup, over paper towels as my father and I ate them together in the kitchen, chatting and cooking all at once. Today’s recipe modifies the original just a little to make it healthy enough to even be considered a side dish with a meal. I have added some chickpea flour as a binder since sweet potatoes are not quite as starchy as regular potatoes.
Print
Sweet Potato and Tapioca Cakes – Sabudana Vada
Prep Time: 1 hour
Cook Time: 20 minutes
Total Time: 1 hour, 20 minutes
Yield: Makes 15 to 20 potato cakes
A healthier remake of the classic potato and tapioca savory cakes, this one made with sweet potato.
Ingredients
1/2 cup tapioca seeds or pearls (not instant)1 large sweet potato (about 3/4 pound)
1 medium sized russet potato
1 medium sized red onion, diced
11/2 teaspoons freshly grated ginger
10 -15 curry leaves, chopped
3 green chilies, chopped
salt to taste
3 tablespoons chopped cilantro
3 tablespoons chickpea flour or besan
Canolla oil for frying
Instructions
Soak the tapioca pearls in 1 cup of hot water for at least 1 hour.In the meantime, quarter the potato and the sweet potato and boil them for about 20 minutes, until soft.
Drain the tapioca and place in a mixing bowl. Cook the sweet potato and potato, peel and place in the same mixing bowl and mash coarsely.
Add in the red onion, ginger, curry leaves, green chilies, salt and the cilantro and mash well until evenly mixed. Mix in the chickpea flour and mix well.
Shape the mixture into 3 inch cakes.
Place the oil in a large skillet to a depth of about 3 inches and heat until a dropped crumb rises to the surface.
Place the cakes in batches (leave enough room to turn without crowding). Cook each side undisturbed for about 3-4 minutes. Carefully remove the cakes, drain on paper towels and serve with chutney or ketchup.Schema/Recipe SEO Data Markup by ZipList Recipe Plugin2.2http://cookinginwestchester.com/2014/04/sweet-potato-and-tapioca-cakes-sabudana-vada.html
Share this on Bebo
Blog this on Blogger
Add this link to Box.net
Share this on del.icio.us
Digg this!
Share this on Facebook
Share this on FriendFeed
Email this via Gmail
Submit this to Hacker News
Share this on LinkedIn
Email this to a friend?
Share this on OkNotizie
Promote this on Orkut
Stumble upon something good? Share it on StumbleUpon
Share this on Google+
Share this on Tumblr
Tweet This!
Email this via Yahoo! Mail
Pin this to Pinterest
Box this on Zabox
Get Shareaholic


April 4, 2014
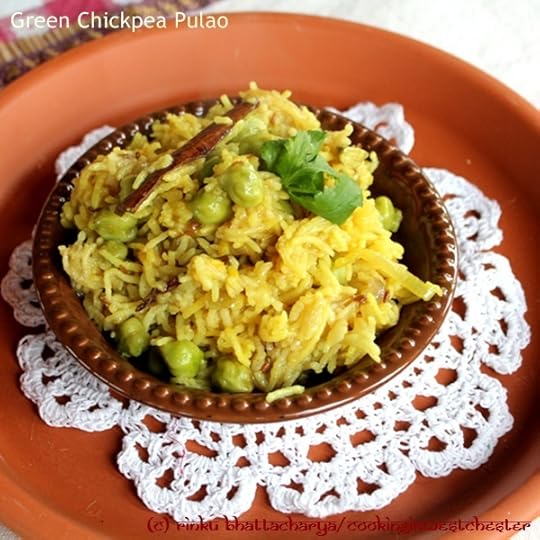
Simple Green Chickpea Pulao (Pilaf)
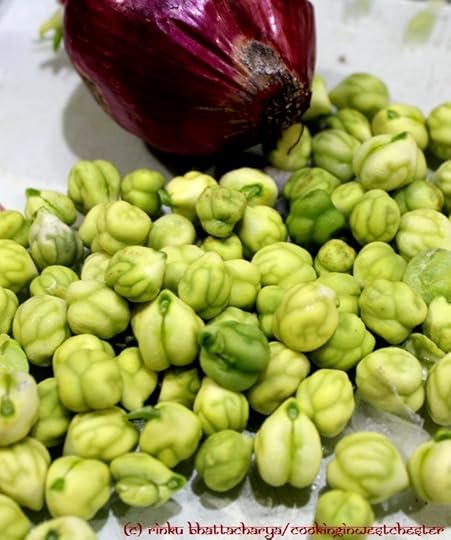 Green, verdant, primavera! Spring just crept over the window sill, will mini blossoms and some cool and crisp days, it looks like this year we shall not be complaining about summer. Green chickpeas or garbanzo beans are very typical of spring in India and since it is very clear that we shall not really have our own vegetables for a while I have been picking them up to enjoy. I use them in soups, stews and salads. One of the simplest ways that they are enjoyed on the table are through a pilaf or pulao. Green Chickpeas are the fresh version of the dried beans that we see and they are usually found sold encased in husky green pods.
The freshness of these lovely chickpeas are just like the weather full of potential and promise, in fact, I can hear the birds chirping even as I am writing, telling me that Old Man Winter has overstayed his welcome.
Somewhere between this springy, green garbanzo post, spices and seasons, confusion and me a lot happened! It has been a mixed week with some unresolved partings. One of my pet peeves always is when people do not make a clean break, it does not take much to just pick up a phone or even shoot an email to bring some closure to things. At the risk of stereotyping I have found this more an issue in my forays in the food world. Although, I guess as with everything else, meshing and meandering into a new world has its cues, challenges and learning ropes.
I live vicariously through my brother, who is quite the jet setter, and is here for a day before he gets over to running the Paris Marathon.
This simple dish provides him homey carbohydrate rich comfort in a box.
Print
Simple Green Chickpea Pulao (Pilaf or Tahiree)
Prep Time: 15 minutes
Cook Time: 25 minutes
Total Time: 40 minutes
A springy one dish meal with fresh green garbanzos.
Ingredients
2 tablespoon olive or canola oil1 teaspoon cumin seeds
3 cloves
2 to 3 sticks cinnamon
3 green cardamom
1 medium sized onion, sliced
1 cup basmati rice, washed and drained
1 cup shelled green chickpeas or green peas
3/4 teaspoon turmeric
1 teaspoon salt or to taste
2 cups of water
Instructions
Heat the oil on medium heat and add in the cumin seeds and wait until the seeds begin to sizzle, add in the cloves and stir well. Add in the onion and cook the onions until soft and beginning to turn a nice shade of toffee gold.Stir in the rice and cook for about 3 minutes, until the grains are well coated with the mixture.
Add in the green chickpeas, turmeric and the salt and the water. Bring to a simmer and cover and cook for 15 minutes. Check to ensure that the water is mostly absorbed. The grains should be still moist.
Let the rice rest for at least 15 minutes, before serving the rice.Schema/Recipe SEO Data Markup by ZipList Recipe Plugin2.2http://cookinginwestchester.com/2014/04/simple-green-chickpea-pilaf.html
Share this on Bebo
Blog this on Blogger
Add this link to Box.net
Share this on del.icio.us
Digg this!
Share this on Facebook
Share this on FriendFeed
Email this via Gmail
Submit this to Hacker News
Share this on LinkedIn
Email this to a friend?
Share this on OkNotizie
Promote this on Orkut
Stumble upon something good? Share it on StumbleUpon
Share this on Google+
Share this on Tumblr
Tweet This!
Email this via Yahoo! Mail
Pin this to Pinterest
Box this on Zabox
Get Shareaholic
March 28, 2014
Goan Red Fish Curry – For a Different Day
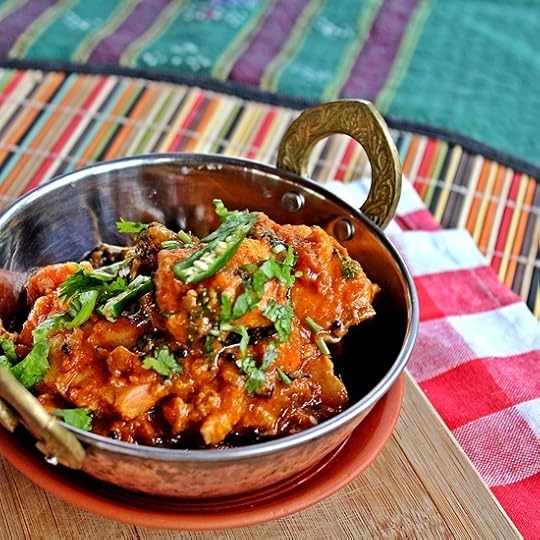 So, I had ended last evening feeling rather low, and using the words of my favorite heroine I had said, tomorrow will be another day. Indeed, that tomorrow is today, and thank goodness, it is another day! Today’s call to the kitchen, was answered by a goan-style red fish curry, of course, mellowed and simplified my way.
Still, pretty chilly in the northeast, but it somehow is rather positive, and there is something extremely different about the morning vibe, maybe it is just the vibe of a day well rested. All things considered, every day, good and bad, happy or sad, I truly, truly count my blessings about how much I enjoy cooking!
I love something, that I have to do anyway, what more can I ask for? Ok, I can probably ask for a bunch of stuff, but for now I will settle for just happiness in the fact that I can bask happily in my kitchen, which fulfilling a regular, daily chore. Yes, I said chore, but that is just my point, in this instance it is not quite a chore to me. But, nonetheless, every day even when I am down, all I need to do is realize that there is someone who is feeling worse than me. I encountered someone today, who share her tale of her autistic child with me, and I counted my blessings. Every day, I am blessed with two smiling, lovely faces that greet me and on most days, it is actually three smiling faces.

Yes, it is sort of mundane, but something that I can count on and it takes people like Ms. M ( the mom with the autistic child to remind me) that not everyone has this. We all have little things, simple things, the things that keep us grounded on this journey called life, we sometimes just need to actively focus on these little things.
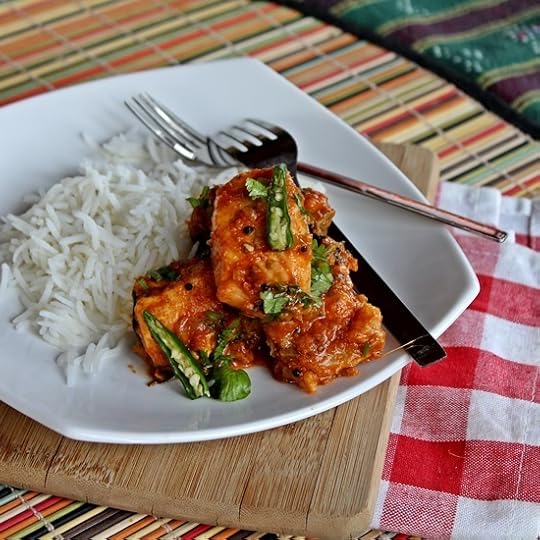
The recipe on hand, is a recipe built around the flavors of Goa, and there is more to Goan cooking than the almost infamous vindaloo that ranges from well balanced to just someone tossing a bunch of cayenne into the cooking pot. There are many renditions of the vindaloo, here is one that I had made some time back with shrimp. Today’s recipe is a sweet and sour dish, with an emphasis on green chilies along with the red chili peppers. I did use cider vinegar and left out the tamarind, yes, I need to strain some fresh tamarind. After, all my trial and errors, I have realized that I prefer swapping vinegar or lemon, rather than working with the tamarind concentrates. This recipe works especially well with salmon, its moist creamy flesh lapping up the diversity of this seasoning, and right alongside steamed white rice we have a match made in heaven.
Print
Goan Red Curry Fish – For a Different Day
Prep Time: 15 minutes
Cook Time: 25 minutes
Total Time: 40 minutes
A spicy fish curry with sweet and sour seasonings. Perfect for these cool spring days.
Ingredients
For the spice base2 tablespoons cider vinegar
2 to 3 cloves
1/2 teaspoon green cardamom, seeds
1 tablespoon coriander seeds
11/2 teaspoons cumin seeds
11/2 teaspoons brown sugar
2 dried red chilies
2 green chilies
11/2 teaspoons salt or to taste
2 tomatoes, halved
For the fish
11/2 pounds salmon
1 teaspoon turmeric
1 teaspoon salt
1 lime or lemon
11/2 of salmon fillet, cubed
2 to 3 tablespoons oil
1 teaspoon mustard seeds
10-12 curry leaves
1 medium sized red onion, diced
4 cloves of garlic, minced
1 tablespoon minced ginger
3 tablespoon chopped cilantro
Instructions
Place the vinegar, cloves, green cardamom, coriander seeds, cumin seeds, brown sugar, dried red chilies, green chilies, salt and the tomatoes in a blender and blend for about 2 minutes until smooth. I like to begin this by pulsing it several times and then processing it into a puree. Set the spice blend aside.In a separate bowl, toss the fish with the turmeric and salt and squeeze the lemon juice and set aside.
Heat the oil on medium heat for about a minute or so, add in the mustard seeds and wait for the seeds to crackle. Add in the curry leaves and the red onion and stir well. Cook the onions until they are wilted and turning softly golden. Stir in the garlic and the ginger and mix well.
Add in the spice base and cook for 10 minutes, until the mixture is fairly thick and fragrant. Add in the salmon pieces carefully with 1/2 cup water. Cook for about 6 to 7 minutes until the fish is cooked through. Check the seasons and stir in the cilantro.Schema/Recipe SEO Data Markup by ZipList Recipe Plugin2.2http://cookinginwestchester.com/2014/03/goanredfishcurry.html
Share this on Bebo
Blog this on Blogger
Add this link to Box.net
Share this on del.icio.us
Digg this!
Share this on Facebook
Share this on FriendFeed
Email this via Gmail
Submit this to Hacker News
Share this on LinkedIn
Email this to a friend?
Share this on OkNotizie
Promote this on Orkut
Stumble upon something good? Share it on StumbleUpon
Share this on Google+
Share this on Tumblr
Tweet This!
Email this via Yahoo! Mail
Pin this to Pinterest
Box this on Zabox
Get Shareaholic
March 26, 2014
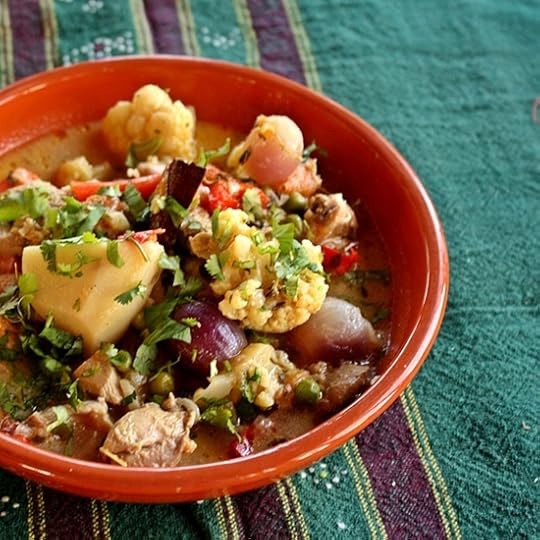
Light and Lemony Chicken Stew
 Today has ended up being one of those down in the dumps days! Just the kind of day, where a bright and refreshing dish like this stew comes in handy! It is a simple, light and wholesome chicken stew that had two relatively new ingredients. I do not usually add cauliflower to my stews, sure I enjoy a lot of cauliflower other ways, like this Bengali Cauliflower with Potatoes or this Cauliflower with Ginger and Curry Leaves, actually reminds me that I actually have been planning to do vegetable round up posts this year. Well, once we get vegetables that is.
My afternoon began with a hard drive crash, and no, I wish I could tell you that I had everything backed up, I did not!!! The only bright side of this entire episode is that I have discarded a lot of clutter, I did not know what to do with. And, yes, most of the really important stuff was actually backed up. To add to everything, I was supposed to meet my daughter at the train, something that we had both been looking forward to. She was on a school trip to see Aladdin and returning back, just a little earlier than my usual train. I left work and fell into the NYC trap of trying to take a taxi, I was left with $15 short and of course the awful experience of watching the train go by.
The thought of my little girl arriving at the station, and not seeing my saddened me. I took my usual train and reached home 20 minutes later than I had planned. She was smiling and ready to forgive and forget, I was actually ready to climb into bed and go to sleep. Instead, I cooked this simple and very soothing stew. It was perfect for this still chilly evening. Tomorrow, hopefully will be another day!
Print
Light and Lemony Chicken Stew
Prep Time: 15 minutes
Cook Time: 40 minutes
Total Time: 55 minutes
A light and lively stew redolent with the flavors of lemon, cinnamon and ginger.
Ingredients
3 tablespoons of olive oil1 medium sized red onion, diced
1 tablespoon freshly grated ginger
1 large (3-4 inch) stick cinnamon broken
2 to 3 cloves
11/2 pound boneless skinless chicken thighs, cut into small pieces
2 medium sized potatoes, peeled and quartered
10-12 small pearl onions, peeled
1/3 medium cauliflower, cut into large pieces
2 cups water
1 teaspoon salt or to taste
1 teaspoon red cayenne pepper
1/2 teaspoon turmeric
1 large lemon, halved and seeded
3/4 cup green peas, can be frozen
2 tablespoons fresh chopped cilantro
Instructions
Heat the oil and add in the red onion and saute for about 4 minutes until the onions are soft and almost wilted. Add in the ginger, cinnamon and the cloves and cook for another 2 or 3 minutes.Add in the chicken and saute for another 3 to 4 minutes. Add in the potatoes, pearl onions and the cauliflower and mix well. Gently add in the water and bring to a simmer, stir in the salt, red cayenne pepper and turmeric and cover and let the stew cook for 35 to 40 minutes.
The vegetables should be tender and there should be a pale golden soupy broth. Squeeze in the lemon juice and add the peas and cook for 3 to 4 minutes. Note, if you are using fresh peas add them into the stew with the potatoes and cauliflower.
Turn off the heat, garnish with the cilantro and serve.Schema/Recipe SEO Data Markup by ZipList Recipe Plugin2.2http://cookinginwestchester.com/2014/03/light-and-lemony-chicken-stew.html
Share this on Bebo
Blog this on Blogger
Add this link to Box.net
Share this on del.icio.us
Digg this!
Share this on Facebook
Share this on FriendFeed
Email this via Gmail
Submit this to Hacker News
Share this on LinkedIn
Email this to a friend?
Share this on OkNotizie
Promote this on Orkut
Stumble upon something good? Share it on StumbleUpon
Share this on Google+
Share this on Tumblr
Tweet This!
Email this via Yahoo! Mail
Pin this to Pinterest
Box this on Zabox
Get Shareaholic
March 23, 2014
Kale and Eggs Torta (Gluten-free)
 This weekend was bouncing with energy, and now I feel anything but energized. LOL! One of the highlights of Friday was being able do a class at Hilltop Hanover Farm. I love to be able to support local enterprises doing something that I enjoy anyway, and being around a working farm always ratifies my sense of being close to nature and in turn cooking mindfully.The class was a lot of fun, my task on hand was to cook with the stuff on hand, which in this case was loads of greens and eggs. I made the Seasonal Greens with Garlic and Fennel, Rice and Green Onion Pilaf and the Egg Jhal Ferazi from Bengali Five Spice, my Kale and Onion Fritters from this blog and a chickpea stir-fry just for fun. Of course, nothing for me ever beats that exhilaration of a the end of class, the silence and contemplative faces of people as they taste their food and watch and savor the flavors.

I also love the fact, that I am usually able to come away with some kind of an offering, the last visit at the Tarrytown Market, it was monk fish and this time it was bags of kale, spinach and chard. I had promised them that I would create something with this stuff, not that anything ever gets wasted in our house, but creating (as my husband would like to say within air quotes) is really about picture taking and sharing and writing on this blog. Well, folks for me it is not really complete if I do not share a good creation here,

. What I made with this was a breakfast torta, with a chickpea flour base. I will stay away from calling it a breakfast pizza, well just because I think this version was very elegant.
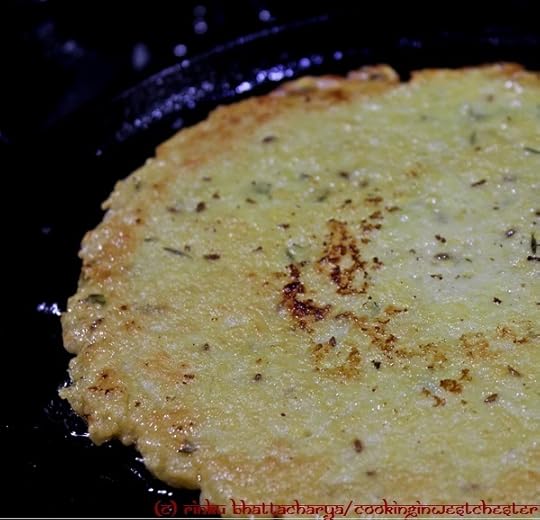
Redolent with the spices found in north Indian breakfasts, this layering made a bunch of kids and mom very happy. This is inspired by the Cheela, however I have kept the base thicker and this was made closer to making panisse, This of this as the panisse with an Indian makeover in Valhalla.
 I made this twice, and then once again. I usually do this to get this right and then keep making it because, its what tends to catch the family’s palate. It will take a little working around but the possibilities with this base is endless and yes, another gluten-free success. We like this better than a more traditional tortilla or pizza dough base anyway and it is actually healthier.
Print
Kale, Red Onion and Egg Torta
Prep Time: 40 minutes
Cook Time: 40 minutes
Total Time: 1 hour, 20 minutes
A lovely breakfast dish, created with kale, eggs, red onion and tomatoes over a well seasoned chickpea crust.
Ingredients
For the Base11/2 cups water
3/4 cup chickpea flour (besan)
3/4 teaspoon salt
1 teaspoon cumin seeds
2 teaspoons thyme
1/2 teaspoon red pepper flakes
Oil for greasing the plates
For the kale
1 tablespoon olive oil
1 red onion thinly sliced
3/4 pound fresh curly leaf kale torn into small pieces
1/2 teaspoon salt or to taste
1 to 2 tablespoons lime juice
Putting it together
4 tablespoons olive oil
20 grape tomatoes, or two medium sized tomato, sliced
3 eggs, hard boiled and sliced
1 cup of sharp cheddar cheese, grated
Instructions
Bring the water to boil, in the meantime thoroughly whisk the chickpea flour to remove any lumps. Reduce the heat to medium low and add in the chickpea flour and begin beating it in very vigorously to ensure that there are no lumps. I like to use a whisk for this purpose. Add in the salt, cumin seeds, thyme and red pepper flakes and mix well and cook until the mixture thickens.Grease two dinner plates and carefully pour the mixture over the two places to gradually allow it to spread into 6 to 7 inch circles. Let this cool. I actually do this step the night before, if I am serving this for breakfast.
Heat the tablespoon of olive oil for the kale and add in the red onion and saute very lightly, add in the kale and the salt and cook the kale for about 5 minutes so that the kale wilts just a little. Stir in the lemon juice.
Let the oven heat to 425 degrees.
In the meantime, on a cast iron skillet add about 2 tablespoons oil and heat well. Carefully place one of the flat chickpea pancakes and cook for 4 minutes on one side and carefully turn the pancake over and cook for another 3 minutes. Place the pancake on a pie pan or baking sheet and continue the process with the second pancake The pancakes should be somewhat crisp and lightly browned at spots.
Arrange the kale mixture to top the pancake base, toss with the tomatoes. If using cherry tomatoes, they should be halved. Arrange the sliced eggs and scatter with the cheddar cheese.
Place in the oven and bake for 15 minutes until the cheese is melted and the edges of the torta or pancake are crisp. Serve immediately and enjoy with your favorite salad.
Schema/Recipe SEO Data Markup by ZipList Recipe Plugin2.2http://cookinginwestchester.com/2014/03/kale-and-eggs-torta-gluten-free.html
Share this on Bebo
Blog this on Blogger
Add this link to Box.net
Share this on del.icio.us
Digg this!
Share this on Facebook
Share this on FriendFeed
Email this via Gmail
Submit this to Hacker News
Share this on LinkedIn
Email this to a friend?
Share this on OkNotizie
Promote this on Orkut
Stumble upon something good? Share it on StumbleUpon
Share this on Google+
Share this on Tumblr
Tweet This!
Email this via Yahoo! Mail
Pin this to Pinterest
Box this on Zabox
Get Shareaholic
March 17, 2014
Sweet Potato Gulab Jamun – Ranga Alur Pantua
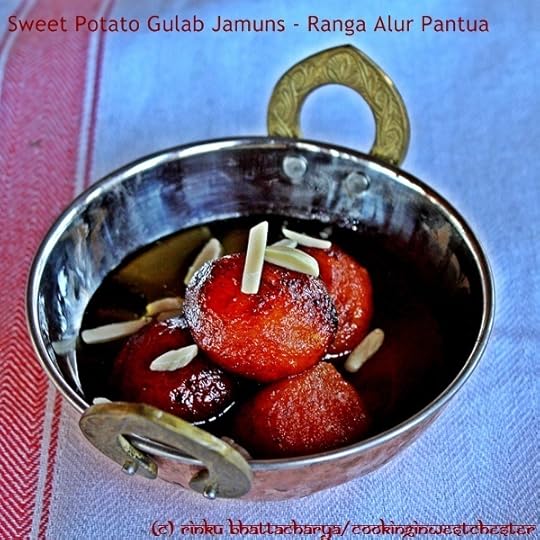 This weekend began with picture perfect weather, getting me quite the spirit for spring. Of course, lets face it most of us have been ready for spring at least a month ago, right around when the groundhog, saw his shadow. I have been obsessing over lentils, they seem to be the only universally comforting item in my life. I pulled myself together to make these sweet potato dumplings, a Bengali harvest sweet called Sweet Potato Gulab Jamuns or Ranga Alur Pantua. Healthier in someways than the traditional variation and without any gluten if you are avoiding it. This is a rustic and simple creation, made without much fuss and best enjoyed warm.
A beautiful sunny Saturday, came with the gift of amazingly blue and clear skies and a stunning full moon, that marked the festivals of Holi and Purim. Not surprisingly, a lot of the Jewish holidays intersect with the Hindu ones, because we all depend on the same lunar calendar and no matter how we acknowledge it the world still has just one moon and of course just one sun. This morning was another day, the weather gave me a rude shock. A sick father and son in tow, we did sneak in a lovely leisurely lunch, I was not sure about being able to fit in much more to acknowledge the beautiful festival of colors.
Unfortunately, the husband and son are under the weather, not leaving much time or energy for blogging out the recipe. They did appreciate the dessert and said it was different, but fun.

I can honestly tell you, given how cold today was, I was far from interested in going out and splashing colors. I did however try a dessert that has been on my mind for sometime now. Once I got the hang of it it turned out very well. A few notes to this, yes, like all fried desserts it needs to be fried low and slow. It is important to actually let the dessert balls rest for 2 to 3 hours before trying them, it lets the flavors mature slightly. Monday was a little cheery, I was pleased to see this mention excerpted from the upcoming Spices and Seasons.

I am fighting a few layers of disappointment on some other fronts, that I will share with you in good time, for now, here is to Spring 2014, happiness and loads of sweetness.
Print
Sweet Potato Gulab Jamun – Ranga Alur Pantua
Prep Time: 40 minutes
Cook Time: 50 minutes
Total Time: 1 hour, 30 minutes
A rustic sweet from the Bengali kitchen, these are sweet potato doughnuts or gulab jamuns stuffed with a creamy cheesy center, fried and soaked in cardamom scented syrup.
Ingredients
4 cups of water3 cups of sugar plus 1 tablespoon of sugar
4 to 5 pods cardamom, bruised
1 large sweet potato (about 3/4 pound
3 tablespoons rice flour
2 tablespoons ricotta cheese
3 tablespoons of milk powder
Oil for frying
Slivered Almonds for garnishing
Instructions
Place the water, sugar and the cardamoms to boil in a heavy bottomed pot and boil for about 15 minutes until the syrup is fairly thick, about a 1/2 strand consistency.Cut the sweet potato into 4 to 6 pieces, cover and boil for about 10 minutes, until soft but not mushy. Cool and peel the sweet potato, mash until very smooth mixing in the rice flour.
In a separate bowl mix in the ricotta cheese and the milk powder to form a soft dough. Shape this into 9-10 balls. This size is between that of a raisin and a grape.
Shape the sweet potato mixture into a circle, flatten and make a dent and add in the ricotta ball and cover evenly. It is important to ensure than there is at least a centimeter of coating around the ricotta center.
Heat the oil in a heavy wok, add the balls about 1 or 2 at a time and fry in a gentle even level on medium low heat. When the balls are crisp and uniformly browned, drain them well and place in the syrup. Let them soak for a couple of hours. Heat slightly if needed and serve garnished with the slivered almonds.Schema/Recipe SEO Data Markup by ZipList Recipe Plugin2.2http://cookinginwestchester.com/2014/03/sweet-potato-gulab-jamun-ranga-alur-pantua.html
Share this on Bebo
Blog this on Blogger
Add this link to Box.net
Share this on del.icio.us
Digg this!
Share this on Facebook
Share this on FriendFeed
Email this via Gmail
Submit this to Hacker News
Share this on LinkedIn
Email this to a friend?
Share this on OkNotizie
Promote this on Orkut
Stumble upon something good? Share it on StumbleUpon
Share this on Google+
Share this on Tumblr
Tweet This!
Email this via Yahoo! Mail
Pin this to Pinterest
Box this on Zabox
Get Shareaholic
March 14, 2014
New Cookbook and Stir Fried Crunchy Bengali Bok Choy
 In the crazy bouncy week we have had, brings sunny beginnings morphing to this cold and frigid day that today is shaping out to be. Yesterday, the commute was totally chaotic with the buildings collapsing in East Harlem. It saddened me to realize that this chance incident resulted in the loss of seven lives. It did provide me an unexpected opportunity to walk down Lehman College, catching in some amazingly great architecture. In the spirit of catching the moment, I have been putting finishing touches on my new book, yes, and just like that there is a new book on the horizons.
Ok, maybe not quite just like that – Spices and Seasons has emerged in a long and meandering way. It has been a book that I have dreamed for a while, actually even longer than the The Bengali Five Spice Chronicles but was not sure where and how it would find a home. It has been a part of our journey of the home, garden and simple sustainability. A journey that shapes this little space I call my virtual home and the Spices and Seasons column for Small Bites, another virtual space that is very close to my heart. This book is different in many ways from The Bengali Five Spice, after all why you want to write, two identical books? In some ways, Spices and Seasons, continues my personal journey where Bengali Five Spice left off, yes, they are both personal cookbooks. After all, what is cooking, if not a personal interpreatation and connection with the ingredients?

So, in time for mother’s day, Spices and Seasons, Simple, Sustainable Indian Flavors will be on the horizon. Most of the recipes are unpublished, but there are favorites such as this Slow Cooker Choley or Beetroot Halwa recipe that finds its way to the book. In a nutshell, this book offers you 150 simple and original ways to spice up your table and explore seasonal bounty.

You will hear more about this with its older sibling, The Bengali Five Spice Chronicles in the weeks to come. I hope you will welcome the new book baby with love and affection into your homes and kitchens. Speaking of babies, my friend Ken, who is very often my lunchtime buddy became a proud grandfather, how about that?

In the spirit of fresh simplicity today’s recipe is a simple homey stir fry, my favorite kind with some interesting crunchiness from crushed boris or lentil nuggets. This is called Shaag Bhaja and usually made with spinach, today’s version uses sautéed Bok Choy as that is what I had around. I have noticed that the boris that tend to be available in our local Indian grocery is a little higher in salt than I would like, so I do play around with the salt just a little bit. The rest of the dish is easier than easy, it is perfect with a serving of rice and lentils and it like me you sometimes need to eat your food on the go, it works brilliantly on a piece of toast with some Greek yogurt added over it. Boris or lentil nuggets actually work very well to add some crunch, especially if gluten-free is on your mind.
There is not much action, some panch phoron, or Bengali Five Spices and some crunchy goodness to finish! Yes, if you are still looking for some green for your table on St Patrick’s Day, this dish might just warm the cockles.
Print
Stir Fried Crunchy Bengali Bok Choy
Prep Time: 7 minutes
Cook Time: 15 minutes
Total Time: 22 minutes
A simple stir-fry that I hope will bring in the green and spring.
Ingredients
2 tablespoons mustard oil (highly recommended)1 teaspoon panch phoron (Bengali 5 Spice)
2 to 3 dried red chilies, lightly crushed
11/2 teaspoons freshly grated ginger
3 cups of coarsely chopped bok choy
1 teaspoon salt
1/2 cup green peas
To finish
Oil for frying
3 tablespoons small boris (sold as vadi in Indian stores)
Instructions
Heat the mustard oil and add in the panch phoron and wait until the spices crackle, about a minutes. Quickly add in the dried red chilies and the grated ginger and stir well.Add in the bok choy and mix well. Stir in the salt and the green peas. Cook the bok choy until just slightly wilted and mix well.
In a separate pan, heat the oil to fry the boris and fry the boris until they turn golden. Lightly crush the boris and mix into the bok choy.Schema/Recipe SEO Data Markup by ZipList Recipe Plugin2.2http://cookinginwestchester.com/2014/03/new-cookbook-and-stir-fried-crunchy-bengali-bok-choy.html
Share this on Bebo
Blog this on Blogger
Add this link to Box.net
Share this on del.icio.us
Digg this!
Share this on Facebook
Share this on FriendFeed
Email this via Gmail
Submit this to Hacker News
Share this on LinkedIn
Email this to a friend?
Share this on OkNotizie
Promote this on Orkut
Stumble upon something good? Share it on StumbleUpon
Share this on Google+
Share this on Tumblr
Tweet This!
Email this via Yahoo! Mail
Pin this to Pinterest
Box this on Zabox
Get Shareaholic
March 8, 2014
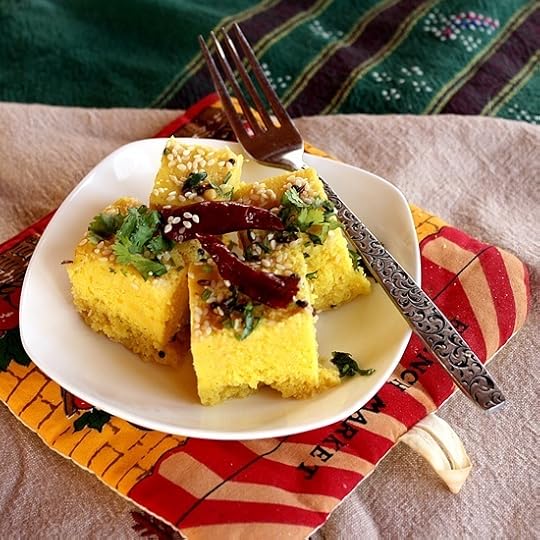
Khaman Dhokla – Soft Steamed Chickpea Flour Cake
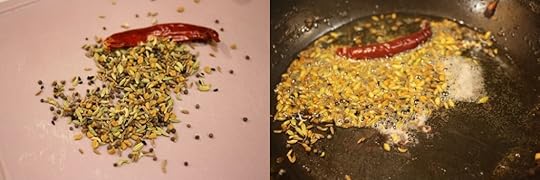
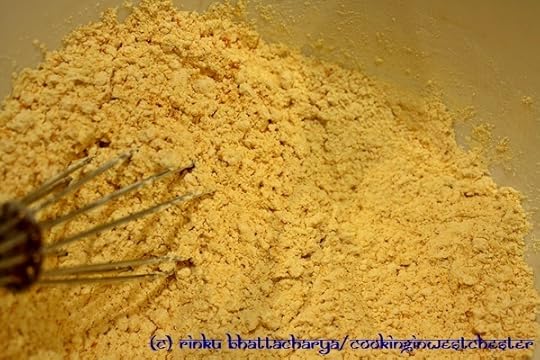
 People often wince, when you tell them about pairing sweet and savory flavors. I personally love to do this, and in Indian regional cuisine the Bengali cuisine and Gujarati cuisine are noted for the addition of a touch of sweetness in their cuisine. In case of Gujarati cuisine, it is more pronounces, however it is all in the balance. I have been meaning to post this family favorite for a while, but things have gotten in the way, so here is Khaman Dhokla, a savory sweet and spice creation that is often brunch in our house. Gluten-free eaters rejoice because this delightful light and fluffy cake is all about power packed comfort without any gluten. Khaman or Khaman Dhokla, is an easier version of the traditional Dhokla, which is made of soaked fermented split gram lentils or channa dal. In this instance, garbanzo bean flour or besan is whisked into yogurt and then leavened. The rising agent is fruit salts aka eno, that reacts with the lime in the batter to produce a bubbling effect to create the soft spongy texture. Actually, even as I write this, I am now persuaded to try this technique for other things.
I have been exploring the world of gluten-free flavors at the request of a friend and this recipe is the first on my list of favorites. It has taken me some time to get confident enough to post this recipe as the gold standard for khaman is held by mother-in-law, so the bar is set very high. After various attempts, I think I can meet to really maybe almost cross that bar.
Actually, where I trump is in getting that sweet and savory flavor as I have a more liberal hand with the sugar. My biggest incentive for testing and trying this recipe to perfection was my daughter, who absolutely loves this simple dish. It is quite a staple on weekends in our house in winter, when I sometimes do not have the patience for fermenting the dosa batter, something that both the kids love.
 The key here as I have said before is balance, I have found that using a simple round cake tin, with a very basic steaming set-up works best for me. I invert a trivet, in a large wok filled with water and place the cake pan over the trivet, cover and steam and we are pretty much good to go. The tempering needs to be done with care, essentially allowing the flavors to settle. I have found allowing about half an hour to let the flavors rest goes a long way to soft and tasty Dhoklas. In our house, we enjoy this with a side of green chutney, and others like it with a side of tamarind chutney. My children love it without any condiment, so I will let you decide what works best for you.
Print
Khaman Dhokla – Soft Steamed Chickpea Flour Bread
Prep Time: 60 minutes
Cook Time: 45 minutes
Total Time: 1 hour, 45 minutes
A classic savory chickpea flour cake from the garden state of Gujarat in Western India.
Ingredients
For the batter1 cup of garbanzo bean flour (besan)
1 cup of yogurt
3/4 teaspoon turmeric
1/2 cup of water
3 tablespoons oil
1/2 teaspoon salt
1/4 inch piece ginger
2 green chilies
1 teaspoon sugar
1 lime
11/2 teaspoons eno fruit salt or 1/2 alka seltzer tablet
For the tempering
1 tablespoon oil
1 teaspoon black mustard seeds
10 curry leaves
4 dried red chilies
1/2 teaspoon asafetida
1 teaspoon sugar
1 lime
4 tablespoons water
1/2 teaspoon salt
Sesame seeds to garnish
1 tablespoon chopped cilantro
Instructions
Place the garbanzo bean flour in a mixing bowl and whisk to remove any lumps and add in the yogurt and the turmeric and beat well. Stir in the water and the oil and salt and mix until smooth.Place the ginger, green chilies, sugar in a mixer and cut the lime and squeeze in the lime juice and blend until the mixture is a smooth paste. Stir this into the garbanzo bean flour mixture and let it rest for 15 minutes.
While this is resting, grease an 9 inch round cake pan. Heat water in a large wok until the water begins to simmer. Invert a trivet onto the simmering water.
Stir in the eno into the batter, it should start bubbling immediately. Quickly pour the mixture onto the cake plan and place over the trivet in the simmering pan. Cover the wok and let the mixture steam for about 35-40 minutes on medium-low heat. The cake should be fairly firm and a knife inserted in the center should come out clean when done.
Turn off the heat and let the cake rest for 15 minutes, invert the cake onto a plate.
Heat the oil for the tempering, working quickly add in the mustard seeds and wait until they crackle, add in the curry leaves, dried red chilies, asafetida and the sugar and turn off the heat. Cut the lime and squeeze in the juice and add in the water and turn on the heat and bring to a simmer. Turn off the heat and pour this mixture over the dhokla and let it rest until the liquid is absorbed.
Sprinkle with the sesame seeds and cilantro. Cut into squares and serve.
Schema/Recipe SEO Data Markup by ZipList Recipe Plugin2.2http://cookinginwestchester.com/2014/03/khaman-dhokla-soft-steamed-chickpea-flour-cake.html
Share this on Bebo
Blog this on Blogger
Add this link to Box.net
Share this on del.icio.us
Digg this!
Share this on Facebook
Share this on FriendFeed
Email this via Gmail
Submit this to Hacker News
Share this on LinkedIn
Email this to a friend?
Share this on OkNotizie
Promote this on Orkut
Stumble upon something good? Share it on StumbleUpon
Share this on Google+
Share this on Tumblr
Tweet This!
Email this via Yahoo! Mail
Pin this to Pinterest
Box this on Zabox
Get Shareaholic
March 6, 2014
Slow Cooker Spicy Pinto Beans
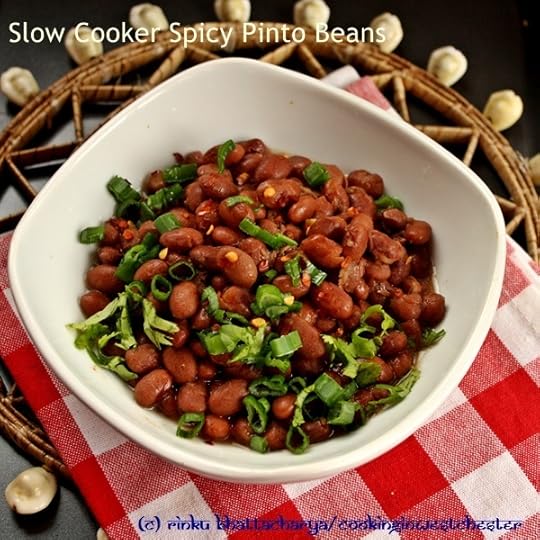 My official protest against this long cold winter has been resorting to the slow cooker, I realize that people may not think that is such a terrible thing. But, my routine has been something like tossing a few things together, throwing them into my slow cooker and retreating to my favorite corner. Since I cannot ever leave anything alone, I do add finishing touches, here and there, occasionally go out and stir the proverbial pot. This insanely simple recipe, has become a huge hit in the house with father and the kids, I have made it at least four times and yes, checked it out with both the pressure cooker and the slow cooker. I have been meaning to post this a few days back, I actually ended up with a camera malfunction, yes, I actually survived without a camera for a week. I am promised that it shall arrive this weekend.
So, we all know what I will be doing this weekend… Pinto beans are very common in Mexican cuisine, they are the beans that make the rice and beans shine. Cooked simply these beans taste magical with simple rice and maybe a side of some kind of meat. I had made a nice and large batch, the kids had some with quesadillas and guacamole.
There is really nothing to this recipe, however, nonetheless I liked it enough to to post. It shall feature in my life and kitchen many times so I would like to keep it for the rainy spring days, if we ever have them again. I have been busy, but did manage to get in a couple of eating experiences for the NYC restaurant week, the highlight of my day today however was a great cup of cardamom coffee, that I picked up from Bombay Sandwich Co.
Now, while I did wince at the fact that it was sweetened, the sugar was not cloying, just what might complement the seductive notes of the cardamom on a cold day. Now, I have a new mission in life, I have to replicate those well spiced notes, for today however, I shall stick to this easy, breezy recipe.
Print
Slow Cooker Spicy Pinto Beans
A slow or pressure cooked super simple version of pinto beans.
Ingredients
1 cup of pinto beans (soaked overnight)21/2 cups of water for the slow cooker and 11/2 cups of water for the pressure cooker
1 red onion, finely diced
1 teaspoon salt
1 teaspoon red cayenne powder
1 tablespoon oil
1 teaspoon cumin seeds
1 bunch of scallion, chopped whites and greens separated
1 lime of lemon
Instructions
Place the beans in the slow cooker, with the onion, cayenne pepper and the salt and cook on high for 6 hours. Alternately place in the pressure cooker and cook for 25 minutes.Heat the oil and add in the cumin seeds and the scallions whites and cook for a couple of minutes. Pour in the beans and simmer for 5 minutes.
Turn off the heat, stir in the scallion greens and squeeze in the lemon or lime and yes, just like that you have dinner.Schema/Recipe SEO Data Markup by ZipList Recipe Plugin2.2http://cookinginwestchester.com/2014/03/slow-cooker-spicy-pinto-beans.html
Share this on Bebo
Blog this on Blogger
Add this link to Box.net
Share this on del.icio.us
Digg this!
Share this on Facebook
Share this on FriendFeed
Email this via Gmail
Submit this to Hacker News
Share this on LinkedIn
Email this to a friend?
Share this on OkNotizie
Promote this on Orkut
Stumble upon something good? Share it on StumbleUpon
Share this on Google+
Share this on Tumblr
Tweet This!
Email this via Yahoo! Mail
Pin this to Pinterest
Box this on Zabox
Get Shareaholic
February 26, 2014
Slow Cooker Dal Makhani – Buttery Mixed Lentils
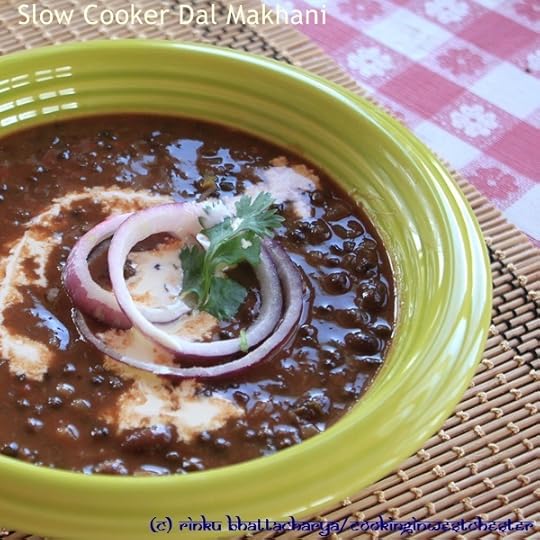 The slow cooker is not for everything in an Indian kitchen, if fact, it is my second favorite tool. Yes, it loses out to the pressure cooker in my world, however, when it comes to beans, lentils and slow simmered stews the slow cooker rocks!
Dal Makhani, is another one of those dishes popularized and killed by some Indian restaurants and some do it just right. It is certainly a dish with a decent amount of butter and cream, but it is mostly about slow simmering. In this slow cooker rendition, I have cut down a significant amount of the fat and made the work rather simple by letting the slow cooker do its slow cooking.
Finish it off with some butter and if you are really feeling indulgent by all means throw a little cream on the top, but truly that is very optional. I personally love the contrasting colors the cream adds to the equation rather than the creaminess (ok, I like the creaminess, too!)
This dish is one of my daughter’s favorite dishes and it has been nourishing us through this rather long and snowy winter that just does not seem to want to go away. Thank goodness we like legumes and grains in this household, because by the look of things, this years garden will have a very late start.
Print
Slow Cooker Dal Makhani – Buttery Mixed Lentils
Prep Time: 10 minutes
Cook Time: 4 hours
Total Time: 4 hours, 10 minutes
A simple slow cooker rendition of creamy Indian lentils or dal makhani.
Ingredients
1 red onion, very finely chopped1 tablespoon freshly grated ginger
3 cloves of garlic, minced
1/2 cup tomato puree
3/4 cup whole urad lentils (black lentils)
1/3 cup red kidney beans (rajmah)
11/2 teaspoons sugar
1 teaspoon salt or to taste
1 teaspoon red cayenne pepper
21/2 cups of water
1 tablespoon crushed fenugreek leaves
2 tablespoons butter
To garnish and finish
11/2 tablespoons oil
1 tablespoon cumin seeds
Sliced red onions
Fresh Cream
Instructions
Place the onion, ginger, garlic, tomato puree, black lentils, kidney beans, sugar, salt and red cayenne pepper with the water in a slow cooker.Set the slow cooker on high for 4 hours and let the lentils cook undisturbed (yes, I know that is what a slow cooker is there for, I just have a hard time sometimes leaving it alone)
After 31/2 hours add the fenugreek leaves and butter and let the lentils simmer for the remaining half and hour uncovered.
Heat the oil and add in the cumin seeds and let them cook for about 30 seconds, until they sizzle, pour the oil over the lentils and mix well.
Let the lentils rest for 15 minutes, check the seasonings and serve with sliced onions and fresh cream.
Notes
Note, this recipe is mostly cooked up in a slow cooker and does not need any attention while cooking except at the very end.
Schema/Recipe SEO Data Markup by ZipList Recipe Plugin2.2http://cookinginwestchester.com/2014/02/slow-cooker-dal-makhani-buttery-mixed-lentils.html
Share this on Bebo
Blog this on Blogger
Add this link to Box.net
Share this on del.icio.us
Digg this!
Share this on Facebook
Share this on FriendFeed
Email this via Gmail
Submit this to Hacker News
Share this on LinkedIn
Email this to a friend?
Share this on OkNotizie
Promote this on Orkut
Stumble upon something good? Share it on StumbleUpon
Share this on Google+
Share this on Tumblr
Tweet This!
Email this via Yahoo! Mail
Pin this to Pinterest
Box this on Zabox
Get Shareaholic


