
Jeffrey E.F. Friedl's Blog, page 32
March 19, 2015
Vacation Update: Grand Canyon
Nikon D4 + Nikkor 24-70mm f/2.8 @ 24mm — 1/100 sec, f/18, ISO 280 —
map & image data — nearby photos
This Afternoon
Grand Canyon, Yaki Point (South Rim)
今日:グランドキャニオン(アメリカのアリゾナ州)
After yesterday's drive from Las Vegas on
our RV trip across America, we made it today to the Grand Canyon.
We're in Page Arizona tonight... tomorrow we visit Antelope Canyon.


March 18, 2015
Vacation Update: Vegas to Williams
A quick update on today, of my vacation....
Nikon D4 + Nikkor 24-70mm f/2.8 @ 24mm — 1/100 sec, f/2.8, ISO 2800 —
map & image data — nearby photos
Last Night
The Bellagio, Las Vegas Nevada
昨夜。ラスヴェガス、ベラジオの噴水
Nikon D4 + Nikkor 24-70mm f/2.8 @ 27mm — 1/250 sec, f/8, ISO 100 —
map & image data — nearby photos
This Afternoon
Hoover Dam, Boulder City Arizona
今日。フーヴァーダム、アリゾナ州
Nikon D4 + Nikkor 24-70mm f/2.8 @ 24mm — 1/100 sec, f/2.8, ISO 800 —
map & image data — nearby photos
This Evening
my first workout in three weeks
Grand Canyon Railway & Hotel
(we're staying in its adjacent RV park)
今夜。三週間ぶりの筋トレ
グランドキャニオンの近く
Tomorrow we see the Grand Canyon. I hope it doesn't make me woozie like it did when I first saw it at 10.
March 16, 2015
Vacation Going Well… Just No Time to Write…
Nikon D4 + Nikkor 24-70mm f/2.8 @ 24mm — 1/1250 sec, f/2.8, ISO 100 —
map & image data — nearby photos
On Vacation
旅行中、ヨセミテ国立公園
Yosemite National Park
I've taken 1,000+ photos so far, but it turns out that I have absolutely zero free time to process them, or
blog about the trip, at least so far. When I do get time (which may be after the trip
is done), I'll start posting about it... hopefully making a diary for
myself, and sharing a bit of Americana along the way.
いっぱい遊べますが、時間は余裕は全く無いので、ブログを書く時間も無い。後でアップします。
March 10, 2015
A Crazy Couple of Days in Silicon Valley
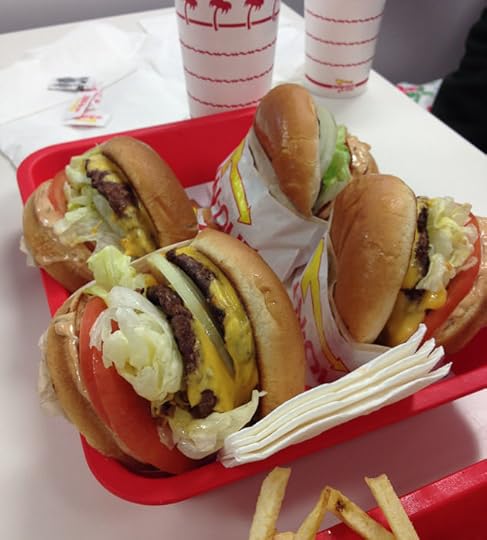
iPhone 4S + iPhone 4S back camera 4.28mm f/2.4 at an effective 35mm — 1/40 sec, f/2.4, ISO 50 —
map & image data — nearby photos
“Welcome to America”
In-n-Out Burger
I've been in The States for two days now, getting read to start a drive across America in
an RV. In the two days I've been here, I've gotten 5 days worth of stuff
done, and had to let another week's worth fall by the side for lack of
time. 
Still, I've done plenty.... Highlights, lowlights, and notable experiences so far include:
Playing Ultimate Frisbee with old Yahoo friend Brian, and getting a tour
of the WhatsApp offices and meeting
some other old Yahoo friends there, including Jan (who used to play Ultimate
with us back in the day, but couldn't join us this time).
A few photos from Ultimate will appear in a subsequent post.
Sadly I missed a chance to see Ash Patel from
back-in-the-day Yahoo. He holds a special place in my Yahoo heart because
he gave me a ride to the airport after my initial interviews back toward
the end of 1996. He was already pretty high in the company at the time, but
not too high to give an interviewee a ride to the airport. Classy guy.
Watching Fumie meet her first ballet instructor from 17+ years ago, who at
82 is still teaching at Santa Clara
Ballet, and looks to be in her 60s. It'd been more than 12 years since Fumie took a lesson there, but
Ms. Reyes remembered her. In the advanced pointe class that Fumie joined in on,
the next oldest student wasn't even alive when Fumie started ballet. 
Spending hour after hour after hour trying to get a friggin'
Verizon WiFi hotspot and a couple of pre-paid phones set up for the trip. How hard can it be?! And it's pre-paid, so why do you need my
social security number? I wasted so many hours on this that could have been
better spent.
Spending $400 at an Under
Armour outlet. Even a small outlet store has more variety than I can
find in Japan, at much better prices.
Spending about the same amount at Supercenter Walmart for stuff we'll need
in the RV, like special TP, blankets, cups, shampoo, etc. etc. etc.
Not thinking much of the road construction going on in front of the hotel, until
I realized that it's part of the construction for Apple's spaceship. Our overpriced hotel is immediate across the street from the south-western corner of Apple's property. I can only imagine how high the prices will go once Apple moves in.
Checking out a massive super-wide 30' (10m) RV that I'm supposed to drive across the country.
Inside is as big as a house, and the outside is even bigger. I'm a bit apprehensive. I drive it for the first time tomorrow.
Getting over fairly quickly the cold that came on a few hours before leaving Kyoto. The flight was not fun,
though the double baggage allowance on American Airlines (compared the United flights I normally take) was
much appreciated. The seats had much more leg space as well.
Having the easiest time with jetlag that I've had in years. The flight left
Osaka at 8:30pm, for an hour's flight to Tokyo Haneda, and then the
transpacific flight left at midnight. So I took Ambien right away on the
second flight and slept through most of it. We arrived to SFO at around
6pm, in the hotel by 8pm, and asleep by 10pm. I was woozy the next morning
during the hours at the Verizon store, but otherwise jetlag has not been an
issue. Woohoo!
There a week's worth to do before we leave Silicon Valley in two more days...
March 7, 2015
Anthony Graduates from Elementary School
Nikon D4 + Nikkor 70-200mm f/2.8 @ 175mm — 1/640 sec, f/2.8, ISO 200 —
map & image data — nearby photos
Heading To Graduation
a young man and his mother
Anthony graduated from elementary school today, a big event in Japanese culture. I snapped the photo as we were heading to the school for the last time.
It reminds me of this photo of the two
of them from the day he started elementary school half his life (six
years) ago, and also the post about his going to school on his own
for the first time. He's growing up all too quickly.
Photo-Development Challenge Results #1: Hillside Temple Buildings
Today I'm sharing the first results from “Photo-Development Challenge:
Inspire Me and Others With Your Artistic Interpretation”. Today's photo
is one of some minor outlying buildings at the Yoshiminedera Temple (善峯寺)
in Kyoto, Japan.
First, let's look at the uninspiring original:
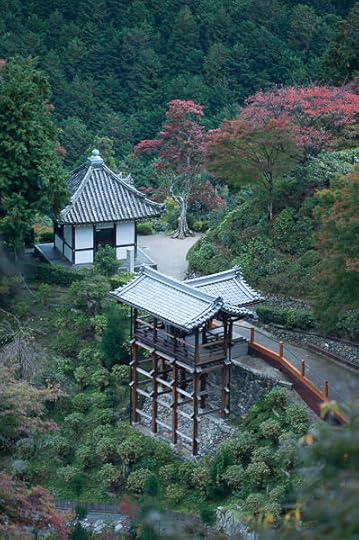
Nikon D700 + Voigtländer 125mm f/2.5 — 1/640 sec, f/2.5, ISO 200 —
map & image data — nearby photos
The Unprocessed Original
This was from a productive outing four years ago that produced
“Temple Hopping in the Mountains of South-Western Kyoto”,
two examples for
“Heading Out To Photograph The Fall Foliage? Don’t Forget The Polarizer Filter”, and an item on
“Visiting My Photo Archives: Random Pretty Shots #1”.
For lack of a better idea, I'll present the various results in the order
I received them, starting with my own interpretation that I apparently did
when I was considering to post it four years ago:
The only change is the white-balance setting, though the impact is
substantial. When writing a blog post about some place I've visited, I usually think of photos in terms of documenting the experience, and so I
guess I didn't do much. (Often I'll do a lot to a photo, but perhaps
because I ended up not including this one in a blog post, I didn't give it
much critical thought.)
processing by
Werner Gansz
div.c2534 { padding-left:1em; border-left: 5px solid #555; margin-right:3em; margin-bottom:30px }
p.p2534 { margin-top:0}
div.d2534 { margin-bottom:0}
Werner comments:
The composition of the meander from the two structures and red foliage
was lovely so I sampled the gray tile for color temperature, then enhanced
contrast.
I used radials to brighten the red tree and darken slightly the
second building, intending for the viewer to start on the first structure
and follow the meander to the foliage.
Also I am not a fan of tall thin verticals that modern cameras shoot so
I cropped all verticals to 10x8. Happliy you framed extra on top and bottom
(to may taste anyway)
My Reaction: This feels more pleasing than mine, with a white balance that feels more
realistic. (The white balance from mine was set via a color-checker sample,
which makes it perhaps “correct” but not necessarily pleasing.)
Nikon D700 + Voigtländer 125mm f/2.5 — 1/640 sec, f/2.5, ISO 200 —
map & image data — nearby photos
processing by
Ben Willmore
Ben comments:
1) Crop to not allow the eye to wonder much and to clean up edges and define composition more.
2) bright highlights down to better see detail in rooftops.
3) Tweak color to make red/orange help define the image better.
4) darken where there is less interesting stuff,
5) brighten where there is more interesting stuf and try not to allow vignetting to over-darken path on right.
My Reaction:
Love the whys and the whats, and the result is impactful. The lower of the two buildings feels like it's popping
out of the screen.
I like it a lot.
Nikon D700 + Voigtländer 125mm f/2.5 — 1/640 sec, f/2.5, ISO 200 —
map & image data — nearby photos
processing by
Daniel Cutter
Daniel comments:
This shot is mostly green, so I turned straight to b/w. I tried to pull
the focus towards the buildings: I used the correction brush to add clarity
to the buildings while removing it elsewhere.
I added vignette and a grad
filter to the top to add an horizon.
Yes, I'm still on Facebook: here
My Reaction: This is almost haunting, and the B&W treatment gives it an “old” look.
The artificial-horizon idea is neat, though perhaps a bit too strong for my tastes, but it's hard
to judge on its own merits because our view is tainted by having seen other versions.
Nikon D700 + Voigtländer 125mm f/2.5 — 1/640 sec, f/2.5, ISO 200 —
map & image data — nearby photos
processing by
Austen
Austen didn't provide a comment, but I can see in Lightroom that he cropped it a bit,
and painted in some very subtle darker exposure here and there. He did a lot with the tone curve
(adjusting how dark darks are, how middle middles are, etc.) and reduced saturation. He even added a bit of grain.
The result is a kind of “old” like the B&W one above, yet a completely different kind of old. It's almost like a “colorized” B&W shot. It feels much more calm and peaceful than “impactful”.
I didn't get as many submissions for this photo as some of the others,
but I picked this one to start because the various versions are so very
different — each person went for a completely different vibe —
so it really makes me appreciate the exercise.
My thoughts on the artificial horizon highlight something
important, though difficult, to keep in mind: comparing and contrasting
different versions is explicitly not what we do with most photos...
as consumers of others' imagery, we generally only see the final product
with eyes untainted by other versions or possibilities.
Had Daniel's version with the dark horizon been the only view I had of
this photo, I perhaps wouldn't have even noticed the artificial horizon,
much less thought it was a bit too dark. It's impossible to know.
I gave some thought to having the images presented randomly for each
viewer, so that not everyone's view is modified in the same way. Had I done
this, folks who happened to see the dark-horizon version first may well
have thought the next one they saw too garish, like drinking orange juice
after brushing your teeth. The order things are presented in can really
matter.
In any case, I really appreciate the four submissions, both individually
and as a group. I hope we'll see similar quality for the other photos in the challenge!
I'm going to be traveling for the rest of the month, so it'll
likely be a while before I get to the next photo, so if
you're considering to participate, you've still time.
March 5, 2015
Another Nice (Tough!) Bicycle Ride in the Mountains Around Kyoto
Nikon D4 + Sigma 35mm F1.4 DG HSM — 1/4000 sec, f/1.4, ISO 100 —
map & image data — nearby photos
Good Times
Meeting new friends before a joint ride into the mountains
Sanjo Bridge Starbucks, Kyoto Japan
水曜日もサイクリングをしました。今回は友達6人と一緒に60kmの山上下いっぱいのルートでした。
Two days ago I did a short easy bicycle ride into
the mountains of western Kyoto, but yesterday I did something a bit more
ambitious. As seems to be the habit since my first ride
with folks from Cycling Kyoto!, we met in front of the Starbucks on
Sanjo Street. This time there were seven people total...
Nikon D4 + Sigma 35mm F1.4 DG HSM — 1/3200 sec, f/1.4, ISO 100 —
map & image data — nearby photos
Gorm Kipperberg
positive fun attitude
Nikon D4 + Sigma 35mm F1.4 DG HSM — 1/2500 sec, f/1.4, ISO 100 —
map & image data — nearby photos
Henry Foster
fast
Nikon D4 + Sigma 35mm F1.4 DG HSM — 1/320 sec, f/4.5, ISO 100 —
map & image data — nearby photos
Kumiko Mini and Manseki Kanemitsu
Manseki would be today's ride leader
Nikon D4 + Sigma 35mm F1.4 DG HSM — 1/2500 sec, f/2, ISO 100 —
map & image data — nearby photos
Arthur Lauritsen
dedication: he brought his bike up an hour on the train from Osaka
Nikon D4 + Sigma 35mm F1.4 DG HSM — 1/640 sec, f/2.8, ISO 640 —
map & image data — nearby photos
Jamie Anderson
a photo from later in the trip
Today's route would be a repeat of one that Manseki had done two days prior, so he was group lead. We got moving at 9:20.
Nikon D4 + Sigma 35mm F1.4 DG HSM — 1/320 sec, f/5, ISO 125 —
map & image data — nearby photos
The First 45 Minutes
9:48am - taken while moving at 18 km/h
We spent the first 45 minutes heading east on Route 1. The route looks
horrible in the photo, but the cycling was fairly smooth and easy, without the stop and go of city traffic. I was surprised at how not unfun it was.
That first 45 minutes involved 350m of vertical gain, but it was spread out over 15km, so it was a relaxed ride and we
all stuck together. Then we turned south along a river and was greeted by a bit nicer scenery...
Nikon D4 + Sigma 35mm F1.4 DG HSM — 1/800 sec, f/5, ISO 100 —
map & image data — nearby photos
Resting with his Pooch
while watching the scullers in the river
10:12am - taken while moving at 21 km/h
Nikon D4 + Sigma 35mm F1.4 DG HSM — 1/1250 sec, f/5, ISO 100 —
map & image data — nearby photos
it was fun to ride along with the scullers for a short while
Nikon D4 + Sigma 35mm F1.4 DG HSM — 1/400 sec, f/4, ISO 100 —
map & image data — nearby photos
Pit Stop
at Sajo-Toson (茶丈藤村)
An hour into the ride, we stopped by a cafe for a quick tea, but ended up eating and chatting for almost an hour.
Nikon D4 + Sigma 35mm F1.4 DG HSM — 1/320 sec, f/8, ISO 360 —
map & image data — nearby photos
Bicycle Parking
most cyclists forego a kickstand to reduce weight
I thought the rack for kickstand-less bicycles was ingenious, and I
never would have realized what it was for without seeing it in use.
Nikon D4 + Sigma 35mm F1.4 DG HSM — 1/320 sec, f/3.5, ISO 200 —
map & image data — nearby photos
First Group Shot of the Day
me, Arthur, Gorm, Henry, Kumiko, Manseki, Jamie
(taken by a waitress standing on a chair)
Perhaps because we were a big group, or perhaps because they're cyclist friendly or just nice,
they gave us some sweets on the house...
Nikon D4 + Sigma 35mm F1.4 DG HSM — 1/1000 sec, f/1.4, ISO 100 —
map & image data — nearby photos
“Terabe Mochi”
「寺辺もち」めっちゃ美味しかった。
This stuff was great... it's mochi (like I made the other day),
with brown sugar and cashews. Highly recommended. The cafe is next to the entrance to the splendid
Ishiyama-dera Temple (which I've written about in the past), so if you make
a visit to the temple, avail yourself of the chance for some of these tasty sweets.
I ended up buying a bunch to bring home, adding to the weight that I
would have to pedal up the mountains when we left.
On the way out of the parking lot, I snapped a quick shot of the temple gate...
Nikon D4 + Sigma 35mm F1.4 DG HSM — 1/400 sec, f/4, ISO 100 —
map & image data — nearby photos
Ishiyama-dera Temple (石山寺)
Otsu-city, Shiga, Japan
as per my prior coverage, this will be spectacular with blossoms in a month
15 minutes later, we were finally heading into the mountains for the first (and biggest) of four major climbs...
Nikon D4 + Sigma 35mm F1.4 DG HSM — 1/640 sec, f/5.6, ISO 100 —
map & image data — nearby photos
Heading Toward Climb #1
11:18am - taken while moving at 15 km/h
10 grueling minutes and 140m of elevation gain later, I had arrived at the spot Manseki
had said is “where the tough part starts”. Crap, I was already ready for it to end!
Nikon D4 + Sigma 35mm F1.4 DG HSM — 1/320 sec, f/10, ISO 180 —
map & image data — nearby photos
Where we Had Been
10 minutes prior
I stopped for a rest, and to enjoy some of the 2.5kg of sports drink I'd bought at the convenience store
just before starting the climb. I also removed my already-drenched-with-sweat jacket, sweater, and gloves,
and shoved them into my pannier:
Nikon D4 + Sigma 35mm F1.4 DG HSM — 1/1000 sec, f/2.2, ISO 100 —
map & image data — nearby photos
Lopsided
the nice flat road heading ahead was to be the road not taken...
the main route headed up
I have no idea how I got in front of Manseki, but he likely either had
stopped for something, or was just pacing himself smarter than I was,
because he came riding past while I was resting....
Nikon D4 + Sigma 35mm F1.4 DG HSM — 1/2500 sec, f/2.2, ISO 100 —
map & image data — nearby photos
Manseki Grinding it Out
puts people ⅓ of his age to shame
After a three-minute rest, I headed back up. The slopes were as
unrelenting as they were ridiculous, continuing without respite. I had to
laugh (figuratively... I didn't have the energy to do so literally) at this
scene:
Nikon D4 + Sigma 35mm F1.4 DG HSM — 1/1000 sec, f/2.2, ISO 100 —
map & image data — nearby photos
I'll Try To Restrain Myself
the vertical sign way up the hill says “slow down”
11:38am - taken while moving, barely, at 5 km/h
Seven minutes and 64m of elevation gain later, I finally joined the rest of the group at the top,
interrupting their long rest... Henry (and others, I'm sure) had made it 10 minutes before me.
Nikon D4 + Sigma 35mm F1.4 DG HSM — 1/1250 sec, f/2.2, ISO 100 —
map & image data — nearby photos
Chilling at the Top
11:44am - taken while moving at 7 km/h
The ride up involved 286m of elevation gain in 2.8km (an average slope of 10.3%). It took me 25 minutes, four of which were resting.
Going down was easier, but three more big ascents awaited.
I headed down a bit before everyone else and set up to take pictures of
folks as they went past, but it was a mostly wasted effort because I
screwed up focus. I seem to have zero ability to learn the focus modes of
the camera beyond the basic “S” mode. I thought I had “C” mode down, but
the results below are a clear indication that I don't.
私は先に降りて、途中で止まって、カメラを準備しょました。皆の写真を撮ったが、ピンはかなり間違いました。
Nikon D4 + Sigma 35mm F1.4 DG HSM — 1/200 sec, f/2.5, ISO 100 —
map & image data — nearby photos
Jamie
more in focus than most
Nikon D4 + Sigma 35mm F1.4 DG HSM — 1/200 sec, f/2.5, ISO 100 —
map & image data — nearby photos
Kumiko
out of focus
Nikon D4 + Sigma 35mm F1.4 DG HSM — 1/200 sec, f/2.5, ISO 100 —
map & image data — nearby photos
Arthur
so-so focus
Nikon D4 + Sigma 35mm F1.4 DG HSM — 1/250 sec, f/2.5, ISO 100 —
map & image data — nearby photos
Henry
my camera lacks focus, but he doesn't
Nikon D4 + Sigma 35mm F1.4 DG HSM — 1/250 sec, f/2.5, ISO 100 —
map & image data — nearby photos
Manseki
Nikon D4 + Sigma 35mm F1.4 DG HSM — 1/200 sec, f/2.5, ISO 100 —
map & image data — nearby photos
Gorm
The least in focus... sorry Gorm
Nikon D4 + Sigma 35mm F1.4 DG HSM — 1/640 sec, f/3.2, ISO 180 —
map & image data — nearby photos
Heading Up Again
12:20pm - taken while moving at 5 km/h
Nikon D4 + Sigma 35mm F1.4 DG HSM — 1/640 sec, f/3.2, ISO 800 —
map & image data — nearby photos
Pass #2
12:23pm - taken while moving at 7 km/h
The second ascent was longer (3.1km) but less elevation gain (238m), but it was 23 minutes of pain for me.
Nikon D4 + Sigma 35mm F1.4 DG HSM — 1/640 sec, f/3.2, ISO 1250 —
map & image data — nearby photos
Heading Down
the sense of steepness seems to be easier to capture when aiming down
Nikon D4 + Sigma 35mm F1.4 DG HSM — 1/640 sec, f/3.2, ISO 2000 —
map & image data — nearby photos
Fun
12:26pm - taken while moving at 19 km/h
The third ascent was insane... 118m of elevation gain over just 880m of distance (an average slope of over 12%). It took me 7½ minutes.
Having followed the others the whole time, I had no idea where I was
beyond “mountains south-east of Kyoto”, but just before the pass I was
surprised to come across a scene I recognized immediately:
Nikon D4 + Sigma 35mm F1.4 DG HSM — 1/640 sec, f/2.8, ISO 2000 —
map & image data — nearby photos
I've Seen This Place Before
12:35pm - taken while moving at 6 km/h
Kiyotaki-gu Shrine (清瀧宮)
アッ、この神社を見た事ある、4年前。
Apparently I hadn't posted any photos from that 2011 visit, but the
photos from “Slightly Mysterious Stairs
Into Mountain Overgrowth” came from a short distance away, just beyond
the pass I would reach in 30 seconds..
That early-summer outing in 2011, with Paul Barr and Katsunori Shimada, produced a bunch of posts,
including
What It Looks Like When Tiered Rice Paddies Go to Seed
Pleasant Little Village in Uji
Pleasant Little Village in Uji, Part 2
Uji-City Rural Mountain Drive #2: Ice-Cream Girl, Fruit Pizza, and More
Some Random Japan Desktop Backgrounds From the Past Year
More Thin Depth Of Field: Retrospective on My First Months with a 300mm f/2
Anyway, I soon arrived at the top:
DMC-SZ9 at an effective 26mm — 1/250 sec, f/3.1, ISO 200 —
map & image data — nearby photos
Finishing Ascent #3
photo by Manseki Kanemitsu
私。撮影は万石さん
I probably looked worse than I felt, but I was pooped and appreciative of the guilt-free rest.
As comparison, here's a photo of a somewhat more portly me, four years ago at the shrine near the pass:
Nikon D3 + Nikkor 24-70mm f/2.8 @ 70mm — 1/400 sec, f/5.6, ISO 800 —
map & image data — nearby photos
Almost Four Years Ago
私、4年前、同じ神社で
not such great shape
photo by Paul Barr
I was using the aforementioned Nikkor 300mm f/2 to take this photo:
Nikon D700 + Nikkor 300mm f/2 — 1/1250 sec, f/2, ISO 2500 —
map & image data — nearby photos
Weathered
I like it when the wood grain is exposed by years of weathering
Anyway, back to yesterday's ride. On the ride down to the next valley,
Manseki asked me to go ahead and set up to take a shot of him coming around
the corner...
Nikon D4 + Sigma 35mm F1.4 DG HSM — 1/640 sec, f/5, ISO 360 —
map & image data — nearby photos
“Action Shot” (sort of)
I really need more than a 35mm lens for these kinds of shots
こんな撮影は、もっと望遠なレンズが有れば良い。今度は持って行く!
As my lens followed him around the corner and off into the distance, it came across an unexpected sight...
Nikon D4 + Sigma 35mm F1.4 DG HSM — 1/640 sec, f/5, ISO 500 —
map & image data — nearby photos
Ms. Yoshino
popped up out of the blue
It turns out that she's an acquaintance of Manseki.
As I'd been getting ready for Manseki to come around the corner, she'd ridden up from below, and greeted me with
“are you Manseki's friend?”. She'd seen the others ride past, and perhaps had known about our plans(?), so just
took a guess.
She decided to turn around and join us for a while.
Nikon D4 + Sigma 35mm F1.4 DG HSM — 1/640 sec, f/5, ISO 360 —
map & image data — nearby photos
Heading Down to Catch Up with the Others
12:48pm - taken while moving at 22 km/h
Nikon D4 + Sigma 35mm F1.4 DG HSM — 1/640 sec, f/3.5, ISO 500 —
map & image data — nearby photos
And Now Up For the Final Ascent
12:53pm - taken while moving at 7 km/h
The final ascent was the “easiest” (if one could say that) of the four... 250m of elevation gain
over 3.4km. Again I was the last one... it took me 21 minutes.
Nikon D4 + Sigma 35mm F1.4 DG HSM — 1/640 sec, f/5.6, ISO 1000 —
map & image data — nearby photos
All Done
sort of... still 440m of elevation gain before home, but
spread out over 18km and mixed with 740m of elevation loss
Ms. Yoshino turned around to continue her original route, and we headed down.
There was one more “mini” ascent (112m gain over 1000m)...
Nikon D4 + Sigma 35mm F1.4 DG HSM — 1/640 sec, f/5.6, ISO 800 —
map & image data — nearby photos
Final Push
1:24pm - taken while moving at 17 km/h
The final big downhill was fantastic, with wide sweeping curves that one could take almost wide open. I hit 62km/h (38mph) at one point. It was fun.
Another 13km of city riding and we were back where we started.
Nikon D4 + Sigma 35mm F1.4 DG HSM — 1/640 sec, f/6.3, ISO 450 —
map & image data — nearby photos
Bidding Adieu
Overall the day's
58km route was tough for me, but still much easier than my 90km route three weeks
ago, which had almost double the elevation gain, plus snow.
Still, I was surprised when I asked Henry how the route was compared to whatever he normally
does. He said “Today's ride was nice, though the pace was...... relaxed.” Doh! But sure, he got
to lounge around all day waiting for me at the top of each ascent, so wouldn't be relaxed. 
March 3, 2015
A Bicycle Ride to the Kuuya-taki Waterfall in Western Kyoto with Manseki Kanemitsu
Nikon D4 + Sigma 35mm F1.4 DG HSM — 1/1250 sec, f/1.4, ISO 100 —
map & image data — nearby photos
Manseki Kanemitsu
金光万石さん
at the meeting point, Sanjo Starbucks, Kyoto Japan
Today I went out for a short, mostly-easy bicycle ride (track at Strava)
with Manseki
Kanemitsu, another member of the
Cycling
Kyoto! group on Facebook. Rain was forecast for the late afternoon
so it was just us.
It was my first real ride since
the grueling 90km mountain/snow adventure three weeks ago,
and my third “real” ride in total, since my inaugural ride
a month and a half ago.
(We're planning to do a more ambitious ride tomorrow
with a larger group, so that'll be ride #4.)
We decided to head off to the Arashiyama area of western Kyoto, which
unfortunately involves a lot of city riding just to get there.
Nikon D4 + Sigma 35mm F1.4 DG HSM — 1/1000 sec, f/8, ISO 900 —
map & image data — nearby photos
Point-A-to-B City Riding
9:55am - taken while moving at 30 km/h
We stopped by a tofu shop whose owners he was friends with, noted because they
are perhaps the last shop in Kyoto sill use the old-style wood-burning hearth
that I've often seen in old temple kitchens, but have never actually seen in use...
Nikon D4 + Sigma 35mm F1.4 DG HSM — 1/500 sec, f/8, ISO 6400 —
map & image data — nearby photos
Iriyama Tofu Shop
入山豆腐店
Nikon D4 + Sigma 35mm F1.4 DG HSM — 1/640 sec, f/2.8, ISO 6400 —
map & image data — nearby photos
Still Made By Hand
手作り
Nikon D4 + Sigma 35mm F1.4 DG HSM — 1/400 sec, f/2.8, ISO 6400 —
map & image data — nearby photos
Wood-Burning Hearth
古いかまどをまだ使っています
京都弁で「おくどさん」言います。
Off we continued toward Arashiyama...
Nikon D4 + Sigma 35mm F1.4 DG HSM — 1/1250 sec, f/3.5, ISO 100 —
map & image data — nearby photos
10:56am - taken while moving at 14 km/h
Nikon D4 + Sigma 35mm F1.4 DG HSM — 1/1250 sec, f/2.2, ISO 100 —
map & image data — nearby photos
“Guts Pose”
in front of the Seiryoji Temple
清凉寺の前のガッツポーズ
( I missed focus horribly on this one )
Nikon D4 + Sigma 35mm F1.4 DG HSM — 1/1000 sec, f/2, ISO 200 —
map & image data — nearby photos
Quaint North-West Arashiyama
getting steeper
11:04am - taken while moving at 14 km/h
Nikon D4 + Sigma 35mm F1.4 DG HSM — 1/50 sec, f/2, ISO 6400 —
map & image data — nearby photos
Tunnel
11:11am - taken while moving at 18 km/h
Nikon D4 + Sigma 35mm F1.4 DG HSM — 1/1600 sec, f/2, ISO 100 —
map & image data — nearby photos
Very Steep Downhill Section
11:14am - taken while moving at 15 km/h
the road eventually deadends, so we'll have to come back up later
Nikon D4 + Sigma 35mm F1.4 DG HSM — 1/1000 sec, f/5, ISO 320 —
map & image data — nearby photos
Little Village Stream
with some plum blossoms at left
Nikon D4 + Sigma 35mm F1.4 DG HSM — 1/1000 sec, f/5, ISO 3200 —
map & image data — nearby photos
Finally in the Mountains
11:23am - taken while moving at 9 km/h
Nikon D4 + Sigma 35mm F1.4 DG HSM — 1/1000 sec, f/1.4, ISO 2200 —
map & image data — nearby photos
11:25am - taken while moving at 10 km/h
Nikon D4 + Sigma 35mm F1.4 DG HSM — 1/1000 sec, f/1.4, ISO 560 —
map & image data — nearby photos
“Warning: No Shoulder”
11:28am - taken while moving at 5.2 km/h
Nikon D4 + Sigma 35mm F1.4 DG HSM — 1/1000 sec, f/1.4, ISO 1100 —
map & image data — nearby photos
End of the Road
entrance path to the Kuuya Shrine
空也神社までの小道の入り口
Nikon D4 + Sigma 35mm F1.4 DG HSM — 1/200 sec, f/5.6, ISO 6400 —
map & image data — nearby photos
Now on Foot
ここでは足で行く
Nikon D4 + Sigma 35mm F1.4 DG HSM — 1/1000 sec, f/1.4, ISO 2200 —
map & image data — nearby photos
Nikon D4 + Sigma 35mm F1.4 DG HSM — 1/1000 sec, f/1.4, ISO 720 —
map & image data — nearby photos
Kuuya-taki Waterfall
空也滝
The guy performing devotions alternated between praying in front of the waterfall, and dipping into the cold water. It was quite cold, so I'm sure he was freezing, but that was likely the point.
I'd prefer to come in the summer when one could cool down after the ride up.
I grabbed a quit snapshot of Manseki...
Nikon D4 + Sigma 35mm F1.4 DG HSM — 1/1000 sec, f/1.4, ISO 2500 —
map & image data — nearby photos
Manseki
... and he of me...
Nikon D4 + Sigma 35mm F1.4 DG HSM — 1/1000 sec, f/3.2, ISO 2800 —
map & image data — nearby photos
Me
Nikon D4 + Sigma 35mm F1.4 DG HSM — 1/1000 sec, f/1.4, ISO 1000 —
map & image data — nearby photos
Quick Prayer for Traffic Safety
交通安全の祈り
Nikon D4 + Sigma 35mm F1.4 DG HSM — 1/500 sec, f/1.4, ISO 500 —
map & image data — nearby photos
Looking Back
on the way out
Nikon D4 + Sigma 35mm F1.4 DG HSM — 1/500 sec, f/1.4, ISO 720 —
map & image data — nearby photos
Rejoining our Bikes
Nikon D4 + Sigma 35mm F1.4 DG HSM — 1/320 sec, f/1.4, ISO 100 —
map & image data — nearby photos
Very Bumpy Road Back Down
12:01pm - taken while moving at 7 km/h
Where we took the tunnel on the way in, on the way back we wanted to
take the short (but insanely steep) road over the mountain, but it turns
out we couldn't.
Nikon D4 + Sigma 35mm F1.4 DG HSM — 1/1000 sec, f/1.6, ISO 100 —
map & image data — nearby photos
“Road Closed”
There's a side road that goes up for a short distance... it gains 28m of elevation in about 150m of distance...
a ridiculous 18% average grade. Here we're headed back down:
Nikon D4 + Sigma 35mm F1.4 DG HSM — 1/800 sec, f/2.2, ISO 100 —
map & image data — nearby photos
Sections were so steep that my front tire would come up with every downstroke of the pedal,
threatening to have me fall backwards off the face of the road. Luckily this section was short.
Nikon D4 + Sigma 35mm F1.4 DG HSM — 1/2000 sec, f/2.2, ISO 100 —
map & image data — nearby photos
Back In Rural Western Kyoto
12:36pm - taken while moving at 12 km/h
Nikon D4 + Sigma 35mm F1.4 DG HSM — 1/320 sec, f/2.2, ISO 1100 —
map & image data — nearby photos
Picking Up Some Tofu on the Way Home
Even though they're not a Yuba shop, I thought they
might have some as a natural byproduct of making tofu, and I scored some
that they were willing to sell me. We had it with dinner tonight and it was
fantastic. Next is to try the tofu, perhaps for breakfast prior to tomorrow's
tougher ride...
February 27, 2015
Performing Minor Surgery on a Nikkor 24-70mm f/2.8 Zoom Lens
Nikon D4 + Voigtländer 125mm f/2.5 — 1/320 sec, f/2.5, ISO 1800 —
map & image data — nearby photos
Minor Lens Surgery in Progress
Nikkor 24-70mm f/2.8
レンズの手術、始まり点
I've had my Nikkor 24-70mm f/2.8 lens (seen here) for more
than eight years. I don't use it all that much anymore because for the last
few years I've tended to prefer faster prime lenses, but it's a great lens for many situations.
I'm pretty tough on my gear... I don't baby it, I use it, and
this lens is no exception. In particular, after using it all day in heavy
snow five years ago (“First Look at Snowy Shirakawago Village”), the zoom became a
bit less smooth. It wasn't so bad that it was worth the bother of having it
serviced, but it was a slight inconvenience I lived with for years.
Fast forward to a few months ago and it suddenly started getting stuck
while zooming... I couldn't zoom out past a certain point. It was hitting a
hard stop, as if a bolt had been placed to stop the zoom. The problem came
and went... when it came, I found that I could usually unstick things by
jiggling the lens, or turning it sideways, or something... I never knew
what would get it to work, beyond “futzing with it until it zooms again”,
sometimes for several minutes. It was a major inconvenience when I was
shooting the big new-year's storm at 3am (“Kyoto At Night During a Heavy
Snow”), so I knew I needed to finally get it fixed.
Thinking to bring the lens on my upcoming across-the-country RV
trip, I checked Nikon's service website and found that the estimation
to fix a troublesome zoom was US$800(!). This is probably for the
worst-case scenario... having to replace the guts of the zoom... but mine
probably needed only a little TLC. They didn't have a pricepoint listed for
“a little TLC”, so I was reticent to send it in.
So, I decided to open it up and fix it myself.
Three resources really helped:
This YouTube video: Nikon 24-70 f2.8 Zoom Ring Fix Repair.
One of the comments on that video: this one, by David Dietrich, starting out “THIS IS THE WRONG PROCEDURE!”.
The Nikon Nikkor 24-70 repair manual, a link provided in David's comment.
The comment by David Dietrich is painful to read because of his writing
style (he comes across like a real jerk), but the information is accurate
and invaluable.
In the end, what I did was quite simple...
After using an X-Acto knife to remove a thin glued-on ring that covered the edge around the end of the lens, I was left with the three exposed screws seen in the opening photo.
Removing the three screws (all while leaving the lens covered with a
lens-cleaning cloth, as minor insurance) lets the filter-holder pop off,
yielding six more screws:
Nikon D4 + Voigtländer 125mm f/2.5 — 1/320 sec, f/2.5, ISO 1600 —
map & image data — nearby photos
Ready To Remove the Front Element
In the shot above, notice that three of the screws are recessed, while
the three that are not have some kind of smudge next to them. The smudge is
likely Loctite,
indicating that those screws should not be removed without a very
explicit need. This is where the video made a mistake, which the comment
corrected.
With that understanding, I removed the three recessed screws, and the whole front-element unit popped out, leaving
the hollow center of the lens open to access:
Nikon D4 + Voigtländer 125mm f/2.5 — 1/125 sec, f/2.5, ISO 6400 —
map & image data — nearby photos
Zoom Grooves
I applied tiny dabs of silicone grease to the grooves.
Nikon D4 + Voigtländer 125mm f/2.5 — 1/125 sec, f/2.5, ISO 6400 —
map & image data — nearby photos
Inner Grooves
結局、美味く修理を出来ました。怖かったけれども。
I would have liked to used lithium grease, but I couldn't find mine, so
I went with what I had. I put the six screws and the little cover ring
back, and it zoomed just fine. Not “good as new” fine — I have a
feeling that lithium grease would have been better — but good
enough.
February 25, 2015
Thoughts on the Venus/Laowa 60mm f/2.8 Super-Macro Lens
Note: this article may not appear properly in news readers.
This article contains interactive aspects that are likely removed by most news readers. Please see this particular article directly on Jeffrey's blog for full functionality.
Nikon D4 Venus 60mm Super Macro f/2.8 68mm extension tubes 2x teleconverter — 1/60 sec, f/8, ISO 100 —
map & image data — nearby photos
Mango Plunging Into a Huge Vat of Red Goop
Splat!
After seeing it
mentioned on PetaPixel
earlier this month, I ordered a Venus (LAOWA) 60mm f/2.8 Ultra-Macro lens. For less than $400 I didn't expect much, but it was worth a try.
(It seems they're changing their name from “Venus” to “Laowa”. The Chinese characters for “Laowa” seem to be 「老蛙」, which means “Aged
Frog”, at least in Japanese.)
This is not a “review”... just some observations that I haven't seen others make yet, and some illustrative photos. In addition to the review
on PetaPixel, other reviews I've seen include
this and
this.
For the TL;DR crowd, here in short are some of the things I discuss that I've not seen
others cover yet:
You can get the aperture Exif data correct in camera (at least for Nikon prosumer cameras).
The lens sharpness profile (summary: only in the center).
The lens has a lot of pincushion distortion, but it's easy to fix in Lightroom/ACR.
This lens will show you how dirty your sensor is.
Nikon D4 Venus 60mm Super Macro f/2.8 — 1/15 sec, f/8, ISO 1600 —
map & image data — nearby photos
Japanese Coin
can you guess how many yen it's worth?
I should preface my comments to note that I don't have much experience
with macro photography beyond some
stupid macro tricks seven years ago with
a reversed lens, and general use over the years
with a Voigtländer 125mm f/2.5, which is a full 1:1 macro. The new Venus/Laowa lens is a 2:1 macro.
So we're clear on the terminology, the phrases “full macro” or “1:1
macro” mean that the lens can project a life-size image of an object onto
the sensor or film. How big that sensor or film frame is in physical size
or pixel dimensions is not relevant to the phrase, though of course what
camera/sensor you couple the lens with has a direct impact of the results
you'll see.
A 1:1 projection of a medium-sized postage stamp might fill the sensor
of a “full frame” camera like a Nikon D4 or a Canon EOS 5D, but be
substantially cropped on a camera with a smaller sensor, or only partially
fill the frame of a medium-format camera. But in all cases, the lens and the projected image
are the same.
This new Venus/Laowa lens is a 2:1 macro, meaning that it can project a
double-life-size image onto the sensor. A bigger projection means
more detail in the result, at least if the lens has the quality to back it up.
As other reviews have mentioned, the thing arrives in a shrink-wrapped bag, which gives a decidedly “cheap” feeling:
Nikon D4 Voigtländer 125mm f/2.5 — 1/640 sec, f/2.5, ISO 4000 —
map & image data — nearby photos
Arrival
The lens' box was somewhat disheveled, so at first I worried that I'd
gotten a used copy, but the shrinkwrap helped assuage that feeling. The lens glass and barrel was pristine, and had enough heft to dispel the
“cheap” feeling that the shrinkwrap had initially imparted.
Nikon D4 Voigtländer 125mm f/2.5 — 1/400 sec, f/4, ISO 6400 —
map & image data — nearby photos
Weird
the lens retracts into itself when focusing at a distance
Nikon D4 Nikkor 85mm f/1.4 — 1/400 sec, f/1.6, ISO 800 —
map & image data — nearby photos
About the Same Size as a Voigtländer 125mm
not quite in the same class in terms of build quality, but good enough for ⅕ the price
When it first arrived a week ago, the late-afternoon sun was quickly
retreating behind increasing gloom, so just to play a bit I threw some
things on a windowsill for a few quick handheld not-much-light snaps. My first impression on seeing the following shot was that the lens distortion
was really noticeable...
Nikon D4 Venus 60mm Super Macro f/2.8 — 1/200 sec, f/2.8, ISO 110 —
map & image data — nearby photos
Nikon D4 Venus 60mm Super Macro f/2.8 — 1/200 sec, f/2.8, ISO 110 —
map & image data — nearby photos
span.b2529A { padding: 6px; border: gray 1px solid }
original
- corrected in Lightroom
mouseover a button to see that image
The distortion and vignetting, both of which can be severe, are easily
corrected in Lightroom or ACR with a lens profile created by Adobe's Lens
Profile Creator, which they generously provide for free. The download includes everything you need to get going: the application, instructions, and printable targets. It's all quite easy.
So, as you might expect, the “corrected” version above is with the lens profile applied.
If you'd like to try the simple profile I created, you can download
it here,
saving it as “NIKON D4 (Venus 60mm Super Macro f2.8) - RAW.lcp”
in your “Library/Application Support/Adobe/CameraRaw/LensProfiles/1.0” folder on OSX,
or its equivalent on Windows.
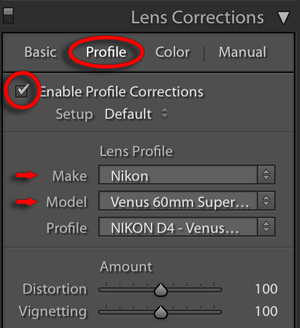
You can probably get reasonable results with any camera. I created the
profile using Nikon D4 raw files, but you can manually apply it to photos
taken with any make and model camera. As illustrated at right, in the
Develop Module's Lens Corrections' “Profile” tab, select “Nikon” (because
that's the body make I used when creating the profile), then the “Venus
60mm...” model from there.
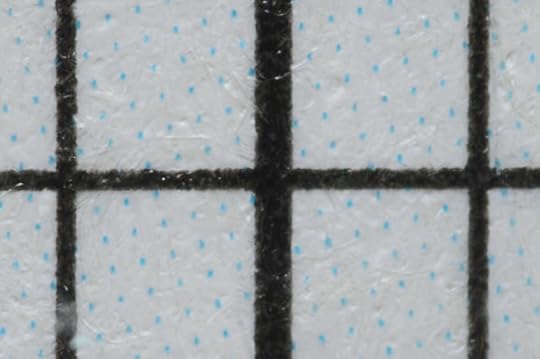
Jumping ahead a bit to later sessions with the lens, I found a tiny graph-paper illustration in my son's old fifth-grade math textbook that I could
use for some tests. Here's the same scene shot at f/2.8 and f/8, with and without correction in Lightroom.
At f/2.8, sharpness falls off drastically as you move away from the center, and of course
that can't be corrected the same way distortion and vignetting can...
Nikon D4 Venus 60mm Super Macro f/2.8 — 1/60 sec, f/2.8, ISO 100 —
map & image data — nearby photos
Nikon D4 Venus 60mm Super Macro f/2.8 — 1/60 sec, f/2.8, ISO 100 —
map & image data — nearby photos
Nikon D4 Venus 60mm Super Macro f/2.8 — 1/60 sec, f/8, ISO 100 —
map & image data — nearby photos
Nikon D4 Venus 60mm Super Macro f/2.8 — 1/60 sec, f/8, ISO 100 —
map & image data — nearby photos
table#t2529C td { width: 150px; border: gray 1px solid; text-align:center }
f/2.8
f/2.8 corrected
f/8
f/8 corrected
mouseover a button to see that image
Jumping back and forth between the f/2.8 and f/8 versions really makes the lack of sharpness at f/2.8 readily apparent.
(You'll appreciate that I refrained from saying that it “..made the sharpness clear. ” )
The non-center softness is probably not a
problem for many kinds of photos this lens would be used to take,
and for the kind of photo where it matters (where you want the whole flat
object to be in focus), it's probably not a
moving subject and you can stop down for better sharpness, at least
if using a tripod like one should. Back to the lens-arrival day, I was just
snapping some quick shots by hand, sometimes bracing the camera against the
window. Here's a 2:1 macro shot of part of the banknote seen above.
Nikon D4 Venus 60mm Super Macro f/2.8 — 1/200 sec, f/8, ISO 1800 —
map & image data — nearby photos
Full-on 2:1 Macro (Handheld)
The small images embedded on this post are drastically reduced copies, of course, but clicking through on any of them goes to the full-size (uncropped) full resolution (un-shrunk) version of the respective shot.
Just to include a bit of un-shrunk full-resolution result directly in the article, here's a tiny bit out of the shot above...
full-resolution crop (1/50th the area of the whole frame) from the shot above
not great, but not too bad for a handheld, natural-light shot
While we're at it, here's a full-resolution crop from the uncorrected f/8 grid shot above:
Nikon D4 Venus 60mm Super Macro f/2.8 — 1/60 sec, f/8, ISO 100 —
map & image data — nearby photos
f/8 uncorrected full-resolution crop (1/50th the area of the whole frame)
As other reviews mention, there's absolutely no communication between
the camera and lens. When one hears “non-CPU lens”, there's normally at
least a mechanical coupling so that the lens can communicate its current
aperture to the camera, but with this Venus/Laowa lens, there's nothing.
When you mount the lens, the camera doesn't even know something's there,
much less what it is and what its aperture ring is dialed to.
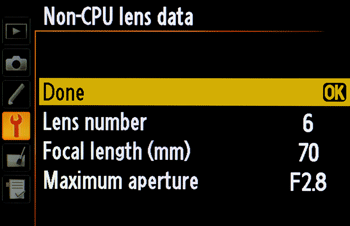
At least on prosumer Nikon bodies, you can set the “Non-CPU lens data” in the setup menu:
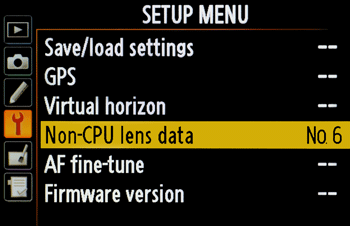
Sadly, as with many things, Nikon doesn't make this as simple as it should be...
We'd like to denote that we're using a lens with a 60mm focal length,
but “60” is not one of the choices available. I run into this problem a
lot... I need “420” when using my Nikkor 300mm f/2 with
its dedicated 1.4×TC, but Nikon doesn't allow for it here. I need
“125” with my aforementioned Voigtländer 125mm f/2.5, but it doesn't
include that either. Sigh.
So, for my new 60mm lens I go with “70”.
Normally you'd set the maximum aperture size (minimum aperture number for your lens — F2.0 for the 300mm lens mentioned above),
and the mechanical linkage between the lens and the camera would tell the camera what aperture the lens was actually dialed to
for any particular shot, but since our super-macro doesn't have that linkage, instead of the maximum aperture,
set the actual aperture you're using. For each shot.
This means that if you want the aperture properly encoded in each
image's metadata, you've got to visit this menu every time you make an
aperture change. That's 11 or 12 button presses per aperture change. Sigh.
I don't envision using this lens except for special macro needs, so it's a
hassle I'll live with.
Even if you've gone through all the “Non-CPU lens data”
hassle, Lightroom still shows the lens as “0.0 mm f/0.0”, which is frustrating to say the least,
and a metadata geek like me can't put up with
that, so prior to importing the raw files into Lightroom, I update them with proper metadata. (It's
abhorrent to me to modify a raw file so
this is painful, but to me the wrong metadata is even worse.)
I update the files with a custom Perl script, but in effect it uses Phil Harvey's
exiftool under the hood, along the lines of this command-line invocation (which should all be on a single line; it's broken up here for legibility):
% exiftool -Lens="Venus 60mm Super Macro f/2.8"
-MaxApertureValue=2.8
-MaxApertureAtMaxFocal=2.8
-MaxApertureAtMinFocal=2.8
-FocalLength=60
-MinFocalLength=60
-MaxFocalLength=60
-FocalLengthIn35mmFormat=60 *.NEF
I really wish Lightroom would let users edit this data so we wouldn't have to go through these kinds of silly hoops.
I've made feature requests, but so far to no avail.
Knowing the limitations of what Lightroom lets plugins do, I know that a
plugin can't do everything that I want in this area, but if your needs are
less demanding, the LensTagger
Lightroom Plugin apparently lets you denote some of the lens info from within Lightroom.
Okay, anyway, back to the day the lens arrived...
Since I had it handy, I also snapped some close-ups of the used bicycle brake pad I'd just had
swapped out of my bicycle after
my 90km mountain ride. One of the shots appeared
as
the “Dark, Striated” What-Am-I? quiz the other day...
Nikon D4 Venus 60mm Super Macro f/2.8 — 1/400 sec, f/4, ISO 1600 —
map & image data — nearby photos
It Gave Me a Brake
A few days later I took a step toward proper shots by breaking out the tripod...
Nikon D4 Venus 60mm Super Macro f/2.8 — 2 sec, f/11, ISO 100 —
map & image data — nearby photos
Tiny Halogen Bulb
my capture method was not such a bright idea
The results were unfulfilling because of camera shake. Even with a
tripod, at this magnification the slightest shake manifest itself in the
viewfinder like a seismograph going crazy, so a two-second shot like the light bulb above
becomes mired in detail-stealing blur.
Still, I'll share two other shots from that session, of the hologram thingie from the lower left
of a Japanese 5,000-yen banknote (such as seen in the windowsill shot above).
Nikon D4 Venus 60mm Super Macro f/2.8 — 0.8 sec, f/16, ISO 100 —
map & image data — nearby photos
One Angle...
Nikon D4 Venus 60mm Super Macro f/2.8 — 0.5 sec, f/8, ISO 100 —
map & image data — nearby photos
... and Another
Anyway, really needed a flash to eliminate blur due to shake, so I broke out the speedlights and spent Monday afternoon
putzing around the house looking for things that might make interesting photos.
Nikon D4 Venus 60mm Super Macro f/2.8 — 1/60 sec, f/8, ISO 100 —
map & image data — nearby photos
2:1 Strawberry at f/8
it was delicious
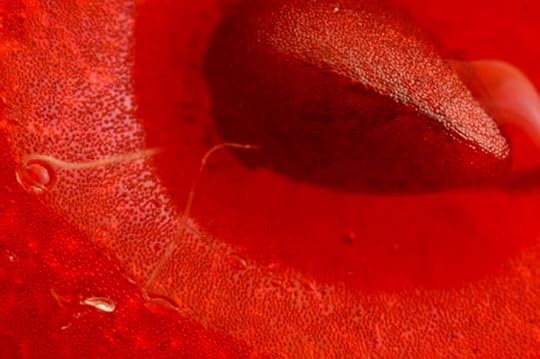
full-resolution crop from the shot above (1/50th the area of the full image)
Nikon D4 Venus 60mm Super Macro f/2.8 — 1/60 sec, f/2.8, ISO 100 —
map & image data — nearby photos
2:1 Strawberry at f/2.8
I was happy to have a 2:1 macro, but had to push the limit, so I reached
into my bag of stupid macro
tricks and added 68mm of extension tubes between the lens and the
camera. This results in a 3:1 macro.
Nikon D4 Venus 60mm Super Macro f/2.8 68mm extension tubes — 1/60 sec, f/8, ISO 640 —
map & image data — nearby photos
3:1 Strawberry
Finally, I added a Sigma 2× TC, which, for optical reasons I don't understand, resulted
in an overall 8:1 macro. Here again is the lead photo of this article, properly captioned:
Nikon D4 Venus 60mm Super Macro f/2.8 68mm extension tubes 2x teleconverter — 1/60 sec, f/8, ISO 100 —
map & image data — nearby photos
8:1 Macro of a Strawberry Seed
Here's a shot of the setup...
Nikon D700 Voigtländer 125mm f/2.5 — 1/400 sec, f/2.5, ISO 4500 —
map & image data — nearby photos
8:1 Macro Setup
Nikon D4 body on top (with an SB-910 flash unit attached), the Sigma TC,
three extension tubes totaling 68mm, and finally the Venus/Laowa itself. It's connected to the tripod via a Really Right Stuff BH-55 ballhead,
an exceedingly exquisite piece of craftsmanship, and a
Really Right Stuff macro focusing rail,
the only Really Right Stuff product that I've been disappointed with (its movement is sloppy).
I'd chosen to have all the lens stuff pointing straight down to
eliminate torque on the camera body mount, but this had a side effect I
should have handled better: without any weight to “anchor” the lens, it
could “swing” and oscillate microscopically at the slightest provocation,
and due to the high magnification, the slightest such movement was rendered
monumentally in the frame. I think that I could literally see the effect of
my heartbeat reflected in the oscillation in the live-view display,
traveling through my body, into the floor, to the tripod legs, and up to
the camera and lens.
Next time I'll have to try something else, but for the moment I was
hoping that the flash was sufficient for a sharp result.
Nikon D4 Venus 60mm Super Macro f/2.8 68mm extension tubes — 1/60 sec, f/8, ISO 640 —
map & image data — nearby photos
Standard LEGO™ Minifig
with extension tubes and lens
Nikon D4 Venus 60mm Super Macro f/2.8 68mm extension tubes 2x teleconverter — 1/60 sec, f/8, ISO 100 —
map & image data — nearby photos
... plus 2×TC Yields Minifig @ 8:1
Nikon D4 Venus 60mm Super Macro f/2.8 68mm extension tubes 2x teleconverter — 1/60 sec, f/8, ISO 100 —
map & image data — nearby photos
Halogen Bulb @ 8:1
in the left half, you can see where it melted
( this is the same kind of bulb seen above )
This halogen-bulb shot illustrates one of the most important things I learned during these experiments: just how ridiculously dirty
my camera's sensor was. Something about the extreme macro combined with the flash made the result hyper-sensitive to
dirt/dust/crud on the sensor, causing the results to be a veritable star field of failure.
In any one individual shot I found literally 10× the number of spots that I'd seen in total over the last 10 years.
I spent some time to clean up the spots with Lightroom's spot healing tool, but even though
the shot above has 612 such corrections(!), clicking through to the full-resolution version
shows many more that I just didn't have the energy to deal with.
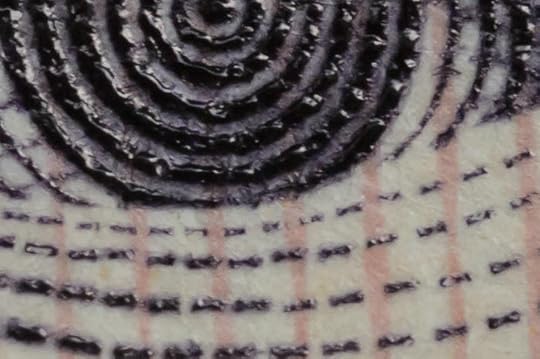
But for a taste of what I was dealing with, here's a full-resolution crop without the spot-removal corrections:
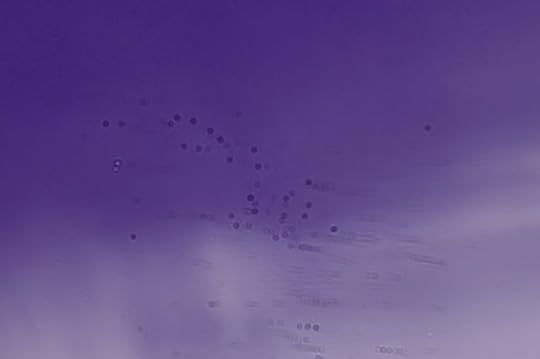
My Sensor Shame
tiny crop (1/50th the area of the whole sensor) at full resolution
Did I let a dog lick the sensor or something?
I think I see the Big Dipper
Not every photo needed as much work as this one... often, the spots were
lost in the detail of the shot, at wider apertures they don't show up as
much, and even for me there's a limit to how much energy I'll spend for my
blog. Overall the photos on this post have 2,147 spot corrections, which
perhaps says as much about my level of anality as it does about my
sensor.
(I didn't count the spots by hand... my Data Explorer plugin counted them for me.)
Checking for sensor dirt the way I normally
do, with a normal lens and without a flash, showed just a few of the
more egregious spots. If that's all I'd seen, I'd have been unconcerned and
simply gotten the blower out to give the sensor a quick once-over. But this was well beyond my ability to deal with, so I headed directly to Nikon's
Osaka service center yesterday to have them clean it.
(I brought the lens and a flash to test how well they did while still at
the service counter, and had to send it back for a more-thorough cleaning.
They were patient as I did my strange test, but probably had never seen
anything like it.)
Nikon D4 Venus 60mm Super Macro f/2.8 68mm extension tubes 2x teleconverter — 1/60 sec, f/8, ISO 100 —
map & image data — nearby photos
My Watch @ 8:1
this watch
Nikon D4 Venus 60mm Super Macro f/2.8 — 1/60 sec, f/8, ISO 100 —
map & image data — nearby photos
Toothbrush @ 8:1
the answer to the “Otherworldly What-am-I Quiz”
Back to the straight 2:1 macro...
Nikon D4 Venus 60mm Super Macro f/2.8 — 1/60 sec, f/8, ISO 100 —
map & image data — nearby photos
Shaver
Nikon D4 Venus 60mm Super Macro f/2.8 — 1/60 sec, f/8, ISO 100 —
map & image data — nearby photos
Nylon String
Nikon D4 Venus 60mm Super Macro f/2.8 — 1/60 sec, f/8, ISO 100 —
map & image data — nearby photos
Standard Needle
not a big leather-use needle... a standard not-much-bigger-than-a-pin needle and thread
( unfortunately, I missed focus on the needle, getting slightly behind it. )
Nikon D4 Venus 60mm Super Macro f/2.8 68mm extension tubes 2x teleconverter — 1/60 sec, f/22, ISO 100 —
map & image data — nearby photos
Needle @ 8:1
( again with missed focus
)Nikon D4 Venus 60mm Super Macro f/2.8 68mm extension tubes 2x teleconverter — 1/60 sec, f/11, ISO 100 —
map & image data — nearby photos
Modern Key @ 8:1
Nikon D4 Venus 60mm Super Macro f/2.8 68mm extension tubes 2x teleconverter — 1/60 sec, f/11, ISO 100 —
map & image data — nearby photos
Japanese 50-Yen Coins Edge On
I used 50-yen coins because I could stick a toothpick through them and then bind them tightly together with a rubber-band
around the ends of the toothpick. You can see a 50-yen coin and its doughnut center at the left side of
the money shot above.
Nikon D4 Venus 60mm Super Macro f/2.8 68mm extension tubes 2x teleconverter — 1/60 sec, f/8, ISO 100 —
map & image data — nearby photos
Corrugated Cardboard on Edge @ 8:1
courtesy of Amazon Japan
Nikon D4 Venus 60mm Super Macro f/2.8 — 1/60 sec, f/8, ISO 100 —
map & image data — nearby photos
Amazon Cardboard @ 2:1
I learned a lot from these fairly haphazard experiments. In the end the
lens' quality exceeds my skill, so I'm happy with my purchase. For less than US$400, it's a great value if you know how to use it... something I
aspire to.
Jeffrey E.F. Friedl's Blog
- Jeffrey E.F. Friedl's profile
- 13 followers

