
Sharilyn Miller's Blog
December 2, 2015
New eBook from Interweave: 10 Wire & Metal Jewelry Designs to Build Your Skills
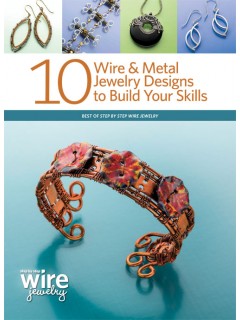 I'm thrilled to have one of my favorite projects included in this brand-NEW eBook from Interweave Press. 10 Wire & Metal Jewelry Designs to Build Your Skills (whew, long title!) is a great new release, featuring wire jewelry designs from some of your favorite artists. It's just $9.95 to download, and, best of all, it's available now!
My own contribution is the "Victorian Cuff" made from knotless-netted sterling silver wire, vintage buttons, beads, and waxed linen threads. I've taught this design in several venues, and it was really popular with my students. I don't know if I myself consider it "Victorian," but it certainly is feminine and lightweight, easy to wear and very comfortable. Here's a picture of it on the cover of Step by Step Wire Jewelry magazine:
 And here it is again, this time in a copper-wire version:
 I loved making this bracelet! Lots of fun to wear, too; I love how the little beads dangle around my wrist. If you'd like to access the full-color step-by-step photos with detailed instructions, you will find them in Interweave's newest publication. Just click here.
In addition to my cuff bracelet tutorial, you'll also find nine more wire jewelry projects including a Cascade Necklace by Shannon Schmid, a pretty bracelet by Kate Richbourg, earring designs, necklace links, a quick tutorial on using liver of sulfur to darken your metal jewelry, more bracelets and necklaces, a couple of soldering projects, a woven cuff bracelet, and a "Delicious Donut" pendant that I cannot wait to make myself.
The artists contributing to this eBook are outstanding, and I'm honored to be included in their midst!
Happy wrapping,
Sharilyn


November 5, 2015
Making Gifts!
 'Tis the season to start thinking about... gifts! Am I right? With Christmas, Hanukkah, and other seasonal holidays coming up next month, we must start preparations. And when you're a jewelry artist, it seems like all of your friends and relatives and coworkers expect handmade jewelry...
...Which is fine, really, except that it's much more time-consuming to make a gift than to simply go out and buy one! So I have a couple of thoughts on that, which I'd like to share.
 1. Planning: Make a list of all the people you really have to prepare a gift for—immediate family, best friends, the boss at work—and then make a secondary list of folks you'd like to remember with a handmade gift, but may not have time to do so.
2. Starting early: As soon as you can begin, get going. Getting all your pieces made and packaged ahead of time will relieve a lot of your holiday stress. I start by making jewelry components first. For example, in the earrings pictured above, I made lots of large fine-silver fused rings and then shaped them into basic geometric shapes (squares & triangles), and then I forged and textured them. I later wrapped pearls and/or beads on them, and set them aside. Ear wires can always be added when you have time. I demonstrate making fine-silver components just like these in my online workshop, Big & Bold Wire Jewelry.
3. As you work: Pretend you're a jewelry-making factory. You're in production-mode now! How to produce a big batch of beautiful jewelry quickly? First, keep it simple. Elaborately wrapped, woven and coiled wire jewelry may be what you're known for, but this is not the time for that. Save your more time-consuming jewelry pieces for special times, like weddings or birthdays. When making lots of jewelry during the holidays, I always find it more expedient to keep my designs super-simple.
4. In process: You have your list of gift recipients, so do the math. For example, 10 recipients means 10 jewelry pieces. Decide if you're going to make bracelets, earrings, pins, or simple necklaces. I like to make earrings because they're always gratefully received by my friends and relatives. This year, I'll make plenty of components for earrings, and then assemble them quickly with beads, and later add ear wires.
5. Tips: For some reason, geometric designs always work in jewelry. Think circles, ovals, squares, rectangles, or triangles. Organic free-form shapes can also work, but sometimes they don't come out looking the way you'd planned. They're fun to experiment with, but when you're under a time-crunch I advise using what works.
Also, much as I love to make coiled and wrapped jewelry, I find that most people prefer simple, clean designs without a lot of elaborate wire wrapping. It pains me to say it, but honestly, that's also what sells best at the fairs and online. So, consider simplifying your jewelry designs. It will make things easier for you, and you'll make pieces that are more gratefully received.
These tips also work for those of you who sell your jewelry. Craft fairs are starting to pop up all over, and while serious sellers started making holiday items last summer, you still have time to get into the game. If you've been invited to participate in a craft fair this winter, go for it! Make at least a dozen pieces (remembering to keep them SIMPLE)—two dozen if you have more time. Earrings, bracelets and pins are the least time-consuming to make. You'll need some cute gift boxes or bags, too, so start sourcing them.
Finally, I wish you all good luck in your jewelry making endeavors. Whether you're making handmade items for gifts or to sell, you can do it! Just keep it simple, and get going as soon as possible. And have fun! That's the most important thing of all.
Happy wrapping,
Sharilyn
October 28, 2015
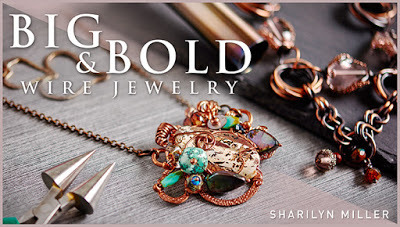
A Couple of Projects & $10 Off My Craftsy Class!
 I thought I'd post a couple of inspirational photos that are based on techniques offered in my brand-new Craftsy class, Big and Bold Wire Jewelry. First up, you can see pictured above one of my embellished pendants which was made using the techniques I teach in Lesson 4, "Bold Focals."
In my online class, I used one large focal bead, a variety of beads and pearls, and heavy-gauge copper wire to make a heavily embellished pendant on a commercial chain. This approach is the most economical because copper wire is relatively cheap, and you can use leftover beads and found objects to make a very interesting focal piece that would look great in any necklace.
By contrast, the pendant shown above is quite pricey! I used sterling silver wire to create a forged and textured frame, and then several beautiful beads and pearls with fine-gauge sterling silver wire to embellish it. A simple handmade chain is very effective in this design, because it supports the pendant without overwhelming the design. I'm really happy with this particular necklace, and although a few people have offered to purchase it, I don't think it will ever be for sale.
Don't be surprised if your embellished pendant takes several hours to make. The design pictured above took eight hours for me to complete, not including the handmade chain. Time-consuming, yes... but I didn't mind that, because it's so much fun to make these pendants and the results are always spectacular.
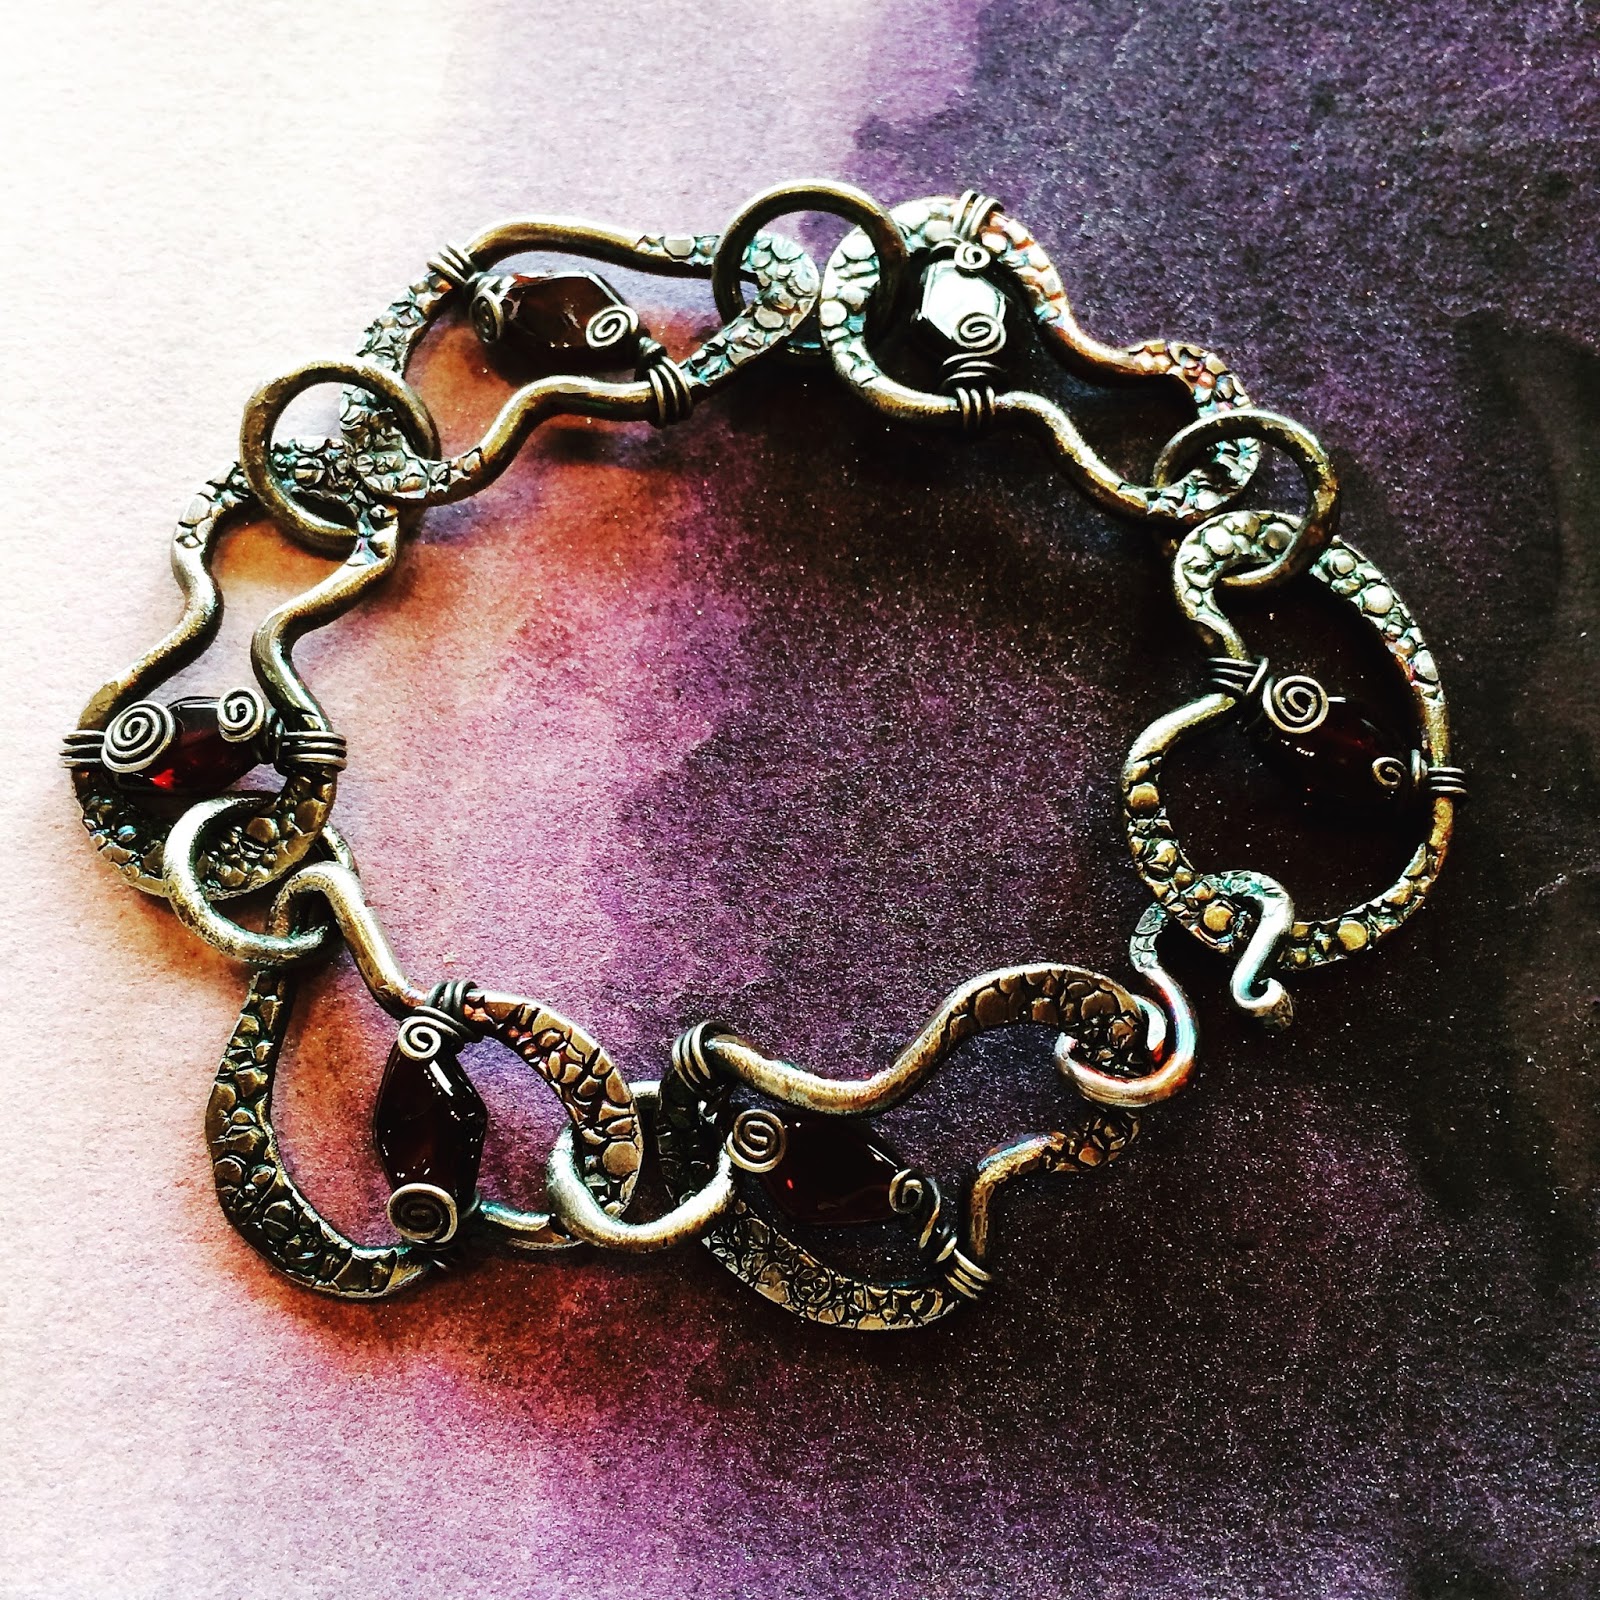
 Next up: a nice, hefty fine-silver bracelet made with 12-gauge fine silver rings that are interconnected into "rosettes" with a pretty ceramic focal bead in the center. Because I used fine silver, I was able to fuse each ring as I connected it to the previous ones until I had four clusters of five permanently interconnected rings. Try saying that three times!
The ring clusters were then connected in a bracelet with large figure-8 links, a focal bead connector with wrapped loops, and a simple hook clasp.
This bracelet was made using techniques that I teach in Lesson 1, Getting Started with Heavy-Gauge Wire, and Lesson 5, Getting Started with Fine Silver Fusing. You can do this! Yes, even if you're fairly new to working with wire. It helps to have some hand-strength when working with heavy-gauges of wire, but with practice you'll be able to manipulate it to your heart's content. I love wearing this bracelet; here's how it looks:
 Sometimes the simpler designs have the most impact. And knowing that my bracelet is connected together permanently relieves any anxiety I might have about losing it or watching it break apart suddenly and unexpectedly. I think we've all had that experience at least once while wearing handmade jewelry, am I right?
And now, here's the best part of this post: a link for $10 off my online Craftsy class, Big and Bold Wire Jewelry. To sign up and save, click right here.
I look forward to seeing you in class, answering your questions, and seeing photos of your finished pieces!
Happy wrapping,
Sharilyn
October 11, 2015
Artsy Buttons for Sale at Idyllwild Quilt Show!
 I'm super excited to be taking part in the Mountain Quilter's 12th annual quilt show and sale next weekend, October 17-18!
We'll be at Buckhorn Camp again, in a huge venue that allows plenty of space to walk around and see the beautiful, award-winning quilts on display. And the vendors at this show are going to be terrific; including quilt fabrics and patterns, kits, creative embellishments, art baskets, jewelry, and MY BUTTONS!
I'm selling my handmade, hand-glazed ceramic buttons—each is one-of-a-kind—for $10 each (cash only) throughout the duration of the show. Once the show is over, I'm retiring this aspect of my art business, at least temporarily.
While I love working with ceramics and have enjoyed making creative buttons, beads and pendants to sell, right now I'm taking care of my 83-year-old mom who needs constant supervision. I'm not able to pursue my artistic activities (making new designs, teaching, writing books and articles, etc.) while I put Mom first in my life.
I do dabble a bit on the side, and you can always learn from me through my previously published books, DVDs, and now my brand-new wire jewelry class on craftsy.com, but new ventures will be put on the back-burner for a while. It's a small sacrifice, one I'm happy to make for my mom, who has given so much to me throughout my entire life.
So, I hope to see you at the quilt show next weekend! Idyllwild is lovely this time of year, when days are still warm and sunny but nights are crisp with a smell of autumn in the air. It's my favorite season, and a wonderful time to visit.
Cheers,
Sharilyn
September 24, 2015
Sale! Save 50% on Big & Bold Wire Jewelry Class!
 This is just a quick post to announce a 50-percent-off SALE on my brand-new online class, Big & Bold Wire Jewelry! Normally $39.95, for a limited time you can save $20 when you use this link:Sharilyn's ClassJoin me and 250 students (so far) in a fabulous adventure making beautiful, bold jewelry using heavy-gauge wire, including fine-silver fusing techniques. It's lots of fun, and I hope to meet you in class!Happy wrapping,Sharilyn
September 21, 2015
NEW Online Class Launches Today!
 My brand-NEW online workshop, Big & Bold Wire Jewelry, just launched on www.craftsy.com moments ago! We are now live and ready to roll up our sleeves and get to work! Fortunately, it's all fun... and lots of it. We'll be exploring several options available for working with heavy gauges of wire to make beautiful jewelry.
We also have a contest winner, who has been notified. Thank you to everyone who entered the contest! I'm so thrilled that so many people have already signed up for the course and I can't wait to meet you all online.
Note: This is an intermediate-level wire workshop, so if you need a beginner's class please look for one on craftsy.com before signing up for my class. Some basic knowledge of wire-working and wire-wrapping is required to take my class, because there wasn't sufficient time to go over the beginner-basics. The good news is, several other jewelry instructors offer a foundation in wire working. You'll find plenty of options to get you started in this wonderful art form!
Once you've mastered some basic techniques, I hope you'll join me in my class because we do get to explore some really fun techniques using heavy wire gauges to make big, bold jewelry pieces. I suppose I should clarify what I believe to be "heavy" gauge wire... The distinction is somewhat arbitrary and will differ from one wire artist to another, so here's how I break it down:
Fine-gauge wire: 18, 20, 22, 24, etc. down to 30
Medium-gauge wire: 16
Heavy-gauge wire: 14, 12, 10, 8, and so on
In class we'll make limited use of fine-gauge wire (for ear wires, wire coiling, bead dangles, etc.). We will be using lots of heavier gauges, especially 14 and 12. I'm going to show you some techniques for making bold focal pieces, clasps, big jump ring rosettes, and more.
My favorite portion of the video lessons comes in the latter half of the class, when we start fusing fine-silver (99.9 percent pure silver) wire to make rings, which we'll then shape, forge and texture to make beautiful links. If you've ever wanted to try out this technique, you'll find it's very easy to do at home with minimal supplies and tools. No need for solder, flux or pickle when you fuse fine silver! That's the beauty of it. And fine-silver jewelry is just gorgeous!!! I guess you can tell I'm a bit fanatical about it.
So, I hope to see you all in class and please do post your comments and questions so we can interact personally on the platform. This is what makes craftsy.com classes so valuable.
I'm making myself available every day for several months so that we can have questions answered, and I'm very eager to see pictures of your finished pieces as well. If you'd like critiques of your work, I promise to be both honest and gentle! We're all here to learn from one another, and I cannot wait to get started.
Happy wrapping,
Sharilyn
September 15, 2015
Contest Alert, Part 2!
 In my previous post, I mentioned that www.craftsy.com is running a terrific contest. The main prize? Lifetime free access to an online class called Big and Bold Wire Jewelry, which I just filmed in Denver last month. There's still time to enter, so if you're interested, click here!
Pictured above, you can see one of the more advanced (but still doable) projects from the second half of my class lessons. The last three lessons (out of a total of seven) focus on fine-silver fusing, manipulation, forging and texturing, and embellishing with wrapped pearls and beads!
 (Picture above by www.craftsy.com)
If you're new to fusing with fine silver, no worries. I begin my lessons right at the very beginning, with tools and materials, how to use two different kitchen torches safely in a home environment, setting everything up, and lots of troubleshooting tips—we all need those. I promise you'll feel very confident of your ability to fuse fine silver once you've finished the very first lesson. And there's still more to come!
 We'll make simple finger rings, spacer beads (from melted balls of fine silver, demonstrating how to make use of our mistakes!), fused shapes with jump-ring connectors (see the photo below), interlocking links that can be used to make bracelets (such as the one pictured at the top of this post), fusing wire shapes inside other, larger shapes, and wire-wrapping beads or pearls onto fused and textured shapes to make gorgeous bracelets, earrings, and more.
These are valuable skills to have. For example, the heart earrings that I make (pictured above) typically retail for $55 a pair. If you sell just one pair of earrings from your class, you'll have paid for the class and made a profit as well.
 Fine-silver fusing is a blast! I love the technique. With this approach to joining metal, you may get some unpredictable results. Your look will be a bit more "organic," but the little imperfections that are part of this art form are simply beautiful. That's why I love it!
I also appreciate the fact that I can very quickly join metal without using solder, flux, pickle, or other harsh chemicals. You needn't pickle your fine-silver jewelry because it doesn't oxidize (darken) from the heat of the flame. When soldering sterling silver, copper and brass, you must pickle it with an acid-based solution to remove the fire-scale. With fine silver, simply cool the finished piece in water, and it's ready to wear.
Here's another great thing about fine silver: Customers love it. They'll appreciate it when you offer a fine piece of jewelry made with 99.9 percent pure silver. With sterling-silver jewelry, who really knows if it's pure sterling or silver-filled? The only way to tell for sure is to cut the wire and take a look inside to see if it's pure all the way through. Nobody wants to do that, so customers have to take it on faith that your sterling-silver jewelry is the real deal, and they're getting value for their money. Not so with fine silver!
 Besides fusing fine silver, finished links are fun (and super easy) to manipulate into a variety of shapes, big and small, geometric, organic, or abstract. Fine silver is very soft and malleable, so you can have a lot of fun with it. I also love hammering and texturing my metal pieces, and given that fine silver is so soft, it naturally takes deep impressions from hammers and chasing tools.
In my www.craftsy.com class (Big and Bold Wire Jewelry), I show you how to shape and forge and texture your pieces to make them stand out. I also show you how to "force tarnish" fine silver jewelry using cold liver of sulfur and a dipping/polishing technique. You can get amazing colors on your jewelry this way! There's nothing like fine silver.
 (Picture above by www.craftsy.com)
I also demonstrate how to wrap pearls, beads, gemstones, etc. inside your finished links to make unique jewelry pieces. Adding just a few semi-precious gemstones to your jewelry at little cost will dramatically increase the appeal of your jewelry, so those of you who like to sell your pieces will have something extra to offer your customers.
Big and Bold Wire Jewelry is a class jam-packed with lots and lots of techniques. The emphasis of this class is on manipulating heavier gauges of wire to make bolder jewelry pieces, but you can easily substitute finer gauges of wire to make similar jewelry if you choose. I show you lots of options and set you free to explore your own creativity with wire. It's a great adventure, and I hope that you'll join me when it begins this September 21!
You have a few more days to enter the contest. Just click right here.
Happy wrapping,
Sharilyn
September 9, 2015
Contest Alert! FREE Online Class Giveaway...
 Last month I had the awesome opportunity to film an online class for www.craftsy.com called Big & Bold Wire Jewelry! Now that my class is almost ready to launch this Sept. 21st, they're offering one FREE class giveaway through a special contest.The class includes lifetime access to all seven lessons offered, in an online environment that also includes my live participation through Q&A's and evaluation of your finished jewelry. If you run into trouble, or if you just want some advice, I'll be there to help you!Quick! Sign up through this link: http://www.craftsy.com/ext/SharilynMiller_GiveawayOnce you've signed up for the giveaway, there's nothing to do but wait... and you just might be the winner! My fingers are crossed for you.Here are just a few of the projects you'll learn how to make using heavy-gauge wire:
 (Photo credit: Craftsy.com)In our first lesson, we'll talk about working with heavy-gauge (14ga through 10ga) wire, and we'll use it to make huge jump rings that we'll interconnect into gorgeous rosettes. The necklace pictured above is just one way to use your rosettes; another of my favorite designs is a bold bracelet like this one:
 Once you're comfortable using your tools to work with heavy wire, a whole new world of design options will open up for you! And the great thing is, you can make some or all of the projects in the first four class lessons using inexpensive copper wire before trying out your new skills with sterling silver or gold-filled. (The remaining three lessons focus on fine-silver fusing, which I'll talk about in a future post.)In our next lesson, we'll make heavy-gauge wire frames that we'll embellish with a variety of beads, pearls and charms using finer gauges of wire. Here's an example of what you can make with the techniques you'll learn in this lesson:
 In my www.craftsy.com class, I used copper wire to make a necklace pendant very similar to the one pictured above. Once you learn how to make a pendant, you can easily use the same skills to design beautiful pins, bracelets or earrings. It's lots of fun, and a great way to use up leftover beads and pearls from other projects!I'm also going to teach you how to make bold S-clasps with coil-wrapped beads, wire forging and texturing techniques, ear hooks, and more.Here's another project we'll tackle using copper metal strip instead of wire:
 Tornado earrings! These are FUN to wear, and incredibly lightweight. The earrings pictured above were made using metal punches. Here's another option:
 And of course, you can also use texturing hammers and chasing tools to make incredibly beautiful copper strips that can then be formed into beautiful cones for earrings (this is demonstrated in our lesson!). I also show you in detail how to make bead dangles on headpins--perfect every time.There are too many projects from my NEW Craftsy class to show in a single blog post, but I will be posting more photos with descriptions very soon. In fact, I haven't even touched on the last three lessons, when we'll be using two different torches to fuse fine-silver wire and shape it into a variety of different links and pendants to make bracelets and earrings. You'll just have to tune in later for more info on that...And if you have any questions, please don't hesitate to email me!Happy wrapping,Sharilyn
October 13, 2014
Jewelry From Our October Retreat
 LOTS to talk about in this post...! My Wild Wire Women retreat (October 9-13) went extremely well, and that's because I had such lovely and talented students attending this past weekend.
Pictured from left (above): Lisa, Joan, Donna, Amrita, and Mona. They're standing behind my "teacher's chair" on the first workshop day of the retreat (last Friday), looking fresh and happy and excited about the next three days to come! By the end of our weekend we were all completely exhausted, but pleased with our accomplishments.
Over the course of three days we explored lots of techniques including metal etching, distressing, forging and foldforming copper sheet, torch enameling, a variety of wire wrapping techniques, and making components for jewelry. It's impossible to describe in detail everything we learned, but the following pictures of our work will give you some idea...
First, pictured below are two of Joan's Metallo del Fiore bangles with forged metal pieces, coil-wrapped wire, handmade clasps, and dangling charms:
 Joan's foldformed copper cuff is next. She wanted to explore folding metal in different directions as well as texturing and decorating her cuff, and I think she created a beauty:
 Joan also made a fun pendant using forged wire as a base from which to dangle a variety of charms, beads, and metal pieces including a copper-tack riveted coin pendant:
 We also tackled fine-silver fusing on our last day. Joan made several fused components that she then fused into one large piece which will form the basis for a lovely necklace:
 The "Twining Vines" technique was a favorite this weekend. Here you can see what Joan did with her wire-wrapped pendant:
 Donna was also very prolific over the weekend, and although we only have a few photos posted here to show off her talent, she also went home with lots more components to make jewelry in her new home studio.
Pictured below, Donna's Metallo del Fiore bangle with luscious beads, textured metal, and wire that was first run through a tube wringer before it was coiled onto a 12-gauge bangle:
 I think this must be Donna's favorite piece from the weekend, a gorgeous foldformed and textured copper cuff:
 Some fun pieces, including Donna's flower pendant and Twining Vines pendant:
 Lisa made lots and lots of textured components to take home with her, but she also finished a few spectacular pieces. Her Metallo del Fiore bangle bracelet pictured below looks like it includes a purchased flower motif, but Lisa actually drew and cut out this flower herself, filed the edges, and then textured and shaped the flower. The spiral pendant pictured on the right is attached to a wire component that spins around the flower. A very clever design:
 And here is one of Lisa's pretty pendants:
 Lisa was quite creative with the chasing tools and small dimpling pliers I had on hand in the studio. She made lots of metal components to use in her jewelry, including the pieces pictured below:
 Mona, a jewelry and fiber instructor herself, made a TON of jewelry over the weekend! Pictured below, a Metallo del Fiore bangle bracelet that she decided to turn into a pendant:
 And here is one of Mona's clever forged wire flower pendants with bead dangles:
 Mona's foldformed cuff is absolutely stunning:
 And here are some wire components she made using the Jumbo Tapered Round Nose Pliers:
 Mona's wire necklace features the Twining Vines technique, Celtic knot links, and a beautiful pendant:
 Mona also made Cone Earrings (you can access a free tutorial on these by clicking here) and a gorgeous wire bracelet:
 Mona's flower earrings; the flower motif was very popular this weekend:
 Here is a picture of the Jumbo Tapered Round Nose Pliers that Wubbers generously supplied my students over the weekend. Patti Bullard very kindly offered them to me at a wholesale price so that I could give each student a pair of these pliers to take home and use in future jewelry projects (thank you, Patti!!!):
 Amrita was a delight to teach; like all of my students from this past weekend's retreat, she was very talented, creative, and ambitious to try everything possible in the time we had together. She etched a cuff, wire-wrapped a Metallo del Fiore bangle, created lots of other wire jewelry pieces, and explored enameling:
 Here are some more pieces from Amrita's collection, including foldformed earrings, a wire pendant, and some lovely fine-silver fused charms:
 One of our favorite techniques was copper tack riveting! Pictured below you can see Amrita's necklace with copper charms riveted to wire links, Celtic knot links, and torch-enameled charms:
 Even I was able to make a few sample pieces over the weekend while I demonstrated different techniques using copper sheet metal and wire. Pictured below are two of my bangles featuring textured metal, wrapped wire, and some of my own handmade ceramic beads:
 I also made a pair of foldformed earrings for a friend of mine. I have made lots of these earrings but I never seem to tire of this simple design:
 Here's a huge S-clasp made from 12-gauge wire on the Jumbo Tapered Round Nose Pliers, embellished with a 16-gauge wire wrapped spiral:
 Finally, some funky fine-silver fused heart charms and pendants that I made while demonstrating this technique. The best advice I can give relating to fine silver fusing is to use heavy-gauge wire and to make sure that all of your wire ends connect securely before fusing them! It's lots of fun... but fusing can end in disaster. I guess that's what makes it challenging as well as satisfying.
 Obviously we were VERY busy and worked extremely hard over the weekend, but we also had fun, made new friends, and laughed a lot. When we weren't making jewelry, we were eating great food, sipping champagne, and dipping into an endless supply of chocolate! I had such a good time with my students, and I feel sure that we will all stay in touch in the future.
Speaking of the future, this is my last retreat for 2014 and I will be taking a sabbatical from teaching for some time. Taking care of my aging parents has now become a full-time endeavor, so I won't be able to host Wild Wire Women retreats for a while. But I do intend to continue creating fun free tutorials for my blog, which is another way to teach. I hope you'll check back in now and then to see what I'm up to.
Happy wrapping,
Sharilyn
September 19, 2014
Oct. 9-13 WWW Retreat: Classes Chosen!
 I'm super-excited about the lineup of classes my students have chosen for my next Wild Wire Women retreat to be held in my mountain home in Idyllwild this October 9-13! Here's our itinerary:
Upon arrival on Thursday afternoon, we'll relax with champagne and snacks, visit, and then head off for a delicious dinner at one of my favorite restaurants. Early to bed... and the first class begins on Friday.
We're going to spend a full day on foldforming. The cuff pictured above is a complex design (thank you to Louise Duhamel for teaching me how to make big cuffs!), with lots of foldforming, hammering, and texturing with hammers and chasing tools.
It takes an entire day to make one like it, but students also have the option to make smaller pieces such as earrings, small pendants, or pins like the one pictured below:
 Sharon Nodelman is the talented artist who made this super-modern foldformed pin during one of my retreats. She not only works in metal and wire, but she's recently started making gorgeous beads with polymer clay. It was an honor to have her in my class!
On Saturday we switch gears, and devote ourselves entirely to wirework. We'll spend the day making as many different wire beads, wraps, connectors (links), and clasps as we can.
I provide copper wire to work with throughout the course of the weekend, but some students have told me they intend to bring some sterling silver wire to make their pieces.
 The "Colorful Tribal Necklace" pictured above was made during a workshop retreat held in the south of France back in 2009. This design is one option for our retreat this October; as is the "Fruit of the Vine" necklace pictured below:
 A fun "Silver Sampler" bracelet is another option, and naturally it can be made using copper or brass wire instead of sterling silver:
 On Sunday we'll explore some new frontier, learning how to successfully fuse fine silver to make wire links, dangles, clasps, pendants, and other jewelry designs. It's not a difficult process, but it does take some practice and it's helpful to have a teacher guide you through the steps if fusing fine silver is new to you. The earrings pictured below are among my bestsellers in my etsy shop, too!
 Some of my students have told me they intend to spend all of Sunday fusing their fine silver wire to make jewelry (keeping in mind that I do not provide fine silver wire; students must provide their own).
One of my students has professed a passionate interest in torch enameling, so I'll spend the second half of Sunday teaching her some really basic techniques to get her started. We'll use a torch to enamel some copper charms and use them in a simple jewelry piece. A good basic introduction to enameling, and I provide all the materials and tools necessary.
 That's it for the weekend! Three full days absolutely jam-packed with instruction and plenty of time for practice. The retreat includes accommodations in my mountain home, seven meals, use of my studio tools, all the copper wire and sheet metal needed to make the jewelry, and some fun extras as well. I'm really looking forward to this retreat, the last one for the 2014 season. Please be sure to check my blog around October 12 or 13 to see the jewelry we make over the weekend!
For more information on my Wild Wire Women retreats, click here.
Happy wrapping,
Sharilyn
Sharilyn Miller's Blog

- Sharilyn Miller's profile
- 2 followers
Sharilyn Miller isn't a Goodreads Author
(yet),
but they
do have a blog,
so here are some recent posts imported from
their feed.

