Janalyn Voigt's Blog, page 16
September 12, 2014
How to Organize Your Kitchen Storage to Make Cooking Easier
Autumn is nearly upon us, and the focus will soon shift from outside to inside the house. If, like me, you’ve had a hectic summer, it’s time to settle in for the more meditative months. Part of that process is taking inventory. Decluttering and reorganizing might be in order, and with Thanksgiving and the Christmas season only a blink away, starting in the kitchen makes sense.

You want to get ready for the upcoming feasts, but when you are already moving fast, organizing your kitchen can seem overwhelming . I understand completely, which is why I suggest starting now, while there’s a window of time before the holidays hit.
It’s possible to do anything in just 15 minutes a day. In fact, the last time I decluttered and organized my kitchen, that’s the method I used, moving around the kitchen one shelf or drawer at a time. Consistency is the key when going that route. Otherwise, a marathon might be in order.
Either way, here are some ways to make the task less odious and more productive.
Listen to a podcast, an audio book, or music while you work.
Have a friend over to talk while you work, then return the favor.
Delegate a portion of the job to other family members and pitch in together. Afterwards, reward yourself with pizza or take out and a movie.
If you plan to reorganize your kitchen, do it as you declutter by labeling each shelf and drawer with what you want it to include. Designate a spot on your counter for objects to wait temporarily until their new location is free. It helps to leave the labels on a little while so that your family can adjust to your new kitchen storage plan.
How to Declutter Your Kitchen
Remove everything from the drawer or shelf you are working on. I like to gently dump contents onto an old towel on a tray. This keeps my counter from being scratched and prevents things from rolling off and crashing to the floor.
Clean and dry the drawer or shelf.
Put back only what you want to keep and will really use.
Relocate objects belonging elsewhere.
Discard throw-away items.
Put things to be given away in a box for donation.
Move to the next area or schedule another decluttering session for later.
How to Organize Your Kitchen Storage
Decide where things will go in a logical manner. For instance, you’ll want dishes to be available either near their point of use (the table), the dishwasher, or if possible, both. Consider including work stations for meal planning, cooking, food preparation, food storage, cleanup, baking, and food preservation.
Depending on the space limitations, you may have to combine functions. The food preparation and food storage stations could be combined, for example, and the baking and cooking stations might work well together.
Try to arrange your kitchen storage in a way the reduces the number of steps you’ll need to take in the triangle between the stove, sink, and refrigerator.
Keep your cookbooks, recipe binders, blank paper, computer, writing implements, and anything else you use for meal scheduling at your menu planning station.
The cooking station centers around the stove and oven(s). Here you would locate pots and pans, casserole dishes, pot holders, trivets, cooking utensils, and the like.
Locate knives, cutting boards, openers, mixing bowls, measuring spoons, and measuring cups in the food preparation station. The blender, mixer, and large spoons for stirring should be handy, also. It helps to have a free counter beside the refrigerator to act as a landing pad for things coming out of or going into the refrigerator.
The food storage station belongs nearest the refrigerator. This is where you would keep things like food storage containers, plastic wrap, and freezer storage bags.
The cleanup station should be around the kitchen sink and dishwasher. It provides storage for dishcloths, dishtowels, scrubbers, dishsoap, dishwashing detergent, etc.
Gather your cookie sheets, pie pans, rolling pins, cookie cutters, plus baking supplies like flour and baking powder in a baking station ideally close to the food preparation station. It helps to have everything you need to whip up that delectable pumpkin pie in one place for easy access.
If you can or dry food, a food preservation station can save you a lot of time during harvest. Locate any canning, freezing, or food dehydrating supplies here.
Plan Purchases Ahead of Time
As you go through your kitchen, keep a running list of things to purchase. Do you need more pie plates, a nut cracker, candles, more serving dishes, or glassware? Put it on the list and start picking up the items before the holiday rush.
Take time now to put your kitchen in order. Before you know it the holidays will bring guests to your home just when you’re in a huge time crunch.
You’ll thank yourself.
©2014 by Janalyn Voigt


©2014 by Janalyn Voigt
The post How to Organize Your Kitchen Storage to Make Cooking Easier appeared first on Janalyn Voigt.


September 9, 2014
Quick and Frugal Gazing Ball Stand
The window behind the couch cranked open, letting cool air rush in. Sweet relief, since the house was still warm from yesterday’s heat. My husband poked his head around the kitchen doorway to ask me if I’d planned anything for breakfast just as I started around the edge of the couch. Distracted, I didn’t notice the lamp cord had caught around my leg. This was the result:
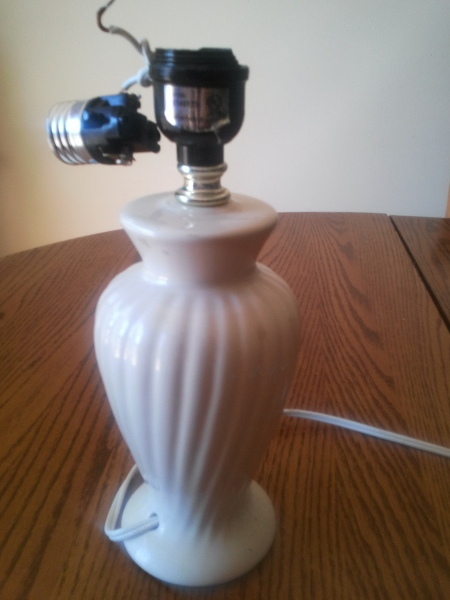 The casualty
The disappointment wasn’t as crushing as it might have been, considering that this particular lamp had always been tippy. The shade, although fringed and beautiful, had never really set right and the lightbulb had even burned it in one place. This made me a little nervous to use it, and I was forever watching to make sure that it didn’t start a fire.
Being of the mindset that you can repurpose belongings, I put the lamp downstairs in THE ROOM. I’m convinced everyone but maybe Martha Stewart has a version of THE ROOM. It’s, you know, where you shove things in no particular order until you figure out what to do with them. I’d been trying to remove, rather than add to, this inventory, but in the broken lamp went to be forgotten for several months.
Now that I’ve renewed my dedication to weeding and generally putting the yard in order, I wanted a focal feature in a dark corner of dry shade where nothing much wanted to grow. A gazing ball seemed just the thing, and I already had a polished marble orb that needed a purpose. Why not marry the two?
It was the work of a few minutes to cut the cord near the top so I can return it to THE ROOM to await another use. I pulled the cord out and unscrewed the all-thread attached to the lightbulb base from the lamp. I removed the foam circle on the bottom of the lamp so I could get the nut that had been holding the all-thread out.
There was a gold decorative collar I considered resting my new gazing ball on, but it sits better on the lamp stand alone. I could have spray painted the stand a different shade, but the simple white stand is the perfect foil for the marble ball balanced at its top. To prevent the stand from becoming a home for spiders, I plugged the cord hole with cork. Of course, I turned that part toward the back so it doesn’t show.
I love the price of my new gazing ball (nothing) and the fact that it repurposed two items that were cluttering up my house.

Make a Do-it-Yourself Gazing Ball and Stand
If you don’t have a broken lamp, either repurpose one you’re tired of or browse thrift shops for a likely candidate. You never know. An ugly lamp you might not otherwise consider might make a beautiful gazing ball stand. I’d avoid using woods, since the finish would get ruined outdoors, but ceramic lamp bases are perfect.
Some people paint an old bowling ball (check at thrift stores) with silver metallic spray paint to create a gazing ball. However, if you want to replicate my marble one, you can easily purchase marble balls online. You’ll want to check the diameter of the marble ball you purchase as some are small. Mine is not very big, so I used a smaller lamp for its stand. I think it’s cute.
A gazing ball lightens a dark corner. To display one to advantage, it should be located where people will take time to look at it. Mine is by my front door, where visitors will wait for the door to open. Another good spot is near a bench.
What do you think of my new garden feature? Are you thinking of making one of your own?
©2014 by Janalyn Voigt
The post Quick and Frugal Gazing Ball Stand appeared first on Janalyn Voigt.
Surprisingly Quick and Frugal Gazing Ball Stand
The window behind the couch cranked open, letting cool air rush in. Sweet relief, since the house was still warm from yesterday’s heat. My husband poked his head around the kitchen doorway to ask me if I’d planned anything for breakfast just as I started around the edge of the couch. Distracted, I didn’t notice the lamp cord had caught around my leg. This was the result:
The casualtyThe disappointment wasn’t as crushing as it might have been, considering that this particular lamp had always been tippy. The shade, although fringed and beautiful, had never really set right and the lightbulb had even burned it in one place. This made me a little nervous to use it, and I was forever watching to make sure that it didn’t start a fire.
Being of the mindset that you can repurpose belongings, I put the lamp downstairs in THE ROOM. I’m convinced everyone but maybe Martha Stewart has a version of THE ROOM. It’s, you know, where you shove things in no particular order until you figure out what to do with them. I’d been trying to remove, rather than add to, this inventory, but in the broken lamp went to be forgotten for several months.
Now that I’ve renewed my dedication to weeding and generally putting the yard in order, I wanted a focal feature in a dark corner of dry shade where nothing much wanted to grow. A gazing ball seemed just the thing, and I already had a polished marble orb that needed a purpose. Why not marry the two?
It was the work of a few minutes to cut the cord near the top so I can return it to THE ROOM to await another use. I pulled the cord out and unscrewed the all-thread attached to the lightbulb base from the lamp. I removed the foam circle on the bottom of the lamp so I could get the nut that had been holding the all-thread out.
There was a gold decorative collar I considered resting my new gazing ball on, but it sits better on the lamp stand alone. I could have spray painted the stand a different shade, but the simple white stand is the perfect foil for the marble ball balanced at its top. To prevent the stand from becoming a home for spiders, I plugged the cord hole with cork. Of course, I turned that part toward the back so it doesn’t show.
I love the price of my new gazing ball (nothing) and the fact that it repurposed two items that were cluttering up my house.
Make a Do-it-Yourself Gazing Ball and Stand
If you don’t have a broken lamp, either repurpose one you’re tired of or browse thrift shops for a likely candidate. You never know. An ugly lamp you might not otherwise consider might make a beautiful gazing ball stand. I’d avoid using woods, since the finish would get ruined outdoors, but ceramic lamp bases are perfect.
Some people paint an old bowling ball (check at thrift stores) with silver metallic spray paint to create a gazing ball. However, if you want to replicate my marble one, you can easily purchase marble balls online. You’ll want to check the diameter of the marble ball you purchase as some are small. Mine is not very big, so I used a smaller lamp for its stand. I think it’s cute.
A gazing ball lightens a dark corner. To display one to advantage, it should be located where people will take time to look at it. Mine is by my front door, where visitors will wait for the door to open. Another good spot is near a bench.
What do you think of my new garden feature? Are you thinking of making one of your own?
©2014 by Janalyn Voigt
The post Surprisingly Quick and Frugal Gazing Ball Stand appeared first on Janalyn Voigt.
September 5, 2014
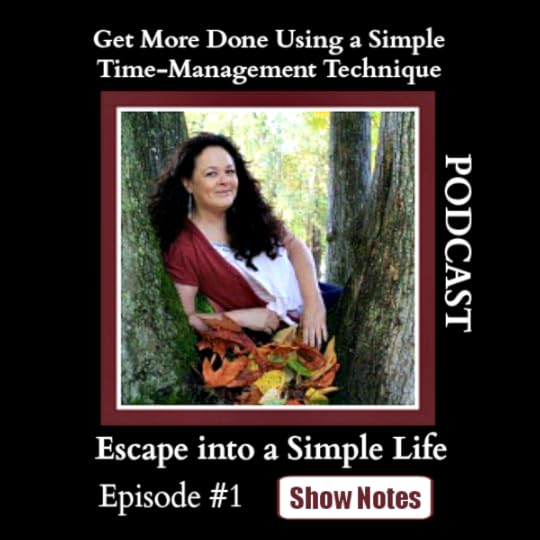
Get More Done Using A Simple Time-Management Technique
I’m often asked how I accomplish so much, and the answer is not that I’m gifted with superpowers but that I use a time-management technique so simple anyone can do it. I take advantage of the power of routine.
What is a routine? My definition is that routine is a group of repetitive tasks you perform during a specific time frame in a certain order for maximum efficiency. I’ll break that down.
Elements of a Routine
Repetitive tasks: Tasks that repeat allow you to benefit from establishing habits, the secret sauce that makes routines so efficient. A habit is something you do without having to stop and think.
Time frame: It’s so easy to keep putting something off while other demands press in. At the end of a day, you can look back and realize you didn’t do anything you planned to do. Sometimes that still can happen, but establishing set patterns within the greater context of your day makes it easier to remember to do things that you otherwise might forget.
Order: Because you do them in order, you will without effort memorize your routine. This allows you to move smoothly from one to another without having to think about it. This amplifies the productivity created by habit. It’s amazing, really.
Some Examples of Routines from my own Schedule
It might help you to see how using routines works out to guide my typical day. I can’t say I accomplish every item on my schedule each day. Sometimes life gets in the way. However, I am able to do more than I would have without a plan.
My schedule might seem strict, but it’s not really. If I need to on a given day, I can always cross the more flexible things off the list, like decluttering. It doesn’t bother me to readjust around the needs of the day, however not everyone has the type of personality where that’s comfortable for you. If that’s the case for you, a solution is to build more margin into your schedule to help you flex without stress.
Morning Routine
Wake at 6 AM.
Eat breakfast while scheduling my day.
Pray and read my Bible.
Make my bed.
Dress and groom.
Start a load of laundry.
Move food from the freezer to the refrigerator to thaw, per my written menu.
Do breakfast dishes.
Work in my home office.
Afternoon Routine
Grade and schedule for homeschooling.
Eat lunch and load lunch dishes in dishwasher.
Transfer laundry to dryer.
Take out trash, recycling, and compost.
Pull three buckets of weeds and perform other garden chores, per my gardening schedule.
Shower and put on clean clothes.
Remove laundry from dryer. Fold and put them away.
Work at my desk or make calls on family matters .
Do one household chore, per my cleaning schedule.
Declutter one area for 45 minutes.
Assist child in decluttering her room for 15 minutes.
Evening Routine
Fix and eat dinner with family.
Do dishes.
Spend time with family.
Put child to bed.
Work until an hour before bedtime.
Read.
Isn’t Following Routines Confining?
I might have said that before I started using routines, but I actually find them freeing. Each day is different, so one day is never the same as another. I’m never bored.
It’s important to give yourself unscheduled time. I don’t schedule my weekends but might use a to-do list if we’re working on any projects. I also take Sunday as a day of rest. This affords me the energy to start fresh on Monday morning.
©2014 by Janalyn Voigt
The post Get More Done Using A Simple Time-Management Technique appeared first on Janalyn Voigt.
September 2, 2014
Words to Live By: Wonderment

Words to Live By
Video Transcript
This poem, I feel, captures the innocence of childhood and is a good reminder to look backward to remember those times when simple joys spoke to you. Maybe it’s the sunlight on a butterflies wings or someone saying hello to you. Just the simple joys. We’ve gotten so far away from simplicity in our culture, these days, that it’s hard to remember how beautiful that is–just the simple joy of being alive.
Today’s headlines are filled with injustices done to children, women, and well really anyone, We’re seeing over and over, man’s inhumanity to man, and it’s heartbreaking. Yet, as we see these headlines constantly, it’s not that hard to become inured to them, and to think, oh yeah, there’s another school shooting. Well, oh yeah, there’s another murder over there. But, in reality, we need to be tender-hearted and to deeply feel, as children do.
I think this is what as a culture we need, and as individuals we definitely need to pull the joy of life to counter the horrendous things that are going on, so that we can live with sanity, dignity, joy, and purpose. And that we will not be discouraged and fearful, and down-trodden by the world around us, that we will lift other people by our very innocent childlikeness.
But Jesus said, “Suffer little children and forbid them not to come unto me, for of such is the kingdom of heaven” Matthew 19:14 (KJV).
©2014 by Janalyn Voigt
©2014 by Janalyn Voigt
The post Words to Live By: Wonderment appeared first on Janalyn Voigt.
August 29, 2014
Weeding Techniques that Free Your Gardening Time
One year’s seeding makes seven years’ weeding. ~ anonymous proverb
I can relate to this quote because this year the margin in my life shrank and finally went away altogether, so that weeds flourished in my garden, demonstrating my inability to function to the world at large. I’m not okay with that. In fact, it is one of the frustrations that prompted me to seek a simple life.
To tackle the weeds in my yard, I’ve developed a system that works pretty well for me. I fill two buckets a day, spending from 15 minutes to an hour, depending on the size of the weeds. On days when I have less time to spare, I combat larger weeds, filling my buckets quickly. Other days, I weed in more detail while birds sing in the bushes all around me and sweet breezes caress my face.
You don’t cover a lot of space at a time by this method, but it’s amazing how much I’ve been able to accomplish, The key is consistency. Think of the perseverence of the ant and you’ll have a picture of the mindset this takes. If you’re having trouble getting to your garden, why not try it?
My Yard Maintenance System
Divide your yard into areas, which you prioritize. Starting with your most urgent area, complete the following steps:
Clear all weeds from each bed, one at a time so I can have a feeling of victory each time I finish a bed. Leave all the good plants in the soil for now, even if they aren’t where you want them. Moving them around or potting them after the beds are all cleared saves time because you can drag out the shovel, pots, and soil mixture just once to do them all. I’ve sometimes listened to podcasts or made phone calls during my weeding sessions to keep me from becoming bored.
Prune all bushes and bribe the kids to pluck the leaves off and put them in a compostable bag or just put them somewhere sunny to dry and scrape the brittle leaves off with gloved hands later. Dry leaves make an excellent free mulch, something you want in order to keep more weeds from sprouting to replace the ones you pulled.
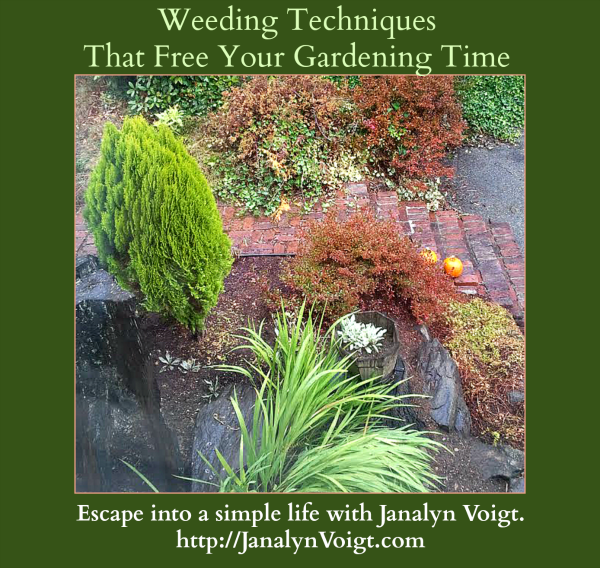
Remove any bushes, tree roots, or stumps that need to be dug out. Before you spend a lot of labor taking out a stump, see if you can make it a garden feature instead. The picture of my garden in the image, below, shows a stump on the left side and also one serving as a stand for a small, half-barrel planter. I was going to dig out the larger of these stumps when my husband mentioned he thought it was kind of cute. I didn’t believe him until I took a look with new eyes. He was right! One note, though: if you keep a stump near the house, you’ll need to keep an eye on it for possible carpenter ant invasions.
Pot any plants you want to move elsewhere. If a plant is too large for a pot, you’ll have to dig a spot for it in its new location and move it there. Either that, or you can keep plants temporarily by covering their roots with soil inside a compostable bag. Be sure to spray in a little water and check until you return it to the soil to make sure the roots don’t dry out.
Now rearrange the remaining plants in your chosen area. This can be fun, like rearranging furniture. You can also add in new plants or transplant some from other beds to fill gaps.
Add mulch. Take the leaves you saved from your pruning and either weedwack inside the bag or dump them on bare ground and run the lawn mower over them. Shovel them back into beds to act as a mulch. if you need more mulch, shredded bark is a good alternative. Wood has a weed-suppressing quality. To add extra oomph to any mulch you put down, place a thick layer of newspaper down first. I once went to a local paper and asked for extra newspapers they were going to trash. I filled my trunk for free and used some of it beneath bark mulch to successfully smother dandelions.
Weeding Wisely
It’s hard to focus on just one area when your whole yard is running rampant, but it does help when you begin to see results. Next year I will only have light weeding to keep up with in the areas I’ve worked this year.
I don’t hang up my trowel at the end of the season but keep at weeds in short bursts until snow covers the ground. There are such delightful things as winter weeds that can creep up on a bed when you least suspect it, and in our area, depending of the weather, dandelions can start setting flowers in January. Attacking when weeds are dormant gives you an advantage. By all means pull weeds in the winter, however, you don’t want to try to work the soil until it’s ready or you’ll ruin its texture.
Time-Saving Weeding Techniques
Use a screwdriver to prise out roots with less effort.
An old knife slips easily into cracks between pavers.
Vinegar kills weeds. Sometimes you need a couple of applications.
Bleach kills moss, so that all you have to do is sweep it up. Reapply to remove thick patches.
When weeds are flowering or seeding and you know you won’t get to them all, fill a bucket a day with seedheads. Children especially love plucking flowers and seed pods.
For a truly weed-infested patch, rather than trying to clear out the mess, sometimes it’s best to cover it with carpet, straw, tarp, or plastic mulch to smother weeds. Once the weeds are dead, you can remove any non-organic coverings, enrich to soil with amendments if needed, and lay down a heavy layer of mulch. Wait a season and pluck out any weed starts that come to the surface before planting. Note: plastic mulch is my last choice here because it can damage the soil and kill beneficial worms and other soil-bound critters. If you resort to it, leave it on no longer than three months.
Before purchasing plants in containers, check them for insects, deseases, and weeds.
When buying compost, manure, and topsoil, ask if it’s been processed to a temperature of between 140 F and 150 F to ensure weed seeds are killed.
In designing my own gardens, I plant an ornamental plant anywhere a weed will want to grow. I’d rather tend pretty flowers than pull weeds any day.
Native plants will usually flourish if you locate them in spots with the proper light and moisture requirements. Healthy plants crowd out weeds much better than languishing ones.
Some Final Thoughts
I hope my weeding techniques help and encourage you. Don’t give up, even when your yard looks hopeless, and before long you’ll free your time in the garden for things you enjoy more, like wandering the paths and smelling the flowers.
©2014 by Janalyn Voigt
Join the Creative Worlds Newsletter
©2014 by Janalyn Voigt
Join the Creative Worlds Newsletter
The post Weeding Techniques that Free Your Gardening Time appeared first on Janalyn Voigt.
August 26, 2014
Homemade Blackberry Cobbler
How well I remember the family homestead in Missouri, where my cousins and I spent lazy summer days picking blackberries. We always returned with purple stains around our mouths, scratches on our arms and legs, and only a few berries in our buckets. We didn’t know it then, but those excursions would become treasured memories.
The taste of fresh blackberries has the power to take me back in a moment to those innocent times. I become a child again. Sunlight kisses me as a bee bumbles and the scent of warm earth mingles with the aroma of ripening blackberries. We have several kinds on our property, a benefit of living in the Pacific Northwest. My husband keeps a patch for harvesting, but otherwise spends a lot of energy keeping them from covering the yard.
Summer’s berries are God’s bountiful gift, one my husband regularly harvests for our table. My husband’s zeal for picking blackberries makes it hard to keep up with eating them, so I’ve developed some recipes to help with this problem.
I adapted this recipe for homemade blackberry cobbler from a vintage recipe for blueberry cobbler from Betty Crocker.
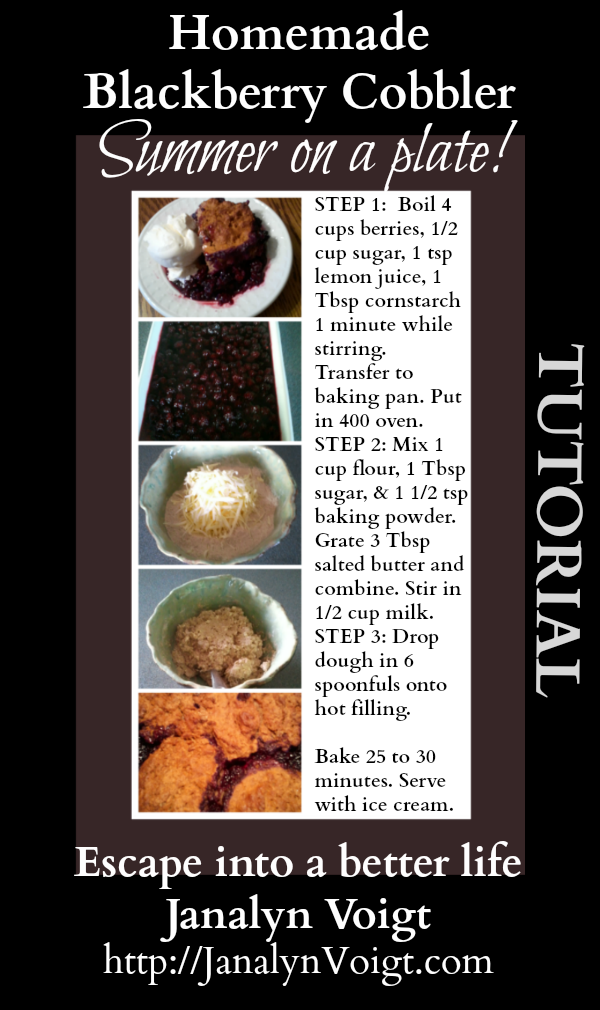
Homemade Blackberry Cobbler

Ingredients
1/2 cup sugar
1 tablespoon cornstarch
4 cups blackberries
1 teaspoon lemon juice
1 cup organic whole wheat flour
1 tablespoon sugar
1 1/2 teaspoons baking powder
3 tablespoons salted butter
1/2 cup milk
Ice cream and/or whipped cream (optional)
Directions
Heat oven to 400ºF.
Put 4 cups blackberries, 1 teaspoon lemon juice, 1/2 cup sugar, and 1 tablespoon cornstarch into a 2-quart saucepan. Stir constantly as the mixture heats. Boil while stirring 1 minute. Pour into an ungreased 2-quart casserole and put in preheated oven to keep the blackberry mixture hot.
In a medium bowl, mix the flour, 1 tablespoon sugar, and 1 1/2 teaspoons baking powder. Either cut the 3 tablespoons butter into the flour mixture with a pastry blender or two knifes, using a crisscross motion or else grate the butter into the flour mixture. (If you live in a hot area, it helps to freeze the butter beforehand so it won’t melt while you are gating it.) Stir in milk.
Drop dough in 6 spoonfuls onto the hot blackberry mixture.
Bake uncovered 25 to 30 minutes or until the cobbler topping is golden brown. Serve warm with icecream and/or whipped cream.
I made a tutorial graphic for this recipe (below) to add to my simple homemade recipes board on Pinterest. If you’re on that site, I’d love to connect with you there. Feel free to share the tutorial on other sites. I only ask that you leave the credits intact. Thanks so much, and I hope you enjoy this sweet taste of summer.
©2014 by Janalyn Voigt
Want more posts about simple living? Join the Creative Worlds Newsletter
The post Homemade Blackberry Cobbler appeared first on Janalyn Voigt.
August 13, 2014
Singing Life
 Pin-friendly image
I took this image while on a writing retreat in Washington state’s Long Beach peninsula. The photograph captures the beauty of a misty beach, which speaks to us of the changing tides of life. The picture didn’t inspire the poem but illustrates it to perfection. Like several of my poems this one came to me as I gazed out a window into my garden. Such unsought inspiration brings with it a breath of divinity, which humbles an artist.
Janalyn
©2014 by Janalyn Voigt
Join the Creative Worlds Newsletter
The post Singing Life appeared first on Janalyn Voigt.
Poems: Singing
Pin-friendly imageI took this image while on a writing retreat in Washington state’s Long Beach peninsula. The photograph captures the beauty of a misty beach, which speaks to us of the changing tides of life. The picture didn’t inspire the poem but illustrates it to perfection. Like several of my poems this one came to me as I gazed out a window into my garden. Such unsought inspiration brings with it a breath of divinity, which humbles an artist.
Janalyn
©2014 by Janalyn Voigt
Join the Creative Worlds Newsletter
The post Poems: Singing appeared first on Creative Worlds of Janalyn Voigt.
August 1, 2014
Dangerous Travel, the Rogue River, and a Hero Issue
News and musings from a literary wayfarer
August 2014 Edition
Do you have a dangerous road story? I wonder what stories travelors on the 7 riskiest roads in the world can tell. At my Literary Wayfarer Travel site I recount a close call that happened on a road to Yosemite.
Despite the dangers, road trips are still my preferred method of travel. There’s nothing quite like the sense of adventure that comes over you when you buckle your seatbelt and nose the car toward the open road. Anything can happen along the way, and your mettle is certain to be tested. I explain my passion for road trips and the movie, Cars, at Literary Wayfarer Travel.
Recent Travels
 View of the Rogue River from our balcony
This month I traveled with my family to California during triple-digit weather. We survived the heat and even had fun. The Hotel del Rogue in Grants Pass was a charming overnight stop. I caught the above photograph from our balcony. Can you feel the serenity of the setting?
Future Travels
I’ll be going on a research trip to Orcas Island in the San Juan Island archepelago for Deceptive Tide, a romantic suspense novel I’m writing. Here’s a video that shows many of my locations, including Moran Mansion, Mount Constitution, and Moran State Park.
Author News
I discovered this month that what I was calling romantic suspense is actually, according to my agent, classic mystery. Apparently that’s what I write. Self-discovery can be so interesting. My agent fell in love with a different character than my heroine did, which meant that I rewrote my sample chapters to change leading men. But when I read scenes from my book to my writing retreat group, hands down they preferred my original leading man. So-oo I emailed my agent and mentioned that I thought we should go with my original plan. I should be finished revising my sample chapters by next week.
After that I’ll be working on completing DawnKing, book three of my epic fantasy trilogy, Tales of Faeraven.
What I’m Reading
Forays into fiction have taken a backseat to living life this month, but I’ll move back into a reading schedule again soon.
Home and Hearth
It’s nice to be home after so much time away this month. I’ll be glad when all the laundry and emails are caught up.
Thanks for reading, and please do let me know what’s new in your world.
©2014 by Janalyn Voigt
Join the Creative Worlds Newsletter
The post Dangerous Travel, the Rogue River, and a Hero Issue appeared first on Creative Worlds of Janalyn Voigt.