
Richela Fabian Morgan's Blog, page 9
July 16, 2013
Summer Camp: Masks and Duct Tape Coin Banks
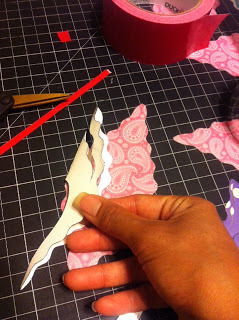
Today we made masks at camp!


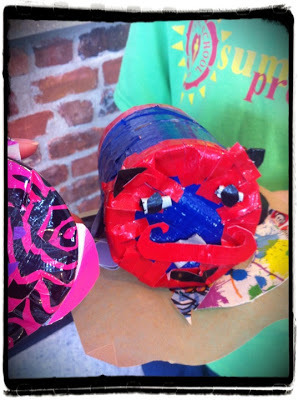
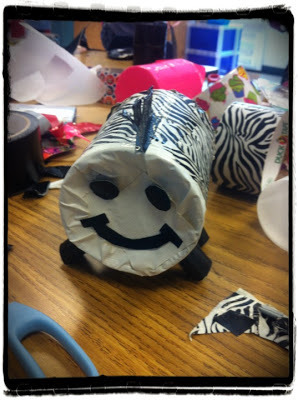
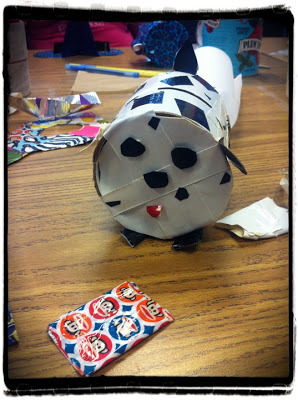
We also made coin banks using empty tape rolls. The kids made different animals, although there was one "classic" style (as the kid described it) piggy bank in the mix.


It was a very good day and I'm looking forward to tomorrow!
xxoxRichela
(p.s. The mask project is from my first book TAPE IT & MAKE IT. The coin bank project is from my second book TAPE IT & MAKE MORE.)


July 15, 2013
Summer Camp And A Paper Pendant Gift
 Today was the first day of a weeklong workshop at the Chapel School Summer Camp in Bronxville, NY. And guess what we made (besides a sticky mess)?
Well, we actually made a few things, but the main thing we learned to make was a duct tape fabric. And the first thing we made with our fabric was a basic clutch bag. (I told the slightly horrified boys that it could be a pencil case rather than a girl's bag and they were fine with that. Whew!)

At dismissal time I brought the kids down to the pick up line in front of the school, and almost every kid was wearing a mustache. I wish that I could have made a little video of the whole scene, with parents and other instructors laughing at my proud bunch of crafters. I think that tomorrow promises to be just as much fun as today.
When I got home, there was a little surprise waiting for me in the mailbox. My friend Ann Martin sent me a gift:

 It's a paper pendant! Ann is an incredibly talented paper quill artist, blogger, and writer. Recently she published ALL THINGS PAPER, a collection of 20 unique paper projects from crafters and artists around the world. I am lucky to be among the crafters and artists in the book. I haven't had the proper time to blog about the book, but there is some down time next week in my schedule and I can finally attempt to make the fantastic paper flower I've had my eye on for weeks now.
A little story about how I met Ann: she started reading my blog at a time when I wasn't using it to write about crafting. I was going through a fairly tough time in my life and Ann followed my posts. Every now and then she would leave a comment, and soon we were exchanging emails about life, family, and crafting. She's supported me when the chips were down--way, way down--and I'll never forget her generosity. So it struck me as a bit odd when I opened her gift to me and her note said, "Thanks for everything."
Oh, Ann. It's you that deserves all of my thanks.

xxoxRichela
p.s. I LOVE my paper pendant!
July 6, 2013
Making A Duct Tape Board Game
 It all began with an innocent purchase at a Five Below store. A few weeks ago, my son Mack and I were browsing the aisles of Five Below. We were mostly filling our basket with bubble gum and candy, but somehow a few pair of dice found their place among the Double Bubble and Bazooka.
When we got home, I placed the dice on the dining room table and stared at it for a while. Then it hit me: what if we made our own family board game? And what if that board game were made out of duct tape? (You knew that I was going to say that, right?)
I quickly made a 22 3/4-inch x 17-inch duct tape mat and asked my kids to sketch some ideas for our board game. Mack and Masana both agreed that it should reflect a task that would start at our house and end at a local grocery store called the Food Basket. They often take walks there to get themselves a treat like a bag of chips or an ice cream cone. Masana thought that there should be elements of Chutes and Ladders while Mack wanted the look of Monopoly. I tried to incorporate both ideas.

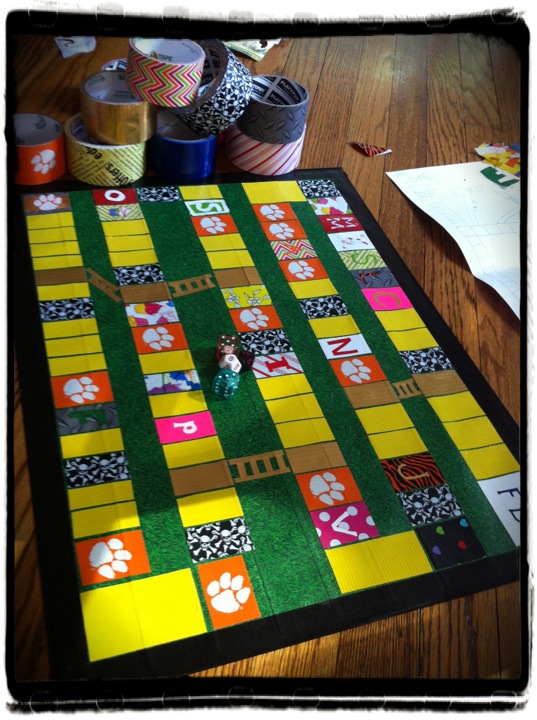

As for me, I wanted a little bit of The Wizard Of Oz in there. In the end we made a yellow brick road with hidden ladders for short cuts and different rectangles to represent local stores in town. We still have to work out the game pieces, which we will make out of modeling clay and bracelet charms, but our board game is pretty much done.
Well, what do you think?
It's a pretty easy project and one that can be done with kids of all ages. While I made the mat out of duct tape, a piece of cardboard can be used instead. Or you can cover up an old vinyl placemat--I know that when my kids were a certain age I had a ton of them.
I hope this inspires some of you to make your own duct tape board game.
xxoxRichela
July 5, 2013
Summer Sojourns: The Battle of the Tostadas
 Cafe Mexicano from Taqueria Tlaxcalli.Last summer my kids and I searched for ices in the five boroughs of NYC. From Di Cosmos in Rockaway Beach to L&B Spumoni Gardens in Brooklyn, we ate our way through lemon, cherry, fruit cocktail, birthday cake, and avocado ices that were piled high in paper cups. It was a labor of love that lasted ten short weeks, and we often talk about the experience with family and friends while licking our lips.
 Our first outing was to a Mexican restaurant called Taqueria Tlaxcalli on Starling Avenue in the Bronx. The reviews on this place from the New York Times, New York Magazine, and TimeOut NY were all fairly decent, so we had high expectations. We tried the tostadas, tacos dorados, and quesadillas. The first thing I noticed that it was drenched in sour cream and cheese. And when I took a bite of my taco, the meat was dry and the taco shell was burnt. The tostadas did have an equal amount of shredded lettuce and steak, but it lacked flavor. the quesadillas were also a bit on the bland side. I ordered a Cafe Mexicano and it tasted of artificial flavoring. We left very disappointed. I hope that we visited on an "off" day for the taqueria, and but I don't think we will be coming back.
 To remind my kids that there are some pretty awesome tostadas to be eaten locally, we took a trip to Mister Taco in New Rochelle, NY. Yes, it is NOT within the boundaries of NYC, but it is one of the best Mexican restaurants I've been to in the Tri-State Area. It's a run-down joint with faded pictures on the wall, the plates are plastic, and the jukebox in the front isn't even plugged in. Ah, ambiance. During the week you will only find a random stray from a neighboring town hunkered down in one of the scant booths and happily eating. But during the weekends, you can't even get in the front door because the place is packed.
 We ordered beef tostadas, a beef burrito, a taco de lengua (beef tongue), and a taco tripa (tripe). It was the perfect temperature, the right balance of meat to shredded lettuce, and everything was flavored to perfection. The beef was moist, the lengua was tender, and the tripa was firm but not chewy. Nothing needed sour cream or hot sauce. But we did throw on copious amounts of hot sauce because it's made right behind the counter--and it's delicious. I often contemplate the consequences of stealing their hot sauce bottle.

So there you have it: Mister Taco wins the battle of the tostadas. And we've completed the letters M (for Mexican) and T (tostadas, tacos) of our ABCs of NYC food.
xxoxRichela
June 24, 2013
On Hair Flowers, Craft Fails, and Being a Mom
 Earlier today my interview with Kemberly Richardson aired on Eyewitness News at 5pm. (To see the video, click here.) Kemberly was wearing the duct tape hair flower that I made for BEA! I gave it to her after our interview was done and she was packing up to leave. And while Kemberly said that she would wear it on the air, I wasn't sure if she was being polite or if she was serious. When I turned on Eyewitness News and saw my black and white gingham flower carefully positioned in her perfectly quaffed hair, I couldn't stop smiling for two reasons. One: I knew that Kemberly wasn't just being polite and truly meant what she said. Two: at that very moment I was wearing a duct tape hair flower, too. Kemberly and I were connected in some weird cosmic duct tape way--and I loved it!
This brings me to my latest announcement: I've decided that this is my summer of duct tape hair flowers. Since I've also decided to keep my hair long (yes, out of sheer laziness), wearing a colorful duct tape flower can distract an onlooker from my mostly drab hairstyle and focus on the pretty, shiny thing in my hair.


Despite how nicely the pattern lined up when the duct tape strips were made into a fabric, I didn't trust it. I thought that it was too much yellow. So when I tried to make a bag, I added other colors and prints to it which made it look, er, busy. And for some crazy reason I added a flower to the front, which gave the impression that a color blind crafter put this bag together. So I tossed it under my bed and there it shall stay until I can figure out what to do with it.
The picture to the left is of my second attempt to use the yellow floral print duct tape. I made another fabric and, again, didn't trust it. It still felt like too much yellow. So I tried to break it up by covering it with a white duct tape sticker of a hibiscus flower. And this little gem is still sitting on top of my work table because I have no idea what to do next with it. The sticker is too delicate to make into a bag or any useful house ware. And until I get that a-ha moment, I'll leave it where it is.
My third attempt proved successful. Instead of making a hibiscus flower sticker, I simply made a hibiscus flower and used the petal template I made for my BEA flower.


I only have two so far, but my goal is to have ten. I've already cut out the parts for five and just have to assemble them.
If you want to make a hair flower, you can use any of the petal patterns on my website. Or you can make one your own. All you need is an index card to cut your petal pattern out of. Fold the index card lengthwise and cut out half the shape of a flower petal. When you open the index card, your petal should be symmetrical.


One last thing: today was my son's 10th birthday. He's a great kid who once again donated his birthday money to help save quite a few sports teams that are being cut in our school district. (He did this for his 9th birthday, too.) This year he raised $810. Yes, that's $810 not spent on toys he doesn't need. I hope he stays the altruistic kid he is now, and that he always sets an example for peers.

Mack: mommy loves you. Don't ever forget, my chicken.
xxoxR
My First TV Interview!
Okay, duct tape fans. Get ready for me!
I was interviewed by the lovely Kemberly Richardson of WABC Eyewitness News last week and the segment is airing today at 5pm. Here is the promo:
Yes, I showed off my Tom Cruise bags.
Hope you all watch it!
xxoxR
I was interviewed by the lovely Kemberly Richardson of WABC Eyewitness News last week and the segment is airing today at 5pm. Here is the promo:
Yes, I showed off my Tom Cruise bags.
Hope you all watch it!
xxoxR
June 13, 2013
My Summer Photography Class part 2
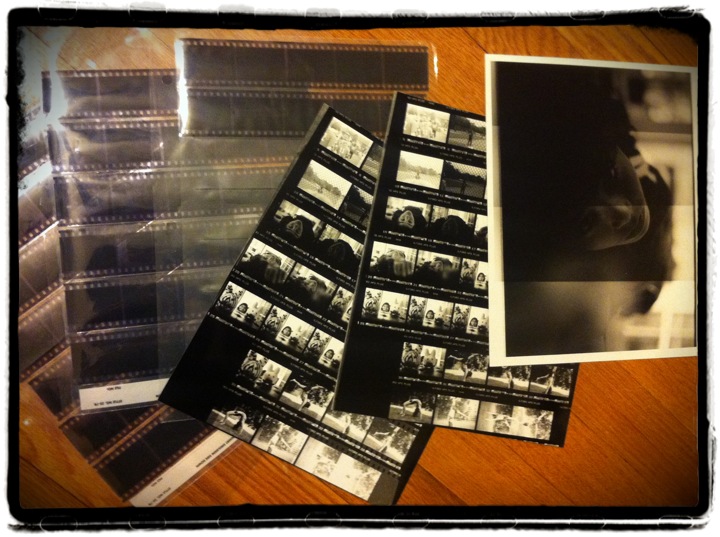 So what have I learned after 20 hours of classroom and lab time? I learned how to develop b/w film and make prints. Okay, I already knew how to make prints, but the last time I used an enlarger was back in 2001. This was the pre-kids era of my life.
I have to admit that I was nervous and feelings of inadequacy started to rise up when I entered the darkroom. I thought that my photographs were pretty good back when I had the time to take pictures, but now? I barely have time to take a shower, like this morning when my daughter's last minute English homework took precedence over my hygiene. She left home happy as a clam and I left home with a not-so-fresh feeling.

It's dirty, it's a bit dark and muddy, but who cares?? I got over my nerves. It can only get better from here and I had fun doing it. The best part is that I have 30 more hours of lab time so I can really experiment with making prints in the darkroom. We learn dodging and burning next week.
Okay, back to my day job...
Over the last two days I received a few shipments of duct tape from my favorite people Fortis Design (Platypus designer duct tape) and TapeBrothers.com. But instead of making something with my new rolls, I decided to clean up my studio. Now my rolls are displayed on my sewing table--which actually doesn't get much use these days. My poor Kenmore machine. I hope to get back to sewing cool paper crafts, but I'm so obsessed with duct tape bags lately. I think tomorrow will definitely be a duct tape bag day.

Let's see what tomorrow brings.
June 7, 2013
Going Back To School: My Summer Photography Class part 1
 Last year I decided that I wanted--needed--to go back to school for my art degree. While crafting around my house as a child was encouraged, the idea of pursuing art in college was frowned on. If you are a first generation Filipino (or fill in the blank)-American like me, then you have parents who want you to make practical choices in life, choices that would secure food in your belly and a roof over your head. And so I ended up with a really useful history degree that opened so many doors in my life. I hope you can feel the sarcasm in that last statement.
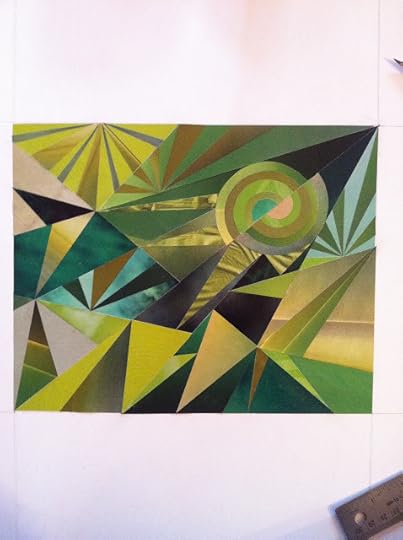 "Green No.1"
Collage, magazine paper glued to Bristol board.
I tried to get all the different values of a single color.
 "Chaos"
 Acylic paint on Bristol board.
I tried to show how colors mix together when they overlap.
This summer I am taking a "basic" photography class--an ANALOG photography class. Yep, the ole 35mm film SLR camera type of class. I dusted off my trusty Ricoh camera that is at least 30 years old and have loaded my first role of film since 2003. I was going to start shooting pics when I noticed that the light meter wasn't working. The batteries were dead! Ugh.
I think they are the same size as the ones for hearing aids so I'll head to the pharmacy later today. And check back with me next week to see what my photos look like. I will develop my rolls of film and make prints on Tuesday.
Wish me luck!
June 5, 2013
Making Duct Tape Stickers
 Making stickers is the easiest project you can do with duct tape. And who doesn't like stickers? Even my 4th grade son Mack likes stickers. Of course, he calls them decals and places them all over his bedroom door. It drives me crazy, but I'm just as guilty of decorating with stickers as he is.
Materials
Duct tape
Parchment paper
Something to trace (optional)
Tools
Pencil
Scissors (be sure to oil the blades before and after use)
Instructions
1. Draw or trace image directly on the parchment paper using a pencil.
2. Cover drawing with duct tape.
3. Flip over parchment paper to reveal the drawn image on the back. You should be able to see it because the parchment paper is mostly transparent.
4. Cut out the image with scissors. You have just made the sticker.
5. Peel off the parchment paper backing and place sticker where desired.
Here are three different levels of duct tape stickers: easy, moderate, and challenging.
1. EASY: FLOWER

A circle stencil was used to trace circle shaped flower petals directly onto the parchment paper.


The circles were covered with duct tape. The parchment paper was flipped over and the circles were cut out with scissors. The circles were then placed on a tin can to make a simple flower.


______________________________________________________
2. MODERATE: LETTERS
 I printed out letters from my computer (using Microsoft Word) that were 1 1/2 inches tall. I places a piece of parchment paper over the letters and traced them with pencil.
After covering the letters with duct tape, I cut out the letters.


I peeled off the parchment paper backing and decorated a glass jar with the letter stickers.


_________________________________________________
3. CHALLENGING: PORTRAIT
This one requires some scanning and Photoshop work. I'm not very proficient in either skill, but it does mean that you must have access to a scanner and Adobe Photoshop application. Once you find the right photo, you will need to scan it and convert the image to b/w in Photoshop. Afterwards, you will need to push the contract of the b/w image so that it mostly reduced to deep shadows and highlights--no mid-tones. Then place a piece of parchment paper over a print out of the image and trace the highlight areas.
Place white duct tape over your drawing and cut out the image with scissors.


I made a messenger bag to place my sticker on.

So there you go, 3 different ways to make a duct tape sticker. Happy duct tape crafting!
xxoxRichela
June 1, 2013
Tom Cruise and I hit the BEA stage: An Epilogue
(Okay, a little confession: there was another post here, but I accidentally deleted it. Serves me right. The perfectionist crafter that I am could NOT leave this post alone. While re-reading this post earlier I noticed a spelling error that, truthfully, probably no one else would have noticed. And so now I am reconstructing the post from memory and doing a horrible job.)
 Me and my Tom Cruise bag.I took this shot right before leaving my house. My kids tell me that I'm addicted to "selfies" since owning an iPhone, but I couldn't pass up another egregious photo of my Tom Cruise bag. I was feeling like a rock star. My phone was buzzing all morning with Facebook posts and Twitter tweets, which I believe is a very rock star-ish phenomenon. A friend of mine even called me a rock star and I believed it for a second. But the truth is that Dave Grohl would never hang out with me, not even if I sported a bag with his duct tape likeness on it.
On the train ride into the city, I decided to review the contents of my TC bag to make sure I had everything I needed. And while I remembered to bring an extra pair of flat sandals and lip gloss, I forgot my BEA pass. I would not be able to get through the front door of the Javits Center without it. I sent frantic text messages to my promotions manager Eric Lowenhar of Barron's Educational Series, hoping that he would be able to solve my quandry.
 I now had to focus on my quaff and the dilemma of the gigantic duct tape hair flower. A seriously talented and rock star-ish stylist named Emily at the Cutler Salon on West 57th Street figured out what to do. She decided to twist my hair into a loose side ponytail, then adhered the duct tape flower with what seemed like a thousand hair pins to the back of my head. The photo to the left was taken during a nauseating cab ride from the salon to the Javits Center. I tried to take another selfie to show off my 'do, but the stop-n-go jerky motion of the cab prevented me from getting the right angle.
Note the duct tape necklace I am wearing. I decided on the shorter strand of beads because the flower and the longer necklace would have been too much duct tape (as if there could be such I thing, I know).
When I finally arrived at the Javits Center (20 minutes late), Eric was there to save the day. Not only did he provide me with a pass, he also personally escorted me to the stage. If I had stepped out of the cab with a bottle of Jim Beam in one hand, it would have been a quintessential rock star moment. Of course, I don't sing or play an instrument, but that's beside the point. My hair looked great!
Here is a link to the video of my BEA presentation (click on photo):
After the presentation, I went to the Barron's booth to sign some books. The duct tape bag I made for their giveaway was proudly displayed on a pedestal and filled with duct tape rolls and tools. And right next to it was a rather large poster with my face on it. The poster was eye-catching, but I couldn't help stare at my own likeness and her luggage pieces beneath her eyes. That woman in that photo looked tired. I took a shot of it with my camera phone, but my subconscious accidentally cut off my face on the left. Oops.

After doing my author duties, I was free to explore the book expo. I found out that Giada DeLaurentiis of the Food Network was signing books the next day so I came back. Here are some photos of what I saw:
 Giada and me!
 Billy and me??
 All Things Paper (the book!) by Ann Martin, proudly displayed at the Tuttle Publishing booth. (I'm in it!)
 Sebastiao Salgado's new book GENESIS, published by Taschen. It's HUGE!
It was an honor to be part of the BEA this year. It's not everyday that a crafter is asked to do a presentation at the biggest book fair in the world. There are people that believe in me not only as a writer and a crafter, but as a person. And I thank you from the bottom of my heart. I love you guys!
xxoxRichela


