
Claire Garland's Blog, page 21
May 6, 2016
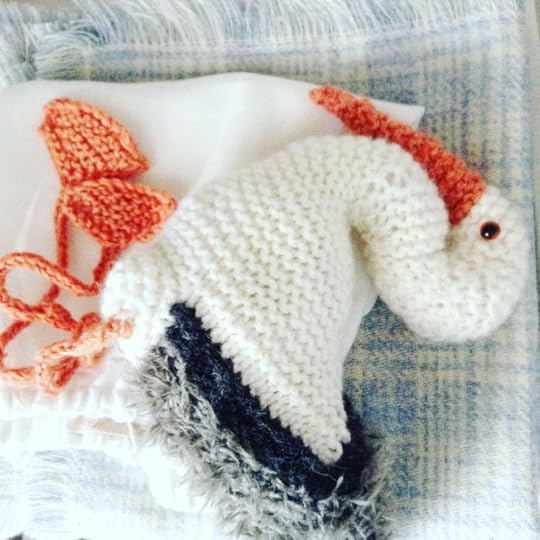
Lucky stork
- knit one for whom ever needs it
I'm knitting them for my children who have been working hard towards their imminent exams later this month - something to slip into their bags as a little luck reassurance...
- this pattern is free today as part of #freebeefridayknits @dotpebbles Instagram - the pattern is posted ready for download - here


April 29, 2016

April 22, 2016
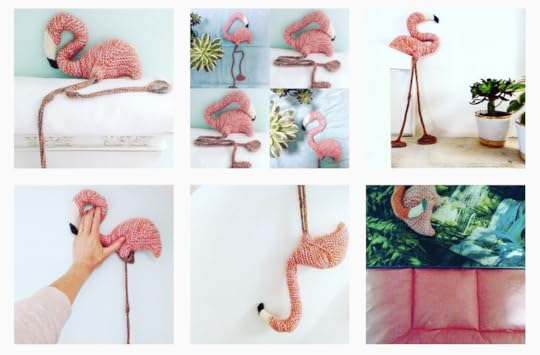
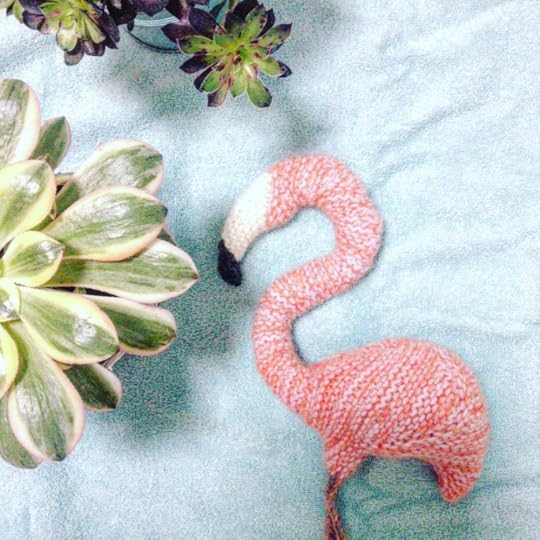
Flamingo follow...
... for fun free friday patterns (oh why can't 'patterns' begin with a letter 'f' - I love alliteration!)
What I mean to say is follow my Instagram @dotpebbles for free patterns for one day only, like this flamingo, every Friday! FANTASTIC FUN
What I mean to say is follow my Instagram @dotpebbles for free patterns for one day only, like this flamingo, every Friday! FANTASTIC FUN

April 15, 2016
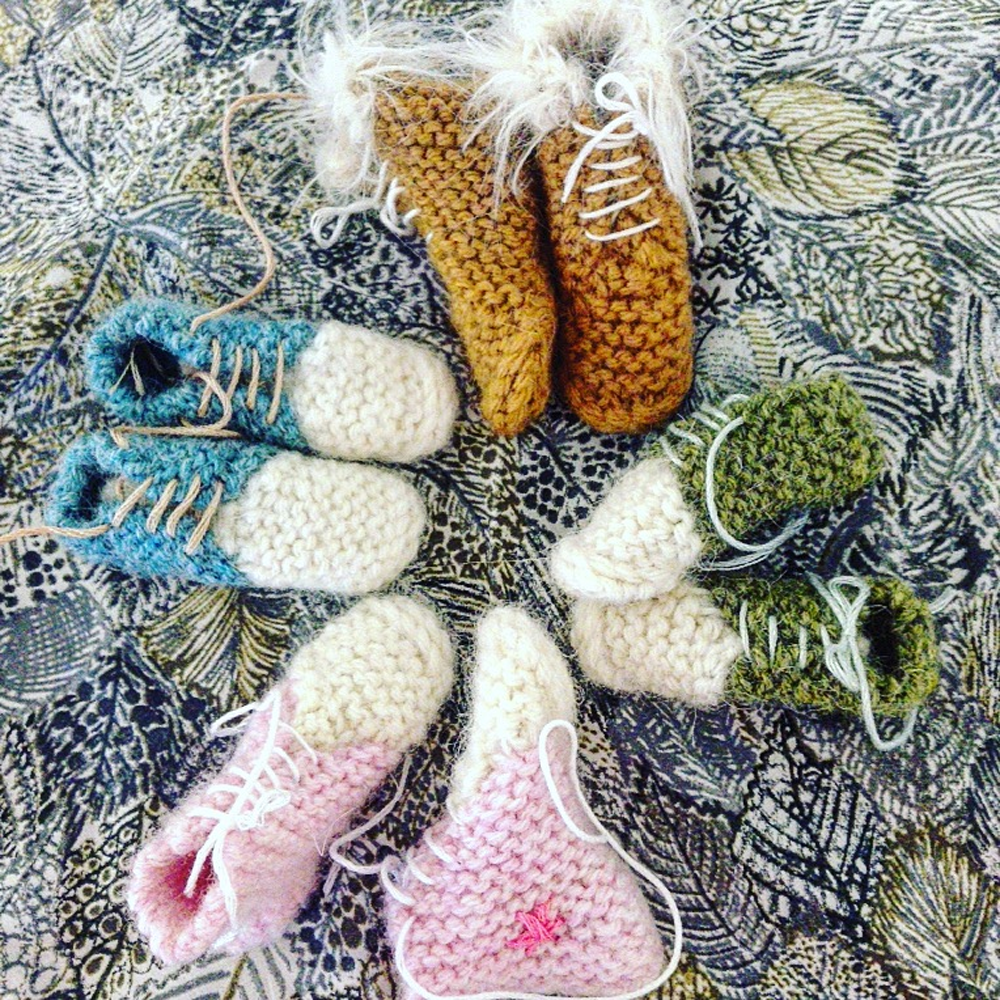
These boots... {and shoes} are made for...
April 1, 2016
Sorry about this title...
... but it seemed so right at the time - #freebeefridayknit no.4 - New Delhi Ele Tea Cosy
here in Ravelry and free for 24 hours!
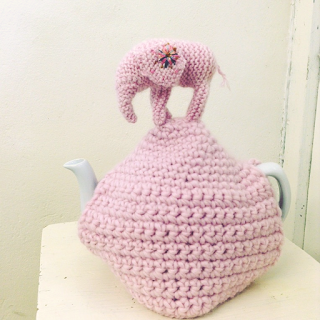
here in Ravelry and free for 24 hours!

March 31, 2016
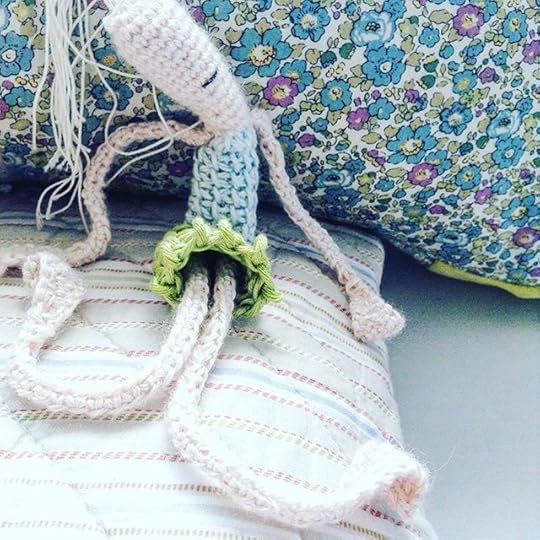
#sleepanywheredoll
As seen on my Instagram feed under the hashtag #sleepanywheredoll - I figured you may wish to make your own and join in the fun by sharing yours at #mysleepanywheredoll
... that said here's the pattern
@font-face {
font-family: "Courier New";
}@font-face {
font-family: "Wingdings";
}@font-face {
font-family: "MS 明朝";
}@font-face {
font-family: "Verdana";
}@font-face {
font-family: "Verdana";
}@font-face {
font-family: "Garamond";
}@font-face {
font-family: "MinionPro-Regular";
}@font-face {
font-family: "Garamond-Bold";
}p.MsoNormal, li.MsoNormal, div.MsoNormal { margin: 0cm 0cm 0.0001pt; font-size: 12pt; font-family: Verdana; }p.BasicParagraph, li.BasicParagraph, div.BasicParagraph { margin: 0cm 0cm 0.0001pt; line-height: 120%; font-size: 12pt; font-family: MinionPro-Regular; color: black; }.MsoChpDefault { font-size: 10pt; }div.WordSection1 { }ol { margin-bottom: 0cm; }ul { margin-bottom: 0cm; }
Use any 4 ply or sock weight cotton or fine yarn in body colour and
3mm/ size C crochet hook for her head, arms and legs and in dress colour and
3.75mm/ size F hook for dress
N.B - DC = English double crochet (US terminology = SC)
Foundation Chain Starting with a slip knot and smaller hook make 4 chain.
You will
now work around (i.e either side of) the foundation chain
enabling
you to crochet in the round as follows:
Round 1 1DC in each of the 4 chain - now, turn your work upside down
to work into the remaining loops of the chain stitches. (When you
are done, your last stitch should be next to the first stitch you
made) – 8dc
Round 2 inc) 2DC into each 8dc - 16dc
Round
3 inc) 2DC into next dc, 1DC into each next 7dc, 2DC in next dc, 1DC
into each next 7 dc to end of the round – 18dc.
Round 4 1DC into each 18dc
Continue
to work in rounds of crochet until piece measures 6mm/ 1 inch, placing a marker
at the beginning of the round so that you know where to begin and end (about 7
or 8 rounds)
Next round dec) 2DC tog, 1DC into each next 7dc, 2DC tog, 1DC into each next 7
dc to end of the round – 16dc
NECK
Round 4 1DC into each 16dc
Next round dec) [2DC tog] 8 times – 8dc
Next round 1DC into each 8dc
Next round Rep last round
ARMS
Next round *Make 25CH,
HAND
Next row Turn, 1CH, 1DC into each next 5ch, SL ST in next ch – then you’re
going to crochet back up the 5 CH – 1DC in each ch - but this time along the
other side – when you get to the tip of the hand work SL ST in each of the
5dc from Hand and then SL ST into the
remaining 20ch back down to the body**. 1DC in next dc then repeat from * to **
for the other arm.
DRESS
Switch yarn to dress colour and use larger hook
Next row 1DC in each 8dc around – working into the dc beneath the chain that
make each arm
Next row Rep last round 7 times.
- Switch to a different colour if you want a different colour for the
skirt
Next row inc) 2DC in next dc, 1DC in each next 3dc around, 2DC in next, 1DC in
each next 3dc – 10dc
Next row 1DC in each 10dc around
Next row inc) 2DC in next dc, 1DC in each next 4dc around, 2DC in next, 1DC in
each next 4dc – 12dc
Next row 1DC in each 12dc around
Next row inc) 2DC in next dc, 1DC in each next 5dc around, 2DC in next dc, 1DC
in each next 5dc – 14dc
Fasten off
LEGS – make 2 alike
Next round Make 32CH,
FOOT
Next row Turn, 1CH, 1DC into each next 7ch, SL ST in next ch – then you’re
going to crochet back up the 7 CH – 1DC in each ch - but this time along the
other side – when you get to the tip of the foot work SL ST in each of the 7dc
from Hand and then SL ST into the remaining 25ch back down to the other end of
the chain.
Sew the legs to the dress top - just under the skirt.
HAIR
Cut even lengths of crochet cotton or any thread you wish to use,
fold each strand in half and beginning at the crown stitches hook under one of
the crochet stitches, grab hold of a length of hair yarn in its middle – at the
fold and pull through the stitch to create a loop of hair yarn - pass the cut ends through the loop and pull
until the knot that you’ve created lies against the head.
Embroider a simple straight line for her mouth in black thread to
complete.
... that said here's the pattern

@font-face {
font-family: "Courier New";
}@font-face {
font-family: "Wingdings";
}@font-face {
font-family: "MS 明朝";
}@font-face {
font-family: "Verdana";
}@font-face {
font-family: "Verdana";
}@font-face {
font-family: "Garamond";
}@font-face {
font-family: "MinionPro-Regular";
}@font-face {
font-family: "Garamond-Bold";
}p.MsoNormal, li.MsoNormal, div.MsoNormal { margin: 0cm 0cm 0.0001pt; font-size: 12pt; font-family: Verdana; }p.BasicParagraph, li.BasicParagraph, div.BasicParagraph { margin: 0cm 0cm 0.0001pt; line-height: 120%; font-size: 12pt; font-family: MinionPro-Regular; color: black; }.MsoChpDefault { font-size: 10pt; }div.WordSection1 { }ol { margin-bottom: 0cm; }ul { margin-bottom: 0cm; }
Use any 4 ply or sock weight cotton or fine yarn in body colour and
3mm/ size C crochet hook for her head, arms and legs and in dress colour and
3.75mm/ size F hook for dress
N.B - DC = English double crochet (US terminology = SC)
Foundation Chain Starting with a slip knot and smaller hook make 4 chain.
You will
now work around (i.e either side of) the foundation chain
enabling
you to crochet in the round as follows:
Round 1 1DC in each of the 4 chain - now, turn your work upside down
to work into the remaining loops of the chain stitches. (When you
are done, your last stitch should be next to the first stitch you
made) – 8dc
Round 2 inc) 2DC into each 8dc - 16dc
Round
3 inc) 2DC into next dc, 1DC into each next 7dc, 2DC in next dc, 1DC
into each next 7 dc to end of the round – 18dc.
Round 4 1DC into each 18dc
Continue
to work in rounds of crochet until piece measures 6mm/ 1 inch, placing a marker
at the beginning of the round so that you know where to begin and end (about 7
or 8 rounds)
Next round dec) 2DC tog, 1DC into each next 7dc, 2DC tog, 1DC into each next 7
dc to end of the round – 16dc
NECK
Round 4 1DC into each 16dc
Next round dec) [2DC tog] 8 times – 8dc
Next round 1DC into each 8dc
Next round Rep last round
ARMS
Next round *Make 25CH,
HAND
Next row Turn, 1CH, 1DC into each next 5ch, SL ST in next ch – then you’re
going to crochet back up the 5 CH – 1DC in each ch - but this time along the
other side – when you get to the tip of the hand work SL ST in each of the
5dc from Hand and then SL ST into the
remaining 20ch back down to the body**. 1DC in next dc then repeat from * to **
for the other arm.
DRESS
Switch yarn to dress colour and use larger hook
Next row 1DC in each 8dc around – working into the dc beneath the chain that
make each arm
Next row Rep last round 7 times.
- Switch to a different colour if you want a different colour for the
skirt
Next row inc) 2DC in next dc, 1DC in each next 3dc around, 2DC in next, 1DC in
each next 3dc – 10dc
Next row 1DC in each 10dc around
Next row inc) 2DC in next dc, 1DC in each next 4dc around, 2DC in next, 1DC in
each next 4dc – 12dc
Next row 1DC in each 12dc around
Next row inc) 2DC in next dc, 1DC in each next 5dc around, 2DC in next dc, 1DC
in each next 5dc – 14dc
Fasten off
LEGS – make 2 alike
Next round Make 32CH,
FOOT
Next row Turn, 1CH, 1DC into each next 7ch, SL ST in next ch – then you’re
going to crochet back up the 7 CH – 1DC in each ch - but this time along the
other side – when you get to the tip of the foot work SL ST in each of the 7dc
from Hand and then SL ST into the remaining 25ch back down to the other end of
the chain.
Sew the legs to the dress top - just under the skirt.
HAIR
Cut even lengths of crochet cotton or any thread you wish to use,
fold each strand in half and beginning at the crown stitches hook under one of
the crochet stitches, grab hold of a length of hair yarn in its middle – at the
fold and pull through the stitch to create a loop of hair yarn - pass the cut ends through the loop and pull
until the knot that you’ve created lies against the head.
Embroider a simple straight line for her mouth in black thread to
complete.
March 25, 2016
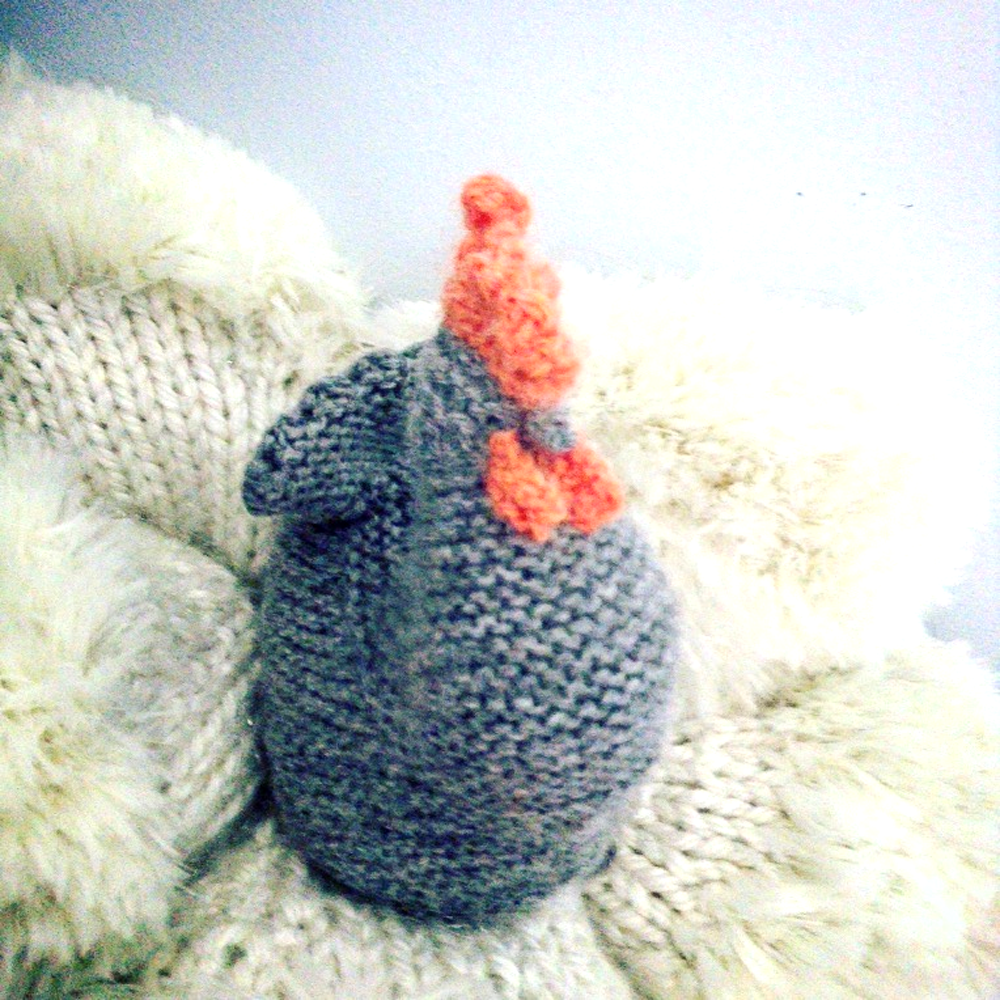
Plucky hen.
I'm free - today... a happy hen loves free-dom right! -
Please go to my Ravelry page for more details... pluck
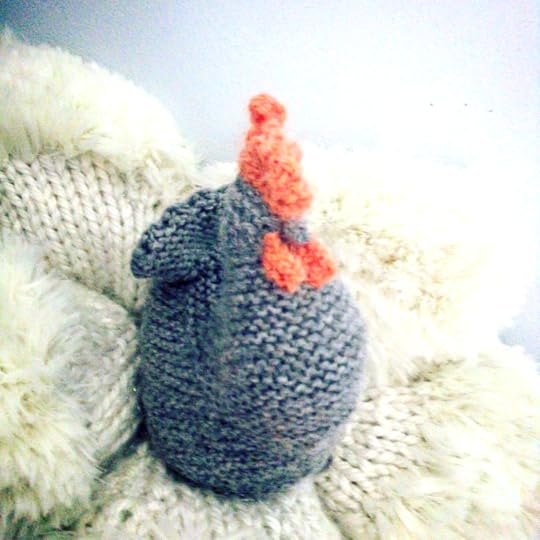
Please go to my Ravelry page for more details... pluck
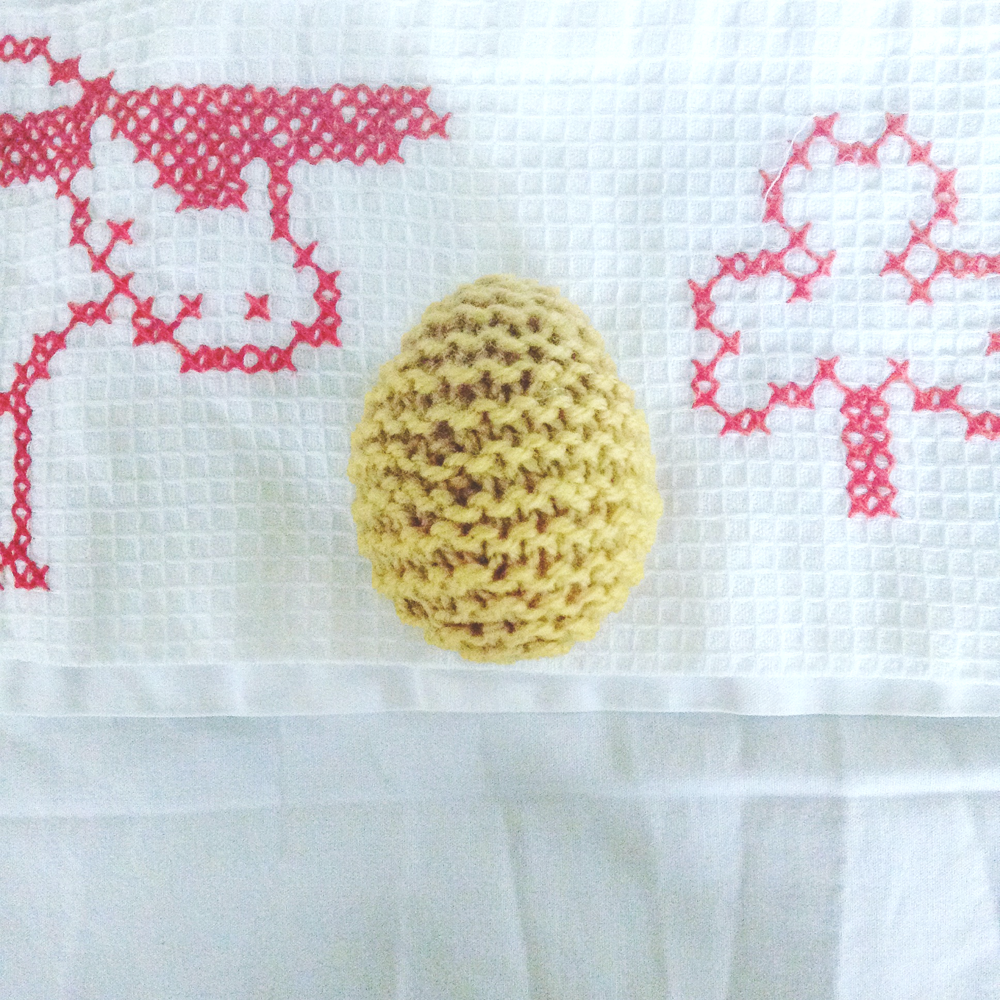
March 23, 2016
E G G
EGG - One of my favourite words... that and Lemon, for whatever reason, I don't know!
Anyhow, here's a eggstremely (I know, eggs are rather victim to the pun so I make no apologies!) easy stash-busting make... so let's CRACK ON (yay!) - PATTERN BELOW THE PIC
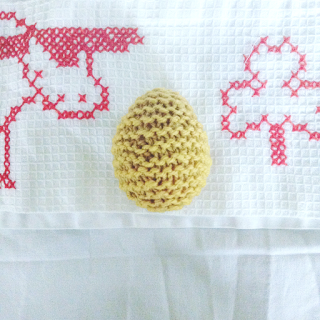
FINISHED SIZE Similar to a hen’s egg!
YARN Small amount of any dk or sport yarn (or 4-ply, aran or chunky) depends how
small or large you’d like your egg to be! I used Quince and Co. and Drops
Lima from my stash
NEEDLES For the yarn I used - 3.25mm/ size 3
EXTRAS Toy filling or scraps fabric, yarn for stuffing
Cast on 4sts
Row 1 inc) Kfb into each stitch - 8sts
Row 2 K
Row 3 inc) [K1, kfb] 4 times - 12sts
Row 4 K
Row 5 inc) [K2, kfb] 4 times - 16sts
Row 6 K
Row 7 inc) [K3, kfb] 4 times - 20sts
Rows 8 - 9 Garter stitch 2 rows.
Row 10 inc) [K4 ,kfb] 4 times - 24sts
Rows 11 - 12 Garter stitch 2 rows
Row 13 inc) [K7 ,kfb] 3 times - 27sts
Row 14 K
Row 15 inc) [K8 ,kfb] 3 times - 30sts
Rows 16 - 17 Garter stitch 2 rows
Row 18 inc) [K4 ,kfb] 6 times - 36sts
Row 19 K
Row 20 dec) [K4, skpo] 6 times - 30sts
Row 21 K
Row 22 dec) [K3, skpo] 6 times - 24sts
Rows 23 - 24 Garter stitch 2 rows
Row 25 dec) [K2, skpo] 6 times - 18sts
Row 26 K
Row 27 dec) [K1, skpo] 6 times - 12sts
Row 28 K
Row 29 dec) K2 tog 6 times - 6sts
Cut the yarn leaving a length that’s long enough to use for the seam, thread the end through the stitches and pull up to gather the stitches together.
TO MAKE UP
This was the easiest way I found it to sew up:
Wrap the egg around the stuffing then sew up the seam - matching the shaping - working mattress seam - you can add a little more stuffing as you near the end of the seaming if it needs it.
Mould the completed egg with your hands to create that perfect egg shape.
Decorate your eggs at will - I simply embroidered on a few straight stitches radiating around some French knots and or some lazy daisy-ish flowers - SEE SOME PRETTIES ON MY INSTAGRAM @dotpebbles FEED
- but really anything goes... they look lovely plain too!
Anyhow, here's a eggstremely (I know, eggs are rather victim to the pun so I make no apologies!) easy stash-busting make... so let's CRACK ON (yay!) - PATTERN BELOW THE PIC
FINISHED SIZE Similar to a hen’s egg!
YARN Small amount of any dk or sport yarn (or 4-ply, aran or chunky) depends how
small or large you’d like your egg to be! I used Quince and Co. and Drops
Lima from my stash
NEEDLES For the yarn I used - 3.25mm/ size 3
EXTRAS Toy filling or scraps fabric, yarn for stuffing
Cast on 4sts
Row 1 inc) Kfb into each stitch - 8sts
Row 2 K
Row 3 inc) [K1, kfb] 4 times - 12sts
Row 4 K
Row 5 inc) [K2, kfb] 4 times - 16sts
Row 6 K
Row 7 inc) [K3, kfb] 4 times - 20sts
Rows 8 - 9 Garter stitch 2 rows.
Row 10 inc) [K4 ,kfb] 4 times - 24sts
Rows 11 - 12 Garter stitch 2 rows
Row 13 inc) [K7 ,kfb] 3 times - 27sts
Row 14 K
Row 15 inc) [K8 ,kfb] 3 times - 30sts
Rows 16 - 17 Garter stitch 2 rows
Row 18 inc) [K4 ,kfb] 6 times - 36sts
Row 19 K
Row 20 dec) [K4, skpo] 6 times - 30sts
Row 21 K
Row 22 dec) [K3, skpo] 6 times - 24sts
Rows 23 - 24 Garter stitch 2 rows
Row 25 dec) [K2, skpo] 6 times - 18sts
Row 26 K
Row 27 dec) [K1, skpo] 6 times - 12sts
Row 28 K
Row 29 dec) K2 tog 6 times - 6sts
Cut the yarn leaving a length that’s long enough to use for the seam, thread the end through the stitches and pull up to gather the stitches together.
TO MAKE UP
This was the easiest way I found it to sew up:
Wrap the egg around the stuffing then sew up the seam - matching the shaping - working mattress seam - you can add a little more stuffing as you near the end of the seaming if it needs it.
Mould the completed egg with your hands to create that perfect egg shape.
Decorate your eggs at will - I simply embroidered on a few straight stitches radiating around some French knots and or some lazy daisy-ish flowers - SEE SOME PRETTIES ON MY INSTAGRAM @dotpebbles FEED
- but really anything goes... they look lovely plain too!
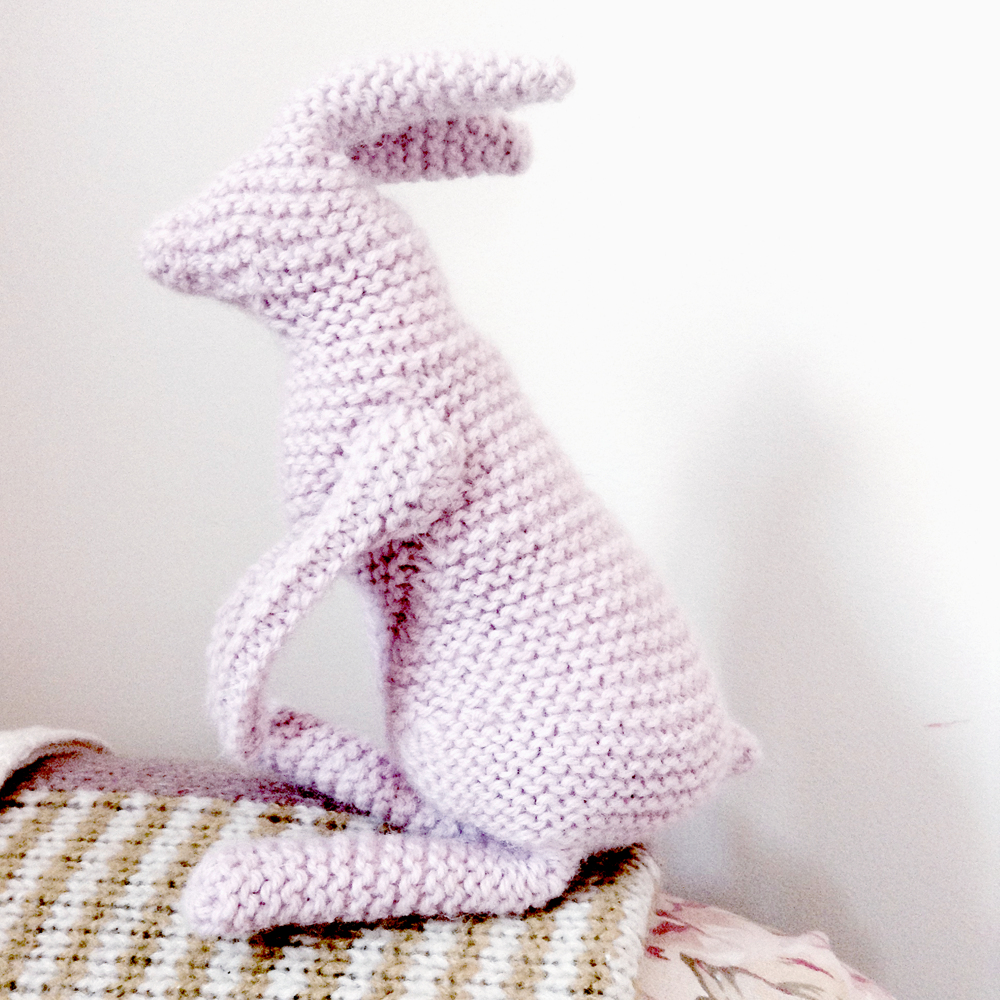
March 18, 2016
#freebeefridayknits pattern 2
Hare - sitting - for Easter - here's the pattern (remember it's only free for 24 hours!) - oh my it's only next week isn't it! - Enjoy you weekend and I'll see you next week for another free pattern via Instagram @dotpebbles. Happiness is a ball of yarn and a pair of needles!

Claire Garland's Blog

- Claire Garland's profile
- 10 followers
Claire Garland isn't a Goodreads Author
(yet),
but they
do have a blog,
so here are some recent posts imported from
their feed.

