
Beth Cato's Blog, page 8
October 2, 2024
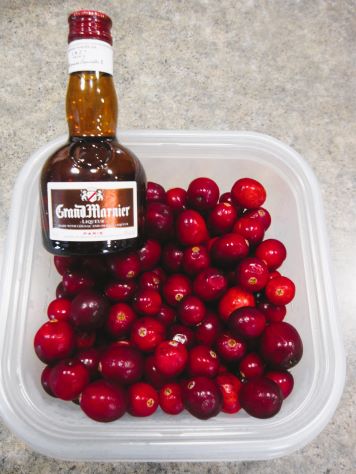
Bready or Not: Easy Cranberry Sauce
It’s the first week of October, but we’re anticipating the holiday season with this Easy Cranberry Sauce recipe.
Last Thanksgiving was my first in almost 20 years when I didn’t get to go home to California. My mom is all about using the canned jellied cranberry sauce. I’ve hinted for years now that I could try making a fresh sauce, but tradition is tradition.
I was sad I couldn’t be with my folks at Thanksgiving, but hey, at least I could try a homemade sauce at long last. Being that I’m in Minnesota now, that also meant using local cranberries.

I used a 12-ounce bag of fresh cranberries, but frozen is fine, too. Since there were only two of us partaking in the feast, we had a lot of leftover sauce, but that was fine–I used most of the remainder in a Cranberry Swirled Blondies recipe that I’ll share next week!
PrintBready or Not: Easy Cranberry SauceThis sauce takes all of 15 minutes to make and can be stashed in the fridge for up to 5 days. That means it can be made ahead of a holiday meal. Modified from Bon Appetit November 2023.Course Side DishCuisine AmericanKeyword cranberriesAuthor Beth CatoIngredients12 ounces cranberries fresh or frozen3/4 cup white sugar1 Tablespoon Grand Marnierzest of one orangepinch kosher salt1 cup waterInstructionsPlace all of the ingredients in a medium saucepan on medium heat. Stir frequently as the contents warm through so that nothing sticks and burns. After 10-15 minutes, the cranberries will start to burst and the mixture will turn jammy. Cook another couple minutes as more berries break down. Remove from heat and cool before serving.Sauce can be made up to 5 days ahead. Store it in an airtight container in the fridge. Serve with meats such as turkey and ham, or with ice cream or within a baked dessert.OM NOM NOM!

September 25, 2024
Bready or Not: Classic Pot Roast
Classic Pot Roast. Why haven’t I featured this on Bready or Not before? Because Arizona is not conducive to prolonged use of the oven outside of the two months of ‘winter.’
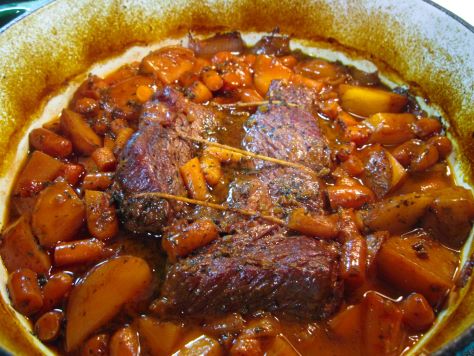
But I’m in the Midwest now. That means I can whip up a proper pot roast (quite likely on a Sunday), and might just use local ingredients, too.
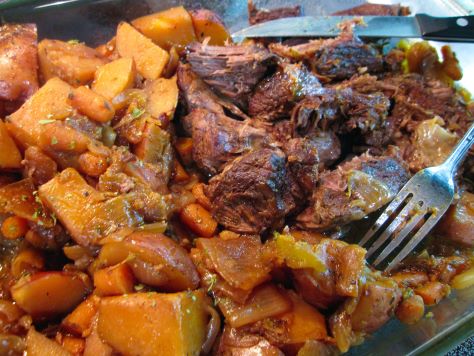
Fun fact: I hate celery, but I like celery flakes. That’s why you see me use celery flakes in recipes like this. You can absolutely use a couple stalks of celery instead.

If you have a large can of tomato paste, portion out standard amounts that are used in recipes (like tablespoon dollops), freeze them on wax paper, then store them in a quart freezer bag to toss into recipes. If you forget to thaw them before cooking, no biggie, just add it in frozen and give it a touch extra time to break down.
PrintBready or Not: Classic Pot RoastThis is a classic stove-to-oven pot roast with beef, potatoes, and all the fixings. It takes about 3 hours total. Leftovers, of course, are wonderful heated up in a smaller pot over the next day or two. Modified from Taste of Home February-March 2015.Course Main CourseCuisine AmericanKeyword beefCook Time 3 hours hoursAuthor Beth CatoEquipmentlarge oven-safe Dutch oven or pot with lidIngredients3-4 pound chuck roast tied2 teaspoons pepper1 1/2 teaspoons salt plus another 1/2 teaspoon2 Tablespoons canola oil2 medium onions cut into 1-inch pieces3 garlic cloves minced2 Tablespoons celery flakes1/4 cup tomato paste1 teaspoon dried thyme2 bay leaves1 cup dry red wine or reduced-sodium beef broth1 can reduced-sodium beef broth1 1/2 pound small red potatoes cleaned and quartered1 1/2 cups baby carrots1/2 Tablespoon apple cider vinegardried parsleyInstructionsPreheat oven at 325 degrees. Dry roast and sprinkle with the pepper and 1 1/2 teaspoons salt on both sides.In a large pot on the stove, heat the oil. Add the roast and brown on all sides. Set meat aside.Add onions, garlic, and remaining salt to the pot. Cook over medium heat, stirring often, 8-10 minutes, until browned. Add celery flakes, tomato paste, thyme, and bay leaves, stirring in for about a minute.Add wine (or extra broth) and stir to loosen browned bits from pan. Add the can of broth. Return roast to the pan. Arrange vegetables around the roast while bringing the pot to a boil. Once that mark is reached, turn off burner and carefully transfer pot to oven. Cover and bake for 2 to 2 1/2 hours, until meat is fork-tender.Pull pot from oven. Carefully remove meat and vegetables to a platter. Discard bay leaves and skim any fat from the top of the liquids. Bring pot to a boil again, cooking for 10-12 minutes, until liquid is reduced by half. (While this is going on, prepare meat by removing string and slicing or cutting into chunks.) Add vinegar and parsley to the pot. Add more salt and vinegar to taste.Serve meat, potatoes, and veggies with sauce. Any leftovers are great reheated on the stove over the next day or so.OM NOM NOM!September 18, 2024
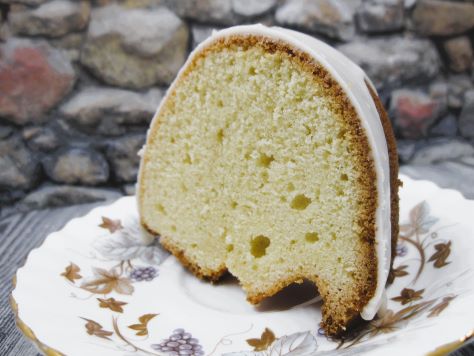
Bready or Not: Maple Bundt Cake with Maple Icing
Yes, it’s time for yet another maple cake on Bready or Not! This time, a straightforward Maple Bundt Cake with Maple Icing. Delicious cake, plain and simple.
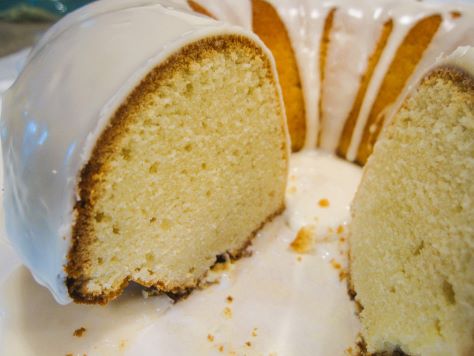
This recipe uses both maple syrup and maple flavor. I feel that both are really necessary here. Really, if you love maple, maple flavor is great to have around. It stays good forever. If you need recipes that use it, well, I think I have dozens of them here on my site.
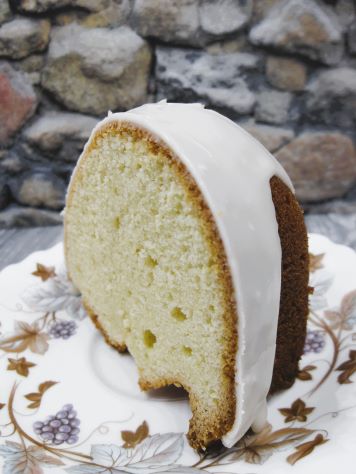
This is the kind of cake that works well for a breakfast, brunch, or dessert. It’s deliciously versatile like that.
 PrintBready or Not: Maple Bundt Cake with Maple IcingThis classic bundt cake is infused with maple flavor inside and out. It’s fantastic for breakfast, brunch, or dessert.Course Breakfast, Dessert, SnackKeyword bundt cake, cake, mapleAuthor Beth CatoEquipmentlarge bundt pan (12 cups/10 inches)nonstick spraybaking sheetIngredientsCake1 cup unsalted butter (2 sticks) room temperature1 cup white sugar1/2 cup pure maple syrup4 large eggs room temperature2 1/2 cups all-purpose flour1 teaspoon baking powder1/2 teaspoon sea salt1/2 cup half & half or milk1/2 teaspoon maple flavorIcing1 1/2 cups confectioners’ sugar2 Tablespoons pure maple syrup2 Tablespoons half & half or milkInstructionsPreheat oven at 350 degrees. Place a baking sheet inside to warm up. Apply nonstick spray to coat the interior of a large bundt pan.In a large mixing bowl, cream the butter until smooth. Add the sugar, scraping down the bowl a few times to make sure everything is mixed. Continue to beat until it becomes light and fluffy. Add the maple syrup followed by the eggs, one at a time.In another bowl, combine flour, baking powder, and salt. Gradually add the dry ingredients to the main bowl, interspersing it with the addition of the half & half. Add the maple flavor. Once everything is added, scrape the bottom of the bowl.Scoop the batter into the prepared bundt pan. Smooth the top with the back of a spoon.Place the bundt pan atop the hot baking sheet. Bake for 1 hour to 1 hour and 10 minutes, until a toothpick plunged into the middle of the cake comes out clean.Let cake rest in pan for 20 minutes, then invert it onto a rack to cool completely.Make the glaze by combining the three ingredients to form a thick texture. Drizzle over the top of the cooled cake.Store cake under a cake dome or other cover. Individual slices can be wrapped in plastic for transport or frozen for later.OM NOM NOM!
September 11, 2024
Bready or Not Original: Goat Cheese Biscuits
Today we are not only bready, to fit with the blog title of Bready or Not, but we are also cheesy. These Goat Cheese Biscuits are the perfect side for a supper meal.

If you’re on the lookout for a good supper meal, too, stay tuned–in two weeks, I’m sharing a pot roast recipe that will set you up nicely for this fall and winter!
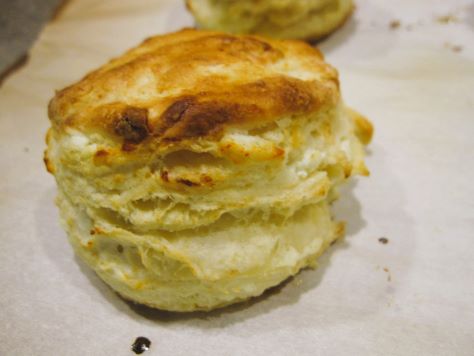
For this recipe, I love using the 4-ounce logs that are often available at Aldi. They are cheap and basic, not high end as far as chevre goes, but they are absolutely perfect in a recipe like this. Plain logs are ideal, but you can also use one with herbs.

I like thick biscuits. I get 6 out of this recipe, but if you form them to be thinner, you could get 8 or more. The texture is cakey, the flavor rich because of the butter and goat cheese throughout.
PrintBready or Not Original: Goat Cheese BiscuitsThis super-easy small batch of cheesy biscuits is perfect to feed a family alongside a good soup or stew. Makes 6-8 biscuits, dependent on thickness.Course BreadKeyword cheese, quick breadServings 6 biscuitsAuthor Beth CatoEquipment2-inch round cutterpastry brushIngredients4- ounces plain goat cheese or used an herbed variety2 cups all-purpose flour plus more for surface1 Tablespoon baking powder1 teaspoon salt1/4 cup unsalted butter3/4 cup buttermilk or soured milk, see noteextra milk or half & halfInstructionsPreheat oven to 475-degrees. Line a baking sheet with parchment paper.Set the goat cheese in the freezer for just a few minutes as the dough is being prepared.In a large bowl, stir together the flour, baking powder, and salt. Cut in the butter and mash it until it is pea-sized. Pour in the buttermilk or soured milk.The chilled goat cheese will be easier to dice into small pieces without being a sticky mess. Fold those chunks into the dough.Sprinkle flour onto a clean work surface. Knead the dough to make sure it is cohesive, but don’t overwork. Pat into a thick round. Use a 2-inch cutter to cut out shapes. Set them on cookie sheet, then reform leftovers to cut out more biscuits.Once all of the scrap dough is used, pour a dab of milk or half & half into a saucer. Use a pastry brush to brush a thin layer of milk onto the top of each biscuit; this will create a nice golden crust.Bake for 10 to 12 minutes, until nicely golden. Serve immediately. Leftovers can be reheated in the microwave or wrapped in foil and set in the oven to briefly bake.OM NOM NOM!NotesTo make soured milk, set out a liquid measuring cup. Add enough lemon juice or vinegar to form a thin line on the bottom of the cup. Pour milk or half & half to equal the 3/4 amount called for in this recipe. Let it sit for 5-10 minutes; it should coagulate. Use in recipe.September 5, 2024
Barnes & Noble Preorder Sale for CHEDDAR LUCK NEXT TIME
Save a bunch of money by preordering my new cozy-and-cheesy mystery, Cheddar Luck Next Time, along with other anticipated books during the Barnes & Noble preorder sale, which ends September 6th. Use code PREORDER25 to save 25%–and if you’re a Premium Member, you’ll save an extra 10%!
Cheddar Luck Next Time comes out April 8, 2025 from Datura Books.
Follow this link to my cheesy book.

September 4, 2024
Bready or Not: Apples and Honey Cake
Yes, yet another delicious version of apple cake. This Apples and Honey Cake uses apple butter, giving it a darker, moister crumb and a deeper infusion of spices.

This is truly a wonderful breakfast cake or a portable snack cake to tote along to work on school. It’s not messy to eat, and it’s refreshing and filling.

Note that, because of the apple butter, the top is dark in color, so don’t use the coloration to judge doneness in the oven. Rely on the good old toothpick test in the middle.
 PrintBready or Not: Apples and Honey CakeThis variation of apple cake is doubly infused with apples and spice, as it includes apple butter, chopped apples, and extra spice. It’s fantastic for breakfast, snack, or dessert, and pieces freeze beautifully. Modified from Star-Tribune September 17, 2023.Course Breakfast, SnackKeyword apple, cakeServings 9 piecesAuthor Beth CatoEquipment9×9 pannonstick sprayIngredients2 medium baking apples such as Honeycrisp or Cortland1 cup olive oil1 cup white sugar3/4 cup apple butter1/2 cup honey1 teaspoon vanilla extract2 large eggs room temperature2 1/4 cups all-purpose flour1 teaspoon ground cinnamon1 teaspoon ground nutmeg1 teaspoon kosher salt1/2 teaspoon baking soda1/2 teaspoon baking powderInstructionsPreheat oven at 350 degrees. Line a 9-inch square pan with foil and apply nonstick spray or butter.Peel and dice up the apples. Set aside.In a large bowl, whisk together the olive oil, sugar, apple butter, honey, vanilla, and eggs, creating a smooth mixture. Stir in the flour, cinnamon, nutmeg, salt, baking soda, and baking powder. Scrape the bottom of the bowl to make sure everything is combined. Fold in the apples.Pour the batter into the prepared pan. Bake for 45 to 55 minutes, until a toothpick plunged into the middle comes out clean. Let cool completely, chilling in fridge to speed the process if desired, then use the foil to lift the cake onto a cutting board for easier slicing.Store in a sealed container at room temperature or in the fridge for up to 5 days. Pieces can also be individually wrapped and frozen for weeks.OM NOM NOM!
August 29, 2024
BOOK ANNOUNCEMENT: Cheddar Luck Next Time, a cozy mystery!
I’m thrilled to announce the forthcoming release of my first cozy mystery, Cheddar Luck Next Time, published by Datura! It’ll be released in Spring 2025. The book features an autistic heroine with a special interest in cheese, a grumpy orange cat, and lots of murder and intrigue!
If you review books and/or host authors on your podcast or site, you can already request the book right from Datura! Do that here.

August 28, 2024
Bready or Not Original: Nutella-Swirled Blondies
These Nutella-Swirled Blondies are quick to make and delicious, making it a fantastic go-to recipe when you need to make a moderately-sized batch of goodies without a lot of fuss.

The amount of Nutella called for here is 12 ounces. You can use more than that, if you want, but don’t use less or it’ll be challenging to spread the layer to the edges.

Look for this base recipe used again in the coming months, too. I first experimented with this format using a fresh cranberry filling, but I won’t share that version until the timing is more seasonal. A Nutella filling has no such restrictions.
 PrintBready or Not Original: Nutella-Swirled BlondiesSimple, delicious blondies with a core of Nutella. Delicious and easy to make!Course Breakfast, Dessert, SnackAuthor Beth CatoEquipment13×9 panaluminum foilnonstick sprayuneven spatulaIngredients2 1/4 cups all-purpose flour1 1/2 teaspoons baking powder1/2 teaspoon salt3/4 cup unsalted butter (1 1/2 sticks) softened1 1/4 cups white sugar1 1/4 cups brown sugar packed2 teaspoons vanilla extract3 large eggs room temperature12 ounces Nutella or similar hazelnut spreadInstructionsPreheat oven to 350-degrees. Line 13×9 pan with wide aluminum foil and apply nonstick spray or butter.In a small bowl, mix together the flour, baking powder, and salt. Set aside.In a mixing bowl, beat together the butter, both sugars, and vanilla to create a smooth batter. Beat in eggs, one at a time, followed by the flour mixture. Dollop about 2/3 of the dough in the pan; dough will be sticky, making it tricky to even out without smearing away the nonstick coating.Spread Nutella on top and to the edges. Add dollops of remaining dough. Use a knife to swirl layers together.Bake until evenly golden brown and set in the middle, 28 to 32 minutes. Cool completely at room temperature or chill before cutting. Blondies keep for up to 3 days in a room temperature sealed container.OM NOM NOM!
August 21, 2024
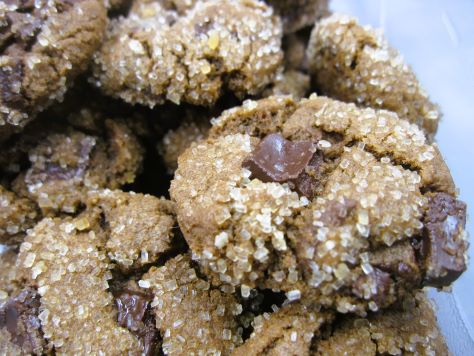
Bready or Not Original: Sparkling Chocolate Cookies
These Sparkling Chocolate Cookies are loaded with flavor and sweetness, and they are outright pretty. Look!
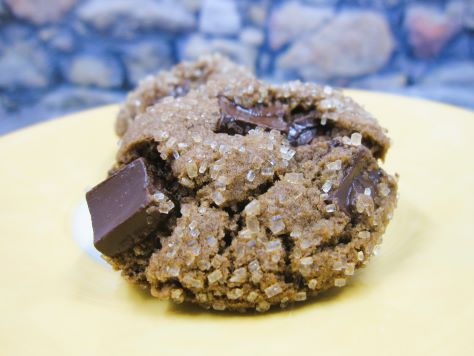
The chocolate flavor here is from cocoa in the dough along with a whole bag of chocolate chunks. I like Aldi’s dark chocolate chunks, but use whatever you can find.
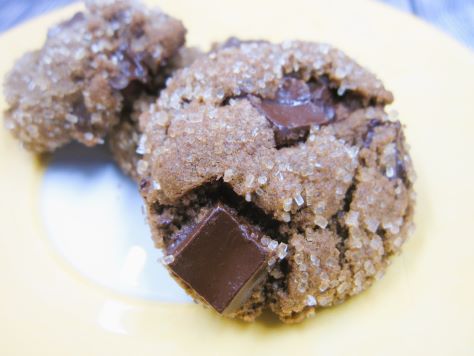
It’s important to note that these cookies don’t keep well. They will go hard after a day. Therefore, bake them up and serve them promptly.
 PrintBready or Not Original: Sparkling Chocolate CookiesThese pudgy, chocolate-packed cookies are chewy and delicious, and are best eaten within a day. Makes about 50 small cookies.Course Dessert, SnackCuisine AmericanKeyword chocolate, cookiesServings 50 cookiesAuthor Beth CatoEquipmentparchment papercookie scoopIngredients1 1/2 cups all-purpose flour1/4 cup unsweetened cocoa powder sifted1 teaspoon ground cinnamon1/2 teaspoon kosher salt1 teaspoon baking soda1/2 cup unsalted butter (1 stick) room temperature1 cup brown sugar packed1 large egg room temperature1 teaspoon pure vanilla extract1 bag chopped dark chocolate1/2 cup turbinado sugar for toppingInstructionsPreheat oven at 325 degrees. Line a baking sheet with parchment paper.In a small bowl, sift together flour, cocoa, cinnamon, salt, and baking soda.In a mixing bowl, beat the butter and brown sugar until light and fluffy. Add the egg and vanilla. Gradually add the dry ingredients until just incorporated. Fold in the chocolate. Measure the turbinado sugar into a another small bowl.Use a cookie scoop or spoon to shape dough. Roll each round in turbinado sugar. Place spaced out on cookie sheet.Bake for 9 to 11 minutes, until set. Let rest on baking sheet for 5 minutes before transitioning to a cooling rack.Store in a sealed container. Cookies are best eaten within a day.OM NOM NOM!
August 14, 2024
Bready or Not Original: Maple Syrup Pie
Do you feel a change in the seasons coming? Or simply want to manifest one? I had to create a psychological autumn and winter when I lived in Arizona, and maple flavor was a big part of that. If you’re in need of some cool weather vibes about now, too, maybe this Maple Syrup Pie will help!

The recipe is pretty straightforward. The most involved process is parbaking the crust, that is, baking the raw dough to form a golden shell that won’t become a soggy mess once it has a wet filling.
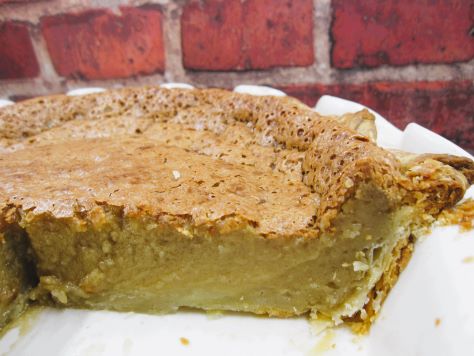
The filling itself comes together quickly in a blender. Mine puffed a LOT in the oven and then dropped down again once the pie cooled.

This is a great pie to make for a treat any time of year, but it would be especially nice for Thanksgiving or at a holiday celebration.
PrintBready or Not Original: Maple Syrup PieThis Maple Syrup Pie is silky smooth and sweet. The flavor is strongest on the first day and mellows after that, but remains unquestionably delicious.Course Breakfast, Dessert, SnackCuisine American, CanadianKeyword maple, pieAuthor Beth CatoEquipmentbaking panaluminum foil or parchment paperpie weightsblenderIngredients1/4 cup all-purpose flour plus more for work surfaceraw pie dough for one crust or store-bought pie crust1 1/4 cups dark maple syrup1/2 cup unsalted butter (1 stick) melted1/2 cup heavy cream room temperature1/2 cup brown sugar packed3 large eggs room temperature1 1/2 teaspoons pure vanilla extract1/2 teaspoon kosher saltcanned whipped topping or Cool Whip for topInstructionsPlace oven racks at the middle and bottom positions. Preheat oven at 375 degrees.If working with unshaped pie dough, use some flour on a clean surface to roll out dough to 12 inches. Place it in a 9-inch pie plate and shape to fit, crimping the crust at the rim. Prick the bottom of the crust all over with a fork. Freeze crust for 20 minutes.Set out a baking sheet. Line with aluminum foil.Line the crust with foil or parchment paper. Fill interior with pie weights, pressing in to make sure there are no gaps along the sides.Set pie crust on baking sheet. Bake it on bottom rack for 20 minutes. Carefully use foil or parchment to lift out pie weights onto another baking sheet or a large bowl. Bake crust again until the edges are golden brown and the bottom is dry, 5 to 10 minutes.Set the crust to cool on a rack while continuing to make the filling.Reduce oven temperature to 350.In a blender, place the flour, maple syrup, butter, heavy cream, brown sugar, eggs, vanilla, and salt. Blend on high until the contents are smooth. Pour into pie crust.Bake on middle rack in oven for 40 to 50 minutes; the filling should be puffed with only a slight jiggle in the middle. Cool on a rack.Store at room temperature, covered with foil. Serve with a dollop of whipped cream or Cool Whip on top. Keeps for at least 4 days.OM NOM NOM!

