
Beth Cato's Blog, page 10
June 5, 2024
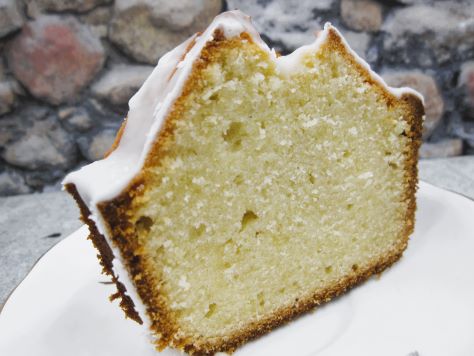
Bready or Not: Cider Pound Cake
This luscious Cider Pound Cake, made in a tube pan, is great by itself or eaten alongside fruit and/or ice cream.

There are no apples in this cake. That means it’s fast and easy to make, too. No peeling, or dicing or grating. Instead, the recipe relies on sparkling apple cider for sweetness and gentle flavor.

“Sparkling cider” means nonalcoholic. That doesn’t mean you should use any old apple juice, though. Apple cider has more flavor and heft (i.e. not so watery). I used a seasonal version from Aldi that is all Honeycrisp, but any basic sparkling cider will do!
Modified from Centennial Kitchen Fall Baking Magazine 2021.
PrintBready or Not: Cider Pound CakeThis recipe includes no actual pieces of apple, instead getting sweetness and fresh flavor from sparkling (meaning nonalcoholic) apple cider. The outside of the cake will form a crunchy crust, while the inside is tender and moist. Modified from Centennial Kitchen Fall Baking Magazine 2021.Course Breakfast, Dessert, SnackKeyword apple, bundt cake, cake, cider, tubeAuthor Beth CatoEquipmentlarge tube pannonstick sprayIngredientsCake2 cups unsalted butter (4 sticks) softened2 cups white sugar6 large eggs room temperature3 1/4 cups all-purpose flour1/4 teaspoon salt1/2 cup sparkling apple ciderGlaze1 cup confectioners’ sugar1 teaspoon clear vanilla extract1 Tablespoon sparkling apple ciderInstructionsPreheat oven to 350 degrees. Coat a tune pan with nonstick spray.In a big bowl, cream together the butter and sugar until they are fluffy. Add the eggs in sequence, beating well after each addition.In another bowl, stir together the flour and salt. Gradually add it to the large bowl along with the apple cider, going back and forth in increments. Scrape the bottom of the bowl to ensure everything is mixed. Pour batter into prepared pan and smooth out the top.Bake for 1 hour and 5 minutes to 1 hour and 20 minutes, until a toothpick plunged into the center of the cake comes out clean. Cool in pan for 20 minutes, then invert onto a cooling rack to completely cool.Once the cake is cool, in a small bowl, combine the three glaze ingredients to make a thick but moveable glaze. Dribble over cake so that it oozes over sides.Let set at least 30 minutes before cutting. Store under a cake dome or cut into individual slices to encase in plastic wrap.OM NOM NOM!

May 29, 2024
Bready or Not: Cookie Butter Pound Cake
This Cookie Butter Pound Cake, topped with a Cookie Butter Glaze, is lush, indulgent, and oh so good.

Because someone always asks, “What’s cookie butter?” The answer is: an addictive substance found near the peanut butter in most every grocery store in America; even my local Walmart has it in the main Biscoff brand or as a Walmart generic, and Trader Joe’s calls it Speculoos. It’s essentially pulverized cookies and oil. It has the exact same texture as peanut butter and can substitute for it in most any recipe. There is nothing healthy about it and it is incredibly delicious.
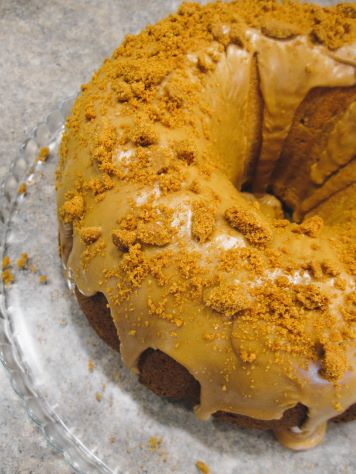
Cookie butter makes everything taste more inherently like cookie dough. In this recipe, you have cookie dough in the cake batter, in the glaze, and actual cookies crumbled on top. If you love cookie butter, this is your recipe–and if you haven’t had it yet, prepare to be converted.

Modified from Bake from Scratch September-October 2023 issue.
PrintBready or Not: Cookie Butter Pound CakeThis indulgent cake is ideal for cookie butter lovers–or will convert people to the ways of cookie butter! Modified from Bake from Scratch September-October 2023 issue.Course Breakfast, Dessert, SnackKeyword bundt cake, cake, cookie butterAuthor Beth CatoEquipmentlarge bundt cake pan (15 cups)baking spray with flourstand mixerIngredientsCake1 cup unsalted butter (2 sticks) softened1 1/2 cups white sugar3/4 cups brown sugar packed3/4 cup cookie butter5 large eggs room temperature1 teaspoon vanilla extract3 cups all-purpose flour1 1/4 teaspoons kosher salt1 teaspoon ground cinnamon1/4 teaspoon ground nutmeg1 cup milk or half & half, room temperatureCookie Butter Glaze1 cup confectioners’ sugar1/2 cup cookie butter1/4 cup milk or half & half2 Biscoff cookies crushed, for garnishInstructionsMake the cakePreheat oven at 325 degrees. Generously apply nonstick spray with flour to a large (15 cup) bundt pan.In a stand mixer with a paddle attachment, beat butter, sugars, and cookie butter until light and fluffy, about 3 to 4 minutes. Add eggs one at a time, beating well after each addition. Follow up with vanilla.In another bowl, stir together flour, salt, cinnamon, and nutmeg. Gradually add the dry mix to the wet, alternatively adding in the milk as well. Scrape the bottom of the bowl to make sure everything is combined.Spoon batter into the greased pan. Even out the batter over the top.Bake for an hour to an hour and 5 minutes, until the middle of the cake passes the toothpick test. Let it cool in pan for 20 minutes, then invert it onto a cooling rack to cool completely.Make the glazeIn a mixing bowl, beat together the confectioners’ sugar, cookie butter, and milk. Beat for 1 to 2 minutes, until it is nice and smooth; if it is too loose, add more confectioners’ sugar, and if it’s too thick, add a touch more milk. Immediately drizzle over cake to form thick drizzles. Crush the two Biscoff cookies and crumble them over the top.Store cake under a cake dome, or cut into individual slices to encase in plastic wrap.OM NOM NOM!May 22, 2024
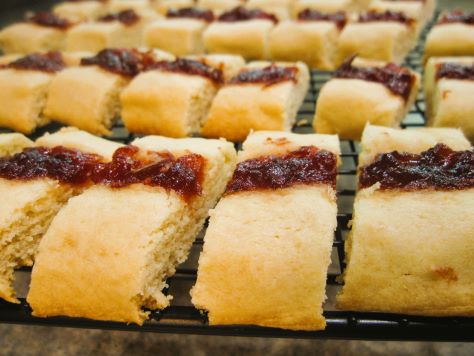
Bready or Not Original: Jammy Shortbread
This Jammy Shortbread is a fun recipe that’s easy to customize with your favorite jam! Go for raspberry, cranberry, blueberry… something sweet and delicious.
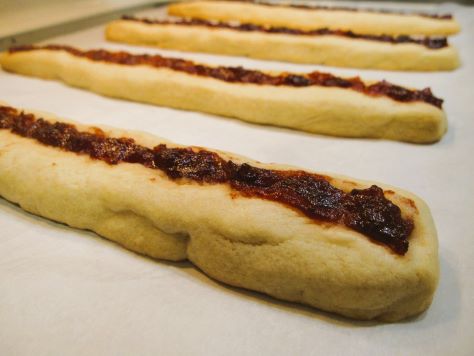
I had to make this recipe a few times to get it right. Specifically, shaping the dough was the issue. That’s why I give instructions to form the divided dough into a 12-inch stick that is 1 inch across. That makes the dough thick enough to form a trench that will hold the jam.
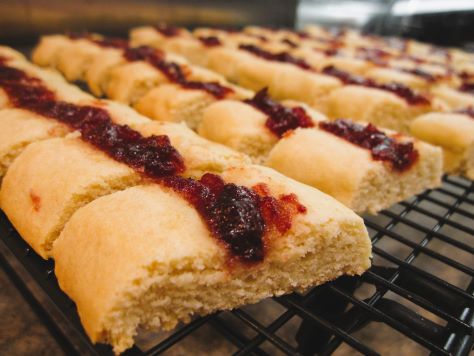
What initially foiled me was that the dough was too wide, and then it spread with baking. I had these wide cookies with just a little bit of jam in the middle. Oops.
Leave it to me to make the screw-ups so that your cookies can turn out great from the first batch!
PrintBready or Not Original: Jammy ShortbreadThe dough is easy to work with in this classic-styled cookie with jam filling!Course Dessert, SnackKeyword cookies, jamAuthor Beth CatoEquipmentfood scaleplastic wrap or bagsparchment paperIngredients3/4 cup unsalted butter (1 1/2 sticks) softened2/3 cup white sugar1 large egg room temperature1 teaspoon vanilla extract2 cups all-purpose flour1/2 teaspoon baking powder1/2 teaspoon salt1/3 cup thick fruit jamInstructionsIn a large bowl, cream together butter and sugar until light and fluffy. Beat in egg and vanilla. In another bowl, sift together the flour, baking powder, and salt. Gradually add the dry ingredients to the wet to form a cohesive dough.Use a food scale to divide the dough into four portions. Wrap them each in plastic wrap or in a sealable bag, and chill for at least an hour.Preheat oven at 350 degrees. Prepare a large baking sheet with parchment paper.Pull out a portion of chilled dough. On a far side of the baking sheet, form it into a 12-inch-long stick, 1 inch across. Use fingertips to form a trench down the middle. Spoon jam to fill the trench. Repeat the process with the other three portions of dough, creating long lines on the pan.Bake for 18 to 22 minutes, until dough looks set and is light golden brown. Let cool for 2 minutes. Slice each stick 3/4-inch apart to form individual cookies. Move them to a rack to completely cool. Store in a sealed container at room temperature.OM NOM NOM!May 17, 2024
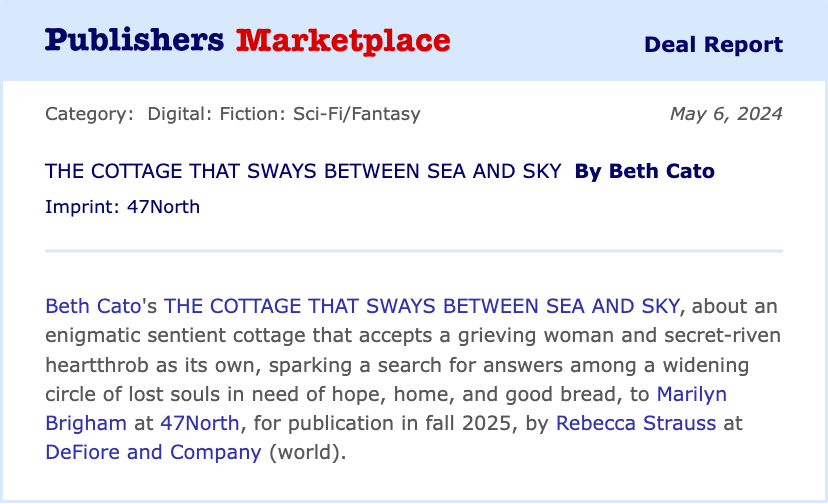
New Book Deal with 47North
Happy news! I’ll have another book published with 47North, the same wonderful people who published A Thousand Recipes for Revenge. The Cottage That Sways Between Sea and Sky (and that title may well change) is something different, a 1926-set cozy piece of historical fiction with a touch of fantasy and a lot of heart. It’ll come out in fall 2025.
#SFWAPro
May 15, 2024
Bready or Not Original: Easy Flatbread Crackers
These Easy Flatbread Crackers are delicious, much better than anything you find in stores, and they are quick to make, too.

Anyone who knows me can figure out how I used these crackers: as a base for cheese. I need crackers to go with all kinds of cheese, so I don’t go heavy on savory flavors. The light seasonings here make for versatility. That versatility also makes these useful for dips, soups, or just eating straight.

A quick note on the cheese, too: whatever kind of Parmigiano-Reggiano or similar hard cheese you use inside these crackers, don’t get the pre-shredded kind if you can help it. Those shreds are coated with preservative, anti-stick stuff. That said, if you need to get shredded cheese for accessibility reasons, I understand–but be aware it can throw off recipes sometimes.
 PrintBready or Not Original: Easy Flatbread CrackersThese basic Flatbread Crackers are great to pair with cheese, dips, soups, and so many things! Adjust the seasonings and cracker thickness to your liking. They are best eaten within 3 days, but will keep for months in the freezer.Course Appetizer, Side Dish, SnackKeyword cheese, crackerAuthor Beth CatoEquipmentbaking sheetparchment paperRolling Pinpizza cutter or knifeIngredients1 1/2 cups bread flour plus flour for surface1 1/2 teaspoons kosher salt1 teaspoon white sugar1/2 cup Parmigiano-Reggiano or a quality domestic version, freshly grated1 teaspoon celery flakes1/2 teaspoon dried thyme1/2 cup cold water3 Tablespoons extra virgin olive oilflaked sea salt to topInstructionsPreheat oven at 400 degrees. Line a baking sheet with parchment paper.In a medium bowl, toss together the flour, salt, sugar, and cheese. Add the herbs along with the olive oil and water, stirring until it just comes together as a dough. Add a touch more water if it’s too dry or flour if it is too wet.Transfer to a lightly floured surface and knead the dough briefly to smooth it out. It shouldn’t be sticky. Divide the dough in half.Roll out a portion on the floured surface. Use a pastry brush to lightly coat the top with water. Sprinkle with flaked sea salt. Use a pizza cutter or other blade to portion the dough into rectangles or other shapes a few inches in diameter. Transfer pieces to prepared parchment. Repeat process with remaining dough.Bake for 18 to 21 minutes, until lightly browned. Let harden and cool for at least an hour. Store in a sealed container for up to 3 days, or immediately freeze portions for later enjoyment.OM NOM NOM!
May 8, 2024
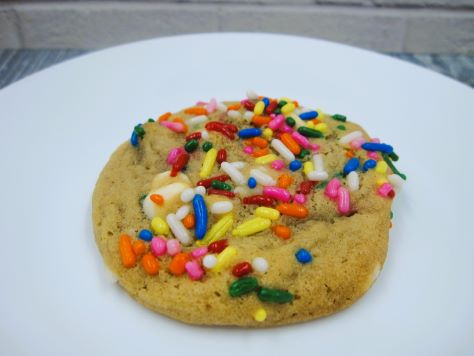
Bready or Not: Cookie Butter-Chocolate Chip Cookies
I like to say that cookie butter makes everything better. I would also add that rainbow sprinkles make everything better. These cookies feature both cookie butter AND rainbow sprinkles, and will absolutely blow your mind.
The recap, as there is always someone discovering cookie butter for the first time: it’s an addictive substance found near the peanut butter in most every grocery store in America; even my local Walmart has it in the main Biscoff brand or as a Walmart generic, and Trader Joe’s calls it Speculoos. It’s essentially pulverized cookies and oil. It has the exact same texture as peanut butter and can substitute for it in most any recipe. There is nothing healthy about it and it is incredibly delicious.
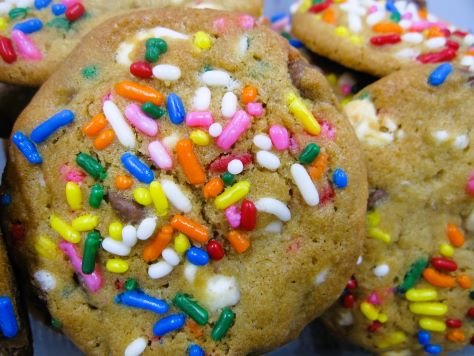
Cookie butter makes things taste like cookie dough. That’s outright magical when paired with chocolate. These cookies are especially pretty as they include white and brown chips along with the sprinkles.
Customize the sprinkles based on the season or reason. Red and green for Christmas, pink and/or red and/or white for Valentine’s, favorite sports team colors, whatever. Of course, basic rainbow sprinkles are always a great choice!
Modified from Food Network Magazine December 2022.
PrintBready or Not: Cookie Butter-Chocolate Chip CookiesThese big, festive cookies taste more inherently like cookie dough thanks to cookie butter. Customize the sprinkles based on the season, or go for classic rainbow sprinkles. Note that the dough needs to be chilled prior to baking. Modified from Food Network Magazine December 2022.Course Dessert, SnackCuisine AmericanKeyword chocolate, cookie butter, cookies, sprinklesServings 32 cookiesAuthor Beth CatoEquipmentlarge cookie scoopbaking sheetparchment paperIngredients1 3/4 cups all-purpose flour1/2 teaspoon baking soda1/2 teaspoon salt10 Tablespoons unsalted butter room temperature1/2 cup smooth cookie butter such as Biscoff or Speculoos1/2 cup brown sugar packed1/4 cup white sugar2 large eggs room temperature1 teaspoon vanilla extract3/4 cup white chocolate chips3/4 cup milk chocolate chips3 Tablespoons sprinkles plus more for toppingInstructionsIn a small bowl, combine flour, baking soda, and salt. Set aside.In a large bowl, beat together the butter, cookie butter, and both sugars until they are light and fluffy. Add the eggs one at a time. Add the vanilla.Gradually stir in the dry ingredients to form a cohesive dough. Fold in both kinds of chips along with the sprinkles. Cover the dough and chill in the fridge at least 2 hours, or up to a few days.Preheat oven at 350 degrees. Line a baking sheet with parchment paper. Pour some sprinkles into a bowl.Use a scoop or spoon to shape the dough. Dip the top into the sprinkles and compress to coat. Place spaced out a few inches on sheet–they will spread!Bake 11 to 12 minutes, until set and golden. Let them cool for about 5 minutes on the sheet, then transfer them to a cooling rack. Store them in a sealed container at room temperature.OM NOM NOM!May 3, 2024
2024 Conventions
Greetings! I haven’t posted anything beyond Bready or Not in a while, with good reason–I’ve been inordinately busy. Things are happening. Good things. Things I hope to share more about very soon.
Right now, I have a chance to catch my breath. This gives me an opportunity to share some other good news–I’m taking part in many cons this year! June in particular will be a busy month for me.
Here are the current plans:
4th Street Fantasy in Minneapolis: June 14-16
I don’t know if I’ll have panels, but I’ll be in attendance nevertheless, happy to chat and likely with some cookies on my person. Do note that I’ll be vigilant about masking, not simply because this convention requests it, but because I’m committed to another convention days later…
Origins Game Fair in Columbus, Ohio: June 19-22
I’m a special guest author at Origins this year! I’ve never been to this fair before, but I’ve heard great things. It looks like a smaller version of Gen Con, which is good, because Gen Con was way too much for my sensitive brain to handle. This will be my first time in Columbus! And there’s a cheese shop right near the convention! Yay!
World Fantasy Convention in Niagara Falls, NY: October 17-20
This is so far out, I’m still not fully sure when I’m arriving or leaving, so regard those dates as a rough estimate. I’ve only been to New York State once before, to the big city, and I’ve always wanted to see the falls. Much excitement! World Fantasy Cons are among my favorites because they are big and yet intimate at the same time. I hope to see a lot of people here that I haven’t seen in years.
#SFWAPro
May 1, 2024
Bready or Not Original: Apple Bundt Cake with Apple Cider Caramel Glaze
This Cider Bundt Cake is part of a series of apple cake experiments that will be on Bready or Not over the next while. They are all just a bit different.
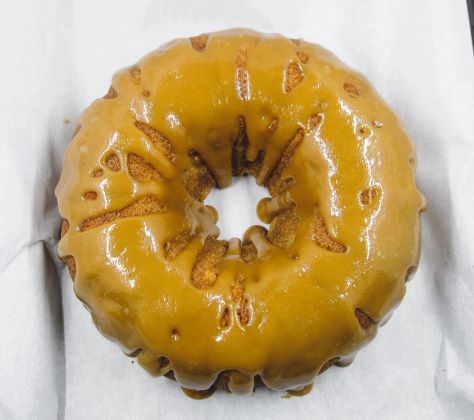
The thing that really sets this cake apart is the Apple Cider Caramel Glaze. Oh boy, this glaze. It’s truly thick, luscious caramel. The cake by itself is fairly standard–this glaze elevates it to star status.

Even better, you’ll likely have some glaze leftover. Store it covered in the fridge and use it in the coming days. Warm up a portion to make it pliable, then use it for dipping apples or cookies, or to top ice cream… or just eat it straight or add even more to the cake slices. Just don’t you dare let it go to waste.
 PrintBready or Not Original: Apple Bundt Cake with Apple Cider Caramel GlazeThis tender, apple-loaded cake is topped with an Apple Cider Caramel Glaze that will make everything better–this cake, your day, the whole dang planet. There will be a little bit of caramel leftover, too, perfect for dipping apple slices, cookies, or for topping ice cream.Course Breakfast, Dessert, SnackAuthor Beth CatoEquipmentlarge bundt pannonstick spray with flourcooling rackmedium saucepanIngredientsCake3/4 cup unsalted butter (1 1/2 sticks) softened1 cup white sugar1 cup brown sugar packed1 Tablespoon vanilla extract3 large eggs room temperature3 cups all-purpose flour2 teaspoons baking powder1 1/2 teaspoons cinnamon1/2 teaspoon baking soda1/2 teaspoon salt1/2 teaspoon cardamom1/2 cup buttermilk or soured milk (see note)3 medium baking apples peeled and grated or finely dicedApple Cider Caramel Glaze1 cup nonalcoholic apple cider1 cup brown sugar packed1/2 cup unsalted butter softened1/4 cup half & halfInstructionsPreheat oven at 325 degrees. Apply nonstick spray with flour to a large bundt pan.In a large bowl, beat together butter, both sugars, and vanilla extract, until fluffy. Scrape down bottom of bowl. Add eggs, beating well after each addition.In another bowl, combine flour, baking powder, cinnamon, baking soda, salt, and cardamom. Gradually add the dry ingredients to the butter mixture, pausing to add the buttermilk at several points. Scrape the bottom of the bowl, then fold in the apple pieces.Scoop batter into the prepared pan. Even it out. Bake until a toothpick inserted into the cake comes out clean, 50 to 60 minutes. Let cool in pan for 20 minutes, then invert onto a rack to completely cool before making the glaze.In a medium saucepan, bring the cider to a low boil and keep it there for about 4 minutes, watching it closely to bring down heat if necessary to ensure it doesn’t boil over. Add the brown sugar, butter, and half & half, then bring to a boil for another 2 to 4 minutes, until it has thickened. Remove from heat to set and cool for about 15 to 20 minutes. While the caramel is still warm (if it’s not warm, heat it again gently to make it pliable), drizzle it over cake. (If you have any caramel leftover, let it cool and then refrigerate it for other delicious uses!)Let cake set in fridge. Keep covered under a dome or individually slice and wrap for storage, keeping it in the fridge. It'll keep for at least 5 days.OM NOM NOM!NotesTo make soured milk as a buttermilk subtitute, put about 3 teaspoons lemon juice or vinegar in a liquid measuring cap. Add milk or half & half to reach the 1/2 cup line. Let set at room temperature about 10 minutes; it should start to curdle. Use in recipe.
April 24, 2024
Bready or Not: Brown Sugar Pie Bars
If you have a major sweet tooth (like me), these indulgent Brown Sugar Pie Bars may blow your mind with their deliciousness. Seriously, these things are unique and they are amazing.
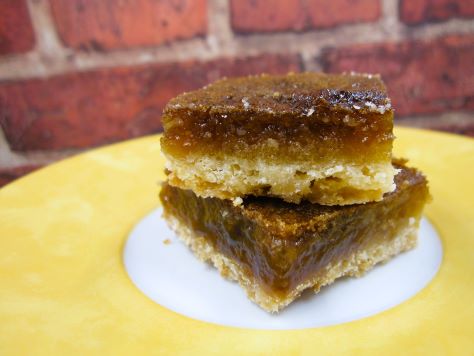
The base is similar to shortbread, nice and simple. The topping is like the filling for Pecan Pie without the pecans–or corn syrup, which is usually the sweetness and glue for such pies.
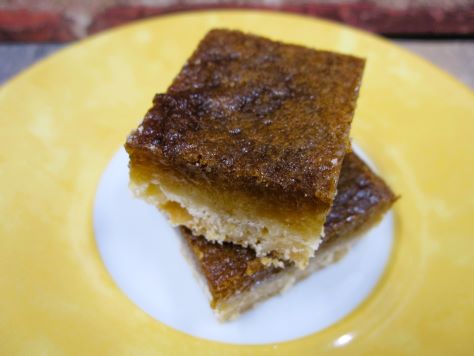
There’s no need to boil the filling or doing anything fussy. During the baking process, the top will essentially boil and caramelize. That creates a kind of crust that adds to the textural delight of every layer of these bars.
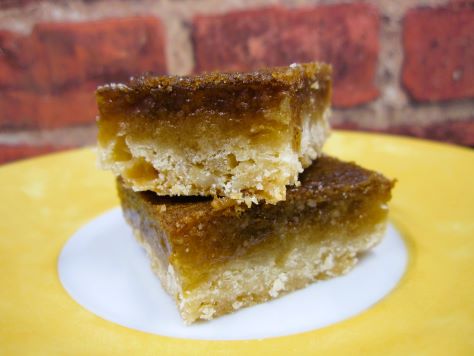
Modified from Better Homes & Gardens Christmas Cookies 2021.
PrintBready or Not: Brown Sugar Pie BarsThis recipe makes simple bars that are potently sweet and addictively delicious! Modified from Better Homes & Gardens Christmas Cookies 2021Author Beth CatoEquipment13×9 panaluminum foilnonstick cooking sprayfood processorIngredientsCrust1/2 cup unsalted butter 1 stick1 1/2 cups all-purpose flour3 tablespoons white sugar1/2 teaspoon fine sea saltFilling3 large eggs room temperature3 1/3 cups light brown sugar packed1/2 teaspoon ground cinnamon1/2 teaspoon fine sea salt1/2 cup unsalted butter melted (1 stick)2 teaspoons vanilla extract1/2 teaspoon almond extractInstructionsPreheat oven at 350 degrees. Line a 13×9 pan with aluminum foil. Apply a coating of nonstick cooking spray. Dice up the butter into chunks.In a food processor, pulse together the flour, sugar, and salt. Drop in the butter and pulse until the mix looks crumbly. It will not be cohesive. Pour everything into the prepared pan. Use the heel of a hand to press it into an even layer across the bottom.Bake the crust for 15 to 18 minutes, until it is lightly brown. While that is cooking, make the filling.In a large bowl, lightly beat the eggs. Mix in the brown sugar, cinnamon, salt, melted butter, and both extracts. Scrape the bottom of the bowl to ensure everything is combined. Pour the filling over the hot crust.Bake for 35 to 38 minutes, until the middle has only a slight jiggle. The filling may form large bubbles near the end of baking but they do not need to be popped. Let the pan cool to room temperature.Use the foil to lift the contents onto a cutting board. To make neat bars, use a knife to slice off the very edges, reserving these especially-candied portions for later enjoyment. Slice the rest into small squares. The bars can be stored in a sealed container at room temperature.OM NOM NOM!April 17, 2024
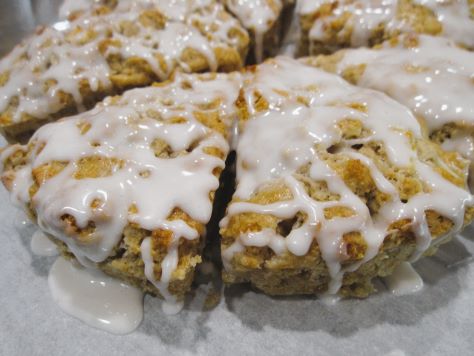
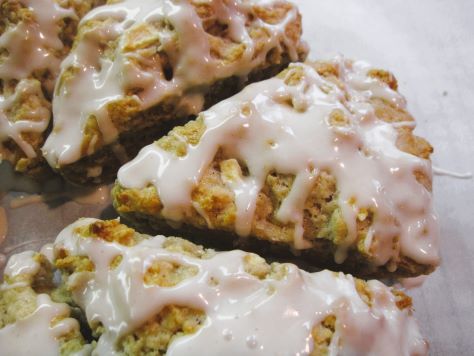
Bready or Not: Spiced Apple Scones
These Spiced Apple Scones make for a delicious breakfast. They are great fresh, but they can also be frozen for a convenient meal on the go later in the week.
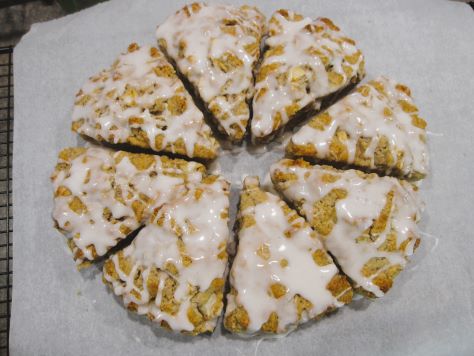
These are not super sweet. There is enough sugar inside to elevate them above what Americans regard as a biscuit; the glaze not only adds some sweetness, but a texture for contrast. If you want these plainer, just omit the glaze!
If you don’t have pie spice, just use cinnamon with perhaps a sprinkle of nutmeg.
Greatly modified from Bake from Scratch Magazine September/October 2023.
PrintBready or Not: Spiced Apple SconesBrighten your morning with these delicious fruit-filled scones! Make a batch over the weekend, and freeze them to pull out throughout the week. Greatly modified from Bake from Scratch Magazine September/October 2023.Servings 8 sconesAuthor Beth CatoEquipmentbaking sheet with parchment or scone panknife or bench knifeIngredientsScones2 cups all-purpose flour plus more for surface1/4 cup white sugar2 1/2 teaspoons baking powder1 1/4 teaspoons pie spice 1 teaspoon kosher salt1/2 teaspoon baking soda6 Tablespoons unsalted butter cut into cubes and cold1 teaspoon vanilla extract1 cup half & half or milk, plus more for tops if desired1 medium baking apple (about 120 grams) peeled and dicedGlaze1 cup confectioners' sugar plus more if neededsprinkle pie spice1 Tablespoon half & half plus more if needed1/2 teaspoon clear vanilla extractInstructionsPreheat oven at 375-degrees. Line a baking sheet with parchment paper or pull out a scone pan.In a big bowl, stir together flour, sugar, baking powder, pie spice, salt, and baking soda. Cut in the butter, mashing it until it resembles coarse crumbs. Pour in the vanilla and half & half, stirring until just combined. Fold in the diced apple.If using a baking sheet to bake, flour a work space. Flour hands and fold and pat the dough into a thick disc. Use a knife or bench knife to slice it into 8 wedges. Move wedges, spaced out, onto baking pan. Alternatively, press dough into scone pan to evenly fill each hole. Whichever method is used, chill scones for about 15 minutes.If softer scones are desired, measure out a tablespoon of milk and brush that atop the scones. If crisper tops are wanted, leave the scones be.Bake scones until tops are golden brown, 15 to 20 minutes. Let cool for about 20 minutes.Make the glaze. Whisk together confectioners’ sugar, a sprinkle of pie spice, half & half, and clear vanilla until they achieve a thick but oozy texture. Drizzle over scones.Enjoy scones right away, or store at room temperature in a sealed container for up to 2 days. They can also be frozen and thawed for later enjoyment.OM NOM NOM!

