
Gail Doane's Blog
March 7, 2020
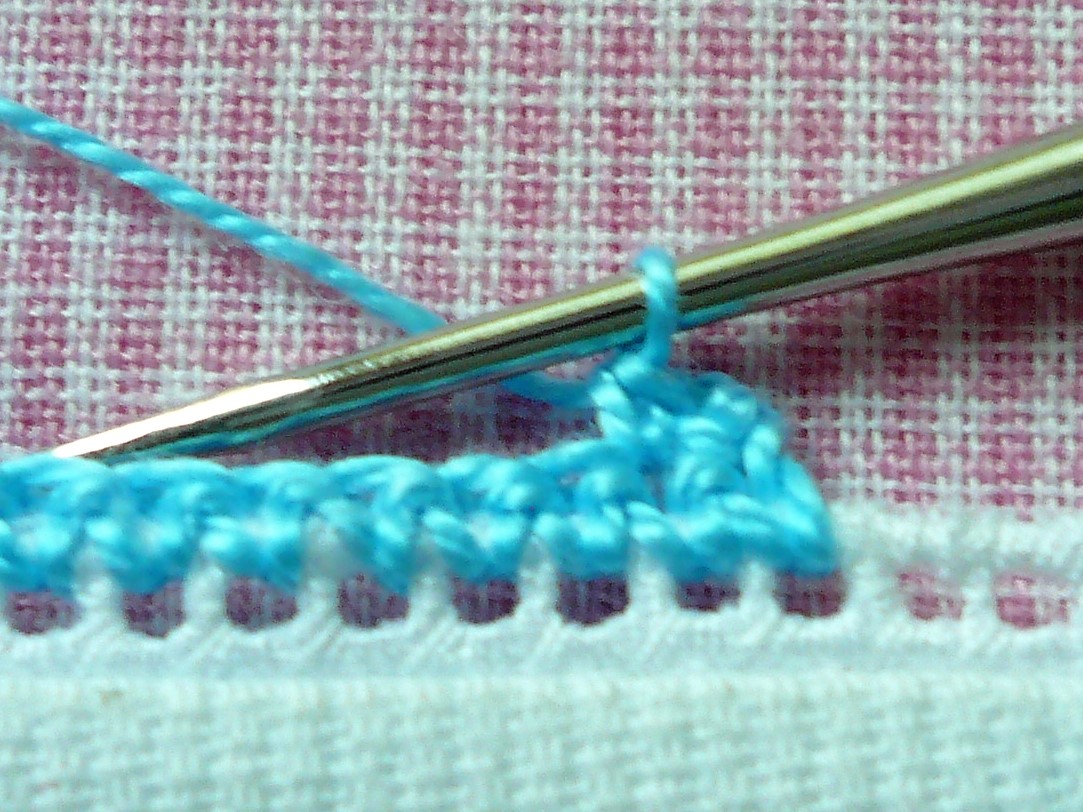
Stitch Sequence for Scallop Crochet Eding into Entredeux
Stitch Sequence for Scallop Crochet Edging into Entredeux(size 12 perle cotton/#10 crochet hook)
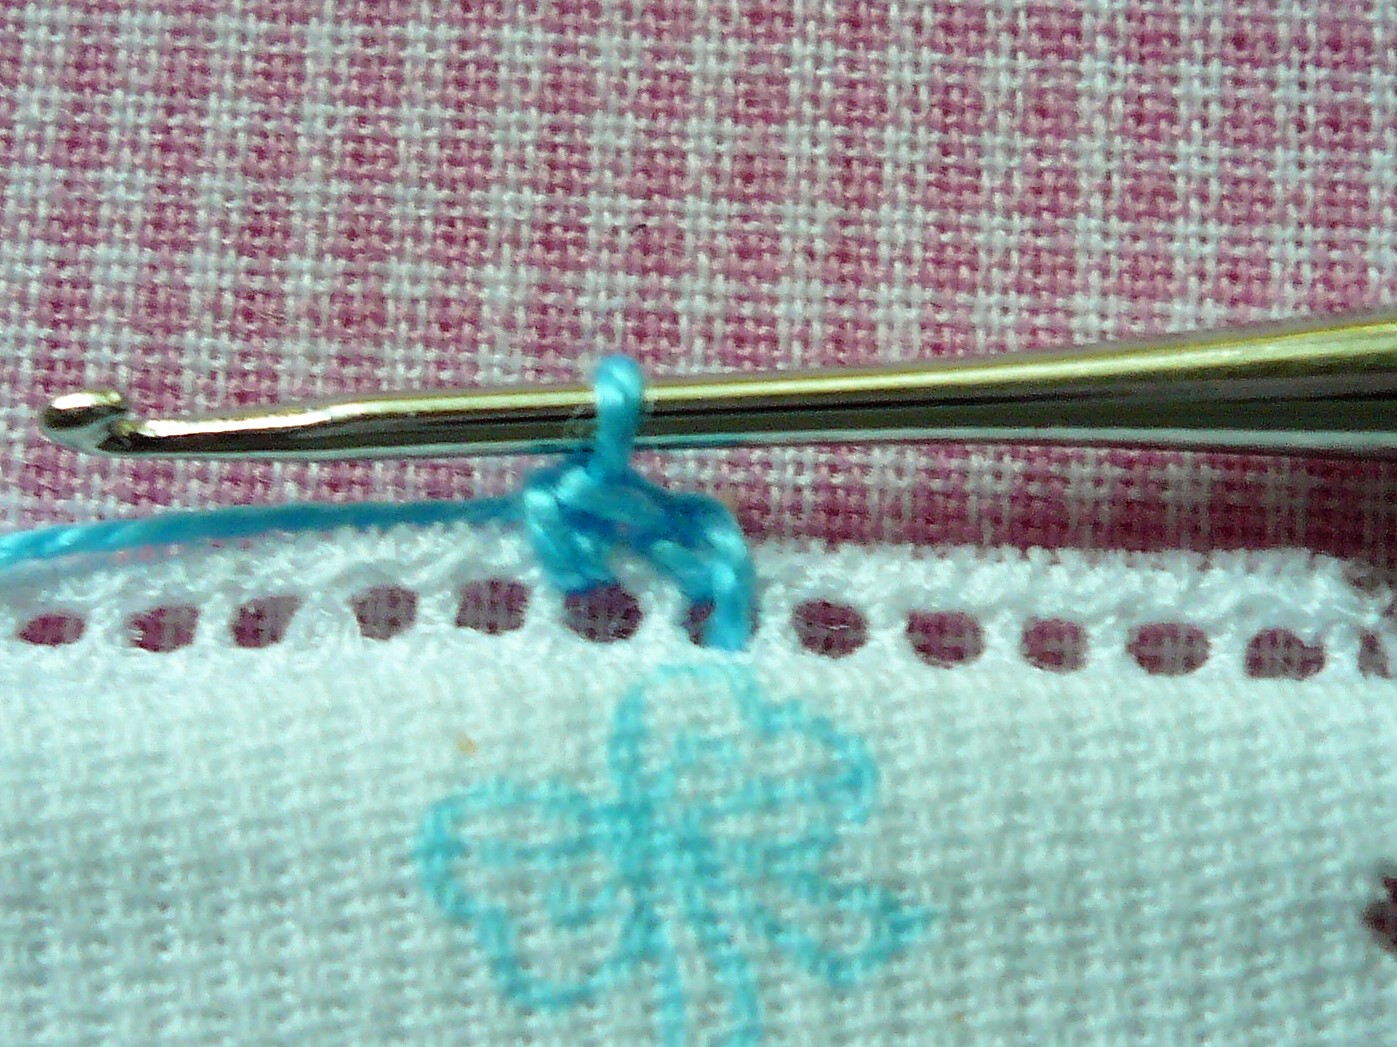
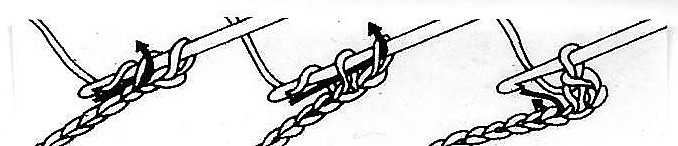
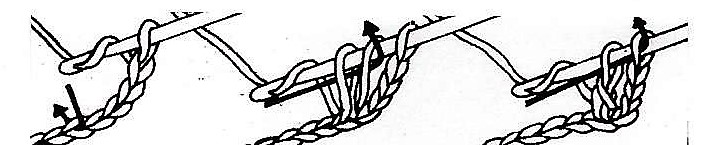
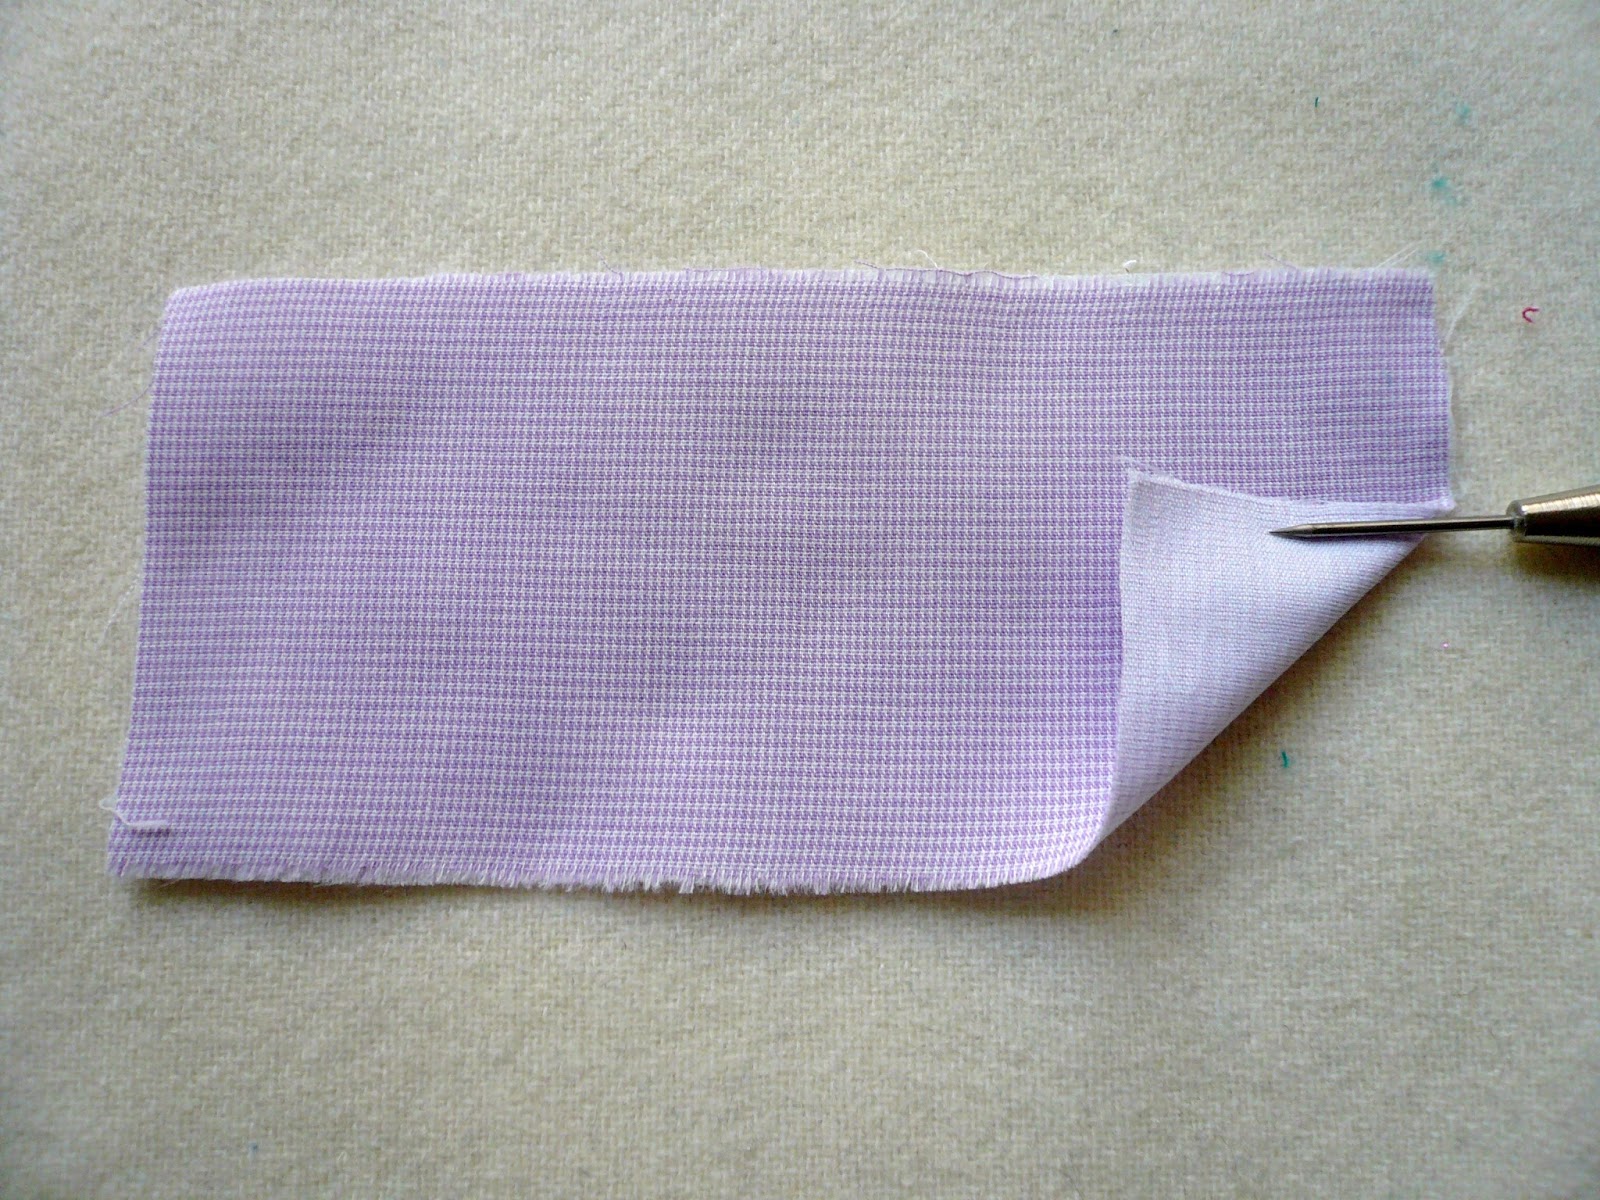
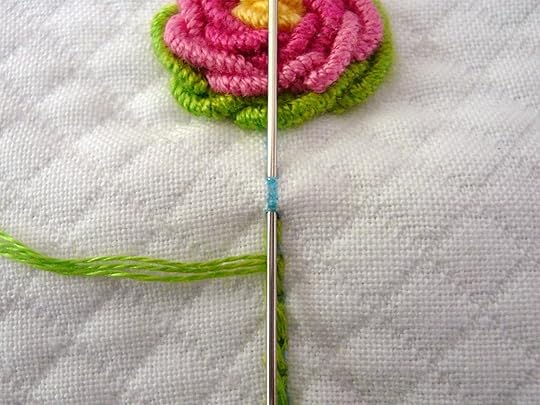
1. Inset hook from front to back through first chosen entredeux hole. Draw through a loop of thread.
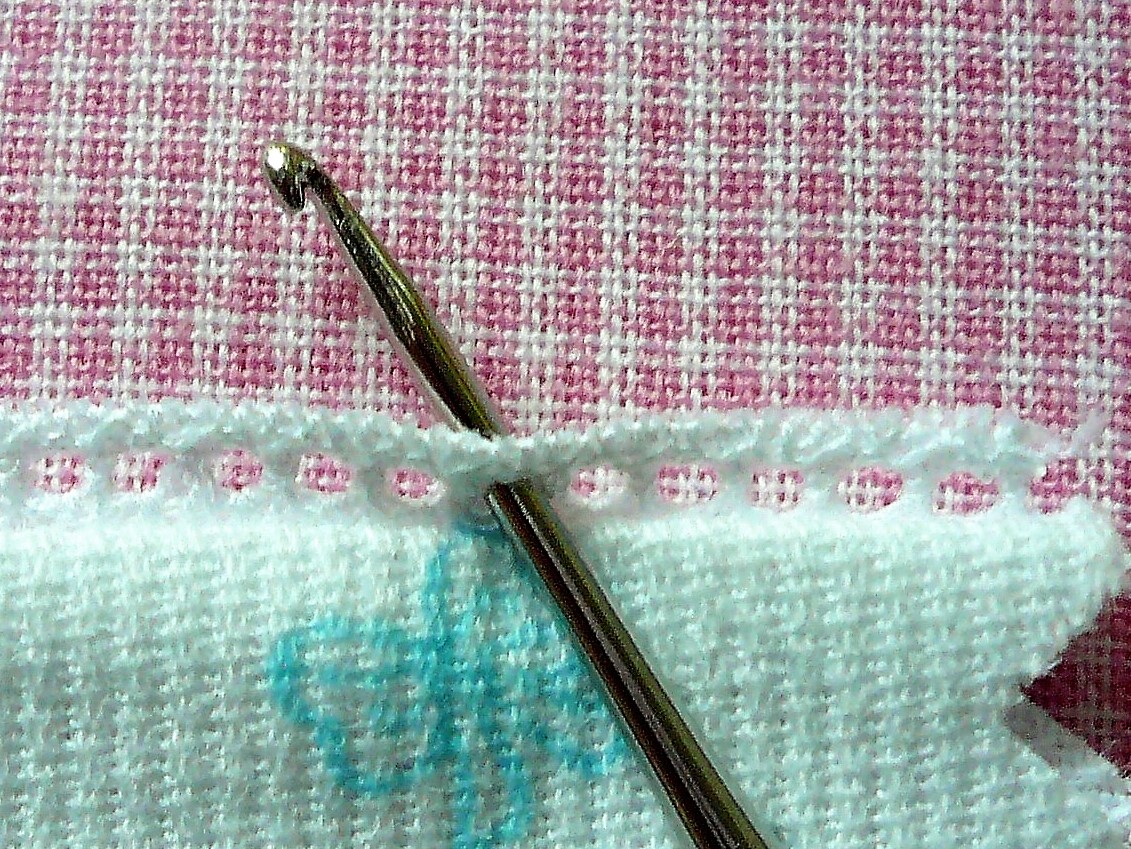
2. Holding the thread tail in place on the back side of the work, make one chain stitch in entredeux hole #1 with the working thread. Tension the new loop down to the edge of the entredeux.
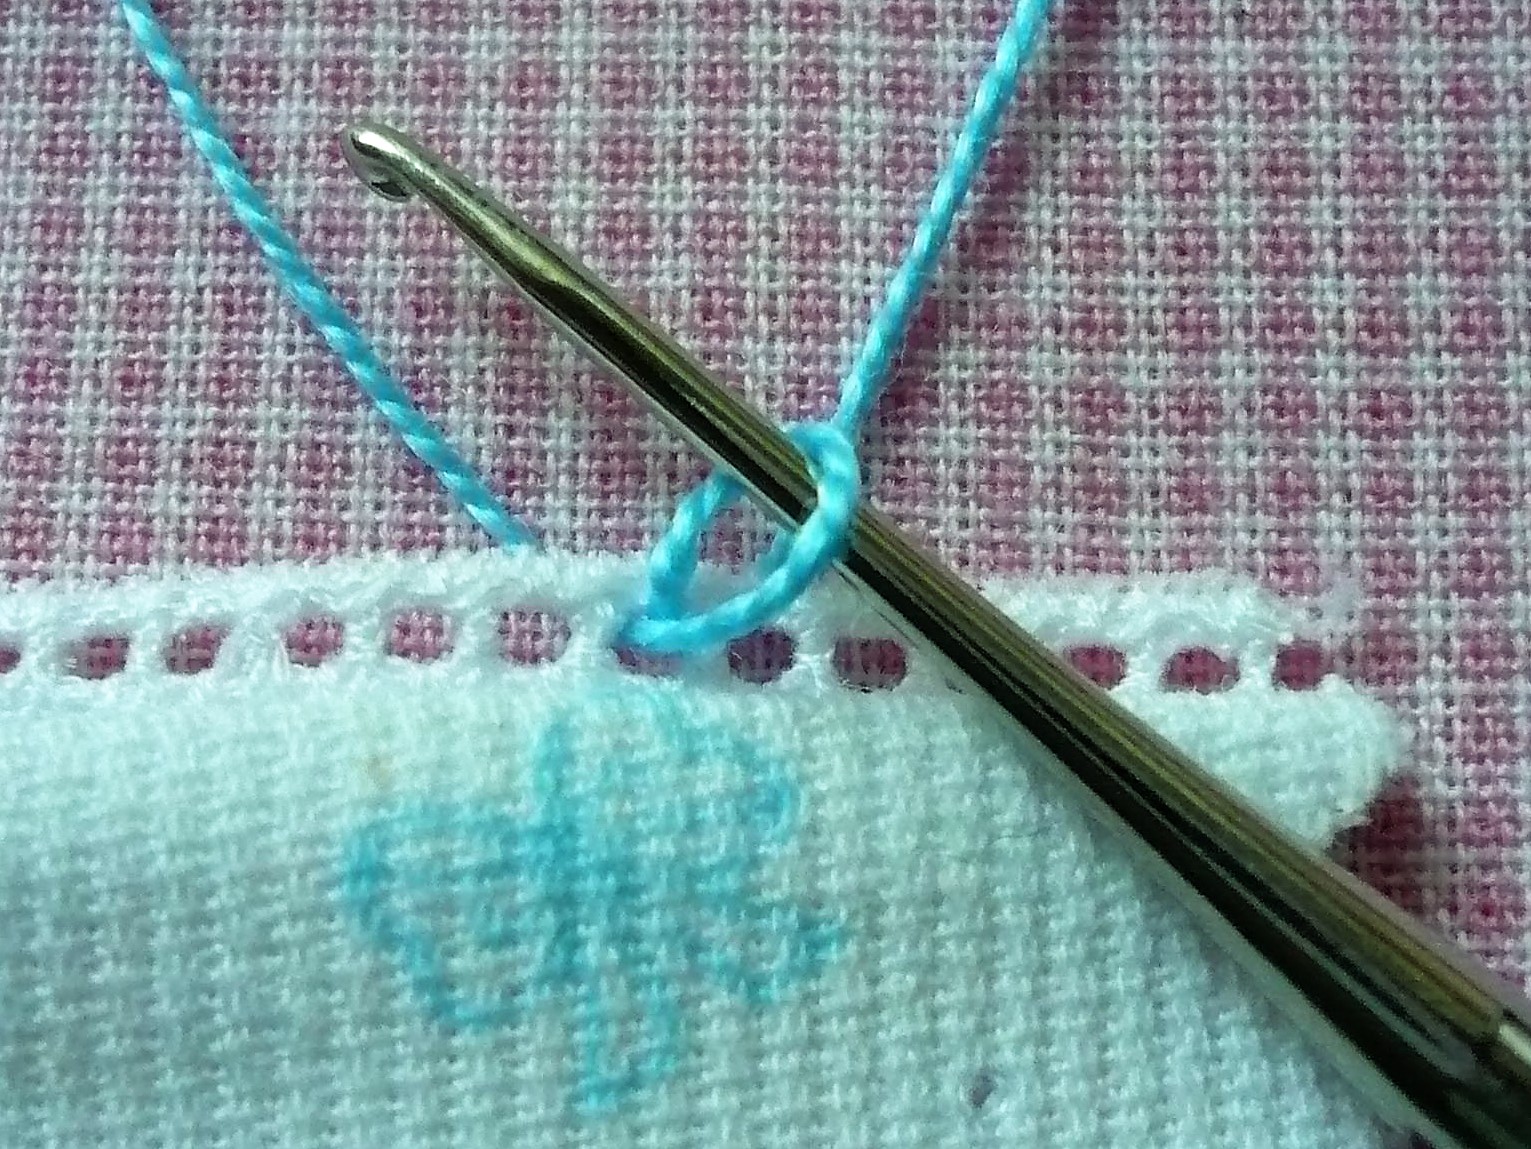
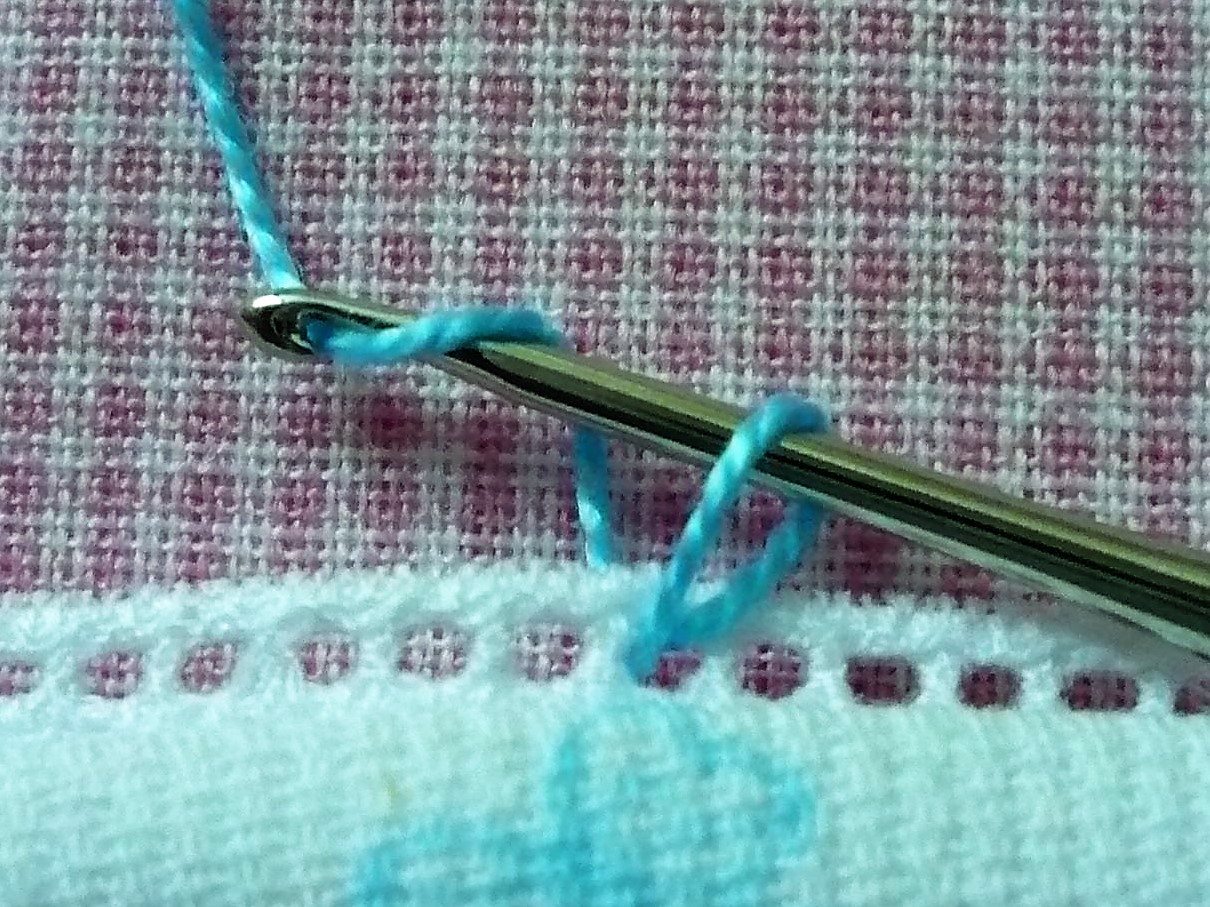
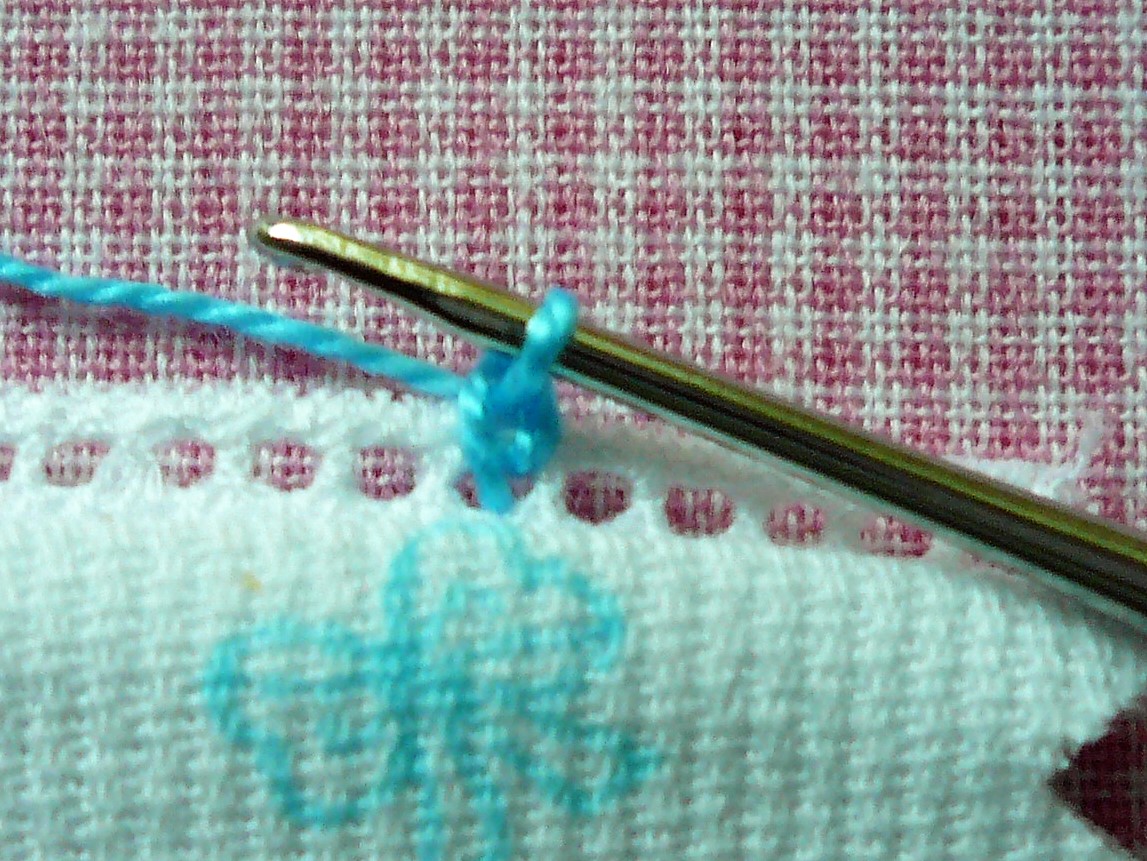
3. Single crochet into the next available entredeux hole. Continue to single crochet in each subsequent entredeux hole keeping an even tension.

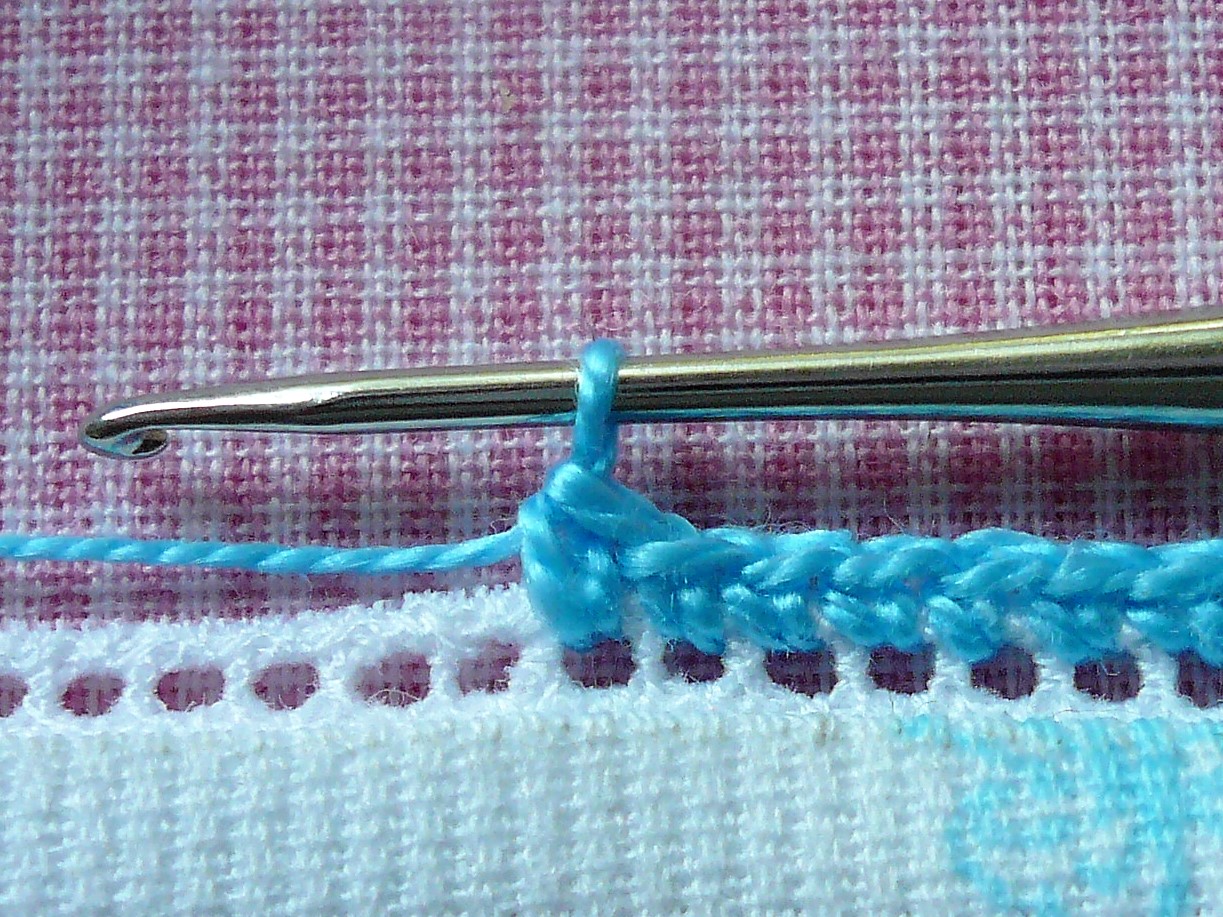
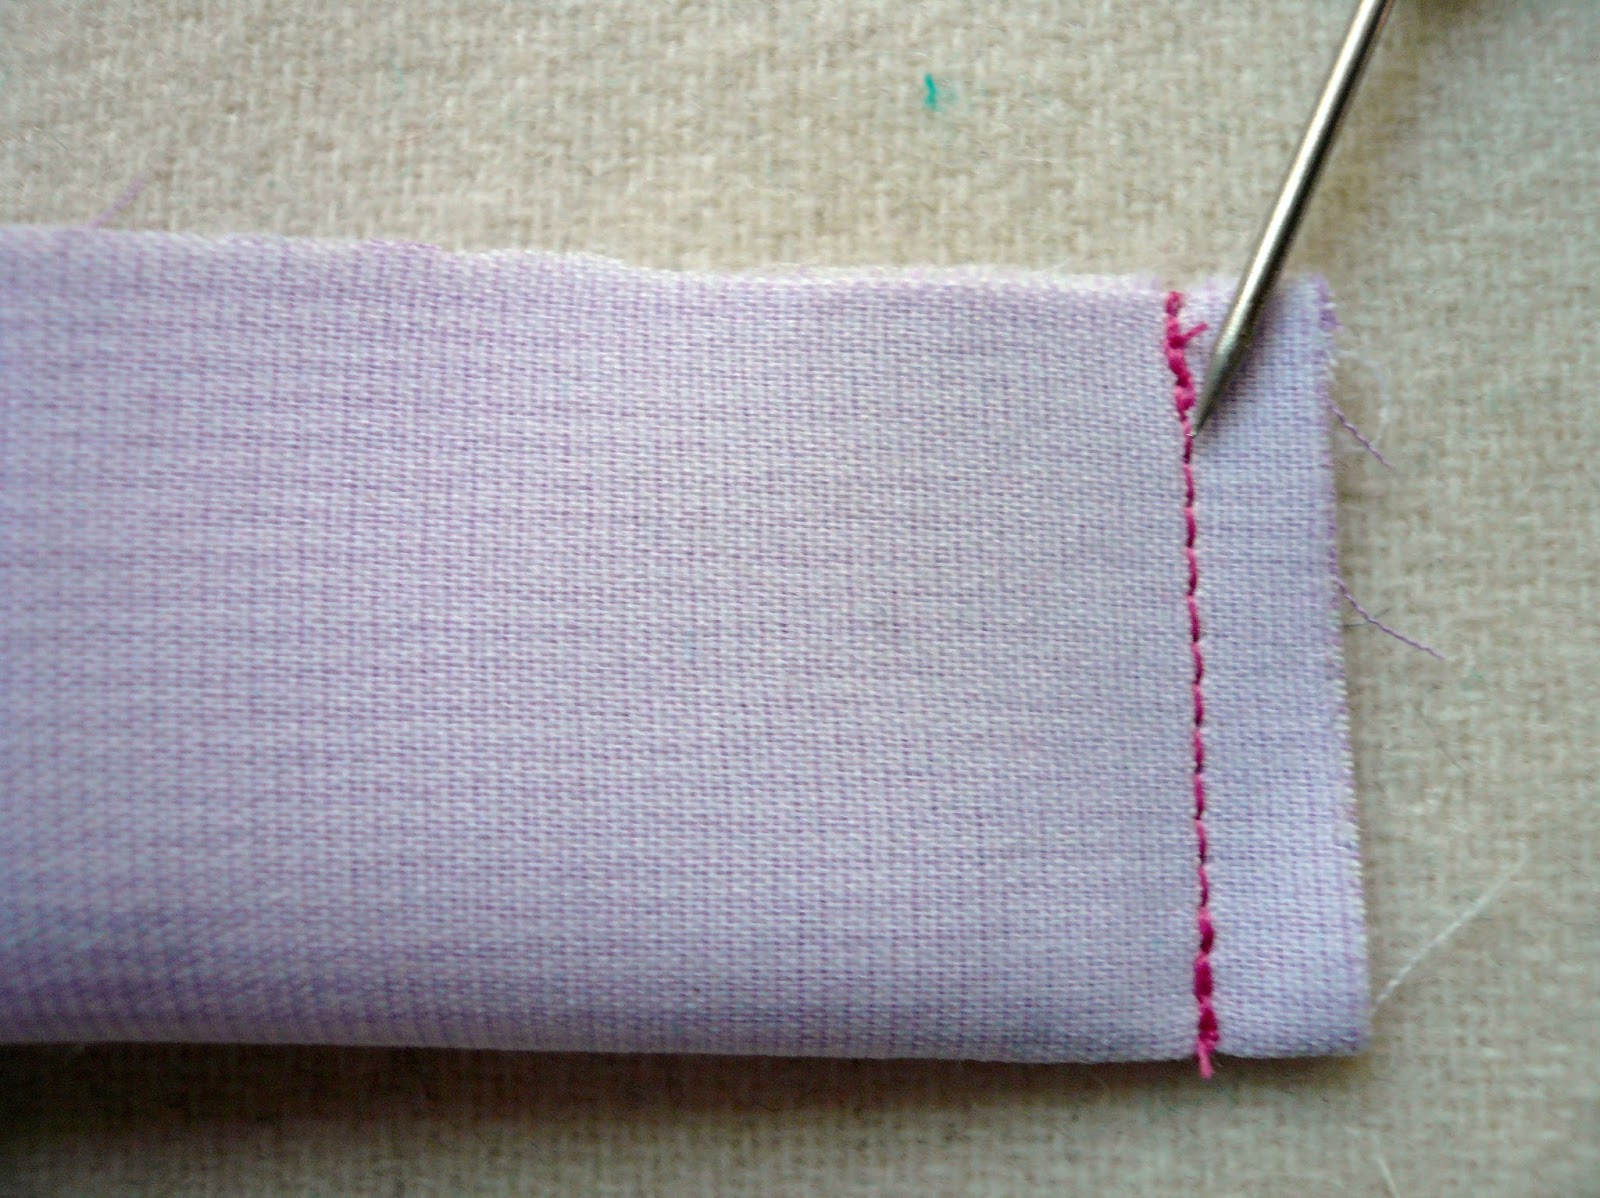
4. Turn work to begin second row.
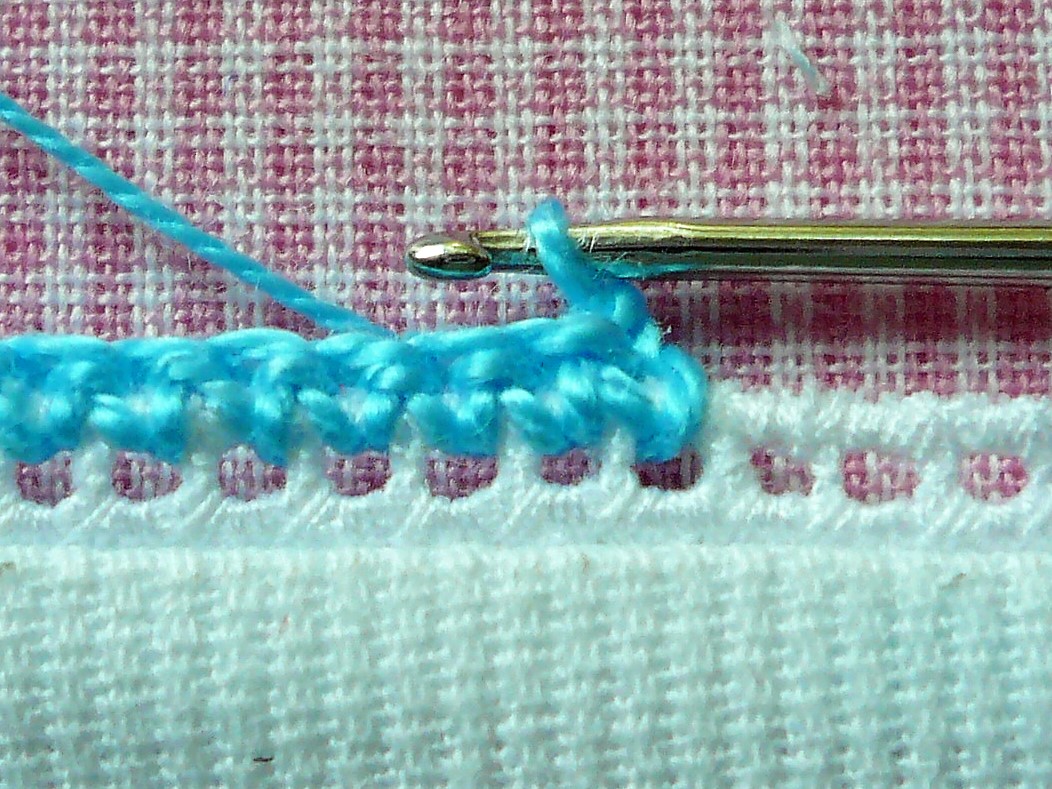
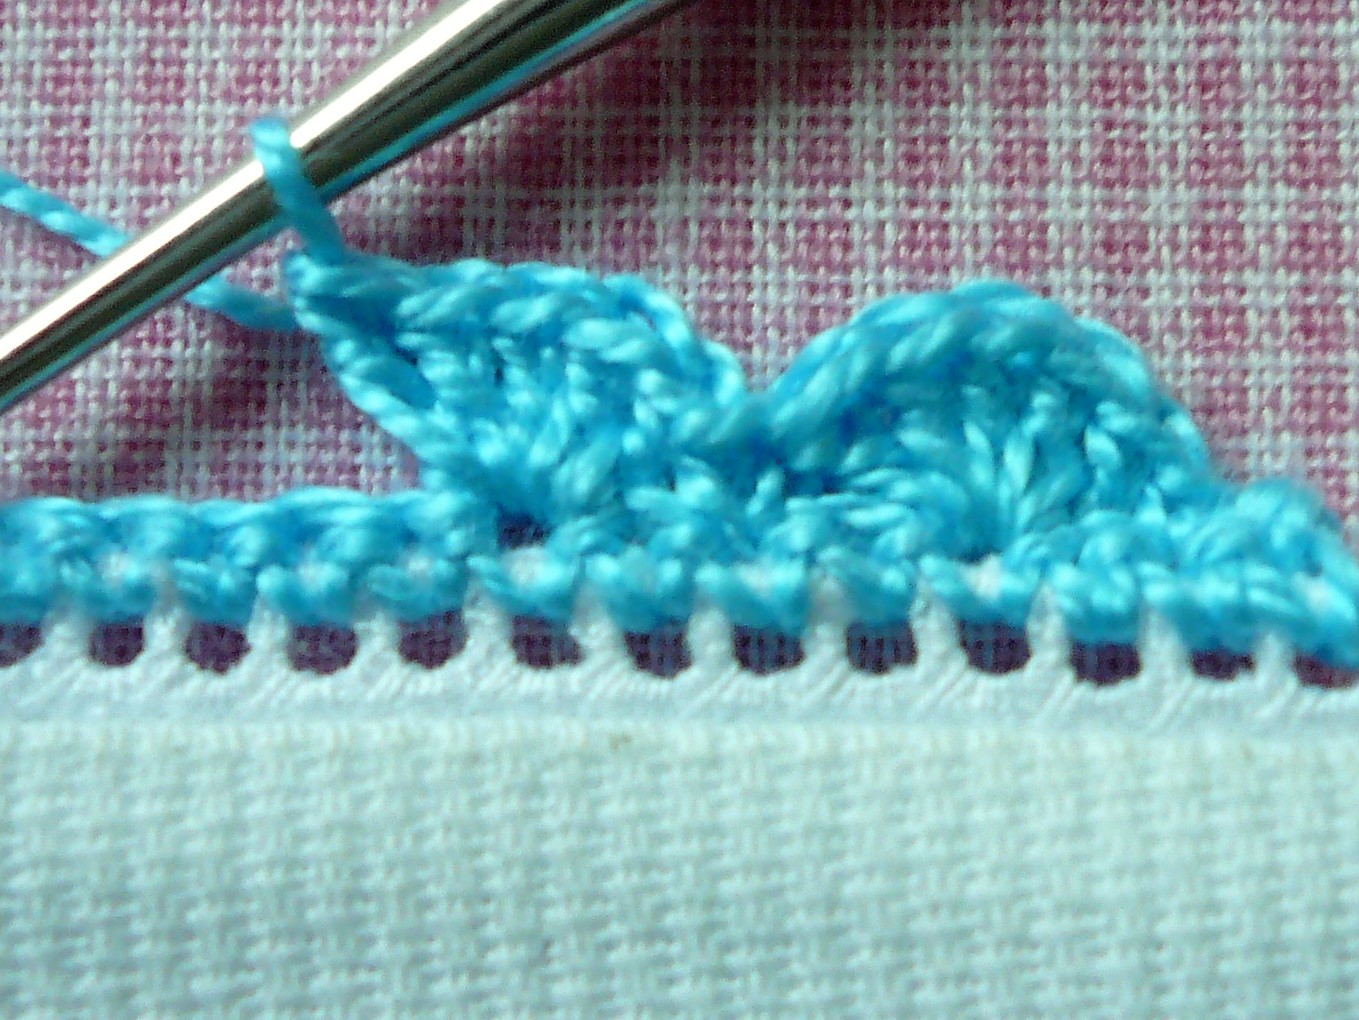
5. Chain 1.
6. Single crochet into first stitch.
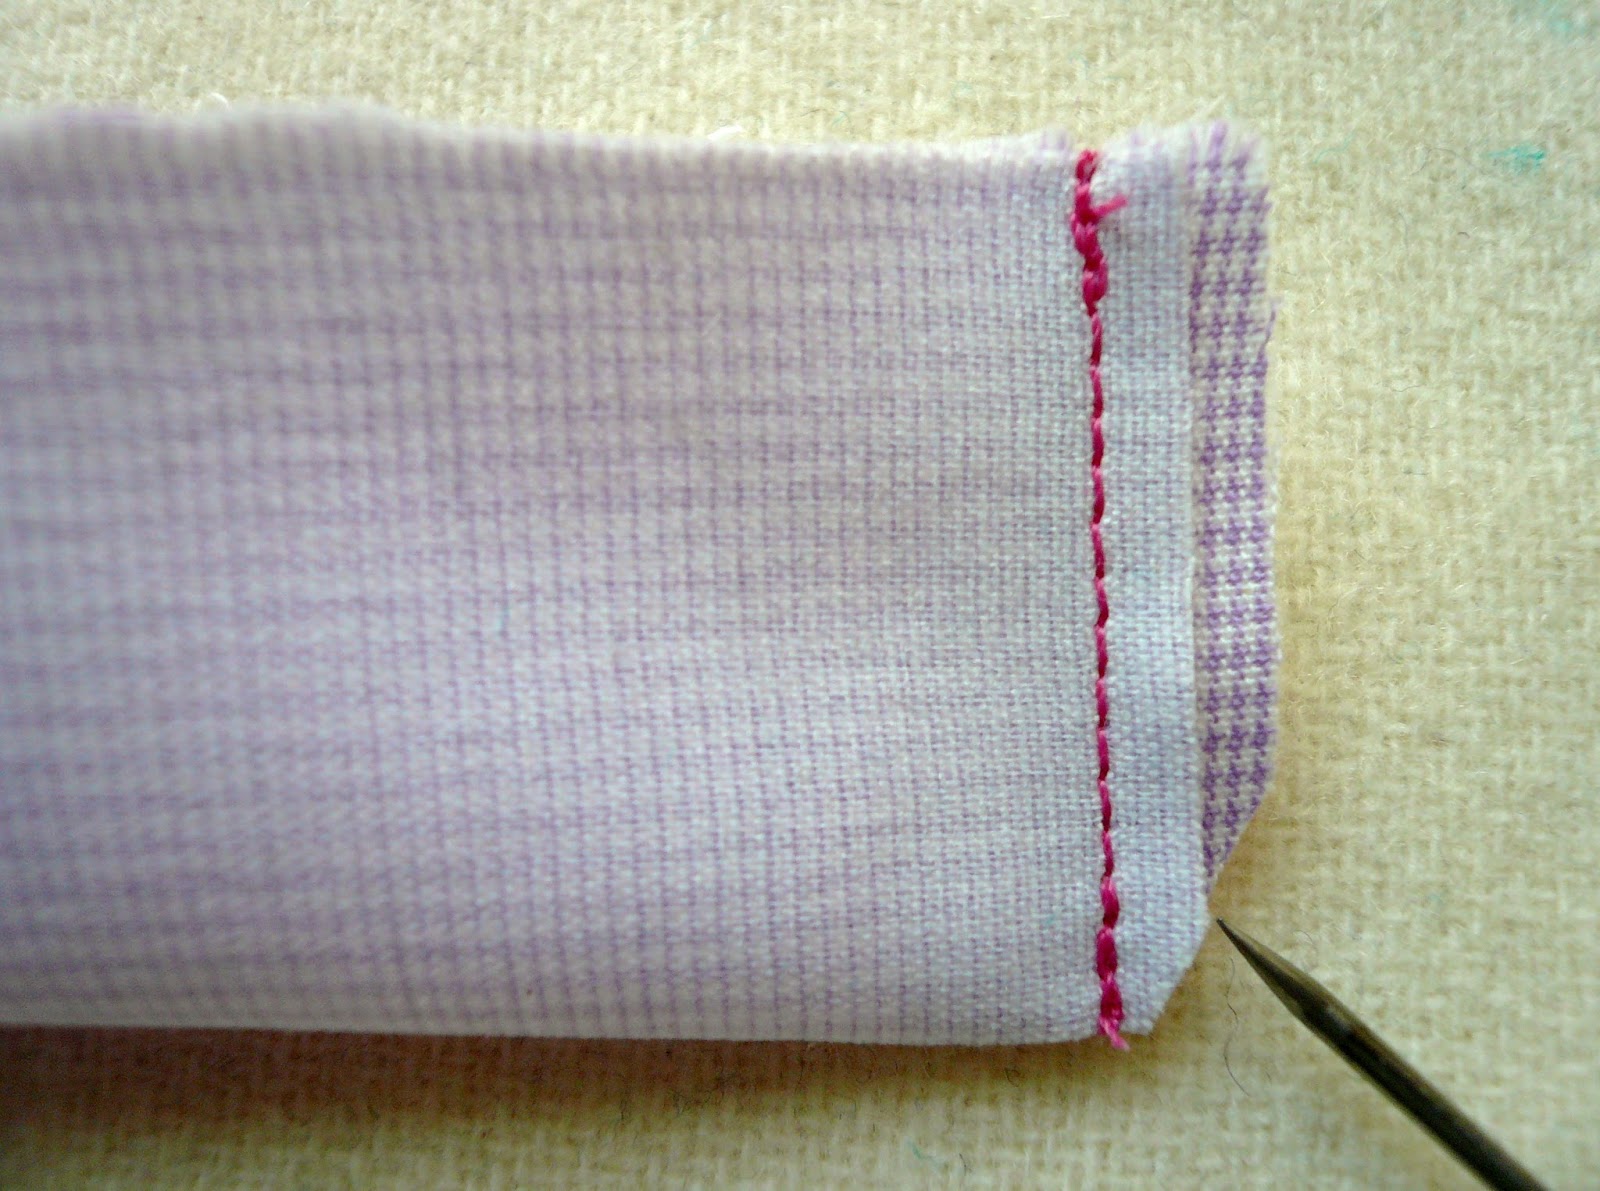
7. Skip 1 stitch.
8. 5 double crochet in next stitch.
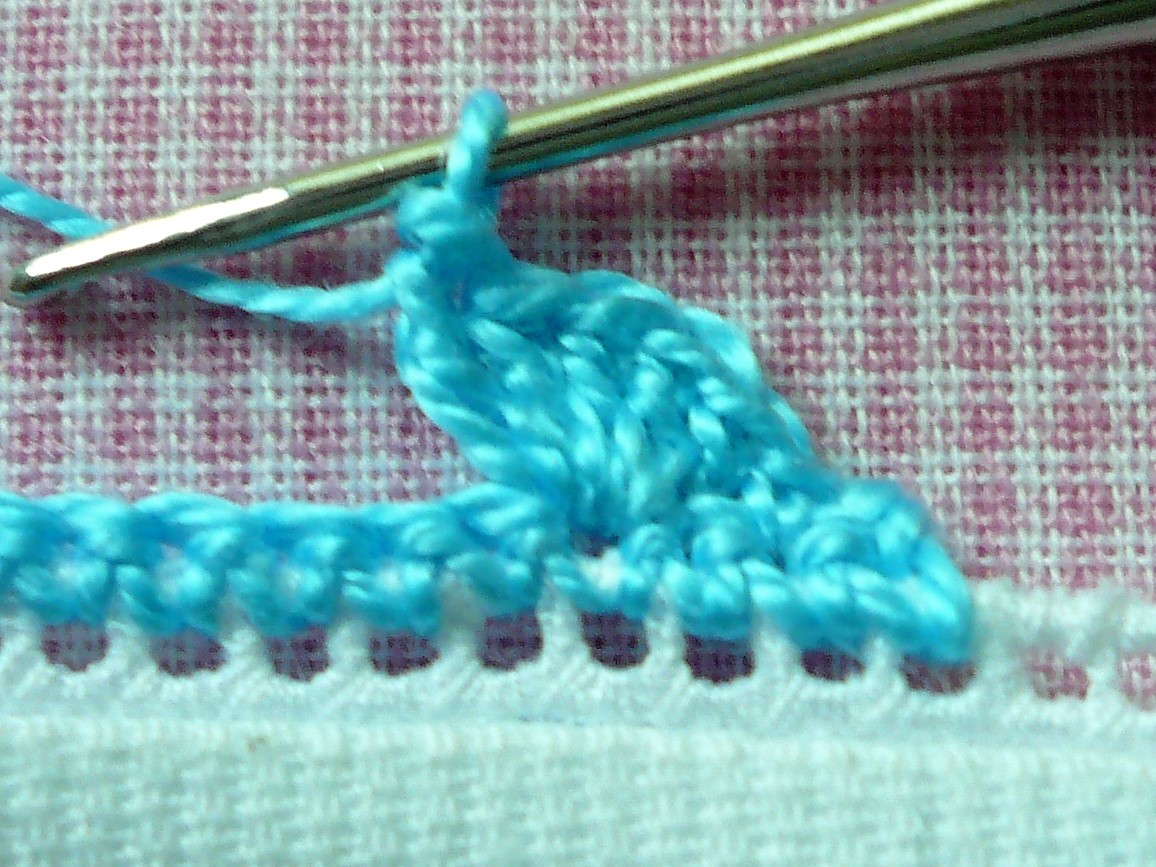
9. Skip 1 stitch.
10. Single crochet in next stitch.
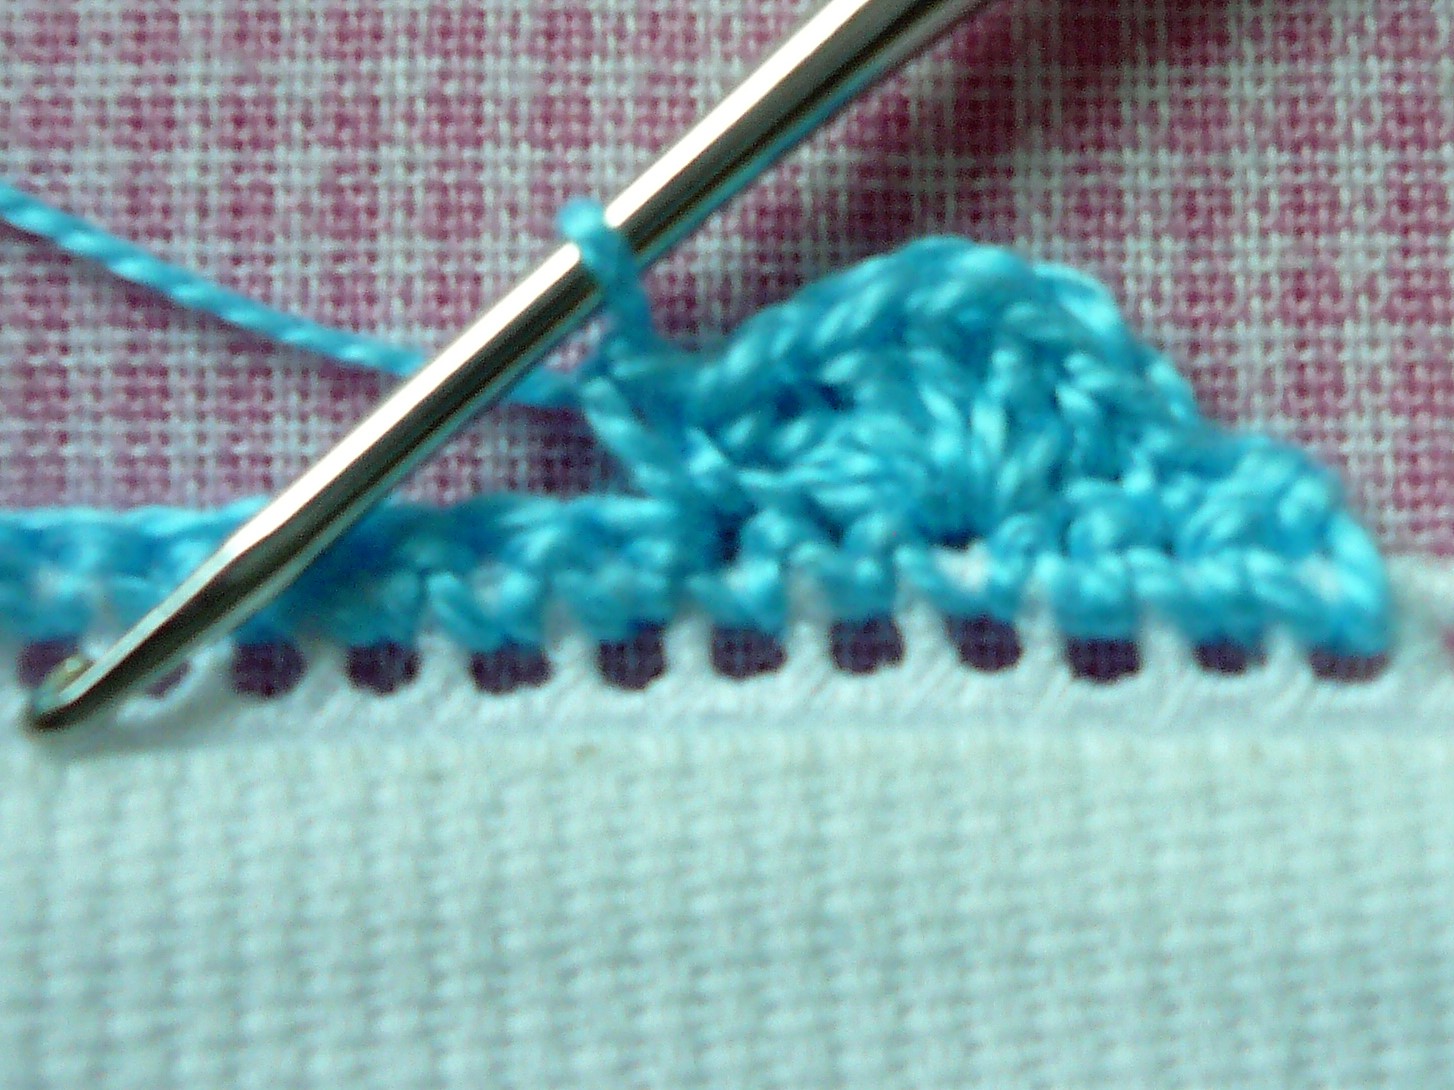
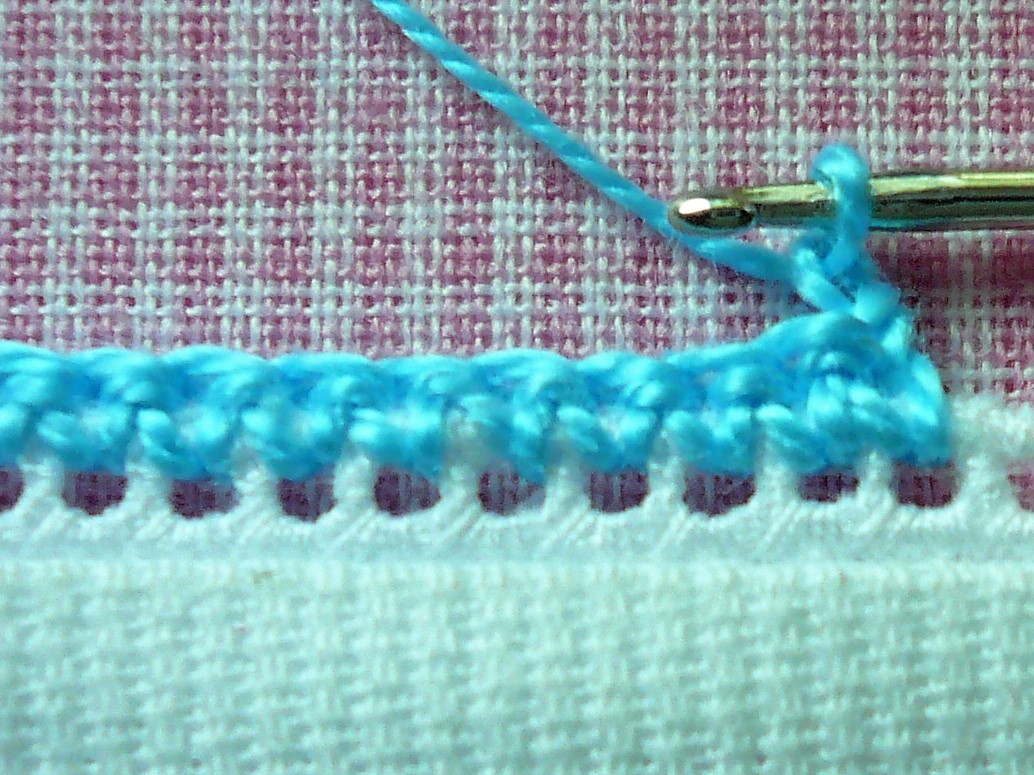
11. Skip 1 stitch
12. 5 double crochet in next stitch.
11. Skip 1 stitch.
13. Single crochet in next stitch.
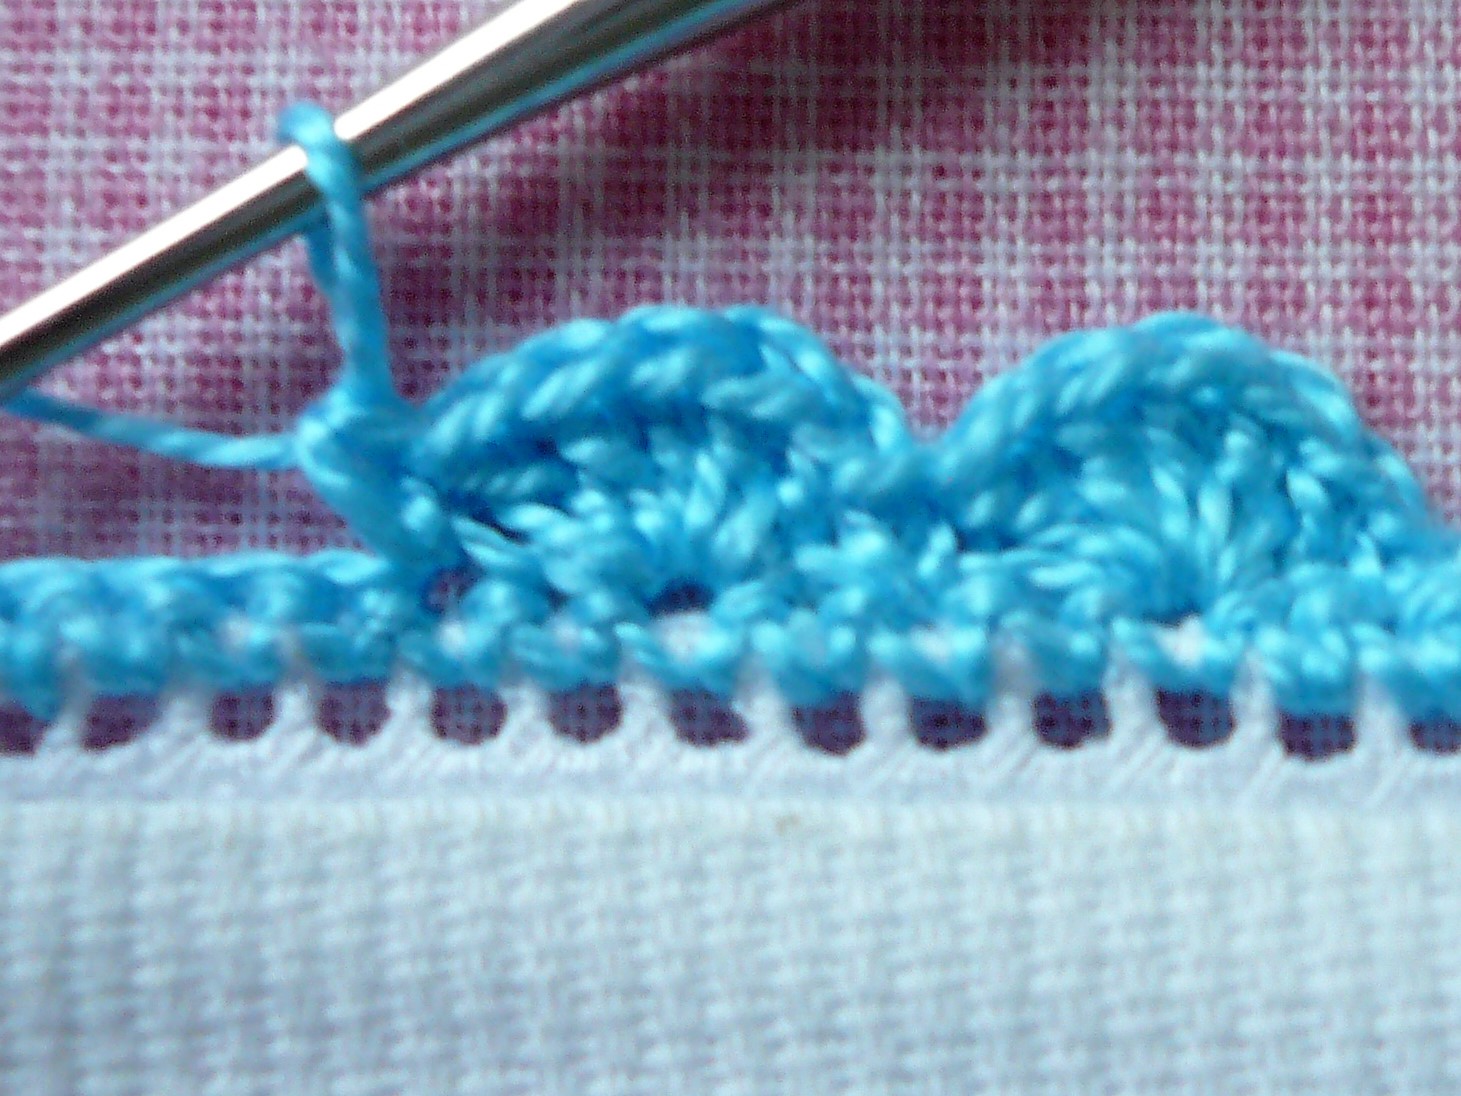
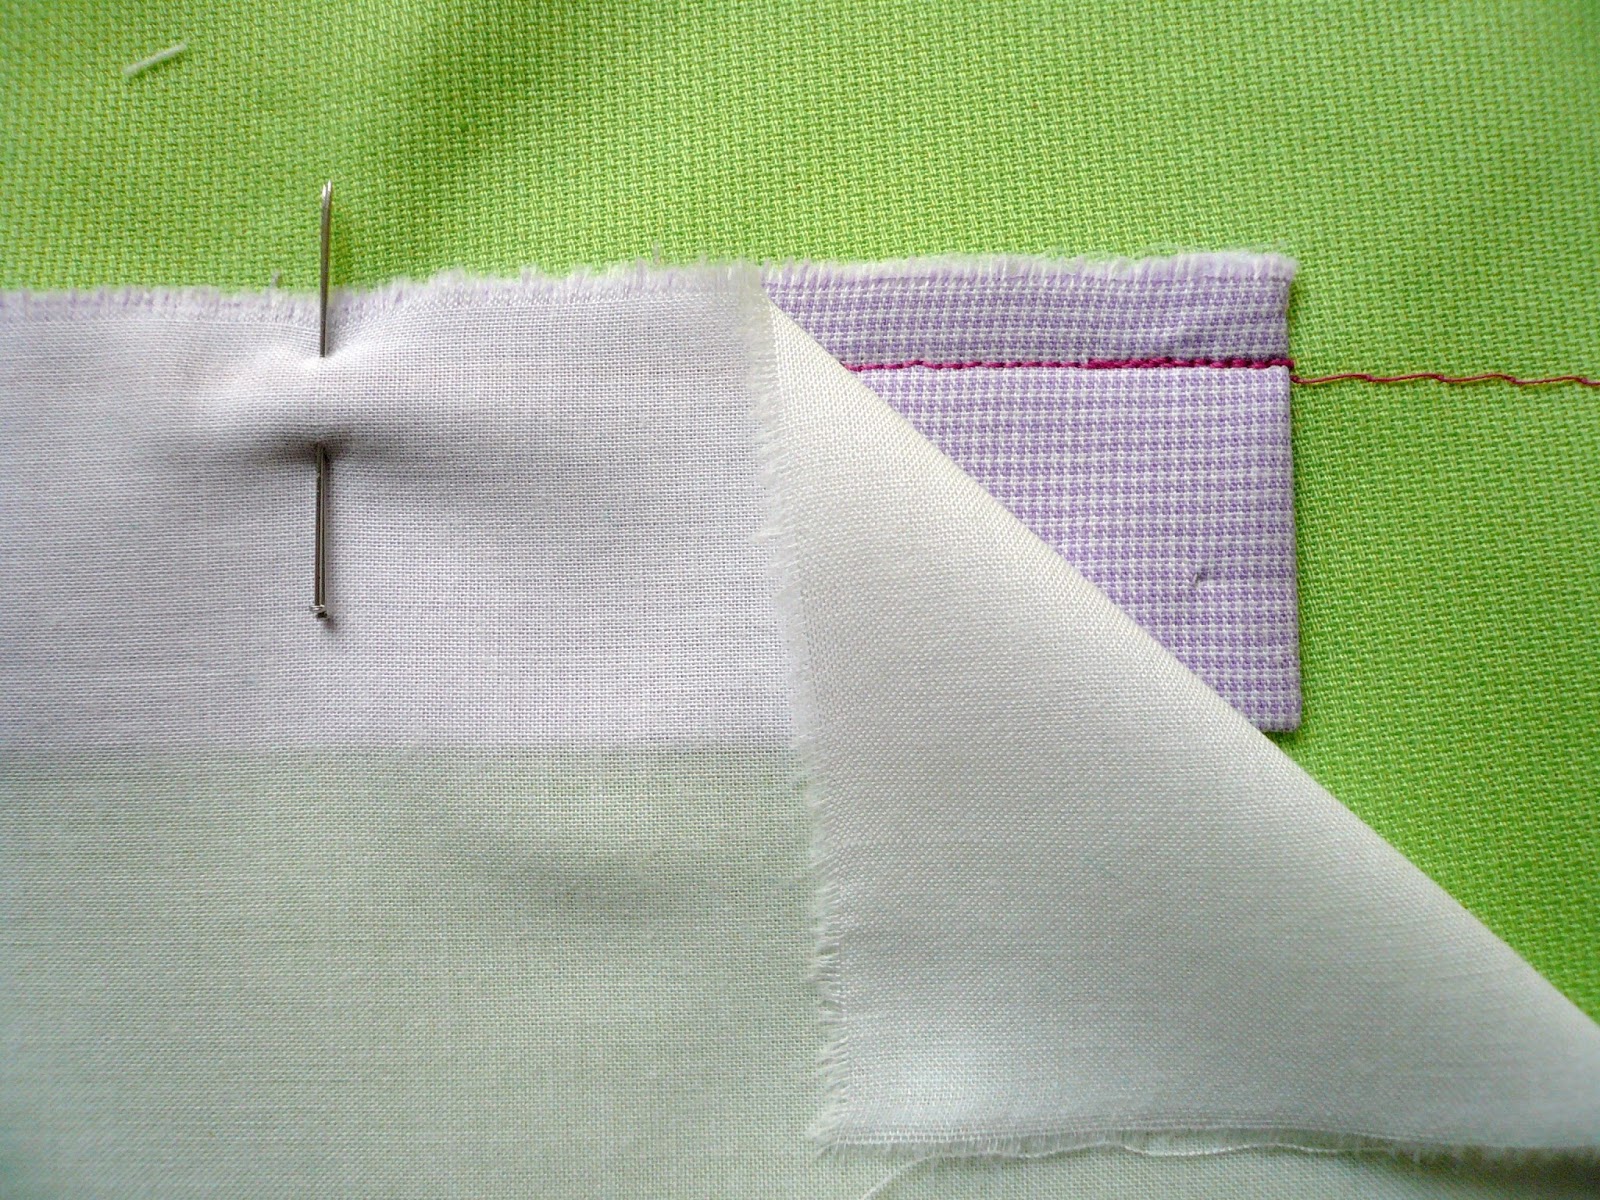
14. Continue in established pattern for desired length.
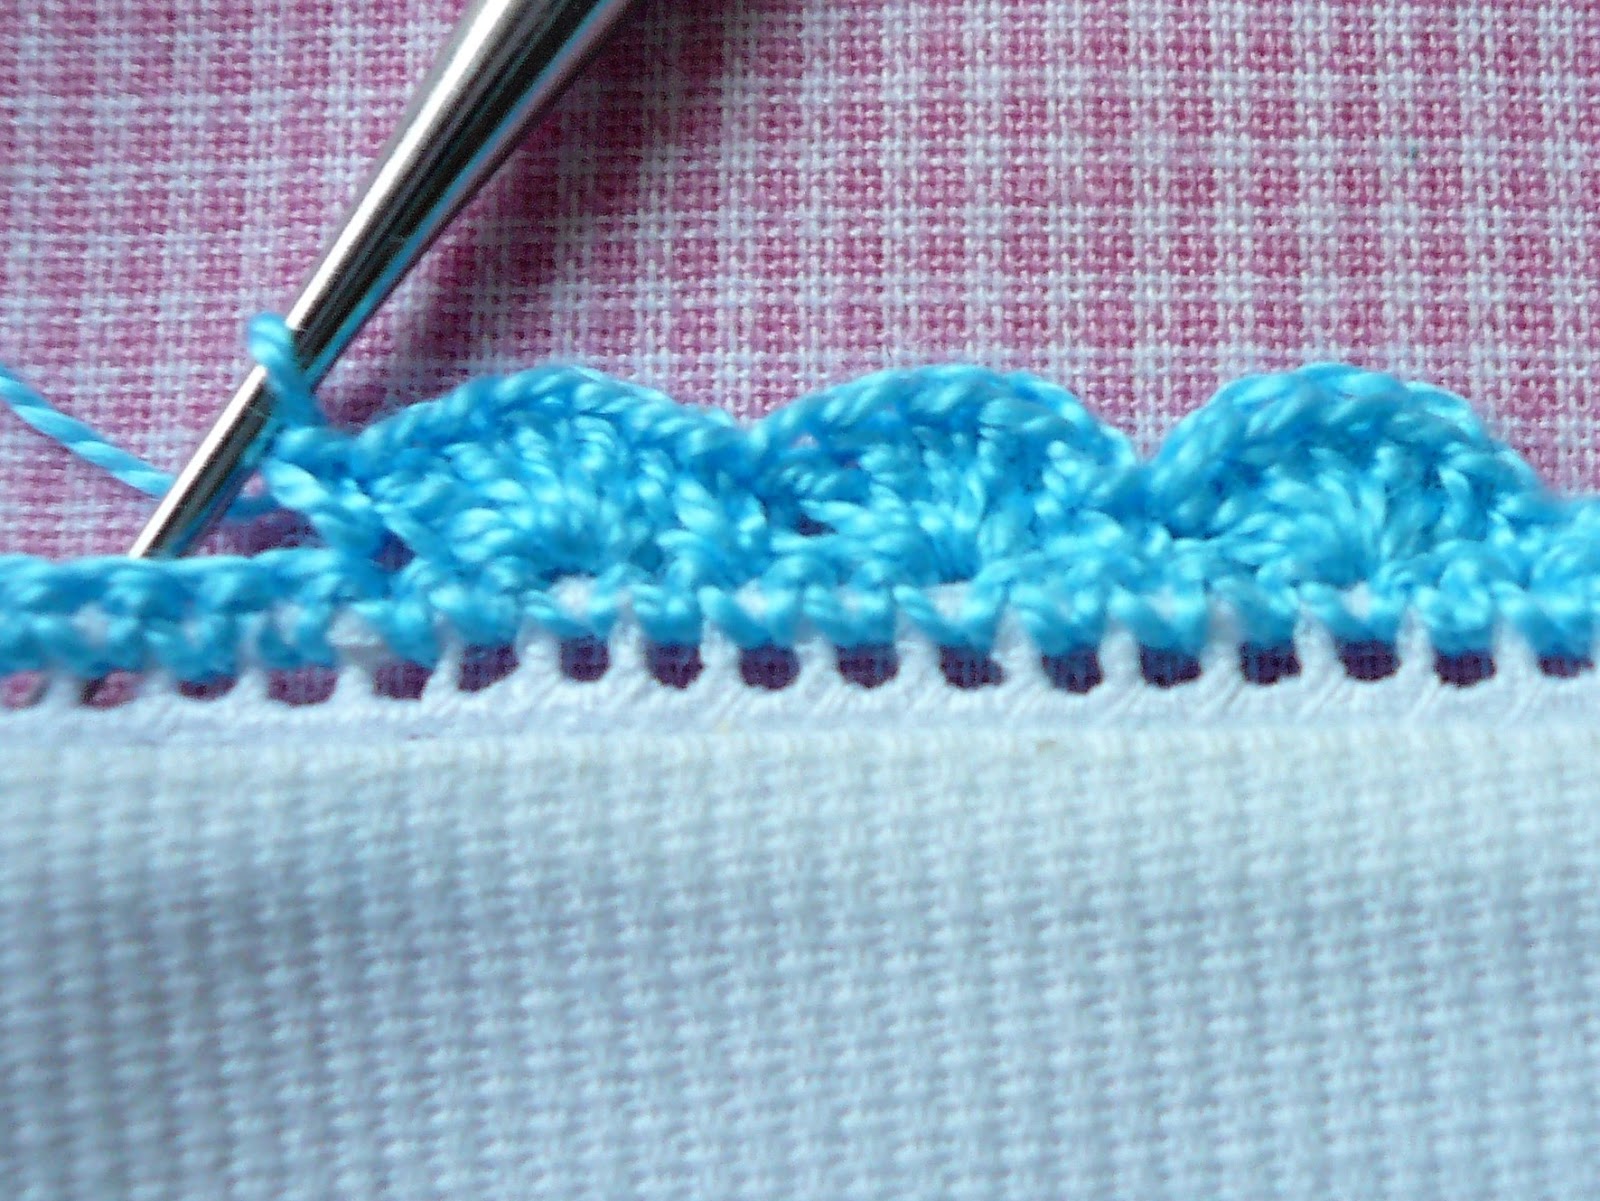
15. The abbreviated pattern would read:· Row 1: SC· Turn work· Row 2: Ch 1, SC in first stitch, *skip 1 st, 5 DC in next st, skip 1 st, 1 SC in next st; Rep from * to end. Fasten off.
Chain Stitch
Single Crochet
Double Crochet


March 6, 2020
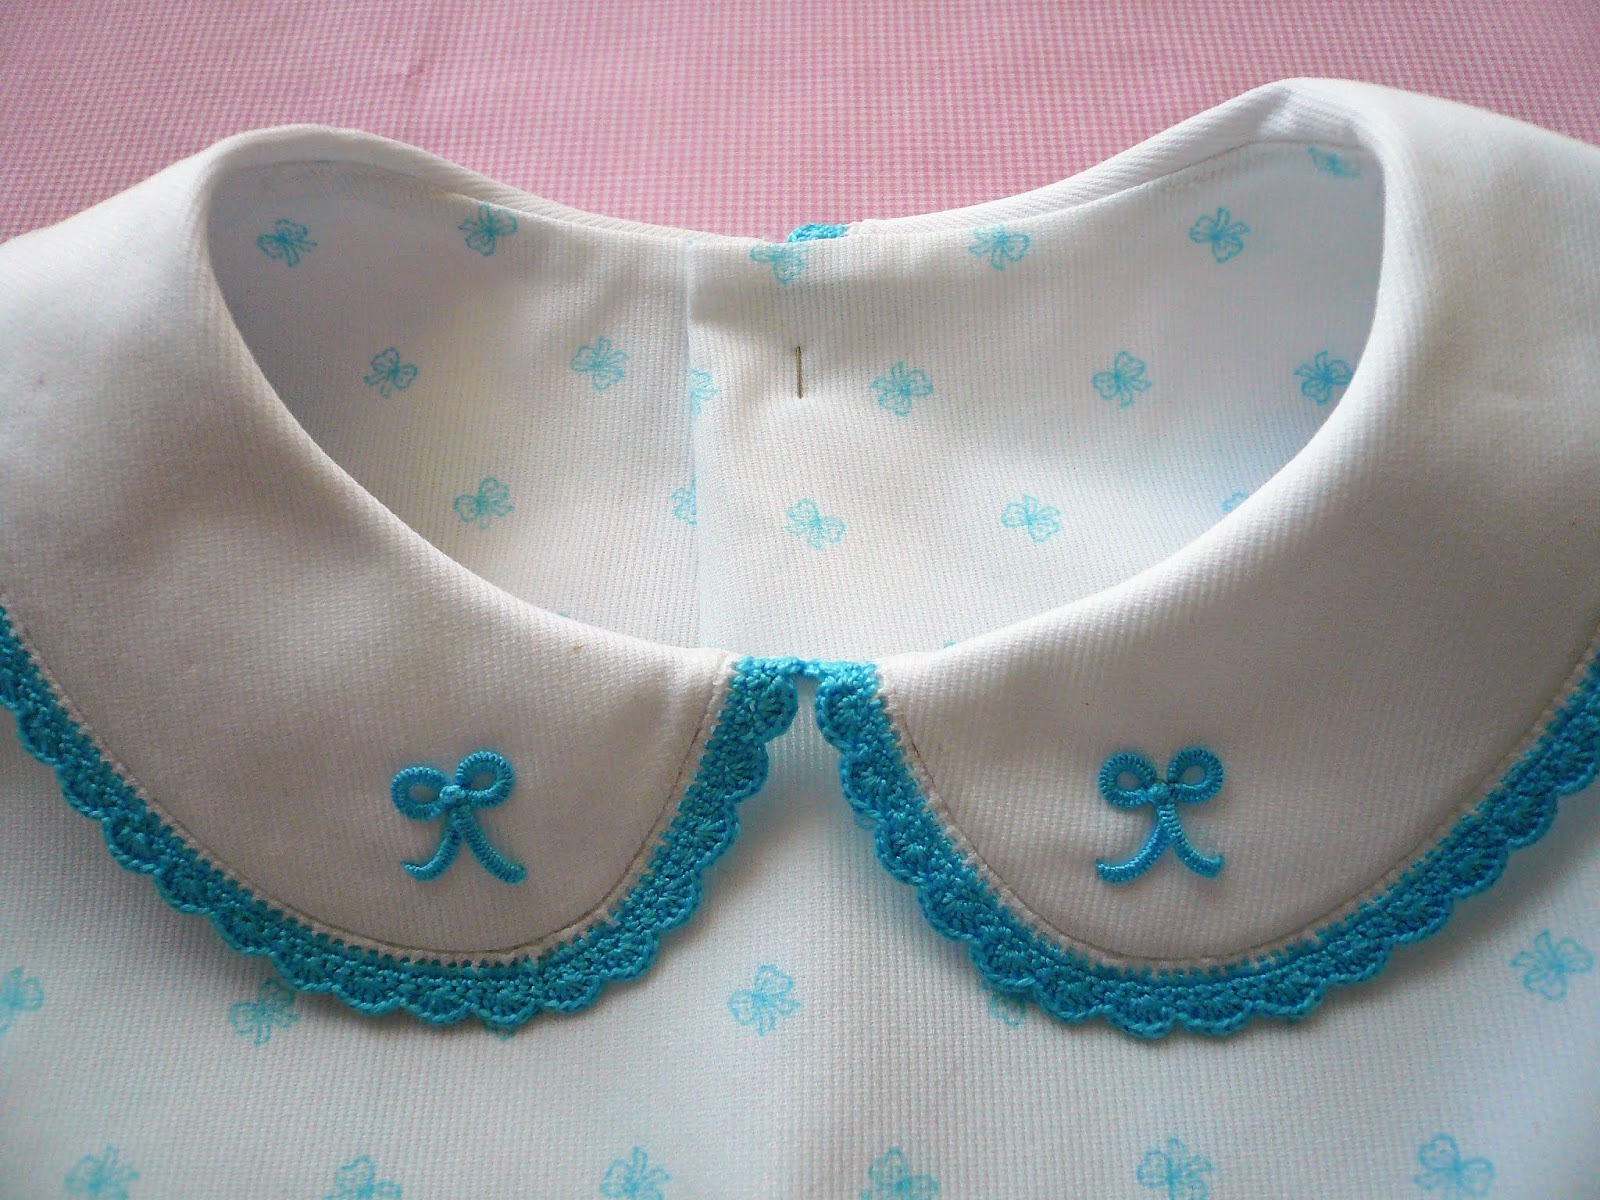
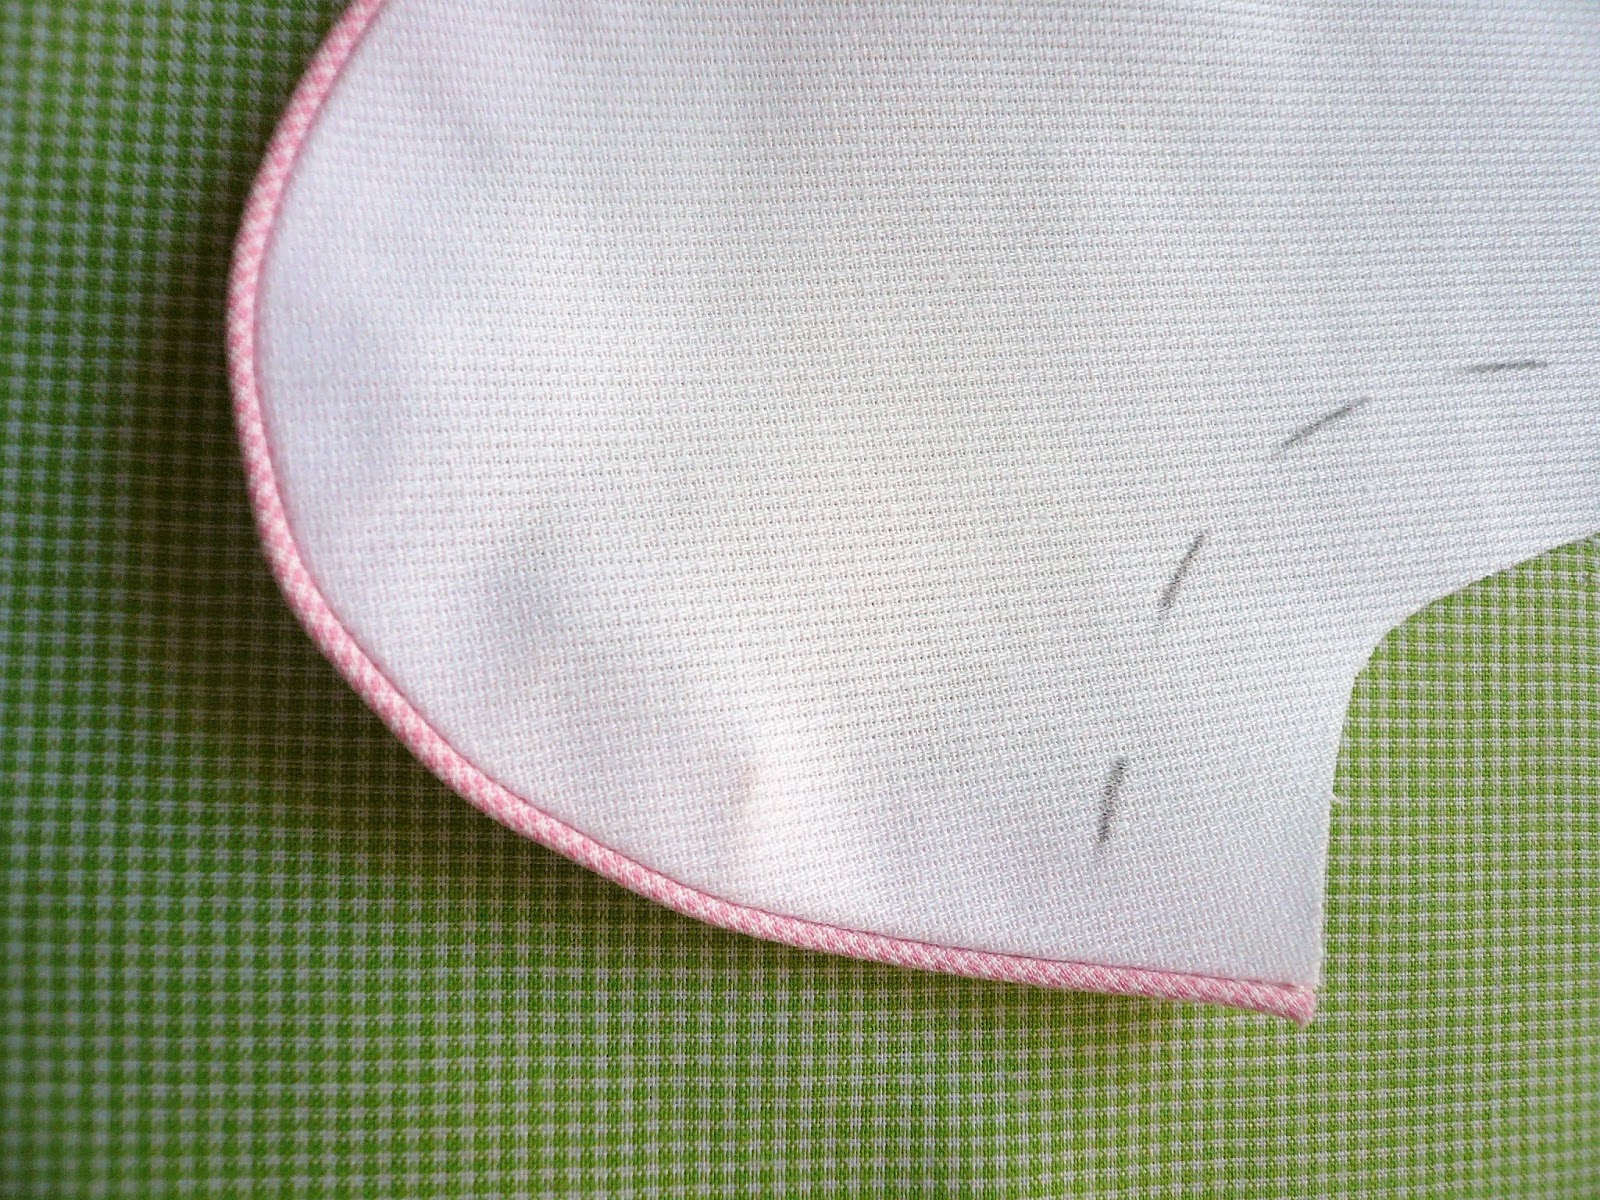
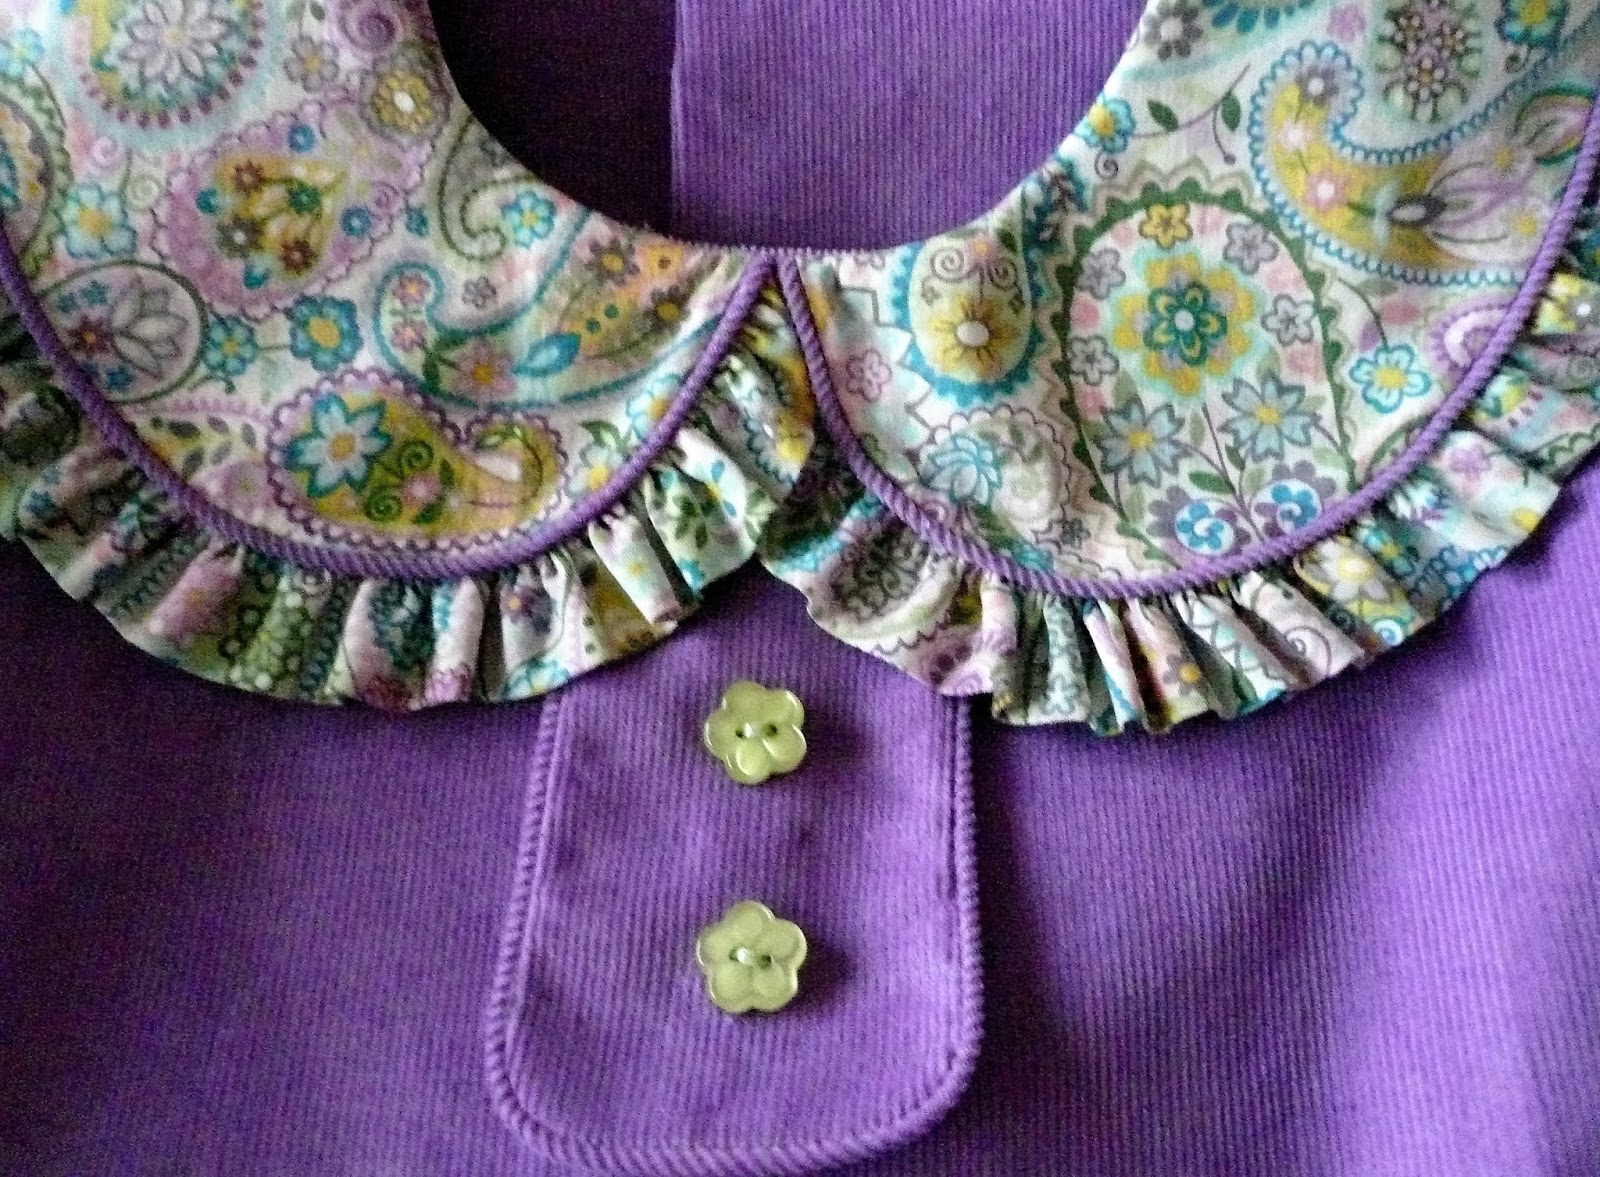
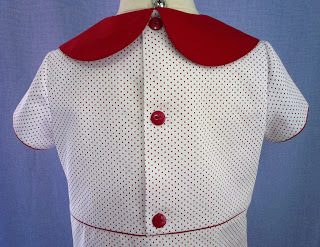
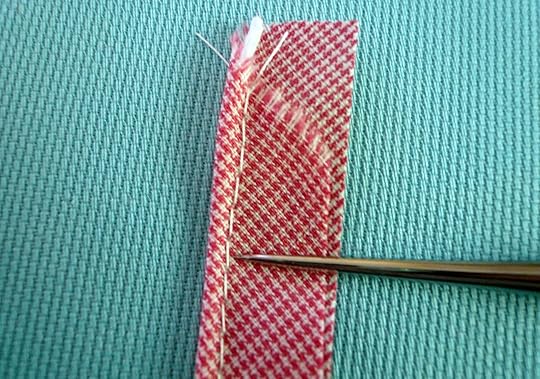
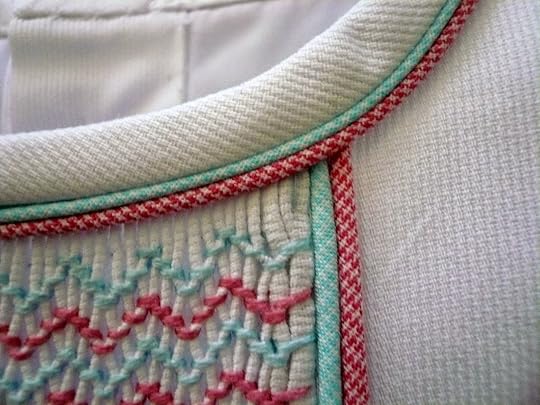
Fabric Ruffle, Piped, Peter Pan Collar Tutorial
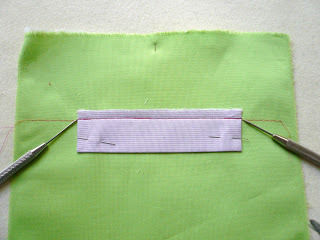
Fabric Ruffle, Piped, Peter Pan Collar 1. Using a #2 pencil, trace the collar outline (make sure to flip the pattern over to make a left and a right collar) onto the right side of a block of fabric. Be careful to line up the grain line of the collar to the grain line of the fabric. DO NOT cut out the collar. Mark the center front, center back, and the shoulder line.
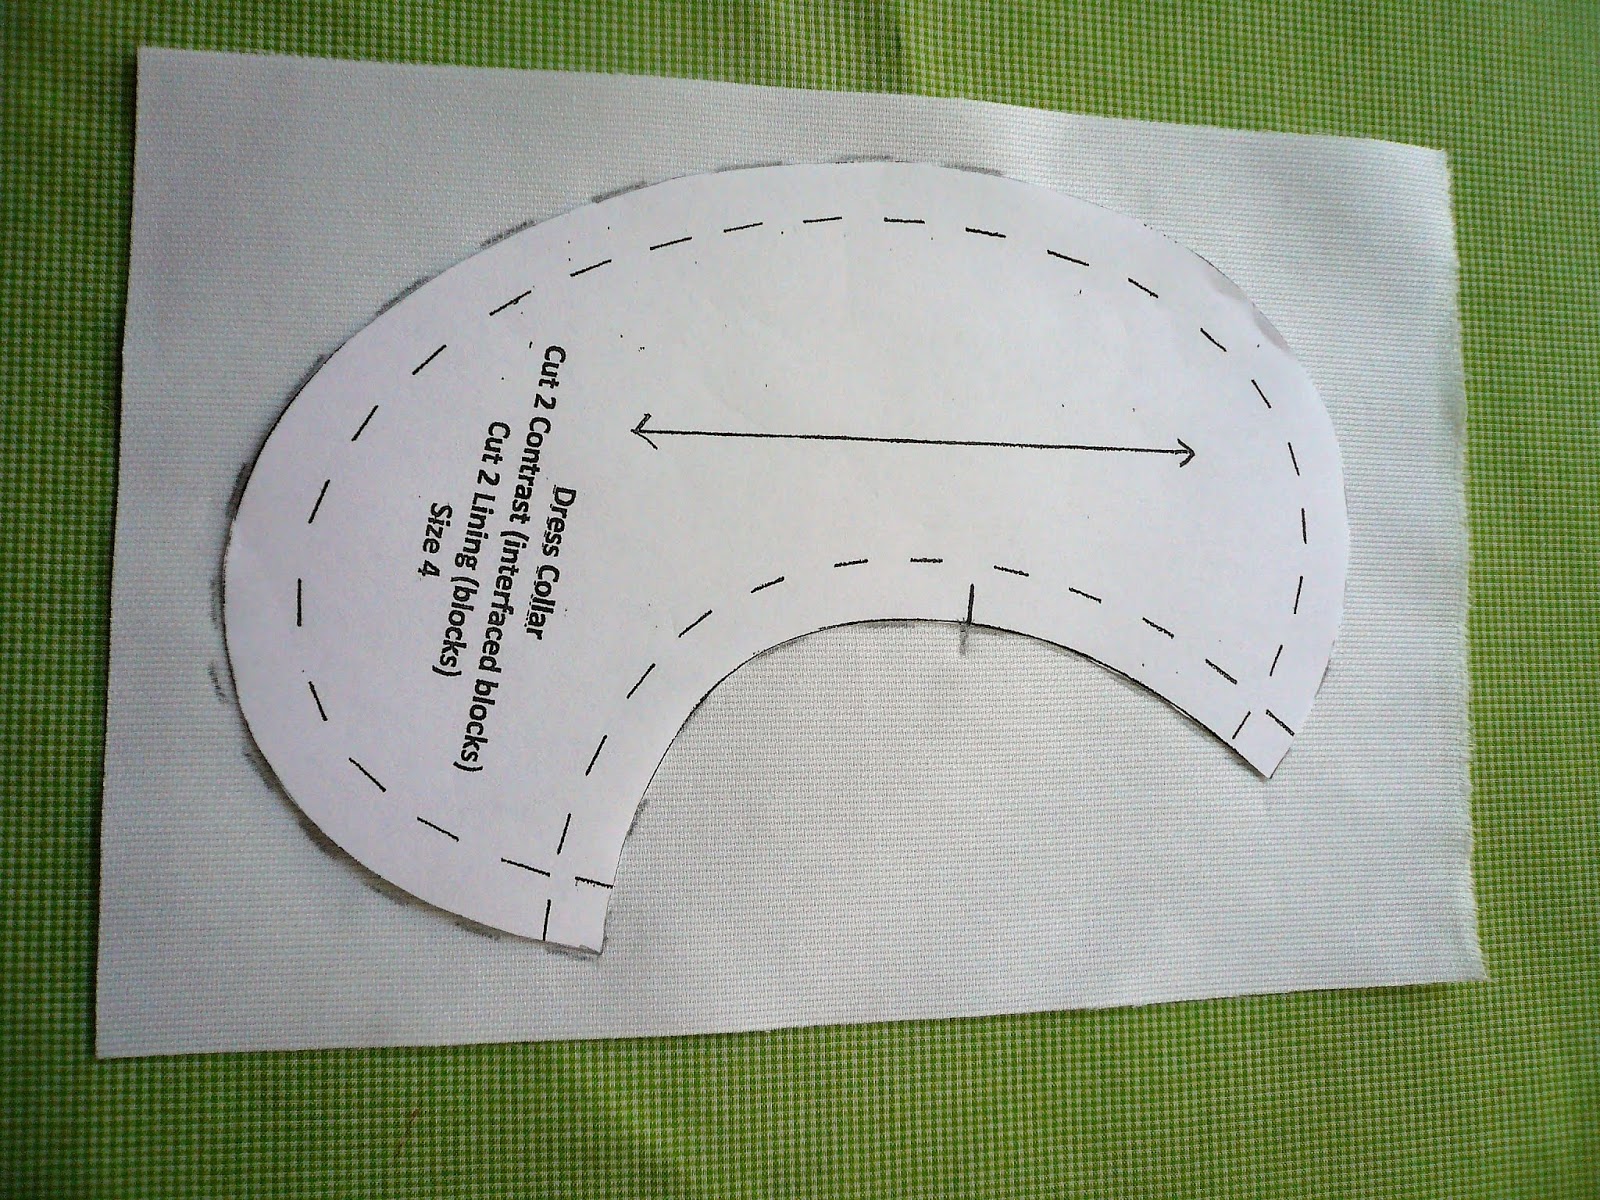
2. Fuse lightweight interfacing to the wrong side of the collar fabric block. For lightweight fabrics an alternative to interfacing is to use two layers of the outer fabric.
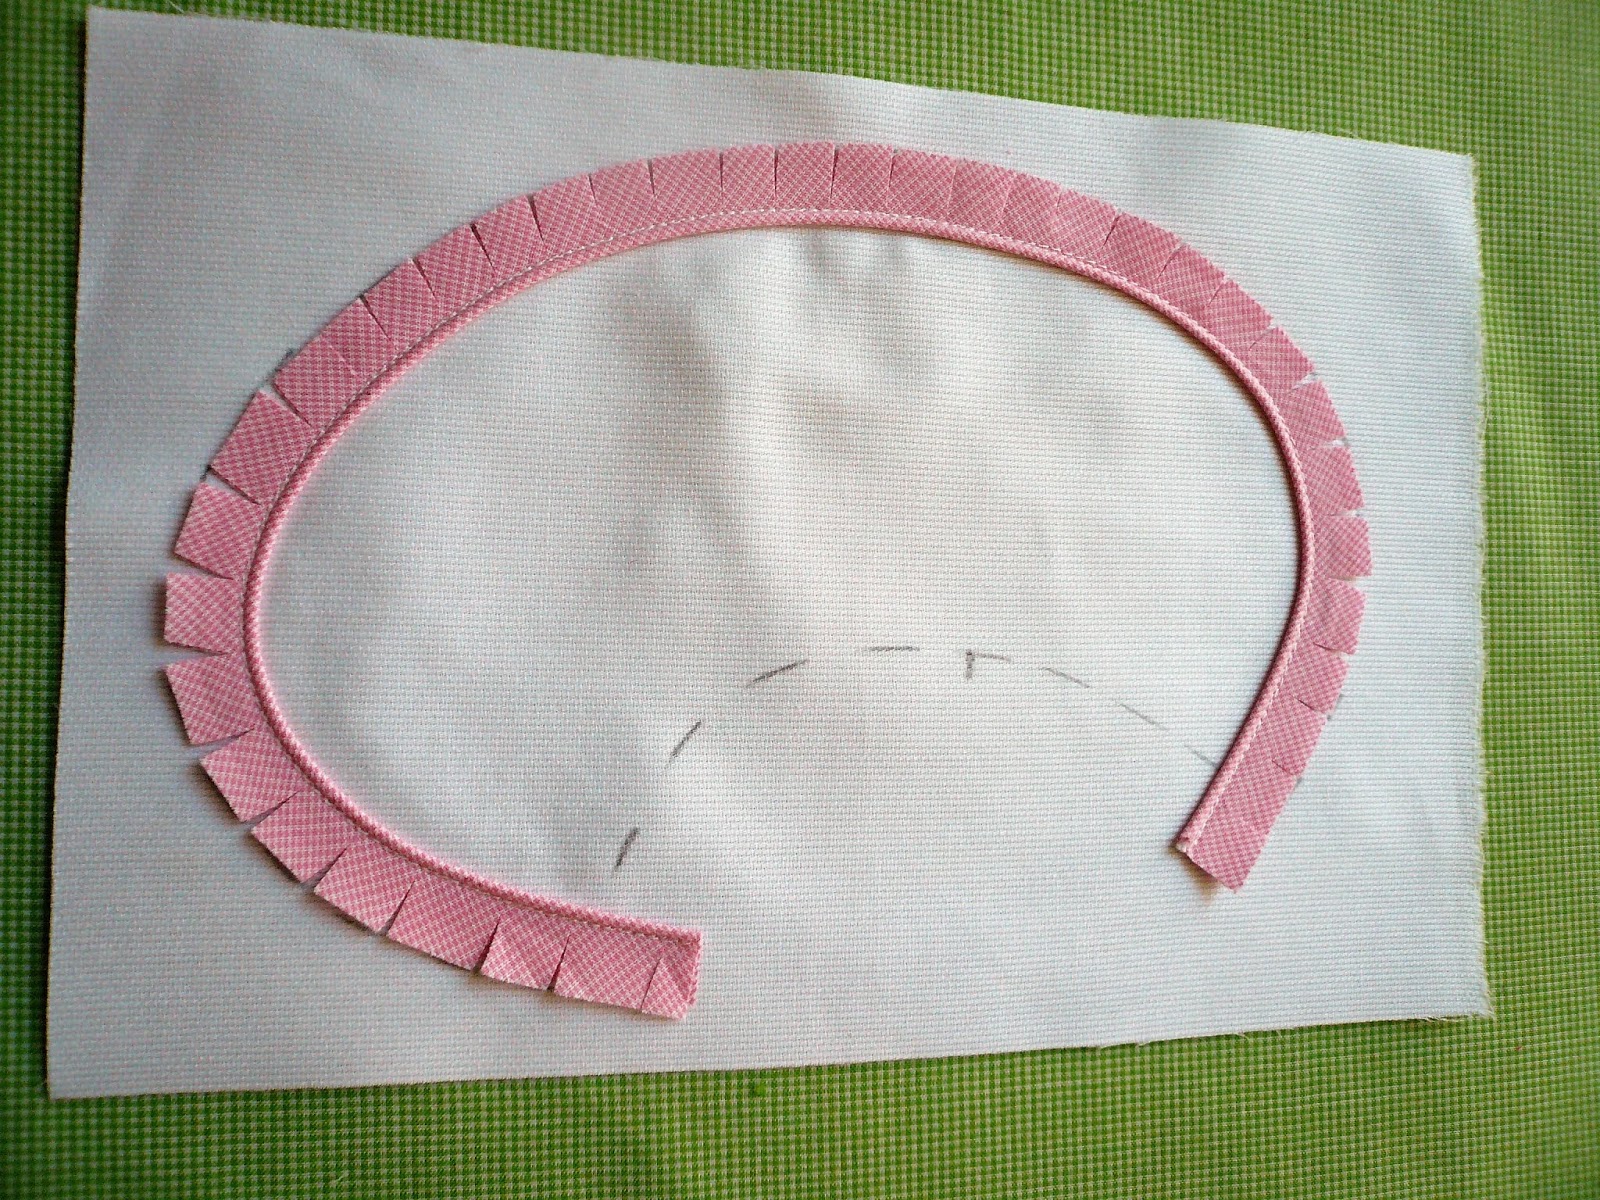
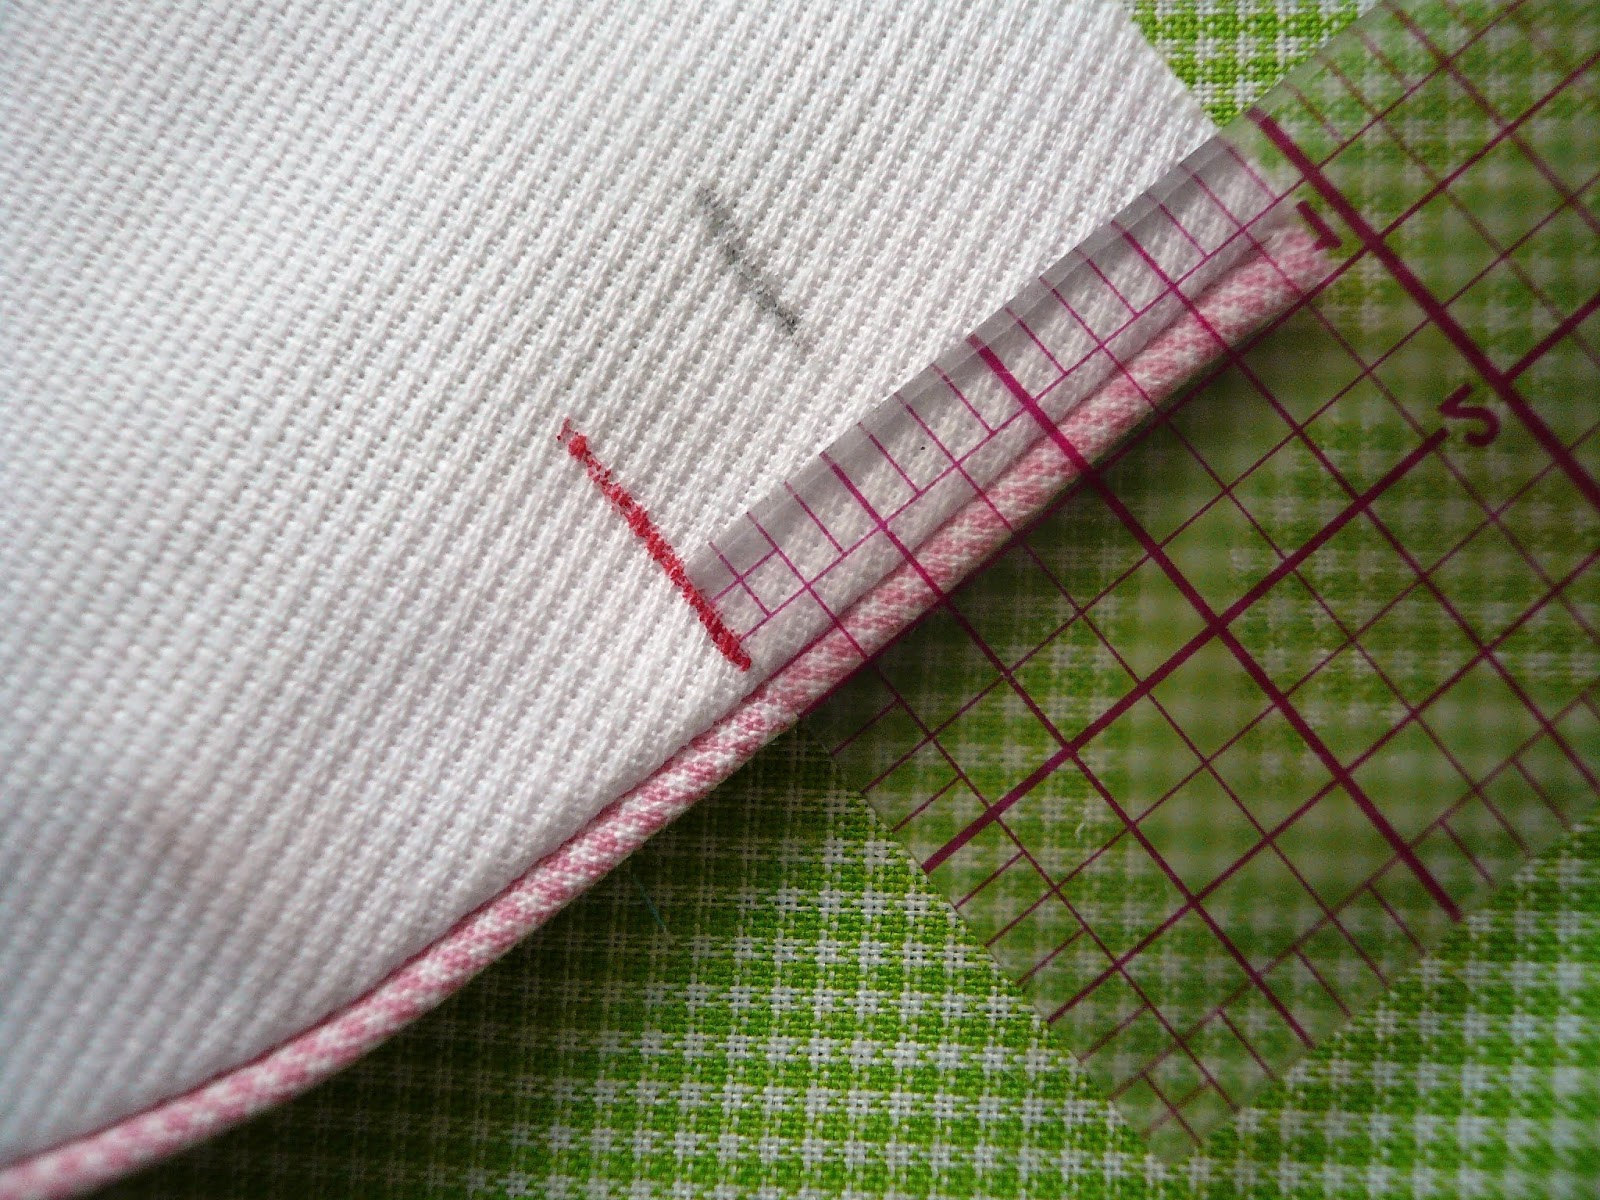
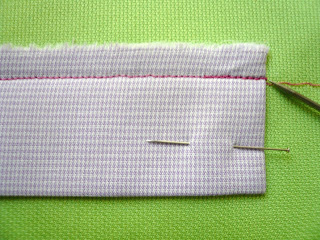
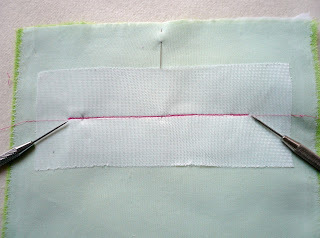
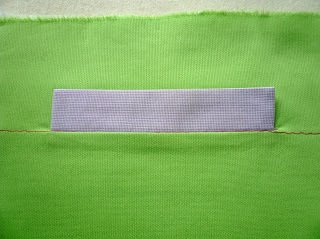
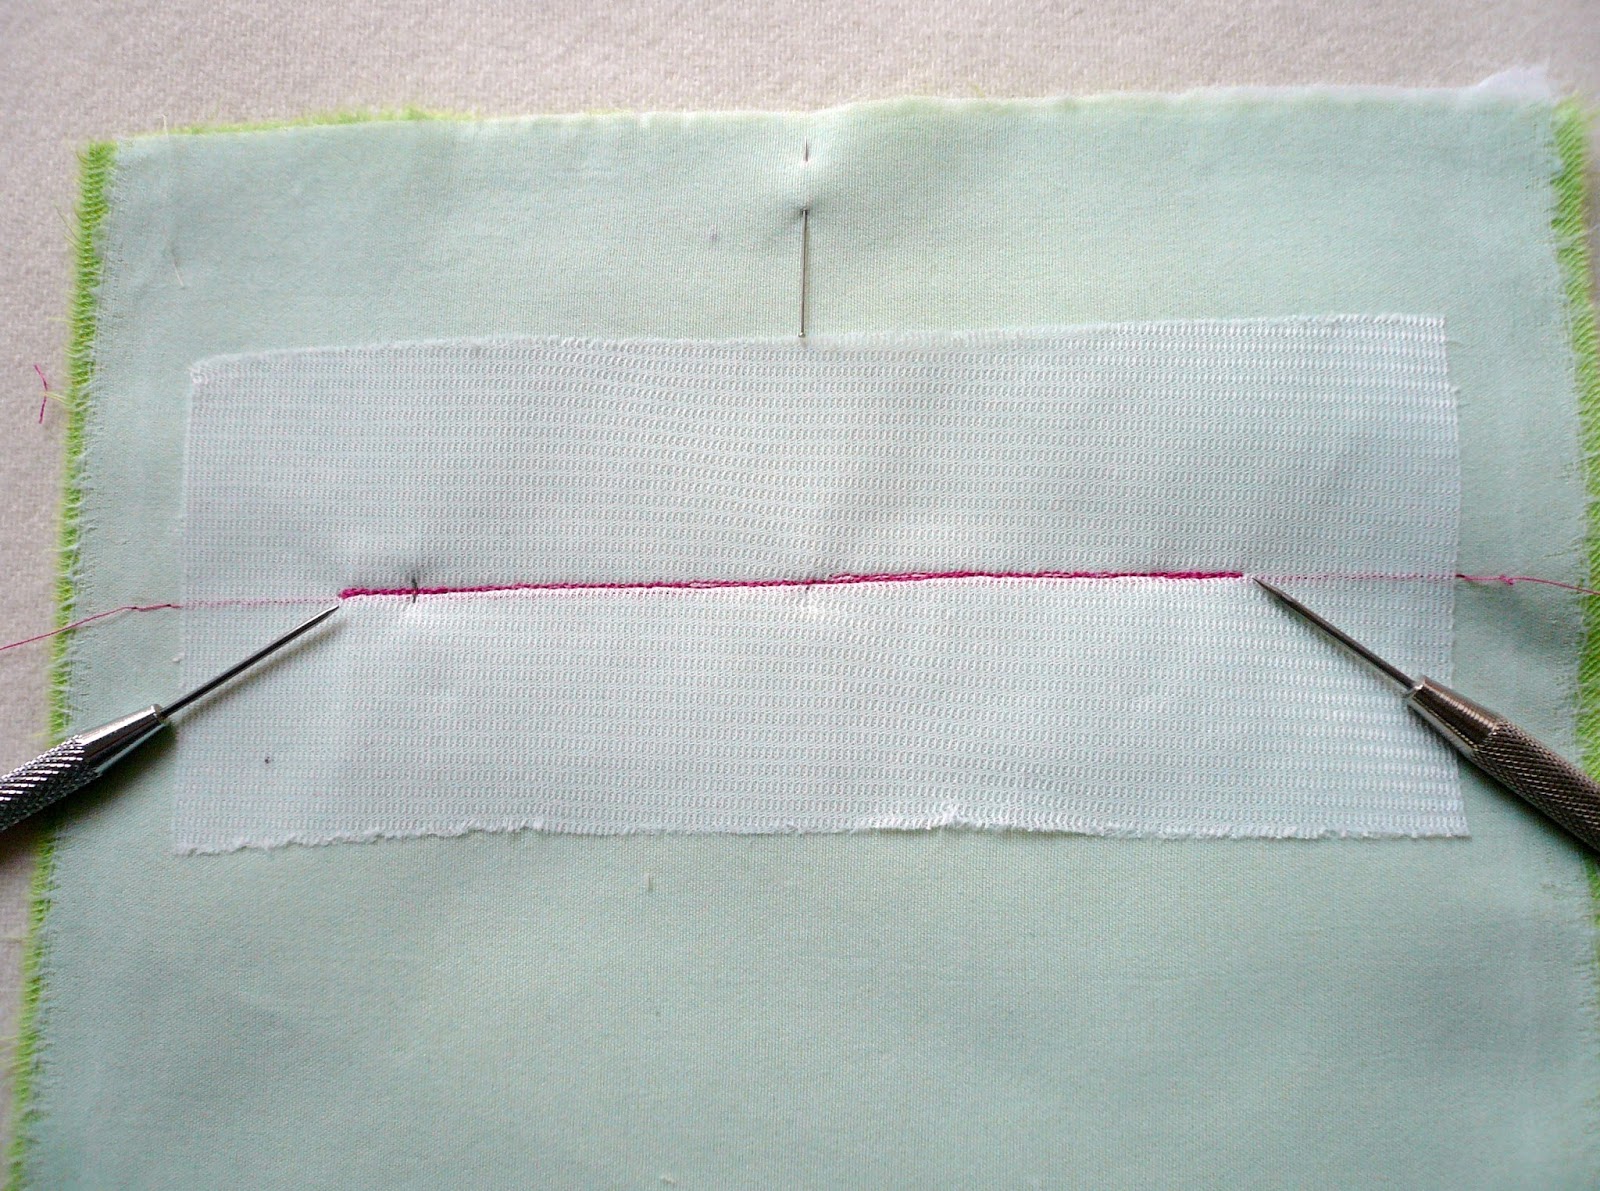
3. Cut bias strips to the following widths (depending on chosen seam allowance):· ¾” wide for ¼” seam allowances· 1” wide for ⅜” seam allowances· 1 ¼” wide for ½” seam allowances· 1 ½” wide for ⅝” seam allowancesWrap the bias strip around the filler cord and use a zipper foot, five groove pintuck foot, cording foot, or open toe applique foot to stitch close to, but not catching the filler cord. There should be the width of one needle between the stitching and the cord. Use a 2.5 stitch length.
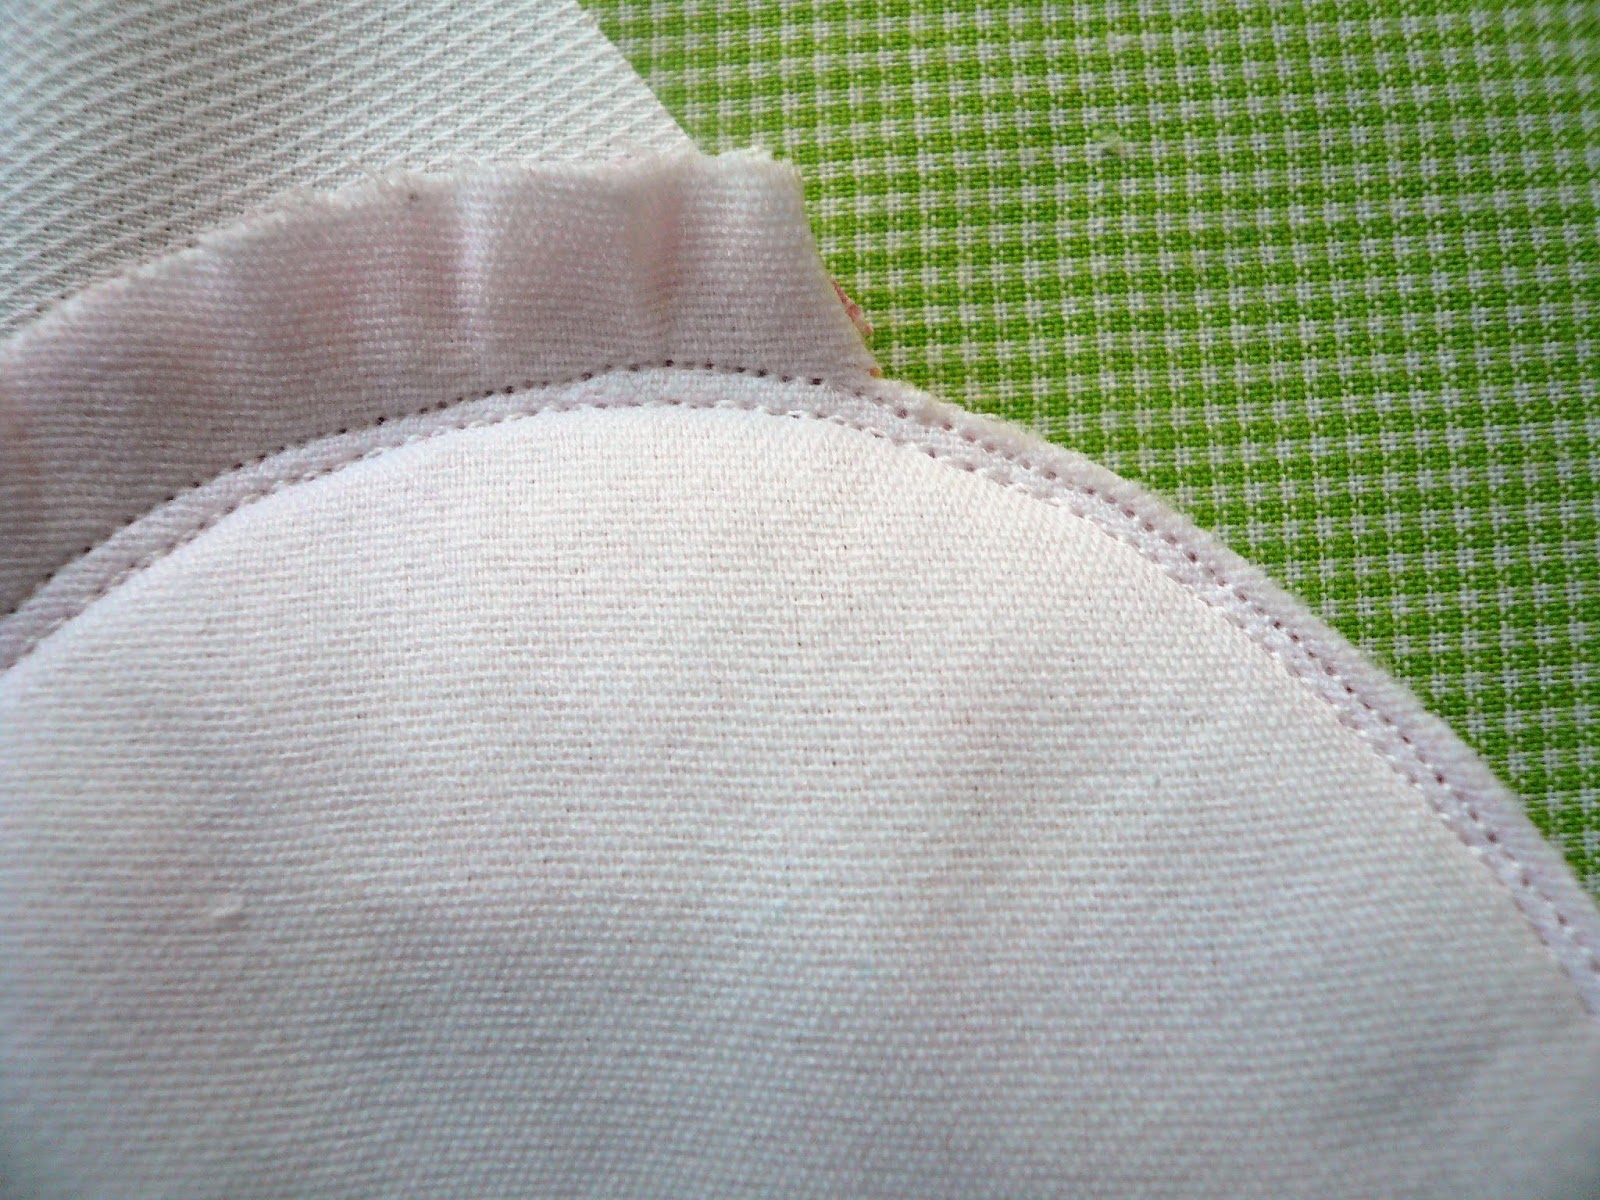
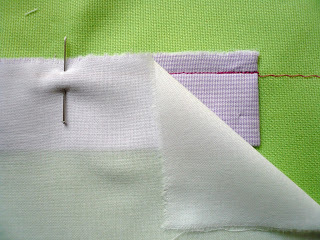
4. Cut a length of piping the approximate length of the collar perimeter. Clip into the piping seam allowance at ½” intervals. Steam shape the piping to the perimeter of the collar. Stitch the piping (2.0L) to the collar, stitching just inside the stitching line on the piping. Be careful to keep the raw edges of the piping aligned to the drawn collar perimeter. Do not stretch the piping while stitching.
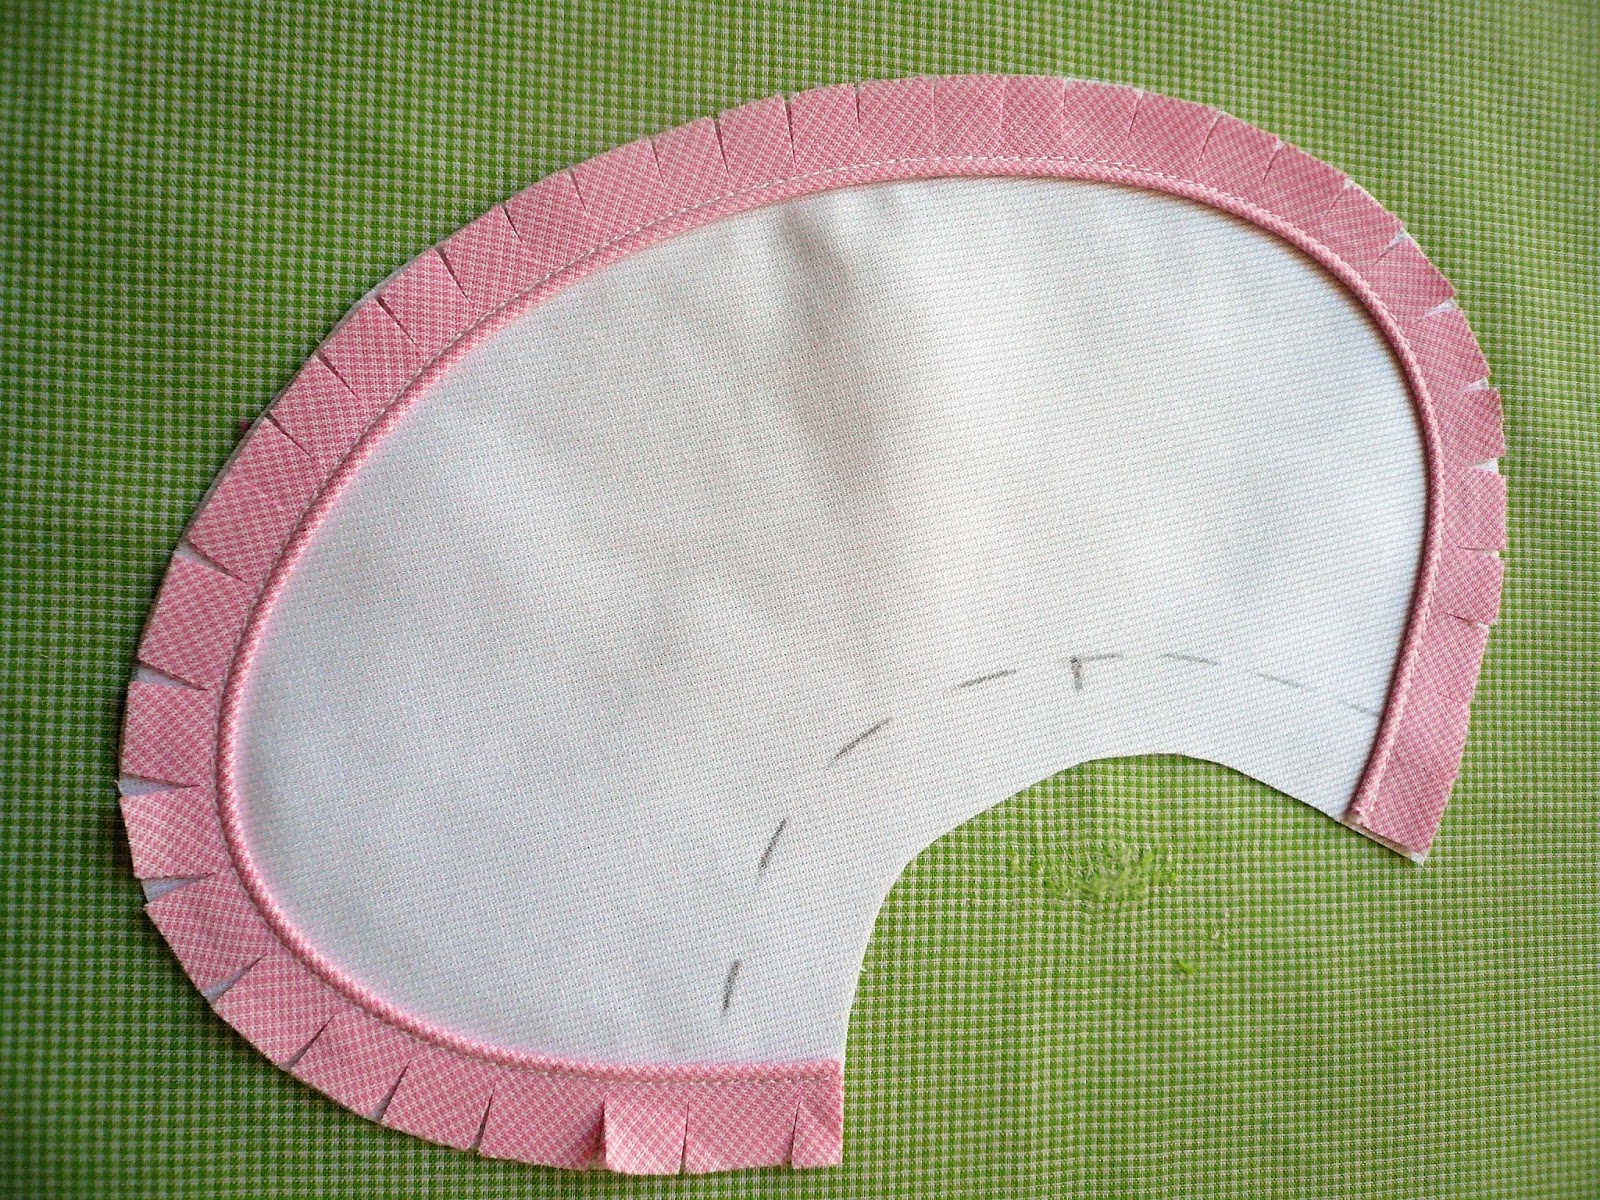
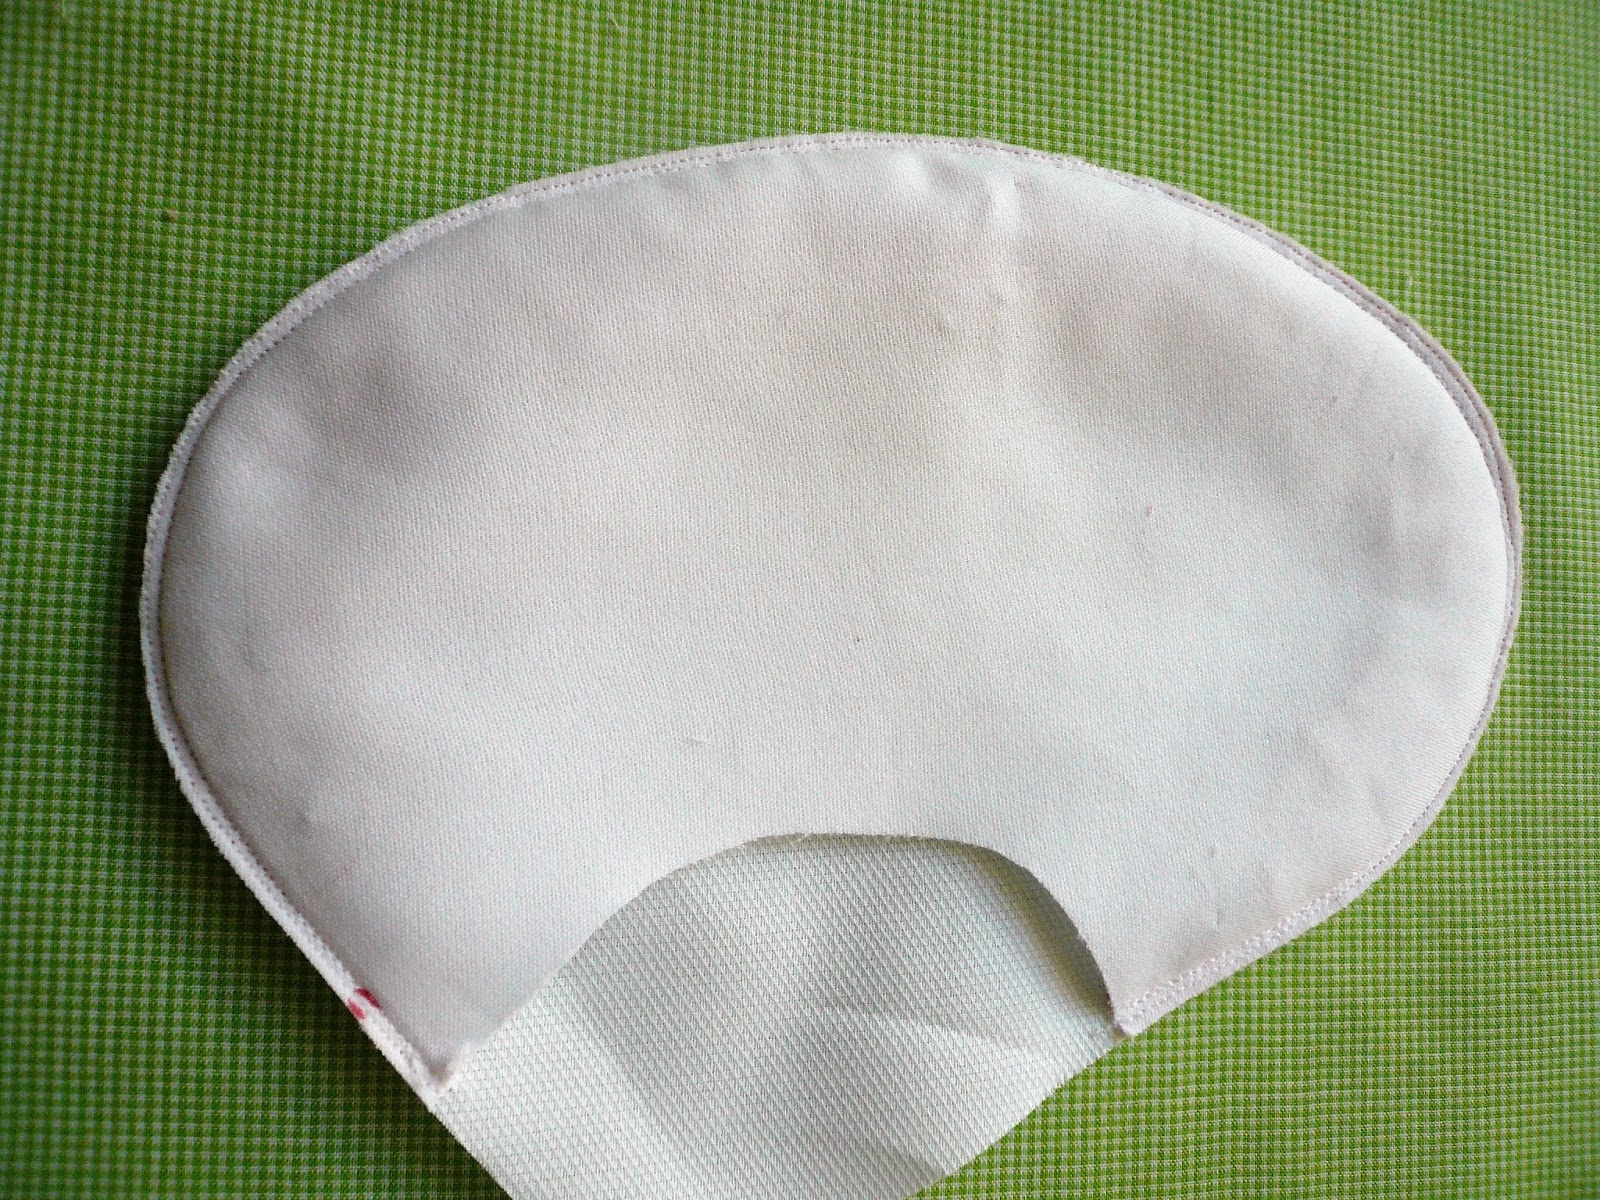
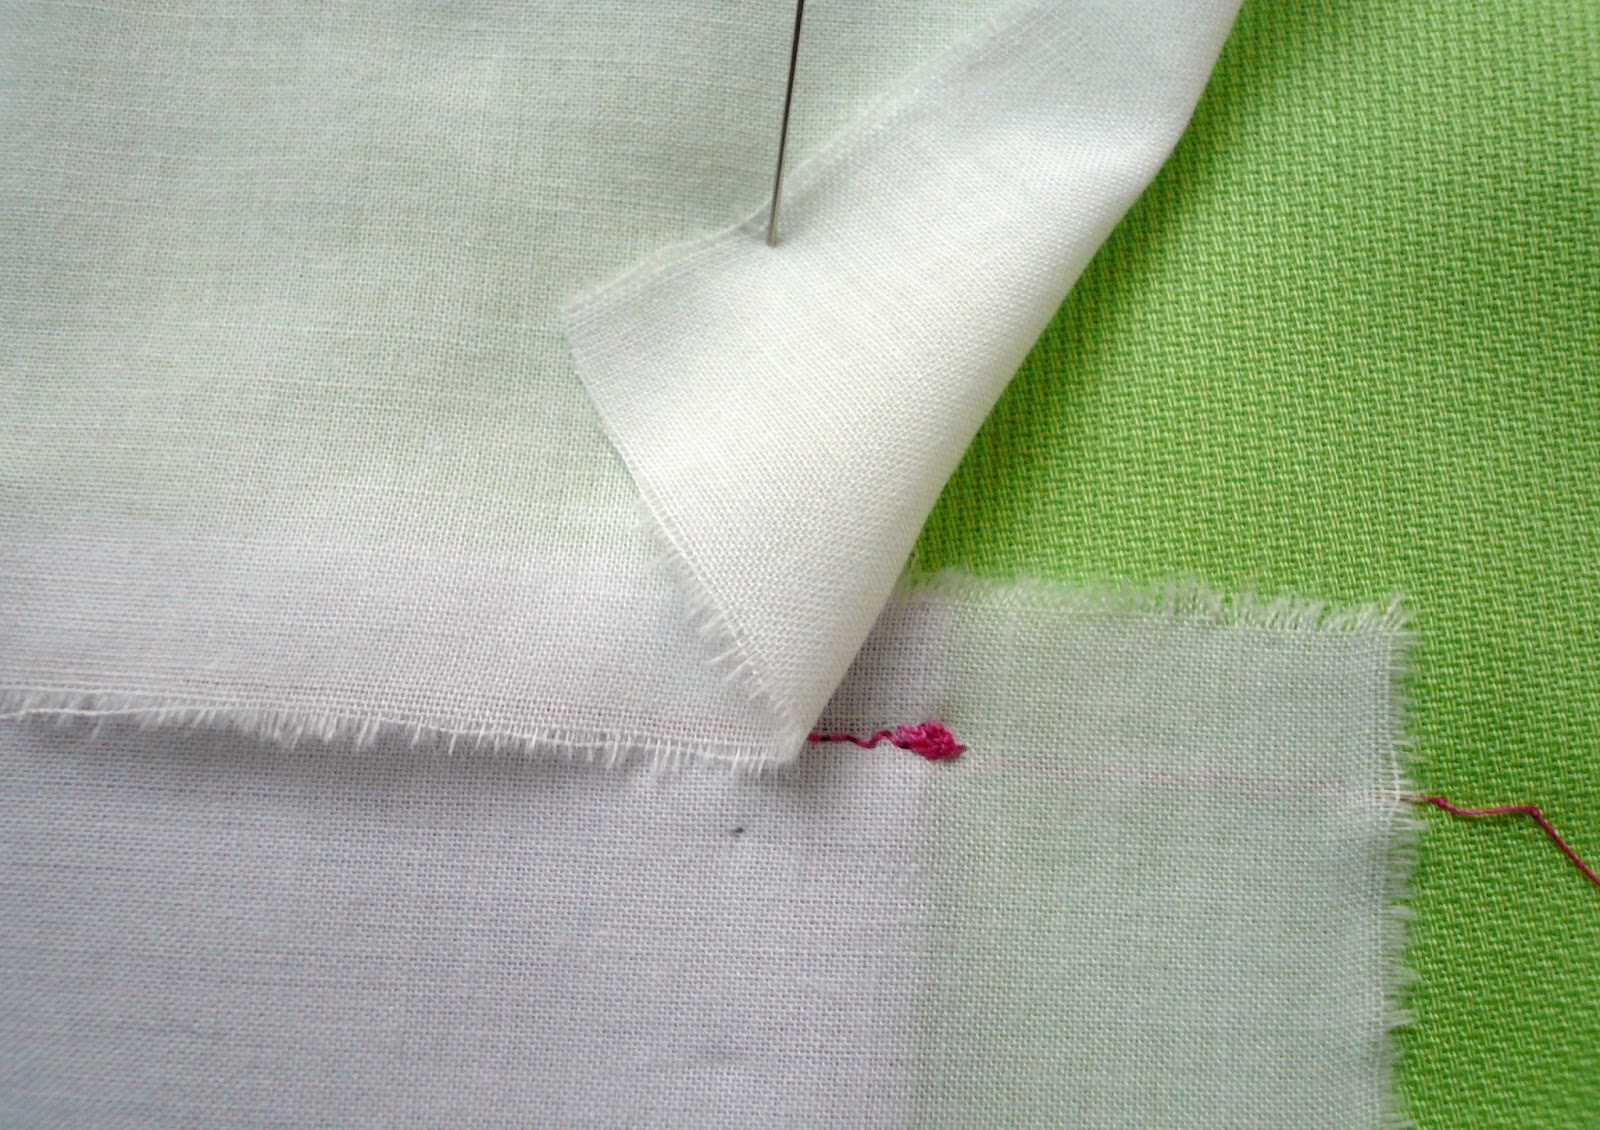
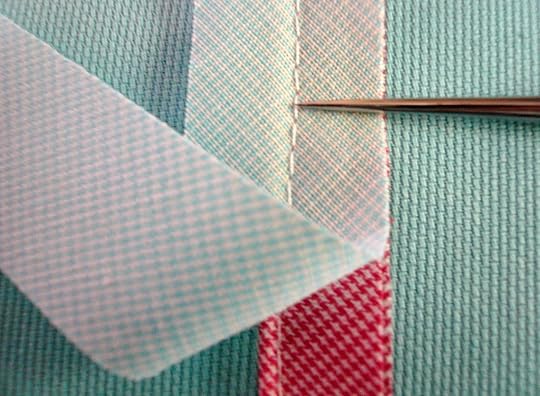
2. Cut out the interfaced, piped collar front on the perimeter pencil line. Cut out the neckline curve ½” from the pencil line.
3. Using a steam iron, gently press the piping into its finished position, easing in the seam allowances on the wrong side of the collar.
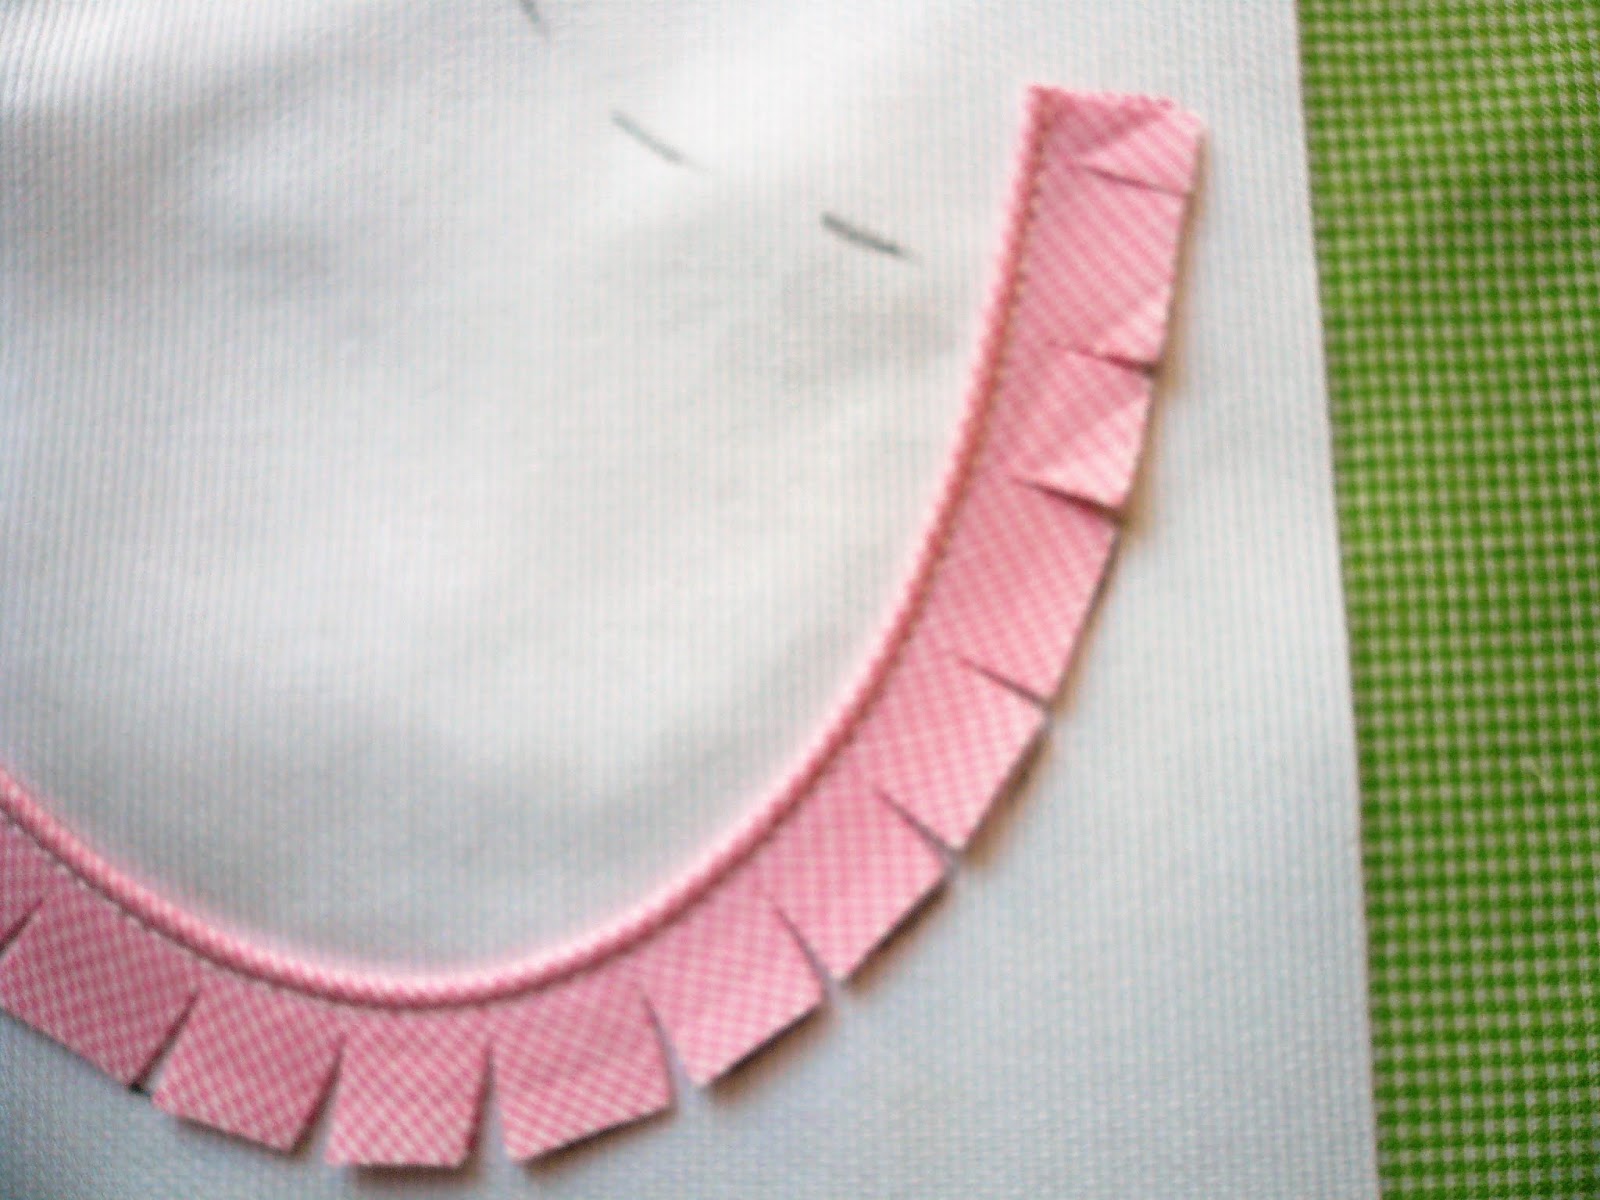
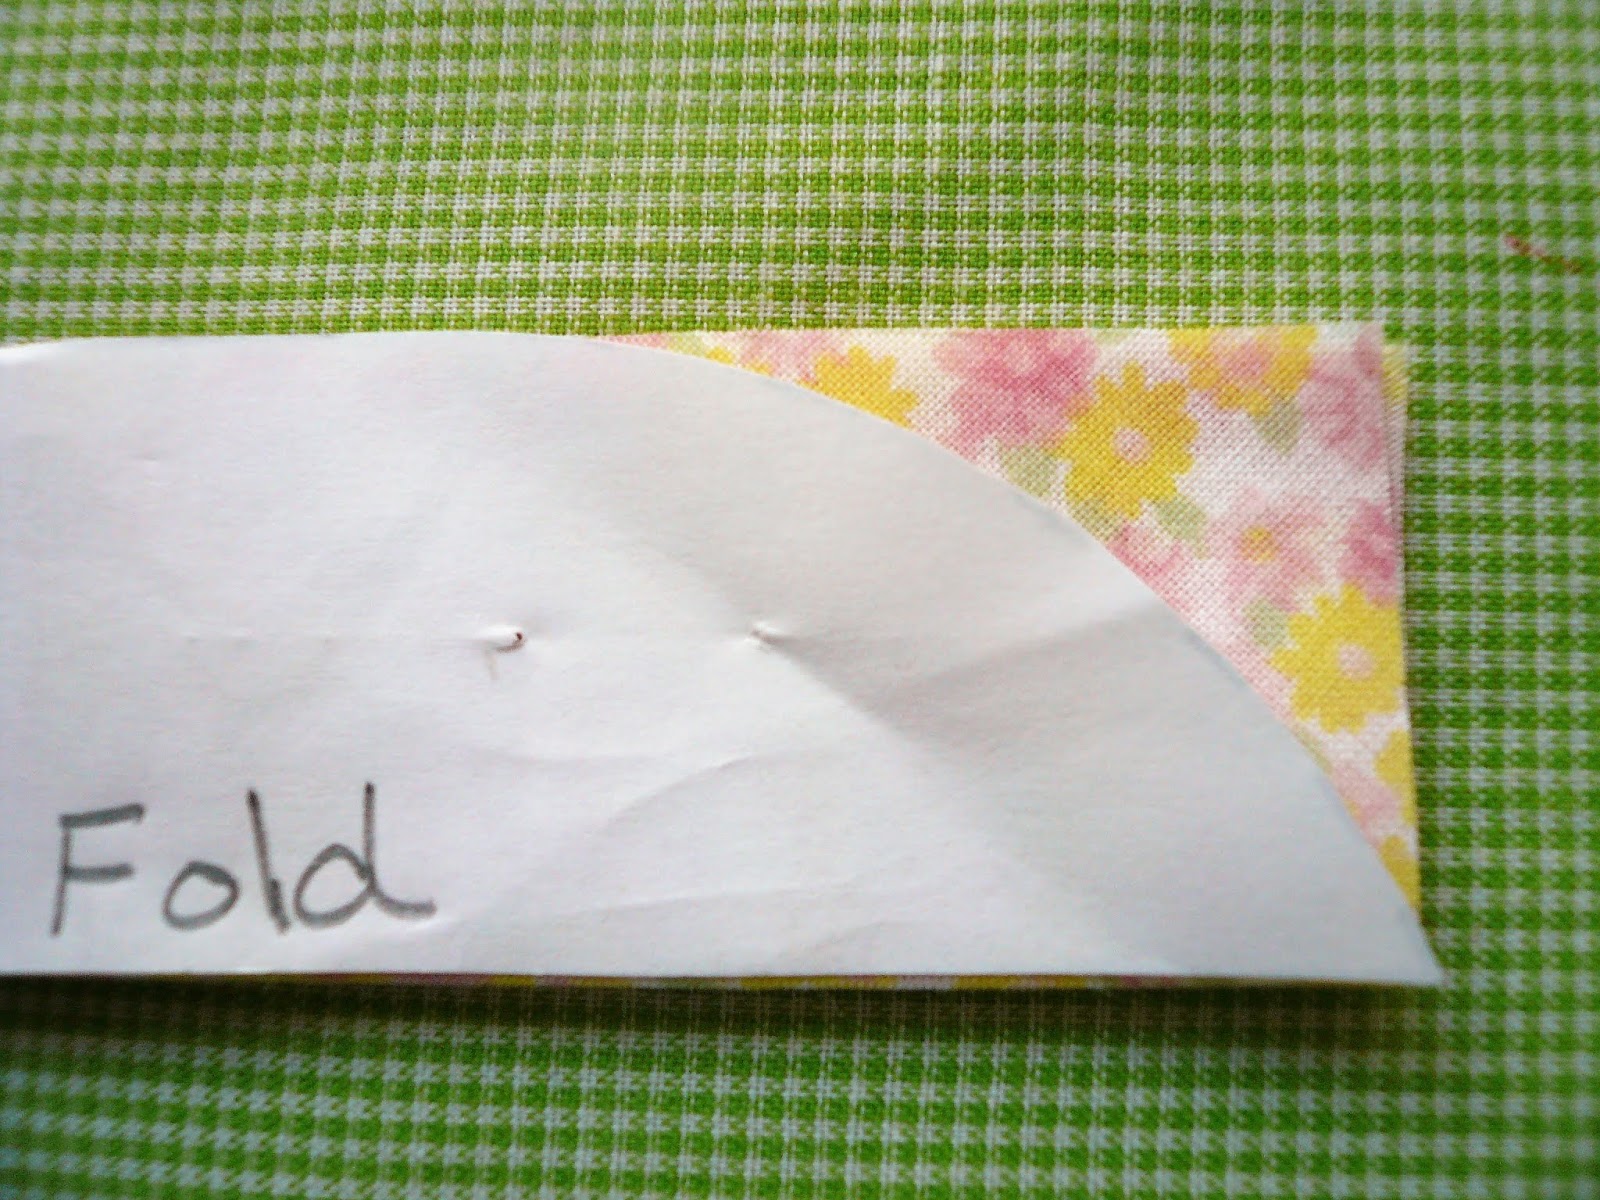
4. For a ¾” wide finished ruffle cut 2 ¼” bide bias strips twice the length of the finished collar edge. Fold the bias strips in half (lengthwise and wrong sides together) and press. Use the ruffle guide provided to shape both ends of the collar ruffle.
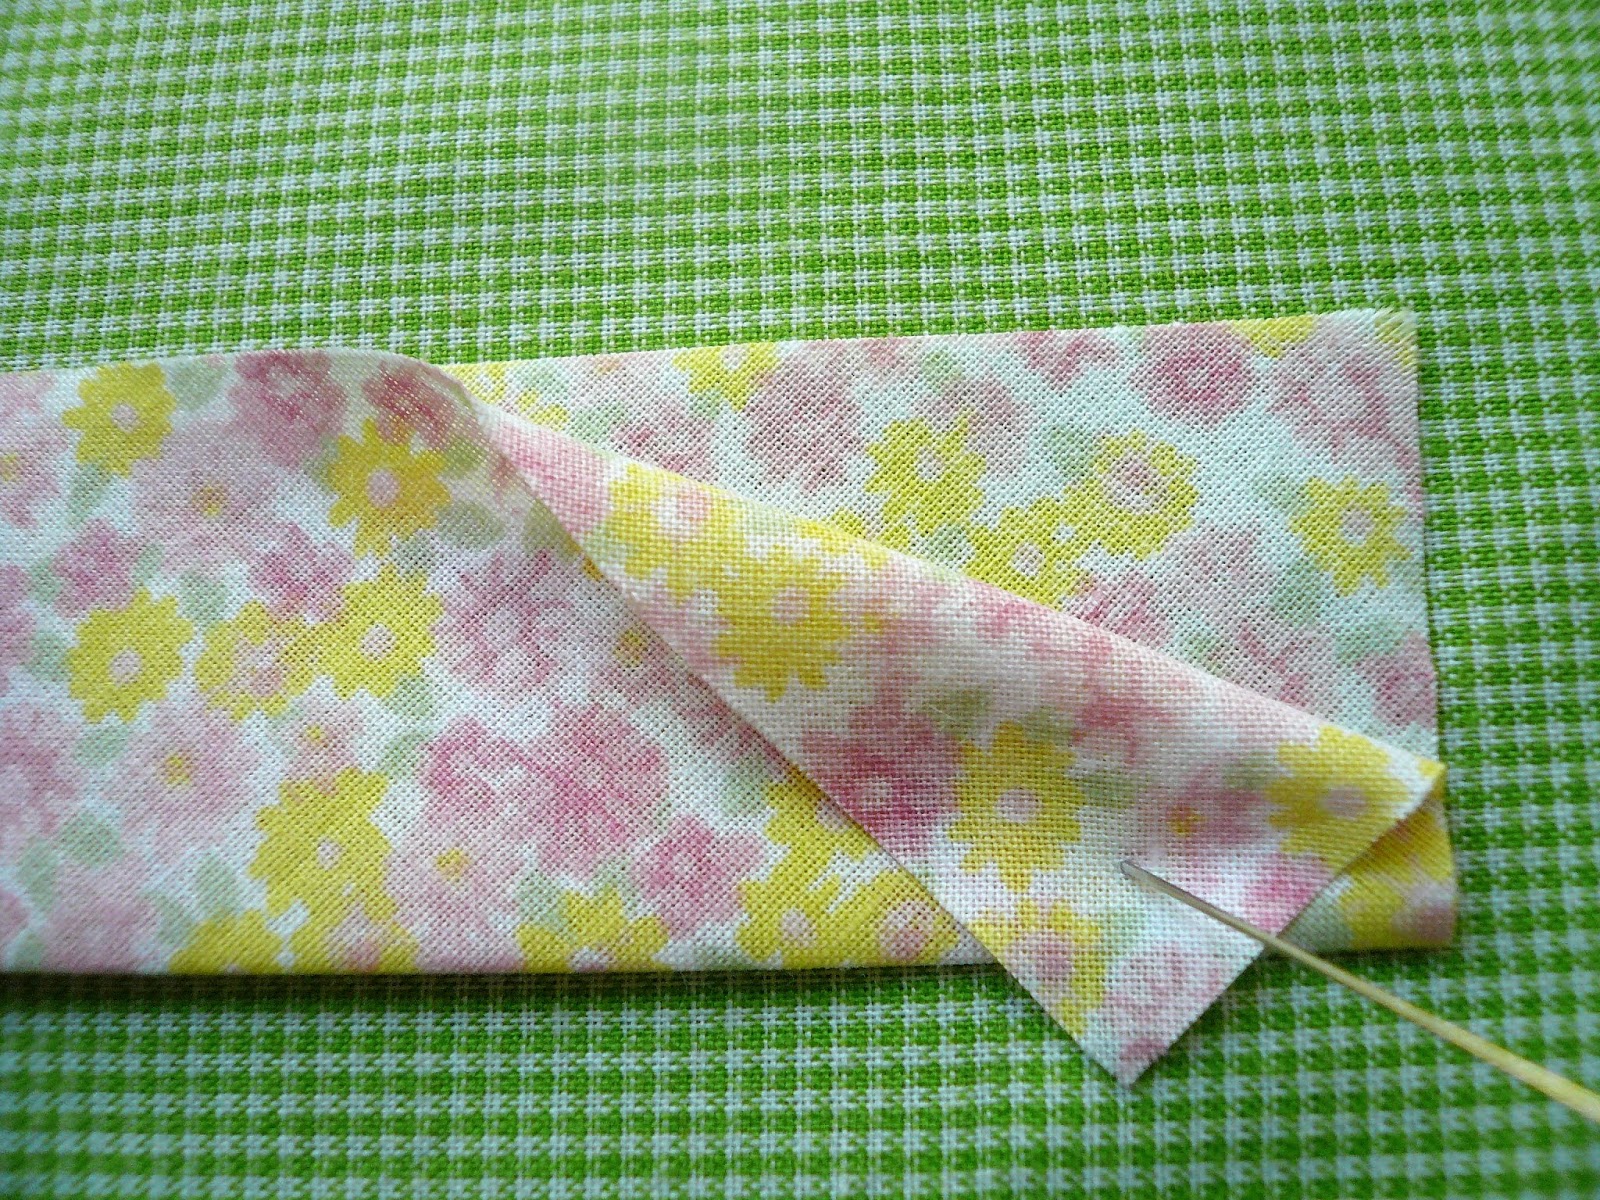
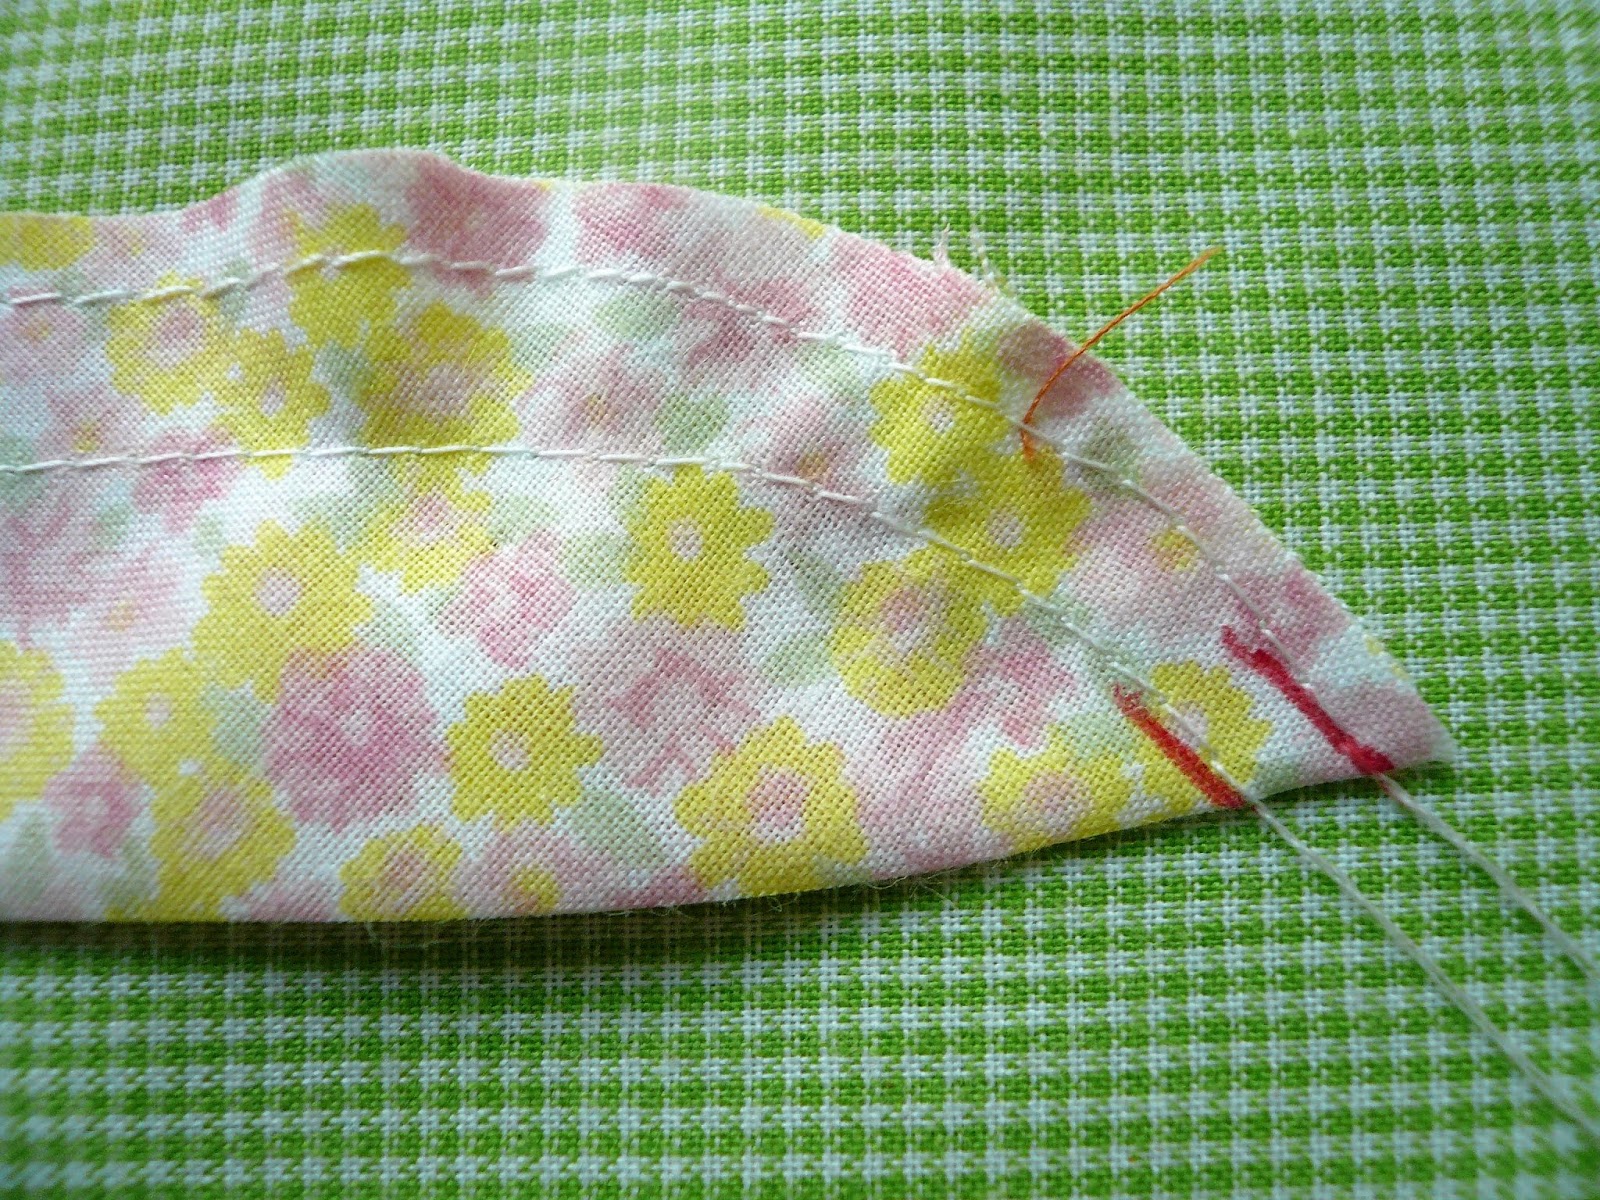
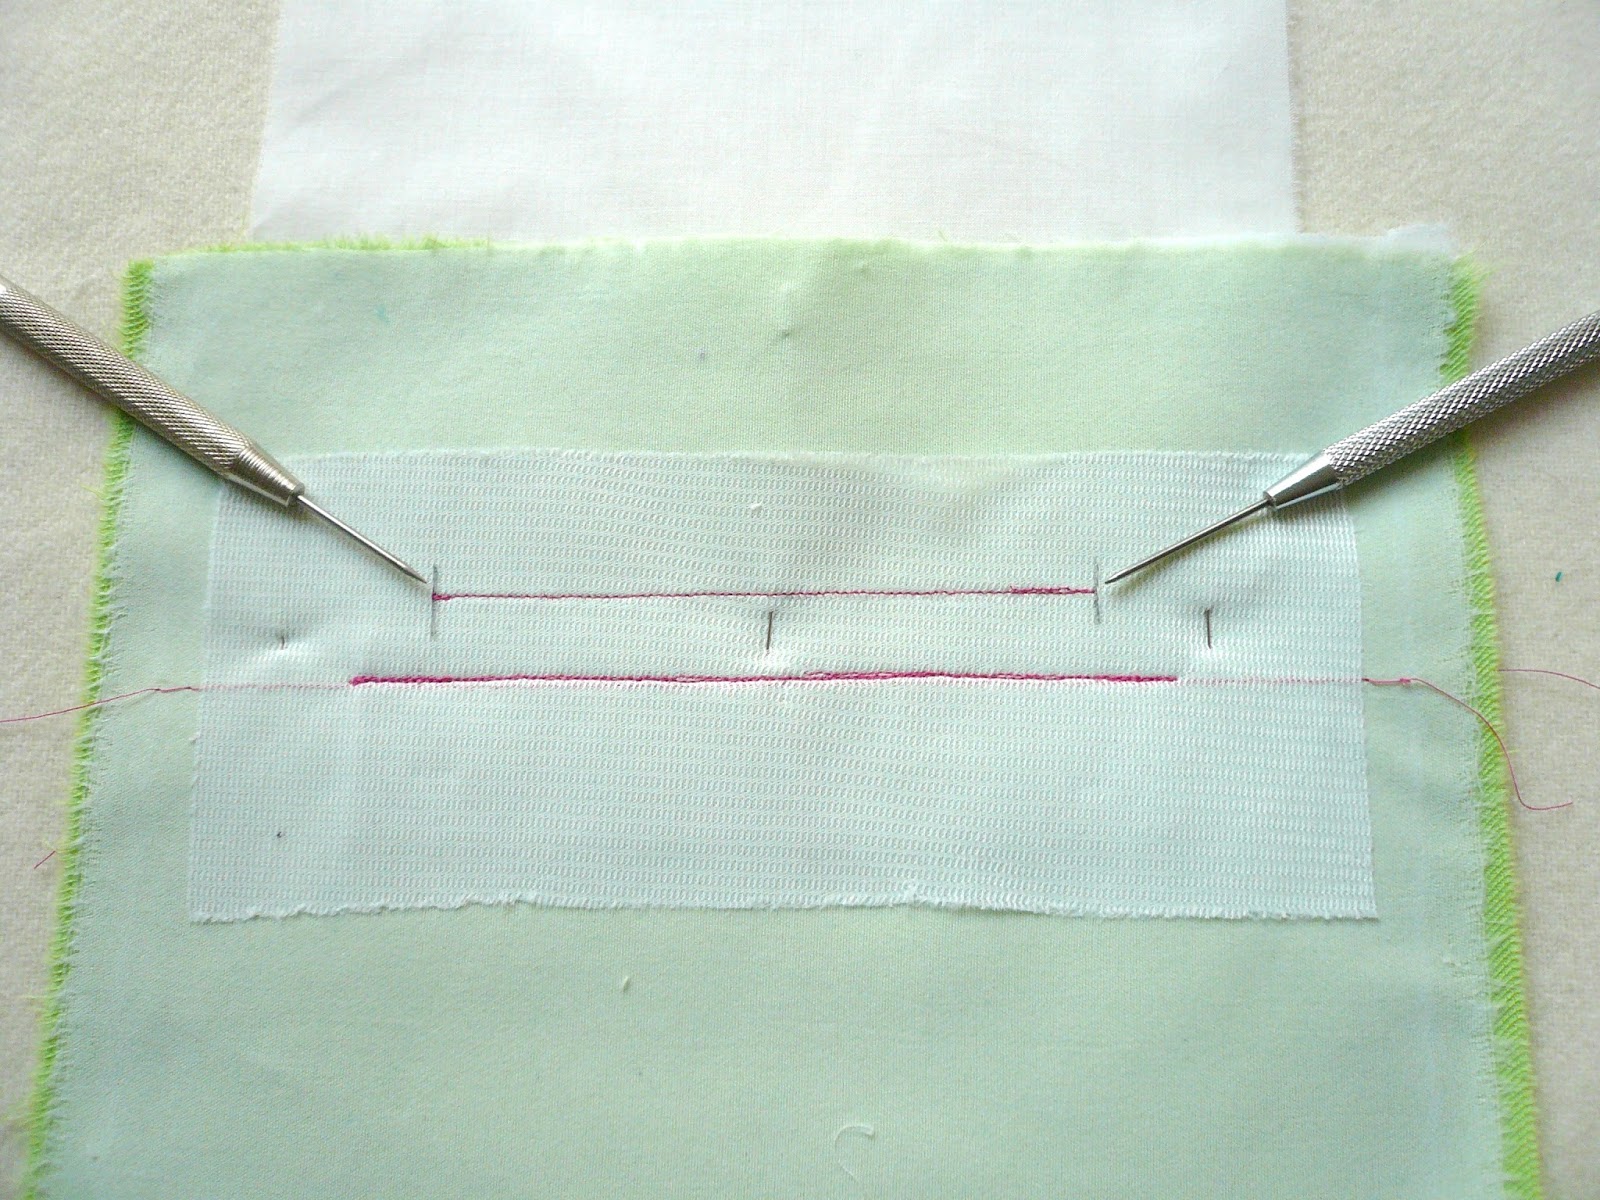
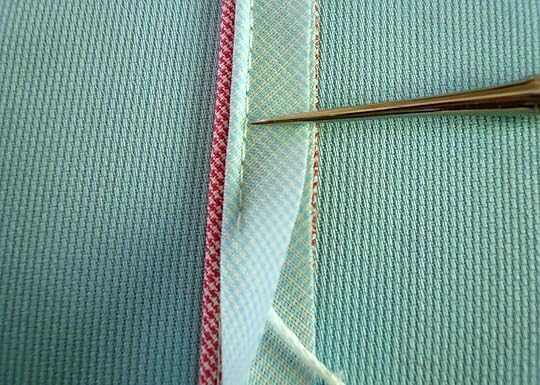
5. Run two rows of gathering threads (3.0L), one at ⅛” and the second at ⅜” away from the cut edges of the collar ruffle. Mark the center point and gather up the collar ruffle to the finished collar measurement. Pull from each end in toward the center point.
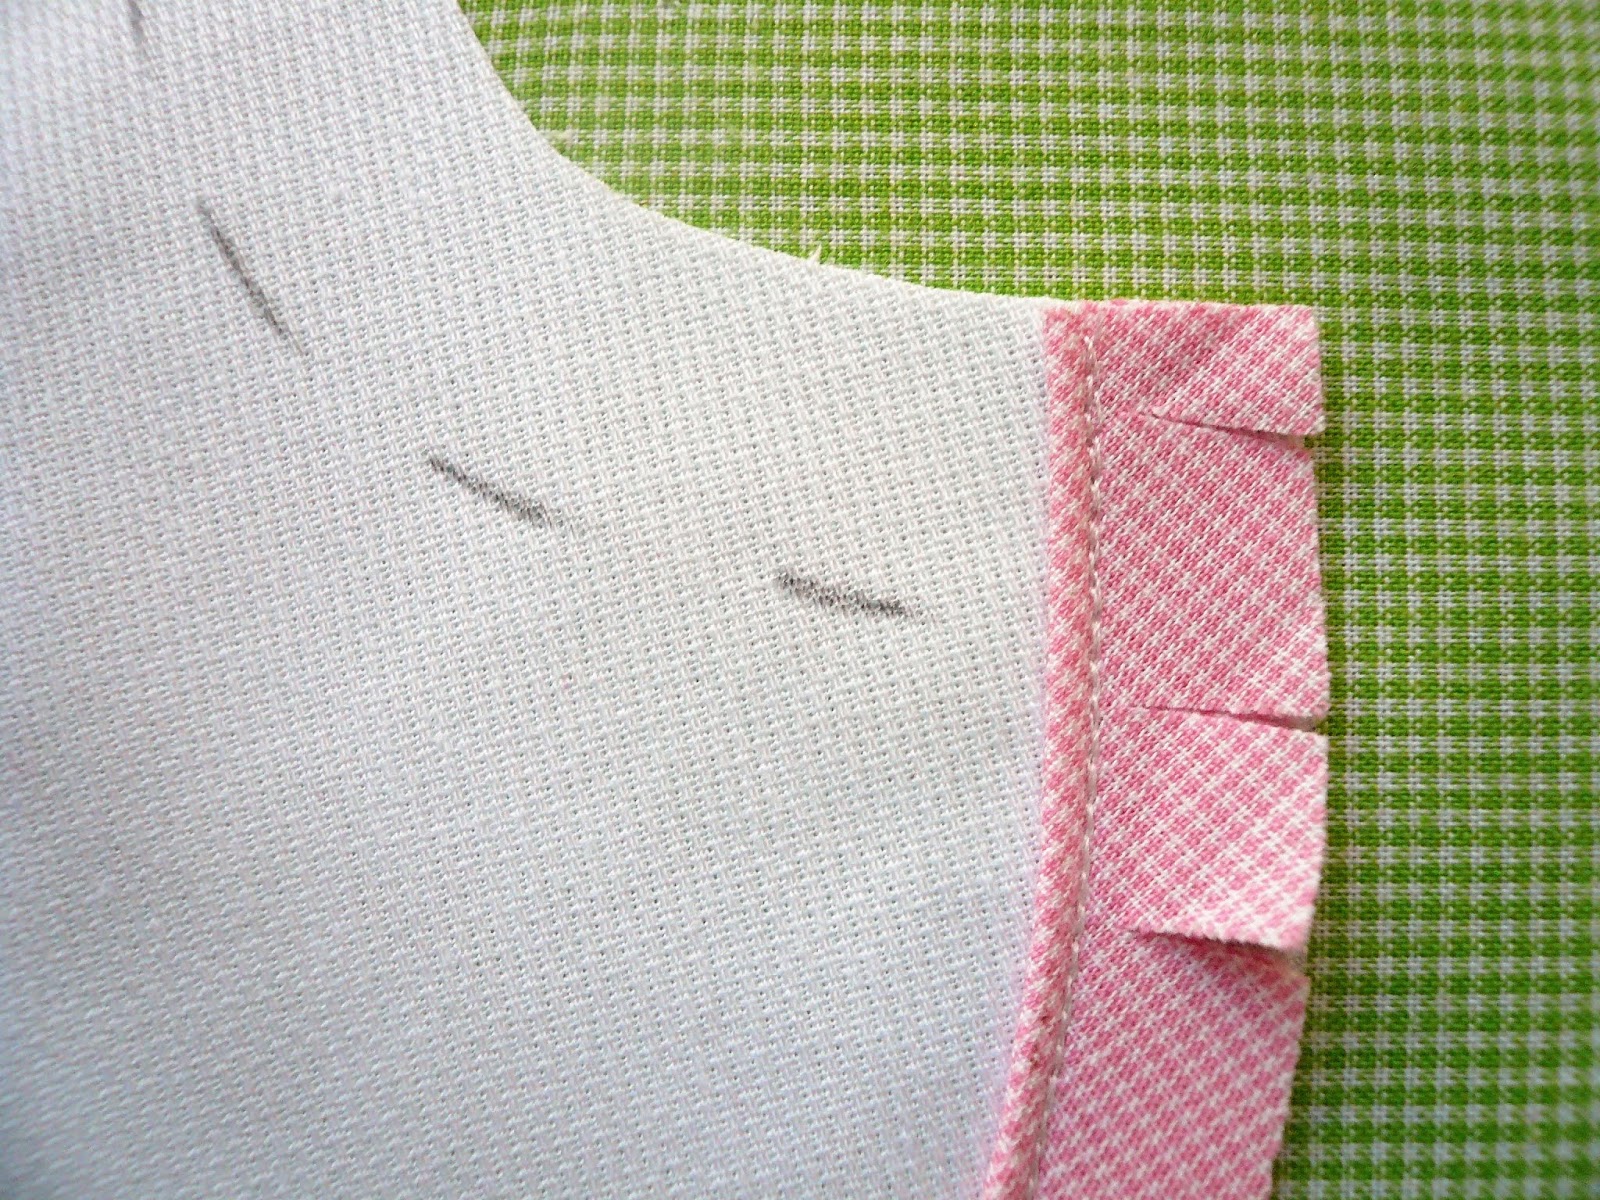
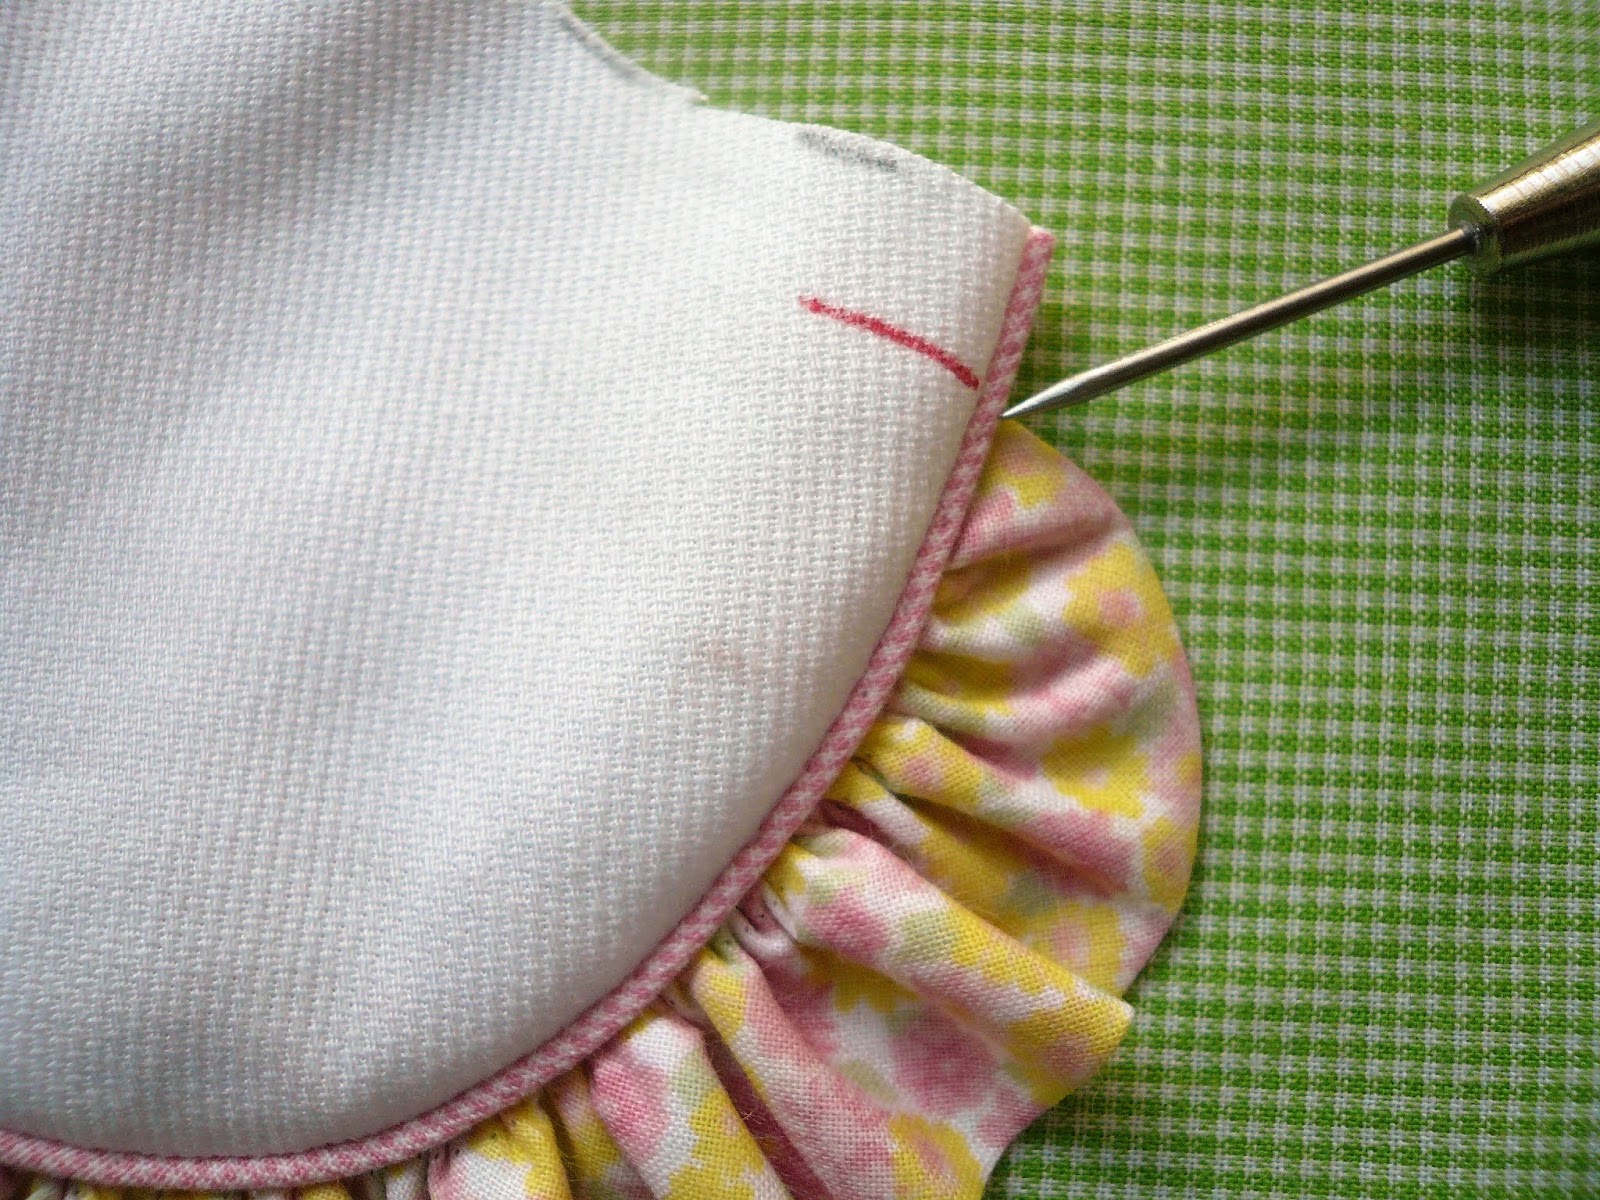
6. Mark the center front and the center back SEAMLINE (not cutting line) on the piped collar. These marks are where the collar ruffle should end.
7. Working from the right side, pin the gathered up ruffle to the wrong side of the collar having the ⅜” gathering thread line positioned just beyond the piped edge of the collar.
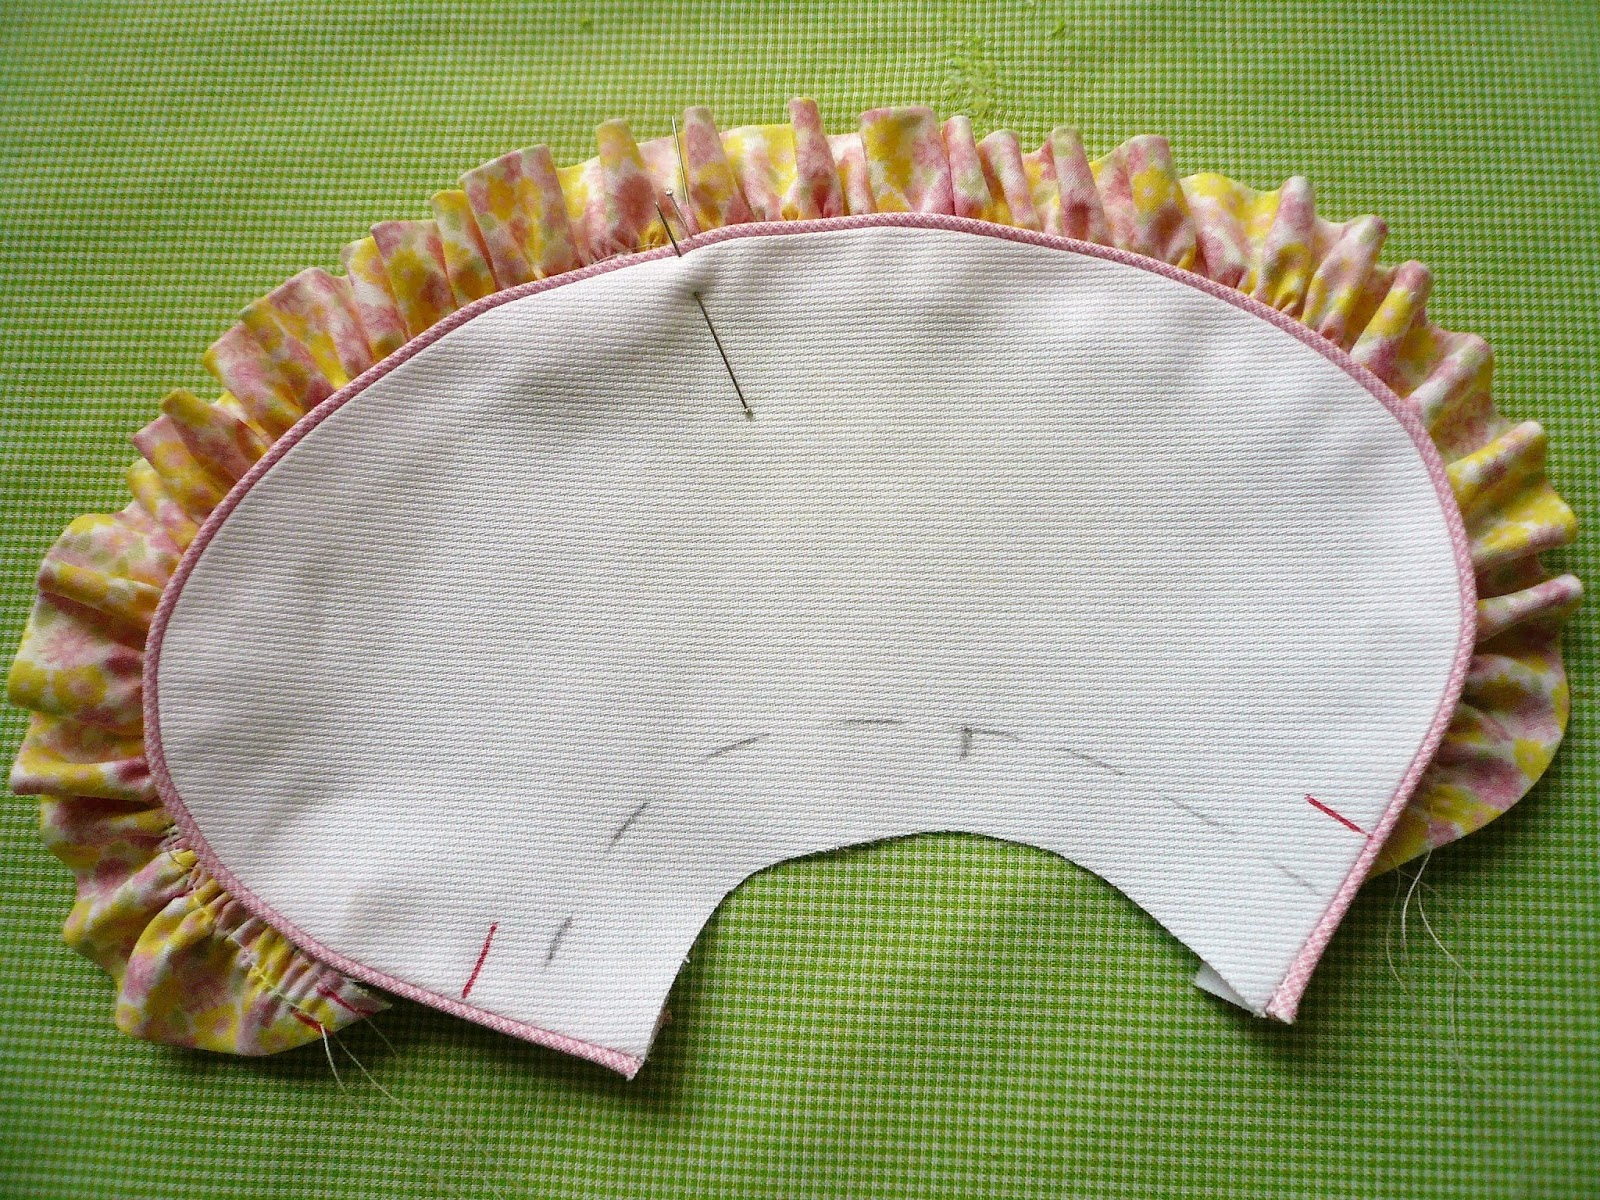
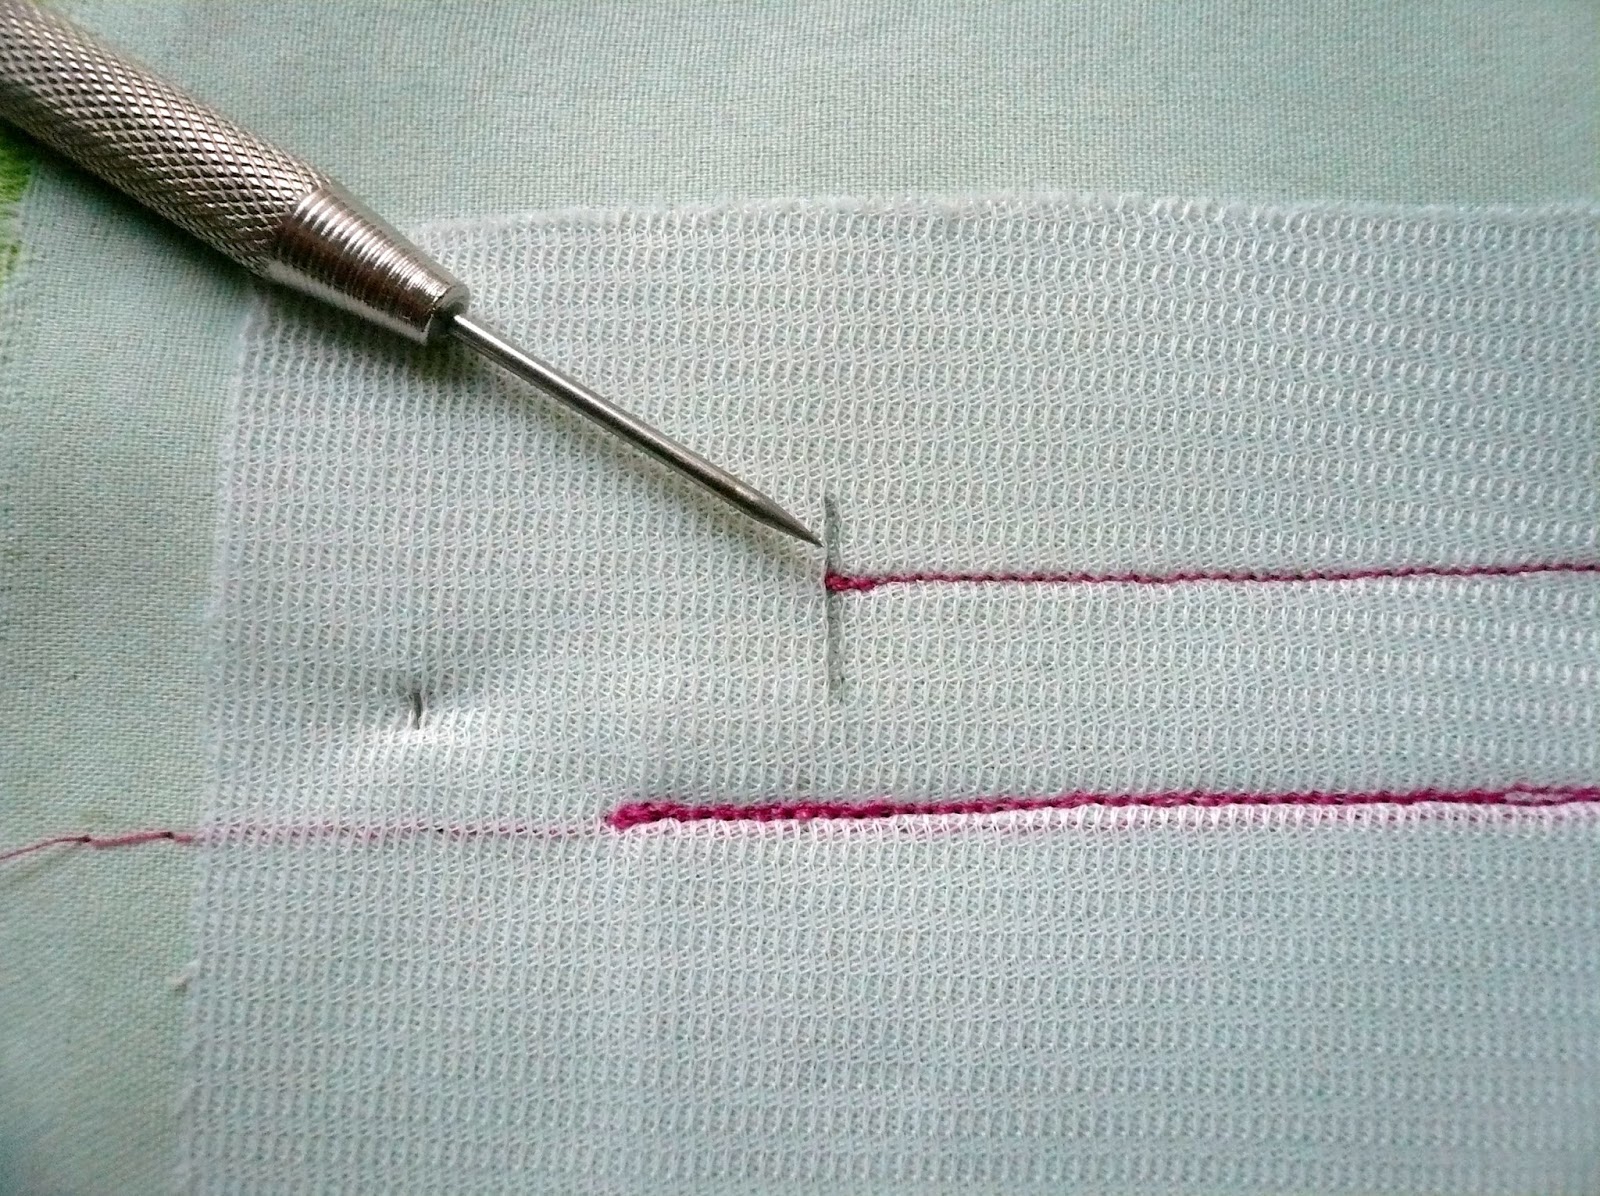
8. Machine baste (5.0L) right along the piping, holding the gathered ruffle in its finished position. Be sure the ruffle begins and ends at the marked center front and center back SEAMLINES.

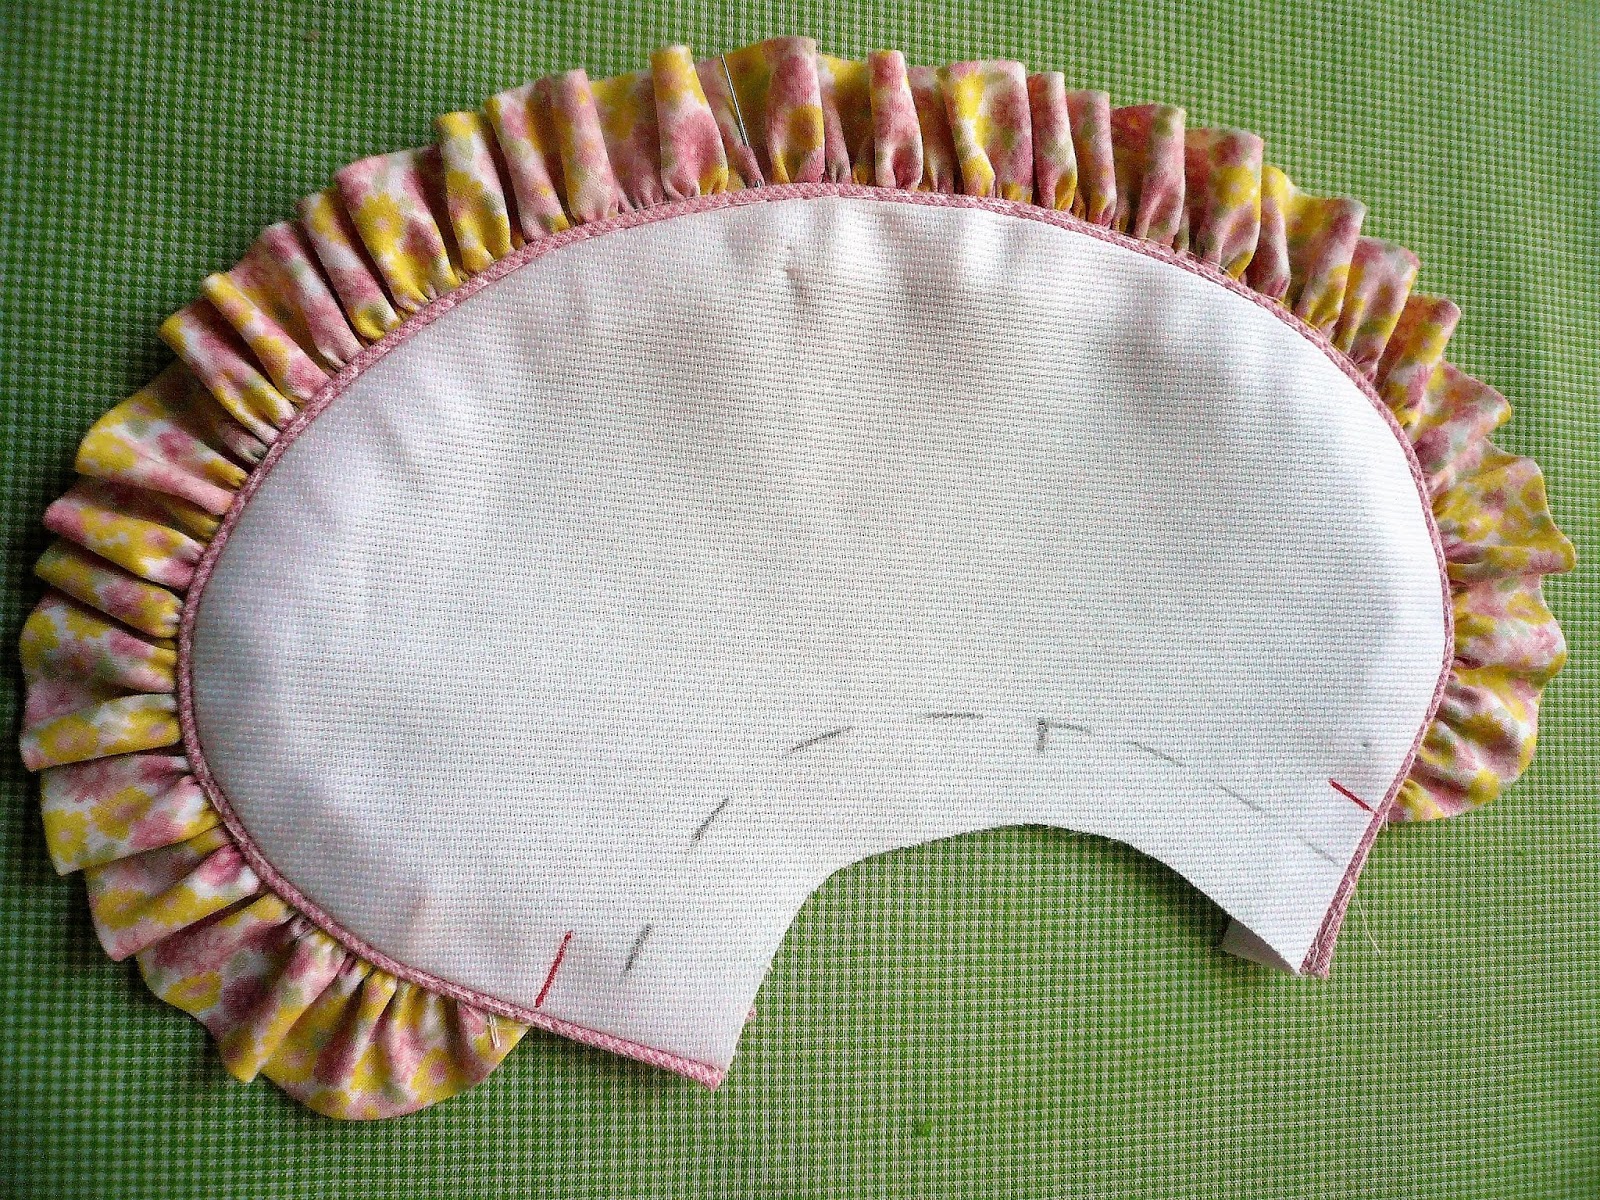
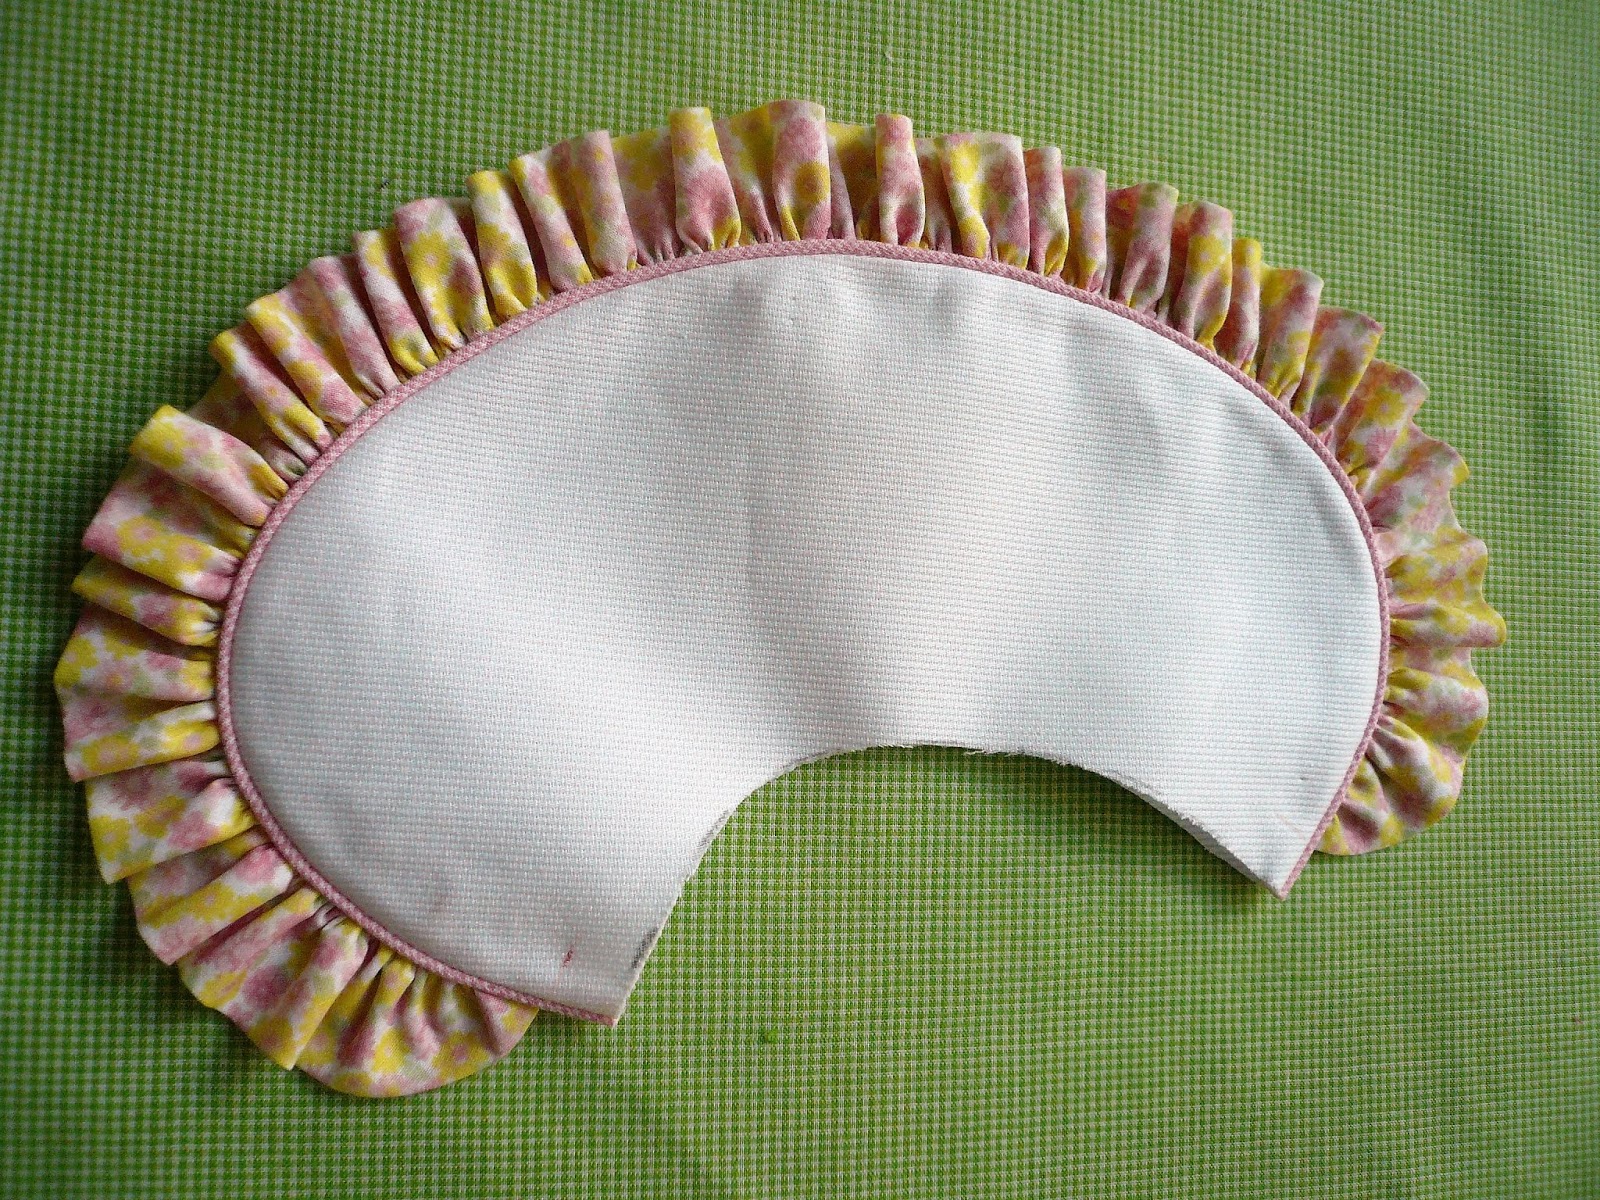
9. Flip the seam allowanced back out, which will force the ruffle toward the center of the collar. The basting line from Step 8 will keep the ruffle in its correct position while you proceed with the finishing steps of the collar.
10. Matching fabric grain lines and right sides together, lay the collar front over the collar backing, sandwiching the piping and the ruffle in the middle. Pin in place.
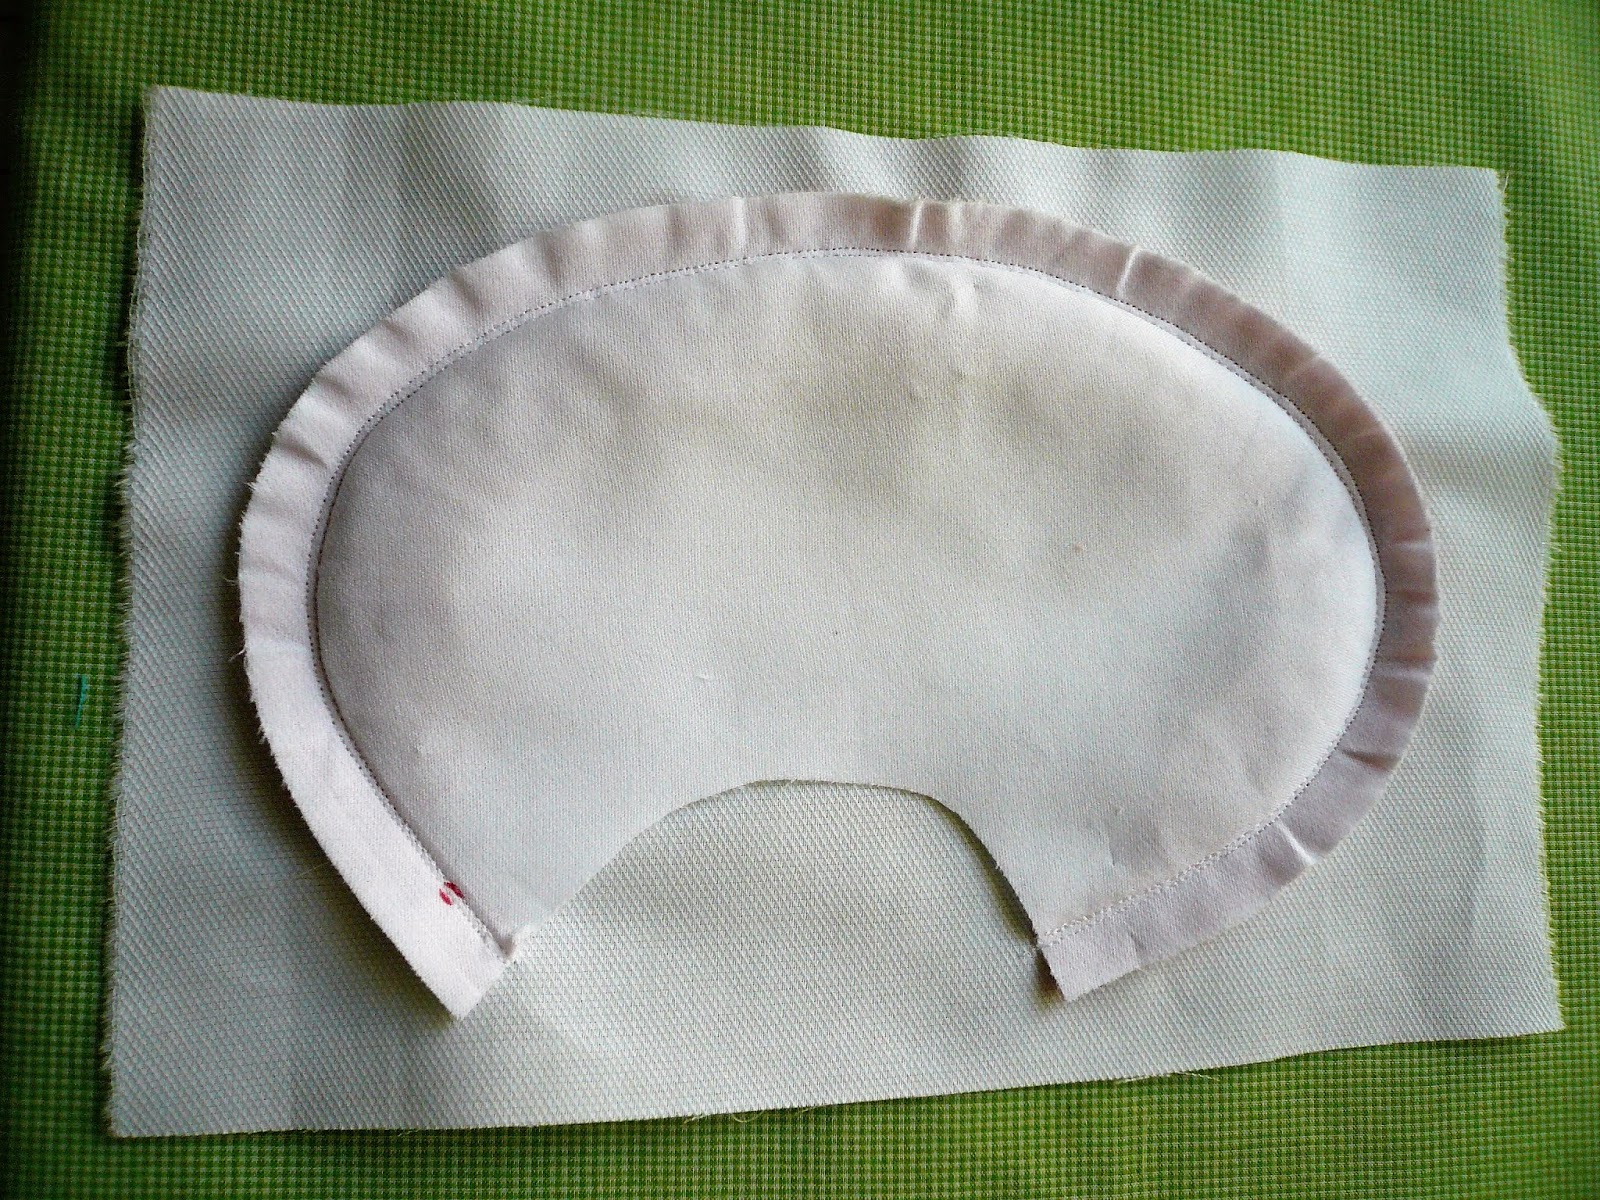
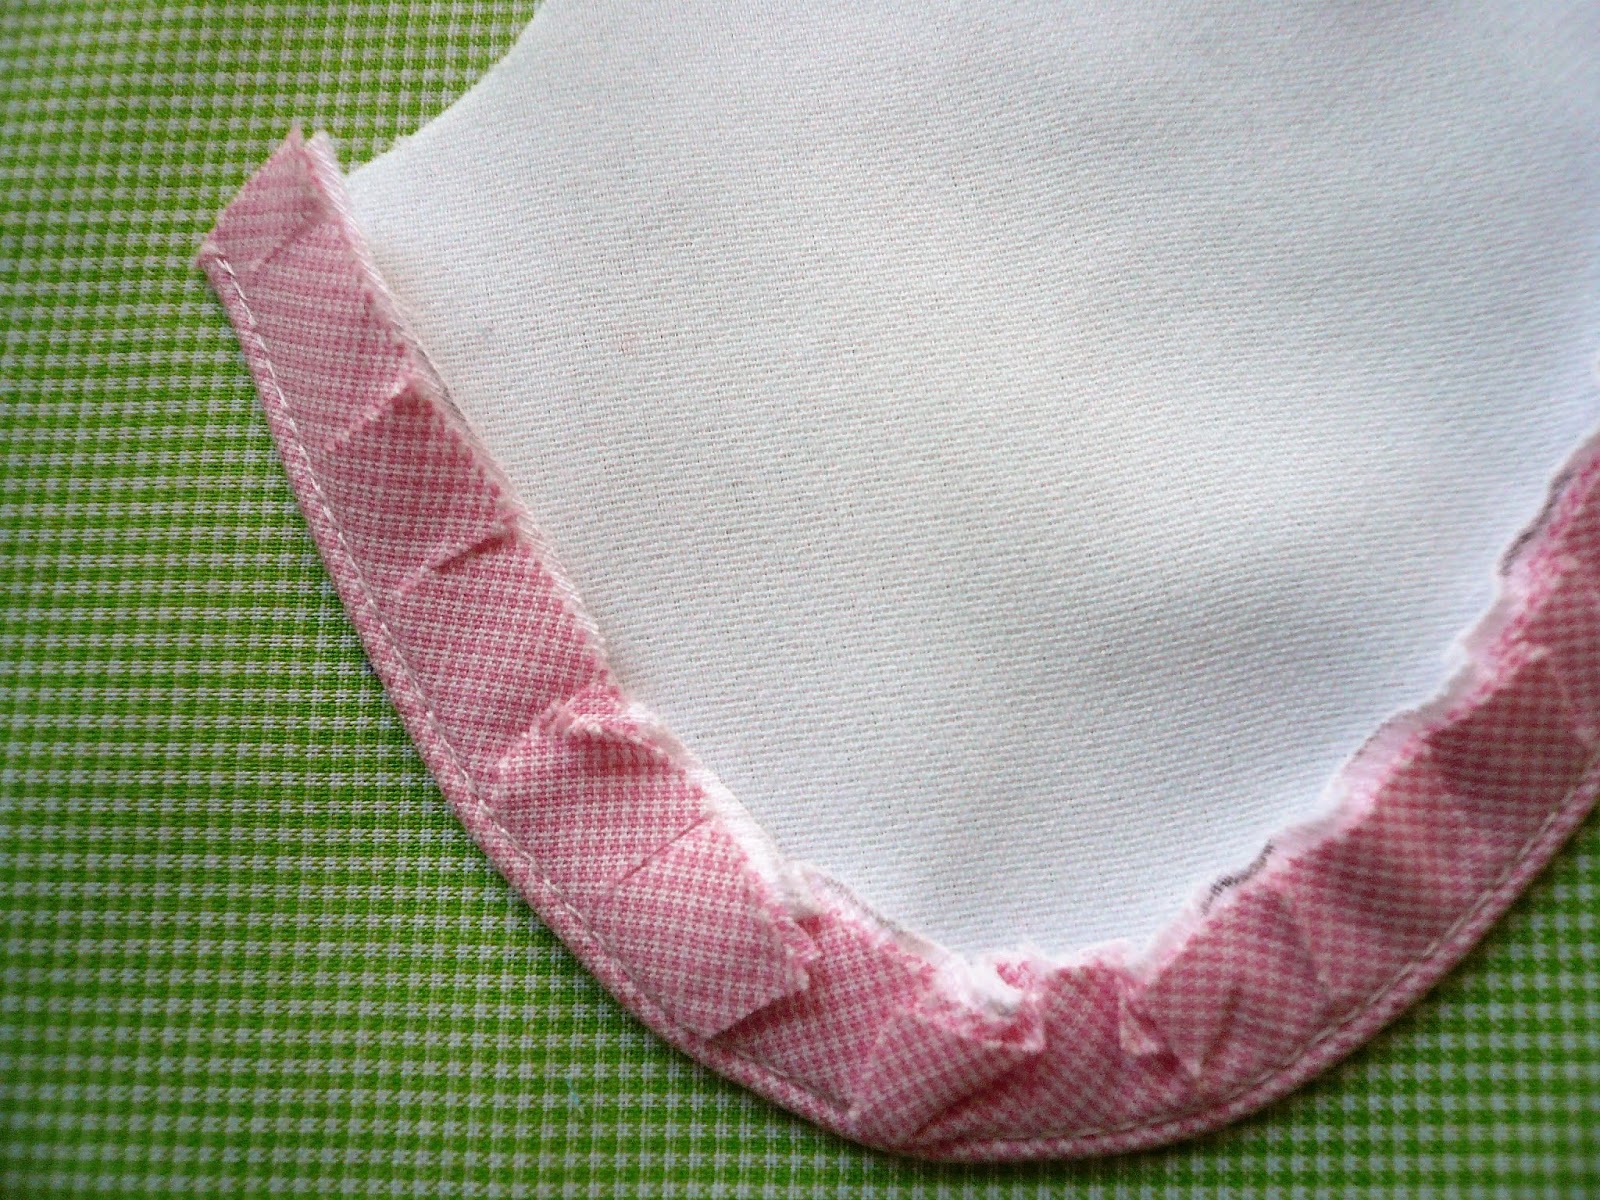
11. Stitch (1.5L) right on top of the stitching line from the application of the piping. Stitch again (1.5L), a scant 1/16” away from the first stitching line.

12. Trim through all layers very close to the second stitching line around the perimeter of the collar.
13. Remove the basting thread lines from the piping and the inner edge of the gathered ruffle.

July 16, 2016
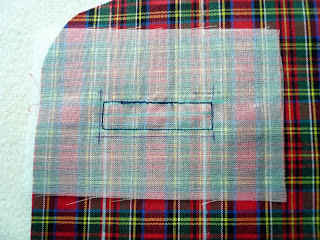
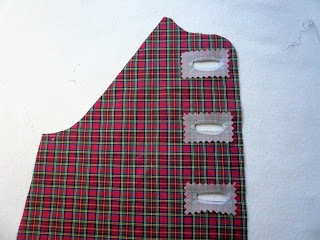
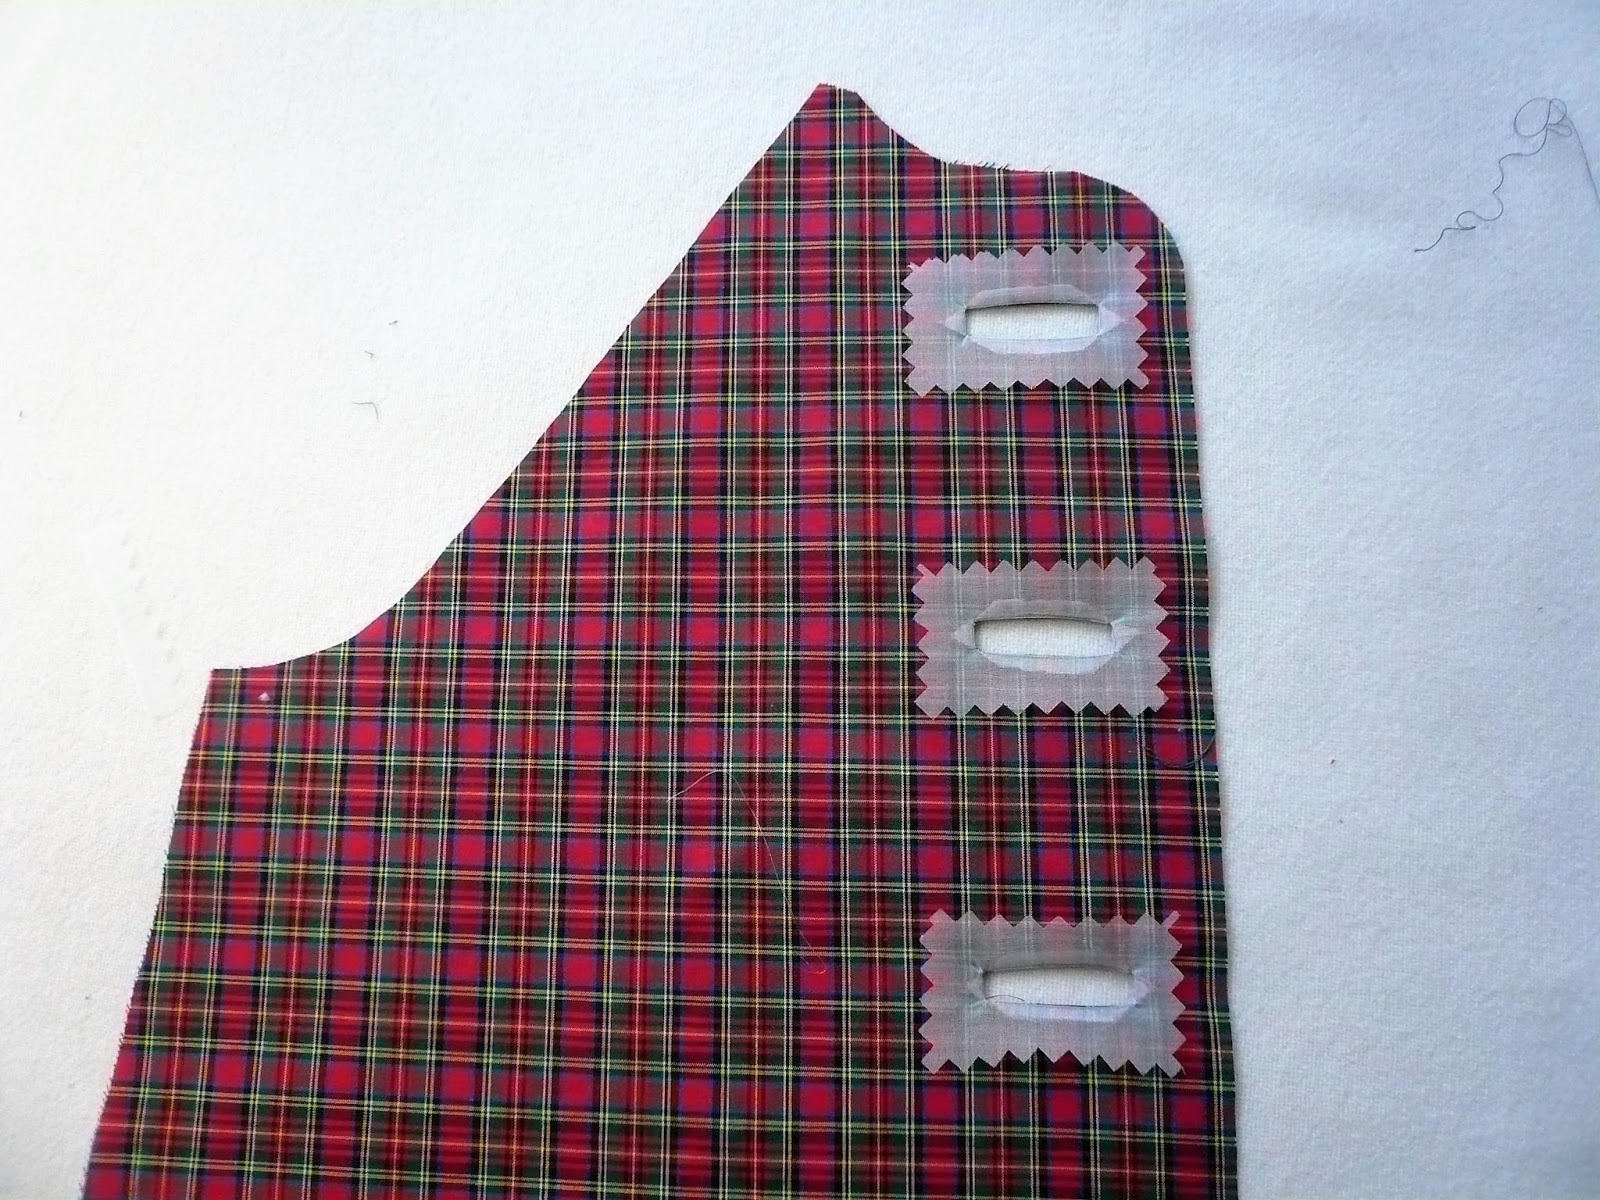
Bound Buttonhole Tutorial
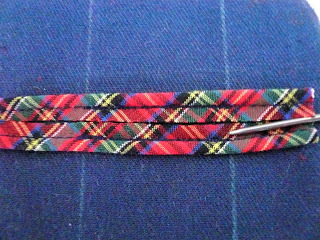
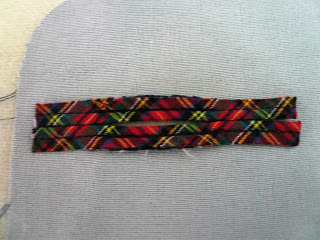
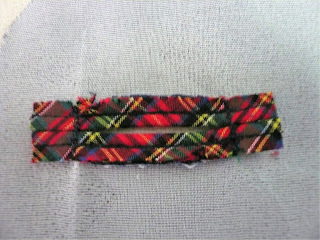
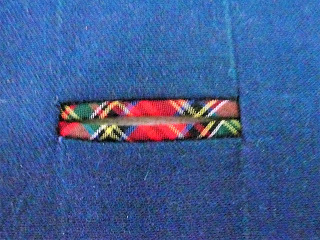
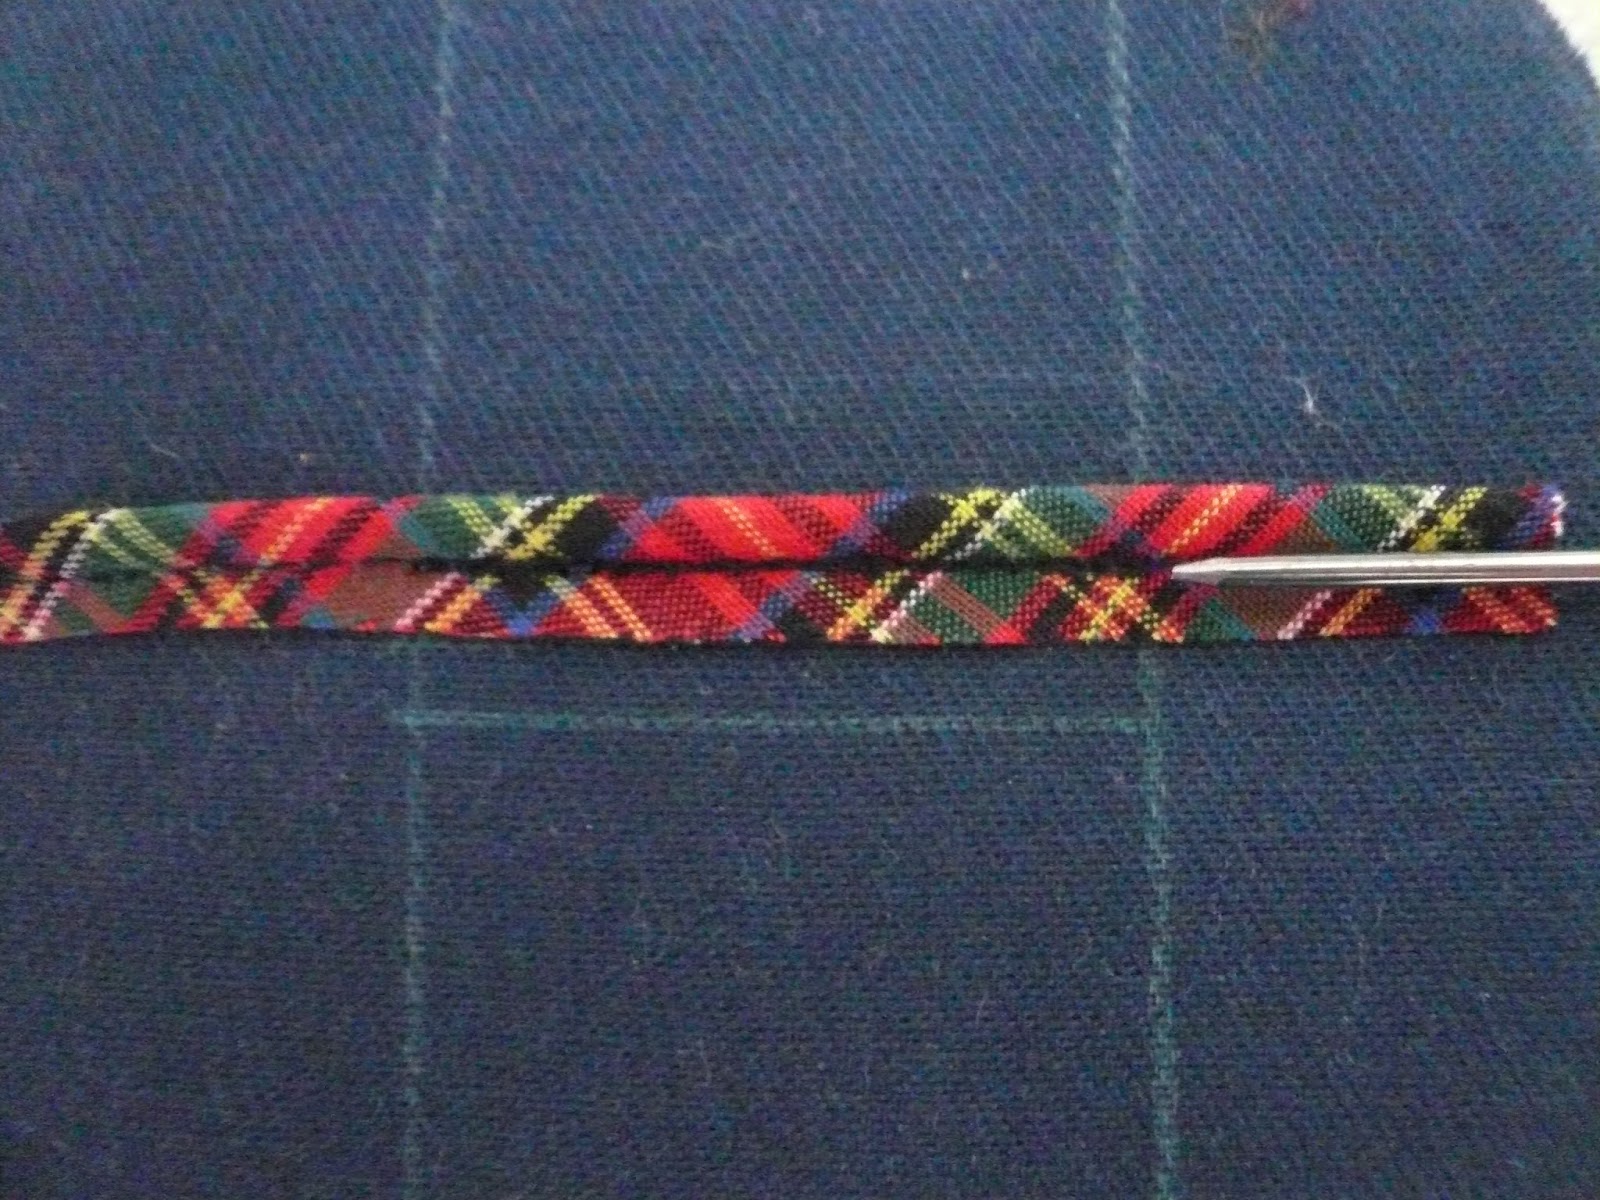
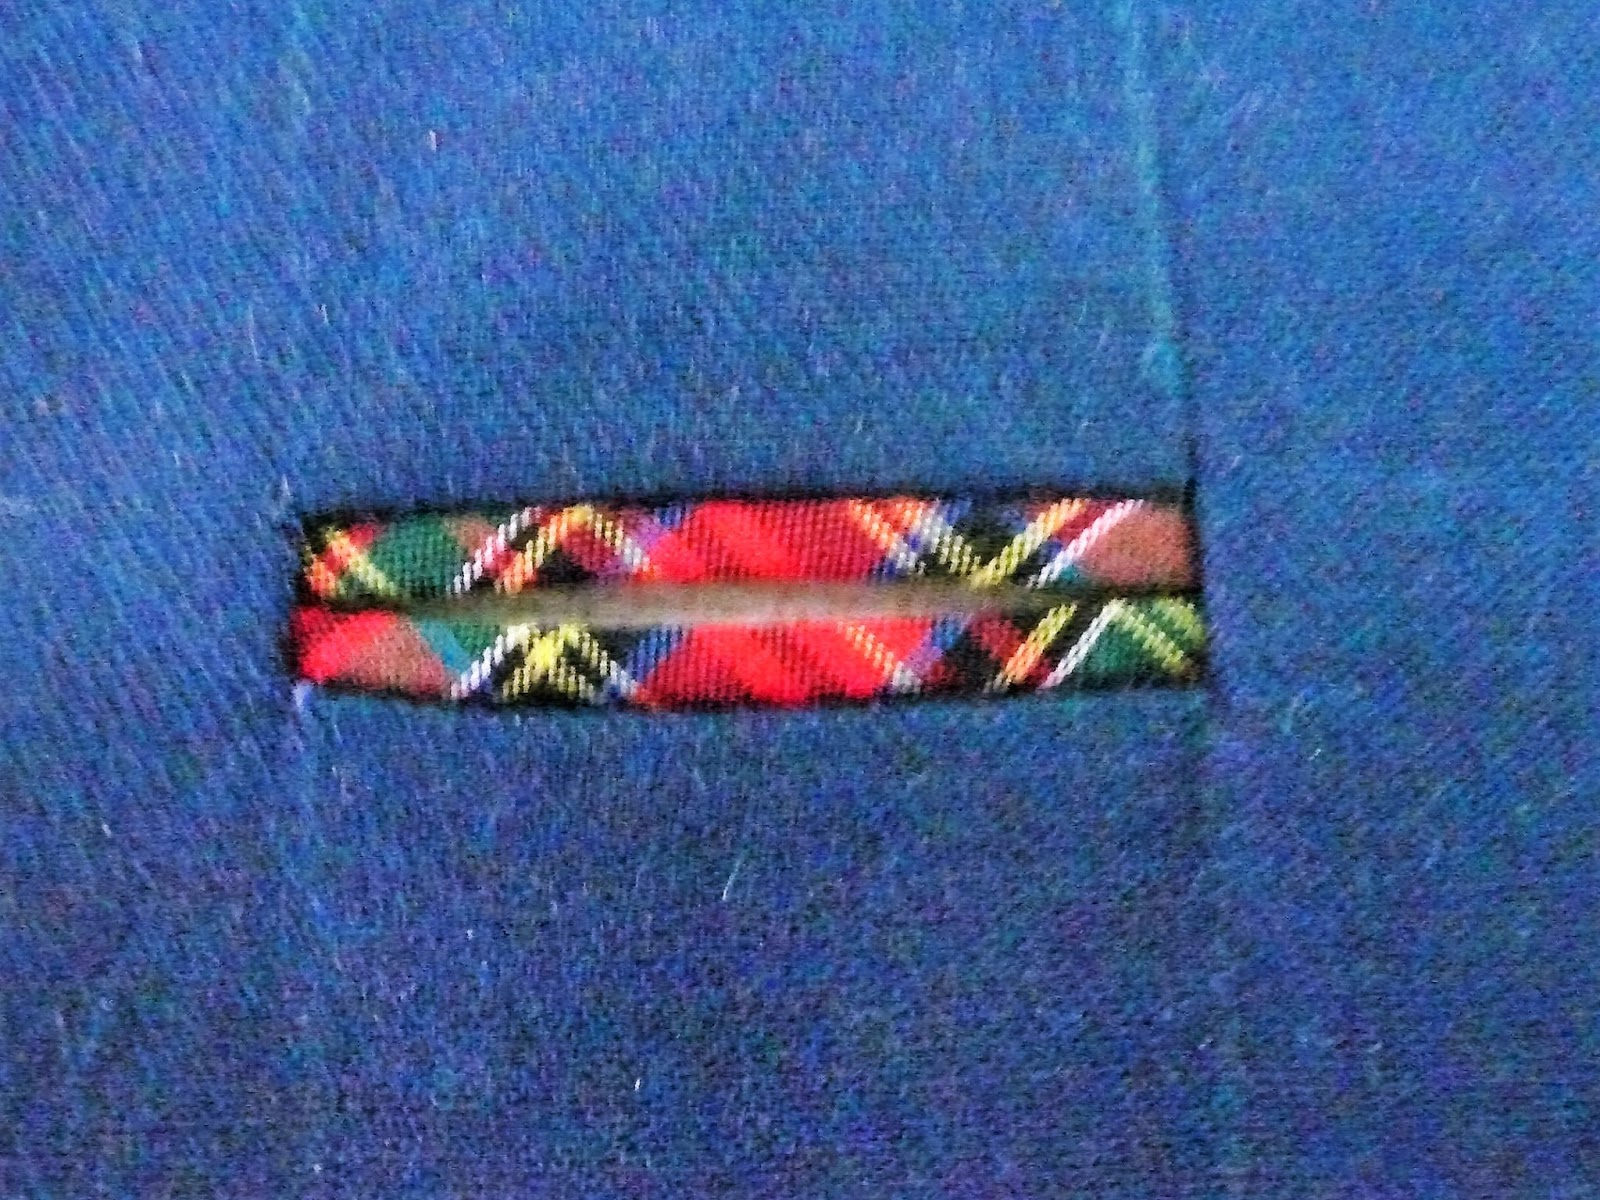
I have had several requests for a little picture tutorial of my method for making bound buttonholes. I posted this photo last week on my Facebook page and the Classic Sewing Magazine Facebook page. It is a close up of a bound buttonhole made with (somewhat enhanced) mini piping using a piping foot on my sewing machine.
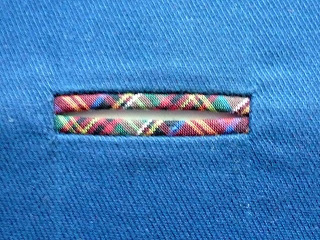
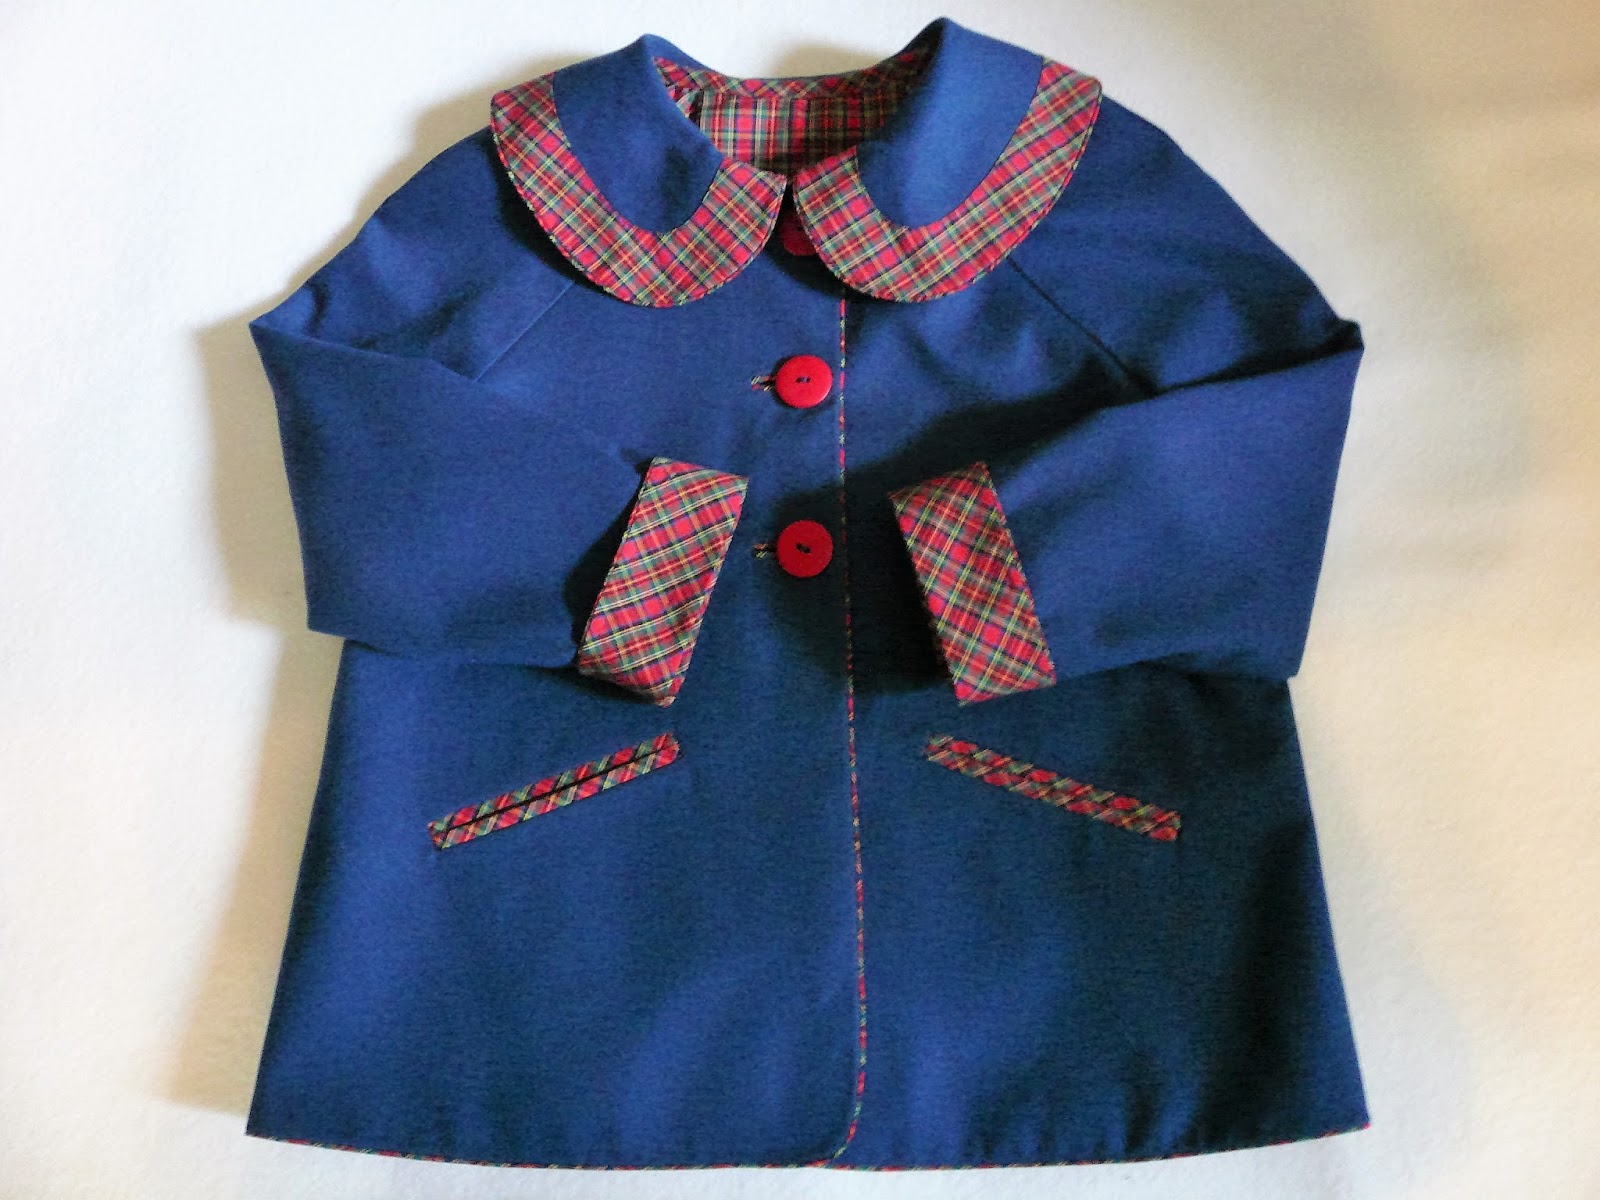
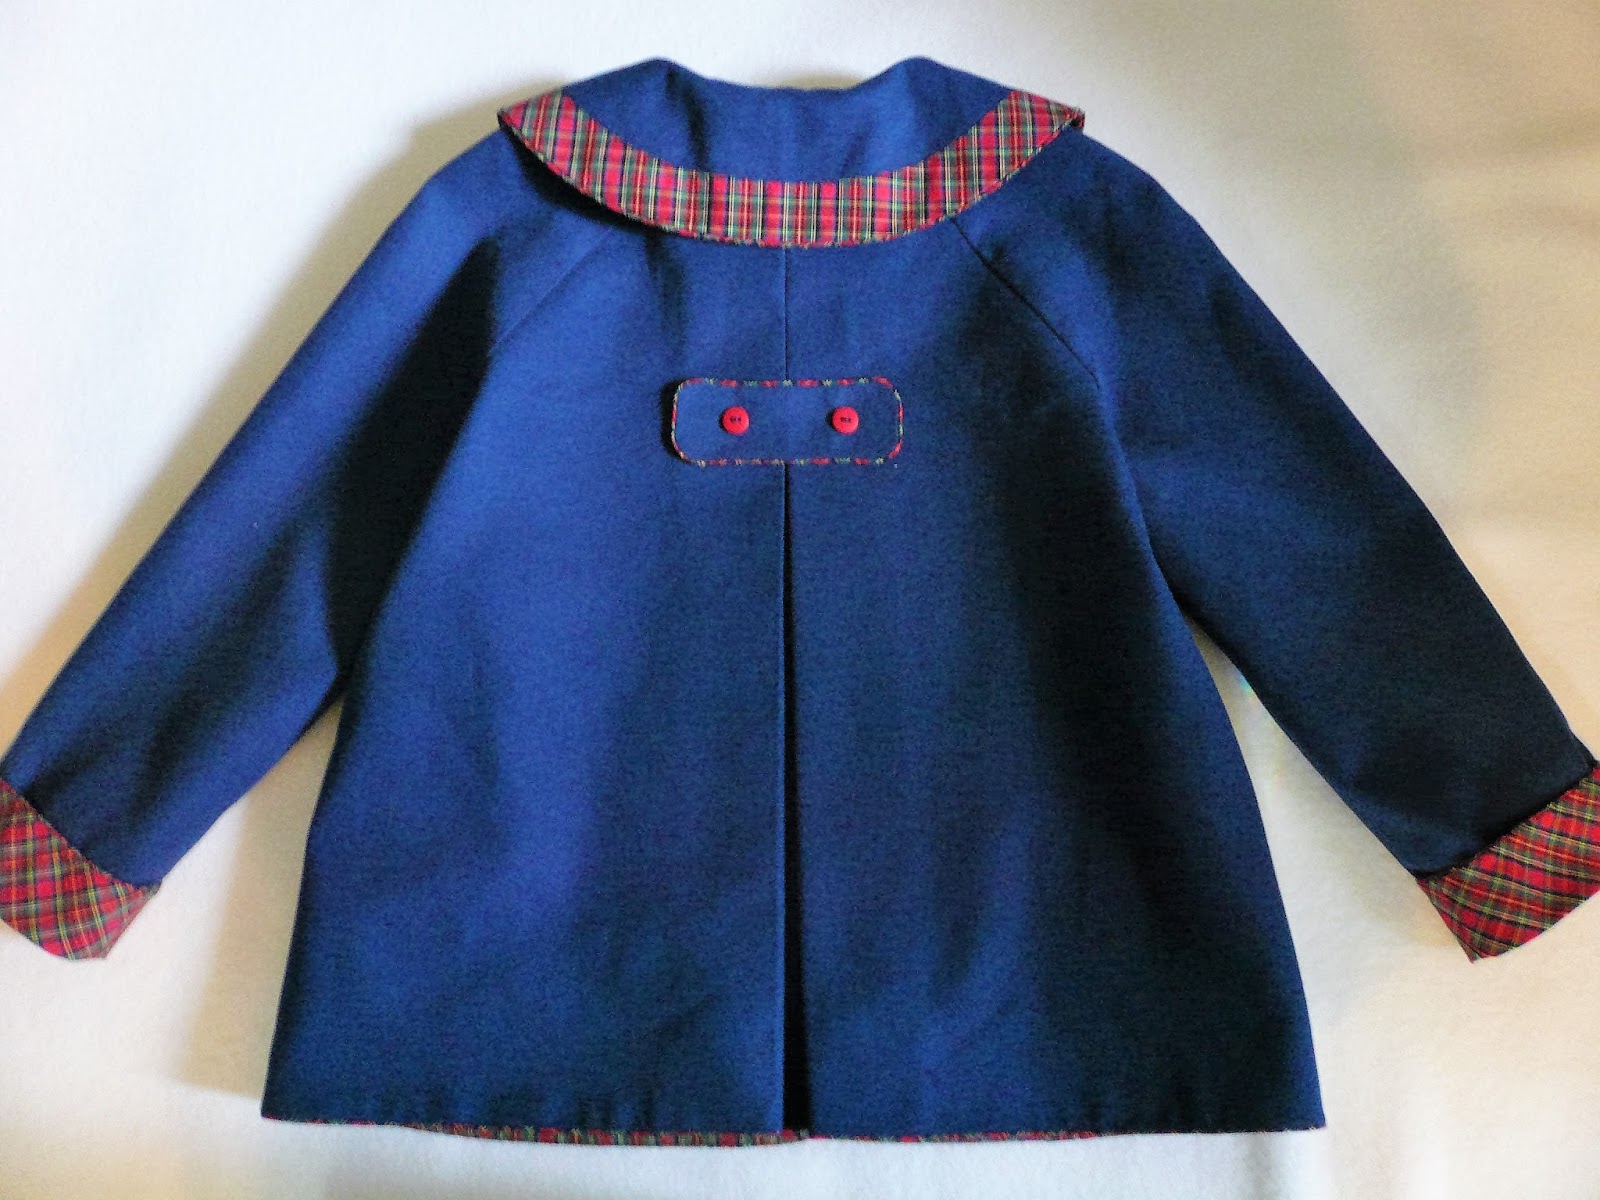
The bound buttonholes are featured on this project which will be a new class in 2017. The jacket and dress fabric are cotton twill from Fabric Finders paired with a 100% pima cotton traditional tartan from Spechler/Vogel. The easy fitting raglan sleeve jacket has lots of construction details....bound buttonholes, double welt bias cut front pockets (which look like huge bound buttonholes), bias cut collar overlay, bias cut cuff turnbacks, mini piping on all perimeter edges, and a pleated back with piped tab.
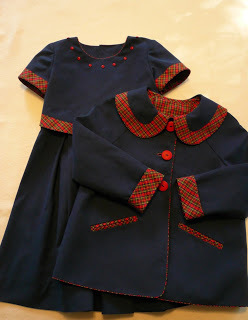


The coordinating dress features a bodice front overlay with a bias cut contrast tartan band, bias cut tartan sleeve overlays, piped back belt with bound buttonholes, and buttons all the way down the back. The hem is bound and shaped to accomodate the A-line of the pleated skirt.
 Project kits will be available in several color options - should be something that appeals to everyone.
Here is a picture step-by-step of my methond for making the bound buttonholes.
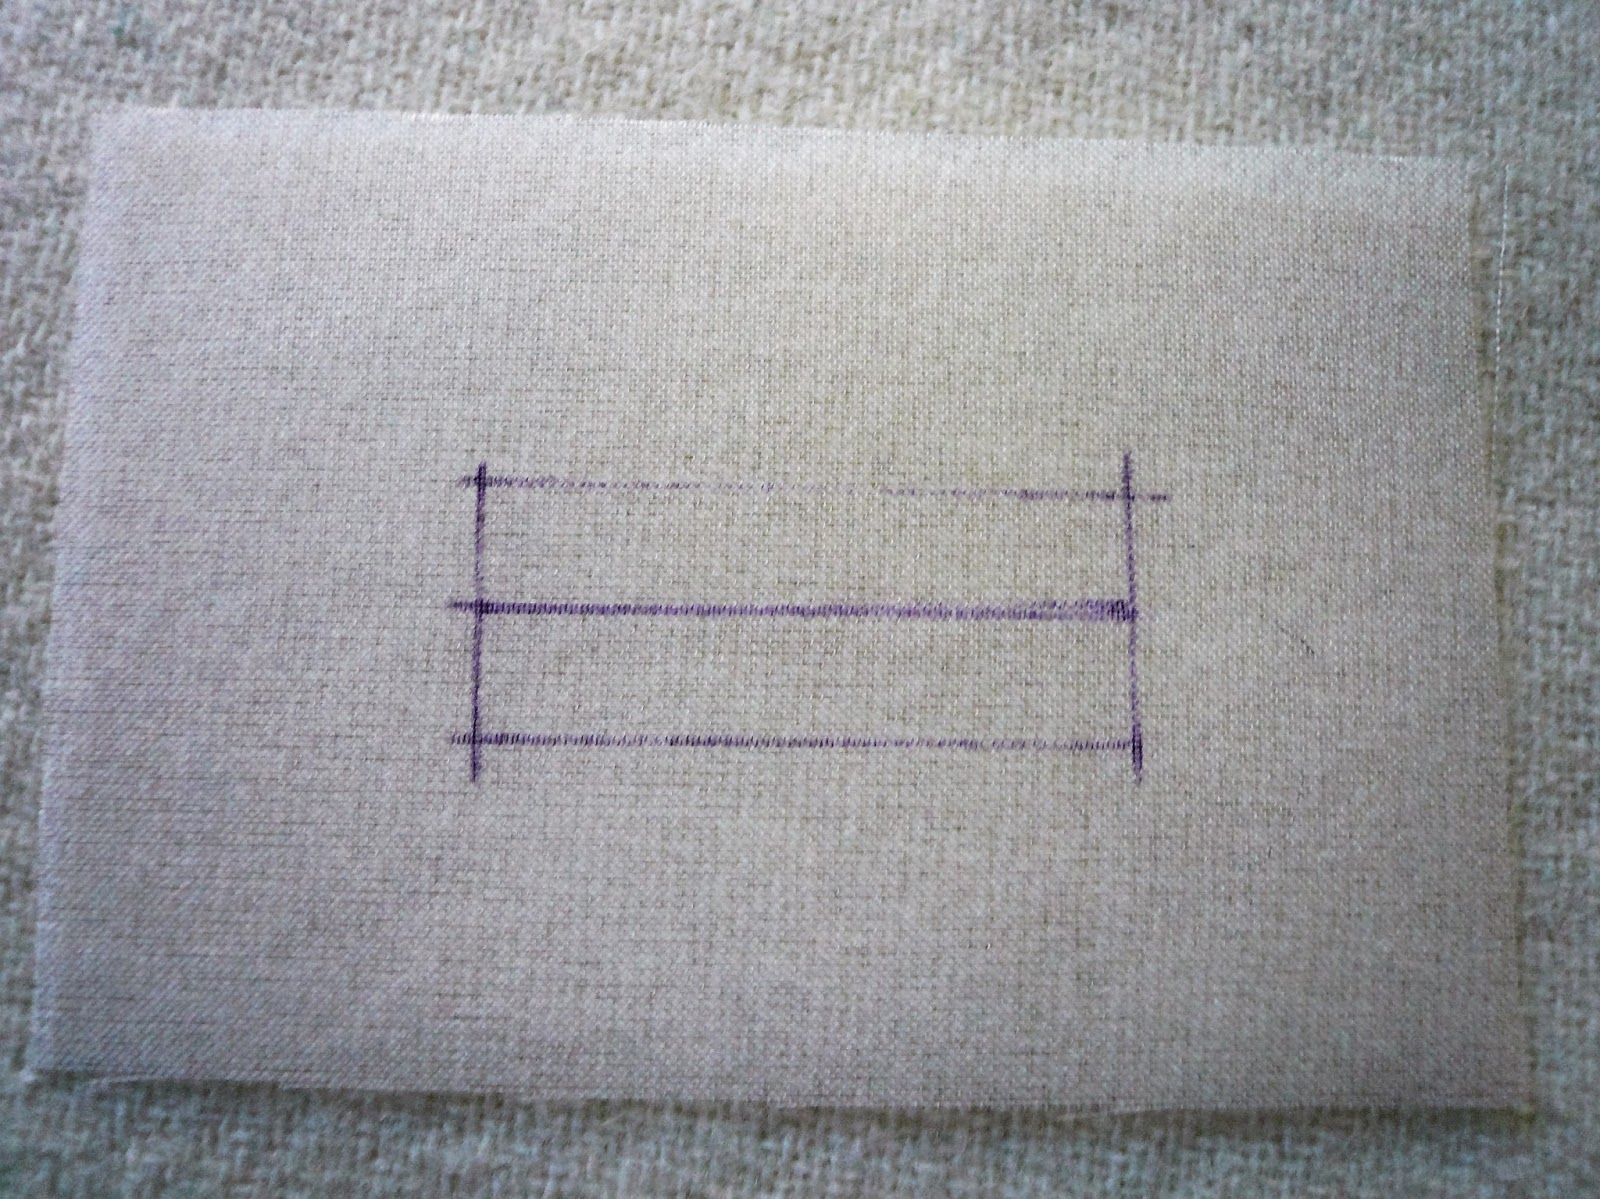
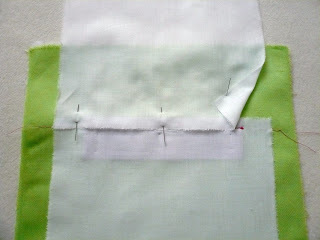
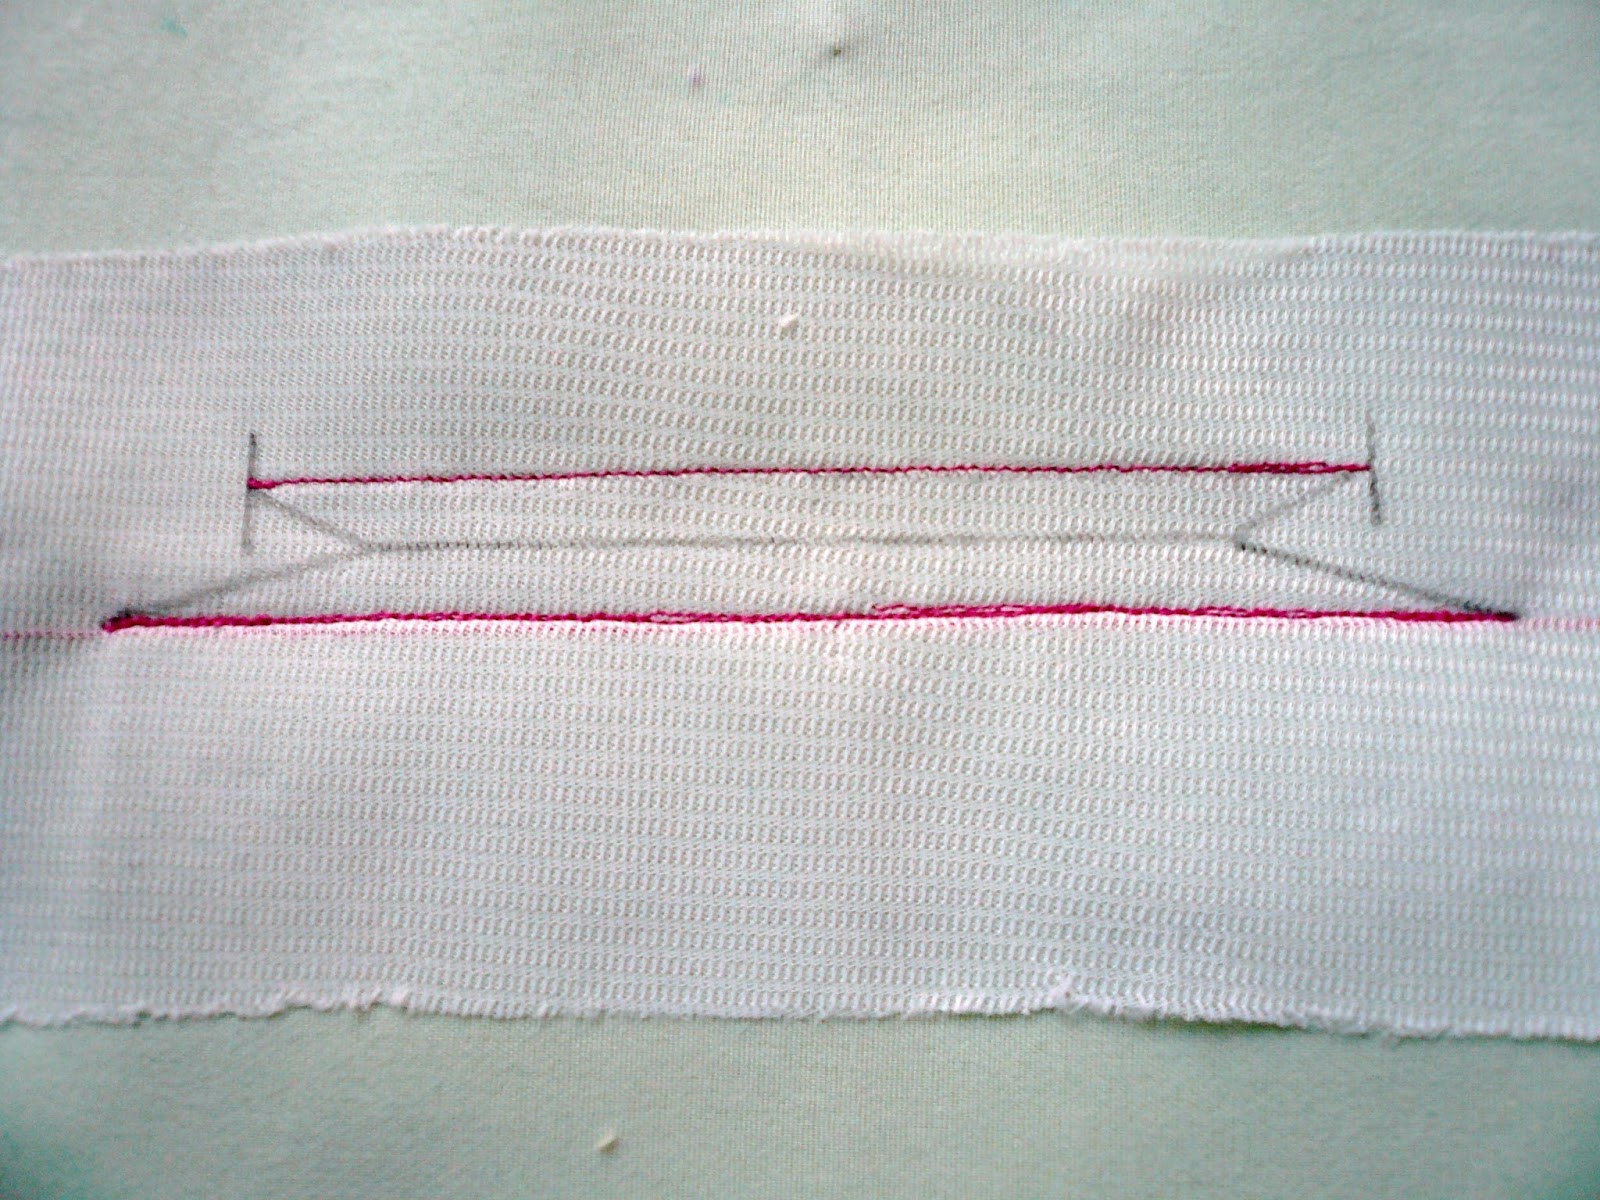
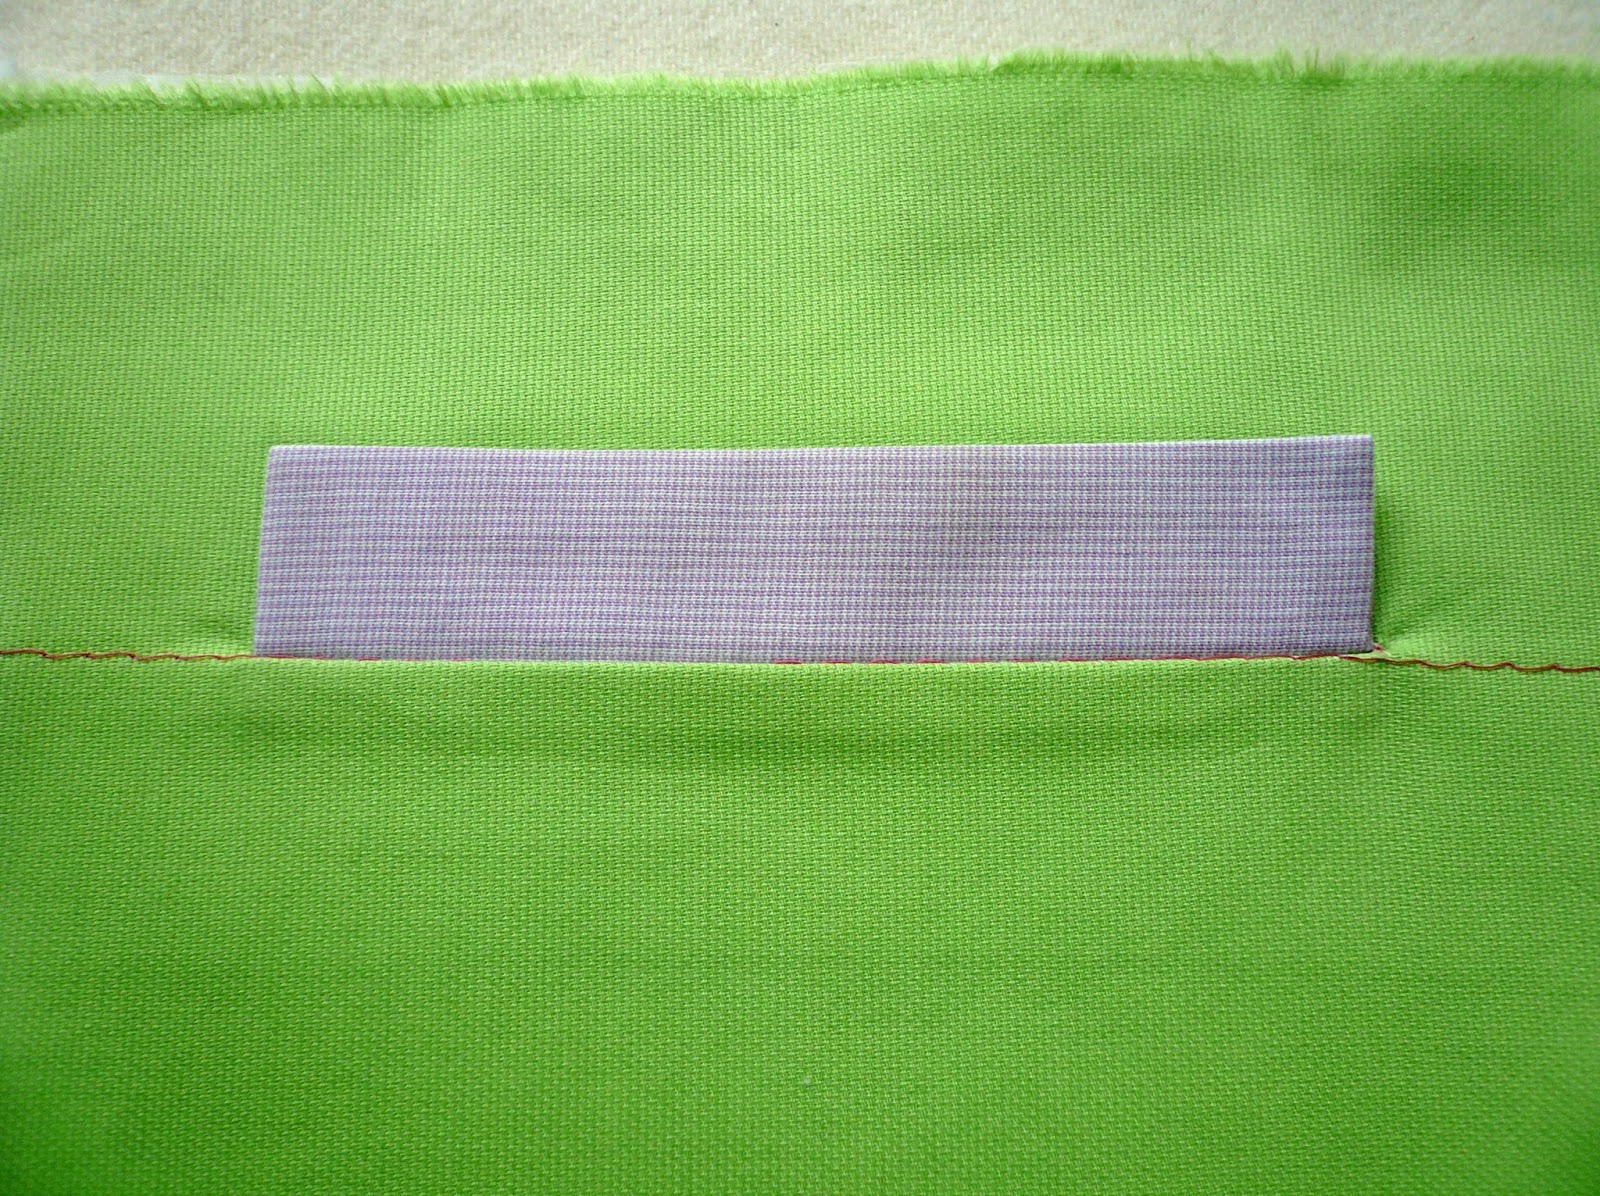
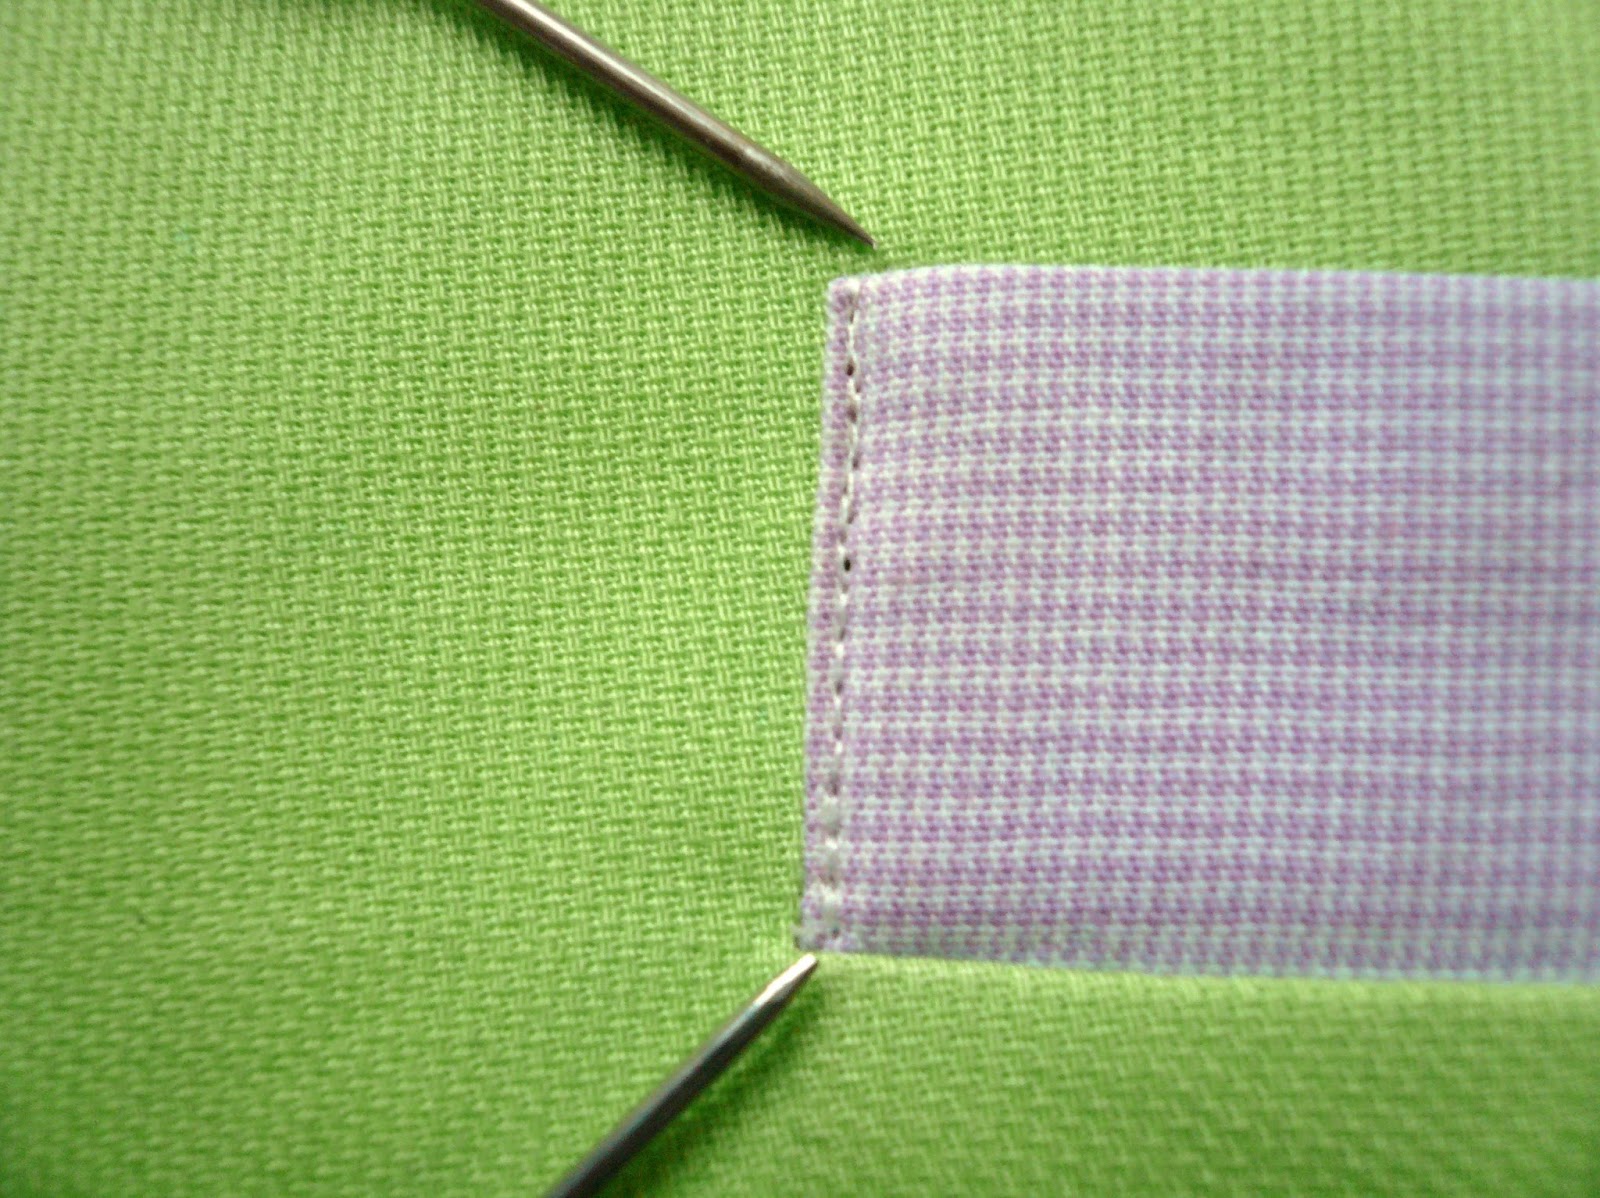
1. Clearly mark the placement of the buttonhole(s) on the right side of the fabric. For a 1" button (for the jacket) I marked a 1 1/8" buttonhole and for a 1/2" button (back belt on dress) I marked a 5/8" buttonhole. Work over interfaced fabric.
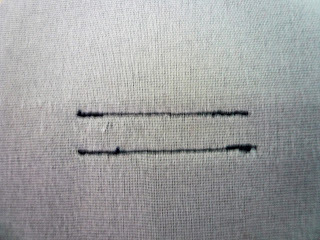
2. Draw in two more lines each an accurate 1/8" away from the center placement line.
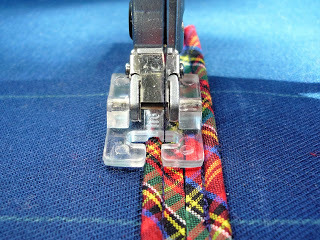
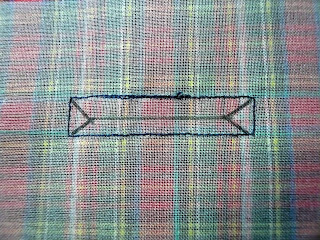
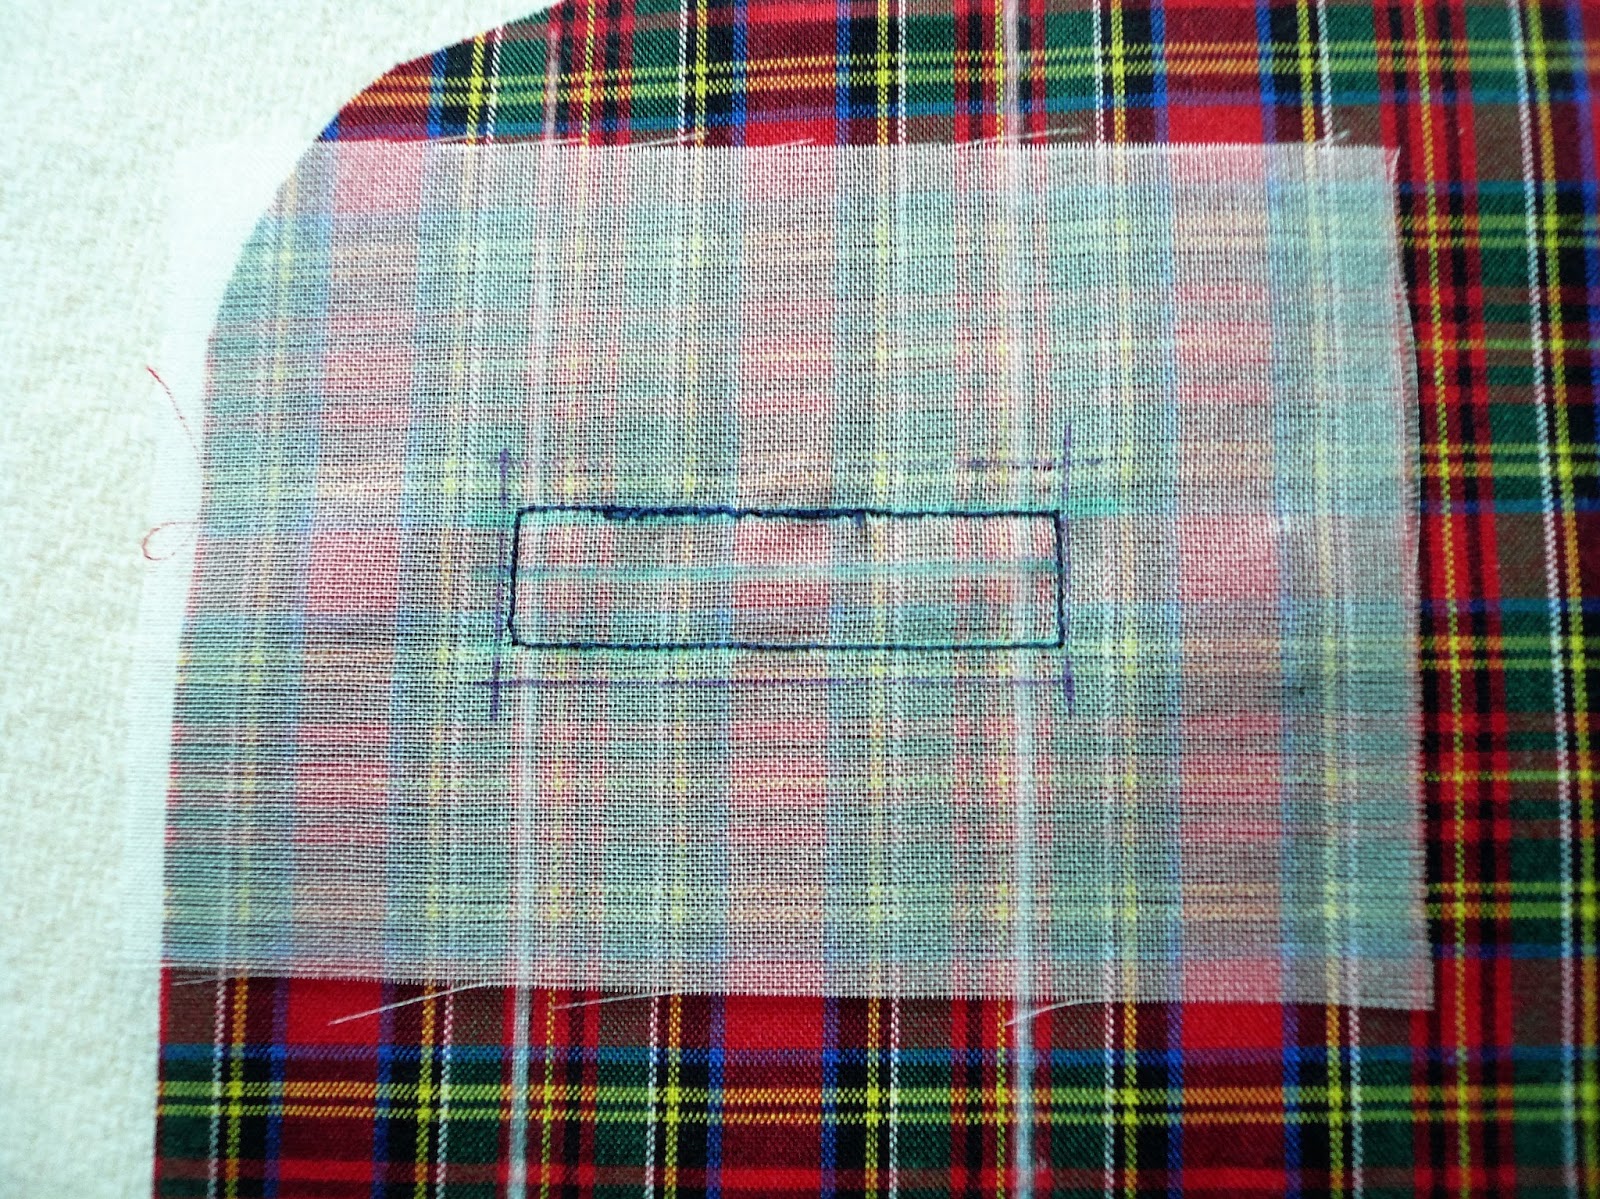
3. Make enough piping for the length of each buttonhole plus 1" (x's 2). For this weight of fabric I found using two strands of filler cord instead of one made for a studier, better proportioned bound buttonhole. I did not adjust my needle position as close to the cord as I normally would for single strand piping. Trim the seam allowance down to an accurate 1/8". I checked and it appears none of the piping rulers on the market will cut a seam allowance down to 1/8" so you will have to have a steady hand to make an accurate cut.
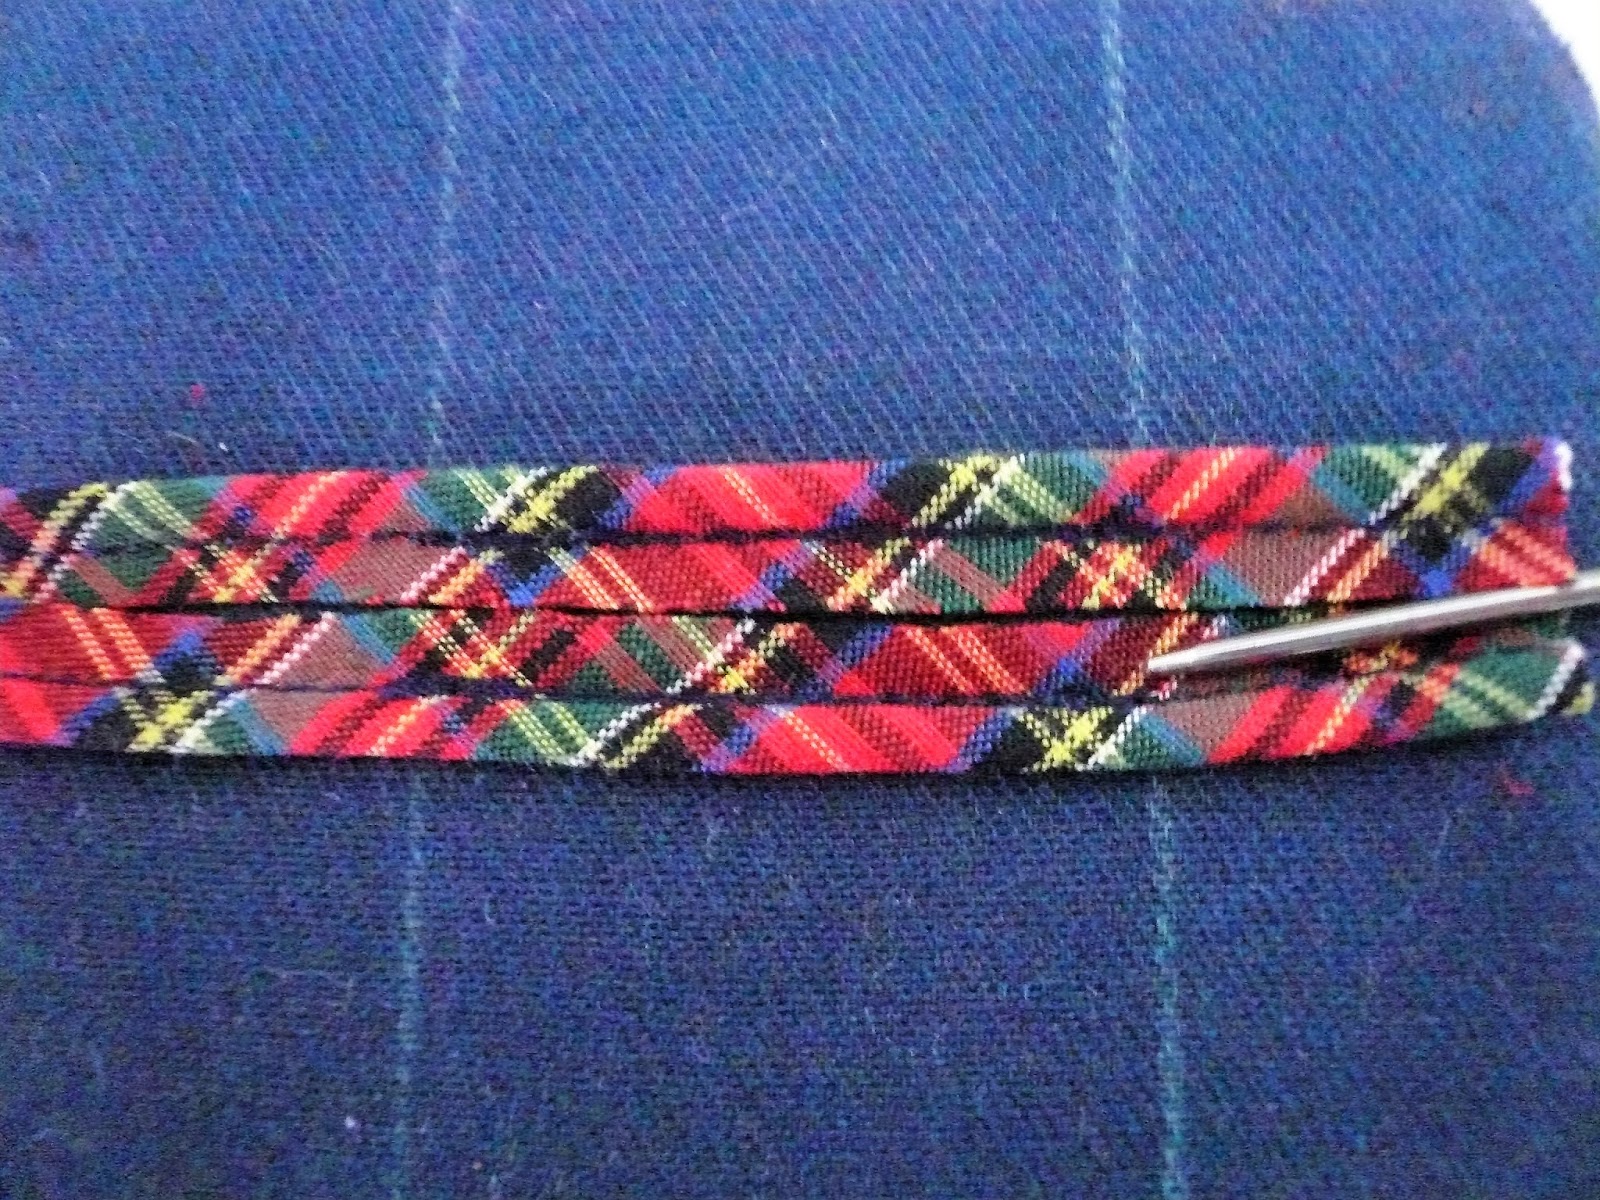
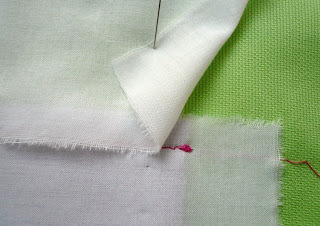
4. Cut the piping the length of the buttonhole plus 1". Lay the seamline of the piping on the outer line of the marked buttonhole. The raw edge of the seam allowance should just touch the center marked line. Using your piping foot and adjusting the needle position as necessary to stitch close to the cord, stitch (1.5L) over the seamline on the piping EXACTLY between the two marked vertical edges. Backstitch at the beginning and the end. Repeat for the second strip of piping. The two 1/8" seam allowances should just touch on the center line. I prefer to use the open toe applique foot to make piping on my Pfaff (rather than the mini piping foot). One 'toe' on the foot is exactly 1/4" wide which is super helpful when lining up the strips for the buttonhole. I love my Pfaff - it has 29 needle positions which allows superb accuracy when working with piping.

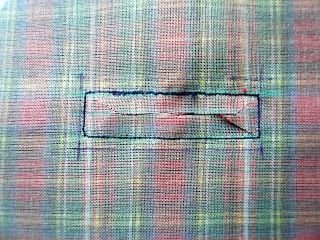
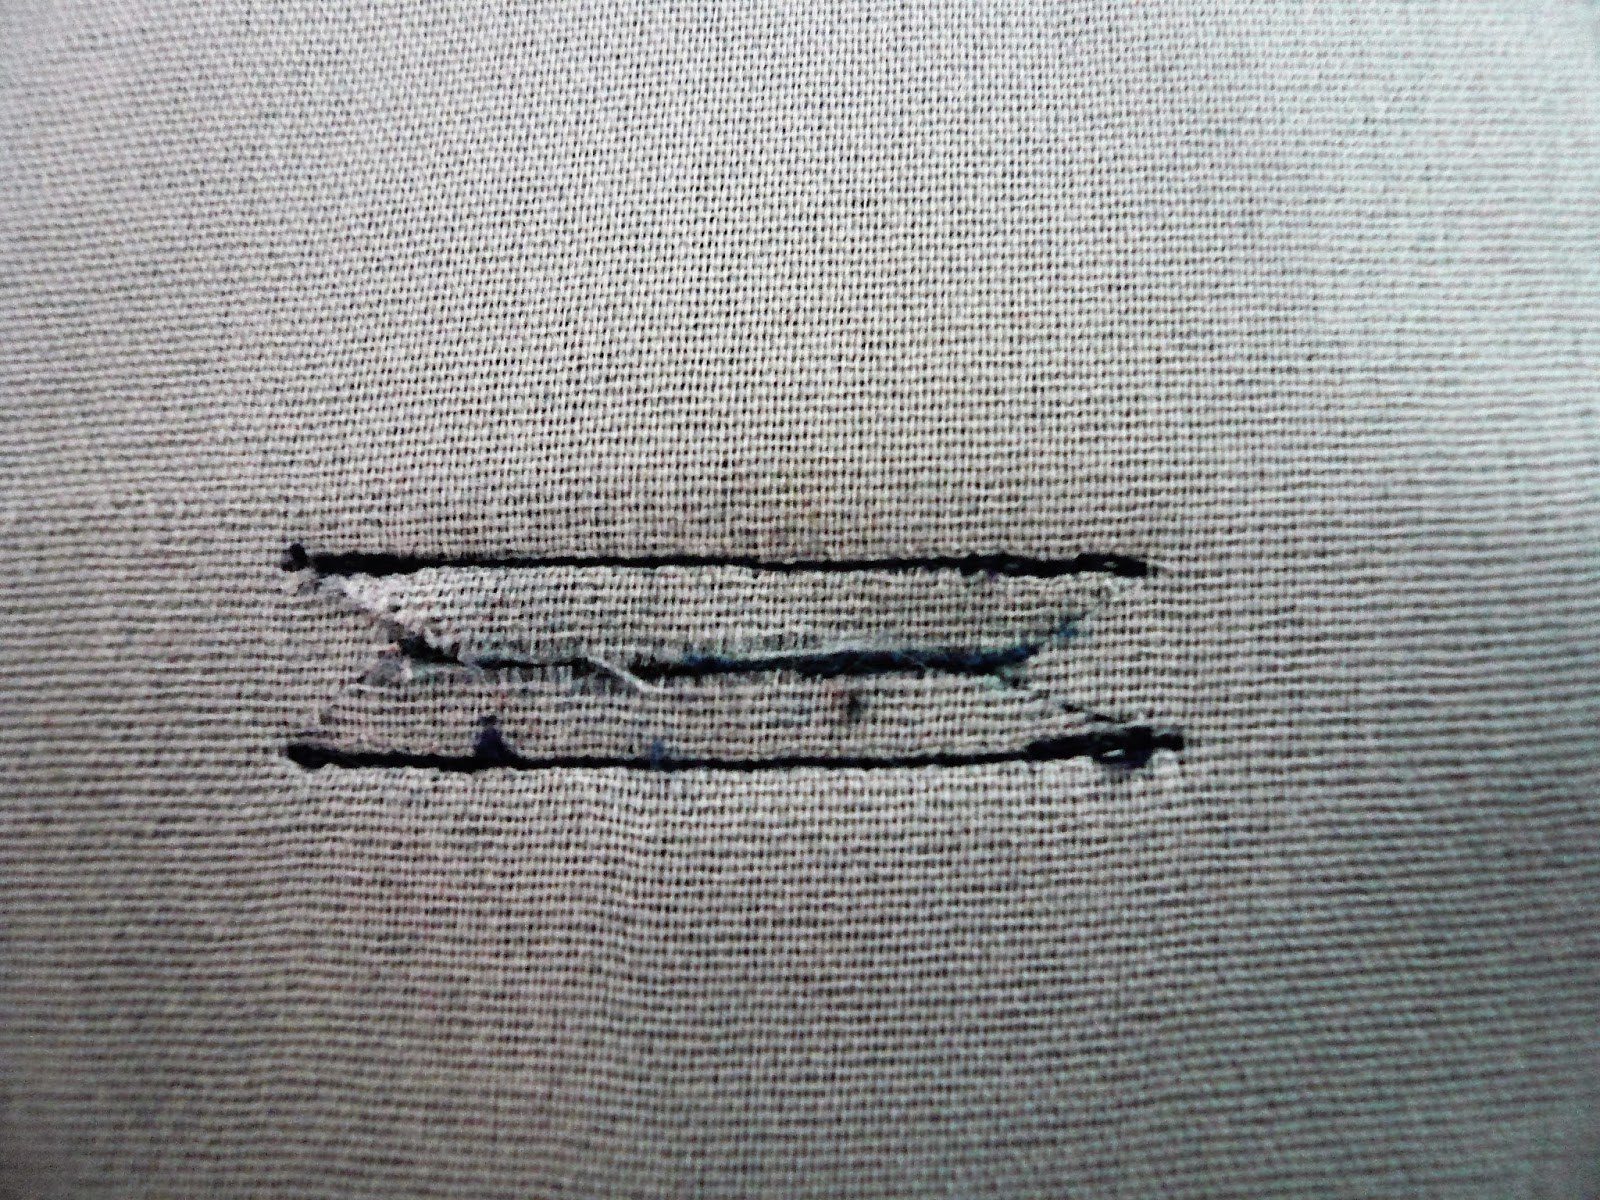
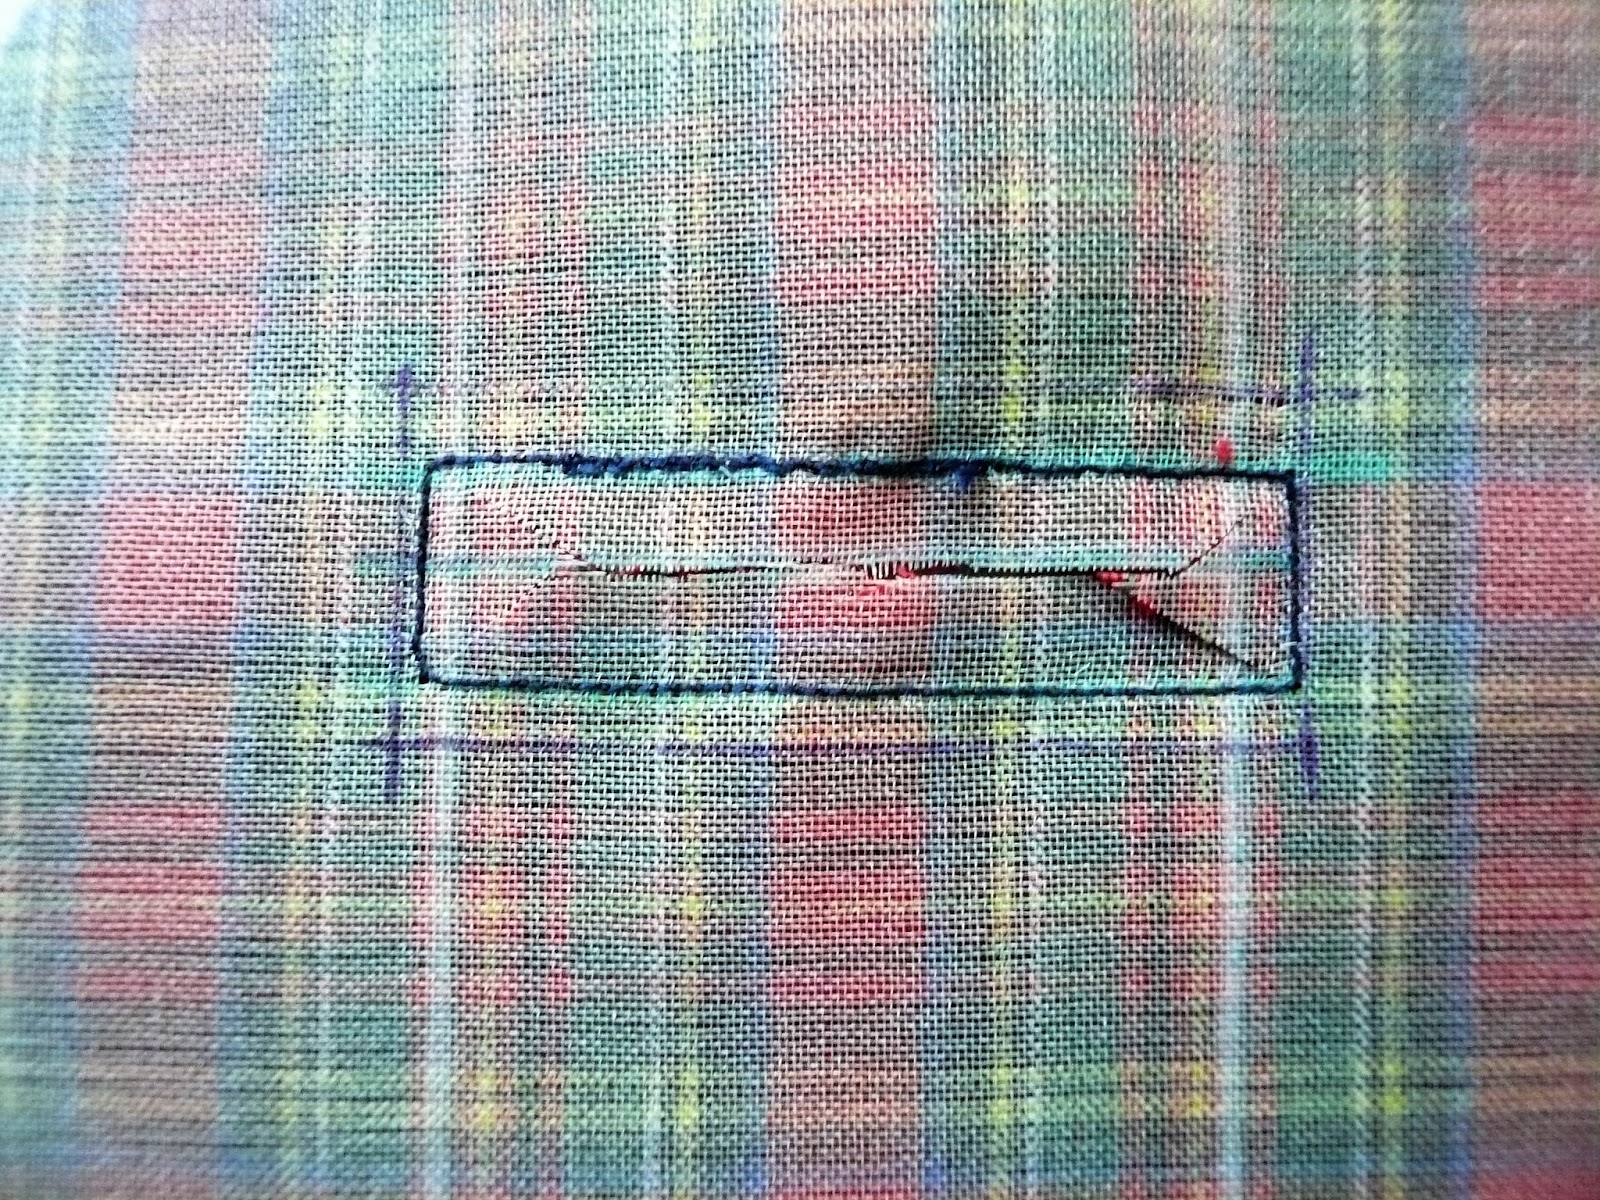
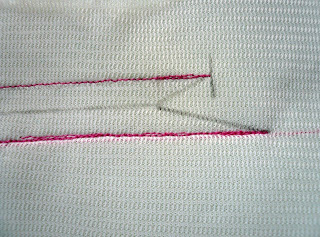
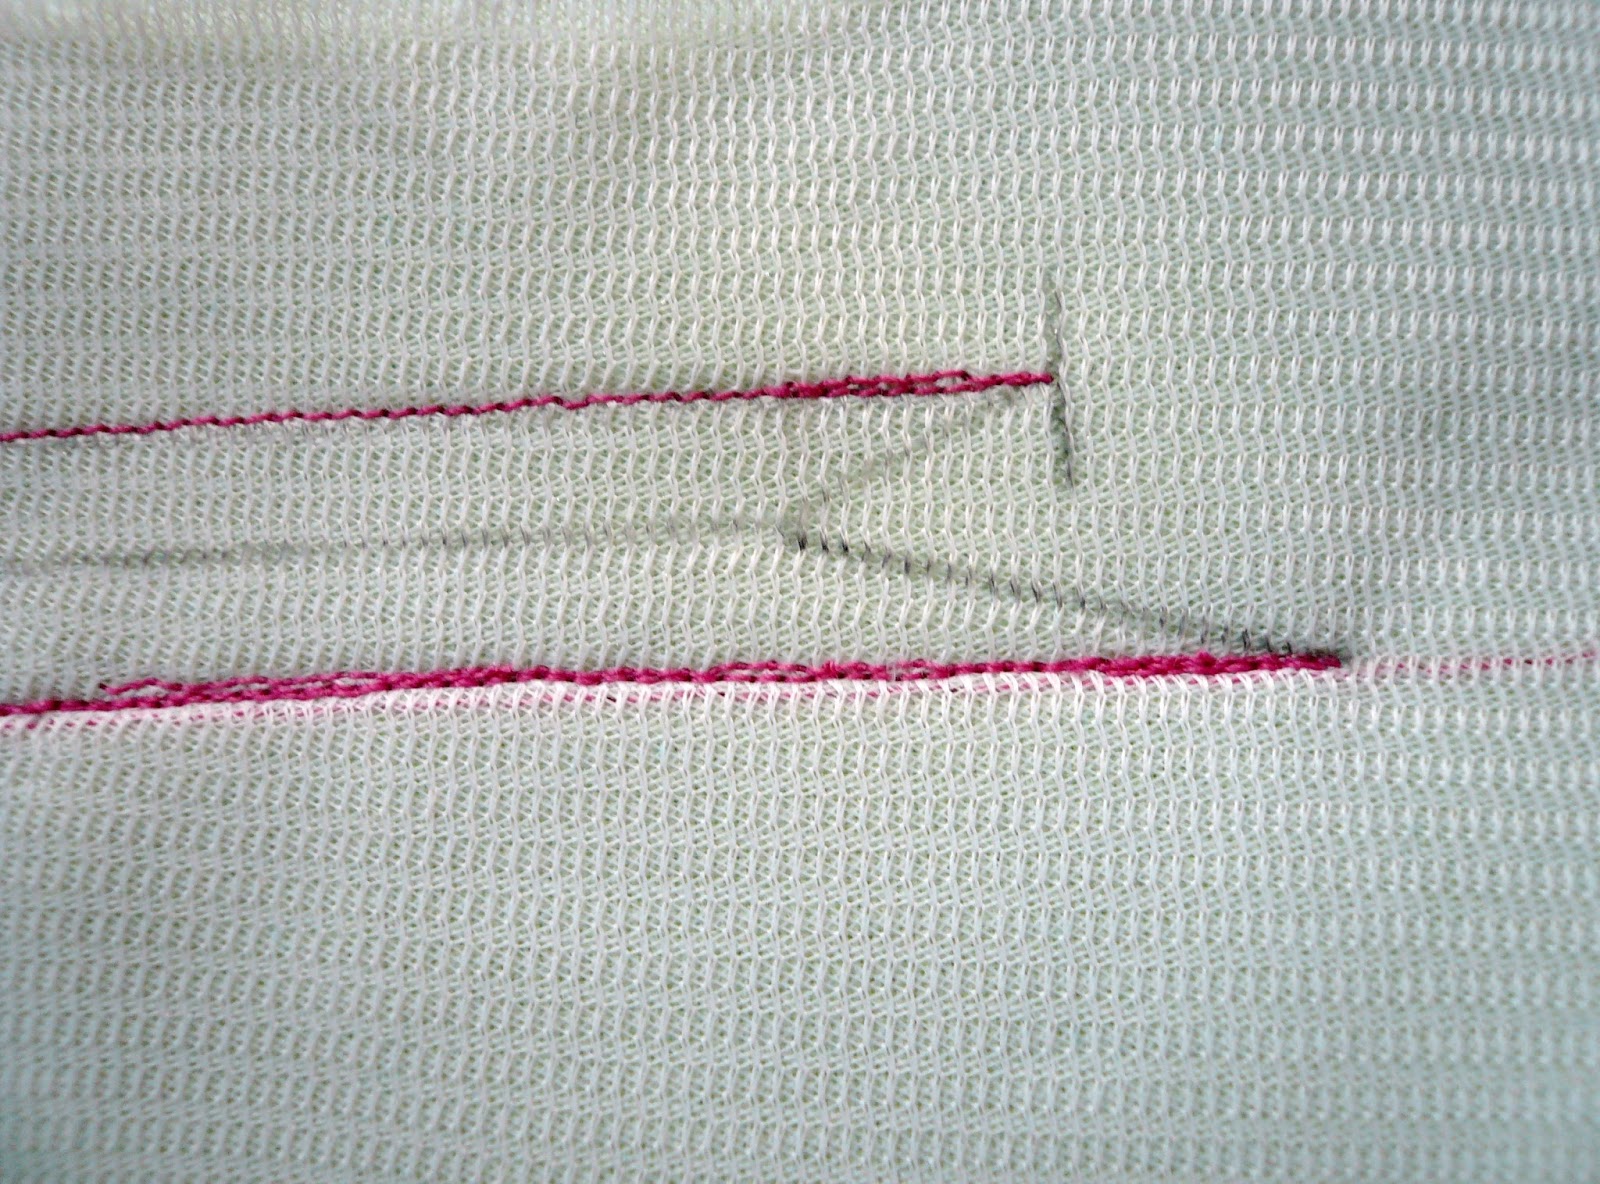
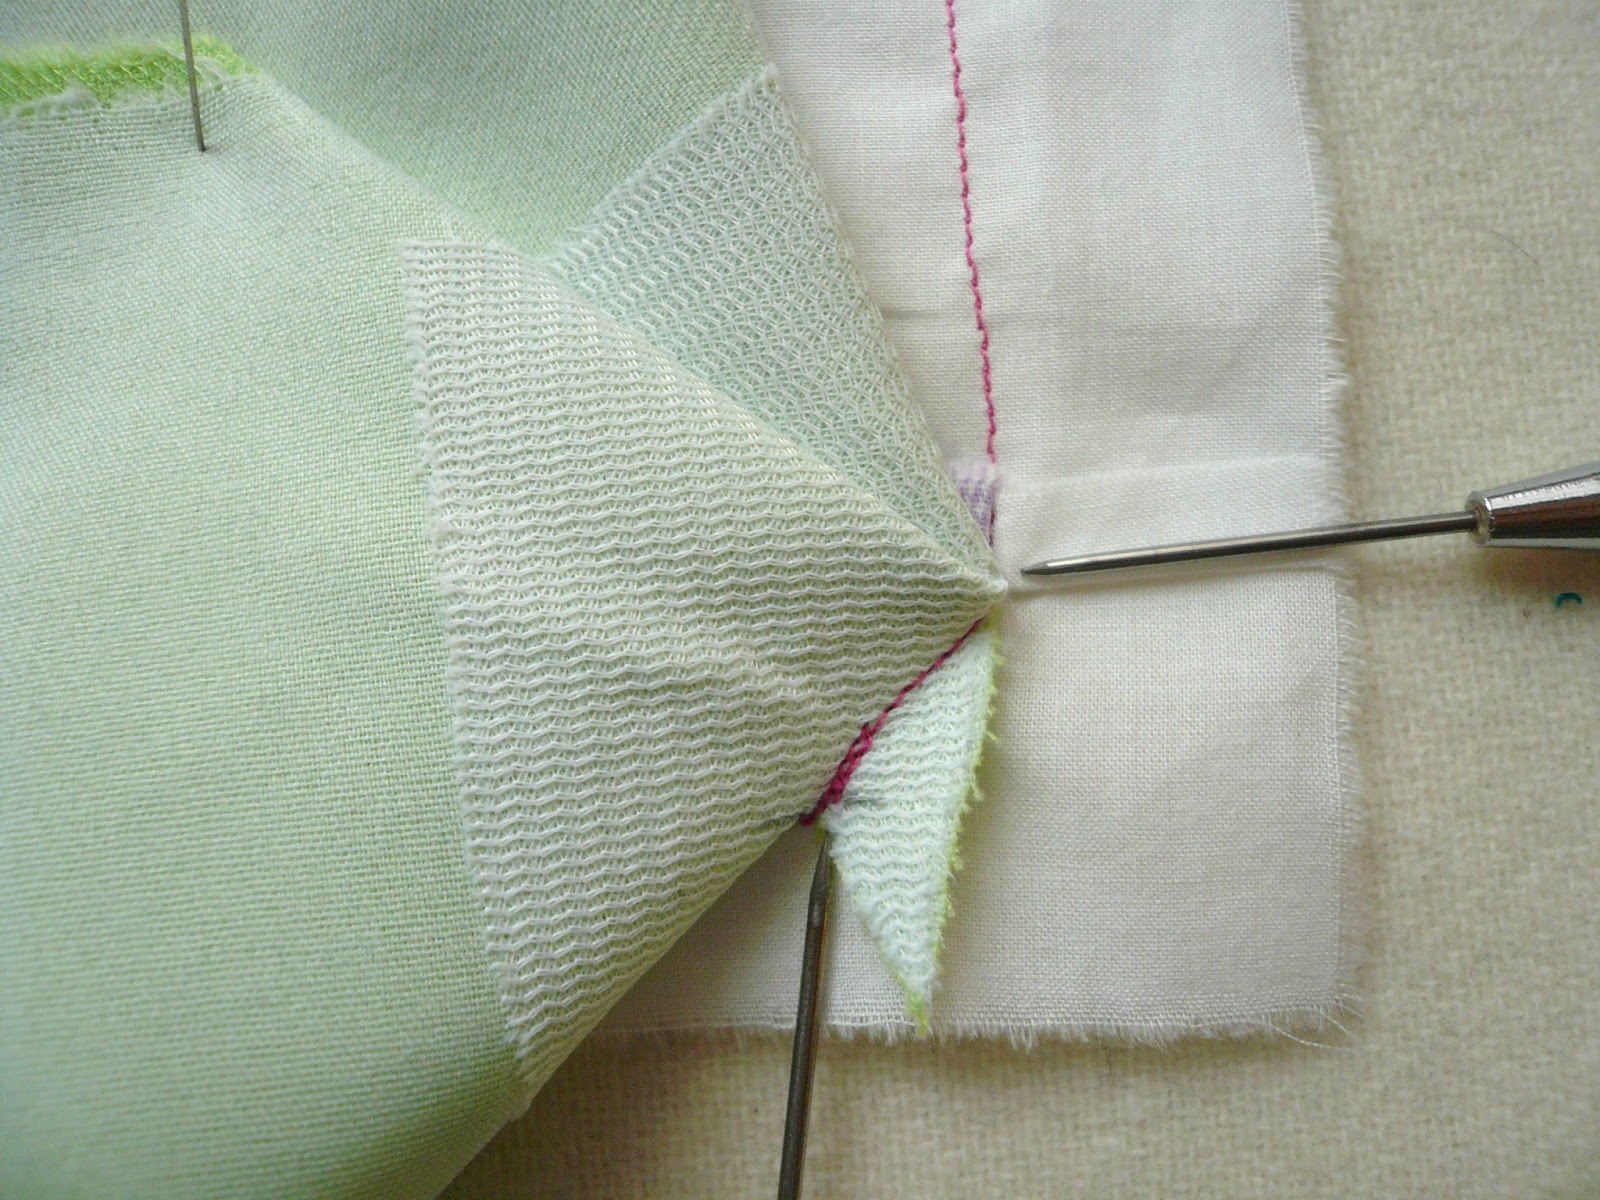
5. The back should look like this, Slash down the center of the back to within 1/4" at each end. Make a 'Y' cut out to the end of the stitching at each end,

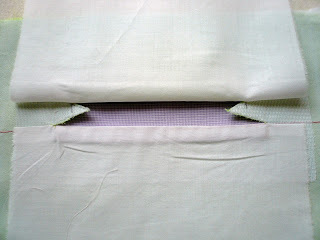
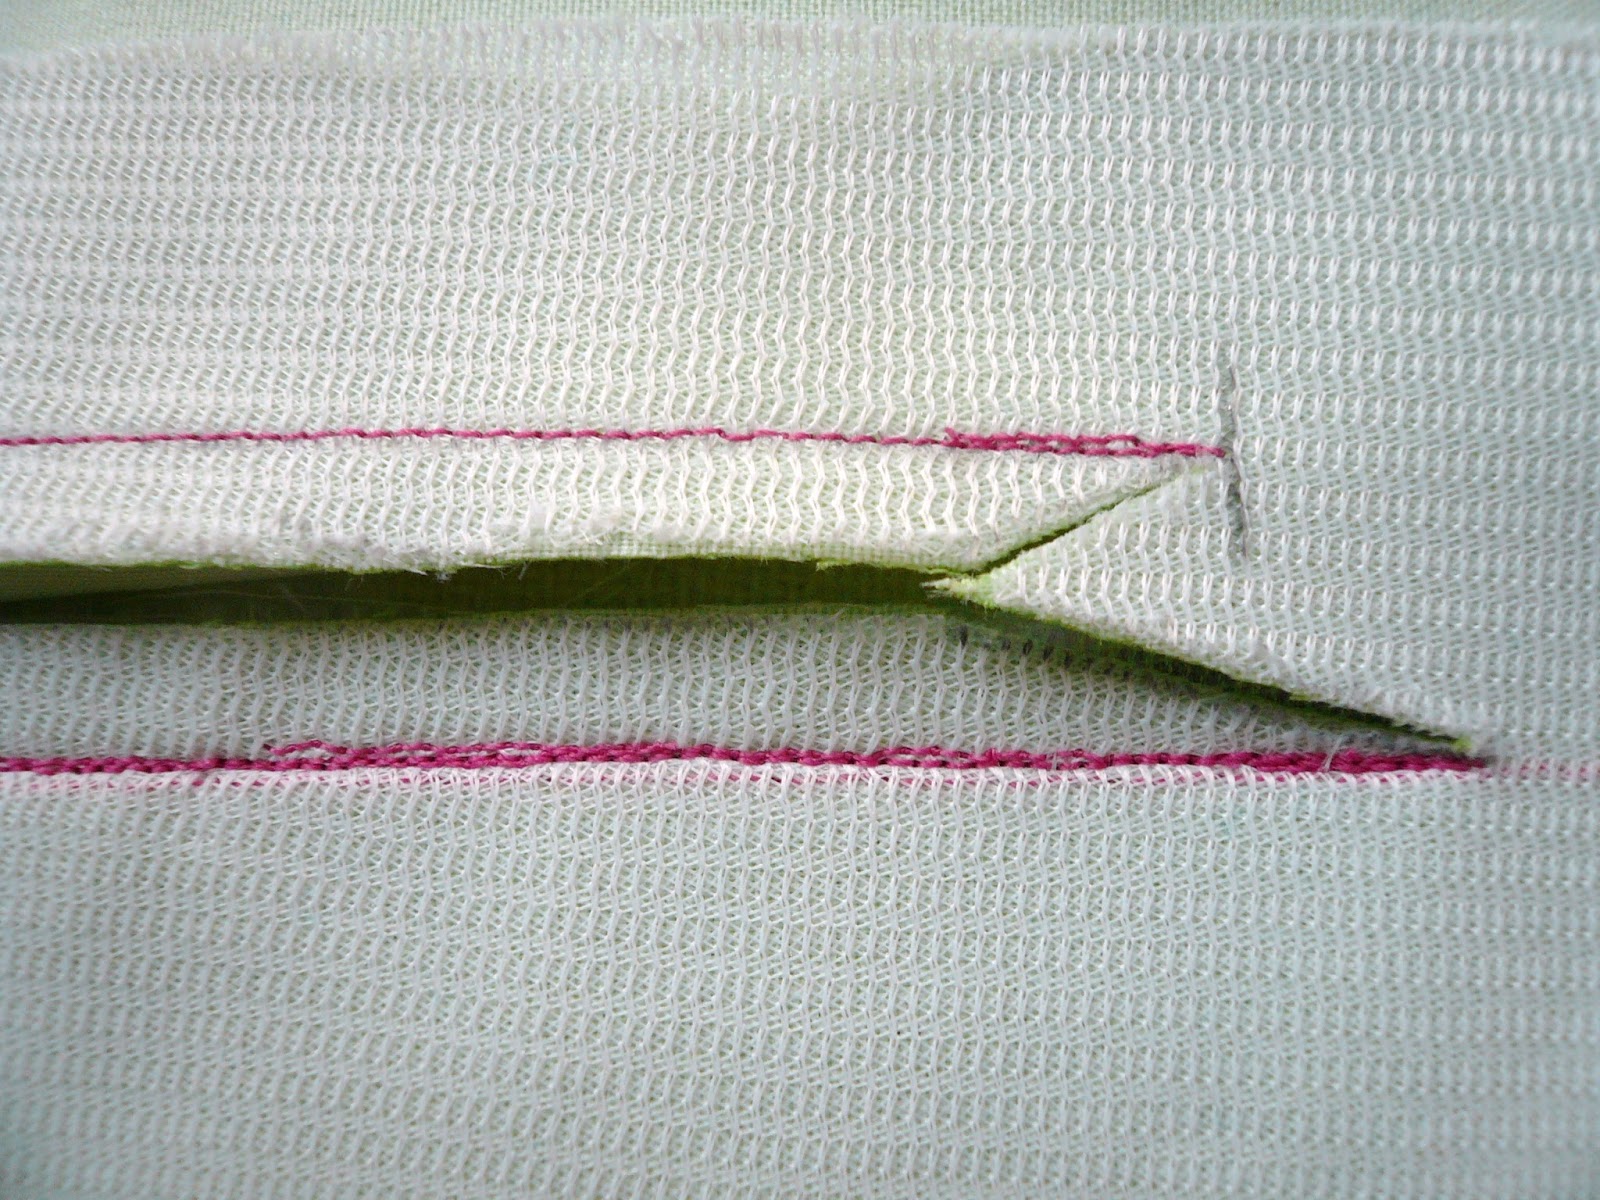
6. Pull the piping strips through to the wrong side. Gently press.

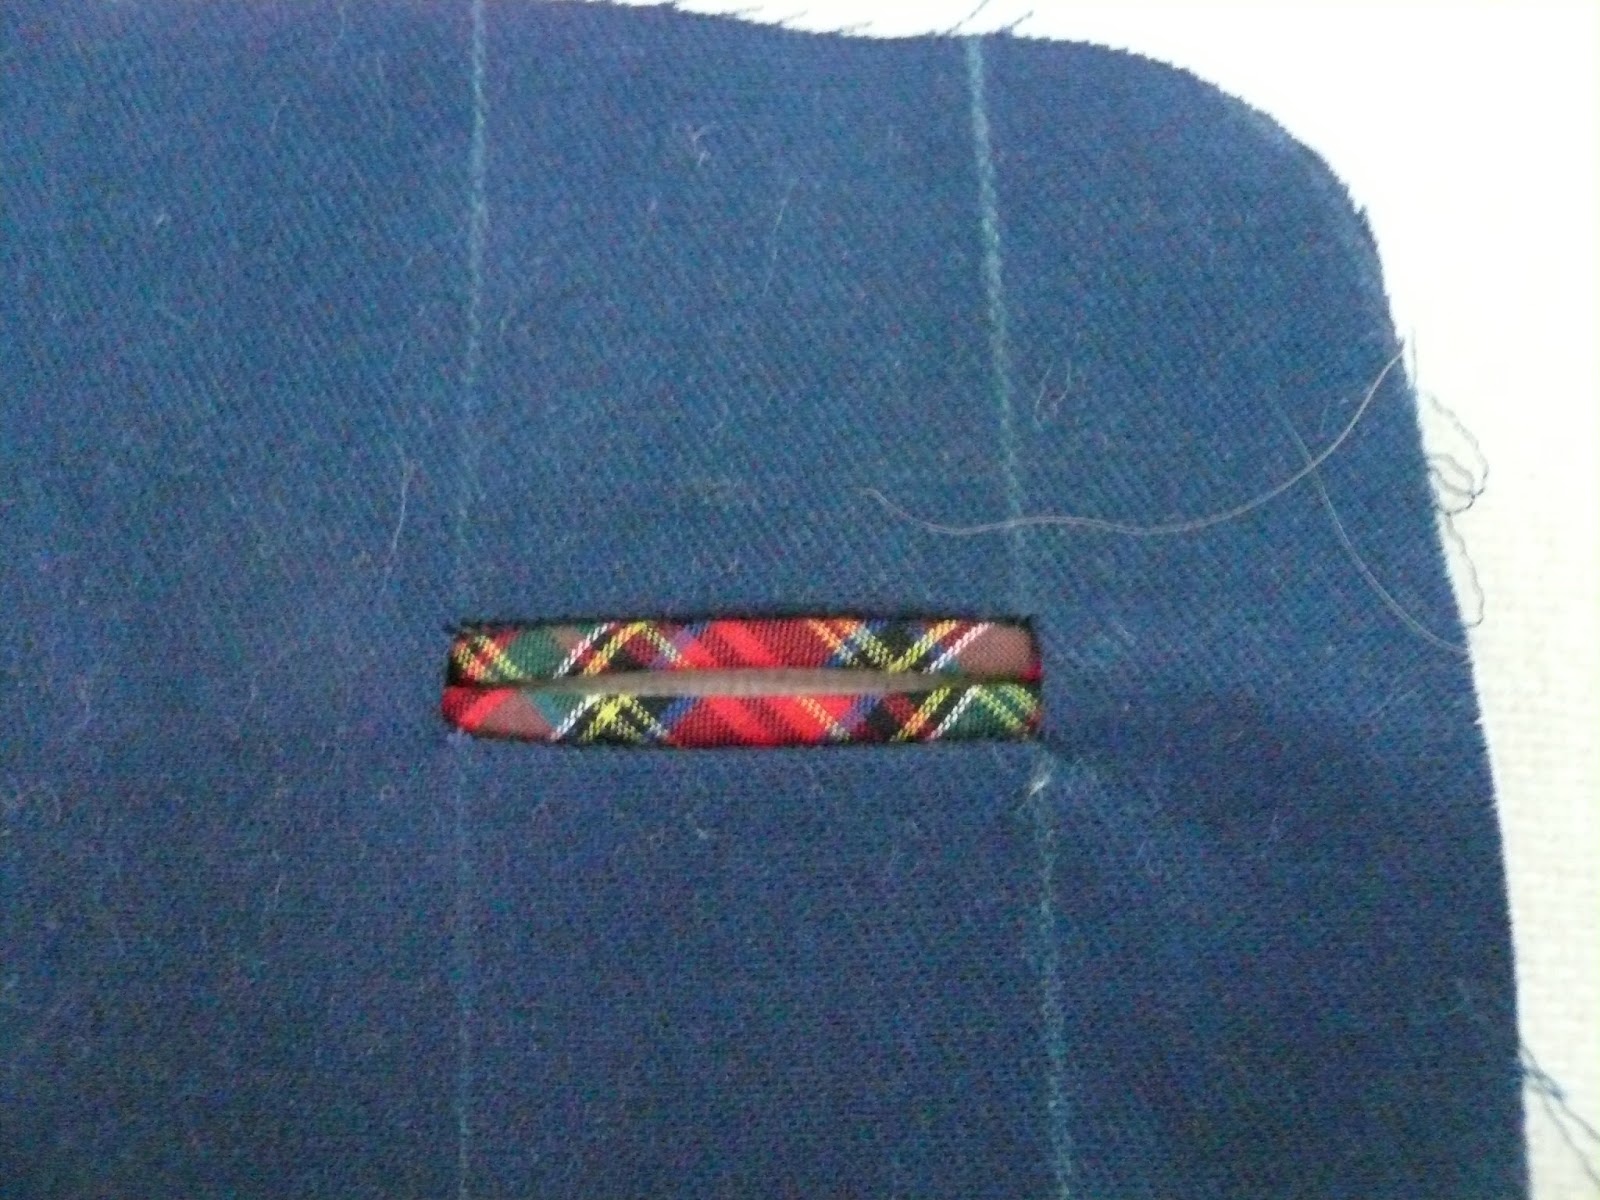
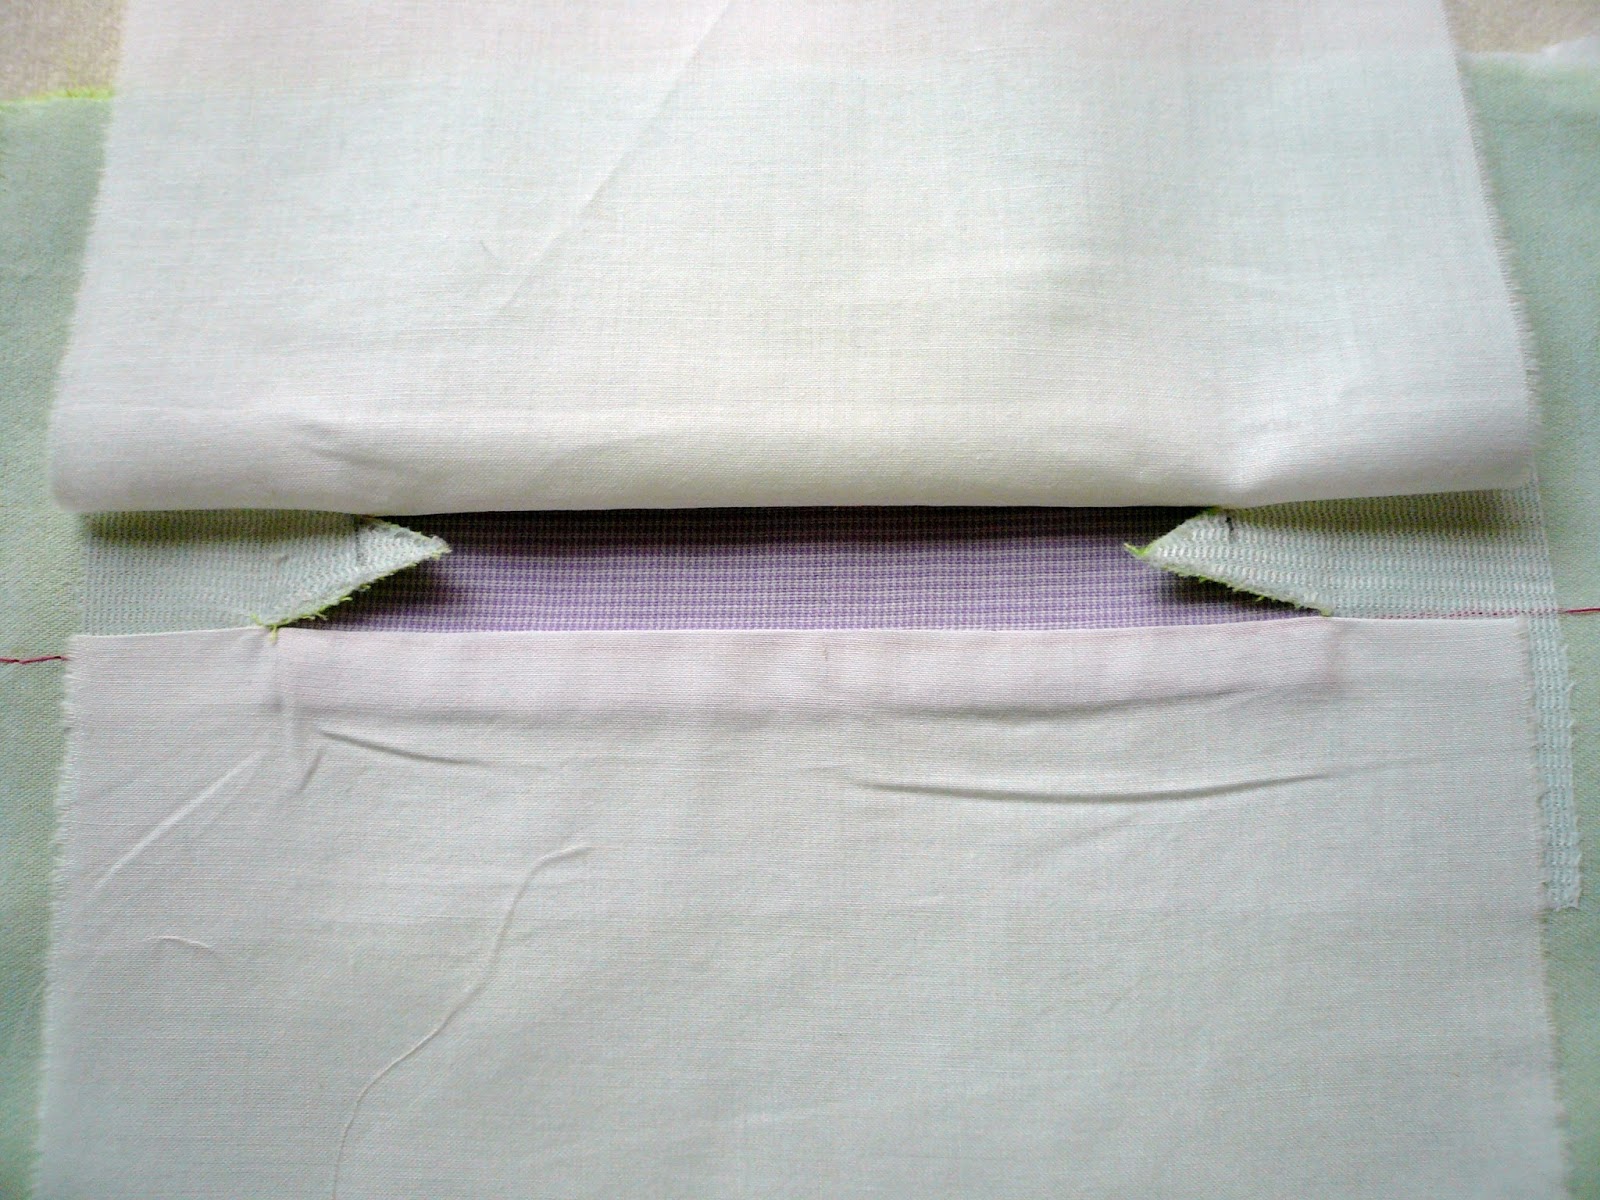
7. Fold the jacket front out of the way and stitch down the little triangle at each end of the buttonhole. Trim the excess piping down to 1/4" at each end of the buttonhole.
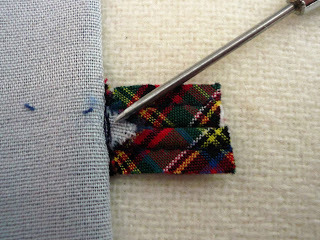
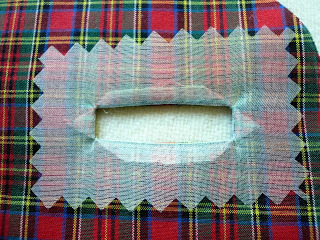
8. The following photos show the method I used to finish the lining side of the bound buttonhole. I used silk organza with the lining window 'patch'.


The bound buttonholes are featured on this project which will be a new class in 2017. The jacket and dress fabric are cotton twill from Fabric Finders paired with a 100% pima cotton traditional tartan from Spechler/Vogel. The easy fitting raglan sleeve jacket has lots of construction details....bound buttonholes, double welt bias cut front pockets (which look like huge bound buttonholes), bias cut collar overlay, bias cut cuff turnbacks, mini piping on all perimeter edges, and a pleated back with piped tab.
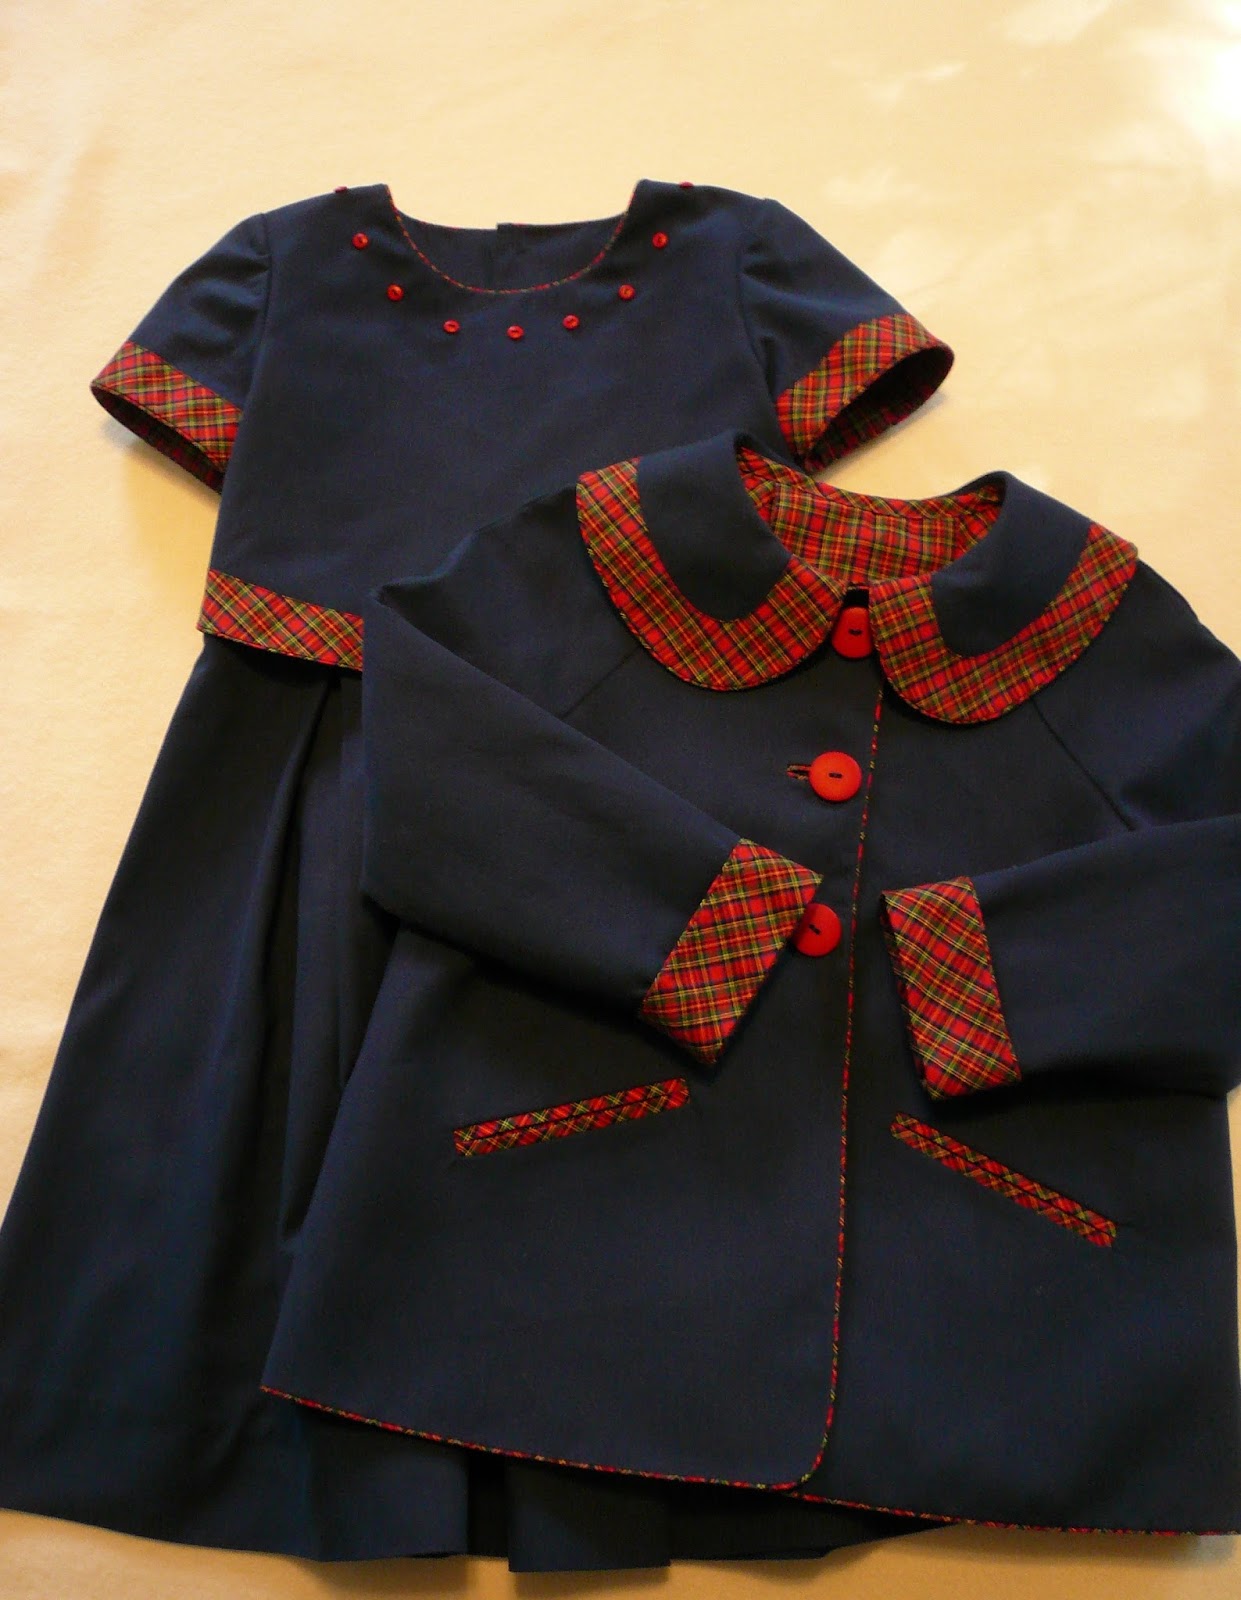
The coordinating dress features a bodice front overlay with a bias cut contrast tartan band, bias cut tartan sleeve overlays, piped back belt with bound buttonholes, and buttons all the way down the back. The hem is bound and shaped to accomodate the A-line of the pleated skirt.
 Project kits will be available in several color options - should be something that appeals to everyone.


Here is a picture step-by-step of my methond for making the bound buttonholes.
1. Clearly mark the placement of the buttonhole(s) on the right side of the fabric. For a 1" button (for the jacket) I marked a 1 1/8" buttonhole and for a 1/2" button (back belt on dress) I marked a 5/8" buttonhole. Work over interfaced fabric.
2. Draw in two more lines each an accurate 1/8" away from the center placement line.

3. Make enough piping for the length of each buttonhole plus 1" (x's 2). For this weight of fabric I found using two strands of filler cord instead of one made for a studier, better proportioned bound buttonhole. I did not adjust my needle position as close to the cord as I normally would for single strand piping. Trim the seam allowance down to an accurate 1/8". I checked and it appears none of the piping rulers on the market will cut a seam allowance down to 1/8" so you will have to have a steady hand to make an accurate cut.

4. Cut the piping the length of the buttonhole plus 1". Lay the seamline of the piping on the outer line of the marked buttonhole. The raw edge of the seam allowance should just touch the center marked line. Using your piping foot and adjusting the needle position as necessary to stitch close to the cord, stitch (1.5L) over the seamline on the piping EXACTLY between the two marked vertical edges. Backstitch at the beginning and the end. Repeat for the second strip of piping. The two 1/8" seam allowances should just touch on the center line. I prefer to use the open toe applique foot to make piping on my Pfaff (rather than the mini piping foot). One 'toe' on the foot is exactly 1/4" wide which is super helpful when lining up the strips for the buttonhole. I love my Pfaff - it has 29 needle positions which allows superb accuracy when working with piping.

5. The back should look like this, Slash down the center of the back to within 1/4" at each end. Make a 'Y' cut out to the end of the stitching at each end,

6. Pull the piping strips through to the wrong side. Gently press.

7. Fold the jacket front out of the way and stitch down the little triangle at each end of the buttonhole. Trim the excess piping down to 1/4" at each end of the buttonhole.


8. The following photos show the method I used to finish the lining side of the bound buttonhole. I used silk organza with the lining window 'patch'.


April 12, 2016
A Little Something Tailored
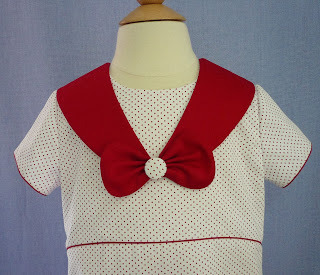
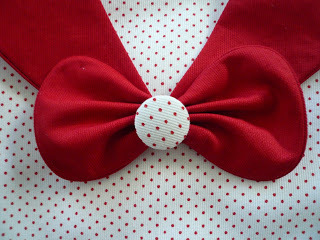
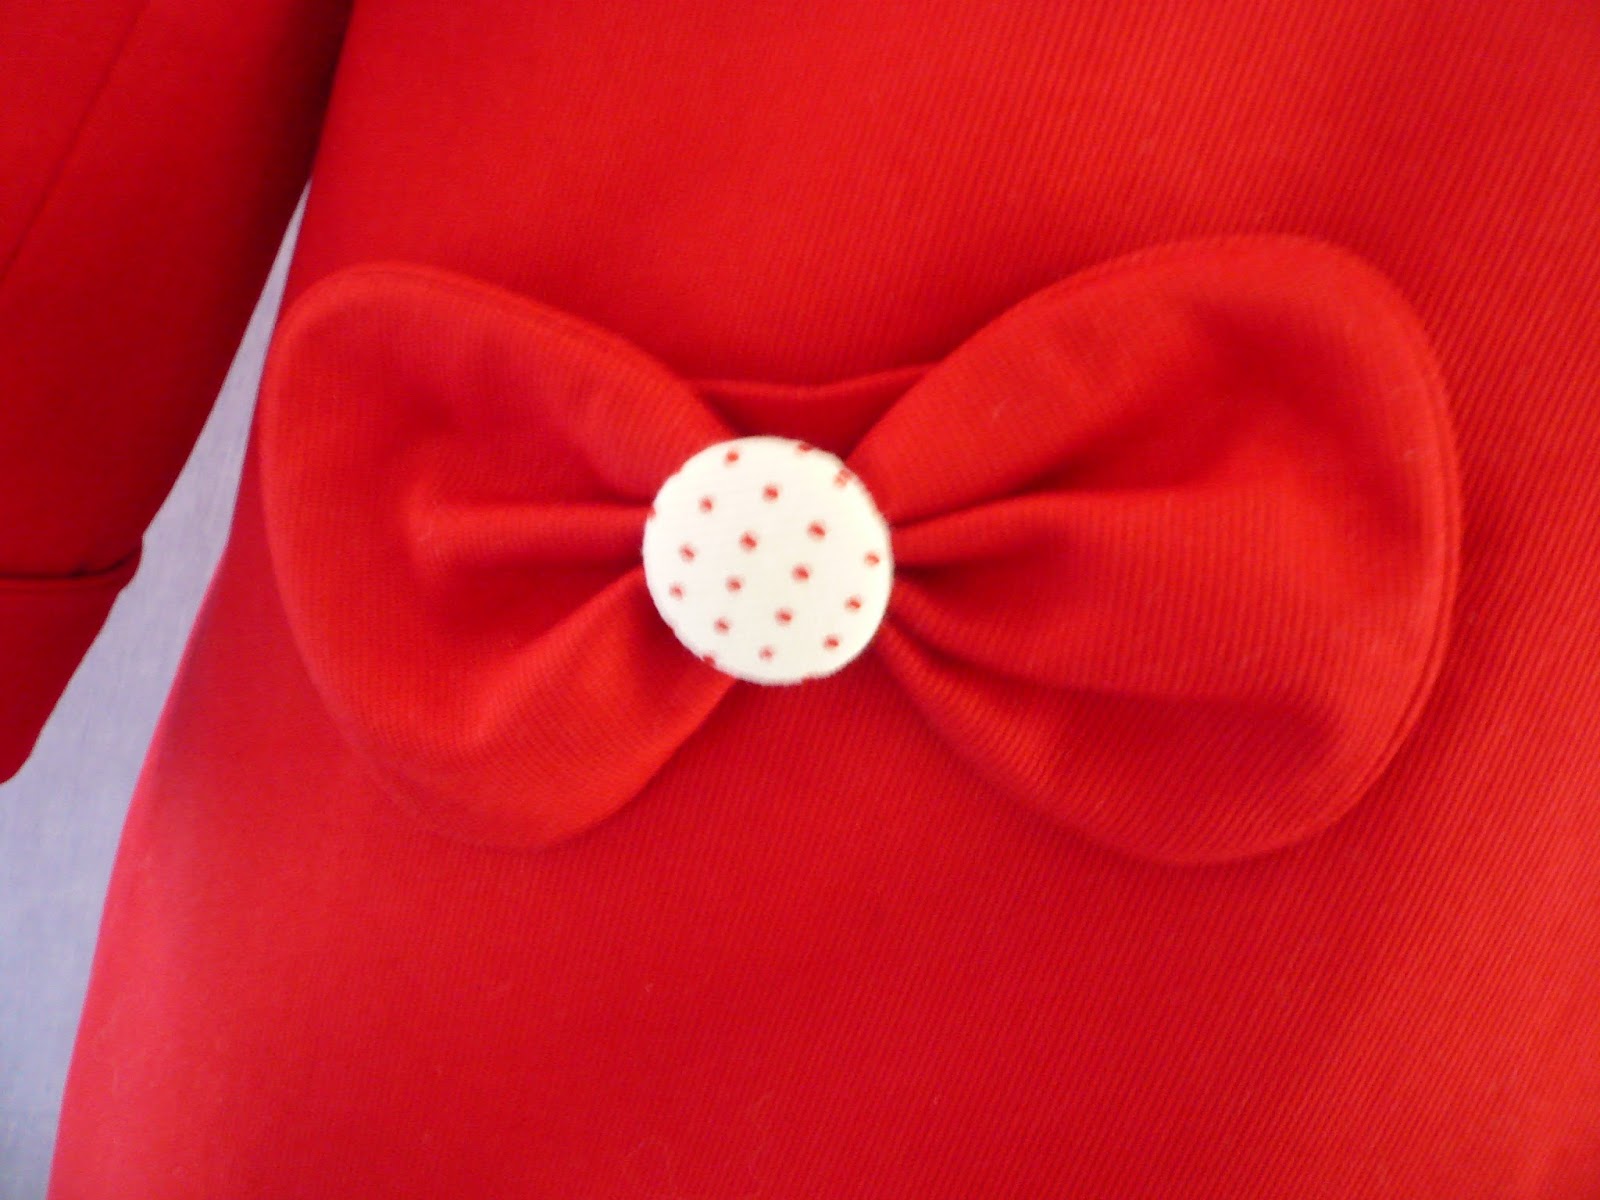
New project..... something that might appeal to the more tailored young lady in your life. A 3/4 length cotton pique jacket and coordinating A-line sailor collar dress. Who does not like a red jacket? It will pair beautifully with denim or white jeans for a more casual look.
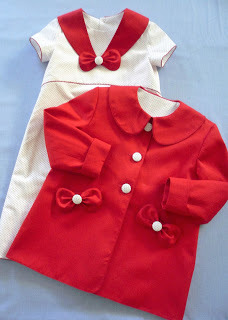
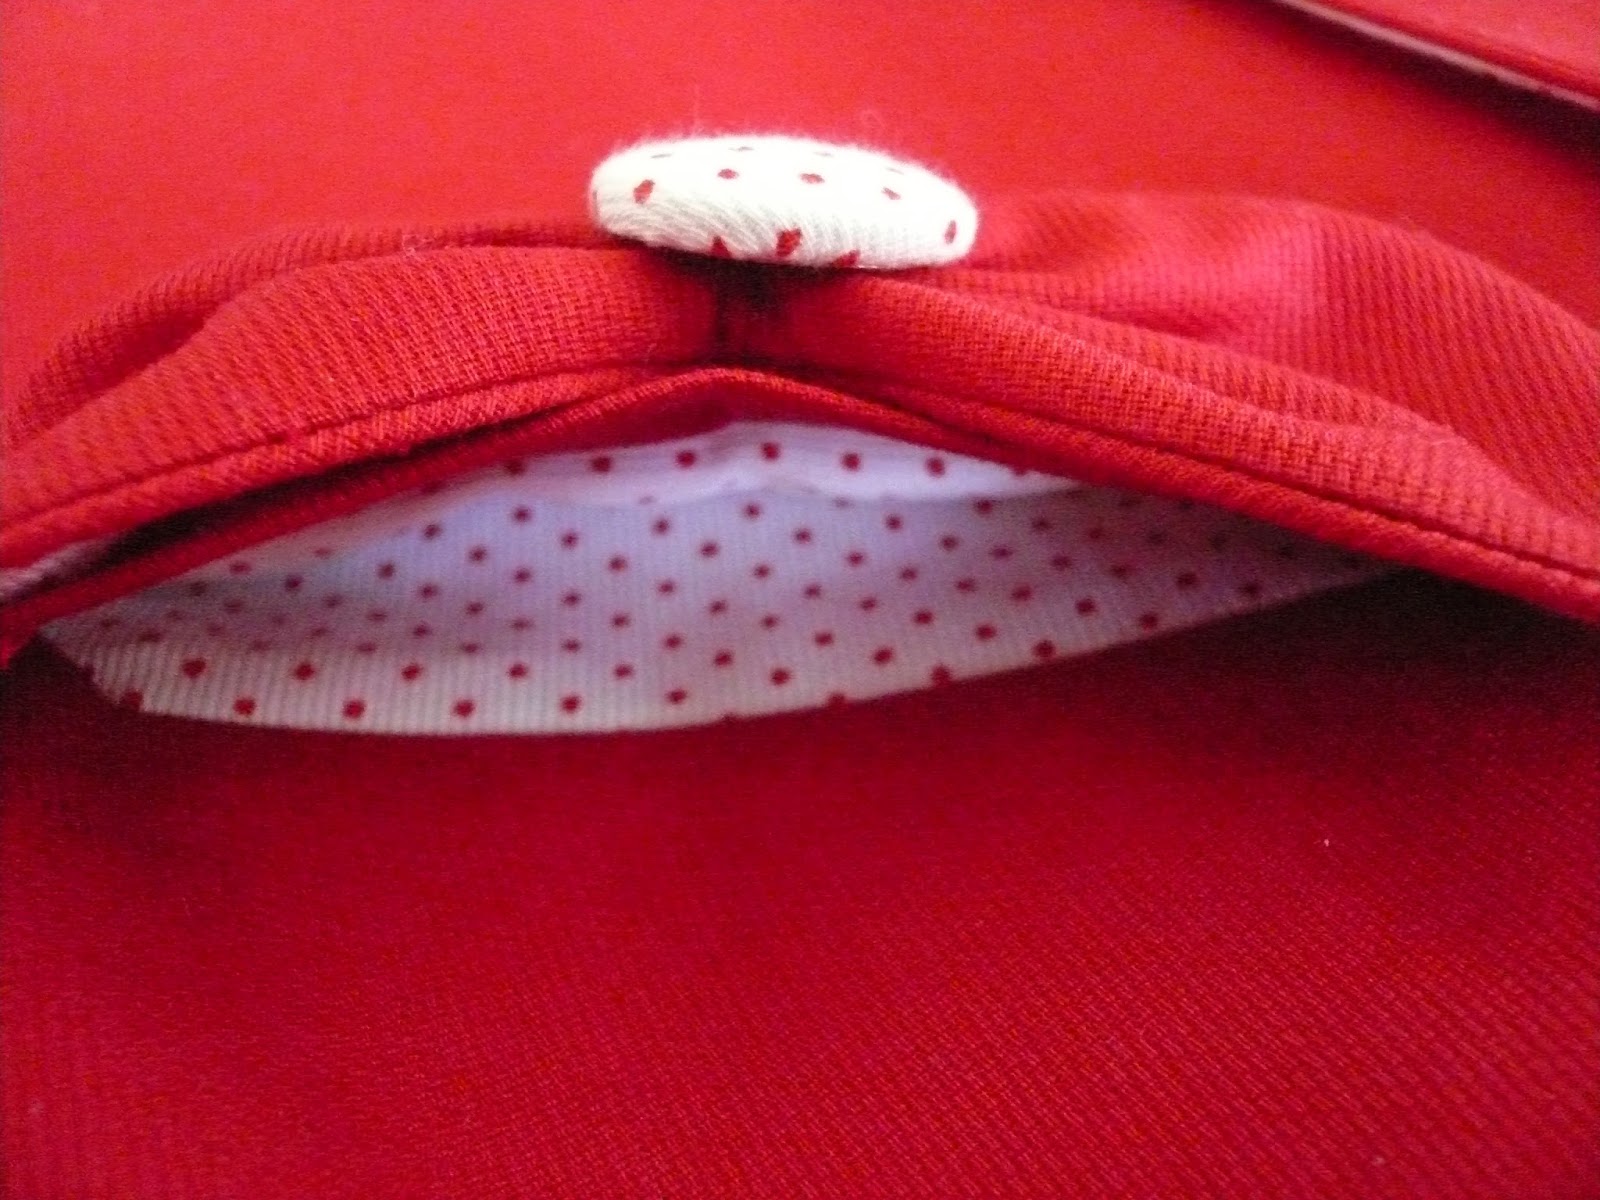
The red cotton pique jacket is fully lined (partially with the red pindot pique and partially with a white poly lining for ease slipping on and off) and features many precision construction details. Can you guess what is behind the two angle set piped bows? Hint.... fully constructed single welt pockets with an angle cut underlap.


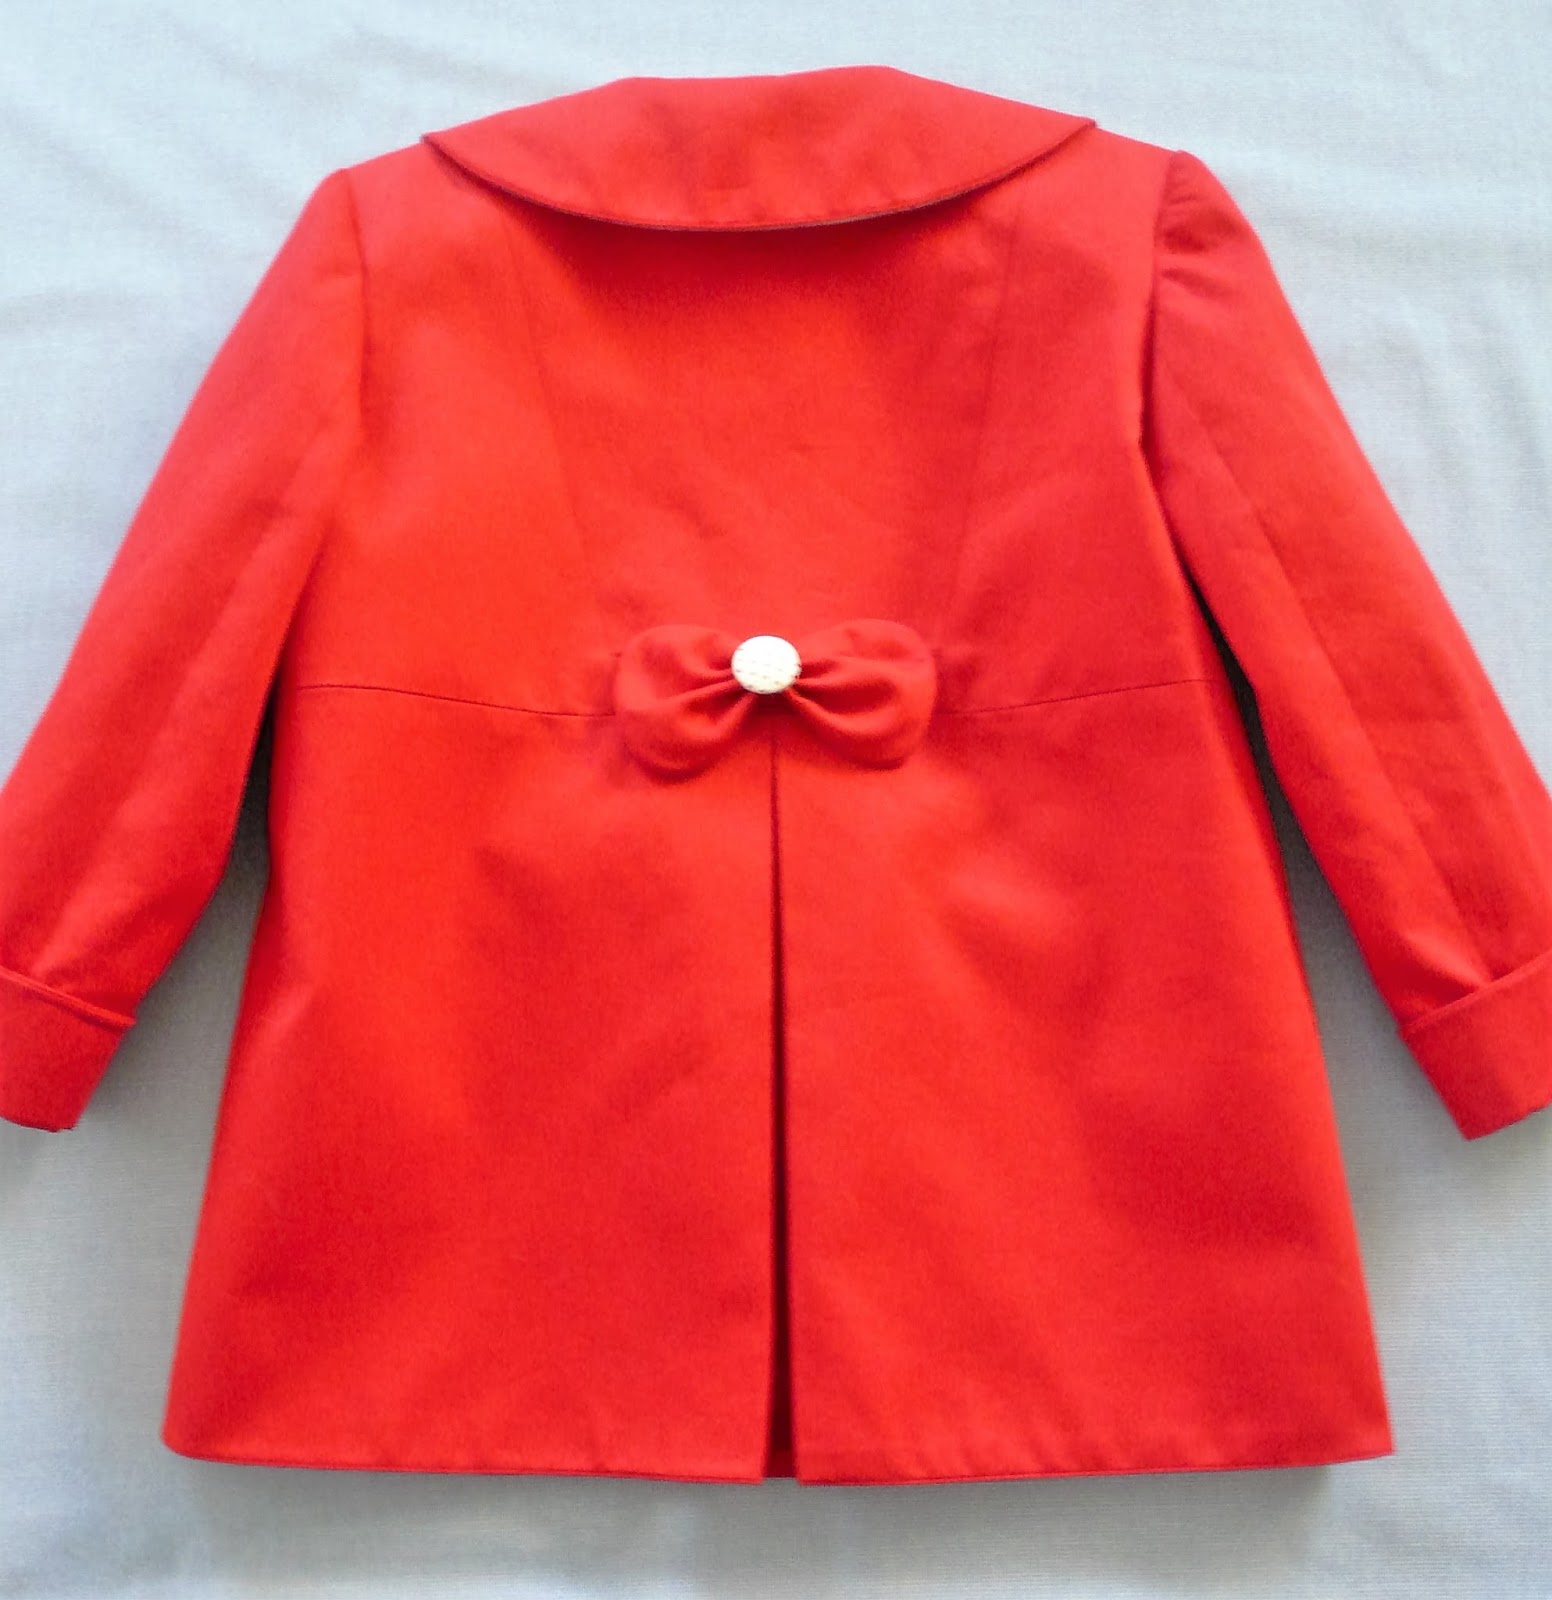
The construction of the jacket back allows for a half belt, embellished with another piped bow, and a wearing ease pleat. The sleeve lining has a turn back of the red pique which builds in at least a year of growth room for most girls.

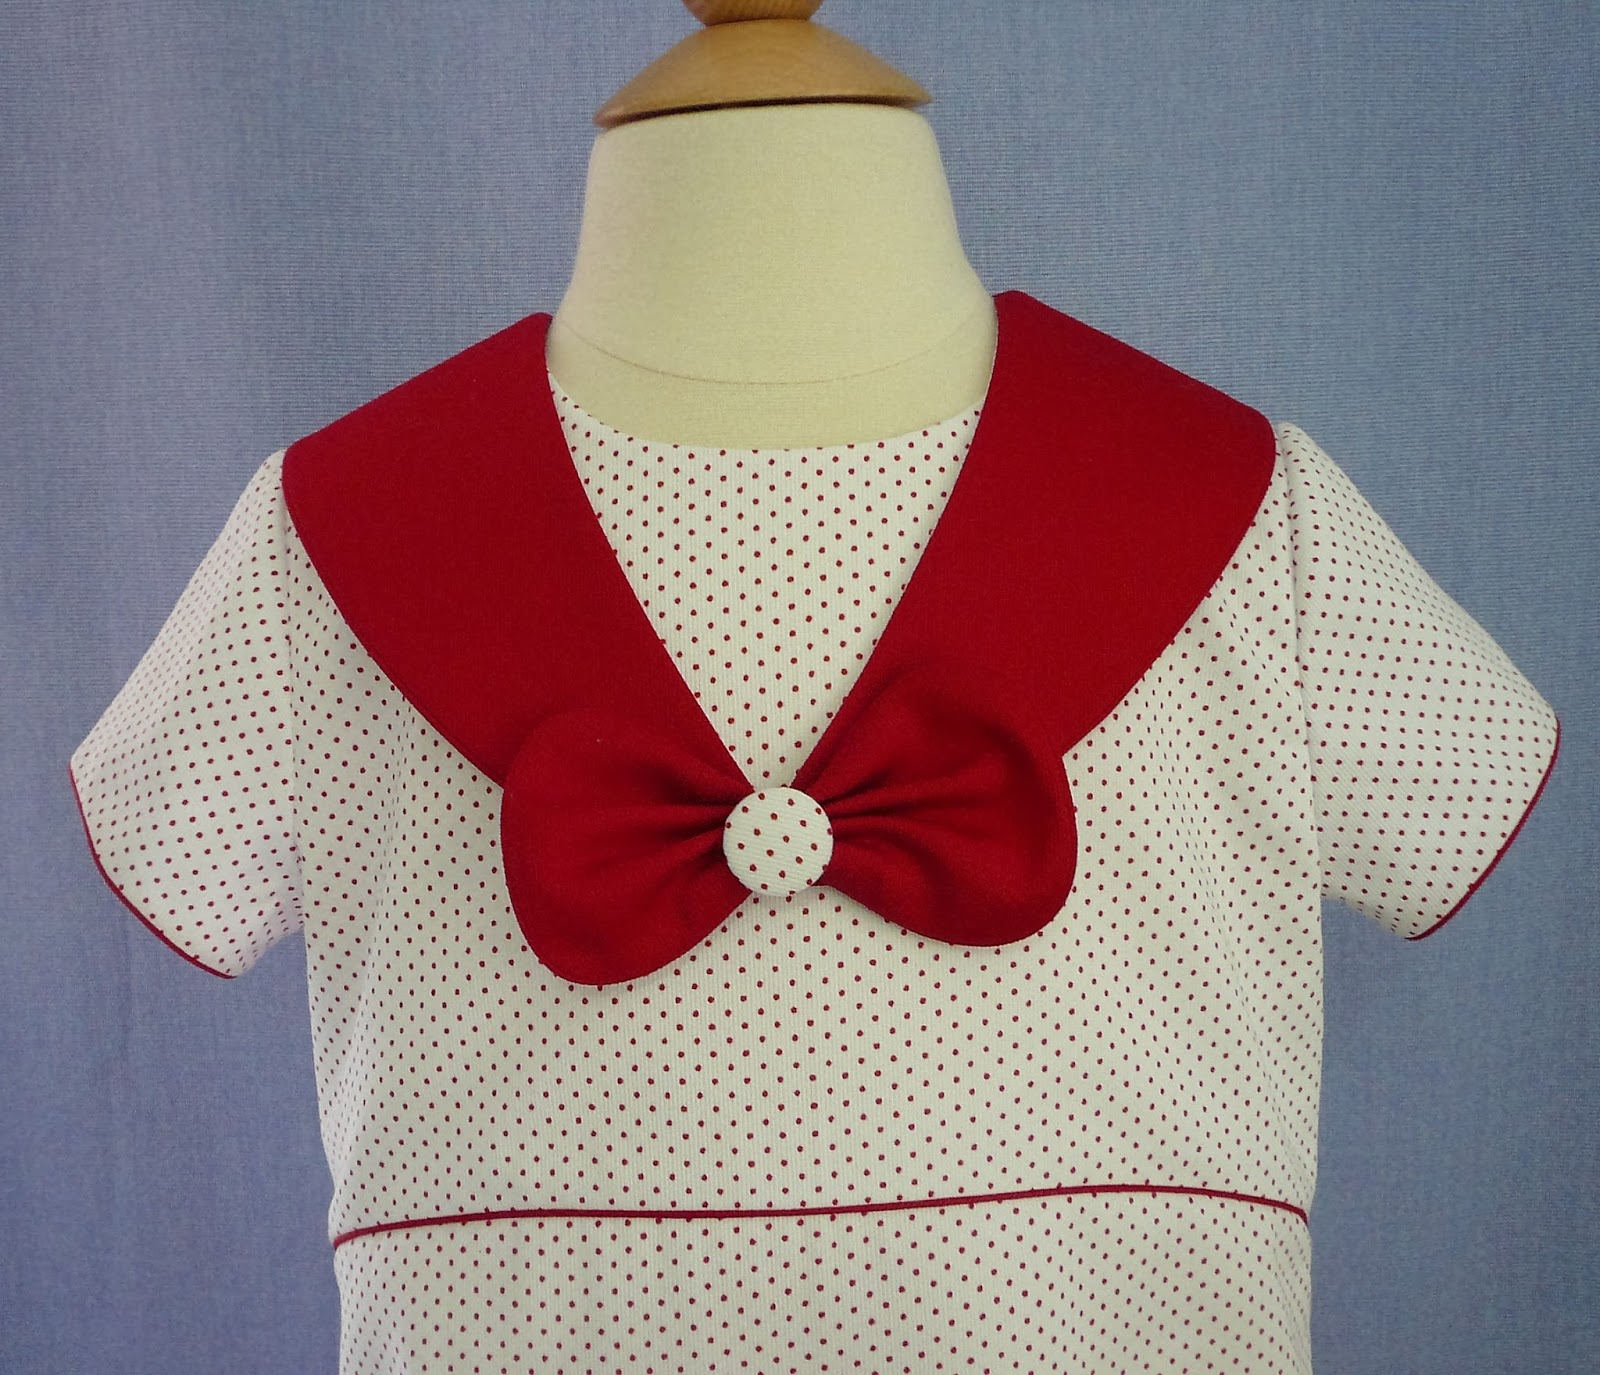
The simple fully lined A-line dress, constructed from a red pin dot pique, is a nice diversion from full skirts and puffy sleeves. The piped sailor style collar curves into a Peter Pan style in the back. The piped set in sleeve offers a good challenge to incorporate enough ease without puckers or gathers across the cap of the sleeve.
Welt pockets (single or double) can be quite challenging to perfect. The following is my preferred method for constructing single welt pockets. These instructions are part of one of my notebook classes titled 'Just Pockets'.
Single Welt - Sample Swatch
1. Base Fabric: 10” long by 9” wide Base Fabric Interfacing: 10” long by 9” wide Pocket Lining: 7” long by 7” wide – cut 2 Welt Fabric: 2 ½” long by 5 ½” wide Welt Interfacing: 2 ½” long by 5 ½” wide French Fuse: 3” long by 7” wide
2. Fuse interfacing to the wrong side of the welt.
3. Right sides together, sew the short ends together. Trim and clip the corners.


4. Turn right side out and press.
5. Measure down and draw a line 3” from the top edge of the base fabric. Machine baste along this line.

6. On the wrong side, center a 3” by 7” rectangle of French Fuse over the basted line and fuse in place.
7. Right sides together place the welt so the raw edge laps ¼” over the basted line.
8. Stitch on the welt taking up a ¼” seam allowance. Begin and end EXACTLY at the ends of the welt. Back stitch very carefully so no stitches extend beyond the welt.
9. On the right side, center one of the pocket lining squares over the welt, matching the top edges.
10. Flip the fabric over to the wrong side and stitch EXACTLY on the first stitching line. Backstitch carefully at the beginning and end.
12. On the right side, pin the second pocket lining square so it overlaps the previous stitching by ¼”. Pin in place.
13. On the wrong side, draw in a line ½” above the original line. Start and stop the line ½” shorter than the original line below it. Stitch on the new line backstitching at the beginning and the end.


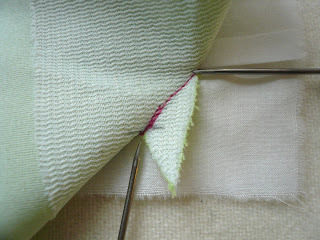
14. On the wrong side, draw a line in between the two stitched lines. Draw two lines diagonally into the corners.

15. Cut along the drawn line through the interfaced base fabric and the French Fuse only. Do not cut through the pocket lining or the welt. Cut diagonally into the corners.

16. Pull the two pocket lining squares through to the wrong side through the slashed opening. Press the welt carefully. It is helpful to do the pressing over a ham.
17. From the wrong side and with the base fabric folded back out of the way carefully stitch diagonally over the folded back pie shaped wedges at each end of the pocket.
18. Continue stitching down the side of the pocket. The lower edges of the pocket squares will not match.
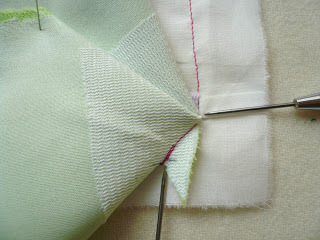
19. Stitch across the bottom of the pocket and up the other side cutting in on a diagonal line to stitch over the folded back pie shaped wedge on the opposite side.
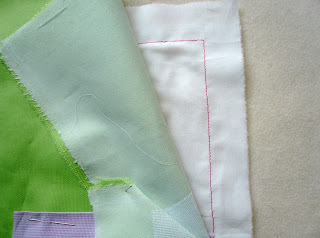

20. On the right side, carefully stitch down the ends of the welt.


.

The red cotton pique jacket is fully lined (partially with the red pindot pique and partially with a white poly lining for ease slipping on and off) and features many precision construction details. Can you guess what is behind the two angle set piped bows? Hint.... fully constructed single welt pockets with an angle cut underlap.
The construction of the jacket back allows for a half belt, embellished with another piped bow, and a wearing ease pleat. The sleeve lining has a turn back of the red pique which builds in at least a year of growth room for most girls.
The simple fully lined A-line dress, constructed from a red pin dot pique, is a nice diversion from full skirts and puffy sleeves. The piped sailor style collar curves into a Peter Pan style in the back. The piped set in sleeve offers a good challenge to incorporate enough ease without puckers or gathers across the cap of the sleeve.


Welt pockets (single or double) can be quite challenging to perfect. The following is my preferred method for constructing single welt pockets. These instructions are part of one of my notebook classes titled 'Just Pockets'.
Single Welt - Sample Swatch
1. Base Fabric: 10” long by 9” wide Base Fabric Interfacing: 10” long by 9” wide Pocket Lining: 7” long by 7” wide – cut 2 Welt Fabric: 2 ½” long by 5 ½” wide Welt Interfacing: 2 ½” long by 5 ½” wide French Fuse: 3” long by 7” wide
2. Fuse interfacing to the wrong side of the welt.
3. Right sides together, sew the short ends together. Trim and clip the corners.
4. Turn right side out and press.

5. Measure down and draw a line 3” from the top edge of the base fabric. Machine baste along this line.

6. On the wrong side, center a 3” by 7” rectangle of French Fuse over the basted line and fuse in place.

7. Right sides together place the welt so the raw edge laps ¼” over the basted line.

8. Stitch on the welt taking up a ¼” seam allowance. Begin and end EXACTLY at the ends of the welt. Back stitch very carefully so no stitches extend beyond the welt.

9. On the right side, center one of the pocket lining squares over the welt, matching the top edges.
10. Flip the fabric over to the wrong side and stitch EXACTLY on the first stitching line. Backstitch carefully at the beginning and end.
12. On the right side, pin the second pocket lining square so it overlaps the previous stitching by ¼”. Pin in place.

13. On the wrong side, draw in a line ½” above the original line. Start and stop the line ½” shorter than the original line below it. Stitch on the new line backstitching at the beginning and the end.
14. On the wrong side, draw a line in between the two stitched lines. Draw two lines diagonally into the corners.
15. Cut along the drawn line through the interfaced base fabric and the French Fuse only. Do not cut through the pocket lining or the welt. Cut diagonally into the corners.
16. Pull the two pocket lining squares through to the wrong side through the slashed opening. Press the welt carefully. It is helpful to do the pressing over a ham.
17. From the wrong side and with the base fabric folded back out of the way carefully stitch diagonally over the folded back pie shaped wedges at each end of the pocket.

18. Continue stitching down the side of the pocket. The lower edges of the pocket squares will not match.
19. Stitch across the bottom of the pocket and up the other side cutting in on a diagonal line to stitch over the folded back pie shaped wedge on the opposite side.


20. On the right side, carefully stitch down the ends of the welt.

.
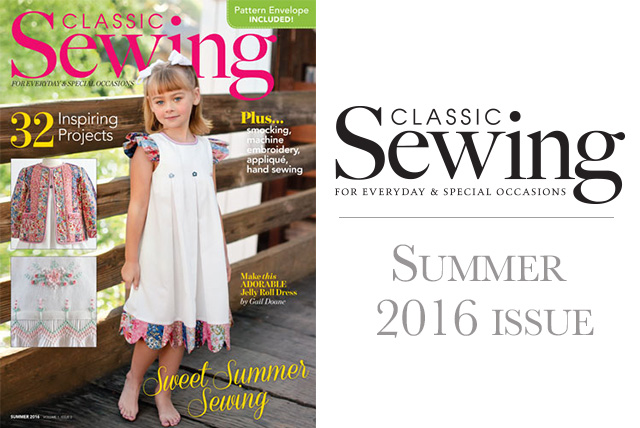
March 29, 2016
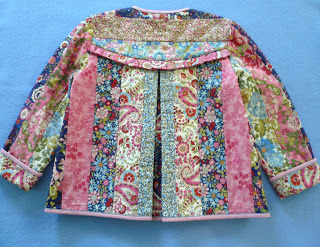
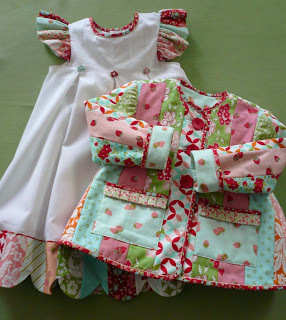
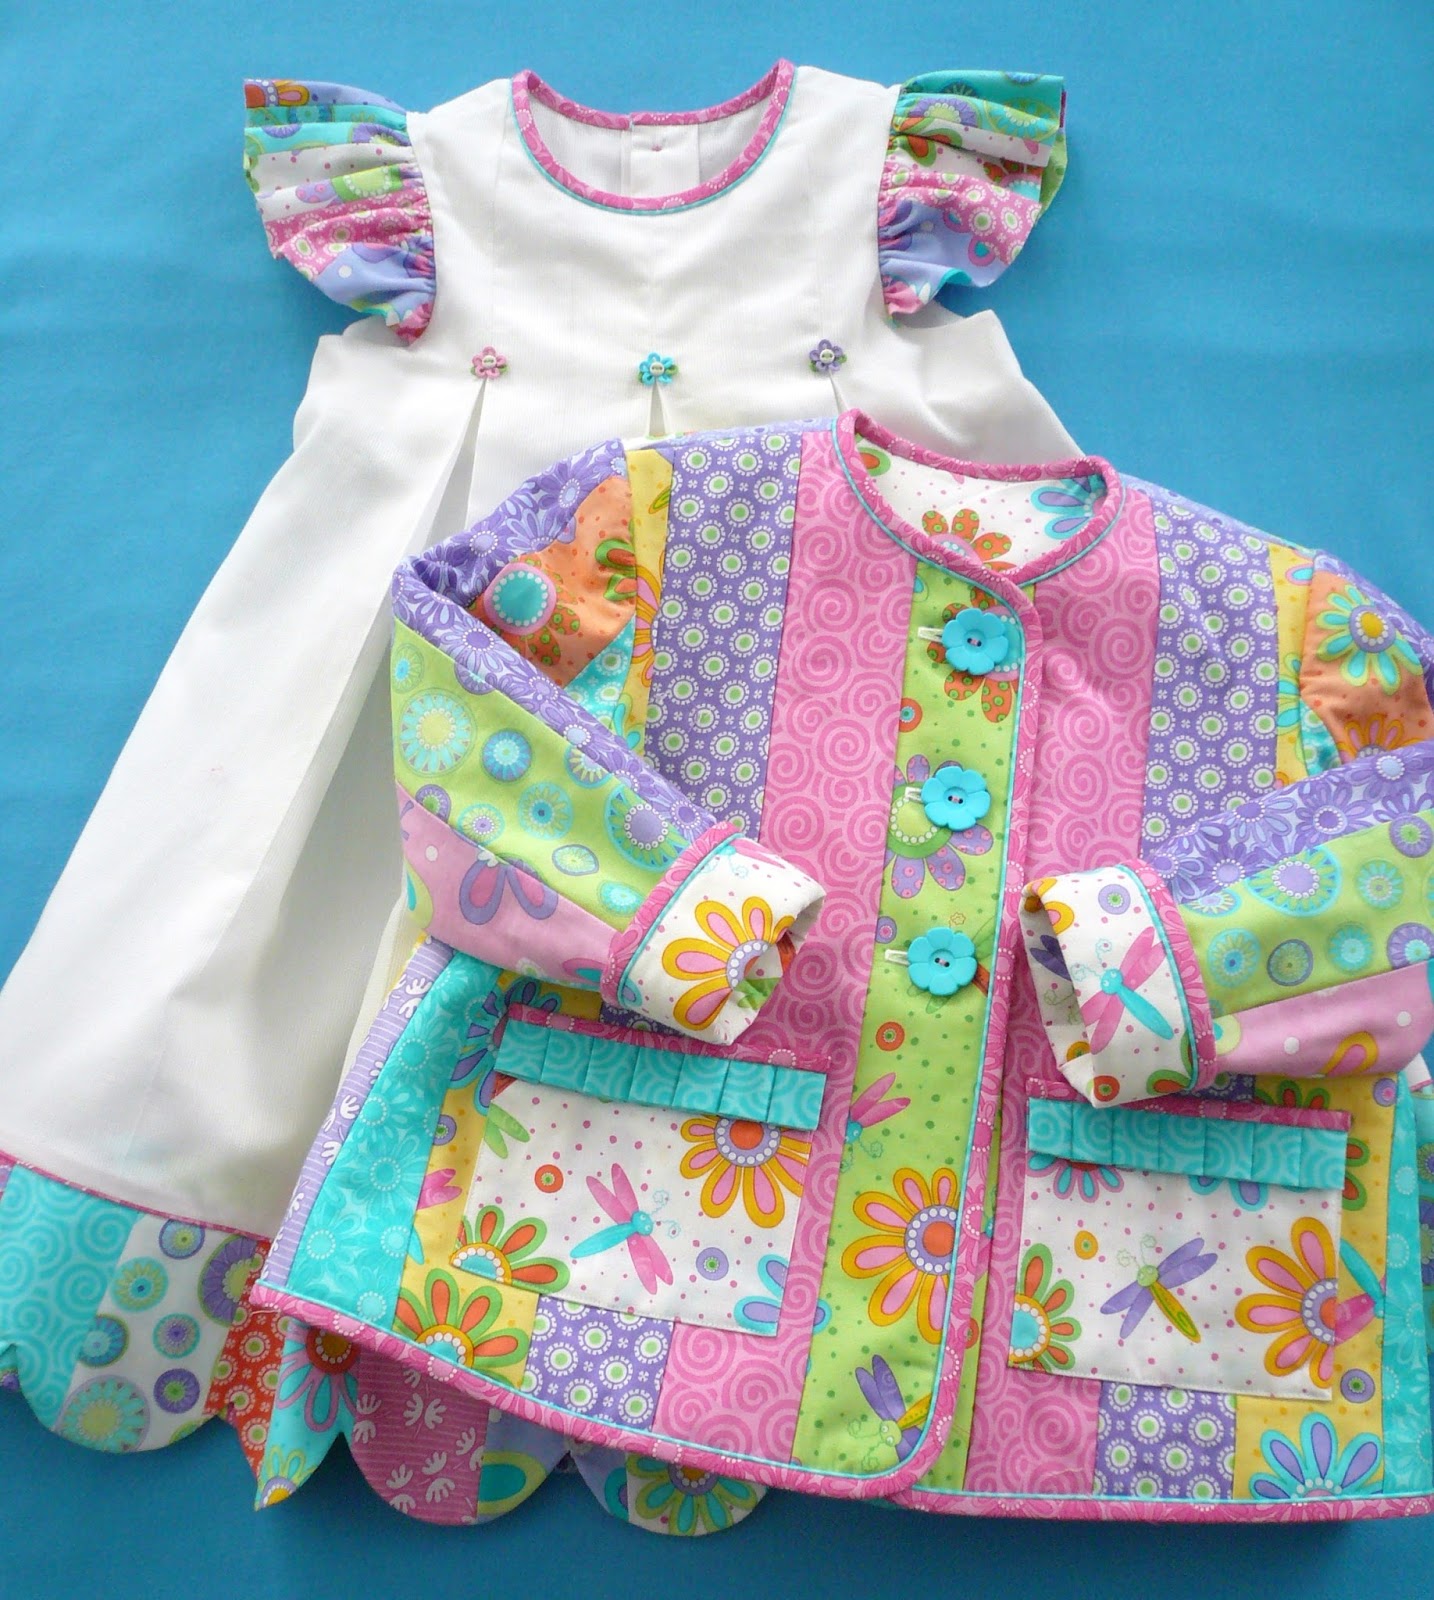
Jelly Roll Madness
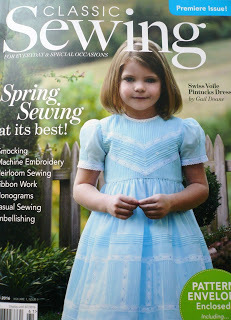
I have been holding off posting these photos waiting on the release of the second issue of Classic Sewing Magazine. I am so very pleased that my project has been chosen for the cover. A big thank- you to Kathy and Phyllis for working so hard to produce this wonderful magazine,
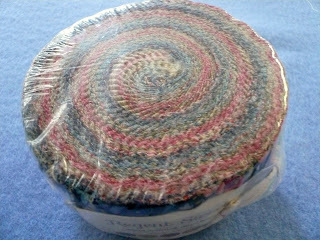
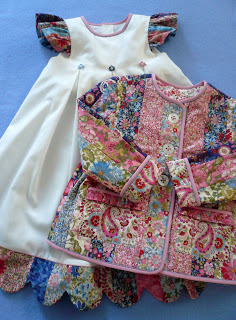
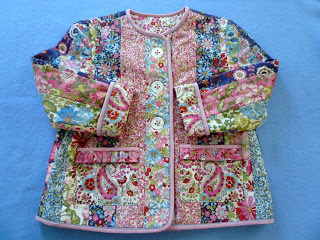
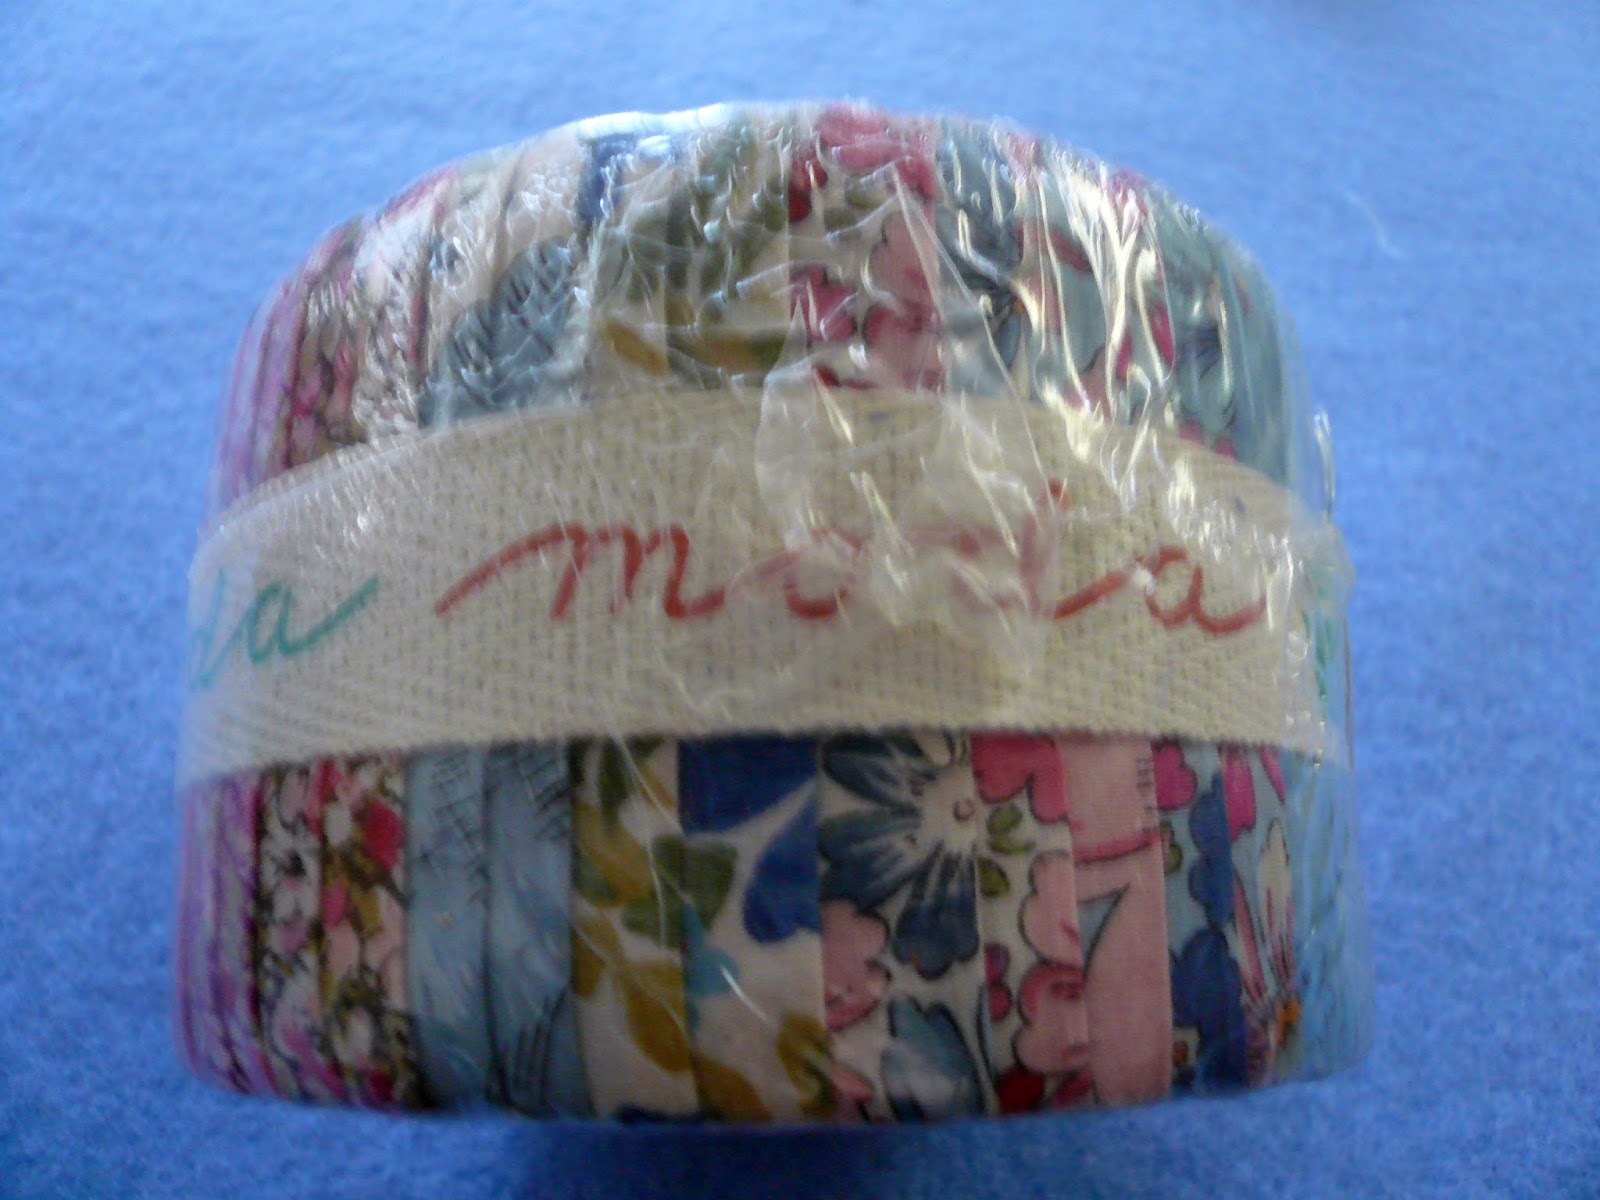
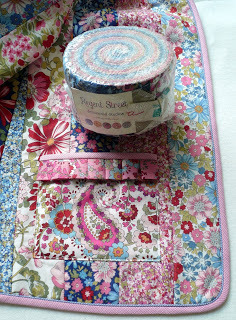
I know very little about the giant quilting world but have been having a bit of fun with jelly rolls. A jelly roll is forty, 2 1/2" by 45"strips of coordinated fabric all rolled up in a cute little package. They look like this and are so much fun to work with.
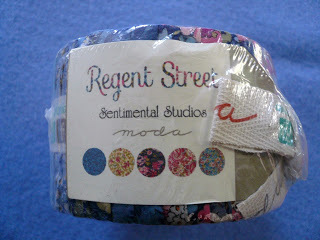

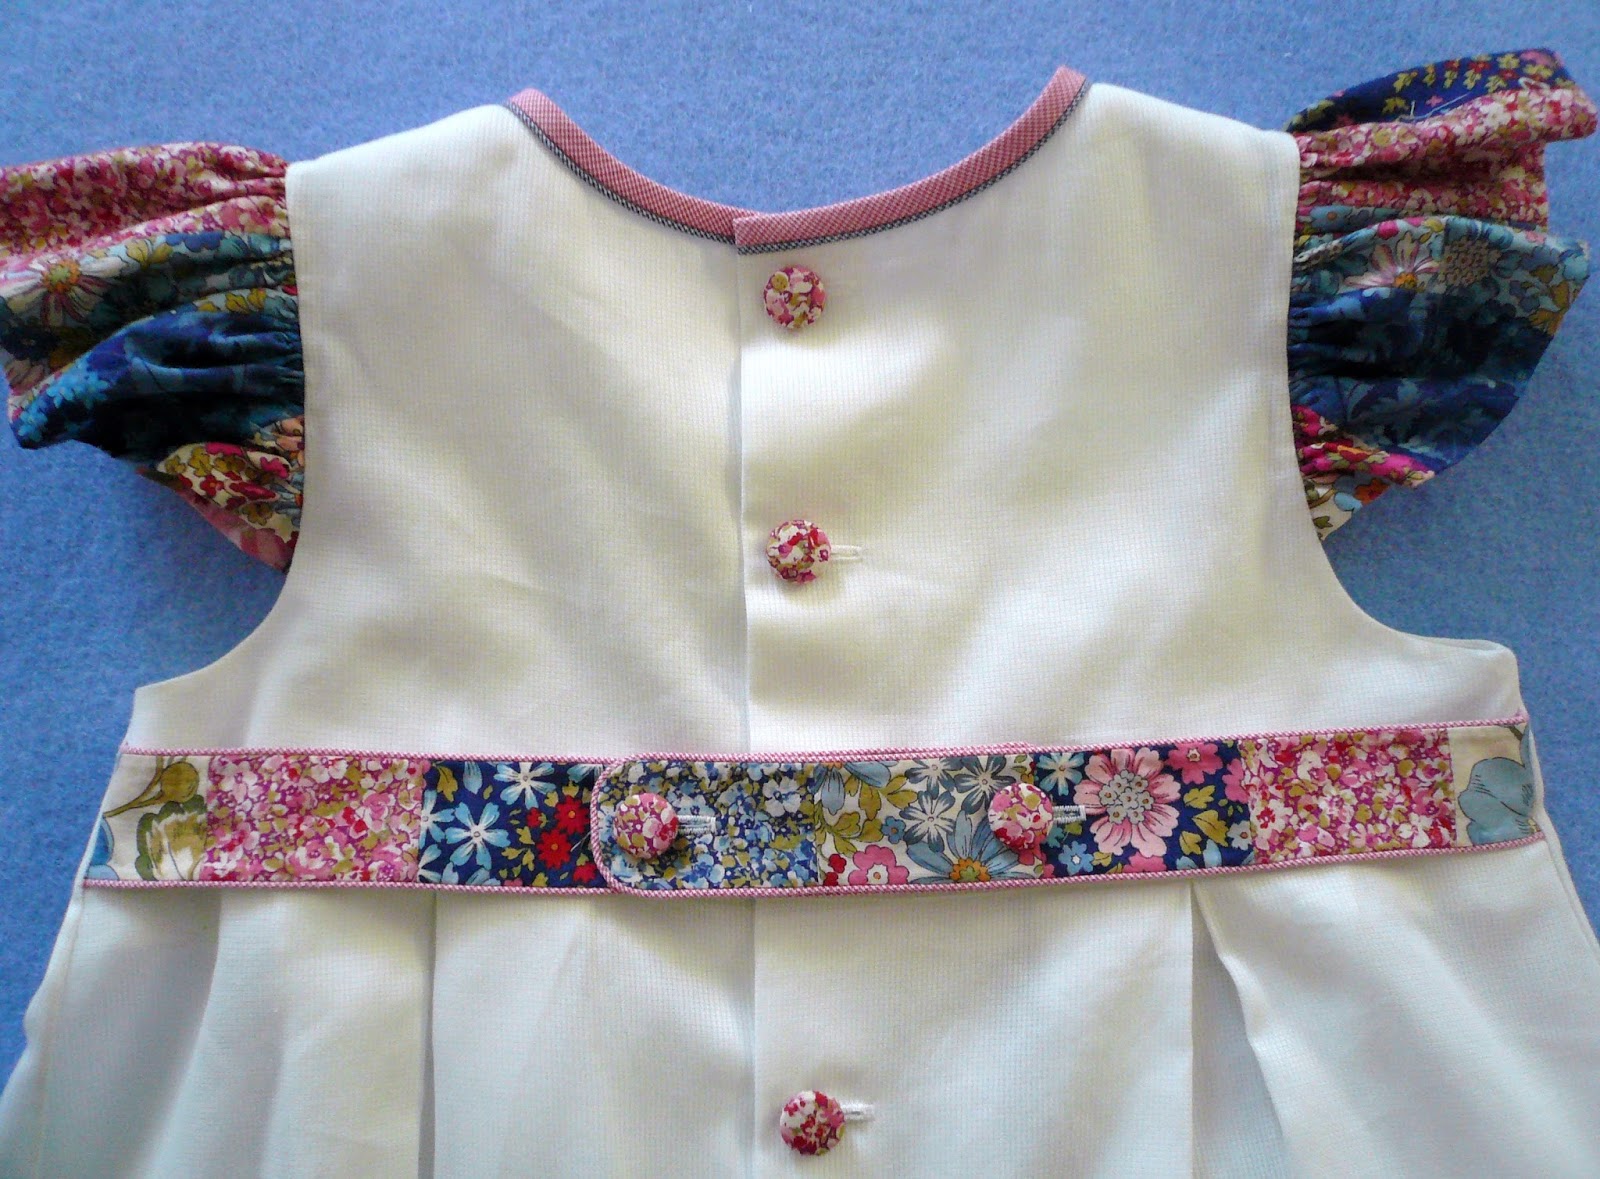
The first version of the jacket and dress came to life on a visit to Becky's Barn (www.beckybarn.blogspot.com) in Tennessee. Becky (a completely fabulous quilter and all around great person) runs this wonderful retreat space with a quilting shop attached. 'Regent Street' from Moda immediately caught my eye and the first jelly roll jacket and dress was planned. Unfortunately, because fabric groups turn over so very quickly in the quilting world this particular group is no longer available. But the good news is new and lovely collections are always on the horizon.


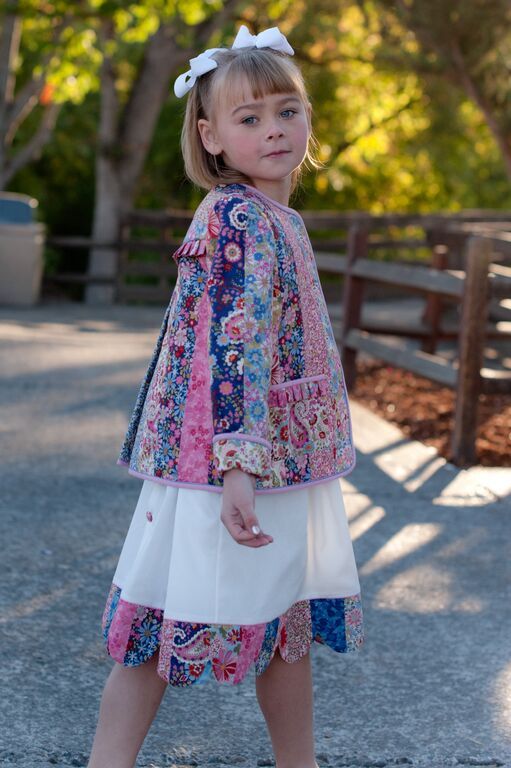
On a teaching trip to Oregon I was lucky enough to have the perfect model and her perfect photographer mom volunteer to model and photograph the project. Many thanks to Gwen and her talented mom Virginia for these lovely photos. We never dreamed in the short time they were taken that the cover of a magazine was in the future for Gwen.

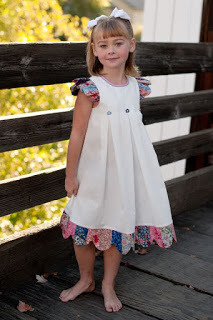

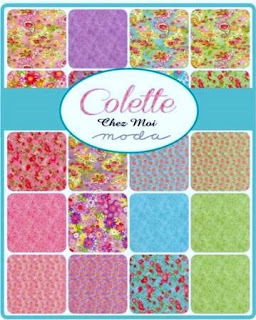
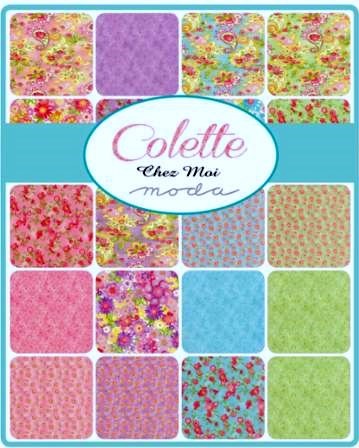
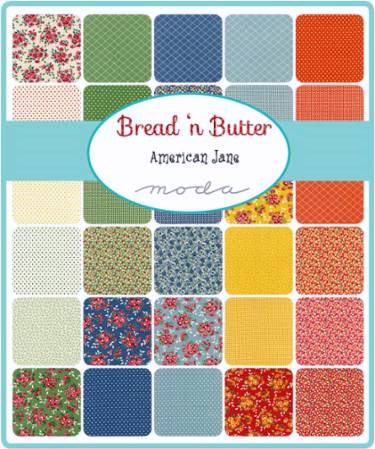
I have made the project up in two other Moda collections. There seems to be endless possibilities for placement of the different coordinating strips so each jelly roll will produce a unique result in the hands of each individual stitcher. You are the designer. The following photos are 'Hello Darling' and 'Hi-De-Ho' both from Moda. Both of these collections are currently available in quilt shops,

I have just added kits on my Etsy site (www.etsy.com/shop/gaildoane) for the following collections;

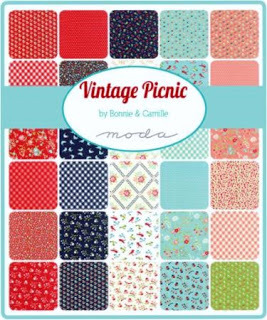
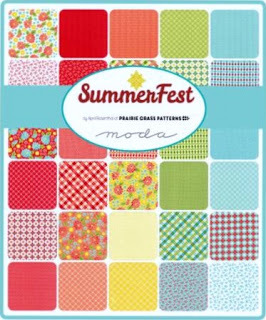
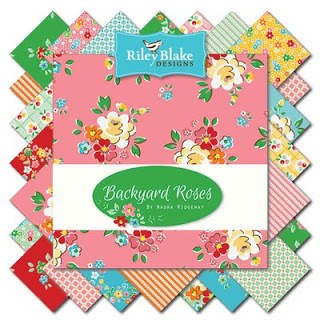
Summerfest (May 2016), Backyard Roses (May 2016), and Fresh Market (June 2016) will be added as they become available.
 You can get a much better look at the fabrics in the various collection by going to www.unitednotions.com and typing the collection name in the search bar for the Moda collections and www.rileyblakedesigns.com for the Riley Blake collectons.
If you happen to have a stash of jelly rolls pull one out and give this project a try - one jelly roll will make up to a size 10 jacket with enough scraps left over for the trim on the angel sleeve, back belt, and scalloped hem of the dress. Keep stitching!
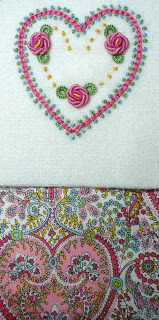
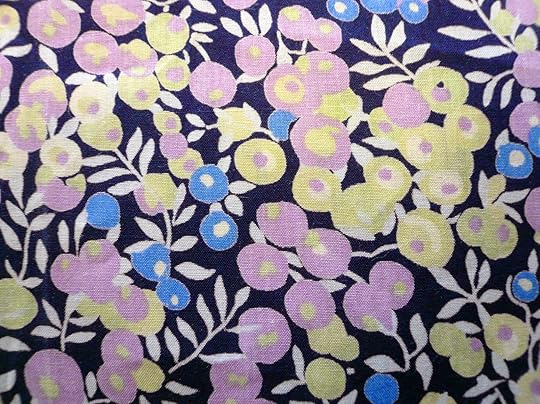
P.S Sneak peek of what's happening in my sewing room. Kitty Grace.... more Liberty of London love.
I know very little about the giant quilting world but have been having a bit of fun with jelly rolls. A jelly roll is forty, 2 1/2" by 45"strips of coordinated fabric all rolled up in a cute little package. They look like this and are so much fun to work with.


The first version of the jacket and dress came to life on a visit to Becky's Barn (www.beckybarn.blogspot.com) in Tennessee. Becky (a completely fabulous quilter and all around great person) runs this wonderful retreat space with a quilting shop attached. 'Regent Street' from Moda immediately caught my eye and the first jelly roll jacket and dress was planned. Unfortunately, because fabric groups turn over so very quickly in the quilting world this particular group is no longer available. But the good news is new and lovely collections are always on the horizon.


On a teaching trip to Oregon I was lucky enough to have the perfect model and her perfect photographer mom volunteer to model and photograph the project. Many thanks to Gwen and her talented mom Virginia for these lovely photos. We never dreamed in the short time they were taken that the cover of a magazine was in the future for Gwen.


I have made the project up in two other Moda collections. There seems to be endless possibilities for placement of the different coordinating strips so each jelly roll will produce a unique result in the hands of each individual stitcher. You are the designer. The following photos are 'Hello Darling' and 'Hi-De-Ho' both from Moda. Both of these collections are currently available in quilt shops,

I have just added kits on my Etsy site (www.etsy.com/shop/gaildoane) for the following collections;

Summerfest (May 2016), Backyard Roses (May 2016), and Fresh Market (June 2016) will be added as they become available.


 You can get a much better look at the fabrics in the various collection by going to www.unitednotions.com and typing the collection name in the search bar for the Moda collections and www.rileyblakedesigns.com for the Riley Blake collectons.
If you happen to have a stash of jelly rolls pull one out and give this project a try - one jelly roll will make up to a size 10 jacket with enough scraps left over for the trim on the angel sleeve, back belt, and scalloped hem of the dress. Keep stitching!
P.S Sneak peek of what's happening in my sewing room. Kitty Grace.... more Liberty of London love.

November 25, 2015
Thank You Kathy and Phyllis
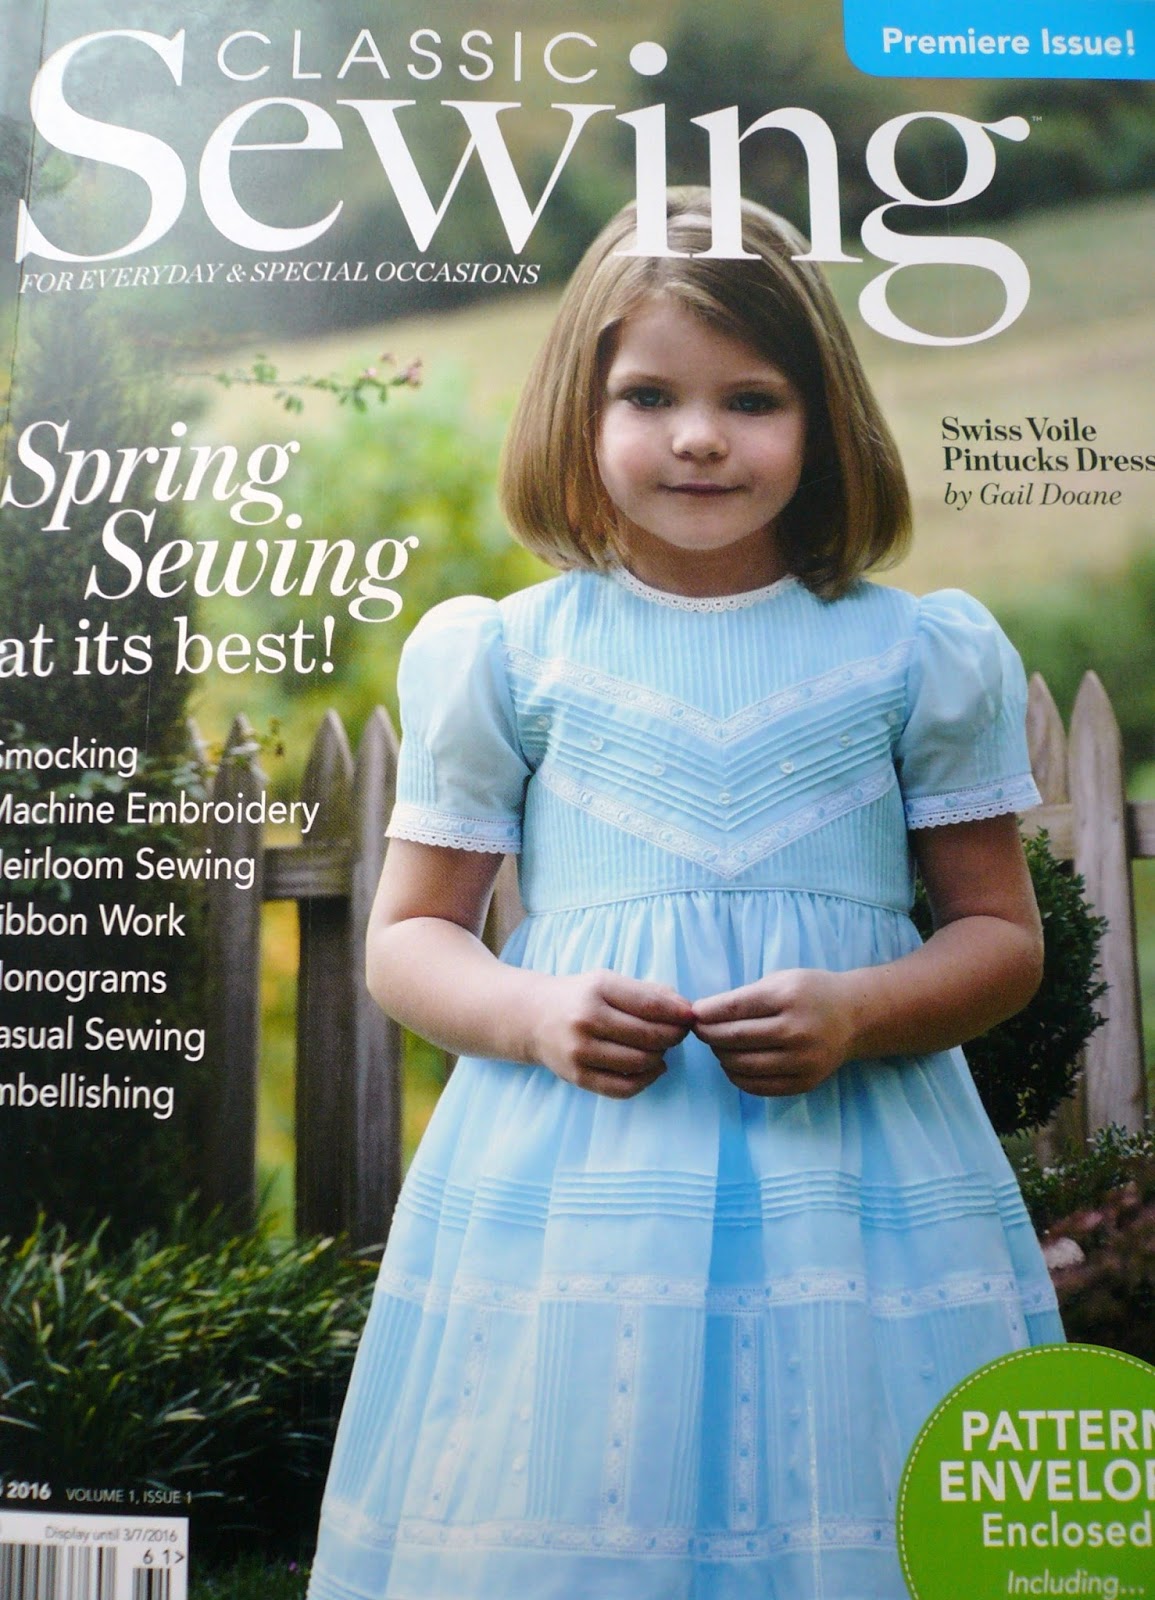
It is an honor to have had my project chosen for the cover garment of the premier issue of Classic Sewing. Thanks to Kathy and Phyllis, this publication is top quality and such a needed addition to our little heirloom sewing world. Bravo ladies!
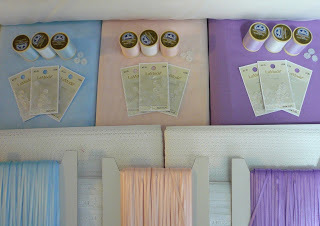
After a bit of a scramble (because the magazine actually released EARLY!!!!) project kits are up on my Etsy site (www.etsy.com/shop/gaildoane) in a choice of three colors.
My submission for the next issue is stitched/drafted/photographed/instructions written/and shipped!!! Ta da!
After a bit of a scramble (because the magazine actually released EARLY!!!!) project kits are up on my Etsy site (www.etsy.com/shop/gaildoane) in a choice of three colors.

My submission for the next issue is stitched/drafted/photographed/instructions written/and shipped!!! Ta da!

May 5, 2015
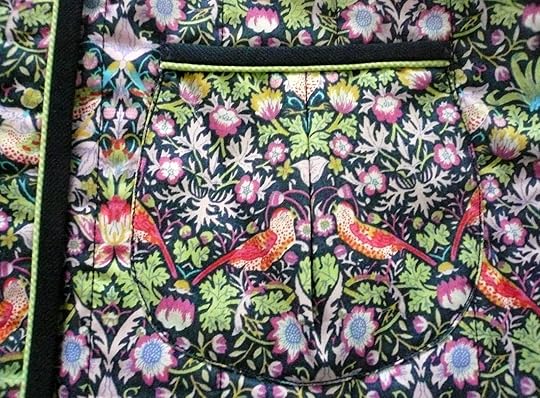
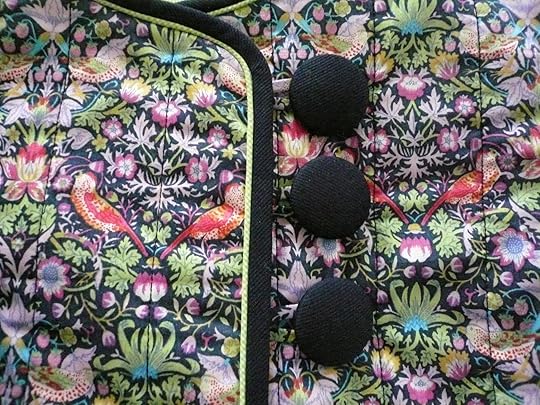
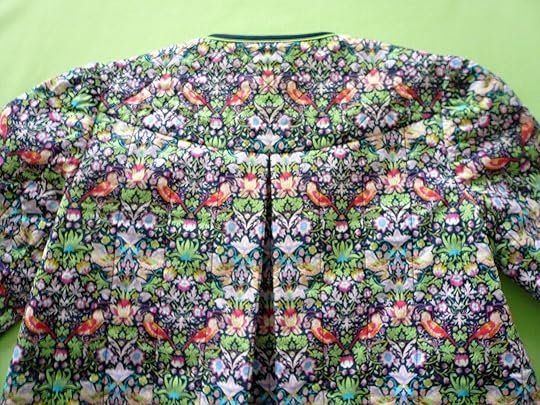
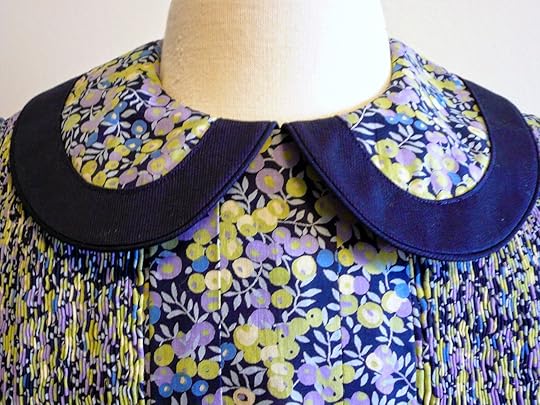
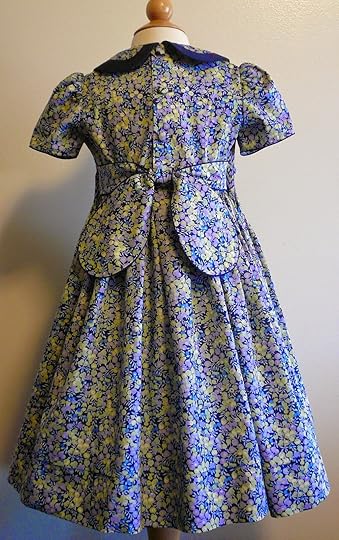
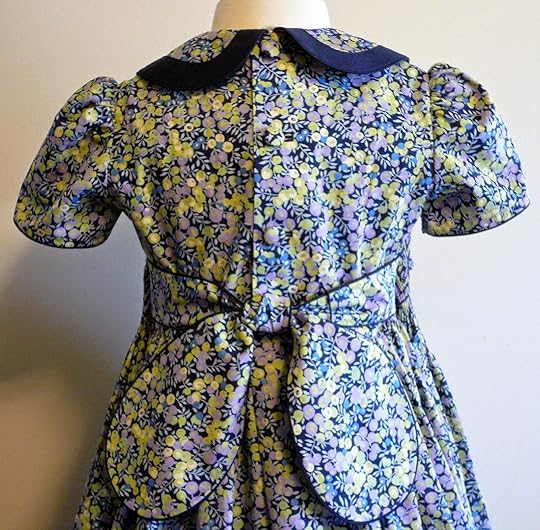
Strawberry Thief - The Liberty Obsession Continues
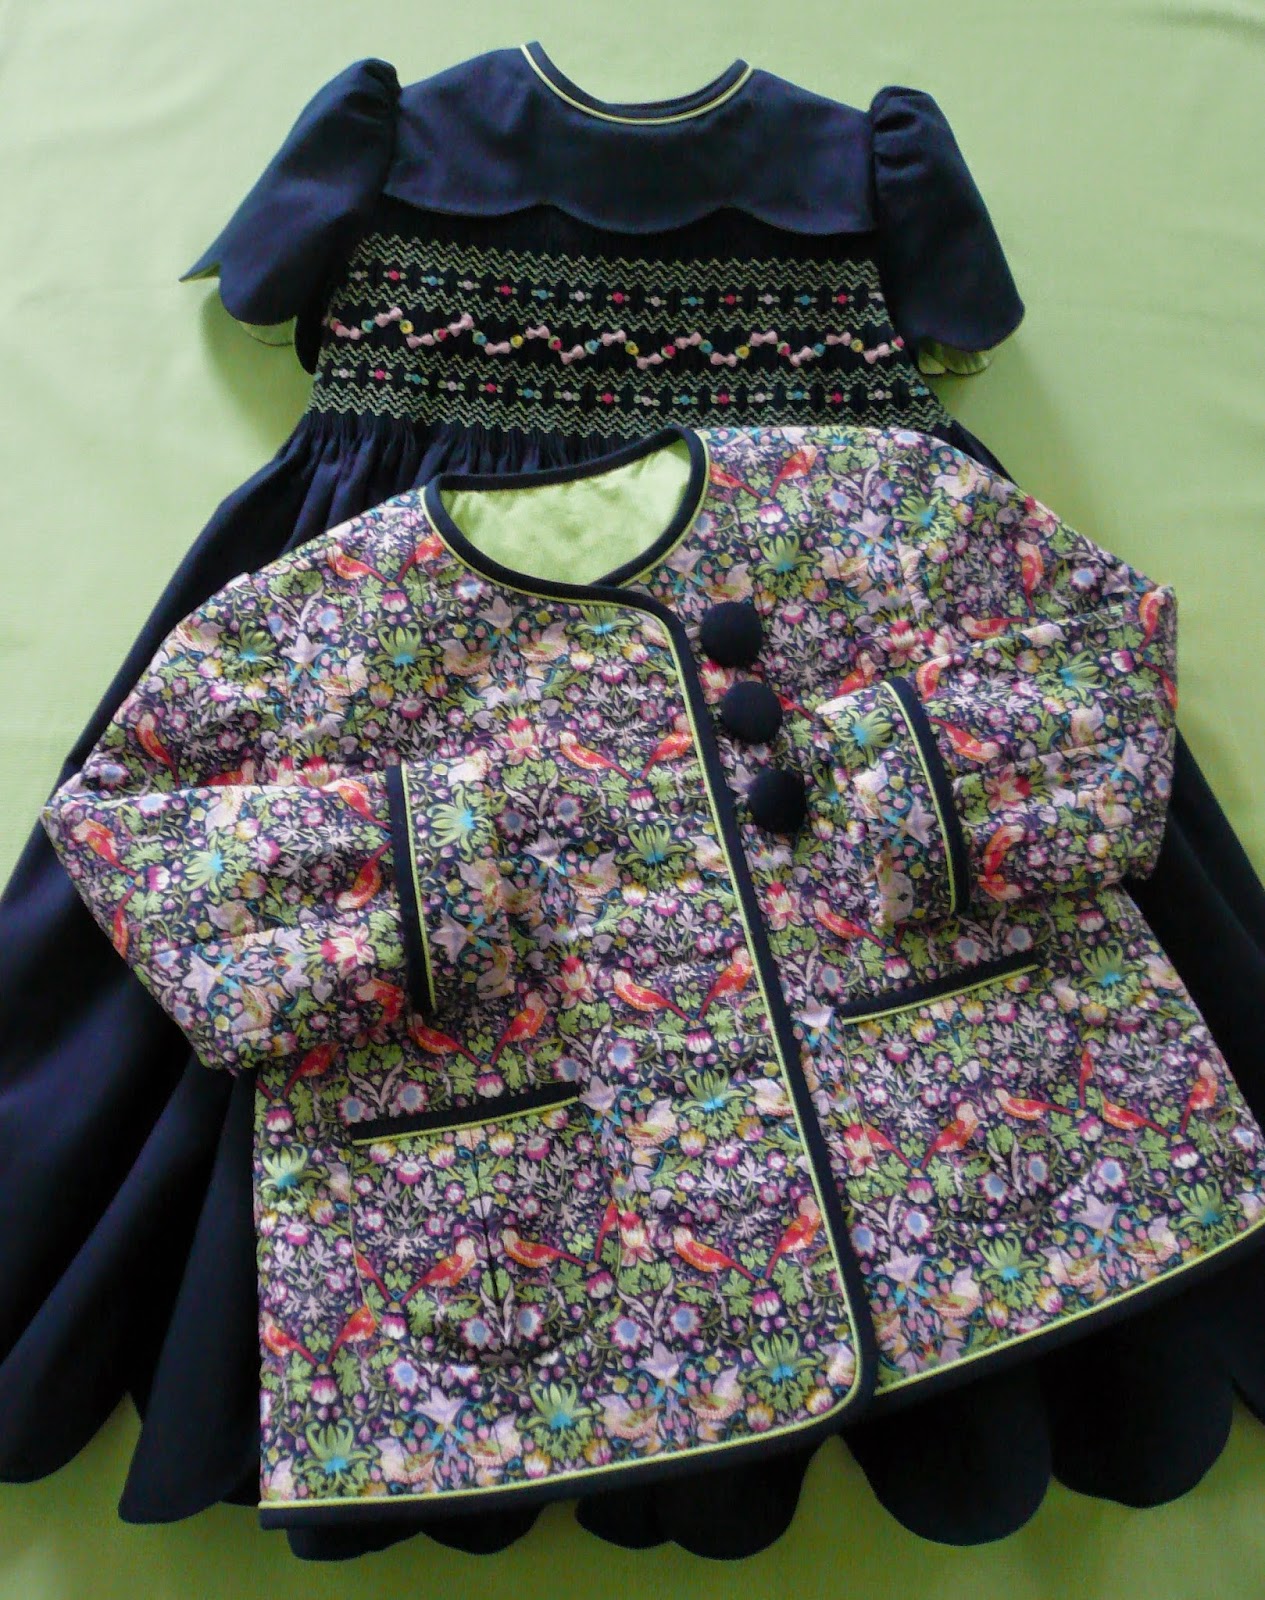
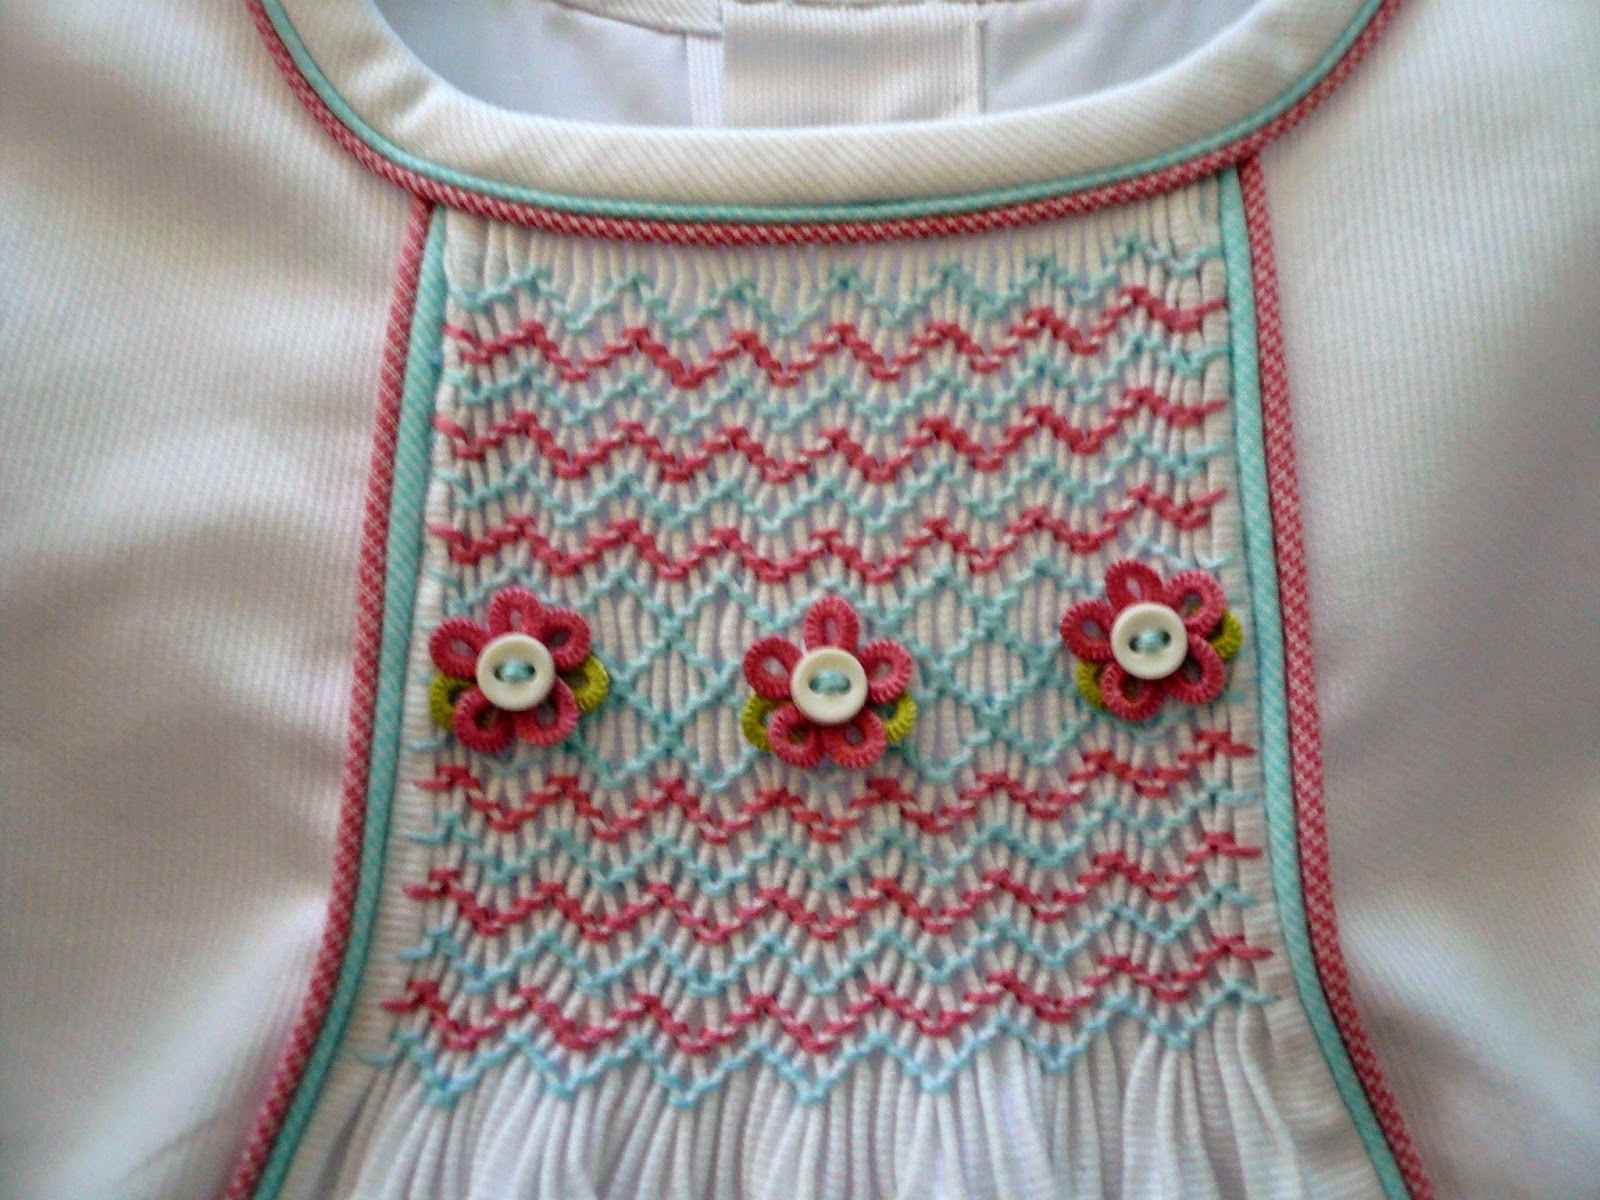
My obsession with Liberty continues. Current project is a jacket/smocked dress combination.
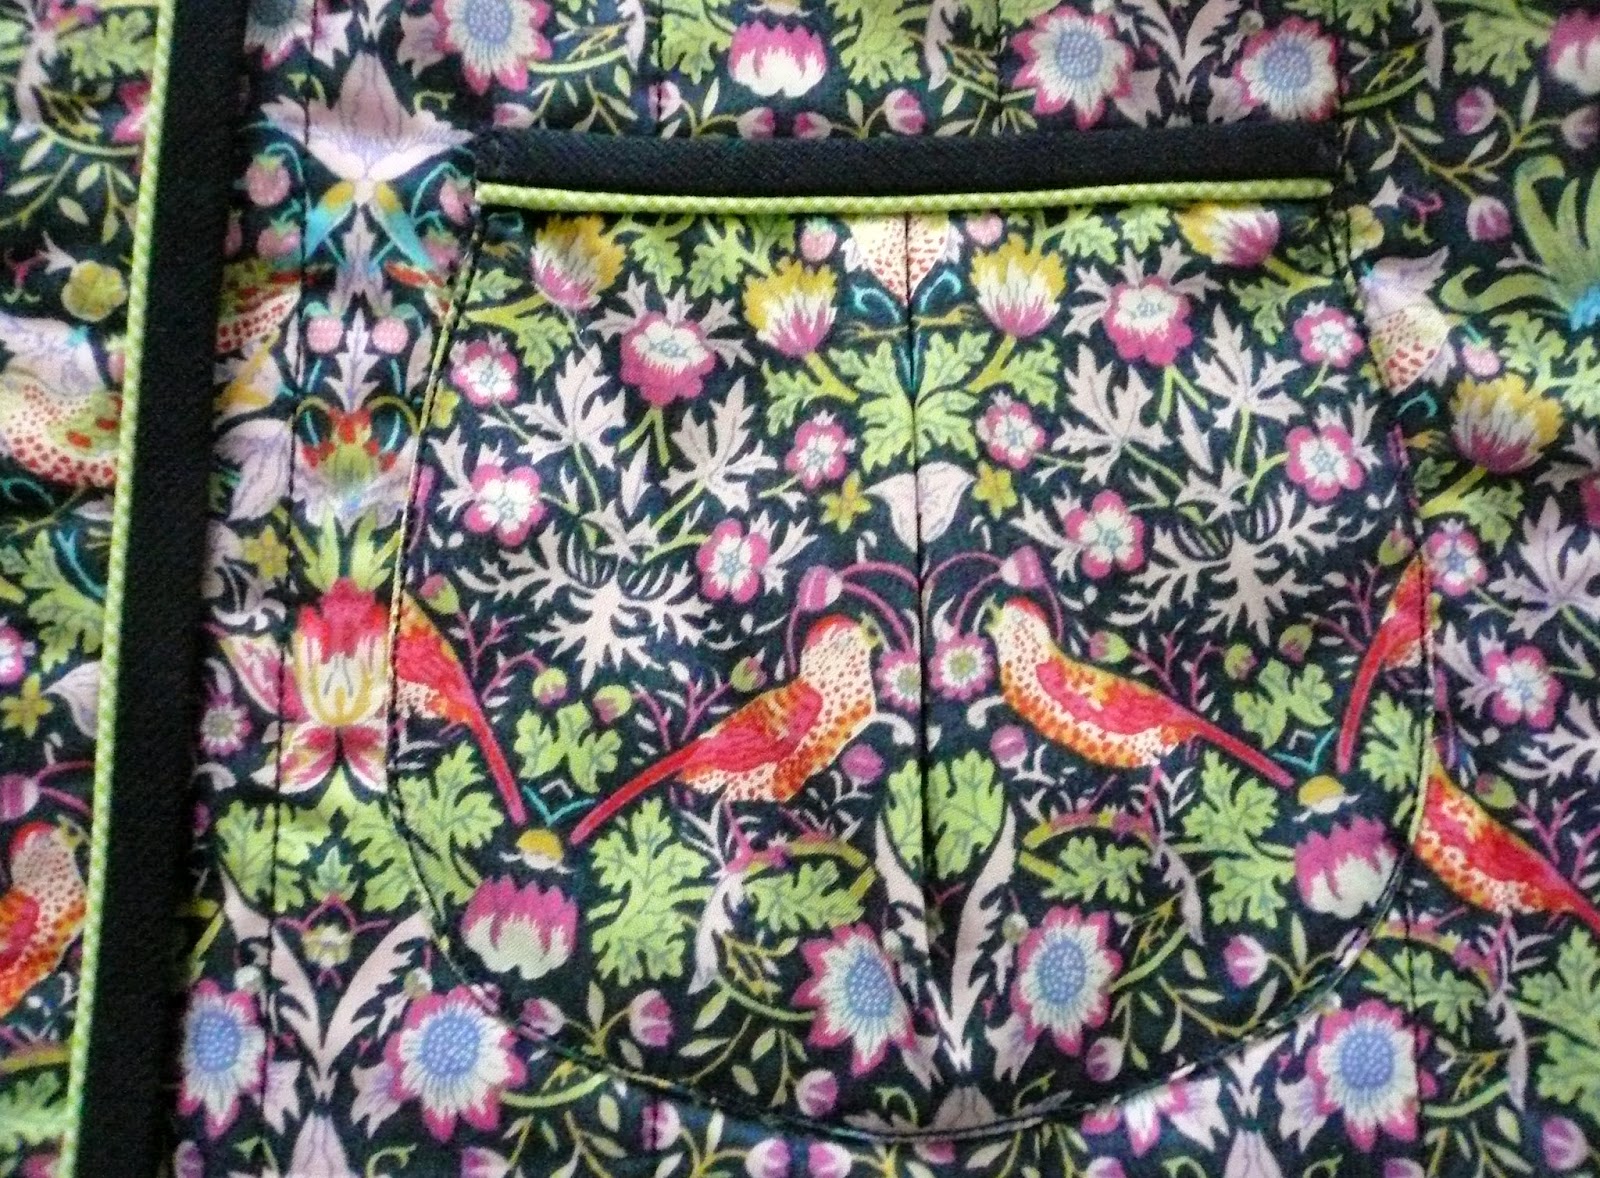
The jacket is constructed with Liberty of London Strawberry Thief from their classic line. I channel quilted the body and sleeves of the jacket to a layer of 'Warm and Natural' which gave it a lovely bit of body but not a lot of extra weight. The two center pleated patch pockets are piped with lime 1/32" micro check and bound with navy pique. I did a fair amount of fussy cutting to keep the birds all lined up and facing the right direction.
The turn up on the sleeve will allow for at least an extra year of growth room. Three turned bias loops over covered buttons secure the asymmetric closure on the front of the jacket.
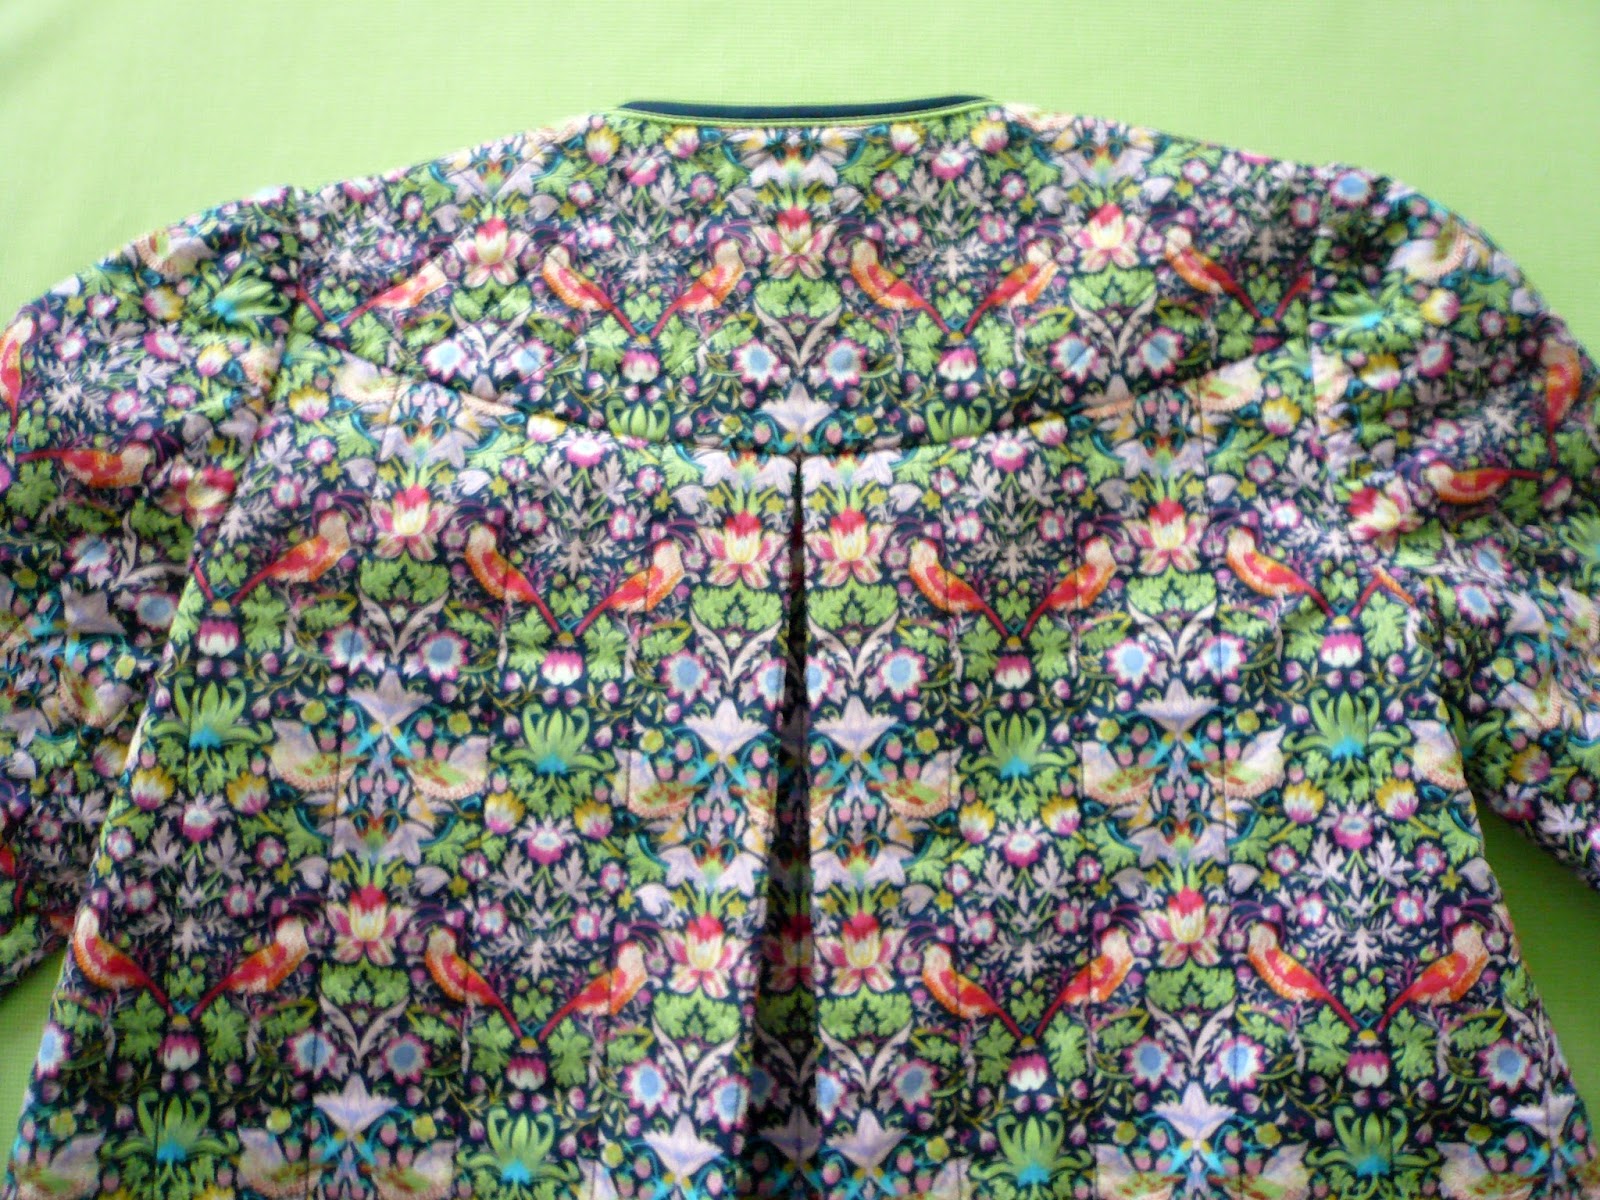
The back yoke of the jacket is quilted on a diagonal 1" grid and the center back pleat give a nice swing shape to the jacket when worn over the dress.
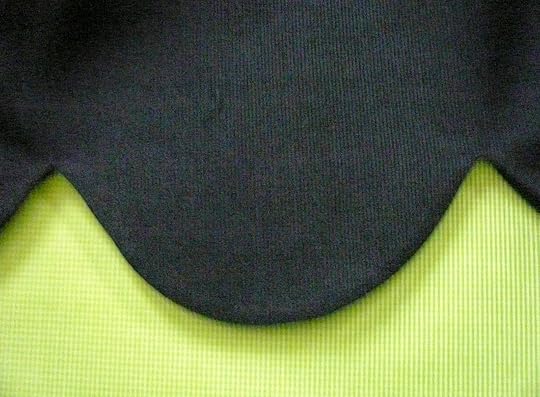
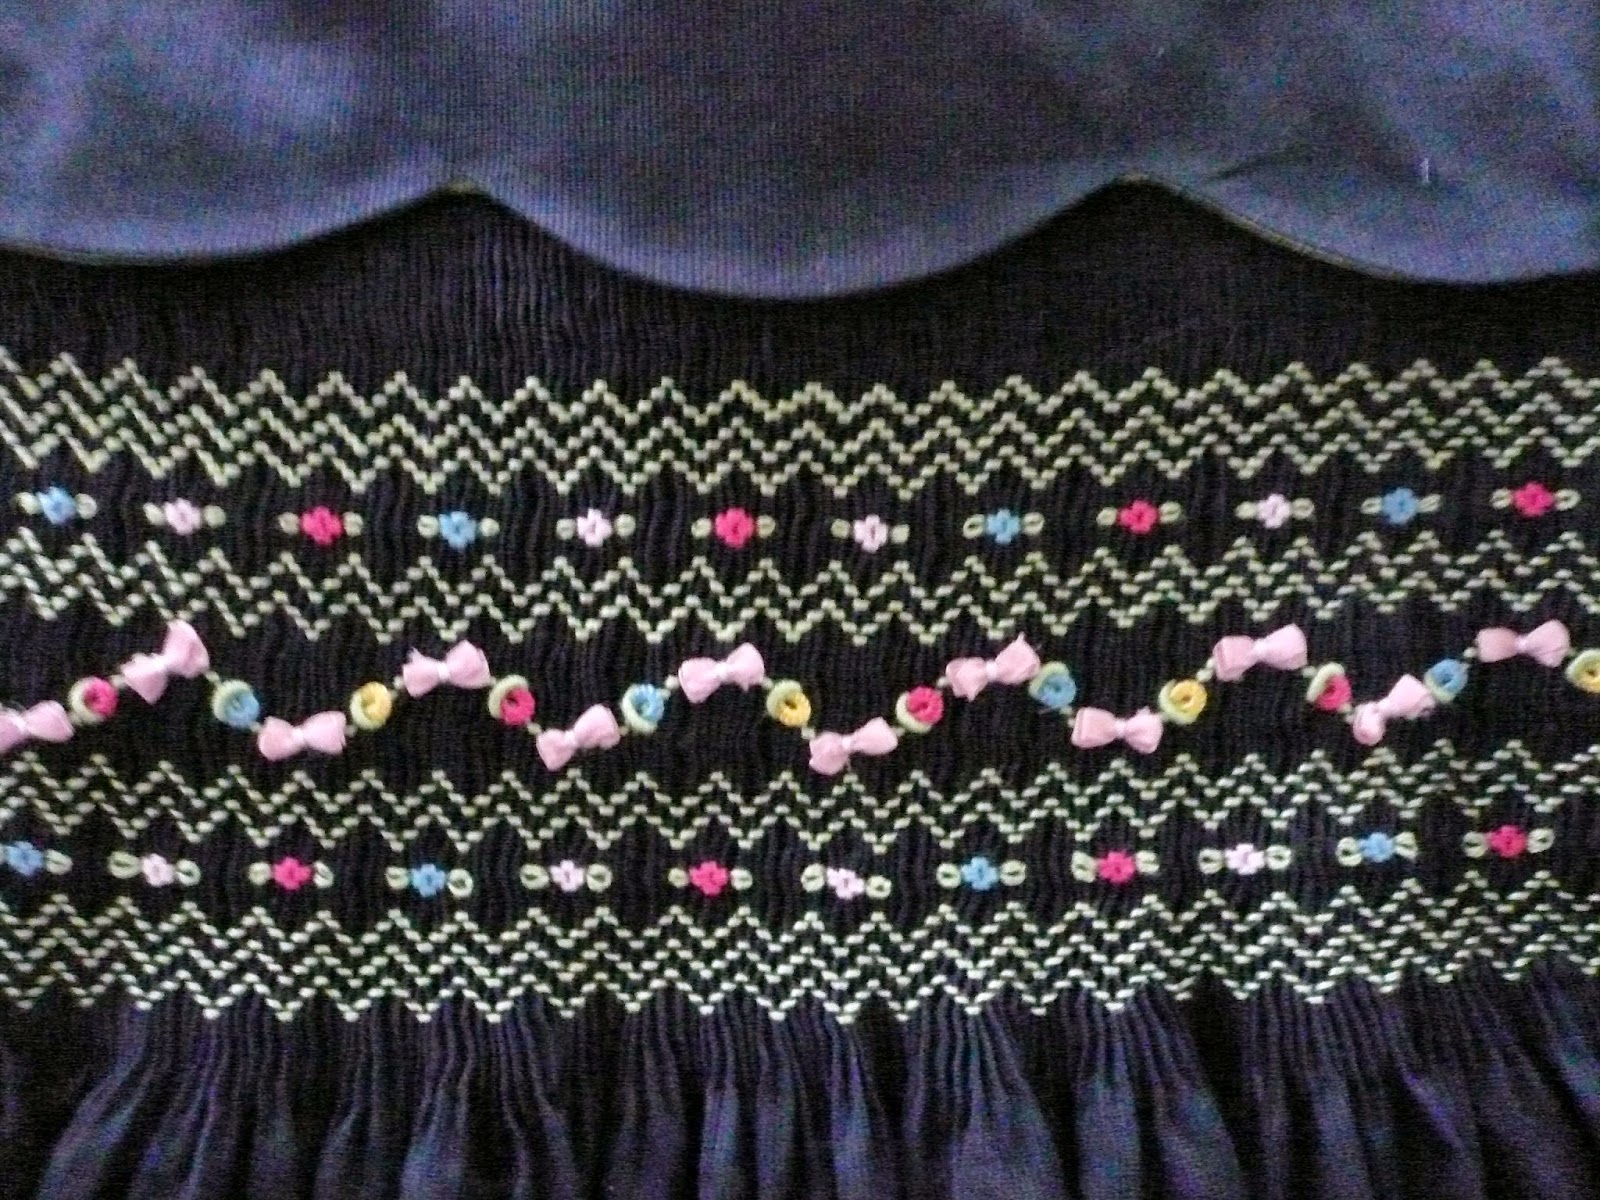
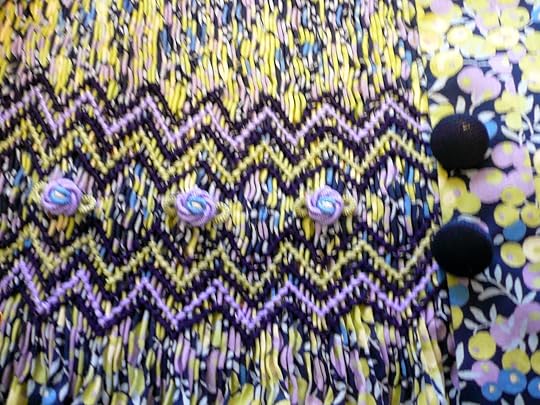
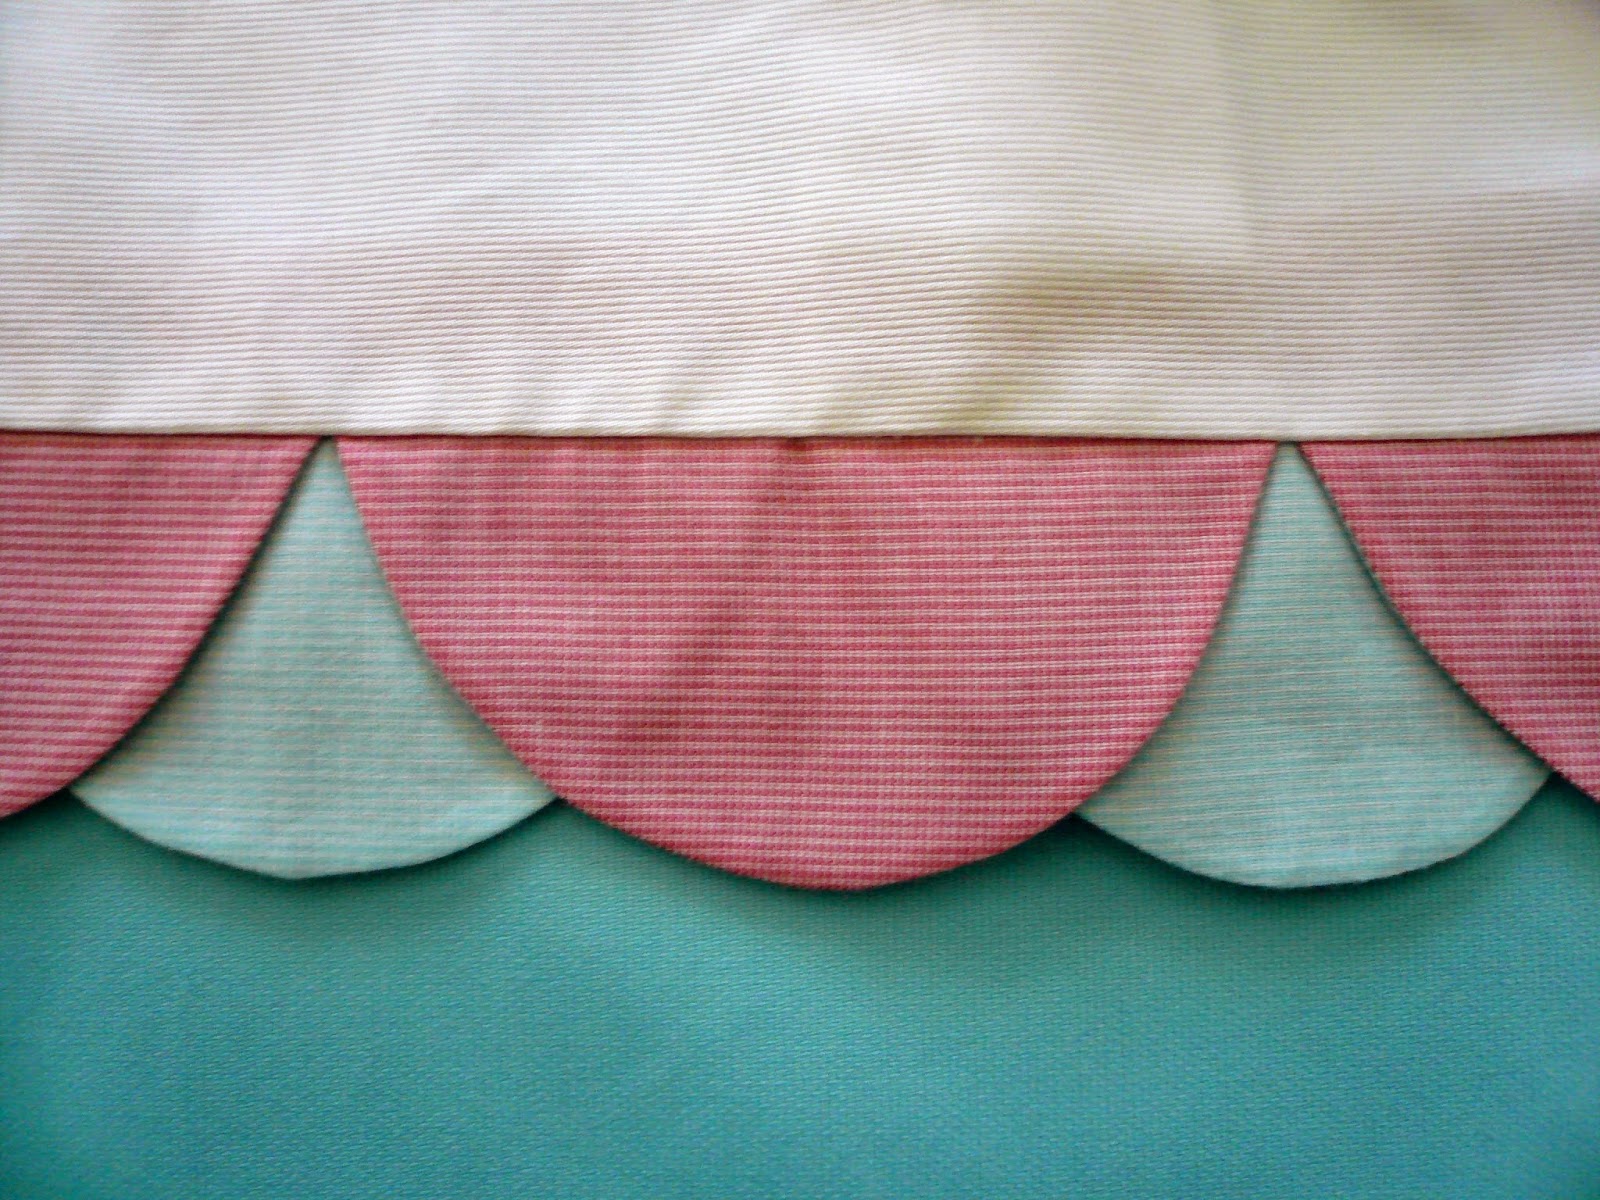
The matching navy pique smocked dress has a scalloped yoke, sleeve and hemline.

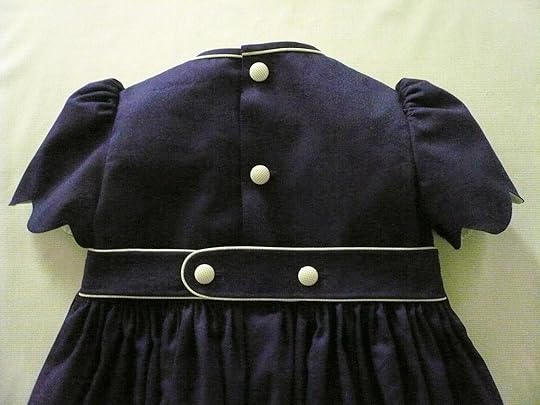
Twenty two 4 1/2" scallops give the hemline a nice weight and serious twirl factor.
I am thinking I might use this quilting technique to make a Liberty jacket for myself. It opens up lots of options for some of the under two yard cuts I have been hoarding for more than a few years (even the 36" wide ones!)
The jacket is constructed with Liberty of London Strawberry Thief from their classic line. I channel quilted the body and sleeves of the jacket to a layer of 'Warm and Natural' which gave it a lovely bit of body but not a lot of extra weight. The two center pleated patch pockets are piped with lime 1/32" micro check and bound with navy pique. I did a fair amount of fussy cutting to keep the birds all lined up and facing the right direction.
The turn up on the sleeve will allow for at least an extra year of growth room. Three turned bias loops over covered buttons secure the asymmetric closure on the front of the jacket.

The back yoke of the jacket is quilted on a diagonal 1" grid and the center back pleat give a nice swing shape to the jacket when worn over the dress.
The matching navy pique smocked dress has a scalloped yoke, sleeve and hemline.
Twenty two 4 1/2" scallops give the hemline a nice weight and serious twirl factor.

I am thinking I might use this quilting technique to make a Liberty jacket for myself. It opens up lots of options for some of the under two yard cuts I have been hoarding for more than a few years (even the 36" wide ones!)
November 21, 2014
Master Class - Details, Details, Details
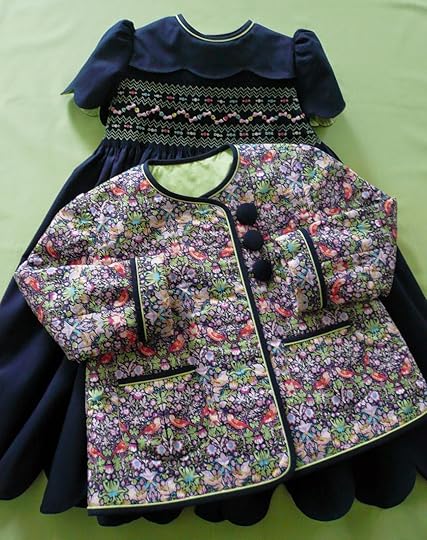
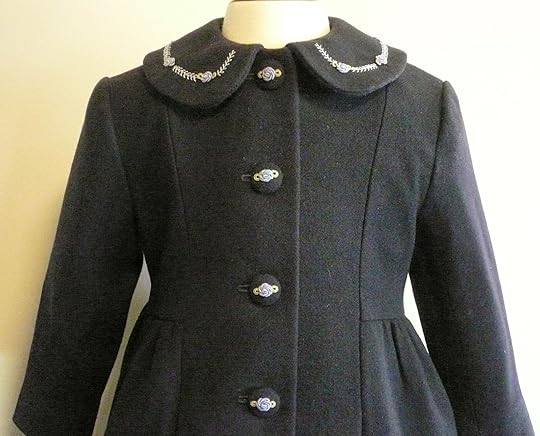
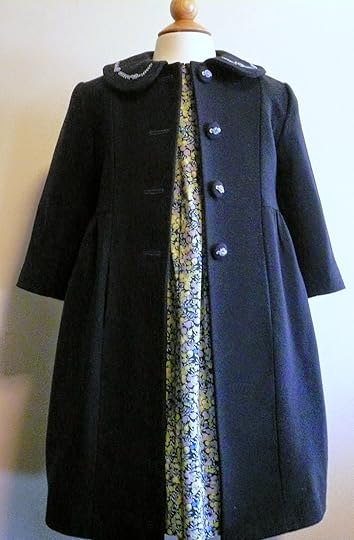
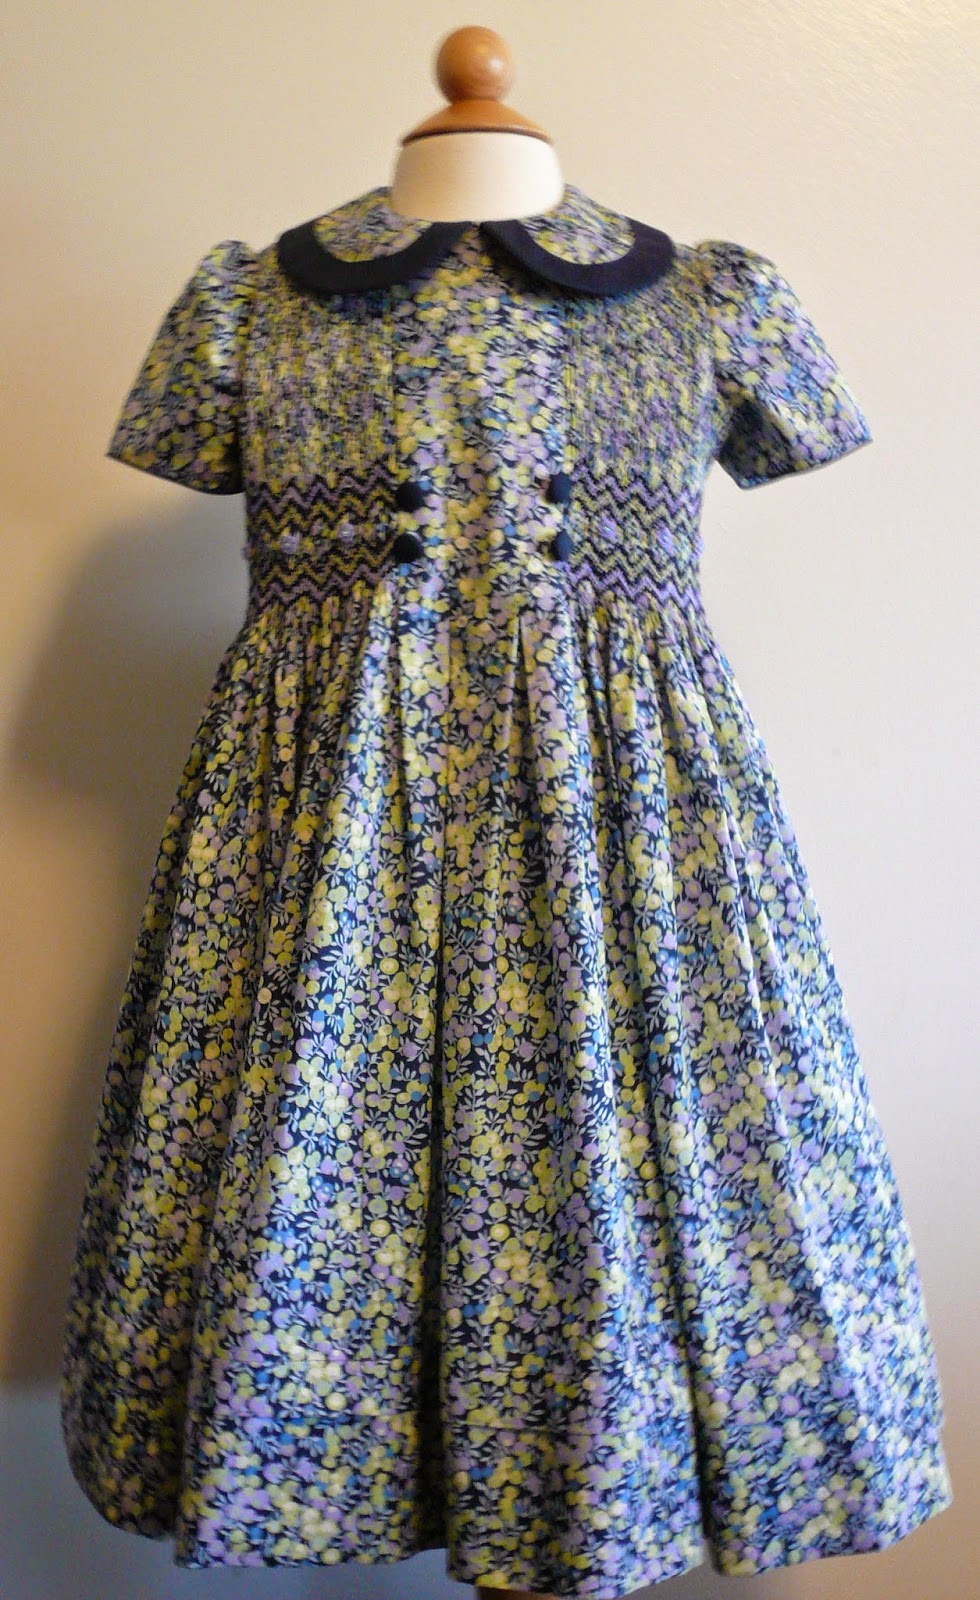
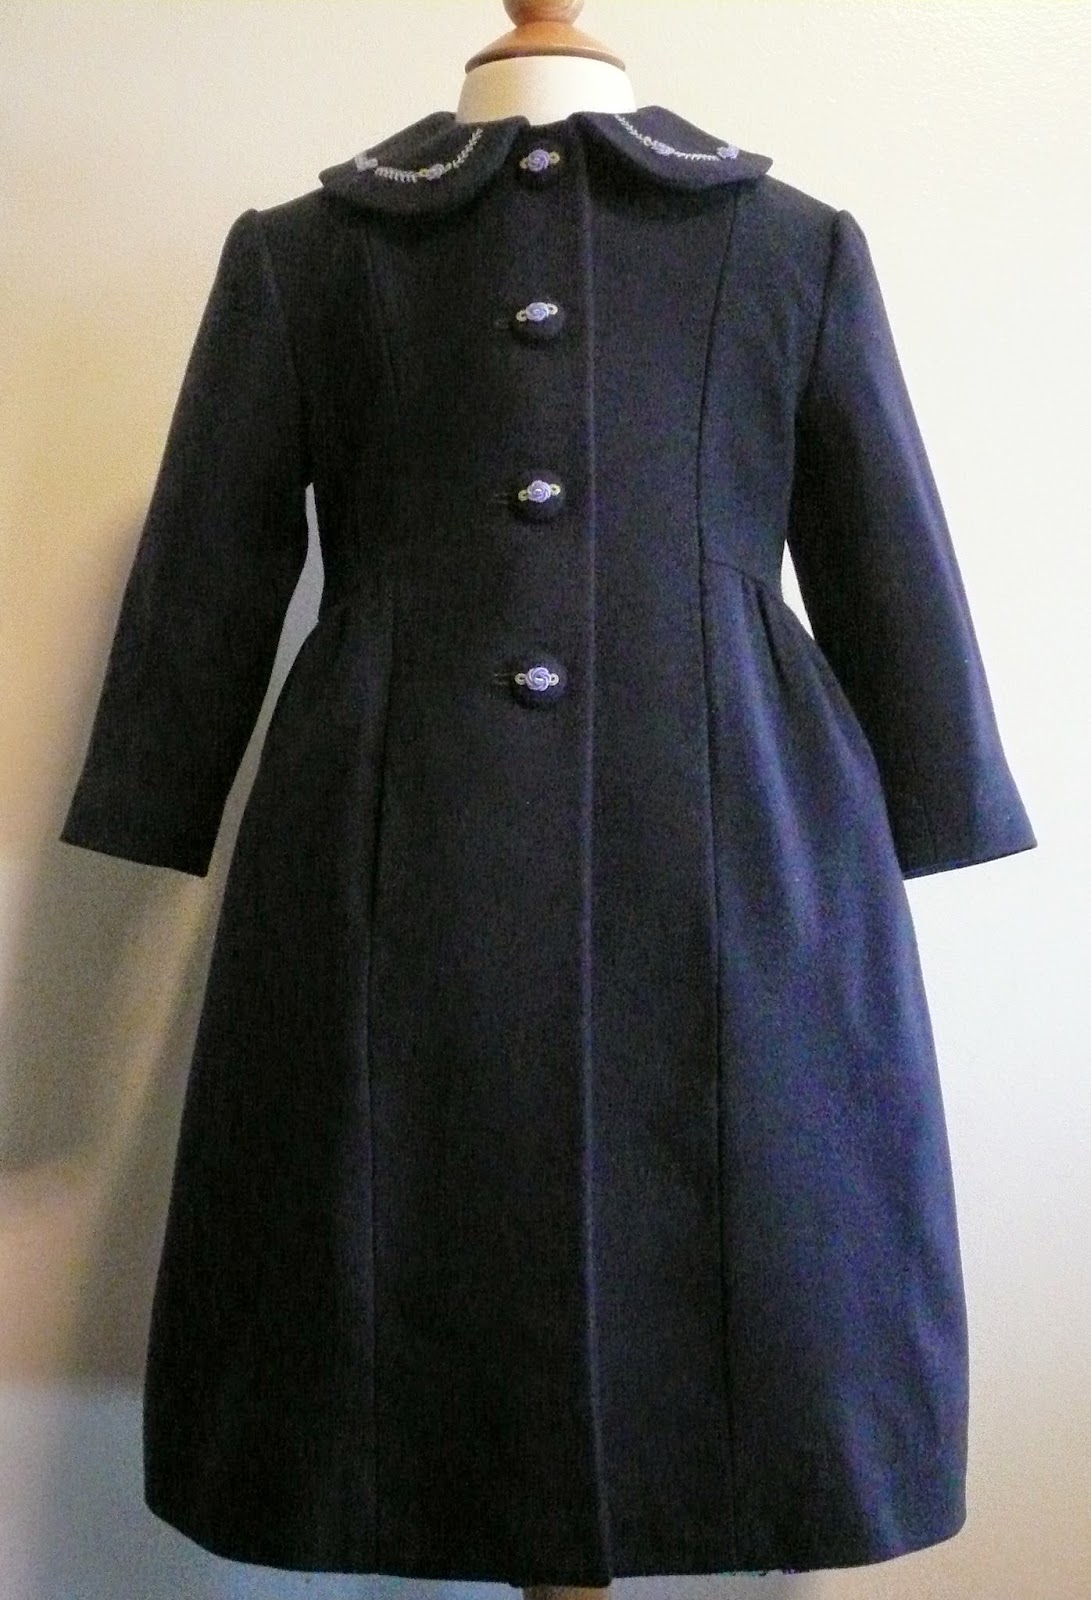
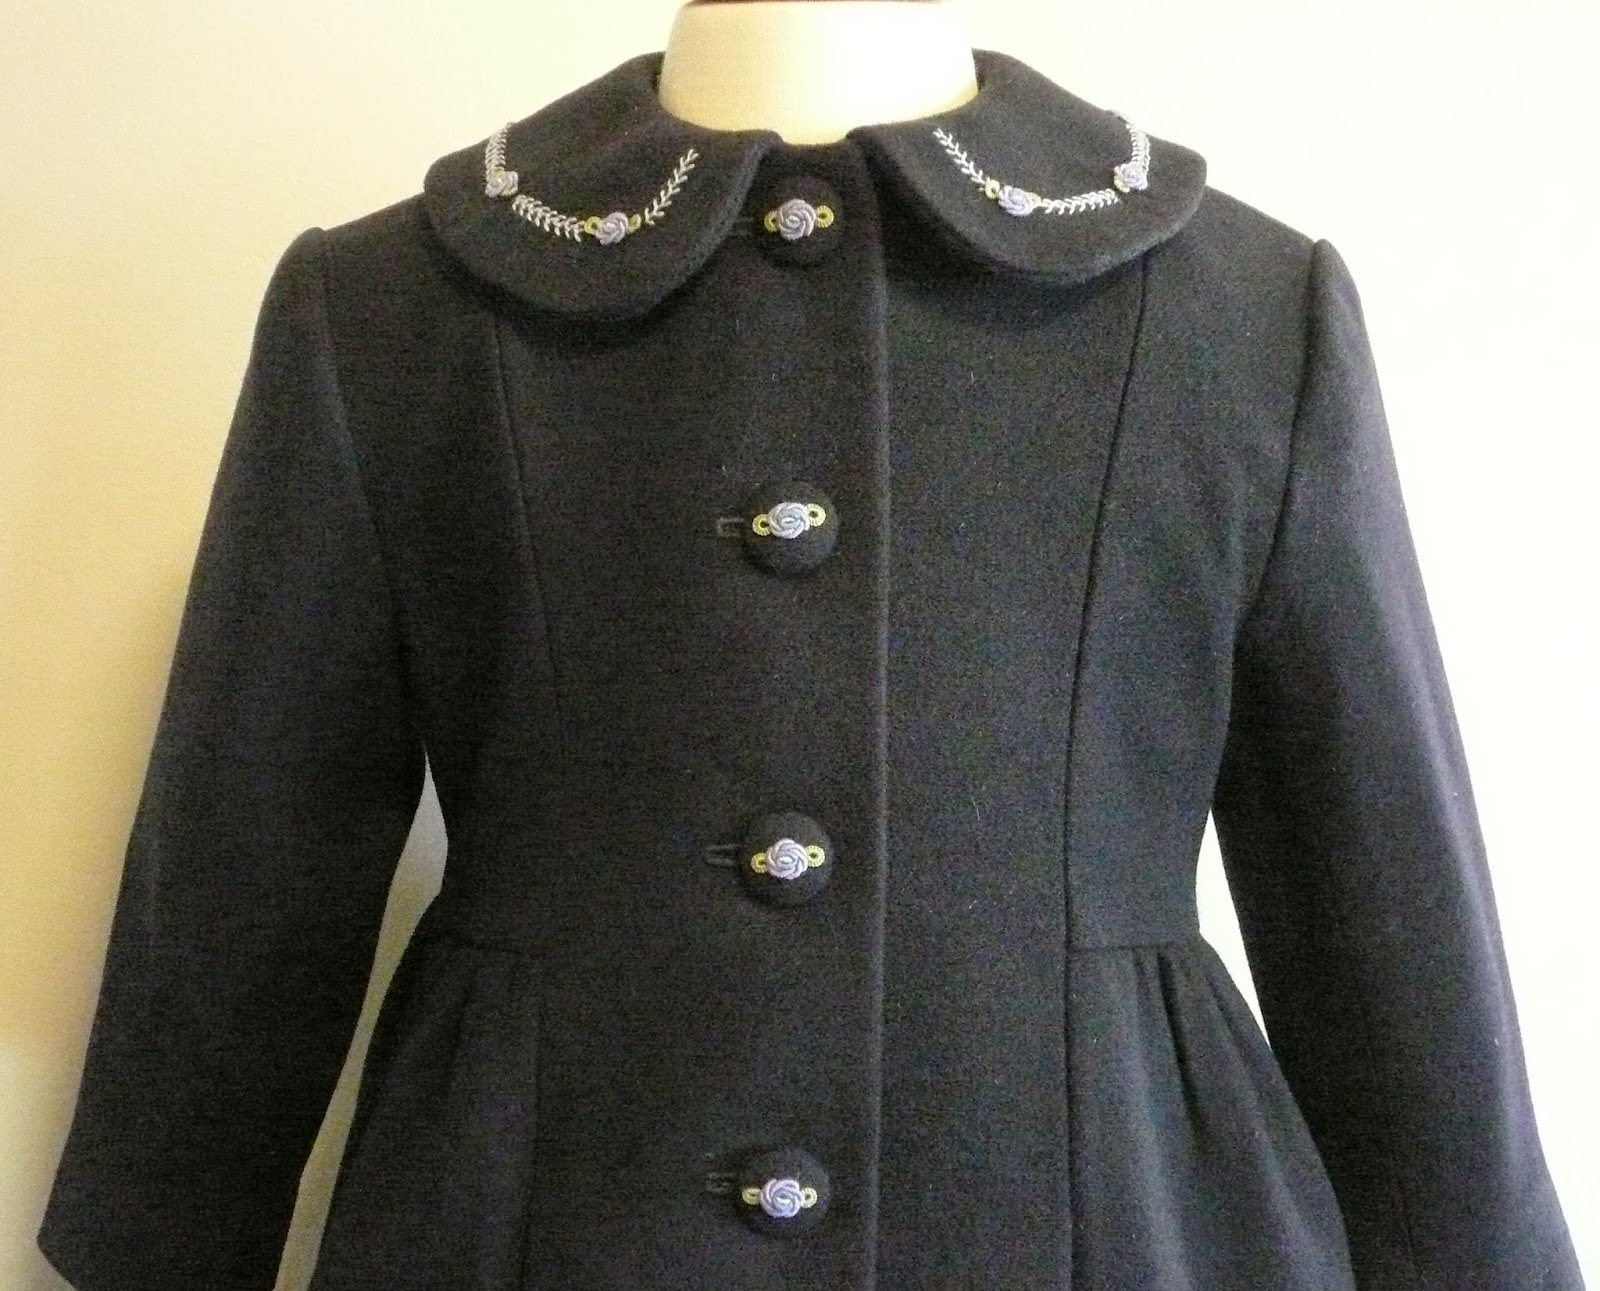
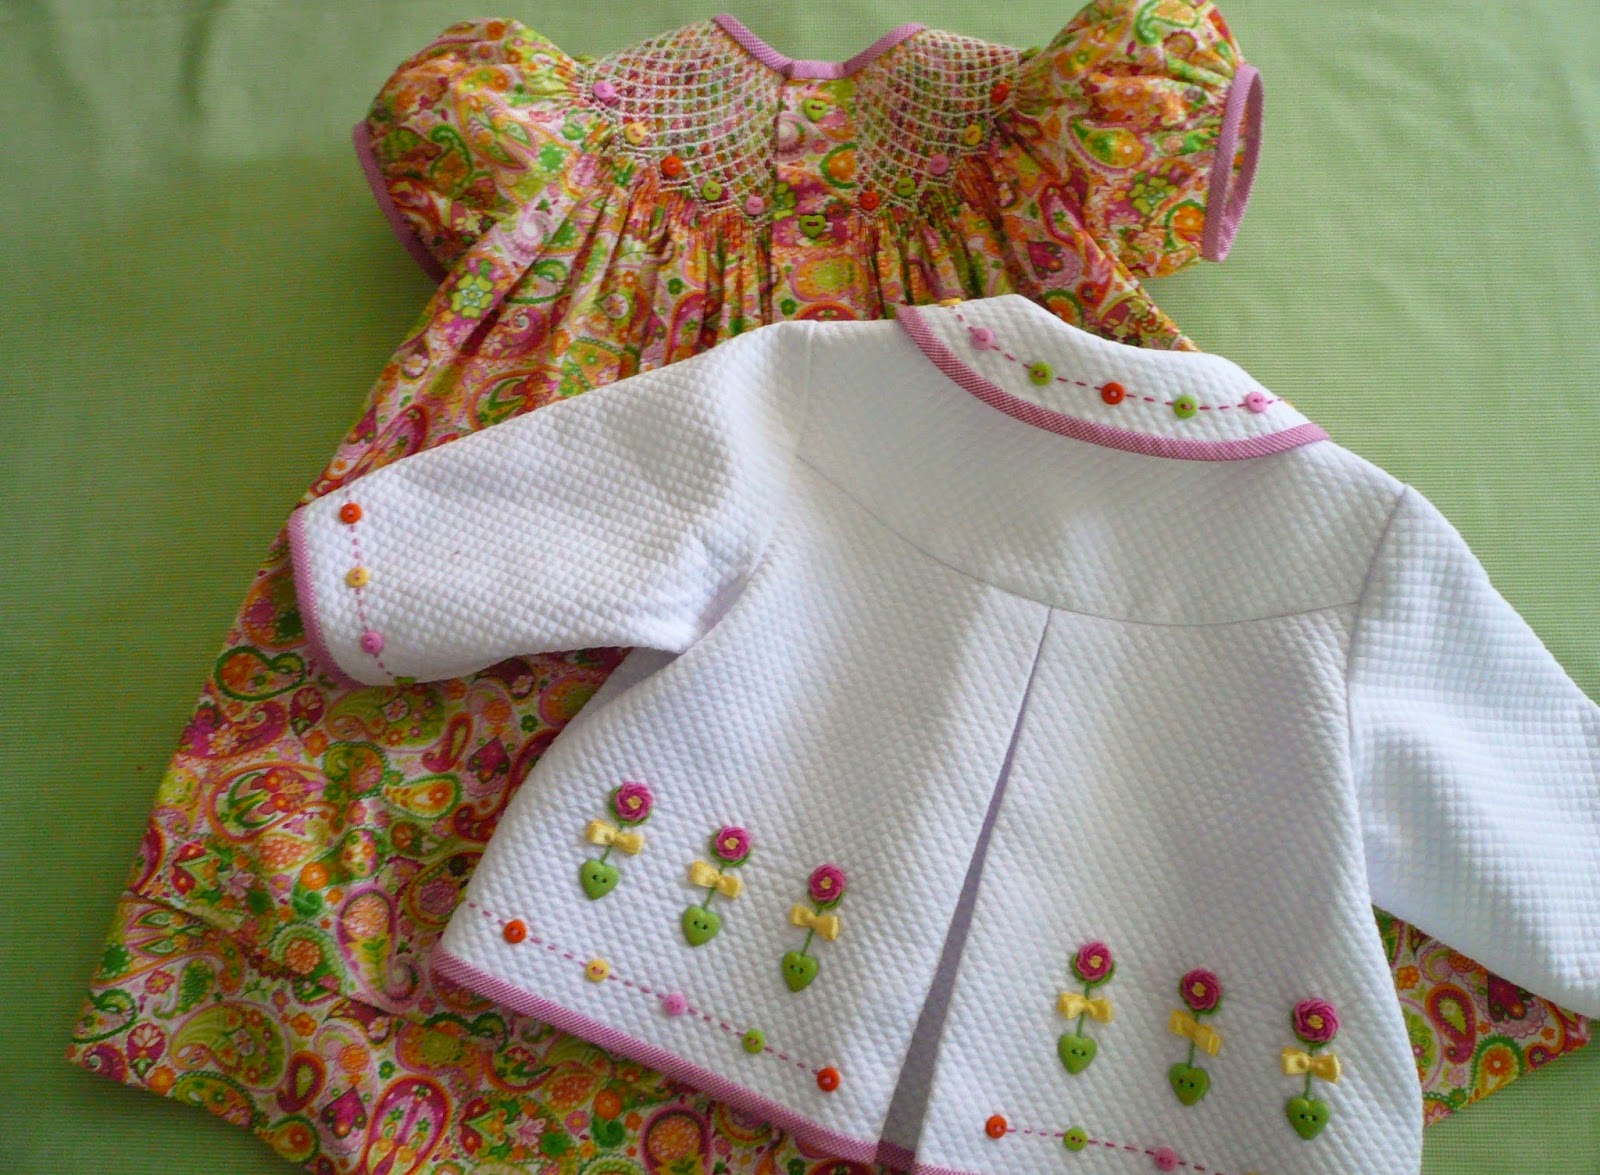
I am lucky enough to be asked to teach private classes every so often. Inevitably the ladies in these small groups end up becoming my trusted friends. As these classes tend to become annual events there is always the desire to move up a notch or two in difficulty with the planned class project. This year I have designed the quintessential little English girl's outfit - a smocked Liberty print dress and matching wool dress coat. It definitely falls into the category of 'master' or advanced class ranking.
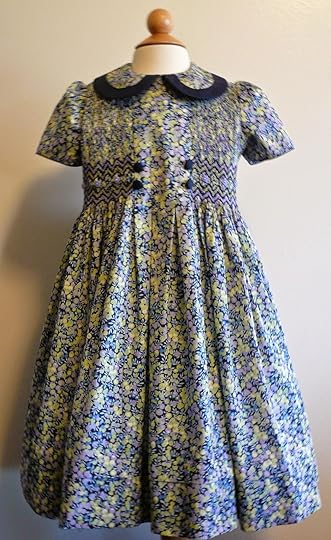 The dress is constructed form Liberty of London tana lawn 'Wiltshire' which is one of their classic prints that stays available for several years rather than just one season. The smocked sections on each side of the box pleated center front panel run right up into the shoulder seam and are backed with 'baby' interfacing to plump up the pleats and give a more structured appearance. It does require a 32 row pleater to prepare the side panels for hand smocking.
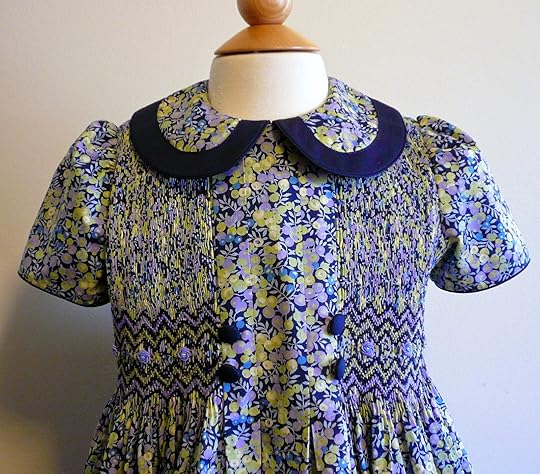
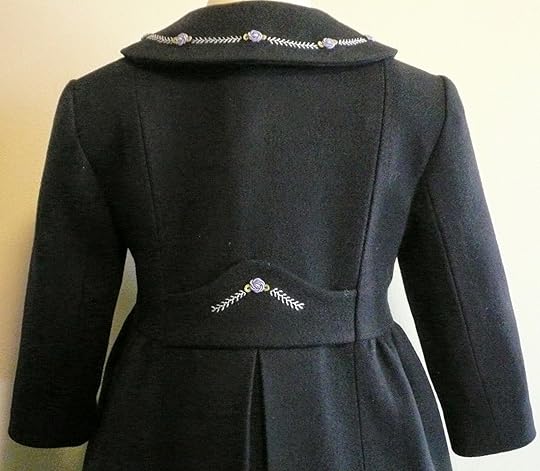
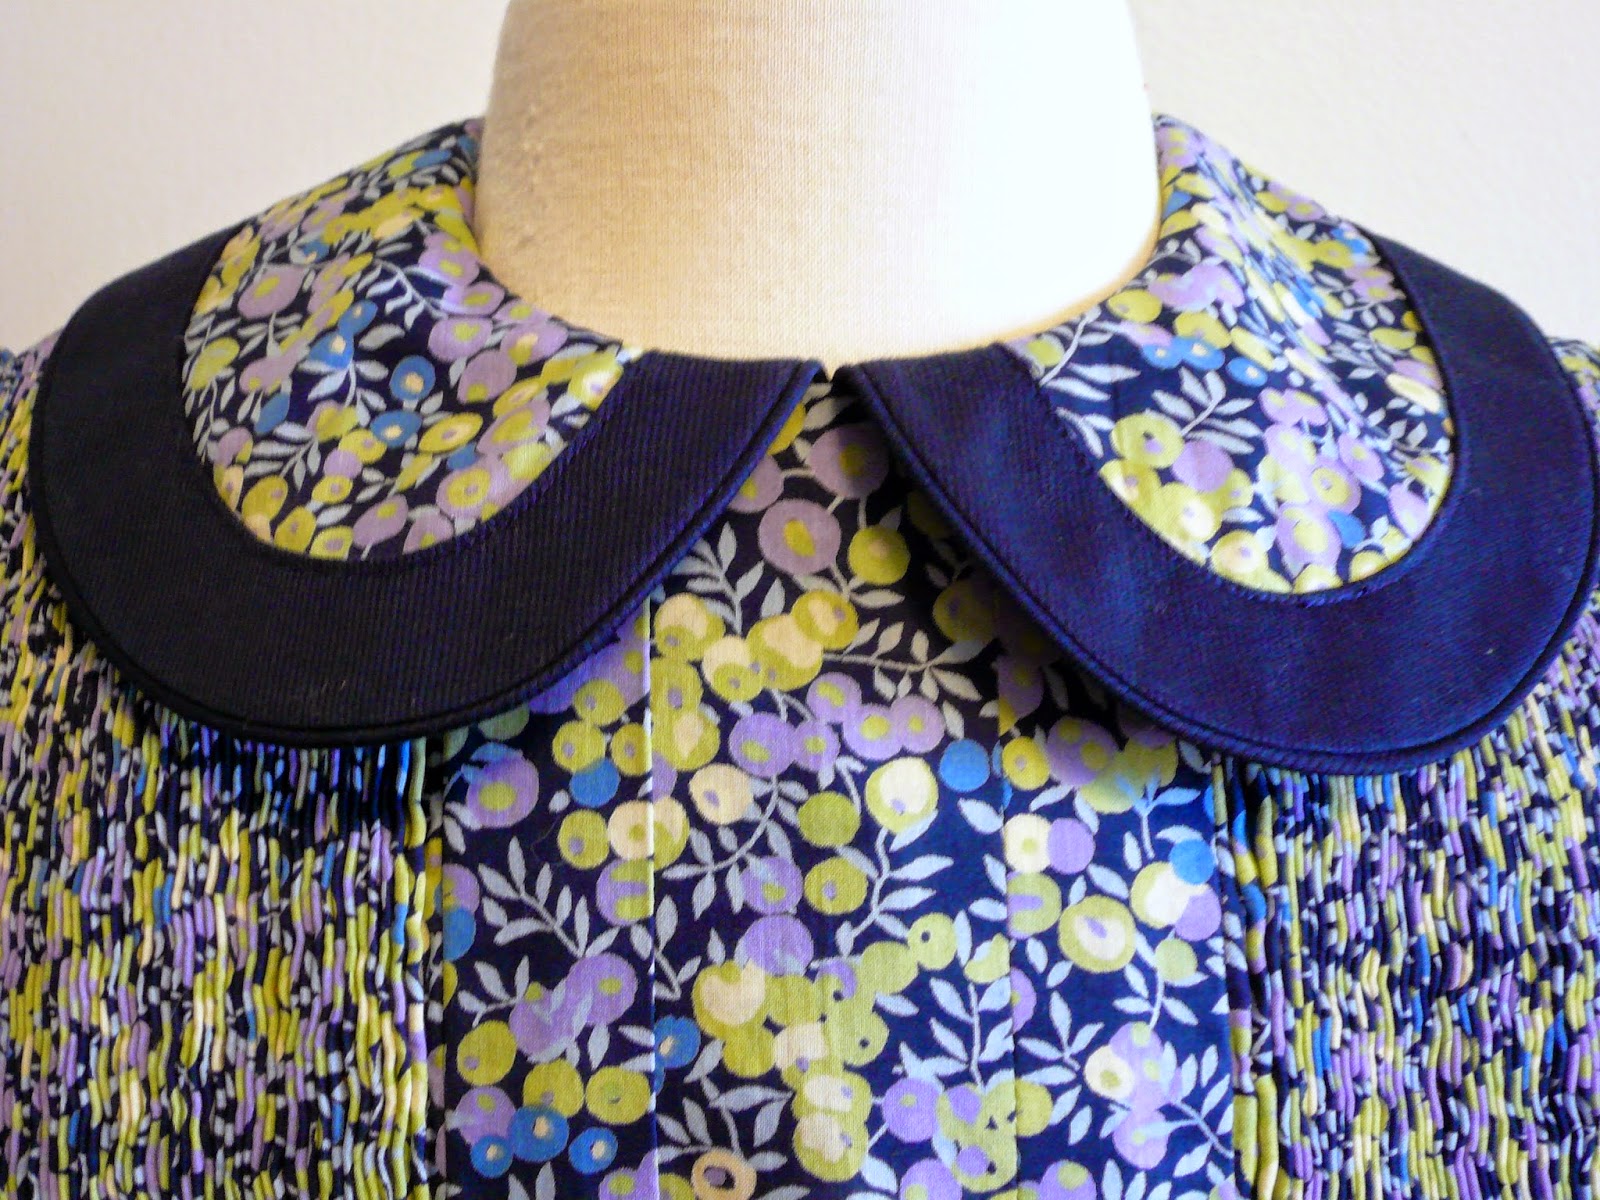
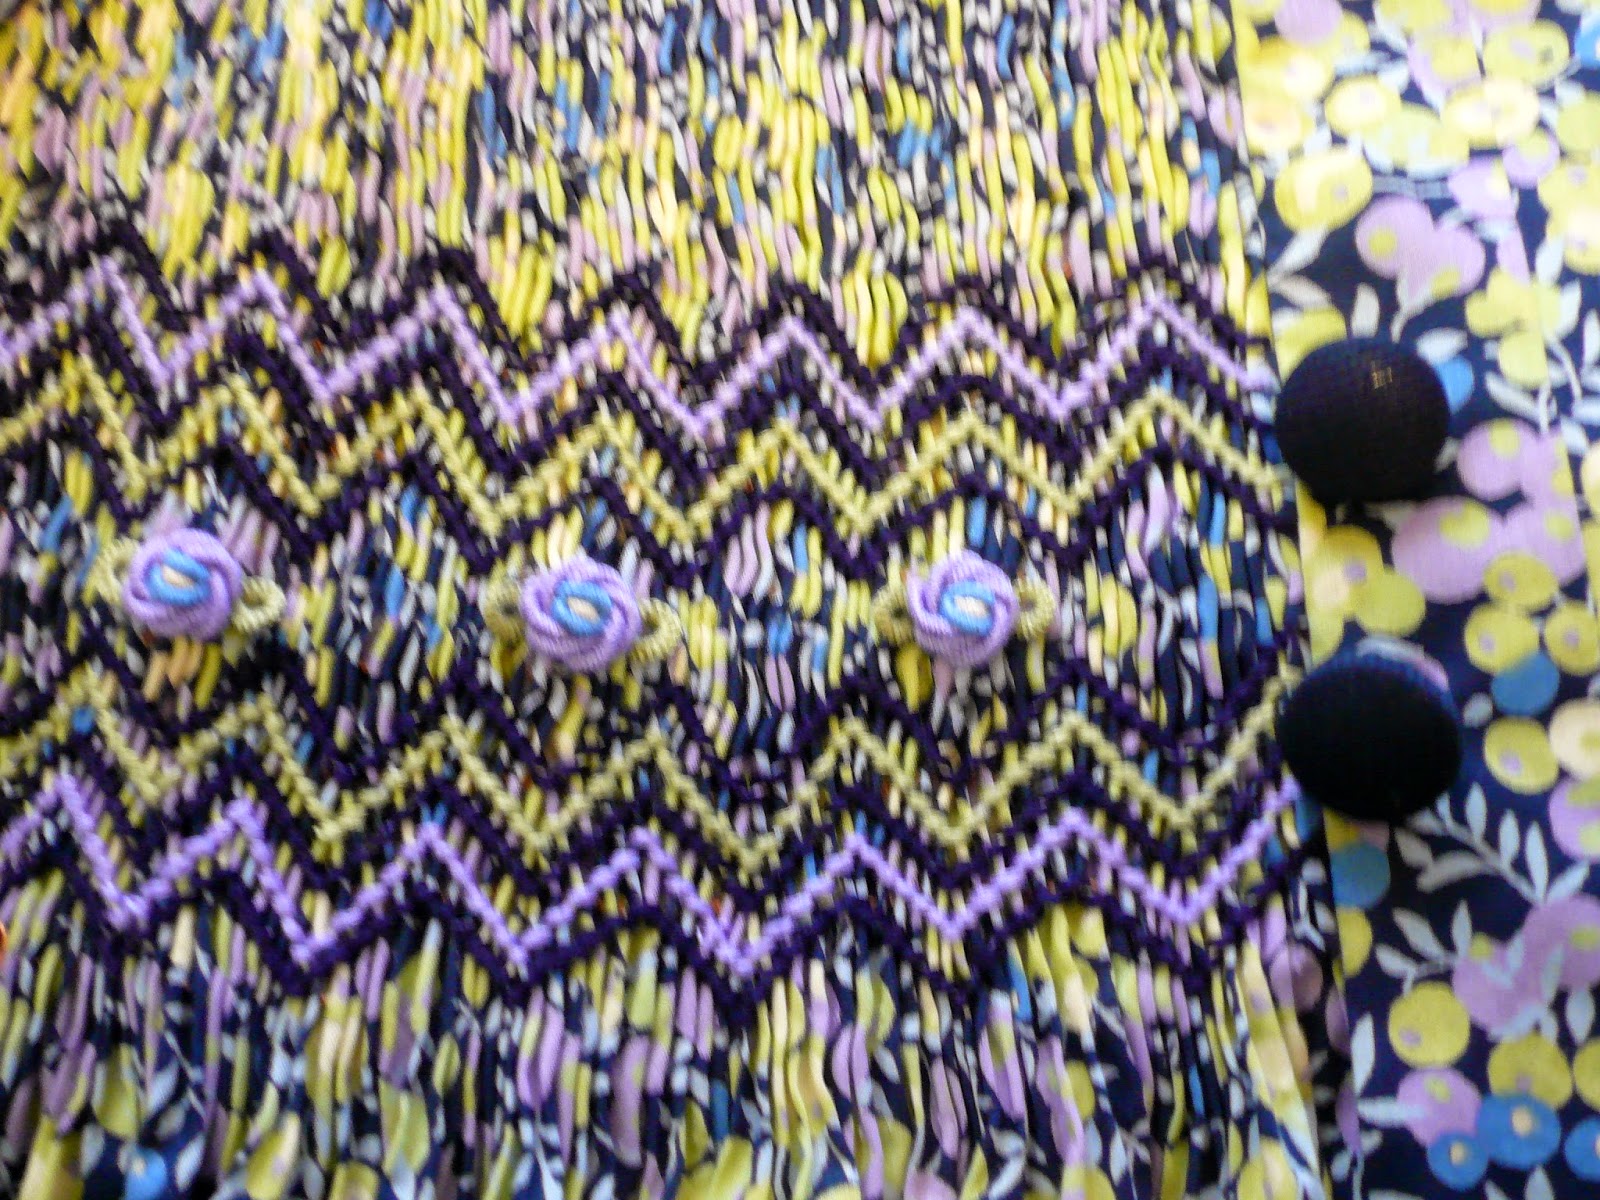
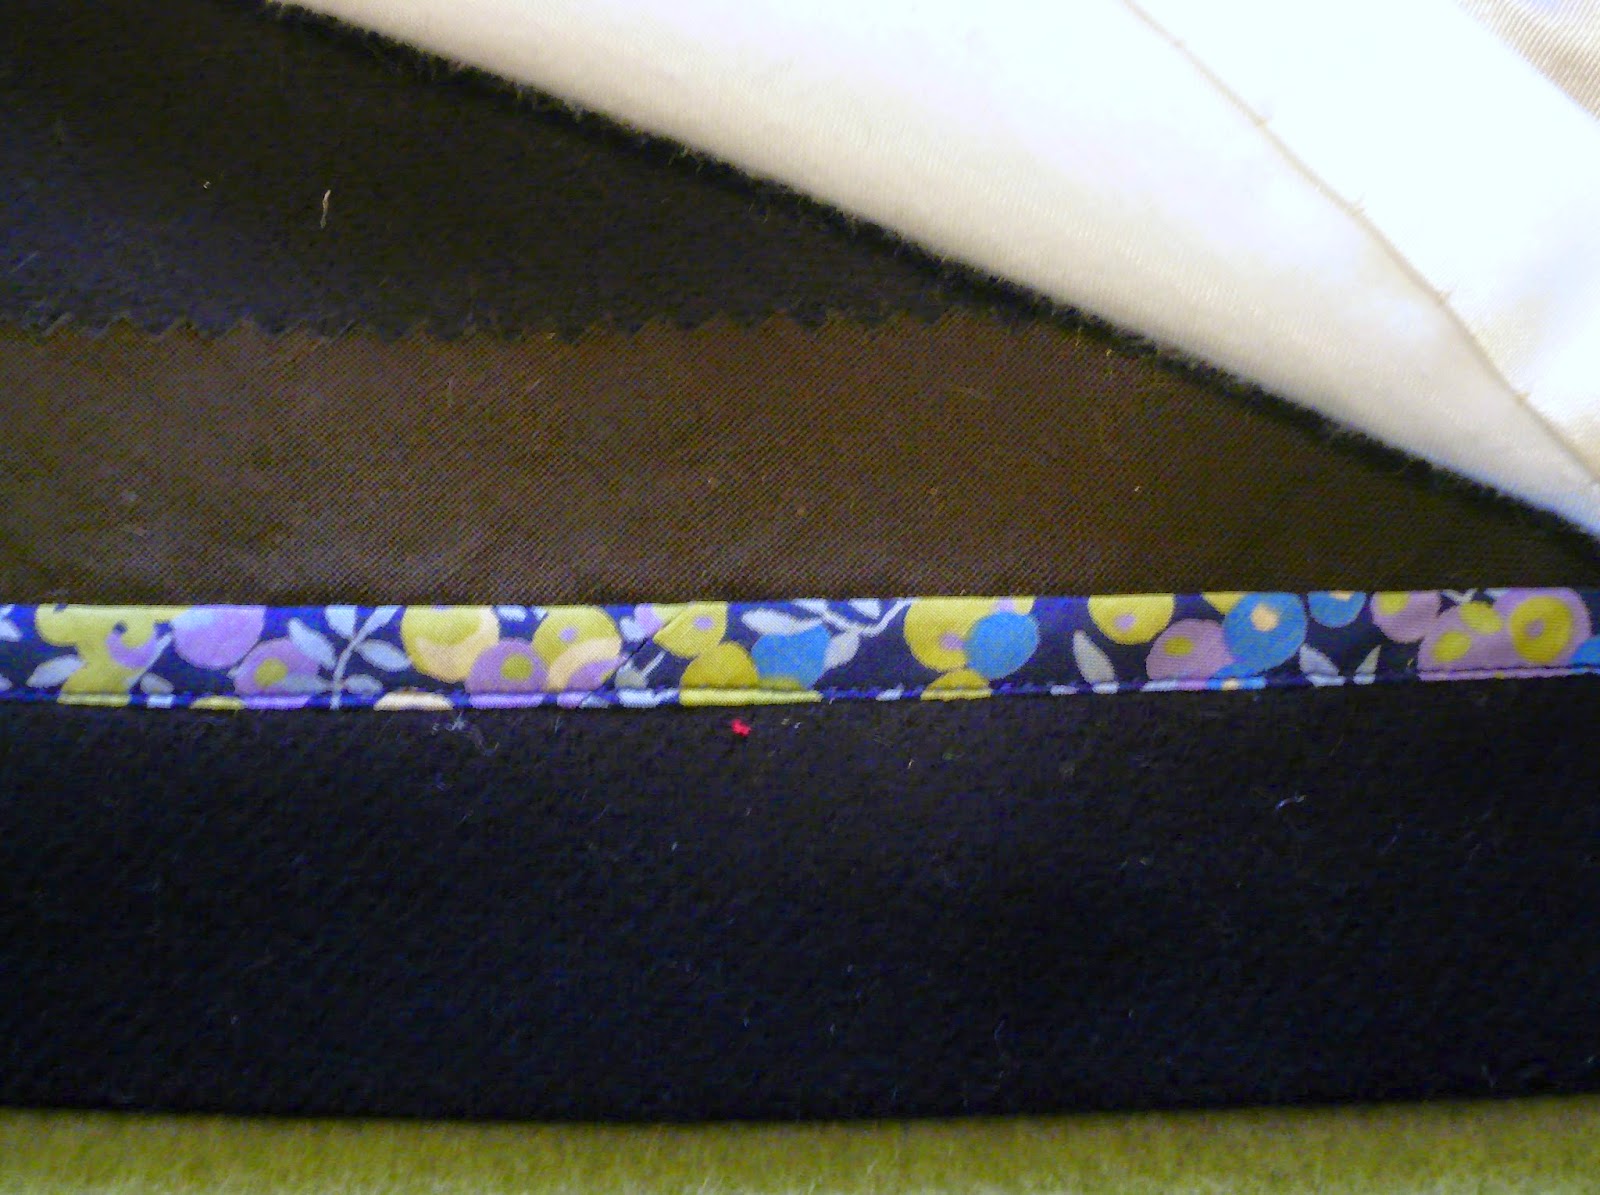
The piped collar features a dark navy overlay of cotton pique which coordinates with the covered buttons at the sides of the center front panel. The lower ten rows are surface smocked with rows of trellis stitch and the upper portion is back smocked to show off the beauty of the 'Wiltshire' print in it's altered, pleated state, Chunky bullion roses (three strands of floss) are centered between the sets of trellis stitch.
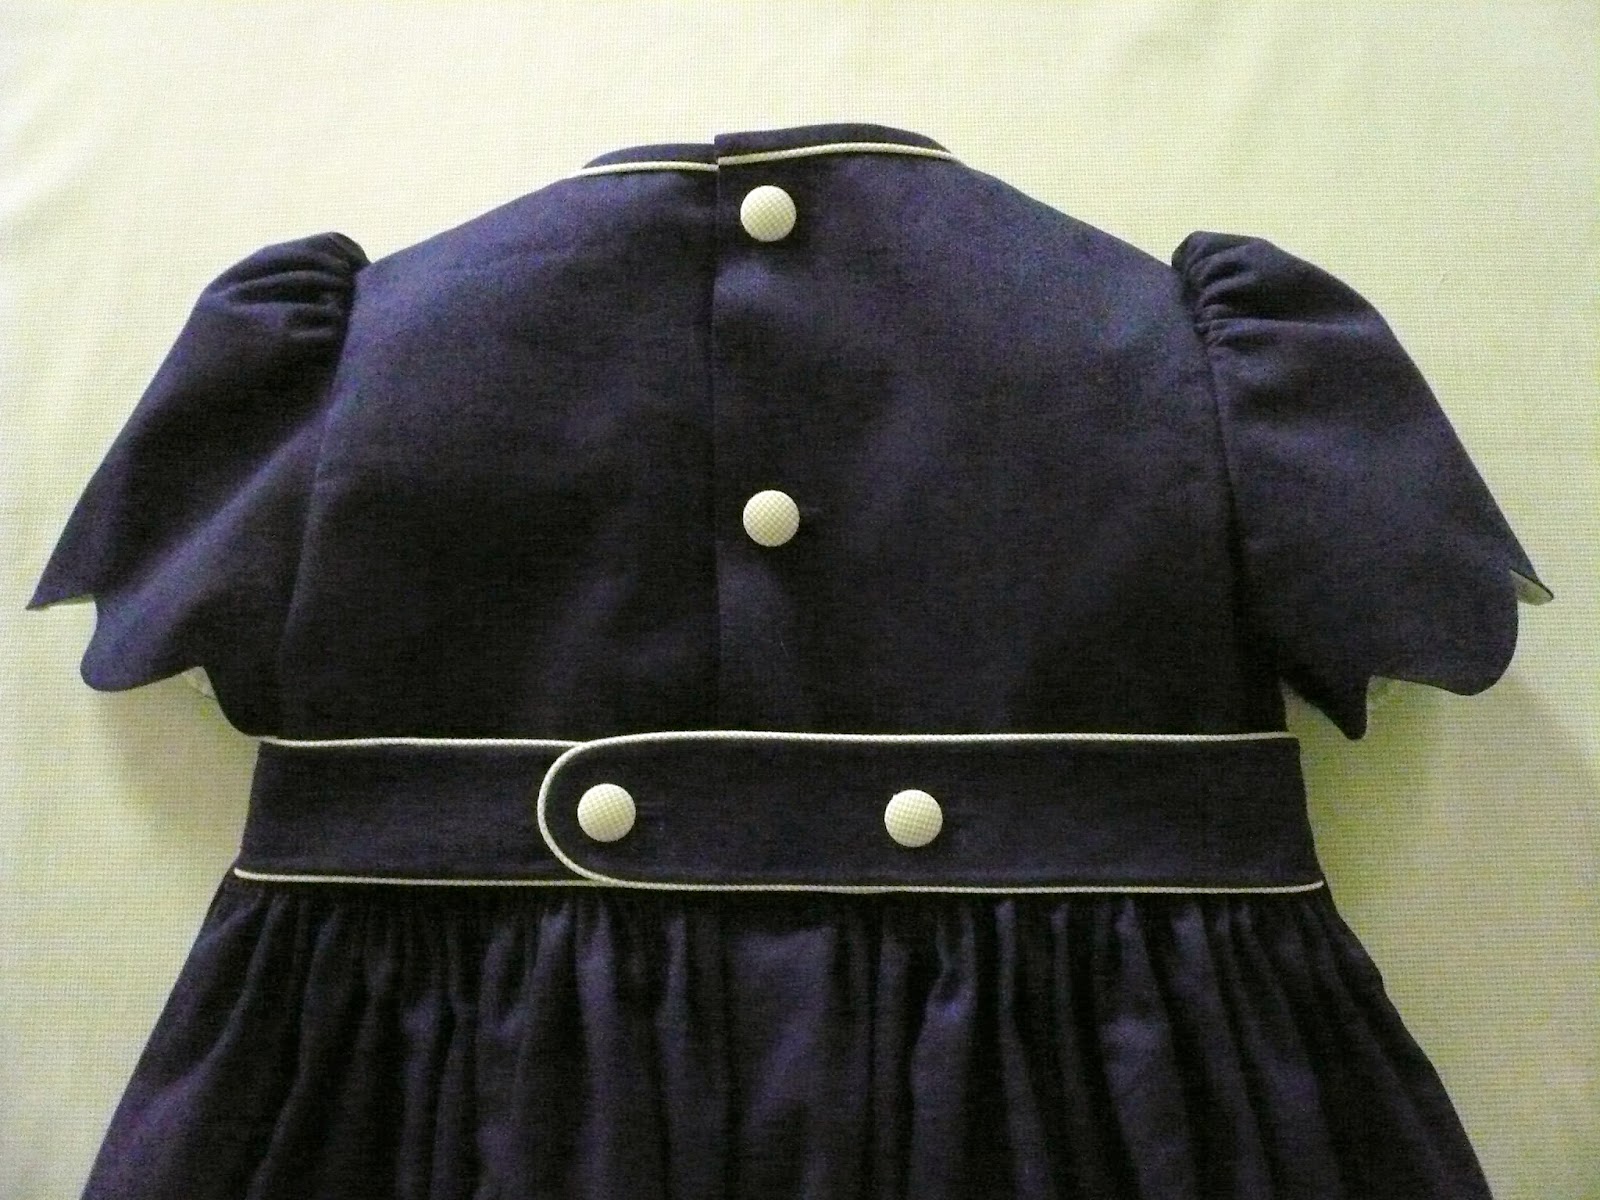
The back of the dress is finished off with a piped modified sash that ties into a flat self bow. I did not want the bulk of a traditional tied sash under the dress coat.
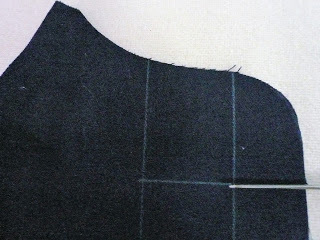
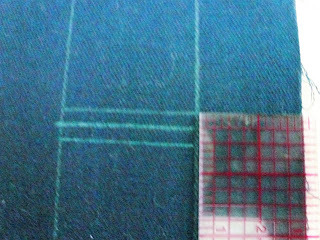
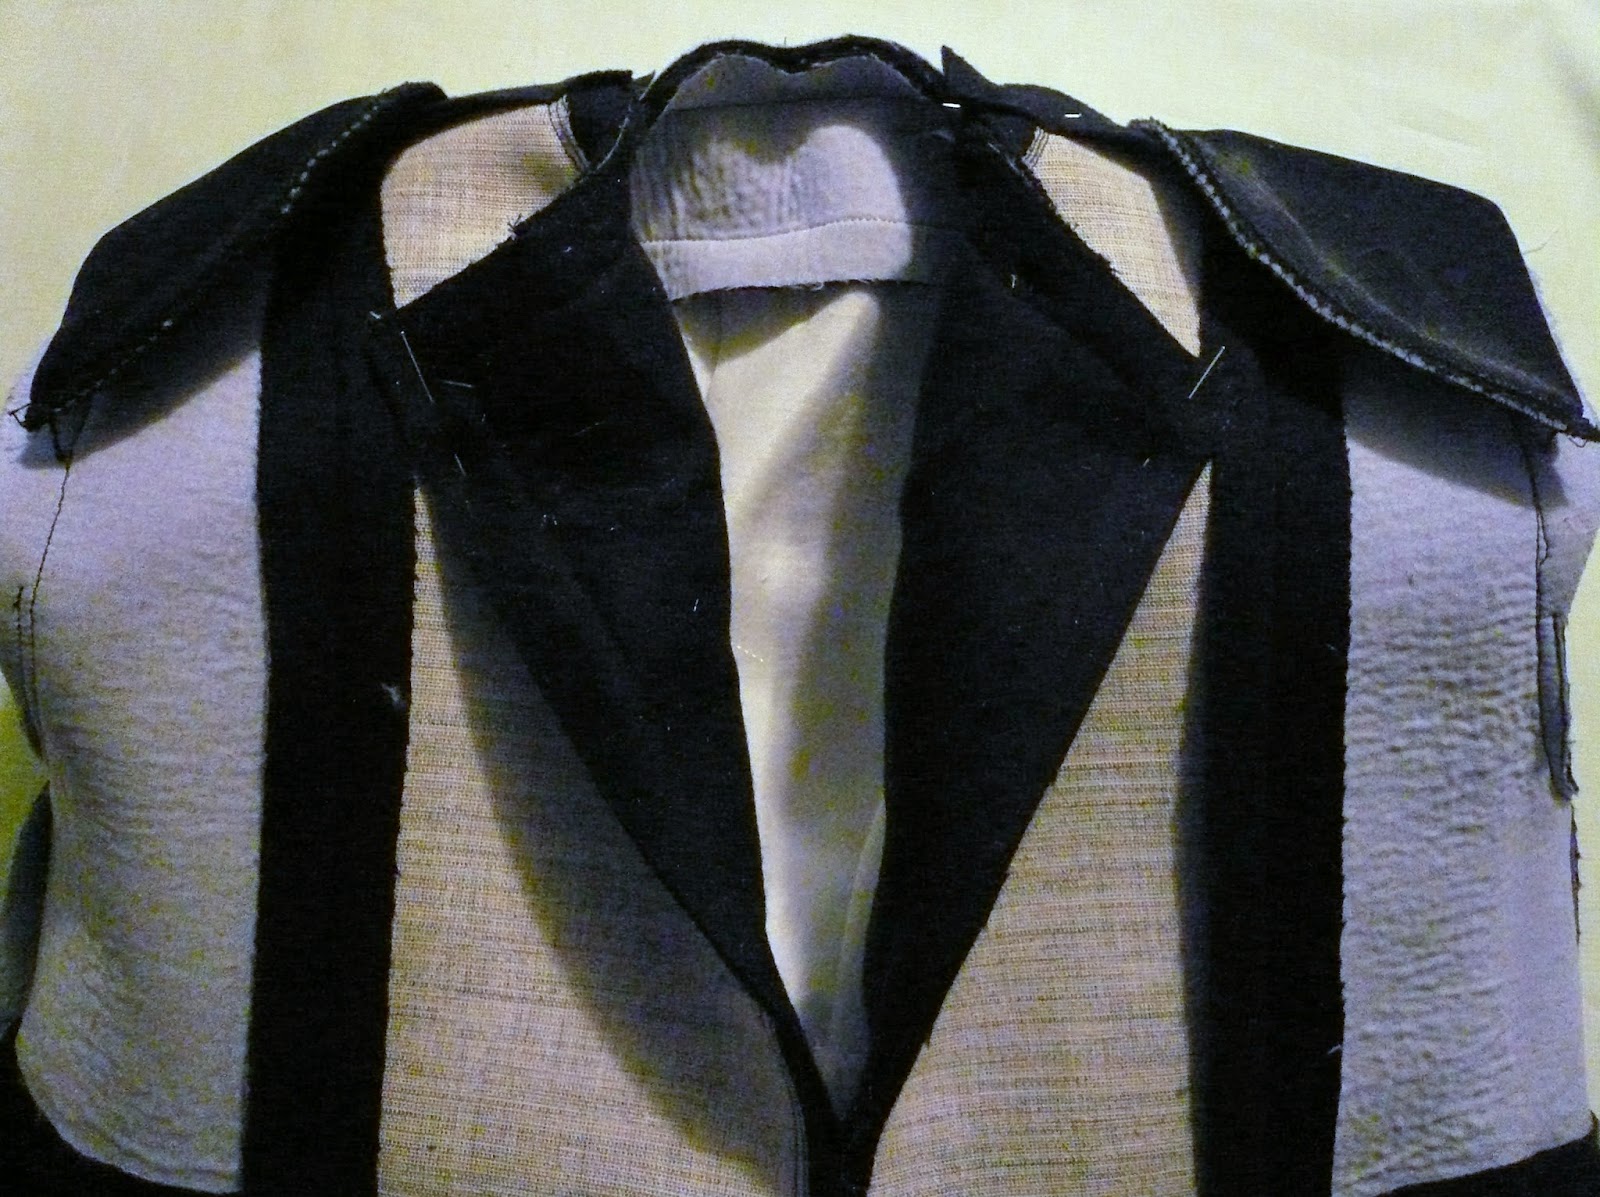
The coat has a traditional look but is modified with added fullness in the side panels to accommodate the fullness of the smocked dress worn underneath. French dark navy blue Italian wool flannel is a perfect weight for a little girl's coat. The upper body and sleeves and completely interlined with 'baby' interfacing but the lower front and back sections are not interlined to allow for gathering up the wool into the bodice front and back.

I tried using fusible hair canvas which was something new (to me!) for the full front panels and the collar. I was very pleased with the results and would definitely recommend it for children's tailored garments as it does not need any pad stitching to hold it in place. The next photo shows a peek inside the half finished coat with the hair canvas in place on the front panels, the 'baby interfacing used as an interlining for the remaining upper portion of the coat and the shoulder pads in place.

The front of the coat closes with machine buttonholes and self covered embroidered buttons to coordinate with the embroidery on the collar of the coat and the print of the dress.

A generous box pleat at the center back allows for extra fullness in the lower portion of the coat. A decorative shaped half belt embellished with a bullion rose and a bit of feather stitch accents the back waistline.
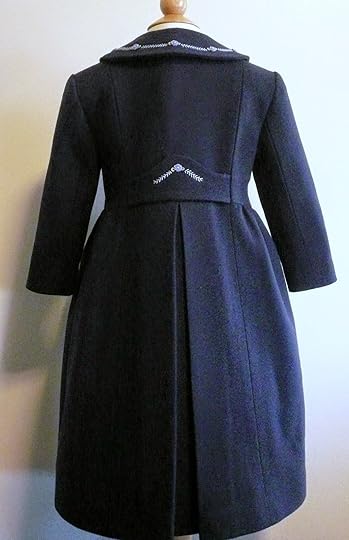
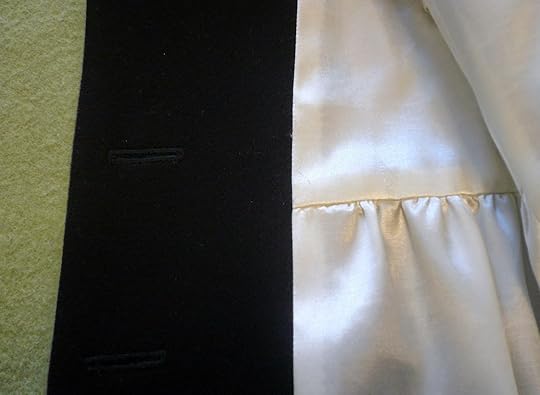
The coat is fully lined with flannel back satin for additional warmth without adding too much bulk. The lower hemline is padded out with strips of bias cut fusible woven interfacing and the raw edge bound with scraps left over from the coordinating dress. It is all covered up with the lining but I still know its in there!

I am going to have my students choose from three colorways in the Wiltshire print which all coordinate beautifully with the dark French navy coat.
The project will be sized 4, 6, and 8. The sample dress and coat shown are a size 4. I am going to try making the coat up in cotton pique which could be a good weight for all my southern friends who would have no use whatsoever for a wool coat. You can click on any of the photos for a (frighteningly) enhanced close up view.
 The dress is constructed form Liberty of London tana lawn 'Wiltshire' which is one of their classic prints that stays available for several years rather than just one season. The smocked sections on each side of the box pleated center front panel run right up into the shoulder seam and are backed with 'baby' interfacing to plump up the pleats and give a more structured appearance. It does require a 32 row pleater to prepare the side panels for hand smocking.
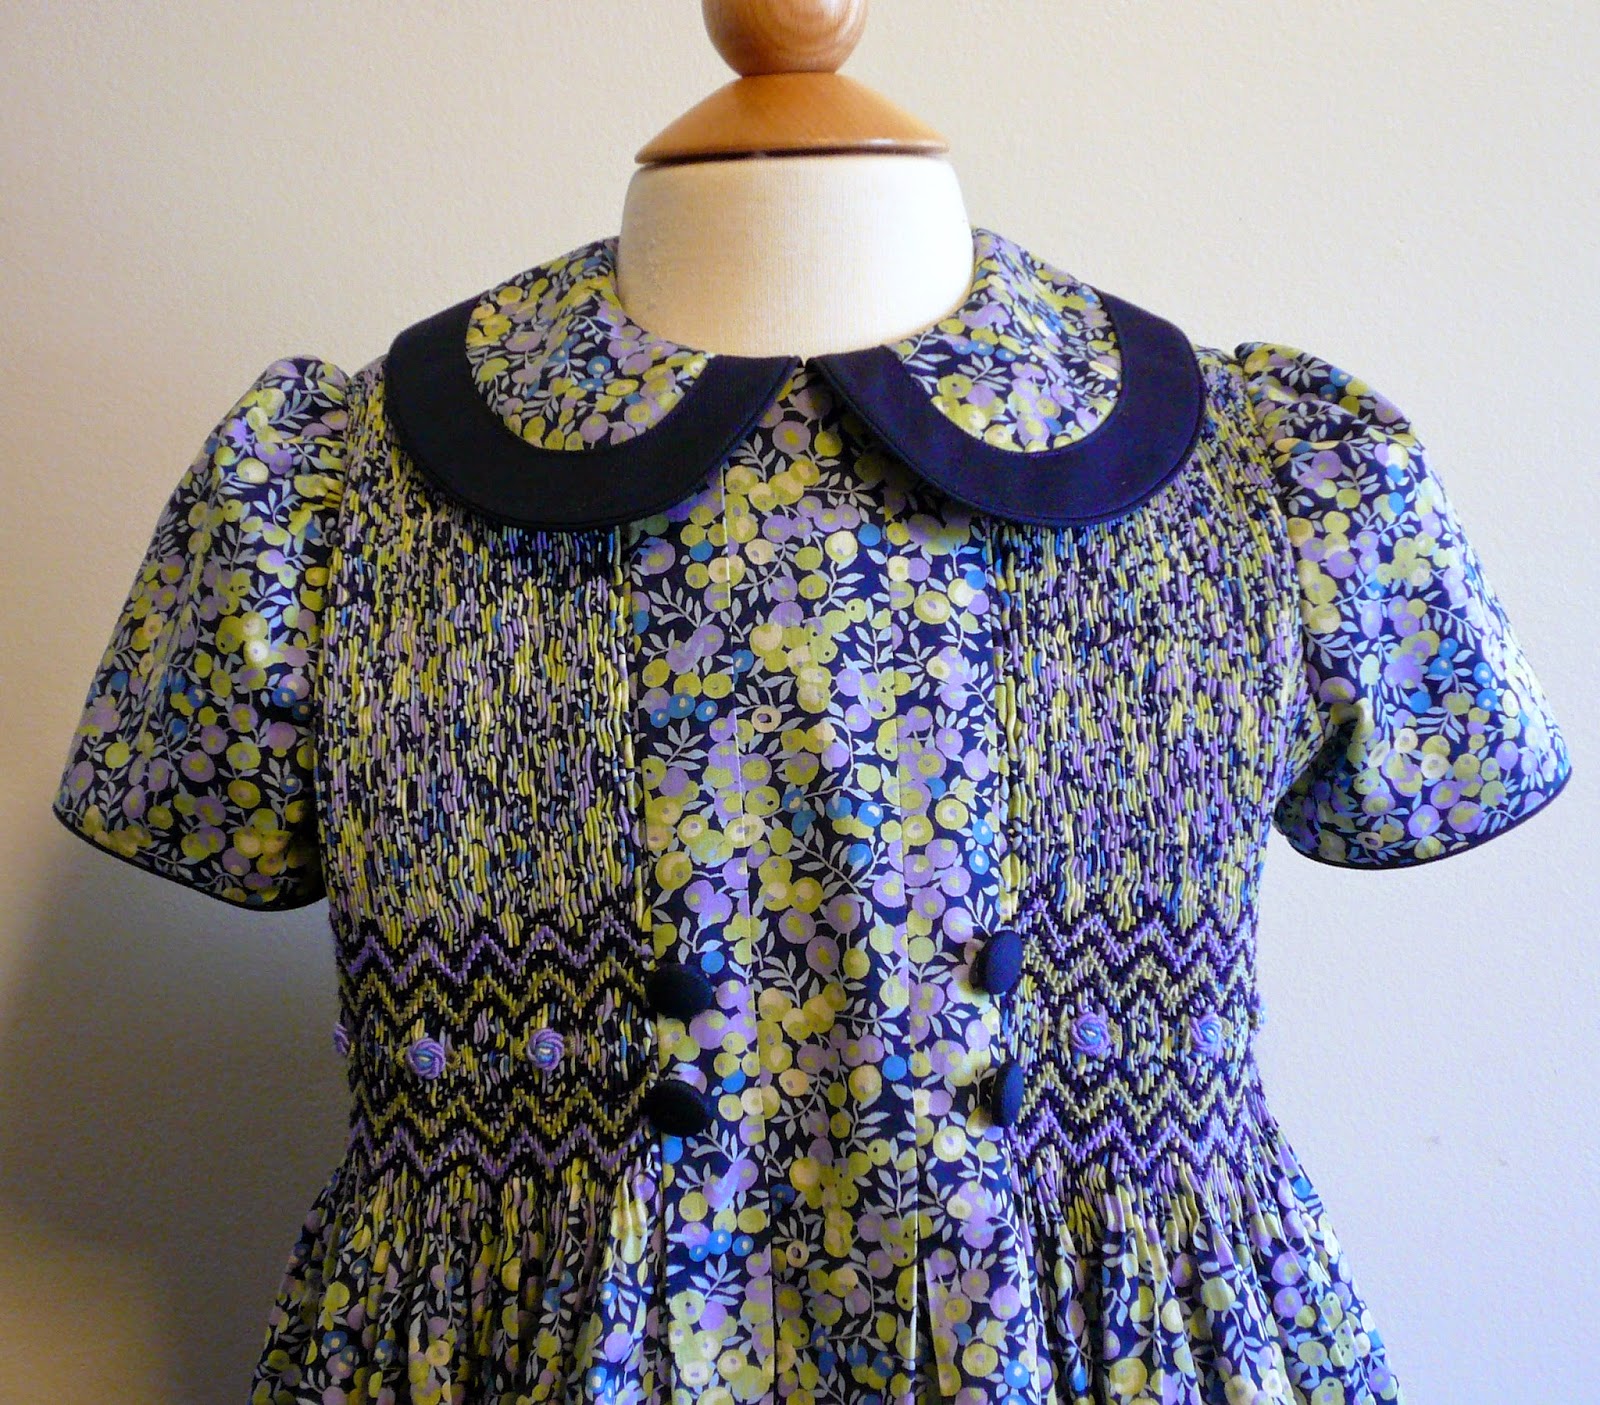
The piped collar features a dark navy overlay of cotton pique which coordinates with the covered buttons at the sides of the center front panel. The lower ten rows are surface smocked with rows of trellis stitch and the upper portion is back smocked to show off the beauty of the 'Wiltshire' print in it's altered, pleated state, Chunky bullion roses (three strands of floss) are centered between the sets of trellis stitch.
The back of the dress is finished off with a piped modified sash that ties into a flat self bow. I did not want the bulk of a traditional tied sash under the dress coat.


The coat has a traditional look but is modified with added fullness in the side panels to accommodate the fullness of the smocked dress worn underneath. French dark navy blue Italian wool flannel is a perfect weight for a little girl's coat. The upper body and sleeves and completely interlined with 'baby' interfacing but the lower front and back sections are not interlined to allow for gathering up the wool into the bodice front and back.
I tried using fusible hair canvas which was something new (to me!) for the full front panels and the collar. I was very pleased with the results and would definitely recommend it for children's tailored garments as it does not need any pad stitching to hold it in place. The next photo shows a peek inside the half finished coat with the hair canvas in place on the front panels, the 'baby interfacing used as an interlining for the remaining upper portion of the coat and the shoulder pads in place.
The front of the coat closes with machine buttonholes and self covered embroidered buttons to coordinate with the embroidery on the collar of the coat and the print of the dress.
.JPG)
A generous box pleat at the center back allows for extra fullness in the lower portion of the coat. A decorative shaped half belt embellished with a bullion rose and a bit of feather stitch accents the back waistline.


The coat is fully lined with flannel back satin for additional warmth without adding too much bulk. The lower hemline is padded out with strips of bias cut fusible woven interfacing and the raw edge bound with scraps left over from the coordinating dress. It is all covered up with the lining but I still know its in there!

I am going to have my students choose from three colorways in the Wiltshire print which all coordinate beautifully with the dark French navy coat.
.JPG)
.JPG)
.JPG)
The project will be sized 4, 6, and 8. The sample dress and coat shown are a size 4. I am going to try making the coat up in cotton pique which could be a good weight for all my southern friends who would have no use whatsoever for a wool coat. You can click on any of the photos for a (frighteningly) enhanced close up view.

July 1, 2014
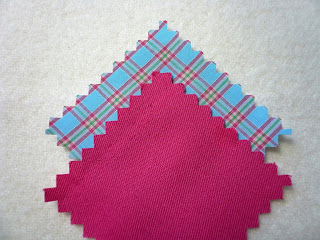
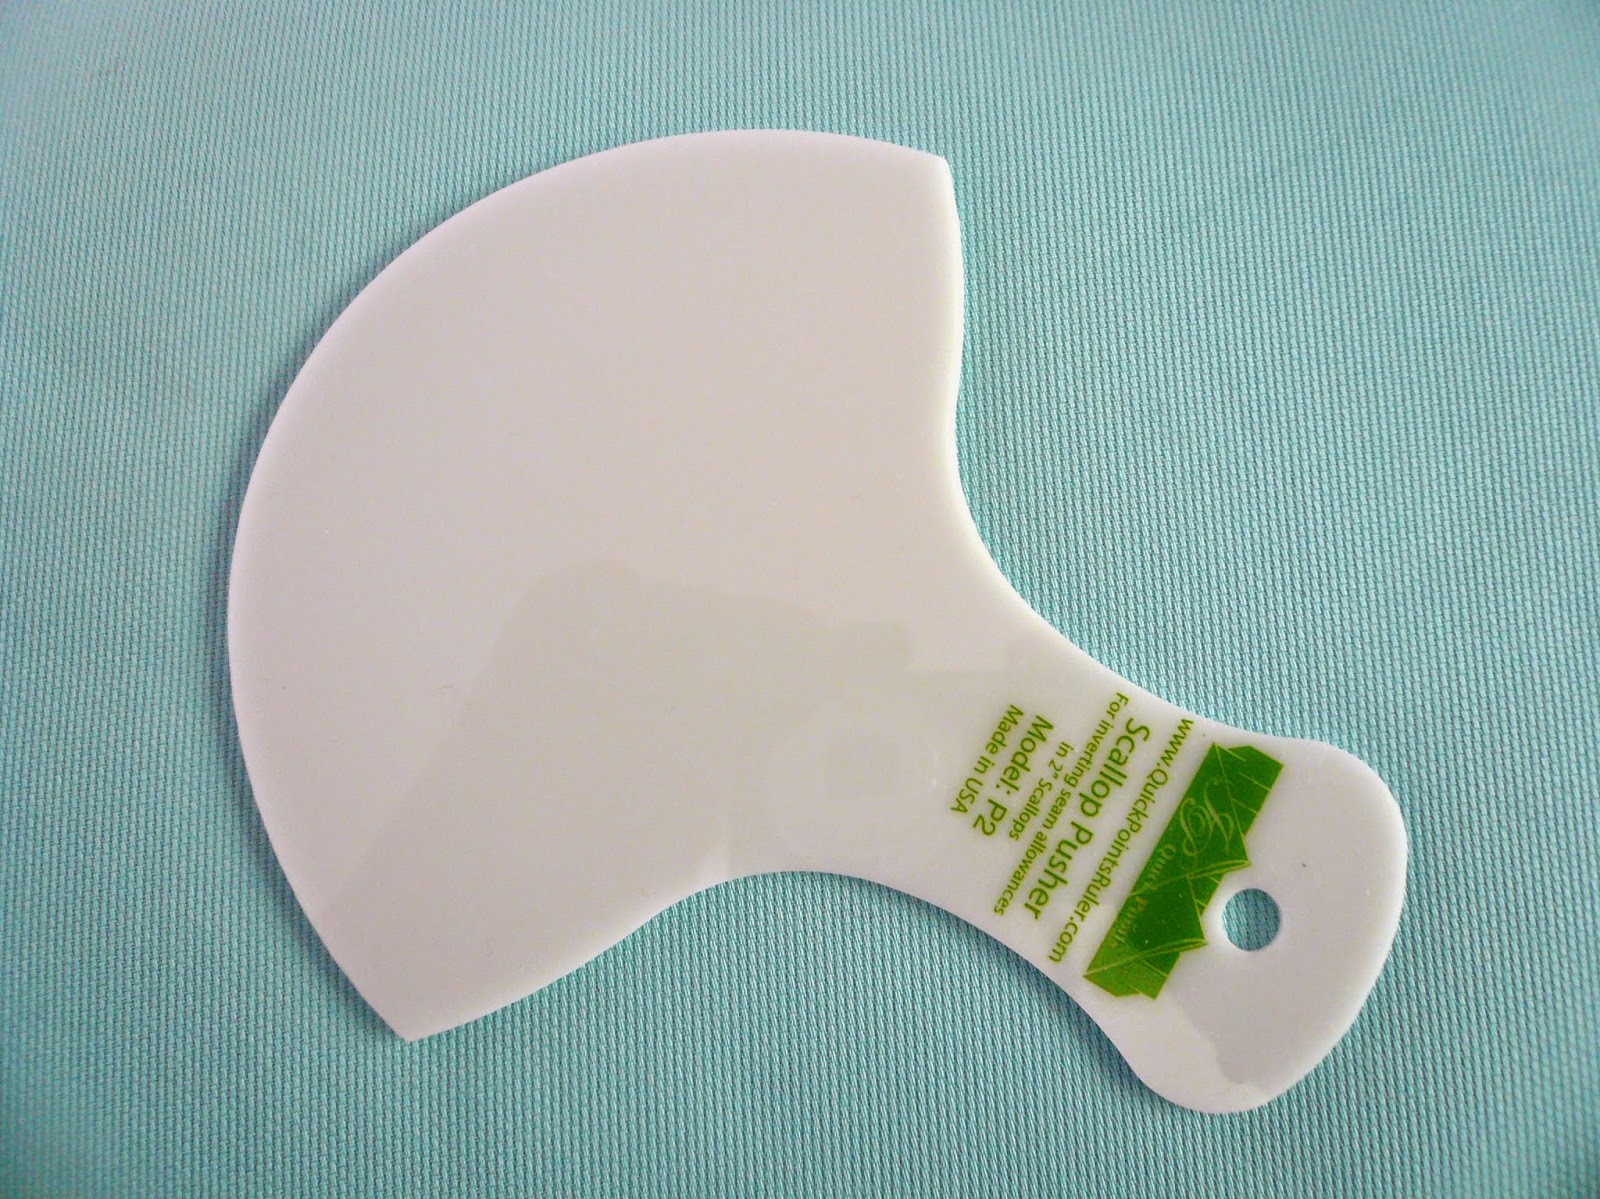
Gotta Love A New Gadget and a Double Piping Tutorial
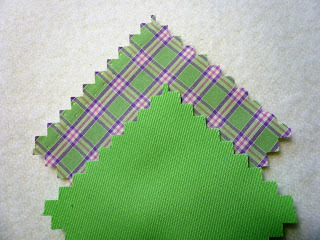
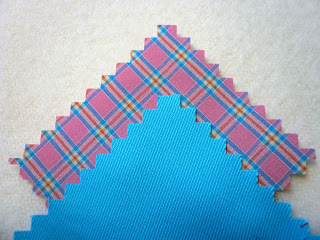
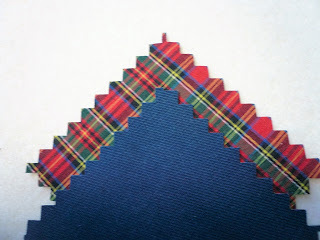
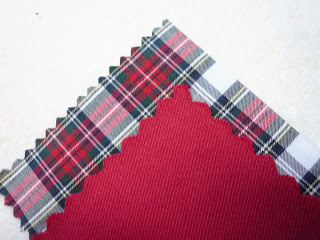
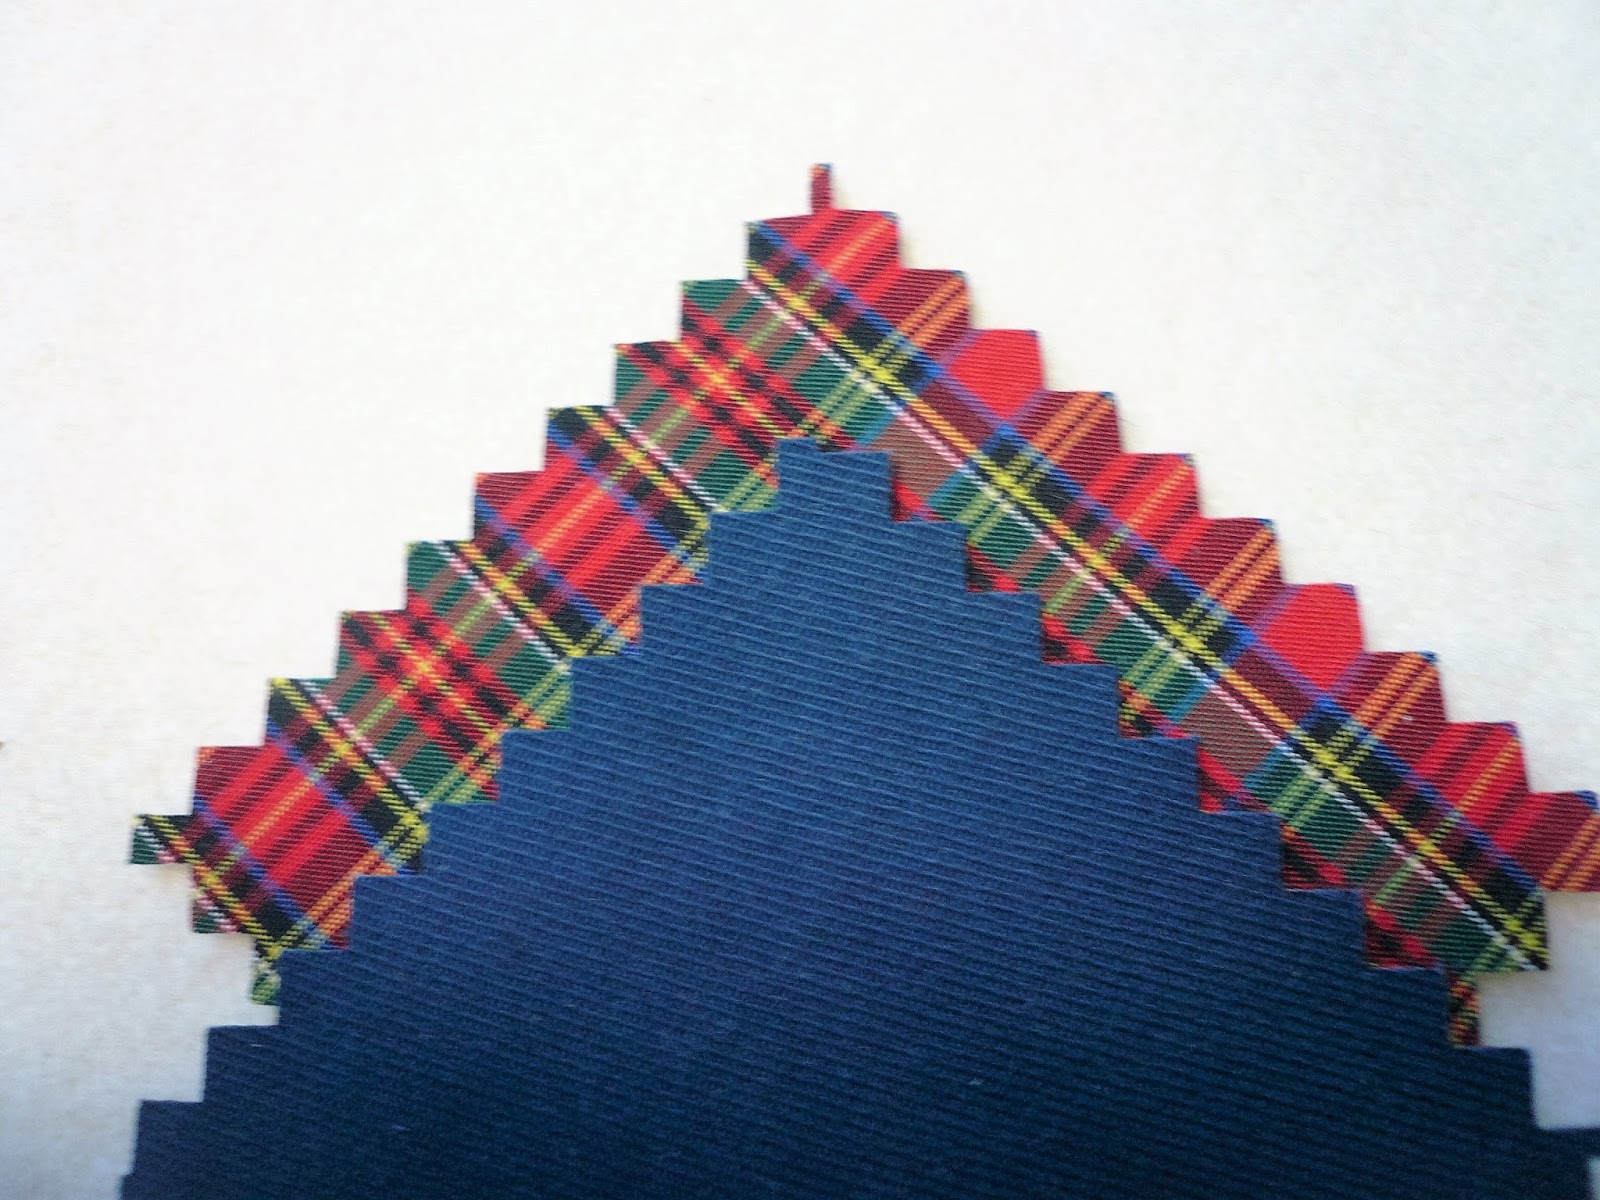
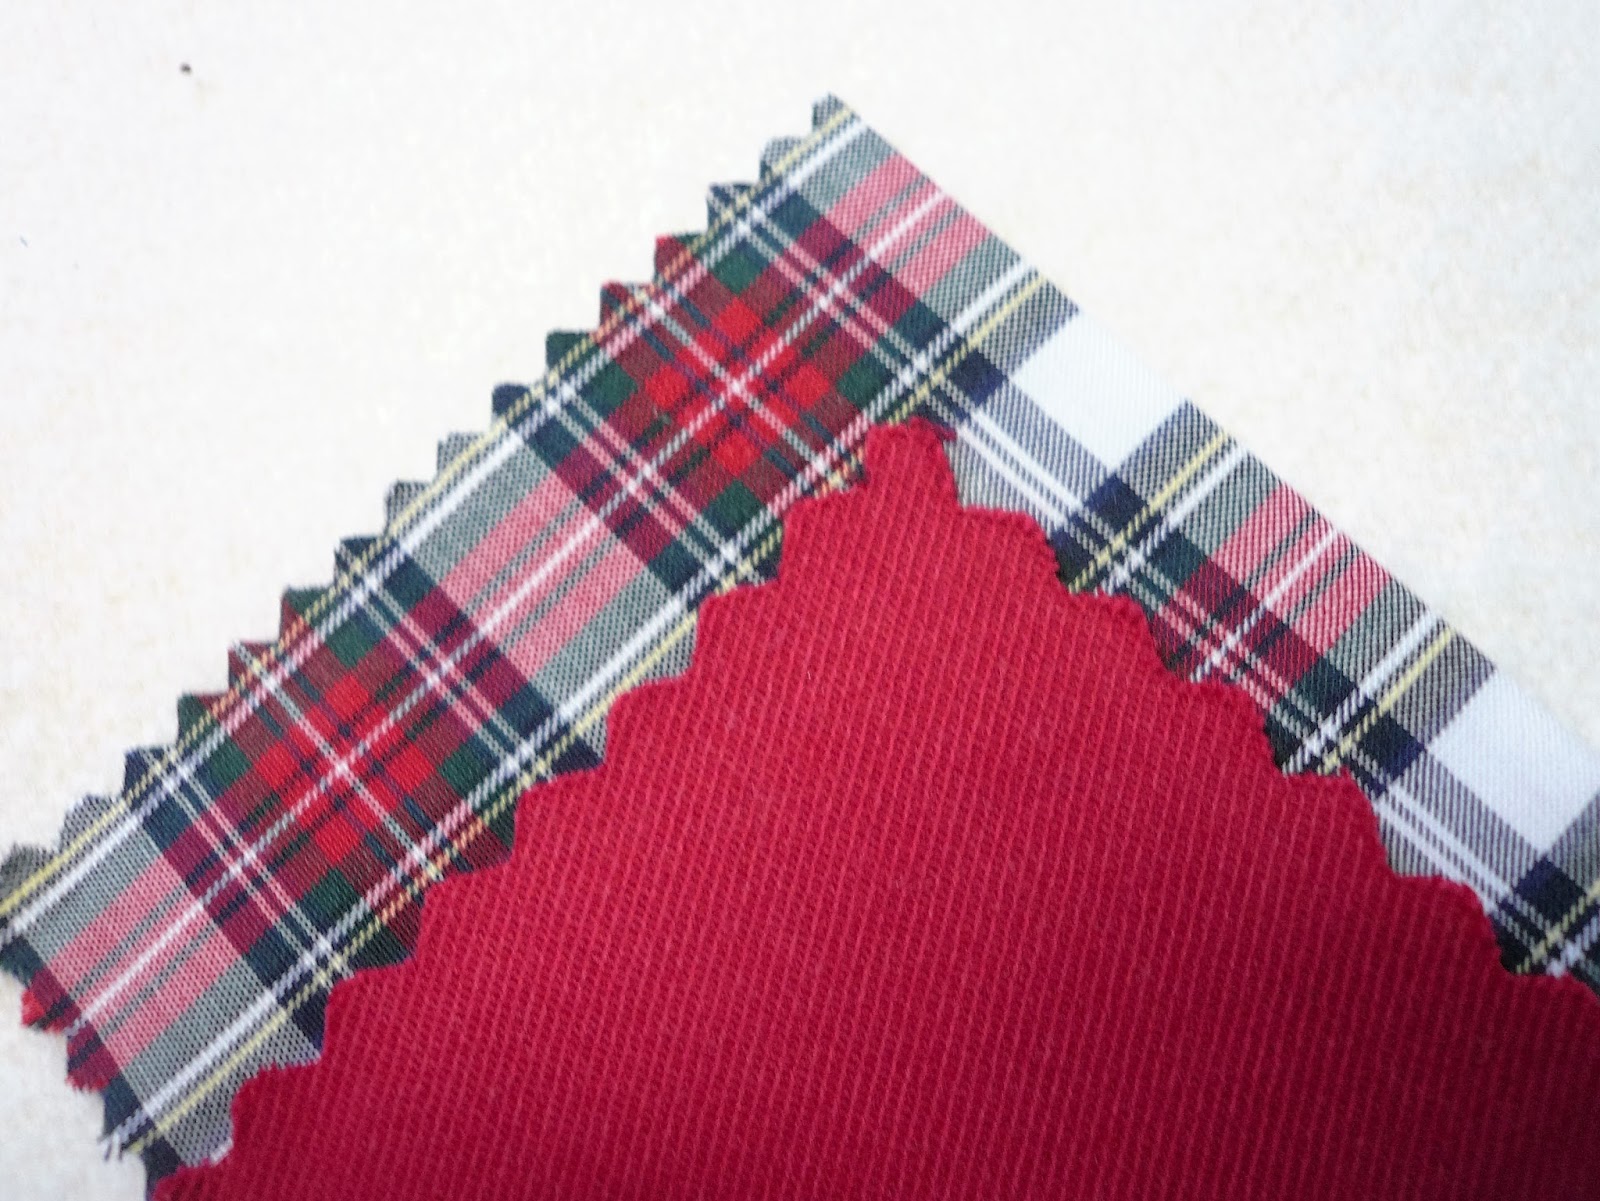
We sewing ladies are great collectors and everyone loves a new gadget. These scallop rulers might not be new on the market but they are new to me. I wanted to try a project that would feature what this little gem will do. I am sure they were developed for the quilt market but I can think of lots of places I might use them in the embellishment of children's garments.

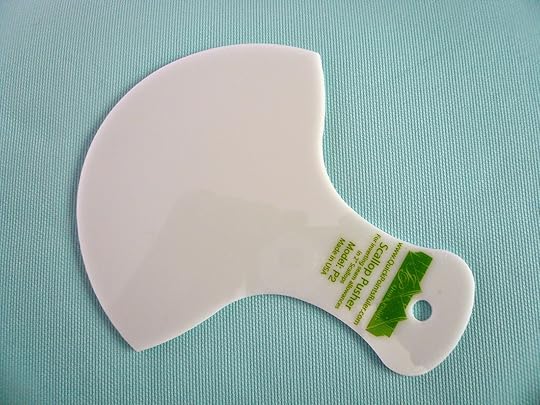
The ruler and the 'pusher' are sold separately and come in 1/2", 3/4", 1", 1 1/2", and 2" sizes. I used the 2" size for this project.
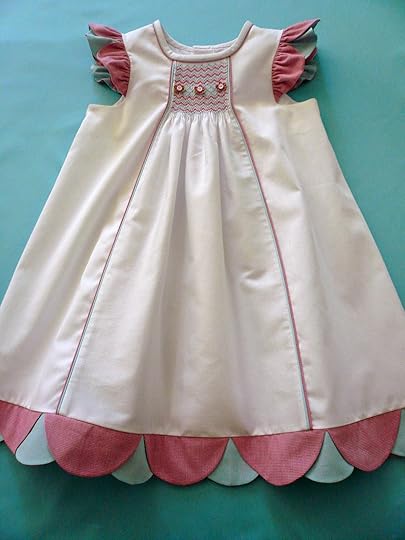
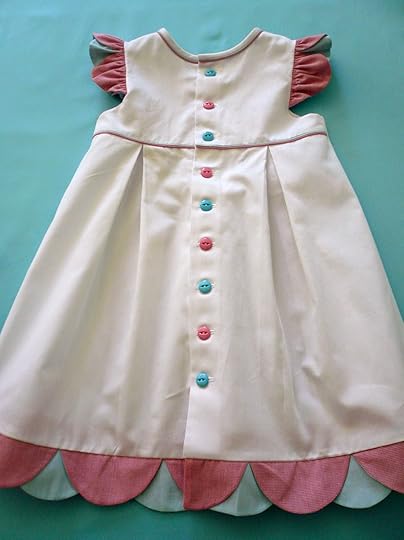
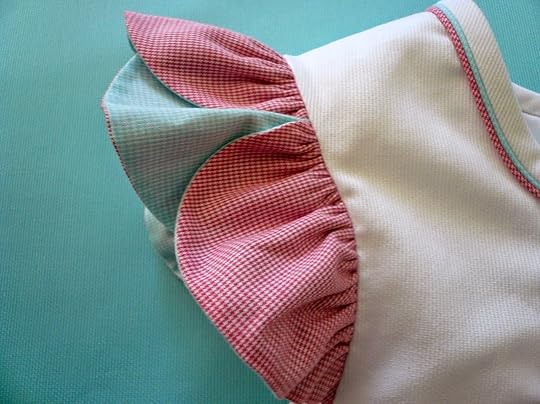
The ruler allows you to quite simply mark and stitch two straight grain strips of fabric together (I used raspberry and aqua 1/32" micro check) and end up with a double scallop border. I gathered it up for the angel sleeve and applied it flat around the hemline. It gave a very nice reversible affect on the angle sleeve.
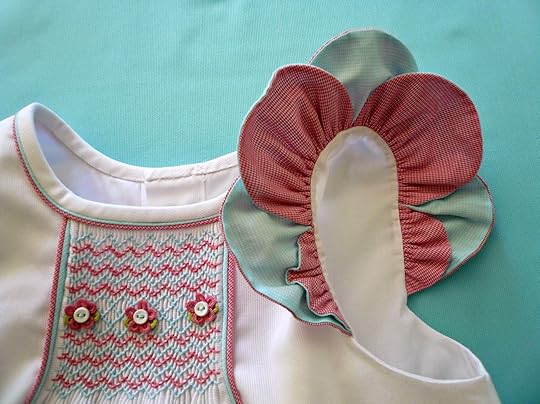

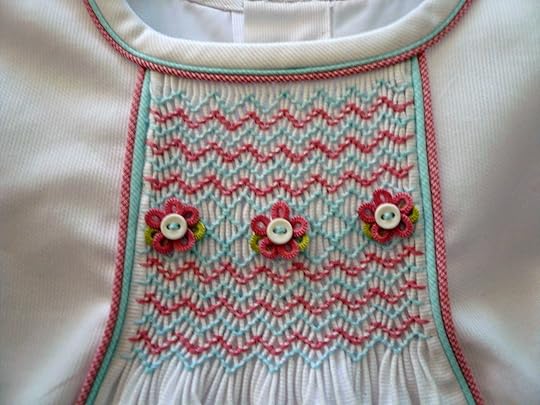
The project would be great for someone just learning to smock because of the small amount of basic trellis stitch smocking on the center panel. I don't love the way fine pine pique looks pleated on the cross grain (parallel to the selvage) so I took the liberty of turning my center panel and pleating it along the lengthwise grain so the rib in the pique runs horizontal rather than vertical. It's O.K to beak the 'rules' sometimes.
The other interesting design feature on this project is the double piping. There are several possible ways to make double piping and on this project I used the following method.
I sew with a Pfaff and prefer to the use center groove open toe applique foot for making piping. It has the perfect size little groove right down the center to hold the cord and allows for multiple needle position adjustment. It is also a very short foot which helps when going around curves. If you want to end up with double piping that has a 3/8" seam allowance start with a 1" wide bias strip for the outer color. Wrap the bias around the cord and stitch with a basting stitch one stitch width away from the cord.
For the inner color cut the bias strip 7/8" wide. Right sides together and raw edges even lay the inner color on top of the outer color stitched piping. Use the same foot and needle position to stitch through all layers right on top of the stitching line from the previous step.
Lay a second piece of cord right next to the stitching line and using the same foot and needle position wrap the inner color over the second cord and stitch one stitch width away from the cord.
You will end up with a 3/8" seam allowance. When the double piping is applied to the garment move the needle position in one click closer to the cord to ensure the original stitching lines from the construction of the double piping do not show.


The ruler and the 'pusher' are sold separately and come in 1/2", 3/4", 1", 1 1/2", and 2" sizes. I used the 2" size for this project.


The ruler allows you to quite simply mark and stitch two straight grain strips of fabric together (I used raspberry and aqua 1/32" micro check) and end up with a double scallop border. I gathered it up for the angel sleeve and applied it flat around the hemline. It gave a very nice reversible affect on the angle sleeve.


The project would be great for someone just learning to smock because of the small amount of basic trellis stitch smocking on the center panel. I don't love the way fine pine pique looks pleated on the cross grain (parallel to the selvage) so I took the liberty of turning my center panel and pleating it along the lengthwise grain so the rib in the pique runs horizontal rather than vertical. It's O.K to beak the 'rules' sometimes.
The other interesting design feature on this project is the double piping. There are several possible ways to make double piping and on this project I used the following method.

I sew with a Pfaff and prefer to the use center groove open toe applique foot for making piping. It has the perfect size little groove right down the center to hold the cord and allows for multiple needle position adjustment. It is also a very short foot which helps when going around curves. If you want to end up with double piping that has a 3/8" seam allowance start with a 1" wide bias strip for the outer color. Wrap the bias around the cord and stitch with a basting stitch one stitch width away from the cord.

For the inner color cut the bias strip 7/8" wide. Right sides together and raw edges even lay the inner color on top of the outer color stitched piping. Use the same foot and needle position to stitch through all layers right on top of the stitching line from the previous step.

Lay a second piece of cord right next to the stitching line and using the same foot and needle position wrap the inner color over the second cord and stitch one stitch width away from the cord.

You will end up with a 3/8" seam allowance. When the double piping is applied to the garment move the needle position in one click closer to the cord to ensure the original stitching lines from the construction of the double piping do not show.


May 31, 2014
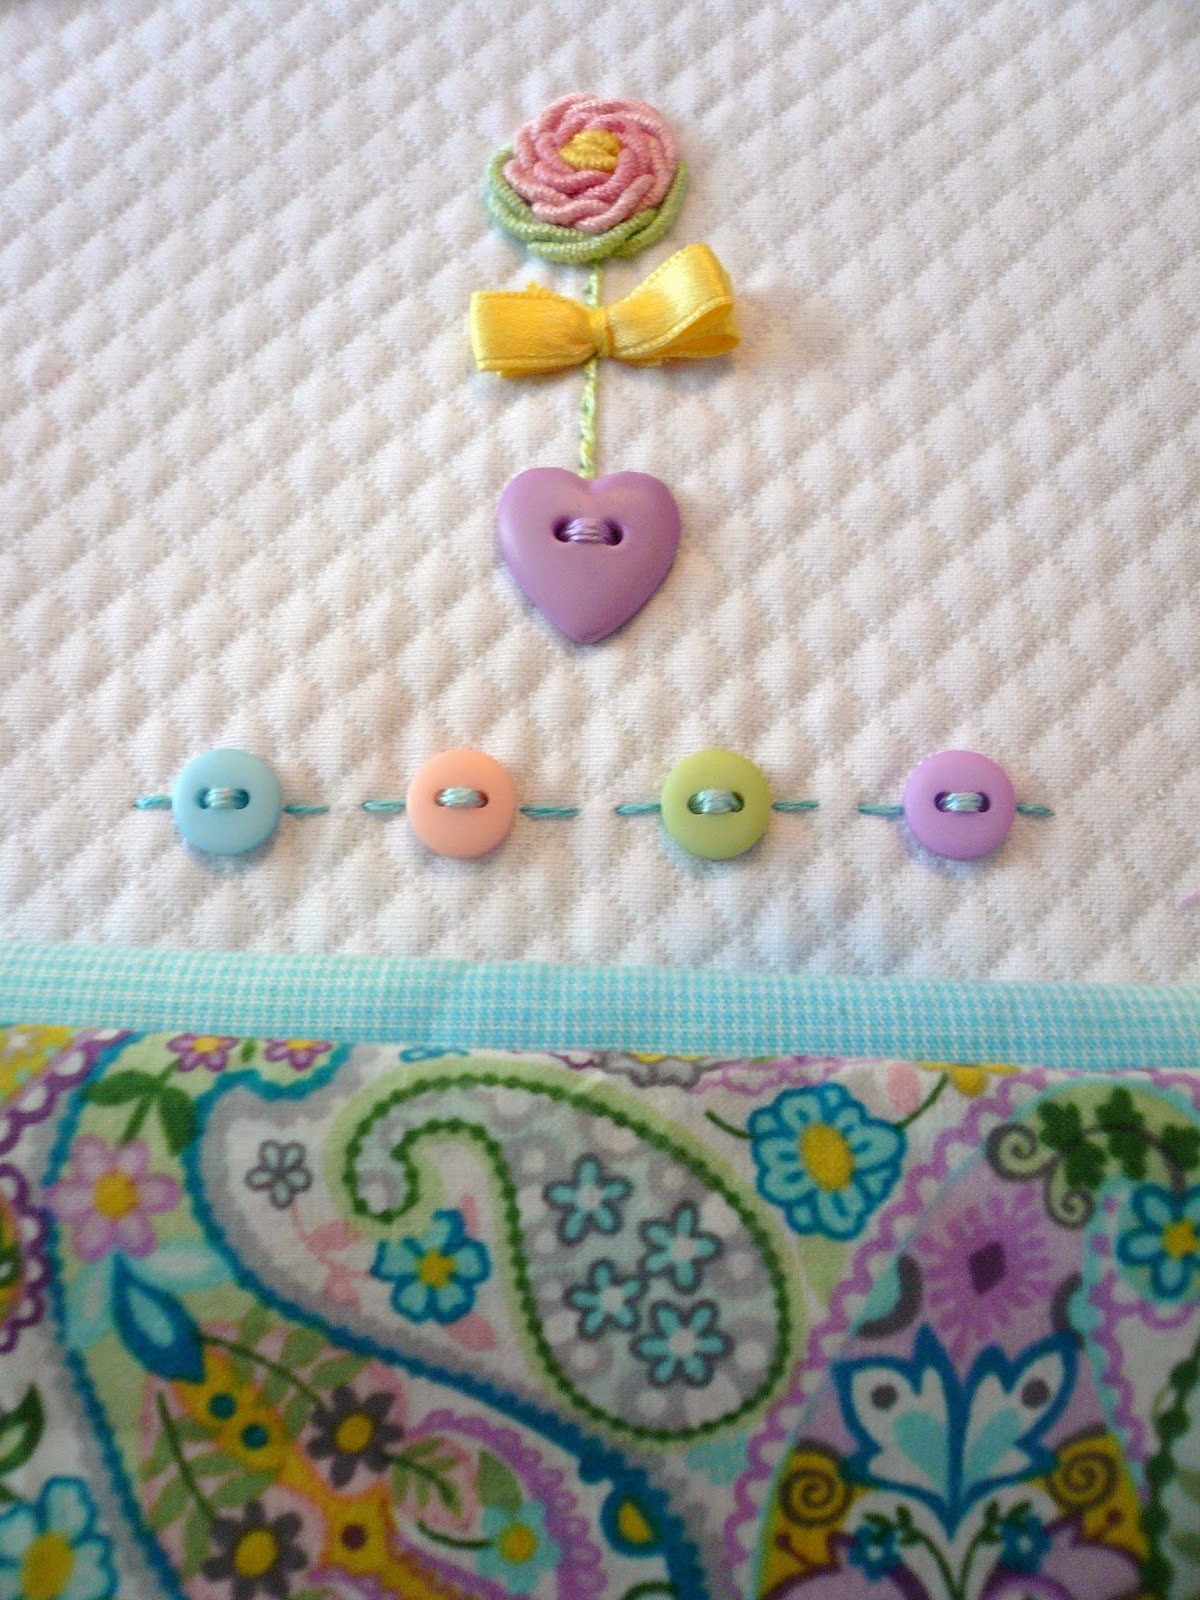
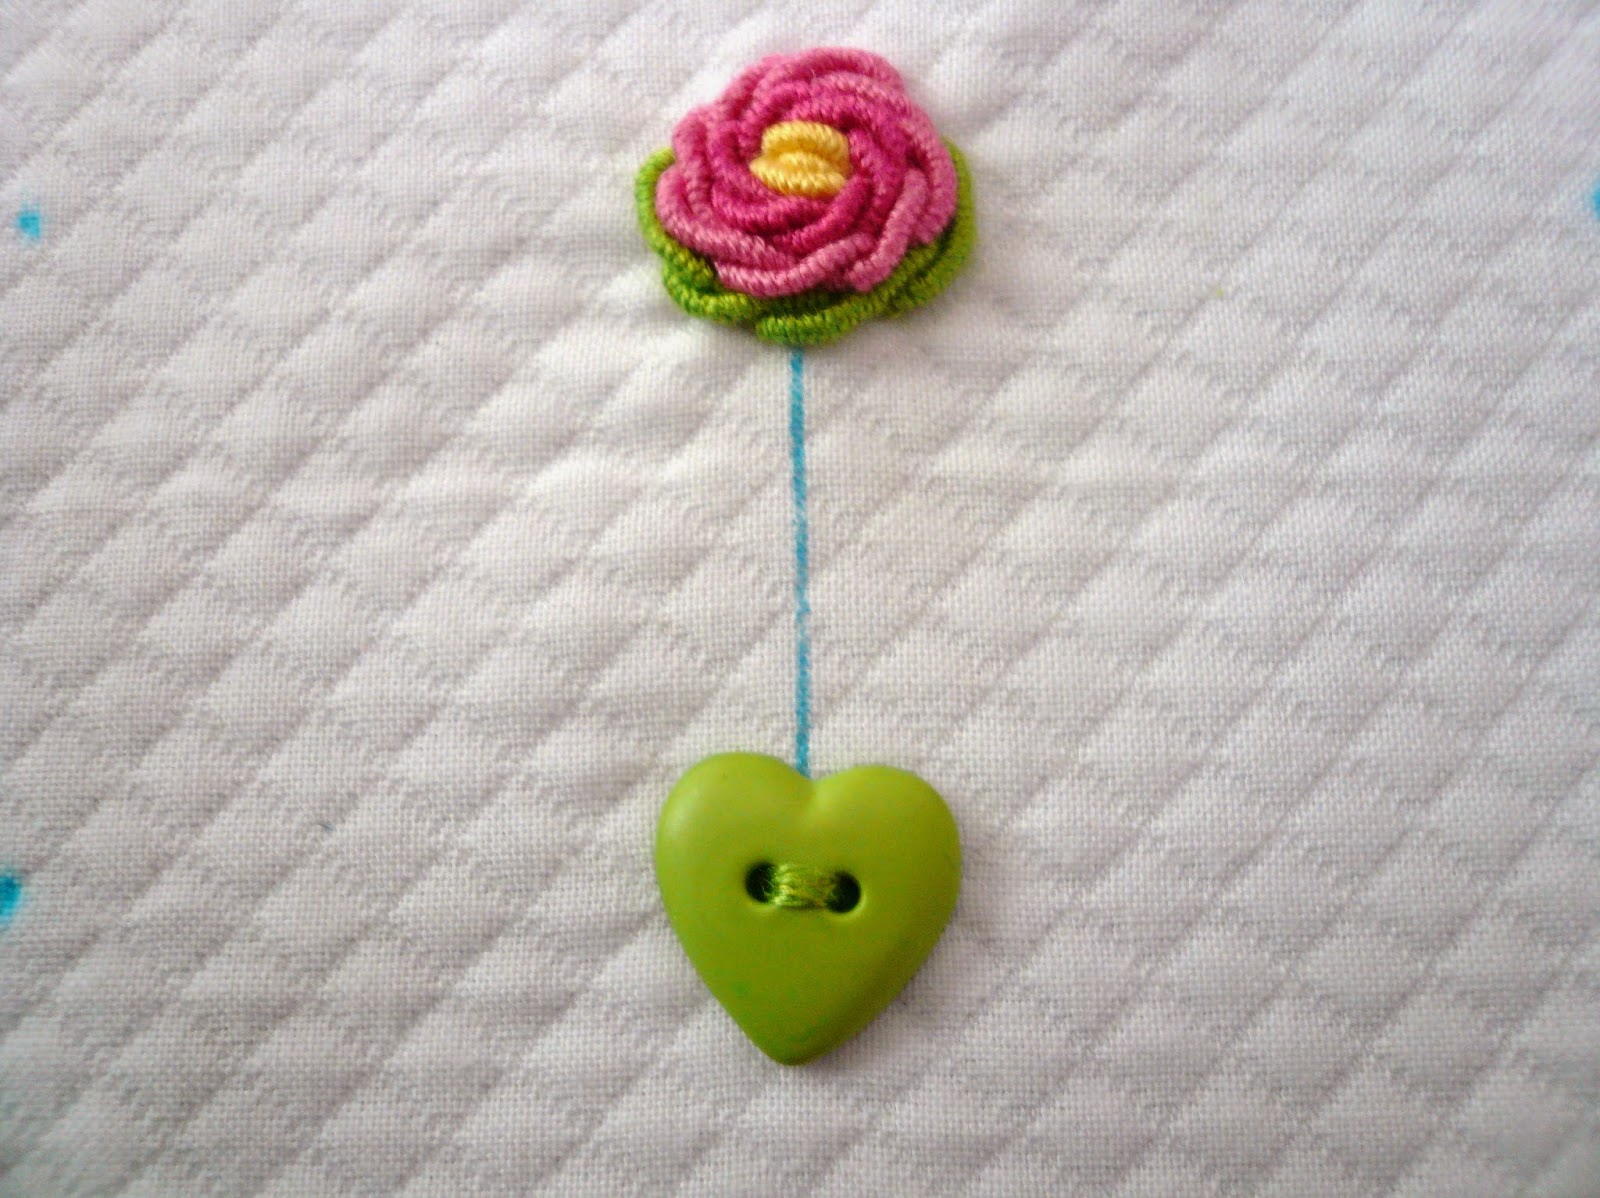
Remake of 'Sweetheart' and Bullion Rose Tutorial
I have had many requests for kits for the 'Sweetheart' project that was featured on the cover of the Australian edition of 'Cute As a Button' which is the EXACT same book as the American edition titled 'Sew Cute Couture". Believe me.... I know it's all a bit confusing. Unfortunately both titles are now out of print and can be a bit tricky to find at a reasonable price. If you happen to know of a good source that still has them please let me know.
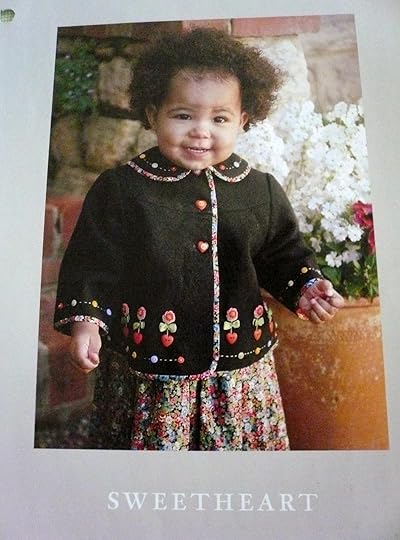
The jacket for the original 'Sweetheart ' project was made from 100% wool Doctors flannel which started out as ivory. I had tried to dye it lavender with a different project in mind with very limited success. Because I thought I had ruined the fabric I figured there was nothing to loose and I threw it in a pot of hot water with a bottle of Rit brand black dye. The wool took the black dye beautifully. You would never know it was once a very unattractive mottled lavender. The bishop dress and jacket trim fabric is probably one of my all time favorite Liberty prints. I am being polite when I say it is a 'vintage' Liberty. It was from back when the dinosaurs still roamed the earth and Liberty prints were only 36" wide. I would like to hear from some of you fabric hoarders (you know who you are!) who still have 36" wide Liberty prints waiting for just the right project. So..... clearly it was not possible to provide kits for the project as shown as both the jacket and dress fabric were a bit obscure and completely unavailable.
My remake of the project is Dakota pique for the jacket and a lovely paisley lawn for the dress, both trimmed with 1/32" pima micro check. You might recognize the paisley lawn from a previous post. I love this fabric. It is not an easy thing to find a good quality lightweight cotton lawn in a small scale print in several nice color ways. My rule of thumb when choosing a print to coordinate with an embroidered jacket is to look for at least three distinct colors in the print and a good green. This lawn more than fits that criteria.

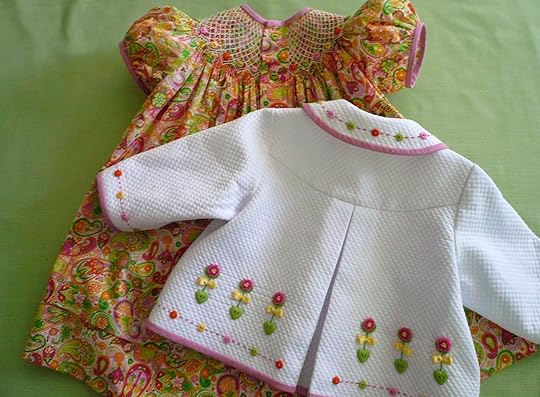
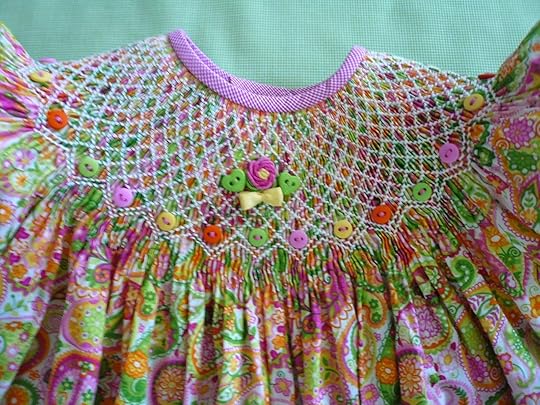
The kit will be available in three color ways on my Etsy site.. I would like to give a big shout out to my friends at www.hillcreekdesigns.com who make all the custom colors in hand dyed buttons for me.
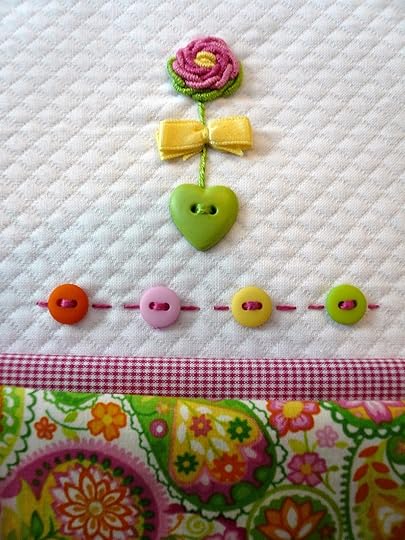
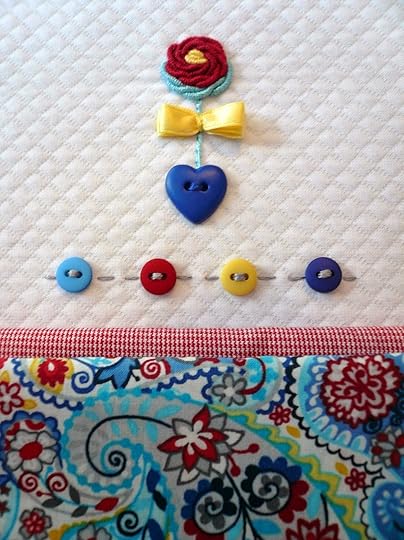

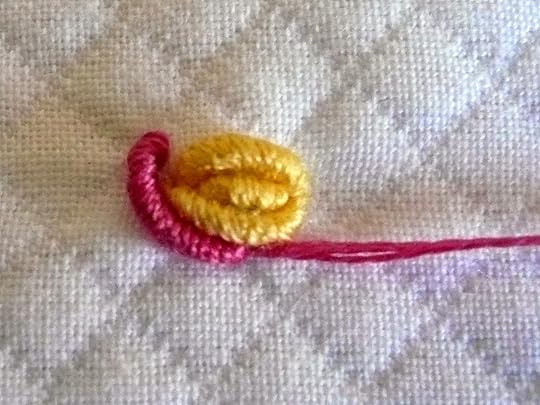
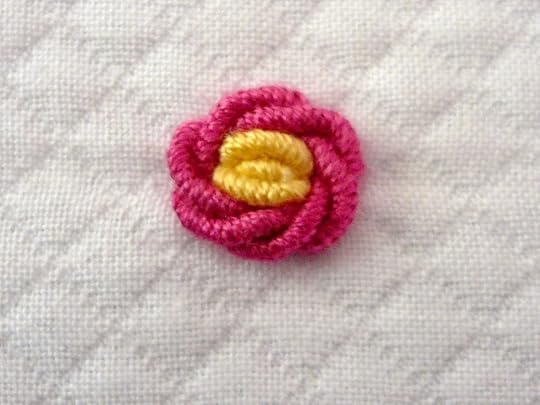
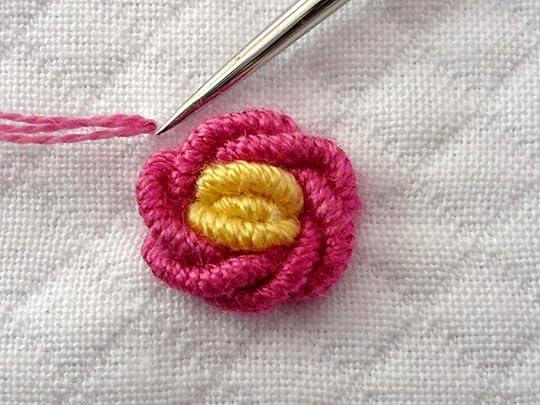
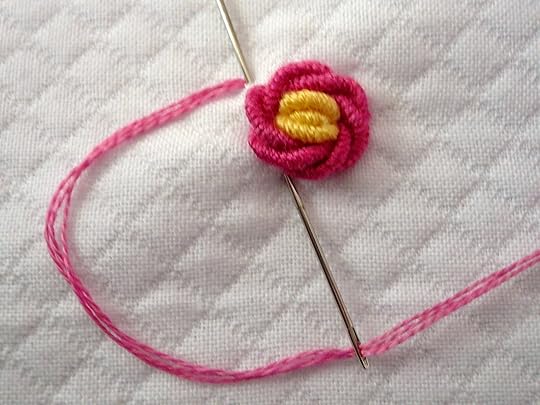
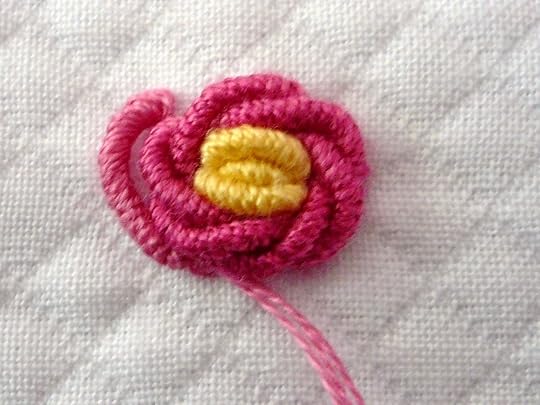
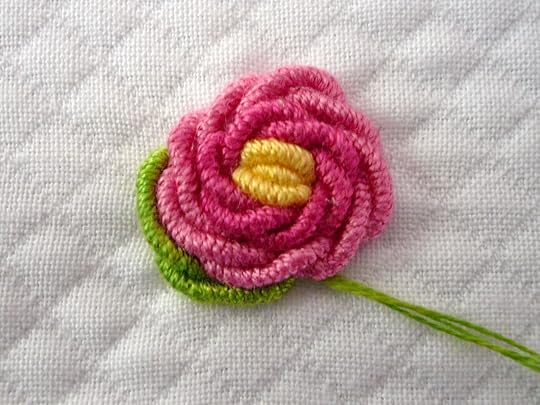
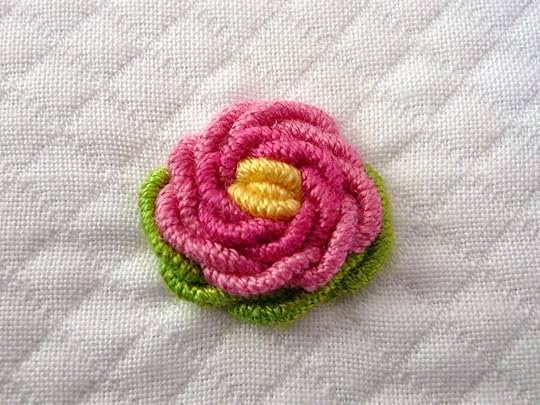
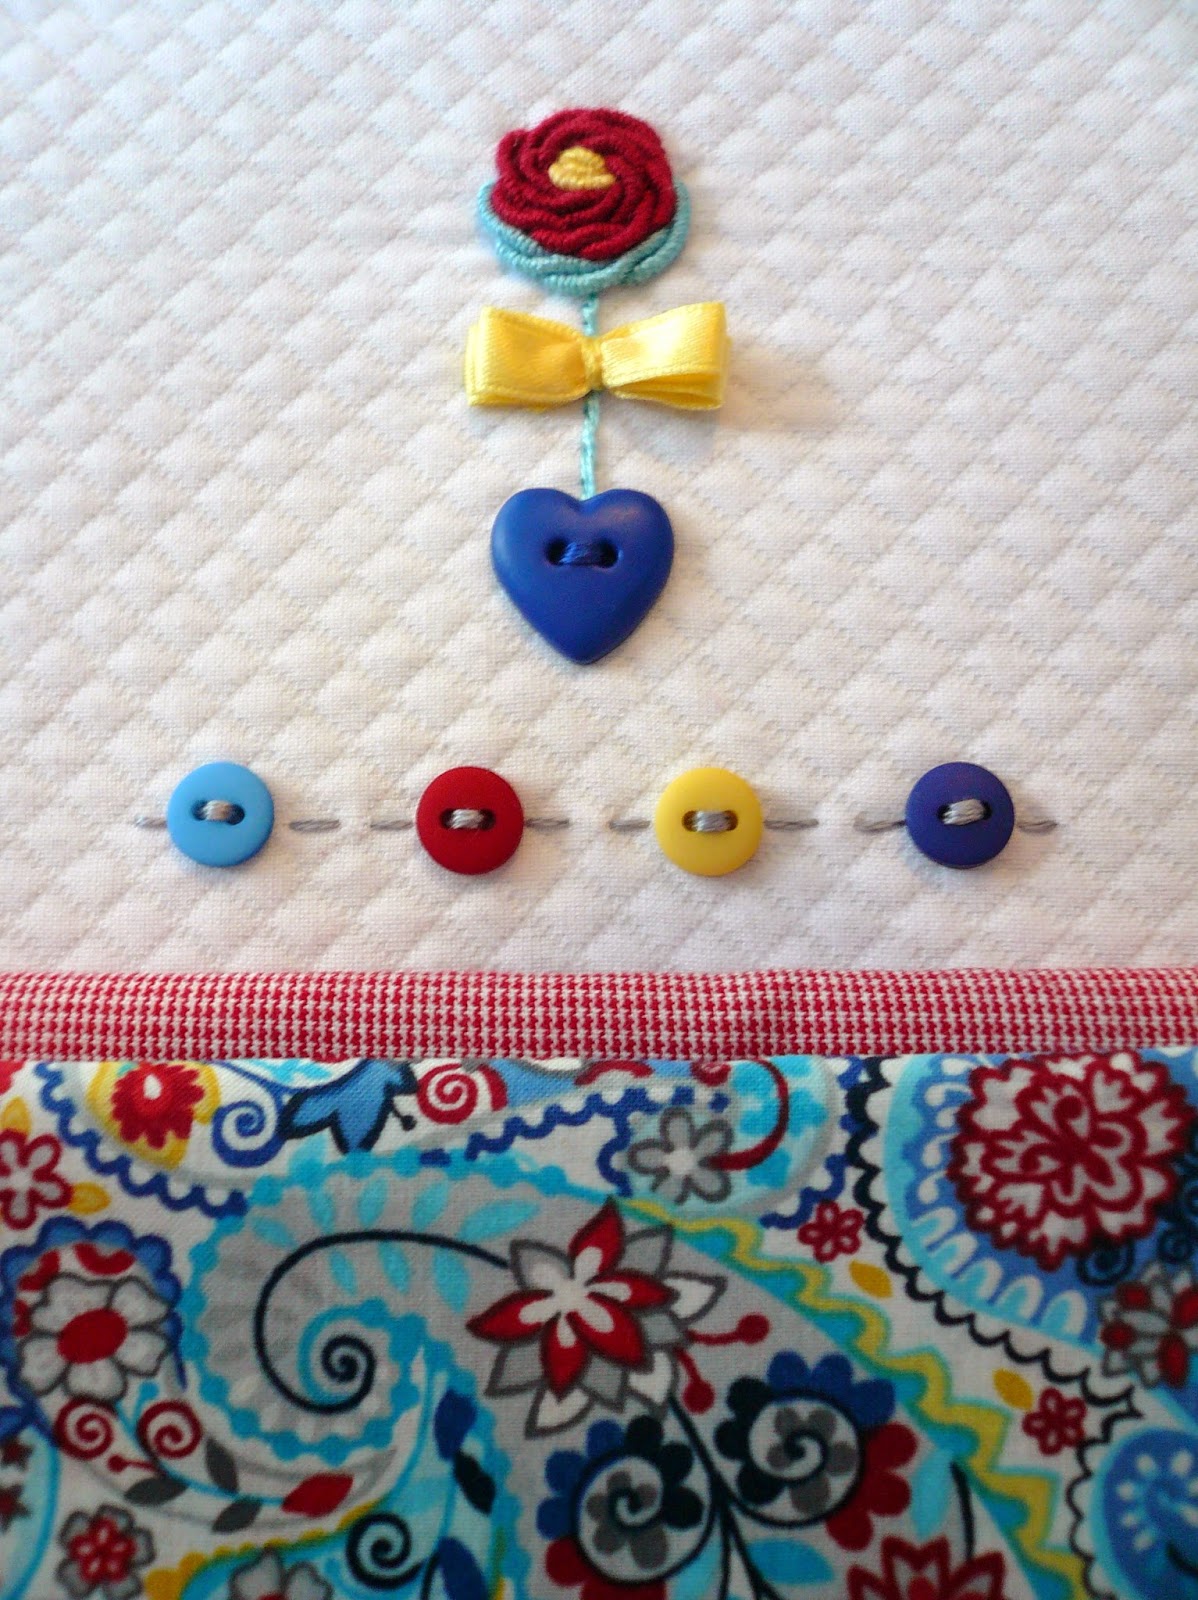
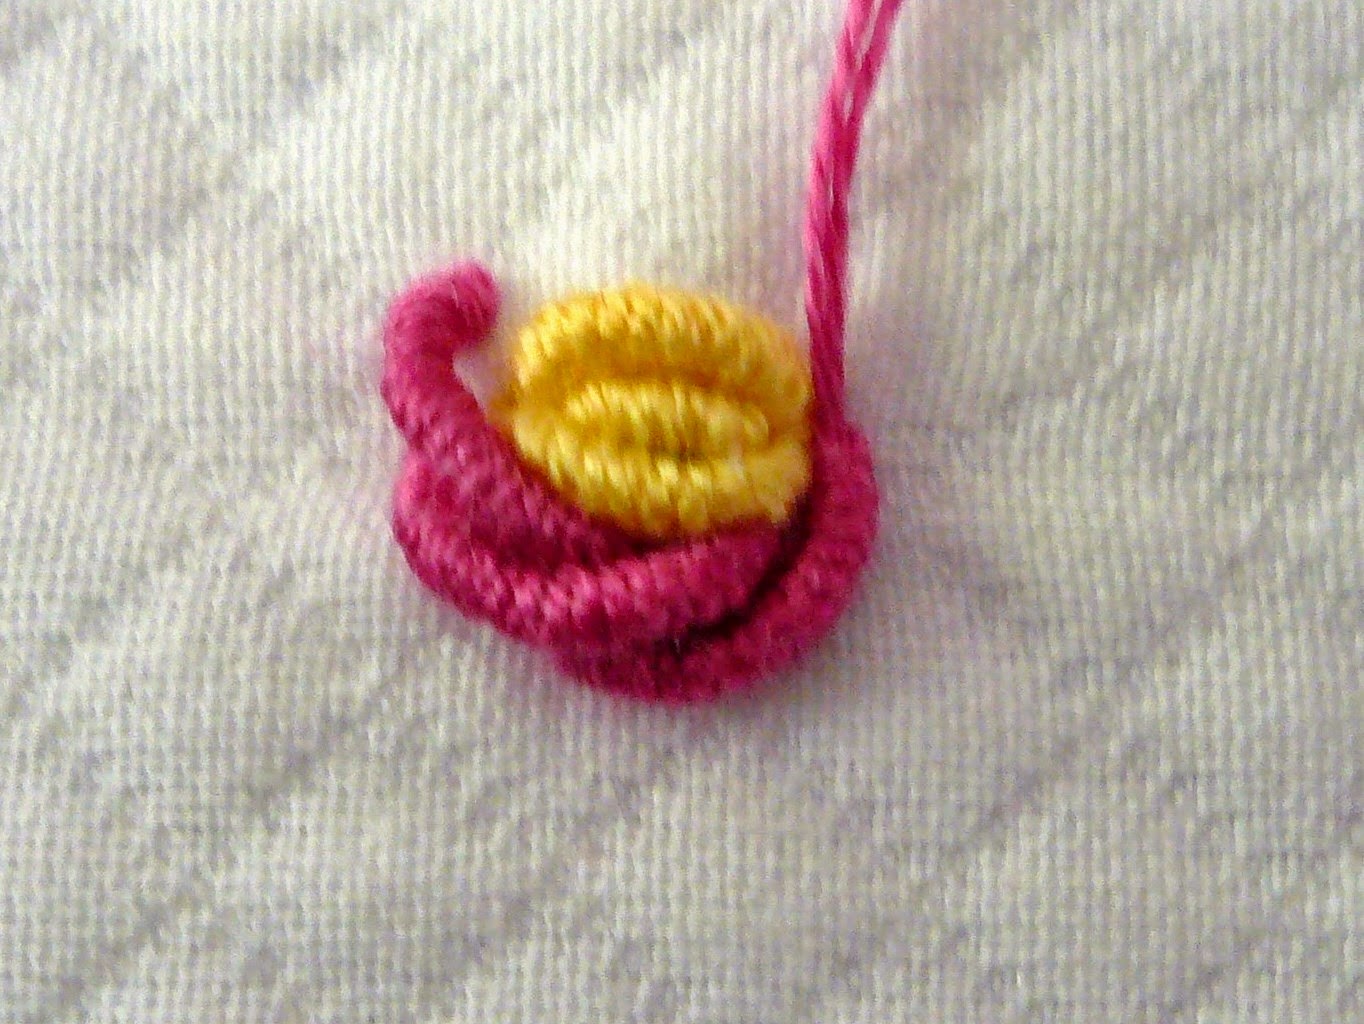
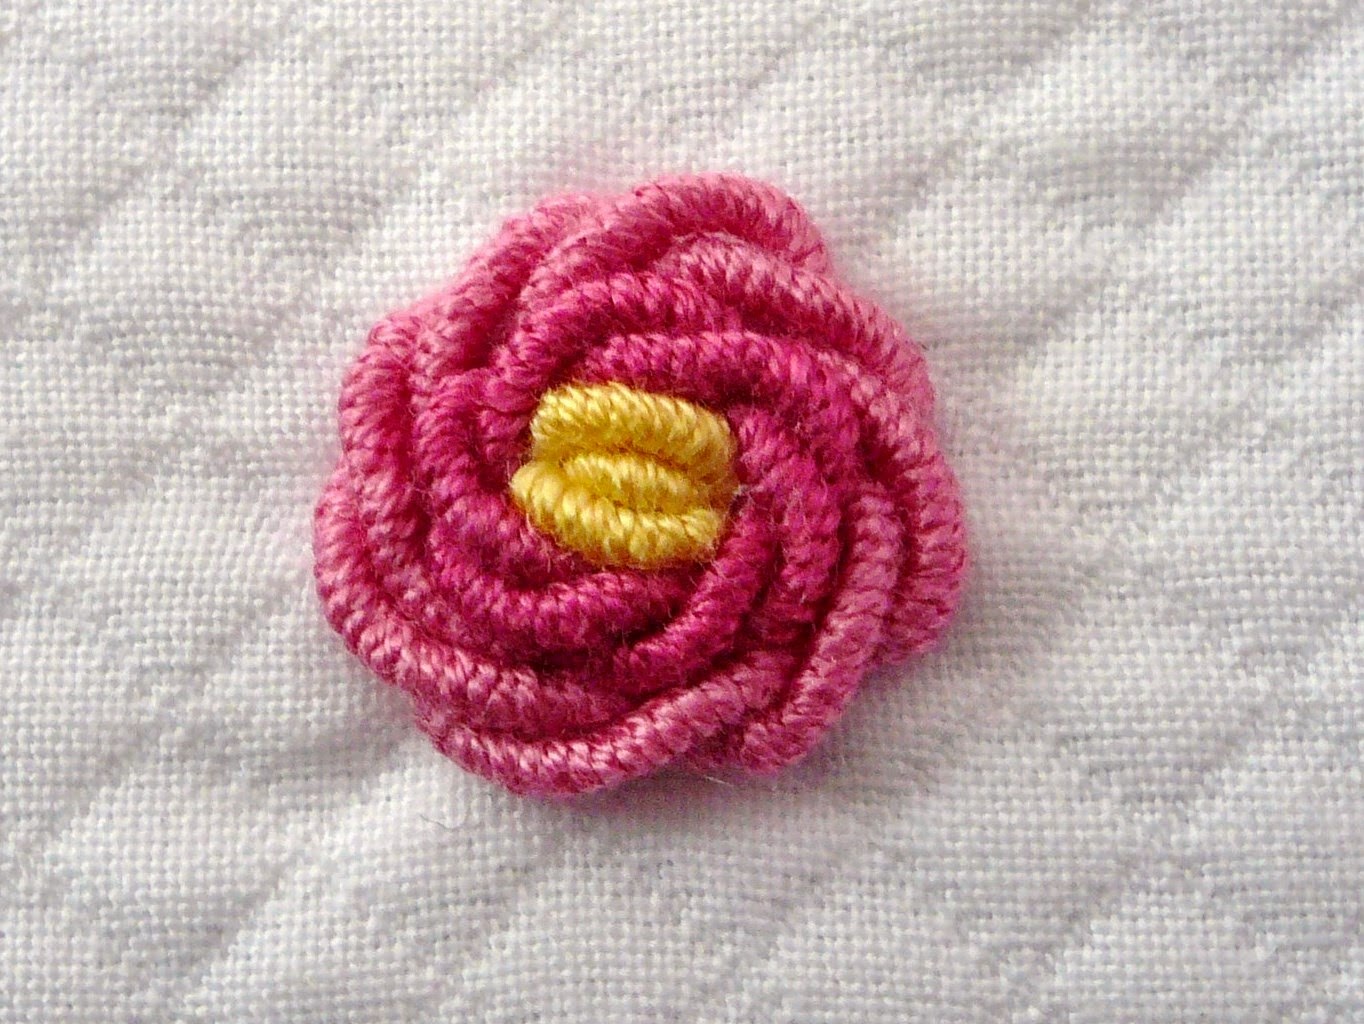
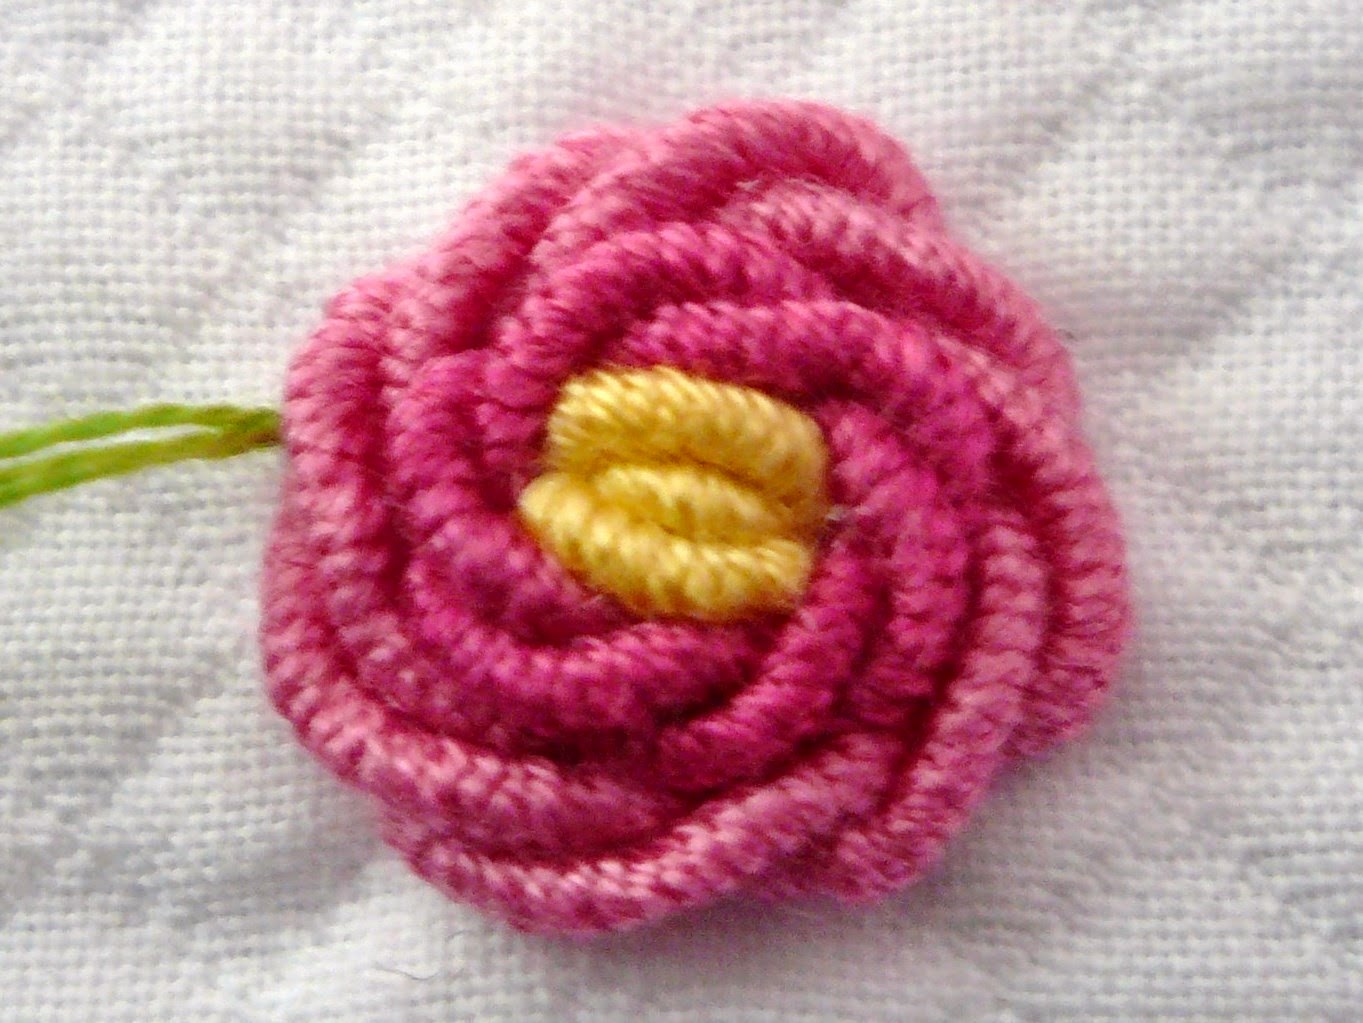
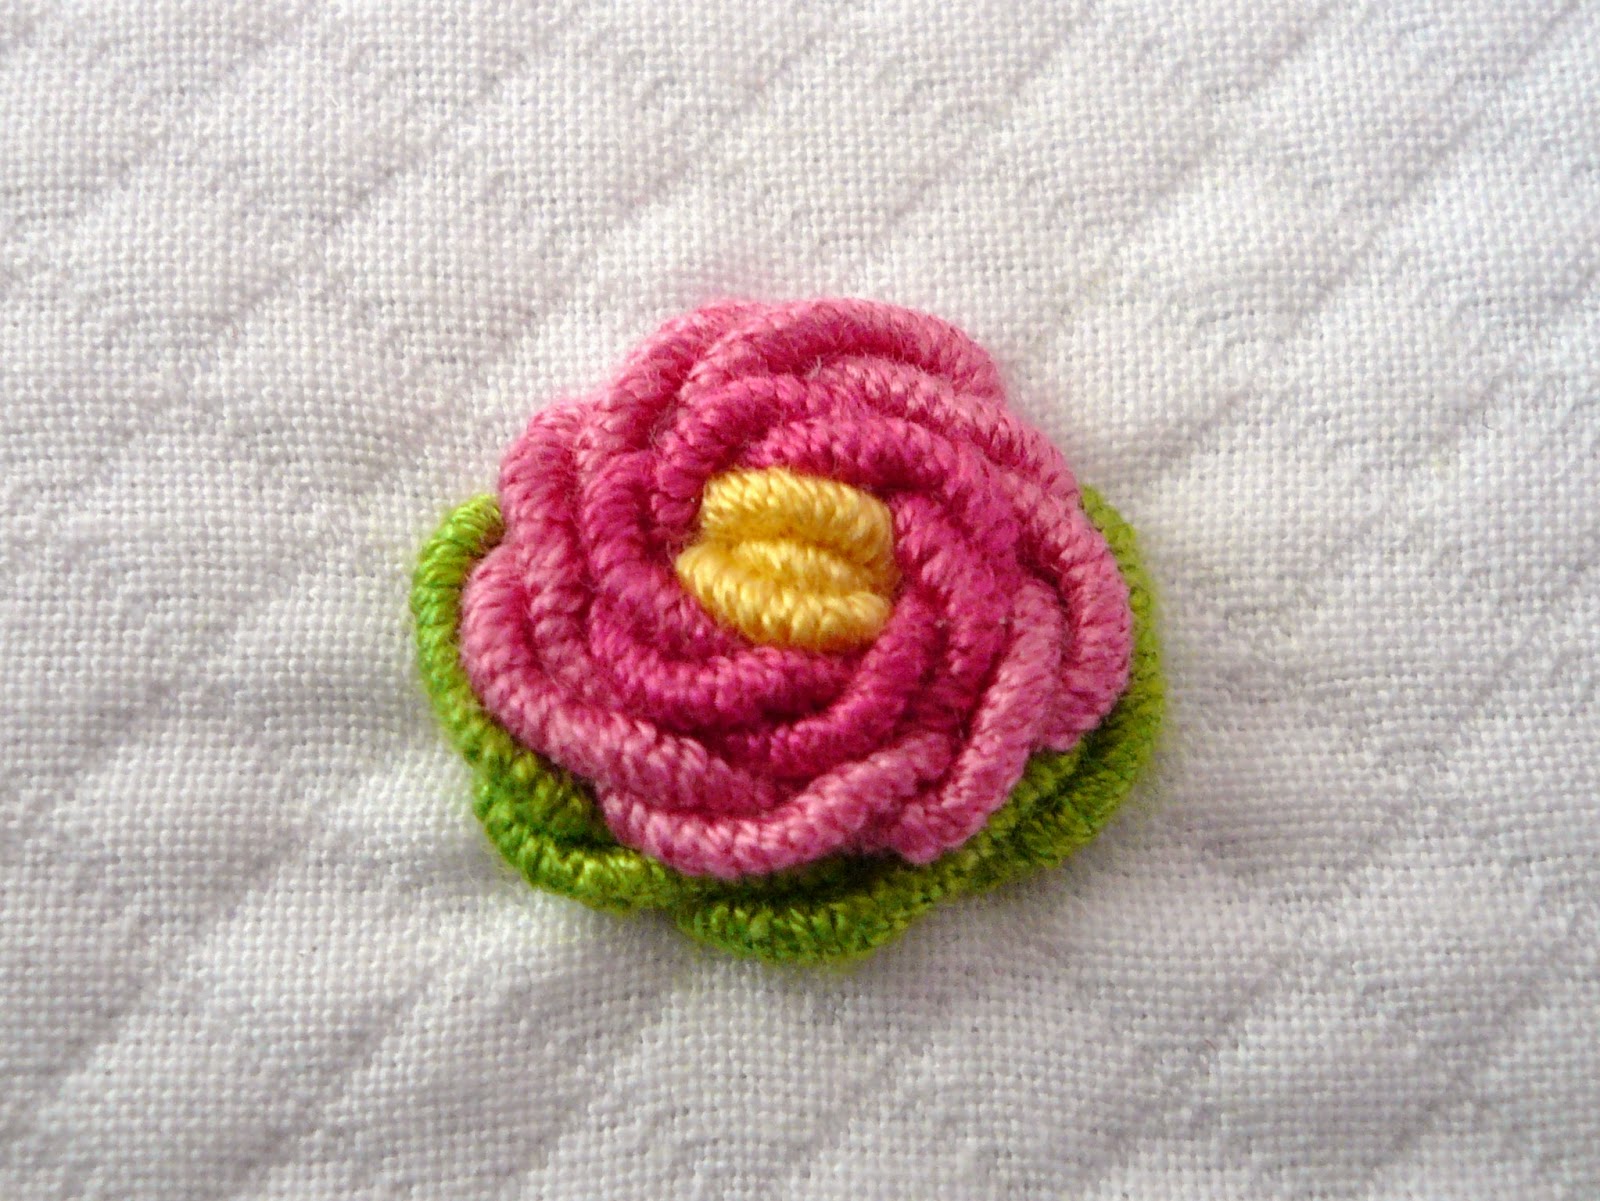
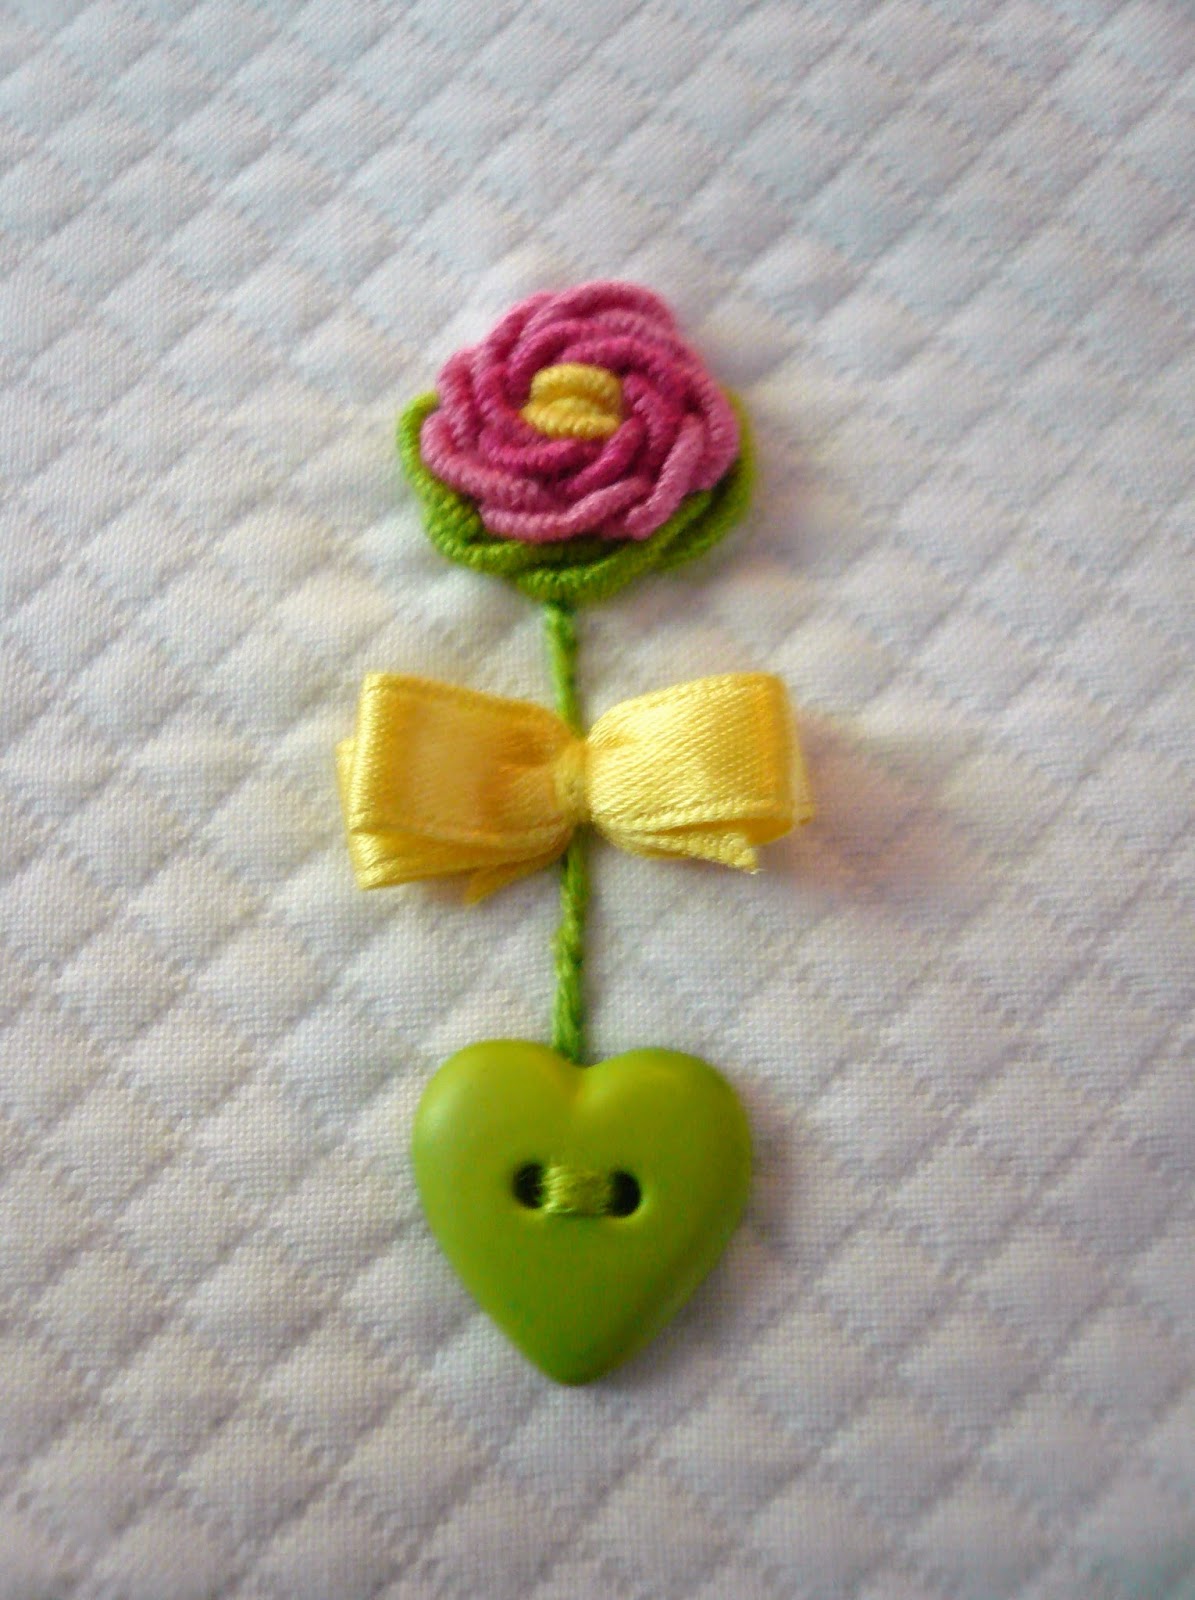
There are probably as many ways to make a bullion rose as there are people making them. I would like to include my take on the classic spiral bullion. These instructions are for big chunky roses as shown on the 'Sweetheart' jacket.
Spiral Bullion Rose:work with three strands of floss and a # 7 milliners needleit is helpful to interface the area behind the embroideryuse three colors of floss plus a green. Use a contrast for the center and two shades of pink or red (a light and a medium shade) for the spiral rose petals. Use the darker shade for the center fifteen wrap spiral bullions and the lighter shade for the outer twenty-two wrap spiral bullions.the spiral bullion is made in four sections (colors):center - one, five wrap bullion and two, ten wrap bullionsinner petals - six, fifteen wrap spiralsouter petals - eight, twenty-two wrap spiralsleaf base - four, twenty four wrap spirals
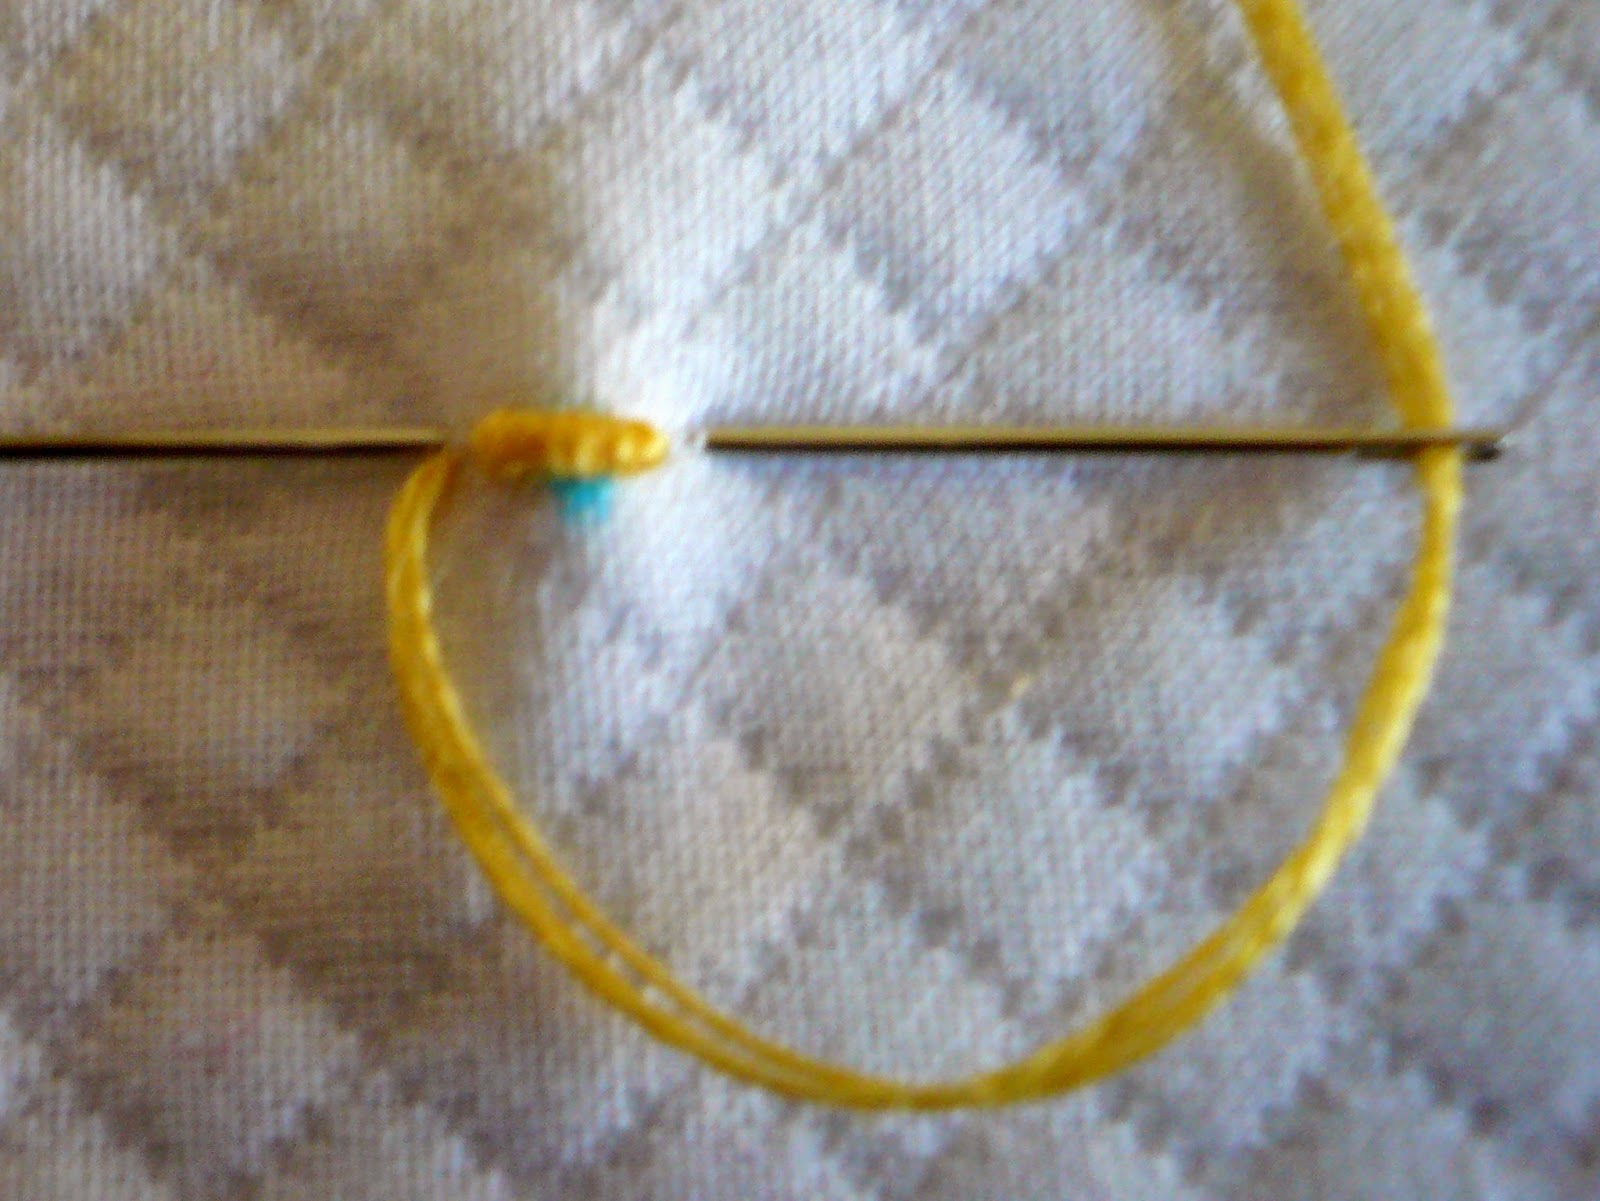
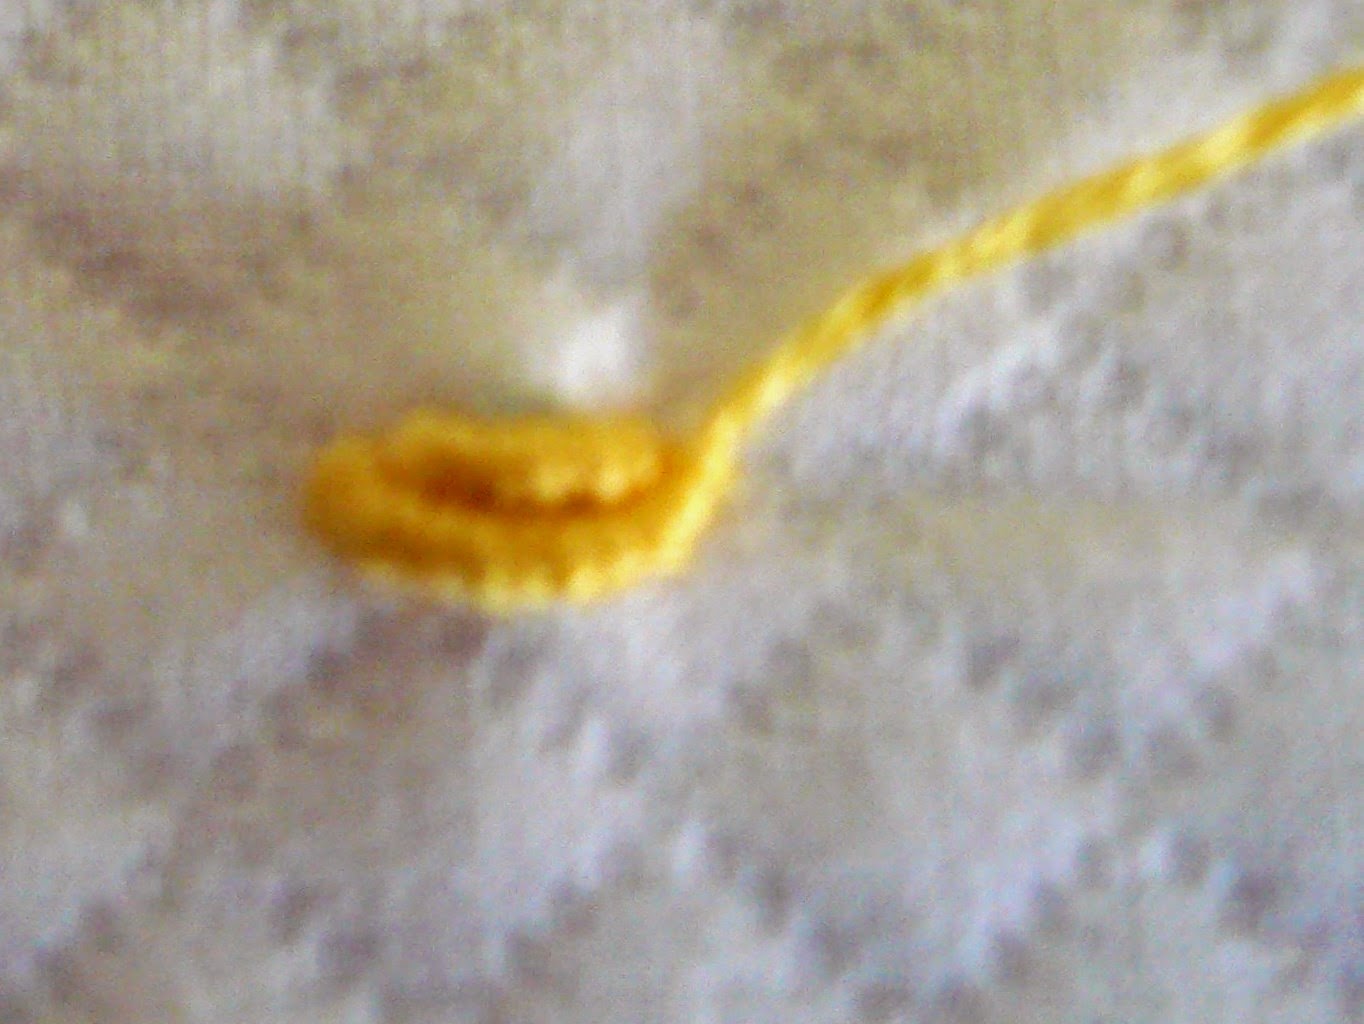
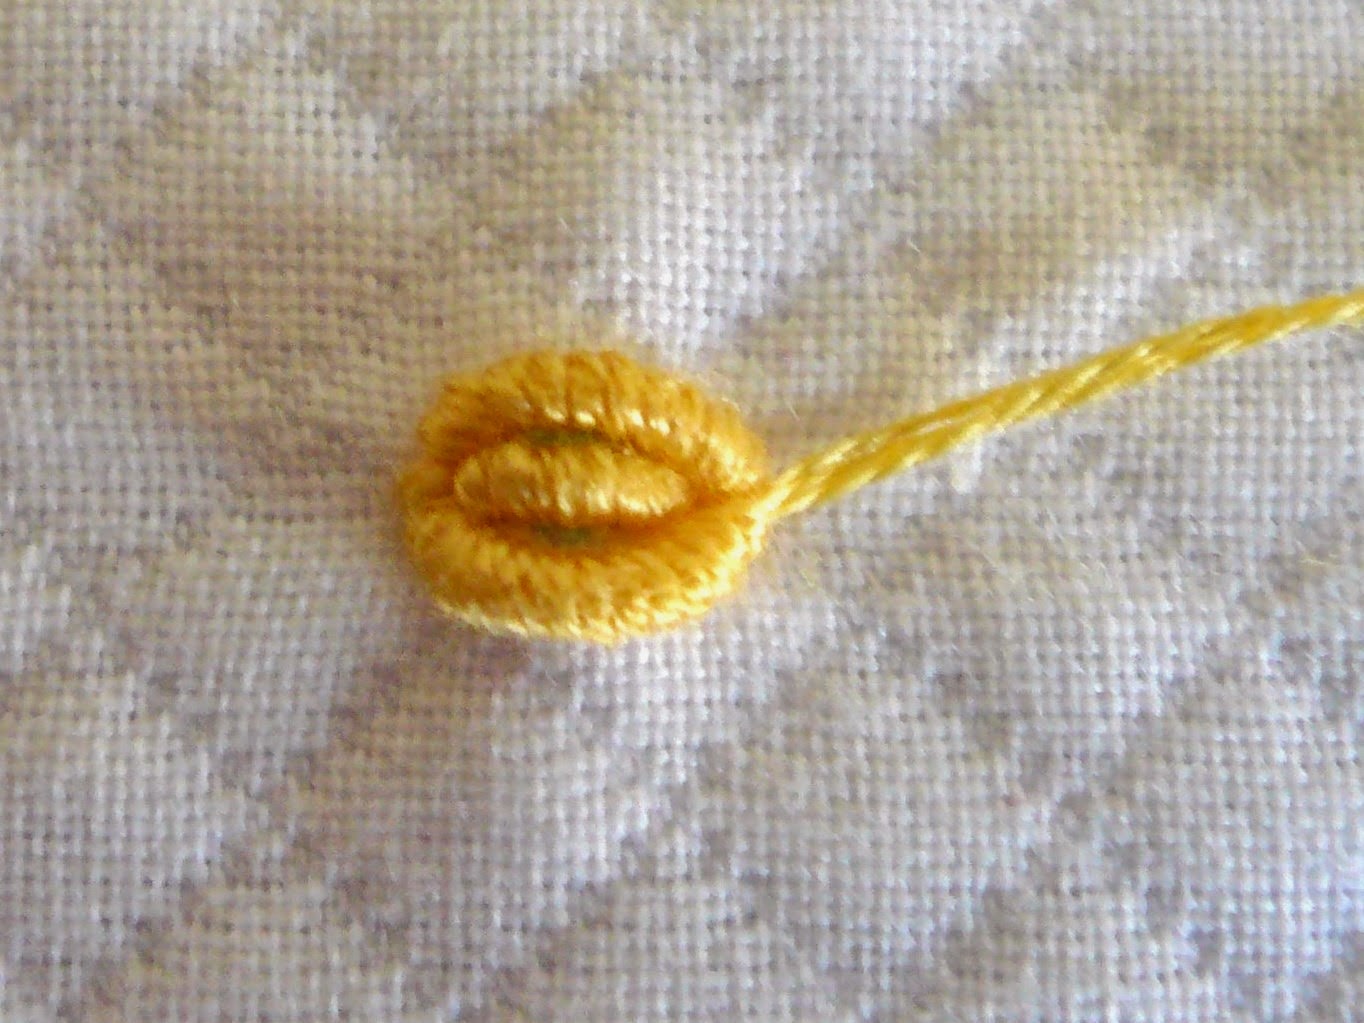
1. Work one, five wrap bullion at the center point.
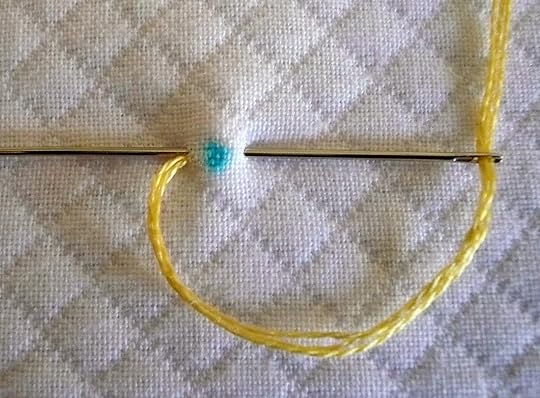
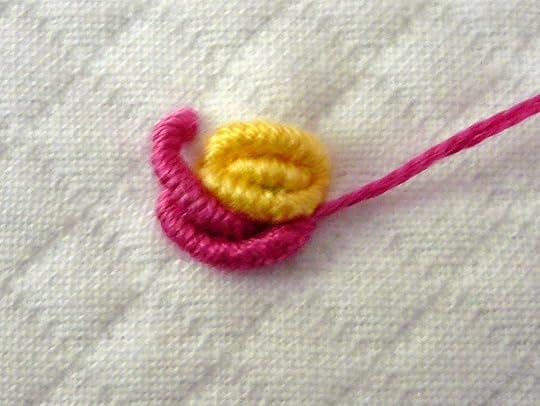
2. Bring the needle back to the left and take a new backstitch to make one, ten wrap bullion that cups beneath the five wrap bullion.


3. Turn the work completely over and make a second ten wrap bullion.

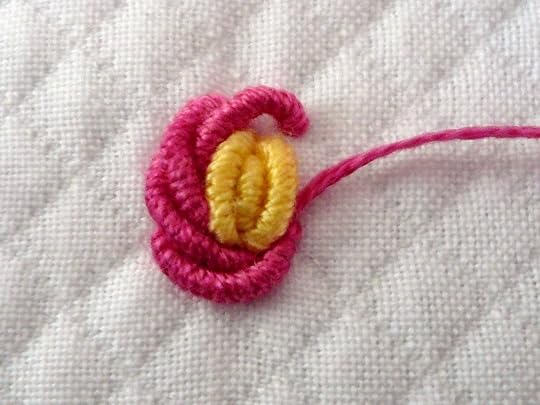
4. To make the first fifteen wrap spiral bullion, bring the needle up at about 11:00. Leave a gap, the width of one bullion stitch, between the entry point of the thread and the center bullion stitches.
5. Backstitch about ¼ of the way around the center. Make the first fifteen wrap bullion.
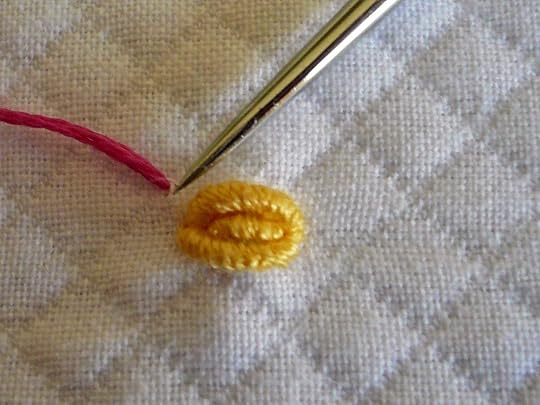
6. To make the second fifteen wrap spiral bullion, drop the needle to the back of the work and bring it up at the half way point on the first spiral bullion.
7. Backstitch about ¼ of the way around the center and make a second fifteen wrap spiral bullion.

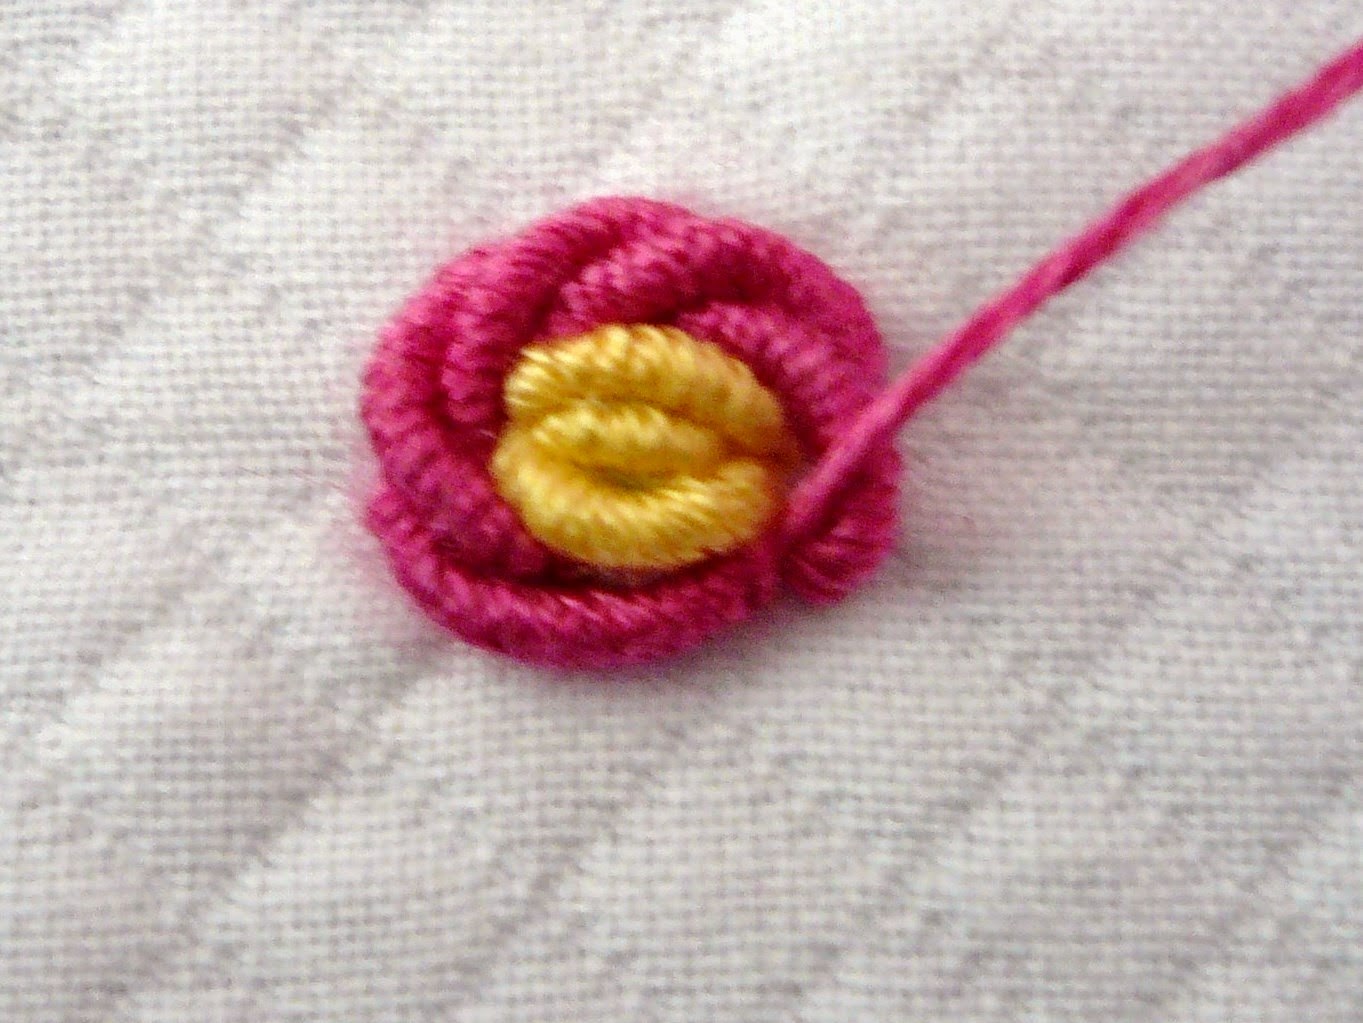
8. Repeat Steps 6-7 to make the third, fourth and fifth spiral bullions.

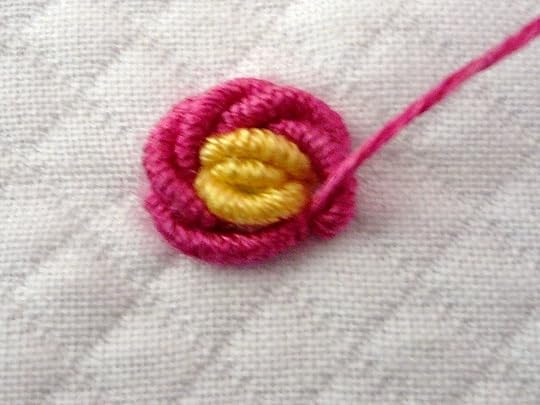
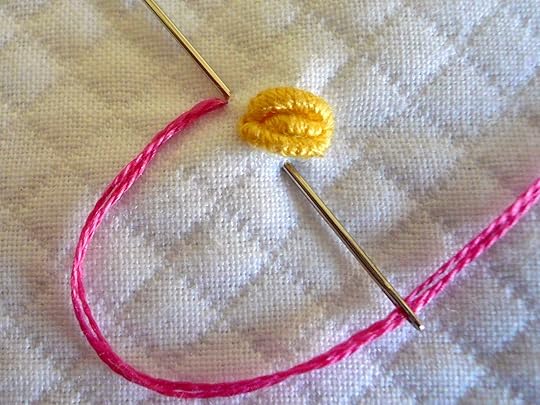
9. The sixth, and final fifteen wrap spiral bullion is made be bringing the needle up at the half way point of the fifth fifteen wrap spiral bullion. Backstitch about ¼ of the way around the center bringing the needle in close to the center, to the inside of the first fifteen wrap spiral bullion. Make the sixth fifteen wrap spiral bullion.
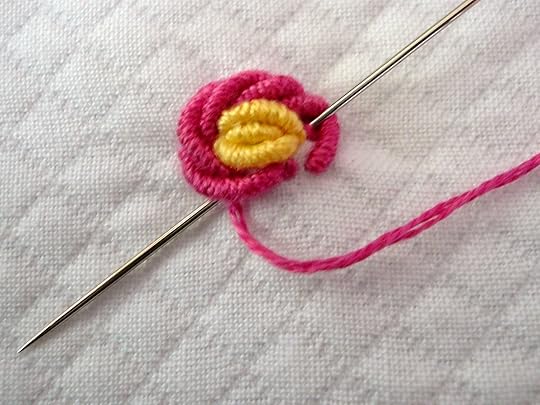
10. To make the first 22 wrap spiral bullion bring the needle up at 11:00 leaving a gap the width of one spiral bullion stitch. Backstitch about 20% of the way around the center fifteen wrap spiral bullions.
11. Make the first twenty-two wrap spiral bullion.
12. Make the second through seventh twenty-two wrap spiral bullions in the same manner as the previous color spiral bullions.
13. The eighth and final twenty two wrap spiral bullion is made by bringing the needle up at the halfway point on the seventh twenty-two wrap spiral bullion. Backstitch about 20% of the way around the center, bringing the needle in close to the fifteen wrap spiral bullions. Make the eighth twenty-two wrap spiral bullion.
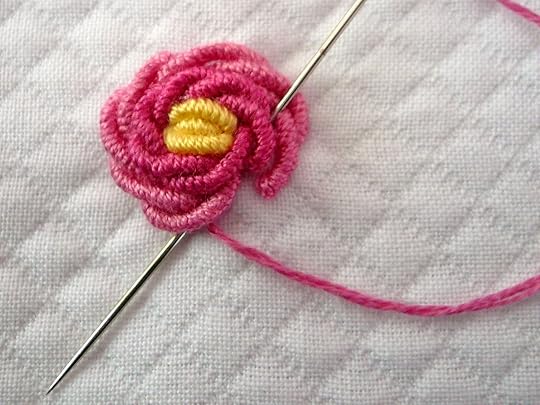

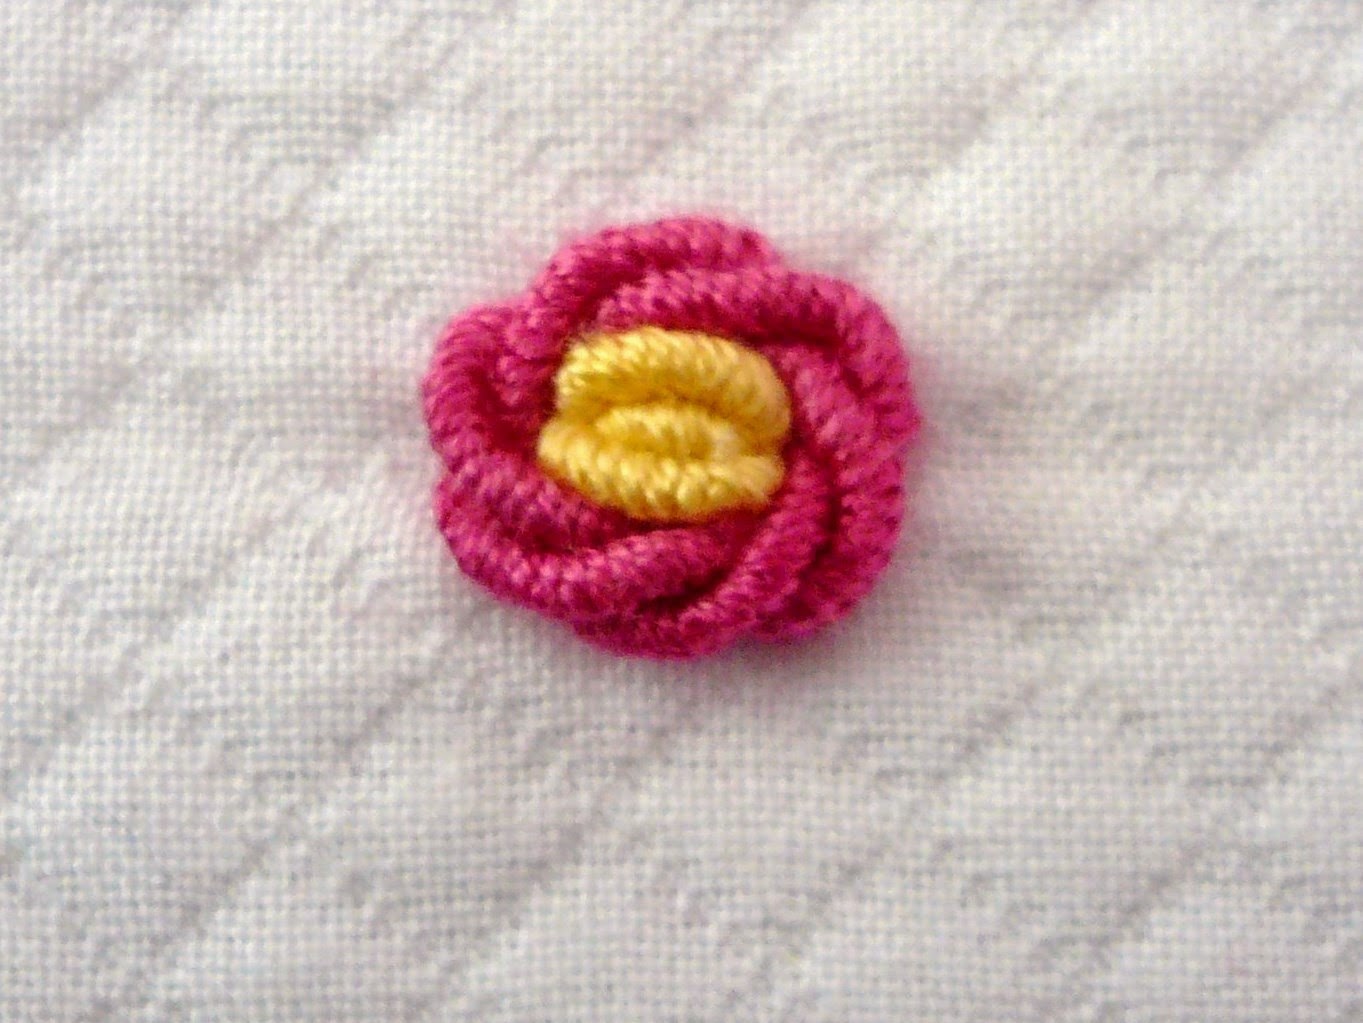
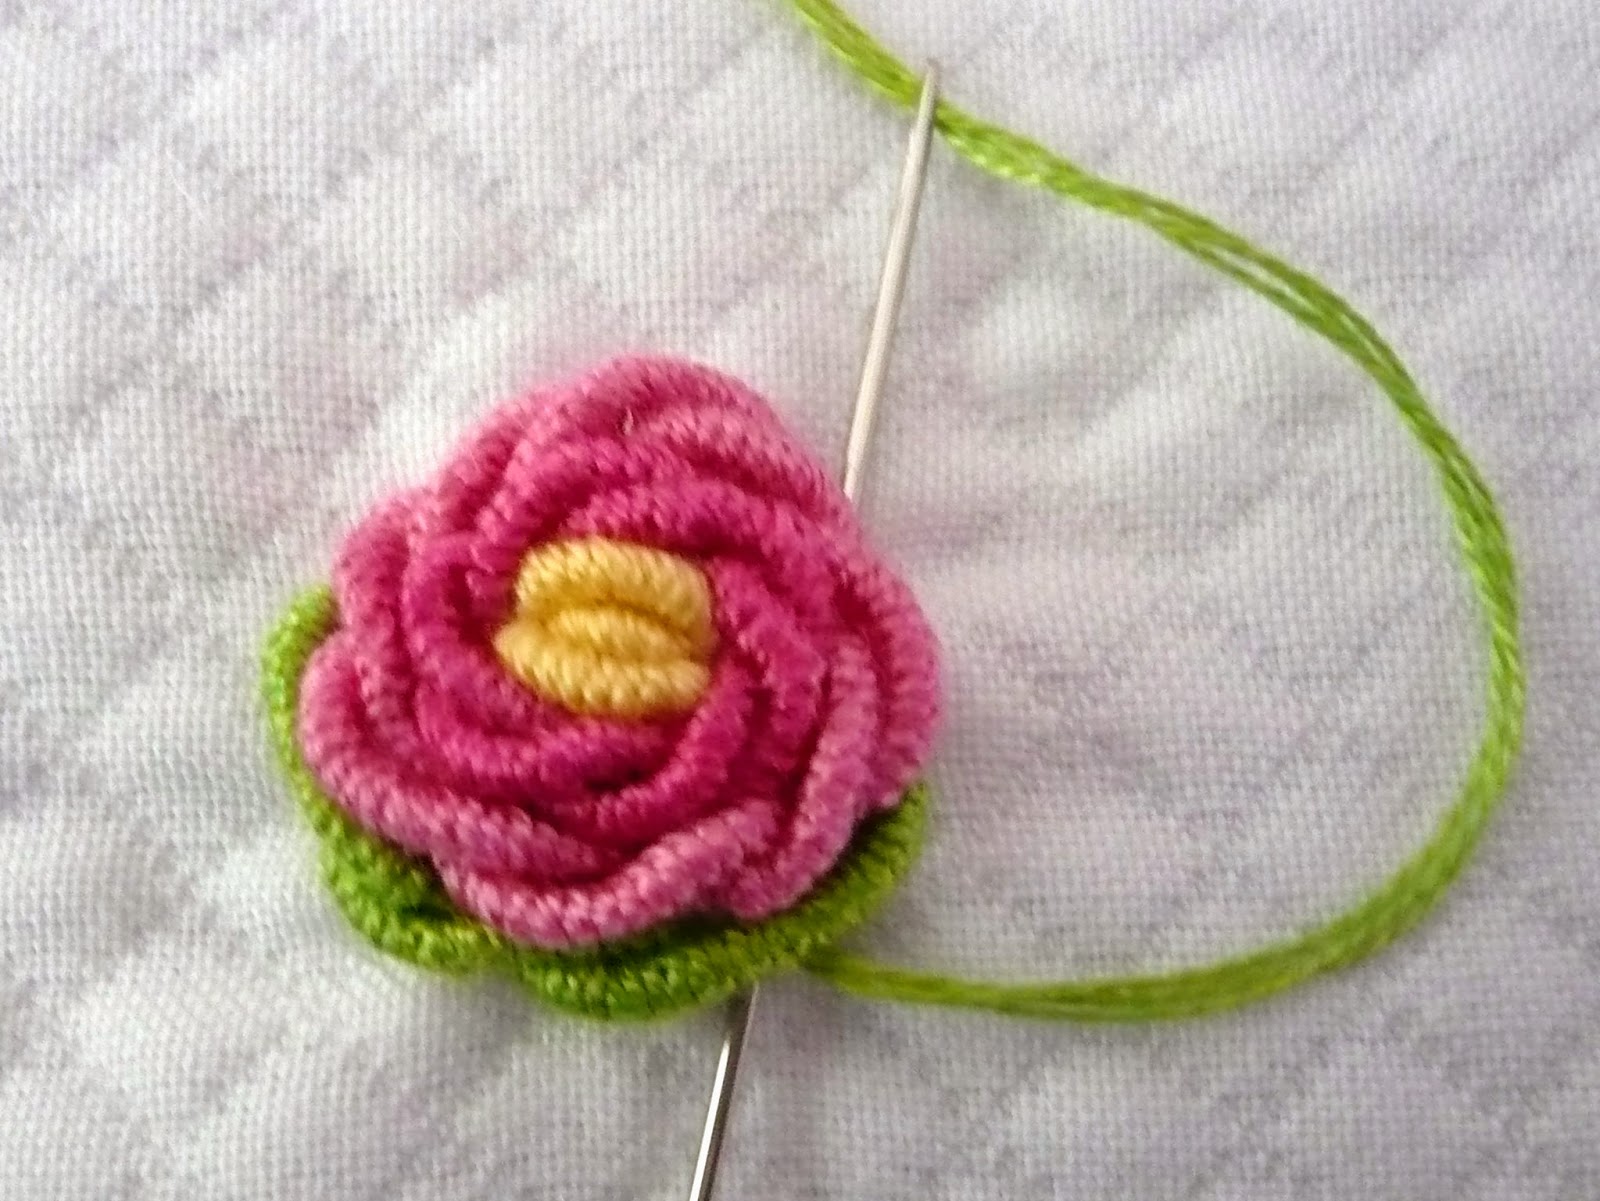
14. Bring the green in about 2/3’s of the way up on the left hand side of the spiral bullion rose. Backstitch about 20% of the way around the rose.

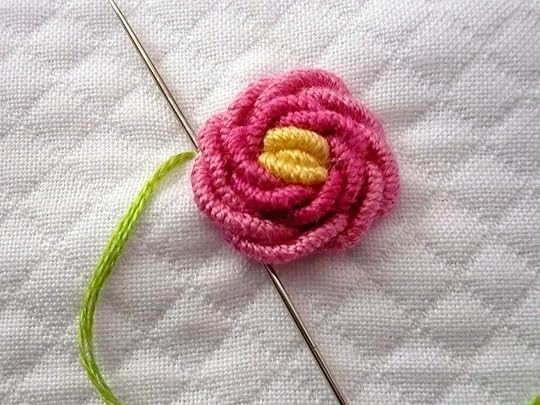
15. Make a twenty four wrap spiral bullion. Make the second, third, and fourth green spiral bullions in the same manner.
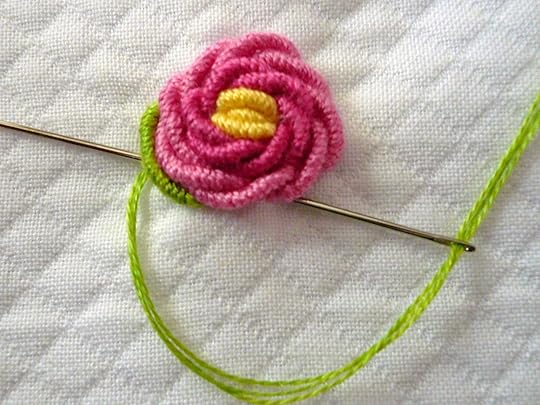
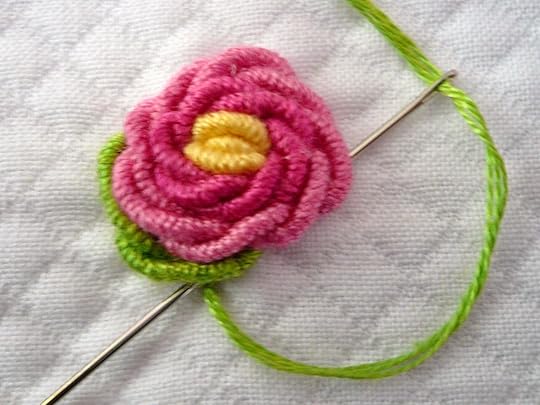
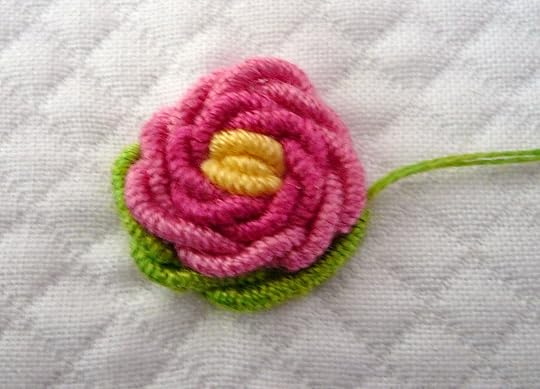

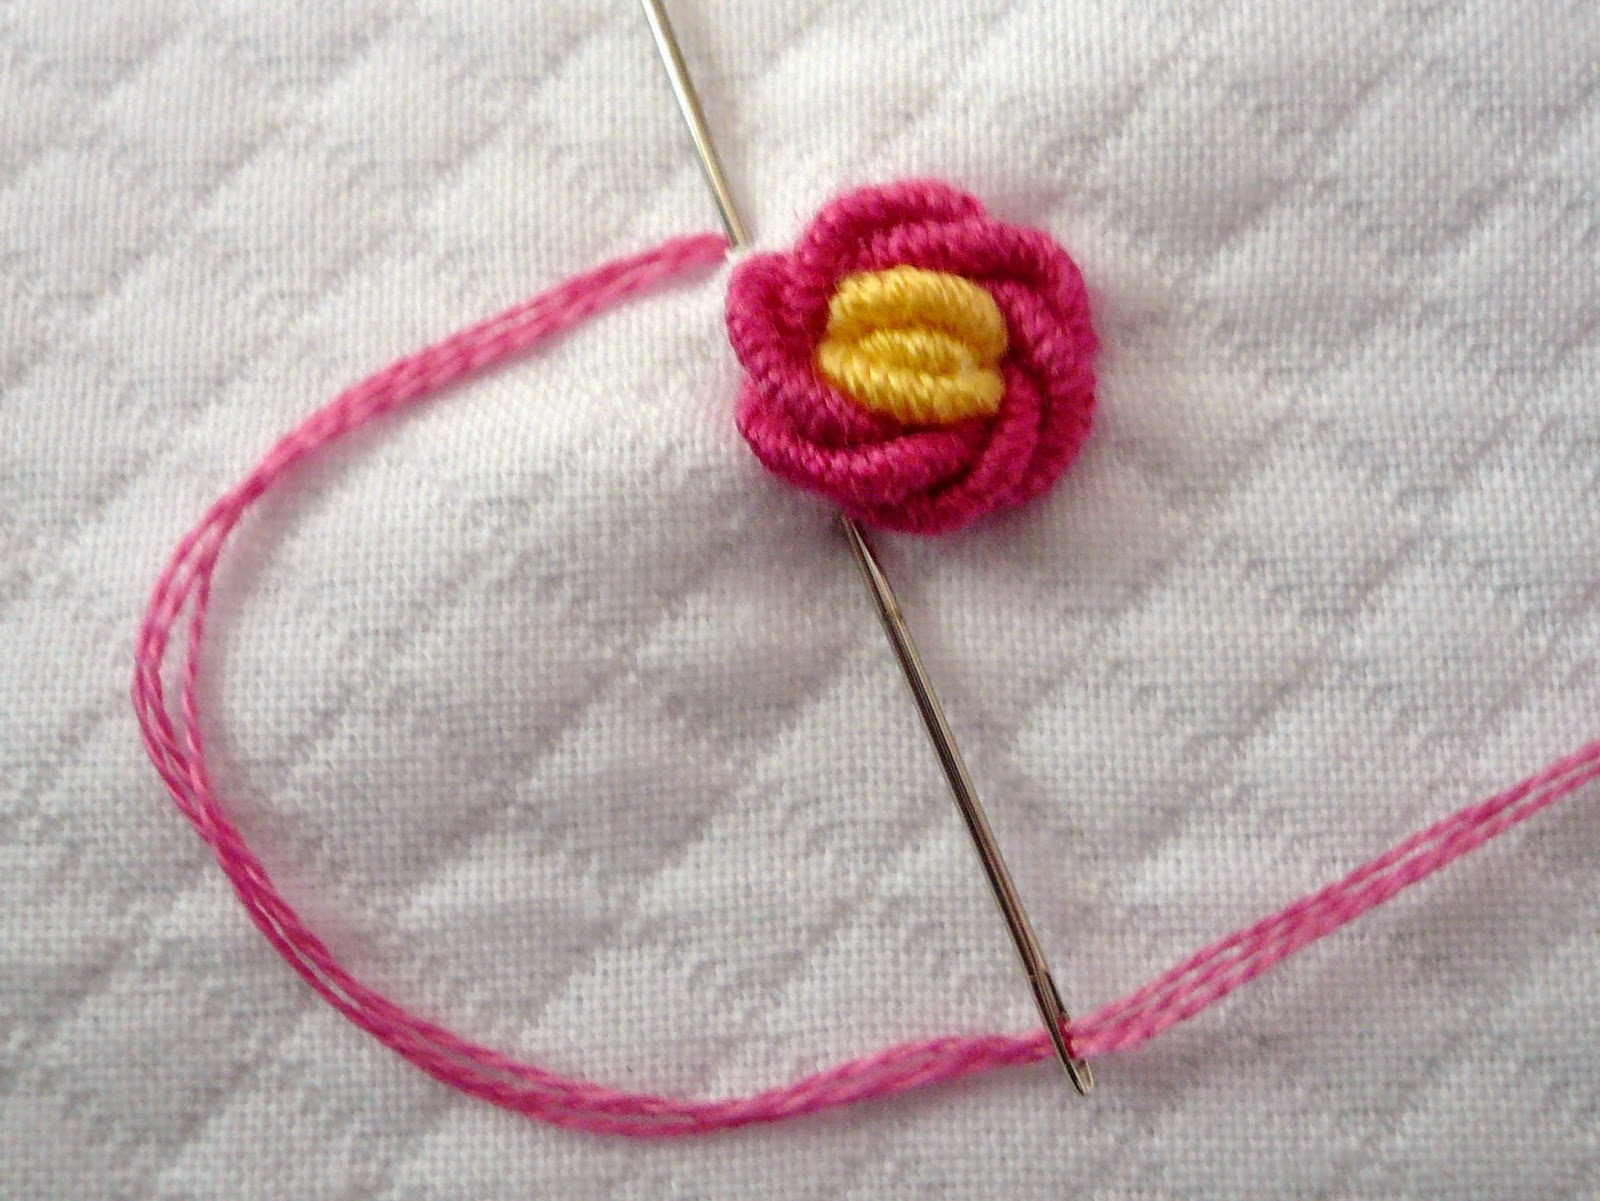
16. Stitch the heart button at the indicated position. Use three strands of floss to outline stitch the stem line.

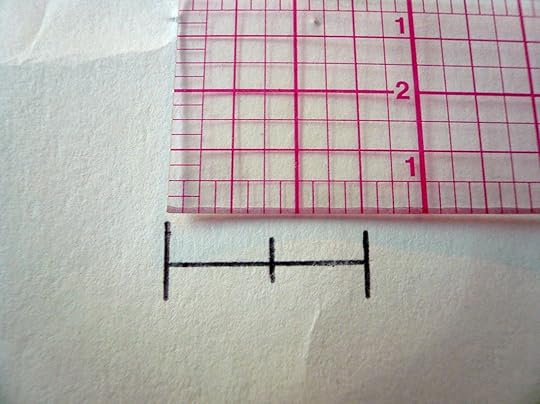
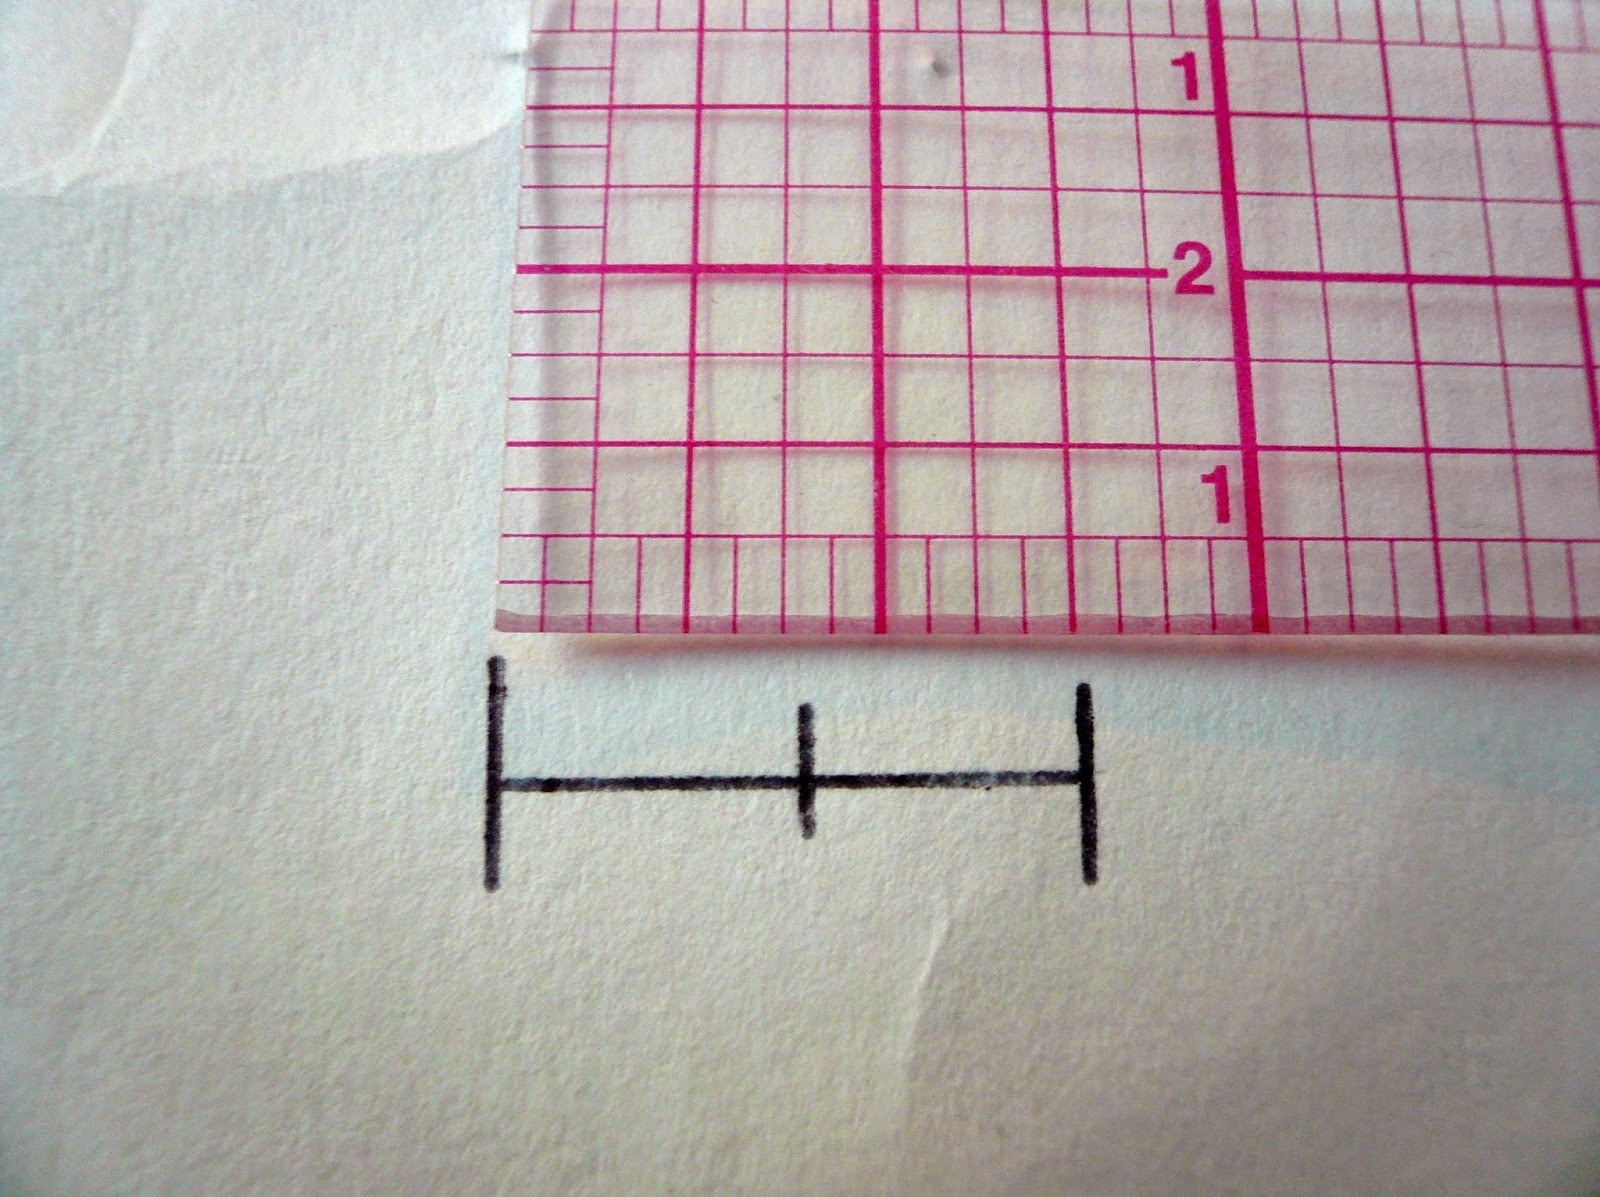
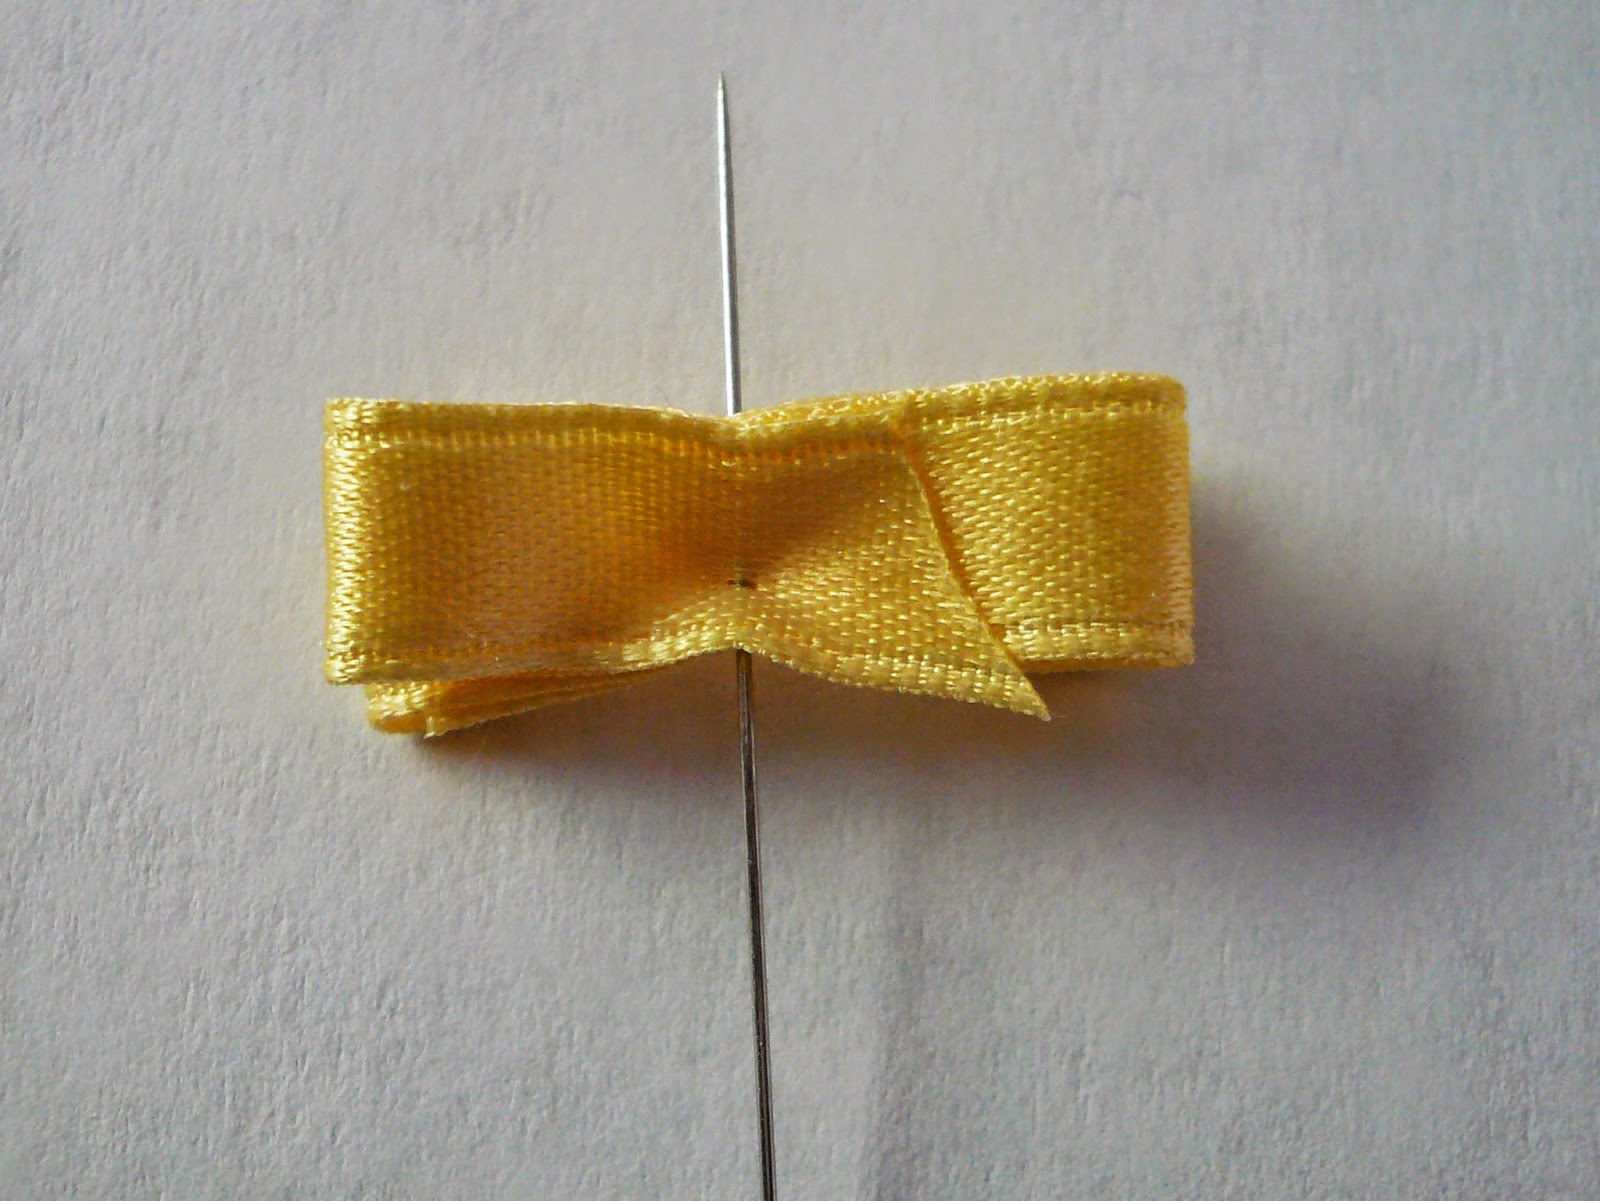
17. To make the bows draw a ¾” long line on a piece of paper. Mark the center point and the ends of the ¾” line.
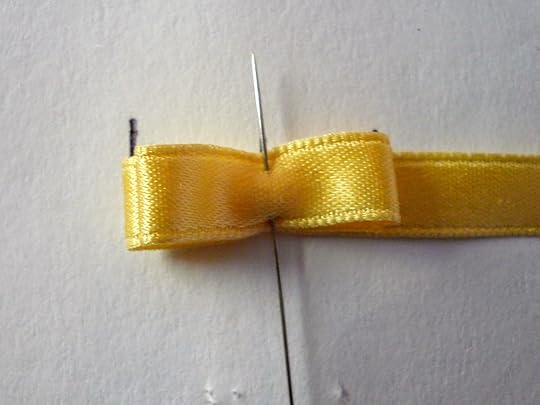
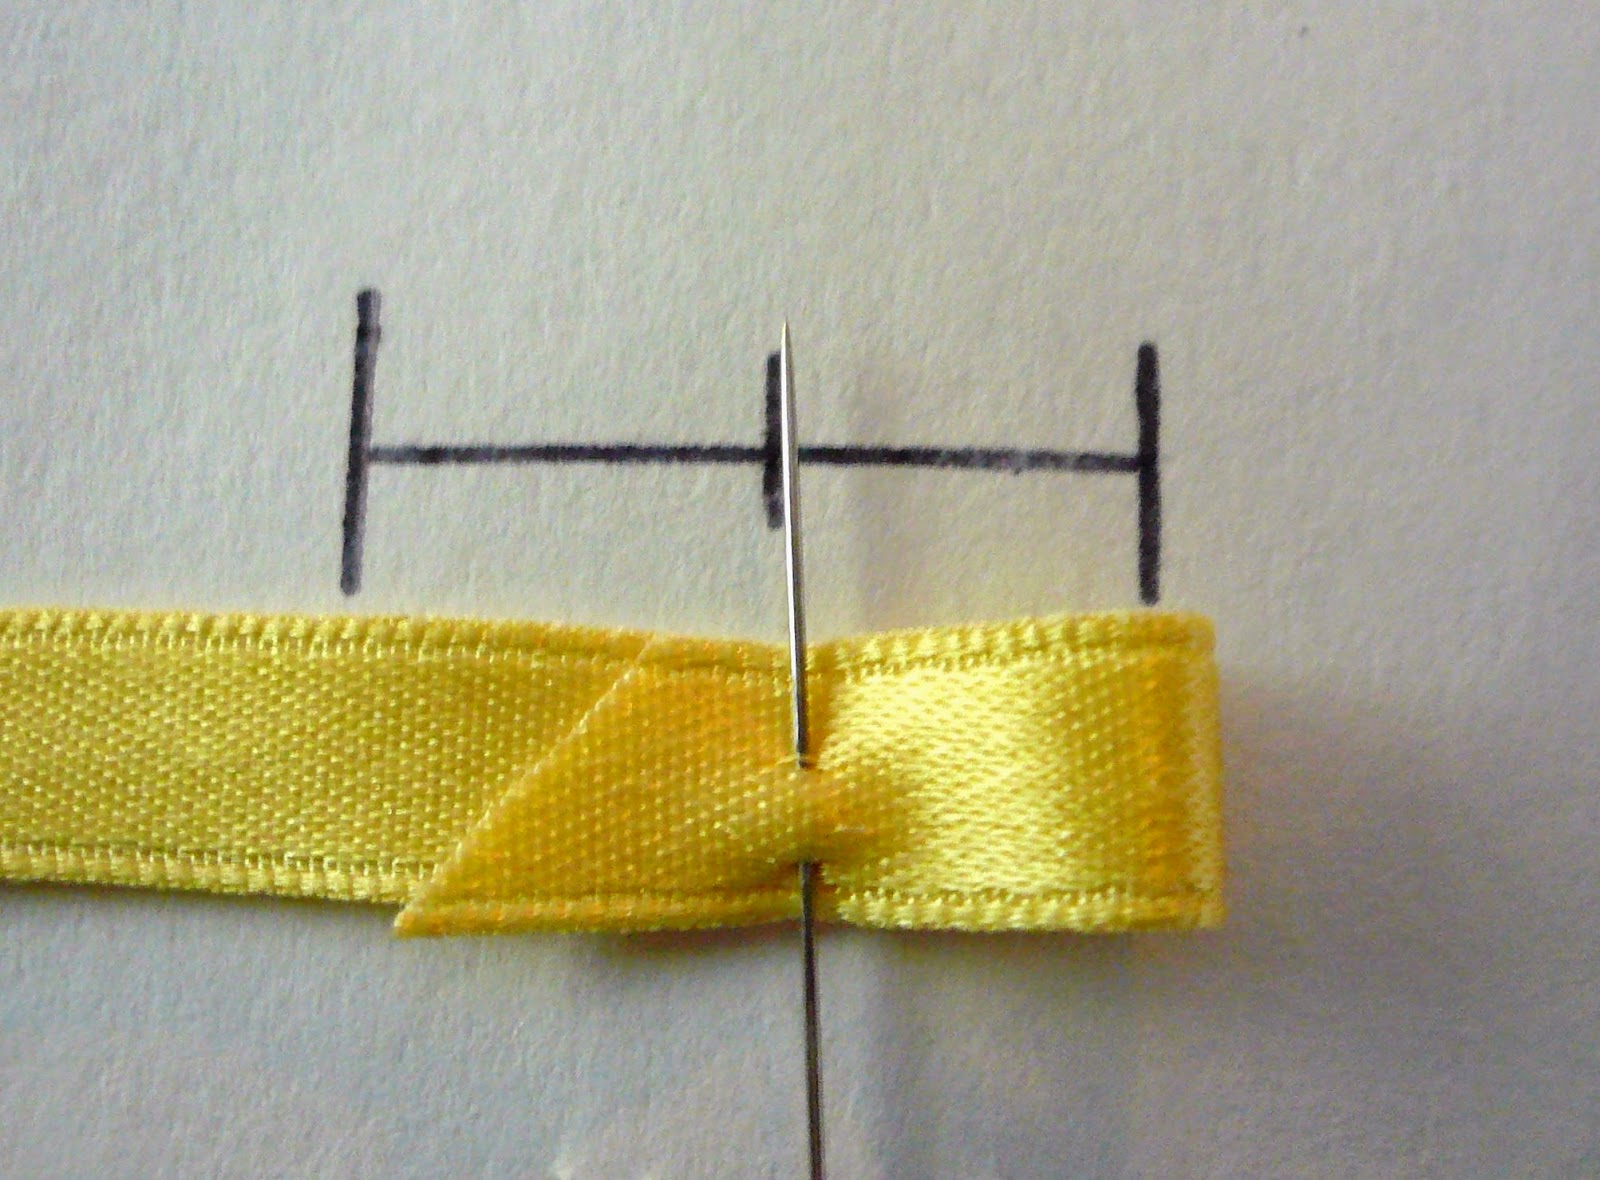
18. Using ¼” wide silk/satin ribbon cut the end on a 45° angle. Fold the ribbon in on itself half the distance of the ¾” line and secure with a pin.

19. Fold in the second loop keeping the cut end of the ribbon on the inside and secure with the pin. Fold in a third loop directly behind the second loop and secure with the pin.

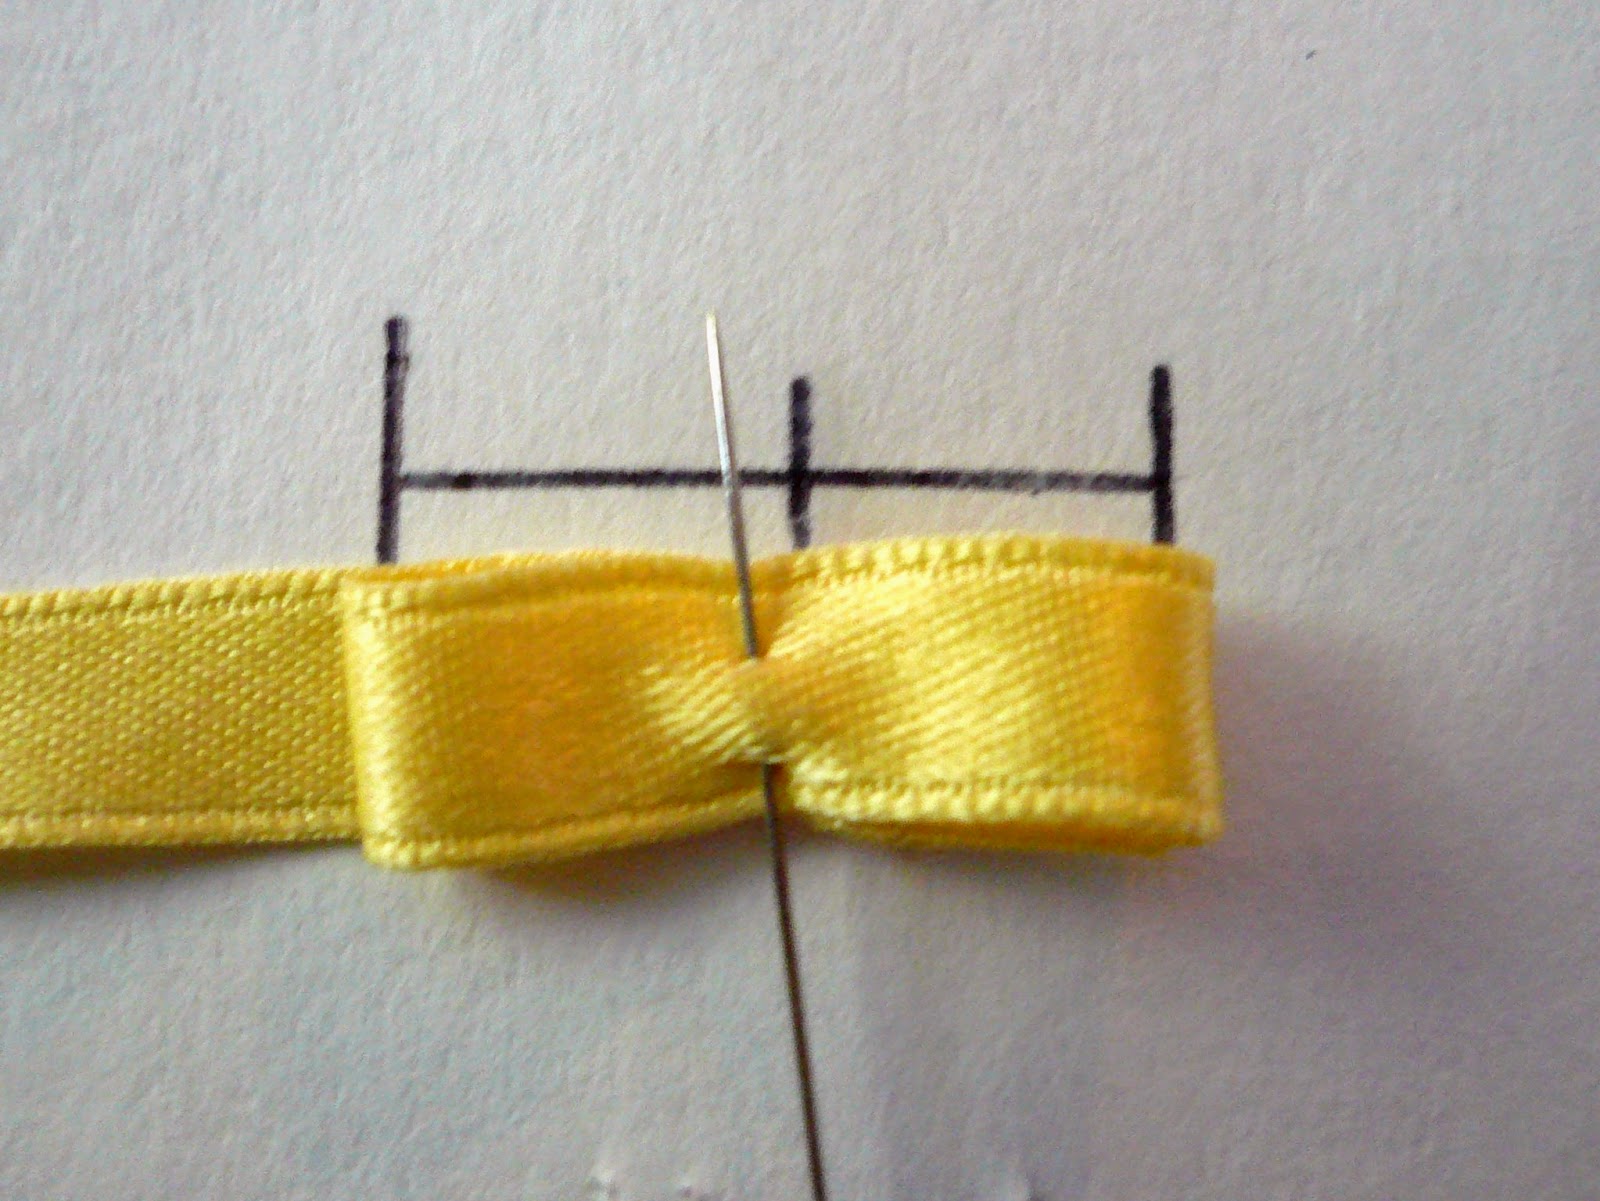
20. Fold in the fourth and final loop resulting with two sets of two loops stacked on top of each other and secure with the pin.
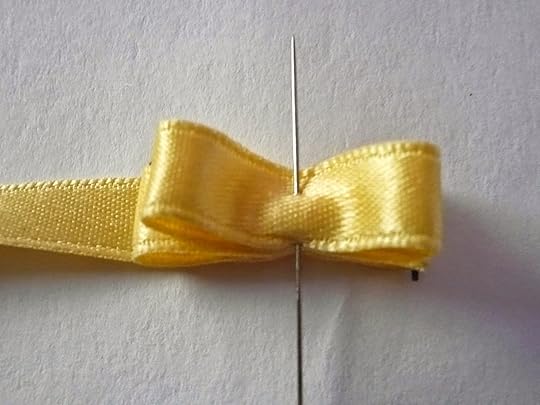
21. Cut the ribbon on the back side on a 45° angle.
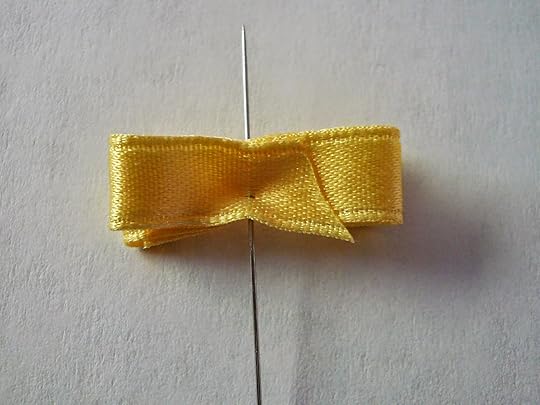
22. Using a hand sewing needle and doubled thread in a matching color to the ribbon, bring the thread up through the center of the bow. Wrap the thread tightly around the center three times and tie off on the wrong side.
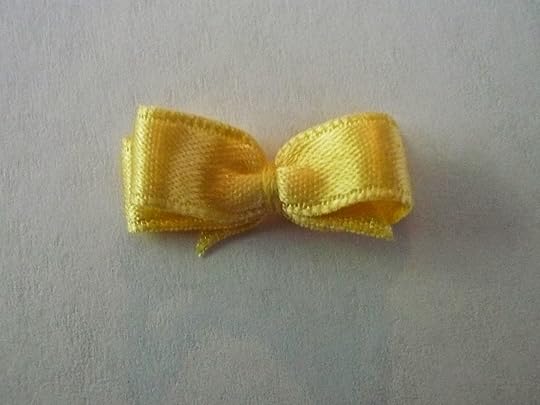
23. Use the center thread to tack the bow to the center of the stem.

ll

The jacket for the original 'Sweetheart ' project was made from 100% wool Doctors flannel which started out as ivory. I had tried to dye it lavender with a different project in mind with very limited success. Because I thought I had ruined the fabric I figured there was nothing to loose and I threw it in a pot of hot water with a bottle of Rit brand black dye. The wool took the black dye beautifully. You would never know it was once a very unattractive mottled lavender. The bishop dress and jacket trim fabric is probably one of my all time favorite Liberty prints. I am being polite when I say it is a 'vintage' Liberty. It was from back when the dinosaurs still roamed the earth and Liberty prints were only 36" wide. I would like to hear from some of you fabric hoarders (you know who you are!) who still have 36" wide Liberty prints waiting for just the right project. So..... clearly it was not possible to provide kits for the project as shown as both the jacket and dress fabric were a bit obscure and completely unavailable.
My remake of the project is Dakota pique for the jacket and a lovely paisley lawn for the dress, both trimmed with 1/32" pima micro check. You might recognize the paisley lawn from a previous post. I love this fabric. It is not an easy thing to find a good quality lightweight cotton lawn in a small scale print in several nice color ways. My rule of thumb when choosing a print to coordinate with an embroidered jacket is to look for at least three distinct colors in the print and a good green. This lawn more than fits that criteria.


The kit will be available in three color ways on my Etsy site.. I would like to give a big shout out to my friends at www.hillcreekdesigns.com who make all the custom colors in hand dyed buttons for me.

There are probably as many ways to make a bullion rose as there are people making them. I would like to include my take on the classic spiral bullion. These instructions are for big chunky roses as shown on the 'Sweetheart' jacket.
Spiral Bullion Rose:work with three strands of floss and a # 7 milliners needleit is helpful to interface the area behind the embroideryuse three colors of floss plus a green. Use a contrast for the center and two shades of pink or red (a light and a medium shade) for the spiral rose petals. Use the darker shade for the center fifteen wrap spiral bullions and the lighter shade for the outer twenty-two wrap spiral bullions.the spiral bullion is made in four sections (colors):center - one, five wrap bullion and two, ten wrap bullionsinner petals - six, fifteen wrap spiralsouter petals - eight, twenty-two wrap spiralsleaf base - four, twenty four wrap spirals
1. Work one, five wrap bullion at the center point.

2. Bring the needle back to the left and take a new backstitch to make one, ten wrap bullion that cups beneath the five wrap bullion.
3. Turn the work completely over and make a second ten wrap bullion.
4. To make the first fifteen wrap spiral bullion, bring the needle up at about 11:00. Leave a gap, the width of one bullion stitch, between the entry point of the thread and the center bullion stitches.

5. Backstitch about ¼ of the way around the center. Make the first fifteen wrap bullion.


6. To make the second fifteen wrap spiral bullion, drop the needle to the back of the work and bring it up at the half way point on the first spiral bullion.
7. Backstitch about ¼ of the way around the center and make a second fifteen wrap spiral bullion.


8. Repeat Steps 6-7 to make the third, fourth and fifth spiral bullions.

9. The sixth, and final fifteen wrap spiral bullion is made be bringing the needle up at the half way point of the fifth fifteen wrap spiral bullion. Backstitch about ¼ of the way around the center bringing the needle in close to the center, to the inside of the first fifteen wrap spiral bullion. Make the sixth fifteen wrap spiral bullion.

10. To make the first 22 wrap spiral bullion bring the needle up at 11:00 leaving a gap the width of one spiral bullion stitch. Backstitch about 20% of the way around the center fifteen wrap spiral bullions.

11. Make the first twenty-two wrap spiral bullion.

12. Make the second through seventh twenty-two wrap spiral bullions in the same manner as the previous color spiral bullions.
13. The eighth and final twenty two wrap spiral bullion is made by bringing the needle up at the halfway point on the seventh twenty-two wrap spiral bullion. Backstitch about 20% of the way around the center, bringing the needle in close to the fifteen wrap spiral bullions. Make the eighth twenty-two wrap spiral bullion.

14. Bring the green in about 2/3’s of the way up on the left hand side of the spiral bullion rose. Backstitch about 20% of the way around the rose.

15. Make a twenty four wrap spiral bullion. Make the second, third, and fourth green spiral bullions in the same manner.


16. Stitch the heart button at the indicated position. Use three strands of floss to outline stitch the stem line.

17. To make the bows draw a ¾” long line on a piece of paper. Mark the center point and the ends of the ¾” line.
18. Using ¼” wide silk/satin ribbon cut the end on a 45° angle. Fold the ribbon in on itself half the distance of the ¾” line and secure with a pin.
19. Fold in the second loop keeping the cut end of the ribbon on the inside and secure with the pin. Fold in a third loop directly behind the second loop and secure with the pin.

20. Fold in the fourth and final loop resulting with two sets of two loops stacked on top of each other and secure with the pin.

21. Cut the ribbon on the back side on a 45° angle.
22. Using a hand sewing needle and doubled thread in a matching color to the ribbon, bring the thread up through the center of the bow. Wrap the thread tightly around the center three times and tie off on the wrong side.

23. Use the center thread to tack the bow to the center of the stem.
ll
Gail Doane's Blog

- Gail Doane's profile
- 17 followers
Gail Doane isn't a Goodreads Author
(yet),
but they
do have a blog,
so here are some recent posts imported from
their feed.

