
Bill Loguidice's Blog, page 121
June 7, 2015
A quick look at utilizing Apple IIGS upgrades (photos and video)
Since I had to get my Apple IIGS in order for an upcoming game review for the Juiced.GS journal, I thought I would take a few photos (and a video) of what I did. Like any good test, I retrieved my ROM 01 Apple IIGS from its undisclosed location in my personal collection and did a quick setup on our dining room table to make sure everything was working. After having a mini heart attack when the monitor went all wonky, I isolated that issue to one of the monitor knobs getting turned. Once that was “fixed,” I was in business:
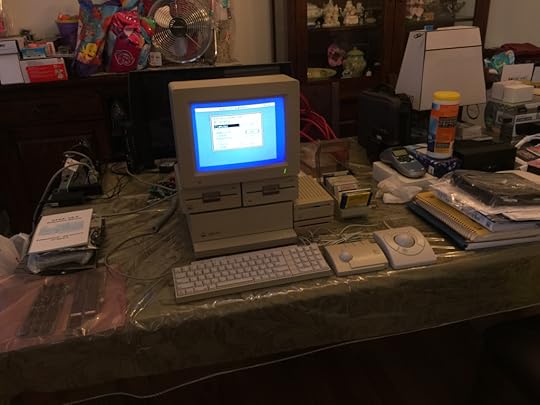
After a quick monitor adjustment, success.
On a side note, I’m not sure where I placed my IIGS mouse, and wasn’t about to tear my basement apart looking for it (it’s torn up enough at the moment), so that’s why I have the two ADB trackballs plugged into the Apple ADB keyboard (daisy chaining multiple keyboards and mice/trackballs was always a nice IIGS feature).
One of the first tests I did was with Nishida Radio‘s (pity he’s retired due to illness) component video adapter board. It’s a small board that plugs directly into the IIGS’s RGB port and provides near RGB quality video on the relatively common component video standard (Apple IIGS sound is normally piped through its internal speaker unless you make use of the headphone jack). I’ll show you a video later, but for now, here’s a quick photo of Shanghai running:

Apple IIGS outputting component video.
Once I confirmed I had a working setup, it was time to take my IIGS apart so I could prepare for the upgrades:

The inside of a stock Apple IIGS.
Removing the case cover is relatively easy, with just two clips to push in on the side as you lift, though of course mine was still a bit difficult to get off. Since my ROM 01 IIGS is stock, inside was a RAM card that was only partially populated. While I did have a fully populated original Apple card ready to go, I had something even better waiting to go in:

Three Apple IIGS RAM cards. The top is the original Apple fully populated RAM card (1MB). To the left is the same type of card (partially populated) that was in my IIGS. To the right is the newly manufactured Briel option, with a full 4MB of RAM. The choice was obvious.
Since the IIGS has a dedicated RAM card slot, it was easy enough to replace what was in there with the Briel Computers 4MB card. It’s smaller and obviously far exceeds the 1MB limit of the original Apple card. While you can get cards that go all the way up to 8MB, it presents some challenges, and 4MB is really all you need for the vast majority of everything you’d ever want to do on a IIGS anyway.

The 4MB card was obviously easy to pop in.
It’s always nice for something to work on the first try and without any additional configuration:

4MB RAM confirmed.
Now, obviously what was missing here was a good flash-based solution. Luckily, I had two CFFA3000 cards on hand to try. I have a v2.0 unit that just has a compact flash slot, as well as a revision C unit with compact flash slot, USB slot, and a remote control option (which I also have). The choice again was obvious, particularly since the v2.0 unit takes a lot more work to get going.
I stuck a 1GB compact flash card in my computer, put in the latest firmware for the CFFA3000 on the card, as well as the IIGS hard drive image for KABOOM!, the game which I’m reviewing for the next issue of Juiced.GS, and whose 2MB RAM requirement “forced” me to upgrade now, and I was in business. I put that card in the CFFA3000 and then insert the CFFA3000 in slot 7 on my IIGS. Once the CFFA3000 menu appeared on boot, I let it do its firmware upgrade. Once that was done, I then told it to boot to the KABOOM! hard drive image:

KABOOM! title screen on the IIGS. This is a direct video capture over component.
Now, I’m not going to go into KABOOM! here since you’ll have to read the next issue of Juiced.GS for that, but, as you can see in the image above, everything worked just fine. I did, however, do some additional testing, and that was try to load arcade conversion Rastan, considered one of the IIGS’s best games, off a USB drive via the CFFA3000. I’ll have a video of that a bit further down, but as you can see here, that also worked fine:

Rastan running off a USB drive via the CFFA3000.
Note the tangle of joysticks in the photo above. Joysticks tend to be the bane of my existence on Apple II systems. The only joystick I’ve ever had a consistently good experience with on the Apple II side is the pictured Kraft joystick. Other joysticks I’ve tried have trouble with the analog adjustments or use of both buttons, or something else annoying. The Kraft on the other hand requires minimal fiddling, feels great, and both buttons always work. Of course the classic Kraft has the old style motherboard controller connector designed for older Apple II systems, so I did need a simple adapter:

Adapting to the 9 pin port on the IIGS.
As you can see in the photo, it looks like something of a mess, but since I already had been using it on my Apple IIe Platinum, I knew it would work. Luckily, it also allowed for the needed two buttons on Rastan and once again proved why the Kraft is the one to get.
What follows is that quick video I took. Once again this is with component video out on the RGB port, going into an XRGB-mini Framemeister and then an AverMedia Live Gamer Portable capture device. The IIGS audio, which normally plays on the internal speaker is being routed through the IIGS headphone jack and straight into the AverMedia Live Gamer Portable:
So that about wraps it up for now. The only notable upgrade I’m missing for my IIGS is an accelerator, but that’s easier said than done, much like the nice-to-have stereo sound card.


June 3, 2015
Bonus photos (03) for the book, CoCo: The Colorful History of Tandy’s Underdog Computer
In the third of a series, I’m posting photos and related materials my co-author, Boisy Pitre, has received and archived during the research phase of our critically acclaimed book on Tandy’s (Radio Shack’s) Color Computer series, CoCo: The Colorful History of Tandy’s Underdog Computer. While the book itself contains quite a few exclusive images, naturally, there were many more that simply couldn’t fit. This is part 03, and the concluding entry for now, and is a companion to the Facebook page on the book, where you can see even more photos and additional commentary.
Boisy Pitre: “This is the photo of the CoCo 4 mock-up that John Prickett sent me via email on October 2, 2012. It was added casually at the end of his email, as though it were a postscript, but you can imagine my excitement when I saw it for the first time. Its existence was rumored but never verified until that moment. Bill Loguidice and I kept the secret about this for over a year, until the book came out in December 2013 (we did let a few select friends in on the existence of the mock-up, but they kept quiet).”

Boisy: “These are photos that I took during my trip to John Prickett’s house for his one-on-one interview. These pictures hold significance to me because they capture my meeting John (a true gentleman) and the Deluxe CoCo and CoCo 4 mock-up. John had these already sitting on his couch when I walked in. When I arrived I fully expected to see the CoCo 4 mock-up because he had emailed me a photo prior, but the Deluxe CoCo was totally unexpected.”

Frank Hogg on the pictured advertising photo: “I was looking for a springtime look for the photo shoot and Sherri brought some outfits she had, but none were what I wanted. It was about noon when we then drove to Dey’s department store in Shoppingtown Mall in Syracuse to look for something. It was the wrong season for what I wanted so she suggested the negligee. We looked in that department and Sherri picked some out and changed into them, came out and showed me each one, and, after several, we decided on that one. Sherri is tall, perhaps 6 feet, and taller than my 5’11”, and all woman. She was much younger that I at the time, perhaps 19 or so and I was about 40. You can just imagine the looks I was getting from the middle-aged women shoppers there. A pity no guys were around to give me the high 5 or thumbs up. Trivia: You can see the price tag just under the Flex manual… I gave the negligee to Sherri after the shoot and I never saw her in it again. It was all very professional and above board. She was a very nice person besides being drop dead gorgeous. She married a baseball player now I’m told.”
What follows are never before released photos of the RMS Prototype, the proposed Motorola graphics chip for the CoCo 3 that never saw the light of day:


June 2, 2015
Technology and the Licensing Deal Lure: How Companies Market their Products
The way brands create a connection to the mainstream and inspire people to pick up a product is constantly changing, but there’s one tried and tested method that hardly ever fails. That is a licensing deal with a popular cultural product. Borrowing iconography and themes from blockbuster movies and TV shows can add a sense of familiarity and excitement to any brand, regardless of its genre, and it’s something marketing experts have used to good effect over the years.
For example, Samsung is currently teasing comic book and movie fans with a special edition S6 phone. Emblazoned with Iron Man imagery, the new Smartphone not only looks fantastic, but meshes particularly well with the film’s focus on technology. Tony Stark, the man inside Iron Man, is a gadget guru so any association helps to give the S6 a lot more credibility.
Of course, the product is a technological marvel in its own right, but there’s no denying that a link to Iron Man is one that’s designed to enhance the subconscious appeal of the phone. However, this strategy is not unique to the technology sector. Almost every major industry has used licensing deals to help promote a product.
Not Much of a Gamble

Star Wars at the casino. Image by Lomo-Cam.
When you visit an online casino, such as TitanCasino, you’ll find slot machines bearing the imagery of popular TV shows and films, such as: Monty Python, Iron Man, the Hulk, X-Men, and more. Why do sites do this? Because everyone knows the Incredible Hulk and, when some recognizes something, they instantly feel more comfortable. Internet gaming providers like to welcome new players to their platform with a special offer. To unlock these offers the player will often need to use a special bonus code. However, if said player has never anted-up online, they may be slightly wary of what they’re getting into.
On first inspection, online slots can often be confusing to look at and when someone is unsure of something they’ll often avoid it. For this reason, operators such as TitanCasino like to use themed slots, such as the Incredible Hulk to make their games seem less alien and, therefore, more inviting. Using this strategy means a player is more likely to want to test out the game and, thus, sign-up and use the special bonus code.
A Classic Gaming Tactic
The same tactic can also be seen in the videogaming world. Taking it back to the old school, Konami’s The Simpsons was a hugely popular arcade game because it traded off the back of the TV show. Originally released in 1991 at one of the first heights of The Simpsons’ popularity, the game featured all the main characters and, therefore, imbued players with a sense of familiarity.
This ability to take a familiar concept and transpose it into a new sphere is something that piques the interest of the general public and, in the marketing game, interest equals sales. Samsung may be the latest company to jump on the licensing bandwagon, but it certainly won’t be the last.
Familiar Lures Hook Fresh Eyes

Lure. Image by derekGavey.
Indeed, attracting fresh eyes to something through a licensing deal means another new customer for the industry as a whole. Just because a player was drawn into the industry because of a certain game doesn’t mean that’s their only reason for being there. Using a brand as the lure is a great marketing strategy and one that will continue hooking new customers for many years to come.
June 1, 2015
Silicon Comfort+ Bluetooth Headphones Review
 Bluetooth headphones have gotten a bad rap over the years, and deservedly so. Whether it was their lack of comfort, poor battery life, poor sound quality, or high price, such issues caused most consumers to simply stick with wired headphones. Fortunately, recent generations of Bluetooth headphones paired to devices with Bluetooth 4.0 capability have solved nearly all of those issues, and are now just as worthy of consideration as most of their wired counterparts. Silicon Devices’ Silicon Comfort+ Headphones is one such product that may make you leave the wires behind for good.

Silicon Devices COMFORT+ box front.

Silicon Devices COMFORT+ box rear.
The Silicon Comfort+ Headphones come in a deluxe package. Contents include the headphones themselves with a default pair of rubber earpieces, additional rubber earpieces and earlocks, a shirt clip, a short MicroUSB charging cable, a carrying case, and an instruction manual.

Silicon Devices COMFORT+ case plus manual.

Silicon Devices COMFORT+ case interior showing the loose shirt clip.

Silicon Devices COMFORT+ package contents. Not pictured is the shirt clip.
It takes just a few hours to charge the headphones (officially about 1.5 hours for a full charge). Once charged, pairing is simple; add Silicon to your Bluetooth device list. The headphones paired right away with my iPhone 6 Plus, but these also work with Android, computer, and other devices that support Bluetooth. In supported devices, you not only get to listen to audio, but can take phone calls thanks to the built-in microphone.
The Silicon Comfort+ Headphones support Bluetooth CSR 8635 v4.0 + EDL at a working distance of 10 meters. Talk time is rated at four to six hours with a standby time of 150 hours. A built-in voice announces connection status.

Silicon Devices COMFORT+ functionality.
The sound quality of the Silicon Comfort+ Headphones is surprisingly good, if not quite perfect. Whatever sound processing is taking place in the headset delivers hiss-free vocals and instruments with strong bass response. The only real negative is that this processing made some of the music I listened to feel a bit sterile, i.e., too “clean” to me. With that said, I’m not sure if it’s fair to call that a negative in the traditional sense, since I’m not really used to that type of clarity from the other Bluetooth headsets I’ve been using. I suspect over time I’ll get used to the enhanced precision these headphones offer. Oh, and speaking of other Bluetooth headsets, the maximum volume these go to put other headsets to shame. These go to 11.
Despite the nice selection of included earpieces and earlocks, I found the default earpieces fit my ears perfectly, with a simple twist providing a nice, secure “seal,” helping keep unwanted sound out and the earphones in. The aesthetics and build quality are excellent, though I did sometimes find that the soft cord connecting the two earphones was a bit annoying on the back of my neck depending upon what shirt I was wearing (particularly with a collared shirt; no doubt the reason why a shirt clip is included). Access to the buttons is fairly intuitive and should become second nature with just a few days of use.
Finally, it should be noted that the headset is sweatproof, but not waterproof, so they’re ideal for vigorous exercise, but not swimming.
Although these are presently sold out on Amazon, they usually retail for just under $50 on there. With coupon code F3J3PFPD, you can even get an extra 10% off. Even without that discount code, though, these represent a tremendous value for the audio quality and included extras.
Special thanks to Silicon Devices for the review unit.
May 29, 2015
First impressions of the Apple Watch
After ordering on the morning of its first pre-order window, April 10, I finally received my 42mm Apple Watch Sport featuring Space Gray Aluminum Case and Black Sport Band, yesterday. These are my first impressions.
Even with the relative high cost of the watch, I didn’t expect much from the packaging. Instead, Apple went all out to deliver a premium experience, as you can in the photos that follow.

The size of the box the Apple Watch was shipped in was huge. It was also heavy!

Even the box inside the packaging is huge.

It’s like a Russian nesting doll. The case the watch itself is in is really nice, and I can see why the empty packaging is so appealing on eBay.

There it is!
Taking the watch out of all of that packaging, what impressed me was the small relative size of the watch. Even though I have the “large” 42mm (versus the “small” 38mm), I was still surprised it was as sleek as it was. I also wasn’t expecting much from the watch band – I mean after all, whatever fancy name you want to give it, I got the rubber band – but the way that it snaps and tucks is downright inspired. Again, say what you will about Apple and their price gouging, but they sweat the details.

The rubber band has no dangly bit thanks to its clever design.
My previous watch was a Pebble Watch (Kickstarter edition). It’s a good watch with excellent battery life and great water proofing, but I was looking for even more of the functionality I got a taste of with the Pebble.
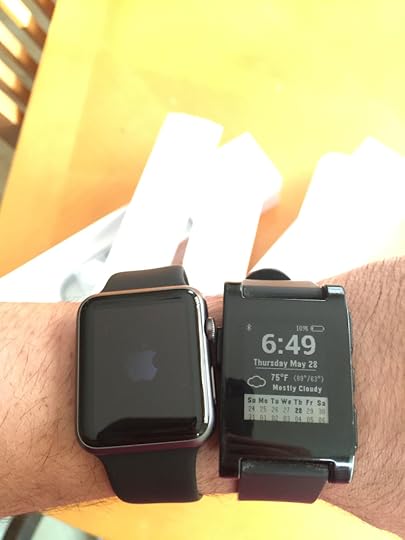
Hello Apple Watch, goodbye (?) Pebble.
Setup was relatively straightforward, though it did take a while to download the apps from my iPhone 6 Plus.

That’s a nice screen!
First things first, the interface is not intuitive. I think I have a handle on it after the first day, but it has no direct analog to typical smartphone or tablet interfaces other than the elements that you can simply touch. The combination of digital crown (a dial you turn and push) and secondary button, along with the touch screen and voice interaction, offer quite a bit to do on such a small screen, and, good or bad, there appear to be multiple ways of doing the same thing. It’s not necessarily a fault of the user interface design, but it is something to keep in mind for those expecting a familiar experience.
In early usage, I can’t help but think how the 42mm size still has a very small screen. I can’t imagine how someone could use the 38mm and still hit the touch targets properly, but my fingers aren’t the daintiest either. In any case, it’s definitely an attractive looking watch, although it’s undeniably an attractive looking digital watch, and could be mistaken for nothing else, at least in the version that I have.
I tried to go into every option on the Apple Watch phone app and then every option on the watch itself. It’s set up satisfactorily for now, although I suspect I’ll be getting rid of the watch app clutter and adding things back in slowly over time. As you can see in the image that follows, it’s a lot to take in. (To take a watch screenshot, press and hold the side button on your Apple Watch, then immediately press and release the digital crown. After you take a screenshot, you can find it in the Photos app on your iPhone.)

An actual screenshot from my watch showing how much relative clutter there is on my screen when allowing it to install all available apps from my phone.
I of course turned on things like the activity tracking and will be making specific use of it at the gym later today. I also used Siri a few times, as well as made a call. It seemed to work as well as you would expect, which means its good for convenience, but not something that would replace your phone (not that that’s even an option). The volume does get surprisingly loud, and I was able to play a podcast and hear it just fine on the tiny speaker. I didn’t test music out yet, but I don’t suspect that will be an issue, albeit not exactly a music hall experience.
While some people are bemoaning the lack of third party watch faces (and I made great use of them on the Pebble), the argument goes that Apple’s limited selection of options are designed to maximize battery life. For now that’s a reasonable enough argument, but something I would expect to be explicitly addressed in a second revision watch with 2+ days of battery life. As it is, I’ll be doing my best to tap all of its existing features and hoping for some really clever apps to be released this year.

This is the watch face I settled on, and is arguably the most useful. Each of the elements you see on the watch face are customizable with other info or app feeds. Some watch faces are more attractive, like the Mickey Mouse one, but no other one presents so much personalized information on one screen. Note the red dot, which means I have an unread notification.
In terms of water resistance, the Apple Watch is rated IPX7 under the IEC standard 60529. For practical purposes this means that the Apple Watch can be totally immersed in just over 3 feet (1 meter) of water for 30 minutes. However, testing is done in fresh water, not salt water, and that or the chemicals in a swimming pool may have other effects on an Apple Watch that I’m not willing to risk at this point. As such, while I’ve decided I’ll shower with the watch when at the gym (but not at home), I’m not going to swim with it anywhere (despite plenty of others already doing so to no ill effect), unlike my Pebble Watch, which I had no qualms about doing everything with.
For swimming, I’ll just revert to my ginormous atomic Casio Pathfinder watch (PAW-1100), which was designed to handle anything, or simply do without. Of course, I could also simply hold onto my well-worn Pebble (and just sell my wife’s Pebble, which she never really used anyway) for extreme use cases (I would of course have to reinstall the Pebble app first; I removed it from my iPhone because I don’t need the app running in the background). I’m assuming that future versions of the Apple Watch will allow for more aggressive water use, perhaps by eliminating or refining some of the potential failure points like the digital crown. Considering how the iPod, iPhone, and iPad evolved, it will fascinating to see the Apple Watch goes through a similar evolution past this first iteration. Of course, the more reports I read of continued use in pools and the ocean, I may very well end up breaking down and using my Apple Watch everywhere. I guess time will tell, but for now, my strategy is shower only.
Despite some struggles with the user interface, I like what I’ve been able to use in less than 24 hours with the watch. My impressions will no doubt evolve over time along with the watch itself. It should be fun.
To close, I wanted to quickly share an email I got from Apple about the watch. It again speaks to how, to go along with the high cost, Apple does try to treat you to a world class experience. It’s no doubt part of why they have such rabid fans. Here’s the email:
Dear Bill Loguidice,
Your Apple Watch will be in your hands shortly. Once it is, we can help you get started right in the comfort of your own home with online Personal Setup. It’s a video session* where we show you how to set up Apple Watch with your iPhone, walk you through some key features, and answer your questions. We’ll also point out some great apps, and help you personalize your device.
To take full advantage of your session, you'll need your Apple Watch, iPhone 5 or later, a high-speed Internet connection, and computer or iPad* to view a live video. iPhone requires iOS 8.2 or later.
Schedule online Personal Setup
Of course, you can always visit an Apple Store and request a Personal Setup session with a Specialist.
Thank you for choosing Apple.
*iPad requires iOS 8 or later.
May 26, 2015
Solid Cordz 5 Pack Male-to-Female 1ft AC Extension Cords Review
Whether you’re a 40 year veteran of videogames, computers, and technology like I am, or you’re a budding enthusiast, I guarantee there’s at least one problem we have in common: bulky power bricks. Whether relatively modestly-sized, like many of today’s smartphone or tablet chargers, or ginormously-sized, like say, Coleco’s ColecoVision power supply or Sega’s Genesis power supply, the problem remains the same. Even if you have a power strip designed to accommodate one or two oversized AC adapters, once you pass that limit, all of a sudden that four, six, or eight port strip has one or more of its precious slots blocked, defeating a good portion of its intended purpose. It’s an obvious problem with, fortunately, a simple solution from Solid Cordz.

The packaging for the Solid Cordz 5 pack.
Solid Cordz sells a five pack of their male-to-female one foot long three prong AC extension cords on Amazon for only $15.99 right now. The cables feature a premium housing, while still remaining flexible. They’re UL listed and CSA approved with a lifetime guarantee. Fully rated for heavy duty 125 Volt/13 Amp applications using 6AWG wire guage, there’s no question that they’ll be able to safely handle just about anything you can plug into one of them. This purpose built solution is obviously far safer and results in greater space saving than plugging in (daisy chaining) additional power strips or using overly long extension cords. These even make a great solution for creating a short extension for hard to reach outlets, e.g., those just out of reach behind a dresser or wall unit.
Frankly, with the number of systems I have and the number of times a week I need to plug and unplug various power adapters, I have a feeling I’ll be adding more five packs to my shopping cart. I can’t recommend these enough.
Special thanks to Solid Cordz for the review units.
May 25, 2015
Bonus photos (02) for the book, CoCo: The Colorful History of Tandy’s Underdog Computer
In the second of an ongoing series, I’m posting photos and related materials my co-author, Boisy Pitre, has received and archived during the research phase of our critically acclaimed book on Tandy’s (Radio Shack’s) Color Computer series, CoCo: The Colorful History of Tandy’s Underdog Computer. While the book itself contains quite a few exclusive images, naturally, there were many more that simply couldn’t fit. This is part 02 and is a companion to the Facebook page on the book.

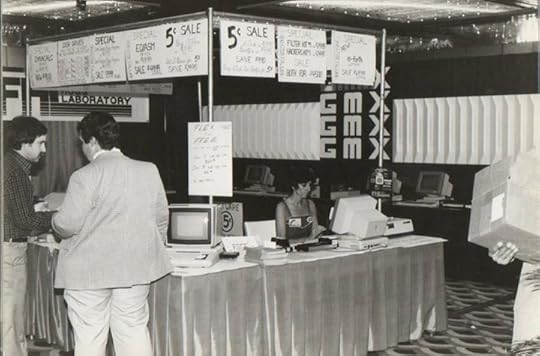
Image from Frank Hogg showing a Mark Data Products booth.

Image from Frank Hogg showing an early ad.

Chris Burke of Burke & Burke. According to Chris, “I think the board in front is an EPROM programmer that I built for early XT-ROM shipments; I later switched to Disto’s programmer. In that case the tall board in back is an IBM PC MFM hard disk controller, from before the half-size boards were common.”

Burke & Burke. Trisha Burke (left), Stephanie McDaniel (middle), and Chris Burke (right).

RMS prototype (courtesy of Ellis Easley).

Another booth. According to Frank Hogg, “Carol Sprague in the booth, Bob Phillips from GMX talking to Rich Hogg.”

Frank Hogg: “Karen from FHL.”
Frank Hogg: “Bob Phillips of GMX; Rich Hogg did all the software, drivers, etc., for Flex and OS9 and Carol Sprague behind the table.”

VIDEOTEX scan of material in engineer Jerry Heep’s collection.

VIDEOTEX scan of material in engineer Jerry Heep’s collection.

VIDEOTEX scan of material in engineer Jerry Heep’s collection.

VIDEOTEX scan of material in engineer Jerry Heep’s collection.

VIDEOTEX scan of material in engineer Jerry Heep’s collection.

VIDEOTEX scan of material in engineer Jerry Heep’s collection.

VIDEOTEX scan of material in engineer Jerry Heep’s collection.
May 24, 2015
Last call on an even better Coleco Adam power supply!
After receiving and using for a while what is now the third major (and countless minor) revision of Rey Lopez’s replacement Coleco Adam power supply, I can say with confidence that it’s perfected. It’s impressively small, is styled to match the Adam, has no fan, and features generous cable lengths. The only negative is that Rey has informed me that 2015 is the final year he’ll be producing these. The ordering deadline for the latest run is Thursday, May 28, 2015, with future runs the remainder of the year as demand dictates. In other words, if you want one, you’ll want to order soon, or at the very least get on his list for a future 2015 run.
You can read my review of the previous revision of this power supply, here, but again, for all intents and purposes he went back to the drawing board and created something that will be hard to top by other makers. Here’s a visual refresher on what we’ve had to deal with in Coleco Adam power supplies over the years:

Various Coleco Adam power supplies.
As you can see in the photo above, in the upper left is the original Coleco Adam power supply, which was also infamously its daisy wheel printer. To the top right is what many people have done over the years, and that’s extract the power supply from the printer and put it in a project box. It’s functional, but still quite heavy. In the lower right is Rey’s second major revision of his power supply, which again, I reviewed here. There was of course nothing particularly wrong with it, but the final revision, pictured in the lower left, just above the Coleco Adam Memory Console, is far better.

The new power supply looks sharp. To the far right is the power button, while on the bottom left is a power indicator light.

Putting the new power supply through its paces.
If you’d like to order or be put on a future list, you need to head on over to AtariAge. You can contact Rey directly through a personal message at his profile (rey_1178), here, or indicate your interest on his official forum thread, here.

One last photo of the power supply.
May 22, 2015
Bonus photos (01) for the book, CoCo: The Colorful History of Tandy’s Underdog Computer
In what will be an ongoing series, I’m posting photos and related materials my co-author, Boisy Pitre, has received and archived during the research phase of our critically acclaimed book on Tandy’s (Radio Shack’s) Color Computer series, CoCo: The Colorful History of Tandy’s Underdog Computer. While the book itself contains quite a few exclusive images, naturally, there were many more that simply couldn’t fit. This series resolves that issue; this is part 01.

A Brazilian CoCo clone (photo by Daniel Campos).

A Brazilian CoCo clone (photo by Daniel Campos).

A Brazilian CoCo clone (photo by Daniel Campos). Note the similarity to the Timex TC/TS2068 computers. Mold re-use was a relatively common practice, particularly in Brazil.

CoCo programmer, Rick Adams.

A momentous occasion for Rick Adams.

Tom Dykema at an event.

A computer tape duplicator setup (Tom Dykema).

63C09 newsletter (Torsten Dittel).

European CoCo photo from Torsten Dittel.

European CoCo photo from Torsten Dittel.

European CoCo photo from Torsten Dittel.

European CoCo photo from Torsten Dittel.
May 21, 2015
Apple Certified 3.4A Rapid Lightning Car Charger Review
Francois et Mimi’s 3.4A Rapid Car Charger (Model: 3ALBK1) bucks the trend of Apple iOS device chargers by coming in black, rather than white. While this may initially seem an odd choice (after all, Apple = white), it arguably blends in better with most car interiors.

Francois et Mimi Apple Certified 3.4A Rapid Lightning Car Charger packaging.
Style-wise, the 3.4A Rapid Car Charger is OK, but I wouldn’t exactly call it stylish. With that said, the bulbish charger portion with white script Francois et Mimi will likely be sight mostly unseen in many vehicles.
Similar to a previous product I reviewed, this has a coiled cord, but there’s also an uncoiled portion that gives it a little extra length over that other product. Nevertheless, the fact that that coil is still there does mean that its five foot total length is still restricted a bit versus cables that aren’t coiled. The coiling does have the advantage of keeping the cable more out of the way and cleaner in appearance, so if you don’t have a large distance from your car’s charging port to where you keep your phone, you may actually prefer this design. In my case, while it’s a bit too short for comfort in my Toyota Prius, it fits far better in my wife’s Toyota Highlander.

Francois et Mimi Apple Certified 3.4A Rapid Lightning Car Charger.
Spec-wise, the 3.4A Rapid Car Charger delivers. Its input is DC 12-24V with a lightning line out certified in Apple’s MFi Program (“Made for iPhone/iPod/iPad”) rated at DC 5V/2.4A for rapid charging, and of course offer over-charge protection. The sleeve on the lightning connector is suitably spartan so it should fit into most cased Apple products. It also has a standard USB out, which is rated at DC 5V/1A for slow charging any other USB-based device. Finally, there’s a one year warranty.
Special thanks to Francois et Mimi for the review unit.


