
Devin Alexander's Blog
September 25, 2018
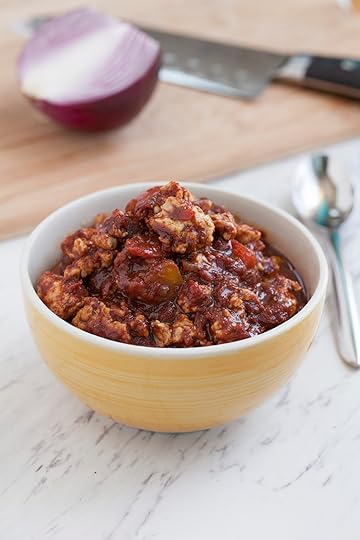
“You Won’t Really Die Crockpot Chili” a.k.a. Devinly Chili
 “You Won’t Really Die Crockpot Chili”Ingredients
Olive oil spray (propellant free)
1 medium red onion, coarsely chopped
2 pounds extra lean (99% lean) ground turkey breast
1 (28-ounce) can crushed tomatoes
1 (14.5 ounce) can no-salt-added diced tomatoes, drained
1 tablespoon + 1 teaspoon chili powder
2 tablespoons brown sugar
1 tablespoon cocoa powder
2 teaspoons chipotle chili pepper (found in the spice aisle)
1 bay leaf
¼ teaspoon hot sauce or more, to taste (optional)
½ teaspoon sea salt
Fresh ground black pepper, to taste
Heat a large, nonstick soup pot to medium-high heat. Lightly mist
it with spray. Add the onions and cook them, stirring occasionally,
until the onions are tender, about 5-7 minutes. Remove them from the pan, turn the heat to medium high. When the pan is hot, remove it from the burner just long enough to mist it with spray. Add the turkey and cook it, breaking into bite-sized chunks as you do, until it is no longer pink throughout and there is no excess water in the pan, about 5 minutes.
Add the onions back to the pan. Stir in the crushed and diced tomatoes, chili powder, sugar, cocoa powder, chili pepper, and bay leaf. Cover the pot with a lid, and cook over low heat for at least two hours, stirring occasionally. Season with salt and pepper to taste.
Enjoy immediately or refrigerate for up to 3 days.
Makes 8 servings.
Each (1 cup) serving has: 110 calories, 4 g fat, 1 g saturated fat, 0 g trans fat, 5 mg cholesterol, 190 mg sodium,435 mg potassium, 15 g carbohydrate, 3 g fiber, 3 g sugars, 4 g protein, 45 mg phosphorus


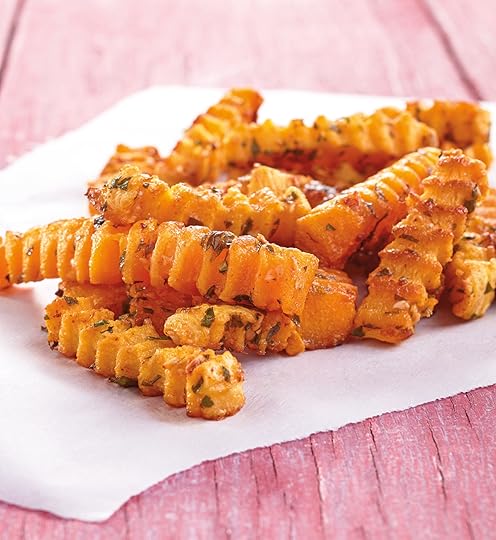
“Kevin’s Keep Your Girl Lava Fries” a.k.a. Garlic Squash “Fries”
 “Kevin’s Keep Your Girl” FriesIngredients
Olive oil spray (propellant free)
1 butternut squash (at least 2 1/2 pounds; not all will be used for this recipe) or 1 pound crinkle cut butternut squash sticks
2 teaspoons extra virgin olive oil1/4 cup shredded Parmesan cheese (preferably natural)
1/4 cup finely chopped flat leaf parsley
2 tablespoons freshly minced garlic
1/2 teaspoon ground paprika
1/8 teaspoon sea salt
Crinkle cutter
Preheat the oven to 325°F. Line a large baking sheet with nonstick foil. Lightly mist it with spray.
Cut both ends from the squash, then peel it, making sure to remove both the very outer layer of peel and the inner bit that is much lighter than most of the squash. Cut the squash in half lengthwise. Using a large spoon, scrape out the seeds. Cut the top portions just above the seeds off both halves (reserve the area with the seeds for another recipe). Using a crinkle cutter, cut 1/2 inch thick by approximately 4 inch long fry like pieces from the top portions until you have 1 pound of “fries” (reserve any excess with the bottoms).
Transfer the fries to a medium mixing bowl. Drizzle them with olive oil then sprinkle the cheese, parsley, garlic, paprika, and salt over top. Gently toss them until the fries are evenly coated.
Place the fries on the prepared baking sheet so they don’t touch. Bake them until the fries are caramelized and tender throughout, about 20–25 minutes per side.Enjoy immediately.
Makes 4 servings.
Each (about 1 heaping cup) serving has: 176 calories, 2.4 g fat, trace saturated fat, 0 trans fat, 45 mg cholesterol, 12 g carbohydrates, 3 g fiber, 3 g sugars, 30 g protein, 359 mg sodium
Cook’s Notes
This recipe calls for a squash that is at least 2 1/2 pounds so you can handle it with ease. You will have a hearty portion of the squash leftover to use in another recipe. But if you buy a smaller squash, it will be very difficult to get even, fry like pieces.
Recipe compliments of Devin Alexander from “You Can Have It!” copyright 2018, American Diabetes Association.“Can’t Forget Jack’s Birthday Banana Muffins” a.k.a Devinly Whipped Topping
 “Can’t Forget Jack’s Birthday Banana Muffins”Ingredients
For the cupcakes
Butter-flavored cooking spray
½ cup unbleached flour
½ cup whole grain oat flour
½ teaspoon baking soda
½ teaspoon salt
¼ teaspoon baking powder
½ cup mashed very ripe banana
½ cup brown sugar (unpacked)
1 large egg white
1/3 cup fat-free vanilla or banana yogurt (not Greek yogurt)
2¼ cups Devinly Whipped Topping
Recipe follows)
Devinly Whipped Topping
3 large egg whites (preferably cage free), at room temperature
1/2 teaspoon cream of tartar
1/4 teaspoon xanthan gum
3/4 cup light agave nectar
Cook’s Notes:
Note that this recipe could yield as many as 8 cups. With a recipe like this, there are so many factors that play into how aerated the topping becomes. If it yields more than 6 cups for you, then it will have even fewer calories and fewer grams of sugar than listed. I’ve never seen this recipe yield less than 6 cups, so, to be safe, we based the nutrition information on that yield for anyone who needs to closely monitor their nutritional intake.
Look for xanthan gum in the baking section or the natural foods aisle of major grocery stores or natural foods stores. I know this ingredient sounds scary, but I promise it’s not a chemical!
Recipe compliments of “You Can Have It” by Devin Alexander, copyright American Diabetes Association.Makes 96 servings.
Each (1 TB) serving has: 10 calories, 0 g fat, 0 g saturated fat, 0 g trans fat, 0 mg cholesterol, 0 mg sodium, 0 mg potassium, 2 g carbohydrate, 0 g fiber, 2 g sugars, 0 g protein, 0 mg phosphorus
InstructionsFor the cupcakes
Preheat the oven to 350°F. Mist 9 foil cupcake wrappers with spray and place them in a cupcake pan. Combine the flour, baking soda, salt, and baking powder in a small bowl. Stir with a fork until combined. Set aside.
Combine the banana, sugar, egg white, and yogurt in a large mixing bowl. Use a sturdy whisk or a spatula to mix until thoroughly blended. Add the flour mixture. Stir until no flour is visible. Then spoon the batter evenly among the prepared cupcake wrappers, filling them three-quarters full.
Bake for 22 to 30 minutes, or until a toothpick inserted in the center comes out dry (the toothpick should not be clean; it should be sticky, but not wet).
Cool in the pan on a rack for 10 minutes. Remove the muffins from the pan to the rack and cool completely. Frost each cupcake with 3 tablespoons Devinly Whipped Topping. Refrigerate any leftovers in an airtight container for up to 3 days.
Makes 9 cupcakes.
Each (1 cupcake serving) has: 112 calories, 2 g protein, 25 g carbohydrates, 2 g fat, 1 g saturated fat, trace cholesterol, 1 g fiber
For the Devinly Whipped Topping
Add the egg whites, cream of tartar, and xanthan gum to the bowl of a stand mixer and mix on medium speed until combined and the egg whites have just started to foam.
Pour the agave into a small saucepan and place it over medium heat. Making sure to watch it very carefully, heat the agave until it comes to a boil (it boils quickly and may burn if unattended even for a few seconds).
Turn the mixer to high and slowly and carefully pour the hot agave into the mixer (stand back, making sure that it does not accidentally splatter on you). Let it continue to whip until the topping is very thick and fluffy, has very stiff peaks, and has turned white.
Enjoy immediately and transfer any leftovers to an airtight plastic container and store in the freezer for up to 2 weeks.
Makes 96 servings
Each (1 TB) serving has: 10 calories, 0 fat, 0 saturated fat, 0 trans fat, 0 cholesterol, 0 sodium, 0 potassium, 2 g carbohydrate, 0 fiber, 2 g sugars, 0 protein, 0 phosphorus
“Kate’s New Favorite Ice Cream” a.k.a. Truer Love in A Bowl
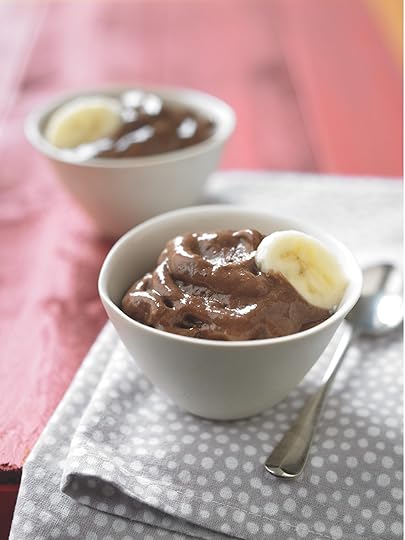 “Kate’s New Favorite Ice Cream”
Kate revealed her special bond with her dad was over ice cream!
Ingredients4 medium peeled frozen bananas (about 3 1/2 ounces each)
3 tablespoons natural peanut butter
1/4 cup unsweetened cocoa powder, or to taste
Break the bananas into a few pieces and place them in the bowl of a food processor fitted with a chopping blade. Add the peanut butter, then sprinkle the cocoa powder over the bananas.
Process the mixture on high, stopping the machine and scraping down the sides of the bowl as needed. It will take at least a few minutes for the bananas and cocoa powder to fully incorporate and become thick and creamy like ice cream. (Stick with it. The payoff is chocolate peanut butter decadence!)
Divide the mixture among 4 martini glasses, heart shaped ramekins, or other small bowls and enjoy immediately.
Makes 4 servings.
Each (1/2 cup) serving has: 170 calories, 7 g fat, 1.3 g saturated fat, 0 g trans fat, 0 mg cholesterol, 45 mg sodium, 520 mg potassium, 28 g carbohydrate, 5 g fiber, 13 g sugars, 5 g protein, 105 mg phosphorus
Cook’s Notes
If you want the banana flavor to shine through, use just 2 tablespoons of cocoa powder. If you’re like me and prefer this dessert to more closely resemble chocolate ice cream, use up to 4 tablespoons.
Recipe compliments of Devin Alexander from “You Can Have It!” copyright 2018, American Diabetes Association.“No Lemon So Sour Sober Lemonade”
Jack always said that there’s no lemon so sour you can’t make lemonade, making it the perfect drink for our party!
IngredientsLemons
Water
Zero calorie natural sweetener
Squeeze the juice from the lemons and add it to a pitcher. Add about 4 to 6 times as much water as fresh squeezed lemon juice, to preference. Add sweetener to taste. Add ice and enjoy.
September 19, 2018
Coffee Toffee Granita
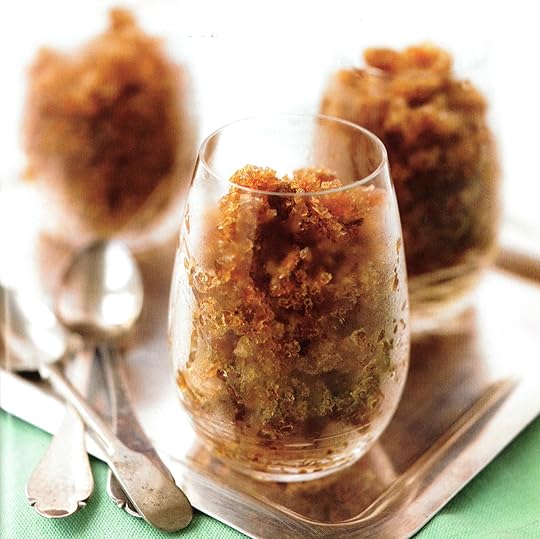 Coffee Toffee Granita
Make sure you use a bold coffee to yield the best results in this recipe. Brew is very strong (stronger than you would want to drink it), otherwise the granite could up tasting watery. And be sure to use a metal pan (not a glass one) so it freezes properly. Don’t use your nonstick pans—you need to be able to scrape your pan with a metal fork, and you don’t want to scratch the coating.
Ingredients2 cups double-strong brewed room-temperature toffee-flavored coffee (I used Don Francisco’s Butterscotch Toffee Flavored Coffee)
20 drops English Toffee Liquid Stevia (I used SweetLeaf), or to taste
Using a whisk, mix the coffee and stevia in a medium mixing bowl, until well combined. Pour the mixture into a 9” x 13” metal pan. Place the pan in the freezer, making sure the pan sits level. After 20 minutes, remove the pan from the freezer and scrape ice crystals from the bottom and sides of the pan using a dinner fork. Return the pan to the freezer. Continue the process of scraping the ice crystals every 20 to 30 minutes, returning the pan to the freezer immediately after scraping, for 2 to 3 hours.
When the coffee mixture is completely frozen, scrape the pan one last time, breaking the granite into small, fluffy flakes. Place the pan back in the freezer for 30 minutes to 1 hour, or until the granite flakes are fluffy and dry (no liquid should remain anywhere in the pan). Divide the granite among 4 margerita glasses or small dessert bowls and serve immediately.
Makes 4 servings.
Each (1 cup) serving has: 1 calorie, trace protein, 0g carbohydrates (0g sugar), trace fat, 0g saturated fatm 0mg cholesterol, 0g fiber, 2mg sodium
Recipe Credit: Reprinted from The Biggest Loser Dessert Cookbook by Devin Alexander © 2010 by Universal Studios Licensing LLLP. The Biggest Loser (TM) and NBC Studios, Inc., and Reveille LLC. Permission granted by Rodale, Inc., Emmaus, PA 18098. Available wherever books are sold. www.devinalexander.comAugust 15, 2018
Bacon Ranch Flatbread Pizza
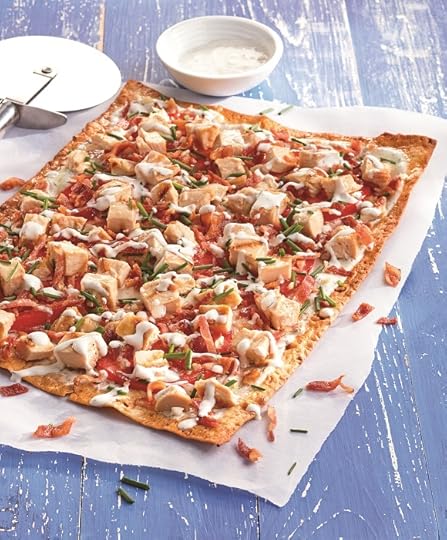 Bacon Ranch Flatbread Pizza
Ingredients
1 piece whole wheat lavash
1/4 cup plus 2 tablespoons Renovated Ranch (see below), divided
1 medium tomato (about 4 ounces), sliced as thinly as possible
1/2 teaspoon freshly minced garlic
2 slices center cut bacon (preferably nitrate free), cut in half
6 ounces extra lean leftover grilled chicken, cut into 1/2 inch cubes, reheated if necessary
1 1/2 tablespoons finely sliced fresh chives
1/4 cup light mayonnaise
1/4 cup plain fat free Greek yogurt
1/2 cup low fat buttermilk
1 tablespoon finely chopped fresh flat leaf parsley
1 teaspoon dried dill
1 teaspoon dried minced onion
1/2 teaspoon dried garlic flakes, chopped or dried minced garlic
1/2 teaspoon dry mustard
1/4 teaspoon freshly ground black pepper
1/8 teaspoon reduced sodium salt substitute
Preheat the oven to 400°F. Line a baking sheet (large enough to fit the flatbread so that it lays flat) with nonstick foil.
Place the flatbread on the prepared baking sheet. Crisp it in the oven, watching it carefully after a few minutes, until it is completely crisp (it should be cracker consistency throughout without being burnt), about 2–3 minutes per side. Note: It can go from crisp to burnt pretty quickly so be sure to watch closely.
Spread 1/4 cup of the ranch evenly over the lavash, leaving about a 1/2 inch outer perimeter of the lavash bare, as if you’re spreading sauce over a pizza. Add the tomato slices side by side over the ranch. Then sprinkle the garlic evenly over them.
Bake the pizza until the ranch is hot and the tomatoes are cooked, about 5–8 minutes, making sure that the outer edges aren’t burning (you can wrap foil around them if they are).
Meanwhile, place the bacon strips in a small nonstick frying pan. Cook them until the strips are crispy, but not burnt. Transfer them to a paper towel–lined plate to remove excess grease. Cut them into tiny slivers.
Remove the pizza from the oven. Top it evenly with the grilled chicken, chives, then bacon. Drizzle the remaining 2 tablespoons of the ranch over top. Cut the pizza into 12 equal pieces. Enjoy immediately.
Makes 2 servings.
CHOICES/EXCHANGES
1 1/2 starch, 3 lean protein
Per serving (1/2 pizza [6 slices]): 250 calories, 7 g fat, 1.5 g saturated fat, 0 g trans fat, 60 mg cholesterol, 400 mg sodium, 370 mg potassium, 19 g carbohydrate, 2 g fiber, 4 g sugars, 27 g protein, 185 mg phosphorus
Renovated RanchI love sharing my recipes and creating dishes that I think people will enjoy! The biggest frustration for me is that different brands of the same food vary so widely, that my healthy creations could be “destroyed” depending on what brand is used. When I finally perfected this recipe, I was blown away by how closely it resembled full fat ranch dressing. But when my final recipe tester made it, it didn’t taste nearly as good. We realized that she used a different light mayo (a vegan one) than I did. So I’ve set up a section on my website so you can learn what brands of ingredients I’m actually using at any given time. Feel free to substitute for different brands anytime you like, but if you want to make the recipes the way they were intended, pop over to www.devinalexander.com/diabetes for the inside scoop on brands and secret chef tips and tricks!
InstructionsIn a small mixing bowl, using a small whisk, mix the mayonnaise, yogurt, buttermilk, parsley, dill, onion, garlic, dry mustard, pepper, and salt substitute. Transfer the mixture to an airtight container and refrigerate it for at least 1 hour, or up to 2 days.
Makes 8 servings.
CHOICES/EXCHANGES
1/2 fat
Per serving (2 tablespoons): 35 calories, 2 g fat, 0.3 g saturated fat, 0 g trans fat, 2 mg cholesterol, 95 mg sodium, 70 mg potassium, 2 g carbohydrate, 0 g fiber, 2 g sugars, 1 g protein, 30 mg phosphorus
Recipe compliments of Devin Alexander from “You Can Have It!” copyright 2018, American Diabetes Association.
August 13, 2018
Summer California Breakfast Sandwich
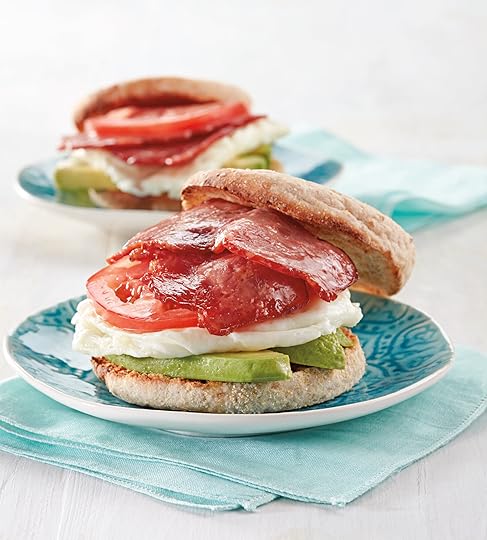 Summer California Breakfast Sandwich
Ingredients
Olive oil spray (propellant free)
2 large egg whites (preferably cage free)
1 (1 ounce) slice turkey bacon (preferably natural and nitrate free), cut in half crosswise
1 spelt or sprouted grain or gluten free English muffin (preferably natural)
1/4 medium avocado, cut into 3 slices
1 large (or 3 small) very thin tomato slices
Place a medium nonstick frying pan over medium high heat. When the pan is hot, remove from heat just long enough to lightly mist with spray. Off to one side, add the egg whites to the pan. As the egg begins to set slightly, use a silicone spatula to shape it into a rough 4 inch circle.
Lay the bacon strips side by side next to the egg so they do not touch. Allow the egg to set completely on the bottom, then flip and continue cooking until the egg is set throughout. Remove egg from the pan and cover on a plate to keep warm. Continue cooking the bacon until desired crispness is reached, about 1–2 minutes per side.
Meanwhile, separate the halves of the English muffin and toast them.
Place the bottom half of the English muffin on a plate. Add the avocado, the egg, the tomato, and then the bacon strips side by side. Cover the sandwich with the English muffin top. Enjoy immediately.
Makes 1 serving.
CHOICES/EXCHANGES
1 starch, 1 nonstarchy vegetable,
1 lean protein, 1 fat
Per serving: 190 calories, 8 g fat, 1 g saturated fat, 0 g trans fat, 10 mg cholesterol, 430 mg sodium, 350 mg potassium, 20 g carbohydrate, 3 g fiber, 2 g sugars, 14 g protein, 15 mg phosphorus
Cook’s Notes
I use spelt English muffins because they are the leanest and lightest of the whole grain options I’ve found. Be sure to read the nutrition labels of all options you’re considering. Don’t be “tricked” when reading labels, especially when it comes to gluten free English muffins. Most English muffin packages list a whole muffin as one serving, but I’ve noticed a few gluten free ones that are higher in calories and list a 1/2 muffin as a serving—who eats just half of an English muffin?!
If you want the eggs to be a perfect circle, use a 4 inch diameter cookie cutter. Be sure to spray the inside of the cookie cutter with olive oil spray so the egg doesn’t stick.
Recipe compliments of Devin Alexander from “You Can Have It!” copyright 2018, American Diabetes Association.
Pumpkin Pie Smoothie
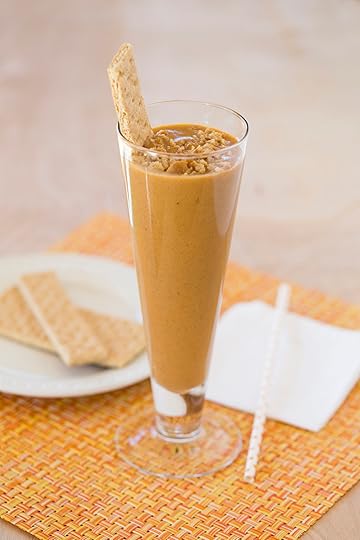 Pumpkin Pie SmoothieIngredients
2/3 cup canned pumpkin purée
1/3 cup 100% liquid egg whites (preferably cage free)
1/4 cup silken tofu (liquid drained before measuring)
1 teaspoon vanilla extract
1/4–1/2 teaspoon maple extract
2 1/2 teaspoons zero calorie natural sweetener
1/2 teaspoon pumpkin pie spice
1/2 teaspoon ground cinnamon
6 ice cubes
Add the pumpkin, egg whites, tofu, vanilla extract, maple extract, sweetener, pumpkin pie spice, cinnamon, and ice cubes to the jar/pitcher of a blender. Blend on high speed until smooth, stopping the blender intermittently to scrape down the sides as needed.
Pour the smoothie into a 12–14 ounce glass. Enjoy immediately.
Makes 1 serving.
CHOICES/EXCHANGES
1 starch, 2 lean protein
Per serving: 160 calories, 2.5 g fat, 0.6 g saturated fat, 0 g trans fat, 0 mg cholesterol, 170 mg sodium, 610 mg potassium, 18 g carbohydrate, 6 g fiber, 8 g sugars, 15 g protein, 130 mg phosphorus
Cook’s Notes
It is important that you use 100% liquid egg whites from a carton, not actual egg whites for this recipe and any others in which you’re consuming a raw egg product. The whites in the carton are pasteurized and safe to eat raw, while egg whites from whole eggs are not, and it’s too easy to get salmonella from consuming raw egg.
I personally prefer to use 1/2 teaspoon of maple extract in this recipe instead of 1/4 teaspoon, though the majority of my recipe testing team preferred 1/4 teaspoon of maple extract. But I like maple flavor more than the taste of cloves (part of the pumpkin spice blend). I recommend starting with 1/4 teaspoon of maple extract the first time you make the recipe, then increasing the amount if desired.
Recipe compliments of Devin Alexander from “You Can Have It!” copyright 2018, American Diabetes Association.
Happy Tummy Greens Juice
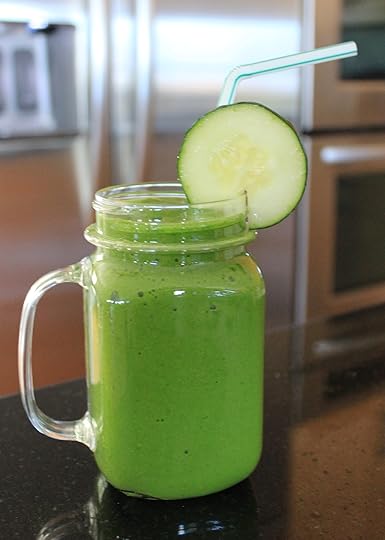 Happy Tummy Greens Juice
Parsley and ginger are known to settle a sick stomach and to help keep a healthy stomach in good shape. That’s why this refreshing juice is called Happy Tummy Greens Juice. I served this green juice in my restaurant and it was always a big hit, even among the vacation crowd, as a refreshing way to start the morning.
Ingredients1 medium (about 5–6 ounce) Granny Smith apple, cored and seeded
1/3 medium cucumber (about 3 ounces), ends trimmed
3/4 inch cube (about 1/3 ounce) fresh ginger
1 1/2 cups packed fresh spinach leaves
1/2 cup fresh parsley leaves (some stems are okay)
6 ice cubes
Cut the apple, cucumber, and ginger into quarters. Add them to the jar/pitcher of a blender along with the spinach, parsley, and ice cubes. Blend all ingredients on high for a few seconds until the ingredients start to incorporate.
Using a spatula, scrape down the sides of the blender, as needed, and continue to blend the mixture until it is completely smooth.
Transfer the juice to a 14–16 ounce glass. Garnish with a cucumber slice, if desired. Enjoy immediately.
Makes 1 serving.
Per serving (12 oz): 110 calories, 1 g fat, 0.2 g saturated fat, 0 g trans fat, 0 mg cholesterol, 80 mg sodium, 870 mg potassium, 25 g carbohydrate, 6 g fiber, 14 g sugars, 4 g protein, 90 mg phosphorus
Recipe compliments of Devin Alexander from “You Can Have It!” copyright 2018, American Diabetes Association.
Devin Alexander's Blog

- Devin Alexander's profile
- 10 followers

