R. Shannon's Blog, page 18
September 1, 2023
Writers Research – Tax Liens
 Yes, a tax lien on a company is a public record. This means that anyone can search for and view the lien, including potential creditors, investors, and the general public. The lien will typically be filed with the county recorder’s office in the county where the company is located.
 The purpose of a tax lien is to give the government a legal claim on the company’s assets if the company fails to pay its taxes. The lien will remain in effect until the taxes are paid in full.
There are a few exceptions to the rule that tax liens are public records. For example, if the lien is filed against a company that is in bankruptcy, the lien may be sealed. This means that the lien will not be available to the public.
Cops & Detectives can use this readily-available information to find out if a suspect is having money problems, or if he has suspicious business practices.
 If you are interested in finding out if a company has a tax lien, you can search the public records for the county where the company is located. You can also contact the Internal Revenue Service (IRS) to see if they have a lien on the company.
Since this is writer’s information, you can see what information a detective can get and where he can get it.
WHY WOULD THE POLICE WANT TO KNOW ABOUT TAX LIENS? Here are some of the reasons why someone (or a detective) might want to know if a company has a tax lien:
 Sometimes just having an overview of how things work can help you thicken the plot or add some details that will enrich the story. Below are some words and definitions that surround the subject of Tax Liens:


August 28, 2023
Writers Research – Bullets Shot Through a Silencer
 A gun silencer, also known as a suppressor, is a muzzle device that reduces the sound of a gunshot. It does this by slowing down and cooling the expanding gases that are released from the barrel when the gun is fired. Silencers do not completely silence a gunshot, but they can reduce the sound level by 20 to 30 decibels. This can make a significant difference in the loudness of the gunshot, making it much less noticeable to people nearby.
Silencers are legal to own and use in most countries, but there are some restrictions. In the United States, for example, silencers are regulated by the National Firearms Act (NFA). This means that you need to obtain a special permit to own a silencer.
COPS AND DETECTIVES USE BALLISTIC REPORTS A ballistic report is a record of the characteristics of a bullet, such as its caliber, weight, and velocity. Ballistic reports are used by law enforcement to identify the type of gun that was used in a crime. They can also be used to determine the range from which a shot was fired.
Ballistic reports are created by firing a bullet into a calibrated target. The target is then measured to determine the bullet’s caliber, weight, and velocity. The results of these measurements are then recorded in a ballistic report.
TERMINOLOGY USED BY POLICE OFFICERS AND DETECTIVES: Here are some of the terms that are commonly used in the field of gun silencers and ballistics:
 A silencer can leave markings on a bullet. These markings are called “tool marks” and they are caused by the rough interior surface of the silencer rubbing against the bullet as it passes through. The tool marks can be microscopic or macroscopic, depending on the type of silencer and the type of bullet.
The markings left by a silencer can vary depending on the type of silencer and the type of bullet.
The markings can be faint or difficult to see, so it is important for ballistics experts to have experience in examining silencer-fired bullets.
The markings left by a silencer are not always unique, so it is possible for two different silencers to leave the same markings.
Overall, the markings left by a silencer can be a valuable tool for ballistics experts. However, it is important to remember that these markings are not always conclusive and that other factors, such as the condition of the gun and the bullet, can also affect the markings.
HOW DO BALLISTICS EXPERTS AND REPORTS WORK? Ballistics experts can use these tool marks to identify the silencer that was used in a shooting. They can also use the tool marks to determine the distance from which the shot was fired.
In addition to tool marks, silencers can also leave other markings on bullets. These markings can include:
Rifling marks: If the bullet was fired from a rifled gun, the silencer can leave rifling marks on the bullet. These marks are caused by the grooves in the barrel of the gun.Gas pitting: The gas that escapes from the silencer can pit the surface of the bullet. This pitting can be seen under a microscope.Lead fouling: The lead from the bullet can foul the interior of the silencer. This fouling can also be seen under a microscope.Ballistics experts can use all of this information to determine if a bullet was fired through a silencer and, if so, what type of silencer was used. This information can be very helpful in solving crimes.Here are some additional things to keep in mind:
August 26, 2023
Writers Research – Throw-away or Burner Phones
 I am in the process of writing the fourth book in the Jack Nolan Detective Series. I had to do some research about cell phone and how the cops trace cellphones, but this is some other research about disposable phones. These are referred to by criminals and cops as burner phones.
They are purchased in a box at Walmart or Walgreens, places like this. Normal people use them to protect their identifies. For example, if you are having a garage sale and you don’t want to use your regular phone number, you can purchase a throw away phone for $15 to $45 dollars and it will protect your real phone number from getting out there.
 Husbands and wives who cheat also use burner phones that they hide from their spouses. They don’t have to worry about getting caught texting to their lovers.
 Drug traffickers also use burner phones. They use them so they can’t be traced by the cops. BUT, as you will read below, they are not foolproof. As a matter of fact, they are kind of easy to trace. If you watched the show, Better Call Saul, his system of selling the phones would work for the drug lords. It worked because Sol bought the phones in bulk in his name. He sold them to individuals for cash. So nothing would ever trace the phones to the people who bought them.
Knowing this is helpful to know what will work in a plotline and what won’t work. Below is also more info about how the police can track most phones that are purchased by the person using them at a big box store.
Can Police Detectives find people who use burner phones?Yes, the cops can find the identities of the people who were contacted using the burner phone if they have the right tools and resources. Burner phones are designed to be disposable and difficult to track, but they are not foolproof.
Here are some ways that the cops can find the identities of the people who were contacted using a burner phone:
Tracing the other party: The cops can get the burner phone number by seeing it on someone else’s phone, like a girlfriend or boss, etc. Once they have the burner phone number, they can get the following:Cellular data: The burner phone will likely have a SIM card that can be traced back to the person who purchased it. The cops can also get a warrant to compel the cellular carrier to provide them with records of the calls and texts that were made and received on the phone.GPS data: If the burner phone has GPS capabilities, the cops can use that data to track the phone’s movements. This can help them to identify the people who were in contact with the phone at certain times and locations.Social media: If the person who used the burner phone has any social media accounts, the cops can try to track them down through those accounts. They can also look for photos or videos that were taken with the phone and see if they can identify the people in the photos or videos.Physical evidence: If the cops find the burner phone, they may be able to find physical evidence that can help them to identify the people who used it. For example, they may be able to find fingerprints or DNA on the phone.Here are some strategies that criminals use to avoid being tracked by the cops if they use a burner phone:
They only use burner phone for short periods of time: The less time they use the burner phone, the less data the cops will have to track them. So plotlines may take this into account.They, of course, dispose of the phone once the crime has been committed.Most non-criminals who use burners phones use it to protect their identity for a specific reason, i.e., maybe selling a car online, having a garage sale, etc. Their use of burner phones are legal and the cops would have no way of knowing they used the phones.However, if criminals use the disposable phones for criminal reasons, that’s when the cops will be more likely to track them down.Be careful about what you say and do on the burner phone, even if you are just selling things online. The cops can use anything you say or do on the phone as evidence against you.It is also important to remember that burner phones are not foolproof. If the cops are determined to track you down, they will eventually be able to do so.August 25, 2023
Writers Research – How Police Can Get Financial Records
 I’m writing Book 4 in the Jack Nolan Detective Series and there is the possibility of a financial crime. I did some research on how detectives can get financial records. I mean, do cops just call and ask nicely? No, there has to be a warrant.
Actually, there’s a whole procedure about getting financial records. I cobbled this together from a few searches I did pertaining to getting records from a financial institution. I hope it helps.
HOMICIDE DETECTIVES NEED TO GO FORMALLY BEFORE A JUDGE FOR A WARRANT FOR FINANCIAL RECORDS Yes, homicide detectives need to formally go before a judge to get a warrant to see financial records. They cannot ask a district attorney to get it informally. This is because financial records are protected by the Fourth Amendment of the U.S. Constitution, which protects against unreasonable searches and seizures. In order to get a warrant, the detectives must show the judge that they have probable cause to believe that the financial records contain evidence of a crime. They must also specify the records they are seeking and the financial institution where they are located.
 The common procedure for obtaining a warrant for financial records is as follows:
 The detectives can also ask the district attorney to help them obtain a warrant for financial records. The district attorney will review the affidavit from a legal perspective and decide whether to file it with the court. If the district attorney does file the affidavit, the judge will still need to review it and decide whether to issue a warrant.
It is important to note that the detectives cannot simply ask the financial institution for the records without a warrant. The financial institution is prohibited from disclosing financial records without a warrant or the consent of the account holder.
The Fourth Amendment requires that warrants be issued by a neutral and detached magistrate, and that they be supported by probable cause. This means that the judge must be convinced that there is a reasonable basis to believe that the financial records contain evidence of a crime. The affidavit that the detectives file with the court must be detailed and specific, and it must support the conclusion that there is probable cause.
 If the judge finds that there is probable cause, they will issue a warrant. The warrant will specify the records that the detectives are seeking and the financial institution where they are located. The warrant will also be valid for a certain period of time, and for a specific type or range of records. After the expiration date, the warrant is void.
Once the warrant is issued, it will be served on the financial institution. The financial institution will be required to produce the records to the detectives. The detectives will then be able to review the records and see if they contain any evidence of a crime.
WHO SERVES (DELIVERS) THE WARRANT? The warrant is served by a law enforcement officer, such as a police officer or a sheriff’s deputy. The officer will present the warrant to the financial institution and demand that the records be produced. The financial institution is required to comply with the warrant, and they cannot refuse to produce the records.
In some cases, the warrant may be served by a private process server. A private process server is a person who is not employed by a law enforcement agency, but who is authorized to serve legal documents. However, private process servers are not typically used to serve warrants for financial records.
The person who serves the warrant must be careful to follow the procedures outlined in the warrant. If the warrant is not served properly, the financial institution may not be required to produce the records.
Here are some of the things that the person who serves the warrant must do:They must identify themselves as a law enforcement officer or a private process server.They must present the warrant to the financial institution.They must demand that the records be produced.They must keep a record of the service.If the financial institution refuses to produce the records, the person who serves the warrant may need to take further action, such as filing a Motion to Compel Production.
LANGUAGE FOR A WARRANT:

Here is a generic warrant form: You never know when you may need some of this verbiage when writing a police procedural.
I, [Your Name], being duly sworn, hereby depose and state:
I am a [Your Title] with the [Your Agency].
I am investigating a potential crime involving [Financial Business Name].
I have probable cause to believe that [Financial Business Name] has engaged in illegal accounting practices.
I believe that the financial records of [Financial Business Name] may contain evidence of this crime.
I request that a warrant be issued for the production of the following financial records:
All account statements for all accounts held by [Financial Business Name]
All transaction records for all accounts held by [Financial Business Name]
All internal accounting records for [Financial Business Name]
I have attached a copy of the financial records that I am requesting .
I declare under penalty of perjury that the foregoing is true and correct.
Dated: [Date]
[Your Signature]
This affidavit is just a template, and you will need to tailor it to the specific facts of your case. For example, you will need to specify the precise financial records that you are requesting. You will also need to provide more detail about the crime that you are investigating and the probable cause that you have.
Once you have completed the affidavit, you will need to file it with the court. The court will then decide whether to issue a warrant for the financial records.
August 24, 2023
Writer’s Research – Police Investigating Cell Tower Information
 In my last police procedural fiction book, I did some research on cell phones and the terminology used by police officers. I thought I would share it with other writers to save you the research time.
Cops and detectives use cell phone triangulation records in most cases now. So here is some basic information with many of the terms used. I hope this helps some other authors.
WHAT ARE CELL TOWERS: Cell towers, also known as cell phone towers or cellular towers, are tall structures that transmit and receive radio signals. These towers facilitate wireless communication between mobile devices and the network. Mobile phones connect to the nearest cell tower to send and receive voice, text messages, and data.
Cell tower pinging is the process of using a cell phone’s signal to determine its location. This can be done by sending a signal to the phone and having it respond with its location data.
How does cell tower pinging work? Cell phones communicate with cell towers by sending and receiving radio signals. The cell tower that a phone is connected to can be determined by the strength of the signal between the phone and the tower. By triangulating the signals from multiple towers, the phone’s approximate location can be determined.
HOW DO COPS USE CELL TOWER INFORMATION?
 When cops are researching where cell phones are pinging from, they typically use a process called cell site location information (CSLI). CSLI is data that records the location of a cell phone by tracking its connection to cell towers.
Is It Legal? In the United States, cell tower pinging is legal if it is done with a warrant or with the consent of the phone’s owner.
WHAT IS THE TERMINOLOGY:Cell Towers – General term for cell towersCSLI (Cell Site Location Information) is data that records the location of a cell phone by tracking its connection to the cell towers.IMEI + a fifteen-digit number is how each cell phone is identified. This number is assigned at the factory.The cell towers don’t have a specific name, they are known by their radio frequency.WHAT IS THE METHOD:
 Each cell tower has a unique identifier, which is called the International Mobile Station Equipment Identity (IMEI). The IMEI is a 15-digit number that is assigned to every cell phone when it is manufactured.
When a cell phone connects to a cell tower, it sends the tower its IMEI number. The tower then records this information in its logs.
Cops can obtain CSLI data from cell phone carriers with a court order. The data they receive from the phone companies will show which cell towers the phone has connected to and when. This information can be used to track the phone’s movements over time. So the cops don’t know the individual cell tower information. They get it with the phone information.
In addition to the IMEI number, cell towers are also identified by their location. This information is typically stored in a database called a cell site locator (CSG). The CSG is used by cell phone carriers to track the location of their towers.
The specific information that is included in CSLI records can vary depending on the cell phone carrier and the type of phone. However, most CSLI records will include the following information:
The date and time of the call or text messageThe phone number of the caller or recipientThe cell tower that the phone was connected to at the time of the call or text messageThe strength of the signal from the cell towerIn some cases, CSLI records may also include the latitude and longitude coordinates of the cell tower. However, this information is not always available.If you are writing a book about a crime, it is important to be aware of the role that CSLI can play in an investigation. CSLI can be a valuable tool for law enforcement, but it is important to remember that it is not always accurate. The accuracy of CSLI can be affected by a number of factors, including the strength of the signal from the cell tower, the location of the cell tower, and the type of phone.
CELL TOWER INFOMATION DISCLAIMER:However, it is important to note that CSLI data is not always accurate. The accuracy of the data can be affected by a number of factors, including the strength of the signal, the distance between the phone and the tower, and the terrain.
Overall, CSLI data is a valuable tool that can be used to track the location of cell phones. However, it is important to understand the limitations of the data before using it to make decisions.
WHAT IS THEIR AREA OF COVERAGE? The coverage radius of a cell tower depends on a number of factors, including the technology used, the height of the tower, and the terrain.
In general, a cell tower can cover a radius of 1 to 3 miles for 4G LTE and 5G cell towers. However, in some cases, the coverage radius can be as much as 10 miles.
For example, a cell tower using 5G technology with a directional antenna can have a coverage radius of up to 10 miles. However, a cell tower using 4G LTE technology with an omnidirectional antenna may only have a coverage radius of 1 to 2 miles.
The terrain can also affect the coverage radius of a cell tower. Mountains and hills can block the signal, so cell towers need to be placed in areas with clear line of sight.
In general, cell towers need to be built every 5 to 10 miles to provide adequate coverage. However, the specific spacing of cell towers will vary depending on the factors discussed above.
Here are some other factors that can affect the overall radius of a cell tower:
The number of antennas on the tower: More antennas can provide better coverage.The power of the transmitter: A stronger transmitter can provide better coverage.The frequency of the signal: Lower frequencies can provide better coverage over longer distances.The weather: Heavy rain or snow can block the signal.HOW TO DETERMINE WHICH CELL TOWER IS USED? This information is about how a cellphone customer can find out about their own cellphone towers. This wouldn’t be used by the police necessarily but it is information I came across during my own research.
There are several methods you can use to determine which cell tower your phone is connected to: · Use an app: Download a cell tower finding app like OpenSignal (iOS), (Android), Network Cell Info Lite (Android), or Cell Tower Locator (Android). These apps provide information about nearby cell towers, including the one your phone is connected to. · Check your phone’s settings: Some smartphones display information about the connected cell tower in the settings menu. Look for “Network” or “About Phone” options to find this information. ·
August 20, 2023
Writers Tip – How to Do Advance Reader Copies
 Is there anything worse than staring at an empty page and not knowing where to begin? I don’t think so.
When I was new, I liked the idea of offering an Advanced Reader Copy of my book. It sounded so easy. It is easy — but, there is a lot of planning involved and you need the right verbiage to ask for a favor without putting your readers off 
When I was new, I was so anxious to release my eBooks. Now that I’ve been doing this for a few years, I realize that the planning behind a book is crucially important. So my tip to newbies is to wait until you have the book back from the editor and the proofreaders. Only then are you ready to release as an ARC Copy.
WHY THE DELAY?The delay is for “reading time” and “pre-order time”. Both of these strategies will help you get reviews and drum up some buzz about your new book. You don’t want to miss out on posting about your book on social media with the following hashtags: #comingsoon, #newrelease, #releasedate, #ARCreaders, #preorders, #freeebooks — and more!
EIGHT WEEKS? Why eight weeks? You need to gather readers for at least two to three weeks to send them the book. They need at least two to three weeks to read the book. That takes you to 6 weeks. Now, if you are a beginner, I’m suggesting you plan your release eight weeks out.
If you will be using Bookfunnel or SiteOrigin to send out the book, you’ll need time for people to find it as the authors all send around the newsletters about the promotion at a different time.
Now, if you have been writing and releasing books for awhile, you can probably get this all done within 6 weeks. I’ll leave it up to you to figure out how you want to do it.
UPLOAD YOUR BOOK TO AMAZON WITH A PRE-ORDER DATE.Only set the eBook for pre-order. I tried to set the paperback once, but that went live! So only do the eBook. Once you upload it, record your ASIN nu
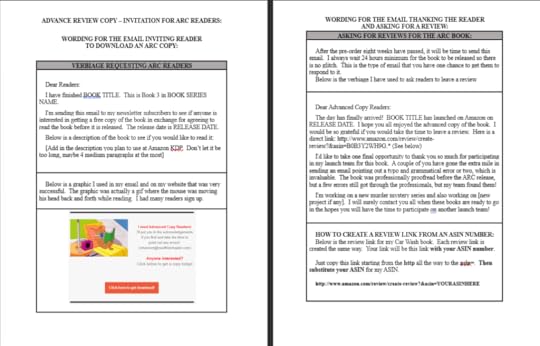
ADVANCE REVIEW COPY – VERBIAGE FOR AN INVITATION FOR ARC READERS:Dear Readers:
I have finished BOOK TITLE. This is Book 3 in BOOK SERIES NAME.
I’m sending this email to my newsletter subscribers to see if anyone is interested in getting a free copy of the book in exchange for agreeing to read the book before it is released. The release date is RELEASE DATE.
Below is a description of the book to see if you would like to read it:
[Add in the description you plan to use at Amazon KDP. Don’t let it be too long, maybe 4 medium paragraphs at the most]
Above is an ad I used on Social Media and on my website when I was looking for ARC readers for Murder in the Car Wash. I had over 25 people sign up. For newbies, that’s a lot. Not for Steven King or Nora Roberts, but for new self-published authors? It’s a lot.
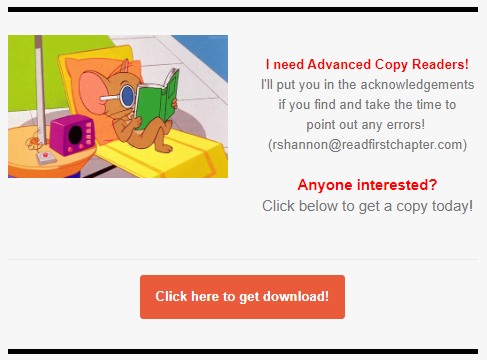
ADD CONTACT INFO:In the ARC copy, I use a page called Note to Reader where I thank them for reading the book. I add in a few words about liking to interact with my readers, and add my email in case any of them want to let me know what they thought about the book.
If anyone takes the time to email you and point out a typo or grammar mistake that got by the editor and proofreader, thank them. I also add them to the Acknowledgement Page in the book!
THE RELEASE DATE HAS ARRIVED: During the time you’re waiting for your ARC readers to finish reading the book, find time to prepare your Paperback and Hardcover manuscripts. This way, you can upload them on the day after your eBook release.
Why the day after? I never trust things 100% — a bit paranoid in today’s world. Maybe Amazon will have a website glitch, etc. I want to make sure the book is released before I send the emails to my ARC readers or publish my Hardcovers or Paperbacks.
WORDING FOR THE EMAIL INVITING READER TO DOWNLOAD AN ARC COPY:Here is an example of wording to ask for a review:
Dear Advanced Copy Readers:
The day has finally arrived! BOOK TITLE has launched on Amazon on RELEASE DATE. I hope you all enjoyed the advanced copy of the book. I would be so grateful if you would take the time to leave a review. Here is a direct link: http://www.amazon.com/review/create-r....* (See below)
I’d like to take one final opportunity to thank you so much for participating in my launch team for this book. A couple of you have gone the extra mile in sending an email pointing out a typo and grammatical error or two, which is invaluable. The book was professionally proofread before the ARC release, but a few errors still got through the professionals, but my team found them!
I’m working on a new murder mystery series and also working on [new project if any]. I will surely contact you all when these books are ready to go in the hopes you will have the time to participate on another launch team!
DON’T FORGET TO PUT A LINK TO LEAVE A REVIEW IN YOUR FINAL MANUSCRIPT!HOW TO CREATE A REVIEW LINK FROM AN ASIN NUMBER:
Below is the review link for my Car Wash book. Each review link is created the same way. Your link will be this link with your ASIN number.
Just copy this link starting from the http all the way to the asin=. Then substitute your ASIN for my ASIN, as shown below:
http://www.amazon.com/review/create-r...
Would you like to sign up for the ARC How To & Verbiage Cheat Sheet to do your own ARC copies? Click below to sign up to receive a link to download a copy.
Book Formatting – Ebook, Paperback & Hardcover
In this blog post I will explain how to go from an eBook template, to a Paperback Template and then to a Hardcover Template. What is the benefit of this? By doing it this way, you don’t have to start over each time with a different template and redo all of your styles!
REMINDERS FOR ALL MANUSCRIPTS:Be sure to remember to embed fonts into your documents. Go to File > Options > Save > Scroll down until you see this section about Embedding the fonts. Only check the first box. This information is from KDP.

EBOOK COVER SIZE: 1600 X 2560 – 300 dpi
If you will be using a cover on the web, make a copy of your eBook cover at 72 dpi. This will make your cover images faster to upload and download on the web.
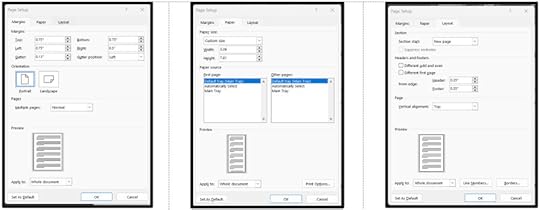
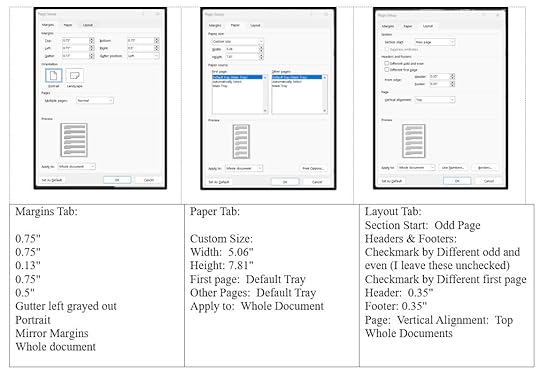
I use an 8.5 x 11 size paper but I have seen videos saying you can use the size of your paperback. But I’m teaching people the way I do it. To get to these settings, Click on the Layout Tab > Margins > Custom Margins. Below is a picture of the settings that I start with.
This formatting has no gutter and the pages are completely centered. That’s why I use this formatting.

NEXT STEP: Spend time changing your styles. You will need the following:
Normal – with indent of .02″
Normal-no-indent – for first paragraph after Chapter
Book Title
Book Subtltle
Book Author
Scene Ending, if applicable
I take away all of the styles that I won’t be using. This makes your template more sleek. You don’t have to comb through all of these styles that you will never use. In order to delete them from the gallery, right click on the style and choose to remove from the gallery.
FORMATTING THE PAPERBACK:KDP suggests you use Kindle Create to make the manuscript, but it was always too finicky for me. I use the same manuscript size for the paperback, 5.81 x 7.81 and just use only page breaks, no headers and no page numbers. I haven’t ever had a problem.
The following pictures are for the eBook and the Paperback. I’ll write them below.
Use simple page breaks. Don’t add page numbers or headers
FORMATTING FOR PAPERBACKS:You need to use section breaks at the end of each chapter so that your chapter pages are on the right hand side in the real-world paperback. That is considered an “odd page” The book title is the first page and you want that on the right-hand side.
You need to put in page numbers and headers for the Paperback.
You need a full total of pages. By skipping some even pages and numbering the first pages with Roman numerals, be sure you take the total page count from the bottom of your Word document. It will be more than your pages in the book. That is the number you will need to go to the Paperback book cover calculator
CHANGES FOR THE HARDCOVER MANUSCRIPT:
EBOOK COVER SIZE: 1600 X 2560 – 300 dpi
If you will be using a cover on the web, make a copy of your eBook cover at 72 dpi. This will make your cover images faster to upload and download on the web.
Paperback Hardcover Book Cover calculator: https://kdp.amazon.com/cover-calculator
Once you have the number of pages of your paperback, go to the calculator at the link above, and click through the calculator and choose what you want.
Then choose the proper trim size. I use Width: 5.06″
And Height: 7.81″. The proper size for your Paperback and Hardcover should be determined by the average in the genre of books you are writing to.
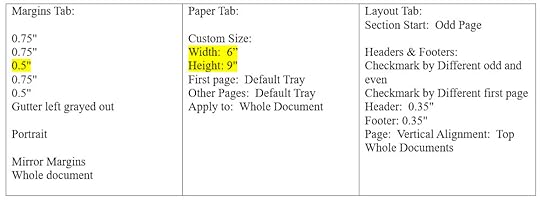
If you use 6” x 9” for your paperback, then you can use the same manuscript for the Hardcover and only have to redo your Hardback Book cover
Tip if you are using Gimp: Once you create your book cover graphic in layers, save the Gimp file and export to a jpg. Then open the jpg separately and export and save a PDF. I say this because when I was new, I was hours and hours trying to figure out why my text kept getting thrown off-kilter.
DO YOU WANT A CHEAT SHEET?
Click below to sign up to get a free download with all of this information on a PDF printout.
August 19, 2023
Testing MailerLite Form
Are you ready to offer a free Advanced Reader Copy? Why reinvent the wheel. Click below to download my Instructional and Cheat Sheet
Don't want to recreate the wheel? Sign up below to get my Advanced Reader Copy Verbiage Template!
Email Name Please be patient Thank you for sign up!
var selectedLanguage = ""; var validationMessages = messages["en"]; if(selectedLanguage) { validationMessages = messages[selectedLanguage]; } window.addEventListener("load", function () { var form_container = document.querySelector(`#mailerlite-form_3[data-temp-id="64e2121f3b886"] form`); let submitButton = form_container.querySelector('.mailerlite-subscribe-submit'); submitButton.disabled = true; fetch('https://readfirstchapter.com/wp-admin...', { method: 'POST', headers:{ 'Content-Type': 'application/x-www-form-urlencoded', }, body: new URLSearchParams({ "action" : "ml_create_nonce", "ml_nonce" : form_container.querySelector("input[name='ml_nonce']").value }) }) .then((response) => response.json()) .then((json) => { if(json.success) { form_container.querySelector("input[name='ml_nonce']").value = json.data.ml_nonce; submitButton.disabled = false; } }) .catch((error) => { console.error('Error:', error); }); form_container.addEventListener('submit', (e) => { e.preventDefault(); let data = new URLSearchParams(new FormData(form_container)).toString(); let validationError = false; Array.from(form_container.elements).forEach((input) => { if(input.type !== 'hidden') { if(input.required) { if(input.value == '') { validationError = true; if(input.nextElementSibling == null) { let error = document.createElement("span"); error.className = 'mailerlite-form-error'; error.textContent = validationMessages.required; input.after(error); } } } } }); if(validationError) { return false; } fade.out(form_container.querySelector('.mailerlite-subscribe-button-container'), () => { fade.in(form_container.querySelector('.mailerlite-form-loader')); }); fetch('https://readfirstchapter.com/wp-admin...', { method: 'POST', headers:{ 'Content-Type': 'application/x-www-form-urlencoded', }, body: data }) .then((response) => { fade.out(form_container.querySelector('.mailerlite-form-inputs'), () => { fade.in(form_container.querySelector('.mailerlite-form-response')); }); }) .catch((error) => { console.error('Error:', error); }); }); }, false); var fade = { out: function(el, fn = false) { var fadeOutEffect = setInterval(function () { if (!el.style.opacity) { el.style.opacity = 1; } if (el.style.opacity > 0) { el.style.opacity -= 0.1; } else { el.style.display = 'none'; clearInterval(fadeOutEffect); } }, 50); if( typeof (fn) == 'function') { fn(); } }, in: function(el) { var fadeInEffect = setInterval(function () { if (!el.style.opacity) { el.style.opacity = 0; } if (el.style.opacity < 1) { el.style.opacity = Number(el.style.opacity) + 0.1; } else { el.style.display = 'block'; clearInterval(fadeInEffect); } }, 50); } }
August 18, 2023
Gimp – How to Create a Hardback Book Cover from a Paperback Book Cover
 This is a shortcut for self-published authors and writers who are creating their own book covers. This will save you at least two hours in design time and even more if you are a beginner.
HOW DOES THIS WORK?

My chosen size for the Hardcover book is 6 x 9 inches. My paperback is in a 5.06 X 7.81. So I’m only going up about an inch. This technique won’t work if you need to grow your book cover much more than that. But with the amount of time saved, it may be worth the trial!
WHAT IS THE PROCESS? You need to get the proper hardcover template from KDP. There is a Paperback and Hardback calculator here
You need to know the exact number of pages your hardback book is. Special note to beginners: This isn’t the book page count. This is the real page count when you count all of the skipped “even pages” before the chapter odd pages. For example: My Sanctuary book has 257 pages but the real count is 262. So when I went to the KDP calculator, I entered 262 as the page count.
Once the KDP Hardcover Calculator creates the book cover template, download to your computer. You may have to open the zip file. If you have any trouble with it — like I did in the video below — try shortening the name of the folder. When I shortened the name, I was able to extract the files in the zip folder.
WHEN DO WE GO TO GIMP?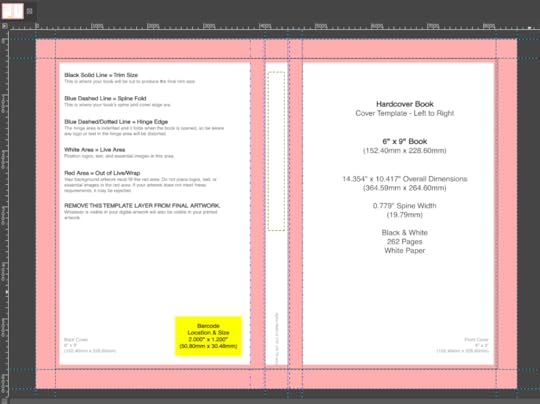 Open the hardback cover pgn document in Gimp. Everything in pink is margin. The spine text must fit into the white area in the center between the front and back.
The first order of business is to put guides around the pink margin areas. If you don’t know what this means, check the video below where I show you how to do it.
START WITH A JPG OF YOUR PAPERBACK BOOK COVER:Pull up a jpg of your paperback cover. You cant use the gimp file with all the layers. If you do, you will go insane. So make sure it’s a single document. If you saved it as a pgn, that will work too. Open the cover as one layer, either a jpg or a png file.
HOW TO COPY A SELECTION AREA IN GIMP:

Choose the Gimp Selection tool — it’s the second or third one in the top row — and drag a selection box around the front of your ebook.
Right click on the selection area and choose Edit > Copy visible. This tells Gimp to only focus on the selected area. Now it’s copied to your invisible clipboard.
Click on FIle > Create > From Clipboard. This will take the front cover from your clipboard and throw it into a new image. Save that as the frontcover.jpg. Do the same for the back cover.
Referring to the template with the pink margins above, bring in the front and back covers you just saved. File > Open as lawyer > find and click on the individual jpg files.
Once you bring in the front cover, click on the move tool, and put the front cover inside the white area in the template. Center it as best you can.
Click on the Resize tool and click on the front cover image. You will see a dialogue box come up and lines with boxes will form around your image. Hold your control key and grab one corner of the image and drag out slowly, making sure to fit the cover exactly into the white area. Avoid the spine area.
Repeat this process for the back cover.

This is what your cover should look like now. Just has the front and back in place. Notice that neither cover is going into the pink margin areas.
MAKE A NEW BACKGROUND:In my cover, I used a gradient as my original background color. As I demonstrate in the video below, using the color eyedropper, I made my foreground color the lighter olive green and the background color the dark olive green.
Then using the gradient tool and holding my shift key down to keep my line straight, I drew a line from top to bottom, inserting a new background that is the same as my original background.
WHAT ABOUT A PICTURE BACKGROUND?If you used a picture scene as your background, you will bring in the picture as a new layer. File > open as layer > and click on your background picture. Just as you pulled your front and back covers into place using the resize tool, do the same with your background.
NOW FOR THE BOOKCOVER SPINE: Once my background was in place. The only thing left was adding a new spine that fit exactly into place.
My text is white, so I changed my foreground/background colors back to black and white. I made sure my foreground color was white as that is the color the text tool pulls from.
Click on the text took and type in your title. Highlight it all and increase or decrease the size that will fit into the spinal area. Make sure you are looking at the guides. The title and author need to fit in the center of these guides.
Once I was finished typing and resizing my title, then it’s time to click on the rotate tool. This took throws up a dialogue box too. In this box, type in 90 in the top area. Then click Rotate. It will put your text into position to be moved into place using the move tool.
Do the same for the Author name. Special Note for Beginners: If you need to change the text after it is rotated, Gimp will need to take the text back to being text. Once you rotate it, it makes it into an object.
So if you need to do that, simple click on the right layer, and click on the text tool and then click on the title. Gimp will then automatically return it to being text only. Fix the text size and you will need to rotate it again.
YOU’RE DONE!Once you have created the new spine, you’re done. Save the document as a gimp file. Then export as a jpg file. I never save from a gimp file directly to a pdf, because when I do, I have had problems with the text falling off the page. It may have been corrected through the years with Gimp, but I still export first as a jpg and then I open the jpg and export that as a pdf.
BELOW IS THE VIDEO WHERE I GO THROUGH THE ENTIRE PROCESS.
August 11, 2023
Catholic – St. Clare of Assissi – Feast Day August 11th
 St. Clare of Assissi:
QUICK FACTS ABOUT ST. CLARE:
She was born in Assisi, Italy, in 1194 to a wealthy family. Her father was a cloth merchant and her mother was a devout Catholic.She was greatly inspired by the example of St. Francis of Assisi to give up her wealth and possessions to live a life of poverty and service to others.In 1212, Clare secretly left her home and family to join St. Francis and his followers. She was initially refused entry into the order, but St. Francis eventually relented and allowed her to join.She founded the Order of Poor Clares in 1212, a religious order for women dedicated to following the teachings of St. Francis.She wrote a rule for the order that emphasized poverty, simplicity, and obedience.She was a gifted mystic and had a close relationship with God. She often experienced visions and ecstasies. She also had a gift for healing the sick and the dying.Just two days before Clare of Assisi died, Pope Innocent IV’s papal bull, Solet annuere, written August 9, 1253, confirmed that Clare’s rule would serve as the governing rule for her community of Poor Ladies at San Damiano.Two days later, Clare died at the age of 59. Her remains were interred at the chapel of San Giorgio (where St. Francis’s remains had initially lain) while an adjacent basilica to hold her relics was being constructed. It was eventually relocated to her own chapel.She was canonized as a saint in 1255.For roughly six centuries, the body of St. Clare lay buried deep under the high altar of her basilica. in 1850, Pope Pius IX granted permission that excavations be made to search for the body of Clare.the stone coffin containing her body was found. When it was opened, it was discovered that St. Clare’s body, though blackened with age, was still incorrupt. She was buried with her poor tunic in addition to the rule that she had written.Her remains were put into a crystal coffin, which was placed in a newly constructed crypt (completed in 1872) within the basilica. The feast of the Finding of the Body of St. Clare, which was instituted by Pope Pius IX, is celebrated by the Franciscans and Conventuals, as well as the Poor Clares.