
Helen Hiebert's Blog, page 57
December 26, 2015
Paper Snowflakes in the White House
The Sunday Paper #87
Paper of the Week: Cotton Blend

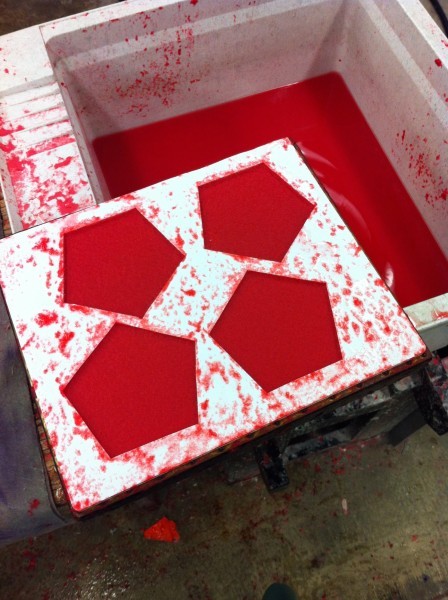
I’ve been trying to concoct the perfect watermarking pulp that also offers folding strength. In general, I’ve found that short cotton linters (beaten quite fine) yield crisp watermarked images. However, the pulp is so short that there is not much strength, so I been experimenting with various combinations of cotton (Cheney, 1st and 2nd cut linters) and premium abaca (highly beaten). A bonus that I didn’t expect is the sheen that the abaca provides – a luminessence in the sheets.
Do you have a recipe for a watermarking pulp that you like?
————————————————————————————————————––––––––––––
In the Studio: I’m using that pulp to make the pieces in the photo above, which is a new artists’ book in progress. It has several folded components, including an envelope that you might recognize from the 25 Days of Paper (top left); a fortune teller (top right); and a map-folded heart shaped watermarked piece that unfolds to become a four-leaf clover (bottom). There’s also a book component; more on that later.
————————————————————————————————————––––––––––––
What do you think 8,000 paper cut snowflakes look like? Like this! Has anyone visited The White House to see these in person? They say it is breathtaking, and I believe it.

Hand-cut paper snowflakes line the ceiling of the East Colonnade
It’s not everyday that you read about paper art in Africa, and this article includes an interesting profile about a young artist whose work deals with human trafficking. Paper II was recently exhibited at the Circle Art Gallery in Nairobi, Kenya. The works on paper – in all their variety from drawings, prints, photographs, collage, sculpture – were displayed in a unique fashion, hung on wires that criss-crossed the gallery space.

Check out this tiny (and I mean tiny) V8 Engine made almost entirely of paper, and it works!
Here’s a tribute to that movie which debuted this week. I’m not a follower of this particular cult, but this origami Yoda by Gonzalo Garcia Calvo is pretty cute!

Here is another article about papermaking in Africa, this one about making it from mahango stems in Namibia.
————————————————————————————————————––––––––––––
 If you enjoyed reading The Sunday Paper today, why not sign up to get it delivered to your in-box each and every Sunday? Click here to subscribe (it’s free), and you’ll receive my nifty pop-up alphabet template as a thank you gift!
If you read this blog regularly, would you consider making a donation to support the research, writing, design and delivery of The Sunday Paper? Click on that cute paper button (I made that paper) to see how you can provide support.
And if you run a paper-related business, you might be interested in promoting your business in The Sunday Paper.
Thank you to those who have pledged your support, and enjoy your Sunday!


December 24, 2015
Merry Day!
25 Days of Paper 2015, Day 25
I enjoy connecting with people in all sorts of ways, especially those from different walks of life. I often think of us as trees with branches and roots. Here’s a simple paper cut of a variety of trees, each one popped up and standing alone yet in a group. Their roots are golden as I envision our roots, continuing to grow and connect to each other in meaningful ways.

Thank you to everyone who participated in the25 Days of Paper 2015 (by reading or making)! Here is a pdf with quick links to the 12 projects we created this holiday season.

I’ve got ideas for more projects in the coming months, so please stay tuned for details in the New Year.
In the meantime, Merry Merry & Happy Happy!
Helen
–––––––––––––––––––––––––––––––––––––––––––––––––––––––––
About the 25 Days of Paper 2015: It’s a great time to celebrate paper, and I’m delighted to share my ideas for using this amazing material with you. Throughout December, I’ll be posting a paper tutorial on even days, and every odd day will bring news about paper artists, stores, distributors and more! Receive updates via e-mail by adding your address in the upper right hand corner of this page. Enjoy the season, and feel free to leave a comment below and check out what people are making in the 25 Days of Paper FB Group!
December 23, 2015
Origami Envelope
25 Days of Paper 2015, Day 24
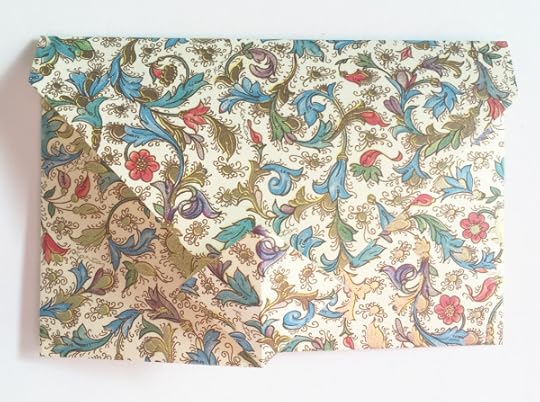
‘Tis the season to write thank-you notes! Here’s a clever origami envelope (not my design) that could be a nice use for wrapping paper. So, think twice before you toss that wrapping paper! This particular paper is an Italian printed paper from GPC Papers.
For this project you will need:
Florentine Portofino paper (9″ x 9″ square)
Bone Folder: optional
Ruler: optional

Step 1: Fold the square of paper in half diagonally with the printed design on the outside.
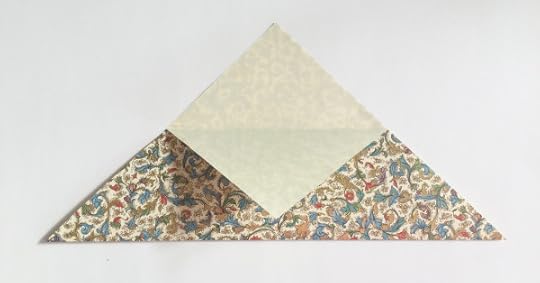
Step 2: Fold the top flap of the triangle down to the center point on the folded edge as shown.
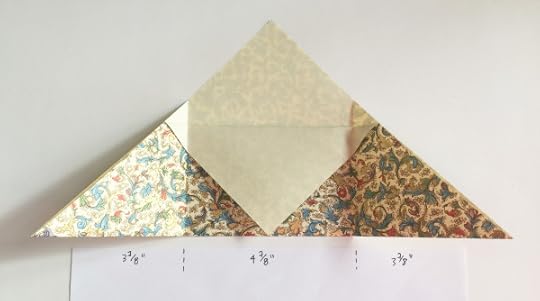
Step 3: You can guess at this step or measure, but basically you need to fold each side corner of the triangle in towards the center at slightly less than one third of the dimension of the bottom edge, keeping the bottom edges aligned. Fold the right flap down first, with the left flap on top (you can also do this vice versa).

Step 4: You do not need a ruler and bone folder for this step; it just depends on how precise you like to be. Either fold back that top left-hand flap in the center, or score the mini-triangle you see created to the right of the ruler in the photo above and then fold it back towards the left along the crease.
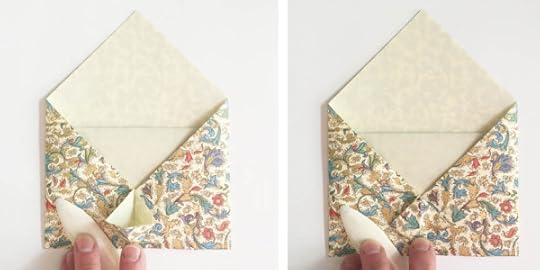
Step 5: Now create a squash fold (you can look this up if you need more visuals). Open up that little triangle that you just folded back and press the paper down to create a small diamond-shaped pocket and squash it down flat.

Step 6: Fold the top flap of your envelope down, tuck it into the diamond-shaped pocket and crease that last fold, forming your envelope.
NOTE: This particular envelope is too small to mail by itself (the post office has size restrictions). You can scale this up if you’d like to actually mail your envelopes!
I’d love to see what you create! Share your ideas in the comments box below and show us what you made in the 25 Days of Paper FB group.
This is our last project of the 25 Days. Check in tomorrow for a summary and a small surprise. Merry Christmas!
–––––––––––––––––––––––––––––––––––––––––––––––––––––––––
About the 25 Days of Paper 2015: It’s a great time to celebrate paper, and I’m delighted to share my ideas for using this amazing material with you. Throughout December, I’ll be posting a paper tutorial on even days, and every odd day will bring news about paper artists, stores, distributors and more! Receive updates via e-mail by adding your address in the upper right hand corner of this page. Enjoy the season, and feel free to leave a comment below and check out what people are making in the 25 Days of Paper FB Group!
December 22, 2015
Chiyogami Sample Box Subscription
25 Days of Paper 2015, Day 23

Hand screened chiyogami papers are the ambassadors of Japanese paper. They are immediately recognizable and beloved by artists and designers. The patterns are gorgeous, the printing of them is exquisite, the colors vibrant, and the range is amazing. You will likely have used chiyogami at some point in your artwork and this year we’d like to tell you more about these papers, inspire you to use them in your work and learn about the patterns.

There are more than 700 patterns of chiyogami currently available and Washi Arts has several hundred in stock at any one time for immediate delivery or ordering. While the patterns look wonderful on the website, it is not the same as seeing the paper for yourself, so Washi Arts has created a Limited Edition Sample Box with a hand-picked selection of 480 3” x 3” pieces of hand-screened chiyogami for reference and use in your studio over the course of the year ahead. You can learn more below or by clicking this link.
About Chiyogami
Wonderfully decorative patterns on paper, known as chiyogami, are silkscreened onto machine made sheets of mixed kozo and sulphite. They are more popularly known as yuzen in the United States.
Originally, chiyogami designs were developed in the Edo period as fine woodblock prints by papermakers during the farming season. They were based on the bright kimono textiles which the papermakers from the country saw on the fashionable wealthier ladies in the cities, especially Kyoto, where the Yuzen area had become famous for its sophisticated techniques for dyeing cloth.
The range of Chiyogami patterns is astounding, and Japanese designers today are tireless in their development of new fascinating patterns.
Washi Arts Limited Edition Chiyogami Sample Box Set
Starting in January 2016, you will be able to acquire a limited edition chiyogami box set of 450+ samples. Each month subscribers will receive a hand selected grouping of Japanese patterned papers. The monthly package could be a selection of of birds, geometrics, stripes, florals or traditional patterns. Some months will include custom, limited edition or rare patterns. Each mailing will include educational and inspirational information about chiyogami. In addition you will receive a subscriber discount code to enter on the website, if you wish to purchase full size sheets of any of the samples you receive in that month.
The starter package of box, dividers, and first set of samples is $45.00 and each month after that is $25.00. By this time next year subscribers will have acquired a set of close to 500 samples of hand-screened Japanese chiyogami paper. This set is limited to an edition of 110. The subscription fee includes mailing. If you live outside the US, please email info@washiarts.com for pricing.

Discount on Chiyogami
Readers of Helen Hiebert’s blog can purchase full sheets or half sheets of chiyogami and receive a discount of 15% on any chiyogami order until December 31st. Enter HELEN at checkout. If you are looking for a particular pattern or color, please contact Washi Arts. There are many more patterns available than are listed on the website. We offer a pattern matching service if you have a favorite Japanese paper you can no longer find.
–––––––––––––––––––––––––––––––––––––––––––––––––––––––––
About our Sponsor: Washi Arts sole focus is Japanese papers, tools and supplies for creative artists and businesses. By having this focus we can offer our customers the widest range of papers for a variety of uses. The papers offered are available in a wide range of fibers, colors, patterns, weights and sizes.
Japan has a culture that honors excellence in craftsmanship and the 1,400 years of continuous paper-making means the quality is excellent, the traditional methods are highly sustainable with the papers made from renewable fibers, in small communities, and family businesses.
–––––––––––––––––––––––––––––––––––––––––––––––––––––––––
About the 25 Days of Paper 2015: It’s a great time to celebrate paper, and I’m delighted to share my ideas for using this amazing material with you. Throughout December, I’ll be posting a paper tutorial on even days, and every odd day will bring news about paper artists, stores, distributors and more! Receive updates via e-mail by adding your address in the upper right hand corner of this page. Enjoy the season, and feel free to leave a comment below and check out what people are making in the 25 Days of Paper FB Group!
December 21, 2015
Origami Snowflake
25 Days of Paper 2015, Day 22
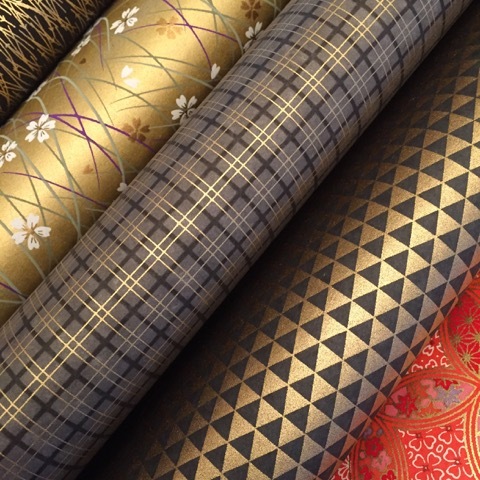
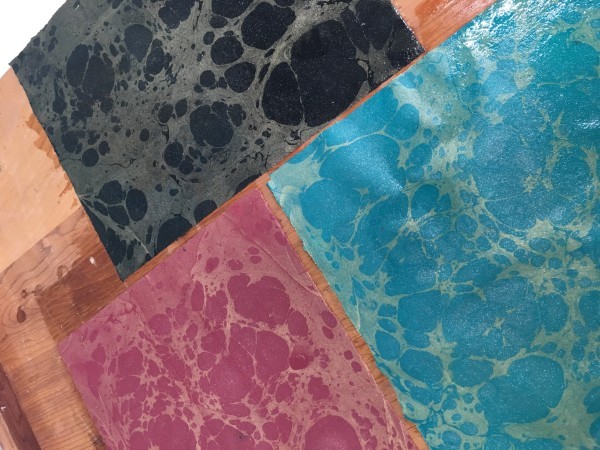
Find the Thai momi marbled paper in your paper pack (this shouldn’t be hard, since we have only two papers left)! The cutting we’ll be doing is called kirigami (there are entire books dedicated to this Japanese form of paper cutting). A quick lesson: origami is just folding paper, while kirigami is folding and cutting paper.
Although this might look simple, I highly recommend making a sample model before cutting into this lovely paper. You need to make sure that you get the folds right and that you cut on the correct edge of the paper, otherwise everything will simply fall apart!

For this project you will need:
This template
Thai Momi Marbled Paper
Scissors

Step 1: Fold the square of paper in half.

Step 2: Fold it in half again.

Step 3: And again!

Step 4: Fold in half one last time to get something that looks like this.

Step 5: Cut out the template and place it on top of your folded piece of paper as shown.
Step 6: Cut off both ends of your snowflake, as shown on the pattern.

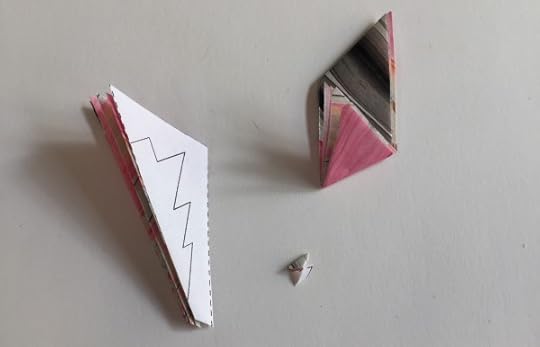
Step 7: Cut out the the tree. It is simpler to cut it out as four shapes (here you see I’ve cut the first shape) rather than trying to twist your scissors and the paper, cutting the tree shape out all in one go.

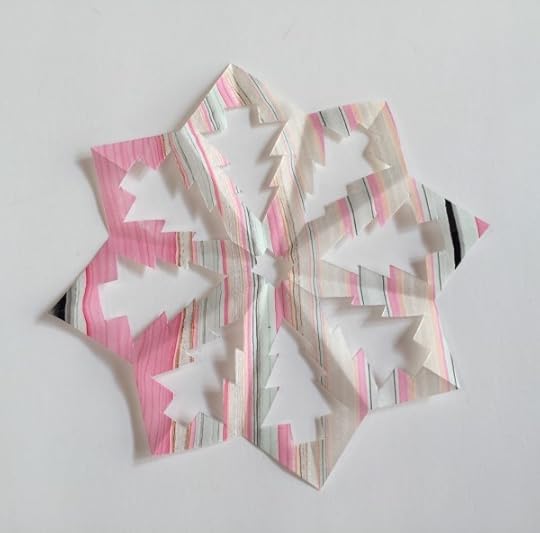
Step 8: Here’s my snowflake with all of the pieces cut out.
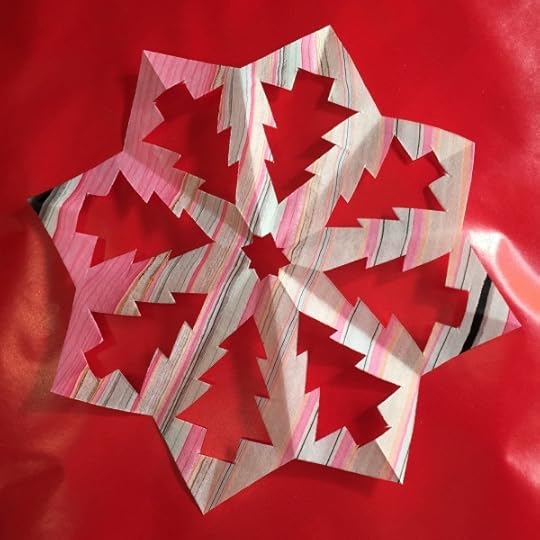
Step 9: Carefully unfold your snowflake.
Try your own cuts!
I’d love to see what you create! Share your ideas in the comments box below and show us what you made in the 25 Days of Paper FB group.
–––––––––––––––––––––––––––––––––––––––––––––––––––––––––
About the 25 Days of Paper 2015: It’s a great time to celebrate paper, and I’m delighted to share my ideas for using this amazing material with you. Throughout December, I’ll be posting a paper tutorial on even days, and every odd day will bring news about paper artists, stores, distributors and more! Receive updates via e-mail by adding your address in the upper right hand corner of this page. Enjoy the season, and feel free to leave a comment below and check out what people are making in the 25 Days of Paper FB Group!
December 20, 2015
Dip-cast Paper Jewelry from VERSO
25 Days of Paper 2015, Day 21

© VERSO 2015, Pistil Earrings
Melanie Brauner combines her training in papermaking and metalsmithing to create VERSO, her line of paper and metal jewelry. The forms are inspired by the homes insects build, such as coccoons, chrysalises, and hives, as well as other shapes found in nature, like the bends in a river, or the curves of a willow leaf, or the pistil of a flower.

Melanie first forms silver, copper, and brass into small frameworks, which are then dipped into abaca paper pulp. The paper fibers cling to the metal and create a webbed network in the open spaces, which shrinks as it dries. Over successive dips in more pulp, a tight paper skin is built up over the form. This technique is called dip-casting, and takes several days of dipping and drying to complete.

© 2015 VERSO, Petal Necklace
The resulting paper beads and pendants are sealed to make them durable and waterproof, and then turned into delicate necklaces and earrings using sterling silver wire and chain, and freshwater pearls.

© 2015 VERSO, Chrysalis Necklace
–––––––––––––––––––––––––––––––––––––––––––––––––––––––––
About our Sponsor: VERSO is a papermaking, metalsmithing, and bookbinding studio in Shoreline, WA. Owner and designer Melanie Brauner makes a line of abaca paper and metal jewelry, as well as hand-painted wrapping paper and gift boxes, hand-sewn bags, suminagashi marbled papers, and miniature book jewelry. She also makes custom books and boxes. Check all of these items out in the VERSO Etsy Shop.
–––––––––––––––––––––––––––––––––––––––––––––––––––––––––
About the 25 Days of Paper 2015: It’s a great time to celebrate paper, and I’m delighted to share my ideas for using this amazing material with you. Throughout December, I’ll be posting a paper tutorial on even days, and every odd day will bring news about paper artists, stores, distributors and more! Receive updates via e-mail by adding your address in the upper right hand corner of this page. Enjoy the season, and feel free to leave a comment below and check out what people are making in the 25 Days of Paper FB Group!
December 19, 2015
Cut & Punched Lantern
The Sunday Paper #86 +25 Days of Paper 2015, Day 20
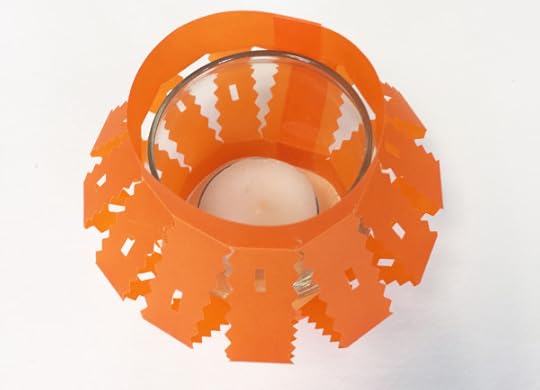
This is a super simple project, and vellum paper is perfect for it because it comes in bright colors, holds its shape nicely and is translucent. This project first appeared in my book Paper Illuminated. Find the red or orange piece of vellum in your paper pack (it is 3-1/2″ x 8″ for those of you using your own papers).
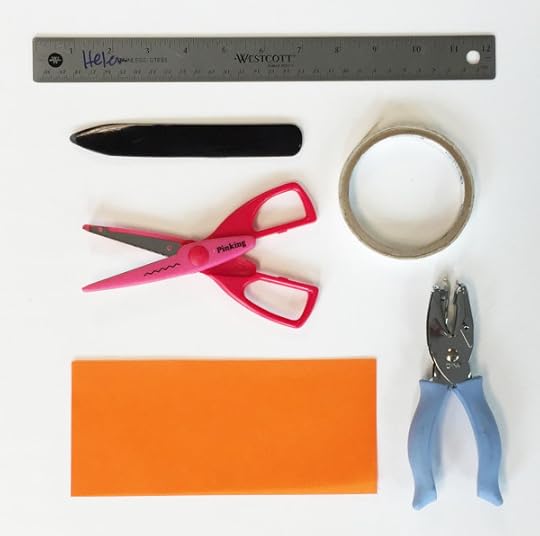
For this project you will need:
Red or orange strip of vellum paper
Ruler, craft knife, and cutting mat (optional if you want to cut straight slits)
Scissors (plain or deckled edged)
Bone folder (optional, I didn’t use one)
Double-sided tape or glue stick (vellum doesn’t do so well when it gets wet)
Decorative punch (optional)
Battery-operated tea light or glass candle holder with tea light

Step 1: Fold in Half: Fold the sheet of vellum in half lengthwise.

Step 2: Fold again: Fold the two edges up at about 1/2″ as shown.

Step 3: Cut Slits: If you look very carefully, you’ll see the slits I’ve cut to the right of the scissors. Cut slits through the fold, approximately 1/2″ apart. Be sure to stop cutting at the crease in the paper. Note that the lantern will fold best if you cut all the way to that crease.

Step 4: Punch: If you want, make decorative punches through the folded slits.

Step 5: Apply Tape: Apply a strip of double-sided tape to one of the short edges and attach the taped edge to the other short edge to complete this miniature lantern.

I happen to have this 2-1/4″ tall rounded votive holder, which the lantern fits around snugly. I’m guessing you won’t have this, but you might have a cylindrical or other shaped votive holder, or feel free to use a battery-operated tea light or votive.
I’d love to see what you create! Share your ideas in the comments box below and show us what you made in the 25 Days of Paper FB group.
–––––––––––––––––––––––––––––––––––––––––––––––––––––––––
Elod Beregszaszi contributed a project for my book Playing With Pop-Ups. He and I share a love for origamic architecture (cutting, scoring and folding paper without removing anything). He’s designed a cool lighting structure and is currently running a kickstarter campaign to fund the launch.
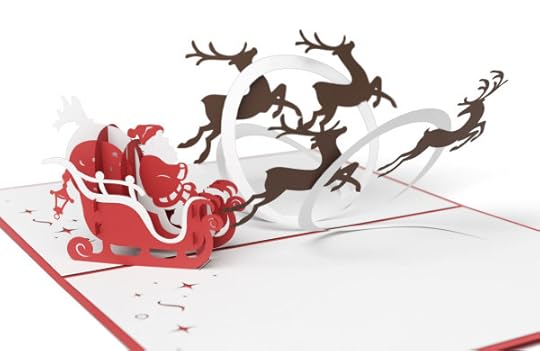
Do you know about Lovepop cards? They recently received a Shark Tank deal, and their mission is to encourage everyone to connect with those in their lives more often, and to do it in unexpected ways.
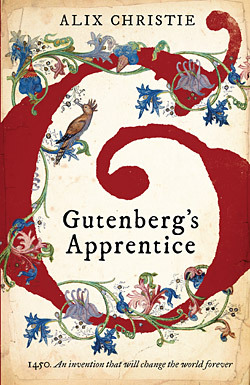
This is a two-fer: someone posted a link to this thoughtful article – The Gift of Apprenticeship – by Alix Christie, which reminded me of her book Gutenberg’s Apprentice, another excellent read! An aside: I spent a year in Mainz, where Gutenberg invented movable type and had the opportunity to live in one of the oldest houses in the center of the city Am Kirschgarten. It was charming!
–––––––––––––––––––––––––––––––––––––––––––––––––––––––––
If you enjoyed reading The Sunday Paper today, why not sign up to get it delivered to your in-box each and every Sunday? Click here to subscribe (it’s free), and you’ll receive my nifty pop-up alphabet template as a thank you gift!
If you read this blog regularly, would you consider making a donation to support the research, writing, design and delivery of The Sunday Paper? Click on that cute paper button (I made that paper) to see how you can provide support.
And if you run a paper-related business, you might be interested in promoting your business in The Sunday Paper.
Thank you to those who have pledged your support, and enjoy your Sunday!
–––––––––––––––––––––––––––––––––––––––––––––––––––––––––
About the 25 Days of Paper 2015: It’s a great time to celebrate paper, and I’m delighted to share my ideas for using this amazing material with you. Throughout December, I’ll be posting a paper tutorial on even days, and every odd day will bring news about paper artists, stores, distributors and more! Receive updates via e-mail by adding your address in the upper right hand corner of this page. Enjoy the season, and feel free to leave a comment below and check out what people are making in the 25 Days of Paper FB Group!
December 18, 2015
Recycled Cotton Papers from Repeat Paperie
25 Days of Paper 2015, Day 19

Repeat Paperie handmade papers are created from 100% recycled materials, mostly old cotton clothing.
This allows us to offer very vibrantly colored, soft papers.

Once the papers are dry they are ready for the letterpress! We use either polymer plates or our collection of lead type to create the text and/or images needed for our projects.

We are a brand new company and are slowly but surely expanding our portfolio to include holiday cards, invitations, stationery, business cards, and other paper goods.
About our Sponsor: The Repeat Paperie is a Memphis based stationery studio specializing in handmade paper and letterpress printing. We make handmade cards, gift tags, and party invitations. All of our handmade papers are made from recycled cotton clothing. Our designs are created in-house on polymer plates that we use for letterpress printing. The Tsunami Winter Farmers’ Market is kind enough to let us have a booth space during their Saturday markets and we hope to sneak into a few holiday sales as well. You can contact us at repeatpaperie@gmail.com if you are interested in purchasing our products! We are working on an Etsy page so stay tuned!
December 17, 2015
Peace Tree Card
25 Days of Paper 2015, Day 18

I designed this card several decades ago. I think it was for an assignment at the School of Visual Arts, where I took a few classes. I remember that my instructor was impressed!
My assistant made the denim paper this past summer. That’s right, you are holding 100% blue jean paper in your hands. Cool, huh? I had to fold it to fit it into your paper pack, but the fold aligns with that first fold between the P and the E.

You might want to make a mock-up before cutting the actual blue jeans paper. There are a few things that could go wrong… like accidentally cutting on a fold line.
For this project you will need:
This template
Blue denim paper
Ruler
Craft Knife
Bone folder
Cutting mat
Tape (to adhere template to paper)
Decorative items (optional)

Step 1: Tape Template: Rough cut the template and tape it on top of the paper, making sure that you line up that first fold to match the score line between the P and the E. Also make sure that the tree top isn’t sticking up over the edge of the paper (I almost chopped mine off)!

Step 2: Score: Cut along all of the solid lines.

Step 3: Score: Score along all of the dashed lines.

Step 4: Fold: Accordion fold your card!

Step 5: Trim the Tree: This is optional. I stitched snowflake/stars onto my tree, but you could also punch, stamp, draw, … you show me!
I’d love to see what you create! Share your ideas in the comments box below and show us what you made in the 25 Days of Paper FB group.
–––––––––––––––––––––––––––––––––––––––––––––––––––––––––
About the 25 Days of Paper 2015: It’s a great time to celebrate paper, and I’m delighted to share my ideas for using this amazing material with you. Throughout December, I’ll be posting a paper tutorial on even days, and every odd day will bring news about paper artists, stores, distributors and more! Receive updates via e-mail by adding your address in the upper right hand corner of this page. Enjoy the season, and feel free to leave a comment below and check out what people are making in the 25 Days of Paper FB Group!
December 16, 2015
Twelve Months of PaperLove
25 Days of Paper 2015, Day 17
Here are some papery prompts for the year ahead from Rachel Hazell, a book artist from Edinburgh, Scotland. Tag @paperhazell on Instagram to share your creations. I can’t wait to meet Rachel in person one day!
January
Paper wish list for 2016. Do you have any particular creative ambitions this year? Is there any project you’ve been meaning to start/finish?! Make a note of your dreams and hopes. Put it somewhere you can see it; on the fridge, or in the front of your diary.

February
Fold origami love hearts for your loves! Paper hearts are great for slipping inside envelopes for posting out to Valentine’s. Sign up to Rachel’s newsletter and receive instructions on how to make this one!

March
The PaperLove e-course unfolds on 14th March with five weeks full of papery passion, including origami, bookart, calligraphy and mailart. Here are all the goodies in the PaperLove Kit.

Photo credit: Uli Schade
April
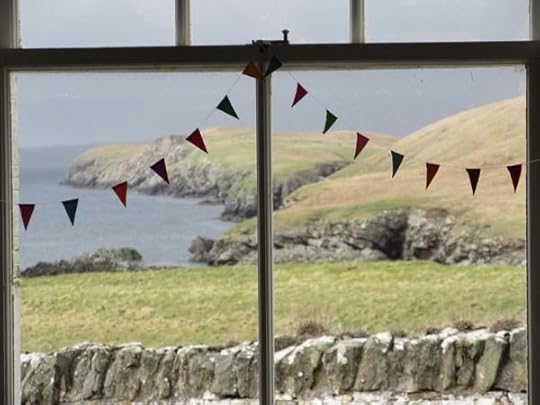
Spring bunting cheers any room! String together paper circles, stamps, sweetie wrappers, freehand triangles, simple rectangles, left over scraps of whatever paper you have to hand. Use a needle and thread or whiz on a sewing machine. Hang up for instant transformation. These cheeky little triangles adorned the Shetland Lighthouse Workshop last April.
May
Explore yourself with a mind map with a difference. Draw an outline of an island then fill it with words. These could be inspiring quotes, a description of your favourite place or simply the flow of feelings in your head. My map is wistful, thinking back to a time of freedom and flexibility, but also a reminder of what’s possible.

June
Send someone a postcard, even if you’re not on holiday! Find a rectangle you can put a stamp on and write a quick jaunty message. Of course you can send a card to yourself too. Here’s a fine selection of ships to choose from, at a specialist paper market in Paris.

July
A story can be as short as one sentence. Find a space where you can sit with book and pen for a few minutes. Write out what comes to mind. If you’d like the first line to start you off: “She slit open the envelope, unfolded the paper inside and began to read….”

August
With watercolour paper and plenty of water, paint a landscape. This could be as simple as a horizon line or a blue sky. I over-ruled my tendency for neat control by using a witches broom brush which splashes and scrapes ink around with unpredictable effects.

September
However old we are, I don’t think that back-to-school feeling ever goes away, does it?! Stock up on fresh art materials (or dig out what you have at the back of a cupboard) and get inky by writing loose lines of words or patterns and remember that this homework is for YOU.

October
Collage the season by assembling a collection of papers of the same tone. Use the colours around you. If you have autumn leaves, you could incorporate them as well. Rip, cut, lay out, shift about and glue down this moment. I picked out inky blues of autumn seas as a starting point before getting going with the scissors.

November
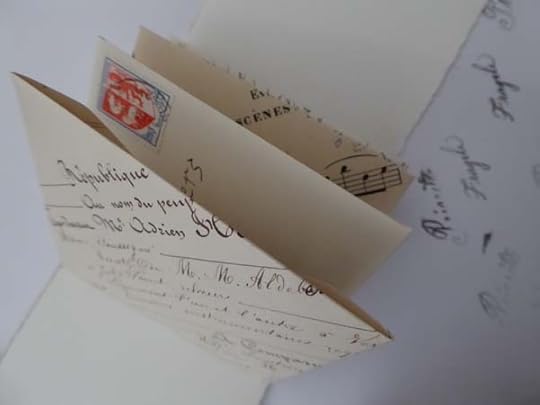
Writing Love Letters in Paris, binding them into a unique book made from hand-cut envelopes is a super-special experience. Only three paper lovers get to explore the best paper places with me on this exclusive workshop. Make your own envelopes and pen love letters on your favourite note paper.
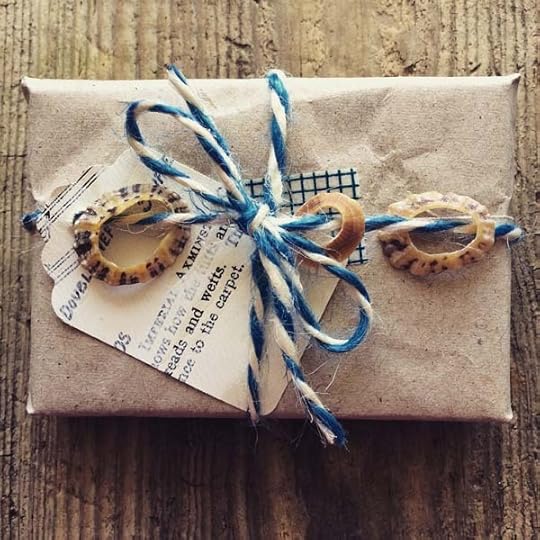
December
Wrapping up parcels is up there with opening presents in my book. I love choosing washi tape, tags, string and, of course, the paper. Experiment this month with developing your own style. Decide on white and silver, red and green, brown paper and string, repurposed old holiday cards, glitter, ribbon rosettes etc. As much of my year is spent on the Isle of Iona, this parcel reflects the surrounding landscape. Give the paperiest of gifts with an e-voucher!
About our Sponsor: Rachel Hazell teaches bookart round the world, and online with the PaperLove e-course. 2016 workshops include Iona, Squam, Amsterdam (details tbc), Arvon, and Paris. Her motto is Read Make Love Books!


