
Helen Hiebert's Blog, page 56
March 5, 2016
Art on Paper
The Sunday Paper #97
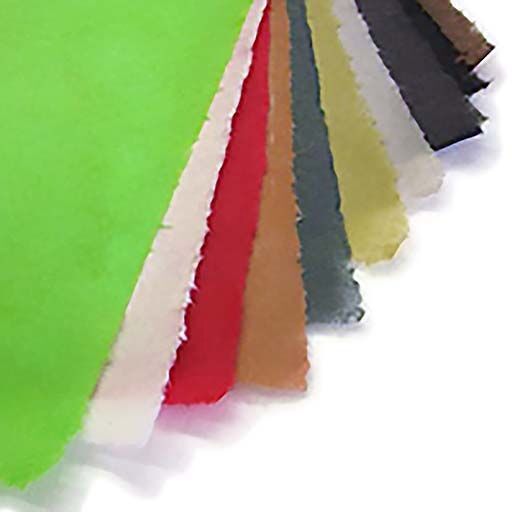
Sponsored Paper of the Week: Mingei Paper from Washi Arts

Mingei backed kozo unryu* – a wonderful Japanese paper for book covers and end papers
Washi Arts is excited to introduce you to another special Japanese paper – Mingei. This is a laminated paper, used in Japan for book covers. The top layer is kozo which is why the colors are so intense and the bottom or backing layer is sulfite / wood pulp.
Order one sheet of each color and save 25%; OR, order any sheet of Mingei through March 15th and save 15%: enter code MINGEI at checkout
Mingei is nice to the touch and flexible so makes for a special book, especially when bound Japanese style. Often you see Mingei as end sheets in hardbound books in Japan. Other uses for Mingei are box-making, a background for framed artwork and since it prints beautifully is great for a digital paper. Mingei is a 100g paper and is available in twelve colors – beige, chair, dark brown, dark green, deep blue, indigo, ivory, pale blue, lime, orange, pink and yellow. Sheet size is 25” x 37”.
Mingei means “folk craft ” and was the name of an cultural and creative movement at the turn of the 19th century when traditional artisan crafts in Japan began to disappear.
————————————————————————————————————–––––––––
In the Studio:
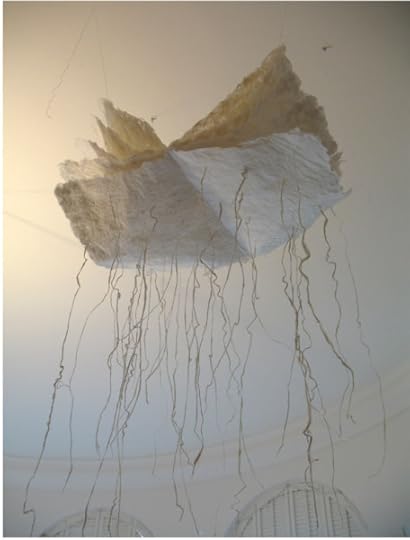
I confess. I only made it to the studio for a couple of hours this week! I’ve been busy getting a retrospective catalog to the printer, which will be published just in time for my exhibition at the Kalamazoo Book Arts Center in April. I should have a web page about the exhibition ready to share with you next week. In the meantime, here’s a sneak peek at one page spread from the catalog, featuring the beginning of a timeline plus a critical essay by Melissa Potter.

————————————————————————————————————–––––––––
Art on Paper ends today in NYC, but here’s a web page with some amazing images. I hope to one day make it to this fair!
I love paper globes, in fact I created a limited edition artist’s book called Handle With Care in 2013. Check out this selection of paper puzzles that you will be able to download later this spring.

Basic Origami Globe/Geografia
This is a lovely story about Moara de Hârtie (The Paper Mill) in Romania. Might be worth a road/plane/train trip!

You’ve probably heard of Robert J. Lang, and I featured his Ted talk on the blog awhile back. His website is an amazing resource for origami enthusiasts, filled with artwork, crease patterns, and more.

© Robert J. Lang
Here’s a fantastic origami video advertisement that I’m sure you’ll enjoy.
————————————————————————————————————–––––––––
About our sponsor: Washi Arts sole focus is Japanese papers, tools and supplies for creative artists and businesses. Contact us for recommendation on quality papers for bookbinding, printmaking, box making, book arts, framing, lighting, graphic design, printing and calligraphy.
————————————————————————————————————––––––––––––
 If you enjoyed reading The Sunday Paper today, why not sign up to get it delivered to your in-box each and every Sunday? Click here to subscribe (it’s free), and you’ll receive my nifty pop-up alphabet template as a thank you gift!
If you read this blog regularly, would you consider making a donation to support the research, writing, design and delivery of The Sunday Paper? Click on that cute paper button (I made that paper) to see how you can provide support.
And if you run a paper-related business, you might be interested in promoting your business in The Sunday Paper.
Thank you to those who have pledged your support, and enjoy your Sunday!


February 27, 2016
The Travelling Bookbinder
The Sunday Paper #96
Paper of the Week: Minter Dry-Tear Guard Strips

Minter Dry-Tear Guard Strip paper was the result of an inventive suggestion by bookbinder Bill Minter, who asked Tim Barrett at the University of Iowa if he could produce a sheet from which conservation guard strips (using in mending old books) could be torn dry, without the need to prewet, fold, or score. Watermarked lines divide each MDTGS sheet into 7mm width strips. Ingenious! The University of Iowa Center for the Book sells sheets of this gorgeous Japanese paper in three grades that they produce on site.
————————————————————————————————————––––––––––––
Sponsor of the Week: Rachel Hazell
Reserve your place in Rachel Hazell’s PaperLove e-course. Starting on March 14th, unfold five weeks of paper inspiration, packed full of ideas and projects to create, using bookart, writing, origami, hand-lettering and collage.

“This course has me giddy with possibilities!” -Karen Grace
Come on a PaperLove journey with Rachel aka The Travelling Bookbinder, who teaches all round the world. Discover new ideas with step-by step instructions via online videos and downloadable printouts, then share stories and your personal tips with an International community.
Read inspiring interviews with experts including Claudine Hellmuth and Monica Dengo. Delve into the curious history of pens and the postal system. Explore links to new artists and send beautiful letters to the like-minded friends you’ll make through the private PaperLove Facebook group.
Readers of The Sunday Paper can claim a special 10% discount using the code SUNDAY10. Sign up now at www.rachelhazell.com.
————————————————————————————————————–––––––––
Out of the Studio:
I’m in Iowa City lecturing, teaching and seeing lots of people I know. Yay! I also had the opportunity to visit the university’s production paper facility and interview Tim Barrett for an upcoming podcast and began an artist’s book collaboration with Emily Martin. Stay tuned!
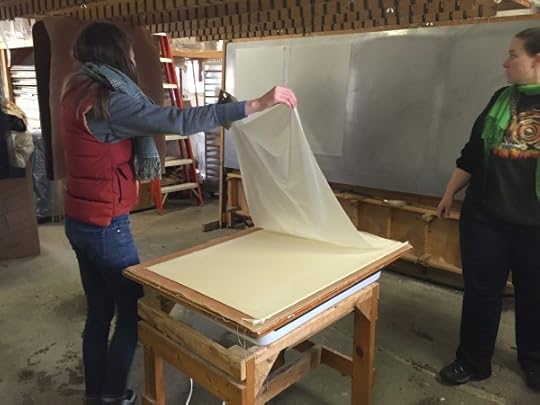
The crew transfer pressed sheets of Japanese paper onto the metal steam dryer.
————————————————————————————————————–––––––––
This is a lovely story about Origami for Africa, a program run by a Japanese woman named Kyoko Kimura. As you’ll read, these kids can learn origami even though they don’t speak the same language as their teacher. They look so proud of their work and are developing leadership skills too.

A reader recently told me about the work of Yuko Nishimura, who works primarily with folded paper, creating precise and elegant sculptures that have a strong architectural presence. The texture and shadows created by her intricate folding work are stunning, as you’ll see in this video.
Check out these unique paper collages by Albin Talik. Whoa!

These are the cutest, programmable Kamibots that are about the size of a coffee mug. These are based around Arduino, so kids can easily program them by using a drag-and-drop programming language like Scratch. They come with colorful papercraft skins that let kids dress up their Kamibots too.

Here’s a fun competition that I’m hoping to enter myself. Studio 360 is hosting, and they are asking us to de-file our taxes by coming up with a creative use of the tax form. Marketplace’s Kai Ryssdal is the judge! Find out how to enter here.
————————————————————————————————————–––––––––
About our sponsor: Rachel Hazell has over 15 years of experience in taking people on creative journeys. She has held creative workshops across the world – from palazzos in Venice to lighthouses in Shetland via Antarctica. Rachel trained in Bookbinding at the London College of Printing.
————————————————————————————————————––––––––––––
If you enjoyed reading The Sunday Paper today, why not sign up to get it delivered to your in-box each and every Sunday? Click here to subscribe (it’s free), and you’ll receive my nifty pop-up alphabet template as a thank you gift!
If you read this blog regularly, would you consider making a donation to support the research, writing, design and delivery of The Sunday Paper? Click on that cute paper button (I made that paper) to see how you can provide support.
And if you run a paper-related business, you might be interested in promoting your business in The Sunday Paper.
Thank you to those who have pledged your support, and enjoy your Sunday!
February 20, 2016
Paper Circle
The Sunday Paper #95
Paper of the Week: O-gami Paper from Paper Circle
O-Gami paper was originally developed for origami folders, but has many uses for anyone who works with paper. Each 22″ x28″ abaca sheet is archival, prized for its amazing strength and ability to withstand water, and in the case of the super-thins, its tissue-like thinness. Paper Circle offers a pallete of about 30 colors and sample booklets are available. O-Gami is available in two surface types (mattes and lusters) and three thicknesses: super thin (23 gsm) or medium (46 gsm) or super thick (72 gsm) and is the only paper of its kind available online.
————————————————————————————————————––––––––––––
Sponsor of the Week: Paper Circle
Registration is now open for Paper Circle’s second “In, On, Of Paper” juried exhibition. Tom Balbo of the Morgan Conservatory in Cleveland will juror all the paper, print and book arts submissions, and Robert Lang will juror the origami submissions. There will be first place prizes for both categories. A new Awagami prize has just been added. Submit your handmade paper, paper sculpture, origami, artist’s books, cut paper, stitched paper, and works on paper!
The entry deadline is July 15 and the show opens September 5, 2016.

Trusu Salt by Melanie Munns , courtesy of Paper Circle
————————————————————————————————————–––––––––
In the Studio:
I’ve been busy finishing up an edition of one of my artist’s books, Alpha, Beta, … which required recreating a paper that I developed several years ago, this alphabet paper. These sheets are saturated with pigment in order to achieve the deep wine color, and I like how the watermark appears subtly on the paper’s surface. This is an edition of 25 and features a unique Japanese hinge that flexes in both directions. Click here for more info.

————————————————————————————————————–––––––––
You HAVE to watch this charming video about Paper Circle, ‘nuf said!
One of my favorite parts of teaching is getting to meet other artists. I met Deborah Ugoretz at The Center for Book Arts in NYC last fall and found about about her work with cut paper. I recommend that you spend a bit of time on her website. I particularly liked this sentiment from her artist statement: “My expressive work deals with the dynamic balance between what is known and what is mysterious. I do this by exploring opposites such as negative and positive space, complementary colors or through an odd juxtaposition of images. I use the color spectrum as a vehicle through which the mysterious makes itself visible. For, if pure white light that we do not see, represents a spiritual force we cannot explain, then the colors of the spectrum are the way that this force is revealed to us”.
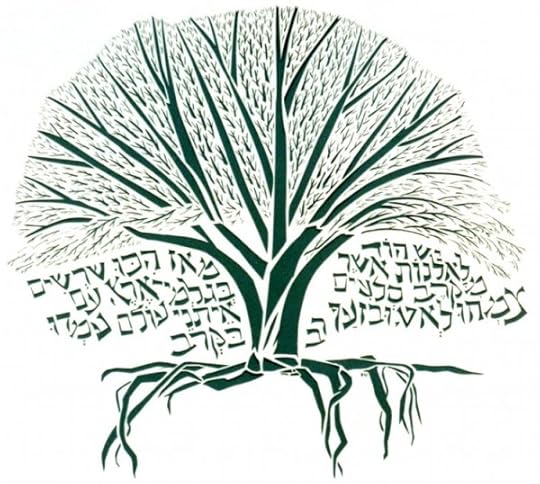
© Deborah Ugoretz, Sinking Roots
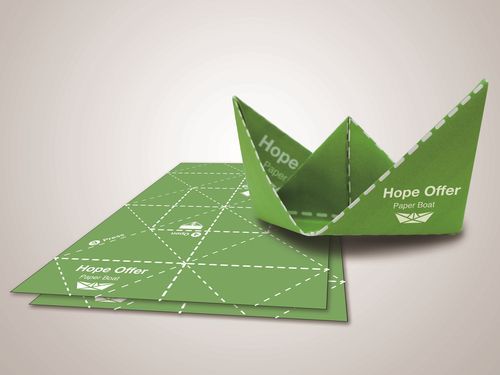
What will they come up with next? This is so clever: origami boats infused with insect repellent. A group of students at National Taipei University of Technology (NTUT) recently won an award for their design of a foldable paper boat infused with a herbal insect repellent. Their project, titled Hope Offer, is aimed at helping to eradicate disease-carrying mosquitoes in underdeveloped countries. How timely!
You may have seen this love stamp, but did you notice that it is quilled paper? Here’s a nice article about how the artist Yulia Brodskaya contemplated her design.

I enjoyed this article and video about the new Book Bikes (libraries on wheels) in New Zealand.
————————————————————————————————————–––––––––
About our sponsor: Paper Circle is a non-profit paper, print and book arts organization located in southeast Ohio. All proceeds from the exhibit go to support their mission of providing living-wages and free exhibition space for artists, holistic, arts-based enrichment programming for under-served teen and youth, educational opportunities for community, and enhancing the creative economy of the region by creating products that support their mission. Like them on FB!
————————————————————————————————————––––––––––––
If you enjoyed reading The Sunday Paper today, why not sign up to get it delivered to your in-box each and every Sunday? Click here to subscribe (it’s free), and you’ll receive my nifty pop-up alphabet template as a thank you gift!
If you read this blog regularly, would you consider making a donation to support the research, writing, design and delivery of The Sunday Paper? Click on that cute paper button (I made that paper) to see how you can provide support.
And if you run a paper-related business, you might be interested in promoting your business in The Sunday Paper.
Thank you to those who have pledged your support, and enjoy your Sunday!
February 13, 2016
Bendable Paper
The Sunday Paper #94
Paper of the Week: DIY Bendable Paper

When you mix paper and wire you end up a new material. I’ve embedded wires in between sheets of handmade abaca paper for years (they stick to each other during the papermaking process). But recently, I got the idea of making this bendable paper with readymade sheets. Here’s how this sheet was made (and of course, there are many variations).
Cut two pieces of Thai Unryu to approximately 12″ x 25″
Cut 18 gauge brass or copper wire into (15) 16″ lengths
Make a mixture of glue: 1/3 PVA and 2/3 methyl cellulose
Place one sheet of the paper on a sheet of freezer paper and paint it with glue (you might need to apply glue a couple of inches at a time, because it tends to soak into the paper and dry quickly). Space the wires approximately 1-1/2″ apart and parallel to each other. Lay the second sheet of paper on top, place another sheet of freezer paper over everything, and apply pressure (with a sponge or your hand) to make sure the papers adhere, especially where the wires are. Remove the top layer of freezer paper and allow the bendable paper to dry overnight.
We made lamps with bendable paper in my workshop at Paperworks in Tucson this week.
————————————————————————————————————–––––––––
In the Studio:

I’ve been teaching in Tucson this week and found this heart image amongst the cacti.
Happy Valentines Day!
————————————————————————————————————–––––––––
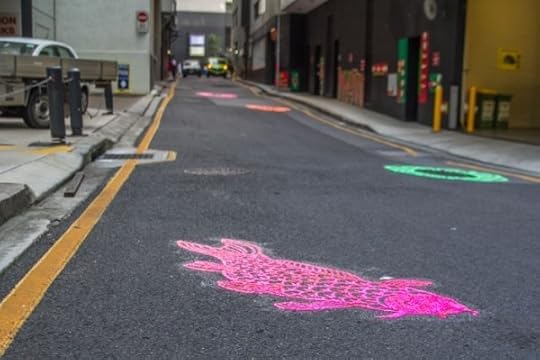
I love this: papercuts on the street! A Brisbane Australia laneway has been transformed with vivid patterns and weavings to celebrate the city’s Asian heritage through street art.
I’m a sucker for legos and paper. Check out this paper airplane folding machine made from legos! I tried to get my son interested in lego robotics when he was little, but he and I both prefer just the blocks.
We’re lucky here in Colorado (Longmont to be specific, just outside of Boulder) to have the Above the Fold origami exhibit on view now through May 1st. Here you see Paul Jackson’s one-sided digital prints of the front and back surfaces of his hands. Through a technique of making hundreds of small slits and folds, parts of the prints twist to the back of the image, so the print becomes two-sided. And by the way, many of the artists are featured in a lovely film about origami by Vanessa Gould called Between the Folds (available on Netflix).
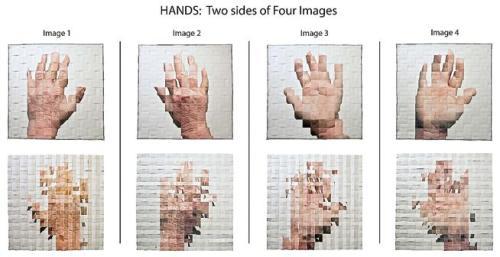
(Paul Jackson / Courtesy photo)
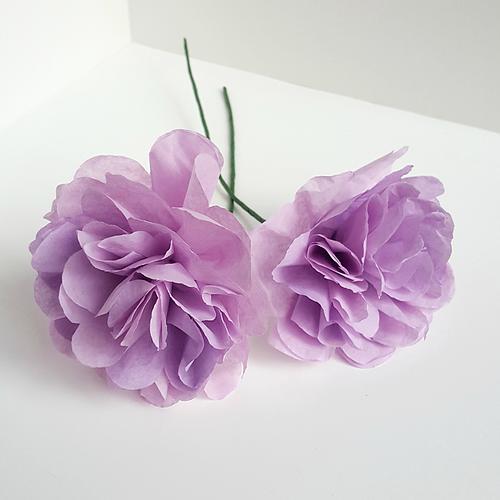
I have a soft spot for paper flowers and recently came across an article about Ashley Cox of Paper Heart Blooms. If you are ever in need of everlasting flowers, this lady’s got you covered!
It is really unbelievable what people come up with. You know flipbooks? Well, here’s a flip book machine that flips those pages for you.
————————————————————————————————————––––––––––––
If you enjoyed reading The Sunday Paper today, why not sign up to get it delivered to your in-box each and every Sunday? Click here to subscribe (it’s free), and you’ll receive my nifty pop-up alphabet template as a thank you gift!
If you read this blog regularly, would you consider making a donation to support the research, writing, design and delivery of The Sunday Paper? Click on that cute paper button (I made that paper) to see how you can provide support.
And if you run a paper-related business, you might be interested in promoting your business in The Sunday Paper.
Thank you to those who have pledged your support, and enjoy your Sunday!
February 6, 2016
Snow Daze
The Sunday Paper #93
Paper of the Week: Zinnia Garden

Zinnia Garden is a 100% cotton rag paper, screen printed in India. I’d rank it between a text and cover weight at 100 g/m2. You’ll receive a small sheet of this paper (plus 13 other papers) in my new Custom Paper Project Pack along with instructions for making this Versatile Valentine – the latest project-of-the-month. You can find full sheets of this paper (22″ x 30″ sheets) through one GPC Paper’s retailers.
————————————————————————————————————–––––––––
In the Studio:
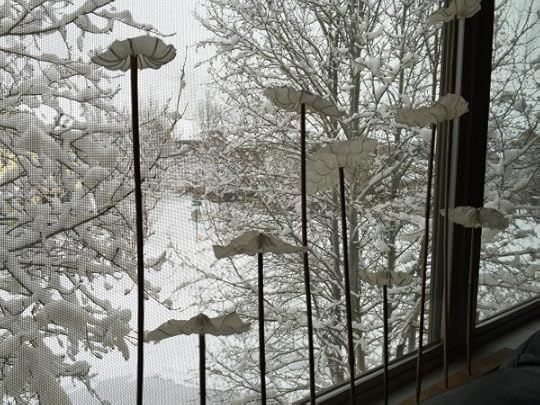
We got a LOT of snow this week, so I spent more time than usual on the business side of things (have I told you that I’m writing a catalog for my upcoming 25 Year retrospective exhibition? More on that soon). I snapped this photo of my Dandelion Seed Sculpture and like how it juxtaposes with the snow-laced tree branches.
————————————————————————————————————–––––––––
I used to ride my bicycle all the time but hardly get on it anymore. Maybe that will change one day. In the meantime, check out these exquisite paper cuts by Parth Kothekar from Ahmedabad, India.

I find this stuff fascinating! The folding pattern used to make these objects, known as the Miura-ori, is a periodic way to tile a plane using the simplest mountain-valley fold in origami. It was used as a decorative item in clothing at least as long ago as the 15th century. A folded Miura, in fact, can be packed into a flat, compact shape and unfolded in one continuous motion, making it ideal for packing rigid structures like solar panels. It also occurs in nature in a variety of situations, such as in insect wings and certain leaves. Now scientists are studying the flexibility hidden within the geometry of this folding pattern because it could be used to create collapsible objects. So cool!

I wish I lived up North so that I might discover one of these paper boats! Inspired by a 19th Century mystery of the Magellan daisy and whalers, Scottish artist Joanne B. Kaar designed, printed and folded 1500 paper boats and has hidden them in public spaces in Iceland, Finland, Shetland, Orkney, Caithness, and Outer Hebrides. Someone found the first paper boat this week. Sail on boats, sail on!

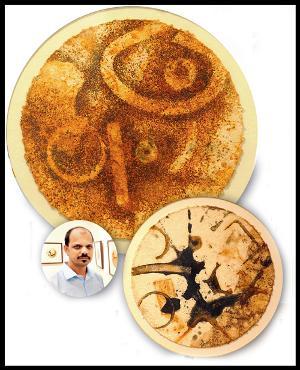
These works by Vikram Marathe use rust to capture the passage of time. Created by processing metal impressions on water-soaked handmade papers, the seemingly spontaneous art is rather counter-intuitive and complex.
There’s a new Call for Entries for a paper show at Paper Circle in Ohio. Entry deadline is July 15. Submit your work!
————————————————————————————————————––––––––––––
If you enjoyed reading The Sunday Paper today, why not sign up to get it delivered to your in-box each and every Sunday? Click here to subscribe (it’s free), and you’ll receive my nifty pop-up alphabet template as a thank you gift!
If you read this blog regularly, would you consider making a donation to support the research, writing, design and delivery of The Sunday Paper? Click on that cute paper button (I made that paper) to see how you can provide support.
And if you run a paper-related business, you might be interested in promoting your business in The Sunday Paper.
Thank you to those who have pledged your support, and enjoy your Sunday!
January 30, 2016
Love in a Maze
The Sunday Paper #92
Paper of the Week: Origami Paper
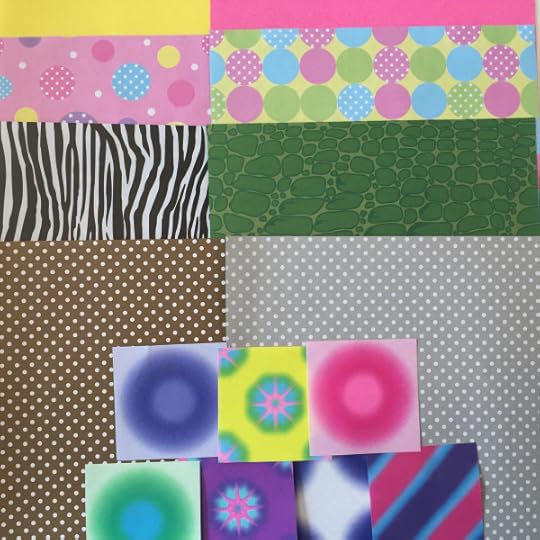
I’m guessing that you’ve heard about (or perhaps even participated in) the adult coloring book craze. Now it seems that origami might take its place (or join in). I’ve dabbled in origami over the years and love to discover printed origami papers (I found the papers pictured here in a shop in Korea a few years ago with two full aisles dedicated to printed origami papers in a variety of sizes). I know there are folders who use all sorts of other papers for origami too.
What papers have you used for origami, and I wonder if there are any artists out there who have done origami with shaped papers?
————————————————————————————————————––––––––––––
In the Studio:

Speaking of origami and shaped papers, I used the turkish map fold for my recent watermarked print called Love in a Maze. This is part of my new book Vertices, which will be on view at the University of Washington later this spring.
————————————————————————————————————––––––––––––
Get your wig on! These paper wigs by Asya Kozina are fantastic, as are the photos of the subjects wearing them.

Since we’re on the topic of origami today, check out Aljoud Lootah’s Oru furniture collection, which started out as tiny paper models.

My friend Mindell Dubansky has a new book out about Blooks (objects that look like books) out! Her exhibition at the Grolier Club in NYC and is receiving lots of press this week: The New York Times, In the Papers, and The Guardian to name a few. Mindy was on the board of Dieu Donné Papermill when I worked there in the early 90’s. She worked (and still works) at the Metropolitan Museum of Art and led a fantastic tour for our members through the museum showing off artifacts made with paper. I remember seeing a papyrus plant growing in the museum and a suit of armor made from paper. I’m going to order a copy of her book now, and you can too, right here.

A lunchbox that looks like a book titled Noonday Exercise – circa 1875 – is among the ‘blooks’ on display at the Grolier Club this month in Manhattan. Photograph: Mindell Dubansky/The Metropolitan Museum of Art
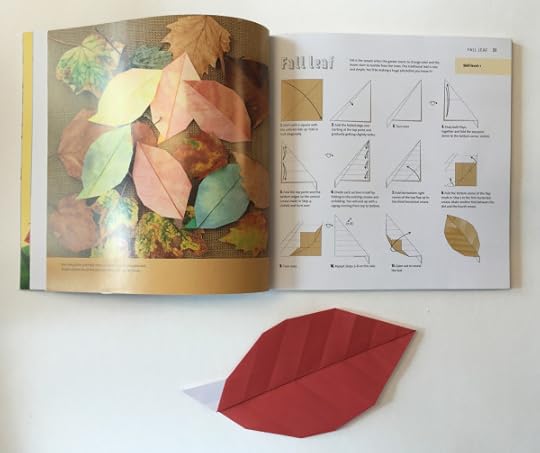
I received a copy of Ioana Stoian’s new(ish) book The Origami Garden recently. I may start writing book reviews, so mark this as the first. I’ve always had trouble with following instructions for origami, often flipping through how-to books trying to fold something and then getting stumped at a certain step and moving on to another project that looks easier only to get stumped again!
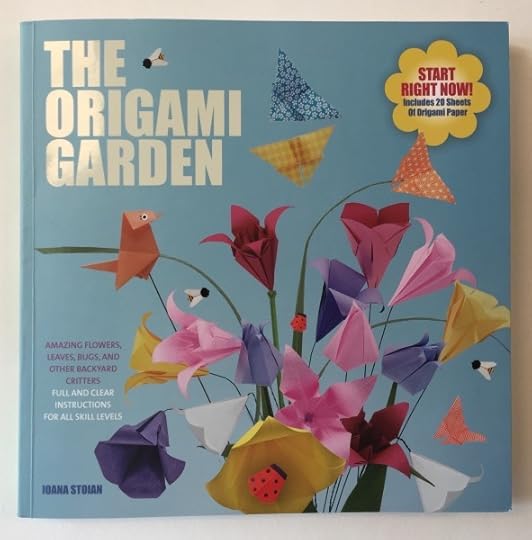
I knew I liked this book right off the bat! The introduction includes a visual chart ranking the projects by skill level (1,2,3). And the book comes with 20 lovely patterned origami papers so that you can get started right away!
I did! Check out my leaf. The photographs of each project in a setting are lovely too. Nice job Ioana!
Here’s a sweet little video about the papermaking process in China.
————————————————————————————————————––––––––––––
If you enjoyed reading The Sunday Paper today, why not sign up to get it delivered to your in-box each and every Sunday? Click here to subscribe (it’s free), and you’ll receive my nifty pop-up alphabet template as a thank you gift!
If you read this blog regularly, would you consider making a donation to support the research, writing, design and delivery of The Sunday Paper? Click on that cute paper button (I made that paper) to see how you can provide support.
And if you run a paper-related business, you might be interested in promoting your business in The Sunday Paper.
Thank you to those who have pledged your support, and enjoy your Sunday!
January 23, 2016
Paper Sale & Custom Paper Project Pack
The Sunday Paper #91
Paper of the Week: Handmade Paper with Inclusions

These are some of my very first papers, made over 25 years ago in my kitchen in Brooklyn. I hadn’t met a soul who made paper (yet), and I was just experimenting (well, gosh I’m still doing that today – some things never change)! These papers have held up pretty well in a sample book. Here you see two variations of onion skin with recycled paper and a brown paper bag with leeks. I don’t remember much about those early days… I’m not even sure what I used as a mould & deckle or how I couched and dried the sheets.
What was the first paper that you made?
————————————————————————————————————––––––––––––
In the Studio:
I have an on-line paper sale every six months, and this one features papers that I made in my studio (I’ve come a long way since those early days in Brooklyn). I’ve got three paper packages on sale now through Thursday, January 28th – translucent abaca, decorative watermarks and denims. I’ve also developed a new Custom Paper Project Pack featuring 14 papers and six monthly projects pictured below. Purchase the paper pack and join me in creating a project-a-month!

Stitched Paper Pouch, Versatile Valentine, Shadow Ornament, Paper Weaving, Pop-Up Dandelion, Solstice Accordion Book
————————————————————————————————————––––––––––––
If you need something to do indoors in Buffalo, this looks like a terrific show: Rare Books 101.

A mother/daughter team from Croatia is making this recycled paper jewelry. MamaMia Art takes paper quilling (and upcycling) to a new level.

The illustrations in this book – Paper Sculpted Meals – caught my eye, so I contacted Joanne DeWald, the author and illustrator and she sent me a copy (thanks, Joanne!). Her illustrations are really clever and different from other paper illustrations that I’ve seen. And there are also some unique recipes in the book (to me at least): dandelion lemonade, broiled grapefruit and chili pepper cupcakes.

Thanks to those of you who forwarded me the link to Ai Weiwei’s paper sculptures at le Bon Marché in Paris. And for those of you who haven’t seen them, lookie here (or better yet, get yourself a plane ticket and hop on over to Paris)!

I think you’ll enjoy listening to this interview with Patterson Clark, who harvests and turns invasive plants into works of art (and paper, of course) in Washington D.C.
————————————————————————————————————––––––––––––
If you enjoyed reading The Sunday Paper today, why not sign up to get it delivered to your in-box each and every Sunday? Click here to subscribe (it’s free), and you’ll receive my nifty pop-up alphabet template as a thank you gift!
If you read this blog regularly, would you consider making a donation to support the research, writing, design and delivery of The Sunday Paper? Click on that cute paper button (I made that paper) to see how you can provide support.
And if you run a paper-related business, you might be interested in promoting your business in The Sunday Paper.
Thank you to those who have pledged your support, and enjoy your Sunday!
January 16, 2016
Nous Sommes: We Are
The Sunday Paper #90
Paper of the Week: Duplex Papers

My first job after college was with a commercial printing company in New York City, and I learned a lot about paper there. One of the papers I was introduced to was duplex papers, which are usually a cover stock consisting of two sheets that are laminated together: one color on one side and another color on the other. I often make double-sided sheets in the papermaking process, to add imagery to a book cover, but there are many other applications. This commercially available Purple/Aegean Paper features two sheets of thai unryu paper laminated together in a purple and teal combination.
How have you used double sided sheets?
————————————————————————————————————––––––––––––
In the Studio:
I spent the last couple of weeks designing and picking out papers for a new Custom Paper Pack which I’ll roll out later this week during my bi-annual on-line paper sale (read about it here next week). Take a peek at the bottom of this image – we’ll be using that duplex paper featured above to make a stitched paper pouch.
————————————————————————————————————––––––––––––
Check out the new artist’s book Nous Sommes by Ioana Stoian (and be sure to watch the video that shows how it unfolds). Nous sommes is a physical manifestation of the spiritual nature of our souls, illustrated through the use of color, structure, and form. It is a contemplation of life, the game we play; and the universe, the puzzle we all fit into. Nous Sommes is on view at the Minnesota Center for Book Arts through February 19th and was created in a limited edition of nine. Oh, and the papers are handmade!

© 2015 Ioana Stoian, Nous Sommes
If you’re in the Chicago area, check out the play Animals Out of Paper: Andy, a calculus teacher and avid fan, pressures a reclusive Ilana, a world famous origami artist, into becoming an unwitting mentor to a troubled teenage prodigy, Suresh. These three intriguingly flawed characters begin to reshape and mold each other’s lives in much the same way they fold and crease their origami art. I wonder who made the paper props!

I’ve written about Steve Messam before. He’s a master of paper bridges and he’s done it again. This bridge, created with 54,390 pieces of paper (and no adhesive) supported the new Range Rover as it made its short journey across. The bridge was constructed using specially designed wooden abutments, which are structures made to support the pressure of an arch. Builders then tightly stacked the paper atop the supports, held in place by a temporary framework. Now that’s paper engineering!

This is a feel-good story if there ever was one. Origami master Bernie Peyton spends one day a week at UCSF Benioff Children’s Hospital Oakland teaching sick kids how to do origami. I believe it when he says that nothing compares to the smiles he gets from children during his weekly visits teaching children the craft at Oakland Children’s.

Here’s a lovely video about back-to-the-landers Jim Croft and Melody Eckroth who live off the grid in Idaho and grow flax which they beat with their homemade stamping mill, fell trees for book boards and scavenge the forest for elk and deer bones to make tools and handles for their willow baskets, among other things.
————————————————————————————————————––––––––––––
If you enjoyed reading The Sunday Paper today, why not sign up to get it delivered to your in-box each and every Sunday? Click here to subscribe (it’s free), and you’ll receive my nifty pop-up alphabet template as a thank you gift!
If you read this blog regularly, would you consider making a donation to support the research, writing, design and delivery of The Sunday Paper? Click on that cute paper button (I made that paper) to see how you can provide support.
And if you run a paper-related business, you might be interested in promoting your business in The Sunday Paper.
Thank you to those who have pledged your support, and enjoy your Sunday!
January 9, 2016
New Year Mandalas
The Sunday Paper #89
Paper of the Week: Wax Paper
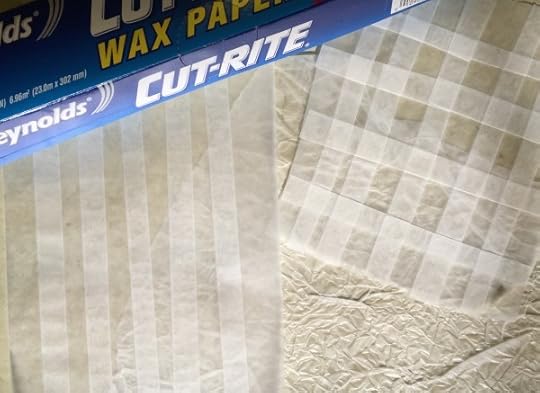
I ran across a story about 16 Genius Wax Paper Tips and it got me thinking. I remember my mom teaching me how to wrap a sandwich in wax paper – there was a special fold that made a nice pouch. And as a kid I loved melting crayon shavings between sheets of wax paper for a stained glass window effect. I’ve made pleated and crumpled papers with abaca handmade paper, but I decided to pleat and crumple some wax paper to see what happened when I ironed it. The wax melted and the overlapping areas stuck!
How have you used wax paper in the studio?
————————————————————————————————————––––––––––––
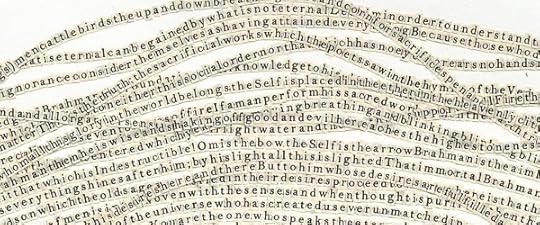
In the Studio: There are so many facets to the learning process and it never ceases to amaze me. Below you see the envelope wrapper for my new artist’s book Vertices, which will be in a group show at the University of Washington later this Spring. The particular facet I learned about with this piece has to do with the changes that occur between the wet and dry stages in the papermaking process. This is double-couched sheet – pink on gray. The symbols look much more dramatic in the wet sheet, which you see below. I realized only after I’d made the sheets and saw them at this stage that they would dry lighter (i.e. I didn’t pre-think how subtle the images would be once the paper dried). It works with the concept of the book which deals with the intersections in relationships – they aren’t always clear – but I am still debating remaking the paper in white on gray, which would be more visible.

————————————————————————————————————––––––––––––
There’s a 2016 New Year Mandalas FB Group and this mandala by Donna Sakamoto Crispin caught my eye because it is made from paper cord. Donna produced a lovely book called Paper Moons, a study in paper cord, weaving techniques and textures on indigo dyed paper.

The Durango Arts Center is currently featuring the exhibition The White Season celebrating the ephemeral beauty of winter January 8–January 30, a group exhibit featuring Sandra Butler, Charlene Geiss, Mary Ellen Long, Andrea Martens, Maureen May, Catherine Nash & Joan K. Russell. The White Season interprets how winter recollections for many of us embrace serenity, silence, grace, tranquility and eternity.
Cloud Root Paper by Mary Ellen Long
I like this quote by Ellen G.K. Rubin, who curated an exhibition of Czech artist Vojtech Kubasta’s work which is currently on view in Cedar Rapids: “A successful pop-up is one that enhances the story or enables you to understand the illustration better,” she said. “If a picture is worth 1,000 words, a pop-up is worth a million.”

If you find yourself on Vashon Island in the Pacific Northwest, check out this new storefront that serves as as both a storefront and office for Alice Larson, who works as a social welfare researcher when she is not folding paper into ornate shapes.

Alice Larson in her new shop — Image Credit: Susan Riemer/Vashon Beach Comber Staff Photo
This is an information podcast about Jillian Bruschera’s Mobile Mill project on Art + Activism’s Digital Dialogue. Take a listen!
————————————————————————————————————––––––––––––
If you enjoyed reading The Sunday Paper today, why not sign up to get it delivered to your in-box each and every Sunday? Click here to subscribe (it’s free), and you’ll receive my nifty pop-up alphabet template as a thank you gift!
If you read this blog regularly, would you consider making a donation to support the research, writing, design and delivery of The Sunday Paper? Click on that cute paper button (I made that paper) to see how you can provide support.
And if you run a paper-related business, you might be interested in promoting your business in The Sunday Paper.
Thank you to those who have pledged your support, and enjoy your Sunday!
January 2, 2016
Support the Sunday Paper!
Dear Friends,
Happy New Year! As we launch into 2016, I wanted to tell you how much I love creating and sharing The Sunday Paper with you. This is just a quick note about some ways that you can contribute –my heartfelt thanks to those of you who already do these things!
Send me interesting paper news. I’m especially interested in featuring new and interesting paper.
Make a donation to support the research, writing, design and delivery of The Sunday Paper? Click on that cute paper button (I made that paper) to see how you can provide support (it is quick and painless).
Tell a paper-loving friend about the blog. It is easy to sign up to receive it by e-mail (just enter your address in the upper right-hand corner).
If you run a paper-related business, consider promoting your business in The Sunday Paper.
I can’t say thank you enough for your support!
––––––––––––––––––––––––––––––––––––––––––––––––––––––––––––––––

Special thanks to everyone shared work in our FB Group. This image shows all of the projects by Yara Bertrán.
If you participated in the 25 Days of Paper (or if you have feedback for me), I’ve created a short survey. I working out plans for new projects, and your response will help guide me!
–––––––––––––––––––––––––––––––––––––––––––––––––––––––––––––––
Paper of the Week: Kozo Bark Fiber

© Jill Powers, detail of Hidden Currents
When I’m in Boulder, I usually visit my friend and colleague Jill Powers, and I had the opportunity to see her this weekend. She’s got a wonderfully inspiring studio where she has developed advanced casting techniques for working with kozo (mulberry) bark. Jill teaches innovative techniques for working with this fiber in her Kozo Bark Fiber Course (technically, this isn’t really paper, but . She is currently working on an exhibition – Holdfast: Seaweeds in a Time of Oceanic Change – that will debut at the Dairy Arts Center in Boulder on March 4th. If you are in Colorado, I hope to see you there!
–––––––––––––––––––––––––––––––––––––––––––––––––––––––––––––––
Here’s a lovely idea for those origami paper balloons (or water bombs) that we learned to make in elementary school from Wit & Whistle.
Here’s a nice interview with paper engineer Robert Sabuda about his new book The White House. I wonder who will be living there next?

These origami characters remind me of the gum wrapper chains I used to make as a kid (did you make those too)? I have no idea how these characters by Kerri Brooks are constructed, but she claims that it takes 1,000 pieces to create a minion. Hopefully this is a meditative process!

While I was in Boulder I visited the 15th Street Frame Shop and Gallery, a sweet little spot that I’ll visit again. They have a lovely show up now called Sculptured and 3-D Paper, and it was fun to see several 3-D lithographs by Red Grooms.
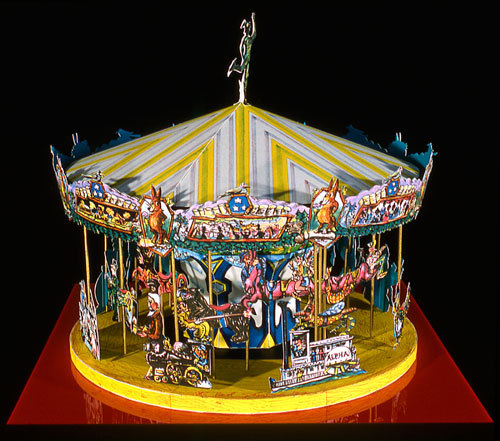
© Red Grooms, Tennessee Fox Trot Carousel
Okay, this is just too much fun. Click through to see this paper animation in motion by an artist duo in Berlin.
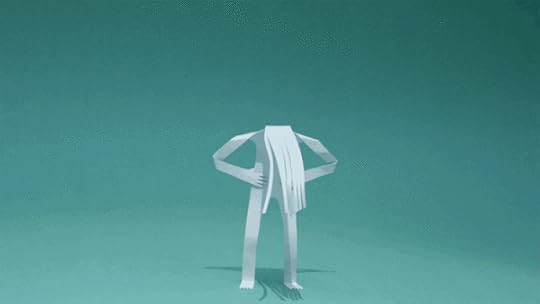
Pitch for German drugstore dm. All images courtesy of Ollanski and Cris Wiegandt
See you next week. Enjoy your Sunday!


