
Julia Lerman's Blog, page 5
June 23, 2018
My First Newsletter: New Course, Pluralsight Discount, Workshops & More

I recently decided it was time to start a newsletter to be sure people who are interested don’t miss out on things like new Pluralsight courses or articles that I’ve published, conferences I’m speaking at and even workshops that I’m teaching. I figure with 26K twitter followers, there might be a few people interested.
I just sent out the first newsletter yesterday. Here are some highlights:


June 20, 2018
Pluralsight Subscriptions On Sale This Week!
[image error]Pluralsight is having a summer sale on annual subscriptions – $100 off (i.e. $199 for an entire year’s access to the entire library) which is a pretty amazing price for what you’re getting. Heck the regular price of $299 for a full year is amazing when you compare it to the cost of almost any type of training from the expert-authors). Anyway, I don’t have to tell you, you already know!
June 14, 2018
EF Core’s IsConfigured and Logging
I got a little confused about some behavior today and finally realized my mistake so thought I would share it. This mostly happens in demo apps that I’m building that are not using ASP.NET Core.
In these cases, I typically stick the DbContext provider configuration in the OnModelConfiguring method. For example, if I’m using SQLite, then I would specify that in the method as such:
protected override void OnConfiguring
(DbContextOptionsBuilder optionsBuilder)
{
optionsBuilder.UseSqlite (@"Filename=Data/PubsTracker.db");
}
I also have been using the logging factory a lot. After defining it, I also configure it. I hadn’t thought much about where I was placig it so added it in randomly.
protected override void OnConfiguring
(DbContextOptionsBuilder optionsBuilder)
{
optionsBuilder.UseLoggerFactory (MyConsoleLoggerFactory);
optionsBuilder.UseSqlite (@"Filename=Data/PubsTracker.db");
}
Then I added in some tests to had to avoid the SQLite provider if the InMemory provider was already configured, so I wrapped the UseSqlite method with a check to see if the options builder was already configured.
protected override void OnConfiguring
(DbContextOptionsBuilder optionsBuilder)
{
optionsBuilder.UseLoggerFactory (MyConsoleLoggerFactory);
if(!optionsBuilder.IsConfigured)
{
optionsBuilder.UseSqlite (@"Filename=Data/PubsTracker.db");
}
}
But my logic wasn’t working. I was running some migrations but they were suddenly not recognizing the UseSqlite method. I’ve used this pattern so many times. It took me a while to realize what was going on. The UseLoggerFactory is a configuration!
I just had to move the UseLoggerFactory logic after the IsConfigured check and all was well.
This is one of those dumb things that seems so silly you wouldn’t imagine someone else would make such a mistake. But since it bit me, I thought it was worth sharing mostly for the sake of the next coder who is trying to solve the same problem.

April 30, 2018
Defining a Defining Query in EF Core 2.1
I have to cut out some text from a too-long article I’ve written for a magazine (links when it’s published), so here is a simple example of using the new ToQuery method for creating a defining query in EF Core 2.1 (currently in Preview 2).
ToQuery is associated with the new Query Type feature that allows you to use types that are not mapped to a table in the database and are therefore not true entities, don’t require a key and are not change tracked.
I’m starting with a simple model that includes these two entities, which are mapped to tables in my DbContext.
public class Team
{
public int TeamId { get; set; }
public string Name { get; set; }
public string TwitterAlias { get; set; }
public List Members { get; set; }
}
public class TeamMember
{
public int TeamMemberId { get; set; }
public string Name { get; set; }
public string Role { get; set; }
public int TeamId { get; set; }
public TimeSpan TypicalCommuteTime { get; private set; }
public void CalculateCommuteTime (DateTime start, DateTime end)
{
TypicalCommuteTime = end.Subtract(start);
}
}
You’ll need to pre-define the type being used for the defining query, mine will have the Name and TypicalCommuteTime for the team member.
public class TeamCommute
{
public TeamCommute(string name, TimeSpan commuteTime)
{
Name = name;
TypicalCommuteTime = commuteTime;
}
public string Name { get; set; }
public TimeSpan TypicalCommuteTime { get; set; }
}
You can define queries directly in OnModelBuilding using either raw sql with FromSql or a LINQ query inside a new method called ToQuery. Here’s an example of using a Query type with a defining query and Linq:
modelBuilder.Query() .ToQuery(() =>
TeamMembers.Select(m => new TeamCommute( m.Name, m.TypicalCommuteTime ) )
With this query defined on the TeamCommute class, you can now use that in queries in your code for example:
var commutes = context.Query().ToList();
Keep I mind that you can’t define both a ToQuery and a ToView mapping on the same type.
April 23, 2018
Talking about my work and of course EF Core 2 on The 6 Figure Dev Podcast
I had a great time chatting with the The 6 Figure Developer podcast hosts this spring. We talked about how I got started, what I actually do for a living, what a Microsoft Director is (and isn’t), how I learn so many things and then of course, geeking out about Entity Framework Core 2! Check it out! Also, yes, I was renewed in the RD program. 
March 27, 2018
Pluralsight Annual Subscriptions are 33% Off This Week
If you want to “try before you buy”, hit me up for a 30 day trial code.
February 12, 2018
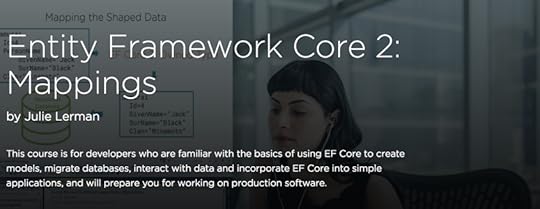
New Pluralsight Course! EF Core 2: Getting Started
 I’ve recently published my 19th course on Pluralsight.com: Entity Framework Core 2: Getting Started.
It’s 2hrs 40 minutes long and focuses on the basics.
This is using EF Core 2.0.1 in Visual Studio 2017.
Future plans: I’ve begun working on an intermediate level course to follow up and have others in the pipeline…such as a course to cover features of EF Core 2.1 when it gets released (I will wait until it has RTMd for stability) and other advanced topics. I am also planning to do a cross-platform version using VS Code on macOS because that’s my fave these days.
If you are not a Pluralsight subscriber, send me a note and I can give you a 30-day trial so you can watch the course. Be warned: the trial is akin to a gateway drug to becoming a subscriber.
Here is the table of contents for the course:
Introducing a New, Lighter Weight Version of EF 32m 40s
Introduction and Overview
What Is Entity Framework Core?
Where You Can Build and Run Apps with EF Core
How EF Core Works
The Path From EF6 to EF Core to EF Core
EF Core 2 New Features
Looking Ahead to EF Core 2.1 and Beyond
Review and Resources
Creating a Data Model and Database with EF Core 42m 36s
Introduction and Overview
Setting up the Solution
Adding EF Core with the NuGet Package Manager
Creating the Data Model with EF Core
Specifying the Data Provider and Connection String
Understanding EF Core Migrations
Adding Your First Migration
Inspecting Your First Migration
Using Migrations to Script or Directly Create the Database
Recreating the Model in .NET Core
Adding Many-to-many and One-to-one Relationships
Reverse Engineering an Existing Database
Review and Resources
Interacting with Your EF Core Data Model 34m 11s
Introduction and Overview
Getting EF Core to Output SQL Logs
Inserting Simple Objects
Batching Commands When Saving
Querying Simple Objects
Filtering Data in Queries
Updating Simple Objects
Disconnected Updates
Deleting Objects with EF Core
Review and Resources
Querying and Saving Related Data 20m 49s
Introduction and Overview
Inserting Related Data
Eager Loading Related Data
Projecting Related Data in Queries
Using Related Data to Filter Objects
Modifying Related Data
Review and Resources
Using EF Core in Your Applications 30m 52s
Introduction and Overview
EF Core on the Desktop or Device
The Desktop Application: Windows Presentation Foundation (WPF)
Creating the WPF Application
Walking Through the WPF Data Access
EF Core in ASP.NET Core MVC
Adding Related Data into the MVC App
Coding the MVC App’s Relationships
Review and Resources
January 4, 2018
The Secret to Running EF Core 2.0 Migrations from a NET Core or NET Standard Class Library
I have had two people that watched my Pluralsight EF Core Getting Started course (which will soon be joined by an EF Core 2: Getting Started course) ask the same question, which mystified me at first.
The were running migrations commands which caused the project to compile, but the commands did not do anything. For example, add-migration didn’t add a migration file. get-dbcontext did not return any information. The most curious part was there was no error message! I was able to duplicate the problem.
With EF6 it was possible to use migrations from a class library with no exe project in sight. EF Core migrations can run from a .NET Framework or .NET Core project but not .NET Standard. It needs a runtime.
We already knew about the multi-targetting fix which solved an error when you try to run migrations from a .NET Standard library. But even with that fix in place, we were getting the mysterious nothingness.
The answer to the question was buried in a GitHub issue and in comments for the Migrations document in the EF Core docs. This same solution solved a problem I was having when trying to use migrations in a UWP app (again, not .NET Core or .NET Framework) that used a separate class library to host its DbContext.
I’m writing this blog post to surface the solution until it is resolved.
The solution that we used with EF Core 1.0 in order to run migrations from a .NET Standard library was to multi-target for .Net Standard (so you can use the library in a few places) and .NET Core (so you can run migrations).
That means replacing
netstandard20
with
netcoreapp2.0;netstandard2.0
Notice that the attribute name is now plural and there is a semi-colon between the two SDKs.
But there’s one more secret which is not in the documentation.
For .NET Standard 2.0 (and EF Core 2.0), you also need to add the following to csproj.
true
Now with the DbContext project set as the startup and ensuring that the package manager console (or command line) are pointing to the same project, your migration commands will work.
Thanks to Christopher Moffat who found the solution in the GitHub issues and shared it in the comments on the EF Core Package Manager Console Tools document.
November 29, 2017
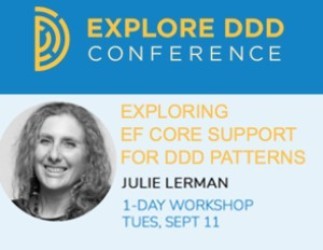
Domain-Driven Design Europe 2018 in Amsterdam
 I’m excited to be attending and speaking at DDD Europe 2018 in Amsterdam on Feb 1-2 2018. It’s an honor to be on the speaker roster with so many DDD gurus and other people with amazing DDD experiences stories to share.
The lowest early-bird ticket prices can still be bought through Nov 30 at €599 (+21% VAT = €724 (app. ~$860US +). The ticket will go to €699 (+VAT) from Dec 1-Dec31 and then to €749 (+VAT) until the conference.
Prior to the conference, there are also 10 amazing workshops ranging from 1/2 day to 2 days across January 30 – 31st.
I’ll be doing a 2 hour workshop during the conference proper on using EF Core 2 to map DDD patterns in your domain. It will be a hands-on workshop and my intention is to build some koans for attendees to work with. Although the flavor of hands-on may shift as I continue to percolate ideas.
November 4, 2017
Copying an Azure Function App using the Portal, GitHub and Cloud Shell
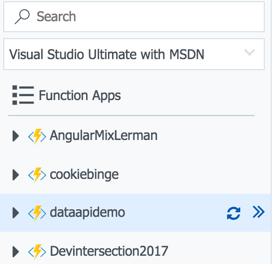
I’ve got an Azure Function App with some functions that I built for a demo for a conference session. I first used this at AngularMix and had named the function app AngularMix2017. Then when I did it for DevIntersection this past week, I recreated it as DevIntersection2017 because you can’t rename a function app. I’m doing it yet again next week at another conference (NetConf.co) and decided it was time to create it as a reusable name: DataApiDemo.
While you can’t flat out copy a function app if you are working strictly in the portal (which is how I’ve been working during my first learning stages of building function apps), you can easily enough duplicate it by downloading and uploading it again.
Keep in mind that if you are developing functions in VS 2017 or VS Code (combined with the Azure CLI) you can just use the tooling to publish the function apps along with the settings. But I don’t like to take the easy path. I learned a lot of new tricks and tools by going this route. Even if I leverage the tooling on my next go round, I’ve learned a lot which gives me a better understanding overall, more control and troubleshooting skills.
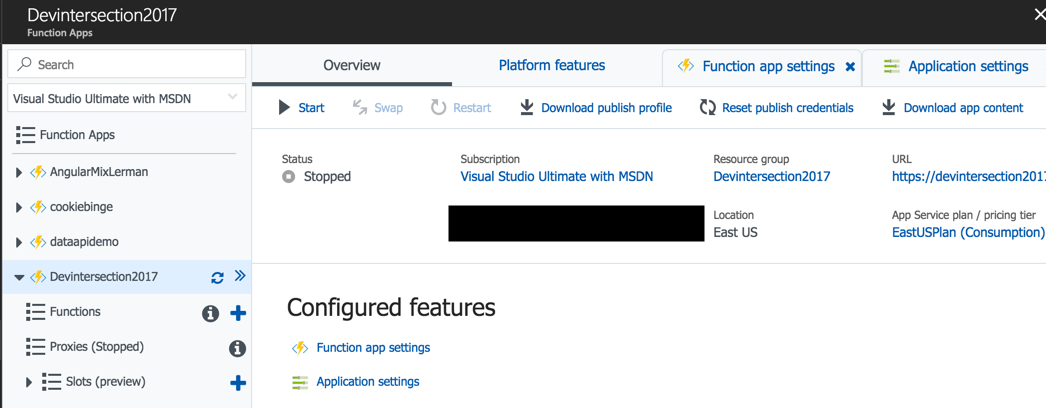
My first step was to create the new function app (dataapidemo).
The Overview blade of an Azure function app has a “download app content” option. That will pull down all of the relevant files onto your machine. So next, I go to the overview of the DevIntersection2017 function app and click on the download app content link.
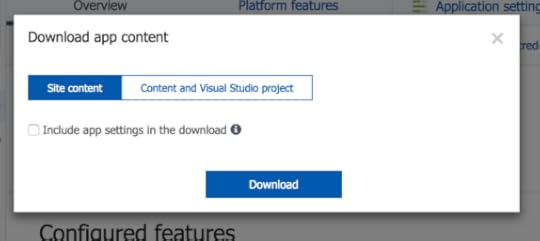
When downloading the app content, you have an option to also grab the app settings. I have a number of secrets stored in my settings ..things like keys to my databases , account ids and more. If you check that, the settings will get downloaded to a local settings file. If you were using this feature to continue your development locally, e.g. in VS2017, then you’ll want them. But for my scenario, they are not useful and even potentially a security issue (you’ll see shortly) so I’m going to leave that unchecked.
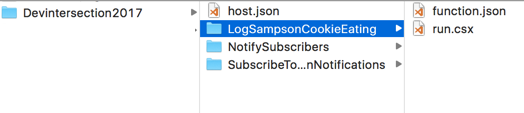
I can see the files in the designated folder on my computer.
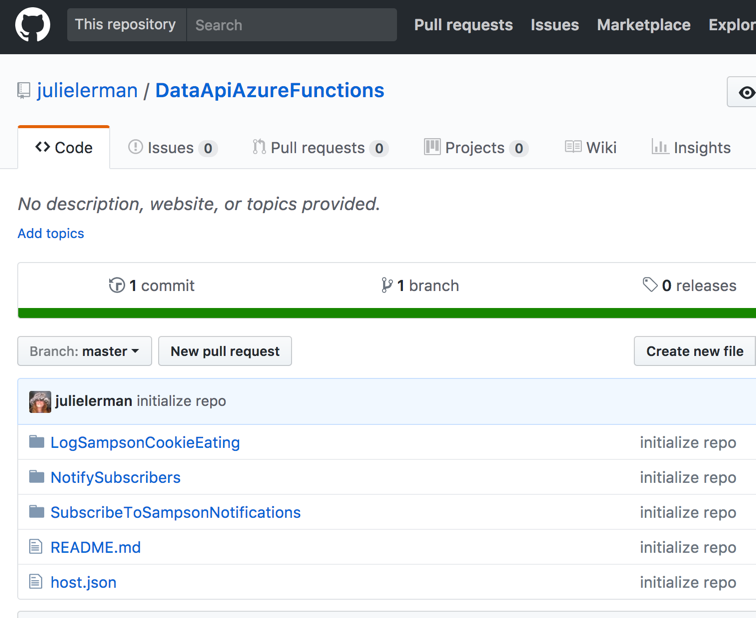
I’ve already created a Github repository to store these files in: https://github.com/julielerman/DataAp....
At the command line in the new folder, I’ll git init, add all of the files into the local repo and commit them. Then I can run the git commands to connect that folder to my GitHub repo and then push my local repository into the online repository.
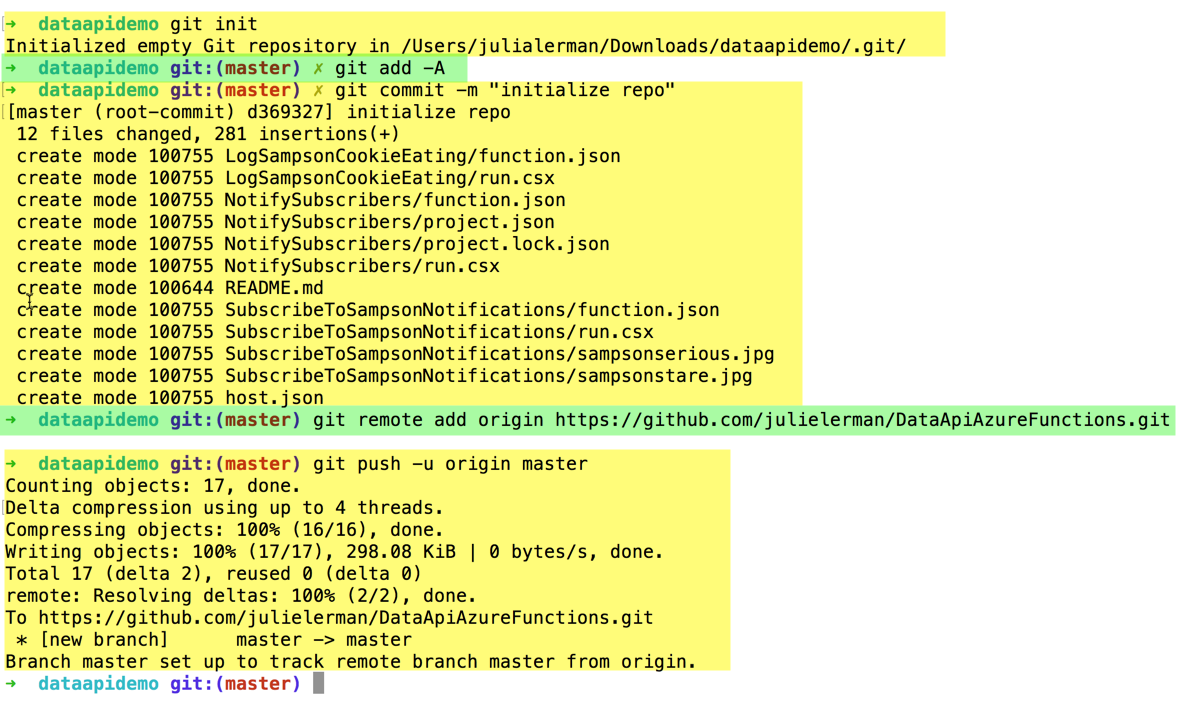
When that’s complete, the files are all in my GitHub repo.
Since I’m using a public repository, this is why I didn’t want the local.settings.json file filled with my secrets to download. Of course I could have deleted it locally or told Git to ignore that file. A few other points about this. If I were developing this locally, then I can have that file locally and use VS2017 or Azure CLI tools to publish my app along with the settings to the portal. But that is not my goal here.
Now I can take advantage of a long-time feature of the Azure Portal: connect it to a repository to auto-deploy from the repository to my app (in the case to my function app).
Back in the portal, I select the new function app again, then from its Platform Features page, open the Deployment Options. Choose Setup new deployment and follow the steps to connect the function app to your repository. When you’ve completed the setup, you can use the Sync button to force the deployment to happen. All of the files are now in my new dataapidemo function, including the function.json files that contain the function setting (e.g. integrations etc) and any other files I may have added to my functions.
Because I am using Twilio, one of my functions has a reference to Twilio in a project.json file and I need to restore that package to this function app. I did that by opening up the project.json and making a small mod to it..adding or removing a blank line, then saving it. That triggers the package restore to happen.
What’s not there however are the function app settings. These are settings that are defined to the app and used by one or more of the functions. There are some default settings created by Azure but I also have some others …those secrets, such as the account and telephone number for my Twilio integration as well as a key for the function.
Some of these settings are my own custom settings that I want in the new function. I could add them in via the portal app settings interface, but I don’t like that path when I have a slew of settings.
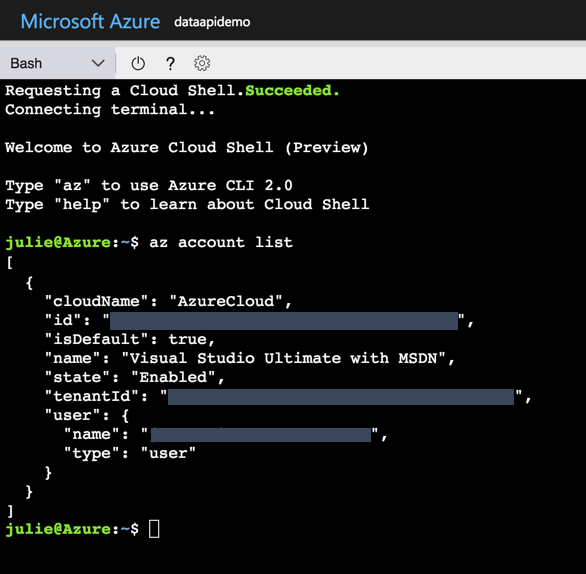
That means moving on to yet another amazing tool in the Azure Portal — Cloud Shell. Here you can run Bash or Powershell commands from the Azure CLI directly on services in your subscription. You can also do this locally on your machine with the extra caveat that there you must provide credentials and other metadata.
In the portal, open the Cloud Shell. This is gives you an interactive terminal window.
If you have multiple subscriptions, you want to be sure that it’s set to the one where your app function is stored.
You can do this by listing the subscriptions with the az account list command.
If the one you want is not default, then set it with:
az account set -s [ID]
This shell can do auto-complete so if the id starts with a123, you can type
az account set -s a123
then hit the tab and the id will get finished . Hit enter and it becomes the default subscription to work in.
I’ll use the azure functionapp commands to get the settings into my function app.
First I’ll list the existing settings. You do this with the command
az functionapp config appsettings list --name [functionname] --resource-group [resource name]
The parameter shortcuts for name and resource-group are -n and -g. Mine are both the same name: dataapidemo. Here’s what the command looks like (except for the wrapping that my blog is forcing):
az functionapp config appsettings list -n dataapidemo -g dataapidemo
The appsettings are listed out as JSON by default although you can affect the output format with the output parameter.
I’ll need to see the settings I want to copy from the other function app so I run:
az functionapp config appsettings list -n devintersection2017 -g devintersection2017 -o tsv
which give me the list of settings from which to choose.
In addition to listing the settings, you can add new ones with the set verb and delete with delete verb. Both would go in place of the verb list.
You use SET by combining the SET command and the –settings parameter. After the –settings parameter, you can list one or more setting with this format:
az functionapp config appsettings set -n dataapidemo -g dataapidemo --settings "property1name=value", "property2name=value"
Note that this is wrapping here on the blog post but not in the shell window.
So I added the handful of settings I wanted to add which looked more like:
az functionapp config appsettings set -n dataapidemo -g dataapidemo --settings "TwilioSID=myvalue", "TwilioAccount=myvalue"
There were others I had to add. For example, my function needs to know how to get to my Cosmos DB document database, so it has a setting that uses the db name as the property name and the dbs account endpoint as the value.
Once I had done that, I was able to get rid of the function apps that were named for each conference and use a common one no matter where I am sharing it.
And boyohboy did I learn a lot of new things!
Julia Lerman's Blog

- Julia Lerman's profile
- 18 followers

