
Julia Lerman's Blog, page 12
February 24, 2014
First look at (beta of) EF 6.1 Designer
EF6.1 is closing in on release. Along with the new DLLs that you can get via Nuget, there is a new designer that you can install into Visual Studio 2012 or 2013 via an MSI install.
Before installing, I uninstalled the EF Power Tools, because I wasn’t sure if they were included. Post install of the 6.1 Beta EF Designer, there was no indication of the power tool features in my context menu where it would normally be.

So it looks like this iteration of the designer won’t have the power tool features wrapped in except for the BIG one, the replacement of the reverse engineer into code first. (So don’t uninstall those power tools! You can still use the other features like this one: my favorite).
With the new designer, when you create a new model, you now get 4 options. Two are familiar, EF Model from Database and Empty Model. The new ones are Empty Code First Model and Code First from database.
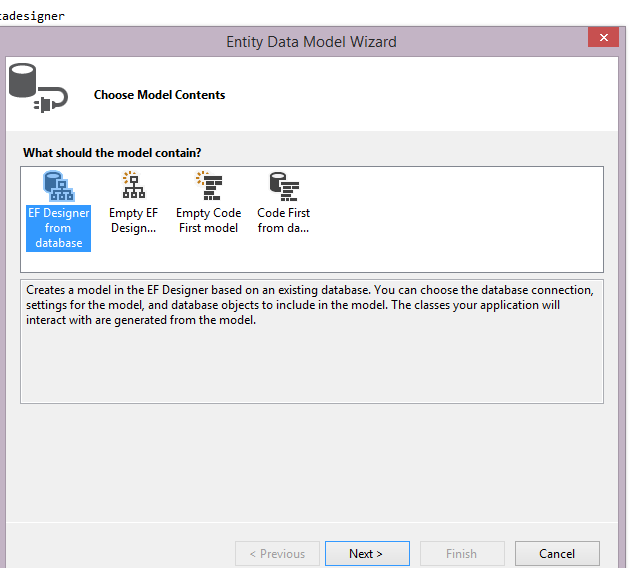
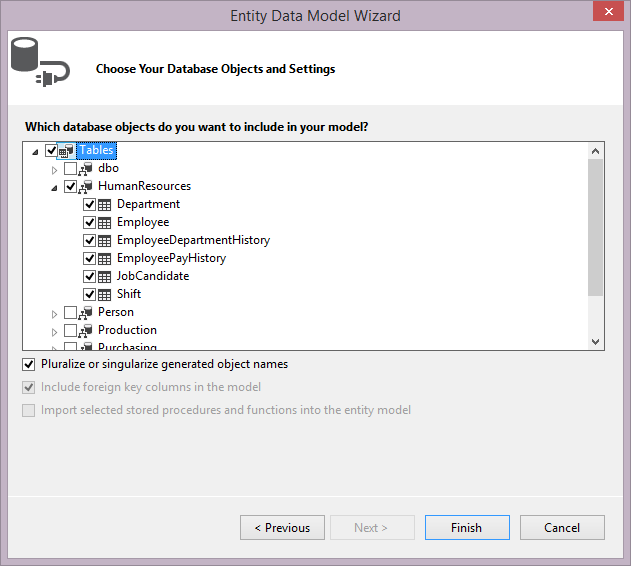
I chose Code First from database and pointed to AdventureWorks2012 and selected everything in the Human Resources schema.
This resulted in all of my new classes being created in my project, not in a folder.
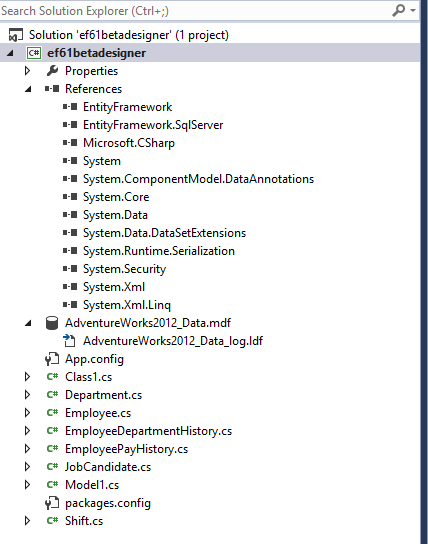
Also, it added references to EF.
But the classes felt a little messy. So for my next model, I began with a new project folder. (note that I am only experimenting. I do not recommend having two models in the same project.)

Then I added the new entity model to th efolder, not the outer project. This time I selected the Person schema.

and all the new classes landed in my new folder

I prefer that. In a real app I would then separate the domain classes into their own projects and I would also put each of the models in its own project.
Let’s take a look at the domain classes that this generated.
Notice that tehre are data annotations. This is different than the EF Power Tools which put everything in fluent API code.
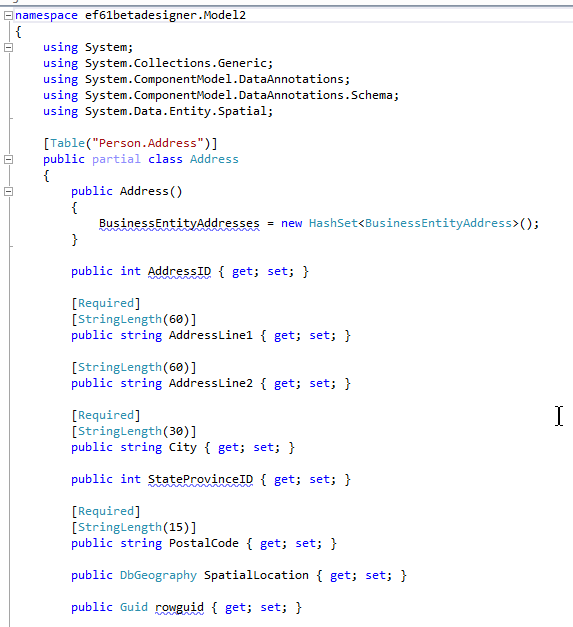
But those are annotations that are reasonable in a class since they are not solely defining a database mapping strategy.. required and stringlength can also be used by EF’s and .NET’s validation APIs. For the latter , think MVC validation.
But that’s not how this tool decides to use data annotations. Check the BusinessEntityAddress type.

It has annotations that drive the composite key creation and also that note database generated mappings. I wouldn’t normally put those in my domain types.
The rule that is being used by default is: any mappings that can be described with a data annotation are done that way. Everything else is done with a fluent api. None of my tables triggered any fluent api mappings. There is some discussion (started by guess who?  ) on codeplex about making it easier to force the designer to use all fluent mappings if you want.
I was curious what Empty Code First Model gives us. It sets up a shell DbContext class. Makes sense to me.

I have been asking for the ability to select individual tables/views for reverse engineering an existing database into Code First context ad classes since the first public CTP of the EF Power Tools. (Here’s proof!) So even with a few things I’d like to see done differently, I am thrilled with this new designer feature.
Why?
For people building new apps with legacy databases, it is a great first step towards setting up DbContexts that you can align with Domain Driven Design Bounded Contexts. It gives me a nice stake in the ground to thinking within boundaries and also forcing me to think about when a customer in one context should be designed differently than a customer type in another context because they are used differently.
Any-hoo…there’s a quick first look for you. There’s still time to provide feedback to the team on the codeplex site. Go to this workitem: https://entityframework.codeplex.com/workitem/407


February 4, 2014
Setting my sites on Barcelona this fall for TechEd Europe 2014
 This will depend on getting a talk accepted, but I promise I will put my best foot forward! You may or may not know that I was supposed to give a talk at TEE 2013 in Madrid in June and follow that with a trip to Barcelona. But I had so many travel problems and after 5 hours at my airport on Monday, then trying again on Tuesday only to get stuck at O’Hare airport in Chicago with United Airlines saying they could not get me to Madrid until Thursday, I finally gave up and went home. So I’m determined to get to Barcelona this time!
January 22, 2014
.NET Rocks Interview from Phoenix is now online
Last week I flew from the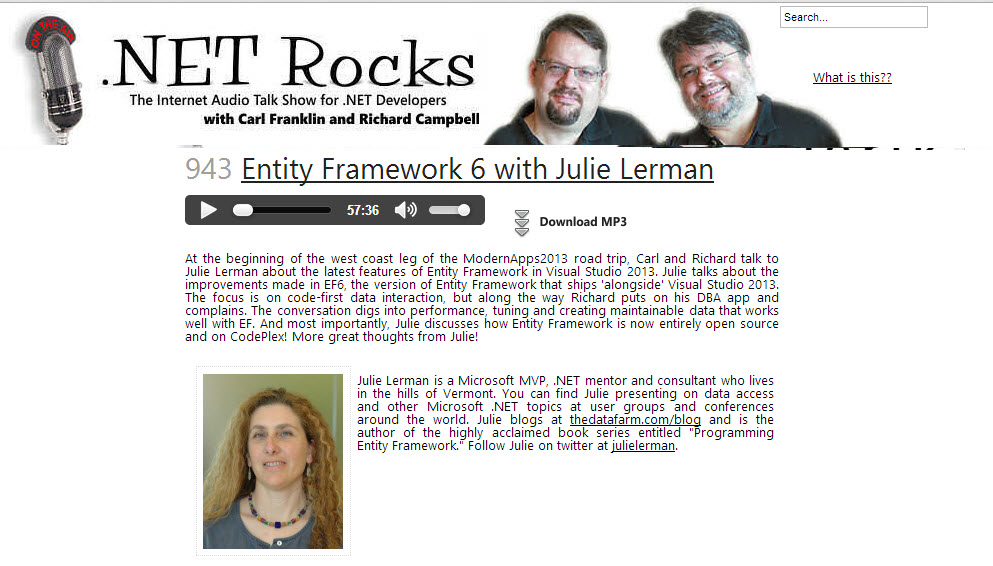 bitterly cold Vermont out to Phoenix Arizona to join Carl Franklin & Richard Campbell in a very cool art film theater in Tempe for their Modern Apps 2013 Road Show Tour. The tour is in conjunction with Xamarin and Visual Studio.
Oh it was warm. Warn and sunny. I’m back home and it is currently warmed up to 4 degrees Fahrenheit!
I got to spend an extra day there which enabled me to see some of the scenery in the Phoenix area and visit with Esther Schindler & her hubby (and cats!) in Scottsdale who took me on a great tour into the hills (without the cats).
At the roadshow event, Carl & Richard interviewed me. We talked about Entity Framework 6, databases and the usual other fun chit chat.
The show is now online. Episode 943. You can listen to or download it here.
January 11, 2014
Email fixed on new website
Whoops. I neglected to set up SMTP and my two contact forms (contact and mentoring contact) were not working. Just added in the Configure SMTP plugin and all is set.
January 10, 2014
New Blog and New WebSite!
I’ve finally done away with my ancient asp.net 2.0 thedatafarm.com that I hadn’t paid any attention to in many years and with it also moved my blog (an early version of graffitiCMS that was starting to act up).
Both are now set up as a WordPress app which was fun to configure with plugins and widgets and not too challenging since I have played with WordPress a bit on behalf of my mom.
So this will be easier for me to maintain and add in modern goodies like the social links.
I’m grateful to a number of people who’s resources helped or inspired me:
Picking a Blog Engine
Many folks on twitter recommended their favorite blog engine. I considered Orchard, the new Ghost blog and initially thought I did not want to use WordPress. My pal Daniel Marbach worked on me on twitter for a while, mystified why I was a brick wall about my anti-Wordpress stance. (He gets the last laugh!) Ghost is new. It will run on Windows Azure. But I was staying with orcsweb (via Cytanium) and that was not an option. Michele Bustamante is loving Ghost on her new site michelebusta.com. Sebastien Ros, from Microsoft, who works on Orchard, was very supportive, even offering to do the big 10 year, 4200 blog post conversion for me. In the end, Steve Smith said two words that swayed me back to WordPress: automatic updates. Yeah I love the ease of one button click wordpress and plugin updates.
Picking a Host
I’ve been very fortunate to have my site hosted by orcsweb.com for many years. While they are one of the highest-end hosts for ASP.net sites and pricey (but oh so worth it), they had offered me free hosting as a benefit of being an ASPInsider. Otherwise, it would have been overkill for my wee web site. But thanks to the gratis hosting, I get the benefits that orcsweb has to offer. Orcsweb has a spin-off company for people like me …don’t need the power (or expense) of the premier hosting, but still want the benefit of their experience, dependibility and great customer support: Cytanium.com. So they offered to host my site on Cytanium which also sports the Microsoft Web App Gallery for auto creating websites using frameworks like Orchard and WordPress. There are about 100 apps to choose from to install from the gallery. Setting up a new WordPress site was a snap.
Migrating 10 years worth of blogging
I have over 4000 blog posts and didn’t want to lose them. I found four resources that made this possible.
Jef Kazimer‘s blog post on his Graffiti to WordPress migration was very helpful.
Jon Sagara‘s Graffiti to BlogML tool. It’s just a small project that you can download and run in Visual Studio. I made one tweak to the code which was to handle some issues with the way it tried to emulate the blog URLs based on the titles. I had lots of quotations in those titles. In the end, I didn’t even need those URLs becasue I figured out how to get WordPress to format URLs just the same as they were formatted in the graffiti so my links should all (or mostly all) work. And I got the tool to create valid XML. I pointed the connection string to my sql server database and it processed all of the blog posts and comments in a matter of minutes!
Once the posts are in BlogML format there is a WordPress plugin, BlogML Importer (which works fine with WordPress 3.8), that does the conversion.
However it has a limit of 2MB file imports. Searching for a solution, I couldn’t believe that it was my own old Vermont pal, Dave Burke, who presented the solution Importing a Big Honkin’ BlogML.xml Into WordPress . I followed his instructions to a T and was able to pull in all of my posts and comments in 7 smaller files.
And some marketing
I left my blog in a /blog subfolder so that I can continue to have a main page on thedatafarm.com to let folks know that, as a consultant, I do like (and need) to work for a living. It is all just one big wordpress site. Well, really a small one. The other stuff, home page, etc , are just static pages.
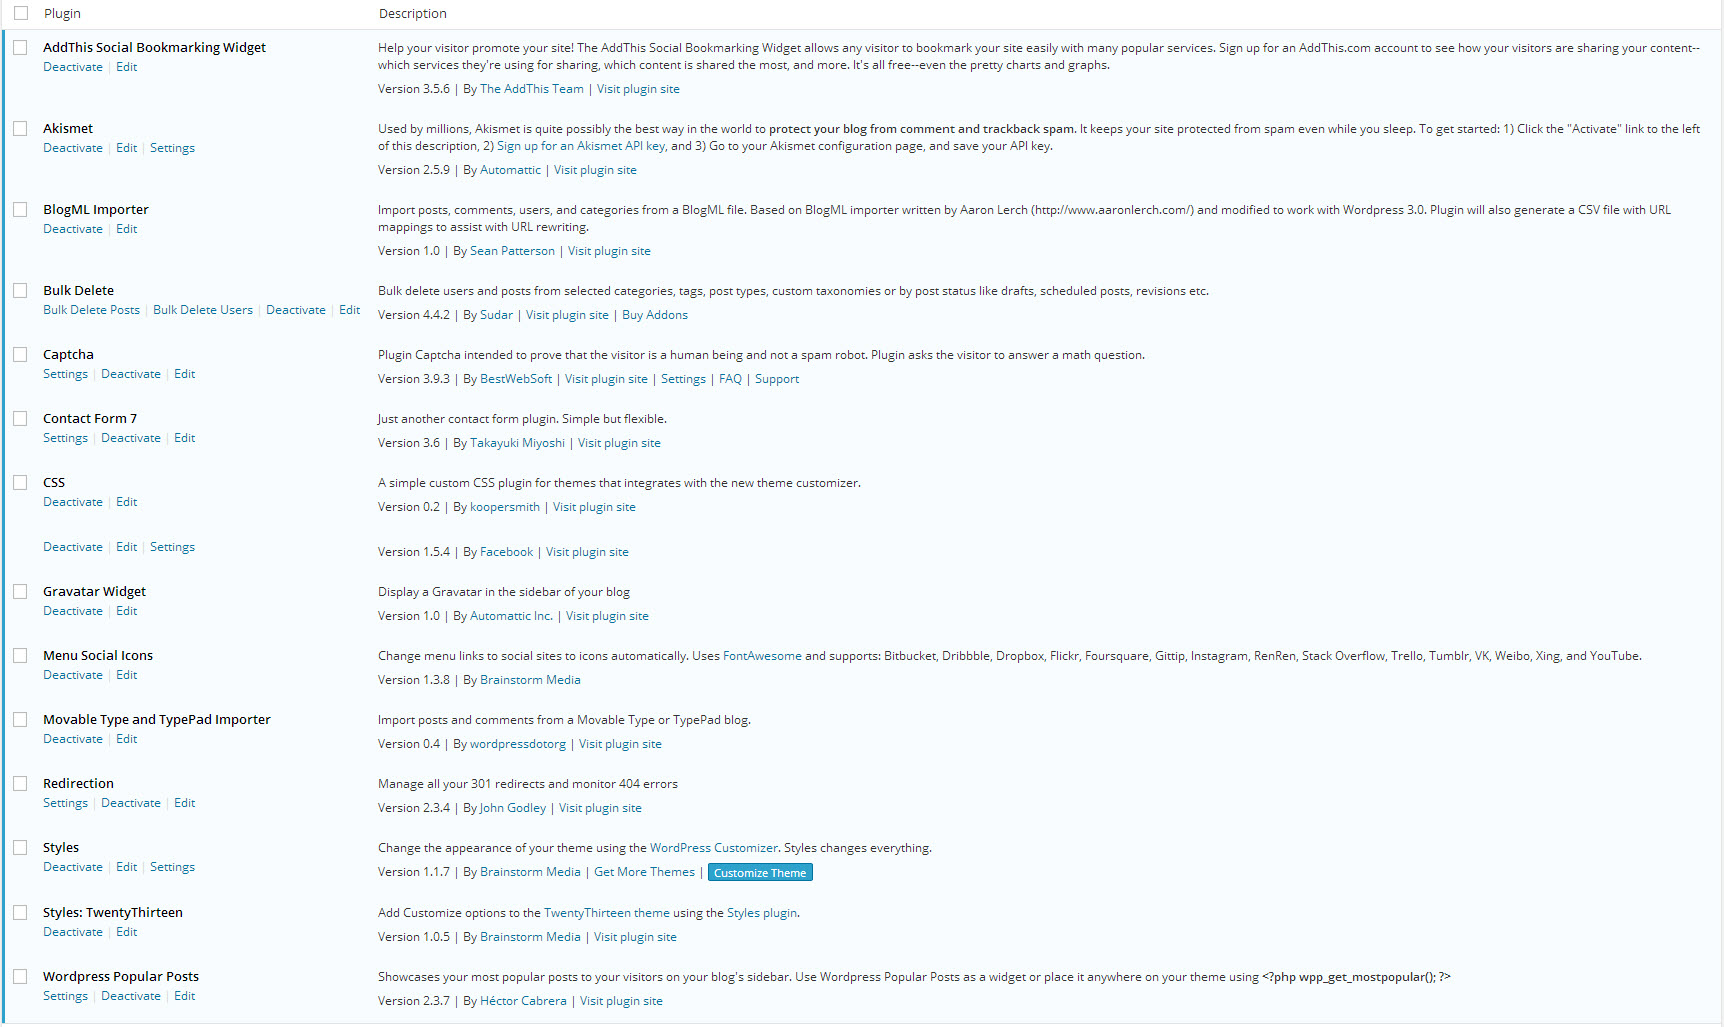
Plugins
I’m using a bunch of plugins. Since they are free, the least I can do is give them a nod:
December 28, 2013
Problems Installing AMD Catalyst Control Center on Windows 8? Here’s my fix!
TLDR: Updating to Windows 8.1 and reinstalling solved the problem. 
(And yes, I realize that I just wrote an UpWorthy-worthy post title!)
I recently replaced my 19” monitors with a pair of 27” monitors. My desktop is a Dell Optiplex and it has an AMD HD Radeon 7500 display adapter installed. This came with the Dell and is not an off-the-shelf card, but something that AMD sells generically to manufacturers.
My monitor has HDMI and DisplayPort outputs. My adapter has DisplayPort and DVI inputs. I plugged one monitor DP to DP. It was fine. For some reason, I got an HDMI to DVI adapter instead of a DisplayPort to DVI and when I plugged the second monitor in from the HDMI output, I got what is a classic problem with HDMI monitors: a 1” black border around my desktop window.
I tried many things via windows settings but none did the trick. The monitor has lots of hardware settings but it doesn’t have the classic Horizontal and Vertical scaling option that I’m used to from older monitors.
So I went to the internet and found many (many many many) recommendations on the web to just install AMD’s catalyst control center and then use it’s features to change the scaling on the monitor and lose the border.
Obviously this was the way to go. But after 4 hours of attempting to install the CCC software, I got bupkus. The installer went through the motions of installing but I did not get the CCC menu option on the desktop context menu. This is what it should look like:

I went through uninstalls, reinstalls, registry purges (based on AMD guidance), installing beta software. Still nothing.
Then I dug into the install folder created by the installer (C:\AMD) and dug through sub folders running all of the installers I could find! (Yes I know…dangerous and potential for having to repave my machine).
This finally installed a shell of the CCC though still not on my context menu. But when I ran this shell, all it had in it was a Quadrant tool that lets you define where on the screen various softare should be displayed.
I gave up on this thinking that next time I was in town, I would just get a proper DisplayPort to DVI adapter.
A month went by and I decided to try again yesterday. I only wasted 1/2 hr this time before giving up.
I also happened to decide it was time to upgrade this computer from Windows 8 to Windows 8.1. I had upgraded all of the other laptops and devices already.
After the 8.1 update was done, I decided to give CCC one last try (or at least what I was calling one last try.) I looked in the install folder and saw something I had never seen before in my many visits to that folder! A folder called WU-CCC2

In there was another install folder and in there another setup.exe!

Of course, I gave this a try and the install (because I just love to click on things!) and it did some interesting things. First it ran an uninstall (cleaning up previous garbage?) and then ran another install.
When complete, I had to reboot and the Catalyst Control Center option was finally on my menu!
I opened it up and it looked like all of the screenshots I had seen all over the internet as a recommendation on how to solve my original problem: the 1” border.
And changing the scaling on that monitor, has indeed, fixed the border problem!

Sometimes being a pit bull pays off. On the other hand, a new display adapter would have probably been more cost effective than the wasted time …but my pride was at risk, here. So I had to solve the puzzle!
Problems Installing AMD Catalyst Control Center on Windows 8? Here’s my fix!
TLDR: Updating to Windows 8.1 and reinstalling solved the problem.
(And yes, I realize that I just wrote an UpWorthy-worthy post title!)
I recently replaced my 19” monitors with a pair of 27” monitors. My desktop is a Dell Optiplex and it has an AMD HD Radeon 7500 display adapter installed. This came with the Dell and is not an off-the-shelf card, but something that AMD sells generically to manufacturers.
My monitor has HDMI and DisplayPort outputs. My adapter has DisplayPort and DVI inputs. I plugged one monitor DP to DP. It was fine. For some reason, I got an HDMI to DVI adapter instead of a DisplayPort to DVI and when I plugged the second monitor in from the HDMI output, I got what is a classic problem with HDMI monitors: a 1” black border around my desktop window.
I tried many things via windows settings but none did the trick. The monitor has lots of hardware settings but it doesn’t have the classic Horizontal and Vertical scaling option that I’m used to from older monitors.
So I went to the internet and found many (many many many) recommendations on the web to just install AMD’s catalyst control center and then use it’s features to change the scaling on the monitor and lose the border.
Obviously this was the way to go. But after 4 hours of attempting to install the CCC software, I got bupkus. The installer went through the motions of installing but I did not get the CCC menu option on the desktop context menu. This is what it should look like:
I went through uninstalls, reinstalls, registry purges (based on AMD guidance), installing beta software. Still nothing.
Then I dug into the install folder created by the installer (C:\AMD) and dug through sub folders running all of the installers I could find! (Yes I know…dangerous and potential for having to repave my machine).
This finally installed a shell of the CCC though still not on my context menu. But when I ran this shell, all it had in it was a Quadrant tool that lets you define where on the screen various softare should be displayed.
I gave up on this thinking that next time I was in town, I would just get a proper DisplayPort to DVI adapter.
A month went by and I decided to try again yesterday. I only wasted 1/2 hr this time before giving up.
I also happened to decide it was time to upgrade this computer from Windows 8 to Windows 8.1. I had upgraded all of the other laptops and devices already.
After the 8.1 update was done, I decided to give CCC one last try (or at least what I was calling one last try.) I looked in the install folder and saw something I had never seen before in my many visits to that folder! A folder called WU-CCC2
In there was another install folder and in there another setup.exe!
Of course, I gave this a try and the install (because I just love to click on things!) and it did some interesting things. First it ran an uninstall (cleaning up previous garbage?) and then ran another install.
When complete, I had to reboot and the Catalyst Control Center option was finally on my menu!
I opened it up and it looked like all of the screenshots I had seen all over the internet as a recommendation on how to solve my original problem: the 1” border.
And changing the scaling on that monitor, has indeed, fixed the border problem!
Sometimes being a pit bull pays off. On the other hand, a new display adapter would have probably been more cost effective than the wasted time …but my pride was at risk, here. So I had to solve the puzzle!
December 25, 2013
Fix for VS2013 Not Showing Databases in SQL Server Object Explorer
This really had me confused. I have used SSOE plenty in VS2012 and on my laptop that I just replaced, in VS2013. But on my new laptop and on my desktop, I can go through the motions of adding the (localdb)/v11 database to SSOE with no errors and still, nothing shows up under the SQL Server branch of the tree.
Finally I opened VS2012 to see if *it* would show my databases in SSOE. Instead I got a message that SQL Server Data Tools (SSDT) was out of date.
SSDT is an extension to Visual Studio 2012 which that team was releasing whenever they had updates to it.
But for VS2013, it’s just a part of the full IDE.
My out-of-date VS2012 SSDT was causing a conflict with the built in tools for VS2013. Go figure. But installing the October 2013 update to SSDT (you’ll find an update for VS2010 and for VS2012) fixed the problem. Now I can see my databases in SSOE in both version of visual studio.
October 26, 2013
How EF6 Enables Mocking DbSets more easily
There’s an interesting change in EF6 that simplifies unit testing when EF is in the way and you don’t want to engage it at all.
EF6 DbSet gained new features. The team had to decide if they would make a breaking change to the existing IDbSet interface or leave that be and just change DbSet. They chose
the latter route. In doing so, they also ensured that we could use the DbSet directly for testing by adding a new constructor.
Here' you can see the different constructors and how they affect our ability to test.
EF5 DbSet Constructor
The DbSet constructor is tied to a DbContext by way of the InternalQuery that is used internally in the constructor.
internal DbSet(InternalSet<TEntity> internalSet)
: base((IInternalQuery<TEntity>) internalSet)
{
this._internalSet = internalSet;
}
.csharpcode, .csharpcode pre
{
font-size: small;
color: black;
font-family: consolas, "Courier New", courier, monospace;
background-color: #ffffff;
/*white-space: pre;*/
}
.csharpcode pre { margin: 0em; }
.csharpcode .rem { color: #008000; }
.csharpcode .kwrd { color: #0000ff; }
.csharpcode .str { color: #006080; }
.csharpcode .op { color: #0000c0; }
.csharpcode .preproc { color: #cc6633; }
.csharpcode .asp { background-color: #ffff00; }
.csharpcode .html { color: #800000; }
.csharpcode .attr { color: #ff0000; }
.csharpcode .alt
{
background-color: #f4f4f4;
width: 100%;
margin: 0em;
}
.csharpcode .lnum { color: #606060; }
In EF5, we also have IDbSet (DbSet derives from this) (and IObjectSet which was introduced in EF4) . These interfaces contain the set operations (Add, Update, Remove and some additional methods through other interfaces) and can be implemented without forcing any ties to EF’s DbContext.
That’s what we’ve used in the past to create fake DbSets for testing scenarios.
EF6 DbSet Constructors
The internal constructor is still there.
internal DbSet(InternalSet<TEntity> internalSet)
: base((IInternalQuery<TEntity>) internalSet)
{
this._internalSet = internalSet;
}
.csharpcode, .csharpcode pre
{
font-size: small;
color: black;
font-family: consolas, "Courier New", courier, monospace;
background-color: #ffffff;
/*white-space: pre;*/
}
.csharpcode pre { margin: 0em; }
.csharpcode .rem { color: #008000; }
.csharpcode .kwrd { color: #0000ff; }
.csharpcode .str { color: #006080; }
.csharpcode .op { color: #0000c0; }
.csharpcode .preproc { color: #cc6633; }
.csharpcode .asp { background-color: #ffff00; }
.csharpcode .html { color: #800000; }
.csharpcode .attr { color: #ff0000; }
.csharpcode .alt
{
background-color: #f4f4f4;
width: 100%;
margin: 0em;
}
.csharpcode .lnum { color: #606060; }
But now there is another constructor. It’s protected and only uses an set interface, but not the query interface. This allows mocking frameworks to get access to DbSet and at the same time, benefit from some of the methods added to DbSet for EF6.
/// <summary>
/// Creates an instance of a <see cref="T:System.Data.Entity.DbSet`1"/> when called from the constructor of a derived
/// type that will be used as a test double for DbSets. Methods and properties that will be used by the
/// test double must be implemented by the test double except AsNoTracking, AsStreaming, an Include where
/// the default implementation is a no-op.
///
/// </summary>
protected DbSet()
: this((InternalSet<TEntity>) null)
{
}
.csharpcode, .csharpcode pre
{
font-size: small;
color: black;
font-family: consolas, "Courier New", courier, monospace;
background-color: #ffffff;
/*white-space: pre;*/
}
.csharpcode pre { margin: 0em; }
.csharpcode .rem { color: #008000; }
.csharpcode .kwrd { color: #0000ff; }
.csharpcode .str { color: #006080; }
.csharpcode .op { color: #0000c0; }
.csharpcode .preproc { color: #cc6633; }
.csharpcode .asp { background-color: #ffff00; }
.csharpcode .html { color: #800000; }
.csharpcode .attr { color: #ff0000; }
.csharpcode .alt
{
background-color: #f4f4f4;
width: 100%;
margin: 0em;
}
.csharpcode .lnum { color: #606060; }
Even if you wanted to create your own fakes (or test doubles) in EF6, you can do that with DbSet now, not IDbSet. IDbSet is still there for backwards compatibility.
There are two detailed documents on MSDN for using EF6 to create Test Doubles and to use with Mocking Frameworks.
You also might find the meeting notes about this change interesting. I sure do! :)
I am curious to revisit my work with Telerik’s JustMock. I built some tests with EF5 and JustMock in my Automated Testing for Fraidy Cats course on Pluralsight. When using the paid version, everything just works. But when using JustMock Lite, the free version, it was not able to grok DbSets and you still needed to implement your own fake. I’ll be checking to see if the new DbSet implementation allows the free version of JustMock to mock DbSets on it's own now.
//update about 20 minutes after initial post. The limitation of JustMock Lite is that it doesn't support ReturnsCollection which is what you want to emulate the return of a DbSet. So if you're not willing to pay for your tools, you can use the free version (which has a ton of features) and do a little extra work (create your own test double for DbSet which you can see how to do in MSDN doc I linked to above.
Julia Lerman's Blog

- Julia Lerman's profile
- 18 followers

