Rebecca Firth's Blog, page 3
July 9, 2025
Easy Delicious Strawberry Jam Recipe 🍓 (No Pectin Needed!)
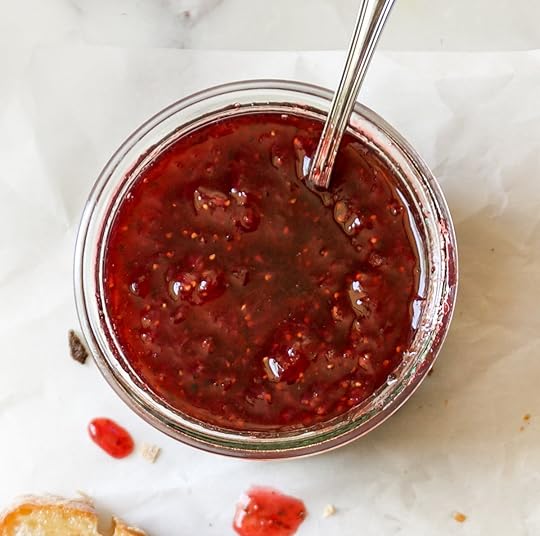
I’m super pumped to share this Easy DELICIOUS Strawberry Jam Recipe that doesn’t need any pectin! I’ve been making this every summer for years now and I realized it’s just too good not to share.
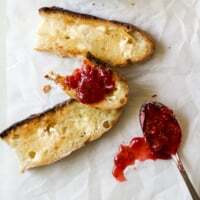
I like my jam to be loaded with lots of fresh, bright, strawberry flavor and an easily spreadable consistency. I love to eat this jam on buttered sourdough toast in the morning. Heaven. It’s also delicious served beside oozy creamy brie or tangy goat cheese.
I’ve even been known to thrown it in a cocktail with vodka, soda water, a spoonful or two of this strawberry jam and mint or basil leaves. So good.
I created this recipe because I used to can fruits and veggies from my garden every summer and no joke, it’s sweaty business. And this was before I had AC in my house. With this recipe, you don’t need any special canning equipment or ingredients and it’s prepped and cooked in under an hour with minimal effort from you.
One other thing that takes this from your basic strawberry jam to something truly dazzling: it has the addition of dried hibiscus flowers. This is optional, but DAMN. It will make your taste buds sing!
I cannot wait for you to make this easy peasy strawberry jam! Let me know what you think!

 Step-by-Step Photos & Instructions to
 Make Perfect Strawberry Jam Every Time!
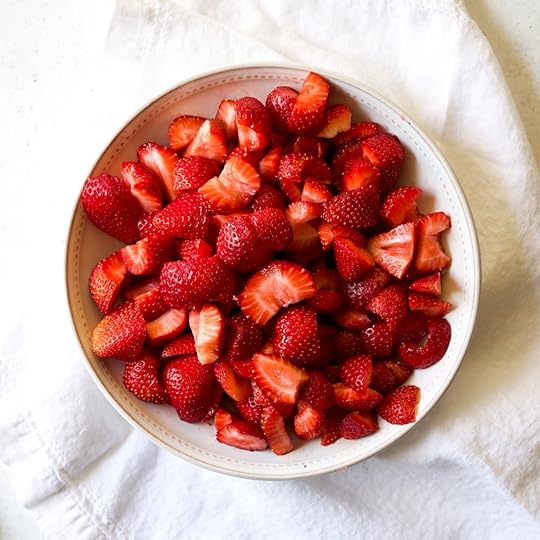
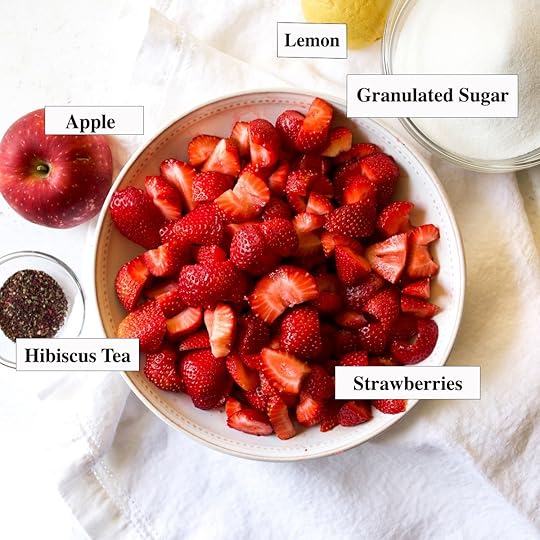 STEP 1: All you need are five ingredients to make the yummiest strawberry freezer jam: strawberries, granulated sugar, lemon (juice + zest), apple (unpeeled!) and dried hibiscus (optional, but the hibiscus takes this tea to the next level!).
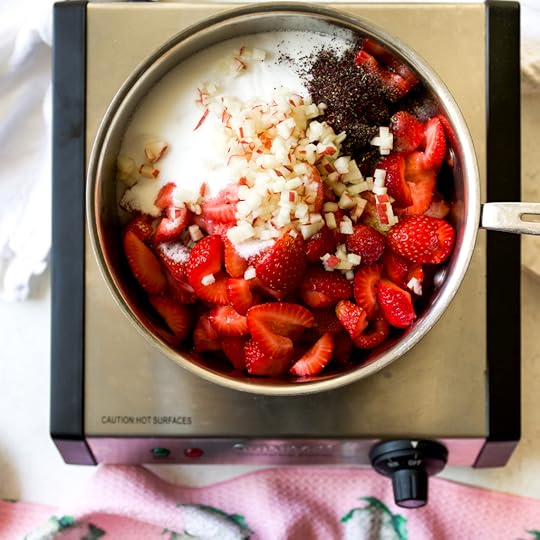 STEP 2: Add all of the ingredients to a large saucepan or Dutch oven.
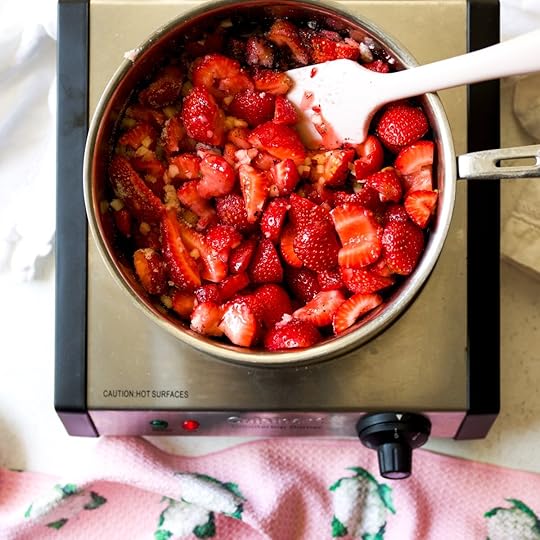 STEP 3: Stir to combine…
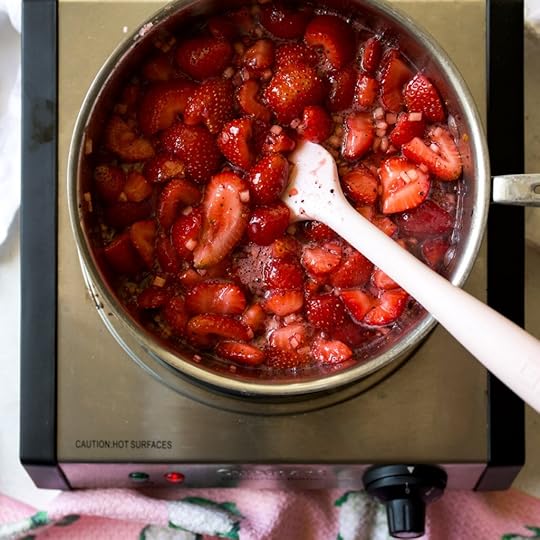 STEP 4: Turn up the heat to high to bring to a boil. The berries will start releasing some juice!
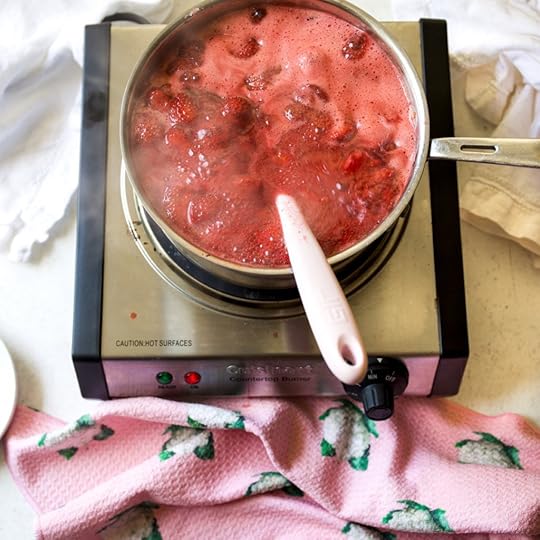 STEP 5: Once the jam reaches a boil, turn it down to medium low (or low if your stovetop runs hot) and let the jam simmer for about 35 minutes until reduced.
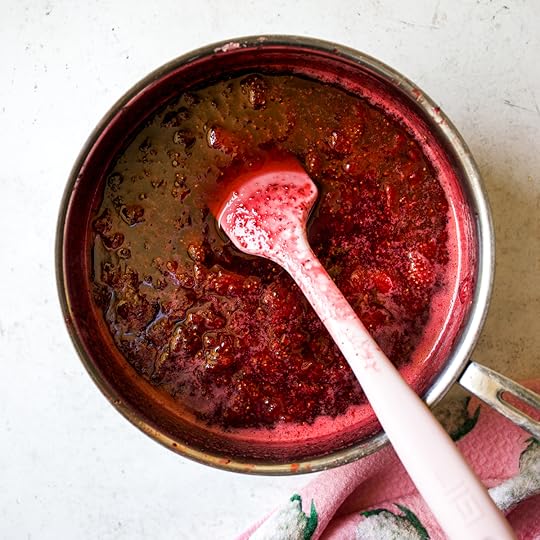 When done, the jam will have reduced and concentrated that delicious strawberry flavor! The jam will thicken quite a bit as it cools.
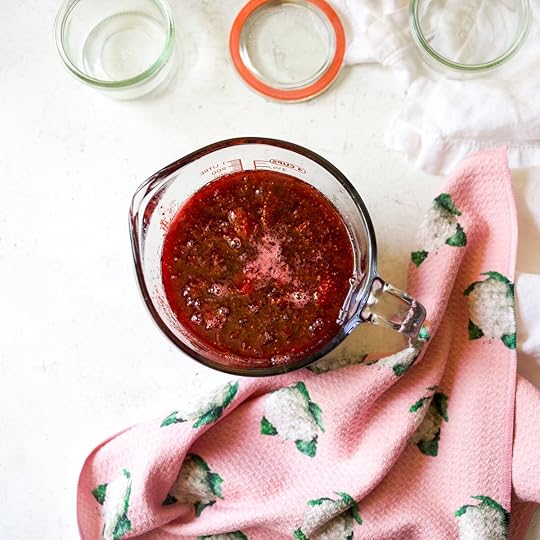 STEP 6: I like to pour the jam into a liquid measuring cup because it makes it easier to pour it into the jars.
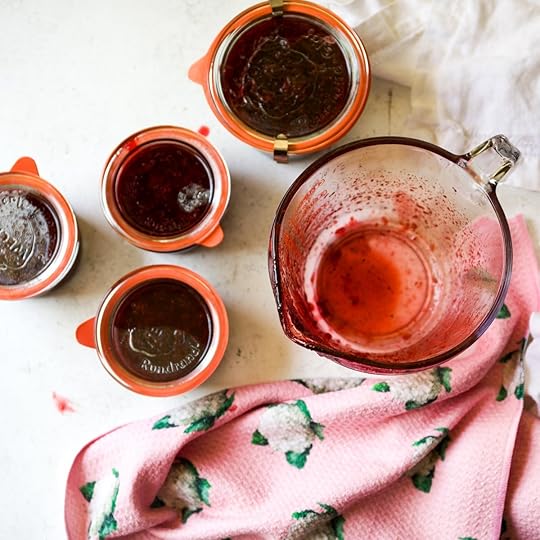 STEP 7: Let the jars sit at room temperature until they are cool to the touch and then stash in the fridge or freezer (see the
Notes
section below the recipe for more details).
STEP 7: Let the jars sit at room temperature until they are cool to the touch and then stash in the fridge or freezer (see the
Notes
section below the recipe for more details).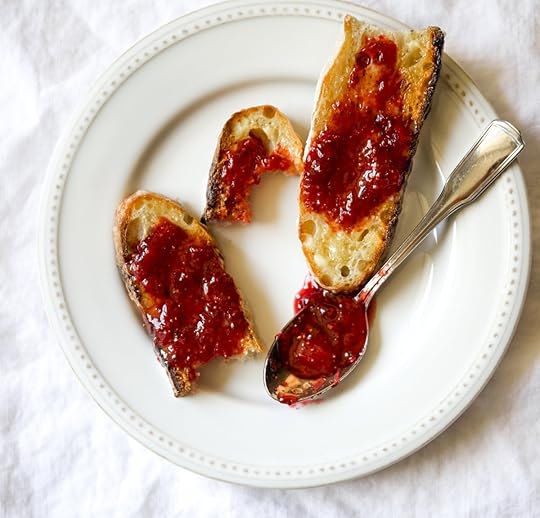 More Delicious Berry Recipes!
Check out my favorite Buttermilk Blueberry Scones (SWOON!), springy Raspberry Muffins and you can find all of the berry recipes here!
Enjoy this dazzling Strawberry Jam!!
 PrintEasy Delicious Strawberry Jam Recipe (No Pectin!)#wprm-recipe-user-rating-0 .wprm-rating-star.wprm-rating-star-full svg * { fill: #343434; }#wprm-recipe-user-rating-0 .wprm-rating-star.wprm-rating-star-33 svg * { fill: url(#wprm-recipe-user-rating-0-33); }#wprm-recipe-user-rating-0 .wprm-rating-star.wprm-rating-star-50 svg * { fill: url(#wprm-recipe-user-rating-0-50); }#wprm-recipe-user-rating-0 .wprm-rating-star.wprm-rating-star-66 svg * { fill: url(#wprm-recipe-user-rating-0-66); }linearGradient#wprm-recipe-user-rating-0-33 stop { stop-color: #343434; }linearGradient#wprm-recipe-user-rating-0-50 stop { stop-color: #343434; }linearGradient#wprm-recipe-user-rating-0-66 stop { stop-color: #343434; }#wprm-recipe-user-rating-0.wprm-user-rating-allowed.wprm-user-rating-not-voted:not(.wprm-user-rating-voting) svg * { fill-opacity: 0.3; }This must-make recipe takes strawberry jam to the next level with dried hibiscus, zero pectin or canning equipment and incredible ease and flavor! You will love this on buttered toast, with oozy, creamy cheeses, drizzled over ice cream or topping your morning oatmeal!Course Breakfast, Dessert, SnackCuisine AmericanKeyword Rebecca Firth, DisplacedHousewife Well-Tested Recipe, Strawberry Jam, No Pectin, Easy Recipe, HibiscusPrep Time 10 minutes minutesCook Time 35 minutes minutesTotal Time 45 minutes minutesServings 3.5 CupsAuthor Rebecca at DisplacedHousewifeEquipmentLarge SaucepanParing Knife (for the strawberries)My Favorite Jam JarsSpatulaLiquid Measuring CupDigital Instant Read Thermometer (optional)Ingredients1 lb 14 oz (848 grams) fresh strawberries cleaned, hulled and quartered (roughly 3 pints of berries)1 ½ cups (300 grams) granulated sugar1/4 (28 g) small apple finely minced (don’t peel; see Notes below recipe for more details5 grams dried hibiscus see Notes below recipe on sourcing1 lemon zest + juiceInstructionsFor the Strawberry JamTo a large saucepan or Dutch oven, add the strawberries, sugar, minced apple, lemon zest, lemon juice and hibiscus. Stir well to combine. Turn the heat to high and bring the mixture to a boil. Reduce the heat to medium low and let the strawberry jam simmer for about 30 to 40 minutes.While the jam simmers stir frequently, scraping the bottom of the pan with a spatula to make sure nothing is sticking or burning. The mixture will foam up. There's no need to scrape this off. Keep stirring and reduce the heat if it starts to boil again. I like the jam to reduce to 2/3 to 1/2 its original volume.To Check When the Jam is ReadyIf you have an instant-read thermometer handy, check to see if the jam has reached 220℉ (104℃). Otherwise, you can put a spoon in the freezer for about 10 to 15 minutes. When you think the jam is done, dip the frozen spoon into the jam. If the jam continues to quickly drip off of the spoon, it needs to simmer and reduce some more. If it slowly drips off and seems to linger on the spoon, your jam is ready.Storing the JamSet your jars on top of a clean kitchen towel.Pour the strawberry jam* into clean, sterilized containers (see
Notes
below recipe for more information), leaving about 1/2 inch at the top to allow for expansion if you plan on freezing the jam. Cover with the lids and let sit for 4 to 6 hours or until completely cool. Stash in the fridge or freezer until ready to use (see
Notes
below recipe for more storage details).*I like to pour the jam into a liquid measuring cup and then pour it into my jars as it makes less of a mess. NotesRecipe InspirationThank you to my friend
Amisha Gurbani
for inspiring me (she is the jam queen!)! She has an amazing recipe for Strawberry Hibiscus Jam in her cookbook,
Mumbai Modern
. Her recipe is made for canning, uses quite a bit more hibiscus and is completely delicious!! I can’t recommend her book enough! xoFresh or Frozen StrawberriesBoth! I love to make this jam when strawberries are abundant in the summertime. However, you could easily make this using frozen strawberries.Sterilizing JarsIf I know I’ll be using the jam within a week or two, I just use clean jars.If I want it to sit in the fridge for a bit longer, I will sterilize them. You can either use the sterilize setting on your dishwasher or you can submerge them in boiling water for at least 10 minutes and then let them air dry before using.Choosing Apples for Your JamThe reason this strawberry jam recipe works without pectin is the combination of naturally occurring pectin in the lemon, apple and strawberries, coupled with the granulated sugar.Green apples such as Granny Smith have the most pectin. However, you’ll note from the photos, that I used a Cosmic Crisp apple (I love them!). Both will work, as will most any apple you have on hand.Where to Get Hibiscus?The addition of hibiscus to this strawberry jam takes it to the next level! I use Republic of Tea Hibiscus Superflower Tea; you’ll need about 3 teabags (just cut them open and empty the contents into the saucepan).Any dried hibiscus will work and the tea aisle at the grocery store is a really easy way to get it!Storing Strawberry JamSince we aren’t using a a canning process when making this jam, it is not shelf stable. Meaning, you’ll need to store it in either the refrigerator or freezer (this is why we call it a freezer jam). This jam will last 3 to 4 weeks in the fridge and up to a year in the freezer. When freezing, set the jars upright with the lid loosened. This will allow for the jam to expand while it freezes. After several hours tighten the lids. Defrost in the fridge overnight before using.
PrintEasy Delicious Strawberry Jam Recipe (No Pectin!)#wprm-recipe-user-rating-0 .wprm-rating-star.wprm-rating-star-full svg * { fill: #343434; }#wprm-recipe-user-rating-0 .wprm-rating-star.wprm-rating-star-33 svg * { fill: url(#wprm-recipe-user-rating-0-33); }#wprm-recipe-user-rating-0 .wprm-rating-star.wprm-rating-star-50 svg * { fill: url(#wprm-recipe-user-rating-0-50); }#wprm-recipe-user-rating-0 .wprm-rating-star.wprm-rating-star-66 svg * { fill: url(#wprm-recipe-user-rating-0-66); }linearGradient#wprm-recipe-user-rating-0-33 stop { stop-color: #343434; }linearGradient#wprm-recipe-user-rating-0-50 stop { stop-color: #343434; }linearGradient#wprm-recipe-user-rating-0-66 stop { stop-color: #343434; }#wprm-recipe-user-rating-0.wprm-user-rating-allowed.wprm-user-rating-not-voted:not(.wprm-user-rating-voting) svg * { fill-opacity: 0.3; }This must-make recipe takes strawberry jam to the next level with dried hibiscus, zero pectin or canning equipment and incredible ease and flavor! You will love this on buttered toast, with oozy, creamy cheeses, drizzled over ice cream or topping your morning oatmeal!Course Breakfast, Dessert, SnackCuisine AmericanKeyword Rebecca Firth, DisplacedHousewife Well-Tested Recipe, Strawberry Jam, No Pectin, Easy Recipe, HibiscusPrep Time 10 minutes minutesCook Time 35 minutes minutesTotal Time 45 minutes minutesServings 3.5 CupsAuthor Rebecca at DisplacedHousewifeEquipmentLarge SaucepanParing Knife (for the strawberries)My Favorite Jam JarsSpatulaLiquid Measuring CupDigital Instant Read Thermometer (optional)Ingredients1 lb 14 oz (848 grams) fresh strawberries cleaned, hulled and quartered (roughly 3 pints of berries)1 ½ cups (300 grams) granulated sugar1/4 (28 g) small apple finely minced (don’t peel; see Notes below recipe for more details5 grams dried hibiscus see Notes below recipe on sourcing1 lemon zest + juiceInstructionsFor the Strawberry JamTo a large saucepan or Dutch oven, add the strawberries, sugar, minced apple, lemon zest, lemon juice and hibiscus. Stir well to combine. Turn the heat to high and bring the mixture to a boil. Reduce the heat to medium low and let the strawberry jam simmer for about 30 to 40 minutes.While the jam simmers stir frequently, scraping the bottom of the pan with a spatula to make sure nothing is sticking or burning. The mixture will foam up. There's no need to scrape this off. Keep stirring and reduce the heat if it starts to boil again. I like the jam to reduce to 2/3 to 1/2 its original volume.To Check When the Jam is ReadyIf you have an instant-read thermometer handy, check to see if the jam has reached 220℉ (104℃). Otherwise, you can put a spoon in the freezer for about 10 to 15 minutes. When you think the jam is done, dip the frozen spoon into the jam. If the jam continues to quickly drip off of the spoon, it needs to simmer and reduce some more. If it slowly drips off and seems to linger on the spoon, your jam is ready.Storing the JamSet your jars on top of a clean kitchen towel.Pour the strawberry jam* into clean, sterilized containers (see
Notes
below recipe for more information), leaving about 1/2 inch at the top to allow for expansion if you plan on freezing the jam. Cover with the lids and let sit for 4 to 6 hours or until completely cool. Stash in the fridge or freezer until ready to use (see
Notes
below recipe for more storage details).*I like to pour the jam into a liquid measuring cup and then pour it into my jars as it makes less of a mess. NotesRecipe InspirationThank you to my friend
Amisha Gurbani
for inspiring me (she is the jam queen!)! She has an amazing recipe for Strawberry Hibiscus Jam in her cookbook,
Mumbai Modern
. Her recipe is made for canning, uses quite a bit more hibiscus and is completely delicious!! I can’t recommend her book enough! xoFresh or Frozen StrawberriesBoth! I love to make this jam when strawberries are abundant in the summertime. However, you could easily make this using frozen strawberries.Sterilizing JarsIf I know I’ll be using the jam within a week or two, I just use clean jars.If I want it to sit in the fridge for a bit longer, I will sterilize them. You can either use the sterilize setting on your dishwasher or you can submerge them in boiling water for at least 10 minutes and then let them air dry before using.Choosing Apples for Your JamThe reason this strawberry jam recipe works without pectin is the combination of naturally occurring pectin in the lemon, apple and strawberries, coupled with the granulated sugar.Green apples such as Granny Smith have the most pectin. However, you’ll note from the photos, that I used a Cosmic Crisp apple (I love them!). Both will work, as will most any apple you have on hand.Where to Get Hibiscus?The addition of hibiscus to this strawberry jam takes it to the next level! I use Republic of Tea Hibiscus Superflower Tea; you’ll need about 3 teabags (just cut them open and empty the contents into the saucepan).Any dried hibiscus will work and the tea aisle at the grocery store is a really easy way to get it!Storing Strawberry JamSince we aren’t using a a canning process when making this jam, it is not shelf stable. Meaning, you’ll need to store it in either the refrigerator or freezer (this is why we call it a freezer jam). This jam will last 3 to 4 weeks in the fridge and up to a year in the freezer. When freezing, set the jars upright with the lid loosened. This will allow for the jam to expand while it freezes. After several hours tighten the lids. Defrost in the fridge overnight before using.The post Easy Delicious Strawberry Jam Recipe 🍓 (No Pectin Needed!) appeared first on DisplacedHousewife.


July 2, 2025
Creamy Dreamy Herby Buttermilk Ranch Dressing Recipe
This flavor bomb Herby Buttermilk Ranch Dressing is a pinch to throw together! It’s the perfect dressing to have in your fridge for nightly salads and positively toe-curling thrown into my favorite Ricotta Salata & Charred Corn Buttermilk Pasta Salad!
This dressing is ranch, but with mega jazz hands! Creamy mayonnaise, sour cream and buttermilk make the base. Flavor is layered in with fresh lemon juice, herby olive oil, Worcestershire sauce and a kick of cayenne. Lastly, a trio of herbs (parsley, dill and chives) add the perfect hit of flavor and color.
A high-speed blender or food processor makes fast work of throwing this together; but it can easily be done with a medium bowl and a whisk (or even a large mason jar!).
Feel free to play around with the herbs (basil is so good in this!) and serve it with salads, pasta salads, with crudite, to dip your pizza in…sky’s the limit!
When I used to cater  (back in the day!), this was my go-to buttermilk dressing and I can’t wait for it to be yours too!
Enjoy this herby, creamy buttermilk dressing that you’ll want to put on everything!
 More Delicious Salad Recipes
I loveee a delicious salad! I hope you’ll also check out Strawberry Freekah Salad, Pecan-Crusted Goat Cheese Salad and you can find all of the savory recipes here!
 PrintCreamy Dreamy Herby Buttermilk Ranch Dressing Recipe#wprm-recipe-user-rating-0 .wprm-rating-star.wprm-rating-star-full svg * { fill: #343434; }#wprm-recipe-user-rating-0 .wprm-rating-star.wprm-rating-star-33 svg * { fill: url(#wprm-recipe-user-rating-0-33); }#wprm-recipe-user-rating-0 .wprm-rating-star.wprm-rating-star-50 svg * { fill: url(#wprm-recipe-user-rating-0-50); }#wprm-recipe-user-rating-0 .wprm-rating-star.wprm-rating-star-66 svg * { fill: url(#wprm-recipe-user-rating-0-66); }linearGradient#wprm-recipe-user-rating-0-33 stop { stop-color: #343434; }linearGradient#wprm-recipe-user-rating-0-50 stop { stop-color: #343434; }linearGradient#wprm-recipe-user-rating-0-66 stop { stop-color: #343434; }#wprm-recipe-user-rating-0.wprm-user-rating-allowed.wprm-user-rating-not-voted:not(.wprm-user-rating-voting) svg * { fill-opacity: 0.3; }Your new go-to herby buttermilk ranch dressing is a FLAVOR BOMB that's a breeze to throw together and is perfect with your favorite green salad, pasta salads or simply crudite!Course Appetizer, Dinner, lunch, SnackCuisine AmericanKeyword Buttermilk, Salad Dressing, Fresh Herbs, Ranch, Rebecca Firth, DisplacedHousewife Well-Tested RecipePrep Time 10 minutes minutesTotal Time 10 minutes minutesAuthor Rebecca FirthEquipmentGlass BottlesMini Food Processor (great for salad dressings!)Chef's KnifeWalnut Cutting BoardIngredients1 cup (240 g) mayonnaise such as Best Foods, Hellmann's or Duke's1/2 cup (120 g) sour cream use full-fat1/2 cup (120 g) buttermilk shaken; plus more for thinning the salad dressing to the desired consistency1 clove garlic minced2 tablespoons (28 g) fresh lemon juice2 tablespoons (28 g) extra virgin olive oil1 teaspoon Worcestershire sauce1 teaspoon sea salt1/2 teaspoon pepper1/4 teaspoon paprika1/4 teaspoon cayenne pepper1/4 cup parsley coarsely chopped2 tablespoons fresh dill coarsely chopped1 tablespoon fresh chives coarsely choppedInstructionsTo a high-speed blender or food processor fit with the blade attachment, add the mayonnaise through the cayenne pepper and blend on high until smooth, about 40 seconds.Add the parsley dill and chives and pulse until the herbs are evenly distributed throughout the dressing, but they still. have definition (they haven't disappeared into the salad dressing. Taste. It's delicious, right?! Adjust your seasonings, if necessary.Store in the fridge, in an airtight container, until ready to use. The salad dressing will thicken in the fridge. You may need to add either more buttermilk or water to thin prior to serving.NotesTo Make Without A BlenderWhisk together the mayo, sour cream and buttermilk until completely combined. Finely chop the garlic and herbs and then combine everything. Either whisk it together or throw it into a large mason jar and shake it up!Sour Cream SubstituteIf I’m out of sour cream, I’ll grab some Greek yogurt and it works great. I prefer the varieties that have some fat in them (not the fat-free versions).HerbsFeel free to sub in any herb combination (or just use one). Love this when it’s just made with basil!!Storing Salad DressingStored in an airtight container in the fridge this dressing will last for a week!
The post Creamy Dreamy Herby Buttermilk Ranch Dressing Recipe appeared first on DisplacedHousewife.
June 27, 2025
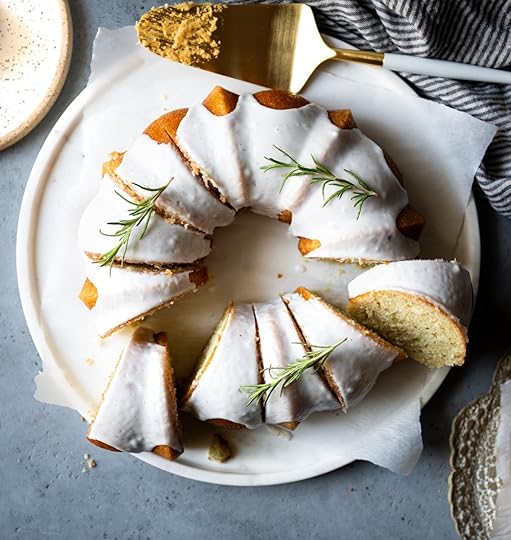
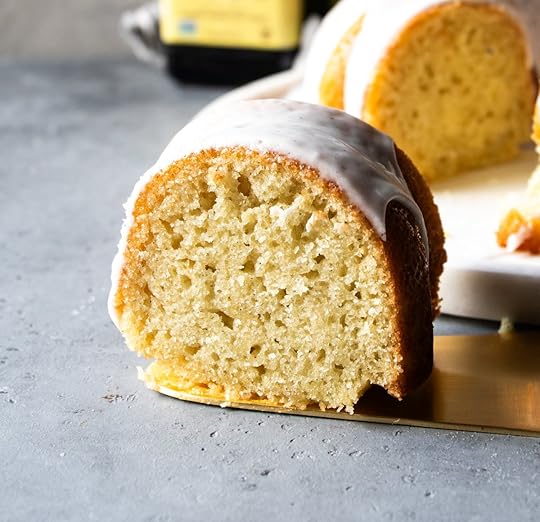
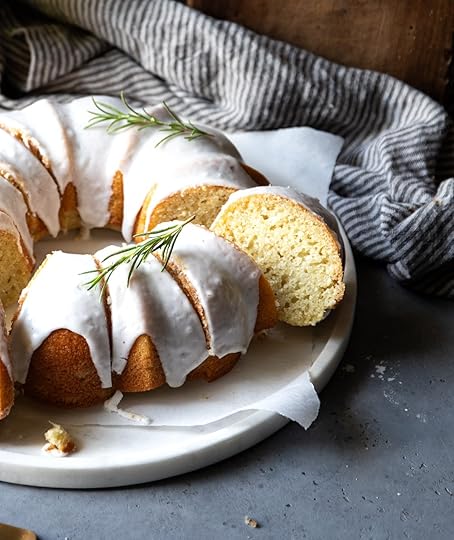
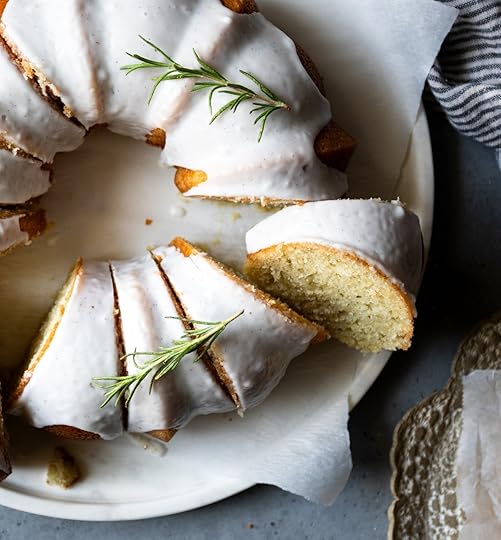
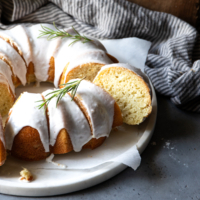
Best Vanilla Bundt Cake: Mega Moist & Flavorful Recipe
If you’ve been searching for the perfect vanilla bundt cake recipe, your search is over!
This easy, one-bowl recipe delivers a super moist, bouncy, vanilla-laced cake that is the perfect backdrop for vibrant macerated berries (see  Baker’s Tip below for my favorite!), a dollop of fresh whipped cream and/or a big scoop of your favorite ice cream.
It’s also completely perfect as is, with a thick pour of my favorite vanilla glaze or simply dusted with confectioners’ sugar just before serving.
This gem (with the perfect tender crumb!) was originally slated for the bundt chapter of The Cake Book, but alas, we ran out of space, and so I’m ULTRA EXCITED to share it with you now!
Come back and let me know your favorite way to serve this incredible cake!
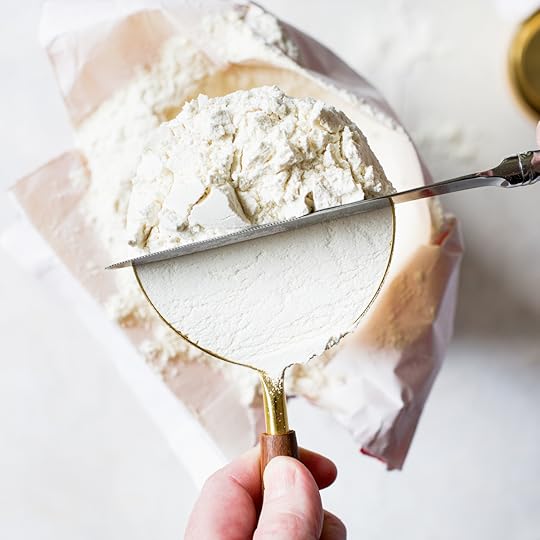 The Baker’s Guide to Measuring Flour
One of the biggest (and most common) mistakes in baking is how we measure flour. If you find yourself without a scale, see my top tips on how to properly measure flour for the perfect amount every time!
 My Favorite Baking Pro Tips for Making
 THE BEST Vanilla Bundt Cake!1. Make sure all of your bundt cake ingredients are at room temperature.
Cake batter will curdle if you mix cold and room temperature ingredients, as well as if you add too much liquid too fast to the cake batter. Make sure everything is at room temperature for the perfect bundt cake buttery crumb.
2. Prep your bundt pan like a pro!I give detailed instructions in the Notes section below the recipe. Follow them to a T and you’ll never have to worry about your bundt cake sticking to your bundt pan.
3. Don’t let your baked bundt sit in the pan for more than 10 minutes.The longer the vanilla bundt cake sits in the pan, the more you increase the likelihood that parts of the cake will stick to the pan.
Let’s make a beautiful classic bundt cake!
 More Beautiful Bundt Cake Recipes
Check out my favorite Chiffon Cake Recipe, Chocolate-Coconut Bundt Cake and you can find all of the bundt cake recipes here!
Have fun making this super delicious classic bundt cake recipe!
 PrintBest Vanilla Bundt Cake: Mega Moist & Flavorful Recipe#wprm-recipe-user-rating-0 .wprm-rating-star.wprm-rating-star-full svg * { fill: #343434; }#wprm-recipe-user-rating-0 .wprm-rating-star.wprm-rating-star-33 svg * { fill: url(#wprm-recipe-user-rating-0-33); }#wprm-recipe-user-rating-0 .wprm-rating-star.wprm-rating-star-50 svg * { fill: url(#wprm-recipe-user-rating-0-50); }#wprm-recipe-user-rating-0 .wprm-rating-star.wprm-rating-star-66 svg * { fill: url(#wprm-recipe-user-rating-0-66); }linearGradient#wprm-recipe-user-rating-0-33 stop { stop-color: #343434; }linearGradient#wprm-recipe-user-rating-0-50 stop { stop-color: #343434; }linearGradient#wprm-recipe-user-rating-0-66 stop { stop-color: #343434; }#wprm-recipe-user-rating-0.wprm-user-rating-allowed.wprm-user-rating-not-voted:not(.wprm-user-rating-voting) svg * { fill-opacity: 0.3; }Imagine the perfect vanilla bundt cake recipe: bouncy, moist, buttery, mega vanilla-flavored and a breeze to throw together. That's this cake! She's a one-bowl dream that delivers in flavor, texture and ease: the baking trifecta!Course Dessert, SnackCuisine AmericanKeyword Rebecca Firth, DisplacedHousewife Well-Tested Recipe, Vanilla, Bundt CakePrep Time 15 minutes minutesCook Time 45 minutes minutesTotal Time 1 hour hourServings 12 ServingsAuthor Rebecca FirthEquipmentBundt Cake PanBaker's JoyBaking ScaleElectric Stand MixerSpatulaIngredientsFor the Vanilla Bundt Cake Recipe2 cup (400 g) granulated sugar8 tablespoons (113 g) unsalted butter room temperature½ cup (112 g) sunflower or grapeseed oil or other neutral-flavored cooking oil1 vanilla bean split and seeds scraped or 1 tablespoon real vanilla extract3 large eggs room temperature1 ½ teaspoons baking powder1 teaspoon baking soda1 teaspoon sea salt1 cup (240 g) whole milk room temperature2/3 cup (160 g) sour cream room temperature; don't use reduced-fat sour cream3 cups (405 g) all-purpose flourFor the Vanilla Glaze1 batch Easy Vanilla GlazeInstructionsFor the Vanilla Bundt Cake RecipePreheat oven to 350°F (177°C) and place a rack in the center of the oven.In the bowl of an electric stand mixer fitted with the paddle attachment, add the sugar, butter, oil and vanilla and mix on medium speed until light and fluffy, about 4 to 5 minutes.With the mixer on low, add in the eggs, one at a time, making sure that each is well blended before adding the next. Add the baking powder, baking soda and salt and mix for 30 seconds more.In a liquid measuring cup or small bowl, whisk together the milk and sour cream.Alternate adding the flour and milk mixture in two batches. Scrape the sides and bottom of the bowl to make sure everything is well blended. Stir the batter enough that everything is combined, but be cautious not to mix too much, as we don't want a tough cake. Set aside.To prep your 12-cup to 15-cup (2.8- to 3.5-L) bundt pan, spray evenly and lightly with cooking or baking spray. Sift flour over the top and then rotate the pan to coat it evenly. Discard any excess flour.*See
Notes
below the recipe for more details on prepping your bundt pan.Pour the batter into the bundt pan. Tap the pan on the counter several times to settle the cake batter and release any trapped bubbles. Use a spatula to smooth and even out the top of the cake batter.Bake in the center of the oven for about 40-45 minutes. Use a toothpick or cake tester to test for doneness. Some moisture and crumbs are fine, but if it's coated in cake batter, bake it for several minutes more. Another way to test for doneness: press the center part of the cake gently and it should spring back when your finger lifts.Removing the Cake From the Bundt PanLet the cake sit for 10 minutes on a cooling rack. After 10 minutes, gently run a knife or thin spatula along the rim of the pan, as well as the center tube, to release the cake from the pan. Invert the cooling rack over the top of the pan and then flip the whole thing over, so that the cake gently falls onto the cooling rack, right-side up. Let it sit for 1 minute and then slowly lift the pan off the cake.For the Easy Vanilla GlazeWhile the cake cools, whisk together the
vanilla glaze
. Don't drizzle over the cake until it is completely cool. Line a baking sheet with parchment paper and set the cooled cake, still on the wire rack, on top of the parchment paper. Slowly pour the glaze over the top of the bundt. Let the glaze set for 5 to 10 minutes and then serve!NotesPrepping Your Bundt PanFor greasing a Bundt pan, I prefer nonstick cooking sprays. For best results, use a baking spray with flour or “perfect release” on the label (NordicWare makes a fabulous one called Baker’s Joy; it’s linked in the recipe card above).When spraying your pan, use light, even strokes and don’t let it pool at the base of the pan. If using a cooking spray without flour, then I highly recommend lightly coating the pan with either flour (for vanilla or light-colored cakes) or unsweetened cocoa powder (for chocolate cakes). Put 2 tablespoons (18 g all-purpose flour or 10 g cocoa powder) of either in the pan and tap around to thoroughly coat the interior of the pan. Discard the excess.Don’t prepare your Bundt pan until just prior to using. Finally, make sure you don’t let it sit in the pan for too long after you take it from the oven. Follow the instructions above and you’ll have a beautiful bundt cake! I should know, I have an entire chapter of
The Cake Book
devoted to bundt cakes (I love them!).Choosing Your Bundt PanThis recipe was created so that you can use anything from a 12-cup to a 15-cup (2.8- to 3.5-L) bundt cake pan. I love the classic NordicWare bundt pan that’s linked in the recipe above. If you don’t know the cup size of your bundt pan, just make sure you don’t fill it more than 3/4s full and you’ll be fine. If you have leftover cake batter make some muffins!Choosing Vanilla for Your Bundt CakeIf it’s a special occasion, or I’m just feeling fabulous, I like to use real vanilla bean in this cake. However, in a pinch, vanilla extract or vanilla bean paste will work great. Just note that either of those can darken the crumb of the cake a wee bit.Storing Your CakeThis cake can be stored at room temperature in an airtight container for several days. If it’s especially hot and/or humid, store it in the fridge.Freezing Bundt CakePlace your freshly baked, cooled, unglazed bundt on a parchment-lined baking sheet and place in the freezer to freeze solid. This will take several hours. Once frozen, wrap in plastic wrap, then foil and freeze for up to two months. Defrost in the fridge overnight and then set on the counter until it’s back to room temperature.I would wait to add glaze to the cake until just prior to serving.
PrintBest Vanilla Bundt Cake: Mega Moist & Flavorful Recipe#wprm-recipe-user-rating-0 .wprm-rating-star.wprm-rating-star-full svg * { fill: #343434; }#wprm-recipe-user-rating-0 .wprm-rating-star.wprm-rating-star-33 svg * { fill: url(#wprm-recipe-user-rating-0-33); }#wprm-recipe-user-rating-0 .wprm-rating-star.wprm-rating-star-50 svg * { fill: url(#wprm-recipe-user-rating-0-50); }#wprm-recipe-user-rating-0 .wprm-rating-star.wprm-rating-star-66 svg * { fill: url(#wprm-recipe-user-rating-0-66); }linearGradient#wprm-recipe-user-rating-0-33 stop { stop-color: #343434; }linearGradient#wprm-recipe-user-rating-0-50 stop { stop-color: #343434; }linearGradient#wprm-recipe-user-rating-0-66 stop { stop-color: #343434; }#wprm-recipe-user-rating-0.wprm-user-rating-allowed.wprm-user-rating-not-voted:not(.wprm-user-rating-voting) svg * { fill-opacity: 0.3; }Imagine the perfect vanilla bundt cake recipe: bouncy, moist, buttery, mega vanilla-flavored and a breeze to throw together. That's this cake! She's a one-bowl dream that delivers in flavor, texture and ease: the baking trifecta!Course Dessert, SnackCuisine AmericanKeyword Rebecca Firth, DisplacedHousewife Well-Tested Recipe, Vanilla, Bundt CakePrep Time 15 minutes minutesCook Time 45 minutes minutesTotal Time 1 hour hourServings 12 ServingsAuthor Rebecca FirthEquipmentBundt Cake PanBaker's JoyBaking ScaleElectric Stand MixerSpatulaIngredientsFor the Vanilla Bundt Cake Recipe2 cup (400 g) granulated sugar8 tablespoons (113 g) unsalted butter room temperature½ cup (112 g) sunflower or grapeseed oil or other neutral-flavored cooking oil1 vanilla bean split and seeds scraped or 1 tablespoon real vanilla extract3 large eggs room temperature1 ½ teaspoons baking powder1 teaspoon baking soda1 teaspoon sea salt1 cup (240 g) whole milk room temperature2/3 cup (160 g) sour cream room temperature; don't use reduced-fat sour cream3 cups (405 g) all-purpose flourFor the Vanilla Glaze1 batch Easy Vanilla GlazeInstructionsFor the Vanilla Bundt Cake RecipePreheat oven to 350°F (177°C) and place a rack in the center of the oven.In the bowl of an electric stand mixer fitted with the paddle attachment, add the sugar, butter, oil and vanilla and mix on medium speed until light and fluffy, about 4 to 5 minutes.With the mixer on low, add in the eggs, one at a time, making sure that each is well blended before adding the next. Add the baking powder, baking soda and salt and mix for 30 seconds more.In a liquid measuring cup or small bowl, whisk together the milk and sour cream.Alternate adding the flour and milk mixture in two batches. Scrape the sides and bottom of the bowl to make sure everything is well blended. Stir the batter enough that everything is combined, but be cautious not to mix too much, as we don't want a tough cake. Set aside.To prep your 12-cup to 15-cup (2.8- to 3.5-L) bundt pan, spray evenly and lightly with cooking or baking spray. Sift flour over the top and then rotate the pan to coat it evenly. Discard any excess flour.*See
Notes
below the recipe for more details on prepping your bundt pan.Pour the batter into the bundt pan. Tap the pan on the counter several times to settle the cake batter and release any trapped bubbles. Use a spatula to smooth and even out the top of the cake batter.Bake in the center of the oven for about 40-45 minutes. Use a toothpick or cake tester to test for doneness. Some moisture and crumbs are fine, but if it's coated in cake batter, bake it for several minutes more. Another way to test for doneness: press the center part of the cake gently and it should spring back when your finger lifts.Removing the Cake From the Bundt PanLet the cake sit for 10 minutes on a cooling rack. After 10 minutes, gently run a knife or thin spatula along the rim of the pan, as well as the center tube, to release the cake from the pan. Invert the cooling rack over the top of the pan and then flip the whole thing over, so that the cake gently falls onto the cooling rack, right-side up. Let it sit for 1 minute and then slowly lift the pan off the cake.For the Easy Vanilla GlazeWhile the cake cools, whisk together the
vanilla glaze
. Don't drizzle over the cake until it is completely cool. Line a baking sheet with parchment paper and set the cooled cake, still on the wire rack, on top of the parchment paper. Slowly pour the glaze over the top of the bundt. Let the glaze set for 5 to 10 minutes and then serve!NotesPrepping Your Bundt PanFor greasing a Bundt pan, I prefer nonstick cooking sprays. For best results, use a baking spray with flour or “perfect release” on the label (NordicWare makes a fabulous one called Baker’s Joy; it’s linked in the recipe card above).When spraying your pan, use light, even strokes and don’t let it pool at the base of the pan. If using a cooking spray without flour, then I highly recommend lightly coating the pan with either flour (for vanilla or light-colored cakes) or unsweetened cocoa powder (for chocolate cakes). Put 2 tablespoons (18 g all-purpose flour or 10 g cocoa powder) of either in the pan and tap around to thoroughly coat the interior of the pan. Discard the excess.Don’t prepare your Bundt pan until just prior to using. Finally, make sure you don’t let it sit in the pan for too long after you take it from the oven. Follow the instructions above and you’ll have a beautiful bundt cake! I should know, I have an entire chapter of
The Cake Book
devoted to bundt cakes (I love them!).Choosing Your Bundt PanThis recipe was created so that you can use anything from a 12-cup to a 15-cup (2.8- to 3.5-L) bundt cake pan. I love the classic NordicWare bundt pan that’s linked in the recipe above. If you don’t know the cup size of your bundt pan, just make sure you don’t fill it more than 3/4s full and you’ll be fine. If you have leftover cake batter make some muffins!Choosing Vanilla for Your Bundt CakeIf it’s a special occasion, or I’m just feeling fabulous, I like to use real vanilla bean in this cake. However, in a pinch, vanilla extract or vanilla bean paste will work great. Just note that either of those can darken the crumb of the cake a wee bit.Storing Your CakeThis cake can be stored at room temperature in an airtight container for several days. If it’s especially hot and/or humid, store it in the fridge.Freezing Bundt CakePlace your freshly baked, cooled, unglazed bundt on a parchment-lined baking sheet and place in the freezer to freeze solid. This will take several hours. Once frozen, wrap in plastic wrap, then foil and freeze for up to two months. Defrost in the fridge overnight and then set on the counter until it’s back to room temperature.I would wait to add glaze to the cake until just prior to serving.The post Best Vanilla Bundt Cake: Mega Moist & Flavorful Recipe appeared first on DisplacedHousewife.
June 20, 2025
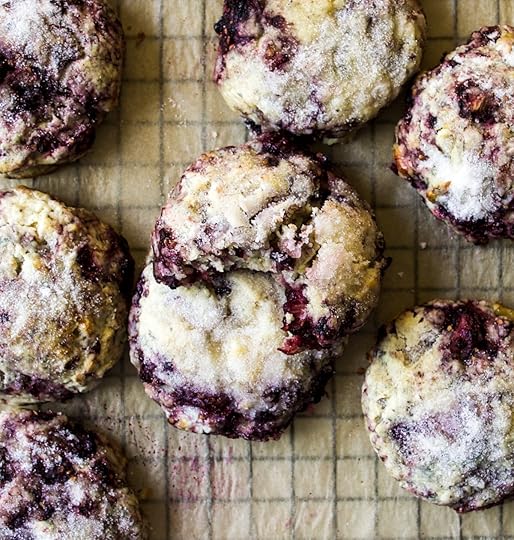
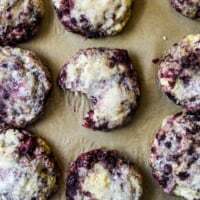
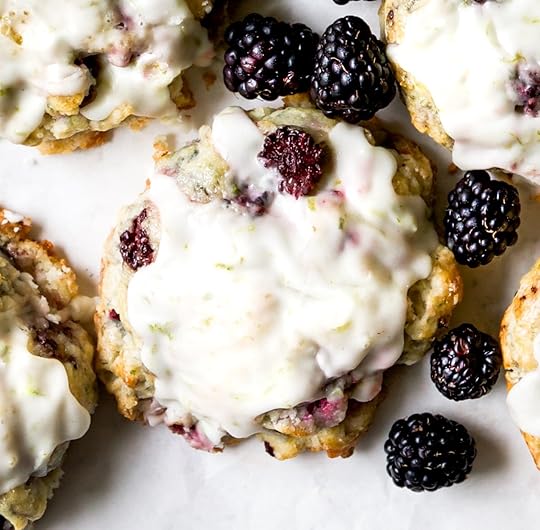
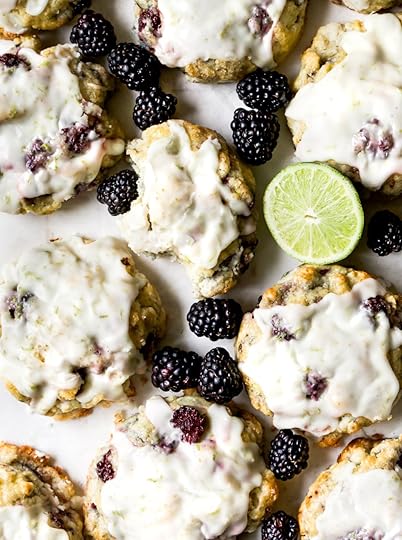
The BEST Fluffy Blackberry Scone Recipe You’ll Crave!
Sweet friends! Is there anything more magical than a warm, homemade scone!? Especially when it’s bursting with juicy, sun-kissed berries. If you’ve been on the hunt for the best blackberry scone recipe that’s both fluffy and tender, your search officially ends right here!
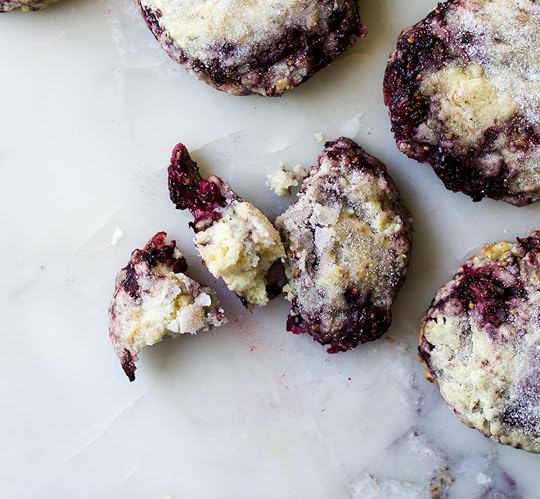
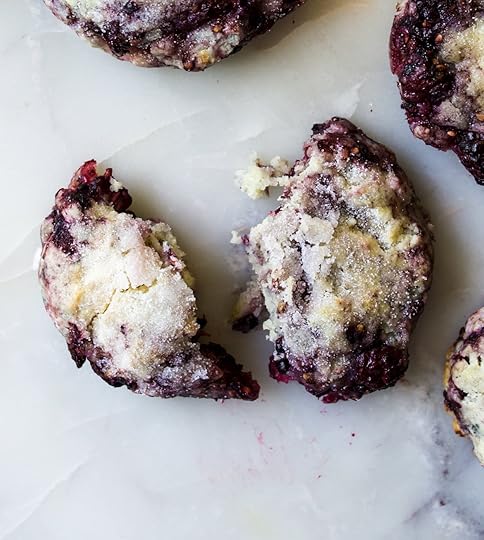
Imagine pulling these beauties from the oven: these aren’t your average dry, crumbly scones.
Oh no, these blackberry scones are an absolute dream of tender, moist perfection, thanks to a generous hand with rich cream and luscious butter. Each bite is a symphony of subtle warmth, scented beautifully with cozy cinnamon and bright, zesty notes of either lime or lemon, depending on your citrus craving.
Their crowning glory is an irresistible crunchy sugar top that shatters delightfully with every bite, contrasting perfectly with the soft interior. And for an extra layer of zing, you can include an optional vibrant lemon glaze or lime glaze that takes them over the top.
These foolproof blackberry scones are designed to be enjoyed with your favorite music on, dressed in your coziest fluffy socks, guaranteeing results so delicious that they’ll truly knock your socks off.
Let’s get baking and fill your home with the most incredible aroma!
 The Baker’s Guide to Measuring Flour
One of the biggest (and most common) mistakes in baking is how we measure flour. If you find yourself without a scale, see my top tips on how to properly measure flour for the perfect amount every time!
 Why You’ll Be Obsessed With These Blackberry Scones
If you’re looking for the ultimate homemade blackberry scone recipe that’s guaranteed to make your heart (and taste buds!) sing, you’ve hit the jackpot. Seriously, these aren’t just scones; they’re a vibe. Here’s why you need to drop everything and bake these beauties ASAP:
Unbelievably Perfect Texture: These blackberry cream scones are the embodiment of scone perfection: impossibly light, wonderfully tender, and unbelievably moist. Zero dry crumbs here, friends!A Flavor Trio You’ll Crave: Each bite is loaded with plump, juicy fresh blackberries, brightened with a burst of zesty lemon (or lime!) zest, and warmed with just a kiss of cinnamon. Super Easy & Foolproof: This is a super-easy blackberry scone recipe! We’ve got step-by-step photos to guide you through every single glorious moment, ensuring foolproof results even if you’re a scone-making newbie. Get ready for baking success!Your New Favorite Make-Ahead Breakfast: Say hello to convenience! The dough for these make-ahead blackberry scones is wonderfully cooperative and can be chilled overnight or even frozen until you’re ready to bake. The Ultimate Topping Options: These beauties are absolute perfection, crowned simply with an easy egg wash and a sprinkle of granulated sugar, Demerara or sparkling sugar for that irresistible crunch. BUT, if you’re feeling fancy (and we always are!), they’re also unbelievably dreamy with a vibrant Bright Lemon Glaze or a zesty Fresh Lime Glaze – truly taking these to “jazz hands” levels of deliciousness!Your Scone, Your Size: This versatile blackberry scone recipe yields 7 generously large scones, or you can opt for 14 adorable smaller, petite scones – perfect for sharing (or, you know, keeping all to yourself!).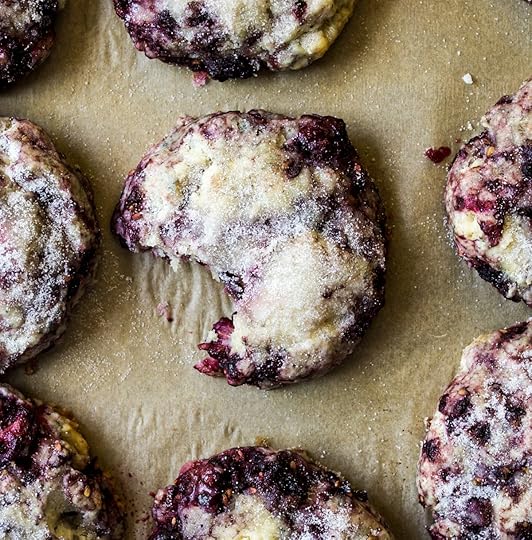 Baking Pro Tips for Perfect Scones
 (Because You Deserve the Best!)
Before we dive into the deliciousness, let’s chat about a few non-negotiables that will take your homemade scones made with blackberries from “good” to “OMG, these are life-changing.” Trust me on these little gems – they’re the secret sauce to fluffy, tender scones every single time:
Keep It Chilly, My Friends! This is paramount for the perfect texture! We’re talking arctic conditions for your cream, egg, and especially that glorious butter. Don’t, I repeat, don’t let them sit around sweating on the countertop like they’re at a summer BBQ. You want them straight-from-the-fridge crisp and cold. This little trick is what creates those magical pockets of steam for the most incredible lift!The “Light Hand” Mantra When it comes to mixing your scone dough, your mantra should be: a light hand reaps big rewards. Overmixing is the ultimate scone villain; it develops too much gluten, leading to tough, sad scones. We want tender, cloud-like pastries, right? So, mix just until combined, no more! You’ve got this.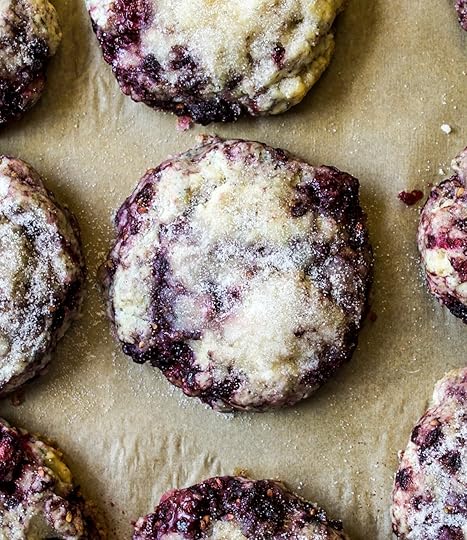 Step-By-Step Instructions (with photos!) for
 Perfect Blackberry Cream Scones
Below are step-by-step photos (with captions) to make the most delicious Fresh Blackberry Scones perfect every single time!
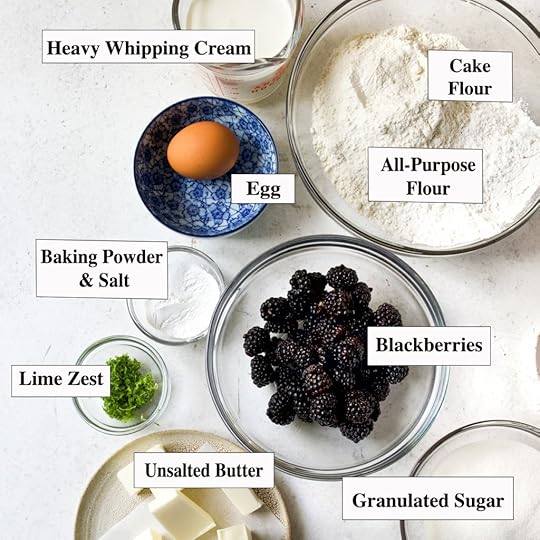 STEP ONE: Gather your scone ingredients: cake flour, all-purpose flour, granulated sugar, baking powder, salt, cinnamon (not pictured), lime zest, butter, heavy whipping cream, egg and fresh blackberries.
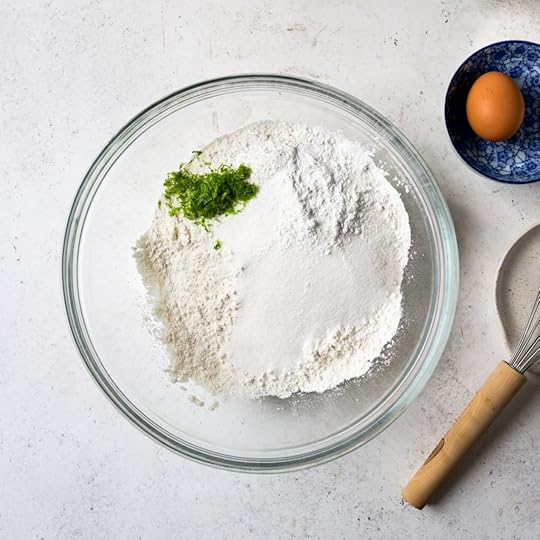 STEP TWO: Whisk together the flours, sugar, baking powder, salt, cinnamon and lime zest.
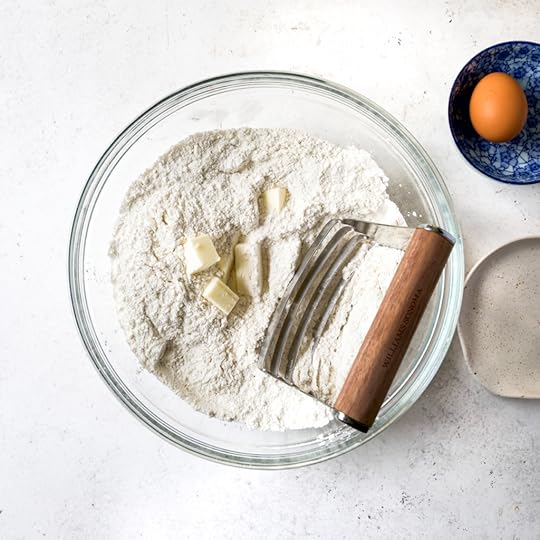 STEP THREE: Cut the butter into the flour mixture using a pastry blender, your hands or two forks…
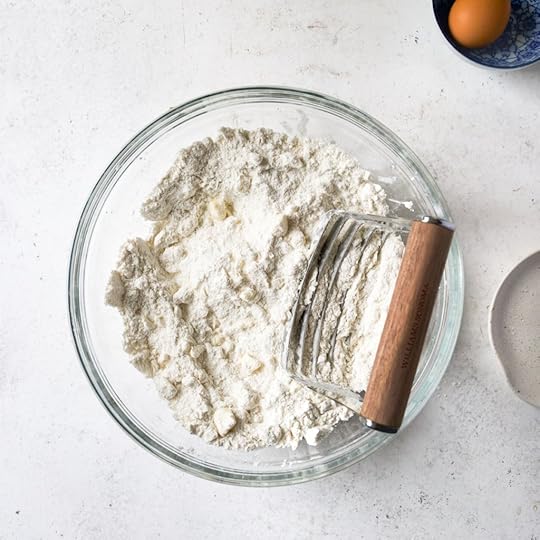 STEP THREE: It will look like this and the flour-coated butter will be about the size of peas or a pencil eraser.
 STEP FOUR: Using a fork, gently stir in the cream-egg mixture until just barely combined…
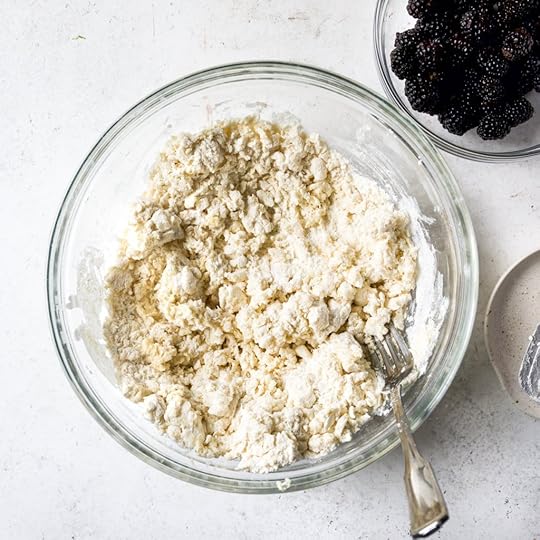 STEP FOUR: …and it looks like this!
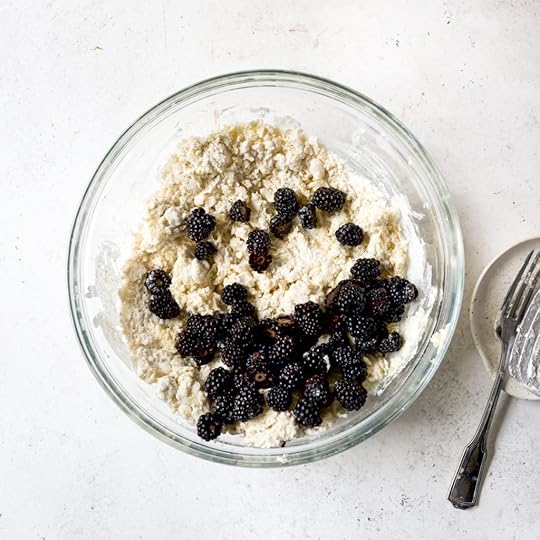 STEP FIVE: Add the halved blackberries…
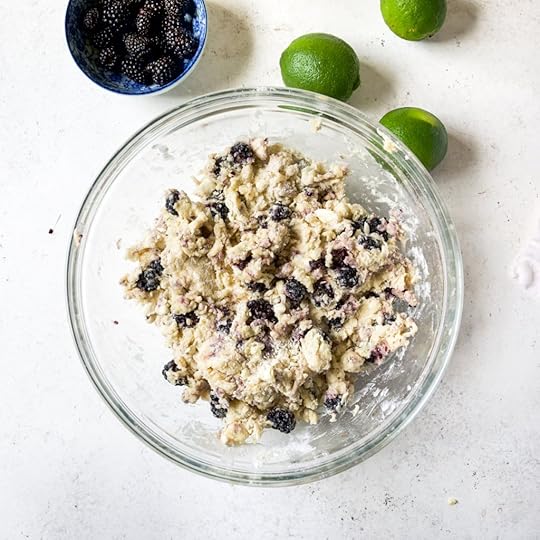 STEP FIVE: Press and fold the dough to gently layer the berries evenly into the dough.
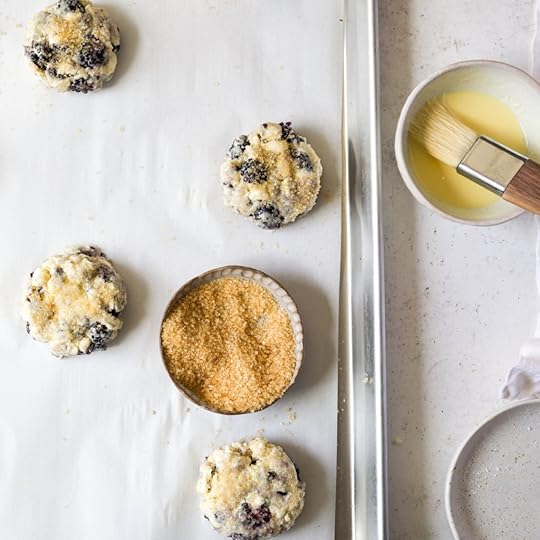 STEP SIX: Brush with egg wash and then sprinkle with Demerara, sparkling sugar or granulated sugar.
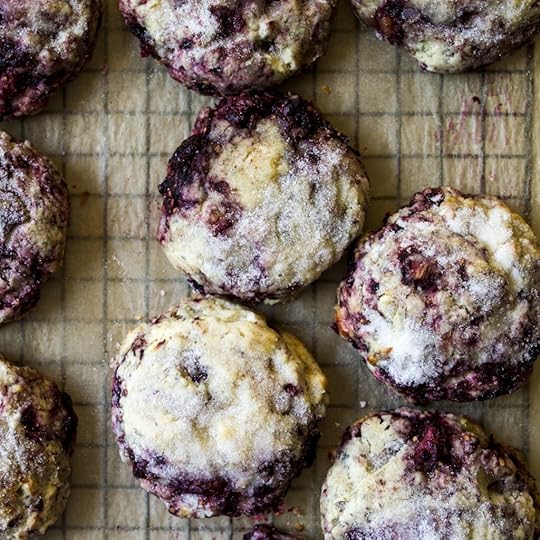 Let cool and they’re ready to either glaze (see
Notes
below recipe) or serve immediately! Enjoy your beautiful scones!
Let cool and they’re ready to either glaze (see
Notes
below recipe) or serve immediately! Enjoy your beautiful scones! 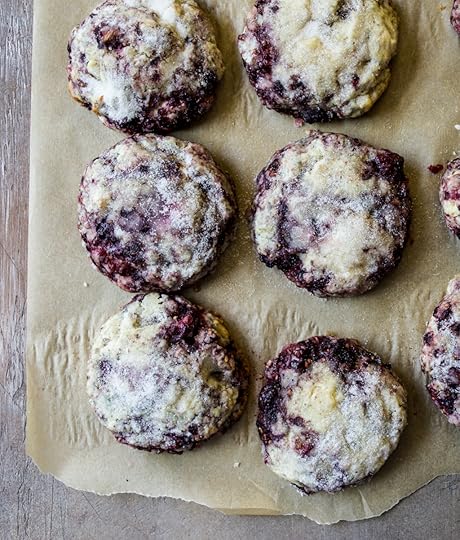 More Delicious Scone Recipes!
Be sure to check out my favorite Buttermilk Blueberry Scones and Fresh Raspberry Scones! You can find all of the Scone Recipes here!
 PrintThe Best Fluffy Blackberry Scone Recipe#wprm-recipe-user-rating-0 .wprm-rating-star.wprm-rating-star-full svg * { fill: #343434; }#wprm-recipe-user-rating-0 .wprm-rating-star.wprm-rating-star-33 svg * { fill: url(#wprm-recipe-user-rating-0-33); }#wprm-recipe-user-rating-0 .wprm-rating-star.wprm-rating-star-50 svg * { fill: url(#wprm-recipe-user-rating-0-50); }#wprm-recipe-user-rating-0 .wprm-rating-star.wprm-rating-star-66 svg * { fill: url(#wprm-recipe-user-rating-0-66); }linearGradient#wprm-recipe-user-rating-0-33 stop { stop-color: #343434; }linearGradient#wprm-recipe-user-rating-0-50 stop { stop-color: #343434; }linearGradient#wprm-recipe-user-rating-0-66 stop { stop-color: #343434; }#wprm-recipe-user-rating-0.wprm-user-rating-allowed.wprm-user-rating-not-voted:not(.wprm-user-rating-voting) svg * { fill-opacity: 0.3; }These are an absolute dream of a scone! These Blackberry Scones are moist, bursting with juicy blackberries, moist from rich cream and butter and subtly scented with cozy cinnamon and bright citrus zest (lemon or lime!). This foolproof recipe is designed for sheer baking joy: prepare to have your socks knocked off!
  Course Breakfast, Brunch, SnackCuisine ScottishKeyword Cream, Scones, Blackberries, Lime, Recipe, EasyPrep Time 10 minutes minutesCook Time 16 minutes minutesTotal Time 16 minutes minutesServings 11 SconesAuthor Rebecca FirthEquipmentElectric ScaleMixing BowlsWhiskBaking SheetsPastry BlenderIngredientsFor the Blackberry Scone Dough1 1/2 cups (187 g) cake flour see Notes below recipe1 cup plus 3 tablespoons (162 g) all-purpose flour how to measure flour2/3 cup (133 g) granulated sugar2 heaping tablespoons lime or lemon zest1 tablespoon (15 g) baking powder1/2 teaspoon sea salt1 teaspoon cinnamon8 tablespoons (113 g) unsalted butter cut in 8 pieces, cold2/3-3/4 cup (160 to 180g) heavy whipping cream cold; see Notes below1 large egg cold1 1/3 cup (198 g) fresh blackberries halvedTo Garnish1 batch
Perfect Egg Wash Recipe
Demerara, sparkling sugar or granulated sugarInstructionsFor the Cream Scone DoughLine several baking sheets with parchment paper. Set aside.In a large mixing bowl, whisk together the cake flour, all-purpose flour, granulated sugar, baking powder, cinnamon, and a pinch of sea salt. Now for the fun part: using a pastry blender, two forks, or even just your fabulous hands, cut the super cold butter pieces into the flour mixture. Mix until you see delightful little pieces, about the size of peas – this is key for those flaky scones!In a separate small bowl, whisk together the egg and the heavy cream (remember our humidity hack for cream amounts – use ⅔ to ¾ cup / 160g to 180g heavy cream; see the note in the 'Pro Tips' section above!). Drizzle this creamy mixture evenly over your flour-butter blend. With a fork, gently stir until the dough just starts to come together. Don't overmix, sweet friends!Add the beautiful berries to your scone dough.Now, I like to use a little "fold and press" technique when adding the berries. Fold about half of the dough onto itself and gently press down so those juicy blackberries are tucked into the middle. Grab any rogue blackberries trying to escape, set them on top of the dough heap, and repeat the process until everything looks just mixed. Heads up: the addition of fresh fruit will make the dough a bit slick and well, sometimes a little 'snotty'… don't panic! It’s perfectly normal, and it means you’re on your way to tender, moist blackberry scones.Using a 1/3 cup muffin/cupcake scoop or a 1/3 cup measuring cup, portion out 11 generous mounds of dough onto your prepared baking sheet, making sure to leave a good 3 inches (8 cm) between each scone for optimal baking. Gently press down the tops to level them a bit and coax any jagged edges on the sides into a cohesive, but not packed, shape. Pop that baking sheet into the freezer (or fridge) for a quick 30 minutes to chill while you preheat your oven to 400°F (204°C).To Garnish the SconesOnce chilled, brush your scones with an
egg wash
, and give them a generous sprinkle of glistening Demerara sugar, granulated sugar or sparkling sugar (if using) for that amazing crunchy top. Bake them in the center of your oven for about 16 to 17 minutes. When they're done, they’ll be beautifully lightly golden brown around the edges and wonderfully golden over the tops. Do a quick check around the blackberries to ensure those areas are baked through too. Let these beauties cool on the baking sheet, in a draft-free area, for about 15 minutes before carefully transferring them to a wire rack to finish cooling completely. While the scones cool, whip up any glaze if you're using (see
Notes
below for Glaze Recipe options). Drizzle over the tops of the cooled scones and serve any remaining glaze on the side for those who like extra. NotesCake FlourFor the absolute lightest, most magical scones, use the cake flour listed in the ingredient list. However, in a pinch you can use more all-purpose flour, substituting it for the cake flour 1:1. Heavy Whipping CreamI include a range of whipping cream because I’ve found when it’s quite humid, I need less. And when it’s dry out, I need all of the cream. I live in a pretty dry climate most of the year, and use the full amount of cream unless it’s raining. The Size of the BlackberriesSome blackberries can be positively enormous. Halve and even quarter them for best results. If you’re blackberries are small, leave them as is!Choosing Citrus Zest for SconesThese are delicious with both lemon or lime zest in the dough. I’m a sucker for the blackberry-lime flavor combination. But lemon-blackberry also can’t be beat. Glaze Options for Blackberry SconesThese are great with
Lime Glaze
,
Lemon Glaze
or
Vanilla Glaze
drizzled over the tops. If you go for the lemon glaze, I reckon I would use lemon zest in the scone dough. But you do you!Blackberry Scone VariationsIf you want to make these with buttermilk, follow my instructions for my
Favorite Blueberry Scones
(these are TO DIE FOR). If your blackberries aren’t especially juicy, follow my recipe for Fresh Strawberry Scones using blackberries. Macerating the berries before adding them to the dough really brings out their sweet, juicy berry flavor!Storing SconesStore any leftover scones at room temperature in an airtight container. Don’t cover until they are completely cool. If you need to layer in the container, separate the layers with parchment paper.Freezing SconesThese scones freeze like a dream! At Step 7 of making the scone dough just keep them in there until they are frozen solid, about 2 to 3 hours. Once frozen, I like to cover each one in a layer of plastic wrap and then place in an airtight container.When ready to bake, set them on a parchment lined baking sheet and then pre-heat the oven. You want them to defrost a bit for the perfect bake.They will need a few more minutes to bake through since the dough is cooler. Make sure the dough around the fruit is baked through before pulling out of the oven. Enjoy!
Course Breakfast, Brunch, SnackCuisine ScottishKeyword Cream, Scones, Blackberries, Lime, Recipe, EasyPrep Time 10 minutes minutesCook Time 16 minutes minutesTotal Time 16 minutes minutesServings 11 SconesAuthor Rebecca FirthEquipmentElectric ScaleMixing BowlsWhiskBaking SheetsPastry BlenderIngredientsFor the Blackberry Scone Dough1 1/2 cups (187 g) cake flour see Notes below recipe1 cup plus 3 tablespoons (162 g) all-purpose flour how to measure flour2/3 cup (133 g) granulated sugar2 heaping tablespoons lime or lemon zest1 tablespoon (15 g) baking powder1/2 teaspoon sea salt1 teaspoon cinnamon8 tablespoons (113 g) unsalted butter cut in 8 pieces, cold2/3-3/4 cup (160 to 180g) heavy whipping cream cold; see Notes below1 large egg cold1 1/3 cup (198 g) fresh blackberries halvedTo Garnish1 batch
Perfect Egg Wash Recipe
Demerara, sparkling sugar or granulated sugarInstructionsFor the Cream Scone DoughLine several baking sheets with parchment paper. Set aside.In a large mixing bowl, whisk together the cake flour, all-purpose flour, granulated sugar, baking powder, cinnamon, and a pinch of sea salt. Now for the fun part: using a pastry blender, two forks, or even just your fabulous hands, cut the super cold butter pieces into the flour mixture. Mix until you see delightful little pieces, about the size of peas – this is key for those flaky scones!In a separate small bowl, whisk together the egg and the heavy cream (remember our humidity hack for cream amounts – use ⅔ to ¾ cup / 160g to 180g heavy cream; see the note in the 'Pro Tips' section above!). Drizzle this creamy mixture evenly over your flour-butter blend. With a fork, gently stir until the dough just starts to come together. Don't overmix, sweet friends!Add the beautiful berries to your scone dough.Now, I like to use a little "fold and press" technique when adding the berries. Fold about half of the dough onto itself and gently press down so those juicy blackberries are tucked into the middle. Grab any rogue blackberries trying to escape, set them on top of the dough heap, and repeat the process until everything looks just mixed. Heads up: the addition of fresh fruit will make the dough a bit slick and well, sometimes a little 'snotty'… don't panic! It’s perfectly normal, and it means you’re on your way to tender, moist blackberry scones.Using a 1/3 cup muffin/cupcake scoop or a 1/3 cup measuring cup, portion out 11 generous mounds of dough onto your prepared baking sheet, making sure to leave a good 3 inches (8 cm) between each scone for optimal baking. Gently press down the tops to level them a bit and coax any jagged edges on the sides into a cohesive, but not packed, shape. Pop that baking sheet into the freezer (or fridge) for a quick 30 minutes to chill while you preheat your oven to 400°F (204°C).To Garnish the SconesOnce chilled, brush your scones with an
egg wash
, and give them a generous sprinkle of glistening Demerara sugar, granulated sugar or sparkling sugar (if using) for that amazing crunchy top. Bake them in the center of your oven for about 16 to 17 minutes. When they're done, they’ll be beautifully lightly golden brown around the edges and wonderfully golden over the tops. Do a quick check around the blackberries to ensure those areas are baked through too. Let these beauties cool on the baking sheet, in a draft-free area, for about 15 minutes before carefully transferring them to a wire rack to finish cooling completely. While the scones cool, whip up any glaze if you're using (see
Notes
below for Glaze Recipe options). Drizzle over the tops of the cooled scones and serve any remaining glaze on the side for those who like extra. NotesCake FlourFor the absolute lightest, most magical scones, use the cake flour listed in the ingredient list. However, in a pinch you can use more all-purpose flour, substituting it for the cake flour 1:1. Heavy Whipping CreamI include a range of whipping cream because I’ve found when it’s quite humid, I need less. And when it’s dry out, I need all of the cream. I live in a pretty dry climate most of the year, and use the full amount of cream unless it’s raining. The Size of the BlackberriesSome blackberries can be positively enormous. Halve and even quarter them for best results. If you’re blackberries are small, leave them as is!Choosing Citrus Zest for SconesThese are delicious with both lemon or lime zest in the dough. I’m a sucker for the blackberry-lime flavor combination. But lemon-blackberry also can’t be beat. Glaze Options for Blackberry SconesThese are great with
Lime Glaze
,
Lemon Glaze
or
Vanilla Glaze
drizzled over the tops. If you go for the lemon glaze, I reckon I would use lemon zest in the scone dough. But you do you!Blackberry Scone VariationsIf you want to make these with buttermilk, follow my instructions for my
Favorite Blueberry Scones
(these are TO DIE FOR). If your blackberries aren’t especially juicy, follow my recipe for Fresh Strawberry Scones using blackberries. Macerating the berries before adding them to the dough really brings out their sweet, juicy berry flavor!Storing SconesStore any leftover scones at room temperature in an airtight container. Don’t cover until they are completely cool. If you need to layer in the container, separate the layers with parchment paper.Freezing SconesThese scones freeze like a dream! At Step 7 of making the scone dough just keep them in there until they are frozen solid, about 2 to 3 hours. Once frozen, I like to cover each one in a layer of plastic wrap and then place in an airtight container.When ready to bake, set them on a parchment lined baking sheet and then pre-heat the oven. You want them to defrost a bit for the perfect bake.They will need a few more minutes to bake through since the dough is cooler. Make sure the dough around the fruit is baked through before pulling out of the oven. Enjoy!The post The BEST Fluffy Blackberry Scone Recipe You’ll Crave! appeared first on DisplacedHousewife.
June 19, 2025
Easy 3-Ingredient Lime Glaze (No Mixer!)
Ready to give your baked goods a serious glow-up?
This easy lime glaze is about to become your new best friend! It’s super simple, made with just three ingredients you likely already have, and whips up in a flash with only a bowl and a whisk.
Beyond its vibrant, bright limey flavor, this versatile glaze adds pure magic to just about anything. Imagine delicate scones with a zesty drizzle, moist muffins bursting with citrus, or even a humble loaf cake elevated to bakery-worthy status.
It’s also fantastic on donuts, sugar cookies and all kinds of cakes, creating those gorgeous, opaque drips that’ll make every bite feel extra special.
So, grab a lime, and let’s get ready to add some serious zing to your next baking adventure!
 The Easiest Lime Glaze Ever (No Mixer Needed!)
Ready to give your baked goods a serious glow-up? This easy lime glaze is about to become your new best friend!
Why You’ll Love This Lime Glaze: Super Simple: Uses just three ingredients: confectioners’ sugar, milk (or cream) and fresh, juicy lime.No Mixer Required: Grab a bowl and a whisk, and you’re set!Seriously Versatile: Perfect for adding “jazz hands” to almost anything, including: Scones Muffins Loaf Cakes Sugar Cookies All kinds of Cakes Bright, Zesty Flavor: Adds a vibrant, limey punch that really makes your sweets sing.Beautifully Opaque: Creates those gorgeous, professional-looking drips down the sides of your baked goods.Get ready to add some serious zest to your next baking adventure!
 My Favorite Baking Pro Tips for Perfect Glaze Every Time
Ready to whip up some seriously dreamy lime glaze? Follow these super easy steps and you’ll be drizzling perfection in no time! (Psst… you’ll find step-by-step photos with captions below!)
My Top Tips for Glaze Greatness:Sift Your Sugar! For that silky-smooth, no-lumps-allowed glaze, give your confectioners’ sugar a quick sift before anything else. No sieve? No worries! Just whisk it really, really well to break up any sneaky clumps.Whisk Away! Don’t be shy – whisk, whisk, whisk! You want that glaze to be perfectly combined and utterly smooth for the ideal drippy consistency.Keep it Cozy! Your glorious lime glaze will thicken as it hangs out. So, use it as soon as you can after mixing, and always keep it covered until you’re ready to add those jazz hands.Now go forth and make the best lime glaze ever!
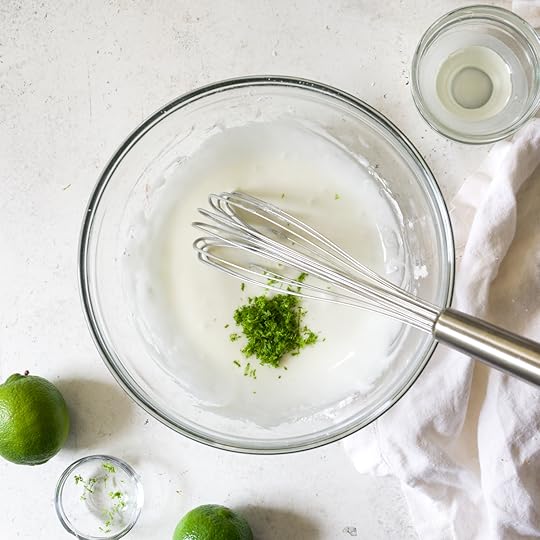
 Step-By-Step Instructions With Photos
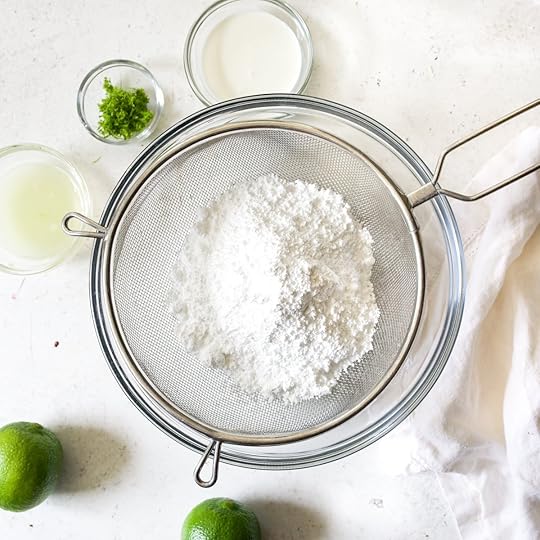 STEP ONE: Gather your ingredients: confectioners’ sugar (also known as 10x, icing sugar and powdered sugar), milk/heavy cream, fresh lime juice and lime zest.
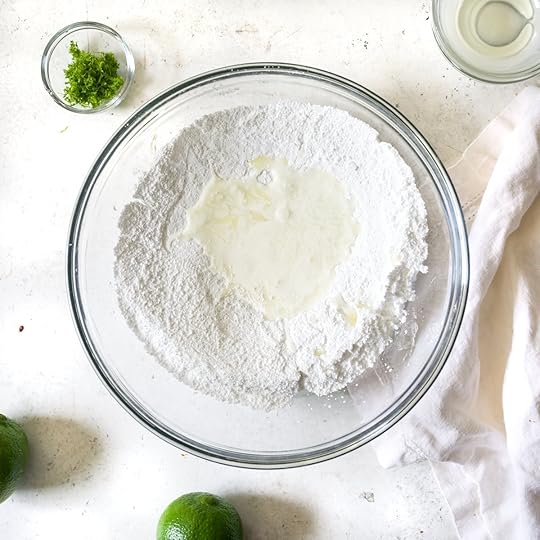 STEP TWO: Whisk together the milk/heavy cream and lime juice until smooth and well blended.
 STEP THREE: Whisk in your vibrant green lime zest and you’re done!
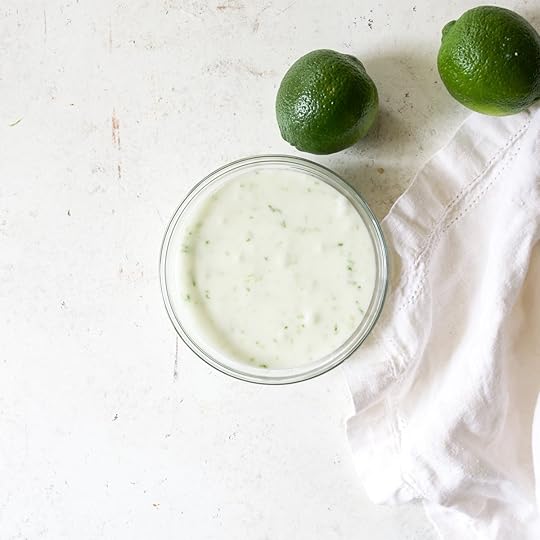 STEP THREE: Use immediately or cover until ready to use.
 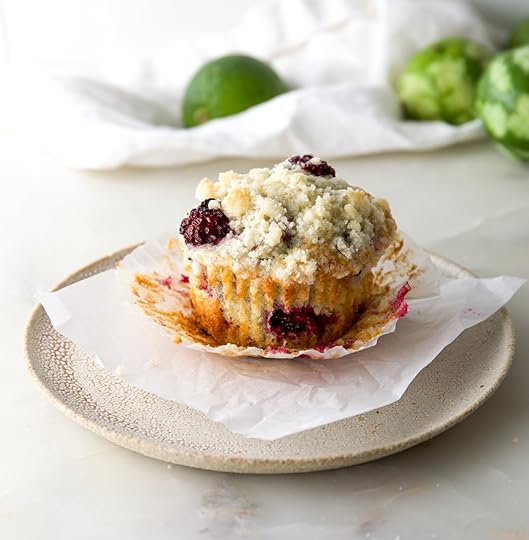 My Favorite Desserts for Lime Glaze
This lime glaze is deeelicious drizzled over the above Blackberry Muffins! 
Also, DO NOT SLEEP on swapping out lime for the lemon in either of these lemon cakes: Lemon Olive Oil Cake and Fresh Lemon Cake. It adds the most beautiful, bright, lip-puckering magic!
 PrintEasy 3-Ingredient Lime Glaze (No Mixer!)#wprm-recipe-user-rating-0 .wprm-rating-star.wprm-rating-star-full svg * { fill: #343434; }#wprm-recipe-user-rating-0 .wprm-rating-star.wprm-rating-star-33 svg * { fill: url(#wprm-recipe-user-rating-0-33); }#wprm-recipe-user-rating-0 .wprm-rating-star.wprm-rating-star-50 svg * { fill: url(#wprm-recipe-user-rating-0-50); }#wprm-recipe-user-rating-0 .wprm-rating-star.wprm-rating-star-66 svg * { fill: url(#wprm-recipe-user-rating-0-66); }linearGradient#wprm-recipe-user-rating-0-33 stop { stop-color: #343434; }linearGradient#wprm-recipe-user-rating-0-50 stop { stop-color: #343434; }linearGradient#wprm-recipe-user-rating-0-66 stop { stop-color: #343434; }#wprm-recipe-user-rating-0.wprm-user-rating-allowed.wprm-user-rating-not-voted:not(.wprm-user-rating-voting) svg * { fill-opacity: 0.3; }Get ready to add a burst of sunshine and serious “jazz hands” to all your favorite treats! This super easy lime glaze whips up in a flash with just 3 ingredients and zero fuss (no mixer needed!). It’s vibrant, zesty, and creates the most gorgeous, opaque drips that’ll make your cakes, cookies, and muffins look like they stepped right out of a fancy bakery. Get ready to make everything sparkle with a tangy, limey glow!Course DessertCuisine AmericanPrep Time 3 minutes minutesTotal Time 3 minutes minutesServings 1 batchAuthor Rebecca FirthEquipmentBaking ScaleMixing BowlsWhiskFine-Mesh SieveIngredients1 ½ cups (180 g) confectioners' sugar sifted2 tablespoons (30 g) heavy whipping cream or milk see Notes below recipe2 tablespoons (28 g) fresh lime juice about 1 to 2 limes; see Notes below recipeInstructionsIn a medium bowl, whisk together the sifted confectioners’ sugar, milk/cream and lime juice until smooth.If you have some air bubbles, slowly run your whisk through the glaze to knock them out. Keep covered until ready to use. As the icing sets, the appearance will dull a bit.NotesZesty Lime Notes for Your Glaze! Let’s talk limes! For the brightest, most vibrant glaze, always reach for fresh lime juice – the bottled stuff just can’t compare, in my opinion!Want to crank up that lime flavor even more? Add some fresh lime zest to your glaze! Not only does it give an extra citrusy punch, but those tiny green flecks are also a fun visual clue that a mega limey bite is coming their way! Just remember this pro tip: always zest your lime before you cut and juice it, and be sure to grab only the bright green outer rind, avoiding any bitter white pith underneath.Happy zesting!Scale & Adjust Your Glaze!This versatile lime glaze recipe is a true baking staple – easily scale it up or down to perfectly fit your needs, whether you’re glazing a single loaf cake or a whole batch of cookies! Need more? Double it! Just a drizzle? Halve it!Always remember to add liquid slowly, in tiny increments, to get that ideal consistency – a little really does go a long way.For reference, this recipe (as written) is the perfect consistency for drizzling over my famous Blackberry Scones (check out the photos above the recipe for proof!).Perfecting Your Glaze ConsistencyGetting that ideal lime glaze consistency is easy! This recipe is incredibly adaptable, letting you create anything from a thin, translucent shimmer to a rich, opaque icing. (For more on customizing, check out our “Lime Glaze vs. Lime Icing” section above the recipe!)How to Adjust:For a Thin, Drizzly Glaze: Need a light, barely-there sheen? Just whisk in extra liquid (milk or lime juice) a teaspoon at a time until it’s perfectly thin and translucent. Remember, a little goes a long way!If It’s Too Thin: Accidentally added too much liquid? No worries! Whisk in more confectioners’ sugar (about 1 tablespoon at a time) until it thickens up to your liking.For a Thick, Dreamy Icing: Craving a richer, more substantial finish? Swap the milk for heavy cream! You’ll likely need to add a bit more cream than milk to make it pourable, so add it in teaspoon increments, whisking until it’s just right. Glaze Ingredients & Consistency TipsMilk Matters for Thickness!For the richest, thickest lime glaze, I always reach for whole milk. It helps create that gorgeous, opaque finish. In a pinch, skim milk works too, but if your glaze turns out a bit thin, just whisk in a touch more confectioners’ sugar to get that perfect consistency. Want the absolute thickest, most decadent glaze? Swap the milk entirely for heavy whipping cream!The Sifting Secret for SmoothnessFor a truly smooth lime icing (no lumps allowed!), sifting your confectioners’ sugar is key. Don’t have a fancy sieve? No worries! Just give that powdered sugar a really good whisk in the bowl to break up any clumps before you add any liquid. This little step makes a big difference in achieving that perfectly silky glaze!
The post Easy 3-Ingredient Lime Glaze (No Mixer!) appeared first on DisplacedHousewife.
June 6, 2025
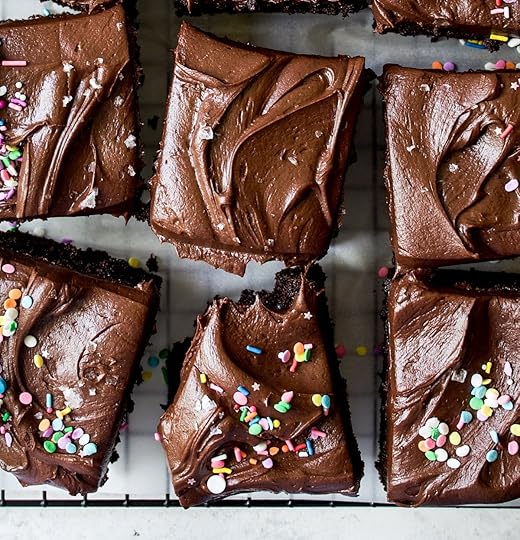
Perfectly Rich & Moist Chocolate Sheet Cake Recipe
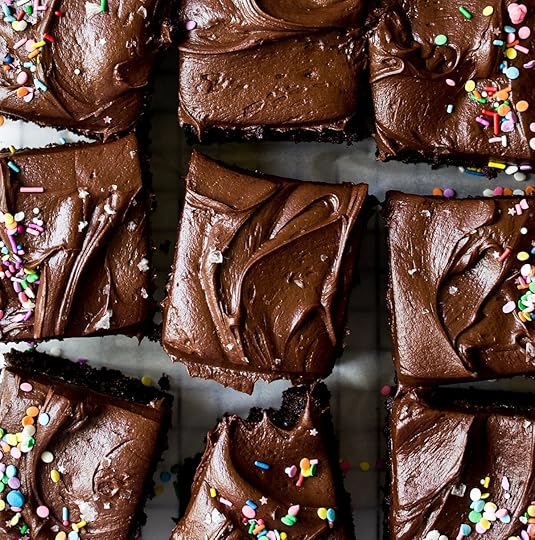
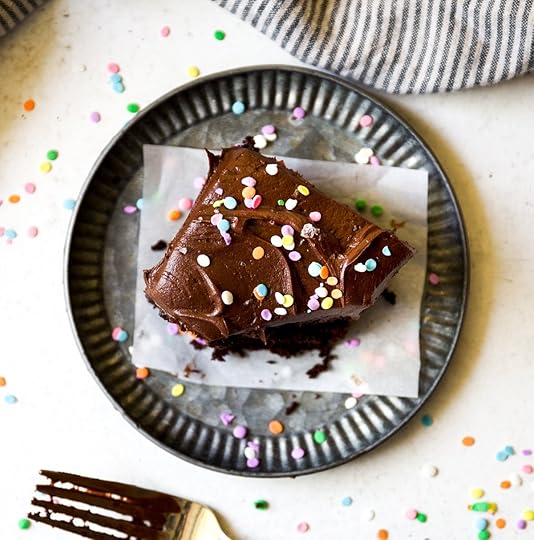
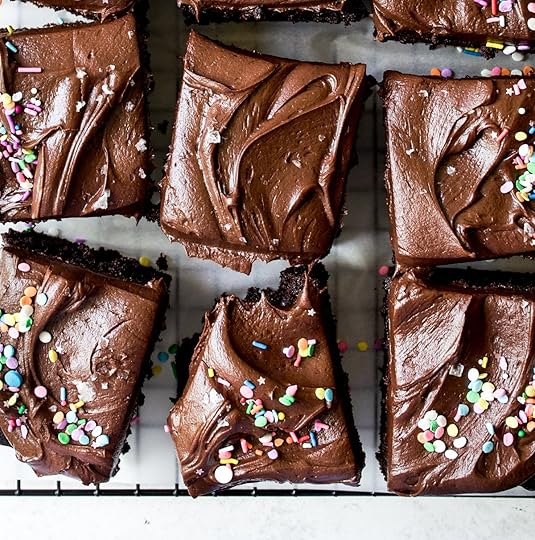
Welcome to your new, go-to Rich & Moist Chocolate Sheet Cake Recipe!
We’ve taken my favorite, Granny Pete’s Chocolate Cake, and given it a serious upgrade. Picture this: a simpler one-bowl method, the rich, nuanced sweetness of brown sugar for extra depth and hot milk plus espresso to bloom the cocoa powder for an intense, decadent rich chocolate flavor.
This cake isn’t just moist; it’s exquisitely fluffy, beautifully bouncy and develops even better flavor the next day. Best of all, it comes together quickly. With just 15 minutes of hands-on prep, and less than an hour from start to finish, you can satisfy your chocolate cravings quickly!
This is the perfect celebration cake, birthday cake (I used it for mine this year! ) or anytime cake, and is next-level fabulous with this Rich & Creamy Chocolate Frosting!
I can’t wait to hear what you think!
 Why You Need to Make This Perfect Chocolate Cake STAT!The texture of this cake is BEYOND! Light, moist, fluffy, bouncyPacked with rich chocolate flavor that’s amplified by the brown sugar, ample vanilla extract and hot espresso or fresh-brewed strong coffeeIt’s one bowl (yay!) and mixed + baked in just under an hour. This cake is so simple and easy, but so incredibly decadent!It’s the perfect cake base for any frosting, from my favorite
Chocolate Frosting
(as seen in the photos) and
Malted Chocolate Buttercream
to
Marshmallow Frosting
The perfect celebration cake! I made it for my birthday cake this year, but would also make it to satisfy a midweek chocolate craving!Great as is or topped with sprinkles…or, my favorite, flaky sea salt
Why You Need to Make This Perfect Chocolate Cake STAT!The texture of this cake is BEYOND! Light, moist, fluffy, bouncyPacked with rich chocolate flavor that’s amplified by the brown sugar, ample vanilla extract and hot espresso or fresh-brewed strong coffeeIt’s one bowl (yay!) and mixed + baked in just under an hour. This cake is so simple and easy, but so incredibly decadent!It’s the perfect cake base for any frosting, from my favorite
Chocolate Frosting
(as seen in the photos) and
Malted Chocolate Buttercream
to
Marshmallow Frosting
The perfect celebration cake! I made it for my birthday cake this year, but would also make it to satisfy a midweek chocolate craving!Great as is or topped with sprinkles…or, my favorite, flaky sea salt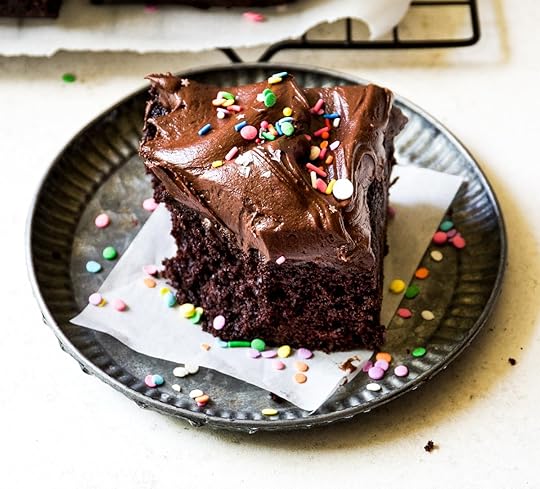 The Baker’s Guide to Measuring Flour
One of the biggest (and most common) mistakes in baking is how we measure flour. If you find yourself without a scale, see my top tips on how to properly measure flour for the perfect amount every time!
 My Favorite Baking Pro Tips for Making
 The Best Chocolate Sheet Cake RecipeMake sure all of your ingredients are at room temperature. The sugar and butter will cream to the creamiest heights if your butter is at room temperature. Additionally, if the eggs and sour cream aren’t at room temp, your cake batter will likely curdle.Add the eggs to the cake slowly. It’s tempting to just throw them all in, but along with throwing cold ingredients into your cake batter, adding too much liquid too quickly to your cake batter will curdle it as well. Mix them in slowly.Use a whisk to mix in the hot espresso and milk. The cake batter will be quite thick at this point. To make sure the liquid is well mixed into the batter, use a whisk. Take care to mix until *just* combined, as over-mixing will result in a tough, dense cake.
 Step-by-Step Instructions for
 Perfect Moist Chocolate Snacking Cake
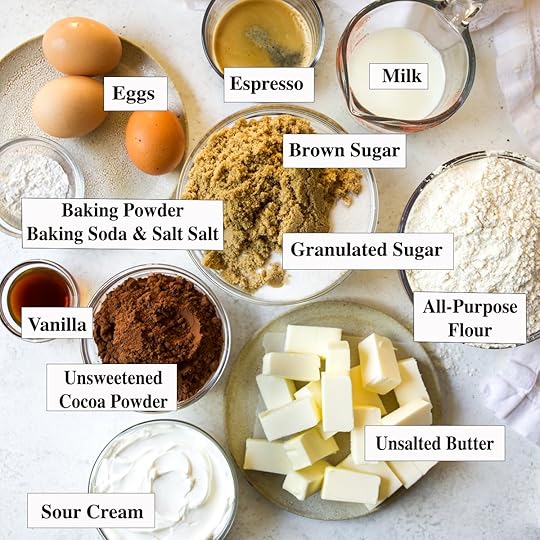 Gather your ingredients: Butter, brown sugar, sugar, vanilla, sour cream, eggs, cocoa powder, baking powder, baking soda, salt, all-purpose flour, hot espresso (you can substitute with coffee or hot water) and hot milk.
 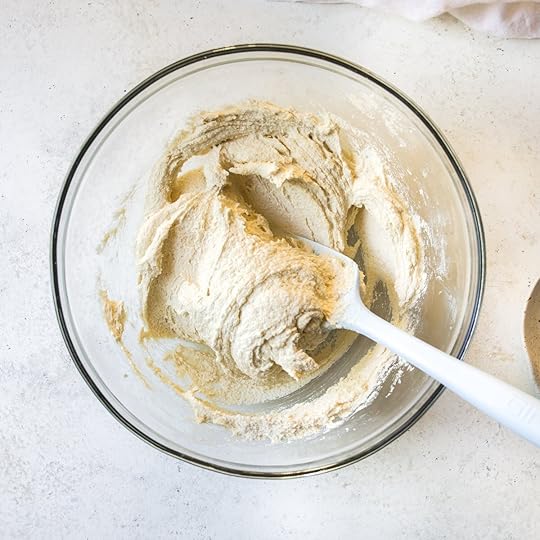 STEP ONE: Cream the granulated sugar, brown sugar, butter and vanilla until light and fluffy.
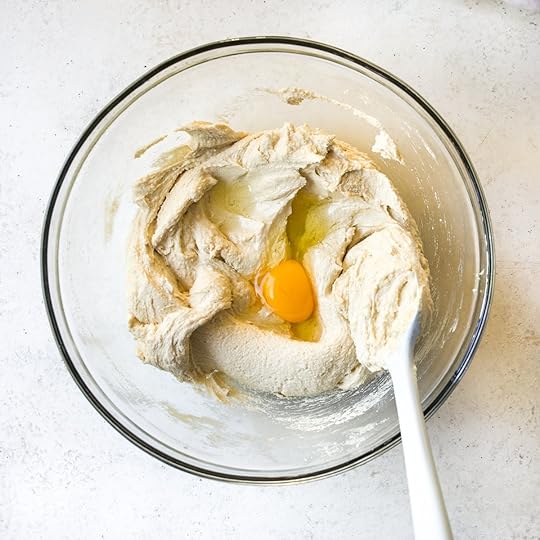 STEP TWO: Slowly add in the eggs, one at a time, making sure each is well blended before adding in the next.
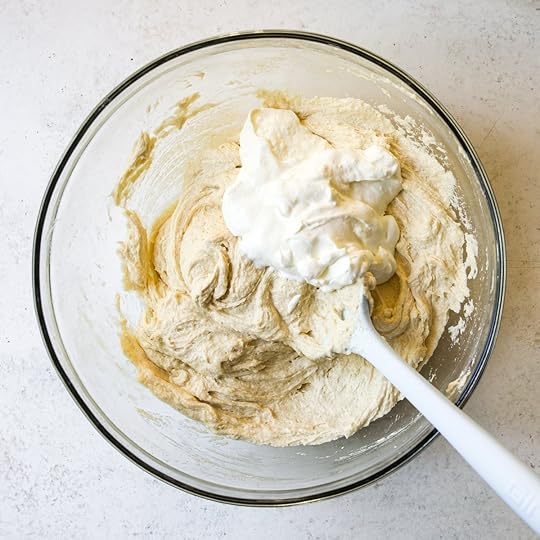 STEP THREE: Mix in the sour cream. Scrape down the sides and bottom of the bowl periodically to make sure everything is combined.
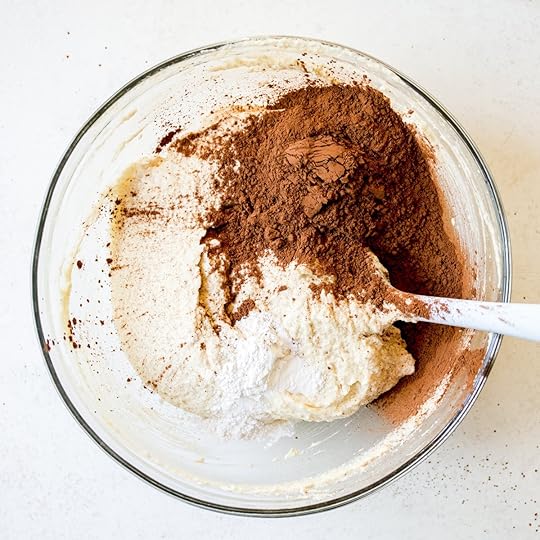 STEP FOUR: Stir in the cocoa powder, baking powder, baking soda and salt until well blended.
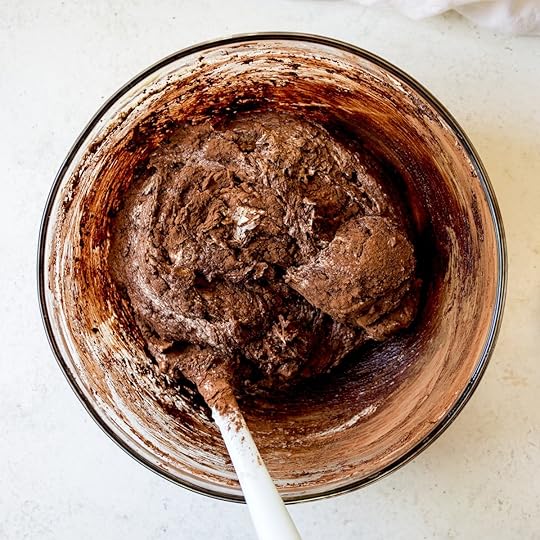 STEP FIVE: Fold in the flour until just barely combined and you see some small streaks.
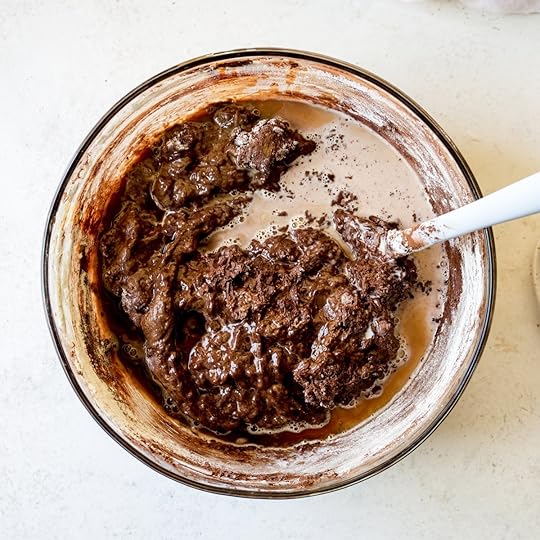 STEP SIX: Mix in the hot milk and espresso/coffee/water. If mixing by hand, a whisk can make this easier.
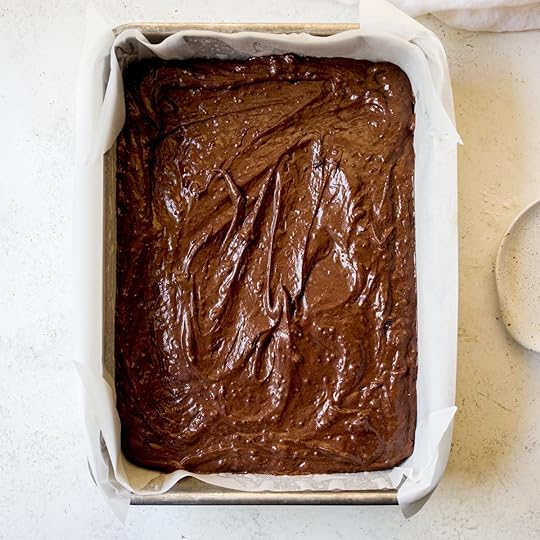 STEP SEVEN: Pour batter into the prepared cake pan and bake in the center of the preheated oven for 40 to 43 minutes.
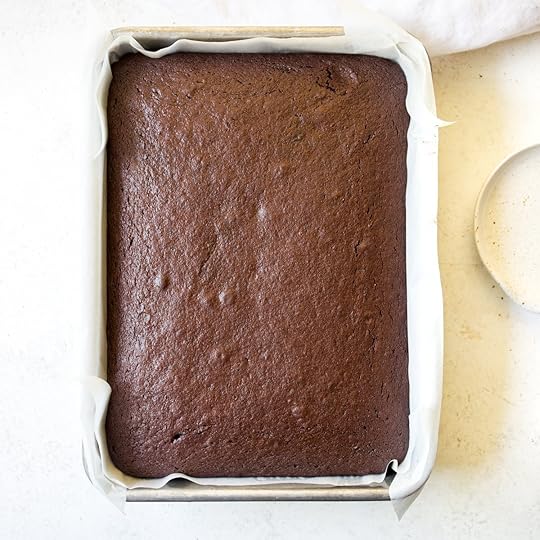 STEP EIGHT: Your chocolate sheet cake will look like this when done! Let cool in the pan for 60 minutes before transferring to a wire rack to finish cooling.
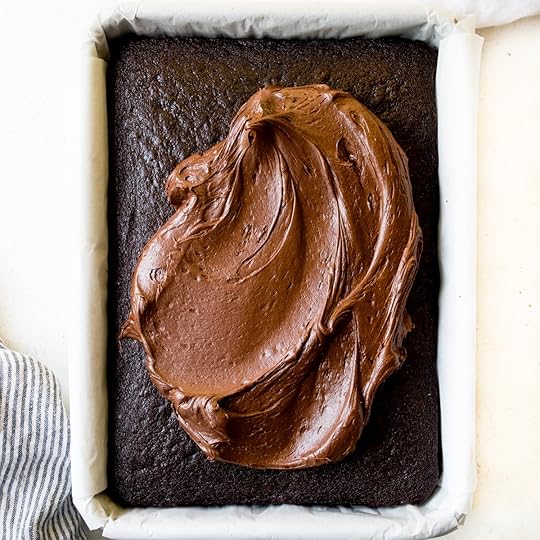 For my birthday, I topped this cake with my favorite
Rich & Creamy Chocolate Frosting
that uses both butter and cream cheese (plus cocoa powder!) for a perfect, chocolatey chocolate frosting that is not too sweet and spreads like a dream!
For my birthday, I topped this cake with my favorite
Rich & Creamy Chocolate Frosting
that uses both butter and cream cheese (plus cocoa powder!) for a perfect, chocolatey chocolate frosting that is not too sweet and spreads like a dream!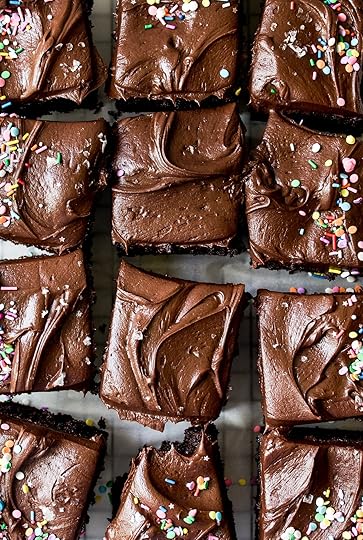
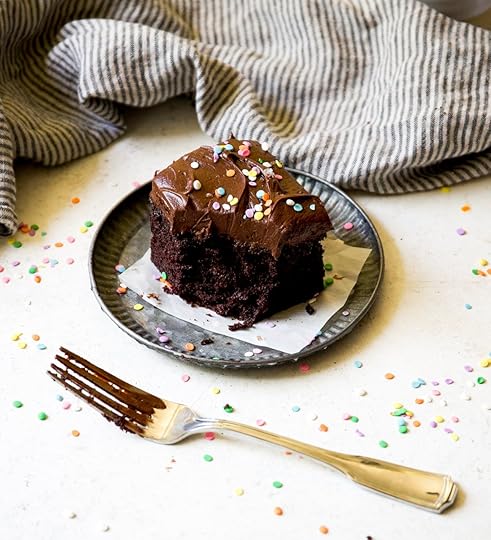 More Delicious Cake Recipes!
I hope you’ll also check out my favorite Brownie Meringue Cake, Pineapple-Coconut Cake or browse all of the Cake Recipes.
I hope you love this delicious Chocolate Sheet Cake!!
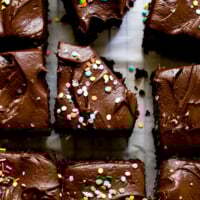 PrintPerfectly Rich & Moist Chocolate Sheet Cake Recipe#wprm-recipe-user-rating-0 .wprm-rating-star.wprm-rating-star-full svg * { fill: #343434; }#wprm-recipe-user-rating-0 .wprm-rating-star.wprm-rating-star-33 svg * { fill: url(#wprm-recipe-user-rating-0-33); }#wprm-recipe-user-rating-0 .wprm-rating-star.wprm-rating-star-50 svg * { fill: url(#wprm-recipe-user-rating-0-50); }#wprm-recipe-user-rating-0 .wprm-rating-star.wprm-rating-star-66 svg * { fill: url(#wprm-recipe-user-rating-0-66); }linearGradient#wprm-recipe-user-rating-0-33 stop { stop-color: #343434; }linearGradient#wprm-recipe-user-rating-0-50 stop { stop-color: #343434; }linearGradient#wprm-recipe-user-rating-0-66 stop { stop-color: #343434; }#wprm-recipe-user-rating-0.wprm-user-rating-allowed.wprm-user-rating-not-voted:not(.wprm-user-rating-voting) svg * { fill-opacity: 0.3; }Welcome to the perfect Rich & Moist Chocolate Sheet Cake of your dreams. Fluffy, moist and bouncy, this cake tastes even better the next day! Loaded with chocolate flavor, this one-bowl recipe can be mixed and baked in an hour and is perfect for any celebration or chocolate craving!Course Dessert, SnackCuisine AmericanKeyword Chocolate Sheet Cake, Snacking Cake, Sour Cream Cake, Brithday Cake, RecipePrep Time 15 minutes minutesCook Time 43 minutes minutesTotal Time 58 minutes minutesServings 12 ServingsAuthor Rebecca FirthEquipmentElectric Stand MixerBaking Scale9 x 13-inch (23 x 33–cm) Baking PanMixing BowlsSpatulaWhiskIngredientsFor the Chocolate Sheet Cake1 1/2 cups (300 g) granulated sugar¾ cup (110 g) light brown sugar packed16 tablespoons (226 g) unsalted butter room temperature, cut into 16 pieces1 tablespoon (13 g) real vanilla extract2/3 cup (160 g) sour cream room temperature3 large eggs room temperature1 cup (85 g) unsweetened Dutch-process cocoa powder1 teaspoon baking powder1 teaspoon baking soda1 teaspoon sea salt2 cups (270 g) all-purpose flour how to measure flour½ cup (120 g) whole milk hot½ cup (112 g) hot, fresh-brewed espresso or strong hot coffee or hot waterFor the Chocolate Frosting1 batch Rich & Creamy Chocolate Frosting see note in instructions regarding using 1 vs 2 batches of chocolate frosting InstructionsFor the Chocolate CakePreheat oven to 350°F (177°C) and place a rack in the center of the oven.In the bowl of an electric stand mixer fitted with the paddle attachment*, add the sugar, brown sugar, butter, vanilla and mix on medium speed until light and fluffy, about 4-5 minutes. Add the sour cream and mix for 1 minute more until light, fluffy and fabulous. Scrape the sides and bottom of the bowl to make sure everything is well blended. *This is a mixer optional recipe; feel free to use a large bowl + spatula!With the mixer on low, slowly add in the eggs, one at a time, making sure that each is well blended before adding in the next.Add the cocoa powder, baking powder, baking soda and salt and mix on low for about 1 minute to blend completely. Finally, add the flour and mix on low until almost (but not quite) blended. Pour in the hot milk and espresso (or coffee) and mix on low for 30 seconds or until mostly combined.* Take the bowl out of the mixer and use a spatula to scrape the sides and bottom of the bowl to make sure everything is blended. Gently mix the batter enough so that everything is combined while being cautious not to overmix as we don't want a tough cake. Set aside.*If mixing the cake batter by hand, use a whisk at this stage to help the liquid blend in.Grease a 9 x 13-inch baking pan (23 x 33–cm) and line with parchment paper on all four sides, taking care that it lays flat against the pan and let the excess hang over the sides of the pan (you'll use these to pull the cake out of the pan). Pour the batter into the prepared baking dish. Tap on the counter several times to settle the cake batter and release any trapped bubbles. Use a spatula to smooth and even out the top of the cake batter. Bake in the center of the oven for about 40-43 minutes. Use a toothpick or cake tester to test for doneness. Some moisture and crumbs are fine, but if it's coated in cake batter, bake it for several minutes more. Another way to test for doneness: press the center part of the cake gently and it should spring back when your finger lifts. Let the cake cool for about 60 minutes before gently using the parchment to lift the cake out of the pan and onto a wire rack. Let the cake cool completely before frosting.For the Chocolate FrostingMake 1 batch of
Rich & Creamy Chocolate Frosting
for a modest layer of frosting over the cake or make 2 batches for ample frosting. See the Chocolate Frosting
Notes
section just below the recipe for instructions on doubling the recipe.If you don't have an offset spatula, use the back of a spoon to make swoops and swirls over the top of the cake (it's fun!). I like to leave a wee edge showing the cake below the frosting. If you make 2 batches of frosting, there is enough to frost the sides of the cake, if that's your vibe!Add sprinkles or flaky sea salt just prior to serving!NotesFully Lining Your Cake PanI like to line all four sides of the pan when baking this cake. To do this, cut a large piece of parchment that’s several inches larger than the base of the pan. Set the parchment over the pan and cut diagonal slits several inches in, at each corner of the parchment. Press the parchment into the pan, letting the flaps at the edges fold along the sides of the pan. It doesn’t have to be perfect. Press to make sure the parchment fits into the corners and sides of the pan to make sure it’s snug in there.Spray non-stick baking spray onto the pan before placing the parchment to help it stay in place. Storing Chocolate Sheet CakeThis cake will last for several days wrapped tightly and stored on the counter at room temperature. If it’s especially humid or warm out, consider storing in the refrigerator.To freeze the unfrosted cake, set it on a parchment-lined baking sheet and freeze for about 2 hours. Wrap tightly in plastic wrap and then store in an airtight container for up to several months. Defrost in the fridge overnight before bringing it onto the counter to come back to room temperature. Leave the cake wrapped while it defrosts, only taking the plastic wrap off once it’s close to room temperature. Serving SizeThe serving size is listed as 12, but frankly, I think it could serve double. This cake bakes up high and fluffy. I love sweets (obviously!) and my mom and I shared a slice on my birthday because even when cut into 12 slices, they are huge slices!We serve this chocolate sheet cake with vanilla ice cream and it is perfection. Enjoy!
PrintPerfectly Rich & Moist Chocolate Sheet Cake Recipe#wprm-recipe-user-rating-0 .wprm-rating-star.wprm-rating-star-full svg * { fill: #343434; }#wprm-recipe-user-rating-0 .wprm-rating-star.wprm-rating-star-33 svg * { fill: url(#wprm-recipe-user-rating-0-33); }#wprm-recipe-user-rating-0 .wprm-rating-star.wprm-rating-star-50 svg * { fill: url(#wprm-recipe-user-rating-0-50); }#wprm-recipe-user-rating-0 .wprm-rating-star.wprm-rating-star-66 svg * { fill: url(#wprm-recipe-user-rating-0-66); }linearGradient#wprm-recipe-user-rating-0-33 stop { stop-color: #343434; }linearGradient#wprm-recipe-user-rating-0-50 stop { stop-color: #343434; }linearGradient#wprm-recipe-user-rating-0-66 stop { stop-color: #343434; }#wprm-recipe-user-rating-0.wprm-user-rating-allowed.wprm-user-rating-not-voted:not(.wprm-user-rating-voting) svg * { fill-opacity: 0.3; }Welcome to the perfect Rich & Moist Chocolate Sheet Cake of your dreams. Fluffy, moist and bouncy, this cake tastes even better the next day! Loaded with chocolate flavor, this one-bowl recipe can be mixed and baked in an hour and is perfect for any celebration or chocolate craving!Course Dessert, SnackCuisine AmericanKeyword Chocolate Sheet Cake, Snacking Cake, Sour Cream Cake, Brithday Cake, RecipePrep Time 15 minutes minutesCook Time 43 minutes minutesTotal Time 58 minutes minutesServings 12 ServingsAuthor Rebecca FirthEquipmentElectric Stand MixerBaking Scale9 x 13-inch (23 x 33–cm) Baking PanMixing BowlsSpatulaWhiskIngredientsFor the Chocolate Sheet Cake1 1/2 cups (300 g) granulated sugar¾ cup (110 g) light brown sugar packed16 tablespoons (226 g) unsalted butter room temperature, cut into 16 pieces1 tablespoon (13 g) real vanilla extract2/3 cup (160 g) sour cream room temperature3 large eggs room temperature1 cup (85 g) unsweetened Dutch-process cocoa powder1 teaspoon baking powder1 teaspoon baking soda1 teaspoon sea salt2 cups (270 g) all-purpose flour how to measure flour½ cup (120 g) whole milk hot½ cup (112 g) hot, fresh-brewed espresso or strong hot coffee or hot waterFor the Chocolate Frosting1 batch Rich & Creamy Chocolate Frosting see note in instructions regarding using 1 vs 2 batches of chocolate frosting InstructionsFor the Chocolate CakePreheat oven to 350°F (177°C) and place a rack in the center of the oven.In the bowl of an electric stand mixer fitted with the paddle attachment*, add the sugar, brown sugar, butter, vanilla and mix on medium speed until light and fluffy, about 4-5 minutes. Add the sour cream and mix for 1 minute more until light, fluffy and fabulous. Scrape the sides and bottom of the bowl to make sure everything is well blended. *This is a mixer optional recipe; feel free to use a large bowl + spatula!With the mixer on low, slowly add in the eggs, one at a time, making sure that each is well blended before adding in the next.Add the cocoa powder, baking powder, baking soda and salt and mix on low for about 1 minute to blend completely. Finally, add the flour and mix on low until almost (but not quite) blended. Pour in the hot milk and espresso (or coffee) and mix on low for 30 seconds or until mostly combined.* Take the bowl out of the mixer and use a spatula to scrape the sides and bottom of the bowl to make sure everything is blended. Gently mix the batter enough so that everything is combined while being cautious not to overmix as we don't want a tough cake. Set aside.*If mixing the cake batter by hand, use a whisk at this stage to help the liquid blend in.Grease a 9 x 13-inch baking pan (23 x 33–cm) and line with parchment paper on all four sides, taking care that it lays flat against the pan and let the excess hang over the sides of the pan (you'll use these to pull the cake out of the pan). Pour the batter into the prepared baking dish. Tap on the counter several times to settle the cake batter and release any trapped bubbles. Use a spatula to smooth and even out the top of the cake batter. Bake in the center of the oven for about 40-43 minutes. Use a toothpick or cake tester to test for doneness. Some moisture and crumbs are fine, but if it's coated in cake batter, bake it for several minutes more. Another way to test for doneness: press the center part of the cake gently and it should spring back when your finger lifts. Let the cake cool for about 60 minutes before gently using the parchment to lift the cake out of the pan and onto a wire rack. Let the cake cool completely before frosting.For the Chocolate FrostingMake 1 batch of
Rich & Creamy Chocolate Frosting
for a modest layer of frosting over the cake or make 2 batches for ample frosting. See the Chocolate Frosting
Notes
section just below the recipe for instructions on doubling the recipe.If you don't have an offset spatula, use the back of a spoon to make swoops and swirls over the top of the cake (it's fun!). I like to leave a wee edge showing the cake below the frosting. If you make 2 batches of frosting, there is enough to frost the sides of the cake, if that's your vibe!Add sprinkles or flaky sea salt just prior to serving!NotesFully Lining Your Cake PanI like to line all four sides of the pan when baking this cake. To do this, cut a large piece of parchment that’s several inches larger than the base of the pan. Set the parchment over the pan and cut diagonal slits several inches in, at each corner of the parchment. Press the parchment into the pan, letting the flaps at the edges fold along the sides of the pan. It doesn’t have to be perfect. Press to make sure the parchment fits into the corners and sides of the pan to make sure it’s snug in there.Spray non-stick baking spray onto the pan before placing the parchment to help it stay in place. Storing Chocolate Sheet CakeThis cake will last for several days wrapped tightly and stored on the counter at room temperature. If it’s especially humid or warm out, consider storing in the refrigerator.To freeze the unfrosted cake, set it on a parchment-lined baking sheet and freeze for about 2 hours. Wrap tightly in plastic wrap and then store in an airtight container for up to several months. Defrost in the fridge overnight before bringing it onto the counter to come back to room temperature. Leave the cake wrapped while it defrosts, only taking the plastic wrap off once it’s close to room temperature. Serving SizeThe serving size is listed as 12, but frankly, I think it could serve double. This cake bakes up high and fluffy. I love sweets (obviously!) and my mom and I shared a slice on my birthday because even when cut into 12 slices, they are huge slices!We serve this chocolate sheet cake with vanilla ice cream and it is perfection. Enjoy!The post Perfectly Rich & Moist Chocolate Sheet Cake Recipe appeared first on DisplacedHousewife.
June 5, 2025
Rich & Creamy Chocolate Frosting
This is my favorite, go-to, not-too-sweet Rich & Creamy Chocolate Frosting! I want to so badly love an American chocolate buttercream that’s made with all butter, but they are too sweet for me!
This recipe uses half butter and half cream cheese for a perfectly balanced frosting that holds its shape like a dream, making it perfect for piping! Plus, it’s a silky, decadent frosting that’s ready in five minutes – what more could you need?
Enjoy this easy, glossy, perfect chocolate frosting recipe!
Why You Need to Make This Chocolate Frosting ASAP!This American-style buttercream takes just 5 minutes to throw togetherUsing cream cheese and unsweetened cocoa powder (rather than melted chocolate) makes for a less-sweet chocolate frosting compared with a traditional all-butter frostingGet ready for a flavor explosion! This frosting’s perfect flavor will steal the show on all your cakes and cupcakes, making every bite an absolute celebrationThe texture is smooth, creamy and utterly delicious!This chocolate buttercream holds it’s shape and is perfect for piping onto cakesUse this frosting anywhere you want chocolate frosting! My dad loves it on graham crackers!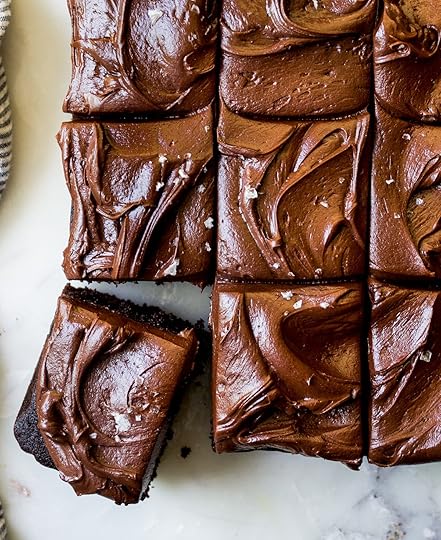 My Favorite Baking Pro Tips for Making The Best Creamy Chocolate Buttercream FrostingMake sure your ingredients are at room temperature. For best results, have the butter and cream cheese at room temperature before creaming them together.Frequently scrape down the sides and bottom of the bowl. After every ingredient addition, make sure you scrape down the sides and bottom of the bowl with a rubber spatula so that you don’t end up with streaks of butter in your final frosting.Sift the flour and cocoa powder. For the smoothest, creamiest, dreamiest chocolate cream cheese frosting, sift your ingredients through a fine-mesh sieve.
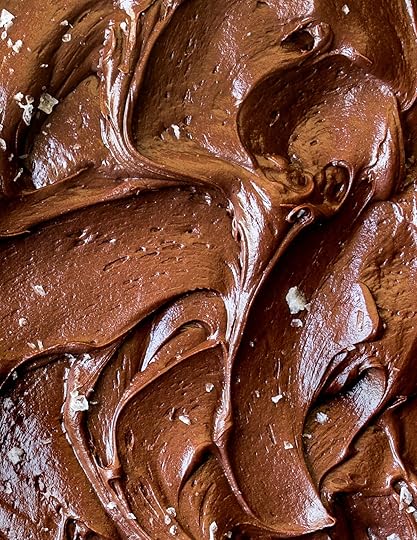 Step-by-Step Instructions for
 Perfect Chocolate Cream Cheese Buttercream
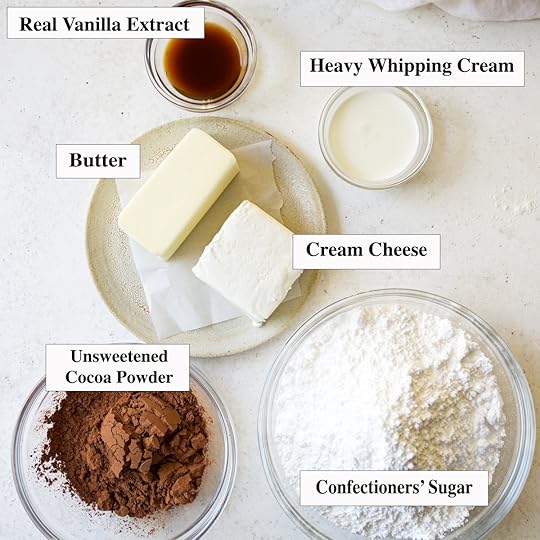 STEP ONE: Gather your ingredients: unsalted butter, cream cheese, confectioners’ sugar (also called powdered sugar, 10x and icing sugar), unsweetened cocoa powder (I love Dutch-processed cocoa powder), heavy whipping cream, vanilla and sea salt (not pictured).
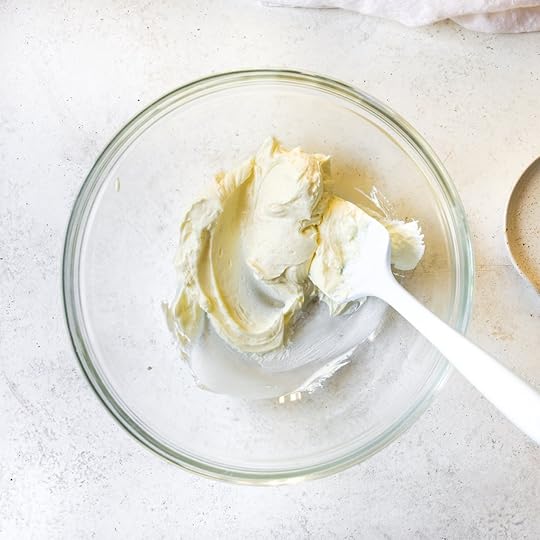 STEP TWO: Cream together butter and cream cheese until smooth and blended.
 STEP THREE: Mix in the confectioners’ sugar…
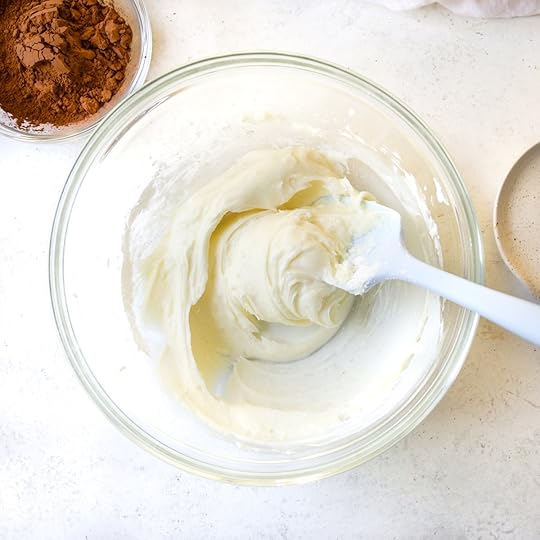 STEP THREE: …it will look like this!
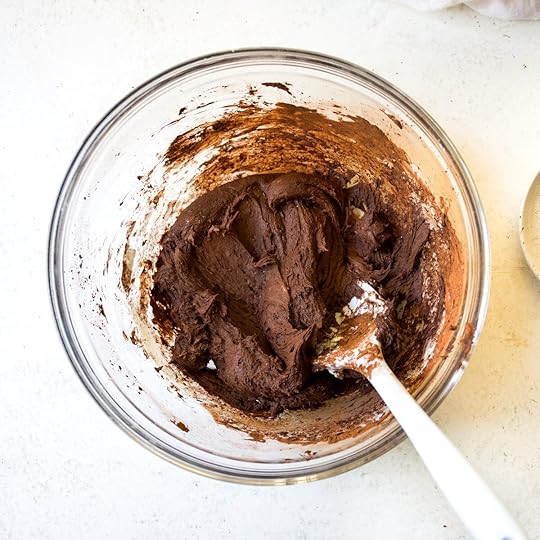 STEP FOUR: Stir in the cocoa powder; the mixture will be quite thick.
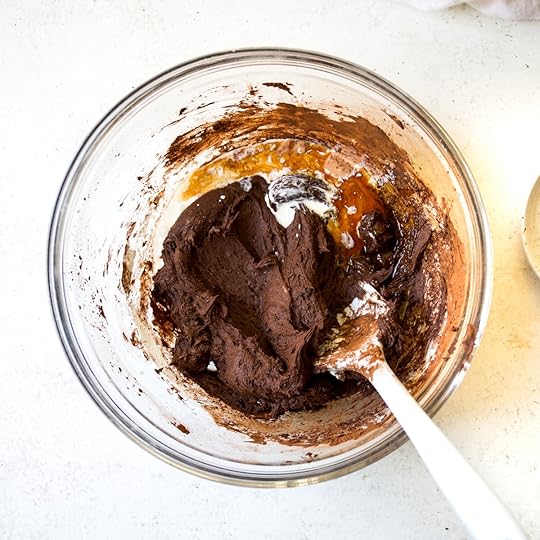 STEP FIVE: Add in the cream, vanilla and salt. Scrape the sides and bottom of the bowl to make sure everything is well combined.
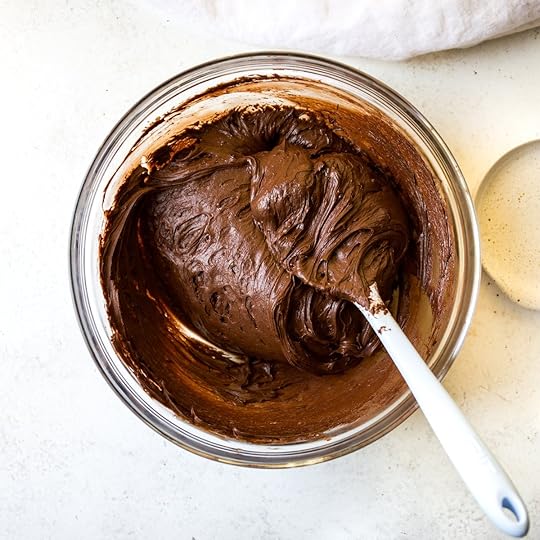 This is the finished frosting! It’s smooth, glossy and perfect for smearing or piping onto your favorite cakes and cupcakes!
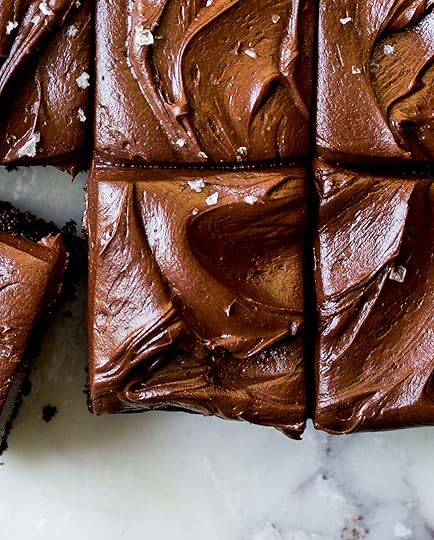 The Best Baking Recipes for Chocolate Frosting
Use this delicious chocolate buttercream recipe anywhere you want (need!) a delicious frosting! It pairs beautifully with Chocolate Guinness Cake, Malted Cupcakes and Granny Pete’s Chocolate Cake.
Enjoy your new favorite, easy chocolate frosting recipe!
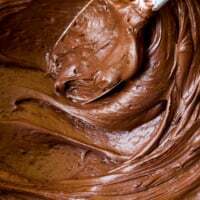 PrintRich & Creamy Chocolate Frosting Buttercream (Not Too Sweet!)#wprm-recipe-user-rating-0 .wprm-rating-star.wprm-rating-star-full svg * { fill: #343434; }#wprm-recipe-user-rating-0 .wprm-rating-star.wprm-rating-star-33 svg * { fill: url(#wprm-recipe-user-rating-0-33); }#wprm-recipe-user-rating-0 .wprm-rating-star.wprm-rating-star-50 svg * { fill: url(#wprm-recipe-user-rating-0-50); }#wprm-recipe-user-rating-0 .wprm-rating-star.wprm-rating-star-66 svg * { fill: url(#wprm-recipe-user-rating-0-66); }linearGradient#wprm-recipe-user-rating-0-33 stop { stop-color: #343434; }linearGradient#wprm-recipe-user-rating-0-50 stop { stop-color: #343434; }linearGradient#wprm-recipe-user-rating-0-66 stop { stop-color: #343434; }#wprm-recipe-user-rating-0.wprm-user-rating-allowed.wprm-user-rating-not-voted:not(.wprm-user-rating-voting) svg * { fill-opacity: 0.3; }Discover the ultimate easy chocolate frosting recipe! This rich and creamy buttercream uses butter and cream cheese for a perfectly balanced, not-too-sweet flavor. Ideal for piping on cakes and cupcakes in just 5 minutes!Course DessertCuisine AmericanKeyword Chocolate, Frosting, Buttercream, American, Recipe, Cocoa PowderPrep Time 5 minutes minutesServings 1 BatchAuthor Rebecca FirthEquipmentBaking ScaleMixing BowlsSpatulaFine-Mesh SieveIngredients8 tablespoons (113 g) unsalted butter room temperature1/2 cup (112 g) cream cheese room temperature2 3/4 cups (330 g) confectioners’ sugar sifted2/3 cup (56 g) unsweetened Dutch-process cocoa powder sifted2 tablespoons (30 g) heavy whipping cream room temperature1 tablespoon (13 g) vanilla paste or real vanilla extract¼ teaspoon sea saltInstructionsIn an electric-stand mixer fitted with the paddle attachment* add the butter and cream cheese, and mix on medium for 2 minutes or until smooth and completely blended.*You can also mix this recipe using a bowl and spatula.Add in the confectioners’ sugar and mix on low for 1 minute. Scrape the sides and bottom of the bowl to make sure everything is well combined.Add in the cocoa and mix on low for 1 minute or until combined. With the machine on low, add in the cream and vanilla and then mix on medium for 1 minute more or until it looks smooth and well combined. Scrape the sides and bottom of the bowl one more time to make sure everything is well mixed and smooth.NotesHow Much Chocolate Frosting Does This Make?This recipe makes about 2 1/2 cups of chocolate frosting. It’s the perfect amount to thickly cover a 9-inch square/round, single-layer cake, thinly cover a 9×13-inch sheet cake or about 12 cupcakes.If you’d like to thickly cover your 9×13-inch sheet cake or a two-layer cake, use the following proportions:16 tablespoons (226 g) unsalted butter, room temperature 1 cup (224 g) cream cheese, room temperature5 1/2 cups (660 g) confectioners’ sugar, sifted1 1/3 cups (112 g) unsweetened Dutch-process cocoa powder, sifted1/4 cup (60 g) heavy whipping cream, room temperature2 tablespoons (26 g) vanilla paste or real vanilla extract1/2 teaspoon sea saltFollow the same recipe instructions in the recipe card.Choosing Cream Cheese for ButtercreamUse full-fat, block cream cheese (not whipped cream cheese in the plastic tub) for best results. A Note About This Frosting’s SweetnessAmerican buttercreams are sweet, full stop. I tried really hard to make a very simple, delicious American buttercream that used all butter (no cream cheese) and every single one was simply too sweet.Using cream cheese and unsweetened cocoa powder really temper the sweetness in comparison to a classic American buttercream. But I need you to know, it will still be sweet!Milk vs Heavy CreamIf you don’t have any heavy whipping cream on hand, then you can use milk in its place. Start with half the amount of milk as it will make the frosting consistency thinner. Add more as needed.The Best Cocoa Powder for Chocolate FrostingA highly recommend unsweetened Dutch-process cocoa powder. I love the color and the flavor. A great store-bought brand is Hershey’s Special Dark and it’s what I tested this recipe with.You can also use regular unsweetened cocoa powder.To Sift or Not To SiftI believe in sifting for the smoothest, creamiest frosting. Of course you can skip this step if you don’t have one handy. Make sure to really mix the frosting at every step for best results.Mixer Optional RecipeYou absolutely don’t need a mixer to make the recipe. In the photos you’ll note I used a bowl and spatula.How to Scale This Frosting Up or DownThis recipe doubles like a dream! You can also halve it. The best results, use a baking scale when scaling the recipe up or down.See note above for the exact proportions to double this recipe.Storing & Freezing Chocolate FrostingYou can store this frosting in an airtight container in the fridge for about a week. You’ll need to bring the frosting closer to room temperature and mix to restore it to the desired consistency. If it’s thickened up too much, add a wee bit of cream or milk and mix some more.To freeze, store in an airtight container and freeze for up to several months. Defrost in the fridge overnight and then follow the refrigeration steps above before using.More Frosting RecipesCheck out two of my favorites:
Chocolate Malt Buttercream
and
White Chocolate Buttercream Frosting
. Don’t miss all of the
Frosting & Buttercream recipes
!
PrintRich & Creamy Chocolate Frosting Buttercream (Not Too Sweet!)#wprm-recipe-user-rating-0 .wprm-rating-star.wprm-rating-star-full svg * { fill: #343434; }#wprm-recipe-user-rating-0 .wprm-rating-star.wprm-rating-star-33 svg * { fill: url(#wprm-recipe-user-rating-0-33); }#wprm-recipe-user-rating-0 .wprm-rating-star.wprm-rating-star-50 svg * { fill: url(#wprm-recipe-user-rating-0-50); }#wprm-recipe-user-rating-0 .wprm-rating-star.wprm-rating-star-66 svg * { fill: url(#wprm-recipe-user-rating-0-66); }linearGradient#wprm-recipe-user-rating-0-33 stop { stop-color: #343434; }linearGradient#wprm-recipe-user-rating-0-50 stop { stop-color: #343434; }linearGradient#wprm-recipe-user-rating-0-66 stop { stop-color: #343434; }#wprm-recipe-user-rating-0.wprm-user-rating-allowed.wprm-user-rating-not-voted:not(.wprm-user-rating-voting) svg * { fill-opacity: 0.3; }Discover the ultimate easy chocolate frosting recipe! This rich and creamy buttercream uses butter and cream cheese for a perfectly balanced, not-too-sweet flavor. Ideal for piping on cakes and cupcakes in just 5 minutes!Course DessertCuisine AmericanKeyword Chocolate, Frosting, Buttercream, American, Recipe, Cocoa PowderPrep Time 5 minutes minutesServings 1 BatchAuthor Rebecca FirthEquipmentBaking ScaleMixing BowlsSpatulaFine-Mesh SieveIngredients8 tablespoons (113 g) unsalted butter room temperature1/2 cup (112 g) cream cheese room temperature2 3/4 cups (330 g) confectioners’ sugar sifted2/3 cup (56 g) unsweetened Dutch-process cocoa powder sifted2 tablespoons (30 g) heavy whipping cream room temperature1 tablespoon (13 g) vanilla paste or real vanilla extract¼ teaspoon sea saltInstructionsIn an electric-stand mixer fitted with the paddle attachment* add the butter and cream cheese, and mix on medium for 2 minutes or until smooth and completely blended.*You can also mix this recipe using a bowl and spatula.Add in the confectioners’ sugar and mix on low for 1 minute. Scrape the sides and bottom of the bowl to make sure everything is well combined.Add in the cocoa and mix on low for 1 minute or until combined. With the machine on low, add in the cream and vanilla and then mix on medium for 1 minute more or until it looks smooth and well combined. Scrape the sides and bottom of the bowl one more time to make sure everything is well mixed and smooth.NotesHow Much Chocolate Frosting Does This Make?This recipe makes about 2 1/2 cups of chocolate frosting. It’s the perfect amount to thickly cover a 9-inch square/round, single-layer cake, thinly cover a 9×13-inch sheet cake or about 12 cupcakes.If you’d like to thickly cover your 9×13-inch sheet cake or a two-layer cake, use the following proportions:16 tablespoons (226 g) unsalted butter, room temperature 1 cup (224 g) cream cheese, room temperature5 1/2 cups (660 g) confectioners’ sugar, sifted1 1/3 cups (112 g) unsweetened Dutch-process cocoa powder, sifted1/4 cup (60 g) heavy whipping cream, room temperature2 tablespoons (26 g) vanilla paste or real vanilla extract1/2 teaspoon sea saltFollow the same recipe instructions in the recipe card.Choosing Cream Cheese for ButtercreamUse full-fat, block cream cheese (not whipped cream cheese in the plastic tub) for best results. A Note About This Frosting’s SweetnessAmerican buttercreams are sweet, full stop. I tried really hard to make a very simple, delicious American buttercream that used all butter (no cream cheese) and every single one was simply too sweet.Using cream cheese and unsweetened cocoa powder really temper the sweetness in comparison to a classic American buttercream. But I need you to know, it will still be sweet!Milk vs Heavy CreamIf you don’t have any heavy whipping cream on hand, then you can use milk in its place. Start with half the amount of milk as it will make the frosting consistency thinner. Add more as needed.The Best Cocoa Powder for Chocolate FrostingA highly recommend unsweetened Dutch-process cocoa powder. I love the color and the flavor. A great store-bought brand is Hershey’s Special Dark and it’s what I tested this recipe with.You can also use regular unsweetened cocoa powder.To Sift or Not To SiftI believe in sifting for the smoothest, creamiest frosting. Of course you can skip this step if you don’t have one handy. Make sure to really mix the frosting at every step for best results.Mixer Optional RecipeYou absolutely don’t need a mixer to make the recipe. In the photos you’ll note I used a bowl and spatula.How to Scale This Frosting Up or DownThis recipe doubles like a dream! You can also halve it. The best results, use a baking scale when scaling the recipe up or down.See note above for the exact proportions to double this recipe.Storing & Freezing Chocolate FrostingYou can store this frosting in an airtight container in the fridge for about a week. You’ll need to bring the frosting closer to room temperature and mix to restore it to the desired consistency. If it’s thickened up too much, add a wee bit of cream or milk and mix some more.To freeze, store in an airtight container and freeze for up to several months. Defrost in the fridge overnight and then follow the refrigeration steps above before using.More Frosting RecipesCheck out two of my favorites:
Chocolate Malt Buttercream
and
White Chocolate Buttercream Frosting
. Don’t miss all of the
Frosting & Buttercream recipes
!The post Rich & Creamy Chocolate Frosting appeared first on DisplacedHousewife.
May 23, 2025
Moist & Plush Lemon Blueberry Loaf Cake Recipe
Butter for flavor, oil for moisture, lemon zest for brightness, fold in those berries and you’ve got the moist delicious Lemon Blueberry Loaf Cake!
As always with loaf cakes I wonder if we should be calling it Lemon Blueberry Bread? A Blueberry Quick Bread? Or are we happy with calling it a loaf cake?! I would love to know your thoughts!
Regardless of what you call it, this plush, springy cake is bursting with juicy blueberries and loaded with bright, zesty lemon flavor. The whole one-bowl cake can be quickly mixed and baked in about an hour and 15 minutes (give or take).
I can’t think of a better way to celebrate blueberries than with this delicious lemon bread recipe! We’re loving it for a snack, for breakfast and yes, for dessert!
Enjoy!
 Why You Should Make
 This Delicious Blueberry Lemon Quick Bread ASAP!The most perfect tight crumb that is equally soft, plush and moistExtra lemon zest (a whooping 2 tablespoons!) PLUS a squeeze of fresh lemon juice over the top of the cake just before it goes into the oven produces an extra lemony-flavored cakeThink of every delicious berry lemon loaf cake that you’ve had at your favorite coffee house or bakery, this is that cake!Lemon-spiked interior is loaded with juicy blueberries in every biteA one-bowl loaf cake recipe that’s mixed + baked in about 1 hour and 15 minutes (ish!)
Whether you call this a loaf cake, quick bread, bread or just plain cake, I promise you and your family will love this bouncy, delicious Lemon Blueberry Cake!
 The Baker’s Guide to Measuring Flour
One of the biggest (and most common) mistakes in baking is how we measure flour. If you find yourself without a scale, see my top tips on how to properly measure flour for the perfect amount every time!
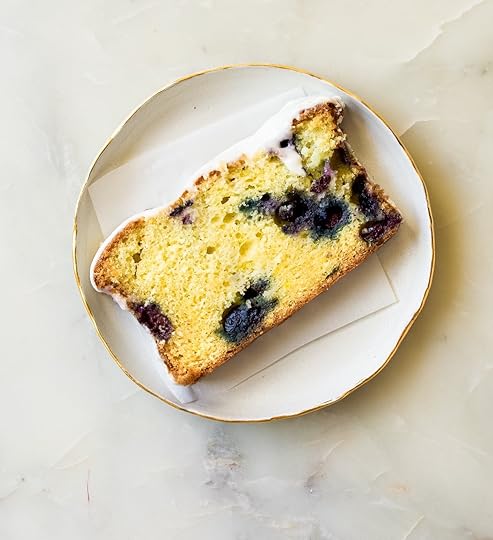 My Favorite Baking Pro Tips to Make
 The Best Blueberry Lemon Loaf
Below you’ll find my favorite pro baking tips and step-by-step photos for making the perfect loaf cake with blueberries and heaps of lemon!
Really cream the butter and sugar together for the perfect light textureMake sure all of your ingredients are at room temperatureMix in the flour until *just* barely combined for the lightest cake crumbMake sure the cake is done before taking it out of the ovenThat’s it! This lemon quick bread recipe comes together quickly. The biggest hardship is the long-ish bake time and waiting for this beauty to cool completely before tearing into it!
Let’s bake the most delicious lemon blueberry loaf cake!
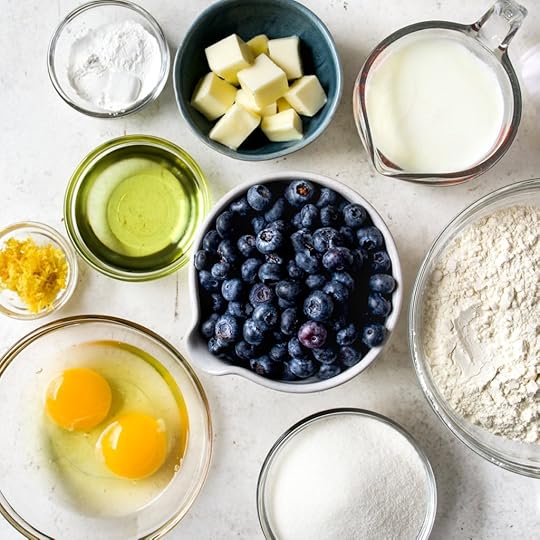 STEP ONE: Grab your ingredients for the cake: granulated sugar, lemon juice & zest, butter, oil, eggs, baking powder, baking soda, salt, all-purpose flour, buttermilk and blueberries. For the
lemon glaze
, you’ll need confectioners’ sugar, milk/cream and fresh lemon juice.
STEP ONE: Grab your ingredients for the cake: granulated sugar, lemon juice & zest, butter, oil, eggs, baking powder, baking soda, salt, all-purpose flour, buttermilk and blueberries. For the
lemon glaze
, you’ll need confectioners’ sugar, milk/cream and fresh lemon juice. STEP TWO: Massage the lemon zest with the granulated sugar…
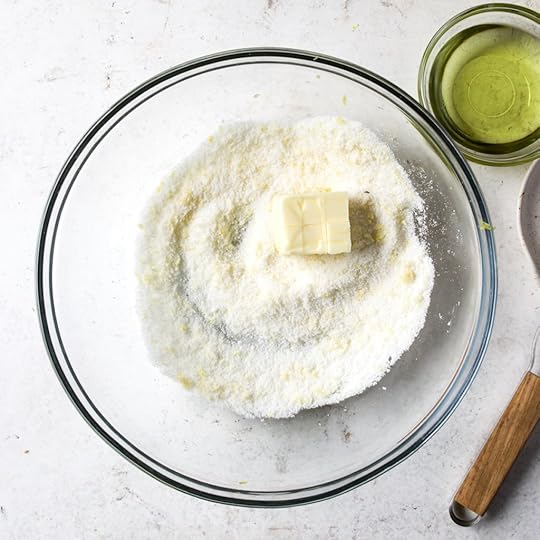 STEP THREE: Cream the butter with the sugar…
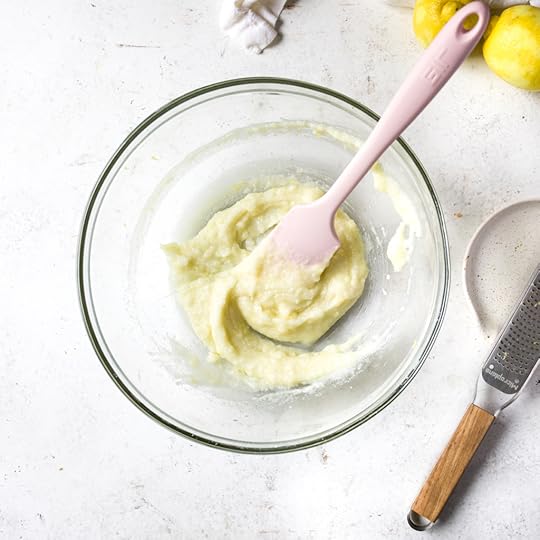 STEP THREE: The mixture will be quite thick and *not* light and fluffy.
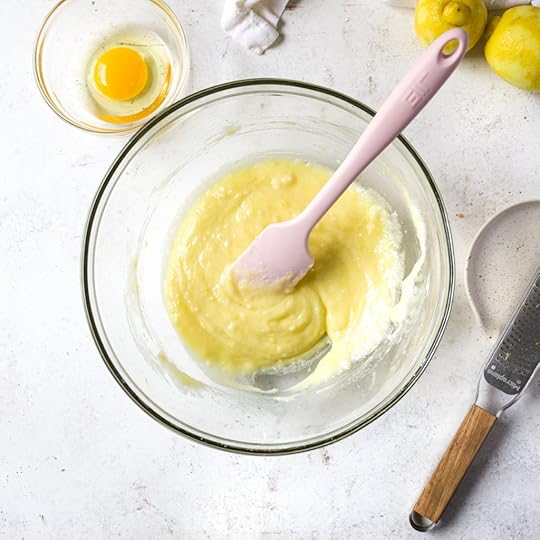 STEP FOUR: Mix in the oil until thoroughly combined; the cake batter will now be smooth and light. Scrape down the sides and bottom of the bowl to make sure everything is well combined.
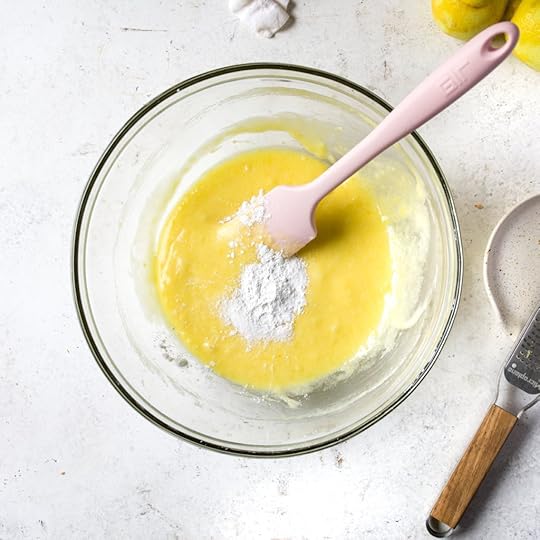 STEP FIVE: Add the baking powder, baking soda, salt and mix until well combined.
 STEP SIX: Alternate adding the flour and buttermilk in two batches, mixing each addition. until just barely combined.
 STEP SEVEN: Fold in the blueberries until evenly distributed throughout the batter. See
Notes
below recipe if using frozen blueberries.
STEP SEVEN: Fold in the blueberries until evenly distributed throughout the batter. See
Notes
below recipe if using frozen blueberries.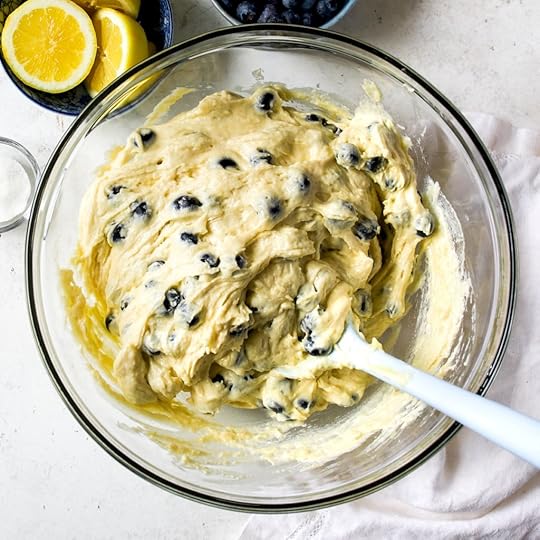 STEP EIGHT: Let the batter rest for 15 minutes.
  STEP NINE: Scoop the batter into the prepared pan…
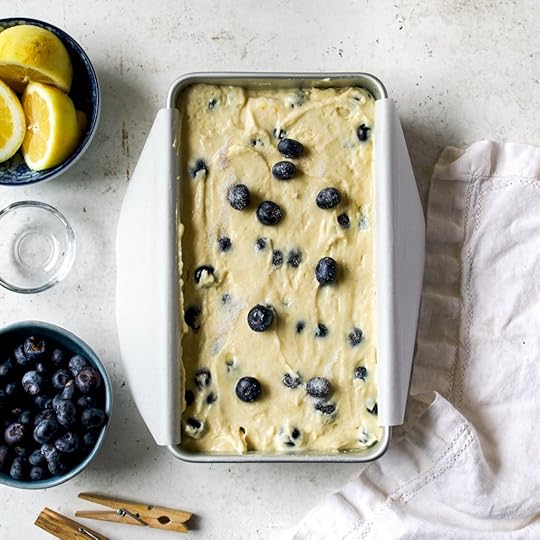 STEP NINE: …and drizzle with fresh lemon juice, a sprinkle of sugar and a couple more blueberries if you have them (optional).
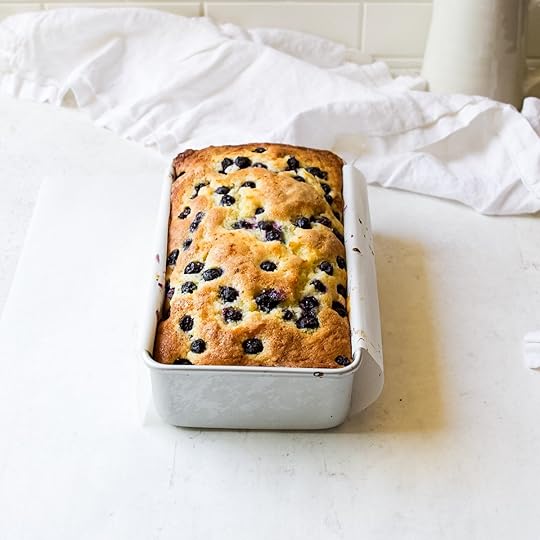 STEP TEN: Bake in the center of the oven for 60 to 65 minutes. The top should be slightly puffed and bronzed. Check the area around the berries to make sure there is no unbaked cake batter.
 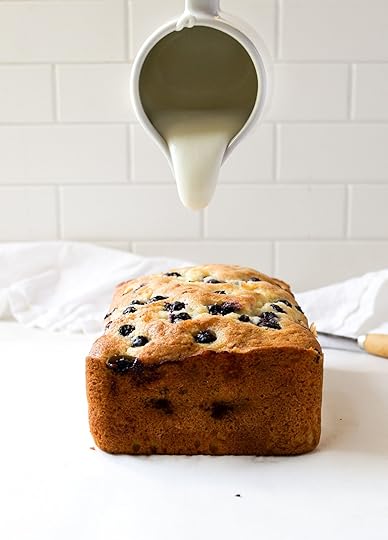 STEP ELEVEN: Once the cake is completely cool, drizzle with lemon glaze and serve!
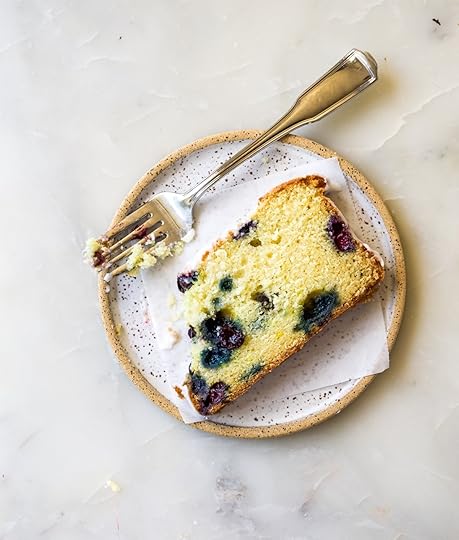 More Fresh Berry Recipes!
I hope you’ll also check out the yummiest Raspberry Lemon Loaf, Raspberry Jam Bars, Blueberry Buttermilk Scones and find all of the berry recipes here!
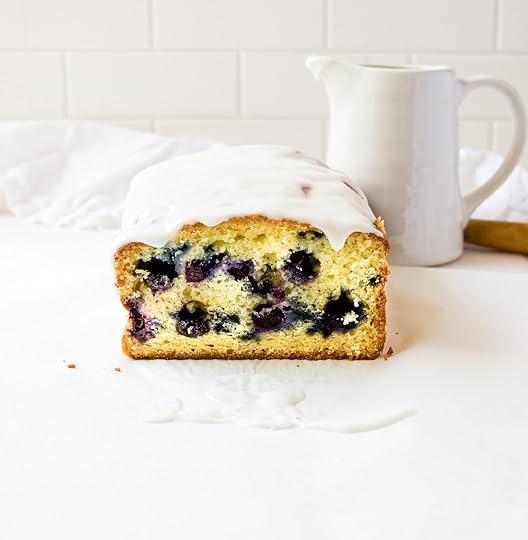
 PrintMoist & Plush Lemon Blueberry Loaf Cake Recipe#wprm-recipe-user-rating-0 .wprm-rating-star.wprm-rating-star-full svg * { fill: #343434; }#wprm-recipe-user-rating-0 .wprm-rating-star.wprm-rating-star-33 svg * { fill: url(#wprm-recipe-user-rating-0-33); }#wprm-recipe-user-rating-0 .wprm-rating-star.wprm-rating-star-50 svg * { fill: url(#wprm-recipe-user-rating-0-50); }#wprm-recipe-user-rating-0 .wprm-rating-star.wprm-rating-star-66 svg * { fill: url(#wprm-recipe-user-rating-0-66); }linearGradient#wprm-recipe-user-rating-0-33 stop { stop-color: #343434; }linearGradient#wprm-recipe-user-rating-0-50 stop { stop-color: #343434; }linearGradient#wprm-recipe-user-rating-0-66 stop { stop-color: #343434; }#wprm-recipe-user-rating-0.wprm-user-rating-allowed.wprm-user-rating-not-voted:not(.wprm-user-rating-voting) svg * { fill-opacity: 0.3; }Bake the ultimate easy, one-bowl lemon blueberry loaf cake (quick bread) – perfectly moist, plush, and bursting with zesty lemon and juicy berries!Course Breakfast, Dessert, SnackCuisine AmericanKeyword Lemon, Blueberry, Loaf, Cake, Quick Bread, One-Bowl, Recipe, ButtermilkPrep Time 15 minutes minutesCook Time 1 hour hourCake Batter Resting Time 15 minutes minutesTotal Time 1 hour hour 30 minutes minutesServings 1 Loaf CakeAuthor Rebecca FirthEquipmentBaking Scale9 x 5-inch (23 x 13-cm) Loaf PanMixing BowlsSpatulaIngredientsFor the Cake3/4 cup (150 g) granulated sugar2 tablespoons fresh lemon zest about 2 lemons4 tablespoons (57 g) unsalted butter make sure it's very soft, but not melted¼ cup (56 g) sunflower or grapeseed oil or other neutral oil2 large eggs room temperature2 teaspoons baking powder1 teaspoon baking soda1 teaspoon sea salt2 cups + 2 tablespoons (288 g) all-purpose flour1 cup (240 g) buttermilk shaken and at room temperature8 oz (227 g) fresh blueberries see Notes below recipe1 teaspoon fresh lemon juice1 teaspoon granulated sugarFor the Lemon Glaze1 batch Bright 3-Ingredient Lemon GlazeInstructionsFor the CakePreheat your oven to 350℉ (177℃). Grease a 9 x 5-inches (23 x 13-cm) loaf pan and line with parchment paper letting the excess fall over the two longer sides of the pan.In an electric stand mixer fitted with the paddle attachment (*This recipe can easily be made with a bowl and spatula), add the granulated sugar and lemon zest and massage the lemon zest into the sugar to infuse the lemon flavor throughout the cake (love).Add in the butter and mix on medium low until it forms a thick mass. With the mixer on low, stream in the oil and mix on medium for about 4 minutes or until completely blended together and smooth and light.With the mixer on low, add in the eggs, one at a time, taking care that each is well blended before adding in the next. Scrape down the sides and bottom of the bowl to make sure everything is well blended.Add the baking powder, baking soda and sea salt and mix for about 30 seconds on low or until combined.Add 1/2 the flour and mix until just barely combined. Alternate between adding 1/2 the buttermilk and the remaining flour mixture (ending with the last of the buttermilk), making sure each addition is fully combined before adding in the next.Let the cake batter sit for 15 minutes. Fold in the blueberries until evenly distributed throughout the cake batter (see
Notes
below recipe if using frozen blueberries before adding them to the cake batter!). Scoop the batter into the loaf pan filling until ¾ full. Drizzle 1 teaspoon lemon juice and then 1 teaspoon of sugar evenly over the top.Bake in the center of the oven for 60 to 65 minutes or until the top is puffed up, golden and a toothpick inserted into the center comes out mostly clean, with the tiniest smidge of cake on it. Let cool in the tin for about 30ish minutes, then use a butter knife and the parchment overhang to help get it out of the pan to finish cooling on a wire rack.For the Lemon GlazeOnce the cake is cool, whisk together 1 batch of
3-Ingredient Lemon Glaze
and drizzle over the top of the cake. Let set for 15-30 minutes before serving. A big pile of fresh blueberries is pretty served over the top of the cake. Enjoy!NotesBlueberriesMake sure your blueberries are completely dry before adding them to the cake batter. If they are damp/wet the cake won’t bake well around them.Make sure the blueberries are evenly distributed throughout the cake batter, this will also help with even baking of the cake.One way to have more control over the berry placement within the cake, is to *not* add it to the cake batter. Instead, add a third of the batter to the pan and then cover it with 1/3 of the berries. Repeat this process three times.
If using frozen blueberries, use this same method so that the blueberries don’t bleed into the cake batter.
Buttermilk ReplacementIf you don’t happen to have any buttermilk on hand, measure out 1 cup milk, remove 1 tablespoon and replace it with 1 tablespoon of fresh lemon juice or white vinegar. Let the mixture sit for about 10 minutes before using.Mixer vs Your Beautiful ArmsI reference an electric-stand mixer with the paddle attachment in the instruction. However, this is definitely a recipe that can easily be made with a bowl and spatula (and the step-by-step photo instructions show it being made that way). Make sure you really cream your butter and sugar so that you get that awesome soft, light texture.Resting Cake BatterI love doing this with muffins, as well as loaf cakes and quick breads. Giving the blueberry lemon loaf batter a 10 to 20 minute period of rest (just letting it sit on the counter pre-bake) makes the cake bake better…a wee puffier (although this cake doesn’t have a super tall crown). It also helps the blueberries not sink to the bottom of the cake.Storing Your Lemon Blueberry Loaf CakeStore at room temperature in an air-tight container. If it’s warm and humid out, wrap it tightly and store in the fridge.For long-term storage, wrap your cooled blueberry lemon cake tightly in plastic wrap and then place in a reusable freezer-safe plastic bag (or Stasher bag) and store in the freezer.The night before serving set the still-wrapped loaf in the fridge to begin thawing. The following day set on the counter until it comes to room temperature. Serve and enjoy!Picking Your Loaf PanThis Fat Daddios loaf pan is my favorite to bake loaf cakes. I find loaf pan sizing vexing, to be honest.I have loaf pans whose packaging lists the dimensions as 9 x 5-inches (23 x 13-cm) but each varies significantly size-wise from one another (some are bigger, some are smaller).For this recipe, I list the appropriate size as 9 x 5-inches (23 x 13-cm) as that is what most everyone owns. However, your loaf pan may be slightly larger or smaller than this.The best rule of thumb is to fill your loaf pan no more than 3/4’s full. And if you have any doubts as to whether it is filled too full, place a rimmed baking sheet underneath to catch any cake batter that may overflow.
PrintMoist & Plush Lemon Blueberry Loaf Cake Recipe#wprm-recipe-user-rating-0 .wprm-rating-star.wprm-rating-star-full svg * { fill: #343434; }#wprm-recipe-user-rating-0 .wprm-rating-star.wprm-rating-star-33 svg * { fill: url(#wprm-recipe-user-rating-0-33); }#wprm-recipe-user-rating-0 .wprm-rating-star.wprm-rating-star-50 svg * { fill: url(#wprm-recipe-user-rating-0-50); }#wprm-recipe-user-rating-0 .wprm-rating-star.wprm-rating-star-66 svg * { fill: url(#wprm-recipe-user-rating-0-66); }linearGradient#wprm-recipe-user-rating-0-33 stop { stop-color: #343434; }linearGradient#wprm-recipe-user-rating-0-50 stop { stop-color: #343434; }linearGradient#wprm-recipe-user-rating-0-66 stop { stop-color: #343434; }#wprm-recipe-user-rating-0.wprm-user-rating-allowed.wprm-user-rating-not-voted:not(.wprm-user-rating-voting) svg * { fill-opacity: 0.3; }Bake the ultimate easy, one-bowl lemon blueberry loaf cake (quick bread) – perfectly moist, plush, and bursting with zesty lemon and juicy berries!Course Breakfast, Dessert, SnackCuisine AmericanKeyword Lemon, Blueberry, Loaf, Cake, Quick Bread, One-Bowl, Recipe, ButtermilkPrep Time 15 minutes minutesCook Time 1 hour hourCake Batter Resting Time 15 minutes minutesTotal Time 1 hour hour 30 minutes minutesServings 1 Loaf CakeAuthor Rebecca FirthEquipmentBaking Scale9 x 5-inch (23 x 13-cm) Loaf PanMixing BowlsSpatulaIngredientsFor the Cake3/4 cup (150 g) granulated sugar2 tablespoons fresh lemon zest about 2 lemons4 tablespoons (57 g) unsalted butter make sure it's very soft, but not melted¼ cup (56 g) sunflower or grapeseed oil or other neutral oil2 large eggs room temperature2 teaspoons baking powder1 teaspoon baking soda1 teaspoon sea salt2 cups + 2 tablespoons (288 g) all-purpose flour1 cup (240 g) buttermilk shaken and at room temperature8 oz (227 g) fresh blueberries see Notes below recipe1 teaspoon fresh lemon juice1 teaspoon granulated sugarFor the Lemon Glaze1 batch Bright 3-Ingredient Lemon GlazeInstructionsFor the CakePreheat your oven to 350℉ (177℃). Grease a 9 x 5-inches (23 x 13-cm) loaf pan and line with parchment paper letting the excess fall over the two longer sides of the pan.In an electric stand mixer fitted with the paddle attachment (*This recipe can easily be made with a bowl and spatula), add the granulated sugar and lemon zest and massage the lemon zest into the sugar to infuse the lemon flavor throughout the cake (love).Add in the butter and mix on medium low until it forms a thick mass. With the mixer on low, stream in the oil and mix on medium for about 4 minutes or until completely blended together and smooth and light.With the mixer on low, add in the eggs, one at a time, taking care that each is well blended before adding in the next. Scrape down the sides and bottom of the bowl to make sure everything is well blended.Add the baking powder, baking soda and sea salt and mix for about 30 seconds on low or until combined.Add 1/2 the flour and mix until just barely combined. Alternate between adding 1/2 the buttermilk and the remaining flour mixture (ending with the last of the buttermilk), making sure each addition is fully combined before adding in the next.Let the cake batter sit for 15 minutes. Fold in the blueberries until evenly distributed throughout the cake batter (see
Notes
below recipe if using frozen blueberries before adding them to the cake batter!). Scoop the batter into the loaf pan filling until ¾ full. Drizzle 1 teaspoon lemon juice and then 1 teaspoon of sugar evenly over the top.Bake in the center of the oven for 60 to 65 minutes or until the top is puffed up, golden and a toothpick inserted into the center comes out mostly clean, with the tiniest smidge of cake on it. Let cool in the tin for about 30ish minutes, then use a butter knife and the parchment overhang to help get it out of the pan to finish cooling on a wire rack.For the Lemon GlazeOnce the cake is cool, whisk together 1 batch of
3-Ingredient Lemon Glaze
and drizzle over the top of the cake. Let set for 15-30 minutes before serving. A big pile of fresh blueberries is pretty served over the top of the cake. Enjoy!NotesBlueberriesMake sure your blueberries are completely dry before adding them to the cake batter. If they are damp/wet the cake won’t bake well around them.Make sure the blueberries are evenly distributed throughout the cake batter, this will also help with even baking of the cake.One way to have more control over the berry placement within the cake, is to *not* add it to the cake batter. Instead, add a third of the batter to the pan and then cover it with 1/3 of the berries. Repeat this process three times.
If using frozen blueberries, use this same method so that the blueberries don’t bleed into the cake batter.
Buttermilk ReplacementIf you don’t happen to have any buttermilk on hand, measure out 1 cup milk, remove 1 tablespoon and replace it with 1 tablespoon of fresh lemon juice or white vinegar. Let the mixture sit for about 10 minutes before using.Mixer vs Your Beautiful ArmsI reference an electric-stand mixer with the paddle attachment in the instruction. However, this is definitely a recipe that can easily be made with a bowl and spatula (and the step-by-step photo instructions show it being made that way). Make sure you really cream your butter and sugar so that you get that awesome soft, light texture.Resting Cake BatterI love doing this with muffins, as well as loaf cakes and quick breads. Giving the blueberry lemon loaf batter a 10 to 20 minute period of rest (just letting it sit on the counter pre-bake) makes the cake bake better…a wee puffier (although this cake doesn’t have a super tall crown). It also helps the blueberries not sink to the bottom of the cake.Storing Your Lemon Blueberry Loaf CakeStore at room temperature in an air-tight container. If it’s warm and humid out, wrap it tightly and store in the fridge.For long-term storage, wrap your cooled blueberry lemon cake tightly in plastic wrap and then place in a reusable freezer-safe plastic bag (or Stasher bag) and store in the freezer.The night before serving set the still-wrapped loaf in the fridge to begin thawing. The following day set on the counter until it comes to room temperature. Serve and enjoy!Picking Your Loaf PanThis Fat Daddios loaf pan is my favorite to bake loaf cakes. I find loaf pan sizing vexing, to be honest.I have loaf pans whose packaging lists the dimensions as 9 x 5-inches (23 x 13-cm) but each varies significantly size-wise from one another (some are bigger, some are smaller).For this recipe, I list the appropriate size as 9 x 5-inches (23 x 13-cm) as that is what most everyone owns. However, your loaf pan may be slightly larger or smaller than this.The best rule of thumb is to fill your loaf pan no more than 3/4’s full. And if you have any doubts as to whether it is filled too full, place a rimmed baking sheet underneath to catch any cake batter that may overflow.The post Moist & Plush Lemon Blueberry Loaf Cake Recipe appeared first on DisplacedHousewife.
May 16, 2025
Mega Fab Salted Chocolate Chip Peanut Butter Cookies
Calling all Reese’s Peanut Butter Cup fans!
I was inspired by my Favorite Soft & Chewy Peanut Butter Cookies to make a loaded version. I adjusted the sugars a bit for this one (a little less brown sugar and more granulated sugar) and then added in chopped chocolate and roasted, salted peanuts.
These cookies are a flavor bomb!
This one-bowl, easy recipe is mixed and baked in 30 minutes. I hope you love them!
 Why You Should Make
 These Delicious Chocolate Chip Peanut Butter Cookies ASAP!The perfect peanut butter cookie LOADED with dark chocolate chunks and roasted, salted peanutsSoft cookie texture with puddles of chocolate and crunchy nutsEasy, one-bowl recipeYou can mix the cookie dough by hand or with an electric stand mixer (or handheld mixer), your choice These peanut butter cookies are the perfect sweet-salty combo
Let’s bake the best peanut butter cookies with chocolate chips!
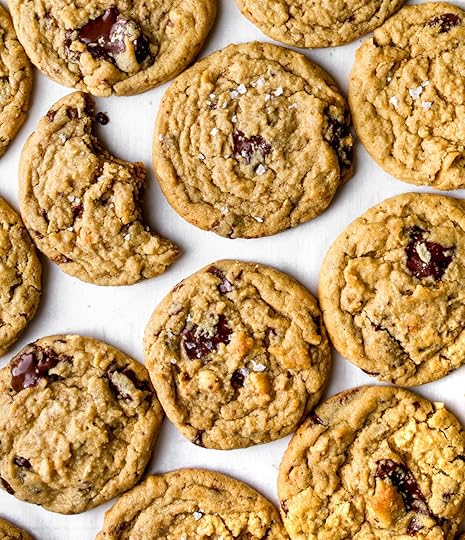 My Favorite Pro Tips to Make
 The Perfect Chewy Chocolate Chip Peanut Butter Cookies
Below you’ll find my favorite pro baking tips and step-by-step photos for making the best peanut butter chocolate chip cookies!
Use the right peanut butter! See Notes below the recipe. You can use a more processed peanut butter brand (like Jiff or Skippy) for a soft and chewy or natural peanut butter (such as Santa Cruz) for a soft and thicker cookie. Either way, opt for a cookie with no-sugar added (ideally).Add your favorite chopped chocolate. I love dark chocolate, but if milk chocolate or semi-sweet chocolate is your jam then use that!Unsalted, raw peanuts won’t do. You want salted, roasted peanuts! It’s the perfect counterpoint to the sweetness of the cookie base and chocolate.Use a cookie scoop. You’ll use a cookie scoop to portion out the cookie dough, gently cover it in sugar and then bake straightaway. This gives the cookie those beautiful cracks and crinkles.Let’s make some delicious chocolate chip peanut butter cookies with roasted, salted peanuts!
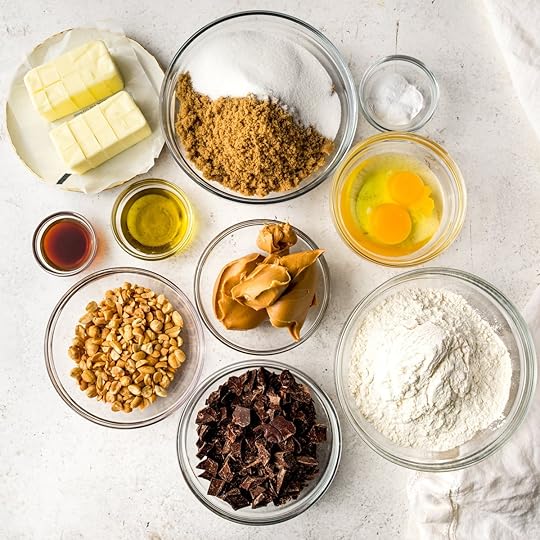 STEP ONE: Gather your ingredients: peanut butter, butter, vanilla, oil, eggs, four, baking powder, baking soda, salt, chopped chocolate, roasted salted peanuts and sea salt flakes (optional).
 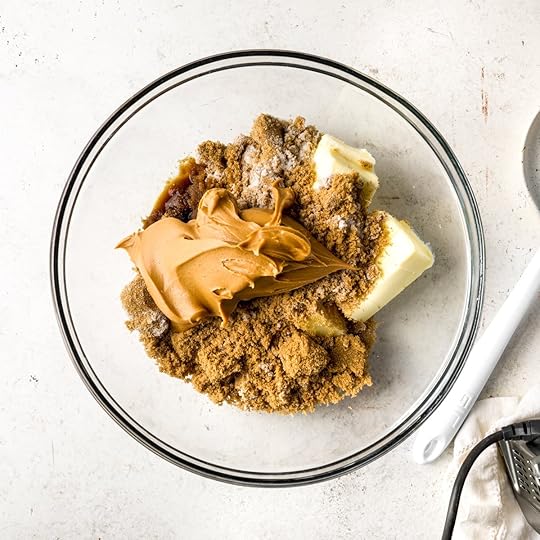 STEP TWO: Add the peanut butter, butter, brown sugar, granulated sugar, oil and vanilla to a large bowl and mix until smooth and well blended.
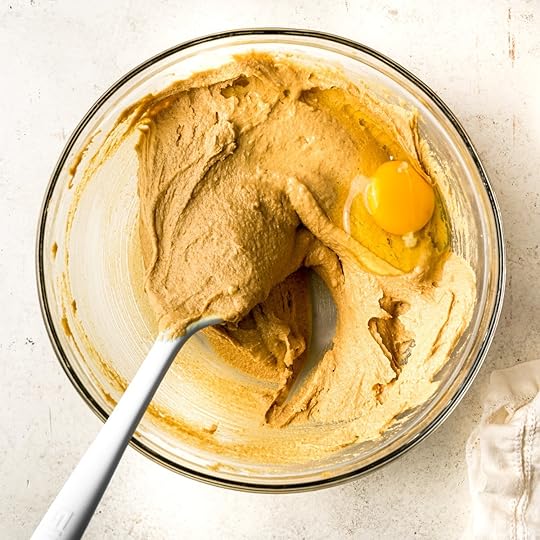 STEP THREE: Add in the eggs, one at a time, making sure the first is well blended before adding the second.
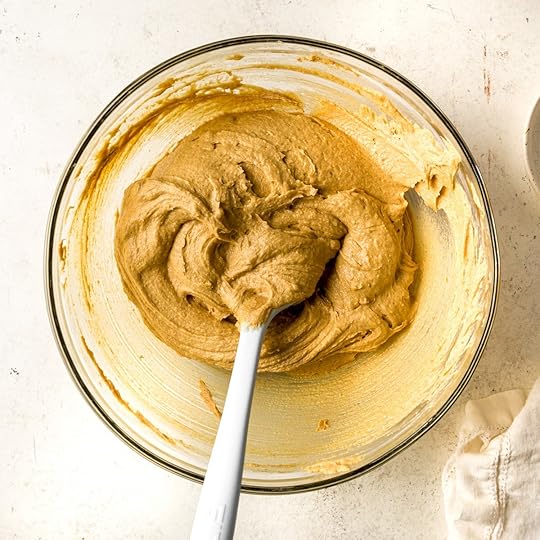 STEP FOUR: Your cookie dough will look like this!
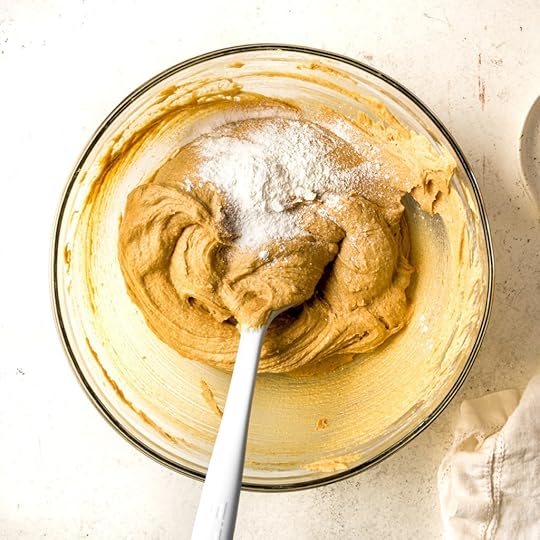 STEP FIVE: Add in the baking powder, baking soda and salt, stirring to evenly distribute throughout the dough.
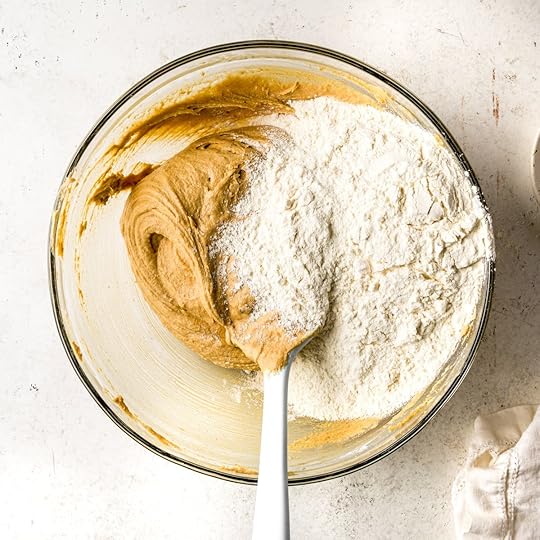 STEP SIX: Add the flour to the dough stirring until just barely combined and you still see streaks of flour.
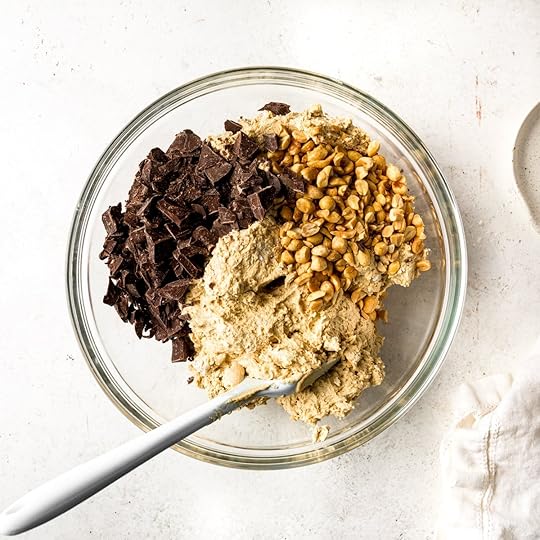 STEP SEVEN: Mix in the chocolate and peanuts, stirring until just combined and evenly mixed throughout the cookie dough.
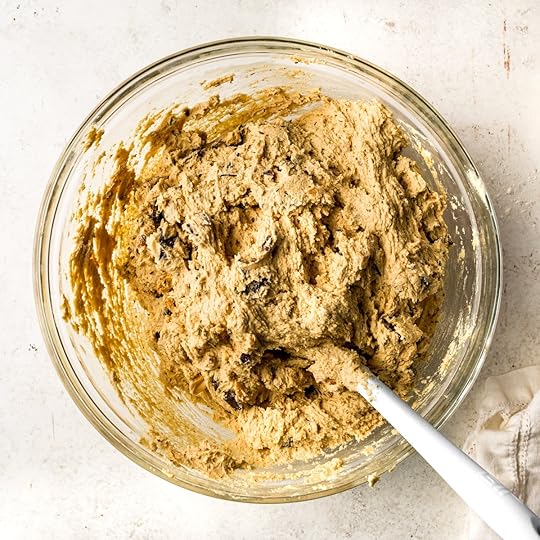 STEP SEVEN: Your dough will look like this!
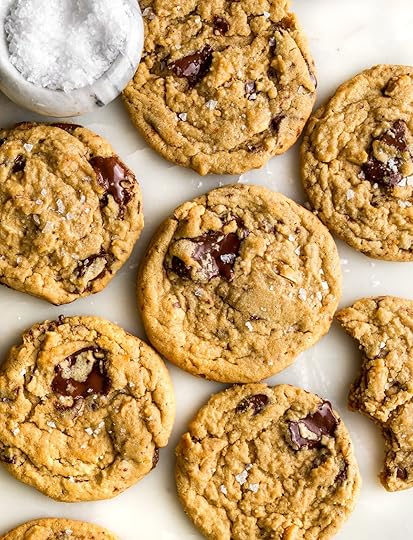 STEP EIGHT: Bake in the center of the oven for 11 minutes or until lightly browned and the cookies are set. They will be very soft. Let rest on the cookie sheet until they’ve firmed up a bit before transferring to a cooling rack.
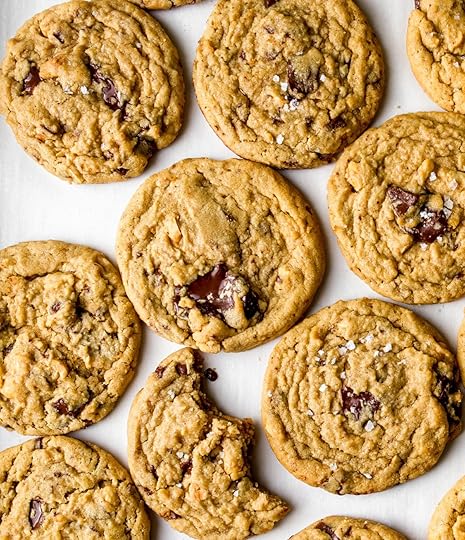
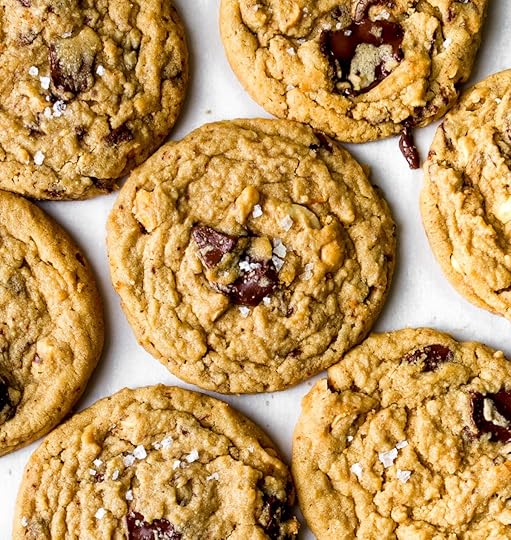 The Baker’s Guide to Measuring Flour
One of the biggest (and most common) mistakes in baking is how we measure flour. If you find yourself without a scale, see my top tips on how to properly measure flour for the perfect amount every time!
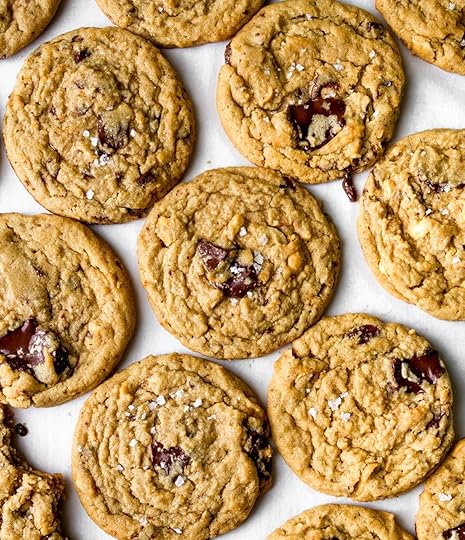 More Delicious Cookie Recipes
I can’t get enough of these Coffee Toffee Cookies, The Best Everyday Chocolate Chip Cookies, Salted Caramel Chocolate Chip Cookies and you can find all of the cookie recipes here.
Enjoy your Soft, Chewy and Fabulous Chocolate Chip Peanut Butter Cookies!
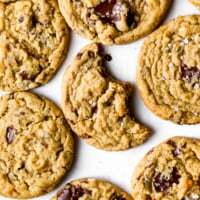 PrintMega Fab Salted Chocolate Chip Peanut Butter Cookies#wprm-recipe-user-rating-0 .wprm-rating-star.wprm-rating-star-full svg * { fill: #343434; }#wprm-recipe-user-rating-0 .wprm-rating-star.wprm-rating-star-33 svg * { fill: url(#wprm-recipe-user-rating-0-33); }#wprm-recipe-user-rating-0 .wprm-rating-star.wprm-rating-star-50 svg * { fill: url(#wprm-recipe-user-rating-0-50); }#wprm-recipe-user-rating-0 .wprm-rating-star.wprm-rating-star-66 svg * { fill: url(#wprm-recipe-user-rating-0-66); }linearGradient#wprm-recipe-user-rating-0-33 stop { stop-color: #343434; }linearGradient#wprm-recipe-user-rating-0-50 stop { stop-color: #343434; }linearGradient#wprm-recipe-user-rating-0-66 stop { stop-color: #343434; }#wprm-recipe-user-rating-0.wprm-user-rating-allowed.wprm-user-rating-not-voted:not(.wprm-user-rating-voting) svg * { fill-opacity: 0.3; }The perfect chocolate chip peanut butter cookies loaded with puddles of chocolate, crunchy, salted peanuts and topped with flaky sea salt. This is the ultimate cookie! These delicious one-bowl cookies are baked in 30 minutes, what could be better?!Course Dessert, SnackKeyword Chocolate Chip, Peanut Butter, Cookies, Salted Roasred Peanuts, Dessert, BakingPrep Time 10 minutes minutesCook Time 12 minutes minutesTotal Time 22 minutes minutesServings 33 CookiesAuthor Rebecca FirthEquipmentBaking ScaleMixing BowlsSpatulaCookie Sheets#40 2-TBSP Cookie ScoopIngredientsFor the Chocolate Chip Peanut Butter Cookie Dough1 cup (256 g) smooth peanut butter see Notes below recipe16 tablespoons (226 g) unsalted butter room temperature1 1/2 cup (330 g) light brown sugar packed1/3 cup (67 g) granulated sugar2 tablespoons (28 g) olive oil or any cooking oil you have on hand1 tablespoon (13 g) real vanilla extract2 large eggs room temperature1 teaspoon baking powder1 teaspoon baking soda1 teaspoon sea salt2 1/4 cups (304 g) all-purpose flour how to measure flour1 ½ cups (255 g) dark chocolate coarsely chopped¾ cup (85 g) roasted salted peanuts coarsely choppedTo FinishSea salt flakes optionalInstructionsTo StartPreheat your oven to 350°F (177°C). Cover several baking sheets with parchment paper.For the Cookie DoughIn an electric stand mixer fitted with the paddle attachment (*you can also use a bowl + spatula), add the peanut butter, butter, brown sugar, granulated sugar, oil, vanilla and mix on medium for about 4 to 5 minutes, or until smooth and well blended.
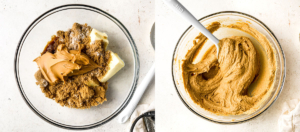 Add in the eggs one at a time, making sure the first is completely blended before adding the next, scraping down the sides and bottom of the bowl so that everything is incorporated.
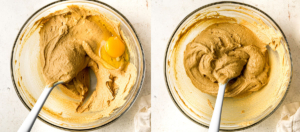 Add in the baking powder, baking soda and salt and mix for 1 minute more. Add in the flour and mix for about 20 seconds more or until just combined and you still see streaks of flour. Add in the chopped chocolate and nuts and mix until evenly distributed throughout the dough.
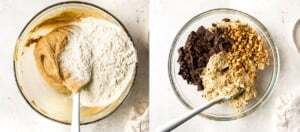 Use a cookie scoop to portion 2 tablespoon of cookie dough and set on the prepared baking sheet, leaving 1½ inches (4 cm) between each dough ball.Bake one sheet at a time for 11 minutes in the center of the oven or until the cookies are set and lightly bronzed over the top.They will be very soft when you get them out of the oven. Tap the baking sheet on the counter to gently deflate the cookies and sprinkle with sea salt flakes, if using. Let them cool for 20 minutes on the baking sheet before transferring to a cooling rack.NotesPeanut ButterMost peanut butter cookie recipes call for using smooth peanut butter such as Jiff and Skippy. This is because the consistency is so, well, consistent.This recipe was tested using both of those brands, as well as natural peanut butter (I love the Santa Cruz brand!).If you use the more-processed peanut butter you are guaranteed the perfect texture in the cookie. If you choose a natural peanut butter (that’s typically just peanuts and salt), just make sure it has a similar consistency as the processed brands. If you use natural peanut butter make sure you stir it really well before using.The ideal peanut butter has zero or minimal sugar added. You can use either chunky or smooth peanut butter, your choice.The peanut butter you choose will impact how the cookie looks and tastes. If you want the exact look as the cookies in the photos then use either a Jiff or Skippy-type smooth peanut butter.Electric-Stand Mixer OptionalThe recipe instructions use an electric stand mixer fitted with the paddle attachment. You can also use a handheld mixer.The step-by-step photo instructions show the recipe being made using a bowl and a spatula.Use either method that makes you happy — both work!Cookie Dough Storage & FreezingThis peanut butter cookie dough can be wrapped tightly and stored in the fridge for several days. The cookies will be a bit thicker than if the dough is baked right after mixing.You can also wrap the dough tightly and store in the freezer in an airtight container for 4 to 6 weeks. Set in the fridge to defrost overnight and then bring closer to room temperature before portioning out and baking.Additionally you can freeze the cookie dough balls on a parchment-lined baking sheet before transferring the portioned cookie dough to an airtight container. You can freeze the dough like this for up to 2 to 3 weeks.To bake the cookie dough balls, place them on a parchment-lined baking sheet and then pre-heat the oven letting the dough come closer to room temp before baking. They may need an extra minute or two in the oven.Want More Cookie Tips?Head over to
My 10 Favorite Tips for Better Cookies
!
Use a cookie scoop to portion 2 tablespoon of cookie dough and set on the prepared baking sheet, leaving 1½ inches (4 cm) between each dough ball.Bake one sheet at a time for 11 minutes in the center of the oven or until the cookies are set and lightly bronzed over the top.They will be very soft when you get them out of the oven. Tap the baking sheet on the counter to gently deflate the cookies and sprinkle with sea salt flakes, if using. Let them cool for 20 minutes on the baking sheet before transferring to a cooling rack.NotesPeanut ButterMost peanut butter cookie recipes call for using smooth peanut butter such as Jiff and Skippy. This is because the consistency is so, well, consistent.This recipe was tested using both of those brands, as well as natural peanut butter (I love the Santa Cruz brand!).If you use the more-processed peanut butter you are guaranteed the perfect texture in the cookie. If you choose a natural peanut butter (that’s typically just peanuts and salt), just make sure it has a similar consistency as the processed brands. If you use natural peanut butter make sure you stir it really well before using.The ideal peanut butter has zero or minimal sugar added. You can use either chunky or smooth peanut butter, your choice.The peanut butter you choose will impact how the cookie looks and tastes. If you want the exact look as the cookies in the photos then use either a Jiff or Skippy-type smooth peanut butter.Electric-Stand Mixer OptionalThe recipe instructions use an electric stand mixer fitted with the paddle attachment. You can also use a handheld mixer.The step-by-step photo instructions show the recipe being made using a bowl and a spatula.Use either method that makes you happy — both work!Cookie Dough Storage & FreezingThis peanut butter cookie dough can be wrapped tightly and stored in the fridge for several days. The cookies will be a bit thicker than if the dough is baked right after mixing.You can also wrap the dough tightly and store in the freezer in an airtight container for 4 to 6 weeks. Set in the fridge to defrost overnight and then bring closer to room temperature before portioning out and baking.Additionally you can freeze the cookie dough balls on a parchment-lined baking sheet before transferring the portioned cookie dough to an airtight container. You can freeze the dough like this for up to 2 to 3 weeks.To bake the cookie dough balls, place them on a parchment-lined baking sheet and then pre-heat the oven letting the dough come closer to room temp before baking. They may need an extra minute or two in the oven.Want More Cookie Tips?Head over to
My 10 Favorite Tips for Better Cookies
!The post Mega Fab Salted Chocolate Chip Peanut Butter Cookies appeared first on DisplacedHousewife.
May 9, 2025
Foolproof Moist Lemon Blueberry Scones (Step-by-Step Photos)
Hot damn are these Blueberry Scones delicious!
These deviate from my usual scone recipes in that they use buttermilk instead of heavy whipping cream and I daresay, I’m in love. The buttermilk adds a bit of tanginess, tenderness and gives the scones a beautiful golden hue.
The texture is oh-so-tender, soft and moist. Bursting with blueberries and lemon zest, your mornings will love these easy, one-bowl scones!
Enjoy them and let me know what you think in the comments!
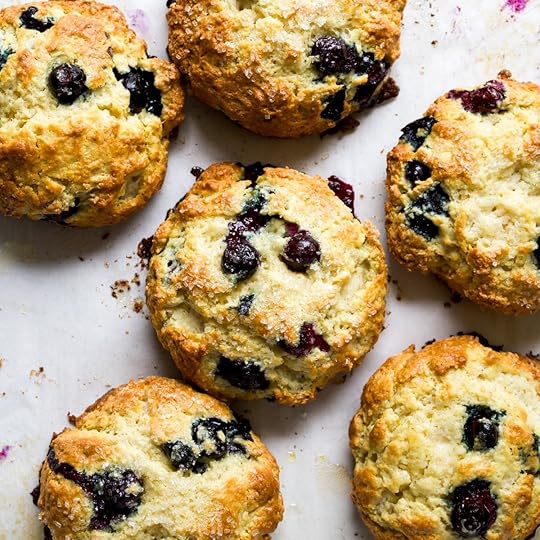 The Baker’s Guide to Measuring Flour
One of the biggest (and most common) mistakes in baking is how we measure flour. If you find yourself without a scale, see my top tips on how to properly measure flour for the perfect amount every time!
 Why You Should Make
 These Delicious Blueberry Scones ASAP!These buttermilk scones are the perfect texture: light, tender and moist!Loaded with fresh blueberries and heaps of lemon zest, they have the yummiest flavor combo They’re super easy to make and one bowl (see step-by-step photos for details)They are the perfect make-ahead breakfast treat: The dough can be chilled overnight or frozen until ready to bake (see the Notes section below recipe for details)These are perfect as made with an easy egg wash + Demerara or sparkling sugar, or…Also dreamy with either this Bright Lemon Glaze or my favorite Vanilla Glaze The recipe can be made into 7 large scones or 14 smaller, petite scones (see the Notes section below the recipe for details)
Let’s make some easy blueberry scones!
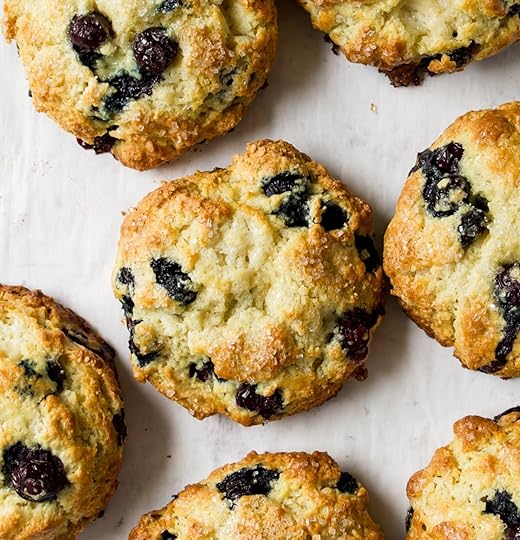 My Favorite Baking Pro Tips for
 The Best Blueberry Lemon Scones
Below are step-by-step photos (with captions) to make the most delicious Lemon Blueberry Scones perfect every single time! My biggest tips are:
Keep all of your cold ingredients cold. I’m talking about the buttermilk, egg and butter. You want them nice, fresh-from-the-fridge cold.Don’t overmix your dough. That’s all there is to say about that. Overworked scone dough will taste dense in the final product. A light hand produces a light scone.That’s it!
To Make the Blueberry Lemon Scones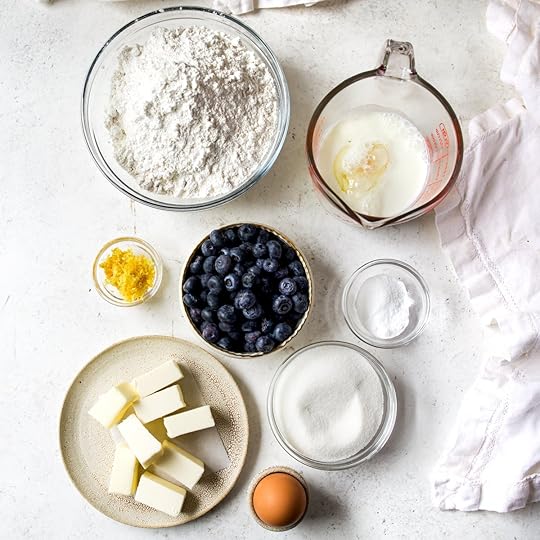 STEP ONE: Gather your ingredients for the scones: cake flour, all-purpose flour, sugar, lemon zest, baking powder, baking soda, salt, butter, buttermilk, egg and blueberries. If you garnish the scones, you’ll need
egg wash
, sugar for sprinkling the tops (Demerara, granulated or sparkling) and/or an easy
lemon glaze
.
STEP ONE: Gather your ingredients for the scones: cake flour, all-purpose flour, sugar, lemon zest, baking powder, baking soda, salt, butter, buttermilk, egg and blueberries. If you garnish the scones, you’ll need
egg wash
, sugar for sprinkling the tops (Demerara, granulated or sparkling) and/or an easy
lemon glaze
. STEP TWO: Whisk together your dry ingredients: cake flour, all-purpose flour, sugar, lemon zest, baking powder, baking soda and salt.
 STEP THREE: Cut in the butter, using a pastry blender or your hands, until you have small bits of butter about the size of an eraser on the end of a pencil.
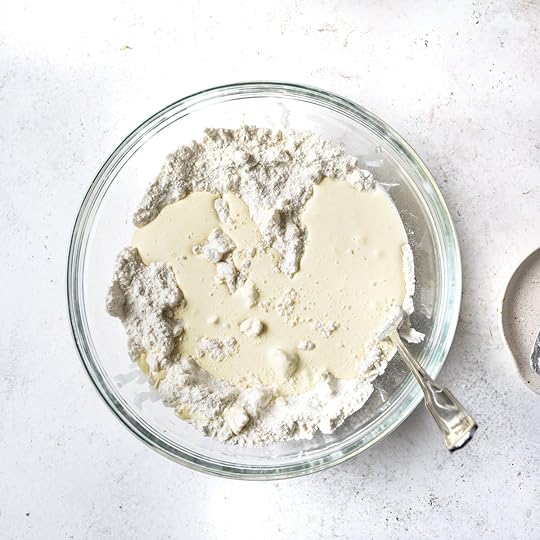 STEP FOUR: Drizzle the buttermilk over the top of the dough and use a fork to gently, and just barely, mix until a shaggy dough forms.
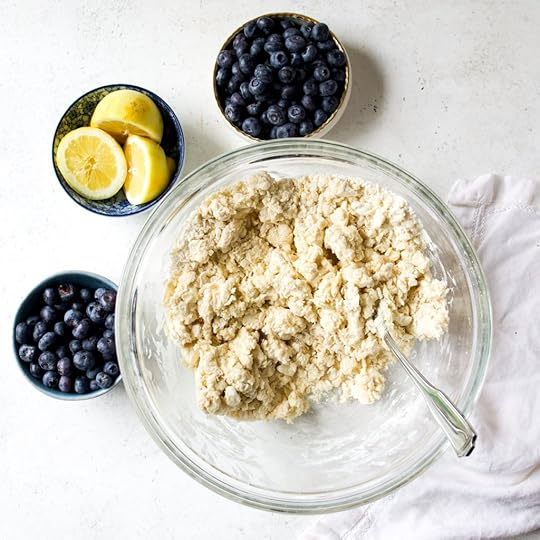 *TIP: If the dough starts to warm up, set it in the fridge for 5 to 10 minutes. You want the butter to stay chilled.
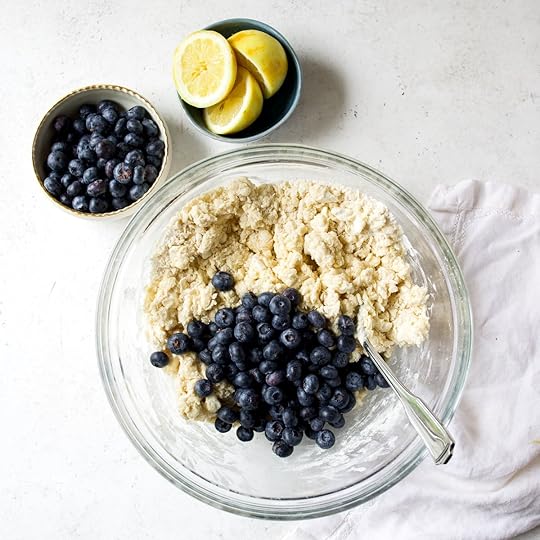 STEP FIVE: Add the blueberries and scoop the dough on top of them, gently pressing down. Repeat until the berries are mingling evenly throughout the dough.
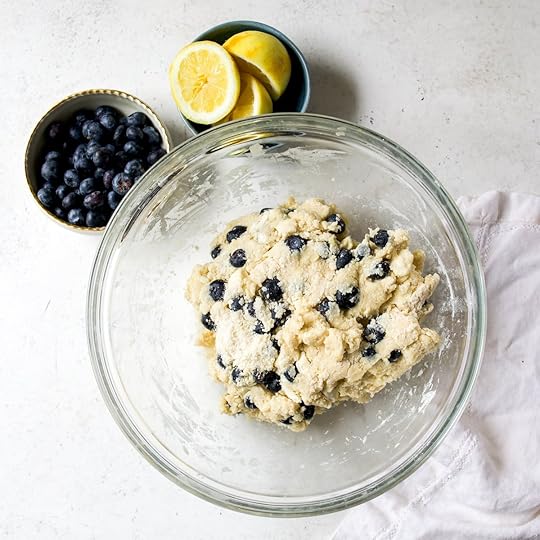 STEP FIVE: Your dough should look like this! Portion the dough using a scoop/measuring cup, set on a parchment-lined baking sheet and chill in the freezer for about 30 minutes.To Garnish & Bake the Scones
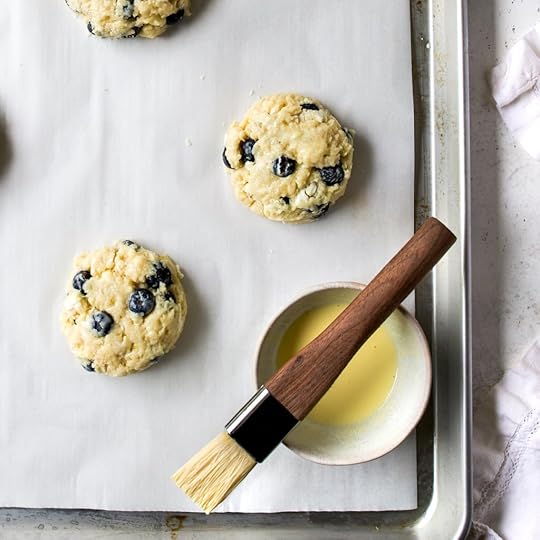 STEP ONE: Brush the chilled scones with egg wash; make sure it doesn’t pool around the base of the scones.
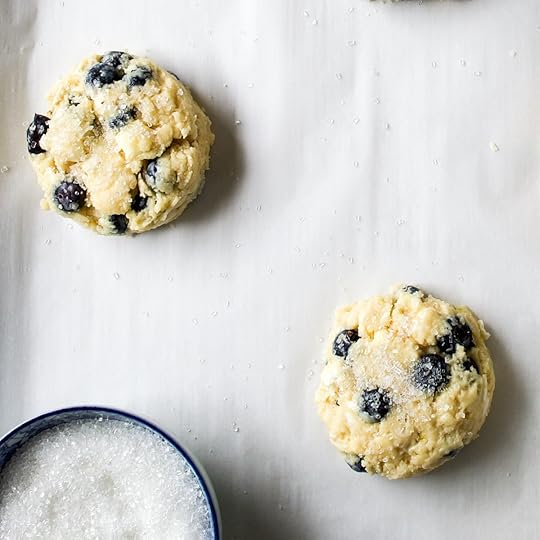 STEP TWO: Sprinkle with Demerara, sparkling or granulated sugar and immediately bake.
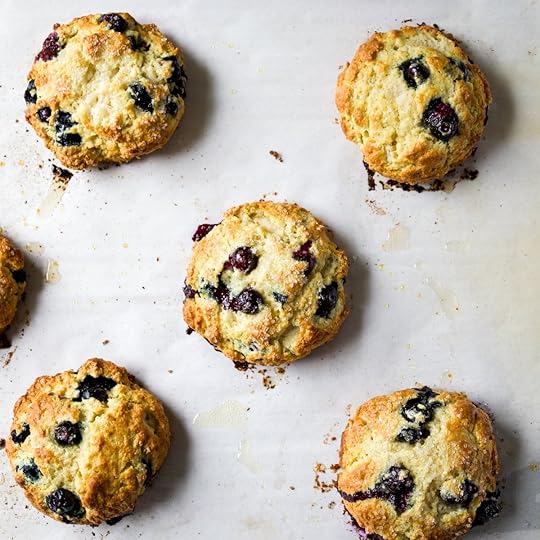 When done, the scones are puffed up, golden brown around the edges and the areas nearest the blueberries are baked through. Transfer to a wire rack to cool completely. You can top the scones with glaze (see
Notes
section below recipe), or simply serve with good-quality salted butter, clotted cream and jam. They’re also perfect just as is!
When done, the scones are puffed up, golden brown around the edges and the areas nearest the blueberries are baked through. Transfer to a wire rack to cool completely. You can top the scones with glaze (see
Notes
section below recipe), or simply serve with good-quality salted butter, clotted cream and jam. They’re also perfect just as is!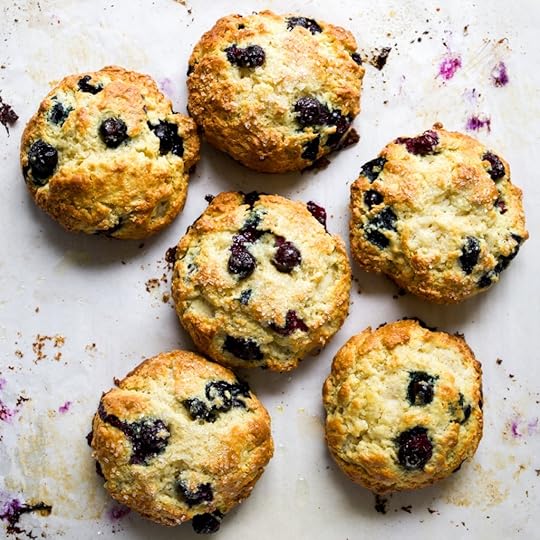 More Favorite Scone Recipes!
Some of my favorites include these Strawberry Scones, Raspberry Scones and Maple Oat Scones and you can find all of the scone recipes here!
 PrintFoolproof Moist Lemon Blueberry Scones (step-by-step tutorial)#wprm-recipe-user-rating-0 .wprm-rating-star.wprm-rating-star-full svg * { fill: #343434; }#wprm-recipe-user-rating-0 .wprm-rating-star.wprm-rating-star-33 svg * { fill: url(#wprm-recipe-user-rating-0-33); }#wprm-recipe-user-rating-0 .wprm-rating-star.wprm-rating-star-50 svg * { fill: url(#wprm-recipe-user-rating-0-50); }#wprm-recipe-user-rating-0 .wprm-rating-star.wprm-rating-star-66 svg * { fill: url(#wprm-recipe-user-rating-0-66); }linearGradient#wprm-recipe-user-rating-0-33 stop { stop-color: #343434; }linearGradient#wprm-recipe-user-rating-0-50 stop { stop-color: #343434; }linearGradient#wprm-recipe-user-rating-0-66 stop { stop-color: #343434; }#wprm-recipe-user-rating-0.wprm-user-rating-allowed.wprm-user-rating-not-voted:not(.wprm-user-rating-voting) svg * { fill-opacity: 0.3; }You will love this easy Lemon Blueberry Scone recipe! The dough is made with tangy buttermilk, heaps of fresh lemon zest and bursting with blueberries. These scones can be mixed & baked in under an hour!Course Breakfast Brunch, SnackCuisine ScottishKeyword Lemon, Blueberry, Scone, Breakfast, Brunch, Recipe, ButtermilkPrep Time 10 minutes minutesCook Time 19 minutes minutesChill Time 30 minutes minutesTotal Time 1 hour hourServings 7 SconesAuthor Rebecca FirthEquipmentBaking ScalePastry BrushMixing BowlsWhiskPastry BlenderExtra-Large Muffin ScoopIngredientsFor the Blueberry Scones1 1/2 cups (187 g) cake flour see Notes below recipe1 cup + 3 tablespoons (162 g) all-purpose flour how to measure flour2/3 cup (133 g) granulated sugar2 generous tablespoons lemon zest about 2 lemon2 teaspoons baking powder1/2 teaspoon baking soda1/2 teaspoon sea salt8 tablespoons (113 g) unsalted butter very cold and cut in 8 pieces3/4 cup (180 g) buttermilk very cold; see Notes below recipe1 large egg cold1 1/3 cup (198 g) blueberries washed and driedTo Garnish1 batch Perfect Egg WashDemerara, sparkling sugar or granulated sugarInstructionsFor the Blueberry SconesLine several baking sheets with parchment paper. Set aside.In a large bowl, whisk together the cake flour, flour, sugar, lemon zest, baking powder, baking soda and sea salt. Cut the cold butter pieces into the flour mixture using a pastry blender or your hands. I like to mix until I see small pieces, about the size of peas.Mix the cold egg and 3/4 cup (180 g) of buttermilk together in a small bowl and then drizzle over the flour mixture. Use a fork, stirring until it just starts to form into a rough dough.
*If your dough starts to get warm at any point, set it in the fridge or freezer for 10 minutes to firm the butter back up and chill it a bit.
Add the berries to the scone dough. I like to use a fold and press technique when adding the blueberries. Fold half of the dough onto itself and gently press down so that the berries are in the middle. Grab any rogue blueberries, set them on top of the dough heap and repeat the process until it looks just mixed. Don't over mix your dough.Use a 1/2 cup muffin/cupcake scoop or 1/2 cup measuring cup to portion out 7 mounds of dough on the prepared baking sheet leaving 3-inches (8-cm) between scones. Gently press down the tops to level a bit and press in any jagged areas on the sides of the scones. You want the dough cohesive, but not packed. Set in the freezer (or fridge) for 30 minutes and preheat the oven to 400℉ (204℃).To GarnishMake 1 batch of my favorite
Egg Wash
, and then brush over the tops of the scones. Take care not to let the wash pool on the tops or sides of the scones. Sprinkle the tops of the scones with Demerara sugar, sparkling sugar or granulated sugar.Bake in the center of the oven for 19 minutes. When done they're lightly bronzed around the edges and golden over the tops. Let them cool on the sheet, in a draft-free area, for about 15 minutes before removing to a wire rack to finish cooling. Let cool to room temperature before adding any glaze, if using (see
Notes
below recipe).NotesCake FlourCake flour makes these scones oh-so-tender. Can you use all-purpose flour in place of the cake flour? Absolutely! However, just know, you will lose some of that tenderness. If possible, get the cake flour when you’re picking up your fresh blueberries at the store.GlazesBoth the
Vanilla Glaze
or this
Lemon Glaze
are delicious with these scones!Substituting ButtermilkYou can use heavy whipping cream in place of the buttermilk. See the next note on baking soda if you’re using heavy whipping cream.Baking Powder & Baking SodaI like these buttermilk scones with a little less baking powder and a touch of baking soda for the perfect amount of lift. If you use heavy whipping cream in place of the buttermilk omit the baking soda and use a full 1 tablespoon (15 g) baking powder.How To Make Buttermilk Scones Ahead of TimeIt’s so easy to make scones ahead of time you’re going to be blown away! Mix and shape your scones through Step 6. When you pop them in the freezer, leave them in there to freeze solid; this should take several hours.Once frozen, place in an air-tight container in the freezer until ready to bake.When it’s time to bake your scones in the morning, take the scones out of the freezer and set them on a fresh baking sheet covered with parchment paper while you preheat your oven; give your oven about 30 minutes to really warm up.Pop them into the oven and bake as normal, adding a few more minutes to the bake time to make sure they bake through.How to Store Blueberry SconesStore your baked lemon blueberry scones at room temperature in an airtight container for several days. If you have to layer them, place parchment paper between layers.Shaping SconesI use a large cookie scoop to portion out the scone dough. If you don’t have one available, you can use a 1/2 cup measuring cup. You’ll need to gently pack the dough and then tap it to get the scone dough out. It will be bit messy, but that’s fine.I used to make my scones by shaping the dough into 1 to 2 discs and then cutting triangles of dough.I prefer the cookie scoop/measuring cup method as you work the dough less resulting in a very tender scone.Scone QuantityThe size of your cookie scoop/measuring cup will determine how many scones you make, as well as how long they bake.Using an extra-large cupcake/muffin scoop or 1/2 cup measuring cup will yield 7 scones.You can use a smaller cookie scoop or 1/4 cup measuring cup and you’ll end up with 14 scones. You’ll need to reduce the bake time, to about 13 minutes, if you make smaller scones.
PrintFoolproof Moist Lemon Blueberry Scones (step-by-step tutorial)#wprm-recipe-user-rating-0 .wprm-rating-star.wprm-rating-star-full svg * { fill: #343434; }#wprm-recipe-user-rating-0 .wprm-rating-star.wprm-rating-star-33 svg * { fill: url(#wprm-recipe-user-rating-0-33); }#wprm-recipe-user-rating-0 .wprm-rating-star.wprm-rating-star-50 svg * { fill: url(#wprm-recipe-user-rating-0-50); }#wprm-recipe-user-rating-0 .wprm-rating-star.wprm-rating-star-66 svg * { fill: url(#wprm-recipe-user-rating-0-66); }linearGradient#wprm-recipe-user-rating-0-33 stop { stop-color: #343434; }linearGradient#wprm-recipe-user-rating-0-50 stop { stop-color: #343434; }linearGradient#wprm-recipe-user-rating-0-66 stop { stop-color: #343434; }#wprm-recipe-user-rating-0.wprm-user-rating-allowed.wprm-user-rating-not-voted:not(.wprm-user-rating-voting) svg * { fill-opacity: 0.3; }You will love this easy Lemon Blueberry Scone recipe! The dough is made with tangy buttermilk, heaps of fresh lemon zest and bursting with blueberries. These scones can be mixed & baked in under an hour!Course Breakfast Brunch, SnackCuisine ScottishKeyword Lemon, Blueberry, Scone, Breakfast, Brunch, Recipe, ButtermilkPrep Time 10 minutes minutesCook Time 19 minutes minutesChill Time 30 minutes minutesTotal Time 1 hour hourServings 7 SconesAuthor Rebecca FirthEquipmentBaking ScalePastry BrushMixing BowlsWhiskPastry BlenderExtra-Large Muffin ScoopIngredientsFor the Blueberry Scones1 1/2 cups (187 g) cake flour see Notes below recipe1 cup + 3 tablespoons (162 g) all-purpose flour how to measure flour2/3 cup (133 g) granulated sugar2 generous tablespoons lemon zest about 2 lemon2 teaspoons baking powder1/2 teaspoon baking soda1/2 teaspoon sea salt8 tablespoons (113 g) unsalted butter very cold and cut in 8 pieces3/4 cup (180 g) buttermilk very cold; see Notes below recipe1 large egg cold1 1/3 cup (198 g) blueberries washed and driedTo Garnish1 batch Perfect Egg WashDemerara, sparkling sugar or granulated sugarInstructionsFor the Blueberry SconesLine several baking sheets with parchment paper. Set aside.In a large bowl, whisk together the cake flour, flour, sugar, lemon zest, baking powder, baking soda and sea salt. Cut the cold butter pieces into the flour mixture using a pastry blender or your hands. I like to mix until I see small pieces, about the size of peas.Mix the cold egg and 3/4 cup (180 g) of buttermilk together in a small bowl and then drizzle over the flour mixture. Use a fork, stirring until it just starts to form into a rough dough.
*If your dough starts to get warm at any point, set it in the fridge or freezer for 10 minutes to firm the butter back up and chill it a bit.
Add the berries to the scone dough. I like to use a fold and press technique when adding the blueberries. Fold half of the dough onto itself and gently press down so that the berries are in the middle. Grab any rogue blueberries, set them on top of the dough heap and repeat the process until it looks just mixed. Don't over mix your dough.Use a 1/2 cup muffin/cupcake scoop or 1/2 cup measuring cup to portion out 7 mounds of dough on the prepared baking sheet leaving 3-inches (8-cm) between scones. Gently press down the tops to level a bit and press in any jagged areas on the sides of the scones. You want the dough cohesive, but not packed. Set in the freezer (or fridge) for 30 minutes and preheat the oven to 400℉ (204℃).To GarnishMake 1 batch of my favorite
Egg Wash
, and then brush over the tops of the scones. Take care not to let the wash pool on the tops or sides of the scones. Sprinkle the tops of the scones with Demerara sugar, sparkling sugar or granulated sugar.Bake in the center of the oven for 19 minutes. When done they're lightly bronzed around the edges and golden over the tops. Let them cool on the sheet, in a draft-free area, for about 15 minutes before removing to a wire rack to finish cooling. Let cool to room temperature before adding any glaze, if using (see
Notes
below recipe).NotesCake FlourCake flour makes these scones oh-so-tender. Can you use all-purpose flour in place of the cake flour? Absolutely! However, just know, you will lose some of that tenderness. If possible, get the cake flour when you’re picking up your fresh blueberries at the store.GlazesBoth the
Vanilla Glaze
or this
Lemon Glaze
are delicious with these scones!Substituting ButtermilkYou can use heavy whipping cream in place of the buttermilk. See the next note on baking soda if you’re using heavy whipping cream.Baking Powder & Baking SodaI like these buttermilk scones with a little less baking powder and a touch of baking soda for the perfect amount of lift. If you use heavy whipping cream in place of the buttermilk omit the baking soda and use a full 1 tablespoon (15 g) baking powder.How To Make Buttermilk Scones Ahead of TimeIt’s so easy to make scones ahead of time you’re going to be blown away! Mix and shape your scones through Step 6. When you pop them in the freezer, leave them in there to freeze solid; this should take several hours.Once frozen, place in an air-tight container in the freezer until ready to bake.When it’s time to bake your scones in the morning, take the scones out of the freezer and set them on a fresh baking sheet covered with parchment paper while you preheat your oven; give your oven about 30 minutes to really warm up.Pop them into the oven and bake as normal, adding a few more minutes to the bake time to make sure they bake through.How to Store Blueberry SconesStore your baked lemon blueberry scones at room temperature in an airtight container for several days. If you have to layer them, place parchment paper between layers.Shaping SconesI use a large cookie scoop to portion out the scone dough. If you don’t have one available, you can use a 1/2 cup measuring cup. You’ll need to gently pack the dough and then tap it to get the scone dough out. It will be bit messy, but that’s fine.I used to make my scones by shaping the dough into 1 to 2 discs and then cutting triangles of dough.I prefer the cookie scoop/measuring cup method as you work the dough less resulting in a very tender scone.Scone QuantityThe size of your cookie scoop/measuring cup will determine how many scones you make, as well as how long they bake.Using an extra-large cupcake/muffin scoop or 1/2 cup measuring cup will yield 7 scones.You can use a smaller cookie scoop or 1/4 cup measuring cup and you’ll end up with 14 scones. You’ll need to reduce the bake time, to about 13 minutes, if you make smaller scones.The post Foolproof Moist Lemon Blueberry Scones (Step-by-Step Photos) appeared first on DisplacedHousewife.